

Indesign - how to use

Create successful ePaper yourself
Turn your PDF publications into a flip-book with our unique Google optimized e-Paper software.
Working with Colour<br />
InDesign is set up exactly like Illustra<strong>to</strong>r in terms of using<br />
colours. You have the option of working in either RGB or<br />
CMYK mode (remember <strong>to</strong> <strong>use</strong> CMYK if creating a document<br />
for print!) and you have the option of ‘Fill’ and ‘Stroke’ colours.<br />
The templates are already set up with the four AWW brand<br />
colours in the Swatches palette, but if you need <strong>to</strong> add <strong>to</strong> the<br />
selection there are several ways of doing so.<br />
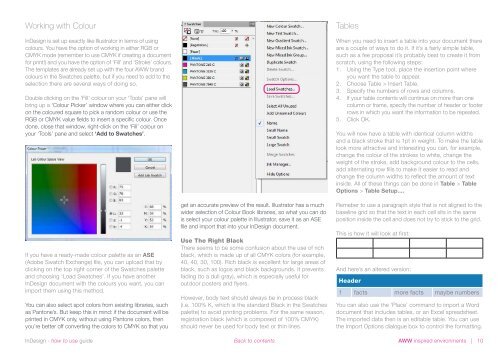
Double clicking on the ‘Fill’ colour on your ‘Tools’ pane will<br />
bring up a ‘Colour Picker’ window where you can either click<br />
on the coloured square <strong>to</strong> pick a random colour or <strong>use</strong> the<br />
RGB or CMYK value fields <strong>to</strong> insert a specific colour. Once<br />
done, close that window, right-click on the ‘Fill’ colour on<br />
your ‘Tools’ pane and select ‘Add <strong>to</strong> Swatches’.<br />
If you have a ready-made colour palette as an ASE<br />
(Adobe Swatch Exchange) file, you can upload that by<br />
clicking on the <strong>to</strong>p right corner of the Swatches palette<br />
and choosing ‘Load Swatches’. If you have another<br />
InDesign document with the colours you want, you can<br />
import them using this method.<br />
You can also select spot colors from existing libraries, such<br />
as Pan<strong>to</strong>ne’s. But keep this in mind: if the document will be<br />
printed in CMYK only, without using Pan<strong>to</strong>ne colors, then<br />
you’re better off converting the colors <strong>to</strong> CMYK so that you<br />
get an accurate preview of the result. Illustra<strong>to</strong>r has a much<br />
wider selection of Colour Book libraries, so what you can do<br />
is select your colour palette in Illustra<strong>to</strong>r, save it as an ASE<br />
file and import that in<strong>to</strong> your InDesign document.<br />
Use The Right Black<br />
There seems <strong>to</strong> be some confusion about the <strong>use</strong> of rich<br />
black, which is made up of all CMYK colors (for example,<br />
40, 40, 30, 100). Rich black is excellent for large areas of<br />
black, such as logos and black backgrounds. It prevents<br />
fading (<strong>to</strong> a dull gray), which is especially <strong>use</strong>ful for<br />
outdoor posters and flyers.<br />
However, body text should always be in process black<br />
(i.e. 100% K, which is the standard Black in the Swatches<br />
palette) <strong>to</strong> avoid printing problems. For the same reason,<br />
registration black (which is composed of 100% CMYK)<br />
should never be <strong>use</strong>d for body text or thin lines.<br />
Tables<br />
When you need <strong>to</strong> insert a table in<strong>to</strong> your document there<br />
are a couple of ways <strong>to</strong> do it. If it’s a fairly simple table,<br />
such as a fee proposal it’s probably best <strong>to</strong> create it from<br />
scratch, using the following steps:<br />
1. Using the Type <strong>to</strong>ol, place the insertion point where<br />
you want the table <strong>to</strong> appear.<br />
2. Choose Table > Insert Table.<br />
3. Specify the numbers of rows and columns.<br />
4. If your table contents will continue on more than one<br />
column or frame, specify the number of header or footer<br />
rows in which you want the information <strong>to</strong> be repeated.<br />
5. Click OK.<br />
You will now have a table with identical column widths<br />
and a black stroke that is 1pt in weight. To make the table<br />
look more attractive and interesting you can, for example,<br />
change the colour of the strokes <strong>to</strong> white, change the<br />
weight of the stroke, add background colour <strong>to</strong> the cells,<br />
add alternating row fills <strong>to</strong> make it easier <strong>to</strong> read and<br />
change the column widths <strong>to</strong> reflect the amount of text<br />
inside. All of these things can be done in Table > Table<br />
Options > Table Setup....<br />
Remeber <strong>to</strong> <strong>use</strong> a paragraph style that is not aligned <strong>to</strong> the<br />
baseline grid so that the text in each cell sits in the same<br />
position inside the cell and does not try <strong>to</strong> stick <strong>to</strong> the grid.<br />
This is <strong>how</strong> it will look at first:<br />
And here’s an altered version:<br />
Header<br />
1 facts more facts maybe numbers<br />
You can also <strong>use</strong> the ‘Place’ command <strong>to</strong> import a Word<br />
document that includes tables, or an Excel spreadsheet.<br />
The imported data then is an editable table. You can <strong>use</strong><br />
the Import Options dialogue box <strong>to</strong> control the formatting.<br />
InDesign - <strong>how</strong> <strong>to</strong> <strong>use</strong> guide Back <strong>to</strong> contents<br />
AWW inspired environments | 10