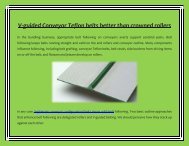
How to Install Bath Mixer Teflon belts (taps)
This nut requires being associated with the shower blender taps. Above all else, move Teflon belts pretty much around the strings on the fixture then hand compels the nut onto this. Take care of additional with a versatile torque. Teflon belts - http://www.bombinobelts.com
This nut requires being associated with the shower blender taps. Above all else, move Teflon belts pretty much around the strings on the fixture then hand compels the nut onto this. Take care of additional with a versatile torque. Teflon belts - http://www.bombinobelts.com

You also want an ePaper? Increase the reach of your titles
YUMPU automatically turns print PDFs into web optimized ePapers that Google loves.
<strong>How</strong> <strong>to</strong> <strong>Install</strong> <strong>Bath</strong> <strong>Mixer</strong> <strong>Teflon</strong> <strong>belts</strong><br />
(<strong>taps</strong>)<br />
<strong>Teflon</strong> Belts<br />
Bombino<strong>belts</strong><br />
17
The shower blender <strong>taps</strong> are truly basic. You could change over from shower <strong>to</strong> shower working by hauling out an<br />
attachment that close off water supply <strong>to</strong> the tap and hives off them <strong>to</strong> the shower head. You could likewise<br />
adjust the temperature of water essentially as you'd requirement for a shower.<br />
Devices required:<br />
• Movable spanner<br />
• Funneling spanner<br />
• <strong>Teflon</strong> <strong>belts</strong><br />
• Screwdriver<br />
• Pack<br />
• Calk<br />
Taking off more seasoned <strong>taps</strong><br />
Start by turning off the water supply <strong>to</strong> the showering tub. On the off chance that there's no single turncock for<br />
this, turn off your water supply at the home mains. Give the <strong>taps</strong> <strong>to</strong> keep running till at no time in the future<br />
water a chance <strong>to</strong> supply turns out.<br />
Take away the substance of the showering tub in this way you could knock off the more established <strong>taps</strong> for<br />
introducing. Use the funneling spanner <strong>to</strong> unscrew the nuts on the water ignores that run with the <strong>taps</strong>. Unscrew<br />
on both the cool and high temp water funneling. At that point use the screwdriver <strong>to</strong> unscrew the calking all<br />
around the <strong>taps</strong> and progressively draw out the <strong>taps</strong> free. Knock off them and separate up them <strong>to</strong> discard after.<br />
Making clean<br />
Ahead before you set up the shower blender <strong>taps</strong> in situ, you should wash down the washing tub <strong>to</strong> take out any<br />
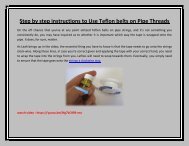
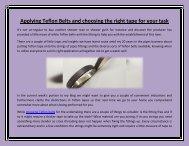
more seasoned calking and check the unique <strong>taps</strong> will take a seat similarly and perfectly. Now, put on the <strong>Teflon</strong><br />
<strong>belts</strong> <strong>to</strong> the strings on the <strong>taps</strong> where they'll conjoin the water channels. These will contribute a more grounded,<br />
more watertight fixing.
With this worked out, put on an exceptionally lean beading of calk on the ground of the shower blender <strong>taps</strong><br />
ahead before you push it in<strong>to</strong> position. At the end of the day, this gets the fixing sealed and precludes pointless<br />
dilute supply from dropping any open up splits.<br />
Taking care of<br />
Start taking care of the considerable number of nuts with hand on<strong>to</strong> the strings with the fixtures. This makes a<br />
point that they are protected and secure on the strings and they will take care of well effectively with a spanner<br />
later on. Use your channeling spanner <strong>to</strong> take care of the considerable number of nuts till they are truly solid.<br />
Don't over take care of or you will danger undressing the strings along these lines you won't be competent <strong>to</strong> take<br />
away the tap on the off chance that you ever like <strong>to</strong> supersede it.<br />
Shower<br />
You at present have the shower blender <strong>taps</strong> in situ however all of you a similar need <strong>to</strong> include the shower bit of<br />
the unit. You'll require a shower head and perhaps also a stand that could be added <strong>to</strong> the fence. A metallic<br />
hosepipe will chip off the shower, completing in a nut.<br />
This nut requires being associated with the shower blender <strong>taps</strong>. Above all else, move <strong>Teflon</strong> <strong>belts</strong> pretty much<br />
around the strings on the fixture then hand compels the nut on<strong>to</strong> this. Take care of additional with a versatile<br />
<strong>to</strong>rque.