AC100 Pro Technical Data Sheet

Create successful ePaper yourself
Turn your PDF publications into a flip-book with our unique Google optimized e-Paper software.
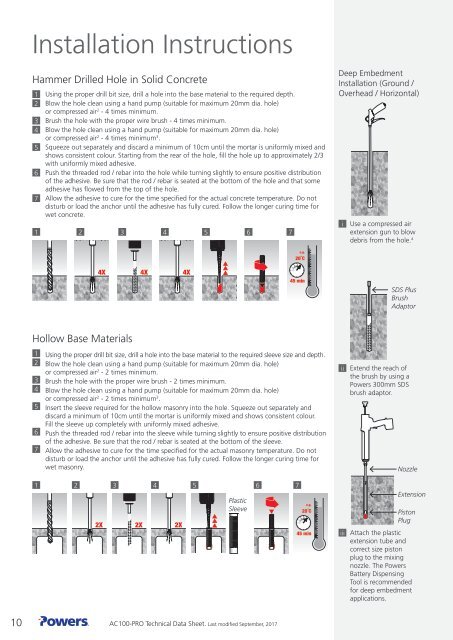
Installation Instructions<br />
Hammer Drilled Hole in Solid Concrete<br />
1 Using the proper drill bit size, drill a hole into the base material to the required depth.<br />
2 Blow the hole clean using a hand pump (suitable for maximum 20mm dia. hole)<br />
or compressed air 2 - 4 times minimum.<br />
3 Brush the hole with the proper wire brush - 4 times minimum.<br />
4 Blow the hole clean using a hand pump (suitable for maximum 20mm dia. hole)<br />
or compressed air 2 - 4 times minimum 3 .<br />
5 Squeeze out separately and discard a minimum of 10cm until the mortar is uniformly mixed and<br />
shows consistent colour. Starting from the rear of the hole, fill the hole up to approximately 2/3<br />
with uniformly mixed adhesive.<br />
6 Push the threaded rod / rebar into the hole while turning slightly to ensure positive distribution<br />
of the adhesive. Be sure that the rod / rebar is seated at the bottom of the hole and that some<br />
adhesive has flowed from the top of the hole.<br />
7 Allow the adhesive to cure for the time specified for the actual concrete temperature. Do not<br />
disturb or load the anchor until the adhesive has fully cured. Follow the longer curing time for<br />
wet concrete.<br />
1 2 3 4 5 6 7<br />
Deep Embedment<br />
Installation (Ground /<br />
Overhead / Horizontal)<br />
i Use a compressed air<br />
extension gun to blow<br />
debris from the hole. 4<br />
e.g.<br />
20˚C<br />
4X<br />
4X<br />
4X<br />
45 min<br />
SDS Plus<br />
Brush<br />
Adaptor<br />
Hollow Base Materials<br />
1 Using the proper drill bit size, drill a hole into the base material to the required sleeve size and depth.<br />
2 Blow the hole clean using a hand pump (suitable for maximum 20mm dia. hole)<br />
or compressed air 2 - 2 times minimum.<br />
3 Brush the hole with the proper wire brush - 2 times minimum.<br />
4 Blow the hole clean using a hand pump (suitable for maximum 20mm dia. hole)<br />
or compressed air 2 - 2 times minimum 3 .<br />
5 Insert the sleeve required for the hollow masonry into the hole. Squeeze out separately and<br />
discard a minimum of 10cm until the mortar is uniformly mixed and shows consistent colour.<br />
Fill the sleeve up completely with uniformly mixed adhesive.<br />
6 Push the threaded rod / rebar into the sleeve while turning slightly to ensure positive distribution<br />
of the adhesive. Be sure that the rod / rebar is seated at the bottom of the sleeve.<br />
7 Allow the adhesive to cure for the time specified for the actual masonry temperature. Do not<br />
disturb or load the anchor until the adhesive has fully cured. Follow the longer curing time for<br />
wet masonry.<br />
1 2 3 4 5 6 7<br />
2X<br />
2X<br />
2X<br />
Plastic<br />
Sleeve<br />
e.g.<br />
20˚C<br />
45 min<br />
ii Extend the reach of<br />
the brush by using a<br />
Powers 300mm SDS<br />
brush adaptor.<br />
Nozzle<br />
Extension<br />
Piston<br />
Plug<br />
iii Attach the plastic<br />
extension tube and<br />
correct size piston<br />
plug to the mixing<br />
nozzle. The Powers<br />
Battery Dispensing<br />
Tool is recommended<br />
for deep embedment<br />
applications.<br />
10 <strong>AC100</strong>-PRO <strong>Technical</strong> <strong>Data</strong> <strong>Sheet</strong>. Last modified September, 2017