Tickle-Tutorial-for-Drones
Este tutorial es de gran ayuda para aprender a programar y usar minidrones Parrot
Este tutorial es de gran ayuda para aprender a programar y usar minidrones Parrot

Create successful ePaper yourself
Turn your PDF publications into a flip-book with our unique Google optimized e-Paper software.
<strong>Tickle</strong> <strong>Tutorial</strong> <strong>for</strong> <strong>Drones</strong> <br />
Intro to Flying <br />
Overview <br />
• Program a droned to take off, flip multiple times, and land. <br />
Objectives <br />
• Became familiar with visual programming. <br />
• Program a drone to fly using basic motion commands. <br />
• Learn the coding concept “loop”: a control statement <strong>for</strong> specifying <br />
iteration, which allows code to be run repeatedly. <br />
Steps <br />
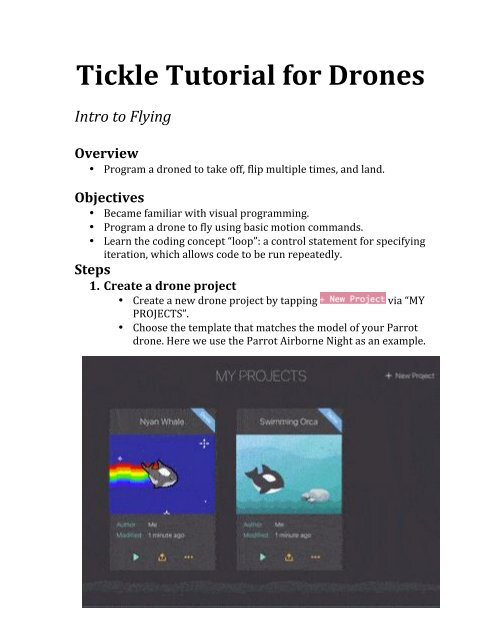
1. Create a drone project <br />
• Create a new drone project by tapping <br />
via “MY <br />
PROJECTS”. <br />
• Choose the template that matches the model of your Parrot <br />
drone. Here we use the Parrot Airborne Night as an example.
2. Connect to the Drone <br />
• Power on the drone, and wait until its eyes are steady green <br />
(about 30 seconds). <br />
• Your drone should automatically be detected and shown in <br />
the “Available Devices” dialog. Tap on it to connect. <br />
• Note: Swipe left/right if you have multiple drones. <br />
• Tip: If your drone is powered on but not automatically <br />
detected, tap on the drone icon to show all available <br />
devices and <strong>for</strong> more tips on troubleshooting.
• The drone will show a battery status icon if it's successfully <br />
connected. Please charge the drone whenever the battery <br />
status becomes red, because the drone may stop responding <br />
to your commands.
Let's Fly <br />
1. Let's review blocks in the new-‐created document be<strong>for</strong>e we start <br />
to fly. <br />
: The blocks attached to this block start to <br />
execute after tapping the <br />
button of <strong>Tickle</strong>. <br />
seconds to complete. <br />
: Make the drone take off, which takes about 4 <br />
: Flip <strong>for</strong>ward. <br />
: Land the drone. <br />
2. Please make sure there are at least 2 meters of open space around <br />
the drone <br />
3. Press the green Play button to start flying.
Make the drone flip 5 times. <br />
1. Let’s add a total of 5 blocks.
2. Press the green Play button to see the drone flip 5 times. <br />
• Tip: If your drone won't flip <strong>for</strong> multiple times, try <br />
adding a "Wait <strong>for</strong> 1 secs" block between each flip <br />
command. <br />
3. Instead of using 5 flip blocks, try adding the block Repeat 5 <br />
times with a single flipblock inside. <br />
4. In programming, a loop is a control statement that allows code to be <br />
executed repeatedly. In <strong>Tickle</strong>, any block whose label begins with <br />
"<strong>for</strong>ever" or "repeat" is a looping construct. <br />
Flying Time, Speed, and Distance <br />
Fly Forward and Backward <br />
• Use the block in the category <br />
to set the flying speed after taking off. You can change the speed by <br />
tapping on the numeric value.
• Use the block in the category, to <br />
set the moving direction and the duration. You can choose a direction <br />
from the pull-‐down menu to fly <strong>for</strong>ward, backward, left, and right. <br />
• Now, let's make the drone fly <strong>for</strong>ward, flip, then fly backward. The <br />
drone should return to its original starting location after executing <br />
all the commands. The program should look like the following:
• Let's start flying by tapping the green Play button! <br />
Let’s do more: Relationship between Speed, <br />
Time, and Distance <br />
• Program the Parrot drone to fly a specific distance by changing its <br />
speed and flying duration. To fly twice the distance, you can double <br />
the speed setting, <strong>for</strong> example, from 50% to 100%. Another way is <br />
keeping the speed the same, but doubling the flying time. <br />
• In Physics, distance = speed x time. Velocity is a vector physical <br />
quantity; both magnitude and direction are required to define it. The <br />
scalar absolute value (magnitude) of velocity is called "speed".
Fly in a Square and Triangle <br />
Turning a Complete Circle <br />
• Heading angle is the angle that the drone is facing or pointing. <br />
• The figure below shows heading angles at 90-‐degree increments. To <br />
turn a full circle, a drone has to turn its heading angle <strong>for</strong> a total of <br />
360 degrees.
Fly in a Square Route <br />
• Use the block in category, , to <br />
turn the heading angle of the drone by a specified angle. <br />
• The following blocks move the drone in a square:
Understanding the Components of a Square <br />
• Notice that the drone has made a complete square by turning 4 <br />
times, turning a total of 360 degrees to return to its original heading. <br />
The degree to turn each time is 360 degrees divided by 4, which is 90 <br />
degrees.
Fly in a Square Route using <br />
Loops <br />
• A loop is used when the number of iterations <br />
can be calculated and known in advance. In our case <strong>for</strong> flying along a <br />
square route, the same blocks <br />
( and ) <br />
will be per<strong>for</strong>med 4 identical times. There<strong>for</strong>e, we can use the block <br />
to replace the redundant blocks, and the <br />
program would look like this:
Program the Drone to Fly in a Triangle <br />
• To fly in a triangle, the drone has to turn 3 times to complete a full <br />
360° turn. The number of degrees to turn each time is <br />
then 360° divided by 3 = 120° . <br />
• The program should look like this:
Pilot Drone using Motion Sensors <br />
Fly a Drone Forward using Motion Sensors <br />
• Under the category, add the motion sensing event block <br />
like the following: <br />
• Let's start flying by tapping the play button. You will discover that if <br />
you tilt the iPad <strong>for</strong>ward, the drone will move <strong>for</strong>ward <strong>for</strong> 2 seconds. <br />
Otherwise it will hover at its current position. You can land the drone <br />
by tapping the red Stop button.
Use Motion Sensors to Fly the Drone in Different <br />
Directions <br />
• To pilot the drone to fly in all four directions, add <br />
a <br />
a <br />
event block <strong>for</strong> each direction. Also, add <br />
event block to flip the drone! <br />
FAQ and Troubleshooting <br />
• Why can't my drone connect to <strong>Tickle</strong>? <br />
• Only one app can connect to a drone at a time. If you are using <br />
Parrot’s Freeflight 3 app, make sure to disconnect your drone by <br />
tapping the menu icon and then selecting your drone. <br />
• Only one iOS device can connect to a drone at a time. Double check <br />
that this drone is not connected to another iPad/iPhone/iPod <br />
Touch.
• Toggle Bluetooth OFF <strong>for</strong> 5 seconds, then turn it back ON in iOS <br />
Settings. <br />
• Restart the drone by removing and re-‐inserting its battery, and <br />
wait till its eyes are steady green. <br />
• Create a new drone project that matches the model of your drone <br />
(e.g. ) <br />
• If you are in the project, but yourr drone is not automatically <br />
detected by <strong>Tickle</strong>, tap on the drone thumbnailicon at the top to <br />
view all available drones. <br />
• Which iOS devices can I use to program Parrot drones? <br />
• iPad: iPad 3 and newer, all iPad Air and iPad mini models. <br />
• iPhone: 4s and later <br />
• iPod Touch: 5th generation <br />
• How do I connect to more robots, drones, and other devices? <br />
• You can connect to more devices and also virtual characters via <br />
the button in any project. <br />
• Only one Parrot quadcopter can be connected to <strong>Tickle</strong> at a time, <br />
but you can add other Parrot mini drones like Jumping Race, and <br />
many other devices like Star Wars BB-‐8 Droid, Sphero, Dash & Dot, <br />
Philips Hue, and Light Blue Bean (Arduino).