Your Handmade Home Magazine December 2017
This issue is packed with holiday design and decor, and an interview with Linda Phan from Property Brothers - Drew's Honeymoon House
This issue is packed with holiday design and decor, and an interview with Linda Phan from Property Brothers - Drew's Honeymoon House

You also want an ePaper? Increase the reach of your titles
YUMPU automatically turns print PDFs into web optimized ePapers that Google loves.
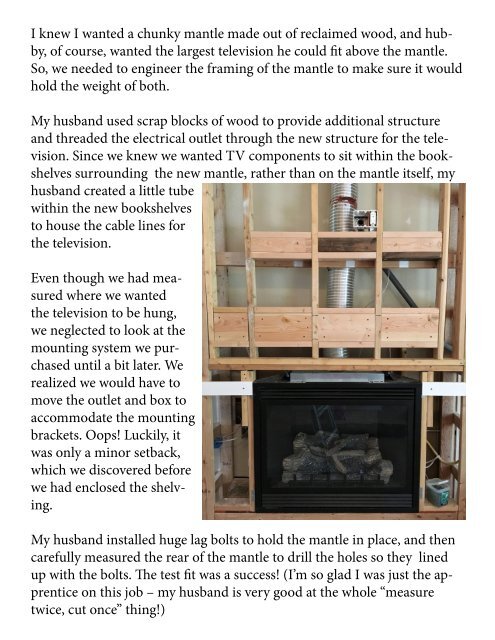
I knew I wanted a chunky mantle made out of reclaimed wood, and hubby,<br />
of course, wanted the largest television he could fit above the mantle.<br />
So, we needed to engineer the framing of the mantle to make sure it would<br />
hold the weight of both.<br />
My husband used scrap blocks of wood to provide additional structure<br />
and threaded the electrical outlet through the new structure for the television.<br />
Since we knew we wanted TV components to sit within the bookshelves<br />
surrounding the new mantle, rather than on the mantle itself, my<br />
husband created a little tube<br />
within the new bookshelves<br />
to house the cable lines for<br />
the television.<br />
Even though we had measured<br />
where we wanted<br />
the television to be hung,<br />
we neglected to look at the<br />
mounting system we purchased<br />
until a bit later. We<br />
realized we would have to<br />
move the outlet and box to<br />
accommodate the mounting<br />
brackets. Oops! Luckily, it<br />
was only a minor setback,<br />
which we discovered before<br />
we had enclosed the shelving.<br />
My husband installed huge lag bolts to hold the mantle in place, and then<br />
carefully measured the rear of the mantle to drill the holes so they lined<br />
up with the bolts. The test fit was a success! (I’m so glad I was just the apprentice<br />
on this job – my husband is very good at the whole “measure<br />
twice, cut once” thing!)<br />
Then, finally, it was time to make the mantle pretty! I had researched the<br />
heck out of our preferred mantle surface, which was stone. I found a manufactured<br />
stone which was a favorite of pro contractors. It was lighter and<br />
less expensive than real stone but looked like the real thing. One of our<br />
local stores had a huge selection in stock, and also had beautiful displays<br />
set up so that I could see what I was really getting instead of relying on a<br />
Google image. Win, win!<br />
There were several different colors, styles and installation types of the<br />
stone, and we ultimately decided on the stacked stone “panel” version. This<br />
product gave us the look of stacked stone without the need for a professional<br />
stone mason to actually fit the stone together. There were different<br />
lengths of stone pieces and different configurations so we tried to randomly<br />
place the stones as much as possible to get that perfectly imperfect look.<br />
Before we started to set the stone, we installed cement board and taped<br />
and put mud on all the seams and screws. These are boring and tedious but<br />
important parts of the project that I might’ve rushed through. That’s why I<br />
couldn’t be trusted to do this project on my own!<br />
After using a spacer along the bottom of the fireplace which would allow<br />
the flooring to be installed underneath the stone, we finally began placing<br />
the stones. I was excited to get those first few rows up, and finally felt like<br />
we were making progress! After a lot of research, here’s the method we<br />
used and a few tips and tricks:<br />
* We laid out several of each type of stone on the floor (corners, short<br />
lengths, medium lengths, and long lengths) and then preassembled the<br />
rows two to three at a time. That way, we could make sure that we were<br />
staggering joints and using a variety of patterns of the stones. There was<br />
only one spot where we didn’t notice that several of the same size stones<br />
were stacked on top of each other. But we got lucky because the TV covers<br />
most of that area.