

rental inspection procedure - Rossignol
rental inspection procedure - Rossignol
rental inspection procedure - Rossignol

You also want an ePaper? Increase the reach of your titles
YUMPU automatically turns print PDFs into web optimized ePapers that Google loves.
Drilling<br />
Select the drill bit recommended by the ski<br />
manufacturer, usually indicated on the ski<br />
manufacturers ski. Information window on<br />
the ski indicates drill dimension and whether<br />
to tap. The binding type determines which<br />
holes in the template to use. (see below)<br />
Adult<br />
Toe piece<br />
front screws<br />
rear screws<br />
Heel piece<br />
Adult<br />
Toe piece<br />
front screws<br />
rear screws<br />
Heel piece<br />
Junior<br />
Toe piece<br />
front screws<br />
rear screws<br />
Heel piece<br />
• For Junior, Children’s, check screw length and ski<br />
thickness, grind or replace screw if necessary. The<br />
ski will indicate drill bit dimensions. If the ski indicates<br />
to use 9.0 mm depth bit the max penetration at the<br />
screw will be 8.5 mm or 8mm. If the ski indicates to<br />
drill with a 7mm depth bit the max penetration of the<br />
screw is 6mm or 6.5mm.<br />
• Drill the toe piece holes.<br />
• Drill the heelpiece holes.<br />
• Turn the ski over to remove debris.<br />
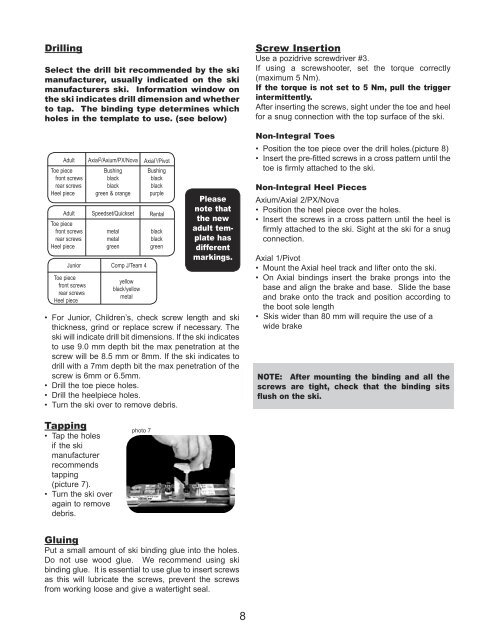
Tapping<br />
• Tap the holes<br />
if the ski<br />
manufacturer<br />
recommends<br />
tapping<br />
(picture 7).<br />
• Turn the ski over<br />
again to remove<br />
debris.<br />
Axial 2 /Axium/PX/Nova Axial 1 /Pivot<br />
Bushing<br />
black<br />
black<br />
green & orange<br />
yellow<br />
black/yellow<br />
metal<br />
photo 7<br />
Bushing<br />
black<br />
black<br />
purple<br />
Speedset/Quickset Rental<br />
metal<br />
metal<br />
green<br />
Comp J/Team 4<br />
black<br />
black<br />
green<br />
Please<br />
note that<br />
the new<br />
adult template<br />
has<br />
different<br />
markings.<br />
Gluing<br />
Put a small amount of ski binding glue into the holes.<br />
Do not use wood glue. We recommend using ski<br />
binding glue. It is essential to use glue to insert screws<br />
as this will lubricate the screws, prevent the screws<br />
from working loose and give a watertight seal.<br />
8<br />
Screw Insertion<br />
Use a pozidrive screwdriver #3.<br />
If using a screwshooter, set the torque correctly<br />
(maximum 5 Nm).<br />
If the torque is not set to 5 Nm, pull the trigger<br />
intermittently.<br />
After inserting the screws, sight under the toe and heel<br />
for a snug connection with the top surface of the ski.<br />
Non-Integral Toes<br />
• Position the toe piece over the drill holes.(picture 8)<br />
• Insert the pre-fitted screws in a cross pattern until the<br />
toe is firmly attached to the ski.<br />
Non-Integral Heel Pieces<br />
Axium/Axial 2/PX/Nova<br />
• Position the heel piece over the holes.<br />
• Insert the screws in a cross pattern until the heel is<br />
firmly attached to the ski. Sight at the ski for a snug<br />
connection.<br />
Axial 1/Pivot<br />
• Mount the Axial heel track and lifter onto the ski.<br />
• On Axial bindings insert the brake prongs into the<br />
base and align the brake and base. Slide the base<br />
and brake onto the track and position according to<br />
the boot sole length<br />
• Skis wider than 80 mm will require the use of a<br />
wide brake<br />
NOTE: After mounting the binding and all the<br />
screws are tight, check that the binding sits<br />
flush on the ski.