CVS 1000L Electro-Pneumatic Linear Positioner - CVS Controls
CVS 1000L Electro-Pneumatic Linear Positioner - CVS Controls
CVS 1000L Electro-Pneumatic Linear Positioner - CVS Controls

Create successful ePaper yourself
Turn your PDF publications into a flip-book with our unique Google optimized e-Paper software.
6<br />
<strong>CVS</strong> <strong>Controls</strong> Ltd.<br />
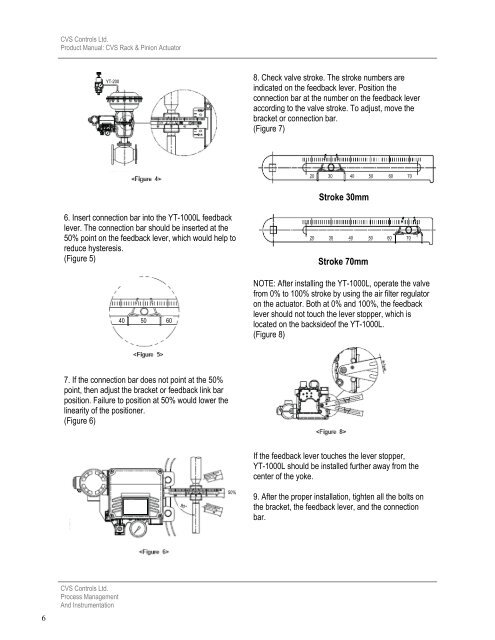
Product Manual: <strong>CVS</strong> Rack & Pinion Actuator<br />
YT-200<br />
6. Insert connection bar into the YT-<strong>1000L</strong> feedback<br />
lever. The connection bar should be inserted at the<br />
50% point on the feedback lever, which would help to<br />
reduce hysteresis.<br />
(Figure 5)<br />
7. If the connection bar does not point at the 50%<br />
point, then adjust the bracket or feedback link bar<br />
position. Failure to position at 50% would lower the<br />
linearity of the positioner.<br />
(Figure 6)<br />
<strong>CVS</strong> <strong>Controls</strong> Ltd.<br />
Process Management<br />
And Instrumentation<br />
40 50 60<br />
90°<br />
50%<br />
8. Check valve stroke. The stroke numbers are<br />
indicated on the feedback lever. Position the<br />
connection bar at the number on the feedback lever<br />
according to the valve stroke. To adjust, move the<br />
bracket or connection bar.<br />
(Figure 7)<br />
20 30<br />
Stroke 30mm<br />
Stroke 70mm<br />
40 50 60 70<br />
20 30 40 50 60<br />
NOTE: After installing the YT-<strong>1000L</strong>, operate the valve<br />
from 0% to 100% stroke by using the air filter regulator<br />
on the actuator. Both at 0% and 100%, the feedback<br />
lever should not touch the lever stopper, which is<br />
located on the backsideof the YT-<strong>1000L</strong>.<br />
(Figure 8)<br />
If the feedback lever touches the lever stopper,<br />
YT-<strong>1000L</strong> should be installed further away from the<br />
center of the yoke.<br />
9. After the proper installation, tighten all the bolts on<br />
the bracket, the feedback lever, and the connection<br />
bar.<br />
70