

Oracle Magazine - September/October 2007 - Marcelo Machado
Oracle Magazine - September/October 2007 - Marcelo Machado
Oracle Magazine - September/October 2007 - Marcelo Machado

Create successful ePaper yourself
Turn your PDF publications into a flip-book with our unique Google optimized e-Paper software.
FRAMEWORKS<br />
FRAMEWORKS<br />
the two lists of values. In <strong>Oracle</strong><br />
ADF 11g, you can configure a list<br />
of values as a declarative feature<br />
of any view object attribute. By<br />
defining the list of values at the<br />
model layer instead of within<br />
the user interface (UI), you can<br />
ensure that your UI will present a<br />
list of values correctly and consistently,<br />
regardless of the particular<br />
<strong>Oracle</strong> ADF–supported UI client<br />
technology you decide to use.<br />
In the Application Navigator,<br />
begin by double-clicking<br />
EmpView to open the view<br />
object editor. Note that in <strong>Oracle</strong><br />
JDeveloper 11g, the business component<br />
editors appear as tabs within the<br />
main editor area instead of in a modal<br />
dialog box. Select the Attributes category<br />
along the left edge of the editor<br />
page, and select the Deptno attribute in<br />
the table that appears in the Attributes<br />
section near the top of the editor frame.<br />
Find the List of Values: Deptno section<br />
header below, and click the green plussign<br />
icon on the right side of the header<br />
to create a list of values for the Deptno<br />
attribute. When the List of Values dialog<br />
box appears, click the green plus-sign<br />
icon in the List Data Source section to<br />
add a datasource that will supply the<br />
list of valid choices for this attribute’s<br />
value. In the View Accessors dialog box<br />
that appears, select the DeptView view<br />
object in the Available View Objects list<br />
on the left and click the Add Instance<br />
(right-arrow) button to add a new<br />
view accessor named DeptView1 for the<br />
selected view object. Then click OK.<br />
Note that the newly added view accessor<br />
datasource DeptView1 appears in the<br />
List Data Source tree display in the List of<br />
Values dialog box. Expand it, and select<br />
its Deptno attribute. Note that the List<br />
Return Values section updates to show<br />
how attributes in the list datasource will<br />
be assigned to attributes in the base view<br />
object when the user makes a choice<br />
from the list. You won’t need to modify<br />
this section for this example, but note<br />
that you could map additional return<br />
value attributes in your application by<br />
adding to this list.<br />
Before leaving the List of Values dialog<br />
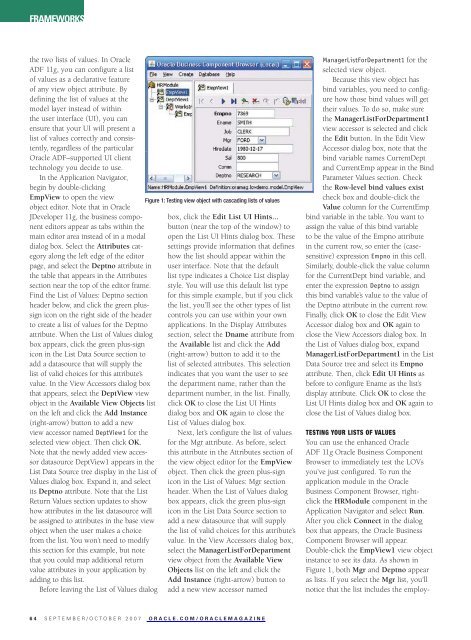
Figure 1: Testing view object with cascading lists of values<br />
box, click the Edit List UI Hints...<br />
button (near the top of the window) to<br />
open the List UI Hints dialog box. These<br />
settings provide information that defines<br />
how the list should appear within the<br />
user interface. Note that the default<br />
list type indicates a Choice List display<br />
style. You will use this default list type<br />
for this simple example, but if you click<br />
the list, you’ll see the other types of list<br />
controls you can use within your own<br />
applications. In the Display Attributes<br />
section, select the Dname attribute from<br />
the Available list and click the Add<br />
(right-arrow) button to add it to the<br />
list of selected attributes. This selection<br />
indicates that you want the user to see<br />
the department name, rather than the<br />
department number, in the list. Finally,<br />
click OK to close the List UI Hints<br />
dialog box and OK again to close the<br />
List of Values dialog box.<br />
Next, let’s configure the list of values<br />
for the Mgr attribute. As before, select<br />
this attribute in the Attributes section of<br />
the view object editor for the EmpView<br />
object. Then click the green plus-sign<br />
icon in the List of Values: Mgr section<br />
header. When the List of Values dialog<br />
box appears, click the green plus-sign<br />
icon in the List Data Source section to<br />
add a new datasource that will supply<br />
the list of valid choices for this attribute’s<br />
value. In the View Accessors dialog box,<br />
select the ManagerListForDepartment<br />
view object from the Available View<br />
Objects list on the left and click the<br />
Add Instance (right-arrow) button to<br />
add a new view accessor named<br />
64 SEPTEMBER/OCTOBER <strong>2007</strong> ORACLE.COM/ORACLEMAGAZINE<br />
ManagerListForDepartment1 for the<br />
selected view object.<br />
Because this view object has<br />
bind variables, you need to configure<br />
how those bind values will get<br />
their values. To do so, make sure<br />
the ManagerListForDepartment1<br />
view accessor is selected and click<br />
the Edit button. In the Edit View<br />
Accessor dialog box, note that the<br />
bind variable names CurrentDept<br />
and CurrentEmp appear in the Bind<br />
Parameter Values section. Check<br />
the Row-level bind values exist<br />
check box and double-click the<br />
Value column for the CurrentEmp<br />
bind variable in the table. You want to<br />
assign the value of this bind variable<br />
to be the value of the Empno attribute<br />
in the current row, so enter the (casesensitive)<br />
expression Empno in this cell.<br />
Similarly, double-click the value column<br />
for the CurrentDept bind variable, and<br />
enter the expression Deptno to assign<br />
this bind variable’s value to the value of<br />
the Deptno attribute in the current row.<br />
Finally, click OK to close the Edit View<br />
Accessor dialog box and OK again to<br />
close the View Accessors dialog box. In<br />
the List of Values dialog box, expand<br />
ManagerListForDepartment1 in the List<br />
Data Source tree and select its Empno<br />
attribute. Then, click Edit UI Hints as<br />
before to configure Ename as the list’s<br />
display attribute. Click OK to close the<br />
List UI Hints dialog box and OK again to<br />
close the List of Values dialog box.<br />
TESTING YOUR LISTS OF VALUES<br />
You can use the enhanced <strong>Oracle</strong><br />
ADF 11g <strong>Oracle</strong> Business Component<br />
Browser to immediately test the LOVs<br />
you’ve just configured. To run the<br />
application module in the <strong>Oracle</strong><br />
Business Component Browser, rightclick<br />
the HRModule component in the<br />
Application Navigator and select Run.<br />
After you click Connect in the dialog<br />
box that appears, the <strong>Oracle</strong> Business<br />
Component Browser will appear.<br />
Double-click the EmpView1 view object<br />
instance to see its data. As shown in<br />
Figure 1, both Mgr and Deptno appear<br />
as lists. If you select the Mgr list, you’ll<br />
notice that the list includes the employ-