August 2018

Create successful ePaper yourself
Turn your PDF publications into a flip-book with our unique Google optimized e-Paper software.
Fastener Tech<br />
INSTALLATION: LET’S TALK TORQUE<br />
In the latest instalment of his series of articles looking at the key issues concerning fixings<br />
for roofing and cladding projects, Brian Mack, Technical Business Development Manager at<br />
EJOT UK, looks at the installation issues concerning correct torque for self-drilling or selftapping<br />
fasteners.<br />
As original manufacturers, we are asked on a<br />
daily basis about correct installation torque<br />
for a self-drilling or self-tapping fastener –<br />
torque being the rotational force applied to the<br />
fastener. Sounds simple enough, but when you stop<br />
to consider the sequence of installation stages that<br />
one single high performance fastener is designed to<br />
deliver, then a greater depth of understanding is<br />
beneficial to all involved.<br />
A self-drilling fastener installs through all of the<br />
operational stages described above, and the<br />
torque required is different at the drilling stage,<br />
tapping stage, run-through and finally the<br />
tightening stage. The component materials that<br />
the fastener is installing and the substrate – plus<br />
any sealants can all influence these variations of<br />
installation torque. The dynamics and variability<br />
– even within the same application – simply calls<br />
for knowledge-driven control by the installer for<br />
the fastener to then deliver the long-term<br />
performance benefits that it was designed to do.<br />
Setting an installation gun to a tightening torque<br />
that may be lower than the tapping or drilling<br />
torque is a typical example. This is especially the<br />
case for applications such as the installation of<br />
composite panels, where the tightening torque of<br />
the washer against the panel face is much lower<br />
than the generated drilling and tapping torques.<br />
So how do we legislate for these variables and<br />
what tools can aid correct installation?<br />
Manufacturers’ guidance is the first port of call.<br />
This will generally include laden speed (the speed<br />
of the installation tool when a load is added) and<br />
the end load, (the load placed upon the<br />
installation tool during the installation process),<br />
and most importantly that the fastener is<br />
installed by depth – depth<br />
being how far the fastener is<br />
installed. This is usually<br />
gauged by the compression<br />
of the EPDM of the bonded<br />
washer. This level of control<br />
can be achieved initially by sight;<br />
observing the reaction of the washer as it<br />
seats against the installed material. Many screw<br />
guns are, or can be, supplied with a depth<br />
sensing nose piece. These can be set to ensure<br />
the correct compression of the washer and<br />
therefore the optimum clamping load of the<br />
fastener in application.<br />
Accurate installation<br />
There are a wide range of electric and battery<br />
powered tools on the market, therefore checking<br />
the performance and speed of these is<br />
imperative. A screwgun should be selected with a<br />
speed suggested by the fastener manufacturer<br />
and suitable for the drive tools – with a clutch to<br />
disengage the drive. A tool that can be supplied<br />
with depth sensing nose pieces that works with<br />
the clutch will ensure fast, accurate installation.<br />
A torque set installation tool can only be used in<br />
applications where the repeatability of the<br />
application is constant and where the installation<br />
tool’s torque setting parameters are in suitable<br />
increments. As you can imagine this is very<br />
limited and requires in-depth torque analysis of<br />
the application to locate the correct torque<br />
setting.<br />
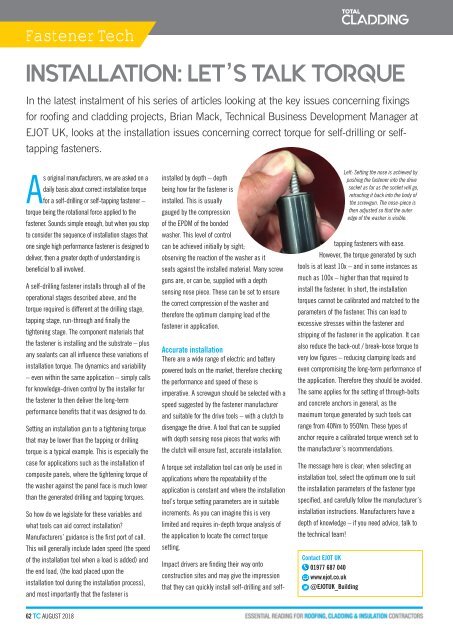
Left: Setting the nose is achieved by<br />
pushing the fastener into the drive<br />
socket as far as the socket will go,<br />
retracting it back into the body of<br />
the screwgun. The nose-piece is<br />
then adjusted so that the outer<br />
edge of the washer is visible.<br />
Impact drivers are finding their way onto<br />
construction sites and may give the impression<br />
that they can quickly install self-drilling and selftapping<br />
fasteners with ease.<br />
However, the torque generated by such<br />
tools is at least 10x – and in some instances as<br />
much as 100x – higher than that required to<br />
install the fastener. In short, the installation<br />
torques cannot be calibrated and matched to the<br />
parameters of the fastener. This can lead to<br />
excessive stresses within the fastener and<br />
stripping of the fastener in the application. It can<br />
also reduce the back-out / break-loose torque to<br />
very low figures – reducing clamping loads and<br />
even compromising the long-term performance of<br />
the application. Therefore they should be avoided.<br />
The same applies for the setting of through-bolts<br />
and concrete anchors in general, as the<br />
maximum torque generated by such tools can<br />
range from 40Nm to 950Nm. These types of<br />
anchor require a calibrated torque wrench set to<br />
the manufacturer’s recommendations.<br />
The message here is clear; when selecting an<br />
installation tool, select the optimum one to suit<br />
the installation parameters of the fastener type<br />
specified, and carefully follow the manufacturer’s<br />
installation instructions. Manufacturers have a<br />
depth of knowledge – if you need advice, talk to<br />
the technical team!<br />
Contact EJOT UK<br />
01977 687 040<br />
www.ejot.co.uk<br />
@EJOTUK_Building<br />
62 TC AUGUST <strong>2018</strong>