OPTIX TLP150-L-HD
License plate cameras
License plate cameras

You also want an ePaper? Increase the reach of your titles
YUMPU automatically turns print PDFs into web optimized ePapers that Google loves.
MODEL : <strong>TLP150</strong><br />
<strong>TLP150</strong>L<br />
LICENSE PLATE<br />
CAMERA<br />
QUALITY PRODUCTS FOR THE PROFESSIONAL INSTALLER
MODEL : <strong>TLP150</strong><br />
<strong>TLP150</strong>L<br />
TABLE OF CONTENTS<br />
INTRODUCTION<br />
Contents<br />
DEVICE<br />
QUICK START/ INSTALLATION<br />
Wiring<br />
3<br />
4<br />
5<br />
2
MODEL : <strong>TLP150</strong><br />
<strong>TLP150</strong>L<br />
INTRODUCTION<br />
guide your vehicle safely into parking stalls, bays, etc.<br />
CONTENTS<br />
1 - License plate camera<br />
1 - License plate frame<br />
1 - Hardwire plug<br />
1 - Video Cable<br />
3
MODEL : <strong>TLP150</strong><br />
<strong>TLP150</strong>L<br />
DEVICE<br />
Black : Ground<br />
Red : Attach the 2 Red wires<br />
together then tap into<br />
your (+) Backup Light<br />
Power to LCD<br />
or (+) Trigger<br />
for your<br />
Double Din<br />
<strong>TLP150</strong><br />
-License Plate Camera<br />
OPTIONAL LOOPS FOR <strong>TLP150</strong><br />
GREEN LOOP:<br />
UNCUT - REGULAR<br />
CUT - MIRROR IMAGE<br />
WHITE LOOP:<br />
UNCUT - NO PARKING LINES<br />
CUT - PARKING LINES<br />
*Monitor Not Included<br />
Black : Ground<br />
Power to LCD<br />
or (+) Trigger<br />
for your<br />
Double Din<br />
Red : Attach the 2 Red wires<br />
together then tap into<br />
your (+) Backup Light<br />
<strong>TLP150</strong>L<br />
-License Plate Camera<br />
4
MODEL : <strong>TLP150</strong><br />
<strong>TLP150</strong>L<br />
QUICK START/INSTALLATION<br />
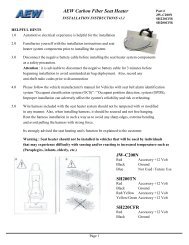
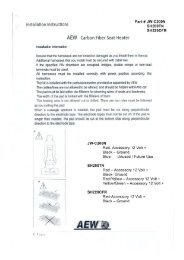
1. Mount the camera install plate bracket to the OEM License plate mountiong location<br />
2. Route wires into the vehicle<br />
Installation Diagram : <strong>TLP150</strong> ONLY<br />
Green Loop : Not Cut - Non Mirror Image<br />
Cut - Mirror Image<br />
White Loop : Not Cut - No Parking Lines<br />
Cut - Parking Lines<br />
*Monitor Not Included<br />
Additional Mounts Included<br />
Flush Mount<br />
18mm hole<br />
required for<br />
Flush Mounting<br />
Mount the camera<br />
license plate bracket to<br />
the OEM license plate<br />
mounting location.<br />
Black : Ground<br />
Red : Attach the 2 Red wires<br />
together then tap into<br />
your (+) Backup Light<br />
Power to LCD<br />
or (+) Trigger<br />
for your<br />
Double Din<br />
Surface Mount<br />
28mm<br />
screw hole<br />
distance<br />
Installation Diagram : <strong>TLP150</strong>L ONLY<br />
*Monitor Not Included<br />
Additional Mounts Included<br />
Flush Mount<br />
18.5mm hole<br />
required for<br />
Flush Mounting<br />
Mount the camera<br />
license plate bracket to<br />
the OEM license plate<br />
mounting location.<br />
Black : Ground<br />
Power to LCD<br />
or (+) Trigger<br />
for your<br />
Double Din<br />
Red : Attach the 2 Red wires<br />
together then tap into<br />
your (+) Backup Light<br />
Surface Mount<br />
28mm<br />
screw hole<br />
distance<br />
5