how to install 2" blinds - Skandia Window Fashions
how to install 2" blinds - Skandia Window Fashions
how to install 2" blinds - Skandia Window Fashions

You also want an ePaper? Increase the reach of your titles
YUMPU automatically turns print PDFs into web optimized ePapers that Google loves.
How <strong>to</strong> Install<br />
2” Blinds<br />
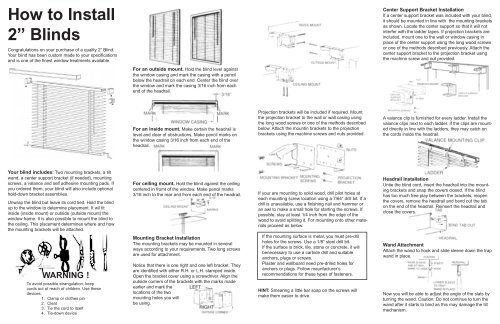
Congratulations on your purchase of a quality 2” Blind.<br />
Your blind has been cus<strong>to</strong>m made <strong>to</strong> your specifications<br />
and is one of the finest window treatments available.<br />
Your blind includes: Two mounting brackets, a tilt<br />
wand, a center support bracket (if needed), mounting<br />
screws, a valance and self adhesive mounting pads. If<br />
you ordered them, your blind will also include optional<br />
hold-down bracket assemblies.<br />
Unwrap the blind but leave its cord tied. Hold the blind<br />
up <strong>to</strong> the window <strong>to</strong> determine placement. It wil fit<br />
inside (inside mount) or outside (outside mount) the<br />
window frame. It is also possible <strong>to</strong> mount the blind <strong>to</strong><br />
the ceiling. This placement determines where and <strong>how</strong><br />
the mounting brackets will be attached.<br />
WARNING !<br />
To avoid possible strangulation, keep<br />
cords out of reach of children. Use these<br />
devices:<br />
1. Clamp or clothes pin<br />
2. Cleat<br />
3. Tie the cord <strong>to</strong> itself<br />
4. Tie-down device<br />
For an outside mount. Hold the blind level against<br />
the window casing and mark the casing with a pencil<br />
below the headrail on each end. Center the blind over<br />
the window and mark the casing 3/16 inch from each<br />
end of the headrail.<br />
For an inside mount. Make certain the headrail is<br />
level and clear of obstructions. Make pencil marks on<br />
the window casing 3/16 inch from each end of the<br />
headrail.<br />
For ceiling mount. Hold the blind against the ceiling<br />
centered in fromt of the window. Make pencil marks<br />
3/16 inch <strong>to</strong> the rear and from each end of the headrail.<br />
Mounting Bracket Installation<br />
The mounting brackets may be mounted in several<br />
ways according <strong>to</strong> your requirements. Two long screws<br />
are used for attachment.<br />
Notice that there is one right and one left bracket. They<br />
are identified with either R.H. or L.H. stamped inside.<br />
Open the bracket cover using a screwdriver. Align the<br />
outside corners of the brackets with the marks made<br />
earlier and mark the<br />
locations of the two<br />
mounting holes you will<br />
be using.<br />
Projection brackets will be included if required. Mount<br />
the projection bracket <strong>to</strong> the wall or wall casing using<br />
the long wood screws or one of the methods described<br />
below. Attach the mountin brackets <strong>to</strong> the projection<br />
brackets using the machine screws and nuts provided.<br />
If your are mounting <strong>to</strong> solid wood, drill pilot holes at<br />
each mounting screw location using a 7/64” drill bit. If a<br />
drill is unavailable, use a finishing nail and hammer or<br />
an awl <strong>to</strong> make a small hole for starting the screws. If<br />
possible, stay at least 1/4 inch from the edge of the<br />
wood <strong>to</strong> avoid splitting it. For mounting on<strong>to</strong> other materials<br />
proceed as below:<br />
If the mounting surface is metal, you must pre-dril<br />
holes for the screws. Use a 1/8” steel drill bit.<br />
If the surface is brick, tile, s<strong>to</strong>ne or concrete, it will<br />
benecessary <strong>to</strong> use a carbide drill and suitable<br />
anchors, plugs or screws.<br />
Plaster and wallboard need pre-driled holes for<br />
anchors or plugs. Follow maunfacturer’s<br />
recommendations for these types of fasteners.<br />
HINT: Smearing a little bar soap on the screws will<br />
make them easier <strong>to</strong> drive.<br />
Center Support Bracket Installation<br />
If a center support bracket was included with your blind,<br />
it should be mounted in line with the mounting brackets<br />
as s<strong>how</strong>n. Locate the center support so that it will not<br />
interfer with the ladder tapes. If projection brackets are<br />
included, mount one <strong>to</strong> the wall or window casing in<br />
place of the center support using the long wood screws<br />
or one of the methods described previously. Attach the<br />
center support bracket <strong>to</strong> the projection bracket using<br />
the machine screw and nut provided.<br />
A valance clip is furnished for every ladder. Install the<br />
valance clips next <strong>to</strong> each ladder. If the clips are mounted<br />
directly in line with the ladders, they may catch on<br />
the cords inside the headrail.<br />
Headrail Installation<br />
Untie the blind cord, insert the headrail in<strong>to</strong> the mounting<br />
brackets and snap the covers closed. If the blind<br />
has <strong>to</strong>o much free play between the brackets, reopen<br />
the covers, remove the headrail and bend out the tab<br />
on the end of the headrail. Reinsert the headrail and<br />
close the covers.<br />
Wand Attachment<br />
Attach the wand <strong>to</strong> hook and slide sleeve down the trap<br />
wand in place.<br />
Now you will be able <strong>to</strong> adjust the angle of the slats by<br />
turning the wand. Caution: Do not continue <strong>to</strong> turn the<br />
wand after it starts <strong>to</strong> bind as this may damage the tilt<br />
mechanism.
Valance Installation<br />
For Aluminum Blind Valances: If the valance slat is<br />
not already <strong>install</strong>ed on the valance channel, lay the<br />
valance channels flat, slide the valance slat in<strong>to</strong> place.<br />
On outside mount <strong>blinds</strong>, the channel is creased <strong>to</strong><br />
allow the ends of the channel <strong>to</strong> be formed in<strong>to</strong> returns.<br />
Starting at one end, place the upper lip of the valance<br />
in<strong>to</strong> the <strong>to</strong>p groove on a valance mounting clip.<br />
Carefully snap the lower lip in<strong>to</strong> the bot<strong>to</strong>m groove on<br />
the clip. Repeat this at each clip. Valance return length<br />
may be trimmed with scissors of necessary.<br />
For Wood and Composite Valances: Place <strong>to</strong>p of<br />
wood valance in<strong>to</strong> valance clip and then carefully snap<br />
bot<strong>to</strong>m of valance in<strong>to</strong> place.<br />
For Built-up Wood Valances: Place <strong>to</strong>p of build-up<br />
in<strong>to</strong> valance clip and then carefully snap bot<strong>to</strong>m of<br />
build-up in<strong>to</strong> place.<br />
The valance may be detached and re-<strong>install</strong>ed as<br />
required.<br />
Adjust Blind Height<br />
To raise or lower your blind, pull the cord down and<br />
<strong>to</strong>ward the center of the blind. Using the cord, raise or<br />
lower the blind <strong>to</strong> the desired height. When lowering,<br />
move slowly or the cord lock may engage. To lock the<br />
blind at the desired height, move the cord past the<br />
edge of the blind and release.<br />
If the bot<strong>to</strong>mrail isn’t level when partially raised, level<br />
the blind, slide the cord tassel up away from the cord<br />
knot and reknot so all cords are even. Return the tassel<br />
over the knot.<br />
Optional Hold Down Brackets<br />
If you ordered the optional hold down brackets, proceed<br />
as follows: Install the bot<strong>to</strong>mrail pins by tapping<br />
in<strong>to</strong> the holes provided. About 1/4 inch of pin should<br />
remail exposed.<br />
Lower the blind, attach the brackets <strong>to</strong> the pins and<br />
mark a small starter hole at each mark and <strong>install</strong><br />
both brackets with the short screws provided. Hook<br />
the bot<strong>to</strong>mrail in<strong>to</strong> the brackets.<br />
Cleaning<br />
Your blind is easily cleaned by lowering it <strong>to</strong> full length<br />
and closing the louvers (not tightly) first in one direction<br />
and then the other. Wipe them with a soft brush,<br />
cloth or clean them with your vacuum cleaner’s brush<br />
attachment.<br />
It is also possible <strong>to</strong> have your blind professionally<br />
cleaned. Look for cleaning services in your telephone<br />
direc<strong>to</strong>ry.<br />
SKANDIA HORIZONTAL ALUMINUM BLINDS<br />
Limited Lifetime Warranty<br />
<strong>Skandia</strong>'s sole obligation under this warranty is <strong>to</strong> repair or replace defective products or components without charge. <strong>Skandia</strong><br />
is not responsible for transportation costs <strong>to</strong> or from the retailer, or costs for taking down and re<strong>install</strong>ing the product.<br />
OUR GUARANTEE: Once you are satisfied with your new <strong>Skandia</strong> Blind and the way it is <strong>install</strong>ed in your home, <strong>Skandia</strong><br />
Industries guarantees your blind will be free from defects due <strong>to</strong> faulty workmanship or materials forever.<br />
OUR OBLIGATIONS TO YOU. For claims covered by the guarantee, <strong>Skandia</strong> Industries will, at no charge <strong>to</strong> you, replace<br />
or repair any product found <strong>to</strong> be defective as a result of faulty workmanship or materials.<br />
FOR GUARANTEE SERVICE. Contact or write <strong>to</strong>:<br />
Cus<strong>to</strong>mer Relations Department • <strong>Skandia</strong> Industries<br />
270 Crossway Road • Tallahassee, FL 32310 Phone: (904) 878-1144<br />
Include your name, address, a description of the problem, the date of purchase, and the date and conditions under which the<br />
problem occurred. A bill of sale, cancelled check, receipt or other record must be provided <strong>to</strong> verify the original purchase date.<br />
GUARANTEE LIMITS: This guarantee does not apply <strong>to</strong> any <strong>Skandia</strong> Blind or parts thereof which fail due <strong>to</strong> accident,<br />
alteration, improper use, abuse, neglect, normal wear, nor color fading due <strong>to</strong> sunlight, direct exposure <strong>to</strong> salt air, failure <strong>to</strong> follow<br />
instructions for measuring, <strong>install</strong>ing or operating the product, products produced by <strong>Skandia</strong> Industries, that are not identified as<br />
<strong>Skandia</strong> Blinds, or any <strong>blinds</strong> made of wood. Also, this guarantee applies only <strong>to</strong> <strong>Skandia</strong> Blinds manufactured by <strong>Skandia</strong> Industries.<br />
Any defect, malfunction, or other failure of the product <strong>to</strong> conform <strong>to</strong> this limited guarantee will be remedied by <strong>Skandia</strong><br />
Industries., solely in the manner provided in this guarantee.<br />
THIS LIMITED GUARANTEE DOES NOT COVER, AND IS INTENDED TO EXCLUDE, ANY AND ALL LIABIL-<br />
ITY ON THE PART OF THE COMPANY, WHETHER UNDER THIS LIMITED GUARANTEE OR UNDER ANY GUAR-<br />
ANTEE IMPLIED BY LAW, FOR ANY INDIRECT OR CONSEQUENTIAL DAMAGES FOR BREACH THEREOF EXCEPT<br />
AS EXPRESSLY PROVIDED ABOVE IN THIS LIMITED GUARANTEE, THE COMPANY HEREBY NEGATES AND DIS-<br />
CLAIMS ALL EXPRESS GUARANTEES.<br />
Note: Some states do not allow the exclusion or limitation of incidental or consequential damages, so the foregoing limitation<br />
or exclusion regarding such damages may not apply <strong>to</strong> you. Also, this Limited Guarantee gives specific legal rights, and you may<br />
also have other rights which vary from state <strong>to</strong> state.<br />
SKANDIA FORESTVIEW AND GRANDVIEW WOOD BLINDS<br />
Limited Lifetime Warratny<br />
<strong>Skandia</strong>'s sole obligation under this warranty is <strong>to</strong> repair or replace defective products or components without charge. <strong>Skandia</strong><br />
is not responsible for transportation costs <strong>to</strong> or from the retailer, or costs for taking down and re<strong>install</strong>ing the product.<br />
• <strong>Skandia</strong> extends this limited lifetime warranty <strong>to</strong> the original purchaser. This warranty applies only <strong>to</strong> Forest View &<br />
GrandView Blinds properly <strong>install</strong>ed in the window, door, or interior area for which it is intended.<br />
• Damage <strong>to</strong> the product resulting from misuse, abuse, direct exposure <strong>to</strong> salty air or discoloration due <strong>to</strong> sunlight or the<br />
passage of time is not covered by this warranty. This warranty takes the place of all other state warranties, whether written,<br />
oral, or implied.<br />
• In no event shall <strong>Skandia</strong> be liable for incidental or consequential damages.<br />
• In the event of a defect under this warranty, <strong>Skandia</strong> will repair or replace the product, at our option, provided it is<br />
returned <strong>to</strong> an authorized <strong>Skandia</strong> dealer.<br />
• The exclusion or limitation of incidental or consequential damages may vary by state of purchase; therefore, the above<br />
limitations or exclusions may not be applicable <strong>to</strong> you. This warranty gives you specific legal rights and may also include<br />
other rights which again, vary from state <strong>to</strong> state.<br />
• The natural beauty of wood often includes dark pigments and strong grain patterns which appear randomly throughout<br />
the blind. These are especially visible in <strong>blinds</strong> finished in light colors. Slight variations in color as well as minimal<br />
warpage may also occur. These are all natural occurring tendencies when dealing with wood products and are considered<br />
acceptable. Returns for the above mentioned reasons are not warranted.<br />
SKANDIA INFUSIONS 2” VINYL BLINDS<br />
Limited Lifetime Warranty<br />
<strong>Skandia</strong>'s sole obligation under this warranty is <strong>to</strong> repair or replace defective products or components without charge.<br />
<strong>Skandia</strong> is not responsible for transportation costs <strong>to</strong> or from the retailer, or costs for taking down and re<strong>install</strong>ing the product.<br />
OUR GUARANTEE: Once you are satisfied with your new <strong>Skandia</strong> Blind and the way it is <strong>install</strong>ed in your home,<br />
<strong>Skandia</strong> Industries guarantees your blind will be free from defects due <strong>to</strong> faulty workmanship or materials forever.<br />
OUR OBLIGATIONS TO YOU. For claims covered by the guarantee, <strong>Skandia</strong> Industries will, at no charge <strong>to</strong> you,<br />
replace or repair any product found <strong>to</strong> be defective as a result of faulty workmanship or materials.<br />
FOR GUARANTEE SERVICE. Contact or write <strong>to</strong>:<br />
Cus<strong>to</strong>mer Relations Department • <strong>Skandia</strong> Industries<br />
270 Crossway Road • Tallahassee, FL 32310<br />
GUARANTEE LIMITS: This guarantee does not apply <strong>to</strong> any <strong>Skandia</strong> Blind or parts thereof which fail due <strong>to</strong> accident,<br />
alteration, improper use, abuse, neglect, normal wear, nor color fading due <strong>to</strong> sunlight, direct exposure <strong>to</strong> salt air, failure<br />
<strong>to</strong> follow instructions for measuring, <strong>install</strong>ing or operating the product, products produced by <strong>Skandia</strong> Industries, that<br />
are not identified as <strong>Skandia</strong> Blinds, or any <strong>blinds</strong> made of wood. Also, this guarantee applies only <strong>to</strong> <strong>Skandia</strong> Blinds manufactured<br />
by <strong>Skandia</strong> Industries.<br />
Any defect, malfunction, or other failure of the product <strong>to</strong> conform <strong>to</strong> this limited guarantee will be remedied by<br />
<strong>Skandia</strong> Industries., solely in the manner provided in this guarantee.<br />
THIS LIMITED GUARANTEE DOES NOT COVER, AND IS INTENDED TO EXCLUDE, ANY AND ALL LIA-<br />
BILITY ON THE PART OF THE COMPANY, WHETHER UNDER THIS LIMITED GUARANTEE OR UNDER ANY<br />
GUARANTEE IMPLIED BY LAW, FOR ANY INDIRECT OR CONSEQUENTIAL DAMAGES FOR BREACH THERE-<br />
OF EXCEPT AS EXPRESSLY PROVIDED ABOVE IN THIS LIMITED GUARANTEE, THE COMPANY HEREBY<br />
NEGATES AND DISCLAIMS ALL EXPRESS GUARANTEES.<br />
Note: Some states do not allow the exclusion or limitation of incidental or consequential damages, so the foregoing<br />
limitation or exclusion regarding such damages may not apply <strong>to</strong> you. Also, this Limited Guarantee gives specific legal rights,<br />
and you may also have other rights which vary from state <strong>to</strong> state.<br />
SKANDIA ENVUE 2” COMPOSITE BLIND<br />
Full Five Year Warranty<br />
<strong>Skandia</strong>'s sole obligation under this warranty is <strong>to</strong> repair or replace defective products or components without charge. <strong>Skandia</strong> is not<br />
responsible for transportation costs <strong>to</strong> or from the retailer, or costs for taking down and re<strong>install</strong>ing the product.<br />
For the period of five years from the date of purchase, <strong>Skandia</strong> will repair or replace without charge any part of your composite<br />
blind, which is found <strong>to</strong> be defective in workmanship or materials.<br />
<strong>Skandia</strong> extends their warranty <strong>to</strong> the original purchaser. This warranty applies only <strong>to</strong> manually operated <strong>Skandia</strong> composite <strong>blinds</strong><br />
properly <strong>install</strong>ed in the window, door, or interior area for which it was intended.<br />
Installation of the blind must be in accordance with <strong>Skandia</strong>’s accompanying instructions. The blind cannot be modified. It is the<br />
purchaser’s responsibility <strong>to</strong> maintain and clean the blind in compliance with the instructions provided.<br />
This warranty does not cover defects which result from misuse or failure <strong>to</strong> follow use and care of instructions provided at the time<br />
of purchase. Damage resulting from direct exposure <strong>to</strong> salty air or discoloration due <strong>to</strong> the passage of time is not covered by this warranty.<br />
This warranty does not cover claims for incidental or consequential damages.<br />
In order for repair or replacement <strong>to</strong> be made, contact your dealer or write <strong>to</strong>:<br />
Cus<strong>to</strong>mer Relations Department • <strong>Skandia</strong> Industries, Inc.<br />
270 Crossway Rd. • Tallahassee, FL 32310<br />
Include your name, address, a description of the problem, the date of purchase, and the date and conditions under which the problem<br />
first occurred. A bill of sale, cancelled check, receipt or other record must be provided <strong>to</strong> verify the original purchase date.<br />
This warranty gives you specific legal rights, and you may also have other rights which vary from state <strong>to</strong> state. Some states do not<br />
allow the exclusion or limitation of incidental or consequential damages, so the foregoing limitation or exclusion may not apply. Exposure<br />
<strong>to</strong> salty air or discoloration due <strong>to</strong> the passage of time is not covered by this warranty. This warranty does not cover claims for incidental<br />
or consequential damages.<br />
Slight variations in color as well as minimal warpage may also occur. These are all natural occurring tendencies when<br />
dealing with composite products and are considered acceptable. Returns for the above mentioned reasons are not warranted.<br />
How <strong>to</strong><br />
Install<br />
2” Blinds