z/TPF Program Management - IBM
z/TPF Program Management - IBM
z/TPF Program Management - IBM

You also want an ePaper? Increase the reach of your titles
YUMPU automatically turns print PDFs into web optimized ePapers that Google loves.
z/Transaction Processing Facility Enterprise Edition<br />
<strong>Program</strong> <strong>Management</strong><br />
Version1Release1<br />
���<br />
GTPL-2MS5-09
|<br />
|<br />
|<br />
|<br />
|<br />
|<br />
Contents<br />
Part 1. Concepts . . . . . . . . . . . . . . . . . . . . . . . . . . . . . . . 1<br />
Make<strong>TPF</strong> build solution . . . . . . . . . . . . . . . . . . . . . 3<br />
Configuration files . . . . . . . . . . . . . . . . . . . . . . . . 3<br />
Environment files . . . . . . . . . . . . . . . . . . . . . . . . 3<br />
Makefiles . . . . . . . . . . . . . . . . . . . . . . . . . . . 4<br />
Control files . . . . . . . . . . . . . . . . . . . . . . . . . . 4<br />
bldtpf utility . . . . . . . . . . . . . . . . . . . . . . . . . . . 5<br />
fctbval utility . . . . . . . . . . . . . . . . . . . . . . . . . . 5<br />
loadtpf utility . . . . . . . . . . . . . . . . . . . . . . . . . . 6<br />
maketpf_cntl_tdmdd_checker utility . . . . . . . . . . . . . . . . . . 6<br />
maketpf utility . . . . . . . . . . . . . . . . . . . . . . . . . . 6<br />
tpfObjectConverter utility . . . . . . . . . . . . . . . . . . . . . . 7<br />
Local modifications . . . . . . . . . . . . . . . . . . . . . . . . 7<br />
Assemble, compile, and link options . . . . . . . . . . . . . . . . . 7<br />
LDFLAGS link options. . . . . . . . . . . . . . . . . . . . . . . 9<br />
z/<strong>TPF</strong> program types and linkage . . . . . . . . . . . . . . . . . 11<br />
Assembler and C program packaging. . . . . . . . . . . . . . . . . 11<br />
Entry points . . . . . . . . . . . . . . . . . . . . . . . . . . 12<br />
Executable and linking format (ELF) . . . . . . . . . . . . . . . . . 12<br />
Archives . . . . . . . . . . . . . . . . . . . . . . . . . . . 13<br />
Visibility in shared objects . . . . . . . . . . . . . . . . . . . . . 13<br />
Stubs . . . . . . . . . . . . . . . . . . . . . . . . . . . . 15<br />
Transfer vectors . . . . . . . . . . . . . . . . . . . . . . . . 16<br />
<strong>Program</strong> linkage . . . . . . . . . . . . . . . . . . . . . . . . 16<br />
z/<strong>TPF</strong> loaders . . . . . . . . . . . . . . . . . . . . . . . . . 19<br />
Loader general file . . . . . . . . . . . . . . . . . . . . . . . 19<br />
Images . . . . . . . . . . . . . . . . . . . . . . . . . . . . 20<br />
Loadsets . . . . . . . . . . . . . . . . . . . . . . . . . . . 20<br />
Version control file index . . . . . . . . . . . . . . . . . . . . . 21<br />
VCFX programming considerations . . . . . . . . . . . . . . . . 21<br />
Where programs are loaded . . . . . . . . . . . . . . . . . . . . 21<br />
Offline general file loader component (ALDR). . . . . . . . . . . . . . 22<br />
Online general file loader component (ACPL). . . . . . . . . . . . . . 23<br />
Offline image loader component (TLDR) . . . . . . . . . . . . . . . 23<br />
Online image loader component (ZTPLD) . . . . . . . . . . . . . . . 24<br />
Offline E-type loader component (OLDR) . . . . . . . . . . . . . . . 25<br />
Online E-type loader component (OLDR) . . . . . . . . . . . . . . . 26<br />
E-type loader recycle interface . . . . . . . . . . . . . . . . . . . 27<br />
Data loader . . . . . . . . . . . . . . . . . . . . . . . . . . 28<br />
Offline loader support on Linux . . . . . . . . . . . . . . . . . . . 28<br />
<strong>Program</strong>ming considerations . . . . . . . . . . . . . . . . . . . 29<br />
Alternate FCTB loader overview . . . . . . . . . . . . . . . . . . 29<br />
Alternate FCTB loader benefits . . . . . . . . . . . . . . . . . . 30<br />
Alternate FCTB loader programming considerations . . . . . . . . . . 30<br />
Alternate FCTB compatibility checking . . . . . . . . . . . . . . . 31<br />
Compiler overview for z/<strong>TPF</strong> C/C++ support . . . . . . . . . . . . . 33<br />
GCC ELF-compatible compilers. . . . . . . . . . . . . . . . . . . 33<br />
Systems/C and Systems/C++ ELF-compatible compilers . . . . . . . . . 34<br />
© Copyright <strong>IBM</strong> Corp. 2005, 2012 iii
|<br />
|<br />
|<br />
|<br />
|<br />
Common deployment . . . . . . . . . . . . . . . . . . . . . . 37<br />
Common deployment configuration file . . . . . . . . . . . . . . . . 38<br />
Common deployment status file. . . . . . . . . . . . . . . . . . . 39<br />
Function-unique processing . . . . . . . . . . . . . . . . . . . . 39<br />
Part 2. Tasks . . . . . . . . . . . . . . . . . . . . . . . . . . . . . . . . 41<br />
iv z/<strong>TPF</strong> <strong>Program</strong> <strong>Management</strong><br />
Acquire and install an ELF-compatible compiler . . . . . . . . . . . 43<br />
Build the GNU compiler collection for the z/<strong>TPF</strong> system . . . . . . . . 45<br />
Unpack the GNU compiler collection for the z/<strong>TPF</strong> system . . . . . . . 49<br />
Set up access to the <strong>IBM</strong>2047 code page . . . . . . . . . . . . . . 53<br />
Using EBCDIC code pages . . . . . . . . . . . . . . . . . . . . 53<br />
Setting the GCC ELF-compatible compiler version to use . . . . . . . . 55<br />
Assemble, compile, and link (build) application programs . . . . . . . 57<br />
Define the HFS directory structure and environment files . . . . . . . . . 57<br />
Real-time environment file: maketpf.env_billing . . . . . . . . . . . . 58<br />
Linux offline environment file: maketpf.env_billing_linux . . . . . . . . . 58<br />
z/OS offline environment file: maketpf.env_billing_zos . . . . . . . . . 59<br />
Set up a configuration file . . . . . . . . . . . . . . . . . . . . . 59<br />
Set up automated loading to remote z/OS systems . . . . . . . . . . . 60<br />
Create a single-segment BSO . . . . . . . . . . . . . . . . . . . 61<br />
Create a single-segment BSO using a generic makefile . . . . . . . . . . 62<br />
Create a multiple-segment BSO with multiple external entry points . . . . . . 62<br />
Use common source files in multiple-segment BSOs . . . . . . . . . . . 63<br />
Add stubs for BAL programs with transfer vectors . . . . . . . . . . . . 64<br />
Create a C shared object . . . . . . . . . . . . . . . . . . . . . 64<br />
Create an archive for online programs . . . . . . . . . . . . . . . . 67<br />
Create an offline Linux program. . . . . . . . . . . . . . . . . . . 67<br />
Create an archive for offline Linux programs . . . . . . . . . . . . . . 68<br />
Create an offline z/OS program . . . . . . . . . . . . . . . . . . . 68<br />
Create an export file . . . . . . . . . . . . . . . . . . . . . . . 69<br />
Update export files . . . . . . . . . . . . . . . . . . . . . . . 70<br />
Resolve TSOC0001W warnings. . . . . . . . . . . . . . . . . . . 70<br />
Update the FACE table . . . . . . . . . . . . . . . . . . . . . . 71<br />
Load system components to a new z/<strong>TPF</strong> system . . . . . . . . . . . 73<br />
Initialize and format the loader general file and online modules . . . . . . . 73<br />
Create the general file loader input file . . . . . . . . . . . . . . . . 74<br />
Load system components to the loader general file . . . . . . . . . . . 74<br />
Load fixed-file records . . . . . . . . . . . . . . . . . . . . . . 74<br />
Load system components to an existing z/<strong>TPF</strong> system . . . . . . . . . 77<br />
Create a new image . . . . . . . . . . . . . . . . . . . . . . . 77<br />
Define a new image . . . . . . . . . . . . . . . . . . . . . . 77<br />
Copy CTKX, IPL areas, program areas, and CIMR components . . . . . . 77<br />
Create an image loader input file . . . . . . . . . . . . . . . . . . 78<br />
Load system components to a storage medium . . . . . . . . . . . . . 78<br />
Load system components to the target image . . . . . . . . . . . . . 78<br />
Enable the target image . . . . . . . . . . . . . . . . . . . . . 78<br />
Move keypoints to the working area (optional) . . . . . . . . . . . . . 78<br />
IPL the image . . . . . . . . . . . . . . . . . . . . . . . . . 79
|<br />
|<br />
|<br />
|<br />
|<br />
Update IPLA on a loader general file . . . . . . . . . . . . . . . . . 79<br />
Load E-type programs and files to an enabled system . . . . . . . . . 81<br />
Create an E-type loader input file . . . . . . . . . . . . . . . . . . 81<br />
Load E-type programs and files to a storage medium . . . . . . . . . . . 81<br />
Load, activate, and accept a loadset of programs and files . . . . . . . . . 82<br />
Load an alternate FCTB . . . . . . . . . . . . . . . . . . . . . 83<br />
Load z/<strong>TPF</strong> debugger information . . . . . . . . . . . . . . . . . 85<br />
Work with loadsets . . . . . . . . . . . . . . . . . . . . . . . 87<br />
Clear E-type loader file resident records . . . . . . . . . . . . . . . 87<br />
Load a loadset of E-type programs and files . . . . . . . . . . . . . . 87<br />
Activate a loadset of E-type programs and files . . . . . . . . . . . . . 88<br />
Selectively activate a loadset of E-type programs and files . . . . . . . . . 88<br />
Deactivate a loadset of E-type programs and files . . . . . . . . . . . . 88<br />
Delete a loadset of E-type programs and files . . . . . . . . . . . . . 88<br />
Accept a loadset of E-type programs and files . . . . . . . . . . . . . 88<br />
Exclude an E-type program or file from a loadset of E-type programs and files 89<br />
Reinclude an E-type program or file to a loadset of E-type programs and files 89<br />
Reclaim system resources. . . . . . . . . . . . . . . . . . . . . 89<br />
Display loadset information . . . . . . . . . . . . . . . . . . . . 89<br />
Change E-type loader program attributes . . . . . . . . . . . . . . . 90<br />
Change E-type loader values. . . . . . . . . . . . . . . . . . . . 90<br />
Display ECB status . . . . . . . . . . . . . . . . . . . . . . . 90<br />
Use selective activate exits. . . . . . . . . . . . . . . . . . . . 91<br />
Activate the selective activation function . . . . . . . . . . . . . . . 91<br />
Create an enable command . . . . . . . . . . . . . . . . . . . . 91<br />
Create a disable command . . . . . . . . . . . . . . . . . . . . 92<br />
Using common deployment . . . . . . . . . . . . . . . . . . . 93<br />
Loading deployment descriptors . . . . . . . . . . . . . . . . . . 93<br />
Removing a deployment descriptor . . . . . . . . . . . . . . . . . 96<br />
Handling an error during IPL after common deployment is installed. . . . . . 97<br />
Part 3. Reference . . . . . . . . . . . . . . . . . . . . . . . . . . . . . . 99<br />
Export files . . . . . . . . . . . . . . . . . . . . . . . . . 101<br />
Control files . . . . . . . . . . . . . . . . . . . . . . . . . 103<br />
XML descriptor control files . . . . . . . . . . . . . . . . . . . 105<br />
Load files for version control . . . . . . . . . . . . . . . . . . 107<br />
General file loader . . . . . . . . . . . . . . . . . . . . . . . 111<br />
Image loader . . . . . . . . . . . . . . . . . . . . . . . . . 113<br />
E-type loader . . . . . . . . . . . . . . . . . . . . . . . . . 115<br />
z/<strong>TPF</strong> offline loader . . . . . . . . . . . . . . . . . . . . . . 117<br />
JCL statements . . . . . . . . . . . . . . . . . . . . . . . . 117<br />
Linux offldr command . . . . . . . . . . . . . . . . . . . . . . 119<br />
Contents v
vi z/<strong>TPF</strong> <strong>Program</strong> <strong>Management</strong><br />
Linux labeltape command . . . . . . . . . . . . . . . . . . . . 121<br />
Return codes . . . . . . . . . . . . . . . . . . . . . . . . . 121<br />
Comment conventions. . . . . . . . . . . . . . . . . . . . . . 123<br />
z/<strong>TPF</strong> offline loader input file control statements. . . . . . . . . . . 125<br />
@APPLICATION . . . . . . . . . . . . . . . . . . . . . . . . 125<br />
@CIMR . . . . . . . . . . . . . . . . . . . . . . . . . . . 128<br />
@CTKX . . . . . . . . . . . . . . . . . . . . . . . . . . . 132<br />
@DEFINE . . . . . . . . . . . . . . . . . . . . . . . . . . 134<br />
@FILE . . . . . . . . . . . . . . . . . . . . . . . . . . . 139<br />
@GFKEYPOINT . . . . . . . . . . . . . . . . . . . . . . . . 142<br />
@INCLUDE . . . . . . . . . . . . . . . . . . . . . . . . . 145<br />
@IPL . . . . . . . . . . . . . . . . . . . . . . . . . . . . 145<br />
@KEYPOINT . . . . . . . . . . . . . . . . . . . . . . . . . 148<br />
@LOADSET . . . . . . . . . . . . . . . . . . . . . . . . . 151<br />
@VERIFY . . . . . . . . . . . . . . . . . . . . . . . . . . 153<br />
Sample code . . . . . . . . . . . . . . . . . . . . . . . . . 157<br />
JCL for sending your output. . . . . . . . . . . . . . . . . . . . 157<br />
VRDR. . . . . . . . . . . . . . . . . . . . . . . . . . . 157<br />
GDS . . . . . . . . . . . . . . . . . . . . . . . . . . . 157<br />
Tape . . . . . . . . . . . . . . . . . . . . . . . . . . . 157<br />
Input files . . . . . . . . . . . . . . . . . . . . . . . . . . 158<br />
ALDR input file . . . . . . . . . . . . . . . . . . . . . . . 158<br />
OLDR input file . . . . . . . . . . . . . . . . . . . . . . . 158<br />
TLDR input file . . . . . . . . . . . . . . . . . . . . . . . 159
Part 1. Concepts<br />
© Copyright <strong>IBM</strong> Corp. 2005, 2012 1
2 z/<strong>TPF</strong> <strong>Program</strong> <strong>Management</strong>
Make<strong>TPF</strong> build solution<br />
Configuration files<br />
Environment files<br />
The Make<strong>TPF</strong> build solution is a set of offline programs that you can use to build<br />
z/<strong>TPF</strong> application and system programs. The Make<strong>TPF</strong> build solution consists of a<br />
set of programs and files that fit together to form an integrated build environment for<br />
online and offline z/<strong>TPF</strong> programs.<br />
Important<br />
The Make<strong>TPF</strong> build solution requires a cross-compiler to build z/<strong>TPF</strong> application<br />
and system programs that are written in C/C++ language. See “Build the GNU<br />
compiler collection for the z/<strong>TPF</strong> system” on page 45 for more information.<br />
Configuration files are used to define the build space. They identify:<br />
v The root directory names where the application and z/<strong>TPF</strong> code reside. Multiple<br />
root directories can be specified and will be searched for needed files in the<br />
order that the directories are specified in the configuration file.<br />
v The z/<strong>TPF</strong> system or subsystem that programs will be built for.<br />
v User overrides to compile, assemble, and link flags.<br />
v User overrides to process options, such as whether to keep clean listings.<br />
You can have multiple configuration files. By default, the programs in the Make<strong>TPF</strong><br />
build solution look for a configuration file named maketpf.cfg in the current<br />
directory. You can override this choice by setting the <strong>TPF</strong>_CFG environment variable<br />
to the full path to a configuration file of your choice. The GNU make syntax is used<br />
for configuration files. See “Set up a configuration file” on page 59 for an example<br />
of a configuration file. See “Assemble, compile, and link options” on page 7 for<br />
more information about configuration file override options. For reference information<br />
about coding configuration files, enter man maketpf.cfg on your Linux build<br />
system.<br />
Environment files define the directory structure of your applications by creating a<br />
mapping between the file types known to the Make<strong>TPF</strong> build solution and the<br />
directories they reside in. These environment files are referenced in makefiles to<br />
define where the Make<strong>TPF</strong> build solution searches for source files and where<br />
output files are written.<br />
This directory structure is defined to the Make<strong>TPF</strong> build solution independent from a<br />
parent (or root) directory. This enables the Make<strong>TPF</strong> build solution to associate the<br />
directory structure to one or more root directories at build (assemble, compile, and<br />
link) time and provides the capability of concatenating directory structures in much<br />
the same way that data sets can be concatenated in JCL.<br />
Environment files are set up by the system administrator based on the hierarchical<br />
file system (HFS) structure. The GNU make syntax is used for environment files.<br />
See “Define the HFS directory structure and environment files” on page 57 for<br />
examples of environment files.<br />
© Copyright <strong>IBM</strong> Corp. 2005, 2012 3
Makefiles<br />
Control files<br />
4 z/<strong>TPF</strong> <strong>Program</strong> <strong>Management</strong><br />
Makefiles are used by the maketpf command to specify the program name, type,<br />
component, and any special build options that are required for a clean build<br />
(assemble, compile, and link). All information is coded by assignment statements<br />
and adheres to GNU make syntax.<br />
Makefiles refer to environment files to define the paths for files that you need for the<br />
build process and to specify the directories to use for output. Makefiles also include<br />
maketpf.rules as their last statement to include the compile, assemble, and link<br />
rules for z/<strong>TPF</strong> processing.<br />
The maketpf.rules file includes a set of common rules files that are located in the<br />
tpftools/include_ztpf and tpftools/include_ztpf_user directories. The audits in<br />
these files are run by maketpf to check build input and output, and can issue errors<br />
and warning messages. These audits can be external programs that check for<br />
errors. For example, the maketpf audit that checks for programs that export data<br />
objects needing relocation is defined in these files. See “Resolve TSOC0001W<br />
warnings” on page 70 for more information about this maketpf audit.<br />
You can add and audit rules in the maketpf.rules_setup1 and<br />
maketpf.rules_setup2 files. If you want to change a rules file that was included by<br />
<strong>IBM</strong> ® , move the appropriate file to the tpftools/include_ztpf_user directory (this<br />
directory is searched before the tpftools/include_ztpf directory) and modify the<br />
file.<br />
See “Assemble, compile, and link (build) application programs” on page 57 for tasks<br />
dealing with makefiles. For reference information about coding makefiles, enter man<br />
maketpf.mak on your Linux build system.<br />
Control files contain a list of programs that can be built by the Make<strong>TPF</strong> build<br />
solution. Control files do the following:<br />
v Define program build options such as makefile, build order, whether the program<br />
is offline or online, and others<br />
v Are used as input for bldtpf to create general file loader, image loader, and<br />
E-type loader input files<br />
v Are used as input for bldtpf to create the program attribute table (PAT)<br />
v Define program attributes (such as protection, restricted use, and so on)<br />
v Are used for system programs (tpf.cntl) and user applications (usr.cntl).<br />
The Make<strong>TPF</strong> build solution recognizes two system-level control files: tpf.cntl and<br />
usr.cntl. However, you can arrange control files into smaller and more<br />
manageable chunks by using include statements in the control files. See Table 4 on<br />
page 103 for information about the set of control files that are included.<br />
You can also use control files on a project level. See “Assemble, compile, and link<br />
(build) application programs” on page 57 for tasks showing how this can be done.<br />
For reference information about control files and the control file format, see “Control<br />
files” on page 103 and the prolog of base/cntl/tpf.cntl.
|<br />
|<br />
|<br />
|<br />
|<br />
|<br />
|<br />
|<br />
|<br />
|<br />
|<br />
bldtpf utility<br />
fctbval utility<br />
The bldtpf utilty (enter the bldtpf command to activate) is a multiple-program<br />
builder for maketpf-format makefiles and issues the maketpf command based on<br />
each program listed in a control file. The bldtpf command also drives the<br />
assemble, compile, and link of all z/<strong>TPF</strong> system and customer application<br />
programs, both online and offline.<br />
The bldtpf command can do the following tasks:<br />
v Build a FACE table (FCTB)<br />
v Build an online program attribute table (PAT)<br />
v Create image loader input files (TLD), general file loader input files (ALD), and<br />
E-type loader input files (OLD)<br />
v Assemble the sip.asm file (the SIP deck)<br />
v Generate the z/<strong>TPF</strong> system configuration data (using SIP and FCTB)<br />
v Build z/<strong>TPF</strong> online, offline, and utility programs<br />
v Generate STUB entries<br />
v Generate PAT entries<br />
v Perform PAT to control file conversions<br />
v Produce programming artifacts (C headers and assembler DSECTS) for the<br />
z/<strong>TPF</strong> system<br />
v Produce the user application data model descriptor file (the cntl_tdmdd file).<br />
These actions are driven by using either the control files or the SIP deck as the<br />
primary input.<br />
For reference information about the bldtpf command, including the syntax, enter<br />
man bldtpf on your Linux build system.<br />
Related information:<br />
“Update the FACE table” on page 71<br />
“maketpf utility” on page 6<br />
“tpfObjectConverter utility” on page 7<br />
The fctbval utility (enter the fctbval command to activate) compares the contents of<br />
the base FACE table (FCTB) and the alternate FCTB and validates that the<br />
alternate FCTB can be used online. This utility performs the same FACE validations<br />
that are done online with the ZFCTB LOAD and ZODBR LOAD commands. The fctbval<br />
command also produces a list of differences to help you verify your changes and<br />
provides an option to list all detected fixed file and pool record moves.<br />
The fctbval utility writes any validation exceptions and differences between the base<br />
FCTB and alternate FCTB to the standard output stream (stdout).<br />
For reference, enter man fctbval on your Linux build system.<br />
Make<strong>TPF</strong> build solution 5
|<br />
|<br />
|<br />
|<br />
|<br />
|<br />
|<br />
|<br />
loadtpf utility<br />
Related reference:<br />
ZFCTB LOAD–Load an alternate FACE table<br />
ZODBR LOAD–Prepare for an online database reorganization<br />
Related information:<br />
“Update the FACE table” on page 71<br />
The loadtpf utility (enter the loadtpf command to activiate) can generate an E-type<br />
load file by using the bldtpf command and the offldr command and transferring<br />
the file (by using FTP) to a z/<strong>TPF</strong> system. The loadtpf utility can load programs and<br />
files based on a control file, an E-type loader input file, an E-type load file, a<br />
program name, or a z/<strong>TPF</strong> shared object.<br />
Note: The loadtpf command requires a user ID and password that is specified in a<br />
.netrc file. For more information, see “Set up automated loading to remote<br />
z/OS systems” on page 60.<br />
For reference information, enter man loadtpf on your Linux build system.<br />
Related information:<br />
“Update the FACE table” on page 71<br />
“bldtpf utility” on page 5<br />
“Linux offldr command” on page 119<br />
“Set up automated loading to remote z/OS systems” on page 60<br />
maketpf_cntl_tdmdd_checker utility<br />
maketpf utility<br />
6 z/<strong>TPF</strong> <strong>Program</strong> <strong>Management</strong><br />
The maketpf_cntl_tdmdd_checker utility verifies the data model descriptor control<br />
file format and content. The utility checks each field in each entry of the cntl_tdmdd<br />
file by using the specifications defined in the prolog of the base/cntl/<br />
tpf.cntl_tdmdd file.<br />
For reference information, enter man maketpf_cntl_tdmdd_checker on your Linux<br />
build system.<br />
The maketpf utility (enter the hmaketpf command to activiate) is a single-program<br />
builder for maketpf-format makefiles and drives the assemble, compile, and link of<br />
all z/<strong>TPF</strong> system and customer application programs, both online and offline.<br />
To build a program, enter maketpf followed by a program name or a makefile name.<br />
If you enter the maketpf command with a program name as an argument, the<br />
command tries to locate the program in the control files and uses the makefile<br />
specified there. If the program is not found, the command tries to locate and use a<br />
makefile with the same name as the program, but with a .mak extension.<br />
To build a single-source segment without a makefile, enter maketpf followed by the<br />
segment file name.<br />
You also can use maketpf to call targets in a build. For example, enter maketpf<br />
cmqs cmqapi.o to build cmqapi.o for program cmqs.
|<br />
|<br />
|<br />
|<br />
|<br />
|<br />
|<br />
|<br />
|<br />
|<br />
|<br />
|<br />
|<br />
|<br />
|<br />
|<br />
|<br />
|<br />
|<br />
|<br />
|<br />
|<br />
|<br />
|<br />
|<br />
|<br />
|<br />
tpfObjectConverter utility<br />
Local modifications<br />
For reference information, enter man maketpf on your Linux build system.<br />
Related information:<br />
“Assemble, compile, and link (build) application programs” on page 57<br />
The tpfObjectConverter utility produces programming artifacts such as C header<br />
files, assembler DSECTS, and Java classes from a descriptor file that contains<br />
Object definitions. You can also use this utility to update the deployable rule request<br />
server enterprise archive (EAR) file to contain the new execution object model that<br />
corresponds to the input data model.<br />
All programming artifacts are produced and placed in subdirectories of the working<br />
directory by default.<br />
<strong>Program</strong>ming artifact Subdirectory<br />
C headers ./include<br />
Assembler DSECTS ./macro<br />
Java ./java<br />
Note: When invoked by the bldtpf utility, which artifacts to create and which<br />
directories to place them in are defined in the cntl_tdmdd files.<br />
For reference information, enter man tpfObjectConverter on your Linux build<br />
system.<br />
Related reference:<br />
Data model descriptor<br />
The data model descriptor contains the definitions for a set of objects.<br />
Business event specification<br />
The business event specification is used to define a business event. This<br />
specialized XML file contains the name of the event, a definition of the data that is<br />
being provided for the event, and a list of business event dispatch adapters that are<br />
used to transmit the data to the event consumers.<br />
Related information:<br />
“bldtpf utility” on page 5<br />
The Make<strong>TPF</strong> build solution allows local modifications to code that is included with<br />
the z/<strong>TPF</strong> system. The Make<strong>TPF</strong> build solution searches the local_mod/ directory<br />
for files before searching the z/<strong>TPF</strong> system directories. You can place modified<br />
copies of files that are included with z/<strong>TPF</strong> in this directory to prevent your changes<br />
(local modifications) from being overwritten when the files are updated.<br />
Assemble, compile, and link options<br />
Options, also known as flags, define how an assembly, compile, or link will run; for<br />
example, you can use them to set optimization levels, generate debug data, or hide<br />
warnings. A default set of assemble, compile, and link options is defined by the<br />
Make<strong>TPF</strong> tools.<br />
Make<strong>TPF</strong> build solution 7
8 z/<strong>TPF</strong> <strong>Program</strong> <strong>Management</strong><br />
There are two ways to add additional options or to override the default options that<br />
are set by the Make<strong>TPF</strong> tools:<br />
v Update the maketpf configuration file (maketpf.cfg).<br />
Options that are stored in the configuration file are intended to be temporary<br />
because the configuration file is not stored or retained; it is part of the build<br />
space and can change from build to build. Specifying options in the configuration<br />
file is useful for testing new options before you formally update the makefile, for<br />
temporarily overriding debug levels, and so on. The following variables are<br />
supported in the configuration file:<br />
– ASMFLAGS_USER<br />
– CFLAGS_USER<br />
– CXXFLAGS_USER<br />
– PLIFLAGS_USER<br />
– LDFLAGS_USER.<br />
Options that are specified in the _USER variables apply to all assemblies,<br />
compiles, or links for any program. They take highest precedence and override<br />
the default options as well as any options that are specified in the makefile.<br />
v Update the makefile for the program.<br />
Options that are specified in the makefiles are intended for permanent changes<br />
to the default options because they are stored directly in the makefile. Options in<br />
the makefile can be specified at two levels: either applying to a specific source<br />
file, or applying to all source files of a given type (C, CXX, and so on). The<br />
following variables are supported in the makefile, where pgm is the<br />
case-sensitive program name specified by the primary target in the makefile<br />
(APP, EXE, and so on) and seg is the case-sensitive source file name, without<br />
the file extension, that is specified in the source file lists (C_SRC, ASM_SRC,<br />
and so on):<br />
– ASMFLAGS_pgm and ASMFLAGS_pgm_seg<br />
– CFLAGS_pgm and CFLAGS_pgm_seg<br />
– CXXFLAGS_pgm and CXXFLAGS_pgm_seg<br />
– PLIFLAGS_pgm and PLIFLAGS_pgm_seg<br />
– LDFLAGS_pgm<br />
Options that are specified in _pgm_seg take higher precedence over those<br />
specified in _pgm for source file _seg, and both take higher precedence over the<br />
default options that are set by the Make<strong>TPF</strong> tools.<br />
In the following example, MY12 is the name of the program in the APP statement of<br />
the makefile. mycfile1.c, mycfile2.c, and mycfile3.c are source files.<br />
APP := MY12<br />
C_SRC := mycfile1.c<br />
C_SRC += mcyfile2.c<br />
C_SRC += mycfile3.c<br />
CFLAGS_MY12 := -O0<br />
CFLAGS_MY12_mycfile2 := -O3<br />
In this example, the mycfile3.c and mycfile1.c source files would have -O0 as an<br />
override; however, the mycfile2.c source file would have -O3 as an override.<br />
Additional information:
LDFLAGS link options<br />
v See the tpftools/include_ztpf/maketpf.rules_set_flags* files for more<br />
information about options in the Make<strong>TPF</strong> tools.<br />
v For more information about the maketpf configuration file, enter man<br />
maketpf.cfg on your Linux build system.<br />
v For more information about makefiles, enter man maketpf.mak on your Linux<br />
build system for a complete list of makefile variables that can be coded.<br />
The following link options can be set using the LDFLAGS _$(APP) variable in the<br />
makefile:<br />
v -Xlinker --defsym -Xlinker CGCC_31BIT=0<br />
This option creates a symbol in the shared object that indicates the shared object<br />
must be loaded below the 2-GB bar and in a 31-bit core resident program area<br />
(CRPA) virtual address area. This option gets propagated online through the<br />
program ordinal (ORDN) record header without being set in the program attribute<br />
table (PAT).<br />
v -Xlinker --defsym CGCC_FastPathStub=0<br />
This option creates a symbol in the shared object that can be used to flag a<br />
condition in the program. The fast path indicator is a core-only value in the PAT<br />
and gets propagated online through the program ordinal (ORDN) record header.<br />
The fast path indicator is valid in the PAT when the program is fetched.<br />
When this option is applied to shared objects that contain library functions, the<br />
linkage path is reduced when calling these functions. This reduction of path<br />
length provides the following benefits:<br />
– Improved system performance.<br />
– The trace name field CE3TRNAME is not changed across function calls,<br />
which are viewed as extensions of the calling shared object.<br />
Note: Only use this option for shared objects that contain fast path linkage<br />
libraries.<br />
v -Xlinker --defsym -Xlinker CGCC_COW_CRPA=0<br />
This option creates a symbol in the shared object that indicates the shared object<br />
must be loaded in the 31-bit or 64-bit standard CRPA virtual address area.<br />
Note: Do not use this option for programs that update static data, import data<br />
from other programs, or have global constructors.<br />
v -Xlinker --defsym -Xlinker CGCC_COW_CRPA=1<br />
This option creates a symbol in the shared object that indicates the shared object<br />
must be loaded in the 31-bit or 64-bit copy-on-write CRPA virtual address area.<br />
For more information about Makefiles, enter man maketpf.mak on your Linux build<br />
system for a complete list of Makefile variables that can be coded.<br />
Make<strong>TPF</strong> build solution 9
10 z/<strong>TPF</strong> <strong>Program</strong> <strong>Management</strong>
z/<strong>TPF</strong> program types and linkage<br />
An object file is a compiler or assembler output file that is suitable as input to a<br />
linkage editor. In the z/<strong>TPF</strong> system, object files are included in a shared object,<br />
which is all or part of a computer program in a form suitable for loading into main<br />
storage for execution. A shared object usually is the output of a linker. Depending<br />
on the z/<strong>TPF</strong> program, there are different ways to package programs for linkage.<br />
The number of entry points defined impacts the way these programs are<br />
externalized to other programs for linkage. There are a number of ways to increase<br />
the efficiency of the linkage between these programs and to improve the<br />
performance of your z/<strong>TPF</strong> system.<br />
A BAL shared object (BSO) is a type of shared object consisting of one or more<br />
objects that are created by assembling z/<strong>TPF</strong> E-type basic assembler language<br />
(BAL) programs. By contrast, a C shared object (CSO) is a type of shared object<br />
consisting of one or more objects that are created by compiling C language<br />
programs or assembling z/<strong>TPF</strong> BAL programs using C/C++ calling conventions.<br />
Both BSOs and CSOs can have single and multiple entry points. See z/<strong>TPF</strong><br />
Application <strong>Program</strong>ming for more information.<br />
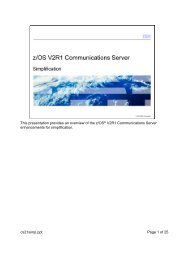
Figure 1 shows E-type program types in the z/<strong>TPF</strong> system.<br />
BAL shared object (BSO)<br />
Single entry point<br />
CSO program without<br />
the main function<br />
Figure 1. E-type program types<br />
E-type programs / shared objects<br />
Single entry point<br />
CSO program with<br />
the main function<br />
Assembler and C program packaging<br />
C shared object (CSO)<br />
Library<br />
(non-program)<br />
<strong>Program</strong> and library<br />
BSOs and CSOs can be repackaged into multiple entry point shared object libraries<br />
to provide the following performance advantages and benefits:<br />
v Reduction in system overhead for an application because two segments can be<br />
linked together as one unit, creating a shorter path length because internal<br />
linkage paths are faster than external paths.<br />
v For BSOs:<br />
– <strong>Program</strong> expansion beyond 4 KB.<br />
– The program can be coded with multiple base registers or can remain<br />
baseless.<br />
– The assembler API of R0 - R7 has been expanded to include R8.<br />
© Copyright <strong>IBM</strong> Corp. 2005, 2012 11
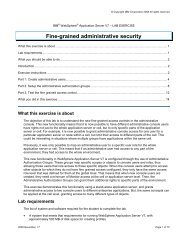
Figure 2. BAL repackaging<br />
Entry points<br />
Note: R10 - R13 are available for program use.<br />
Figure 2 shows how multiple programs (PGM1, PGM2, and PGM3) are packaged<br />
into one BSO. The result is a BSO with multiple entry points.<br />
The initial packaging will convert each assembler program into its own BSO. It is<br />
possible for an assembler program to reside in more than one BSO, but its entry<br />
point name can only be externalized from one of the BSOs.<br />
Entry points are listed in the entry point linkage table (EPLT). The following shared<br />
objects and entry points are included in the EPLT:<br />
v All shared objects (real-time programs)<br />
v Entry points that are coded for BEGIN macros in BSO source files<br />
– Primary entry points that are specified for the NAME= parameter<br />
– Transfer vectors that are specified for the TV= parameter.<br />
Executable and linking format (ELF)<br />
12 z/<strong>TPF</strong> <strong>Program</strong> <strong>Management</strong><br />
PGM1<br />
PGM2<br />
PGM3<br />
PGM1.so<br />
Entry point<br />
PGM1<br />
Entry point<br />
PGM2<br />
Entry point<br />
PGM3<br />
ELF is the standard binary format on operating systems such as Linux. Some of the<br />
capabilities of ELF are dynamic linking, dynamic loading, imposing run-time control<br />
on a program, and an improved method for creating shared libraries. The ELF<br />
representation of control data in an object file is platform independent, which is an<br />
additional improvement over previous binary formats.<br />
The ELF representation permits object files to be identified, parsed, and interpreted<br />
similarly, making the ELF object files compatible across multiple platforms and<br />
architectures of different size. The three main types of ELF files are:<br />
v Executable<br />
v Relocatable<br />
v Shared object<br />
These file types hold the code, data, and information about the program that the<br />
operating system and linkage editor need to perform the appropriate actions on<br />
these files.
Archives<br />
Visibility in shared objects<br />
Archives are a collection of ELF objects that are link-edited into a shared object. If<br />
your calling program has an ARCHIVES:= statement coded in the associated<br />
makefile, the archives specified by the statement get link-edited into the shared<br />
object. This way, the link to the functions contained in the archive is static.<br />
Use archives if you have a library of functions that frequently change and you are<br />
interested in changing the functions themselves without impacting the application<br />
programming interfaces (APIs) contained in the shared object or the calling<br />
program. A tape library is an example of an archive. See “Create an archive for<br />
online programs” on page 67 and “Create an archive for offline Linux programs” on<br />
page 68 for more information about creating archives. See “Create an offline Linux<br />
program” on page 67 for an example of a program that calls functions in an archive.<br />
In the GNU compiler collection (GCC) environment, the term that is used for<br />
exporting is visibility. As it applies to functions and variables in a shared object,<br />
visibility refers to the ability of other shared objects to call a C/C++ function.<br />
Functions with default visibility have a global scope and can be called from other<br />
shared objects. Functions with hidden visibility have a local scope and cannot be<br />
called from other shared objects.<br />
Visibility can be controlled by using either compiler options or visibility attributes.<br />
The -fvisibility=default compiler option (used in conjunction with the<br />
-fvisibility inlines=default compiler option for C++ programs) is used to define<br />
all of the functions in a shared object as visible (global scope). These compiler<br />
options are available on all z/<strong>TPF</strong>-supported compilers. Adding the visibility attribute<br />
can override a compiler option.<br />
Using the z/<strong>TPF</strong> Make<strong>TPF</strong> tool makes it relatively easy to control the visibility of<br />
functions by changing the makefile to specify APP_EXPORT or to use the visibility<br />
attribute in the program.<br />
Make<strong>TPF</strong> and visibility<br />
The maketpf APP_EXPORT variable controls which functions are local to the shared<br />
object and which functions can be called from other shared objects, where<br />
APP_EXPORT can be set to: ALL, VISIBILITY, LIST, orENTRY.<br />
v ALL is used to make all functions visible by default at compile time, by adding the<br />
-fvisibility=default compiler option (used in conjunction with the<br />
-fvisibility inlines=default compiler option for C++ programs) to the compile<br />
commands. Individual functions can be hidden by using the visibility attribute; add<br />
__attribute__ ((visibility("hidden")) to the functions you want to hide.<br />
Note: Avoid adding __attribute__ ((visibility("hidden")) to C++ code<br />
unless it is essential for class member functions to be hidden. For more<br />
information about potential problems when you use visibility with C++<br />
classes, see “Special considerations for C++ classes” on page 15.<br />
v VISIBILITY is used to hide all functions by default at compile time, by adding the<br />
-fvisibility=hidden compiler option (used in conjunction with the -fvisibility<br />
inlines=hidden compiler option for C++ programs) to the compile commands.<br />
z/<strong>TPF</strong> program types and linkage 13
14 z/<strong>TPF</strong> <strong>Program</strong> <strong>Management</strong><br />
Individual functions can be made visible by using the visibility attribute; add<br />
__attribute__ ((visibility("default")) to the functions you want to make<br />
visible.<br />
Note: Use this option for shared objects that contain only C language code<br />
because runtime problems can occur when you use this option on a<br />
shared object that contains C++ code. For more information about<br />
potential problems when you use visibility with C++ classes, see “Special<br />
considerations for C++ classes” on page 15.<br />
v LIST is used to indicate that the list of visible functions is provided in an export<br />
file. As with ALL, the -fvisibility=default compiler option (used in conjunction<br />
with the -fvisibility inlines=default compiler option for C++ programs) is<br />
used at compile time to make the functions visible; however, at link time, the<br />
export file provides:<br />
– A list of functions that are to be hidden.<br />
– A list of functions that are visible.<br />
Note: You must use the LIST option and export files when hiding functions that<br />
are coded in assembly language, because there is no assembly option<br />
that is equivalent to the -fvisibility option. For more information, see<br />
“Export files” on page 15.<br />
v ENTRY is used to indicate that only the function specified by APP_ENTRY is made<br />
visible. This is also controlled at link time by using the base/exp/app_entry.exp<br />
export file. For more information, see “Export files” on page 15.<br />
Examples<br />
v To make all of the functions for a given program visible except for the<br />
ftpc_get_file function, specify APP_EXPORT := ALL in the makefile for the<br />
program and code the following in your C/C++ application source code:<br />
__attribute__ ((visibility("hidden")))<br />
size_t ftpc_get_file (void *ptr, size_t size, size_t nmemb, void *stream)<br />
{<br />
...<br />
}<br />
Adding the attribute hides the C/C++ function.<br />
v To hide all of the functions for a given program except for the mq_msg function,<br />
specify APP_EXPORT := VISIBILITY in the makefile for the program and code<br />
the following in your C/C++ application source code:<br />
__attribute__ ((visibility("default")))<br />
char *mq_msg(size_t buffer_length);<br />
Adding the attribute makes the C/C++ function visible.<br />
v In this example, the makefile for program ABCD makes all functions visible by<br />
default. However, the application hides uncallableFunction( ) by declaring it as<br />
a static function; the application also hides anotherUncallableFunction( ) by<br />
using the visibility("hidden") attribute. An important distinction to make is that<br />
the scope of the hidden function in terms of visibility is the shared object, while<br />
the scope of the static function is limited to the object.<br />
abcd.mak:<br />
APP := ABCD<br />
APP_EXPORT := ALL<br />
C_SRC := program.c<br />
program.h:
Stubs<br />
void callableFunction( );<br />
void anotherCallableFunction( );<br />
static void uncallableFunction( );<br />
__attribute__ ((visibility("hidden")))<br />
void anotherUncallableFunction( );<br />
Special considerations for C++ classes<br />
C++ classes have a number of vague linkage entities; for example, typeinfo and<br />
vtable. These entities take on the visibility attribute of the class; therefore, if a class<br />
is hidden, the entities are hidden, which might have undesirable side effects. Some<br />
side effects include not being able to be inherited from a class in a different shared<br />
object and not being able to get thrown by an exception.<br />
For example, a common problem that is introduced when you compile a class with<br />
the -fvisibility=hidden option is when the now-hidden class needs to run a<br />
constructor from another shared object (such as running a constructor for an<br />
inherited class); it appears to compile and link, but you will receive a runtime<br />
linkage error.<br />
Note: Unless you know that the C++ logic is contained in the same shared object<br />
without the need to use CPP1 or any other C++ library, avoid using<br />
APP_EXPORT := VISIBILITY.<br />
In general, it is best not to use the visibility option for C++ object-oriented programs<br />
because of the danger of generating runtime errors that are difficult to debug.<br />
Instead, take advantage of the inherent characteristics of C++ object-oriented<br />
programs, such as encapsulation, namespaces, inheritance, and other<br />
characteristics.<br />
If, however, you do use the visibility option for C++ programs, use it with<br />
declarations; in most cases, you do not need to specify the visibility option in the<br />
definition.<br />
Export files<br />
Also called version scripts, export files in the z/<strong>TPF</strong> system are meant to be used<br />
when you have C/C++ functions that are coded in basic assembly language (BAL)<br />
that need to be hidden (not shared globally); the only way to hide them is by using<br />
an export file. With an export file, you can hide functions that were visible at<br />
assemble (or compile) time. However, at link time, you cannot make visible any<br />
functions that were hidden at assemble or compile time.<br />
The executable and linking format (ELF)-compatible compilers support export files<br />
for z/<strong>TPF</strong> applications that require specific symbols to be modified. For more<br />
information about export files, go to http://www.gnu.org.<br />
For more information about using export files with the Make<strong>TPF</strong> build solution, see<br />
“Create an export file” on page 69 and “Update export files” on page 70.<br />
Stubs are used to resolve external references between BSOs. The control files that<br />
are shipped by <strong>IBM</strong> contain an entry to generate a stub file that contains a list of<br />
programs with entry points (including transfer vectors). This stub file is entered into<br />
the linkage editor and gets compiled and link-edited to generate a shared object<br />
that contains the entry points for your BAL application programs. The BEGIN macro<br />
z/<strong>TPF</strong> program types and linkage 15
Transfer vectors<br />
<strong>Program</strong> linkage<br />
16 z/<strong>TPF</strong> <strong>Program</strong> <strong>Management</strong><br />
generates an external reference in the shared object that maps to the name of the<br />
entry point. All stub entries for transfer vectors and multiple source BSOs are<br />
located in a control file (tpf_app_base_xv.cntl) that is shipped by <strong>IBM</strong>. When you<br />
build a z/<strong>TPF</strong> system, a complete stub library is created.<br />
Because multiple entry point BSOs do not require specific entries in the control file,<br />
no stubs are generated. To create a stub for multiple source BSOs with multiple<br />
entry points and transfer vectors, code a STUB ONLY entry in your control file. See<br />
“Create a multiple-segment BSO with multiple external entry points” on page 62 for<br />
more information about creating stubs.<br />
You do not need to create stubs. However, you will receive unresolved external<br />
references during link-editing if stubs are not generated during the build process.<br />
All stub entries for transfer vectors and multiple source BSOs are located in a<br />
control file (tpfl_app_base_xv.cntl) that is shipped by <strong>IBM</strong>. When you build a<br />
z/<strong>TPF</strong> system, a complete stub library is created.<br />
Because transfer vectors do not require specific entries in the control file, no stubs<br />
are generated. To create a stub for transfer vectors, code a STUB ONLY entry in<br />
your control file. See “Add stubs for BAL programs with transfer vectors” on page<br />
64 for more information about creating stubs.<br />
You do not need to create stubs for transfer vectors. However, you will receive<br />
unresolved external references during link-editing if stubs are not generated during<br />
the build process.<br />
External reference validation is performed by default with maketpf and can be<br />
turned off with maketpf options (<strong>TPF</strong>_VERIFY_LINK_REFS). Validation issues<br />
errors at build time rather than at run time. If the program is built without verifying<br />
external references, it will build cleanly, but a run-time error will be issued if a<br />
function is not found online.<br />
Standard libraries (including stub libraries) are included automatically by maketpf.<br />
The list of standard libraries is managed in the maketpf setup. You can define your<br />
own standard libraries. If you reference nonstandard libraries, you need to make a<br />
corresponding entry in your makefile. For more information about Makefiles, enter<br />
man maketpf.mak on your Linux build system for a complete list of Makefile<br />
variables that can be coded.<br />
Input libraries are specified by using LIBS assignments in the calling makefile. Your<br />
z/<strong>TPF</strong> programs will not be linked if unresolved references are detected.<br />
The following list describes different linkage types:<br />
v Load-time linkage: Normal load-time linkage is sometimes referred to as dynamic<br />
linkage because the linkage references are resolved dynamically when the<br />
program is loaded into storage.<br />
v Link-time linkage: This internal linkage is resolved at link time and provides the<br />
fastest linkage between programs. For CSOs, this linkage is generated by the
compiler and cannot be controlled. For BSOs, the BEGIN macro controls the<br />
linkage. See z/<strong>TPF</strong> General Services for more information about the BEGIN<br />
macro.<br />
v Run-time linkage: This is the longest linkage because it is resolved at run time.<br />
The enter stub branches to a program name hash routine, which locates the<br />
program attribute table (PAT) of the program to be entered and determines the<br />
stub based on program type. The hash routine then branches to the CSO stub<br />
code.<br />
v Nonstandard linkage: One type of common nonstandard linkage involves getting<br />
the base address of a program and branching directly to it. You can see an<br />
example of this linkage in recoup descriptors, which are programs that are used<br />
as data records that also can contain the code needed to chase your own file<br />
chains. While not suggested, you can use this type of linkage.<br />
z/<strong>TPF</strong> program types and linkage 17
18 z/<strong>TPF</strong> <strong>Program</strong> <strong>Management</strong>
z/<strong>TPF</strong> loaders<br />
Loader general file<br />
A loader is a tool for introducing new or modified system components, programs,<br />
files, or data to a z/<strong>TPF</strong> system. All loaders have both an online and offline<br />
component.<br />
Offline Component<br />
Takes system components, programs, files, or data from the hierarchical file<br />
system (HFS) data sets and writes them to a storage medium such as tape,<br />
DASD, virtual reader, or user-defined device.<br />
Online Component<br />
Takes the system components, programs , files, or data from the storage<br />
medium and loads them to their correct location on the online system.<br />
The load functions of a z/<strong>TPF</strong> system are handled by the general file loader, data<br />
loader, E-type loader, and image loader. Only the general file loader is used for an<br />
initial full load (see “Load system components to a new z/<strong>TPF</strong> system” on page 73).<br />
When you have completed a full load, you do not need to do another except for<br />
some DASD configuration or core image restart (CIMR) changes.<br />
The loader general file (LGF) contains the program and keypoints that are needed<br />
to start or restart the system. The following list shows the loader general file<br />
contents:<br />
v IPLA and the volume ID (VOLID)<br />
Note: This copy of IPLA is used when the loader general file is IPLed.<br />
v Keypoints from an HFS object library<br />
v IPLA<br />
Note: This copy of IPLA is loaded to online modules.<br />
v IPLB<br />
v Core image restart (CIMR) area components<br />
– Control program (CP)<br />
– In-core dump formatter (ICDF) program<br />
– Online component of the general file loader (ACPL)<br />
– Global synchronization table (SIGT)<br />
– Record ID attribute table (RIAT)<br />
– File address compute program table (FCTB)<br />
– USR1<br />
– USR2<br />
v E-type programs and data records<br />
– E-type programs from an HFS object library<br />
– Loader control record (LDCRL)<br />
– <strong>Program</strong> attribute table (PAT).<br />
Note: The general file loader (ALDR) does not load files. The ALDR loads a<br />
sufficient subset of z/<strong>TPF</strong> programs and application programs to an image<br />
so that after an initial program load (IPL) is performed, online image load<br />
processing can occur from that image. These programs are not file<br />
dependent.<br />
© Copyright <strong>IBM</strong> Corp. 2005, 2012 19
Images<br />
Loadsets<br />
20 z/<strong>TPF</strong> <strong>Program</strong> <strong>Management</strong><br />
v General file IPL keypoints<br />
v Online module IPL keypoints<br />
v Online keypoint patches.<br />
There are two types of general files for High Performance Option (HPO) feature:<br />
one for the basic subsystem (BSS) and one for subsystems. Only the basic<br />
subsystem has the code that is necessary for an IPL.<br />
See “Load system components to a new z/<strong>TPF</strong> system” on page 73 for information<br />
about creating and loading the loader general file; also see “Update IPLA on a<br />
loader general file” on page 79 for information about updating an existing loader<br />
general file.<br />
An image is a selectable version of the z/<strong>TPF</strong> system software that includes the<br />
following components:<br />
v Core image restart (CIMR) area components<br />
– Control program (CP)<br />
– In-core dump formatter (ICDF) program<br />
– Online component of the general file loader (ACPL)<br />
– Global synchronization table (SIGT)<br />
– Record ID attribute table (RIAT)<br />
– File address compute program table (FCTB)<br />
– USR1<br />
– USR2.<br />
v <strong>Program</strong> base components<br />
– <strong>Program</strong> attribute table (PAT)<br />
– E-type programs and files.<br />
v Keypoints<br />
– Keypoint staging area<br />
– Keypoint backup area.<br />
v IPL area<br />
v The image pointer record (CTKX) area.<br />
The z/<strong>TPF</strong> system supports multiple images. These images can share IPL areas<br />
and program bases. Multiple images are often used for testing and for migration<br />
because the z/<strong>TPF</strong> system can fall back to a good image if there is a problem in<br />
the image that is being tested.<br />
See “Load system components to an existing z/<strong>TPF</strong> system” on page 77 for<br />
information about creating and loading an image.<br />
A loadset is group of E-type programs or files identified by a unique name on which<br />
E-type loader functions can be performed. Loadsets can be loaded to the z/<strong>TPF</strong><br />
system without requiring an IPL. Loadsets can be enabled and disabled and are<br />
often used for testing programs.<br />
See “Load E-type programs and files to an enabled system” on page 81 for<br />
information on creating and loading a loadset. See “Version control file index” on<br />
page 21 for more information about including files in a loadset.
Version control file index<br />
File version control requires that versioned files be represented by entries in a<br />
subdirectory of a mounted, explicitly versioned file system known as a version<br />
control file index (VCFX). Symbolic links permit files under version control to be<br />
handled like they reside in any directory in any file system.<br />
The /sys/tpf_pbfiles target in the system pseudo-file system (SYSFS) provides a<br />
symbolic link to the appropriate z/<strong>TPF</strong> collection support file system (TFS)<br />
subdirectory for program base unique files. Each file referenced in the VCFX<br />
through the /sys/tpf_pbfiles target is a symbolic link to the corresponding<br />
program base unique file version in TFS. See z/<strong>TPF</strong> Process Pseudo-File System<br />
and System Pseudo-File System Targets for more information about the<br />
/sys/tpf_pbfiles target.<br />
The VCFX is managed by using the E-type loader. Table 1 lists the commands that<br />
you use to manage loaded files.<br />
Table 1. Commands used to manage loaded files<br />
Command File support<br />
The ZOLDR commands. Process files that are both program base<br />
unique and not program base unique to the<br />
TFS.<br />
ZTPLD Load program base unique files to the TFS.<br />
ZFILE fver Locate the specific version of a file.<br />
See z/<strong>TPF</strong> Operations for more information about the ZOLDR commands, and the<br />
ZTPLD and ZFILE fver commands.<br />
VCFX programming considerations<br />
The following lists the programming considerations for using VCFX support:<br />
Where programs are loaded<br />
v VCFX is managed exclusively by using the E-type loader.<br />
v When using the E-type loader to load files, you must use the ZOLDR ACCEPT<br />
command to ensure that the file changes are persistent. If a loadset is deleted,<br />
changes to any of the files in the loadset are lost. In the case of an affiliated file,<br />
changes to the file in the loadset are not reflected in the existing online version.<br />
v You can specify binary or text files in the offline loader input file. Text files are<br />
translated during load processing.<br />
See the following for more information about using VCFX support:<br />
v “z/<strong>TPF</strong> offline loader input file control statements” on page 125<br />
v “Load files for version control” on page 107<br />
v z/<strong>TPF</strong> Database User's Guide<br />
v z/<strong>TPF</strong> Concepts and Structures.<br />
<strong>Program</strong>s are generally loaded above the 2-GB bar. However, there are times (such<br />
as when you are migrating to the z/<strong>TPF</strong> system) when you want to load a program<br />
or set of programs below the 2-GB bar. The CGCC_31BIT symbol determines<br />
where programs will be loaded. The offline loader examines the symbol table of<br />
each shared object to see if the CGCC_31BIT symbol exists. If this symbol is<br />
z/<strong>TPF</strong> loaders 21
present, the program or programs are loaded below the 2-GB bar; if the symbol is<br />
not there, the program or programs are loaded above the 2-GB bar. The<br />
CGCC_31BIT symbol is added during the link-edit phase of the build process only<br />
when CGCC_31BIT=0 is set as a link edit flag in an individual makefile or in a<br />
Make<strong>TPF</strong> configuration file (maketpf.cfg).<br />
Note: You cannot specify where to load a program at load time.<br />
See “Create a C shared object” on page 64 for more information about creating a C<br />
shared object, including where to load programs. For more information about<br />
Makefiles, enter man maketpf.mak on your Linux build system for a complete list<br />
of Makefile variables that can be coded.<br />
Offline general file loader component (ALDR)<br />
ELF objects<br />
and libraries<br />
from the HFS<br />
Loader input file<br />
Begin process<br />
General file<br />
loader<br />
offline component<br />
(<strong>TPF</strong>LDR – ALDR)<br />
End process<br />
LDCRL = Loader control record<br />
Primary process<br />
Data flow<br />
General<br />
file<br />
LDCRL<br />
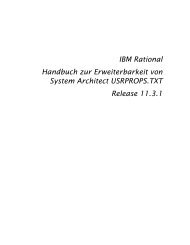
Figure 3. General file load using the general file loader offline component (ALDR)<br />
22 z/<strong>TPF</strong> <strong>Program</strong> <strong>Management</strong><br />
When you create your z/<strong>TPF</strong> system for the first time, you must initialize and format<br />
the loader general file, initialize and format the online modules, and load IPLA and<br />
the volume ID (VOLID) to the loader general file before you can load system<br />
components to the loader general file. See “Initialize and format the loader general<br />
file and online modules” on page 73 for more information.<br />
Figure 3 shows how the remainder of the loader general file is loaded by the offline<br />
general file loader (ALDR). ALDR loads all the records and programs specified in<br />
the loader input file and creates a loader control record (LDCRL) on the loader<br />
general file. This control record indicates the components to load from the loader<br />
general file to the online modules during the online general file load (ACPL).<br />
The general file loader is only necessary at system generation time or in an<br />
emergency load condition in which no fallback image exists.<br />
Note: The general file loader always overwrites image 1, which must be defined to<br />
use program area 1 and IPL area 1. Therefore, ensure that you reserve<br />
image 1, program area 1, and IPL area 1 for emergency general file loads.
Online general file loader component (ACPL)<br />
General<br />
File<br />
LDCRL<br />
Figure 4 shows what happens when you IPL the loader general file.<br />
General file IPL<br />
(initializer program)<br />
General file<br />
loader<br />
online component<br />
(ACPL)<br />
General file IPL<br />
(restart scheduler)<br />
LDCRL = Loader control record<br />
Primary process<br />
Data flow<br />
Online<br />
module<br />
Online<br />
module<br />
When you IPL the loader general file, the online general file loader component<br />
(ACPL) is placed in main storage. ACPL then uses the loader control record<br />
(LDCRL) to load the contents of the loader general file on the online modules.<br />
Keypoints, if present in the loader general file (LGF), are loaded to the prime and<br />
duplicate modules. They are copied to the first 256 modules of the same type as<br />
the prime module during online processing.<br />
When online loading has been completed, the operator is notified about all the<br />
components that were loaded. If the IPL is unsuccessful, the operator is sent all of<br />
the error messages for the run.<br />
If the IPL is successful, the online general file loader sends the following message<br />
to the operator terminal:<br />
ACPL0001I SYSTEM LOAD COMPLETE<br />
LOAD DATA AFTER 1052 STATE IF NEEDED<br />
IF NOT IPL PRIME MODULE ccud<br />
This message reminds an operator who is performing a full load to load data after<br />
the system has reached 1052 state (see “Load fixed-file records” on page 74).<br />
Offline image loader component (TLDR)<br />
Online<br />
module<br />
Figure 4. General file IPL using the general file loader online component (ACPL)<br />
Figure 5 on page 24 shows how system components are loaded by the offline<br />
image loader component (TLDR).<br />
z/<strong>TPF</strong> loaders 23
ELF objects<br />
and libraries<br />
from the HFS<br />
Loader input file<br />
Begin process<br />
Primary process<br />
Data flow<br />
Image loader<br />
offline component<br />
(<strong>TPF</strong>LDR – TLDR)<br />
Figure 5. Image load via image loader (Offline – z/OS)<br />
End process<br />
TLDR places the components that are specified in the loader input file on a storage<br />
medium that can be loaded to the system by the ZTPLD command. For more<br />
information about the ZTPLD command, see z/<strong>TPF</strong> Operations.<br />
Note: If you are writing to a virtual reader, use the ELDRVRDR EXEC to convert<br />
TLDR JOB output to a spool file that supports virtual reader input. A sample<br />
ELDRVRDR EXEC is shipped as segment base/samples/uelv.rex.<br />
The image loader is the main method for performing system loads for an existing<br />
z/<strong>TPF</strong> system. The general file loader is only necessary at system generation time<br />
or in an emergency load condition where no fallback image exists.<br />
Use the image loader to load system components from a storage medium to any<br />
defined and disabled z/<strong>TPF</strong> image. Because the image loader runs in 1052 state or<br />
above, the subsystem must be initialized through a full load before the image loader<br />
can be used. The image loader requires only a hard IPL to switch the image that is<br />
now active.<br />
If you are running more than one z/<strong>TPF</strong> image, make sure that the FCTBs and<br />
RIATs for each system have compatible structures; that is, make sure that the<br />
tables:<br />
v Do not point to different addresses for the same record<br />
v Do not point to the same address for different records.<br />
Online image loader component (ZTPLD)<br />
24 z/<strong>TPF</strong> <strong>Program</strong> <strong>Management</strong><br />
Storage<br />
medium<br />
Figure 6 on page 25 shows what happens when you enter the ZTPLD command to<br />
start the online image loader component.
Storage<br />
medium<br />
ZTPLD<br />
command<br />
Image loader<br />
online component<br />
Output message<br />
Primary process<br />
Data flow<br />
Online<br />
module<br />
Online<br />
module<br />
Figure 6. Image load via image loader (Online – z/<strong>TPF</strong>)<br />
The ZTPLD command loads system components from a storage medium to the<br />
online modules in an area that belongs to a disabled image. For more information<br />
about this command, see z/<strong>TPF</strong> Operations.<br />
Note: Use the ZTPLD command to load system components to a target image.<br />
This image must be disabled and its IPL area and PROG bases must not be<br />
referred to by any enabled image (if loading IPL area or PROG bases).<br />
Use the ZIMAG DISABLE command to disable an image. Use the ZIMAG<br />
DISPLAY command to display the status of the IPL area and PROG bases.<br />
See z/<strong>TPF</strong> Operations for more information about the use of these<br />
commands.<br />
The online image loader component sends the following message after a successful<br />
load:<br />
TPLD0004I hh.mm.ss LOAD COMPLETE<br />
In the previous message, hh.mm.ss is a time stamp.<br />
Additional status and error messages also are sent to the operator console. For<br />
more information about image loader messages, see z/<strong>TPF</strong> Messages (System<br />
Error, Offline, and <strong>Program</strong> Status Word) and z/<strong>TPF</strong> Messages (Online,<br />
SQLCODEs, and errno Values).<br />
Offline E-type loader component (OLDR)<br />
Online<br />
module<br />
Figure 7 on page 26 shows how E-type programs and files are loaded by the offline<br />
E-type loader component (OLDR).<br />
z/<strong>TPF</strong> loaders 25
ELF objects<br />
and libraries<br />
from the HFS<br />
Loader input file<br />
Primary process<br />
Data flow<br />
Begin<br />
process<br />
E-type loader<br />
offline component<br />
End process<br />
Figure 7. E-type load via E-type loader (Offline – z/OS and Linux)<br />
Storage<br />
medium<br />
OLDR places loadsets of programs and files (identified by the input parameters) on<br />
a storage medium that you can load to the system by using the ZOLDR LOAD<br />
command. For more information about the ZOLDR LOAD command, see z/<strong>TPF</strong><br />
Operations.<br />
Note: If you are writing to a virtual reader, use the ELDRVRDR EXEC to convert<br />
OLDR JOB output to a spool file that supports virtual reader input. A sample<br />
ELDRVRDR EXEC is included as segment base/samples/uelv.rex.<br />
Online E-type loader component (OLDR)<br />
26 z/<strong>TPF</strong> <strong>Program</strong> <strong>Management</strong><br />
Figure 8 on page 27 shows what happens when you enter the ZOLDR LOAD<br />
command to start the online E-type loader component.
Storage<br />
medium<br />
ZOLDR LOAD<br />
command<br />
E-type loader<br />
online component<br />
Output message<br />
Primary process<br />
Data flow<br />
The ZOLDR LOAD command loads a loadset of E-type programs or files from a<br />
storage medium to the system. For more information about the ZOLDR LOAD<br />
command, see z/<strong>TPF</strong> Operations.<br />
If you want to replace a base version of an E-type program, change the program in<br />
main storage using the ZAPGM command or load and activate a loadset of<br />
programs using the E-type loader.<br />
Note: ZAPGM should not be used for major program changes because it permits<br />
you to change only 16 bytes of a program. ZAPGM can be used to make an<br />
immediate change to a program that is causing system problems. In most<br />
cases, make program changes by loading and activating a loadset of<br />
programs.<br />
See z/<strong>TPF</strong> Operations for more information about the ZAPGM command.<br />
E-type loader recycle interface<br />
Main storage<br />
Online<br />
module<br />
Figure 8. E-type load via E-type loader (Online – z/<strong>TPF</strong>)<br />
Online<br />
module<br />
The E-type loader recycle interface is used to determine whether any program in a<br />
set of programs has changed versions. A long-running process uses the E-type<br />
loader recycle interface to:<br />
v Determine whether the long-running process needs to be recycled to use<br />
different program versions in the long-running process package<br />
v Update the long-running process to allow E-type loader commands such as<br />
ZOLDR ACCEPT and ZOLDR DELETE to complete if the program versions in<br />
the long-running process package have not changed.<br />
The Internet daemon monitor calls the E-type loader recycle interface for all Internet<br />
server applications using the daemon process model except for the debug server<br />
(DBUG) and the z/<strong>TPF</strong> Internet mail servers (SMTP, IMAP, and POP3). Use the<br />
z/<strong>TPF</strong> loaders 27
Data loader<br />
Pilot Tape<br />
(SDF)<br />
ZSLDR LOAD DATA n<br />
E-type loader recycle interface user Internet server programs user exit (UERA) to<br />
specify the programs that comprise the Internet server application.<br />
If the E-type loader recycle interface detects a change in any standard library<br />
version, the caller is notified that a recycle is needed. The standard libraries are<br />
CFVS, CISO, CJ00, CLBM, COMS, COMX, CPP1, CTAD, CTAL, CTBX, CTDF,<br />
CTHD, CTIS, and CTXO. Use the E-type loader recycle interface user libraries user<br />
exit (UERL) to specify additional standard libraries.<br />
Related information:<br />
v See tpf_etype_loader_recycle_interface.<br />
v See ZOLDR ACCEPT and ZOLDR DELETE.<br />
v See ECB-controlled program user exits.<br />
Figure 9 shows how the ZSLDR command takes data from a pilot (SDF) tape and<br />
loads it to online modules.<br />
Data Loader<br />
Output Msg<br />
Primary Process<br />
Data Flow<br />
Online<br />
Module<br />
Online<br />
Module<br />
Figure 9. Loading fixed-file records using the ZSLDR command<br />
When system has been brought to 1052 state for the first time by a loader general<br />
file IPL, use the data loader to load it with fixed-file records. These records are<br />
used by the system and by the application programs.<br />
Offline loader support on Linux<br />
28 z/<strong>TPF</strong> <strong>Program</strong> <strong>Management</strong><br />
Online<br />
Module<br />
You can use the z/<strong>TPF</strong> offline loader on Linux to write offline image loader<br />
component (TLDR) and offline E-type loader component (OLDR) files to both tape<br />
devices and hierarchical file system (HFS) files. Use the file transfer protocol (FTP)<br />
to send the z/<strong>TPF</strong> offline loader files that are created in your HFS to a z/<strong>TPF</strong>
system. <strong>Program</strong>s and files that have been compiled and linked on Linux do not<br />
need to be moved to a z/OS ® system before the z/<strong>TPF</strong> offline loader is created.<br />
The virtual reader (VRDR) and general data set (GDS) files, which are currently<br />
supported on MVS, are not supported by the z/<strong>TPF</strong> offline loader on Linux.<br />
<strong>Program</strong>ming considerations<br />
The following lists the programming considerations for using the z/<strong>TPF</strong> offline loader<br />
on Linux:<br />
v The maximum file sizes for a z/<strong>TPF</strong> loader file that is created in the Linux HFS<br />
are:<br />
– 2 gigabytes (GB) for the ext2 file system<br />
– A range of 2 GB - 32 GB for the ext3 file system depending on the block size<br />
that was specified when the file system was initialized<br />
– 2 exabytes (EB) for the file systems used less frequently (such as XFS and<br />
ReiserFS)<br />
– 2 GB for the HFS file system that is implemented on the z/<strong>TPF</strong> system.<br />
v The size of an offline loader tape data set is limited to the capacity of a single<br />
tape volume.<br />
v The Linux offldr command creates tapes with MVS standard label (SL) headers<br />
and trailers to provide the z/<strong>TPF</strong> system with SL tapes, which are not supported<br />
by Linux.<br />
See the “Linux offldr command” on page 119 and the Linux man page for more<br />
information about using the z/<strong>TPF</strong> offline loader on Linux. See “Linux labeltape<br />
command” on page 121 and the Linux man page for more information about using<br />
the z/<strong>TPF</strong> labeltape command on Linux.<br />
Alternate FCTB loader overview<br />
An alternate FACE table (FCTB) loader loads an FCTB to a z/<strong>TPF</strong> system without<br />
requiring an initial program load (IPL).<br />
The following ZFCTB commands support alternate FCTB processing:<br />
v ZFCTB LOAD<br />
Loads an alternate FCTB to the online system<br />
v ZFCTB ACTIVATE<br />
Activates an alternate FCTB<br />
v ZFCTB ACCEPT<br />
Accepts an activated alternate FCTB<br />
v ZFCTB DEACTIVATE<br />
Deactivates an activated alternate FCTB<br />
v ZFCTB DELETE<br />
Deletes a loaded or deactivated alternate FCTB.<br />
See z/<strong>TPF</strong> Operations for more information about the ZFCTB commands. See<br />
“Load an alternate FCTB” on page 83 for more information about the alternate<br />
FCTB loader.<br />
z/<strong>TPF</strong> loaders 29
Alternate FCTB loader benefits<br />
Use the alternate FACE table (FCTB) loader to perform the following tasks:<br />
v Modify your database without a scheduled outage. This includes:<br />
– Removing deactivated pool extents<br />
– Expanding the number of tracks and cylinders<br />
– Removing or reduce the number of ordinals in fixed file records<br />
– Changing the physical location of records types<br />
– Changing the file address reference format (FARF) address for fixed-file<br />
records.<br />
Attention: Do not use the alternate FCTB loader to modify records that are<br />
critical to the z/<strong>TPF</strong> system or unexpected results can occur.<br />
See “Alternate FCTB compatibility checking” on page 31 and Table 2 on page 31<br />
for more information about using an alternate FCTB.<br />
v Activate an alternate FCTB on all processors or any specific processor.<br />
v Use the ufct.c user exit to customize compatibility checking for the alternate<br />
FCTB and the existing database. See “Alternate FCTB compatibility checking” on<br />
page 31 for more information about how to ensure that a valid alternate FCTB is<br />
loaded.<br />
v Use the uftz.c user exit to maintain a log of alternate FCTB activity.<br />
Alternate FCTB loader programming considerations<br />
The following lists the programming considerations for the alternate FACE table<br />
(FCTB) loader:<br />
30 z/<strong>TPF</strong> <strong>Program</strong> <strong>Management</strong><br />
v A maximum of one alternate FCTB and one base FCTB can be loaded for each<br />
z/<strong>TPF</strong> image.<br />
v If you use the ZFCTB ACCEPT command to accept an alternate FCTB that is<br />
active, that alternate FCTB becomes the base FCTB; no other FCTB exists.<br />
v You must delete or accept the existing alternate FCTB to load another alternate<br />
FCTB.<br />
v The FCTBCLEAR parameter on the @DEFINE control statement specifies if an<br />
existing alternate FCTB on a z/<strong>TPF</strong> image is cleared or left intact when an initial<br />
program load (IPL) is performed on the z/<strong>TPF</strong> image. See z/<strong>TPF</strong> <strong>Program</strong><br />
<strong>Management</strong> for more information about the FCTBCLEAR parameter on the<br />
@DEFINE control statement.<br />
v You can display the status of an alternate FCTB by using the ZIMAG DISPLAY<br />
IMAGE command. See z/<strong>TPF</strong> Operations for more information about the ZIMAG<br />
DISPLAY IMAGE command and displaying the status of an alternate FCTB.<br />
v If you perform a hard IPL and an active alternate FCTB exists, you will be<br />
prompted in the IPLB program to specify the base FCTB or the alternate FCTB.<br />
If the base FCTB is specified, the alternate FCTB is deactivated. This allows you<br />
to prevent looping errors that result from an alternate FCTB that is not valid.<br />
When a soft IPL is performed, this option is not available.<br />
v The offline loader (<strong>TPF</strong>LDR) creates the input medium that contains the alternate<br />
FCTB used by the ZFCTB LOAD command. If there are items on the input<br />
medium other than an FCTB, the ZFCTB LOAD command is rejected.<br />
v The alternate FCTB loader is not supported from image 1 to prevent interference<br />
with the general file loader. See z/<strong>TPF</strong> <strong>Program</strong> <strong>Management</strong> for more<br />
information about the general file loader.
Alternate FCTB compatibility checking<br />
To ensure that a valid alternate FACE table (FCTB) is loaded, a compatibility check<br />
is performed with the existing database. The following lists the database<br />
characteristics that are checked:<br />
v CONK tables that are not equal result in a warning being issued. A CONK table<br />
stores the system constants, such as the number of modules, module file status<br />
table (MFST) slots, general file (GF) modules, and control units (CUs).<br />
v Tracks represented in the module configuration (CTSD) table and defined in the<br />
current database must have the same size and duplication when being loaded.<br />
v You cannot modify the #RLOGx record type.<br />
v The subsystem user (SSU) names must be same.<br />
v You cannot add or delete SSUs.<br />
v The subsystem (SS) names must be the same.<br />
The following table lists the alternate FCTB restrictions for critical record types:<br />
Table 2. Alternate FCTB critical record type restrictions<br />
Critical record types Restrictions when loaded using an alternate FCTB<br />
#CIMR1 to<br />
#CIMR8<br />
#CTKA<br />
#CTKD<br />
#CTKX<br />
#CTK0<br />
#CTK2<br />
#CTK3<br />
#CTK6<br />
#IPL1 to #IPL4<br />
#KEYPT<br />
v The location cannot be changed.<br />
v The file address must be the same.<br />
v There cannot be fewer ordinals defined.<br />
v The extents cannot be expanded because the data would be<br />
relocated.<br />
z/<strong>TPF</strong> loaders 31
32 z/<strong>TPF</strong> <strong>Program</strong> <strong>Management</strong>
|<br />
|<br />
|<br />
|<br />
|<br />
|<br />
|<br />
|<br />
|<br />
|<br />
|<br />
|<br />
|<br />
|<br />
|<br />
|<br />
|<br />
|<br />
|<br />
|<br />
|<br />
|<br />
|<br />
|<br />
|<br />
|<br />
|<br />
|<br />
|<br />
|<br />
|<br />
|<br />
|<br />
|<br />
|<br />
|<br />
|<br />
|<br />
|<br />
|<br />
|<br />
|<br />
|<br />
|<br />
Compiler overview for z/<strong>TPF</strong> C/C++ support<br />
The z/<strong>TPF</strong> system requires three compilers to support C/C++ language programs:<br />
an ELF-compatible compiler (GNU compiler collection (GCC) or Systems/C and<br />
Systems/C++), the <strong>IBM</strong> z/OS C/C++ compiler, and a native Linux C/C++ compiler.<br />
The executable and linking format (ELF)-compatible compiler is required to build the<br />
online z/<strong>TPF</strong> system and user application programs. C/C++ language programs that<br />
are written for the z/<strong>TPF</strong> system must be compiled and linked in an ELF format. To<br />
do this, the z/<strong>TPF</strong> system uses an ELF-compatible compiler, also known as a<br />
cross-compiler, that emits object code specifically for the z/<strong>TPF</strong> system. The<br />
ELF-compatible compiler runs on Linux and produces object code that is a<br />
specialization of ELF for the z/<strong>TPF</strong> system. The ELF-compatible compiler is<br />
required because you cannot use the native compiler that comes with Linux to build<br />
z/<strong>TPF</strong> applications that are written in C/C++ language.<br />
The ELF-compatible compiler links to the GNU C library (glibc) and the GNU<br />
standard C++ library (libstdc++). Each ELF-compatible compiler is associated with a<br />
specific version of the libstdc++ library that it links to. For more information, see<br />
Required z/<strong>TPF</strong> and z/<strong>TPF</strong>DF product software.<br />
The <strong>IBM</strong> z/OS C/C++ compiler is required to build offline utilities, such as tpfldr<br />
and db2pp, on z/OS. It is not used to build programs that are loaded to the online<br />
system.<br />
A native Linux C/C++ compiler is required to build offline utilities, such as tpfobjpp<br />
and offldr, on Linux. It is not used to build programs that are loaded to the online<br />
system.<br />
For more information about the z/<strong>TPF</strong> ELF-compatible compilers, see “GCC<br />
ELF-compatible compilers” and “Systems/C and Systems/C++ ELF-compatible<br />
compilers” on page 34.<br />
GCC ELF-compatible compilers<br />
For the GNU compiler collection (GCC) executable and linking format<br />
(ELF)-compatible compilers, the z/<strong>TPF</strong> system supports a staged approach to<br />
upgrading your compiler.<br />
In other words, you can have a combination of compiled product and application<br />
code levels:<br />
v Continue with all product and application code compiled with GCC V4.1.<br />
v Compile all product code with GCC V4.6, with some applications compiled with<br />
GCC V4.6 and some applications compiled with GCC V4.1.<br />
v Compile all product and application code with GCC V4.6.<br />
All of the combinations assume that you installed all of the compiler-related APARs<br />
for the z/<strong>TPF</strong> system.<br />
GCC V4.6 only<br />
Using the GCC V4.6 compiler exclusively involves installing the compiler-related<br />
APARs, getting and installing the GCC V4.6 compiler, and rebuilding your product<br />
and application code with the GCC V4.6 compiler.<br />
© Copyright <strong>IBM</strong> Corp. 2005, 2012 33
|<br />
|<br />
|<br />
|<br />
|<br />
|<br />
|<br />
|<br />
|<br />
|<br />
|<br />
|<br />
|<br />
|<br />
|<br />
|<br />
|<br />
|<br />
|<br />
|<br />
|<br />
|<br />
|<br />
|<br />
|<br />
|<br />
|<br />
|<br />
|<br />
|<br />
|<br />
|<br />
|<br />
|<br />
|<br />
|<br />
|<br />
|<br />
|<br />
|<br />
|<br />
|<br />
|<br />
|<br />
|<br />
|<br />
GCC V4.1 only<br />
Apply the APARs for GCC V4.6 support even if you do not intend to use V4.6 at<br />
this time. Applying the APARs means that your z/<strong>TPF</strong> system remains current while<br />
you avoid recompiling your product and application code. You do not need to do<br />
anything else to continue using GCC V4.1 until you are ready to install and use the<br />
GCC V4.6 compiler.<br />
Open source software packages that are available from the University of Illinois<br />
contain separate directories for versions of the libstdc++ library that are specific to<br />
GCC V4.6 and GCC V4.1. You can ignore the version of the library that is specific<br />
to the GCC V4.6 compiler.<br />
Mixed-mode GCC V4.6 and GCC V4.1<br />
After you install the z/<strong>TPF</strong> system APARs that are associated with GCC V4.6, you<br />
can get and install the GCC V4.6 compiler and rebuild your product code. You can<br />
start getting some of the benefit from GCC V4.6 by compiling some application<br />
code with GCC V4.6 even while some application objects and CSOs remain<br />
compiled with GCC V4.1. For example, you might choose to use the GCC V4.6<br />
compiler for all future compiles while you continue to run with objects and CSOs<br />
that were built with the GCC V4.1 compiler. That is, a C/C++ program that was built<br />
and linked using the GCC V4.1 compiler can call a function in a library that contains<br />
C/C++ code that was built with the GCC V4.6 compiler. The reverse is also true; a<br />
C/C++ program that was built and linked using the GCC V4.6 compiler can call a<br />
function in a library that contains C/C++ code that was built with the GCC V4.1<br />
compiler. This is possible because there is no change to the application binary<br />
interface (ABI) between the two versions of the GCC compiler.<br />
When you want to start using the GCC V4.6 compiler, rebuild all z/<strong>TPF</strong> product C<br />
and C++ code with the GCC V4.6 compiler before using the compiler with any<br />
C/C++ applications. Rebuilding all z/<strong>TPF</strong> C and C++ product code is not required,<br />
but is encouraged to help in problem reporting for the z/<strong>TPF</strong> system. At a minimum,<br />
z/<strong>TPF</strong> module CPP1 must be rebuilt with the GCC V4.6 compiler and loaded before<br />
any other C/C++ product or application code built with the GCC V4.6 compiler is<br />
loaded.<br />
For more information about GCC on the z/<strong>TPF</strong> system, see:<br />
v GNU compiler collection (GCC) V4.6 support (APARs PJ39969, PJ39980,<br />
PJ40647, PJ39875, and PM59949)<br />
v “Unpack the GNU compiler collection for the z/<strong>TPF</strong> system” on page 49<br />
v “Setting the GCC ELF-compatible compiler version to use” on page 55<br />
For more information about the GCC compilers, see the GCC website<br />
(http://gcc.gnu.org).<br />
Systems/C and Systems/C++ ELF-compatible compilers<br />
34 z/<strong>TPF</strong> <strong>Program</strong> <strong>Management</strong><br />
The z/<strong>TPF</strong> system supports the Systems/C and Systems/C++ V1.96 compilers as<br />
ELF-compatible compilers.<br />
Install the Systems/C and Systems/C++ V1.96 compilers and apply all of the<br />
compiler-related APARs for z/<strong>TPF</strong> PUT 9 so that you can use the latest level of the<br />
Dignus C/C++ compilers. By applying the APARs, your z/<strong>TPF</strong> system remains<br />
current, even if you choose not to use the latest level of the compilers at this time.
|<br />
|<br />
|<br />
|<br />
|<br />
|<br />
|<br />
|<br />
|<br />
|<br />
|<br />
However, your product code must be compiled with the Systems/C and<br />
Systems/C++ V1.96 compilers to benefit from the function provided in this version<br />
of the compilers. You can start to use the Systems/C and Systems/C++ V1.96<br />
compilers gradually, for example, by using the latest version of the compilers for all<br />
future compiles while you continue to run with application objects and CSOs that<br />
were built with the Systems/C and Systems/C++ V1.91 compilers.<br />
For more information about z/<strong>TPF</strong> support for the Systems/C and Systems/C++<br />
V1.96 compilers, see Systems/C and Systems/C++ V1.96 compilers support<br />
(APARs PJ39875 and PJ40512).<br />
For more information about the Systems/C and Systems/C++ V1.96 compilers, see<br />
the Dignus website (http://www.dignus.com).<br />
Compiler overview for C/C++ support 35
36 z/<strong>TPF</strong> <strong>Program</strong> <strong>Management</strong>
|<br />
|<br />
|<br />
|<br />
|<br />
|<br />
|<br />
|<br />
|<br />
|<br />
|<br />
|<br />
|<br />
|<br />
|<br />
|<br />
|<br />
|<br />
|<br />
|<br />
|<br />
|<br />
|<br />
|<br />
|<br />
|<br />
|<br />
|<br />
|<br />
|<br />
|<br />
|<br />
|<br />
|<br />
|<br />
|<br />
|<br />
|<br />
|<br />
|<br />
|<br />
|<br />
|<br />
|<br />
|<br />
|<br />
Common deployment<br />
The z/<strong>TPF</strong> system uses a mechanism called common deployment to make<br />
deployment descriptors available for use.<br />
A deployment descriptor is an XML file that describes the capabilities and options<br />
for a specific function or component. This XML file must be deployed on the z/<strong>TPF</strong><br />
system before it can be used. When a deployment descriptor is deployed, the XML<br />
file is parsed and the results are placed in memory. This process reduces processor<br />
usage for subsequent uses of this information.<br />
Some aspects of deployment are unique to the type of deployment descriptor. For<br />
example, parsing the file and creating the in-memory structure that holds the results<br />
of the parsing. However, there are several tasks that must occur during deployment<br />
that are common to each type of deployment descriptor. In particular, common<br />
deployment handles the following tasks related to deploying a deployment<br />
descriptor on the z/<strong>TPF</strong> system:<br />
v Validates that the file exists<br />
v Maintains the status of which files are deployed<br />
v Deploys the file again after an IPL<br />
v Provides a mechanism to find the in-memory structure<br />
v Handles any changes to the file; that is, handles a file in a loadset that was<br />
activated or deactivated.<br />
Deployment descriptors that use common deployment are available for use in all<br />
z/<strong>TPF</strong> states. During restart, common deployment initializes the memory structures<br />
and calls function-unique processing for each deployment descriptor. Additionally, if<br />
a file is deployed, the in-memory structure is marked as available for use.<br />
Common deployment rules and conventions<br />
Deployment descriptors that use common deployment must conform to the following<br />
rules:<br />
v Deployment descriptors must have a unique file extension that identifies the<br />
function or application. Use the format .function_unique_name.xml, where<br />
function_unique_name is the unique name for the deployment descriptor<br />
associated with your function or application. For example, the unique file<br />
extension for a business event specification is .evspec.xml.<br />
v Deployment descriptors are program base unique files that must be loaded to the<br />
/sys/tpf_pbfiles/tpf-fdes/ directory on the z/<strong>TPF</strong> system with the E-type<br />
loader or the image loader. For more information, see “Loading deployment<br />
descriptors” on page 93.<br />
v Deployment descriptors contain information that is used by common deployment<br />
to find the in-memory structures; that is, a key, a type, and optionally, a version.<br />
The key, type, and version are generated by the function-unique processing that<br />
creates the in-memory structures and are based on the contents of the<br />
deployment descriptor.<br />
Each deployment descriptor must contain a unique combination of key, type, and<br />
version. The type generally correlates to the file extension of the descriptor;<br />
therefore, each descriptor file with the same type must contain a unique<br />
combination of key and version. For deployment descriptors that do not use a<br />
© Copyright <strong>IBM</strong> Corp. 2005, 2012 37
|<br />
|<br />
|<br />
|<br />
|<br />
|<br />
|<br />
|<br />
|<br />
|<br />
|<br />
|<br />
|<br />
|<br />
|<br />
|<br />
|<br />
|<br />
|<br />
|<br />
|<br />
|<br />
|<br />
|<br />
|<br />
|<br />
|<br />
|<br />
|<br />
|<br />
|<br />
|<br />
|<br />
|<br />
|<br />
|<br />
|<br />
|<br />
|<br />
|<br />
|<br />
|<br />
|<br />
|<br />
version (for example, .evspec.xml descriptor for business event processing),<br />
each descriptor file must contain a unique key.<br />
You can use the E-type loader to load and activate new versions of deployment<br />
descriptors. These new versions have the same file name and must have the<br />
same key, type, and version as the previously loaded versions.<br />
<strong>IBM</strong> uses the following conventions for schemas that define deployment descriptors<br />
that use common deployment:<br />
v Include the unique file extension of the deployment descriptor in the schema<br />
name and use the following naming convention: tpf-function_unique_name.xsd,<br />
where function_unique_name is the unique name for the deployment descriptor.<br />
v <strong>IBM</strong>-delivered schemas are placed on Linux in relative directory<br />
base/tpf-fdes/schema/.<br />
v Schema files must be loaded to the /sys/tpf_pbfiles/tpf-fdes/schema/<br />
directory on the z/<strong>TPF</strong> system.<br />
Related reference:<br />
Deployment descriptors<br />
Use this information as a reference guide to deployment descriptors that are<br />
supported by the z/<strong>TPF</strong> system.<br />
Common deployment configuration file<br />
38 z/<strong>TPF</strong> <strong>Program</strong> <strong>Management</strong><br />
The z/<strong>TPF</strong> system uses a configuration file to identify each function or component<br />
that uses common deployment.<br />
The common deployment configuration file is a comma-separated values (.csv) file<br />
that is delivered with the z/<strong>TPF</strong> product code. The file name and location of the<br />
configuration file, as delivered from <strong>IBM</strong>, is base/tpf-fdes/fdes-config.csv. To use<br />
common deployment, the fdes-config.csv configuration file must be loaded to the<br />
/sys/tpf_pbfiles/tpf-fdes/ directory on the z/<strong>TPF</strong> system with the image loader.<br />
For more information about the image loader, see “z/<strong>TPF</strong> loaders” on page 19.<br />
Each row of the common deployment configuration file identifies one type of<br />
deployment descriptor, as described in Table 3.<br />
Table 3. Common deployment configuration file format<br />
Field Description<br />
1 Unique file extension for the deployment descriptor.<br />
2 4-character name of the function-unique processing program.<br />
3 Automatic deployment indicator, where:<br />
YES<br />
Automatically deploys the deployment descriptor the first time that it is loaded<br />
and activated on the system. You can use the ZMDES command with the<br />
UNDEPLOY parameter specified to undeploy the deployment descriptor.<br />
If an existing deployment descriptor is loaded and activated again to make a<br />
change to the descriptor, the existing deployment status is used.<br />
NO Does not automatically deploy the deployment descriptor. Use the ZMDES<br />
command with the DEPLOY parameter specified to deploy the deployment<br />
descriptor.
|<br />
|<br />
|<br />
|<br />
|<br />
|<br />
|<br />
|<br />
|<br />
|<br />
|<br />
|<br />
|<br />
|<br />
|<br />
|<br />
|<br />
|<br />
|<br />
|<br />
|<br />
|<br />
|<br />
|<br />
|<br />
|<br />
|<br />
|<br />
|<br />
|<br />
|<br />
|<br />
|<br />
|<br />
|<br />
|<br />
|<br />
|<br />
|<br />
|<br />
|<br />
|<br />
|<br />
|<br />
|<br />
Table 3. Common deployment configuration file format (continued)<br />
Field Description<br />
4 Permanent deployment indicator, where:<br />
YES<br />
Specifies that the deployment descriptor must be deployed permanently. A<br />
deployment descriptor that is permanently deployed cannot be undeployed.<br />
NO Specifies that the deployment descriptor will not be deployed permanently. A<br />
deployment descriptor that is permanently deployed can be undeployed.<br />
For more information about the ZMDES command, see z/<strong>TPF</strong> Operations.<br />
Common deployment status file<br />
Function-unique processing<br />
The z/<strong>TPF</strong> system maintains a status file to track the deployment descriptors that<br />
are deployed on each processor. There is one status file for each processor in the<br />
loosely coupled complex.<br />
The status file contains an entry for each deployment descriptor that has an entry in<br />
the common deployment configuration file and exists in the /sys/tpf_pbfiles/tpffdes/<br />
directory. When the z/<strong>TPF</strong> system IPLs and restart processing builds the<br />
in-memory structures for each deployment descriptor, the status file is used to<br />
determine whether to mark the deployment descriptor as deployed in memory.<br />
Deployment descriptors are marked as deployed in one of the following ways:<br />
v When a deployment descriptor initially is loaded and activated on the z/<strong>TPF</strong><br />
system, the descriptor is marked as deployed if the common deployment<br />
configuration file indicates YES for the automatic deployment indicator or the<br />
permanent deployment indicator.<br />
v When the ZMDES command is entered with the DEPLOY parameter specified, the<br />
specified deployment descriptor is marked as deployed. If you specify the IPROC<br />
parameter, the status file for the processor specified by the IPROC parameter is<br />
updated; otherwise, the status file for the processor that you entered the<br />
command from is updated.<br />
See z/<strong>TPF</strong> Operations for more information about the ZMDES command.<br />
The status file is a hidden file located in the /etc/tpf-fdes directory. The file name<br />
is .status_x, where x is the processor ID associated with the status file. For<br />
example, the full path name for the status file for processor B is<br />
/etc/tpf-fdes/.status_B.<br />
There is some processing that common deployment cannot do for a deployment<br />
descriptor. For these processes, a function-unique processing program is<br />
referenced from the common deployment configuration file.<br />
Function-unique processing handles the following tasks:<br />
v Build in-memory structures.<br />
The function-unique processing program is called to parse the deployment<br />
descriptor and builds a structure in system heap storage to place the results in.<br />
The in-memory structure includes a common deployment standard header<br />
Common deployment 39
|<br />
|<br />
|<br />
|<br />
|<br />
|<br />
|<br />
|<br />
|<br />
|<br />
|<br />
|<br />
|<br />
|<br />
|<br />
40 z/<strong>TPF</strong> <strong>Program</strong> <strong>Management</strong><br />
(tpf/imfdes.h). This standard header consists of a section that is managed by<br />
common deployment and another section that is managed by the function-unique<br />
processing program.<br />
v Cycle to NORM state processing.<br />
The function-unique processing program is called when the system is cycled to<br />
NORM state to handle tasks that cannot be done during z/<strong>TPF</strong> restart or 1052<br />
state. For example, if the deployment descriptor requires a socket to be started,<br />
function-unique processing starts the socket during cycle to NORM state<br />
processing.<br />
v Clean-up processing.<br />
The function-unique processing program is called when a previous version of a<br />
deployment descriptor must be removed. For example, when a deployment<br />
descriptor is loaded, activated, and accepted with the E-type loader, the previous<br />
version must be removed and the in-memory structure in system heap must be<br />
returned to the system.
Part 2. Tasks<br />
© Copyright <strong>IBM</strong> Corp. 2005, 2012 41
42 z/<strong>TPF</strong> <strong>Program</strong> <strong>Management</strong>
Acquire and install an ELF-compatible compiler<br />
You cannot use the native compiler that comes with Linux to build the z/<strong>TPF</strong><br />
applications written in the C/C++ language. You must use an executable and linking<br />
format (ELF)-compatible compiler for the z/<strong>TPF</strong> system as a cross-compiler on a<br />
Linux system; that is, the compiler is (potentially built and) used on a system that is<br />
not the z/<strong>TPF</strong> system, but the compiler produces code that runs correctly on the<br />
z/<strong>TPF</strong> system.<br />
You can obtain the GNU compiler collection (GCC) source files from the Free<br />
Software Foundation (FSF) or from a third party vendor. You can also obtain a<br />
pre-built ELF-compatible cross-compiler from various third party vendors. See your<br />
<strong>IBM</strong> service representative for information about the alternatives available, and then<br />
do one of the following:<br />
v If you obtain the GCC source files, continue with “Build the GNU compiler<br />
collection for the z/<strong>TPF</strong> system” on page 45.<br />
v If you obtain a binary package containing the GCC, continue with “Unpack the<br />
GNU compiler collection for the z/<strong>TPF</strong> system” on page 49.<br />
v If you obtain a binary package for another compiler, follow the instructions that<br />
come with the compiler.<br />
© Copyright <strong>IBM</strong> Corp. 2005, 2012 43
44 z/<strong>TPF</strong> <strong>Program</strong> <strong>Management</strong>
|<br />
|<br />
|<br />
|<br />
|<br />
|<br />
|<br />
|<br />
|<br />
|<br />
|<br />
|<br />
|<br />
|<br />
|<br />
|<br />
|<br />
|<br />
|<br />
|<br />
|<br />
|<br />
|<br />
|<br />
|<br />
Build the GNU compiler collection for the z/<strong>TPF</strong> system<br />
Complete the following steps to build the GCC.<br />
Before you begin<br />
v Ensure that you have approximately 5 GB of free DASD to build the executable<br />
and linking format (ELF)-compatible compiler, which is also known as a<br />
cross-compiler.<br />
v Ensure that you have all the tools on Linux that are required to build the<br />
ELF-compatible compiler by installing Linux using the standard option. Go to<br />
http://gcc.gnu.org and see the documentation for installation to verify that you<br />
have all of the prerequisites.<br />
v See your <strong>IBM</strong> service representative for information about how to get the<br />
following source files:<br />
– gpl-include.tar.bz2 (the Red Hat, Inc. gpl-include file).<br />
– src-cross.tar.bz2 (the ELF-compatible compiler source files).<br />
v Go to http://www.ibm.com/software/htp/tpf/maint/toolsztpf.html to get the <strong>IBM</strong><br />
sysroot file that corresponds to the version of the compiler that you are using.<br />
– tpf-sysroot-ibm.version.tar.bz2<br />
v The directory names that are used in the following instructions and examples are<br />
only suggestions; you can use any directory names that are appropriate for your<br />
environment.<br />
Begin<br />
1. Get and unpack the sysroot files.<br />
a. Get the sysroot files if you do not have them and take note of what directory<br />
you place them in, for example, /home/downloads. The sysroot refers to the<br />
following set of two tar files:<br />
v gpl-include.tar.bz2<br />
v tpf-sysroot-ibm.version.tar.bz2<br />
b. Create a directory and unpack the gpl-include files:<br />
mkdir -p /ztpf/tpfcross/sys-root/usr<br />
cd /ztpf/tpfcross<br />
tar -xjf /home/downloads/gpl-include.tar.bz2<br />
Note: After you complete this step, the /gpl-include directory contains a<br />
subdirectory named ./sys-root.<br />
c. Unpack the <strong>IBM</strong> sysroot:<br />
mv gpl-include/* sys-root/usr/include<br />
rmdir gpl-include<br />
tar -xjf tpf-sysroot-ibm.version.tar.bz2<br />
2. Set up two subdirectories to use for building and installing the compiler:<br />
mkdir /ztpf/tpfcross/build<br />
mkdir /ztpf/tpfcross/install<br />
3. Get and unpack the source package:<br />
a. Get the src-cross tar file if you do not have it and take note of what<br />
directory you place it in, for example: /home/downloads:<br />
© Copyright <strong>IBM</strong> Corp. 2005, 2012 45
|<br />
|<br />
|<br />
|<br />
|<br />
|<br />
|<br />
|<br />
|<br />
|<br />
|<br />
|<br />
|<br />
|<br />
|<br />
|<br />
|<br />
|<br />
|<br />
46 z/<strong>TPF</strong> <strong>Program</strong> <strong>Management</strong><br />
src-cross.tar.bz2<br />
b. Unpack the source files to the root directory. Enter the following commands:<br />
cd /ztpf/tpfcross<br />
tar -xjf /home/downloads/src-cross.tar.bz2<br />
After you complete this step, the /ztpf/tpfcross directory contains a<br />
subdirectory named ./src-cross.<br />
4. Build the compiler:<br />
a. Enter the following command from the /ztpf/tpfcross/build directory to<br />
configure the compiler:<br />
/ztpf/tpfcross/src-cross/configure --target=s390x-ibm-tpf<br />
--with-sysroot=/ztpf/tpfcross/sys-root --prefix=/ztpf/tpfcross/install<br />
--program-prefix=tpf- --enable-languages=c,c++<br />
Note: After configure command processing is complete, if you determine<br />
that you made an error or want to change something (for example,<br />
the installation path), you can enter the rm -rf * command from your<br />
build directory (for example, /ztpf/tpfcross/build) and repeat step<br />
4a.<br />
b. Enter the following command from the /ztpf/tpfcross/build directory to<br />
build the compiler:<br />
make<br />
c. Enter the following command from the /ztpf/tpfcross/build directory to<br />
install the compiler:<br />
make install<br />
5. Complete post-build setup and verification:<br />
a. Update (or create) the path variable and environment variables <strong>TPF</strong>_X_GCC<br />
and <strong>TPF</strong>_X_LIBS by using an editor to update a profile file (such as<br />
.bash_profile or /etc/profile.local) or by using the command prompt.<br />
For example, enter the following commands if you are using the GCC 4.1.2<br />
compiler:<br />
export PATH=/ztpf/tpfcross/install/bin:${PATH}<br />
export <strong>TPF</strong>_X_GCC=/ztpf/tpfcross/install/lib/gcc/s390x-ibm-tpf/4.1.2/include<br />
export <strong>TPF</strong>_X_LIBS=/ztpf/tpfcross/install/lib/gcc/s390x-ibm-tpf/4.1.2<br />
export <strong>TPF</strong>_INFO=/ztpf/tpfcross/install/share/info<br />
export INFOPATH=$<strong>TPF</strong>_INFO:$INFOPATH<br />
If you are using the GCC 4.6.3 compiler, enter the following lines into your<br />
.bash_profile file:<br />
export PATH=/ztpf/tpfcross/install/bin:${PATH}<br />
export <strong>TPF</strong>_X_GCC=/ztpf/tpfcross/install/lib/gcc/s390x-ibm-tpf/4.6.3/include<br />
export <strong>TPF</strong>_X_LIBS=/ztpf/tpfcross/install/lib/gcc/s390x-ibm-tpf/4.6.3<br />
export <strong>TPF</strong>_INFO=/ztpf/tpfcross/install/share/info<br />
export INFOPATH=$<strong>TPF</strong>_INFO:$INFOPATH<br />
b. Optional: To offer a choice of GCC compiler versions to application<br />
programmers, customize the tpftools/include_ztpf/<br />
maketpf_rules_cfg_REDHAT file to set four environment variables to define<br />
the installation location for the supported levels of the compiler:
|<br />
|<br />
|<br />
|<br />
|<br />
|<br />
|<br />
|<br />
|<br />
|<br />
|<br />
|<br />
|<br />
|<br />
|<br />
|<br />
|<br />
|<br />
|<br />
|<br />
|<br />
|<br />
|<br />
|<br />
|<br />
|<br />
|<br />
|<br />
|<br />
|<br />
|<br />
|<br />
|<br />
|<br />
|<br />
|<br />
|<br />
|<br />
|<br />
|<br />
|<br />
|<br />
|<br />
1) Uncomment the export directives by removing the leading number sign<br />
(#).<br />
2) Change the <strong>TPF</strong>_* variables to identify the directories where the versions<br />
are installed. For example, change<br />
#export <strong>TPF</strong>_X_LIBS:=<br />
to<br />
export <strong>TPF</strong>_X_LIBS:=/opt/gcc/current/libs<br />
3) Prefix the PATH setting with the directory where the version is installed.<br />
For example:<br />
export PATH:=/opt/gcc/current/bin:$(PATH)<br />
A set of environment variables for GCC V4.1 and GCC V4.6 might look<br />
like this example:<br />
ifeq ($(<strong>TPF</strong>GCC_VERSION),41)<br />
export <strong>TPF</strong>_X_GCC:=/opt/gcc/current/tpf_x_gcc<br />
export <strong>TPF</strong>_X_LIBS:=/opt/gcc/current/libs<br />
export <strong>TPF</strong>_INFO:=/opt/gcc/current/info<br />
export PATH:=/opt/gcc/current/bin:$(PATH)<br />
endif<br />
ifeq ($(<strong>TPF</strong>GCC_VERSION),46)<br />
export <strong>TPF</strong>_X_GCC:=/cteam/jones/tpf-gcc-4.6.3-8/s390x-ibm-tpf/include/c++/4.6.3<br />
export <strong>TPF</strong>_X_LIBS:=/cteam/jones/tpf-gcc-4.6.3-8/lib/gcc/s390x-ibm-tpf/4.6.3<br />
export <strong>TPF</strong>_INFO:=/cteam/jones/tpf-gcc-4.6.3-8/share/info<br />
export PATH:=/cteam/jones/tpf-gcc-4.6.3-8/bin:$(PATH)<br />
endif<br />
c. Verify that the compiler was built successfully. Start a new Linux session and<br />
enter the following command:<br />
tpf-gcc -v<br />
If the compiler was built successfully and the directories that are shown in<br />
the examples were used, the following information is displayed if you are<br />
using the GCC 4.1.2 compiler:<br />
Using built-in specs.<br />
Target: s390x-ibm-tpf<br />
Configured with: /ztpf/tpfcross/src-cross/configure<br />
--target=s390x-ibm-tpf --with-sysroot=/ztpf/tpfcross/sys-root<br />
--prefix=/ztpf/tpfcross/install --program-prefix=tpf-<br />
--enable-languages=c,c++<br />
Thread model: tpf<br />
TARGET_SYSTEM_ROOT: /ztpf/tpfcross/sys-root<br />
gcc version 4.1.2 20060724 (GNUPro 06r1-13) for z/<strong>TPF</strong> PUT05 or later<br />
If you are using the GCC 4.6 compiler, the following example shows the<br />
output from the tpf-gcc -v command:<br />
Using built-in specs.<br />
COLLECT_GCC=tpf-gcc<br />
COLLECT_LTO_WRAPPER=/opt/tpf-11r1-8/H-s390x-linux-gnu/bin/../libexec/gcc/s390x-ibm-tpf/4.6.3/lto-wrapper<br />
Target: s390x-ibm-tpf<br />
Configured with: /opt/redhat/tpf-11r1-8/sources/tools/cross/configure<br />
--disable-bootstrap --host=s390x-linux-gnu --target=s390x-ibm-tpf<br />
--build=s390x-linux-gnu --prefix=/opt/redhat/tpf-11r1-8<br />
--exec-prefix=/opt/redhat/tpf-11r1-8/H-s390x-linux-gnu<br />
--enable-languages=c,c++ --program-prefix=tpf- --without-newlib --with-sysroot<br />
Thread model: tpf<br />
gcc version 4.6.3 20111128 (tpf-11r1-8) for z/<strong>TPF</strong> PUT09 or later<br />
(s390x-ibm-tpf) (GCC)<br />
6. Set up access to the <strong>IBM</strong>2047 code page. For more information, see “Set up<br />
access to the <strong>IBM</strong>2047 code page” on page 53.<br />
Build the GNU compiler collection for the z/<strong>TPF</strong> system 47
48 z/<strong>TPF</strong> <strong>Program</strong> <strong>Management</strong>
|<br />
|<br />
|<br />
|<br />
|<br />
|<br />
|<br />
|<br />
|<br />
|<br />
|<br />
|<br />
|<br />
|<br />
|<br />
|<br />
|<br />
|<br />
|<br />
|<br />
|<br />
|<br />
|<br />
|<br />
|<br />
Unpack the GNU compiler collection for the z/<strong>TPF</strong> system<br />
You can unpack a binary package as an alternative to building the GNU compiler<br />
collection (GCC).<br />
Complete the following steps to unpack the GCC executable and linking format<br />
(ELF)-compatible compiler, which is also known as a cross-compiler.<br />
1. Set up a directory structure for unpacking the ELF-compatible compiler. For<br />
example, enter the following commands to create a base directory for the tar<br />
files of the compiler, and a subdirectory to use for building and unpacking the<br />
ELF-compatible compiler:<br />
mkdir /ztpf/tpfcross<br />
mkdir /ztpf/tpfcross/build<br />
2. Unpack the binary package:<br />
a. See your <strong>IBM</strong> service representative for information about how to get the<br />
compiler tar file. Put the tar file in the /ztpf/tpfcross directory.<br />
v /s390x-linux-gnu-x-s390x-ibm-tpf.tar.bz2<br />
b. Go to http://www.ibm.com/software/htp/tpf/maint/toolsztpf.html to get the <strong>IBM</strong><br />
sysroot file that corresponds to the version of the compiler that you are<br />
using:<br />
tpf-sysroot-ibm.version.tar.bz2<br />
c. Unpack the binary files to the build directory. Enter the following commands:<br />
cd /ztpf/tpfcross/build<br />
tar -xjf ../s390x-linux-gnu-x-s390x-ibm-tpf.tar.bz2<br />
The gpl-include sysroot files are included in these tar files. After you<br />
complete this step successfully, the /ztpf/tpfcross/build directory contains<br />
the pre-built ELF-compatible compiler.<br />
3. Enter the following command to unpack the sysroot files into, for example, a<br />
directory called /home/downloads:<br />
tar -xjf /home/downloads/tpf-sysroot-ibm.version.tar.bz2<br />
You then have a directory that is called /ztpf/tpfcross/build/sys-root/ for the<br />
<strong>IBM</strong> sysroot files.<br />
4. Enter one of the following commands to copy the <strong>IBM</strong> sysroot files to the<br />
ELF-compatible compiler directory.<br />
v For GCC 4.1.2:<br />
/ztpf/tpfcross/build/tpf-06r1-13/H-s390x-linux-gnu/bin/refix<br />
v For GCC 4.6.3:<br />
/ztpf/tpfcross/build/tpf-11r1-8/H-s390x-linux-gnu/bin/refix<br />
You are prompted to enter the location of the <strong>IBM</strong> sysroot, for example:<br />
/ztpf/tpfcross/build/sys-root. The fully populated sysroot is ready to use.<br />
5. Complete setup and verification:<br />
a. Update (or create) the path variable and environment variables <strong>TPF</strong>_X_GCC<br />
and <strong>TPF</strong>_X_LIBS by using an editor to update a profile file (such as<br />
.bash_profile or /etc/profile.local) or by using the command prompt.<br />
For example, enter the following commands if you are using the GCC 4.1.2<br />
ELF-compatible compiler:<br />
export PATH=/ztpf/tpfcross/build/tpf-06r1-13/H-s390x-linux-gnu/bin:${PATH}<br />
export <strong>TPF</strong>_X_GCC=/ztpf/tpfcross/build/tpf-06r1-13/include/c++/4.1.2<br />
© Copyright <strong>IBM</strong> Corp. 2005, 2012 49
|<br />
|<br />
|<br />
|<br />
|<br />
|<br />
|<br />
|<br />
|<br />
|<br />
|<br />
|<br />
|<br />
|<br />
|<br />
|<br />
|<br />
|<br />
|<br />
|<br />
|<br />
|<br />
|<br />
|<br />
|<br />
|<br />
|<br />
|<br />
|<br />
|<br />
|<br />
|<br />
|<br />
|<br />
|<br />
|<br />
|<br />
|<br />
export <strong>TPF</strong>_X_LIBS=/ztpf/tpfcross/build/tpf-06r1-13/H-s390x-linux-gnu/lib/gcc/s390x-ibm-tpf/4.1.2<br />
export <strong>TPF</strong>_INFO=/ztpf/tpfcross/build/tpf-06r1-13/share/info<br />
export INFOPATH=$<strong>TPF</strong>_INFO:$INFOPATH<br />
For example, enter the following commands if you are using the GCC 4.6.3<br />
ELF-compatible compiler:<br />
export PATH=/ztpf/tpfcross/build/tpf-11r1-8/H-s390x-linux-gnu/bin:${PATH}<br />
export <strong>TPF</strong>_X_GCC=/ztpf/tpfcross/build/tpf-11r1-8/include/c++/4.6.3<br />
export <strong>TPF</strong>_X_LIBS=/ztpf/tpfcross/build/tpf-11r1-8/H-s390x-linux-gnu/lib/gcc/s390x-ibm-tpf/4.6.3<br />
export <strong>TPF</strong>_INFO=/ztpf/tpfcross/build/tpf-11r1-8/share/info<br />
export INFOPATH=$<strong>TPF</strong>_INFO:$INFOPATH<br />
b. Optional: To offer a choice of GCC compiler versions to application<br />
programmers, customize the tpftools/include_ztpf/<br />
maketpf_rules_cfg_REDHAT file to set four environment variables to define<br />
the installation location for each of the supported levels of the compiler:<br />
1) Uncomment the export directives by removing the leading number sign<br />
(#).<br />
2) Change the <strong>TPF</strong>_* variables to identify the directories where the versions<br />
are installed. For example, change<br />
#export <strong>TPF</strong>_X_LIBS:=<br />
to<br />
export <strong>TPF</strong>_X_LIBS:=/opt/gcc/current/libs<br />
3) Prefix the PATH setting with the directory where the version is installed.<br />
For example:<br />
export PATH:=/opt/gcc/current/bin:$(PATH)<br />
A set of environment variables for GCC V4.1 and GCC V4.6 might look<br />
like this example:<br />
ifeq ($(<strong>TPF</strong>GCC_VERSION),41)<br />
export <strong>TPF</strong>_X_GCC:=/opt/gcc/current/tpf_x_gcc<br />
export <strong>TPF</strong>_X_LIBS:=/opt/gcc/current/libs<br />
export <strong>TPF</strong>_INFO:=/opt/gcc/current/info<br />
export PATH:=/opt/gcc/current/bin:$(PATH)<br />
endif<br />
ifeq ($(<strong>TPF</strong>GCC_VERSION),46)<br />
export <strong>TPF</strong>_X_GCC:=/cteam/jones/tpf-gcc-4.6.3-8/s390x-ibm-tpf/include/c++/4.6.3<br />
export <strong>TPF</strong>_X_LIBS:=/cteam/jones/tpf-gcc-4.6.3-8/lib/gcc/s390x-ibm-tpf/4.6.3<br />
export <strong>TPF</strong>_INFO:=/cteam/jones/tpf-gcc-4.6.3-8/share/info<br />
export PATH:=/cteam/jones/tpf-gcc-4.6.3-8/bin:$(PATH)<br />
endif<br />
c. Verify that the compiler was built successfully. Start a new Linux session and<br />
enter the following command:<br />
tpf-gcc -v<br />
If the compiler was unpacked successfully and the directories that are<br />
shown in the examples were used, the following information is displayed if<br />
you are using the GCC 4.1.2 compiler:<br />
Using built-in specs.<br />
Target: s390x-ibm-tpf<br />
Configured with: /ztpf/tpfcross/build/tpf-06r1-13/sources/tools/cross/configure --host=s390x-linux-gnu --target=s390x-ibm-tpf<br />
--build=s390x-linux-gnu --prefix=/ztpf/tpfcross/build/tpf-06r1-13 --exec-prefix=/ztpf/tpfcross/build/tpf-06r1-13/H-s390x-linux-gnu<br />
--enable-languages=c,c++ --program-prefix=tpf- --without-newlib --with-sysroot<br />
Thread model: tpf<br />
TARGET_SYSTEM_ROOT:<br />
/ztpf/tpfcross/build/tpf-cross-tools-4.1-tpf-06r1-13/H-s390x-linux-gnu/bin/../s390x-ibm-tpf/sys-root<br />
gcc version 4.1.2 20060724 (GNUPro 06r1-13) for z/<strong>TPF</strong> PUT05<br />
50 z/<strong>TPF</strong> <strong>Program</strong> <strong>Management</strong><br />
If you are using the GCC 4.6 compiler, the following example shows the<br />
output from the tpf-gcc -v command:
|<br />
|<br />
|<br />
|<br />
|<br />
|<br />
|<br />
|<br />
|<br />
|<br />
|<br />
|<br />
|<br />
|<br />
Using built-in specs.<br />
COLLECT_GCC=tpf-gcc<br />
COLLECT_LTO_WRAPPER=/opt/tpf-11r1-8/H-s390x-linux-gnu/bin/../libexec/gcc/s390x-ibm-tpf/4.6.3/lto-wrapper<br />
Target: s390x-ibm-tpf<br />
Configured with: /opt/redhat/tpf-11r1-8/sources/tools/cross/configure<br />
--disable-bootstrap --host=s390x-linux-gnu --target=s390x-ibm-tpf<br />
--build=s390x-linux-gnu --prefix=/opt/redhat/tpf-11r1-8<br />
--exec-prefix=/opt/redhat/tpf-11r1-8/H-s390x-linux-gnu<br />
--enable-languages=c,c++ --program-prefix=tpf- --without-newlib --with-sysroot<br />
Thread model: tpf<br />
gcc version 4.6.3 20111128 (tpf-11r1-8) for z/<strong>TPF</strong> PUT09 or later<br />
(s390x-ibm-tpf) (GCC)<br />
6. Set up access to the <strong>IBM</strong>2047 code page. For more information, see “Set up<br />
access to the <strong>IBM</strong>2047 code page” on page 53.<br />
Unpack the GNU compiler collection for the z/<strong>TPF</strong> system 51
52 z/<strong>TPF</strong> <strong>Program</strong> <strong>Management</strong>
Set up access to the <strong>IBM</strong>2047 code page<br />
Using EBCDIC code pages<br />
If you enter the tpf-gcc or tpf-g++ options from the command line to compile C or<br />
C++ segments (such as APACHE HTTPD), you must access the <strong>IBM</strong>2047 code<br />
page for support of the line feed X'15' value, which is used with the 3215 consoles.<br />
To do this, take one of the following actions:<br />
v Linux administrator action<br />
Request that the GNU/Linux system administrator add the following lines in the<br />
/etc/profile file below the <strong>TPF</strong>_ROOT= statement where the ${<strong>TPF</strong>_ROOT}<br />
variable expands to the file system path and the z/<strong>TPF</strong> source code is always<br />
located:<br />
GCONV_PATH=${<strong>TPF</strong>_ROOT}/linux/gconv:${GCONV_PATH}<br />
Export GCONV_PATH<br />
v User action<br />
Change your $HOME/.bash_profile file.<br />
If the the GCONV_PATH extension is not specified correctly, the tpf-gcc compiler<br />
option will not complete successfully when -fexec-charset=<strong>IBM</strong>2047 is run on the<br />
command line, and an error message will result. The following example shows the<br />
kind of error message that can result:<br />
cc1: conversion from cpv to <strong>IBM</strong>2047 not supported by iconv<br />
Note: Setting up access to the <strong>IBM</strong>2047 code page is not needed for the<br />
Systems/C and Systems/C++ compilers.<br />
EBCDIC code pages, other than <strong>IBM</strong>2047, that are used exclusively by the z/<strong>TPF</strong><br />
system support the line feed X'15' value. The line feed X'15' value is used with<br />
3215 consoles. These code pages might have been modified to properly match<br />
ASCII-based character encoding, which are used as input character sets. If you<br />
enter the tpf-gcc option from the command line to compile C or C++ segments,<br />
you must set up access to these code pages. If you use the Systems/C and<br />
Systems/C++ compilers, contact the provider for more information about EBCDIC<br />
code page support.<br />
If this setup is not necessary for your development environment, you must specify<br />
one of these code pages as the execution time coded character set instead of the<br />
default value of <strong>IBM</strong>2047. For example, to use the <strong>TPF</strong>939 code page, which is a<br />
modified version of the <strong>IBM</strong>939 code page, specify CFLAGS_USER :=<br />
-fexec-charset=<strong>TPF</strong>939 or CXXFLAGS_USER := -fexec-charset=<strong>TPF</strong>939 in your<br />
maketpf.cfg file.<br />
© Copyright <strong>IBM</strong> Corp. 2005, 2012 53
54 z/<strong>TPF</strong> <strong>Program</strong> <strong>Management</strong>
|<br />
|<br />
|<br />
|<br />
|<br />
|<br />
|<br />
|<br />
|<br />
|<br />
|<br />
|<br />
|<br />
|<br />
|<br />
|<br />
|<br />
|<br />
Setting the GCC ELF-compatible compiler version to use<br />
You can control the GNU compiler collection (GCC) version to use by setting a<br />
variable in the maketpf configuration file.<br />
Before you begin<br />
Your administrator must have customized the tpftools/include_ztpf/<br />
maketpf_rules_cfg_REDHAT file to support more than one version of the GCC<br />
compiler.<br />
Procedure<br />
1. In the maketpf configuration file (maketpf.cfg), define the compiler to use by<br />
setting the MAKE<strong>TPF</strong>_COMPILER variable to REDHAT (MAKE<strong>TPF</strong>_COMPILER :=<br />
REDHAT). REDHAT is the default.<br />
2. Define the compiler version to use by setting the <strong>TPF</strong>GCC_VERSION variable.<br />
For example, <strong>TPF</strong>GCC_VERSION := 41 or <strong>TPF</strong>GCC_VERSION := 46. The default is<br />
determined by querying the version that is found in the PATH environment<br />
variable.<br />
“Build the GNU compiler collection for the z/<strong>TPF</strong> system” on page 45<br />
“Unpack the GNU compiler collection for the z/<strong>TPF</strong> system” on page 49<br />
© Copyright <strong>IBM</strong> Corp. 2005, 2012 55
56 z/<strong>TPF</strong> <strong>Program</strong> <strong>Management</strong>
|<br />
Assemble, compile, and link (build) application programs<br />
The following tasks provide information about setting up the Make<strong>TPF</strong> build<br />
solution, building application programs, and other actions that use the Make<strong>TPF</strong><br />
build solution:<br />
v “Define the HFS directory structure and environment files”<br />
v “Set up a configuration file” on page 59<br />
v “Set up automated loading to remote z/OS systems” on page 60<br />
v “Create a single-segment BSO” on page 61<br />
v “Create a single-segment BSO using a generic makefile” on page 62<br />
v “Create a multiple-segment BSO with multiple external entry points” on page 62<br />
v “Use common source files in multiple-segment BSOs” on page 63<br />
v “Add stubs for BAL programs with transfer vectors” on page 64<br />
v “Create a C shared object” on page 64<br />
v “Create an archive for online programs” on page 67<br />
v “Create an offline Linux program” on page 67<br />
v “Create an archive for offline Linux programs” on page 68<br />
v “Create an offline z/OS program” on page 68<br />
v “Create an export file” on page 69<br />
v “Update export files” on page 70<br />
v “Resolve TSOC0001W warnings” on page 70<br />
v “Update the FACE table” on page 71.<br />
Define the HFS directory structure and environment files<br />
One of the first decisions you must make regarding your applications is the<br />
directory structure. There are an unlimited number of ways that you can define the<br />
directory structure, and the structure that you use may vary from application to<br />
application. The directory structure itself is defined to the Make<strong>TPF</strong> tools using<br />
environment files, which define a mapping between the file types known to<br />
Make<strong>TPF</strong> and the directories that they reside in. As you will see in the following<br />
sections, these environment files are referenced within the makefiles to define<br />
where source files are located and where output files are written.<br />
For the remainder of this information, we use the following directory structure to<br />
represent a set of real-time and offline applications that pertain to billing. This<br />
structure is set up by using the criteria that each of the application types (real-time,<br />
Linux offline, and z/OS offline) have their own source files (asm, c, or cpp), but<br />
share common include and macro files:<br />
billing/<br />
include/<br />
macro/<br />
rt/<br />
exp/<br />
lib/<br />
load/<br />
lst/<br />
obj/<br />
src/<br />
linux/<br />
bin/<br />
lst/<br />
© Copyright <strong>IBM</strong> Corp. 2005, 2012 57
zos/<br />
obj/<br />
src/<br />
bin/<br />
lst/<br />
obj/<br />
src/<br />
This directory structure is defined to the Make<strong>TPF</strong> tools independent from a parent,<br />
or root directory. This enables the Make<strong>TPF</strong> tools to associate the directory<br />
structure to one or more root directories at build (assemble, compile, and link) time<br />
and provides the capability of concatenating directory structures in much the same<br />
way that data sets can be concatenated in JCL. The root directories that will be<br />
used are defined in your configuration file by the APPL_ROOT variable and are<br />
referenced in the environment file examples that follow. For more information about<br />
configuration files, see “Configuration files” on page 3 and “Set up a configuration<br />
file” on page 59.<br />
For the billing application example, three corresponding environment files are<br />
needed: one for the real-time applications, one for the Linux offline applications, and<br />
one for the z/OS offline applications. The contents of each environment file follow,<br />
mapping the directory names to the Make<strong>TPF</strong> variables that are used for each of<br />
the file types. Each environment file needs only to define the variables that pertain<br />
to that application type.<br />
GNU make syntax is shown in each environment file. The for each statement<br />
expands the directory structure listed previously in this section for each of the root<br />
directories listed in the APPL_ROOT variable, providing the concatenation. The<br />
directories do not need to exist before you run Make<strong>TPF</strong> because nonexistent input<br />
directories will be ignored by the tools and output directories will be created as<br />
needed.<br />
Note: For output directories, the first root directory in the APPL_ROOT list will be<br />
considered the output root directory, and listings, objects, and other build<br />
output files will be written under that root directory.<br />
Real-time environment file: maketpf.env_billing<br />
# Input files<br />
ROOTASMDIRS := $(foreach d,$(APPL_ROOT),$d/billing/rt/src) # asm source files<br />
ROOTCDIRS := $(foreach d,$(APPL_ROOT),$d/billing/rt/src) # C source files<br />
ROOTCXXDIRS := $(foreach d,$(APPL_ROOT),$d/billing/rt/src) # C++ source files<br />
ROOTEXPDIRS := $(foreach d,$(APPL_ROOT),$d/billing/rt/exp) # export files<br />
ROOTINCDIRS := $(foreach d,$(APPL_ROOT),$d/billing/include) # include files<br />
ROOTMACDIRS := $(foreach d,$(APPL_ROOT),$d/billing/macro) # macro files<br />
ROOTCPYDIRS := $(foreach d,$(APPL_ROOT),$d/billing/rt/src) # copy files<br />
# Output files<br />
ROOTLIBDIRS := $(foreach d,$(APPL_ROOT),$d/billing/rt/lib) # real-time libraries<br />
ROOTLOADDIRS := $(foreach d,$(APPL_ROOT),$d/billing/rt/load) # real-time loadables<br />
ROOTLSTDIRS := $(foreach d,$(APPL_ROOT),$d/billing/rt/lst) # listings<br />
ROOTOBJDIRS := $(foreach d,$(APPL_ROOT),$d/billing/rt/obj) # object files<br />
Linux offline environment file: maketpf.env_billing_linux<br />
58 z/<strong>TPF</strong> <strong>Program</strong> <strong>Management</strong><br />
# Input files<br />
ROOTASMDIRS := $(foreach d,$(APPL_ROOT),$d/billing/linux/src) # asm source files<br />
ROOTCDIRS := $(foreach d,$(APPL_ROOT),$d/billing/linux/src) # C source files<br />
ROOTCXXDIRS := $(foreach d,$(APPL_ROOT),$d/billing/linux/src) # C++ source files<br />
ROOTINCDIRS := $(foreach d,$(APPL_ROOT),$d/billing/include) # include files<br />
ROOTMACDIRS := $(foreach d,$(APPL_ROOT),$d/billing/macro) # macro files<br />
ROOTCPYDIRS := $(foreach d,$(APPL_ROOT),$d/billing/linux/src) # copy files
# Output files<br />
ROOTBINDIRS := $(foreach d,$(APPL_ROOT),$d/billing/linux/bin) # linux executables<br />
ROOTLSTDIRS := $(foreach d,$(APPL_ROOT),$d/billing/linux/lst) # listings<br />
ROOTOBJDIRS := $(foreach d,$(APPL_ROOT),$d/billing/linux/obj) # object files<br />
z/OS offline environment file: maketpf.env_billing_zos<br />
Set up a configuration file<br />
# Input files<br />
ROOTASMDIRS := $(foreach d,$(APPL_ROOT),$d/billing/zos/src) # asm source files<br />
ROOTCDIRS := $(foreach d,$(APPL_ROOT),$d/billing/zos/src) # C source files<br />
ROOTCXXDIRS := $(foreach d,$(APPL_ROOT),$d/billing/zos/src) # C++ source files<br />
ROOTINCDIRS := $(foreach d,$(APPL_ROOT),$d/billing/include) # include files<br />
ROOTMACDIRS := $(foreach d,$(APPL_ROOT),$d/billing/macro) # macro files<br />
ROOTCPYDIRS := $(foreach d,$(APPL_ROOT),$d/billing/zos/src) # copy files<br />
# Output files<br />
ROOTBINDIRS := $(foreach d,$(APPL_ROOT),$d/billing/zos/bin) # z/OS executables<br />
ROOTLSTDIRS := $(foreach d,$(APPL_ROOT),$d/billing/zos/lst) # listings<br />
ROOTOBJDIRS := $(foreach d,$(APPL_ROOT),$d/billing/zos/obj) # object files<br />
# Output Link PDS<br />
LINKPDS := $(subst *,LINK,$(word 1,$(APPL_ROOTPDS)))<br />
Note: For the z/OS offline programs, in addition to the directories, a LINK partition<br />
data set (PDS) is required as the repository for the executables. In this<br />
example, the syntax shown will replace an asterisk (*) with the string LINK. It<br />
chooses only the first string provided in the APPL_ROOTPDS variable, which<br />
also is defined in the configuration file.<br />
For our example, we have set up the billing applications so that each of the<br />
environment files is independent of one another, and all three refer to the macro<br />
and include directory. This was done so that each makefile would need to list only<br />
the environment file related to its type (real-time, Linux or z/OS). As an alternative,<br />
we could have created a fourth environment file named<br />
maketpf.env_billing_common that contained only the macro and include variable<br />
definitions, and removed those definitions from each of the other three files. Each<br />
makefile would have to reference both the common and corresponding<br />
program-type makefile. Both approaches work equally well. The approach that you<br />
use really depends on how you want to set up and manage your directory<br />
structures.<br />
Note: Environment files are intended to be set up with respect to either an<br />
application root directory or a z/<strong>TPF</strong> root directory. The environment files that<br />
are supplied by z/<strong>TPF</strong> are set up to reference the <strong>TPF</strong>_ROOT variable, while<br />
application environment files are expected to reference the APPL_ROOT<br />
variable.<br />
Use the configuration file to define the build space and to identify:<br />
v The root directory names where the application and z/<strong>TPF</strong> code reside. You can<br />
specify multiple root directory names and each will be concatenated. The files will<br />
be pulled on a topdown, first-found basis.<br />
v The z/<strong>TPF</strong> system or subsystem being built.<br />
v User overrides to compile, assemble, and link flags.<br />
v User overrides to process options, such as whether to keep clean listings.<br />
For the remainder of this information, we define the configuration file as shown in<br />
the following example and expect the file to reside under the name<br />
/home/joe/mywork/build/maketpf.cfg:<br />
Assemble, compile, and link (build) application programs 59
APPL_ROOT := /home/joe/mywork<br />
APPL_ROOT += /home/project1<br />
APPL_ROOT += /usrtpf/z11/app<br />
<strong>TPF</strong>_ROOT := /home/joe/mywork<br />
<strong>TPF</strong>_ROOT += /tpf/z11<br />
<strong>TPF</strong>_BSS_NAME := BSS<br />
The previous example identifies the following:<br />
v That the z/<strong>TPF</strong> source code can be found by searching the user working<br />
directory structure (/home/joe/mywork) first, and the z/<strong>TPF</strong> production directory<br />
(/tpf/z11) second.<br />
Note: Even though we are building an application, a user layer is added to the<br />
list of z/<strong>TPF</strong> root directory names because updates to the control files may<br />
be needed and they are found under the z/<strong>TPF</strong> directory structure, not the<br />
application directory structure.<br />
v That the application source code can be found by searching the user working<br />
directory structure (/home/joe/mywork) first, a project level directory<br />
(/home/project1) second, and the application production directory<br />
(/usrtpf/z11/app) last.<br />
v That the z/<strong>TPF</strong> system that the application will be built for is a basic subsystem<br />
with the default name BSS.<br />
To provide the benefit of keeping all output files generated by maketpf for a<br />
particular configuration file in a common directory, use the default name<br />
(maketpf.cfg) and place the file in a directory named build under the first<br />
APPL_ROOT directory listed; and then run all maketpf commands from that same<br />
build directory.<br />
If you are going to build the same code against different systems, consider creating,<br />
for each system, a build/system-name directory containing the config file<br />
(maketpf.cfg) for the system-name system. You would then run all maketpf<br />
commands from the build/system-name directory.<br />
If you prefer a name other than maketpf.cfg, the full path and file name of the<br />
configuration file can be defined in an environment variable named <strong>TPF</strong>_CFG. For<br />
example, to use a configuration file named bss.cfg in your build directory, you<br />
would enter the following command at the command prompt:<br />
export <strong>TPF</strong>_CFG=/home/joe/mywork/build/bss.cfg<br />
If the <strong>TPF</strong>_CFG variable is set, the Make<strong>TPF</strong> tools will always use the file defined<br />
by it instead of a file named maketpf.cfg in the current directory.<br />
Set up automated loading to remote z/OS systems<br />
60 z/<strong>TPF</strong> <strong>Program</strong> <strong>Management</strong><br />
Some offline z/<strong>TPF</strong> programs are built and run on the z/OS platform. For any<br />
Make<strong>TPF</strong> build solution commands that transfer files to or from z/OS, define your<br />
user ID and password in a file named .netrc under your home directory on Linux.<br />
The .netrc file must contain the following information:<br />
machine zoshost login username password password<br />
In the previous example, zoshost is the name of your z/OS UNIX system, username<br />
is your z/OS UNIX user name, and password is your z/OS UNIX password.
Create a single-segment BSO<br />
The .netrc file must be readable only by you. To test the file setup, enter ftp<br />
zoshost from a Linux command prompt. If you are connected automatically to your<br />
z/OS UNIX system, your .netrc file is set up correctly.<br />
If you have a different user name on z/OS UNIX, complete the following steps:<br />
v Add another entry to the .netrc file for the additional user ID.<br />
v In your maketpf.cfg file, set variable S390USER := diffID. This will force the<br />
commands to connect using diffID rather than your Linux ID.<br />
To create and build a BAL shared object (BSO) that has one assembler source file<br />
(as specified by the BEGIN macro) and one entry point, follow these steps:<br />
1. Create a new makefile (/home/joe/mywork/billing/rt/src/bill.mak) as shown<br />
in the following example:<br />
APP := BILL<br />
ASM_SRC := bill.asm<br />
maketpf_env := billing<br />
maketpf_env += base_rt<br />
include maketpf.rules<br />
Note:<br />
a. Both the billing and base_rt environment files are listed because<br />
the base_rt environment file provided by z/<strong>TPF</strong> is almost always<br />
required to enable the application program to access macros and<br />
includes that are included in z/<strong>TPF</strong>.<br />
b. The first environment listed defines the owning environment and,<br />
therefore, the corresponding environment file defines the directory<br />
(under the first root directory listed) that will be used for writing<br />
listings, objects, and executables. Both environments are used to<br />
define where the source files (including macros and include files) will<br />
be found.<br />
2. Create a source segment named /home/joe/mywork/billing/rt/src/bill.asm.<br />
3. Update the user control file with an entry for the new program:<br />
a. Create a copy of the control file in your working directory:<br />
cp /tpf/z11/local_mod/base/cntl/usr.cntl /home/joe/mywork/base/cntl/usr.cntl<br />
b. Edit the file that you just copied and add a new entry for the program named<br />
BILL. Enter the following information on one line.<br />
BILL;APP;billing/rt/src/bill.mak;1;ALL;OBJ;<strong>TPF</strong>_SBALL;LOADONLINE;STUB;DEMAND;DEBUG;<br />
50;PROGRAM;NOGRP;<strong>IBM</strong>_DEFT;BPAUTH;RESTRICT;MONTC;KEY0;NOCMB;TIMESLICE;;;;;;;;;;;;;<br />
See “Control files” on page 103 for more information about the control file fields<br />
and values.<br />
4. Enter the maketpf command to build the program. This assumes that a file<br />
named maketpf.cfg exists in the /home/joe/mywork/build directory.<br />
cd /home/joe/mywork/build<br />
maketpf bill<br />
See “maketpf utility” on page 6 for more information about the maketpf<br />
command and its options.<br />
Assemble, compile, and link (build) application programs 61
Create a single-segment BSO using a generic makefile<br />
This task shows you how to create and build a generic makefile that you can use to<br />
assemble and link a BSO that has one assembler source file (as specified by the<br />
BEGIN macro) and one entry point, with the convention that the assembler source<br />
file has the same base name as the application name, but is in lowercase with a<br />
.asm file extension. The application name itself will be in uppercase. This enables<br />
one makefile to be used for all BAL applications that match that criteria.<br />
To create a single-segment BSO using a generic makefile, follow these steps:<br />
1. Create a new makefile (/home/joe/mywork/billing/rt/src/generic_bso.mak) as<br />
shown in the following example:<br />
APP := $(shell echo $(<strong>TPF</strong>_PGM_NAME) | tr [:lower:] [:upper:] )<br />
ASM_SRC := $(shell echo $(<strong>TPF</strong>_PGM_NAME) | tr [:upper:] [:lower:]).asm<br />
maketpf_env := billing<br />
maketpf_env += base_rt<br />
include maketpf.rules<br />
This makefile is very similar to the single-segment BSO makefile described in<br />
“Create a single-segment BSO” on page 61; however, the value of variable<br />
<strong>TPF</strong>_PGM_NAME is derived at build time as input to the maketpf command.<br />
2. Create a source segment named /home/joe/mywork/billing/rt/src/bill.asm.<br />
3. Update the user control file with an entry for the new program:<br />
a. Create a copy of the control file in your working directory:<br />
cp /tpf/z11/local_mod/base/cntl/usr.cntl /home/joe/mywork/base/cntl/usr.cntl<br />
b. Edit the file that you just copied and add a new entry for the program named<br />
BILL. Enter the following information on one line.<br />
BILL;APP;billing/rt/src/generic_bso.mak;1;ALL;OBJ;<strong>TPF</strong>_SBALL;LOADONLINE;STUB;DEMAND;<br />
DEBUG;50;PROGRAM;NOGRP;<strong>IBM</strong>_DEFT;BPAUTH;RESTRICT;MONTC;KEY0;NOCMB;TIMESLICE;;;;;;;;;;;;;<br />
See “Control files” on page 103 for more information about the control file fields<br />
and values. Again, this makefile is similar to the entry added in “Create a<br />
single-segment BSO” on page 61; however, you can use the same generic<br />
makefile for many applications.<br />
4. Enter the maketpf command to build the program. This assumes that a file<br />
named maketpf.cfg exists in the /home/joe/mywork/build directory.<br />
cd /home/joe/mywork/build<br />
maketpf bill<br />
The string bill is supplied to the generic_bso.mak file to be used as the value<br />
of "<strong>TPF</strong>_PGM_NAME". See “maketpf utility” on page 6 for more information<br />
about the maketpf command and its options.<br />
Create a multiple-segment BSO with multiple external entry points<br />
62 z/<strong>TPF</strong> <strong>Program</strong> <strong>Management</strong><br />
BSO programs can contain multiple BAL segments linked together in one BAL<br />
shared object. Each BAL segment in the BSO will have its own entry point, which<br />
by default can be seen external to the program. For these programs, you must<br />
create a unique makefile for the program; a generic makefile cannot be used.<br />
To create a multiple-segment BSO with multiple external entry points, follow these<br />
steps:<br />
1. Create a new makefile (/home/joe/mywork/billing/rt/src/bill.mak) as shown<br />
in the following example:
APP := BILL<br />
ASM_SRC := bill.asm<br />
ASM_SRC += a123.asm<br />
maketpf_env := billing<br />
maketpf_env += base_rt<br />
include maketpf.rules<br />
The only difference from the example in “Create a single-segment BSO” on<br />
page 61 is the addition of a second BAL segment.<br />
2. Create two source segments: /home/joe/mywork/billing/rt/src/bill.asm and<br />
/home/joe/mywork/billing/rt/src/a123.asm.<br />
3. Update the user control file with entries for the new program:<br />
a. Create a copy of the control file in your working directory:<br />
cp /tpf/z11/local_mod/base/cntl/usr.cntl /home/joe/mywork/base/cntl/usr.cntl<br />
b. Edit the file that you just copied and add a new entry for the program named<br />
BILL. Enter the following information on one line.<br />
BILL;APP;billing/rt/src/bill.mak;1;ALL;OBJ;<strong>TPF</strong>_SBALL;LOADONLINE;STUB;DEMAND;DEBUG;<br />
50;PROGRAM;NOGRP;<strong>IBM</strong>_DEFT;BPAUTH;RESTRICT;MONTC;KEY0;NOCMB;TIMESLICE;;;;;;;;;;;;;<br />
c. Add a new stub entry for each of the additional entry points.<br />
A123;STUB;billing/rt/src/bill.mak;;ALL;;;;;;;;;;;;;;;;;;;;;;;;;;;;;<br />
See “Control files” on page 103 for more information about the control file fields<br />
and values.<br />
4. Enter the maketpf command to build the program. This assumes that a file<br />
named maketpf.cfg exists in the /home/joe/mywork/build directory.<br />
cd /home/joe/mywork/build<br />
maketpf bill<br />
See “maketpf utility” on page 6 for more information about the maketpf<br />
command and its options.<br />
Use common source files in multiple-segment BSOs<br />
As an extension to the multiple-segment BSO topic, it is possible to include the<br />
same BAL source file in two or more BSOs. However, this can lead to a problem<br />
when two or more BSOs have a commonly named entry point. Therefore, an<br />
additional step must be taken to suppress the common entry point in all but one of<br />
the BSOs. To do this, you must use an export file.<br />
To demonstrate, consider two BSOs named BILL and CRDT, both of which contain<br />
source file a123.asm. We want to suppress the external A123 entry point from CRDT<br />
and only export it from BILL. This task assumes that “Create a multiple-segment<br />
BSO with multiple external entry points” on page 62 has been completed before<br />
starting this task.<br />
1. The BILL makefile remains as shown in “Create a multiple-segment BSO with<br />
multiple external entry points” on page 62.<br />
2. Create a new makefile (/home/joe/mywork/billing/rt/src/crdt.mak) as shown<br />
in the following example:<br />
APP := CRDT<br />
ASM_SRC := crdt.asm<br />
ASM_SRC += a123.asm<br />
APP_EXPORT := LIST<br />
maketpf_env := billing<br />
maketpf_env += base_rt<br />
include maketpf.rules<br />
Assemble, compile, and link (build) application programs 63
Adding the line APP_EXPORT := LIST directs the Make<strong>TPF</strong> tools to use a file<br />
named CRDT.exp during link time.<br />
3. Create a source segment named /home/joe/mywork/billing/rt/src/crdt.asm.<br />
4. Create an export file named /home/joe/mywork/billing/rt/exp/CRDT.exp<br />
{<br />
global:<br />
CRDT_BSO;<br />
local:<br />
A123_BSO;<br />
};<br />
See “Create an export file” on page 69 for more information about creating<br />
export files.<br />
5. Update the user control file and add a new entry for the program named CRDT.<br />
Enter the following information on one line.<br />
CRDT;APP;billing/rt/src/crdt.mak;1;ALL;OBJ;<strong>TPF</strong>_SBALL;LOADONLINE;STUB;DEMAND;DEBUG;<br />
50;PROGRAM;NOGRP;<strong>IBM</strong>_DEFT;BPAUTH;RESTRICT;MONTC;KEY0;NOCMB;TIMESLICE;;;;;;;;;;;;;<br />
See “Control files” on page 103 for more information about the control file fields<br />
and values.<br />
Add stubs for BAL programs with transfer vectors<br />
Create a C shared object<br />
64 z/<strong>TPF</strong> <strong>Program</strong> <strong>Management</strong><br />
BSOs also can have multiple entry points when transfer vectors are used. No<br />
changes need to be made to the BSO makefiles that are already shown. The only<br />
additional step required is to add STUB entries to the control file for each of the<br />
transfer vector names.<br />
By convention, make the STUB entry in the control file refer to the parent BSO<br />
program makefile name if a unique makefile exists, or to the parent BSO name if a<br />
generic makefile was used to build the parent BSO. For example, if XVB1 is a<br />
transfer vector in the BSO named BILL, the STUB entry in the control file could be<br />
coded as either of the following:<br />
v XVB1;STUB;billing/rt/src/bill.mak;;ALL;;;;;;;;;;;;;;;;;;;;;;;;;;;;;<br />
v XVB1;STUB;BILL;;ALL;;;;;;;;;;;;;;;;;;;;;;;;;;;;;<br />
The value provided in the third column has no effect on the build of the program or<br />
the stub library; it is used only for reference.<br />
This task shows you how to create and build a new makefile for a C shared object<br />
(CSO). There are many variations on how to code CSOs. A CSO might have only<br />
one entry point, it might be a library that exports some or all of its functions, it might<br />
be a combination of the two, or it might be a main program.<br />
To create a CSO, follow these steps:<br />
1. Create a new makefile (/home/joe/mywork/billing/rt/src/bill.mak) as shown<br />
in the following example:<br />
APP := BILL<br />
C_SRC := billing1.c<br />
C_SRC += billing2.c<br />
maketpf_env := billing<br />
maketpf_env += base_rt<br />
include maketpf.rules
|<br />
The previous example is the minimal amount that you need to code the CSO<br />
makefile. With no other changes, this defines the CSO as exporting all functions<br />
and having an entry named BILL.<br />
Like the BSOs, both the billing and base_rt environment files are listed. The<br />
base_rt environment file included with z/<strong>TPF</strong> is almost always required to<br />
enable the application program to access macros and includes that are included<br />
in z/<strong>TPF</strong>. The first environment listed defines the owning environment and,<br />
therefore, the corresponding environment file defines the directory (under the<br />
first root directory listed) that is used for writing listings, objects, and<br />
executables. Both environments are used to define where the source files<br />
(including macros and include files) are found.<br />
a. To define the CSO as a main program, add the following line to the makefile:<br />
APP_ENTRY := main<br />
b. To specify that there is only one entry point for this program and to make all<br />
other functions in the program local to the program, add the following line to<br />
the makefile: APP_EXPORT := ENTRY<br />
c. To define an entry point name, add the following line to the makefile. The<br />
value specified can be any function name or the CSO name: APP_ENTRY :=<br />
EntryName<br />
Note: You must add APP_ENTRY when APP_EXPORT := ENTRY is specified.<br />
If no entry is given, the CSO cannot be entered.<br />
d. To specify that all functions in the CSO can be called externally, no action is<br />
needed; APP_EXPORT := ALL is the default.<br />
Note: You also can specify APP_ENTRY with APP_EXPORT := ALL to define<br />
the entry point name. If no entry is given, the CSO cannot be<br />
entered.<br />
e. To limit the functions in the CSO that can be called externally, add the<br />
following line to the makefile: APP_EXPORT := LIST<br />
This requires that you also create an export file, which defines which<br />
functions are global or local. See “Create an export file” on page 69 for<br />
information about how to create the export file.<br />
An alternative way to limit the functions in the CSO that can be called<br />
externally is to use the -fvisibility compiler option. Specify<br />
-fvisibility=default to indicate that the functions in the CSO are identified<br />
as global for the shared object. Specify -fvisibility=hidden to indicate that<br />
all C/C++ functions are local except where they are coded with<br />
__attribute__((visibility("default"))).<br />
Note: You also can specify APP_ENTRY to define the entry point name. If<br />
no entry is given, the CSO cannot be entered.<br />
f. To call functions in other CSOs, the referenced CSOs must be listed in the<br />
calling makefile. The exception is for any of the CSOs that are defined as<br />
standard libraries, such as:<br />
v CISO<br />
v CLBM<br />
v <strong>TPF</strong>STUB<br />
v USRSTUB<br />
v CTIS<br />
v CTAL<br />
v CFVS<br />
Assemble, compile, and link (build) application programs 65
66 z/<strong>TPF</strong> <strong>Program</strong> <strong>Management</strong><br />
v CTBX<br />
v CTXO<br />
v COMS<br />
v CPP1<br />
v CTAD<br />
v COMX<br />
v CTHD<br />
v CTDF<br />
v CJ00.<br />
For example, to call a function from a CSO named CRDT from the BILL<br />
CSO, add the following line to the makefile: LIBS := CRDT<br />
You can add additional libraries by separating the names by blanks on the<br />
same line, or by adding additional LIBS += XXXX lines.<br />
g. To call functions from an archive, the referenced archive must be listed in<br />
the calling makefile. For example, to call a function from an archive named<br />
TaxFunctions, add the following line to the makefile: ARCHIVES :=<br />
TaxFunctions<br />
You can add additional archives by separating the names by blanks on the<br />
same line, or adding additional ARCHIVES += ArchiveName lines.<br />
Note: A function that is called from a CSO is dynamically loaded at run<br />
time, but a function that is included from the archive is statically<br />
linked in the calling CSO.<br />
h. To change the assemble, compile, or link options, use flags (ASMFLAGS,<br />
CFLAGS, CXXFLAGS, or LDFLAGS) in your makefile or maketpf.cfg file.<br />
For example, when you are migrating to the z/<strong>TPF</strong> system, you might want<br />
to load programs below the 2-GB bar.<br />
v To load a single program below the 2-GB bar, add the following statement<br />
to an individual makefile: LDFLAGS_(pgm) := -Xlinker --defsym -Xlinker<br />
CGCC_31BIT=0 where pgm is the name of the makefile.<br />
v To load real-time programs below the 2-GB bar, add the following<br />
statement as an overall configuration option to the maketpf configuration<br />
file (maketpf.cfg) before building the shared object: LDFLAGS_USER :=<br />
-Xlinker --defsym -Xlinker CGCC_31BIT=0<br />
Note: All programs that are built after this flag is added are loaded below<br />
the 2-GB bar.<br />
2. Create two source segments named /home/joe/mywork/billing/rt/src/<br />
billing1.c and /home/joe/mywork/billing/rt/src/billing2.c.<br />
3. Update the user control file with a new entry for the new program:<br />
a. Create a copy of the control file in your working directory: cp<br />
/tpf/z11/local_mod/base/cntl/usr.cntl /home/joe/mywork/base/cntl/<br />
usr.cntl<br />
b. Edit the file that you just copied and add a new entry for the program named<br />
BILL. Enter the following information on one line:<br />
BILL;APP;billing/rt/src/bill.mak;1;ALL;OBJ;<strong>TPF</strong>_SBALL;LOADONLINE;NOSTUB;DEMAND;DEBUG;<br />
50;PROGRAM;NOGRP;<strong>IBM</strong>_DEFT;BPAUTH;RESTRICT;MONTC;KEY0;NOCMB;TIMESLICE;;;;;;;;;;;;;<br />
See “Control files” on page 103 for more information about the control file fields<br />
and values.
|<br />
|<br />
4. Enter the maketpf command to build the program. This assumes that a file<br />
named maketpf.cfg exists in the /home/joe/mywork/build directory.<br />
cd /home/joe/mywork/build<br />
maketpf bill<br />
See “maketpf utility” on page 6 for more information about the maketpf<br />
command and its options.<br />
See Compiler and system levels by PUT for more information about the<br />
supported compiler levels for each program update (PUT).<br />
Create an archive for online programs<br />
To create and build an archive for online programs, follow these steps:<br />
1. Create a new makefile (/home/joe/mywork/billing/rt/src/TaxFunctions.mak)<br />
as shown in the following example:<br />
ARCHIVE := TaxFunctions<br />
C_SRC := addtax.c<br />
maketpf_env := billing<br />
maketpf_env += base_rt<br />
include maketpf.rules<br />
2. Create a source segment named /home/joe/mywork/billing/rt/src/addtax.c.<br />
3. Update the user control file and add a new entry for the archive named<br />
TaxFunctions. Enter the following information on one line.<br />
TaxFunctions;ARCHIVE;billing/rt/src/TaxFunctions.mak;1;ALL;OBJ;<strong>TPF</strong>_SBALL;NOLOAD;<br />
NOSTUB;;;;;;;;;;;;;;;;;;;;;;;;;<br />
Note: You must add this archive to the control file before any program that calls<br />
it. In our example tasks, this means that the entry for TaxFunctions must<br />
appear before online program BILL.<br />
See “Control files” on page 103 for more information about the control file fields<br />
and values.<br />
4. Enter the maketpf command to build the program. This assumes that a file<br />
named maketpf.cfg exists in the /home/joe/mywork/build directory.<br />
cd /home/joe/mywork/build<br />
maketpf TaxFunctions<br />
Create an offline Linux program<br />
See “maketpf utility” on page 6 for more information about the maketpf<br />
command and its options.<br />
To create and build an offline Linux program (EXE), follow these steps:<br />
1. Create a new makefile (/home/joe/mywork/billing/linux/src/<br />
CustomerSummary.mak) as shown in the following example:<br />
Note: This program will use functions from an archive named Receipts.<br />
EXE := CustomerSummary<br />
<strong>TPF</strong>_OL := Linux<br />
ARCHIVES := Receipts<br />
CXX_SRC := list.cpp<br />
maketpf_env := billing_linux<br />
maketpf_env += base_rt<br />
include maketpf.rules<br />
2. Create a source segment named /home/joe/mywork/billing/linux/src/<br />
list.cpp.<br />
Assemble, compile, and link (build) application programs 67
3. Update the user control file and add a new entry for the offline Linux program<br />
named CustomerSummary. Enter the following information on one line.<br />
CustomerSummary;OL;billing/linux/src/CustomerSummary.mak;1;LINUX;<br />
NOOBJ;;;;;;;;;;;;;;;;;;;;;;;;;;;;<br />
See “Control files” on page 103 for more information about the control file fields<br />
and values.<br />
4. Enter the maketpf command to build the program. This assumes a that file<br />
named maketpf.cfg exists in the /home/joe/mywork/build directory.<br />
cd /home/joe/mywork/build<br />
maketpf CustomerSummary<br />
See “maketpf utility” on page 6 for more information about the maketpf<br />
command and its options.<br />
Create an archive for offline Linux programs<br />
To create and build an archive for offline Linux programs, follow these steps:<br />
1. Create a new makefile (/home/joe/mywork/billing/linux/src/Receipts.mak) as<br />
shown in the following example:<br />
ARCHIVE := Receipts<br />
<strong>TPF</strong>_OL := Linux<br />
CXX_SRC := receipts.cpp<br />
maketpf_env := billing_linux<br />
maketpf_env += base_rt<br />
include maketpf.rules<br />
2. Create a source segment named /home/joe/mywork/billing/linux/src/<br />
receipts.cpp.<br />
3. Update the user control file and add a new entry for the archive named<br />
Receipts. Enter the following information on one line.<br />
Receipts;ARCHIVE;billing/linux/src/Receipts.mak;1;LINUX;<br />
NOOBJ;;;;;;;;;;;;;;;;;;;;;;;;;;;;<br />
Note: You must add this archive to the control file before any program that calls<br />
it. In our example tasks, this means that the entry for Receipts must<br />
appear before offline program CustomerSummary.<br />
See “Control files” on page 103 for more information about the control file fields<br />
and values.<br />
4. Enter the maketpf command to build the program. This assumes that a file<br />
named maketpf.cfg exists in the /home/joe/mywork/build directory.<br />
cd /home/joe/mywork/build<br />
maketpf Receipts<br />
Create an offline z/OS program<br />
68 z/<strong>TPF</strong> <strong>Program</strong> <strong>Management</strong><br />
See “maketpf utility” on page 6 for more information about the maketpf<br />
command and its options.<br />
To create and build a new makefile for an offline z/OS program (EXE), follow these<br />
steps:<br />
1. Create a new makefile (home/joe/mywork/billing/zos/src/custsumm.mak) as<br />
shown in the following example:
Create an export file<br />
EXE := custsumm<br />
<strong>TPF</strong>_OL := OS/390<br />
C_SRC := list.c<br />
maketpf_env := billing_zos<br />
maketpf_env += base_rt<br />
include maketpf.rules<br />
Note: z/OS programs do not support the use of archives and, because the<br />
programs are written to a PDS, the program name must be 8 characters<br />
or less.<br />
2. Create a source segment named /home/joe/mywork/billing/zos/src/list.c.<br />
3. Update the user control file and add a new entry for the offline Linux program<br />
named custsumm. Enter the following information on one line.<br />
custsumm;ARCHIVE;billing/zos/src/custsumm.mak;1;OS/390;<br />
NOOBJ;;;;;;;;;;;;;;;;;;;;;;;;;;;;<br />
Note: The control file entry uses the value OS/390 ® rather than z/OS. This was<br />
done for compatibility reasons with <strong>TPF</strong> 4.1 and the terms are<br />
considered interchangeable.<br />
See “Control files” on page 103 for more information about the control file fields<br />
and values.<br />
4. Enter the maketpf command to build the program. This assumes that a file<br />
named maketpf.cfg exists in the /home/joe/mywork/build directory.<br />
cd /home/joe/mywork/build<br />
maketpf custsumm<br />
See “maketpf utility” on page 6 for more information about the maketpf<br />
command and its options.<br />
The following task shows you how to create an export file for a CSO or BSO.<br />
Export files are used to control the entry points that are exported globally and the<br />
ones that are kept local to the object. Export files are required whenever you code<br />
APP_EXPORT := LIST in the program makefile. (An alternate way to change the<br />
scope of symbols that are global for a shared object is to use the -fvisibility<br />
compiler option. Specify -fvisibility=default to indicate that the functions in the<br />
CSO (or C/C++ functions in a BSO) are global for the shared object. Specify<br />
-fvisibility=hidden to indicate that all C/C++ functions are local except where they<br />
are coded with __attribute__((visibility(default))). )<br />
Note: Although we are using a CSO for an example, you can follow the same<br />
steps to create an export file for a BSO.<br />
If you have created a CSO named BILL as described in “Create a C shared object”<br />
on page 64 and have coded APP_EXPORT := LIST in the /home/joe/mywork/billing/<br />
rt/src/bill.mak makefile, you can create an export file by following these steps:<br />
1. Run maketpf to create a preliminary version of the export file.<br />
cd /home/joe/mywork/build<br />
maketpf bill<br />
Note: Export files present a “what came first” problem; you must link the<br />
program to be able to generate the export file, but when you code<br />
APP_EXPORT := LIST, you need an export file at link time. To work around<br />
Assemble, compile, and link (build) application programs 69
Update export files<br />
this, when an export file is not found, the link will continue and a<br />
preliminary export file will be created with all entry points listed in the<br />
global section of the export file.<br />
2. Move the generated export file from the build/ directory to the exp/ directory:<br />
mv /home/joe/mywork/build/BILL.exp /home/joe/mywork/billing/base/exp/BILL.exp<br />
3. Edit the preliminary export file and move entry points from the global section to<br />
the local section of the file to limit the entry points that can be called from other<br />
programs. The result is shown in the following example:<br />
{<br />
global:<br />
create_bill;<br />
local:<br />
calculate_tax;<br />
print_receipt;<br />
};<br />
Note: The export file is used as input to the link editor and must be relinked to the<br />
called shared object. You must update the export file whenever a new entry<br />
point is added to the BSO or CSO. See “Update export files” for more<br />
information.<br />
When you add an entry point to a BSO or CSO with an export file, the export file<br />
must be updated and the entry point added to either the local or global section as<br />
appropriate. The Make<strong>TPF</strong> tools will automate some of this process by creating a<br />
copy of the existing export file in the working (build/) directory and inserting the<br />
new entry point into the global section of the new copy of the export file. You must<br />
edit the new export file and use it to replace the old export file in the source<br />
directory (exp/).<br />
Resolve TSOC0001W warnings<br />
70 z/<strong>TPF</strong> <strong>Program</strong> <strong>Management</strong><br />
You may receive a TSOC0001W warning message after building your program. This<br />
occurs because with the z/<strong>TPF</strong> implementation of dynamic linkage, there can be<br />
problems with imported data in rare cases. If a program exports any data object<br />
that references an external symbol, dynamic linkage must occur before another<br />
program tries to import the data.<br />
One common cause of this warning is function pointers. If a program exports a<br />
pointer to an external function and another program imports the function pointer<br />
without causing dynamic linkage to take place, the imported function pointer will not<br />
be initialized correctly because it has not been relocated as part of dynamic linkage.<br />
Note: This warning message is not triggered if a function pointer is passed as an<br />
argument to a function. It is only triggered for functions when a function<br />
pointer is exported by a program.<br />
If you receive this warning message, complete one of the following steps to resolve<br />
the warning and avoid possible errors:<br />
v If you do not need to export the symbol, you can prevent it from being exported<br />
by modifying the source code or by using an export file. See “Create an export<br />
file” on page 69 for information about how to prevent the symbol from being<br />
exported.
|<br />
Update the FACE table<br />
v If a function is called before the data is referenced, code<br />
<strong>TPF</strong>_RUN_<strong>TPF</strong>SOCHK:=NO in the makefile for the program.<br />
v If the program will not be used before all programs not marked as DEMAND in<br />
the control files have been fetched during restart, ensure that the program is<br />
defined as DEFAULT in its control file and code <strong>TPF</strong>_RUN_<strong>TPF</strong>SOCHK:=NO in the<br />
makefile for the program.<br />
v If you must code the program as DEMAND in the control files or if it is coded as<br />
DEFAULT but may be used before all programs not marked as DEMAND in the<br />
control files have been fetched during restart, the programs that are importing the<br />
data objects that triggered the warning can ensure that the exporting program<br />
has been fully fetched by issuing the GETPC macro or getpc function, or by<br />
calling a function in the exporting program before referencing the exported data<br />
object. You also must code <strong>TPF</strong>_RUN_<strong>TPF</strong>SOCHK := NO in the makefile for the<br />
program to avoid the warning in the future.<br />
v You also can avoid this warning by marking the program as PRELOAD in its<br />
control file.<br />
See “Control files” on page 103 for reference information about coding control files.<br />
For more information about Makefiles, enter man maketpf.mak on your Linux build<br />
system for a complete list of Makefile variables that can be coded.<br />
To update the file address compute (FACE) program table, follow these steps:<br />
1. Copy the sip.asm file to your user directory. For example, if you are working on<br />
the basic subsystem (BSS), enter:<br />
mkdir -p /home/joe/mywork/bss/src<br />
cp /tpf/z11/bss/src/sip.asm /home/joe/mywork/bss/src/sip.asm<br />
2. Edit the sip.asm file that you just copied and update the data definition<br />
statements (RAMFIL, UFTFTI, ONLFIL, and others).<br />
3. Enter the bldtpf command to generate an alternate FACE table (FCTB). This<br />
example assumes that a file named maketpf.cfg exists in the<br />
/home/joe/mywork/build directory:<br />
cd /home/joe/mywork/build<br />
bldtpf -fctb /home/joe/mywork/bss/src/sip.asm<br />
Note: This command produces an updated FCTB (FCTB.so) and a set of source<br />
files and macros that are produced while assembling the FCTB.o object.<br />
See “bldtpf utility” on page 5 for more information on the bldtpf command; also,<br />
enter man bldtpf on your Linux system for more information, including the<br />
syntax.<br />
4. Enter the fctbval command to check your changes to the FCTB. For example:<br />
fctbval /tpf/z11/bss/load/FCTB.so /home/joe/mywork/bss/load/FCTB.so<br />
This command performs the same FCTB validations that are done online with<br />
the ZFCTB LOAD command and produces a list of differences to help you verify<br />
your changes. If there are validation errors or differences that you do not<br />
expect, repeat the procedure from step 2 and make any necessary corrections.<br />
See “fctbval utility” on page 5 for more information about the fctbval command;<br />
also, enter man fctbval on your Linux system for more information, including<br />
the syntax.<br />
5. Load the alternate FCTB to your z/<strong>TPF</strong> system. In this example, step 3 placed<br />
the FCTB in /home/joe/mywork/bss/load/FCTB.so.<br />
Assemble, compile, and link (build) application programs 71
72 z/<strong>TPF</strong> <strong>Program</strong> <strong>Management</strong><br />
Note: If macros were changed, there might be an impact to z/<strong>TPF</strong> shared<br />
objects other than the FCTB. You must reassemble and load these<br />
objects with the FCTB.
Load system components to a new z/<strong>TPF</strong> system<br />
After you assemble all system and application programs and generate their data<br />
records, complete the following steps to load the system components to a new<br />
z/<strong>TPF</strong> system:<br />
1. “Initialize and format the loader general file and online modules.”<br />
2.<br />
Note: If you have an existing loader general file and want to replace only the<br />
IPLA component, see “Update IPLA on a loader general file” on page 79.<br />
“Create the general file loader input file” on page 74<br />
3. “Load system components to the loader general file” on page 74<br />
4. IPL the general file.<br />
5. “Load fixed-file records” on page 74.<br />
6. IPL the online module.<br />
Note: See z/<strong>TPF</strong> and z/<strong>TPF</strong>DF System Generation for more detailed information<br />
about loading the loader general file.<br />
Initialize and format the loader general file and online modules<br />
You must initialize the loader general file before you can load system components<br />
to it. The system initialization process (SIP) creates the JCL to perform the<br />
initialization. The JCL uses z/OS utility program ICKDSF to load IPLA and the<br />
volume ID (VOLID) to the general file. The JCL that is created by SIP is placed in<br />
the jcl/ directory of the hierarchical file system (HFS).<br />
Note: If you have an existing loader general file and want to replace only the IPLA<br />
component, see “Update IPLA on a loader general file” on page 79.<br />
Run the real-time disk formatter to format the general file and online modules. The<br />
real-time disk formatter (FMTR) prepares the general file and online modules to<br />
receive system components.<br />
The JCL that is used to initialize and format the loader general file is produced by<br />
SIP and is placed in the HFS. If the root directory name is /home/joe/mywork and<br />
you built the BSS subsystem, the JCL will be placed in /home/joe/mywork/bss/jcl/<br />
lgffmt.jcl. Complete the following steps to format the loader general file:<br />
1. Update the JCL with any local job library information.<br />
2. The JCL references IPLA in the Linux HFS that it was built in. You must change<br />
the referenced HFS to point to the binary mount HFS name, which contains<br />
IPLA, or you will need to move IPLA to a partitioned data set (PDS) and then<br />
reference that PDS.<br />
3. Submit the JCL.<br />
The JCL that is used to initialize and format the online modules is produced by SIP<br />
and is placed in the HFS. If the root directory name is /home/joe/mywork and you<br />
built the BSS subsystem, the JCL will be placed in /home/joe/mywork/bss/jcl/<br />
fmtrdeck.jcl. Complete the following steps to format the online modules:<br />
1. Update the JCL with any local job library information.<br />
2. The JCL references IPLA in the Linux HFS that it was built in. You must change<br />
the referenced HFS to point to the binary mount HFS name, which contains<br />
IPLA, or you will need to move IPLA to a PDS and then reference that PDS.<br />
© Copyright <strong>IBM</strong> Corp. 2005, 2012 73
3. The JCL also references the format cards produced by the FACE table<br />
generator (fmta.mac, fmtb.mac, and so on). You will need to change the<br />
referenced HFS to the text mount HFS name where the format cards reside or<br />
you will need to move the format cards to a PDS and then reference that PDS.<br />
4. Submit the JCL for each of the online modules to be formatted.<br />
Create the general file loader input file<br />
Create a general file loader input file by entering bldtpf -ald controlfile, where<br />
controlfile is the path to tpf.cntl. See z/<strong>TPF</strong> and z/<strong>TPF</strong>DF System Generation for<br />
more information about creating a general file loader input file. See “ALDR input<br />
file” on page 158 for an example of a general file loader input file.<br />
Load system components to the loader general file<br />
Load fixed-file records<br />
74 z/<strong>TPF</strong> <strong>Program</strong> <strong>Management</strong><br />
Run the <strong>TPF</strong>LDR offline program with the ALDR parameter specified to load system<br />
components to the general file. You must load the following z/<strong>TPF</strong> components to<br />
the loader general file by using <strong>TPF</strong>LDR:<br />
v Core image restart (CIMR) area components.<br />
v CTKX.<br />
v IPLA.<br />
v IPLB.<br />
v <strong>Program</strong> attribute table (PAT).<br />
v Real-time components that are required in the loader general file and specified in<br />
the control file. See “Control files” on page 103 for more information about control<br />
files<br />
v Keypoints.<br />
Note: You must load all keypoints to the loader general file, but not necessarily<br />
to the online keypoint area. To avoid loading any particular keypoints to<br />
the online keypoint area, specify the keypoints on the @GFKEYPOINT<br />
control statement and do not specify them on the @KEYPOINT control<br />
statement.<br />
Sample JCL is provided in the base/samples/jcl directory.<br />
Complete the following steps to load fixed-file records:<br />
1. Create a pilot tape (symbolic name = SDF) with the system test compiler (STC)<br />
program. See z/<strong>TPF</strong> <strong>Program</strong> Development Support Reference for information<br />
about the system test compiler program.<br />
Note: A maximum of 2 147 483 647 records can be read or written from a pilot<br />
tape.<br />
2. Mount the pilot tape (SDF). This is the only input to the data loader.<br />
3. Enter the ZSLDR command to activate the data loader. See z/<strong>TPF</strong> Operations<br />
for more information about the ZSLDR command.<br />
Note: Once records are loaded to the z/<strong>TPF</strong> database, no utility is available to<br />
remove the records from the database. If it is necessary to delete<br />
previously loaded records from the z/<strong>TPF</strong> database, you must create and<br />
load a new pilot tape that contains dummy records. If the number of
ecords decreases from one load to the next, the additional records from<br />
the first load will not be removed from the database.<br />
4. Take either of the following two actions:<br />
a. If the loaded records are meant for main storage, perform an online module<br />
IPL to place the records there.<br />
b. The system can be cycled to NORM state without an online module IPL. An<br />
IPL will be required in the future to place the records in main storage.<br />
Note:<br />
1. The data loader can be operated only while the z/<strong>TPF</strong> system is in 1052<br />
state unless the ID of the pilot tape is N. If the ID of the pilot tape is N,<br />
the z/<strong>TPF</strong> system can be in any state.<br />
2. In a loosely coupled facility, the subsystem cannot be above 1052 state<br />
in any processor unless the ID of the pilot tape is N. If the ID of the pilot<br />
tape is N, the subsystem can be in any state.<br />
Load system components to a new z/<strong>TPF</strong> system 75
76 z/<strong>TPF</strong> <strong>Program</strong> <strong>Management</strong>
Load system components to an existing z/<strong>TPF</strong> system<br />
Create a new image<br />
Complete the following steps to load system components to an existing z/<strong>TPF</strong><br />
system:<br />
1. “Create a new image.”<br />
2. “Create an image loader input file” on page 78.<br />
3. “Load system components to a storage medium” on page 78.<br />
4. “Load system components to the target image” on page 78.<br />
5. “Enable the target image” on page 78.<br />
6. “Move keypoints to the working area (optional)” on page 78.<br />
7. “IPL the image” on page 79.<br />
Note: If you have an existing loader general file and want to replace only the IPLA<br />
component, see “Update IPLA on a loader general file” on page 79.<br />
Before loading system components to an image, you must first have an image. If<br />
you do not have an image, or want to create a new image, complete the following<br />
steps:<br />
1. “Define a new image.”<br />
2. “Copy CTKX, IPL areas, program areas, and CIMR components.”<br />
Define a new image<br />
To define a new image (for example, <strong>TPF</strong>02) enter ZIMAG DEF <strong>TPF</strong>02 NUM 2 IPL<br />
x PROG y. Where x is the IPL area and y is the program area for <strong>TPF</strong>02.<br />
Note: The general file loader always overwrites image 1, which must be defined to<br />
use program area 1 and IPL area 1. Therefore, ensure that you reserve<br />
image 1, program area 1, and IPL area 1 for emergency general file loads.<br />
For more information on defining an image see the ZIMAG DEFINE command.<br />
Copy CTKX, IPL areas, program areas, and CIMR components<br />
To physically copy CTKX, IPL areas, program areas, and CIMR components to the<br />
new image (for example, from <strong>TPF</strong>01 to <strong>TPF</strong>02), complete the following steps:<br />
1. Enter ZIMAG COPY <strong>TPF</strong>01 <strong>TPF</strong>02 CTKX to physically copy CTKX from image<br />
<strong>TPF</strong>01 to image <strong>TPF</strong>02.<br />
Note: CTKX must be loaded or copied to an image before any CIMR<br />
components can be copied.<br />
2. Enter ZIMAG COPY <strong>TPF</strong>01 <strong>TPF</strong>02 IPL to physically copy IPL areas from image<br />
<strong>TPF</strong>01 to image <strong>TPF</strong>02.<br />
3. Enter ZIMAG COPY <strong>TPF</strong>01 <strong>TPF</strong>02 PROG to physically copy program areas<br />
from image <strong>TPF</strong>01 to image <strong>TPF</strong>02.<br />
4. Enter ZIMAG COPY <strong>TPF</strong>01 <strong>TPF</strong>02 COMP ALL PHYSICAL to physically copy<br />
all CIMR components from image <strong>TPF</strong>01 to image <strong>TPF</strong>02.<br />
© Copyright <strong>IBM</strong> Corp. 2005, 2012 77
To logically copy CIMR components from image <strong>TPF</strong>01 to image <strong>TPF</strong>02, use the<br />
ZIMAG COPY LOGICAL command. For example, enter ZIMAG COPY <strong>TPF</strong>01<br />
<strong>TPF</strong>02 COMP FCTB.ICDF.ACPL.SIGT.RIAT.USR1.USR2 LOGICAL, assuming that<br />
you are loading a new CPS0.<br />
Note: The CTKX, IPL areas, and program areas cannot be logically copied.<br />
Create an image loader input file<br />
Create an image loader input file by entering bldtpf -tld controlfile, where controlfile<br />
is the path to tpf.cntl or by coding an image loader input file manually. See<br />
“Image loader” on page 113 for more information on creating image loader input<br />
files. See “TLDR input file” on page 159 for an example image loader input file.<br />
Load system components to a storage medium<br />
Run the <strong>TPF</strong>LDR offline program with the TLDR parameter specified to load system<br />
components to a storage medium. Sample JCL is provided in the samples/jcl<br />
directory. See “z/<strong>TPF</strong> offline loader” on page 117 for information about running the<br />
<strong>TPF</strong>LDR program.<br />
Load system components to the target image<br />
Enable the target image<br />
Use the ZTPLD command to load system components from the storage medium to<br />
a target image. See “Online image loader component (ZTPLD)” on page 24 for<br />
more information.<br />
Use the ZIMAG ENABLE command to enable the image that you loaded the system<br />
components to. For example, to enable image <strong>TPF</strong>02, enter ZIMAG ENABLE<br />
<strong>TPF</strong>02. You will receive a message that tells you whether the components were<br />
loaded. To display any CIMR components that were not loaded, enter ZIMAG<br />
DISPLAY IMAGE <strong>TPF</strong>02. This will show you information about all of the CIMR<br />
components for <strong>TPF</strong>02. If a CIMR component is missing, you can copy it from<br />
another image by entering the ZIMAG COPY command or you can load the missing<br />
component by using the image loader (TLDR). To display any IPL components that<br />
were not loaded, enter ZIMAG DISPLAY IPL and determine from the IPL2 line if<br />
both IPLA and IPLB are loaded. If an IPL area is missing, you must enter ZIMAG<br />
COPY IPL or load the missing area by using the image loader (TLDR).<br />
Move keypoints to the working area (optional)<br />
78 z/<strong>TPF</strong> <strong>Program</strong> <strong>Management</strong><br />
If the keypoints for the new image are not compatible with the existing image, you<br />
must move the keypoints to the working area (#KEYPT). If the existing keypoints<br />
are compatible with the new image, you do not have to load or move new<br />
keypoints.<br />
Because it is dangerous to overlay keypoints, they are not loaded directly to the<br />
image; they are loaded to a staging area. Use the ZIMAG KEYPT MOVE command<br />
to move the keypoints from the staging area (#KSAx) to the working area<br />
(#KEYPT). The ZIMAG KEYPT MOVE command prompts you to continue (ZIMAG<br />
KEYPT CONT) or abort (ZIMAG KEYPT ABORT). After you move the keypoints to<br />
the working area, perform a hard IPL to put them in core storage.
IPL the image<br />
Note: Keypoints are shared for all images. If there is something wrong with a<br />
keypoint, that prevents you from bringing a system to NORM, IPL your<br />
loader general file and use the ZIMAG KEYPT RESTORE command to<br />
restore the keypoints you had before you entered the ZIMAG KEYPT MOVE<br />
command. This allows you to come up again on your prime mod.<br />
To use the enabled image, you must perform a hard IPL, choose image selection,<br />
and enter the name of the image.<br />
Note:<br />
Update IPLA on a loader general file<br />
1. If you are IPLing an image that has a different core layout from the<br />
previously used image, IPL with CLEAR to clear the VFA buffers.<br />
2. If the image does not IPL successfully, IPL another image and debug the<br />
problem image.<br />
Use the following sample JCL and complete the following steps to place an updated<br />
version of IPLA on an existing loader general file.<br />
Note: Do this only if you have a loader general file that was previously initialized<br />
and formatted and want to replace only the IPLA component without running<br />
the system initialization process (SIP) to generate the JCL. If you are<br />
creating the loader general file for the first time, see “Initialize and format the<br />
loader general file and online modules” on page 73.<br />
//LGFADD EXEC PGM=ICKDSF<br />
//SYSPRINT DD SYSOUT=A<br />
//IPLTDD DD PATH=’/ztpf/aparbld/18974/bss/obj/ipla.o’,<br />
// PATHOPTS=ORDONLY,BLKSIZE=80,LRECL=80<br />
//CUU DD DSN=GNFLBSS,DISP=OLD,UNIT=3390,<br />
// VOL=(PRIVATE,,,,SER=TX0999)<br />
//SYSIN DD *<br />
REFORMAT DDNAME(CUU) NOVERIFY -<br />
IPLDD(IPLTDD) PURGE<br />
/*<br />
1. Update the JCL with any local job library information.<br />
2. The JCL references IPLA in the Linux HFS that it was built in. You must change<br />
the referenced HFS to point to the binary mount HFS name, which contains<br />
IPLA, or you will need to move IPLA to a partitioned data set (PDS) and then<br />
reference that PDS.<br />
3. Ensure that the CUU information matches the CUU information that was used to<br />
create the loader general file initially.<br />
4. Submit the JCL.<br />
Load system components to an existing z/<strong>TPF</strong> system 79
80 z/<strong>TPF</strong> <strong>Program</strong> <strong>Management</strong>
Load E-type programs and files to an enabled system<br />
Complete the following steps to load new E-type programs and files to a z/<strong>TPF</strong><br />
system:<br />
1. “Create an E-type loader input file.”<br />
2. “Load E-type programs and files to a storage medium”<br />
3. “Load, activate, and accept a loadset of programs and files” on page 82.<br />
E-type loader functions affect only the program base that is being used on the<br />
processor that the function was requested from. If other processors are using a<br />
different program base, those processors do not see the effects of E-type loader<br />
functions until they begin to use the same program base.<br />
For example, in a loosely coupled environment where processor A is using program<br />
base 1 and processor B is using program base 2, if you issue the ZOLDR<br />
ACTIVATE command on processor A, the specified loadset is started on all<br />
processors using program base 1. Because processor B is using program base 2,<br />
the specified loadset is not actually activated on that processor until you perform an<br />
initial program load (IPL) using program base 1.<br />
When using the E-type loader to load files, you must use the ZOLDR ACCEPT<br />
command to ensure that the file changes are persistent. In the case of an affiliated<br />
file, changes to the file in the loadset are not reflected in the existing online version.<br />
If you use the E-type loader to move a C function from one program to another, all<br />
callers of the function must be included in the same loadset.<br />
If you use the E-type loader to move an entry point from one program to another,<br />
the loadset must be deactivated or accepted before the entry point can be moved<br />
again.<br />
Create an E-type loader input file<br />
You can create an E-type loader input file on z/OS or Linux.<br />
To create an E-type loader input file based on a control file, enter bldtpf -old. The<br />
bldtpf command, by default, will write the loader input file to bldtpf.old_loaddeck.<br />
Enter man bldtpf for more information.<br />
To manually create an E-type loader input file, create a file containing the E-type<br />
loader input parameters. See “E-type loader” on page 115 for more information.<br />
See “OLDR input file” on page 158 for an example of an E-type loader input file.<br />
Load E-type programs and files to a storage medium<br />
To load an E-type loader input file on z/OS, use the E-type loader JCL cards.<br />
Sample JCL is provided in the base/samples/jcl directory. See “JCL statements” on<br />
page 117 for more information.<br />
You can use the loadtpf command on Linux to load E-type programs and files to<br />
your z/<strong>TPF</strong> system. You can specify a control file, a loader input file, a load file, a<br />
program name, a file, or a shared object as input and loadtpf will call the bldtpf and<br />
© Copyright <strong>IBM</strong> Corp. 2005, 2012 81
offldr programs, as necessary, to create a load file that is then transferred to your<br />
z/<strong>TPF</strong> system by FTP. See “loadtpf utility” on page 6 or enter man loadtpf for more<br />
information.<br />
Note: You also can generate an E-type load file on Linux by entering the offldr<br />
command and specifying an E-type loader input file. You must manually<br />
transfer the generated load file to your z/<strong>TPF</strong> system. See “Linux offldr<br />
command” on page 119 for more information.<br />
See “Offline E-type loader component (OLDR)” on page 25 for conceptual<br />
information.<br />
Load, activate, and accept a loadset of programs and files<br />
82 z/<strong>TPF</strong> <strong>Program</strong> <strong>Management</strong><br />
When you have loaded an E-type loader input file to a storage medium, load and<br />
activate the loadset of programs and files by doing the following steps:<br />
1. Use the ZOLDR LOAD command to load a loadset of programs and files from<br />
the storage medium to the system.<br />
2. Use the ZOLDR ACTIVATE command to activate the loadset and test the new<br />
programs and files.<br />
3. Use the ZOLDR ACCEPT command to accept the loadset (if you want to<br />
replace the base version programs with the new versions). See “Accept a<br />
loadset of E-type programs and files” on page 88 for more information.<br />
See “Work with loadsets” on page 87 for more commands that you can use to work<br />
with loadsets.
Load an alternate FCTB<br />
Complete the following steps to load an alternate FACE table (FCTB) on a z/<strong>TPF</strong><br />
image:<br />
1. Use the ZFCTB LOAD command to load an alternate FCTB to the online<br />
system.<br />
The following example shows an alternate FCTB being loaded on the Z<strong>TPF</strong>B<br />
image.<br />
User: ZFCTB LOAD MYGDS<br />
System: FCTB2004I 15.20.24 LOAD REQUEST RECEIVED<br />
FCTB2410I 15.20.29 LOAD OF ALTERNATE FCTB SCHEDULED<br />
FOR CPU B FOR IMAGE Z<strong>TPF</strong>B<br />
FCTB2410I 15.20.29 LOAD OF ALTERNATE FCTB SCHEDULED<br />
FOR CPU C FOR IMAGE Z<strong>TPF</strong>B<br />
FCTB2412I 15.20.29 LOAD OF ALTERNATE FCTB COMPLETED<br />
FOR CPU B AS REQUESTED BY CPU B FOR IMAGE Z<strong>TPF</strong>B<br />
FCTB2412I 15.20.29 LOAD OF ALTERNATE FCTB COMPLETED<br />
FOR CPU C AS REQUESTED BY CPU B FOR IMAGE Z<strong>TPF</strong>B<br />
FCTB2414I 15.20.29 LOAD OF ALTERNATE FCTB COMPLETED<br />
FOR ALL REQUESTED PROCESSORS FOR IMAGE Z<strong>TPF</strong>B<br />
2. Use the ZFCTB ACTIVATE command to activate an alternate FCTB that is<br />
loaded on an image for a specific processor or for all processors so that<br />
programs can now use the new FCTB.<br />
The following example activates an alternate FCTB for the Z<strong>TPF</strong>B image on<br />
processor B.<br />
User: ZFCTB ACT B<br />
System: FCTB2004I 15.20.24 ACTIVATE REQUEST RECEIVED<br />
FCTB2209I 15.26.55 ACTIVATE OF ALTERNATE FCTB SCHEDULED<br />
FOR CPU B FOR IMAGE Z<strong>TPF</strong>B<br />
FCTB2211I 15.26.55 ACTIVATE OF ALTERNATE FCTB COMPLETED<br />
FOR CPU B AS REQUESTED BY CPU B FOR IMAGE Z<strong>TPF</strong>B<br />
FCTB2212I 15.26.55 ACTIVATE OF ALTERNATE FCTB COMPLETED<br />
FOR ALL REQUESTED PROCESSORS FOR IMAGE Z<strong>TPF</strong>B<br />
3. Use the ZFCTB ACCEPT command to accept an activated alternate FCTB.<br />
When an alternate FCTB is accepted, that FCTB becomes the base version and<br />
an alternate FCTB no longer exists.<br />
The following example accepts an alternate FCTB for the Z<strong>TPF</strong>B image.<br />
User: ZFCTB ACCEPT<br />
System: FCTB2004I 16.03.17 ACCEPT REQUEST RECEIVED<br />
FCTB2304I 16.03.17 ACCEPT OF ALTERNATE FCTB SCHEDULED<br />
FOR CPU B FOR IMAGE Z<strong>TPF</strong>B<br />
FCTB2306I 16.03.17 ACCEPT OF ALTERNATE FCTB COMPLETED<br />
FOR CPU B AS REQUESTED BY CPU B FOR IMAGE Z<strong>TPF</strong>B<br />
FCTB2307I 16.05.14 ACCEPT OF ALTERNATE FCTB COMPLETED<br />
FOR ALL REQUESTED PROCESSORS FOR IMAGE Z<strong>TPF</strong>B<br />
Complete the following steps to deactivate or delete an alternate FCTB that has<br />
been loaded to a z/<strong>TPF</strong> system:<br />
v Use the ZIMAG DISPLAY command with the IMAGE parameter specified to<br />
display the status of the alternate FCTB.<br />
The following example displays information about the COMMIT1 image. An<br />
alternate FCTB was loaded and has been activated on some processors.<br />
© Copyright <strong>IBM</strong> Corp. 2005, 2012 83
84 z/<strong>TPF</strong> <strong>Program</strong> <strong>Management</strong><br />
User: ZIMAG DISP IMAGE COMMIT1<br />
System: IMAG0019I 17.25.51 IMAGE DISPLAY<br />
NAME - COMMIT1 STATUS - ENABLED IPL - 1 PROG - 1 CTKX - ZZ<br />
PAT CREATION TIME 04-26-05 09.26.56<br />
COMP PHYSICAL COPY LOGICAL LOGICAL<br />
VC DATE TIME REF TO IMAGE REF FROM IMAGE<br />
FCTB GA 04-28-05 10.11.32<br />
ALTFCTB KW 04-29-05 08.24.47<br />
CPS0 ZZ 04-26-05 09.26.56 <strong>TPF</strong>01<br />
ICDF <strong>TPF</strong>01<br />
ACPL <strong>TPF</strong>01<br />
SIGT <strong>TPF</strong>01<br />
RIAT ZZ 04-26-05 09.26.56 <strong>TPF</strong>01<br />
USR1 <strong>TPF</strong>01<br />
USR2 <strong>TPF</strong>01<br />
ALTERNATE FCTB ACTIVE ON PROCESSORS:<br />
BCD<br />
END OF ZIMAG DISPLAY<br />
v Use the ZFCTB DEACTIVATE command to deactivate an activated alternate<br />
FCTB on an image for a specific processor or for all processors where it is<br />
currently active.<br />
The following example deactivates an alternate FCTB for the Z<strong>TPF</strong>B image.<br />
User: ZFCTB DEACT B<br />
System: FCTB2004I 15.20.24 DEACTIVATE REQUEST RECEIVED<br />
FCTB2509I 15.32.21 DEACTIVATE OF ALTERNATE FCTB SCHEDULED<br />
FOR CPU B FOR IMAGE Z<strong>TPF</strong>B<br />
FCTB2511I 15.32.21 DEACTIVATE OF ALTERNATE FCTB COMPLETED<br />
FOR CPU B AS REQUESTED BY CPU B FOR IMAGE Z<strong>TPF</strong>B<br />
FCTB2512I 15.32.21 DEACTIVATE OF ALTERNATE FCTB COMPLETED<br />
FOR ALL REQUESTED PROCESSORS FOR IMAGE Z<strong>TPF</strong>B<br />
v Use the ZFCTB DELETE command to delete a loaded or deactivated alternate<br />
FACE table (FCTB) from the z/<strong>TPF</strong> system.<br />
The following example deletes an alternate FCTB for the Z<strong>TPF</strong>B image.<br />
User: ZFCTB DELETE<br />
System: FCTB2004I 16.00.06 DELETE REQUEST RECEIVED<br />
FCTB2603I 16.00.06 DELETE OF ALTERNATE FCTB SCHEDULED<br />
FOR CPU B FOR IMAGE Z<strong>TPF</strong>B<br />
FCTB2605I 16.00.06 DELETE OF ALTERNATE FCTB COMPLETED<br />
FOR CPU B AS REQUESTED BY CPU B FOR IMAGE Z<strong>TPF</strong>B<br />
FCTB2612I 16.05.14 DELETE OF ALTERNATE FCTB COMPLETED<br />
FOR ALL REQUESTED PROCESSORS FOR IMAGE Z<strong>TPF</strong>B<br />
See “Alternate FCTB loader overview” on page 29 for more information about the<br />
alternate FCTB. See z/<strong>TPF</strong> Operations for more information about the ZFCTB<br />
commands and the ZIMAG DISPLAY command.
Load z/<strong>TPF</strong> debugger information<br />
When you run the offline build procedure by using the Make<strong>TPF</strong> build solution,<br />
source code is converted into an executable and link format (ELF) module to<br />
produce a shared object. Debug data can be included in this shared object.<br />
The offline loader writes two copies of each shared object to the desired storage<br />
medium: in one of the copies, the debug data is removed; in the other copy, the<br />
debug data remains intact. When running the offline loader, you can use the<br />
@DEFINE control statement in the loader input file to specify whether to write the<br />
shared object with debug data to the desired storage medium.<br />
Note: No debug data is loaded when you use the loader general file loader.<br />
The online load (performed by using the ZOLDR LOAD command or the ZTPLD<br />
command) then writes the shared object containing the debug data to the z/<strong>TPF</strong><br />
collection support file system (TFS). The file will be written based on the following<br />
directory structure:<br />
/tpfdbgelf/ab/abcd/ts<br />
Where:<br />
/tpfdbgelf is the root directory<br />
/ab is the first two letters of the program name<br />
/abcd is the four-character program name<br />
/ts is the timestamp given to the shared object by the post-processor.<br />
User exit UELJ determines how many copies of the debug files are kept. You can<br />
use the NODEBUG option in the online loader component to specify that the shared<br />
object with debug data is not to be written to the z/<strong>TPF</strong> collection support file<br />
system.<br />
If you use the ZAPGM command to change a program that has debug data, the<br />
z/<strong>TPF</strong> debugger might not display an accurate listing view of the program.<br />
See z/<strong>TPF</strong> Debugger User's Guide for information about the z/<strong>TPF</strong> debugger. See<br />
z/<strong>TPF</strong> Operations for information about the ZOLDR LOAD, ZTPLD, and ZAPGM<br />
commands.<br />
© Copyright <strong>IBM</strong> Corp. 2005, 2012 85
86 z/<strong>TPF</strong> <strong>Program</strong> <strong>Management</strong>
Work with loadsets<br />
When using loadsets, use the ZOLDR command to complete the following tasks:<br />
v “Clear E-type loader file resident records.”<br />
v “Load a loadset of E-type programs and files.”<br />
v “Activate a loadset of E-type programs and files” on page 88.<br />
v “Selectively activate a loadset of E-type programs and files” on page 88.<br />
v “Deactivate a loadset of E-type programs and files” on page 88.<br />
v “Delete a loadset of E-type programs and files” on page 88.<br />
v “Accept a loadset of E-type programs and files” on page 88.<br />
v “Exclude an E-type program or file from a loadset of E-type programs and files”<br />
on page 89.<br />
v “Reinclude an E-type program or file to a loadset of E-type programs and files”<br />
on page 89.<br />
v “Reclaim system resources” on page 89.<br />
v “Display loadset information” on page 89.<br />
v “Change E-type loader program attributes” on page 90.<br />
v “Change E-type loader values” on page 90.<br />
You can to use the ZDEAT command to display ECB status.<br />
Note: For online help, enter ZOLDR ?, ZDEAT ?, orseez/<strong>TPF</strong> Operations for<br />
more information about the ZOLDR and ZDEAT commands.<br />
Clear E-type loader file resident records<br />
Use the ZOLDR CLEAR command to clear and initialize all E-type loader file<br />
resident records the first time the system is IPLed or if E-type loader records are<br />
damaged.<br />
Load a loadset of E-type programs and files<br />
Use the ZOLDR LOAD command to load a loadset of programs and files. ZOLDR<br />
LOAD reads program records from an input device and writes them to 4KB fixed file<br />
records; files are written to z/<strong>TPF</strong> collection support file system (TFS).<br />
Note: If you are loading from a virtual reader, make sure your OLDR job output has<br />
been converted. Use the ELDRVRDR EXEC to convert OLDR JOB output to<br />
a spool file that supports virtual reader input. A sample ELDRVRDR EXEC is<br />
shipped as segment UELV.<br />
The names of the loaded loadsets are maintained in loadset directory (LSD)<br />
records. The names and temporary file locations of the loaded programs are<br />
maintained in E-type loader program directory (EPD) records. The names and<br />
temporary file locations of the loaded files are maintained in the TFS. Loaded<br />
programs and files have no effect on system activity until they are activated.<br />
© Copyright <strong>IBM</strong> Corp. 2005, 2012 87
Activate a loadset of E-type programs and files<br />
Use the ZOLDR ACTIVATE command to activate a loadset of programs and files.<br />
The programs and files in a loadset are available for use by new entries in the<br />
z/<strong>TPF</strong> system when the loadset are activated by using the ZOLDR ACTIVATE<br />
command.<br />
Selectively activate a loadset of E-type programs and files<br />
You can control the use of E-type programs and files by selectively activating a<br />
loadset of programs and files. Use the SEL option of the ZOLDR ACTIVATE<br />
command to limit the use of new programs and files to specific terminals, lines,<br />
users, and others.<br />
Note: Use the selective activate user exits to specify the terminals, lines, users,<br />
and others that you want to allow to use a specific loadset of programs and<br />
files. See “Use selective activate exits” on page 91 for information to help<br />
you write the code needed to support the SEL option.<br />
Deactivate a loadset of E-type programs and files<br />
Use the ZOLDR DEACTIVATE command to deactivate a loadset of programs and<br />
files. ZOLDR DEACTIVATE makes all programs and files in a loadset become<br />
inactive when they finish processing. When all programs and files in a loadset are<br />
deactivated, previously active versions of the programs and files are used by new<br />
entries.<br />
Note: The FORCE option processes before any previously scheduled ZOLDR<br />
tasks. It should only be used if ZOLDR DEACTIVATE processing ends with<br />
an error. The FORCE option can change the version of a program or file that<br />
is currently in use by an entry. This could cause interface problems.<br />
Delete a loadset of E-type programs and files<br />
Use the ZOLDR DELETE command to delete a loadset of programs and files.<br />
ZOLDR DELETE makes all of the fixed file records associated with a loadset of<br />
programs and files be returned to the pool of available fixed file records. It also<br />
removes the z/<strong>TPF</strong> collection support file system (TFS) files associated with a<br />
loadset. ZOLDR DELETE cannot delete an active loadset until it has been<br />
deactivated.<br />
If a program in the loadset is still active, the system changes the loadset name to<br />
-nnnn (where nnnn is 0000–9999) and marks it as delete pending. The system<br />
deletes the renamed loadset when all ECBs using the loadset are finished.<br />
Accept a loadset of E-type programs and files<br />
Use the ZOLDR ACCEPT command to accept a loadset of programs and files.<br />
ZOLDR ACCEPT makes the active loadset of programs and files replace the base<br />
version of existing programs and files. The fixed file records associated with an<br />
accepted loadset of programs and files are deleted after you perform the accept.<br />
Note:<br />
88 z/<strong>TPF</strong> <strong>Program</strong> <strong>Management</strong><br />
1. The loadset must be activated on all processors to be accepted.
2. A new program or file will not be accepted if there is an ECB on any<br />
subsystem that can still use the base version program or file.<br />
3. If active loadsets intersect, you must accept them in the order they were<br />
activated. That is, the first activated loadset will be the first accepted<br />
loadset.<br />
4. Use the ZOLDR DISPLAY command before accepting a loadset of<br />
programs and files to make sure that you are accepting the correct<br />
version of a program or file.<br />
Exclude an E-type program or file from a loadset of E-type programs<br />
and files<br />
Use the ZOLDR EXCLUDE command to exclude a program or file from an existing<br />
loadset of programs and files. If a loadset is active, ZOLDR EXCLUDE deactivates<br />
the program or file on all processors. A program or file that is excluded from a<br />
loadset of programs and files will not be included in later functions performed on the<br />
loadset. For example, if you exclude the PGM1 program from the GROUP1 loadset,<br />
PGM1 is not activated when you activate GROUP1.<br />
Reinclude an E-type program or file to a loadset of E-type programs<br />
and files<br />
Reclaim system resources<br />
Display loadset information<br />
Use the ZOLDR REINCLUDE command to reinclude a program or file to an existing<br />
loadset of programs and files. A program that is reincluded to a loadset of programs<br />
and files will be included in later functions performed on the loadset. For example, if<br />
you reinclude the program PGM1 to loadset GROUP1 then PGM1 (which had<br />
previously been excluded from GROUP1) is activated when you activate GROUP1.<br />
You must deactivate an active loadset before an excluded program or file can be<br />
reincluded into the loadset.<br />
Use the ZOLDR RECLAIM command to make inaccessible E-type loader fixed file<br />
records available to the system.<br />
If an E-type loader action is interrupted by a system error, some fixed file records<br />
may not be able to be accessed by the system. Although the information in the<br />
records is still available elsewhere, the original fixed file record may not be<br />
accessible. If the fixed file record is not accessible, the system cannot use that disk<br />
space. Therefore, you must enter ZOLDR RECLAIM to allow the system to be able<br />
to use that disk space again.<br />
Note: Your site's procedures will determine how you use the ZOLDR RECLAIM<br />
command. You may want to enter ZOLDR RECLAIM after any E-type loader<br />
RESTART, or you may want to enter ZOLDR RECLAIM every night to<br />
reclaim inaccessible disk space.<br />
Use the ZOLDR DISPLAY command to display the following information:<br />
v Status or contents of a loadset<br />
v Intersections with other loadsets<br />
v Active loadsets<br />
Work with loadsets 89
v All loadsets containing a particular program<br />
v All loadsets<br />
v E-type loader values and rules.<br />
Change E-type loader program attributes<br />
Change E-type loader values<br />
Display ECB status<br />
90 z/<strong>TPF</strong> <strong>Program</strong> <strong>Management</strong><br />
Use the ZOLDR ALTER PROGCHAR command to change the characteristics of<br />
unallocated E-type programs. The <strong>IBM</strong> defaults are:<br />
v NOKEY0<br />
v NOMONTC<br />
v NORESTRICT<br />
v NOCMB<br />
v NOBPAUTH<br />
v DBUG<br />
v TIMESLICE<br />
v TIMEOUT=DEFAULT<br />
v FETCH=DEFAULT<br />
v DUMPGROUP=NONE<br />
v AFFINITY=PROGRAM<br />
v TRACEGROUP=<strong>IBM</strong>_DEFT.<br />
Use the ZOLDR ALTER command to change the following E-type loader values:<br />
v Extra program attribute table (PAT) slot threshold percentage<br />
v E-type loader fixed file record threshold percentage<br />
v Time interval for starting the E-type loader police routine<br />
v Time interval for starting the E-type loader long running job detection routine and<br />
the E-type loader reclaim detection routine.<br />
Use the ZDEAT commands to see the number of ECBs using each activation<br />
number and if the activation number corresponds to a selectively activated loadset.
Use selective activate exits<br />
Selective activate exits allow you to limit the use of an E-type loader loadset to a<br />
specific ECB origin. An ECB origin can be a terminal address, communication line<br />
number, port number, user ID, NCP ALS, NCP name, and others.<br />
To use the selective activate function you must:<br />
v Activate the selective activation function during system generation.<br />
v Create an enable command.<br />
v Create a disable command.<br />
Activate the selective activation function<br />
Create an enable command<br />
You can activate the selective activation function in the CONFIG macro or by using<br />
the ZSYSG command. When activated, selected ECBs can enter the programs and<br />
files in a selectively activated loadset. Otherwise, no ECBs can enter the programs<br />
and files in a selectively activated loadset. See z/<strong>TPF</strong> Operations for more<br />
information about ZSYSG.<br />
To enable loadsets for specific ECB origins, create a command that builds two<br />
core-resident structures; a selective activation table and a selective activation index.<br />
The selective activation table should contain loadset names and selective activation<br />
numbers. The selective activation index should contain the ECB origins and<br />
pointers to the loadset names. Entries should be added to these structures using a<br />
user-defined enable message. To do this your command should do the following:<br />
1. Add the ECB origin to the selective activation index.<br />
2. If the loadset name is already in the selective activation table, update the index.<br />
3. If the loadset name is not in the selective activation table, add the entry and call<br />
the selective activate utility (COLW) to set the activation number. Update the<br />
index.<br />
Note: COLW returns an activation number of zero if the loadset has not been<br />
selectively activated.<br />
4. Update the file resident structure (if one exists) to allow enable requests to<br />
survive an IPL.<br />
Figure 10 shows an example of a selective activation table. Figure 11 on page 92<br />
shows an example of a selective activation index.<br />
Loadset Name Selective Activation Number<br />
------------ ---------------------------<br />
Joseph 0<br />
Sally 4<br />
Fred1 8<br />
Figure 10. Selective activation table example<br />
Note: In Figure 10, Joseph was enabled to be used from an ECB origin, but is not<br />
yet activated selectively. Loadsets Sally and Fred1 were selectively activated<br />
and were assigned activation numbers 4 and 8, respectively.<br />
© Copyright <strong>IBM</strong> Corp. 2005, 2012 91
Terminal Addr Index into Selective Activation Table<br />
------------- ------------------<br />
020103 0<br />
030567 0, 1<br />
002203 1<br />
292834 1, 2<br />
Figure 11. Selective activation index example<br />
Create a disable command<br />
92 z/<strong>TPF</strong> <strong>Program</strong> <strong>Management</strong><br />
Note: Figure 11 contains a list of ECB origins (terminal addresses) and the<br />
associated index into the selective activation table. In this example, ECBs<br />
originating on terminal 292834 can enter programs and files from loadsets<br />
Sally or Fred1.<br />
The user-defined disable command should stop an ECB from using a loadset. This<br />
message should remove the index pointer for the selective activation index entry,<br />
and if there are no more index entries that reference the specified loadset, remove<br />
the associated selective activation table entry (if there are no more ECB origins that<br />
reference a loadset, there is no longer a need to maintain the activation number in<br />
the selective activation table). If there are no more loadsets enabled to be used by<br />
the specified ECB origin, then the index entry can be removed. By removing the<br />
table index from the index entry, ECBs originating from that origin will not have the<br />
specified loadset's activation number in their activation number list (which is used<br />
by Enter / Back to determine which version of a program or file to use). If a file<br />
copy of the mapping structure is maintained, then it will have to be updated to<br />
reflect the disable request.<br />
Note: It is entirely possible that the loadset name will not be found in either table.<br />
The user-written disable code should handle this condition. This can occur<br />
for 2 reasons:<br />
1. The loadset was selectively activated, but never enabled. Here, a table<br />
entry for the loadset was never created.<br />
2. It is possible that the loadset was enabled; however, the mapping<br />
structure is not recorded on file (for example, the enables do not survive<br />
an IPL). If an IPL were to occur after the enable and before the disable<br />
request, the disable code would not find the loadset in the tables.
|<br />
|<br />
|<br />
|<br />
|<br />
|<br />
|<br />
|<br />
|<br />
|<br />
|<br />
|<br />
|<br />
|<br />
|<br />
|<br />
|<br />
|<br />
|<br />
|<br />
|<br />
|<br />
|<br />
|<br />
|<br />
|<br />
|<br />
|<br />
|<br />
|<br />
|<br />
|<br />
|<br />
|<br />
|<br />
|<br />
|<br />
|<br />
|<br />
|<br />
Using common deployment<br />
You must load your deployment descriptors to the z/<strong>TPF</strong> system with the E-type<br />
loader or the image loader. After the descriptors are loaded to the system, you can<br />
use the ZMDES command to deploy and undeploy the descriptor files.<br />
Related concepts:<br />
“Common deployment” on page 37<br />
The z/<strong>TPF</strong> system uses a mechanism called common deployment to make<br />
deployment descriptors available for use.<br />
Related reference:<br />
ZMDES–Manage deployment descriptors<br />
Loading deployment descriptors<br />
Use this procedure to load your deployment descriptors to the z/<strong>TPF</strong> system with<br />
the E-type loader.<br />
About this task<br />
You can use the E-type loader or the image loader to load your deployment<br />
descriptors. This procedure is an example of how to load the descriptor files with<br />
the E-type loader.<br />
Procedure<br />
1. On Linux, create an offline loader input file that defines where to find the<br />
deployment descriptors on Linux and where to place them on the z/<strong>TPF</strong> system.<br />
The following example shows the contents of an offline loader file called<br />
ddfiles.list:<br />
@DEFINE<br />
SYSID=BSS<br />
@LOADSET DESCRIPT<br />
@FILE<br />
/home/mydir/wodmDrvr.ilr.xml /sys/tpf_pbfiles/tpf-fdes/wodmDrvr.ilr.xml<br />
/home/mydir/wodmDrvr.ept.xml /sys/tpf_pbfiles/tpf-fdes/wodmDrvr.ept.xml<br />
/home/mydir/wodmDrvr.tdm.xml /sys/tpf_pbfiles/tpf-fdes/wodmDrvr.tdm.xml<br />
/home/mydir/bepDrvr.evspec.xml /sys/tpf_pbfiles/tpf-fdes/bepDrvr.evspec.xml<br />
/home/mydir/bepDrvr.evda.xml /sys/tpf_pbfiles/tpf-fdes/bepDrvr.evda.xml<br />
2. On Linux, generate the OLDR format loader output file by entering the loadtpf<br />
command with the input file that you created in step 1 specified.<br />
For example, loadtpf ddfiles.list.<br />
The following messages are displayed. In this example, the files are transferred<br />
automatically to the z/<strong>TPF</strong> system based on a LOAD<strong>TPF</strong>_IP parameter that is<br />
specified in the maketpf.cfg file.<br />
© Copyright <strong>IBM</strong> Corp. 2005, 2012 93
|<br />
|<br />
|<br />
|<br />
|<br />
|<br />
|<br />
|<br />
|<br />
|<br />
|<br />
|<br />
|<br />
|<br />
|<br />
|<br />
|<br />
|<br />
|<br />
|<br />
|<br />
|<br />
|<br />
|<br />
|<br />
|<br />
|<br />
|<br />
|<br />
|<br />
|<br />
|<br />
|<br />
|<br />
|<br />
|<br />
|<br />
|<br />
|<br />
|<br />
|<br />
|<br />
|<br />
|<br />
|<br />
|<br />
|<br />
|<br />
|<br />
|<br />
|<br />
|<br />
|<br />
|<br />
|<br />
|<br />
|<br />
|<br />
|<br />
94 z/<strong>TPF</strong> <strong>Program</strong> <strong>Management</strong><br />
M<strong>TPF</strong>2210I: Configuration file: "/home/mydir/maketpf.cfg"<br />
M<strong>TPF</strong>2706I: loadtpf: Using loader input file "wodmfiles.list".<br />
M<strong>TPF</strong>2701I: loadtpf: Generating offldr output file.<br />
Command: "offldr oldr -o /home/mydir/mydir.oldr -l /home/mydir/ddfiles.list<br />
-r /home/mydir/OLDR.report "<br />
M<strong>TPF</strong>2709I: offldr return code: 0<br />
The following messages were generated:<br />
LOAD0010I Parsing step ended with return code 0.<br />
LOAD0020I Load step ended with return code 0.<br />
M<strong>TPF</strong>2702I: loadtpf: FTPing offldr output file.<br />
Command: "echo -e "open 9.57.13.44 \n user ftp ******** \n binary \n epsv4<br />
\n cd /mytpf \n put /home/mydir/mydir.oldr mydir.oldr \n" | ftp -v -n"<br />
Connected to 9.57.13.44.<br />
220 <strong>TPF</strong> FTP server (Version 1.01) ready.<br />
331 Guest login ok, type your name as password.<br />
230 Guest login ok, access restrictions apply.<br />
Remote system type is UNIX.<br />
Using binary mode to transfer files.<br />
200 Type set to I.<br />
EPSV/EPRT on IPv4 off.<br />
250 CWD command successful.<br />
local: /home/mydir/mydir.oldr remote: mydir.oldr<br />
227 Entering Passive Mode (9,57,13,44,4,4)<br />
150 Opening BINARY mode data connection for ’mydir.oldr’.<br />
226 Transfer complete.<br />
90090 bytes sent in 00:00 (751.58 KB/s)<br />
221 Goodbye.<br />
M<strong>TPF</strong>2713I: loadtpf ended, RC=0.<br />
3. On the z/<strong>TPF</strong> system, define a path to the directory where the OLDR format<br />
output file resides by entering the ZDSMG DEFINE command.<br />
For example, ZDSMG DEFINE CMDEPLOY PATH='/mytpf/mydir.oldr'.<br />
The following messages are displayed:<br />
CSMP0097I 15.16.37 CPU-B SS-BSS SSU-HPN IS-01<br />
CSMP0099I 15.16.37 010000-B ZDSMG DEFINE CMDEPLOY PATH=’/MY<strong>TPF</strong>/MYDIR.OLDR’+<br />
CSMP0097I 15.16.37 CPU-B SS-BSS SSU-HPN IS-01<br />
DSMG0001I 15.16.37 DDNAME CMDEPLOY DEFINED+<br />
4. On the z/<strong>TPF</strong> system, load the loadset to the system by entering the ZOLDR LOAD<br />
command.<br />
For example, ZOLDR LOAD CMDEPLOY.<br />
The following messages are displayed:<br />
CSMP0097I 15.16.41 CPU-B SS-BSS SSU-HPN IS-01<br />
CSMP0099I 15.16.41 010000-B ZOLDR LOAD CMDEPLOY+<br />
CSMP0097I 15.16.41 CPU-B SS-BSS SSU-HPN IS-01<br />
OLDR1016I 15.16.41 CELA - LOAD REQUEST RECEIVED+<br />
OLDR3000I 15.16.41 CLD0 - LOADSET DESCRIPT HAS BEEN LOADED FROM DDNAME CMDEPLOY+<br />
CSMP0097I 15.16.41 CPU-B SS-BSS SSU-HPN IS-01<br />
OLDR3001I 15.16.41 CELL - LOAD FOR DDNAME CMDEPLOY COMPLETED+<br />
5. On the z/<strong>TPF</strong> system, activate the loadset by entering the ZOLDR ACTIVATE<br />
command.<br />
For example, ZOLDR ACTIVATE DESCRIPT.<br />
The following messages are displayed:
|<br />
|<br />
|<br />
|<br />
|<br />
|<br />
|<br />
|<br />
|<br />
|<br />
|<br />
|<br />
|<br />
|<br />
|<br />
|<br />
|<br />
|<br />
|<br />
|<br />
|<br />
|<br />
|<br />
|<br />
|<br />
|<br />
|<br />
|<br />
|<br />
|<br />
|<br />
|<br />
|<br />
|<br />
|<br />
|<br />
|<br />
|<br />
|<br />
|<br />
|<br />
|<br />
|<br />
|<br />
|<br />
|<br />
|<br />
|<br />
|<br />
|<br />
|<br />
|<br />
|<br />
|<br />
|<br />
|<br />
|<br />
|<br />
CSMP0097I 15.17.02 CPU-B SS-BSS SSU-HPN IS-01<br />
CSMP0099I 15.17.02 010000-B ZOLDR ACTIVATE DESCRIPT+<br />
CSMP0097I 15.17.02 CPU-B SS-BSS SSU-HPN IS-01<br />
OLDR1016I 15.17.02 CELA - ACTIVATE REQUEST RECEIVED+<br />
CSMP0097I 15.17.02 CPU-B SS-BSS SSU-HPN IS-01<br />
OLDR2036I 15.17.02 ACTIVATE OF LOADSET DESCRIPT SCHEDULED<br />
FOR CPU B +<br />
CSMP0097I 15.17.02 CPU-B SS-BSS SSU-HPN IS-01<br />
OLDR2036I 15.17.02 ACTIVATE OF LOADSET DESCRIPT SCHEDULED<br />
FOR CPU C +<br />
CSMP0097I 15.17.02 CPU-B SS-BSS SSU-HPN IS-01<br />
OLDR2036I 15.17.02 ACTIVATE OF LOADSET DESCRIPT SCHEDULED<br />
FOR CPU D +<br />
:<br />
:<br />
CSMP0097I 15.17.02 CPU-B SS-BSS SSU-HPN IS-01<br />
OLDR2036I 15.17.02 ACTIVATE OF LOADSET DESCRIPT SCHEDULED<br />
FOR CPU 6 +<br />
CSMP0097I 15.17.02 CPU-B SS-BSS SSU-HPN IS-01<br />
CYC10007I 15.17.02 POOL TYPE SST DEVICE DEVA COUNTS 1100 IN USE<br />
FIRST TIME THE DIRECTORY IS BEING USED SINCE LAST REALLOCATION+<br />
CSMP0097I 15.17.02 CPU-B SS-BSS SSU-HPN IS-01<br />
OLDR2015I 15.17.02 CEL2 - LOADSET DESCRIPT ASSIGNED ACTIVATION<br />
NUMBER 1 ON CPU B+<br />
CSMP0097I 15.17.02 CPU-B SS-BSS SSU-HPN IS-01<br />
OLDR2043I 15.17.02 ACTIVATE OF LOADSET DESCRIPT COMPLETED<br />
FOR CPU B AS REQUESTED BY CPU B+<br />
CSMP0097I 15.17.10 CPU-B SS-BSS SSU-HPN IS-01<br />
OLDR2043I 15.17.10 ACTIVATE OF LOADSET DESCRIPT COMPLETED<br />
FOR CPU C AS REQUESTED BY CPU B+<br />
CSMP0097I 15.17.10 CPU-B SS-BSS SSU-HPN IS-01<br />
OLDR2043I 15.17.10 ACTIVATE OF LOADSET DESCRIPT COMPLETED<br />
FOR CPU D AS REQUESTED BY CPU B+<br />
:<br />
:<br />
CSMP0097I 15.17.10 CPU-B SS-BSS SSU-HPN IS-01<br />
OLDR2043I 15.17.10 ACTIVATE OF LOADSET DESCRIPT COMPLETED<br />
FOR CPU 6 AS REQUESTED BY CPU B+<br />
6. On the z/<strong>TPF</strong> system, remove the data definition name that was previously<br />
defined by entering the ZDSMG RELEASE command.<br />
For example, ZDSMG RELEASE CMDEPLOY.<br />
The following messages are displayed:<br />
CSMP0097I 15.17.45 CPU-B SS-BSS SSU-HPN IS-01<br />
CSMP0099I 15.17.45 010000-B ZDSMG RELEASE CMDEPLOY+<br />
CSMP0097I 15.17.45 CPU-B SS-BSS SSU-HPN IS-01<br />
DSMG0014I 15.17.45 DDNAME CMDEPLOY RELEASED+<br />
Results<br />
All deployment descriptors that are specified in the loader input file are loaded to<br />
the /sys/tpf_pbfiles/tpf-fdes/ directory on the z/<strong>TPF</strong> system. Additionally, any<br />
deployment descriptor that is listed in the common deployment configuration file<br />
with the automatic deployment indicator set to YES is automatically deployed.<br />
What to do next<br />
To deploy any deployment descriptors that were not defined to automatically deploy,<br />
enter the ZMDES command with the DEPLOY parameter specified.<br />
You can display all deployment descriptors that are currently deployed by entering<br />
ZMDES DISPLAY. For example:<br />
Using common deployment 95
|<br />
|<br />
|<br />
|<br />
|<br />
|<br />
|<br />
|<br />
|<br />
|<br />
|<br />
|<br />
|<br />
|<br />
|<br />
|<br />
|<br />
|<br />
|<br />
|<br />
|<br />
|<br />
|<br />
|<br />
|<br />
|<br />
|<br />
|<br />
|<br />
|<br />
|<br />
|<br />
|<br />
|<br />
|<br />
|<br />
|<br />
|<br />
|<br />
|<br />
|<br />
|<br />
|<br />
|<br />
|<br />
|<br />
CSMP0097I 15.29.17 CPU-B SS-BSS SSU-HPN IS-01<br />
CSMP0099I 15.29.17 010000-B ZMDES DISP+<br />
CSMP0097I 15.29.17 CPU-B SS-BSS SSU-HPN IS-01 _<br />
MDES0016I 15.29.17 DISPLAY OF ALL DEPLOYMENT DESCRIPTORS FOR PROCESSOR B<br />
IN-MEMORY FILE<br />
STATUS STATUS FILE NAME<br />
DEPLOYED DEPLOYED /sys/tpf_pbfiles/tpf-fdes/wodmDrvr.ept.xml<br />
DEPLOYED DEPLOYED /sys/tpf_pbfiles/tpf-fdes/wodmDrvr.ilr.xml _<br />
DEPLOYED DEPLOYED /sys/tpf_pbfiles/tpf-fdes/wodmDrvr.tdm.xml<br />
DEPLOYED DEPLOYED /sys/tpf_pbfiles/tpf-fdes/bepDrvr.evspec.xml<br />
DEPLOYED DEPLOYED /sys/tpf_pbfiles/tpf-fdes/bepDrvr.evda.xml<br />
END OF DISPL<br />
Related reference:<br />
ZMDES–Manage deployment descriptors<br />
Related information:<br />
“E-type loader” on page 115<br />
“Image loader” on page 113<br />
Removing a deployment descriptor<br />
Use this procedure to remove a deployment descriptor from the z/<strong>TPF</strong> system.<br />
Procedure<br />
1. Delete or accept any active or inactive loadsets that contain the deployment<br />
descriptor that you want to remove. Wait for the delete or accept operation to<br />
complete before you continue to the next step.<br />
2. Undeploy the deployment descriptor.<br />
a. To undeploy the deployment descriptor on all inactive processors, enter<br />
ZMDES UNDEPLOY FILE-descriptor IPROC-ALL, where descriptor is the file<br />
name of the descriptor.<br />
b. To undeploy the deployment descriptor on all active processors, enter<br />
ALL//ZMDES UNDEPLOY FILE-descriptor, where descriptor is the file name of<br />
the descriptor.<br />
If the deployment descriptor is permanently deployed, an error is issued<br />
because you cannot undeploy a permanently deployed descriptor. If this error<br />
occurs, ensure that the deployment descriptor is no longer used before you<br />
continue to step 3.<br />
3. Remove the deployment descriptor from the file system by entering ZFILE rm<br />
/sys/tpf_pbfiles/tpf-fdes/descriptor, where descriptor is the file name of<br />
the descriptor.<br />
Results<br />
96 z/<strong>TPF</strong> <strong>Program</strong> <strong>Management</strong><br />
In-memory structures that are associated with the deployment descriptor continue to<br />
exist until the next IPL. Additionally, the deployment descriptor file name remains in<br />
the common deployment status file until the next IPL.<br />
What to do next<br />
At your convenience, IPL the prime module and cycle the z/<strong>TPF</strong> system to NORM<br />
state to clean up memory and the common deployment status file.
|<br />
|<br />
|<br />
|<br />
|<br />
|<br />
|<br />
|<br />
|<br />
|<br />
|<br />
|<br />
|<br />
|<br />
|<br />
|<br />
|<br />
|<br />
|<br />
|<br />
|<br />
|<br />
|<br />
|<br />
|<br />
|<br />
|<br />
|<br />
|<br />
|<br />
|<br />
Related reference:<br />
ZMDES–Manage deployment descriptors<br />
Related information:<br />
“Work with loadsets” on page 87<br />
Handling an error during IPL after common deployment is installed<br />
After common deployment is loaded on your z/<strong>TPF</strong> system, if you IPL an additional<br />
processor in your loosely coupled complex, you might receive errors during restart.<br />
About this task<br />
Before you load common deployment to the z/<strong>TPF</strong> system in a loosely coupled<br />
complex, you must ensure that the version control file index (VCFX), process<br />
pseudo-file system (PROCFS), and the system pseudo-file system (SYSFS) are all<br />
mounted on each processor. If you IPL an additional processor in the loosely<br />
coupled complex and these file systems are not mounted on that processor, you<br />
might receive errors during restart. In particular, you might receive message<br />
FDES0011W. Use this procedure to correct the problem.<br />
Procedure<br />
1. In 1052 state, cycle up get file storage (GFS). Enter ZPOOL 1052 UP.<br />
2. Mount the version control file index (VCFX).<br />
3. Mount the process pseudo-file system (PROCFS).<br />
4. Mount the system pseudo-file system (SYSFS).<br />
5. Cycle down GFS. Enter ZPOOL 1052 DOWN.<br />
6. IPL the processor again.<br />
Related concepts:<br />
“Common deployment” on page 37<br />
The z/<strong>TPF</strong> system uses a mechanism called common deployment to make<br />
deployment descriptors available for use.<br />
Related reference:<br />
ZPOOL 1052–Cycle get file storage support up or down in 1052 state<br />
Related information:<br />
z/<strong>TPF</strong> file system support<br />
Using common deployment 97
98 z/<strong>TPF</strong> <strong>Program</strong> <strong>Management</strong>
Part 3. Reference<br />
© Copyright <strong>IBM</strong> Corp. 2005, 2012 99
100 z/<strong>TPF</strong> <strong>Program</strong> <strong>Management</strong>
Export files<br />
The following example shows the C shared object (CSO) export file used when<br />
APP_EXPORT:=ENTRY. The global section lists common symbols that are required by<br />
the z/<strong>TPF</strong> system. All other symbols are specified as local. This export file is<br />
located at base/exp/app_entry.exp<br />
{<br />
global:<br />
CGCC_31BIT;<br />
__<strong>TPF</strong>_soinit;<br />
main;<br />
__do_global_ctors_aux;<br />
__do_global_dtors_aux;<br />
__<strong>TPF</strong>SUD;<br />
local:<br />
*;<br />
};<br />
An alternate way to define functions as global or local for CSOs is to use the<br />
-fvisibility compiler option. Specify -fvisibility=hidden to identify all C/C++ functions<br />
as local except where they are coded with __attribute__((visibility(default))).<br />
An alternate and preferred method to define functions as local for shared objects<br />
that contain assembler code is to use the APP_EXPORT := VISIBILITY makefile<br />
setting.<br />
For more information about export files, called version scripts by the GNU compiler<br />
collection (GCC), go to http://www.gnu.org.<br />
© Copyright <strong>IBM</strong> Corp. 2005, 2012 101
102 z/<strong>TPF</strong> <strong>Program</strong> <strong>Management</strong>
Control files<br />
The following table provides details about the various types of control files that are<br />
included by <strong>IBM</strong>.<br />
Note:<br />
1. base/cntl/tpf.cntl and base/cntl/usr.cntl are the only control files<br />
known to the Make<strong>TPF</strong> build solution. All other files listed are included by<br />
these two files. These files are included with the z/<strong>TPF</strong> system to group<br />
and categorize z/<strong>TPF</strong> programs.<br />
2. To prevent your changes from being overwritten when you make<br />
modifications to these control files, copy them to the<br />
local_mod/base/cntl directory and make your changes to these copies.<br />
For more information about the local_mod/ directory, see “Local<br />
modifications” on page 7.<br />
Table 4. Control file descriptions included by <strong>IBM</strong><br />
Control file name and location Description<br />
base/cntl/tpf.cntl List of all z/<strong>TPF</strong> programs with their build<br />
and load options.<br />
base/cntl/usr.cntl List of all customer programs with their build<br />
and load options.<br />
base/cntl/tpf_app_base.cntl List of all z/<strong>TPF</strong> applications.<br />
base/cntl/tpf_app_base_ux.cntl List of all z/<strong>TPF</strong> application user exits.<br />
base/cntl/tpf_app_base_xv.cntl List of all z/<strong>TPF</strong> transfer vectors and stubs<br />
for multi-segment BSO entry points.<br />
base/cntl/tpf_app_hpo.cntl List of all z/<strong>TPF</strong> HPO applications. Includes<br />
any archives needed to build the<br />
applications.<br />
base/cntl/tpf_app_tpfdf.cntl List of all z/<strong>TPF</strong>DF applications.<br />
base/cntl/tpf_app_tpfdf_ux.cntl List of all z/<strong>TPF</strong>DF application user exits.<br />
base/cntl/tpf_app_tpfdf_xv.cntl List of all z/<strong>TPF</strong>DF transfer vectors and stubs<br />
for multi-segment BSO entry points.<br />
base/cntl/tpf_app_usr.cntl List of all customer system programs. Use to<br />
list customer programs needed to build the<br />
z/<strong>TPF</strong> system.<br />
base/cntl/tpf_cimr.cntl List of all z/<strong>TPF</strong> CP, CIMR, IPL programs.<br />
Any ARCHIVES needed to link these<br />
programs also are included.<br />
base/cntl/tpf_kpt.cntl List of all z/<strong>TPF</strong> keypoints.<br />
base/cntl/tpf_ol_linux.cntl List of all z/<strong>TPF</strong> offline programs that run on<br />
the Linux platform. Archives needed to link<br />
the offline programs also are included.<br />
base/cntl/tpf_ol_os390.cntl List of all z/<strong>TPF</strong> offline programs that run on<br />
the z/OS platform.<br />
base/cntl/tpf_stdlib.cntl List of all standard libraries and includes.<br />
base/cntl/tpf_util_linux.cntl List of all z/<strong>TPF</strong> utility programs that run on<br />
the Linux platform. Archives needed to link<br />
these utilities also are included.<br />
© Copyright <strong>IBM</strong> Corp. 2005, 2012 103
|<br />
104 z/<strong>TPF</strong> <strong>Program</strong> <strong>Management</strong><br />
For details about the content and format, see the prolog of base/cntl/tpf.cntl.
|<br />
|<br />
|<br />
|<br />
|<br />
|<br />
|<br />
XML descriptor control files<br />
The base/cntl/tpf.cntl_tdmdd and base/cntl/usr.cntl_tdmdd files are shipped<br />
with your z/<strong>TPF</strong> system to list the XML descriptor files and the artifacts that should<br />
be created from each.<br />
For a detailed description of the file content and format, see the prolog of the<br />
base/cntl/tpf.cntl_tdmdd file.<br />
© Copyright <strong>IBM</strong> Corp. 2005, 2012 105
106 z/<strong>TPF</strong> <strong>Program</strong> <strong>Management</strong>
Load files for version control<br />
The base/cntl/tpf.loadfile and base/cntl/usr.loadfile files are shipped with<br />
your z/<strong>TPF</strong> system to group and categorize z/<strong>TPF</strong> files.<br />
The following table describes the record types that are supported by the<br />
base/cntl/tpf.loadfile and base/cntl/usr.loadfile files.<br />
Table 5. Load file record type support<br />
Load file record type Description<br />
Comment A line that begins with the # delimiter.<br />
Include A line reference to a load file that is to be<br />
included on the z/<strong>TPF</strong> system. Use the<br />
following format:<br />
include filename<br />
where filename is a relative file name such<br />
as base/cntl/tpf_comms.loadfile, which is<br />
found under the <strong>TPF</strong>_ROOT or APPL_ROOT<br />
directories.<br />
The include statements are only supported in<br />
the base/cntl/tpf.loadfile and<br />
base/cntl/usr.loadfile files.<br />
File entry A line delimited with a semicolon that<br />
contains the file descriptor data, as outlined<br />
in the Table 6.<br />
Version statement The file version of the load list.<br />
The following table provides details about the information that you need to enter in<br />
each column of the load file. See the prolog of the base/cntl/tpf.loadfile file for<br />
more details about the load file format requirements.<br />
Table 6. Load file column definitions<br />
Column<br />
Number Field Name Values Comments<br />
© Copyright <strong>IBM</strong> Corp. 2005, 2012 107
108 z/<strong>TPF</strong> <strong>Program</strong> <strong>Management</strong><br />
Table 6. Load file column definitions (continued)<br />
1 Source path Free-form edit v The relative or absolute path<br />
of the file on Linux that is to<br />
be loaded to the z/<strong>TPF</strong><br />
system.<br />
If the Make<strong>TPF</strong> build solution<br />
determines that the file does<br />
not use the source path as an<br />
absolute path:<br />
– The files in the<br />
base/cntl/tpf.loadfile<br />
file are relative to the<br />
<strong>TPF</strong>_ROOT directory<br />
– The files in<br />
base/cntl/usr.loadfile<br />
are relative to the<br />
APPL_ROOT directory.<br />
v Pathnames for<br />
configuration-dependent files<br />
can use the string to<br />
represent the configuration<br />
dependent directory name.<br />
The Make<strong>TPF</strong> build solution<br />
will replace with the<br />
directory name derived from<br />
the values of<br />
<strong>TPF</strong>_BSS_NAME,<br />
<strong>TPF</strong>_SS_NAME, and<br />
<strong>TPF</strong>_BAS_DIRNAME, defined<br />
in the maketpf configuration<br />
file.<br />
v Example names:<br />
/loadfiles/<br />
data.txt,ztpf/prod/<br />
loadfiles/data.txt,<br />
home/user/myprj//<br />
loadfiles/data.txt<br />
2 Target path Free-form edit v The absolute path on a z/<strong>TPF</strong><br />
system.<br />
v The program base unique files<br />
must be loaded to the<br />
/sys/tpf_pbfiles directory.<br />
3 Permission See the permission parameter on<br />
the “@FILE” on page 139 control<br />
statement for more information.<br />
4 Owner Free-form edit See the newowner parameter on<br />
the ZFILE chown command for<br />
more information.<br />
5 Group Free-form edit See the newgroup parameter on<br />
the ZFILE chown command for<br />
more information.
Table 6. Load file column definitions (continued)<br />
6 Source file data<br />
type<br />
v<br />
v<br />
BINARY<br />
TEXT<br />
v ONLINE<br />
7 System<br />
allocation<br />
v ALL<br />
v BSS<br />
v EXC<br />
v ssname<br />
Specifies the data type of the file<br />
that is loaded to the z/<strong>TPF</strong><br />
system. Explanation of the<br />
supported values:<br />
BINARY<br />
specifies that the source file<br />
contains binary data that<br />
does not require text<br />
translation when loaded on<br />
the z/<strong>TPF</strong> system.<br />
TEXT<br />
specifies that the source file<br />
contains text data that is<br />
translated to EBCDIC data<br />
when loaded on the z/<strong>TPF</strong><br />
system.<br />
ONLINE<br />
specifies that the source<br />
path identifies an online file<br />
to be affiliated with the<br />
loadset. The ONLINE<br />
parameter applies to files<br />
that not included in loader<br />
input files that are generated<br />
for an OLDR load.<br />
Indicates the type of system to<br />
which a file is loaded.<br />
Explanation of the supported<br />
values:<br />
ALL<br />
BSS<br />
EXC<br />
specifies that the file is<br />
included in the loader input<br />
file for all subsystems.<br />
specifies that the file is<br />
included in the loader input<br />
file for the basic subsystem<br />
(BSS).<br />
specifies that the file is<br />
included in the loader input<br />
file for all subsystems except<br />
the BSS.<br />
ssname<br />
specifies that the file is<br />
included in the loader input<br />
file for a specified<br />
subsystem.<br />
Load files for version control 109
110 z/<strong>TPF</strong> <strong>Program</strong> <strong>Management</strong><br />
Table 6. Load file column definitions (continued)<br />
8 Function<br />
Switch<br />
Free-form edit The values defined by SIP to<br />
include or exclude the files that<br />
are to be loaded based on the<br />
switch values. For example, the<br />
<strong>TPF</strong>_SB<strong>TPF</strong>DF value specifies<br />
that files are loaded when the<br />
z/<strong>TPF</strong>DF product is active. The<br />
<strong>TPF</strong>_SBALL value specifies the<br />
files that are to be loaded all the<br />
time.<br />
9-12 User 1–4 Free-form edit Reserved for customer use.<br />
13 Sid Code Free-form edit Use in the base/cntl/<br />
tpf.loadfile file to identify the<br />
support that added or modified<br />
the entry.
General file loader<br />
The general file loader consists of an offline ALDR load and the online ACPL<br />
program:<br />
v Use the z/<strong>TPF</strong> offline loader to perform an ALDR load. The following control<br />
statements apply to an ALDR load:<br />
– “@APPLICATION” on page 125<br />
– “@CIMR” on page 128<br />
– “@CTKX” on page 132<br />
– “@DEFINE” on page 134<br />
– “@INCLUDE” on page 145<br />
– “@IPL” on page 145<br />
– “@KEYPOINT” on page 148<br />
– “@GFKEYPOINT” on page 142.<br />
v The ACPL program is called when you IPL the pack that contains the loader<br />
general file that was created by ALDR.<br />
Note: The @VERIFY control statement is not necessary because verification is<br />
performed by using the program attribute table (PAT) loaded in the @CIMR<br />
control statement.<br />
See “Offline general file loader component (ALDR)” on page 22, “Online general file<br />
loader component (ACPL)” on page 23, and “Load system components to a new<br />
z/<strong>TPF</strong> system” on page 73 for more information about the general file loader. See<br />
“z/<strong>TPF</strong> offline loader” on page 117 for more information about the z/<strong>TPF</strong> offline<br />
loader.<br />
© Copyright <strong>IBM</strong> Corp. 2005, 2012 111
112 z/<strong>TPF</strong> <strong>Program</strong> <strong>Management</strong>
|<br />
Image loader<br />
The image loader consists of an offline TLDR load and an online image load:<br />
v Use the z/<strong>TPF</strong> offline loader to perform a TLDR load. The following control<br />
statements apply to a TLDR load:<br />
– “@APPLICATION” on page 125<br />
– “@CIMR” on page 128<br />
– “@CTKX” on page 132<br />
– “@DEFINE” on page 134<br />
– “@FILE” on page 139<br />
– “@INCLUDE” on page 145<br />
– “@IPL” on page 145<br />
– “@KEYPOINT” on page 148<br />
– “@VERIFY” on page 153.<br />
v Use the ZTPLD command to perform an online image load. See z/<strong>TPF</strong><br />
Operations for more information about this command.<br />
See “Offline image loader component (TLDR)” on page 23, “Online image loader<br />
component (ZTPLD)” on page 24, and “Load system components to an existing<br />
z/<strong>TPF</strong> system” on page 77 for more information about the image loader. See “z/<strong>TPF</strong><br />
offline loader” on page 117 for more information about the z/<strong>TPF</strong> offline loader.<br />
© Copyright <strong>IBM</strong> Corp. 2005, 2012 113
114 z/<strong>TPF</strong> <strong>Program</strong> <strong>Management</strong>
|<br />
E-type loader<br />
The E-type loader consists of an offline OLDR load and an online E-type load:<br />
v Use the z/<strong>TPF</strong> offline loader to perform an OLDR load. The following control<br />
statements apply to an OLDR load:<br />
– “@DEFINE” on page 134<br />
– “@FILE” on page 139<br />
– “@INCLUDE” on page 145<br />
– “@LOADSET” on page 151<br />
– “@VERIFY” on page 153.<br />
v Use the ZOLDR command to perform an online E-type load. See z/<strong>TPF</strong><br />
Operations for more information about this command.<br />
See “Offline E-type loader component (OLDR)” on page 25, “Online E-type loader<br />
component (OLDR)” on page 26, and “Load E-type programs and files to an<br />
enabled system” on page 81 for more information about the E-type loader. See<br />
“z/<strong>TPF</strong> offline loader” on page 117 for more information about the z/<strong>TPF</strong> offline<br />
loader.<br />
© Copyright <strong>IBM</strong> Corp. 2005, 2012 115
116 z/<strong>TPF</strong> <strong>Program</strong> <strong>Management</strong>
z/<strong>TPF</strong> offline loader<br />
JCL statements<br />
This section describes how to call the z/<strong>TPF</strong> offline loader by using:<br />
v “JCL statements”<br />
v The “Linux offldr command” on page 119<br />
v The “Linux labeltape command” on page 121.<br />
The following topics also are included:<br />
v “Return codes” on page 121<br />
v “Comment conventions” on page 123.<br />
Use the <strong>TPF</strong>LDR program in your job control language (JCL) to call the z/<strong>TPF</strong><br />
offline loader on your z/OS system. Your JCL code must reflect your environment,<br />
standards, and naming conventions. For more information about JCL, see “JCL for<br />
sending your output” on page 157.<br />
The EXEC statement of your JCL must conform to the following syntax:<br />
►►<br />
►<br />
PGM=<strong>TPF</strong>LDR<br />
USER: userparms<br />
,PARM='ALDR,TRACE(OFF)'<br />
ALDR ,TRACE(OFF)<br />
,PARM=' '<br />
OLDR ,TRACE(ON)<br />
TLDR<br />
ALDR<br />
performs an offline ALDR load. See “General file loader” on page 111 for more<br />
information about the general file loader.<br />
OLDR<br />
performs an offline OLDR load. See “E-type loader” on page 115 for more<br />
information about the E-type loader.<br />
TLDR<br />
performs an offline TLDR load. See “Image loader” on page 113 for more<br />
information about the image loader.<br />
TRACE(OFF)<br />
performs the load without performing a trace function.<br />
TRACE(ON)<br />
performs the load while performing a trace function that can help with<br />
debugging the loader. If you specify this option, you must specify the<br />
LDRTRACE DD statement in your JCL.<br />
USER: userparms<br />
is an indicator that allows user parameters that are passed to the offline loader<br />
© Copyright <strong>IBM</strong> Corp. 2005, 2012 117<br />
►<br />
►◄
118 z/<strong>TPF</strong> <strong>Program</strong> <strong>Management</strong><br />
user exit (UELR) to be included, where userparms are the parameters that you<br />
have specified. This parameter indicates that no subsequent parameter will be<br />
parsed by the offline loader. If you specify this parameter, the offline loader<br />
does not impose any syntax constraints.<br />
Your JCL must include the following DD statements:<br />
GENFIL<br />
specifies the general file that offline data is written to.<br />
Note: When performing an ALDR load, use the GENFIL and GENFI2<br />
parameters instead of LDROUT.<br />
GENFI2<br />
specifies the general file DSN for the 4 KB region that offline programs and<br />
data are written to.<br />
Note: When performing an ALDR load, use the GENFIL and GENFI2<br />
parameters instead of LDROUT.<br />
LDRLOAD<br />
specifies the location of the loader input file.<br />
LDRTEMP<br />
specifies a temporary data set used to hold information before writing the final<br />
output to the location specified by LDROUT.<br />
LDROUT<br />
specifies the location for the final output. This final output is used as input for<br />
the online load.<br />
Note: When performing an ALDR load, use the GENFIL and GENFI2<br />
parameters instead of LDROUT.<br />
LDRREPORT<br />
specifies the file that the output report is written to. This report includes<br />
information about the programs and components that were loaded and where<br />
they were loaded from. This report also indicates which programs and<br />
components could not be loaded.<br />
If you specify TRACE(ON), your JCL must include the following DD statement:<br />
LDRTRACE<br />
specifies the trace file used for debugging the loader.<br />
Note: This DD statement is ignored when you do not specify the TRACE(ON)<br />
parameter on your JCL EXEC statement.<br />
See “JCL for sending your output” on page 157 for sample JCL.
Linux offldr command<br />
On your Linux system, use the offldr command to call the z/<strong>TPF</strong> offline loader. See<br />
“z/<strong>TPF</strong> offline loader input file control statements” on page 125 for more information.<br />
►► offldr oldr<br />
tldr<br />
--help<br />
--Version<br />
►<br />
►<br />
►<br />
►<br />
-output TLDR.out<br />
OLDR.out<br />
-output outfile<br />
-o<br />
-trace tracefile<br />
-t<br />
-load TLDR.load<br />
OLDR.load<br />
-load loadfile<br />
-l<br />
-report TLDR.report<br />
OLDR.report<br />
-report reportfile<br />
-r<br />
-w workdir<br />
-dsn TLD.TAPE<br />
OLD.TAPE<br />
-volser volser<br />
SCRTCH -expdt yyyyddd -dsn datasetname<br />
-retpd nnnn<br />
-u user parms<br />
oldr<br />
writes an OLDR-formatted file to the output file. See “E-type loader” on page<br />
115 for more information about the E-type loader.<br />
tldr<br />
writes a TLDR-formatted file to the output file. See “Image loader” on page 113<br />
for more information about the image loader.<br />
--help<br />
prints help information for the parameters that you can specify using the z/<strong>TPF</strong><br />
offline loader command and then exits.<br />
--Version<br />
specifies that the version number of the z/<strong>TPF</strong> offline loader command is<br />
printed and then exits.<br />
-load loadfile<br />
specifies the location of the loader input file, where loadfile is the path of the<br />
file. The default is OLDR.load if the oldr parameter was specified, or TLDR.load<br />
if the tldr parameter was specified. If the -load parameter is not specified, the<br />
offline loader assumes that your loader input file is named OLDR.load or<br />
TLDR.load, and that this file exists in your current working directory. Otherwise,<br />
an error will occur.<br />
You also can enter -l for this parameter.<br />
►<br />
►<br />
►<br />
►<br />
►◄<br />
z/<strong>TPF</strong> offline loader 119
120 z/<strong>TPF</strong> <strong>Program</strong> <strong>Management</strong><br />
-output outfile<br />
specifies the location of the output file, where outfile is the path of the file. The<br />
default is OLDR.out if the oldr parameter was specified. In this case, the offline<br />
loader creates (or replaces the contents of) a file named OLDR.out in your<br />
current working directory. The default is TLDR.out if the tldr parameter was<br />
specified. In this case, the offline loader creates (or replaces the contents of) a<br />
file named TLDR.out in your current working directory.<br />
You also can enter -o for this parameter.<br />
-report reportfile<br />
specifies the location of the report file, where reportfile is the path of the file.<br />
The default is OLDR.report if the oldr parameter was specified. In this case, the<br />
offline loader creates (or replaces the contents of) a file named OLDR.report in<br />
your current working directory. The default is TLDR.report if the tldr parameter<br />
was specified. In this case, the offline loader creates (or replaces the contents<br />
of) a file named TLDR.report in your current working directory.<br />
You also can enter -r for this parameter.<br />
-trace tracefile<br />
specifies the location of the trace file, where tracefile is the path of the file. If<br />
this parameter is not specified, a trace file is not generated.<br />
You also can enter -t for this parameter.<br />
-w workdir<br />
specifies the working directory, where workdir is the path of the directory. Any<br />
relative paths specified for this command are assumed to be relative to this<br />
directory. If this parameter is not specified, the offline loader assumes that the<br />
appropriate working directory is the directory from which the offldr command<br />
was entered.<br />
-volser<br />
specifies a tape volume serial number (VOLSER), where:<br />
volser<br />
is the volume serial number of the tape that you want the data written to.<br />
This value must match the label on the tape that is mounted on the device<br />
specified by the -output parameter.<br />
SCRTCH<br />
writes the data to a scratch tape that is mounted on the device specified by<br />
the -output parameter.<br />
You must specify this parameter if the output device is a tape.<br />
-expdt yyyyddd<br />
specifies the expiration date for the tape specified, where yyyyddd is the year<br />
and day that the data expires. The data on the tape can be overwritten when<br />
the expiration date on the tape has elapsed. If you do not specify this<br />
parameter, the current date is used and the tape expires.<br />
-retpd nnnn<br />
specifies the retention period for the tape specified, where nnnn is the number<br />
of days before the tape expires. The data on the tape can be overwritten when<br />
the expiration date on the tape has elapsed. If you do not specify this<br />
parameter, zero is used and the tape expires.
Linux labeltape command<br />
Return codes<br />
-dsn datasetname<br />
specifies the name of the data set, where datasetname is the data set name.<br />
The default is OLD.TAPE if the oldr parameter was specified, or TLD.TAPE if<br />
the tldr parameter was specified.<br />
-u user parms<br />
is an indicator that allows user parameters that are passed to the offline loader<br />
user exit (UELR) to be included, where user parms are the parameters that you<br />
have specified. This parameter indicates that no subsequent parameters will be<br />
parsed by the offline loader. If you specify this parameter, the offline loader<br />
does not impose any syntax constraints.<br />
See “Offline loader support on Linux” on page 28 for more information about this<br />
command.<br />
Use the z/<strong>TPF</strong> labeltape command on Linux to create an z/OS-style standard label<br />
on a tape. See “z/<strong>TPF</strong> offline loader input file control statements” on page 125 and<br />
“Offline loader support on Linux” on page 28for more information about the z/<strong>TPF</strong><br />
offline loader.<br />
►► labeltape --help<br />
--Version<br />
--file device --volser volser<br />
= =<br />
-f -v<br />
--help<br />
prints help information for the parameters that you can specify with the z/<strong>TPF</strong><br />
labeltape command and then exits.<br />
--Version<br />
specifies that the version number of the z/<strong>TPF</strong> labeltape command is printed<br />
and then exits.<br />
--file device<br />
specifies the device that the tape is mounted on. This value must be specified<br />
using the /dev/ directory on Linux, which lists the system devices that are<br />
available. You also can enter -f for this parameter.<br />
--volser volser<br />
specifies a tape volume serial number (VOLSER) that is used to label the tape.<br />
This value must contain exactly six alphanumeric characters. You also can enter<br />
-v for this parameter.<br />
See “Offline loader support on Linux” on page 28for more information about this<br />
command.<br />
After running the offline loader, the following two return codes are sent to SYSOUT<br />
(z/OS STDOUT) in a two-line status message:<br />
v A return code indicating the level of success of the parsing phase of the offline<br />
load. If this return code is 8 or greater, the loading phase is not performed.<br />
►◄<br />
z/<strong>TPF</strong> offline loader 121
0 8<br />
0<br />
v A return code indicating the level of success of the loading phase of the offline<br />
load.<br />
The return code for the entire offline load is the greater of the two return codes.<br />
The following defines the return code values.<br />
Explanation: No errors occurred; no warnings were<br />
generated.<br />
System action: The offline load is completed.<br />
User response: Use the appropriate online loader to<br />
load the components or programs to your z/<strong>TPF</strong><br />
system:<br />
1. If you did an offline E-type load, use the ZOLDR<br />
command.<br />
2. If you did an offline general file load, ACPL will start<br />
automatically when you IPL the loader general file.<br />
3. If you did an offline image load, use the ZTPLD<br />
command.<br />
See z/<strong>TPF</strong> Operations for more information about the<br />
ZOLDR and ZTPLD commands. See “Online general file<br />
loader component (ACPL)” on page 23 for more<br />
information about the ACPL program.<br />
4<br />
Explanation: An error occurred because there was an<br />
unexpected line in the loader input file.<br />
For example, this return code is generated for the<br />
following errors:<br />
v A line started with a slash-asterisk (/*) indicating that<br />
the line is a comment. A closing asterisk-slash (*/)<br />
was not found before the end of the file. The offline<br />
loader assumes that the end of the file is the end of<br />
the comment.<br />
v The @INCLUDE control statement was started with<br />
@INCLUDE, but a file was not specified.<br />
v A processor was specified for something other than a<br />
processor-unique keypoint.<br />
v An object file was specified for a control statement<br />
other than @APPLICATION.<br />
v A control statement was misspelled; for example,<br />
@APPLICATOIN rather than @APPLICATION.<br />
v A control statement includes extra text that was not<br />
expected.<br />
System action: The offline loader program makes<br />
assumptions about the unexpected lines and completes<br />
the load.<br />
User response: Complete the following steps:<br />
1. Review the errors and determine if the assumptions<br />
made by the loader were correct.<br />
2. Do one of the following:<br />
122 z/<strong>TPF</strong> <strong>Program</strong> <strong>Management</strong><br />
8<br />
v If the assumptions made by the offline loader<br />
were correct, use the appropriate online loader to<br />
load the components to your z/<strong>TPF</strong> system:<br />
a. If you did an offline E-type load, use the<br />
ZOLDR command.<br />
b. If you did an offline general file load, ACPL<br />
will start automatically when you IPL the<br />
loader general file.<br />
c. If you did an offline image load, use the<br />
ZTPLD command.<br />
See z/<strong>TPF</strong> Operations for more information about<br />
the ZOLDR and ZTPLD commands. See “Online<br />
general file loader component (ACPL)” on page<br />
23 for more information about the ACPL program.<br />
Consider correcting the loader input file so that<br />
these errors are not repeated in the future.<br />
v If the assumptions made by the offline loader<br />
were incorrect, make the necessary corrections to<br />
the loader input file and run the offline load again.<br />
Explanation: An error occurred that impacts the<br />
output of the offline load.<br />
For example, this return code is generated for the<br />
following error:<br />
v There is an entry point name that is exported by<br />
more than one shared object.<br />
System action: If this return code is for the parsing<br />
phase of the load, the loading phase is not completed.<br />
If this return code is for the loading phase, the load is<br />
completed without the component that caused the error.<br />
User response: Do one of the following:<br />
v If the error occurred during the parsing phase,<br />
complete the following steps:<br />
1. Review the error message and correct the loader<br />
input file.<br />
2. Run the offline load again.<br />
The loading phase will not begin until the parsing<br />
phase has completed with a return code of 0 or 4.<br />
v If the error occurred during the loading phase,<br />
complete the following steps:<br />
1. Review the error message and make the<br />
necessary corrections.<br />
2. If your load requires the component that caused<br />
the error, run the offline load again.
12<br />
Explanation: An error occurred that prevents the load<br />
from being completed.<br />
For example, this return code is generated for the<br />
following errors:<br />
v The loader input file could not be opened.<br />
v The loader input file is empty.<br />
v There are multiple occurrences of the load type<br />
parameter in the JCL. For example, ’TLDR,ALDR’ or<br />
’TLDR,TLDR’.<br />
v There are multiple occurrences of the trace<br />
parameter in the JCL. For example,<br />
’TRACE(ON),TLDR,TRACE(OFF)’ or ’TRACE(ON),<br />
TRACE(ON)’.<br />
Comment conventions<br />
v There is not enough space for one or more<br />
structures.<br />
v A parameter specified in the JCL is not valid.<br />
v An error occurred while opening, writing to, or<br />
reading one of the output files.<br />
System action: The load is not completed.<br />
User response: Complete the following steps:<br />
1. Review the error messages and make the<br />
necessary corrections.<br />
2. Run the offline load again.<br />
When you create the loader input file for the offline loader, you can include<br />
comments that use the following conventions:<br />
v To denote that an entire line is a comment, ensure that the first nonblank<br />
character on the line is an asterisk (*).<br />
v To denote a comment in a line, place a slash-asterisk (/*) before the start of your<br />
comment and an asterisk-slash (*/) after the end of your comment. These inline<br />
comments can span multiple lines.<br />
Note: When your loader input file is inline with your JCL (that is, you are using<br />
the LDRLOAD DD * DD statement), a slash-asterisk (/*) in the first column<br />
indicates the end of the input file. Accordingly, any comments in that inline<br />
loader input file cannot start in the first column.<br />
v To associate a comment with a program, place the comment text in parentheses<br />
after the program specification. The comment is displayed in the output report.<br />
v To associate a comment with a loadset, place the comment text in parentheses<br />
on the line following the @LOADSET statement. The parentheses cannot be<br />
nested and you cannot use a closing parentheses as part of a comment.<br />
Examples<br />
The following example shows:<br />
v The text of a loadset-level comment in parentheses on the line following the<br />
@LOADSET LOADTEST statement<br />
v The text of an inline comment contained between a /* and /*<br />
v The text of a program-associated comment contained in parentheses<br />
v The text of a comment on an entire line denoted by an *.<br />
@LOADSET LOADTEST /home/dfallon/proj/maketpf_load<br />
(Place your loadset-level comment here.)<br />
PRG2bin parentheses.so /* comment in line */<br />
PRG1.so<br />
PRG3.so (This is a program-associated comment.)<br />
@@PRG1.so 044 0047 this is a patch to PRG1.so<br />
* Comment line - include a file in this loadset<br />
@FILE -s /u/dfallon -o tpfdfltu -g tpfdfltg<br />
myfile.txt<br />
@LOADSET LOADTXT<br />
@FILE -s /u/dfallon -o tpfdfltu -g tpfdfltg<br />
filebase1.txt<br />
12<br />
z/<strong>TPF</strong> offline loader 123
124 z/<strong>TPF</strong> <strong>Program</strong> <strong>Management</strong><br />
The following two examples show different ways a loadset-level comment can span<br />
multiple lines. The first example shows a load-set level comment that contains more<br />
that 80 characters on a single line wrapping to multiple lines. The second example<br />
shows a loadset-level comment written on separate lines.<br />
@LOADSET LSNAME<br />
(this is a very long line that is to be more<br />
than 80 characters in length coded on a single<br />
line that just wraps when viewed in an editor)<br />
PROG.so<br />
@LOADSET LSNAME<br />
(this is a long comment<br />
that is broken up<br />
onto several lines)<br />
PROG.so<br />
The following example shows an inline comment immediately following a<br />
loadset-level comment.<br />
@LOADSET LSNAME<br />
(this is a loadset comment) /* this is an inline comment */<br />
@FILE -s /u/dfallon -o tpfdfltu -g tpfdfltg<br />
filebase1.txt
z/<strong>TPF</strong> offline loader input file control statements<br />
@APPLICATION<br />
The z/<strong>TPF</strong> offline loader can be run on z/OS (using the <strong>TPF</strong>LDR program) or Linux<br />
(using the OFFLDR program). The offline load is directed by a loader input file,<br />
which consists of a series of control statements. The offline loader supports three<br />
types of offline loads. For more information about each type of load, including a<br />
summary of which control statements apply to which load, see the following:<br />
v “General file loader” on page 111<br />
v “Image loader” on page 113<br />
v “E-type loader” on page 115.<br />
Use a combination of the following control statements to create your loader input<br />
file:<br />
v “@APPLICATION”<br />
v “@CIMR” on page 128<br />
v “@CTKX” on page 132<br />
v “@DEFINE” on page 134<br />
v “@FILE” on page 139<br />
v “@GFKEYPOINT” on page 142<br />
v “@INCLUDE” on page 145<br />
v “@IPL” on page 145<br />
v “@KEYPOINT” on page 148<br />
v “@LOADSET” on page 151<br />
v “@VERIFY” on page 153.<br />
You can use control statements more than once in a loader input file.<br />
Note: When loading a program, the specified file and path names in the loader<br />
input file are case sensitive. When patching a program, however, the case is<br />
ignored.<br />
Use the @APPLICATION control statement to specify the real-time programs that<br />
you want to load to the z/<strong>TPF</strong> system. If an older version of a particular program<br />
was previously specified in the loader input file, that version will be replaced by the<br />
new version.<br />
The following figure shows the syntax for the @APPLICATION control statement<br />
section of the loader input file. In this figure, the double arrowhead (►►) indicates<br />
that the information must begin on a new line.<br />
© Copyright <strong>IBM</strong> Corp. 2005, 2012 125
►►<br />
126 z/<strong>TPF</strong> <strong>Program</strong> <strong>Management</strong><br />
@APPlication<br />
CWD<br />
defaultloc<br />
Note: This must be the first line of the @APPLICATION control statement<br />
section.<br />
,<br />
►► ▼<br />
defaultloc/<br />
progname<br />
specificloc/ version .ext (progcmt)<br />
Note: If you have more than one program to load, use this line as many times<br />
as you need. Each time you use it, separate occurrences with a comma<br />
or start each occurrence on a new line.<br />
►► ▼ @@progname rsa newdata<br />
.objfile valdata-olddata<br />
, MOVe<br />
Note: If you have more than one program to patch (or if you have more than<br />
one patch for a program), use this line as many times as you need. Each<br />
time you use it, start the next occurrence on a new line.<br />
Figure 12. @APPLICATION control statement section of the loader input file<br />
defaultloc<br />
is the default location of programs to load, where defaultloc is one of the<br />
following:<br />
v The name of a search path that was defined previously in an @DEFINE<br />
control statement section (for example, &APPLPATH)<br />
v An absolute path (for example, /u/ztpf/applpath)<br />
v A relative path (for example, applpath).<br />
Note: All relative paths are appended to the current working directory, which<br />
must have been defined previously using the CWD parameter in the<br />
@DEFINE control statement section.<br />
The default location is searched for programs listed in the @APPLICATION<br />
control statement section. You can override the default path for a particular<br />
program by specifying a specific path for that program.<br />
specificloc<br />
is the specific location of the program to load, where specificloc is one of the<br />
following:<br />
v The name of a search path that was defined previously in an @DEFINE<br />
control statement section (for example, &APPLPATH)<br />
v An absolute path (for example, /u/ztpf/applpath)<br />
v A relative path (for example, applpath).<br />
►◄<br />
►◄<br />
►◄
Note: All relative paths are appended to the current working directory, which<br />
is defined using the CWD parameter in the @DEFINE control<br />
statement section. Therefore, you must define the CWD parameter<br />
before you can specify a relative path.<br />
If you specify a specific location for a program, this location overrides any<br />
default location that might have been defined for the @APPLICATION control<br />
statement section; that is, only the specific location is searched for the program.<br />
If the program is not found in the specific location, an error occurs.<br />
CWD<br />
is the value specified for the CWD parameter in the @DEFINE control<br />
statement section. If you do not specify a default location or a specific location,<br />
this is the only location that is searched.<br />
progname<br />
is the 4-character alphanumeric name of the program that you want to load to<br />
the z/<strong>TPF</strong> system. <strong>Program</strong> names must begin with a letter (A–Z). For example,<br />
if the linker creates a program called ctal51.so, the CTAL portion of the name is<br />
required.<br />
version<br />
is the 1- to 2-character alphanumeric version code for the program. For<br />
example, if the linker creates a program called ctal51.so, the 51 portion of the<br />
name is optional.<br />
.ext<br />
specifies an extension of the full program name as created by the linker, where<br />
ext is the appropriate extension. For example, if the linker creates a program<br />
called ctal51.so, the .so portion of the name is optional.<br />
(progcmt)<br />
appends a comment for the program specified by progname that is displayed in<br />
the output report, where progcmt is the text that is appended.<br />
@@progname<br />
specifies a program to patch or to move, where progname is the 4-character<br />
name of the program that you want to patch or move. <strong>Program</strong> names must<br />
begin with a letter (A–Z).<br />
Note: If you want to patch a program, you must load the program in the current<br />
@APPLICATION control statement section before you can patch it. If you<br />
are moving an entry point, you must ensure that it is being loaded in the<br />
current @APPLICATION control statement section.<br />
.objfile<br />
specifies the object file name, where objfile is an alphanumeric name of the<br />
object file (in the program) that you want to patch on the z/<strong>TPF</strong> system. Object<br />
file names must begin with a letter (A–Z).<br />
rsa<br />
is the 1- to 6-digit hexadecimal relative starting address in the program or object<br />
file. The relative starting address specifies the offset into the program or object<br />
file where the patch will be applied.<br />
newdata<br />
is the new data (or patch) that will replace the old data in the program or object<br />
file, beginning at the relative starting address. The new data must be an even<br />
number of hexadecimal digits and cannot exceed 32 digits (16 bytes).<br />
z/<strong>TPF</strong> offline loader input file control statements 127
@CIMR<br />
128 z/<strong>TPF</strong> <strong>Program</strong> <strong>Management</strong><br />
valdata-olddata<br />
validates the data that is replaced by newdata, where olddata is an even<br />
number in hexadecimal format that does not exceed 32 digits (16 bytes). The<br />
data specified for olddata must match what is currently in the program. If it does<br />
not, the data in the program is not changed and an error occurs. If it does, the<br />
data in the program is replaced by newdata. For example, this parameter can<br />
help to verify that your patch is starting at the correct relative starting address.<br />
Note: The length of the data that you are validating can have fewer bytes or<br />
more bytes than the new data. If the validation is completed successfully,<br />
only the number of bytes in your new data will be replaced.<br />
MOVe<br />
indicates that the single entry BSO specified by @@progname has been moved<br />
into another BSO. The BSO that @@progname has been moved to must be<br />
included in the loader input file.<br />
Use the @CIMR control statement to specify the core image restart (CIMR)<br />
components that you want to load to the z/<strong>TPF</strong> system.<br />
The following figure shows the syntax for the @CIMR control statement section of<br />
the loader input file. In this figure, the double arrowhead (►►) indicates that the<br />
information must begin on a new line.
►►<br />
@CIMr<br />
CWD<br />
defaultloc<br />
Note: This must be the first line of the @CIMR control statement section.<br />
►► ▼<br />
,<br />
defaultloc/<br />
ACPL<br />
specificloc/ CPS0<br />
FCTB<br />
ICDF<br />
IPAT<br />
RIAT<br />
SIGT<br />
USR1<br />
USR2<br />
version .ext (progcmt)<br />
Note: If you have more than one component to load, use this line as many<br />
times as you need. Each time you use it, separate occurrences with a<br />
comma or start each occurrence on a new line.<br />
►► ▼ @@ACPL rsa newdata<br />
@@CPS0 valdata-olddata<br />
@@FCTB<br />
@@ICDF<br />
@@IPAT<br />
@@RIAT<br />
@@SIGT<br />
@@USR1<br />
@@USR2<br />
@@csect<br />
Note: If you have more than one component to patch (or if you have more than<br />
one patch for a component), use this line as many times as you need.<br />
Each time you use it, start the next occurrence on a new line.<br />
Figure 13. @CIMR control statement section of the loader input file<br />
defaultloc<br />
is the default location for the @CIMR control statement section, where<br />
defaultloc is one of the following:<br />
v The name of a search path that was defined previously in an @DEFINE<br />
control statement section (for example, &CIMRPATH)<br />
v An absolute path (for example, /u/ztpf/cimrpath)<br />
v A relative path (for example, cimrpath).<br />
Note: All relative paths are appended to the current working directory, which<br />
is defined using the CWD parameter in the @DEFINE control<br />
statement section. Therefore, you must define the CWD parameter<br />
before you can specify a relative path.<br />
z/<strong>TPF</strong> offline loader input file control statements 129<br />
►◄<br />
►◄<br />
►◄
The default location is searched for the CIMR components listed in the @CIMR<br />
control statement section. You can override the default location for a particular<br />
CIMR component by specifying a specific location for that CIMR component.<br />
specificloc<br />
is the specific location for the CIMR component to load, where specificloc is one<br />
of the following:<br />
v The name of a search path that was defined previously in an @DEFINE<br />
control statement section (for example, &CIMRPATH)<br />
v An absolute path (for example, /u/ztpf/cimrpath)<br />
v A relative path (for example, cimrpath).<br />
Note: All relative paths are appended to the current working directory, which<br />
is defined using the CWD parameter in the @DEFINE control<br />
statement section. Therefore, you must define the CWD parameter<br />
before you can specify a relative path.<br />
If you specify a specific location for a CIMR component, this location overrides<br />
any default location that might have been defined for the @CIMR control<br />
statement section; that is, only the specific location is searched for the CIMR<br />
component. If the CIMR component is not found in the specific location, an<br />
error occurs.<br />
CWD<br />
is the value specified for the CWD parameter in the @DEFINE control<br />
statement section. If you do not specify a default location or a specific location,<br />
this is the only location that is searched.<br />
ACPL<br />
loads the online segment of the general file loader to the z/<strong>TPF</strong> system.<br />
CPS0<br />
loads the control program (CP) to the z/<strong>TPF</strong> system.<br />
Note: You can load the CP only to the basic subsystem (BSS).<br />
FCTB<br />
loads the FACE table to the z/<strong>TPF</strong> system.<br />
ICDF<br />
loads the in-core dump formatter (ICDF) to the z/<strong>TPF</strong> system.<br />
Note: You can load the ICDF only to the BSS.<br />
IPAT<br />
loads the program attribute table (PAT) to the z/<strong>TPF</strong> system.<br />
RIAT<br />
loads the record ID attribute table (RIAT) to the z/<strong>TPF</strong> system.<br />
SIGT<br />
loads the global synchronization table (SIGT) to the z/<strong>TPF</strong> system.<br />
USR1<br />
loads the first user-defined CIMR area (USR1) to the z/<strong>TPF</strong> system.<br />
Note:<br />
130 z/<strong>TPF</strong> <strong>Program</strong> <strong>Management</strong><br />
1. You can load the USR1 only to the BSS.
2. USR1 is required for a full load. See “Load system components to a<br />
new z/<strong>TPF</strong> system” on page 73 for more information about<br />
performing a full load.<br />
USR2<br />
loads the second user-defined CIMR area (USR2) to the z/<strong>TPF</strong> system.<br />
version<br />
is the 1- to 2-character alphanumeric version code for the CIMR component.<br />
For example, if the linker creates a program called usr151.so, the 51 portion of<br />
the name is optional.<br />
.ext<br />
specifies an extension of the full program name as created by the linker, where<br />
ext is the appropriate extension. For example, if the linker creates a program<br />
called usr151.so, the .so portion of the name is optional.<br />
(progcmt)<br />
appends a comment for the CIMR component that is displayed in the output<br />
report, where progcmt is the text that is appended.<br />
@@ACPL<br />
patches the online program of the general file loader (ACPL).<br />
Note: You must load the ACPL in the current @CIMR control statement section<br />
before you can patch it.<br />
@@CPS0<br />
patches the control program (CP).<br />
Note: You must load the CP in the current @CIMR control statement section<br />
before you can patch it.<br />
@@FCTB<br />
patches the FACE table.<br />
Note:<br />
1. You must load the FACE table in the current @CIMR control<br />
statement section before you can patch it.<br />
2. You can patch data only in the first 16 MB of the FACE table.<br />
@@ICDF<br />
patches the in-core dump formatter (ICDF).<br />
Note: You must load the ICDF in the current @CIMR control statement section<br />
before you can patch it.<br />
@@IPAT<br />
patches the program attribute table (PAT).<br />
Note: You must load the PAT in the current @CIMR control statement section<br />
before you can patch it.<br />
@@RIAT<br />
patches the record ID attribute table (RIAT).<br />
Note: You must load the RIAT in the current @CIMR control statement section<br />
before you can patch it.<br />
@@SIGT<br />
patches the global synchronization table (SIGT).<br />
z/<strong>TPF</strong> offline loader input file control statements 131
@CTKX<br />
132 z/<strong>TPF</strong> <strong>Program</strong> <strong>Management</strong><br />
Note: You must load SIGT in the current @CIMR control statement section<br />
before you can patch it.<br />
@@USR1<br />
patches the first user-defined CIMR area (USR1).<br />
Note: You must load the USR1 in the current @CIMR control statement section<br />
before you can patch it.<br />
@@USR2<br />
patches the second user-defined CIMR area (USR2).<br />
Note: You must load the USR2 in the current @CIMR control statement section<br />
before you can patch it.<br />
@@csect<br />
patches the specified CSECT in the control program, where csect is the<br />
6-character alphanumeric name of the CP CSECT (for example, CCNUCL).<br />
Note: You must load the control program in the current @CIMR control<br />
statement section before you can patch a specific CSECT.<br />
rsa<br />
is the 1- to 6-digit hexadecimal relative starting address in the CIMR component<br />
or CSECT. The relative starting address specifies the offset into the CIMR<br />
component or CSECT where the patch will be applied.<br />
newdata<br />
is the new data (or patch) that will replace the old data in the CIMR component<br />
or CSECT, beginning at the relative starting address. The new data must be an<br />
even number of hexadecimal digits and cannot exceed 32 digits (16 bytes).<br />
valdata-olddata<br />
validates the data that is replaced by newdata, where olddata is an even<br />
number in hexadecimal format that does not exceed 32 digits (16 bytes). The<br />
data specified for olddata must match what is currently in the CIMR component.<br />
If it does not, the data in the CIMR component is not changed and an error<br />
occurs. If it does, the data in the CIMR component is replaced by newdata. For<br />
example, this parameter can help to verify that your patch is starting at the<br />
correct relative starting address.<br />
Note: The length of the data that you are validating can have fewer bytes or<br />
more bytes than the new data. If the validation is completed successfully,<br />
only the number of bytes in your new data will be replaced.<br />
Use the @CTKX control statement to load the image pointer record (CTKX) to the<br />
z/<strong>TPF</strong> system.<br />
The following figure shows the syntax for the @CTKX control statement section of<br />
the loader input file. In this figure, the double arrowhead (►►) indicates that the<br />
information must begin on a new line.
►►<br />
@CTKx<br />
CWD<br />
defaultloc<br />
Note: This must be the first line of the @CTKX control statement section.<br />
►►<br />
defaultloc/<br />
CTKX<br />
specificloc/ version .ext (progcmt)<br />
►► ▼ @@CTKX rsa newdata<br />
valdata-olddata<br />
Note: If you have more than one patch for the CTKX component, use this line<br />
as many times as you need. Each time you use it, start the next<br />
occurrence on a new line.<br />
Figure 14. @CTKX control statement section of the loader input file<br />
defaultloc<br />
is the default location for the @CTKX control statement section, where<br />
defaultloc is one of the following:<br />
v The name of a search path that was defined previously in an @DEFINE<br />
control statement section (for example, &CTKXPATH)<br />
v An absolute path (for example, /u/ztpf/ctkxpath)<br />
v A relative path (for example, ctkxpath).<br />
Note: All relative paths are appended to the current working directory, which<br />
is defined using the CWD parameter in the @DEFINE control<br />
statement section. Therefore, you must define the CWD parameter<br />
before you can specify a relative path.<br />
The default location is searched for the CTKX component listed in the @CTKX<br />
control statement section. You can override the default path for the CTKX<br />
component by specifying a specific location on a separate line.<br />
specificloc<br />
is the specific location for the CTKX component to load, where specificloc is<br />
one of the following:<br />
v The name of a search path that was defined previously in an @DEFINE<br />
control statement section (for example, &CTKXPATH)<br />
v An absolute path (for example, /u/ztpf/ctkxpath)<br />
v A relative path (for example, ctkxpath).<br />
Note: All relative paths are appended to the current working directory, which<br />
is defined using the CWD parameter in the @DEFINE control<br />
statement section. Therefore, you must define the CWD parameter<br />
before you can specify a relative path.<br />
If you specify a specific location for the CTKX component, this location<br />
overrides any default location that may have been defined for the @CTKX<br />
z/<strong>TPF</strong> offline loader input file control statements 133<br />
►◄<br />
►◄<br />
►◄
@DEFINE<br />
134 z/<strong>TPF</strong> <strong>Program</strong> <strong>Management</strong><br />
control statement section; that is, only the specific location is searched for the<br />
CTKX component. If the CTKX component is not found in the specific location,<br />
an error occurs.<br />
CWD<br />
is the value specified for the CWD parameter in the @DEFINE control<br />
statement section. If you do not specify a default location or a specific location,<br />
this is the only location that is searched.<br />
CTKX<br />
loads the image pointer record (CTKX) to the z/<strong>TPF</strong> system. When a new copy<br />
of CTKX is loaded, it is compared to the existing version. If the starting ordinal<br />
of a core image record (CIMR) or IPL component is different in the new copy of<br />
CTKX, or the allocated size is too small, that component must also be loaded.<br />
version<br />
is the 1- to 2-character alphanumeric version code for the CTKX component.<br />
.ext<br />
specifies an extension of the full program name as created by the linker, where<br />
ext is the appropriate extension. For example, if the linker creates a program<br />
called ctkx51.so, the .so portion of the name is optional.<br />
(progcmt)<br />
appends a comment to the CTKX component that is displayed in the output<br />
report, where progcmt is the text appended.<br />
@@CTKX<br />
patches the image pointer record (CTKX).<br />
Note: You must load the image pointer record (CTKX) in the current @CTKX<br />
control statement section before you can patch it.<br />
rsa<br />
is the 1- to 6-digit hexadecimal relative starting address in the CTKX<br />
component. The relative starting address specifies the offset into the CTKX<br />
component where the patch will be applied.<br />
newdata<br />
is the new data (or patch) that will replace the old data in the CTKX component,<br />
beginning at the relative starting address. The new data must be an even<br />
number of hexadecimal digits and cannot exceed 32 digits (16 bytes).<br />
valdata-olddata<br />
validates the data that is replaced by newdata, where olddata is an even<br />
number in hexadecimal format that does not exceed 32 digits (16 bytes). The<br />
data specified for olddata must match what is currently in the component. If it<br />
does not, the data in the component is not changed and an error occurs. If it<br />
does, the data in the component is replaced by newdata. For example, this<br />
parameter can help to verify that your patch is starting at the correct relative<br />
starting address.<br />
Note: The length of the data that you are validating can have fewer bytes or<br />
more bytes than the new data. If the validation is completed successfully,<br />
only the number of bytes in your new data will be replaced.<br />
Use the @DEFINE control statement to define system settings.
The following figure shows the syntax for the @DEFINE control statement section<br />
of the loader input file. In this figure, the double arrowhead (►►) indicates that the<br />
information must begin on a new line.<br />
►► @DEFine ►◄<br />
Note: This must be the first line of the @DEFINE control statement section.<br />
►►<br />
(1)<br />
▼ &searchpath= ▼<br />
:<br />
(2)<br />
path<br />
&previouslydefinedsearchpath<br />
Notes:<br />
1 If you have more than one search path to define, use this line as many<br />
times as you need. Each time you use it, start the next occurrence on a<br />
new line.<br />
2 The definition of a search path can span more than one line. To continue<br />
on a new line, end your current line with a colon (:), which indicates there is<br />
more information in the definition.<br />
►►<br />
►►<br />
CWD=path<br />
SYSID=bssname<br />
SYSID=ssname<br />
Figure 15. @DEFINE control statement section of the loader input file<br />
z/<strong>TPF</strong> offline loader input file control statements 135<br />
►◄<br />
►◄<br />
►◄
136 z/<strong>TPF</strong> <strong>Program</strong> <strong>Management</strong><br />
Additional syntax for an OLDR or a TLDR load:<br />
DEBUGFILES=YES<br />
DEBUGFILES=NO<br />
Additional syntax for a TLDR load:<br />
►<br />
ELDRCLEAR=NO<br />
ELDRCLEAR=YES<br />
FCTBCLEAR=NO<br />
FCTBCLEAR=YES<br />
OVERLAY_IPAT=NO<br />
OVERLAY_IPAT=YES<br />
Additional syntax for an ALDR load:<br />
IMGCLEAR=NO<br />
IMGCLEAR=YES<br />
PROGCLEAR=NO<br />
PROGCLEAR=YES<br />
Figure 16. Additional syntax for specific uses of the @DEFINE control statement section<br />
&searchpath<br />
specifies the name of a path, where searchpath is the name you want<br />
associated with the path. The path must start with an ampersand (&). If you<br />
specify more than one directory, use a colon (:) to separate directories.<br />
path<br />
is an absolute or relative directory that you can specify to search.<br />
&previouslydefinedsearchpath<br />
is an absolute or relative directory that was defined previously with the<br />
@DEFINE control statement section to search.<br />
The following example shows a path named &CIMRPATH that has three path<br />
definitions.<br />
@DEFINE<br />
&CIMRPATH=/u/ztpf/cp:/u/ztpf/fctb:/u/ztpf/cimrobj<br />
Using this definition, if you specify the path name of &CIMRPATH anywhere in<br />
the loader input file, the offline loader will attempt to locate the object that it<br />
applies to by searching the following directories in order:<br />
1. /u/ztpf/cp<br />
2. /u/ztpf/fctb<br />
3. /u/ztpf/cimrobj<br />
Note: Path names are case sensitive.<br />
CWD=path<br />
specifies the current working directory, where path is the name of the absolute<br />
directory that relative directories are appended to. For other control statements,<br />
the following apply:<br />
►
v Any relative paths are assumed to be relative to this directory.<br />
v The directory specified here is used as the search directory if neither a<br />
default location nor a specific location is specified for the control statement.<br />
Note: You can specify CWD as both a system setting in the @DEFINE control<br />
statement and as a command-line argument when you are performing an<br />
offline load on Linux. However, if you specify both the command-line<br />
argument and the system setting, these values must be consistent.<br />
SYSID<br />
specifies the subsystem ID.<br />
bssname<br />
is the name of the basic subsystem (BSS). You can define your own BSS<br />
name by specifying the BSSNAME parameter on the SSDEF macro; see<br />
z/<strong>TPF</strong> and z/<strong>TPF</strong>DF System Generation for more information about the<br />
SSDEF macro.<br />
ssname<br />
is the name of the subsystem.<br />
DEBUGFILES<br />
specifies whether the shared object with debug data will be written to the<br />
desired storage medium.<br />
YES<br />
writes the shared object with debug data to the desired storage medium.<br />
NO does not write the shared object with debug data to the desired storage<br />
medium.<br />
ELDRCLEAR<br />
specifies whether E-type loader record definitions are cleared.<br />
YES<br />
clears and reinitializes all E-type loader records and versioned files for the<br />
target image.<br />
Attention: When ELDRCLEAR=YES is specified, all programs and files<br />
that were loaded using the E-type loader (except those that were accepted)<br />
are cleared from the online system.<br />
NO does not clear or reinitialize E-type loader record definitions.<br />
Attention: Use this line for the @DEFINE control statement section only<br />
when performing a TLDR load.<br />
FCTBCLEAR<br />
specifies whether the alternate FACE table (FCTB) is cleared.<br />
YES<br />
clears the alternate FCTB for the target image.<br />
Attention: When FCTBCLEAR=YES is specified, the alternate FCTB that<br />
was loaded using the ZFCTB LOAD command is cleared from the online<br />
system unless it had already been accepted. See z/<strong>TPF</strong> Operations for<br />
more information about the ZFCTB LOAD command.<br />
NO does not clear the alternate FCTB.<br />
Attention: Use this line for the @DEFINE control statement section only<br />
when performing a TLDR load.<br />
z/<strong>TPF</strong> offline loader input file control statements 137
IMGCLEAR<br />
specifies whether image-related records are cleared.<br />
YES<br />
clears and initializes various image-related records. When IMGCLEAR=YES<br />
is specified, IPLA, IPLB, CTKX, and all the CIMR components need to be<br />
loaded.<br />
Attention: When IMGCLEAR=YES is specifed, all image definitions are<br />
NO<br />
cleared from the online system.<br />
does not clear or initialize various image-related records.<br />
Attention: Do not use this line for the @DEFINE control statement section<br />
when performing an OLDR load. If you do, you will receive an error message<br />
and a return code of 8. See “Return codes” on page 121 for more information<br />
about offline loader return codes.<br />
Note: If you specify this line for the @DEFINE control statement section when<br />
performing a TLDR load, it is ignored. You will receive a return code of 4.<br />
See “Return codes” on page 121 for more information about offline<br />
loader return codes.<br />
OVERLAY_IPAT<br />
specifies whether to merge or replace the program attribute table (PAT).<br />
YES<br />
replaces the PAT in core and requires that all programs get reloaded.<br />
NO merges the existing PAT with the PAT that is being loaded.<br />
Attention: Use this line for the @DEFINE control statement section only<br />
when performing a TLDR load.<br />
PROGCLEAR<br />
specifies whether a program base is cleared.<br />
YES<br />
138 z/<strong>TPF</strong> <strong>Program</strong> <strong>Management</strong><br />
clears and reinitializes the master extra program record for the target image<br />
so that all extra program records (#XPRGn fixed file records, where n is the<br />
program base number for the image you are loading to) are available to be<br />
dispensed.<br />
Additionally, the program base unique file directory (/sys/tpf_pbfiles) is<br />
cleared. If get file storage (GFS) is not active when the online load is<br />
performed, the target program base indicates that its program base unique<br />
file directory has not been cleared. In this case, the directory will be cleared<br />
the next time GFS activation occurs on any processor.<br />
If GFS activation does not occur before an initial program load (IPL) is<br />
performed on the target image, the program base unique file directory is<br />
cleared when GFS is activated following the IPL of the target image.<br />
References to program base unique files that occur before GFS activation<br />
are intercepted by the z/<strong>TPF</strong> system and the directory appears empty to an<br />
application.<br />
Note: Only files in the program base unique file directory are cleared.<br />
Other files that are loaded by using the loader are not part of the<br />
program base and are not cleared.
@FILE<br />
NO does not clear or reinitialize the master extra program record or the<br />
program base unique file directory.<br />
Attention: Use this line for the @DEFINE control statement section only<br />
when performing a TLDR load.<br />
Note:<br />
1. You must specify PROGCLEAR=YES to initialize a program base<br />
before you can load any real-time programs to an image for the first<br />
time.<br />
2. All real-time programs must be reloaded when you specify<br />
PROGCLEAR=YES.<br />
Use the @FILE control statement to specify one or more files to be loaded. This<br />
control statement is valid for OLDR and TLDR files.<br />
Note: REP cards are not supported for files.<br />
The following figure shows the syntax for the @FILE control statement section of<br />
the loader input file. In this figure, the double arrowhead (►►) indicates that the<br />
information must begin on a new line.<br />
►► @FILe<br />
►<br />
►<br />
-d /sys/tpf_pbfiles<br />
-s default-sourcedir -d default-targetdir<br />
-p default-permission -o default-owner -g default-group<br />
-t NONE<br />
-t ATOE<br />
-ONL<br />
Note: This must be the first line of the @FILE control statement section.<br />
►► sourceloc<br />
►<br />
-t NONE<br />
-t ATOE<br />
-ONL<br />
Note:<br />
targetloc -p permission -o owner -g group<br />
(comment)<br />
v You can specify any number of files.<br />
v When listing programs after files in an E-type loader input file, you must<br />
use a @LOADSET control statement (without specifying a loadset<br />
name) to indicate the end of files and start of programs.<br />
Figure 17. @FILE control statement section of the loader input file<br />
-s default-sourcedir<br />
is the default source location when relative paths are specified. If you do not<br />
z/<strong>TPF</strong> offline loader input file control statements 139<br />
►<br />
►<br />
►◄<br />
►<br />
►◄
-d<br />
specify this parameter, the source locations that specify a relative path are<br />
based on the CWD parameter of the “@DEFINE” on page 134 and<br />
“@LOADSET” on page 151 control statements.<br />
specifies the target location when relative paths are specified, where:<br />
default-targetdir<br />
is the default target location when relative paths are specified.<br />
/sys/tpf_pbfiles<br />
is the program base unique directory. This is the default.<br />
Note: When using TLDR, if the target location is not in the program base<br />
unique directory (/sys/tpf_pbfiles) the z/<strong>TPF</strong> online image loader<br />
(ZTPLD) passes the file information to the UELK user exit. By default,<br />
the UELK user exit specifies that the file is not loaded by the image<br />
loader. You can modify the UELK user exit to specify files to be loaded.<br />
See z/<strong>TPF</strong> and z/<strong>TPF</strong>DF System Installation Support Reference for more<br />
information about the UELK user exit.<br />
-p default-permission<br />
specifies the default file permission that is used when writing out the files in the<br />
@FILE control statement that do not have permission values specified. If you<br />
do not specify this parameter, the permission will match the source file when it<br />
is read by the z/<strong>TPF</strong> offline loader.<br />
-o default-owner<br />
specifies the default file owner ID that is used when writing out files in the<br />
@FILE control statement that do not have owner ID values specified. If you do<br />
not specify this parameter, the owner ID will match the source file when read by<br />
the z/<strong>TPF</strong> offline loader. The owner ID obtained from the source file will be the<br />
mapped text owner ID, not the numeric owner ID.<br />
Note: If you specify an owner ID, use the owner ID name, not the numeric ID.<br />
Owner IDs are not required to be identically mapped online and offline.<br />
-g default-group<br />
specifies the default file group ID that is used when writing out files in the<br />
@FILE control statement that do not have group ID values specified. If you do<br />
not specify this parameter, the group ID will match the source file when read by<br />
the z/<strong>TPF</strong> offline loader. The group ID obtained from the source file will be the<br />
mapped text group ID, not the numeric group ID.<br />
-t<br />
Note: If you specify a group ID, use the group ID name, not the numeric ID.<br />
Group IDs are not required to be identically mapped online and offline.<br />
specifies a translation option, where:<br />
NONE<br />
specifies no file translation. This is the default.<br />
ATOE<br />
specifies that an ASCII data file is translated to an EBCDIC data file.<br />
Note:<br />
140 z/<strong>TPF</strong> <strong>Program</strong> <strong>Management</strong>
v This translation does not include a verification check that the data file<br />
being translated is in ASCII format. You must ensure that the data file<br />
being translated is an ASCII data file before specifying the ATOE<br />
parameter.<br />
v If specified on the @FILE control statement, this option defines a<br />
default translation that applies to subsequent files that do not have the<br />
-t or -ONL parameter specified. If the -t parameter is specified for a<br />
subsequent file, the -ONL parameter option is ignored for that file.<br />
-ONL<br />
specifies that a file that exists in z/<strong>TPF</strong> collection support file system (TFS) on<br />
the z/<strong>TPF</strong> system is affiliated with the loadset. If this parameter is specified on<br />
the @FILE control statement, a default option is defined that applies to<br />
subsequent files that do not have the t or b parameter specified. If the t or b<br />
parameter is specified for a subsequent file, the ONL parameter is ignored for<br />
that file.<br />
Note:<br />
v You only can specify this parameter for OLDR.<br />
v The changes made to the file in the loadset are not reflected in the<br />
existing online version. A ZOLDR ACCEPT must be done to replace<br />
the existing online version with the version in the loadset.<br />
v If you specify this parameter, there is no file translation when an<br />
online file is associated with a loadset.<br />
sourceloc<br />
specifies the path where the file is to be found by the z/<strong>TPF</strong> offline loader. If the<br />
default-sourcedir parameter is not specified, the source locations that specify a<br />
relative path are based on the CWD parameter of the “@DEFINE” on page 134<br />
control statement. If the -ONL parameter is specified, it indicates the online<br />
location of the file to be affiliated with the loadset.<br />
Note: If the file specified with this parameter is a versioned file when the<br />
loadset is loaded online, the base version of the file is associated with<br />
the loadset.<br />
targetloc<br />
specifies the path where the file is to be written online. If you do not specify this<br />
parameter, the file is written online using the same path as the offline source<br />
file.<br />
Note: When using TLDR, if the target location is not in the program base<br />
unique directory (/sys/tpf_pbfiles) the online image loader (ZTPLD)<br />
passes the file information to the UELK user exit. By default, the UELK<br />
user exit specifies that the file is not loaded by the image loader. You<br />
can modify the UELK user exit to specify files to be loaded. See z/<strong>TPF</strong><br />
and z/<strong>TPF</strong>DF System Installation Support Reference for more<br />
information about the UELK user exit.<br />
-p permission<br />
specifies the permission for the target file when loaded to the file system on the<br />
z/<strong>TPF</strong> system. If you do not specify this parameter, the file permission is based<br />
on the default-permission value that is specified on the @FILE control<br />
statement.<br />
-o owner<br />
specifies the owner ID of the (target) file when loaded to the file system on the<br />
z/<strong>TPF</strong> offline loader input file control statements 141
@GFKEYPOINT<br />
142 z/<strong>TPF</strong> <strong>Program</strong> <strong>Management</strong><br />
z/<strong>TPF</strong> system. If you do not specify this parameter, the owner is based on the<br />
default-owner value specified on the @FILE control statement.<br />
Note: If you specify an owner ID, use the owner ID name, not the numeric ID.<br />
Owner IDs are not required to be identically mapped online and offline.<br />
-g group<br />
specifies the group ID of the (target) file when loaded to the file system on the<br />
z/<strong>TPF</strong> system. If you do not specify this parameter, the group ID is based on<br />
the default-group value specified on the @FILE control statement.<br />
Note: If you specify a group ID, use the group ID name, not the numeric ID.<br />
Group IDs are not required to be identically mapped online and offline.<br />
(comment)<br />
appends a comment for the file specified by filename that is displayed in the<br />
output report, where comment is the text that is appended.<br />
Use the @GFKEYPOINT control statement to specify the keypoints to write to the<br />
general file keypoint area.<br />
The following figure shows the syntax for the @GFKEYPOINT control statement<br />
section of the loader input file. In this figure, the double arrowhead (►►) indicates<br />
that the information must begin on a new line.<br />
►► @GFKeypoint<br />
defaultloc<br />
Note: This must be the first line of the @GFKEYPOINT control statement<br />
section.<br />
►► ▼<br />
,<br />
defaultloc/<br />
keypoint<br />
specificloc/ version .ext %cpuid (progcmt)<br />
Note: If you have more than one general file keypoint to load, use this line as<br />
many times as you need. Each time you use it, separate occurrences with<br />
a comma or start each occurrence on a new line.<br />
►► ▼ @@keypoint rsa newdata<br />
%cpuid valdata-olddata<br />
Note: If you have more than one keypoint to patch (or if you have more than<br />
one patch for a keypoint), use this line as many times as you need. Each<br />
time you use it, start the next occurrence on a new line.<br />
Figure 18. @GFKEYPOINT control statement section of the loader input file<br />
►◄<br />
►◄<br />
►◄
defaultloc<br />
is the default location for the @GFKEYPOINT control statement section, where<br />
defaultloc is one of the following:<br />
v The name of a search path that was defined previously in an @DEFINE<br />
control statement section (for example, &GFKPPATH)<br />
v An absolute path (for example, /u/ztpf/gfkppath)<br />
v A relative path (for example, gfkppath).<br />
Note: All relative paths are appended to the current working directory, which<br />
is defined using the CWD parameter in the @DEFINE control<br />
statement section. Therefore, you must define the CWD parameter<br />
before you can specify a relative path.<br />
The default location is searched for the keypoints listed in the @GFKEYPOINT<br />
control statement section. You can override the default location for a particular<br />
keypoint by specifying a specific location for that keypoint.<br />
specificloc<br />
is the specific location for the keypoint to load, where specificloc is one of the<br />
following:<br />
v The name of a search path that was defined previously in an @DEFINE<br />
control statement section (for example, &GFKPPATH)<br />
v An absolute path (for example, /u/ztpf/gfkppath)<br />
v A relative path (for example, gfkppath).<br />
Note: All relative paths are appended to the current working directory, which<br />
is defined using the CWD parameter in the @DEFINE control<br />
statement section. Therefore, you must define the CWD parameter<br />
before you can specify a relative path.<br />
If you specify a specific location for a keypoint, this location overrides any<br />
default location that may have been defined for the @GFKEYPOINT control<br />
statement section; that is, only the specific location is searched for the keypoint.<br />
If the keypoint is not found in the specific location, an error occurs.<br />
CWD<br />
is the value specified for the CWD parameter in the @DEFINE control<br />
statement section. If you do not specify a default location or a specific location,<br />
this is the only location that is searched.<br />
keypoint<br />
specifies one of the following keypoints to load:<br />
v CTK0<br />
v CTK1<br />
v CTK2<br />
v CTK3<br />
v CTK4<br />
v CTK5<br />
v CTK6<br />
v CTK7<br />
v CTK8<br />
v CTK9<br />
v CTKA<br />
v CTKB<br />
v CTKC<br />
v CTKE<br />
v CTKI<br />
z/<strong>TPF</strong> offline loader input file control statements 143
144 z/<strong>TPF</strong> <strong>Program</strong> <strong>Management</strong><br />
v CTKM<br />
v CTKV.<br />
See z/<strong>TPF</strong> and z/<strong>TPF</strong>DF System Generation for more information about these<br />
keypoints.<br />
version<br />
is the 1- to 2-character alphanumeric version code for the keypoint.<br />
.ext<br />
specifies an extension of the full keypoint name, as created by the linker, where<br />
ext is the appropriate extension. For example, if the linker creates a keypoint<br />
called ctka51.so, the .so portion of the name is optional.<br />
%cpuid<br />
loads the specified keypoint to a processor, where cpuid is the identifier for the<br />
processor. If a processor identifier is not specified and the keypoint is<br />
processor-specific, the identifier defaults to the first processor that was defined.<br />
(progcmt)<br />
appends a comment for the specified keypoint that is displayed in the output<br />
report, where progcmt is the text that is appended.<br />
@@keypoint<br />
patches one of the following keypoints:<br />
v CTK0<br />
v CTK1<br />
v CTK2<br />
v CTK3<br />
v CTK4<br />
v CTK5<br />
v CTK6<br />
v CTK7<br />
v CTK8<br />
v CTK9<br />
v CTKA<br />
v CTKB<br />
v CTKC<br />
v CTKE<br />
v CTKI<br />
v CTKM<br />
v CTKV.<br />
See z/<strong>TPF</strong> and z/<strong>TPF</strong>DF System Generation for more information about these<br />
keypoints.<br />
rsa<br />
is the 1- to 6-digit hexadecimal relative starting address in the keypoint. The<br />
relative starting address specifies the offset into the keypoint where the patch is<br />
applied.<br />
newdata<br />
is the new data (or patch) that will replace the old data in the keypoint,<br />
beginning at the relative starting address. The new data must be an even<br />
number of hexadecimal digits and cannot exceed 32 digits (16 bytes).<br />
valdata-olddata<br />
validates the data that is replaced by newdata, where olddata is an even<br />
number in hexadecimal format that does not exceed 32 digits (16 bytes). The<br />
data specified for olddata must match what is currently in the keypoint. If it does<br />
not, the data in the keypoint is not changed and an error occurs. If it does, the
@INCLUDE<br />
@IPL<br />
data in the keypoint is replaced by newdata. For example, this parameter can<br />
help to verify that your patch is starting at the correct relative starting address.<br />
Note: The length of the data that you are validating can have fewer bytes or<br />
more bytes than the new data. If the validation is completed successfully,<br />
only the number of bytes in your new data will be replaced.<br />
Use the @INCLUDE control statement to specify one or more files that contain a<br />
list of components or programs to load.<br />
The following figure shows the syntax for the @INCLUDE control statement section<br />
of the loader input file. In this figure, the double arrowhead (►►) indicates that the<br />
information must begin on a new line.<br />
►► ▼ @INCLUDE<br />
loc<br />
is the location for the file being included, where loc is one of the following:<br />
v An absolute path name (for example, /u/ztpf/inclpath/filename)<br />
v A relative path name (for example, inclpath/filename).<br />
CWD<br />
CWD<br />
loc<br />
Note: If you have more than one file to include, use this line as many times as<br />
you need. Each time you use it, start the next occurrence on a new line.<br />
Figure 19. @INCLUDE control statement section of the loader input file<br />
Note: All relative path names are appended to the current working directory,<br />
which is defined using the CWD parameter in the @DEFINE control<br />
statement section. Therefore, you must define the CWD parameter<br />
before you can specify a relative path.<br />
For more information about the structure of an include file, go to “Input files” on<br />
page 158.<br />
is the value specified for the CWD parameter in the @DEFINE control<br />
statement section. If you do not specify a location, this is the only location that<br />
is searched.<br />
Use the @IPL control statement to specify which IPL programs are to be loaded.<br />
The following figure shows the syntax for the @IPL control statement section of the<br />
loader input file. In this figure, the double arrowhead (►►) indicates that the<br />
information must begin on a new line.<br />
z/<strong>TPF</strong> offline loader input file control statements 145<br />
►◄
►►<br />
@IPL<br />
146 z/<strong>TPF</strong> <strong>Program</strong> <strong>Management</strong><br />
CWD<br />
defaultloc<br />
Note: This must be the first line of the @IPL control statement section.<br />
,<br />
►► ▼<br />
defaultloc/<br />
IPLA<br />
specificloc/ IPLB version .ext (progcmt)<br />
Note: If you have more than one program to load, use this line as many times<br />
as you need. Each time you use it, separate occurrences with a comma<br />
or start each occurrence on a new line.<br />
►► ▼ @@IPLA rsa newdata<br />
@@IPLB valdata-olddata<br />
Note: If you have more than one program to patch (or if you have more than<br />
one patch for a component), use this line as many times as you need.<br />
Each time you use it, start the next occurrence on a new line.<br />
Figure 20. @IPL control statement section of the loader input file<br />
defaultloc<br />
is the default location for the @IPL control statement section, where defaultloc<br />
is one of the following:<br />
v The name of a search path that was defined previously in an @DEFINE<br />
control statement section (for example, &IPLPATH)<br />
v An absolute path (for example, /u/ztpf/iplpath)<br />
v A relative path (for example, iplpath).<br />
Note: All relative paths are appended to the current working directory, which<br />
is defined using the CWD parameter in the @DEFINE control<br />
statement section. Therefore, you must define the CWD parameter<br />
before you can specify a relative path.<br />
The default location is searched for the programs listed in the @IPL control<br />
statement section. You can override the default location for a particular program<br />
by specifying a specific location for that program.<br />
specificloc<br />
is the specific location for the program to load, where specificloc is one of the<br />
following:<br />
v The name of a search path that was defined previously in an @DEFINE<br />
control statement section (for example, &IPLPATH)<br />
v An absolute path (for example, /u/ztpf/iplpath)<br />
v A relative path (for example, iplpath).<br />
Note: All relative paths are appended to the current working directory, which<br />
is defined using the CWD parameter in the @DEFINE control<br />
►◄<br />
►◄<br />
►◄
statement section. Therefore, you must define the CWD parameter<br />
before you can specify a relative path.<br />
If you specify a specific location for a program, this location overrides any<br />
default location that may have been defined for the @IPL control statement<br />
section; that is, only the specific location is searched for the program. If the<br />
program is not found in the specific location, an error occurs.<br />
CWD<br />
is the value specified for the CWD parameter in the @DEFINE control<br />
statement section. If you do not specify a default location or a specific location,<br />
this is the only location that is searched.<br />
IPLA<br />
loads the IPLA program.<br />
IPLB<br />
loads the IPLB program.<br />
version<br />
is the 1- to 2-character alphanumeric version code for the program.<br />
.ext<br />
specifies an extension of the full program name as created by the linker, where<br />
ext is the appropriate extension. For example, if the linker creates a program<br />
called ipla51.so, the .so portion of the name is optional.<br />
(progcmt)<br />
appends a comment for the program specified (either IPLA or IPLB) that is<br />
displayed in the output report, where progcmt is the text that is appended.<br />
@@IPLA<br />
patches the IPLA program.<br />
Note: You must load the IPLA program in the current @IPL control statement<br />
section before you can patch it.<br />
@@IPLB<br />
patches the IPLB program.<br />
Note: You must load the IPLB program in the current @IPL control statement<br />
section before you can patch it.<br />
rsa<br />
is the 1- to 6-digit hexadecimal relative starting address in the program. The<br />
relative starting address specifies the offset into the program where the patch is<br />
applied.<br />
newdata<br />
is the new data (or patch) that will replace the old data in the program,<br />
beginning at the relative starting address. The new data must be an even<br />
number of hexadecimal digits and cannot exceed 32 digits (16 bytes).<br />
valdata-olddata<br />
validates the data that is replaced by newdata, where olddata is an even<br />
number in hexadecimal format that does not exceed 32 digits (16 bytes). The<br />
data specified for olddata must match what is currently in the program. If it does<br />
not, the data in the program is not changed and an error occurs. If it does, the<br />
data in the program is replaced by newdata. For example, this parameter can<br />
help to verify that your patch is starting at the correct relative starting address.<br />
z/<strong>TPF</strong> offline loader input file control statements 147
@KEYPOINT<br />
Note: The length of the data that you are validating can have fewer bytes or<br />
more bytes than the new data. If the validation is completed successfully,<br />
only the number of bytes in your new data will be replaced.<br />
Use the @KEYPOINT control statement to load keypoints.<br />
The following figure shows the syntax for the @KEYPOINT control statement<br />
section of the loader input file. In this figure, the double arrowhead (►►) indicates<br />
that the information must begin on a new line.<br />
►►<br />
148 z/<strong>TPF</strong> <strong>Program</strong> <strong>Management</strong><br />
@KEYpoint<br />
CWD<br />
defaultloc<br />
Note: This must be the first line of the @KEYPOINT control statement section.<br />
►► ▼<br />
,<br />
defaultloc/<br />
keypoint<br />
specificloc/ version .ext %cpuid (progcmt)<br />
Note: If you have more than one keypoint to load, use this line as many times<br />
as you need. Each time you use it, separate occurrences with a comma<br />
or start each occurrence on a new line.<br />
►► ▼ @@keypoint rsa newdata<br />
%cpuid valdata-olddata<br />
rsa newdata ONLine<br />
%cpuid<br />
Note: If you have more than one keypoint to patch (or if you have more than<br />
one patch for a keypoint), use this line as many times as you need. Each<br />
time you use it, start the next occurrence on a new line.<br />
Figure 21. @KEYPOINT control statement section of the loader input file<br />
defaultloc<br />
is the default location for the @KEYPOINT control statement section, where<br />
defaultloc is one of the following:<br />
v The name of a search path that was defined previously in an @DEFINE<br />
control statement section (for example, &KEYPPATH)<br />
v An absolute path (for example, /u/ztpf/keyppath)<br />
v A relative path (for example, keyppath).<br />
Note: All relative paths are appended to the current working directory, which<br />
is defined using the CWD parameter in the @DEFINE control<br />
statement section. Therefore, you must define the CWD parameter<br />
before you can specify a relative path.<br />
►◄<br />
►◄<br />
►◄
The default location is searched for the keypoints listed in the @KEYPOINT<br />
control statement section. You can override the default location for a particular<br />
keypoint by specifying a specific location for that keypoint.<br />
specificloc<br />
is the specific location for the keypoint to load, where specificloc is one of the<br />
following:<br />
v The name of a search path that was defined previously in an @DEFINE<br />
control statement section (for example, &KEYPPATH)<br />
v An absolute path (for example, /u/ztpf/keyppath)<br />
v A relative path (for example, keyppath).<br />
Note: All relative paths are appended to the current working directory, which<br />
is defined using the CWD parameter in the @DEFINE control<br />
statement section. Therefore, you must define the CWD parameter<br />
before you can specify a relative path.<br />
If you specify a specific location for a keypoint, this location overrides any<br />
default location that may have been defined for the @KEYPOINT control<br />
statement section; that is, only the specific location is searched for the keypoint.<br />
If the keypoint is not found in the specific location, an error occurs.<br />
CWD<br />
is the value specified for the CWD parameter in the @DEFINE control<br />
statement section. If you do not specify a default location or a specific location,<br />
this is the only location that is searched.<br />
keypoint<br />
is the keypoint to write to load. Specify one of the following:<br />
v CTK0<br />
v CTK1<br />
v CTK2<br />
v CTK3<br />
v CTK4<br />
v CTK5<br />
v CTK6<br />
v CTK7<br />
v CTK8<br />
v CTK9<br />
v CTKA<br />
v CTKB<br />
v CTKC<br />
v CTKE<br />
v CTKI<br />
v CTKM<br />
v CTKV.<br />
See z/<strong>TPF</strong> and z/<strong>TPF</strong>DF System Generation for more information about these<br />
keypoints.<br />
version<br />
is the 1- to 2-character alphanumeric version code for the keypoint.<br />
.ext<br />
specifies an extension of the full keypoint name as created by the linker, where<br />
ext is the appropriate extension. For example, if the linker creates a keypoint<br />
called ctk751.so, the .so portion of the name is optional.<br />
z/<strong>TPF</strong> offline loader input file control statements 149
%cpuid<br />
loads the specified keypoint to a processor, where cpuid is the identifier for the<br />
processor. If a processor identifier is not specified and the keypoint is<br />
processor-specific, the identifier defaults to the first processor that was defined.<br />
(progcmt)<br />
appends a comment for the specified keypoint that is displayed in the output<br />
report, where progcmt is the text appended.<br />
@@keypoint<br />
patches a keypoint, where keypoint is one of the following keypoints:<br />
v CTK0<br />
v CTK1<br />
v CTK2<br />
v CTK3<br />
v CTK4<br />
v CTK5<br />
v CTK6<br />
v CTK7<br />
v CTK8<br />
v CTK9<br />
v CTKA<br />
v CTKB<br />
v CTKC<br />
v CTKE<br />
v CTKI<br />
v CTKM<br />
v CTKV.<br />
See z/<strong>TPF</strong> and z/<strong>TPF</strong>DF System Generation for more information about these<br />
keypoints.<br />
rsa<br />
is the 1- to 6-digit hexadecimal relative starting address in the keypoint. The<br />
relative starting address specifies the offset into the keypoint where the patch is<br />
applied.<br />
newdata<br />
is the new data (or patch) that will replace the old data in the keypoint,<br />
beginning at the relative starting address. The new data must be an even<br />
number of hexadecimal digits and cannot exceed 32 digits (16 bytes).<br />
valdata-olddata<br />
validates the data that is replaced by newdata, where olddata is an even<br />
number in hexadecimal format that does not exceed 32 digits (16 bytes). The<br />
data specified for olddata must match what is currently in the keypoint. If it does<br />
not, the data in the keypoint is not changed and an error occurs. If it does, the<br />
data in the keypoint is replaced by newdata. For example, this parameter can<br />
help verify that your patch is starting at the correct relative starting address.<br />
Note:<br />
150 z/<strong>TPF</strong> <strong>Program</strong> <strong>Management</strong><br />
1. The length of the data that you are validating can have fewer bytes<br />
or more bytes than the new data. If the validation is completed<br />
successfully, only the number of bytes in your new data will be<br />
replaced.<br />
2. This parameter is ignored if the patch is for an online keypoint.
@LOADSET<br />
ONLine<br />
specifies that only the patch data is applied to the online keypoint. The entire<br />
keypoint is not loaded and the online keypoint is not changed except for the<br />
patch data.<br />
Note: You must specify the ONLine parameter when patching a keypoint that is<br />
not being loaded.<br />
Use the @LOADSET control statement to create a loadset, which contains a list of<br />
programs or files, or both to load.<br />
The following figure shows the syntax for the @LOADSET control statement section<br />
of the loader input file. In this figure, the double arrowhead (►►) indicates that the<br />
information must begin on a new line.<br />
►► @LOAdset<br />
lsname<br />
CWD<br />
defaultloc<br />
Note: This must be the first line of the @LOADSET control statement section.<br />
►► ▼<br />
,<br />
defaultloc/<br />
progname<br />
specificloc/ version .ext (progcmt)<br />
Note: If you have more than one program in the loadset, use this line as many<br />
times as you need. Each time you use it, separate occurrences with a<br />
comma or start each occurrence on a new line.<br />
►► ▼ @@progname rsa newdata<br />
.objfile valdata-olddata<br />
, MOVe<br />
Note: If you have more than one loadset to patch (or if you have more than one<br />
patch for a loadset), use this line as many times as you need. Each time<br />
you use it, start the next occurrence on a new line.<br />
Figure 22. @LOADSET control statement section of the loader input file<br />
lsname<br />
specifies a name for the loadset to create, where lsname is the 5- to<br />
8-character name of the loadset program that you are creating.<br />
Use the lsname parameter to specify additional programs to follow an @FILES<br />
control statement.<br />
If you do not specify the lsname parameter, the @LOADSET control statement<br />
indicates that the programs to follow are part of the previously defined loadset.<br />
z/<strong>TPF</strong> offline loader input file control statements 151<br />
►◄<br />
►◄<br />
►◄
152 z/<strong>TPF</strong> <strong>Program</strong> <strong>Management</strong><br />
defaultloc<br />
is the default location for the @LOADSET control statement section, where<br />
defaultpath is one of the following types of paths:<br />
v The name of a search path that was defined previously in an @DEFINE<br />
control statement section (for example, &LDSTPATH)<br />
v An absolute path (for example, /u/ztpf/ldstpath)<br />
v A relative path (for example, ldstpath).<br />
Note: All relative paths are appended to the current working directory, which<br />
is defined by using the CWD parameter in the @DEFINE control<br />
statement section. Therefore, you must define the CWD parameter<br />
before you can specify a relative path.<br />
The default location is searched to locate the programs listed in the<br />
@LOADSET control statement section. You can override the default path for a<br />
particular program by specifying a specific path for that program.<br />
specificloc<br />
is the specific location for the program in the loadset, where specificpath is one<br />
of the following types of paths:<br />
v The name of a search path that was defined previously in an @DEFINE<br />
control statement section (for example, &LDSTPATH)<br />
v An absolute path (for example, /u/ztpf/ldstpath)<br />
v A relative path (for example, ldstpath).<br />
Note: All relative paths are appended to the current working directory, which<br />
is defined using the CWD parameter in the @DEFINE control<br />
statement section. Therefore, you must define the CWD parameter<br />
before you can specify a relative path.<br />
If you specify a specific location for a program, this location overrides any<br />
default location that may have been defined for the @LOADSET control<br />
statement section; that is, only the specific location is searched for the program.<br />
If the program is not found in the specific location, an error occurs.<br />
CWD<br />
is the value specified for the CWD parameter in the @DEFINE control<br />
statement section. If you do not specify a default location or a specific location,<br />
this is the only location that is searched.<br />
progname<br />
is the 4-character alphanumeric name of the program that you want to load to<br />
the z/<strong>TPF</strong> system. <strong>Program</strong> names must begin with a letter (A–Z). For example,<br />
if the linker creates a program called ctal51.so, the CTAL portion of the name is<br />
required.<br />
version<br />
is the 1- to 2-character alphanumeric version code for the program. For<br />
example, if the linker creates a program called ctal51.so, the 51 portion of the<br />
name is optional.<br />
.ext<br />
specifies an extension of the full program name as created by the linker, where<br />
ext is the appropriate extension. For example, if the linker creates a program<br />
called ctal51.so, the .so portion of the name is optional.
@VERIFY<br />
(progcmt)<br />
appends a comment for the program specified by progname that is displayed in<br />
the output report, where progcmt is the text that is appended.<br />
@@progname<br />
specifies a program to patch or to move, where progname is the 4-character<br />
name of the program that you want to patch or move. <strong>Program</strong> names must<br />
begin with a letter (A–Z).<br />
Note: If you want to patch a program, you must load the program in the current<br />
@LOADSET control statement section before you can patch it. If you are<br />
moving an entry point, you must ensure that it is being loaded in the<br />
current @LOADSET control statement section.<br />
.objfile<br />
specifies the object file name, where objfile is the 4-character alphanumeric<br />
name of the object file (within the program) that you want to patch on the z/<strong>TPF</strong><br />
system. Object file names must begin with a letter (A–Z).<br />
rsa<br />
is the 1- to 6-digit hexadecimal relative starting address in the program or object<br />
file. The relative starting address specifies the offset into the program or object<br />
file where the patch will be applied.<br />
newdata<br />
is the new data (or patch) that will replace the old data in the program or object<br />
file, beginning at the relative starting address. The new data must be an even<br />
number of hexadecimal digits and cannot exceed 32 digits (16 bytes).<br />
valdata-olddata<br />
validates the data that is replaced by newdata, where olddata is an even<br />
number in hexadecimal format that does not exceed 32 digits (16 bytes). The<br />
data specified for olddata must match what is currently in the program. If it does<br />
not, the data in the program is not changed and an error occurs. If it does, the<br />
data in the program is replaced by newdata. For example, this parameter can<br />
help to verify that your patch is starting at the correct relative starting address.<br />
Note: The length of the data that you are validating can have fewer bytes or<br />
more bytes than the new data. If the validation is completed successfully,<br />
only the number of bytes in your new data will be replaced.<br />
MOVe<br />
indicates that the single entry BSO specified by @@progname has been moved<br />
into another BSO. The BSO that @@progname has been moved to must be<br />
included in the same loadset.<br />
Note: If the E-type loader is used to move an entry point, you cannot activate<br />
another loadset that moves the entry point again. The loadset that<br />
moved the entry point first must be deactivated or accepted before the<br />
entry point can be moved again.<br />
Use the @VERIFY control statement to specify a program attribute table (PAT) that<br />
includes all of the programs being loaded. The loader determines if each program<br />
being loaded exists in the specified PAT.<br />
The following figure shows the syntax for the @VERIFY control statement section of<br />
the loader input file. In this figure, the double arrowhead (►►) indicates that the<br />
z/<strong>TPF</strong> offline loader input file control statements 153
information must begin on a new line.<br />
►►<br />
@VERIFY<br />
CWD<br />
defaultloc<br />
Note: This must be the first line of the @VERIFY control statement section.<br />
►►<br />
154 z/<strong>TPF</strong> <strong>Program</strong> <strong>Management</strong><br />
defaultloc/<br />
IPAT<br />
specificloc/ version .ext (progcmt)<br />
Figure 23. @VERIFY control statement section of the loader input file<br />
defaultloc<br />
is the default location for the @VERIFY control statement section, where<br />
defaultloc is one of the following types of paths:<br />
v The name of a search path that was defined previously in an @DEFINE<br />
control statement section (for example, &IPATPATH)<br />
v An absolute path (for example, /u/ztpf/ipatpath)<br />
v A relative path (for example, ipatpath).<br />
Note: All relative paths are appended to the current working directory, which<br />
is defined by using the CWD parameter in the @DEFINE control<br />
statement section. Therefore, you must define the CWD parameter<br />
before you can specify a relative path.<br />
The default location is searched for the PAT component listed in the @VERIFY<br />
control statement section. You can override the default path for the PAT<br />
component by specifying a specific location on a separate line.<br />
specificloc<br />
is the specific location for the PAT component to load, where specificloc is one<br />
of the following types of paths:<br />
v The name of a search path that was defined previously in an @DEFINE<br />
control statement section (for example, &VERIFYPATH)<br />
v An absolute path (for example, /u/ztpf/verifypath)<br />
v A relative path (for example, verifypath).<br />
Note: All relative paths are appended to the current working directory, which<br />
is defined using the CWD parameter in the @DEFINE control<br />
statement section. Therefore, you must define the CWD parameter<br />
before you can specify a relative path.<br />
If a specific location is specified for the PAT component, it overrides any default<br />
location that may have been defined for the @VERIFY control statement<br />
section; that is, only the specific location is searched for the PAT component. If<br />
the PAT component is not found in the specific location, an error occurs.<br />
IPAT<br />
specifies the PAT where the list of programs being loaded will be checked. If a<br />
program is not found in the PAT for an OLDR load, the program will be loaded<br />
and a warning will be issued; if a program is not found in the PAT for a TLDR<br />
load, the program will not be loaded.<br />
►◄<br />
►◄
version<br />
is the 1- to 2-character alphanumeric version code for the VERIFY component.<br />
.ext<br />
specifies an extension of the full program name as created by the linker, where<br />
.ext is the appropriate extension. For example, if the linker creates a program<br />
called IPAT51.cimr, the .cimr portion of the name is required.<br />
(progcmt)<br />
appends a comment to the VERIFY component that is displayed in the output<br />
report, where progcmt is the appended text.<br />
z/<strong>TPF</strong> offline loader input file control statements 155
156 z/<strong>TPF</strong> <strong>Program</strong> <strong>Management</strong>
Sample code<br />
JCL for sending your output<br />
VRDR<br />
GDS<br />
Tape<br />
The following code samples show how to create the code that is necessary to<br />
complete an offline load from your z/OS system.<br />
The following examples show sample JCL for directing the output of your load.<br />
The following JCL will send your output to VRDR:<br />
//VRDRLD JOB MSGLEVEL=1,CLASS=S,MSGCLASS=S<br />
/*ROUTE PRINT <strong>TPF</strong>VM1()<br />
/*ROUTE PUNCH <strong>TPF</strong>VM1()<br />
//TLDR EXEC PGM=<strong>TPF</strong>LDR,PARM=’TLDR’,REGION=90M<br />
//STEPLIB DD DSN=ACP.LINK.CUR51.BSS,DISP=SHR<br />
//LDROUT DD DSN=&&VRDROUT,SPACE=(TRK,(1600,120)),<br />
// DISP=(NEW,PASS),UNIT=SYSDA<br />
//LDRTEMP DD DSN=&&SYSUT1,SPACE=(CYL,(1600,120)),UNIT=SYSDA<br />
//LDRREPRT DD SYSOUT=A<br />
//SYSUDUMP DD DUMMY<br />
//SYSABEND DD DUMMY<br />
//LDRTRACE DD SYSOUT=A<br />
//LDRLOAD DD *<br />
<br />
/*<br />
//TRANSMIT EXEC PGM=IKJEFT01,<br />
// PARM=’TRANSMIT <strong>TPF</strong>VM1.(uderid) DDNAME(SYSTSIN) NOLOG NONOTIFY SEQ’<br />
//SYSTSIN DD UNIT=SYSDA,<br />
// DSN=&&VRDROUT,DISP=(OLD,DELETE)<br />
//SYSTSPRT DD DUMMY<br />
The following JCL will send your output to GDS:<br />
//GDSLDR JOB MSGLEVEL=1,CLASS=S,MSGCLASS=S<br />
/*ROUTE PRINT <strong>TPF</strong>VM1()<br />
/*ROUTE PUNCH <strong>TPF</strong>VM1()<br />
//GDSLD EXEC PGM=<strong>TPF</strong>LDR,PARM=’TLDR’,REGION=90M<br />
//STEPLIB DD DSN=ACP.LINK.CUR51.BSS,DISP=SHR<br />
//LDROUT DD DSN=,DISP=OLD<br />
//LDRTEMP DD DSN=&&SYSUT1,SPACE=(CYL,(1600,120)),UNIT=SYSDA<br />
//LDRREPRT DD SYSOUT=A<br />
//LDRTRACE DD SYSOUT=A<br />
//LDRLOAD DD *<br />
<br />
The following JCL will send your output to the Virtual Tape Server (VTS):<br />
//LDROUT DD DSN=BOSS.TAPE,UNIT=VTS,DISP=(OLD,KEEP),<br />
// VOL=SER=TV2127,LABEL=(,SL),<br />
// DCB=(BLKSIZE=4095,RECFM=U)<br />
The following JCL will send your output to VTAPE:<br />
//LDROUT DD DSN=DASD.TAPE,UNIT=VTAPE,DISP=(NEW,KEEP),<br />
// VOL=SER=SCRTCH,LABEL=(,SL),<br />
// SPACE=(TRK,(3500,500)),<br />
// DCB=(BLKSIZE=4095,RECFM=U)<br />
© Copyright <strong>IBM</strong> Corp. 2005, 2012 157
Input files<br />
The following examples show sample input files for each type of offline load (ALDR,<br />
OLDR, TOLDR).<br />
ALDR input file<br />
The following input file runs the offline loader to perform an ALDR load:<br />
@DEFINE<br />
SYSID=BSS<br />
IMGCLEAR=YES<br />
CWD = /tpf/z11/build/bss/load/<br />
&APPATH = /tpf/z11/build/opensource/stdload/:<br />
/tpf/z11/build/base/stdload/:<br />
/tpf/z11/build/bss/load/<br />
@CTKX<br />
CTKX.kpt<br />
@CIMR<br />
CPS0.cimr, ACPL.cimr, ICDF.cimr, SIGT.cimr, RIAT.cimr,<br />
IPAT.cimr, USR1.cimr, USR2.cimr, FCTB.cimr<br />
@IPL<br />
IPLA.ipl, IPLB.ipl<br />
@GFKEYPOINT<br />
CTKAGF.kpt, CTKVGF.kpt<br />
@@CTKV 8 000E /* patch x’000E’ into keypoint at offset 8 */<br />
@INCLUDE /tpf/z11/build/bss_gfk.loadlist<br />
@KEYPOINT<br />
CTKA.kpt %B, CTKA.kpt %C, CTKA.kpt %D,<br />
CTKB.kpt %O, CTKC.kpt, CTKD.kpt,<br />
CTKEPB.kpt %B, CTKEPC.kpt %C, CTKI.kpt<br />
@INCLUDE /tpf/z11/build/bss_kpt.loadlist<br />
@APPLICATION &APPATH<br />
CISO.so, CLBM.so, CTIS.so, CTAL.so, COSY.so,<br />
/tpf/z11/build/base/xml4c/load/CXML.so, CFIN.so,<br />
@INCLUDE /tpf/z11/build/bss_app.loadlist<br />
@VERIFY<br />
IPAT.cimr<br />
OLDR input file<br />
The following input file runs the offline loader to perform an OLDR load:<br />
158 z/<strong>TPF</strong> <strong>Program</strong> <strong>Management</strong><br />
@DEFINE<br />
SYSID=BSS<br />
DEBUGFILES=YES<br />
&APPATH = /tpf/z11/build/opensource/stdload/:<br />
/tpf/z11/build/base/stdload/:<br />
/tpf/z11/build/bss/load/<br />
@LOADSET TEST1 &APPATH<br />
CISO.so, CLBM.so, CTIS.so<br />
@FILE<br />
/tpf/files/data/datafile.txt /sys/tpf_pbfiles/data/datafile.txt -p 755 -o tpfdfltu<br />
@LOADSET TEST2 &APPATH
CFIN.so, CXML.so, CTAL.so<br />
@LOADSET TEST#<br />
XNEE.so, XXAA.so<br />
@VERIFY /tpf/z11/build/bss/load<br />
IPAT.cimr<br />
TLDR input file<br />
The following input file runs the offline loader to perform a TLDR load:<br />
@DEFINE<br />
OVERLAY_IPAT=YES<br />
SYSID=BSS<br />
PROGCLEAR=YES<br />
ELDRCLEAR=YES<br />
DEBUGFILES=YES<br />
CWD = /tpf/z11/build/bss/load/<br />
&APPATH = /tpf/z11/build/opensource/stdload/:<br />
/tpf/z11/build/base/stdload/:<br />
/tpf/z11/build/bss/load/<br />
@CTKX<br />
CTKX.kpt<br />
@CIMR<br />
CPS0.cimr, ACPL.cimr, ICDF.cimr, SIGT.cimr, RIAT.cimr,<br />
IPAT.cimr, USR1.cimr, USR2.cimr, FCTB.cimr<br />
@IPL<br />
IPLA.ipl, IPLB.ipl<br />
@KEYPOINT<br />
CTKA.kpt %B, CTKA.kpt %C, CTKA.kpt %D,<br />
CTKB.kpt %O, CTKC.kpt, CTKD.kpt,<br />
CTKEPB.kpt %B, CTKEPC.kpt %C, CTKI.kpt<br />
@@CTKEPB %B 1E 11FF /* patch x’11FF’ into keypoint at offset x’1E’ */<br />
@INCLUDE /tpf/z11/build/bss_kpt.loadlist<br />
@APPLICATION &APPATH<br />
CISO.so, CLBM.so, CTIS.so, CTAL.so, COSY.so,<br />
/tpf/z11/build/base/xml4c/load/CXML.so, CFIN.so,<br />
@INCLUDE /tpf/z11/build/bss_app.loadlist<br />
@FILE<br />
/tpf/files/data/datafile.txt /sys/tpf_pbfiles/data/datafile.txt -p 755 -o tpfdfltu<br />
@VERIFY<br />
IPAT.cimr<br />
Sample code 159
160 z/<strong>TPF</strong> <strong>Program</strong> <strong>Management</strong>
����<br />
Product Number: 5748-T15<br />
Printed in USA<br />
GTPL-2MS5-09