

Watercolor Studio - Missouri Watercolor Society
Watercolor Studio - Missouri Watercolor Society
Watercolor Studio - Missouri Watercolor Society

Create successful ePaper yourself
Turn your PDF publications into a flip-book with our unique Google optimized e-Paper software.
for the bottom trim of the windowpane. For the<br />
actual trim of the windows, I use a combination<br />
of Alizarin Crimson and Deoxidized Purple. I<br />
do not finish the top part of the smaller building<br />
right away. I leave it for the end of the process,<br />
where I will be retouching some spots and putting<br />
on the final details. I also finish the detail in<br />
the awning that hangs on the side of the farthest<br />
building. Finishing the awning makes the background<br />
look complete, but I always keep in mind<br />
that I may go back to it later for some touch-ups.<br />
The awning is not difficult; it was blocked with<br />
masking fluid, so now all I had to do is use a<br />
size 4 round to get the details just right. The rails<br />
that run through the center on top of the building<br />
are done last.<br />
With most of the background in good shape, I move toward the foreground. I begin by painting the tall beams<br />
that separate the windows. The same colors are used as the window trim on the far right window (alizarin<br />
crimson and deoxidized purple). I use less water this time to make the beams stand out. The colors get sharper<br />
and crisper as the object moves toward the foreground.<br />
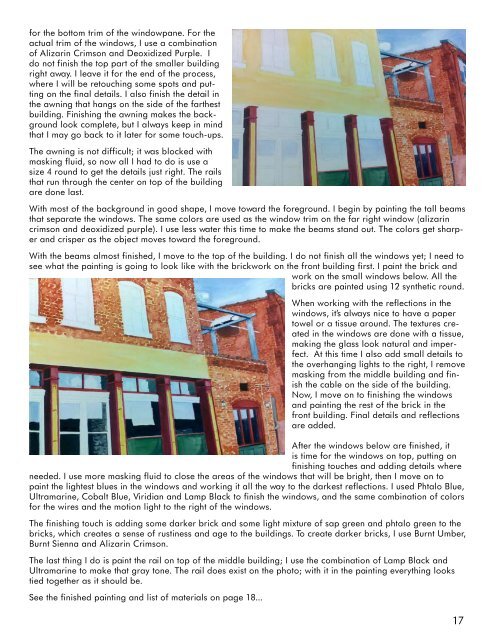
With the beams almost finished, I move to the top of the building. I do not finish all the windows yet; I need to<br />
see what the painting is going to look like with the brickwork on the front building first. I paint the brick and<br />
work on the small windows below. All the<br />
bricks are painted using 12 synthetic round.<br />
When working with the reflections in the<br />
windows, it’s always nice to have a paper<br />
towel or a tissue around. The textures created<br />
in the windows are done with a tissue,<br />
making the glass look natural and imperfect.<br />
At this time I also add small details to<br />
the overhanging lights to the right, I remove<br />
masking from the middle building and finish<br />
the cable on the side of the building.<br />
Now, I move on to finishing the windows<br />
and painting the rest of the brick in the<br />
front building. Final details and reflections<br />
are added.<br />
After the windows below are finished, it<br />
is time for the windows on top, putting on<br />
finishing touches and adding details where<br />
needed. I use more masking fluid to close the areas of the windows that will be bright, then I move on to<br />
paint the lightest blues in the windows and working it all the way to the darkest reflections. I used Phtalo Blue,<br />
Ultramarine, Cobalt Blue, Viridian and Lamp Black to finish the windows, and the same combination of colors<br />
for the wires and the motion light to the right of the windows.<br />
The finishing touch is adding some darker brick and some light mixture of sap green and phtalo green to the<br />
bricks, which creates a sense of rustiness and age to the buildings. To create darker bricks, I use Burnt Umber,<br />
Burnt Sienna and Alizarin Crimson.<br />
The last thing I do is paint the rail on top of the middle building; I use the combination of Lamp Black and<br />
Ultramarine to make that gray tone. The rail does exist on the photo; with it in the painting everything looks<br />
tied together as it should be.<br />
See the finished painting and list of materials on page 18...<br />
17
