Motorola IHF1000 Bluetooth Car Kit Installation tutorial.
Motorola IHF1000 Bluetooth Car Kit Installation tutorial.
Motorola IHF1000 Bluetooth Car Kit Installation tutorial.

Create successful ePaper yourself
Turn your PDF publications into a flip-book with our unique Google optimized e-Paper software.
INTRODUCTION<br />
Discountcarstereo.com<br />
<strong>Motorola</strong> <strong>IHF1000</strong> <strong>Bluetooth</strong> <strong>Car</strong> <strong>Kit</strong><br />
<strong>Installation</strong> <strong>tutorial</strong>.<br />
The <strong>Motorola</strong> <strong>IHF1000</strong> car kit is an innovative <strong>Bluetooth</strong> solution which will change the way you talk while<br />
you are in your car. Using your compatible <strong>Bluetooth</strong> "Hands-Free Profile" enabled mobile phone (1) with<br />
the BLNC <strong>IHF1000</strong> car kit, your in-vehicle communication experience is about to go to the next level.<br />
Just touch the blue button and the BLNC <strong>IHF1000</strong> car kit will listen to your command and make calls for<br />
you. The system's brilliant sound quality with noise reduction and high output sound optimizes sound<br />
quality for all parties in conference. With the voice operated control features and high performance audio,<br />
you are in the driver's seat.<br />
The stylish, backlit controller with its chrome-brushed finish mounts within easy reach on the dashboard.<br />
The simple voice menu prompts and the controller make it easy to:<br />
• pair compatible <strong>Bluetooth</strong> enabled mobile phones<br />
• answer incoming calls<br />
• mute and un-mute calls<br />
• dial by name with up to 20 locally stored contacts<br />
• dial by number<br />
• dial by the mobile phone keypad<br />
• request system help<br />
Multiple Languages<br />
the system also supports voice recognition in multiple languages including English (US and UK), French<br />
(EU), Spanish, Italian and German. So, regardless of who is doing the talking, or in what language, there is<br />
no need to "train" the system.<br />
One <strong>Car</strong>: Multiple Drivers<br />
Multiple people can enjoy the BLNC <strong>IHF1000</strong> car kit. Up to four compatible <strong>Bluetooth</strong> enabled mobile<br />
phones can be paired to the system at a time, and easily switched between phones using the voice<br />
operated controls.<br />
COMPATIBILITY<br />
The BLNC <strong>IHF1000</strong> car kit supports <strong>Bluetooth</strong> hands-free profile. Your phone must support this profile. For<br />
<strong>Motorola</strong> phones visit the customer support page at www.hellomoto.com/us/bluetoothcompatibility. For<br />
other phones, contact the manufacturer.<br />
CAR KIT CONTENTS<br />
Interface Cable<br />
The Interface Cable connects the electronic module (see Fig 2) to the other system components. It<br />
connects the vehicle’s power and ignition to the car kit and provides some optional audio connections<br />
when the car kit is used with the vehicle’s radio.<br />
Electronic Module<br />
You can place the electronic module anywhere inside the vehicle to facilitate convenient connection<br />
between the interface cable and other system components.<br />
Microphone<br />
The microphone cable can be routed along the side of the vehicle, through the dash, and along the edge<br />
of the windshield. The microphone is placed best near the rearview mirror and aimed directly toward the<br />
user. This mic that may already exist in your vehicle is not compatible with this kit. You must use the<br />
microphone included with this kit.<br />
User Interface Module<br />
The User Interface Module (UIM) cable can be mounted in several ways to provide a safe and comfortable<br />
environment for use.<br />
INSTALLATION<br />
Disconnect Negative battery terminal.
Discountcarstereo.com<br />
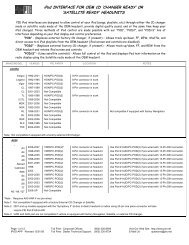
1. HARNESS INSTALLATON<br />
For illustration purposes we will demonstrate installing the <strong>IHF1000</strong> car kit in a 2000 VW Jetta.<br />
The same procedure would apply to any AUDI/VW Group Vehicle with the connector diagramed below.<br />
(See Fig, 6) Group A vehicles include Premium IV, Premium V and Monsoon radios.<br />
Note: Audi/VW Group B radios with a “quad lock connector” will require a different CelFi harness and a<br />
speaker switcher. (MSS) – see Fig 13<br />
Parts Required:<br />
1 <strong>IHF1000</strong>Z (this kit does not include a speaker)<br />
1 or 2 GET (German Radio Extraction Tools)<br />
1 PXVWHF1 vehicle specific plug-n-play CelFi harness<br />
• Remove the radio (German radio removal tools required) See Fig. 7<br />
Plug the radio tool into the radio slots until it locks into position<br />
Pull the radio out of the dashboard by holding onto the grip rings of the release tool<br />
• Disconnect the radios 8-pin speaker harness (black) and plug into the female 8-pin connector of the<br />
PXVWHF1, connect the male 6-pin male connector of the PXVWHF1 into the 6-pin connector (center) on<br />
the radio.<br />
VW GROUP A<br />
Premium IV / Premium V /Monsoon New Beetle<br />
Premium IV / Premium V / Monsoon<br />
Fig. 5<br />
Fig. 7<br />
Audi/VW Radio 20/8/8-pin connectors<br />
Fig. 6<br />
Fig. 8<br />
• Should a 3-part connector (yellow, green, blue) already exist, replace the green connector with the<br />
connector provided. (See Fig 8A)<br />
Note: Radios without Telephone inputs must use the PPH1784 harness along with the <strong>Motorola</strong> Speaker<br />
Switcher (MSS) See Fig. 8C and Fig 13.<br />
• Connect the white 8-pin connector on the PXVWHF1 to the mating 8-pin connector to the 8-pin Molex<br />
connector of the main harness included with the <strong>IHF1000</strong> car kit (3043533Z02) -- See Fig. 9a for close-up<br />
or Fig. 9 labeled “to 8-pin vehicle specific harness.
Discountcarstereo.com<br />
Fig 8A<br />
Fig 8C<br />
Fig.9a<br />
Fig.9 (3043533Z02)<br />
Alert!! Alert!! Alert!! The harness included in older versions for the <strong>IHF1000</strong> car kit did not have an<br />
8-pin Molex connector and because of that you will have to cut, splice and hardwire it to the 8-pin<br />
connector of the CelFi harness.<br />
2. USER INTERFACE MODULE (UIM) INSTALLATION<br />
Fig. 10<br />
Determine a suitable mounting location for the UIM (see Fig.10) The UIM should be within a comfortable<br />
reach of the driver for ease of use.<br />
• Remove the backing of the tape on the bottom of the User Interface Module (UIM).<br />
• Place the UIM in the desired location and mount the UIM with a firm press.<br />
• Route the UIM cable behind the dashboard and trim, and connect to the 12-pin connector of the<br />
Interface cable labeled “to UIM” (see Fig 9)<br />
3. MICROPHONE INSTALLATION
Discountcarstereo.com<br />
Fig. 11<br />
Note! Please review the microphone installation warning sheet included in the <strong>IHF1000</strong> and <strong>IHF1000</strong>z kit<br />
before installing the microphone. Proper placement of the microphone is essential for optimal Handsfree<br />
and Speech Recognition performance.<br />
• Identify a location on the overhead dome light/console assembly or visor to mount the microphone.<br />
•The position of the microphone should be ahead of the driver<br />
• Aim the microphone directly toward the driver for best Speech Recognition performance and Handsfree<br />
calling quality.<br />
• Attach 1 side of the provided Velcro tape to the bottom side of the microphone and mount<br />
Notes:<br />
The front of the microphone should point toward the driver; the wire comes out the back of the<br />
microphone.<br />
Microphone placement is about function, not esthetics.<br />
• Route the microphone cables across the top of the windshield towards the A-pillar. Make sure to route<br />
the cable behind the corner of the headliner, and give a slight tug to insure that the cable sits up in the<br />
headliner, away from the windshield.<br />
• Continue the cable down the inside of the A-pillar and its trim, above and out of the away of any<br />
curtain airbag lines or equipment. Removal of the A-pillar trim may be, but is not always necessary to<br />
achieve proper routing. Insure the cable is completely hidden behind the A-pillar trim piece.<br />
• Pass the cable in through the side of the dashboard, then across to the desired Handsfree Module<br />
mounting position. Connect microphone to the interface cable labeled “To Mic”<br />
4. HANDSFREE MODULE INSTALLATION<br />
Fig. 12<br />
Choose a suitable point for mounting the Handsfree module based on the locations chosen for the<br />
microphone, UIM and the length of the <strong>IHF1000</strong> or <strong>IHF1000</strong>z harness<br />
Hint: Mounting the Handsfree module behind the carpet at the firewall in from of the passenger foot area<br />
works for many vehicles. For larger vehicles, large spaces behind the dashboard will also make good<br />
mounting location.<br />
After all components are installed make sure to:<br />
• Connect the 32-pin Handsfree module connector from the main <strong>Bluetooth</strong> system harness (see Fig 9) to<br />
the Handsfree Module (See Fig 12)<br />
• Connect the 2-pin Microphone connector from the main <strong>Bluetooth</strong> system harness to the microphone<br />
cable connector<br />
• Connect the 12-pin UIM connector from the main <strong>Bluetooth</strong> system harness to the UIM cable connector.<br />
• Insure that the 8-pin white connector is secure to its mate on the PXFHDF Harness (See Fig. 9a)<br />
5. TESTING<br />
• Reconnect the battery negative terminal<br />
• Turn the key to the ignition ON or Accessory position<br />
• Pair a phone<br />
• Verify functionality<br />
When a phone call is received or placed your VW radio will automatically mute the audio source and the<br />
caller’s voice is heard on the car speakers.
Discountcarstereo.com<br />
Notes!<br />
1. Select radios allow the Handsfree system volume to be adjusted by the radio. Please insure that the<br />
volume setting chosen on the <strong>IHF1000</strong> or <strong>IHF1000</strong>z UIM is not at a level that causes distortion when the<br />
radio’s Phone volume level is set to maximum. If distortion is heard, adjust the <strong>IHF1000</strong> or <strong>IHF1000</strong>z<br />
volume down via the UIM. This check is necessary for both Handsfree conversation audio, as well as<br />
Speech Recognition prompt audio.<br />
2. Audi/VW radios that do not have a Telephone input will require the MSS (<strong>Motorola</strong> Speaker switcher) in<br />
addition to PPH1784 vehicle specific CelFi harness.<br />
3. CelFi vehicle specific harnesses are available for: ACURA/HONDA, GM, TOYOTA, SCION and<br />
NISSAN/INFINITI, AUDI, BMW, VW, MITSUBISHI, and CHRYSLER.<br />
4. What is the difference between the <strong>IHF1000</strong> kit and your offering (<strong>IHF1000</strong>z)?<br />
The interface cable included in our <strong>IHF1000</strong>Z kit includes an 8-pin connector for plug-n-play connection<br />
to the vehicle specific harness; the interface cable included with the <strong>IHF1000</strong> does not include this<br />
connector. You may still use that harness but must cut, crimp or solder the connections to the vehicle<br />
specific harness.<br />
6. Can I use this setup to install my <strong>Motorola</strong> HF850 <strong>Kit</strong>?<br />
YES, however you must cut, splice and hardwire the HF850 harness to that of the aftermarket CelFi<br />
harness.<br />
7.<br />
Revised February 4, 2008<br />
Fig 13<br />
© 1995-08 Discount <strong>Car</strong> Stereo, Inc. All rights reserved© Information contained in this document is based of the latest<br />
information available at the time of printing and is subject to the copyright and other intellectual property rights of Discount<br />
<strong>Car</strong> Stereo Inc., its affiliated companies and its licensors. All rights are reserved to make changes as any time without<br />
notice. No part of this document may be reproduced, stored in a retrieval system, or transmitted in any form or by any<br />
means, electronic, mechanical, photocopy, recording or otherwise, nor may these materials be modified or reposted to<br />
other internet sites, without expressed written permission of the publisher.