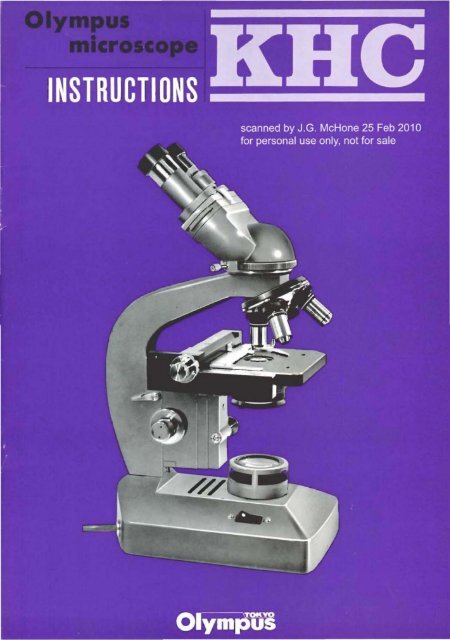
Olympus Microscope Instructions KHC
Olympus Microscope Instructions KHC
Olympus Microscope Instructions KHC

You also want an ePaper? Increase the reach of your titles
YUMPU automatically turns print PDFs into web optimized ePapers that Google loves.
MODEL <strong>KHC</strong> INSTRUCTIONS<br />
Contents<br />
I. Standard Set 1<br />
IT. Specifications .. ······· .. ·.. ····· .... ·· .... ···· .. ·· .... ·· .. ··· .. ·.. ·.. ····· .. ·.... ·· .. ······ .. · 1<br />
m. Name of Parts·················································································2<br />
N. Optical Path.. ·· .... ·· .. ···· .... ·· ·· ···· .. ·.. ·.. ·.. ·.. ·· .. · ·· ·· ·.. ·· .. · · 2<br />
V. Structure and Assembly .. ·· · ·.. ·· ·3<br />
VI. Method of Operation .. · ·.. · · ·4<br />
A. Smoothening of Coarse Adjustment knob<br />
B. Light Source<br />
C. Focusing<br />
D. Interpupillary Distance and Diopter Adjustments<br />
E. Use of Oil Immersion Objective<br />
F. Use of Condenser<br />
G. Change of Bulb<br />
vll. Optical Characteristics 6<br />
W. Major Troubles with <strong>Microscope</strong>, their Possible Causes<br />
and Applicable Steps to be Taken ·.. ·.. ··7<br />
IX. Important Points to Remember ·.. ·8
I. Standard Set<br />
Main Body: (built-in light source, stage and revolving nosepiece)<br />
Binocular Head<br />
Objectives: 4x, lOx, 40x, lOOx,<br />
Eyepiece ; Bi WFlOx<br />
Condenser<br />
Filter<br />
Spare Lamps ; 20W<br />
Eyepiece tube cap<br />
Dustproof Cap (for projection lens)<br />
Cargille Oil<br />
Vinyl cover<br />
Certificate of Inspection<br />
IT. Specifications<br />
Head: Binocular Head<br />
Revolving nosepiece :<br />
Focusing:<br />
Coarse abjustmemt :<br />
Fine adjustment:<br />
Condenser:<br />
Illumination:<br />
Stage:<br />
Dimensions :<br />
45 0 inclination, rotatable through 360 0<br />
Height<br />
Width<br />
Depth<br />
Net weight<br />
horizontally;<br />
Stopper to fix the head at any designed position.<br />
1 set<br />
1 set<br />
lea.<br />
1 pr.<br />
1 pc.<br />
1 pc.<br />
3 pcs.<br />
2 pce.<br />
1 pc.<br />
1 btl.<br />
1 pc.<br />
1 copy<br />
Range of interpupillary distance adjustment: 55.5 - 74mm.<br />
Dioptric adjustment is possible.<br />
Quadruple indicator for Objectives' position<br />
Vertical movement stage<br />
Range of operation 28mm<br />
Range of operation 2mm<br />
N. A. 1.25<br />
Variable iris-diaphragm<br />
Range of vertical movement 15mm<br />
Pre-centered 20W light source is built inside the base.<br />
Coaxial single-handle square mechanical stage<br />
Range of operation: Back-forth 30mm<br />
-1-<br />
Right-left 70mm<br />
355mm<br />
165mm<br />
205mm<br />
approx. 5.5kg without case
ill. Name of Parts<br />
Eyepiece<br />
Binocular head<br />
Coaxial knob for<br />
slide monipulation<br />
Coaxial coarse and<br />
fine adjustment knobs<br />
N. Optical Path<br />
Prism<br />
Projection Lens<br />
Lamp<br />
- 2 -<br />
Objective<br />
Stage<br />
Condenser<br />
Projection lens<br />
Filler
c. Focusing<br />
1. Turn the fine adjustment knob to bring the index line to the middle of the two lines<br />
(movement range).<br />
2. Place the specimen on tne stage and secure it with the clips.<br />
3. Put the lOX objective in position.<br />
4. Looking from side of the microscope, move the stage upward carefully by the coarse<br />
adjustment knob until the specimen is brought very close to the tip of objective.<br />
(** Be most careful not to hit the objective.)<br />
5. Looking through the eyepiece, gradually lower the stage to obtain rough focus.<br />
6. Turn the nosepiece to set the desired objective in position. Accrately focus with the<br />
fine adjustment knob.<br />
7. The specimen may be moved by the slide manipulation knob, built on the stage so<br />
that the particular spot to be observed comes into the center of the view field.<br />
**** For convenience in the later operations, tighten up the pre-set focus lock when the<br />
specimen is roughly in focus at step 5, above. (See for V -A-2, Pre-set focus lock)<br />
D. Inter-pupillary Distance and Dioptor Adjustments<br />
1. The interpupillary distance is adjusted by<br />
a. Holding both eyepiece tube seats,<br />
b. Looking into the eyepieces, and<br />
c. Pulling apart or pushing closer the seats until the view field is observed in one.<br />
When the adjustment is made, read the figure on the scale; this will make the<br />
adjustment easier from the next time on, as it can be done by merely setting the<br />
tUbes at the given figure.<br />
2. Diopter is adjusted by<br />
a. Looking through the right eyepiece with the right eye,<br />
b. Focusing on the specimen by the coarse and fine adjustment knobs,<br />
c. Then looking into the left eyepiece with the left eye, and<br />
d. Turning the diopter ring until the specimen is brought into focus correctly.<br />
When looking into the left eyepiece with the left eye, do not touch the coarse or fine<br />
adjustment knob.<br />
E. Use of Oil Immersion Objective<br />
First, bring the specimen into focus with a low magnification objective (lOX). Apply a<br />
drop of cargille oil on the specimen as well as at the tip of the oil immersion objective.<br />
Turn the nosepiece to bring the oil immersion objective above the specimen. This can be<br />
done without the fear of crashing them into each other. Focus accurately with the fine<br />
adjustment knob and make observations. Upon completion of observations, carefully wipe<br />
off cargille oil on the oil immersion objective with a piece of gauze moistened with xylol.<br />
**** Cargille oil left on the objective can ruin the lens greatly. An utmost care is<br />
required in this point.<br />
-5-
F. Use of Condenser<br />
If an objective of low magnification (less than 10X) is in use, lower the condenser<br />
slightly to avoid an uneven illumination as well as for a better result. The upper-lens<br />
of the condenser may be removed. Removal of the upper-lens gives a better result than<br />
lowering of the condenser. When the oil-immersion objective is in use, move it up to<br />
the top of its movement range.<br />
G. Change of Bulb<br />
Lay down the microscope, and loosen two screws CD underside the base with a coin<br />
or something like that. Remove the cover and change the used lamp with a new one.<br />
vI. Optical Characteristics<br />
"",<br />
".<br />
'" '"<br />
I<br />
Objective Magnification<br />
4x<br />
1<br />
10x 40x<br />
1 I 100x<br />
Numerical<br />
aperture (N. A.) I<br />
0.1<br />
1<br />
0.25 0.65 I 1.3<br />
1<br />
"<br />
Working distance<br />
, (W. D.)<br />
5.1 0.4 0.11<br />
"'"<br />
I 19.771<br />
I I<br />
Eyepiece "'. Focal length I 29.2 i 15.7 "" Total magnification 40x 100x<br />
I I<br />
4.3<br />
I<br />
I<br />
1.8<br />
400x 11'OOOX<br />
WF 10x (Number<br />
Depth of focus<br />
I 112.5 I 18.0<br />
of viewfield 18)<br />
I<br />
2.0<br />
I<br />
0.6<br />
I Actual viewfield I 4.5<br />
- 6 -<br />
I<br />
1.8 I 0.45<br />
I<br />
I 0.18
VIII. Major troubles with microscope, their possible<br />
causes and applicable steps to be taken.<br />
Troubles<br />
I<br />
Possible causes<br />
1<br />
Steps to be taken<br />
Slipping down of the Loosened coarse See Smoothening of Coarse<br />
stage by itself adjustment knob Adjustment knob and pro-<br />
perly adjust it.<br />
Coarse Adjustment 1. Axis of Coarse Adjust- 1. Take reverse steps of<br />
knob too heavy<br />
ment knob overly the above.<br />
tightened<br />
2. Hardened grease on the 2. Notify the<br />
sliding surface. manufacturer.<br />
-<br />
Fine Adjustment knob Hardened grease on the Notify the manufacturer.<br />
too heavy sliding surface<br />
Dust/Oirt on objective 1.<br />
2.<br />
Eyepiece tubes are left<br />
without eyepieces or<br />
cap.<br />
Fingerprints left on the<br />
lens;<br />
Lens hitting the specimen;<br />
or cargille oil left on<br />
the oil-Immersion lens.<br />
Wipe off the top lens of the<br />
objective with clean gauze;<br />
do not touch inner lenses<br />
but notify the manufacturer<br />
Dust/Dirt on eyepiece 1. Careless storage. 1. Be sure to store the<br />
eyepieces after use in<br />
the provided container<br />
or in a desiccator<br />
2. Fingerprints left on the 2. Wipe off with clean<br />
lens surfece<br />
gauze. Do not try to<br />
disassemble the<br />
eyepiece. Any change in<br />
arrangement of lenses<br />
can deteriorate the<br />
entire opical efficiency.<br />
Scratches on the lens Lens was wiped with a piece Immediately notify the<br />
of cloth or leather while manufacturer. The lens will<br />
dust or filth is still left on. be replaced at the actual<br />
- 7 -<br />
cost.
IX. Important points to remember<br />
Dampness and dust is a taboo for the microscope. But, frequently, a lab where the<br />
microscope is used is not free of such. It is the best to store microscope after each use in<br />
the provided container. If frequent observations make it impossible, at least cover the<br />
instrument with the provided vinyl cover.<br />
The objectives and eyepieces should best be stored in a desiccator. Also recommended<br />
is to place a pack of silicagel in the container. After the eyepiece is removed from the<br />
instrument, be sure to cover the eyepiece tube with the provided cap. Never attempt to<br />
disassemble or repair the mechanical parts of the microscope. It must be done by<br />
specialists. Cleaning must be performed with utmost care. For expample, dust off with a<br />
soft brush or blow off by a rubber ball where hands cannot reach.<br />
Mirror (optional accessory)<br />
In general, microscopy with <strong>KHC</strong> is conducted with the projection lens on. However, for<br />
special illumination effect this mirror can be used for high magnification lens. and the other<br />
side, concave surface, is good for observation with low magnification objl'ctives.<br />
- 8 -