Heljan ContainerTerminal with TrainController
Heljan ContainerTerminal with TrainController
Heljan ContainerTerminal with TrainController
You also want an ePaper? Increase the reach of your titles
YUMPU automatically turns print PDFs into web optimized ePapers that Google loves.
Tip: - Control of the <strong>Heljan</strong> Container Terminal using <strong>TrainController</strong> Gold<br />
Date: 18-08-2012 Created<br />
Hi All,<br />
I have just retrieved my Container Terminal from three years in storage and thought it was about time to<br />
get the crane working <strong>with</strong> <strong>TrainController</strong> and this document is another record how I configured<br />
<strong>TrainController</strong> for easy control of my <strong>Heljan</strong> Container Terminal 89001 and the important points<br />
required to successfully run it using macros embedded as function buttons in a Train Window.<br />
Note: - As there is no feedback from the <strong>Heljan</strong> Container Terminal all actions are time based and will<br />
be subject to time variations caused by temperature change, power supply variations, wear and tear etc.<br />
Systems Tested: - ESU ECoS<br />
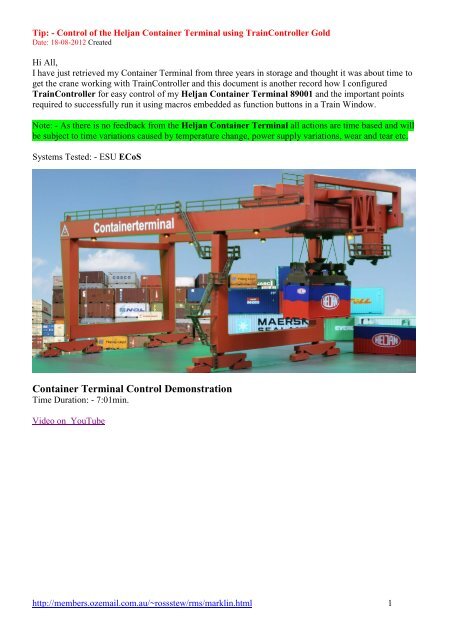
Container Terminal Control Demonstration<br />
Time Duration: - 7:01min.<br />
Video on YouTube<br />
http://members.ozemail.com.au/~rossstew/rms/marklin.html 1
Tip: - Control of the <strong>Heljan</strong> Container Terminal using <strong>TrainController</strong> Gold<br />
Date: 18-08-2012 Created<br />
Read Container Terminal Manuals<br />
For completeness I have supplied links to the <strong>Heljan</strong> Manuals below<br />
1. Container Terminal Manual<br />
a. Main manual how to set up the container terminal and control it using<br />
the supplied controller.<br />
b. It is essential you understand how the container terminal works before<br />
trying to use DCC control and the <strong>TrainController</strong> software.<br />
2. Container Terminal Trouble Shooting Guide<br />
a. At some point <strong>with</strong> your experimentation to control the container<br />
terminal you may find the hoist cables get jammed and this explains a<br />
point by point procedure to fix the problem. (This is not for the faint<br />
hearted).<br />
Testing the Container Terminal for the First Time<br />
Having read the Container Terminal Manual, try out controlling the Container Terminal <strong>with</strong> the supplied<br />
controller to get a feel for how it operates.<br />
Testing the Container Terminal for the First Time using DCC<br />
Before connecting your Container Terminal to a DCC system make a note of the address being used on<br />
the <strong>Heljan</strong> controller, C1: C2: C3: are the possible choices.<br />
Refer to the Configuration Variables (CV’s) table page 4 to match the “Local Crane Address” to that<br />
shown on the <strong>Heljan</strong> controller.<br />
Next enter two locomotive addresses on your DCC equipment (ECos) <strong>with</strong> the locomotive address<br />
matching the CV1 value for the “Local Crane Address”. (see example)<br />
C1: would have a locomotive address 4 for the Trolley/Hoist<br />
C1: would have a locomotive address 5 for the Gantry<br />
http://members.ozemail.com.au/~rossstew/rms/marklin.html 2
Tip: - Control of the <strong>Heljan</strong> Container Terminal using <strong>TrainController</strong> Gold<br />
Date: 18-08-2012 Created<br />
Setup locomotive functions as shown on the (CV’s) table next page to match the functions required.<br />
Now connect your Container Terminal to the DCC system and try controlling the crane <strong>with</strong> your DCC<br />
controller. Once you have got this far you can start thinking about using <strong>TrainController</strong> to control the<br />
Container Terminal.<br />
http://members.ozemail.com.au/~rossstew/rms/marklin.html 3
Tip: - Control of the <strong>Heljan</strong> Container Terminal using <strong>TrainController</strong> Gold<br />
Date: 18-08-2012 Created<br />
Configuration Variables (CV’s) and Function Keys for DCC Operation<br />
Trolley / Hoist Decoder<br />
CV#s Function Description Range Default Setting Value Function Key<br />
CV1 Local address, Crane 1 (C1:) 1-99 4 4<br />
CV1 Local address, Crane 2 (C2:) 1-99 6 6<br />
CV1 Local address, Crane 3 (C3:) 1-99 8 8<br />
CV2 Trolley Motor, start voltage 1-255 48 48<br />
CV3 Trolley Motor, acceleration time 1-255 0 0<br />
CV4 Trolley Motor, deceleration time 1-255 0 0<br />
CV5 Trolley Motor, maximum speed 1-255 255 255<br />
CV55 Hoist Motor, Down Speed 1-255 100 8.0V<br />
Hoist Down F8<br />
CV56 Hoist Motor, Up Speed 1-255 100/120 8.0V<br />
Hoist Up F7<br />
CV57 Hoist Rotation, Turn right speed (CW) 1-255 80 6.5V<br />
Hoist Rotation CW F5<br />
CV58 Hoist Rotation, Turn left speed (CCW) 1-255 80 6.5V<br />
Hoist Rotation CCW F6<br />
CV59 Spot Light function mapping 1-255 2 2 F2<br />
CV60 Magnet function mapping 1-255 1 1 F1<br />
CV61 Magnet On 1-255 255 16.0V<br />
CV120 Address Change CV (write only) 1-3 - -<br />
Gantry Decoder<br />
CV#s Function Description Range Default Setting Value Function Key<br />
CV1 Local address, Crane 1 (C1:) 1-99 5 5<br />
CV1 Local address, Crane 2 (C2:) 1-99 7 7<br />
CV1 Local address, Crane 3 (C3:) 1-99 9 9<br />
CV2 Gantry Motor, start voltage 1-255 48 48<br />
CV3 Gantry Motor, acceleration time 1-255 0 0<br />
CV4 Gantry Motor, deceleration time 1-255 0 0<br />
CV5 Gantry Motor, maximum speed 1-255 255 255<br />
CV58 Gantry Light, function mapping 1-255 4 4 F3<br />
CV60 Flash Light config 0-44 33 33<br />
CV120 Address Change CV (write only) 1-3 - -<br />
The Function Key assignments are not stated in the original <strong>Heljan</strong> Container Terminal Manual.<br />
CV56 = 120 was increased from the default value 100 to allow the hoist to lift a container at a better<br />
speed.<br />
http://members.ozemail.com.au/~rossstew/rms/marklin.html 4
Tip: - Control of the <strong>Heljan</strong> Container Terminal using <strong>TrainController</strong> Gold<br />
Date: 18-08-2012 Created<br />
Changing the Default CV1 Values<br />
The reason changing the default CV1 values on one of the cranes possible 3 channels (C1:C2:C3:) is I<br />
have a very full roster of Märklin locomotives which can only use addresses 1-80. The Container<br />
Terminal has a range of 1-99 so I chose the following values.<br />
Changing the Default CV1 Value for the Gantry (CV1=85)<br />
1. Since I have an ECoS I wired the Gantry to the programming track and removed the Trolley /<br />
Hoist from the Gantry.<br />
2. I decided to use C3: then read CV120 to obtain its value. I changed the value=3 and wrote<br />
the value.<br />
3. Next I read CV1 and obtained the value=9. I changed the value=85 and wrote the value.<br />
Changing the Default CV1 Value for the Trolley / Hoist (CV1=84)<br />
1. The Trolley / Hoist is more difficult to program. Using an ohmmeter I traced which side of<br />
the Trolley / Hoist when mounted on the Gantry was connected to the red (R)/brown (B)<br />
wires. I made a temporary sticker and identified the Trolley pickups.<br />
140mm Rail Centres<br />
2. You can’t program the Trolley/Hoist when mounted on the Gantry so I made a rail setup to<br />
mount the Trolley/Hoist on and wired the rails according to my temporary identification to<br />
my programming track.<br />
3. I used channel C3: then read CV120 to obtain its value. I changed the value=3 and wrote the<br />
value.<br />
4. Next I read CV1 and obtained the value=8. I changed the value=84 and wrote the value.<br />
5. After some testing I increase the Hoist Up<br />
speed to help improve the Hoist lift <strong>with</strong> a<br />
container.<br />
6. I read CV56 and obtained the value=100. I<br />
changed the value=120 and wrote the value.<br />
This was the only operational value that I<br />
changed.<br />
http://members.ozemail.com.au/~rossstew/rms/marklin.html 5
Tip: - Control of the <strong>Heljan</strong> Container Terminal using <strong>TrainController</strong> Gold<br />
Date: 18-08-2012 Created<br />
Fix the addresses on DCC equipment (ECoS)<br />
1. Having changed the default CV1 addresses on the Trolley/Hoist and Gantry I<br />
edited the locomotive addresses on my ECoS to reflect CV1=84 for the Trolley<br />
/Hoist and CV1=85 for the Gantry.<br />
2. Test all the operations once more on the DCC equipment (ECoS) before<br />
attempting to use the <strong>TrainController</strong> software.<br />
Container Terminal Orientation<br />
Trolley<br />
Backward Forward<br />
Left<br />
Gantry<br />
http://members.ozemail.com.au/~rossstew/rms/marklin.html 6<br />
Right
Tip: - Control of the <strong>Heljan</strong> Container Terminal using <strong>TrainController</strong> Gold<br />
Date: 18-08-2012 Created<br />
Container Terminal Control Using <strong>TrainController</strong><br />
The diagram above shows the four <strong>TrainController</strong> Windows required for the Container Terminal.<br />
Gantry<br />
In the Gantry Window the Gantry can be operated Left and Right. The only function is the<br />
Gantry lights Off and Gantry lights On .<br />
Gantry Slew A<br />
In the Gantry Slew A Window the Gantry can be operated Left and Trolley Backward.<br />
In the Gantry Slew A Window the Gantry can be operated Right and Trolley Forward.<br />
Gantry Slew B<br />
In the Gantry Slew B Window the Gantry can be operated Left and Trolley Forward.<br />
In the Gantry Slew B Window the Gantry can be operated Right and Trolley Backward.<br />
Trolley and Hoist<br />
In the Trolley and Hoist Window the Trolley can be operated Backward and Forward.<br />
Trolley and Hoist Functions<br />
F1 = Magnet Off and Magnet On<br />
F2= Spotlight Off and Spotlight On<br />
F5 = Hoist Rotate CW Pushbutton Off and Pushbutton On<br />
Hoist Rotate CW 90 Deg macro Hoist Rotate CW 180 Deg macro<br />
http://members.ozemail.com.au/~rossstew/rms/marklin.html 7
Tip: - Control of the <strong>Heljan</strong> Container Terminal using <strong>TrainController</strong> Gold<br />
Date: 18-08-2012 Created<br />
Trolley and Hoist Functions continued<br />
F6 = Hoist Rotate CCW Pushbutton Off and Pushbutton On<br />
Hoist Rotate CCW 90 Deg macro Hoist Rotate CW 180 Deg macro<br />
For the macro operations the rotation time was setup <strong>with</strong>out a container load and <strong>with</strong> the Container<br />
Load the hoist doesn’t rotate to the correct position but can be adjusted <strong>with</strong> the pushbutton<br />
controls as required, this works well.<br />
F7 = Hoist Up Switch Off and Switch On<br />
F8 = Hoist Down Switch Off and Switch On<br />
Slew macro = Gantry Left and Trolley/hoist Backward for a timed duration.<br />
Slew macro = Gantry Left and Trolley/hoist Forward for a timed duration.<br />
Slew macro = Gantry Right and Trolley/hoist Backward for a timed duration.<br />
Slew macro = Gantry Right and Trolley/hoist Forward for a timed duration.<br />
The time duration for the Slew operation can be changed by the sec and sec macro functions.<br />
14 seconds is required for the full traverse of the Gantry and 7 seconds is as you have guessed it, for the<br />
Gantry to traverse half the distance.<br />
The Container Terminal Pwr Off/On toggle switch and Flagman indicators<br />
are controlled by the and icons in the Trolley/Hoist Train Window.<br />
The toggle switch controls a k84 relay which turns Off/On the power supply to the Container terminal.<br />
This icon is used to toggle Off the Gantry lights from the Trolley/Hoist window via a pushbutton<br />
and flagman.<br />
This icon is used to toggle On the Gantry lights from the Trolley/Hoist window via a pushbutton<br />
and flagman.<br />
http://members.ozemail.com.au/~rossstew/rms/marklin.html 8
Tip: - Control of the <strong>Heljan</strong> Container Terminal using <strong>TrainController</strong> Gold<br />
Date: 18-08-2012 Created<br />
Blocks and Flagman<br />
The Container Terminal has four motors.<br />
Two motors are controlled by function buttons, F5-F6 control the hoist rotation <strong>with</strong> a preset speed and<br />
F7-F8 control the hoist Up and Down movements which is also controlled by a preset speed.<br />
The Gantry and the Trolley are controlled by variable speed controls.<br />
The “ContTerm Slew Trolley Fwd” and “ContTerm Slew Trolley Rev” blocks are required to control<br />
the direction of the Container Terminal when both motors (Gantry and Trolley) are used together in a<br />
slewing motion, this provides four different movements.<br />
The “ContTerm Trolley & Hoist” block is used for all functions and movements for the Trolley and<br />
Hoist. All diorama macros are also controlled or channelled through this block.<br />
The “ContTerm Gantry” block is used for all functions and movements for the Gantry. Some macros are<br />
also controlled or channelled through this block.<br />
All Flags are assigned to their respective blocks except for PWR Off/On and Macro Link<br />
http://members.ozemail.com.au/~rossstew/rms/marklin.html 9
Tip: - Control of the <strong>Heljan</strong> Container Terminal using <strong>TrainController</strong> Gold<br />
Date: 18-08-2012 Created<br />
Blocks, Flagman, Engines and Train Sets<br />
“CT Gantry B Slew” train set is<br />
made up of two engines “(85) CT<br />
Gantry B Slew” and “(84) CT<br />
Trolley B” each is defined <strong>with</strong> the<br />
connection as shown in ( )<br />
Note that “(84) CT Trolley B”<br />
has had the Toggle Direction button<br />
used on it.<br />
The “CT Gantry B Slew” train set<br />
is associated in the block<br />
“ContTerm Slew Trolley Rev”<br />
“CT Gantry A Slew” train set is<br />
made up of two engines “(85) CT<br />
Gantry A Slew” and “(84) CT<br />
Trolley A” each is defined <strong>with</strong><br />
the connection as shown in ( )<br />
The “CT Gantry A Slew” train set<br />
is associated in the block<br />
“ContTerm Slew Trolley Fwd”<br />
This setup provides four different slewing movements for the Gantry and Trolley of the Container<br />
Terminal.<br />
http://members.ozemail.com.au/~rossstew/rms/marklin.html 10
Tip: - Control of the <strong>Heljan</strong> Container Terminal using <strong>TrainController</strong> Gold<br />
Date: 18-08-2012 Created<br />
The Engine “(84) CT Trolley & Hoist” is associated in the block “ContTerm Trolley & Hoist”<br />
The Engine “(85) CT Gantry” is associated in the block “ContTerm Gantry”<br />
All Train Sets and Engines are associated to the right hand side of the respective blocks.<br />
Engine Functions<br />
All functions for the Container Terminal can be controlled from the “CT Trolley & Hoist” engine.<br />
You will notice some functions are decoder function On/Off Switches, decoder function Push Buttons and<br />
List commands. As the database “rms_container_terminal_160812.yrr” is supplied, have a discovery tour<br />
to see how things are setup.<br />
http://members.ozemail.com.au/~rossstew/rms/marklin.html 11
Tip: - Control of the <strong>Heljan</strong> Container Terminal using <strong>TrainController</strong> Gold<br />
Date: 18-08-2012 Created<br />
Macros<br />
I have provided a few macros to help provide a base structure to control the Container Terminal.<br />
When I use my container Terminal on my layout I intend to have a<br />
larger Gantry track which will have contact sensors. This will alter<br />
how the slew functions will work and I will have more timer<br />
functions. I will update this article sometime in the future to reflect<br />
the Container Terminal installation on my layout.<br />
The supplied file “container_terminal_files.zip” contains the following files<br />
rms_container_terminal_160812.yrr<br />
rms_container_terminal_160812.yrs<br />
rms_container_terminal_160812.yrw<br />
container_terminal_engines.yrl<br />
<strong>ContainerTerminal</strong>.yra<br />
CT_Trolley.yra<br />
fx_1.yra<br />
Portalkran_87dfe3b713.bmp (Loco icon for the ECoS Command Station)<br />
Portalkran_902aace727.bmp (Loco icon for the ECoS Command Station)<br />
Warning: - All files have been created using Gold TC software version 7.0F7c<br />
Testing your <strong>Heljan</strong> Container Terminal is done at your own risk.<br />
Installing Container Terminal Files<br />
To have a look at the <strong>Heljan</strong> Container Terminal operating, unzip “container_terminal_files.zip” and do<br />
the following.<br />
1) Place rms_container_terminal_160812.yrr, rms_container_terminal_160812.yrs and<br />
rms_container_terminal_160812.yrw under the <strong>TrainController</strong> directory.<br />
2) Make a directory called “function_items” under the TrainAnimator directory and place<br />
<strong>ContainerTerminal</strong>.yra, CT_Trolley.yra and fx_1.yra under the function_items directory.<br />
3) Place container_terminal_engines.yrl under <strong>TrainController</strong>\Locomotive Data directory.<br />
http://members.ozemail.com.au/~rossstew/rms/marklin.html 12
Tip: - Control of the <strong>Heljan</strong> Container Terminal using <strong>TrainController</strong> Gold<br />
Date: 18-08-2012 Created<br />
Container Terminal Control Testing<br />
a. Start <strong>TrainController</strong> and select your digital system. The rms_container_terminal_160812.yrr<br />
file was created using an ECoS.<br />
b. Go into Edit Mode, Under the General Tab add the correct graphic from Function Items<br />
directory then under Connection Tab The Container Terminal address (default is 4 and 5) to suit<br />
the decoder address that your Container Terminal has on channel C1: and you are now nearly<br />
ready to start testing.<br />
c. Control you Container Terminal manually from your digital controller and confirm that the<br />
forward directions for the Gantry (5) is to the right and the Trolley (4) is forward, see Container<br />
Terminal Orientation page 6.<br />
4) Ensure all engines and Trains are assigned to the correct Blocks.<br />
5) Click the function button in the Trolley Train Window, the spot light will turn on.<br />
6) Click the function button in the Gantry Train Window to test the gantry lights.<br />
7) Click the function button and hold down the left mouse key in the Train Window for a CW<br />
rotation of the hoist, release the mouse button and the rotation will stop.<br />
8) Click the function button and hold down the left mouse key in the Train Window for a CCW<br />
rotation of the hoist, release the mouse button and the rotation will stop.<br />
9) Click the function button in the Trolley Train Window, ensure the Container Terminal will<br />
lower the Hoist, click the button to stop the action.<br />
10) Click the function button in the Trolley Train Window, ensure the Container Terminal will raise<br />
the Hoist, click the button to stop the action.<br />
11) Test the Container Terminal Slew Operations in the Train Window(s) to make sure all directions are<br />
correct, keep the speed low to avoid running too far.<br />
12) The blue macro icons shown contain macros where the action required is first<br />
selected then the crane is controlled for a period of time. Make sure you are successful <strong>with</strong> points 7-8<br />
before you start using the blue rotate hoist icons and wait until the action is complete before selecting<br />
the next action.<br />
a) If you notice the Container Terminal overruns any action, edit the appropriate macro (listed<br />
below) and shorten the time duration.<br />
http://members.ozemail.com.au/~rossstew/rms/marklin.html 13
Tip: - Control of the <strong>Heljan</strong> Container Terminal using <strong>TrainController</strong> Gold<br />
Date: 18-08-2012 Created<br />
b) If the Container Terminal underruns any action, edit the appropriate macro (listed below) and<br />
lengthen the time duration.<br />
13) The Slew icons are very complex and should only be tested once you have<br />
adjusted all the times in the macros shown and point 11 is correct.<br />
a) First click the sec function, position the Trolley to its most forward position using the Train<br />
Window.<br />
b) Position the Gantry to the far right using the Train Window.<br />
c) Click the function, the Container Terminal should slew the Gantry left and the trolley<br />
backward.<br />
d) If you notice the Container Terminal overruns any action, edit the appropriate macro (listed<br />
below) and shorten the time duration.<br />
e) If the Container Terminal underruns any action, edit the appropriate macro (listed below) and<br />
lengthen the time duration.<br />
f) Repeat this process for all 14 Sec slew macros using the correct function making sure you position<br />
the Gantry and Trolley before you execute the slew macros.<br />
g) Possible positions are<br />
i) Gantry right Trolley forward<br />
ii) Gantry right Trolley backward<br />
iii) Gantry left Trolley backward<br />
iv) Gantry left Trolley forward<br />
14) Edit all 7 Sec slew macros and make sure the time you may have changed in the 14 Sec macros is half<br />
the value.<br />
15) The Diorama Macro push buttons should ONLY be tested once points 4-14 work really well.<br />
a) Ensure you Container Terminal power is on and can be controlled from the Train windows.<br />
b) Position the Gantry to the far right and the Trolley to the most forward position using the Train<br />
Windows.<br />
c) Both <strong>Heljan</strong> containers should be stacked and positioned so the hoist can lower and pick up the<br />
first container, see YouTube video demonstration.<br />
http://members.ozemail.com.au/~rossstew/rms/marklin.html 14
Tip: - Control of the <strong>Heljan</strong> Container Terminal using <strong>TrainController</strong> Gold<br />
Date: 18-08-2012 Created<br />
16) The Diorama push buttons 1-3 will only work when the Macro Link flagman is on.<br />
a) Once the diorama (1) button is pushed, pause a few seconds then turn the Macro Link switch off<br />
and sit back and enjoy the action.<br />
b) Once the first diorama (1) is complete, refer to the message window to know when. Switch the<br />
Macro Link switch on, push diorama (2) button, pause a few seconds then turn the Macro Link<br />
switch off and sit back and enjoy the second diorama.<br />
c) Repeat once again for diorama (3)<br />
d) Leaving the Macro Link on will execute all macros one after the other.<br />
http://members.ozemail.com.au/~rossstew/rms/marklin.html 15
Tip: - Control of the <strong>Heljan</strong> Container Terminal using <strong>TrainController</strong> Gold<br />
Date: 18-08-2012 Created<br />
Bonus Time<br />
If you have successfully tested and run the <strong>Heljan</strong> Container Terminal 89001 as listed above and would<br />
like to enter the information into “your_layout.yrr” you will have completed most of the hard work<br />
required. I have outlined some procedures below.<br />
Warning: -<br />
Copying “rms_container_terminal_160812.yrr” will take an experienced user 1-2 hours or less to<br />
complete.<br />
Because this is an advanced topic the procedures below are an outline only of what you will have to do.<br />
TIP: -<br />
Copying data from one *.yrr file to another *.yrr file<br />
To do this process you must start another <strong>TrainController</strong> (you will have two <strong>TrainController</strong>’s running)<br />
and resize both windows so they are side by side.<br />
“rms_container_terminal_160812.yrr” should be open in the left side <strong>TrainController</strong> and<br />
“your_layout.yrr” is open in the right <strong>TrainController</strong>.<br />
In the left <strong>TrainController</strong> window select the items required in a window then hit Ctrl + C to copy items.<br />
In the right <strong>TrainController</strong> LMC (left mouse click) the location you want to place the items and Hit<br />
Ctrl + V to paste items. Do another LMC away from any other item in the right <strong>TrainController</strong> to finally<br />
place the items in your_layout.yrr<br />
Copy Procedure Outline<br />
1. Create a new Switchboard in ‘your_layout.yrr’ named “Container Terminal”.<br />
2. Import the Engine named “container_terminal_engines.yrl” (supplied file) into<br />
‘your_layout.yrr’. This provides all icons required and a speed profile for the Container Terminal<br />
engines (total 6) so Dr. Railroad won’t complain too much.<br />
3. Using New Explorer windows copy all macros. Make sure that you copy last<br />
and in the order stated.<br />
4. Copy all switchboard switches, Flagmen, text and image.<br />
5. Check all switch properties and make any required changes.<br />
6. Fix Flagman to required switches and check all properties.<br />
7. Using the Block Editor delete all Flagman and reinsert the required Flagman for all blocks.<br />
8. Edit the Engine ‘CT Trolley’ and fix list operations (accessories and macro’s).<br />
9. Enjoy controlling your <strong>Heljan</strong> Container Terminal <strong>with</strong> ease.<br />
As always enjoy your model trains.<br />
http://members.ozemail.com.au/~rossstew/rms/marklin.html 16


