Setting up a new PDA - Frames
Setting up a new PDA - Frames
Setting up a new PDA - Frames

You also want an ePaper? Increase the reach of your titles
YUMPU automatically turns print PDFs into web optimized ePapers that Google loves.
<strong>Setting</strong> <strong>up</strong> a <strong>new</strong> <strong>PDA</strong><br />
This section presents instructions on setting <strong>up</strong> a <strong>new</strong> <strong>PDA</strong> (personal digital assistant) for using<br />
FFI <strong>PDA</strong> in the field. The steps are:<br />
o Synchronizing the <strong>PDA</strong>.<br />
o Installing FFI <strong>PDA</strong>.<br />
o Loading any needed reference documents.<br />
FFI <strong>PDA</strong> is designed to be used on <strong>PDA</strong>s that run Windows Mobile 5.0. See FFI installation for<br />
memory and speed requirements.<br />
Synchronizing the <strong>PDA</strong><br />
The first step in installing FFI <strong>PDA</strong> is synchronization. The User's Guide assumes that you are using<br />
ActiveSync to synchronize your <strong>PDA</strong>. If you do not have ActiveSync on your <strong>PDA</strong>, you can<br />
download ActiveSync 4.5 from http://www.microsoft.com/windowsmobile/activesync.<br />
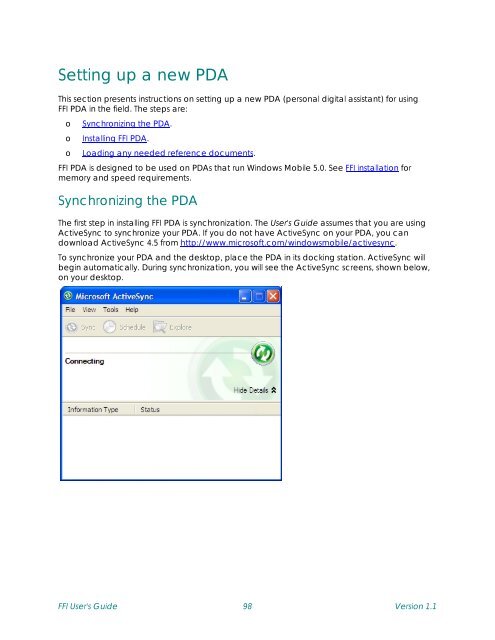
To synchronize your <strong>PDA</strong> and the desktop, place the <strong>PDA</strong> in its docking station. ActiveSync will<br />
begin automatically. During synchronization, you will see the ActiveSync screens, shown below,<br />
on your desktop.<br />
FFI User's Guide 98 Version 1.1
Important: When FFI opens, it occ<strong>up</strong>ies the full screen. Whenever you use FFI with your <strong>PDA</strong>,<br />
be sure to resize the FFI window so that you can see the ActiveSync window. ActiveSync must<br />
be running every time you use FFI with your <strong>PDA</strong>.<br />
Important: When you run ActiveSync, be sure that all of the ActiveSync options are turned<br />
OFF, so that only ActiveSync itself is running. Follow the procedure shown below to turn off the<br />
ActiveSync options.<br />
When synchronization is complete, move on to Installing FFI on the <strong>PDA</strong>.<br />
A note about ActiveSync partnerships<br />
ActiveSync partnerships are optional. In a partnership, ActiveSync identifies your <strong>PDA</strong> with a<br />
specific desktop PC, and retains the information type settings for synchronization. You can also<br />
use ActiveSync as a guest, without forming a formal partnership. Because partnerships can<br />
trigger conflicts with FFI <strong>PDA</strong>, use them only if you also use your <strong>PDA</strong> for other applications, such<br />
as MS Outlook, that require a partnership.<br />
IMPORTANT: If you use an ActiveSync partnership, be sure to turn your partnership OFF before<br />
running FFI <strong>PDA</strong>. FFI <strong>PDA</strong> operations conflict with ActiveSync operations.<br />
FFI User's Guide 99 Version 1.1
To turn off your ActiveSync partnership:<br />
1. In the ActiveSync window on the desktop, click Options in the Tools pull-down menu.<br />
2. Unselect each of the checkboxes, and click OK.<br />
FFI User's Guide 100 Version 1.1
Installing FFI on the <strong>PDA</strong><br />
NOTE: Installing FFI <strong>PDA</strong> requires approximately 15 minutes, and requires that you carefully<br />
monitor your desktop and the <strong>PDA</strong> to read and respond to installation prompts and<br />
instructions.<br />
Important: Be sure to resize the FFI window so that you can see the ActiveSync window.<br />
ActiveSync must be running every time you use FFI with your <strong>PDA</strong>.<br />
After synchronizing your <strong>PDA</strong>, follow these steps to install FFI <strong>PDA</strong>:<br />
1. Start FFI on your desktop computer and open <strong>PDA</strong> Coordination.<br />
2. In the Set<strong>up</strong> <strong>PDA</strong> pull-down menu, select Set<strong>up</strong> New <strong>PDA</strong>.<br />
FFI User's Guide 101 Version 1.1
3. The <strong>PDA</strong> Set<strong>up</strong> window opens on your computer. This window will remain open throughout<br />
the installation, and will periodically give you instructions and prompts. Click Continue in<br />
the window to begin the installation process.<br />
4. IMPORTANT: Pay close attention during the installation process. You will need to watch<br />
both the desktop and the <strong>PDA</strong> windows to read and respond to dialogs. Although the<br />
installation procedure varies somewhat from <strong>PDA</strong> to <strong>PDA</strong>, depending on its configuration,<br />
the installation generally follows this pattern:<br />
a. The <strong>PDA</strong> will ask to install a component.<br />
b. Install the component on the <strong>PDA</strong>.<br />
c. Once the component is installed, tap OK in the <strong>up</strong>per right corner of the <strong>PDA</strong> window.<br />
d. Click Continue in the desktop <strong>PDA</strong> Set<strong>up</strong> message box.<br />
General installation notes:<br />
o If the <strong>PDA</strong> asks about reinstalling existing components, click Yes.<br />
o When the <strong>PDA</strong> asks to restart, click OK.<br />
o When the <strong>PDA</strong> announces that it has successfully installed something, click OK.<br />
o Click Continue in the <strong>PDA</strong> Set<strong>up</strong> window after the <strong>PDA</strong> has finished a particular task.<br />
5. When installation is finished, a Finished message box will display on the desktop. Click OK.<br />
FFI User's Guide 102 Version 1.1
After FFI is installed on your <strong>PDA</strong>, the FFI <strong>PDA</strong> program icon appears in the <strong>PDA</strong> Programs<br />
window.<br />
NOTE: You need only install FFI on the <strong>PDA</strong> once, although there is no harm in reinstalling it.<br />
After FFI <strong>PDA</strong> is successfully installed, see Exporting sample events to the <strong>PDA</strong>.<br />
FFI User's Guide 103 Version 1.1
Exporting sample events to the <strong>PDA</strong><br />
To prepare for sampling in the field with the <strong>PDA</strong>, you must export sample events to FFI <strong>PDA</strong>. FFI<br />
will also export the local species list and its associated picklists to the <strong>PDA</strong>.<br />
Following are some important tips to observe when you export sample events:<br />
• If you have an ActiveSync partnership, be sure to turn it OFF before running FFI. Also turn<br />
off any ActiveSync options, so that only ActiveSync is running.<br />
• You can only collect data for the macro plots and sample events that you specify when<br />
you export to the <strong>PDA</strong>. Therefore, if you are installing a <strong>new</strong> plot, you must create the plot<br />
in the FFI Project Management module, even if you don't yet have any coordinates or<br />
other information about the plot. You can edit the macro plot description after you return<br />
from the field.<br />
• Sample events are unique to macro plots, You must select each sample event for each<br />
macro plot you wish to visit. Example: if you want to visit three plots on May 29, 2008, that<br />
date should appear three times in the <strong>PDA</strong> Coordination Details data grid, as shown<br />
below.<br />
• Be sure to export a sample event to the <strong>PDA</strong> only once. The <strong>PDA</strong> doesn't retain any data,<br />
so once you import a completed sample event into FFI, the <strong>PDA</strong> has no memory of it. If<br />
you export the sample event again later, none of its method data will be exported with it.<br />
To export sample events:<br />
1. On your desktop, start FFI and select <strong>PDA</strong> Coordination.<br />
2. Place the <strong>PDA</strong> in its docking station.<br />
3. In the <strong>PDA</strong> Coordination tree view, navigate to the appropriate project unit and macro<br />
plot.<br />
4. Click each sample event to be exported. The events will be listed in the grid in the <strong>PDA</strong><br />
Coordination Details window. Note that sample events for two macro plots will be<br />
exported.<br />
FFI User's Guide 104 Version 1.1
NOTE: To remove an event, select it and then click Remove Selected. To remove all events,<br />
click Clear Entries.<br />
5. Ensure that ActiveSync is running and that FFI <strong>PDA</strong> is not running.<br />
FFI User's Guide 105 Version 1.1
6. On the desktop, select Export Sample Events to <strong>PDA</strong> in the Send/Retrieve pull-down menu.<br />
7. A progress bar will appear. The export process takes several minutes. When the bar<br />
disappears, the process is complete. The sample events will disappear from the<br />
<strong>PDA</strong> Coordination Details grid.<br />
You may also wish to load reference documents on your <strong>PDA</strong> before going to the field.<br />
Important: Before you go into the field, perform a self-restoring Sprite back<strong>up</strong> on each of your<br />
memory cards to protect against data and application loss. For information, see Creating a<br />
self-restoring Sprite back<strong>up</strong> file in the FFI <strong>PDA</strong> Field Handbook.<br />
To work with your sample events in the field, proceed to the FFI <strong>PDA</strong> field handbook.<br />
FFI User's Guide 106 Version 1.1
Loading reference documents<br />
You may also wish to transfer Word, Excel, and Acrobat documents from your desktop to the<br />
<strong>PDA</strong> for reference in the field.<br />
To transfer files, you need to establish an ActiveSync partnership. Then you can use the Explore<br />
icon on the ActiveSync window to bring <strong>up</strong> a Mobile Device explorer window, which can then<br />
be used to copy documents directly to the <strong>PDA</strong>. See your <strong>PDA</strong> operator's manual for more<br />
information on document transfer.<br />
NOTE: Be sure to turn your ActiveSync partnership OFF before running FFI.<br />
Acrobat Reader<br />
The FFI <strong>PDA</strong> Field Handbook is available as a PDF that you can load on your <strong>PDA</strong> for use in the<br />
field. This requires that you install Adobe Reader for Pocket PC 2.0, which can be downloaded at<br />
http://www.adobe.com/products/acrobat/readerforppc.<br />
FFI User's Guide 107 Version 1.1
Importing data from the <strong>PDA</strong><br />
After you have collected field data and returned to the office, import your data into the<br />
administrative unit database on the desktop.<br />
NOTE: Be sure to turn your ActiveSync partnership and any ActiveSync options OFF before<br />
running FFI.<br />
1. Synchronize the <strong>PDA</strong> by placing it in the docking station. FFI <strong>PDA</strong> should not be running. Be<br />
sure that ActiveSync recognizes the <strong>PDA</strong>, ensuring that the computer and the <strong>PDA</strong> are<br />
communicating.<br />
NOTE: ActiveSync does NOT download your field data from the <strong>PDA</strong>.<br />
2. On the desktop, start FFI and log into the appropriate administrative unit and database.<br />
3. Click <strong>PDA</strong> Coordination.<br />
4. In the Send/Retrieve pull-down menu, click Import Data From <strong>PDA</strong>. The import begins<br />
automatically and may take a few minutes.<br />
FFI User's Guide 108 Version 1.1
5. When the import is complete, a message window opens. Click OK in the Data Capture<br />
<strong>PDA</strong> message window.<br />
NOTE: All of the field data that you designated for import is now contained in the<br />
administrative unit database on the desktop, and no longer resides on the <strong>PDA</strong>. However, if<br />
other administrative unit databases are present on your <strong>PDA</strong>, they will not be affected.<br />
6. You can now go to Data Entry and Edit in FFI on your desktop and view the data for the<br />
sample events that you imported. The screenshot below shows the data that was<br />
imported for the Magic Kingdom October 11, 2007 sample event.<br />
NOTE: See Data entry and edit for more information on viewing and working with data.<br />
FFI User's Guide 109 Version 1.1