DM8 Module - Operator's Manual - RevA - Alesis
DM8 Module - Operator's Manual - RevA - Alesis
DM8 Module - Operator's Manual - RevA - Alesis
You also want an ePaper? Increase the reach of your titles
YUMPU automatically turns print PDFs into web optimized ePapers that Google loves.
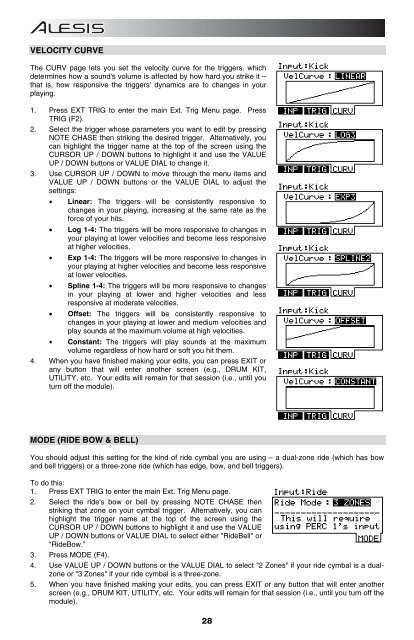
VELOCITY CURVE<br />
The CURV page lets you set the velocity curve for the triggers, which<br />
determines how a sound's volume is affected by how hard you strike it –<br />
that is, how responsive the triggers' dynamics are to changes in your<br />
playing.<br />
1. Press EXT TRIG to enter the main Ext. Trig Menu page. Press<br />
TRIG (F2).<br />
2. Select the trigger whose parameters you want to edit by pressing<br />
NOTE CHASE then striking the desired trigger. Alternatively, you<br />
can highlight the trigger name at the top of the screen using the<br />
CURSOR UP / DOWN buttons to highlight it and use the VALUE<br />
UP / DOWN buttons or VALUE DIAL to change it.<br />
3. Use CURSOR UP / DOWN to move through the menu items and<br />
VALUE UP / DOWN buttons or the VALUE DIAL to adjust the<br />
settings:<br />
• Linear: The triggers will be consistently responsive to<br />
changes in your playing, increasing at the same rate as the<br />
force of your hits.<br />
• Log 1-4: The triggers will be more responsive to changes in<br />
your playing at lower velocities and become less responsive<br />
at higher velocities.<br />
• Exp 1-4: The triggers will be more responsive to changes in<br />
your playing at higher velocities and become less responsive<br />
at lower velocities.<br />
• Spline 1-4: The triggers will be more responsive to changes<br />
in your playing at lower and higher velocities and less<br />
responsive at moderate velocities.<br />
• Offset: The triggers will be consistently responsive to<br />
changes in your playing at lower and medium velocities and<br />
play sounds at the maximum volume at high velocities.<br />
• Constant: The triggers will play sounds at the maximum<br />
volume regardless of how hard or soft you hit them.<br />
4. When you have finished making your edits, you can press EXIT or<br />
any button that will enter another screen (e.g., DRUM KIT,<br />
UTILITY, etc. Your edits will remain for that session (i.e., until you<br />
turn off the module).<br />
MODE (RIDE BOW & BELL)<br />
You should adjust this setting for the kind of ride cymbal you are using – a dual-zone ride (which has bow<br />
and bell triggers) or a three-zone ride (which has edge, bow, and bell triggers).<br />
To do this:<br />
1. Press EXT TRIG to enter the main Ext. Trig Menu page.<br />
2. Select the ride's bow or bell by pressing NOTE CHASE then<br />
striking that zone on your cymbal trigger. Alternatively, you can<br />
highlight the trigger name at the top of the screen using the<br />
CURSOR UP / DOWN buttons to highlight it and use the VALUE<br />
UP / DOWN buttons or VALUE DIAL to select either "RideBell" or<br />
"RideBow."<br />
3. Press MODE (F4).<br />
4. Use VALUE UP / DOWN buttons or the VALUE DIAL to select "2 Zones" if your ride cymbal is a dualzone<br />
or "3 Zones" if your ride cymbal is a three-zone.<br />
5. When you have finished making your edits, you can press EXIT or any button that will enter another<br />
screen (e.g., DRUM KIT, UTILITY, etc. Your edits will remain for that session (i.e., until you turn off the<br />
module).<br />
28


