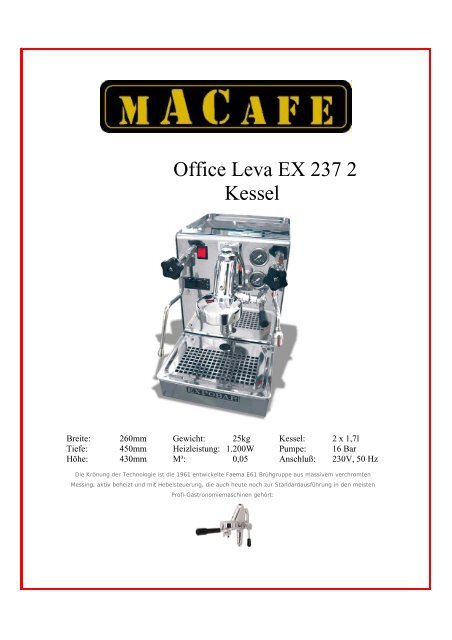
Office Leva EX 237 2 Kessel
Office Leva EX 237 2 Kessel
Office Leva EX 237 2 Kessel

Create successful ePaper yourself
Turn your PDF publications into a flip-book with our unique Google optimized e-Paper software.
<strong>Office</strong> <strong>Leva</strong> <strong>EX</strong> <strong>237</strong> 2<br />
<strong>Kessel</strong><br />
Breite: 260mm Gewicht: 25kg <strong>Kessel</strong>: 2 x 1,7l<br />
Tiefe: 450mm Heizleistung: 1.200W Pumpe: 16 Bar<br />
Höhe: 430mm M³: 0,05 Anschluß: 230V, 50 Hz<br />
Die Krönung der Technologie ist die 1961 entwickelte Faema E61 Brühgruppe aus massivem verchromten<br />
Messing, aktiv beheizt und mit Hebelsteuerung, die auch heute noch zur Standardausführung in den meisten<br />
Profi-Gastronomiemaschinen gehört:
Der große hochstehende 1,7 Liter Kupferboiler funktioniert nach dem Wärmetauscherprinzip und hält auch<br />
größerem Andrang stand.<br />
So funktioniert Genuß<br />
Die LEVA ist eine echte Innovation unter den Espressomaschinen: Stilecht im Design und außergewöhnlich in<br />
ihrer Funktionalität. Denn für die Espressozubereitung können alle Systeme genutzt werden, sowohl gemahlener<br />
Kaffee als auch Cialde. Einzigartig ist auch das neu entwickelte Thermosiphon System mit senkrecht aufgebautem<br />
Boiler. Damit bleibt die Brühtemperatur immer konstant und garantiert eine durchgehende Qualität für jede<br />
Zubereitungsart. Dauerdampf ermöglicht die gleichzeitig Zubereitung von Kaffee und Milchschaum. Mit einem<br />
Fassungsvermögen von fast 3 Litern ist der Wassertank der größte seiner Klasse, der sich dank der großen<br />
Tanköffnung bequem befüllen läst. Optional wird die Maschine auch mit Festwasseranschluß geliefert.<br />
Vier rutschfeste Füße verleihen der Maschine einen sicheren Stand. Das Innenleben ist durch abnehmbare<br />
Seitenteile leicht einsehbar, so lassen sich Ersatzteile (deutschlandweiter Service) problemlos einbauen.<br />
Verchromter, zwei Millimeter dicker Edelstahl (INOX) sowie die hochwertige Verarbeitung und massive Bauweise<br />
gewährleisten eine lange Lebensdauer. Servieren auch Sie italienische Kaffeekultur – mit der LEVA<br />
Espressomaschine.<br />
Die <strong>Leva</strong> ist nicht nur optisch ein Blickfang, auch technisch erfüllt sie professionelle Ansprüche. Den Vergleich mit<br />
Espressomaschinen italienischen Bars braucht sie nicht zu scheuen. Caffèzubereitung, Dampf- und<br />
Heißwasserentnahme für Tee oder Instantgetränke sind gleichzeitig möglich. Durch die automatische<br />
Füllstandskontrolle im Boiler, sowie im Wassertank ist die Espressomaschine für den Dauerbetrieb bestens<br />
geeignet.<br />
2
Technische Daten:<br />
- 2 x großer Kupferkessel 1700 ml<br />
- Leistung pro Tag = 200 bis 300 Tassen Espresso<br />
- Leistung pro Stunde = bis maximal 80 Tassen Kaffee<br />
- 1 Siebträger mit je einem 7 Gr. Sieb und einem 14 Gr. Sieb, Stampfer, Messlöffel, Wasserfilter<br />
- automatische <strong>Kessel</strong>-Wasserstandsregulierung<br />
- Thermosyphon-System (Wärmetauscher)<br />
- gepanzerter Heizkörper<br />
- Profibrühkopf der Faema E 61 aus massivem Messing , verchromt<br />
- Pressostatsteuerung, Überdruckventil<br />
- Überhitzungsschutz, Elektromagnetventil<br />
- Hochleistungs-Ulka-Pumpe 16 Bar<br />
- Profi-Giemme-Elektronik<br />
- <strong>Kessel</strong>druck - Manometer<br />
- Extra starkes reines Edelstahlgehäuse (AISI 304)<br />
- Zwei schwenkbare Düsen zur permanenten Dampf- und Heißwasserentnahme<br />
- keine Aufheizzeit zum Dampfen<br />
- kein Entlüften nach Dampfentnahme<br />
- automatische Abschaltung bei fehlendem oder zu wenig Wasser<br />
- Tassenvorwärmfläche<br />
- Einfaches Abnehmen der Wärmfläche und befüllen des darunter liegenden Wassertanks<br />
- Kontroll – Leuchten, Kippschalter<br />
<strong>Office</strong> <strong>Leva</strong> 1 Gr. Ausführung<br />
Dampfhahn 1<br />
Heisswasser 1<br />
Gehäuse Edelstahl, Seitenverkleidung INOX<br />
Farben Edelstahl<br />
Wasseranschluss<br />
Anschluss Wassertank 3 L oder Optional direkt 3/8“<br />
Druck 1-5 bar<br />
Ablauf Behälter<br />
Wasserhärte 4-6 dKH°<br />
4
Brewtus Operating Manual<br />
April 2005<br />
5
Chapter I: Unpacking the Machine<br />
The Brewtus is a very heavy machine, weighing in at 61 pounds. Use care in removing<br />
the Expobar box from within the shipping carton. After you have done so, turn the<br />
Expobar box upside down, open the bottom four flaps, turn the box right side up and lift<br />
the box straight up. Then lay the machine on its side and remove the top layer of molded<br />
foam. Next, carefully remove the machine from the bottom piece of molded foam. It is<br />
easier to have a second person helping during this operation as the machine is heavy and<br />
the bottom piece may stick to the machine.<br />
Included Accessories: The accessories include are a portafilter with double spout, single<br />
shot filter basket, double shot filter basket, a plastic tamper, back flush disk, and a coffee<br />
scoop.<br />
Chapter II: The Anatomy of the Brewtus<br />
What’s inside that gleaming exoskeleton?<br />
1. How It All Works:<br />
The Brewtus is a double boiler, E61 brewgroup espresso machine utilizing some very<br />
clever techniques and controls to enable 120V operation of two 1000 W boiler heaters<br />
and pump from a 15 amp service.<br />
We hope that this section will take some of the mystery out of the things that go on<br />
inside your machine while it is operating and during idle times as well.<br />
2. The Boilers:<br />
The single feature that distinguishes this machine from the vast majority of other<br />
makes and models in both the commercial and home market place, is the double<br />
boiler system and how it handles the interaction between brew and steam boilers.<br />
Note: Now is an excellent time to become acquainted with the schematic diagram<br />
of the plumbing of the machine on page 7 of this manual. Item numbers on the<br />
schematic will be shown as superscripts throughout this section.<br />
In the center of the diagram are the two 1.7L boilers; Steam 46 and Brew 47 , each<br />
Boiler has a 1000W heater 16 that is screwed in from the bottom of the boiler. With<br />
the exception of a heat exchanger 42 installed in the steam boiler for brew boiler<br />
feedwater pre-heat, the construction of the two units is identical. Fittings on the<br />
boilers are BSPP thread of various sizes and consist of the following:<br />
Brew Boiler:<br />
• Upper feedwater from the Steam boiler HX.<br />
• Upper supply to the Brewgroup.<br />
• Lower return from the Brewgroup.<br />
Steam Boiler:<br />
• Lower inlet to HX for Brew boiler feed water from the pump.<br />
• Lower inlet for steam boiler fill from solenoid valve.<br />
6
• Lower outlet to hot water tap.<br />
• Upper outlet from HX to brew boiler.<br />
• Upper outlet to steam wand/Pressurestat.<br />
• Fitting for water level sensor. 25<br />
• Fitting for a vacuum break assembly.<br />
Conditions during operation:<br />
Idle:<br />
• Brew boiler 47 will be completely full of water including the brewgroup 35 (a<br />
very slight air gap may exist in the brewgroup). Thermosyphon action will<br />
be circulating hot water from the top of the boiler into the brewgroup 35<br />
where it cools and exits out the bottom pipe of the group and returns to the<br />
bottom of the boiler, pulling more hot water into the top of the group as it<br />
settles.<br />
• The steam boiler 46 is kept half-full by virtue of the electronic level control<br />
sensor 28 , this allows sufficient steam for frothing and ~ 760ml of water for<br />
the hot water tap. Boiler pressure is regulated at 1.2Bar by the<br />
pressurestat 31 and the HX 42 is full of feedwater for the brew boiler. The<br />
vacuum break 23 is held closed by the steam pressure and will emit a slight<br />
hissing sound during warm-up only.<br />
Brew:<br />
• The Pump 3 maintains 9Bar of pressure through the HX 42 in the steam<br />
boiler 46 where the feedwater is pre-heated and then routed to the top of the<br />
brew boiler 47 that is also maintained at 9Bar during brew. This water flows<br />
out of the brew boiler to the brewgroup 35 and then out of the machine into<br />
the drip pan.<br />
• The steam boiler 46 will drop in temperature during brewing due to the<br />
cooling effects of the incoming feedwater in the HX 42 . This cooling action<br />
will most likely cause the pressurestat 31 to call for steam boiler heat 16/46 ;<br />
when this happens, the heat to the brew boiler 16/47 is put in standby until<br />
1.2Bar is reached.<br />
• The solenoid valve 11 is not activated at this time.<br />
Steam boiler details:<br />
• The steam boiler 46 will automatically refill itself when the water level<br />
drops below the bottom of the level sensor 28 . When this happens, the<br />
control module (not pictured) will activate the pump 3 and the solenoid<br />
valve 11 to fill the steam boiler 46 . The water will flow into the steam boiler 46<br />
by virtue of the fact that the brew boiler 47 circuit is already filled with<br />
water; forcing the water to flow into the steam boiler until it reaches the<br />
level sensor 28 .<br />
• The safety relief 37 opens at approximately 1.8Bar<br />
• The vacuum break 23 is a valve that is held closed by boiler pressure, it will<br />
hiss during warm-up until enough pressure is built up to hold it closed.<br />
This valve prevents pump operation issues and also prevents generation of<br />
a vacuum in the steam boiler 46. A vacuum can draw contaminated water<br />
7
ack into the boiler in the event that either the steam wand 36 or the water<br />
wand 34 are left submerged in pitchers of water/milk when the machine is<br />
turned off.<br />
3. The Pump:<br />
The “pump” consists of three distinct components:<br />
• A 41watt Ulka or 50watt CEME vibe pump 3<br />
• A de-aeration valve 45 to reduce the incidence of air bubbles in the pump<br />
output.<br />
• An Over-Pressure-Valve or OPV 5 that regulates the system brew pressure.<br />
Some machines have shipped with an Ulka pump and others have the original<br />
CEME version. Both pumps are fine units and should give years of trouble-free<br />
service. The pump 3 inlet line is connected to a water softener 39 that is at the end of<br />
the intake hose. As the water leaves the pump 3 , it passes through a de-aeration<br />
valve 45 that removes the air bubbles that may be present in the water. The deaeration<br />
valve 45 is essentially a port with a very fine opening that allows air to<br />
pass easily, but presents a difficult path for water to pass. This port is vented back<br />
to the water reservior 38 for recovery of the water that does pass through the port.<br />
After the water passes the de-aeration valve it comes to the OPV 5 , this valve uses<br />
an adjustable, spring-loaded ball that opens when a pre-set pressure is exceeded.<br />
When the ball opens, the excess pressure (water) is vented back to the water<br />
reservoir 38 until the pressure lowers to the pre-set value. At times, this process of<br />
open-close can cause slight “moaning” noises, this is not detrimental, just noisy.<br />
Incorporated into the outlet of the OPV is a one-way check valve 44 , this valve<br />
prevents water backflow through the pump assembly.<br />
4. The Electronics:<br />
Temperature control<br />
Temperature control of the brew boiler is maintained by a digital on/off type<br />
control. The control is a 2-digit display unit set for readout in degrees Celsius<br />
with adjustments to brew temperature in 1 degree increments. Temperature<br />
sensing is via a proprietary sensor that is inserted into a thermowell in the<br />
brew boiler and which is held in place with thermally conductive paste.<br />
Programmed into the control is an offset between the measured boiler<br />
temperature and the displayed value on the control; this compensates for the<br />
temperature difference between the boiler and the brewgroup. Displayed value<br />
should reflect the temperature of the brewgroup.<br />
System Control, A.K.A “The Brain Box”:<br />
Control of the overall system is performed by a small black box mounted<br />
behind the front panel, just below the temperature controller. This controller<br />
coordinates the automatic refilling of the steam boiler and the logic required<br />
for switching the pump on during brewing.<br />
8
Inputs to this unit are:<br />
• The spring-loaded switch under the reservoir for detection of an empty<br />
reservoir.<br />
• The microswitch for the pump. (behind the brew handle)<br />
• The level sensor in the steam boiler.<br />
Outputs from this unit are:<br />
• The pump.<br />
• Heater power for the boilers.<br />
• Solenoid valve control.<br />
The heaters:<br />
The heater control for the machine is actually very straightforward. The steam<br />
boiler has priority in this system and that prioritizing is performed via the<br />
pressurestat. Overall, the switch on the platform for the reservoir controls<br />
power to the boilers. This power is then routed to the pressurestat where the<br />
steam boiler is assigned priority by the SPST switch on the pressurestat.<br />
• When the steam pressure is below ~1.1Bar, the pressurestat switches<br />
power to the steam boiler heater through the safety thermostat (steam).<br />
• When the pressure is above ~1.2Bar, the power is routed to the brew<br />
temperature controller and then through the safety thermostat (brew) and<br />
brew boiler heater.<br />
IMPORTANT:<br />
It is possible to for the light for the steam boiler to be on at the same time that<br />
the digital temperature controller is calling for heat (small LED in the upper<br />
left hand corner of the display); keep in mind, that although the temperature<br />
controller is calling for heat, all power switching for boiler priority is done at<br />
the pressurestat and the display only reflects a “request” for heat in the brew<br />
boiler.<br />
Notes:<br />
a. The control can be programmed to read in degrees Fahrenheit but due<br />
to the 2 digit display limitation; it will display an E1 (out of range)<br />
error when the display rolls from 99 to 100; this will also occur if the<br />
temperature exceeds 100 degrees Celsius at any time. Normal<br />
operation will resume once the temperature displayed drops below the<br />
“100” value.<br />
b. Programming information for the controller can be found in Appendix<br />
A on page 26 of this manual.<br />
9
Schematic of the Internal Parts of the Brewtus<br />
To zoom in, hold down your CTRL key and move the scroll wheel on your mouse<br />
Nomenclature Translation:<br />
03 Pump Housing<br />
05 Complete Pump Bypass Housing & OVP Valve<br />
11 Charged Electrical Valve<br />
16 Resistance Heater Coil<br />
22 Thermostat Housing<br />
23 Relief Valve<br />
28 Water Level Control Sensor Valve<br />
31 Pressure Gauge<br />
34 Water Faucet Assembly<br />
35 Brewgroup Assembly<br />
36 Steam Faucet Assembly<br />
37 Safety Valve<br />
38 Plastic Water Reservoir<br />
39 Water Softener Orifice<br />
42 Thermal Pipe<br />
43 Expansion Valve<br />
44 Retention Valve<br />
45 De-aeration Valve<br />
46 Boiler with Thermal Sensor<br />
47 Boiler Without Thermal Sensor<br />
10
Steam Knob<br />
Heat Insulator<br />
Steam Wand<br />
Main Power Switch<br />
ControlPanelW/DigitalDisplay<br />
E61 Brew Group<br />
Portafilter handle<br />
Description of the controls<br />
Identifying the Important Features of the Machine<br />
Control Lever: The control lever on the front of the machine controls a valve inside of<br />
the brewgroup and controls the pump for brewing. The lever has three positions: up,<br />
middle and down.<br />
1. Up: When the lever is in the up position, the pump turns on for brewing and the valve<br />
inside the brewgroup opens and allows water to flow under pressure onto the coffee<br />
grounds.<br />
2. Middle: When in the middle position, the pump is turned off but the pressure in the<br />
brewgroup has not been released. Do not attempt to remove the portafilter yet!<br />
3. Down: When in the down position, any pressure left in the group is released and<br />
deposited into the drip tray through the bottom of the brewgroup. Important: Always<br />
move the lever to the full down position before removing the portafilter handle from<br />
the brewgroup!<br />
11<br />
Cup warmer and reservoir access<br />
Steam Boiler<br />
Pressure Gauge<br />
Hot Water Knob<br />
Steam Boiler Light<br />
Control Lever<br />
Hot Water Wand<br />
Removable drip tray
Main Power Switch: The main power switch is the red-lighted switch on the top left side<br />
of the front of the machine. When the switch is engaged, the machine will automatically<br />
begin the heating up cycle.<br />
Steam Boiler Light: This is the round red light on the right of the machine. It will turn on<br />
whenever the heating element in the steam boiler is on. It is perfectly normal for this light<br />
to turn on or off without any discernable pattern.<br />
Pressure Gauge: The pressure gauge shows the amount of pressure inside the steam<br />
boiler. The pressure comes pre-set from the factory at around 1.2 Bar. This is the proper<br />
steam boiler pressure and there should be no needs to make any adjustments. The needle<br />
will go down during steaming but will quickly rise up as the steam boiler element is<br />
activated.<br />
Steam Knob: When this knob is turned counter clockwise, the steam valve is opened and<br />
high-pressure steam will exit through the steam wand.<br />
Hot Water Knob: When this knob is turned counter clockwise, steam and hot water will<br />
exit through the hot water wand. Note: Use caution when using this function as boiling<br />
water exiting the wand can cause painful burns.<br />
Steam Wand: Always use caution while steaming and frothing milk as the wand will<br />
become very hot. When adjusting the position of the wand, only grip the black rubber<br />
insulator.<br />
E61 Brew Group:<br />
The brew group will become very hot so always use caution while working with the<br />
machine.<br />
E61 Brew Group Very Hot<br />
Water exits here when lever<br />
in the down position.<br />
12
Control Panel with Digital Display:<br />
LED # 2: Flashes when in Program Mode<br />
LED #1: On whenever the brew boiler is<br />
This electronic controller is designed to monitor, control and regulate<br />
the temperature of the brewing boiler only. All temperature is in<br />
Celsius.<br />
It has no control over the steam boiler. It has two functions; it will display the current<br />
temperature inside the brewing boiler and will be used to adjust the temperature of the<br />
brewing boiler only. We recommend brewing between 95 and 96 Degrees C.<br />
Display functions: All temperature readings are in Celsius. It has no control over the<br />
steam boiler whatsoever.<br />
1. On start up, the digital display will show the current temperature inside the boiler and<br />
the LED will illuminate when the boiler is on. You will see the temperature numbers<br />
change as the boiler is heating.<br />
2. When the boiler reaches the set temperature the LED will go out. When the boiler<br />
cycles on again, the LED will illuminate.<br />
Note: The steam boiler is the first to heat and will take about eight to ten minutes and<br />
then the brewing boiler will turn on. Both boilers will not operate at the same time.<br />
Programming the Brewing Boiler Temperature: When you want to change the<br />
temperature of the brewing boiler, please follow the next set of instructions:<br />
1. Push and hold the “Set Key” until the second smaller LED starts flashing.<br />
2. Push the “Up Key” or the “Down Key” until the desired temperature is displayed.<br />
3. Push and release the “Set Key” to accept the new temperature setting.<br />
Celius 89 90 91 92 93 94 95 96 97<br />
Fahrenheit 192.2 194 195,8 197.6 199.4 201.2 203 204.8 206.6<br />
Steam Boiler Adjustments: We do not recommend attempting any adjustments to the<br />
steam boiler. It is set for 1.2 Bar, which works very well with the Brewtus.<br />
13<br />
Up Key: Raises value on display<br />
Set Key: Enter and exit from program mode<br />
Down Key: Lowers the value on the display
Chapter III: Preparing the Machine for Start Up<br />
1. Remove the white protective covering from all parts of the machine,<br />
2. Remove reservoir from inside of the top of the machine and wash it out with<br />
warm soapy water and be sure to rinse well.<br />
3. Fill the Reservoir with water and place it back in the machine. Make sure the<br />
plastic tubes are placed back into the reservoir and are not pinched anywhere.<br />
Note: Do not use water that has had all the minerals removed, e.g., distilled water.<br />
Minerals are necessary for the sensors in the boilers to work properly.<br />
4. Plug the machine into an outlet that matches the three-pronged plug on the cord.<br />
The machine must be grounded! If you have any questions regarding this, call<br />
Tech Support at 888-411-5282 before proceeding further.<br />
5. Turn on the main power switch and lift the lever on the brewgroup to the top<br />
position to start the pump and fill both the main brew boiler and the steam boiler,<br />
both of which have a 1.7-liter capacity. Leave the lever in this position until there<br />
is a steady stream of water coming out of the brewgroup.<br />
6. Look into the reservoir to see if the water level is lowering as the boilers fill. If<br />
the water is not lowering, the pump is having a difficult time priming. Turn off<br />
the machine and call us at the phone number given above for further instructions.<br />
7. If the boilers filled and this step was successful, move the lever down to the<br />
neutral or middle position and let the machine heat up—about 20 minutes.<br />
Important: Now you must refill the reservoir, as it will be critically low.<br />
8. Always leave the empty portafilter in the brewgroup so that it will always be hot<br />
and ready for use.<br />
NOTES:<br />
14
Chapter IV: Understanding Water Quality and the Water Softener<br />
Defining Water hardness: Water hardness often is expressed as milligrams of hardness<br />
per liter of water (mg/L). Table I, adapted from the Water Quality Association (WQA),<br />
shows hardness classifications. Hardness ions are typically combined with sulfate,<br />
chloride, carbonate, or bicarbonate ions. For consistency, concentrations are generally<br />
converted to the equivalent concentration as calcium carbonate (CaCO3) and expressed in<br />
terms of hardness as calcium carbonate.<br />
Table I. Classification of water hardness (hardness as calcium carbonate).<br />
Classification mg/l or ppm grains/gal<br />
Soft 0 – 17.1 0 – 1<br />
Slightly hard 17.1 – 60 1 – 3.5<br />
Moderately hard 60 – 120 3.5 – 7.0<br />
Hard 120 – 180 7.0 – 10.5<br />
Very Hard 180 & over 10.5 & over<br />
For our purposes here, it will suffice if you understand that dissolved calcium and<br />
magnesium salts are primarily responsible for most scaling in pipes, water heaters as well<br />
as espresso boilers. Hardness is usually expressed in grains per gallon (or ppm) as<br />
calcium carbonate equivalent. However, because we are dealing with very small<br />
quantities of water for our purposes, our reference should always be made in parts per<br />
million or ppm.<br />
It is important to have your water tested if you intend to use tap water in the reservoir of<br />
your espresso machine to brew coffee. Tap water, it should be noted, may also have<br />
chlorine, ozone and/or sulphur as well as numerous other chemicals that can adversely<br />
affect the taste of your coffee. Thus, you may ultimately prefer bottled water or water<br />
from your own filtering system or device.<br />
A typical home water purification system uses a prefilter to remove particulates, then a<br />
reverse osmosis filter, and a final filter, which contains a solid block carbon (charcoal)<br />
filter. This type of system removes nearly all of the priority pollutants as well as bacteria.<br />
They are widely available from various companies listed in your local Yellow Pages.<br />
Generally, a dedicated water faucet is installed on the sink from which to draw the<br />
purified water. A line can also be run to the refrigerator water dispenser. These systems<br />
condition the water admirably and samples will typically test between 25 and 50ppm<br />
hardness. The downside is that they are costly and can run upwards of $500.<br />
To have a sample of water tested for hardness, use a clean well-rinsed screw-top<br />
container and take the sample in to your nearest swimming pool supply store. They will<br />
usually perform a hardness test free of charge.<br />
15
Note: Many manufacturers of coffee machines recommend you use distilled water in<br />
their machines. The Brewtus is an exception because the dissolved salts enable the boiler<br />
sensors to do their job.<br />
The Brewtus comes with a convenient water softener that will help keep damaging<br />
minerals out the boilers. There is nothing that has to be done on initial start up to get the<br />
water softener ready for use. After 3 months of use it is recommended that it be<br />
recharged.<br />
Water softener filter Water reservoir<br />
Recharging Instructions:<br />
a) Fill the water reservoir.<br />
b) Pour in 3 big spoons of salt.<br />
c) Stir the salt into the water.<br />
d) Insert the water softener filter inside the reservoir.<br />
e) Drain the water from the reservoir through the water softener filter.<br />
To drain the water from the reservoir:<br />
• Place the plastic tube as it is indicated.<br />
• Suck in the tube until it fills with water.<br />
• Press your finger over the inlet from the tube in order to avoid any air.<br />
• While the tube is being pressed, place the inlet from the tube downwards<br />
(as indicated). Wait until the reservoir is completely empty.<br />
Once the water reservoir is empty, fill it again with water (without salt) and repeat the<br />
process, in order to clean the water softener filter.<br />
Water softener filter<br />
Plastic tube<br />
16<br />
Drain the water from the tank<br />
this way<br />
Water tank filled with salty water<br />
Salty water outlet
Water<br />
Hardness<br />
Maximum<br />
Volume of water<br />
softened by filter<br />
Liters of softened water, depending on its hardness<br />
(In French Degrees)<br />
20<br />
11<br />
30<br />
9<br />
40<br />
8<br />
Now you are ready to proceed to Chapter V: Brewing and Operating Techniques.<br />
17<br />
60<br />
7<br />
80<br />
5<br />
Salt<br />
Grams<br />
300
Chapter V: Brewing and Operating Techniques<br />
Getting Ready to Brew: After you have pulled about four “blank” shots to clean and<br />
normalize the machine, please be sure to refill the reservoir. A blank shot is simply a shot<br />
without grounds in the basket. Now you are ready to pull your first real shot of espresso!<br />
As you work through the following steps while learning to use your new machine and<br />
calibrating your grinder, you may use up to a pound of coffee so be sure you have plenty<br />
of the very same kind on hand.<br />
To answer the age-old question of why Italian coffee is so amazing, Paul Bennett from<br />
Bon Appetit magazine asked Luca Vizzini, the head barista at Tazza d’Oro in Rome the<br />
same question. He says it is three m’s: miscela (the mixture of coffee; usually four or five<br />
beans), macchina (the machine), and mano (the preparation, ideally by someone who<br />
understands “the art of espresso”).<br />
The entire theory of the extraction process for our purposes here can be summarized in<br />
four words: Temperature, Grind, Dose and Tamp. As each of these factors constitutes a<br />
variable, it is therefore vitally important to gain complete control of the techniques<br />
required of each. Thankfully, with a little practice and understanding they are not difficult<br />
to master.<br />
Temperature: Perhaps the primary reason aficionados decide to purchase the Expobar<br />
Brewtus, is its remarkable ability to maintain the exact temperature in the boilers and<br />
brewgroup required for perfect extraction, thus virtually eliminating temperature from the<br />
list, though it is the most critical factor of all. Other machines require the seasoned barista<br />
to perform a series of quick manipulations, sometimes called “temperature surfing”, to<br />
achieve the desired brewhead temperature. The Brewtus does it all for you electronically<br />
and in combination with the E61 brewgroup which circulates the hot water through<br />
brewing head surrounding the portafilter and basket. There is nothing to forget to do or<br />
anything left to chance. Moreover, any guesswork is eliminated with the digital heat<br />
gauge and the boiler pressure gauge for both the steam and hot water wands.<br />
Grinding and Dosing: The following set of instructions begins with the assumption you<br />
will be grinding and dosing directly into the filter basket by itself (or into a spare one, or<br />
some other small container, which you can then dump into the actual one). During the<br />
grinding step, the portafilter handle can remain in the brewgroup to maintain its heat.<br />
However, if at first you choose to fill the basket while it is seated in the portafilter handle,<br />
remove the handle from the group, dry the basket and dose and tamp as quickly as<br />
possible. Then return the handle to the brewgroup immediately so it does not lose too<br />
much precious heat!<br />
Of the four variables, temp, grind/dose and tamp, the grind/dose step is the process many<br />
people find the most vexing. The object here is to grind exactly 14 grams into the double<br />
filter basket. However, the problems that frequently occur with nearly all grinders are the<br />
effects of temperature, humidity, freshness, roast and variety of the beans as well as the<br />
18
selected fineness of the setting. The finest settings may create a powdery grind, which<br />
produces tiny balls or causes the grinds to stick in the chute or doser. Worse, too fine a<br />
grind may prevent the water from penetrating the puck at all.<br />
On the other hand, too coarse a grind adversely affects shot quality and diminishes the<br />
amount of the desired crema and flavor. The only solution is to experiment to determine<br />
which settings are the right ones for your grinder, beans and ambient conditions. Bear in<br />
mind the grind should most often imitate very fine sand, not a silky powder.<br />
Tip: While standard food scales tend to be inexact as well as bulky, there is another class<br />
of scales known as pocket scales. These tiny precision wonders are usually accurate to ±<br />
1/10 th of a gram. Some people will put the basket on the scale’s platform and for every<br />
shot grind 14 grams directly into it, then transfer it to the handle, which has been heating<br />
in the group head. Others fill a small container on the scale and then fill the heated<br />
basket.<br />
Note: If you elect to dose into the basket itself each time then you will have to contend<br />
with the issue of the spring in the portafilter, which holds the basket very tightly in place.<br />
It will need to be adjusted for tension or removed entirely to use this method successfully.<br />
Thus, grinding directly into the basket in the handle without removing it, and then<br />
tamping, may work the best for you—but be sure to work quickly so heat is not lost.<br />
Still another option is to weigh each dose until the grinder is properly calibrated for the<br />
dose amount. You will have to do this often with changes in the weather, grind setting or<br />
different batches of roasted beans. In the end, many people simply learn to determine<br />
what a reasonable approximation of what 14 grams looks like in the basket. With<br />
practice, this method can become surprisingly accurate.<br />
Others like to overfill the basket and use a straight edge to level off before tamping. This,<br />
however, is quite messy and surely a waste of good coffee and does not necessarily<br />
assure an accurate dose.<br />
It is important to remember that consistency with each step builds a professional<br />
foundation of accuracy, so choose a routine you like and stay with it.<br />
Tamping: Much has been written about this subject and its importance. The David<br />
Schomer method seems to be the most widely adopted tamping method. Quite simply, it<br />
involves distributing the grounds in north, south, east and west directions with the finger<br />
until they are level and even but with a slight indentation or well in the center. Then a 30<br />
to 40 pound tamp is delivered straight down with a twisting motion. After carefully<br />
removing the tamper, lightly tap the side of the filter or basket with the tamper to<br />
dislodge any loose grounds. Tamp and polish again. Sometimes three tamps may be<br />
required. To test your tamp pressure, practice with a bathroom scale.<br />
Now you are ready to return the basket or filter handle to the brew head and begin your<br />
shot. If you have done the tamp step correctly you have successfully minimized the<br />
19
negative effects of another variable. The good news is the Brewtus is about to help you<br />
with your tamp also, thanks to its ability to pre-infuse the grounds with hot water.<br />
Progressive Coffee Infusion: the Brewtus’s specialized brewing system enables a<br />
smoother delivery of the pressurized hot water to the grounds in the basket in order to<br />
moisten them before the full force of the hot water hits them. This is a unique ability<br />
among machines and it effectively eliminates channeling or pinholes in the puck that are<br />
responsible for weak shots with very little crema.<br />
Brewing: Okay, without further ado, it is time to pull the perfect shot! First, move the<br />
lever to full up position and let the pump run about 2 to 4 ounces of water through the<br />
empty portafilter basket and handle into the cup you plan to use. This step pre-heats the<br />
cup and also brings the brewgroup up to temperature if it has been sitting idle for a while.<br />
Do not forget to move the lever to the fully lowered position before you remove the<br />
handle to release any pressure and/or water. Quickly dry the surface of the basket with a<br />
towel and grind, dose and fill the basket. Tamp as described above. Now return the<br />
handle to the brewgroup and tighten it by moving the handle to the right or<br />
counterclockwise.<br />
Next, if your cup has cooled you can refill it with hot water from the wand on the right,<br />
being mindful that it is also under pressure and can scald the skin if you open it too<br />
quickly.<br />
Now is a good time to do a quick cleanup of any spilled grounds, wet spots on the<br />
counter, and take out your milk and pitcher from the fridge if you intend to froth for a<br />
cappuccino. A cold pitcher and cold milk create the best microfoam.<br />
Zero your timer, empty the hot water from the cup into the drip tray and center it under<br />
the spout. Now simultaneously hit the timer’s start button and move the lever up to the<br />
brew position and the pump will turn on. In a few seconds, the brew should emerge from<br />
the spout hesitatingly in long strings, turning to a light chestnut color as it becomes<br />
crema. Timing your shot, it should take 23 to 28 seconds to produce a double espresso<br />
shot of 2 to 2.5 ounces. Now, to end the shot, immediately move the lever to the full<br />
downward position! The heat and water pressure are instantly relieved in the brewhead<br />
and excess water pours down the drainpipe into the drip tray.<br />
If you are now looking at a beautiful head of golden crema sitting atop your brew,<br />
everything went according to plan. Excellent! Great job! If not, you may need to adjust<br />
one or both of the two variables of the grind/dose or tamp steps. Be patient as it often<br />
takes a half dozen or so attempts before you get all the factors working together just right.<br />
Important: NEVER attempt to remove the portafilter handle without relieving the<br />
pressure or you may get a mild scalding as well as blow wet grounds onto your work<br />
area. Also, forgetting to relieve the pressure by putting the lever in the full down position<br />
and only lowering it to the middle position, just to where the pump stops, will cause<br />
excess brewing water to drip into your cup and turn your double espresso into an<br />
20
Americano. This is still a very nice drink but not what you intended here. This is a very<br />
common mistake with new lever machine users. This writer actually developed a liking<br />
for Americanos by making this mistake three times in a row over two days!<br />
At this point, feel free to enjoy your double espresso and come back later to do the few<br />
minor points of cleanup which will be discussed next. However, if you are making a<br />
cappuccino, let’s move on…<br />
Frothing: Much has been written about the subject of frothing when actually it is the<br />
easiest part of the brewing ritual. The main factors to successful frothing are: 1) Use the<br />
correct sized pitcher and fill it no more than a third full as the milk will triple in volume.<br />
2) Chill or freeze the pitcher and use very cold milk. 3) Use a frothing thermometer until<br />
you learn to “feel the heat” in the pitcher.<br />
There are two techniques that are commonly used to froth, but first point the steam wand<br />
into the trip tray and open the valve slightly to release any watery steam. You want pure<br />
steam vapor.<br />
The first technique involves inserting the steam tip just off-center and barely under the<br />
surface of the milk to circulate it and create foam. Do this until the thermometer reaches<br />
100 degrees. Then bury the wand to about 1/8 th of an inch from the bottom and tilt the<br />
pitcher slightly to create a vortex in the milk. Continue until the milk reaches a temp of<br />
155 to 160 degrees, but no higher or you will scorch the milk. The pitcher should now<br />
contain froth up to the brim.<br />
The second technique is just the opposite in that you begin with the wand near the bottom<br />
of the pitcher and as the thermometer rises to 100 degrees, you very slowly bring the<br />
wand up to the surface, always maintaining the vortex. This is called “stretching”.<br />
After you have finished frothing and set the pitcher down, immediately take a wet cloth<br />
or small scouring pad and clean the drying milk from the wand. Point the wand into the<br />
drip tray again and open the valve briefly to clear the tip of dried milk.<br />
One final note—do you pour or may you spoon the foam into the cup? The vast majority<br />
of home baristas admit to using a spoon most of the time. The professional baristas insist<br />
pouring is the only acceptable method. If your pitcher contains near-perfect microfoam,<br />
then by all means, learn to pour and thus you will have taken the first step to learning<br />
latte art.<br />
The Quick and Final Cleanup: You left the lever in the full down position after pulling<br />
your shot, so remove your portafilter handle and give it a tap on the knock box. The dry<br />
puck should fall out leaving a clean basket, requiring only a quick wipe with a bar rag or<br />
paper towel. Next move the lever up to brew for a couple of seconds to rinse any residue<br />
off the shower screen with hot water and then give it a wipe.<br />
21
After you empty the drip tray, please do not forget to check and fill the reservoir.<br />
Incorporating this step into your cleanup routine at this time will avoid the inconvenience<br />
of the Brewtus shutting itself down to protect an empty boiler.<br />
The Best Advice: The best advice you will ever receive is “Practice consistency!” Create<br />
a step by step brewing routine and maintain it until it becomes second nature. Polish and<br />
perfect each individual step within your routine and in no time at all, you will be serving<br />
the best coffee drinks money can buy. That is a guarantee!<br />
Chapter VI: Machine Maintenance<br />
Don’t forget to wash out the reservoir with hot water and liquid detergent occasionally.<br />
Cleaning the brew head is necessary in order to maintain the quality of flavor you expect<br />
and are accustomed to with your new Brewtus. There are three different processes used to<br />
thoroughly clean the machine: 1) Backflushing with water only, 2) backflushing with a<br />
specialized cleaner and 3) removing the shower screen for cleaning by hand.<br />
Under normal household conditions, it is recommended you backflush with water only<br />
about every ten to 14 days to remove any grinds or sediment buildup within the<br />
brewgroup and the water lines.<br />
Using a recommended product, such as Urnex® Cafiza Espresso Machine Cleaner, you<br />
should backflush about six times a year.<br />
We also recommend you remove the shower screen, inspect and clean it as well as the<br />
brewgroup behind the screen. Do this inside cleaning as often as you feel it is necessary<br />
after inspecting it during the regular cleaning intervals.<br />
Next, to prepare for a backflush cycle, your machine must be up to brew temperature and<br />
pressure. Important: Please make sure your drip tray is clean and empty.<br />
The Water-Only Backflush:<br />
1. Install the single shot filter basket in the portafilter and place the rubber backflush<br />
disc in the filter basket with the nipple side facing up.<br />
2. Raise the control lever up to the brew position for 5 to 10 seconds. Listen carefully to<br />
the pump. You will notice an audible decrease in water volume as the machine<br />
pressurizes.<br />
3. Turn the lever to the full down position to release the pressure. You will notice an<br />
immediate stream of pressurized backflush water jetting into the drip tray. Now check the<br />
water in the tray. Is it dirty or does it contain particles? If so, repeat the process until the<br />
released water runs out clean.<br />
The Backflush with Cleaner: The recommended maintenance interval for backflushing<br />
with a cleaner is six times a year under normal usage. WLL prefers Urnex® Cafiza as it<br />
22
gives excellent results and is easy to use. Simply add ½ teaspoon of Cafiza cleaner to the<br />
blind filter basket or backflush disc and follow the exact same procedure as above. It may<br />
take five cycles or more to completely clean the machine. Thereafter, rinse the brewgroup<br />
thoroughly and backflush four times without any cleaner. Repeat until you are absolutely<br />
sure that no cleaner remains in the system.<br />
Cleaning the Brewgroup by Hand: Wait until the machine is cold to avoid burns!<br />
1. First remove the shower screen under the brew head. Using a flat head screwdriver,<br />
wiggle the screen out as it is a press fit. Work it a little on one side, then the other. Both<br />
the screen and gasket will come out together.<br />
2. Separate the screen from the gasket as the cleaning solution can damage plastic and<br />
rubber parts. Note: Remember what side of the gasket faces up.<br />
3. Mix up a solution of Urnex® Cafiza Espresso Machine Cleaner and very hot water in<br />
a container. Use 2 tablespoons of cleaner but only fill the container halfway as it will<br />
foam up.<br />
4. Soak the shower screen, shot baskets and portafilter head in the solution for about ten<br />
minutes. Note: It is important that the plastic handle of the portafilter does not contact the<br />
solution or it will permanently mark it.<br />
5. After cleaning thoroughly, rinse all parts well with fresh clean water.<br />
6. Reassemble in reverse order and brew yourself a wonderful shot of espresso.<br />
Cleaning the Housing: When the surfaces are cool, you may use a special stainless steel<br />
cleaner or polish with a soft cloth. Never use anything abrasive or it will scratch. For<br />
stubborn stains, try some Windex but the surface must be cool.<br />
Chapter VII: Check List of Accessories and Essentials<br />
1. The little plastic tampers that are usually are included with new espresso machines<br />
are definitely not up to the job. Solid, high quality tampers come in many shapes, weights<br />
and styles. The Espro tamper is a training device which delivers an exact 30 pound tamp.<br />
The Brewtus requires a 58 mm tamper. Prevailing wisdom says spend a little more and<br />
get the very best because you may be using it a thousand times a year or more.<br />
2. A timer is essential for brewing the perfect 28 second shot. Polder makes a good one<br />
for about $12.95.<br />
3. A knock box is generally considered an essential item for the home barista. It sits next<br />
to the machine and is the receptacle for spent pucks. It prevents messy drips and trips to<br />
the sink.<br />
4. Brushes are also essentials. A stiff round brush is used to clean the gasket around the<br />
rim of the brew head and the burrs in your grinder. Flat brushes are useful for cleaning<br />
spilled grounds from around your grinder.<br />
5. Stainless steel pitchers are used for frothing milk and pouring latte art. Choose one<br />
that is three times the volume of the milk you will use to allow for the expansion of the<br />
foam. A 400ml/1.3 cup size is sufficient for two or three cappas.<br />
6. A graduated beaker is very handy for measuring liquids in both metric and American<br />
equivalents. These can be purchased through science and medical supply stores as well as<br />
some of the larger hobby shops.<br />
23
7. A frothing thermometer is most handy for learning the technique of foaming milk.<br />
You need to learn the 100 and 160 degree points and with practice, you will know by<br />
touch when they are reached.<br />
8. Espresso machine cleaners are also essential. Use Urnex® Cafiza or its equivalent<br />
for best results. Do not use dish washing detergents as they may contain fragrances and<br />
fillers and are not suited to the task.<br />
9. Invest in a bundle of terry cloth bar mops. Making espresso drinks can be a bit<br />
messy, especially in the beginning. Wives may soon become overly protective of their tea<br />
towels.<br />
10. Pocket scales are excellent devices for weighing doses and calibrating the grinder.<br />
Food scales are not as accurate, are bulkier and can cost more.<br />
11. A medium funnel with at least a 1-cup capacity is very convenient for filling the<br />
reservoir and preventing water spills into the depths of the machine.<br />
Chapter VIII: Trouble Shooting<br />
1. The machine does not turn on: Make sure the power is turned on and the machine is<br />
plugged in. Also, check ground fault interrupter which is the small button on the outlet<br />
receptacle.<br />
2. Coffee exits the portafilter too quickly: The grind should probably be finer or the<br />
coffee may be old and dry. Also, measure the force of your tamp to be sure you are in the<br />
30 pound range.<br />
3. Coffee comes out too slowly: Too fine a grind and/or too hard a tamp. Also, make sure<br />
reservoir is full and/or clean the brewgroup as described Chapter VI.<br />
4. Coffee is not hot enough: Make sure the cup and all brewing components are preheated<br />
as described in Chapter V.<br />
5. Pump runs but does not produce a head of water: The pump may need priming. Call<br />
Whole Latte Love for instructions.<br />
6. Water is leaking around the portafilter: Make sure group gasket is clean by brushing<br />
inside the groove with your round espresso brush. Depending on its age, the gasket may<br />
be old and need replacing. Also, there may be too much coffee in the basket. Try again<br />
with a shot adjustment.<br />
NOTES:<br />
24
Chapter IX: Recipes<br />
Espresso: Espresso is pressure-brewed coffee and should have a thick golden crema on<br />
top and not taste bitter or sour.<br />
1. A single shot consists of approximately 7 grams of ground coffee and 1 to 1.5 ounces<br />
of liquid in the cup.<br />
2. A double shot is 14 grams of ground coffee and 2 to 2.5 ounces of liquid in the cup.<br />
Café Latte: A latte is made with 2/3rds steamed milk and 1/3 espresso.<br />
1. Steam and froth a small pitcher of milk.<br />
2. Fill your cup with 2/3rds steamed milk.<br />
3. Brew your espresso and pour it down the side of your cup.<br />
Cappuccino: A Cappuccino is traditionally served in a 7 oz. cup. The drink is comprised<br />
of equal amounts of espresso, steamed milk and frothed milk.<br />
1. Steam and froth a pitcher of milk.<br />
2. Brew a double espresso into your cup.<br />
3. Add steamed milk by holding back the froth with a spoon.<br />
4. Spoon the froth on top.<br />
Ristretto: Also known as the “little one”, is the strongest espresso of the family. The<br />
Ristretto uses the same amount of ground coffee as a regular espresso but uses less water.<br />
The name is derived from the “restricted use of water”.<br />
1. Prepare to brew an espresso using your normal amount of coffee.<br />
2. Stop the extraction just short of a regular shot.<br />
Café Mocha: By adding some chocolate to milk to an espresso you’ve got a Mocha.<br />
1. Steam a small pitcher of milk.<br />
2. Add a squirt of chocolate syrup to the milk and mix well.<br />
3. Brew your espresso and pour it into a larger mug or glass.<br />
4. Add the chocolate milk.<br />
5. Top it off with some whipped cream and/or some chocolate shavings.<br />
Café Crema: A Café Crema is a long espresso. Instead of stopping the shot at the normal<br />
time for a single or double shot, let the pump run longer until you have a full cup of<br />
coffee.<br />
Café Americano: Brew a proper single or double espresso and then add hot water from<br />
the wand to fill the cup.<br />
Espresso Macciato: This is just an espresso with a wee bit of froth on top.<br />
Latte Macciato: Just brew a standard Latte and add a little foam on top.<br />
25
Try this amazing dessert—You have certainly earned it!<br />
Affogato Mocha: Affogato is a typically Italian way to enjoy ice cream. It is literally<br />
“drowned” in espresso or another liquid topping. For four servings:<br />
1-pint chocolate ice cream. (Try Godiva’s)<br />
8 tablespoons finely chopped bittersweet (not unsweetened) or semisweet chocolate<br />
8 tablespoons hot freshly brewed espresso coffee. A dark roast works really well.<br />
8 tablespoons dark rum<br />
Divide ice cream among 4 dessert bowls, cappuccino or latte cups. Spoon 2 tablespoons<br />
each of chocolate, espresso, and rum over the ice cream and serve immediately.<br />
(May 2005/ Bon Appetit)<br />
NOTES:<br />
26
Chapter X: Shipping the Brewtus<br />
For whatever reason, whether you are moving, taking your machine with you for a long<br />
summer vacation or sending it in for service, it may someday be necessary to box it up<br />
for shipment. You will need to empty the boilers first.<br />
The following set of instructions is specific to the Brewtus and the directions are different<br />
from HX machines or single boiler units.<br />
Draining the Boilers:<br />
1. Read and comprehend these instructions entirely before attempting to drain your<br />
boiler. Pose any questions to the WLL Tech Department before continuing.<br />
2. Caution! Machine must be heated to steam temperature/pressure to properly drain the<br />
boiler. Note: Machine and water will be at scalding temperatures!<br />
3. Plug the machine in and allow it to come to normal brewing temperature/pressure.<br />
4. Find (2) large tall-sided containers and place one under the brewgroup and one under<br />
the hot water dispenser. Make sure that both containers are solidly in place and will<br />
not spill or fall when water begins to drain into them!<br />
5. Remove the cover of your water reservoir, that is, the cup warming tray.<br />
6. Remove the water intake line from the water reservoir.<br />
7. Engage the pump by moving the brew lever to the up or brew position.<br />
8. Beware of splashing hot water! It will burn!<br />
9. Run the pump/machine until water stops flowing from the brew head.<br />
10. Disengage the pump by moving the lever to the full down position.<br />
11. Turn off the main power switch.<br />
12. Open the hot water dispensing valve.<br />
13. Run the machine until water stops flowing from the hot water dispensing valve.<br />
14. Beware of splashing hot water!! It will burn!!<br />
15. Close the hot water dispensing valve.<br />
Your machine’s boiler is now drained.<br />
27
Cautions<br />
• There are no user serviceable parts inside the<br />
machine. Defer service to a qualified technician.<br />
• Do not try to put anything inside the machine<br />
through the vents.<br />
• Please check the water level in the reservoir<br />
frequently.<br />
• Do not let children touch or operate the machine, as<br />
it is very dangerous to do so and could cause injuries.<br />
• Do not use the machine with wet hands.<br />
• To disconnect the machine from the power supply,<br />
pull the plug itself—do not pull on the power cord.<br />
• Please consult with a qualified technician for any<br />
problems or questions.<br />
The manufacturer reserves the right to make any changes<br />
to the machine for improved performance without prior<br />
notice.<br />
28
Appendix A: To zoom in/out on the following diagrams, hold down the CTRL key<br />
and use the scroll wheel on your mouse.<br />
29