26HLC56 32HLC56 37HLC56 LCD Monitor - Toshiba Canada
26HLC56 32HLC56 37HLC56 LCD Monitor - Toshiba Canada
26HLC56 32HLC56 37HLC56 LCD Monitor - Toshiba Canada
You also want an ePaper? Increase the reach of your titles
YUMPU automatically turns print PDFs into web optimized ePapers that Google loves.
Connecting an HDMI or DVI device<br />
to the HDMI input<br />
The HDMI input on your monitor receives digital audio and<br />
uncompressed digital video from an HDMI source device, or<br />
uncompressed digital video from a DVI (Digital Visual<br />
Interface) source device.<br />
This input is designed to accept HDCP (High-Bandwidth<br />
Digital-Content Protection) program material in digital form<br />
from EIA/CEA-861-861B–compliant [1] consumer electronic<br />
devices (such as a set-top box or DVD player with HDMI or<br />
DVI output).<br />
The HDMI input is designed for best performance with 1080i<br />
signals but will also accept and display 480i, 480p and 720p<br />
signals.<br />
NOTE: DO NOT CONNECT A PC USING<br />
THE HDMI PORT. Always use the monitor’s<br />
PC IN (VGA) port to connect a PC.<br />
The HDMI port is not designed to support input from a<br />
PC.<br />
Only monitor models that include a PC IN (VGA) port are<br />
suitable for connection to a PC.<br />
HDMI device connection<br />
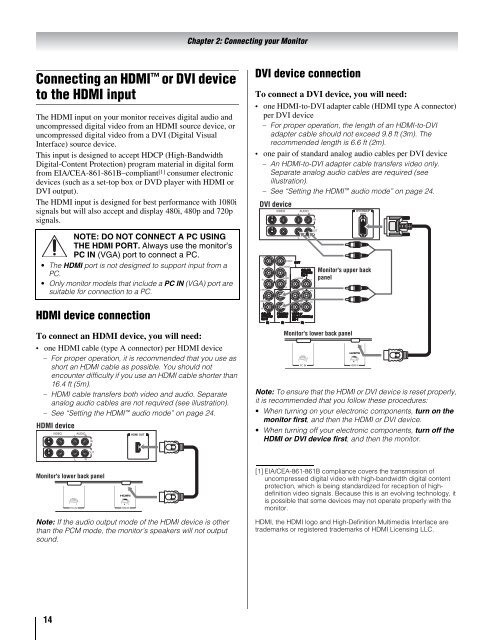
To connect an HDMI device, you will need:<br />
one HDMI cable (type A connector) per HDMI device<br />
– For proper operation, it is recommended that you use as<br />
short an HDMI cable as possible. You should not<br />
encounter difficulty if you use an HDMI cable shorter than<br />
16.4 ft (5m).<br />
– HDMI cable transfers both video and audio. Separate<br />
analog audio cables are not required (see illustration).<br />
– See “Setting the HDMI audio mode” on page 24.<br />
HDMI device<br />
Note: If the audio output mode of the HDMI device is other<br />
than the PCM mode, the monitor’s speakers will not output<br />
sound.<br />
14<br />
VIDEO AUDIO<br />
L R<br />
IN IN<br />
L<br />
R<br />
OUT<br />
<strong>Monitor</strong>'s lower back panel<br />
HDMI OUT<br />
Chapter 2: Connecting your <strong>Monitor</strong><br />
DVI device connection<br />
To connect a DVI device, you will need:<br />
one HDMI-to-DVI adapter cable (HDMI type A connector)<br />
per DVI device<br />
– For proper operation, the length of an HDMI-to-DVI<br />
adapter cable should not exceed 9.8 ft (3m). The<br />
recommended length is 6.6 ft (2m).<br />
one pair of standard analog audio cables per DVI device<br />
– An HDMI-to-DVI adapter cable transfers video only.<br />
Separate analog audio cables are required (see<br />
illustration).<br />
– See “Setting the HDMI audio mode” on page 24.<br />
DVI device<br />
VIDEO AUDIO<br />
L R<br />
IN IN<br />
L<br />
R<br />
OUT<br />
DVI/HDCP<br />
OUT<br />
<strong>Monitor</strong>'s upper back<br />
panel<br />
<strong>Monitor</strong>'s lower back panel<br />
Note: To ensure that the HDMI or DVI device is reset properly,<br />
it is recommended that you follow these procedures:<br />
When turning on your electronic components, turn on the<br />
monitor first, and then the HDMI or DVI device.<br />
When turning off your electronic components, turn off the<br />
HDMI or DVI device first, and then the monitor.<br />
[1] EIA/CEA-861-861B compliance covers the transmission of<br />
uncompressed digital video with high-bandwidth digital content<br />
protection, which is being standardized for reception of highdefinition<br />
video signals. Because this is an evolving technology, it<br />
is possible that some devices may not operate properly with the<br />
monitor.<br />
HDMI, the HDMI logo and High-Definition Multimedia Interface are<br />
trademarks or registered trademarks of HDMI Licensing LLC.


