Owner's Manual - dbap GmbH
Owner's Manual - dbap GmbH
Owner's Manual - dbap GmbH
Create successful ePaper yourself
Turn your PDF publications into a flip-book with our unique Google optimized e-Paper software.
MOUNTING AND OPERATING THE REMOTE LOCK-OUT CONTROL<br />
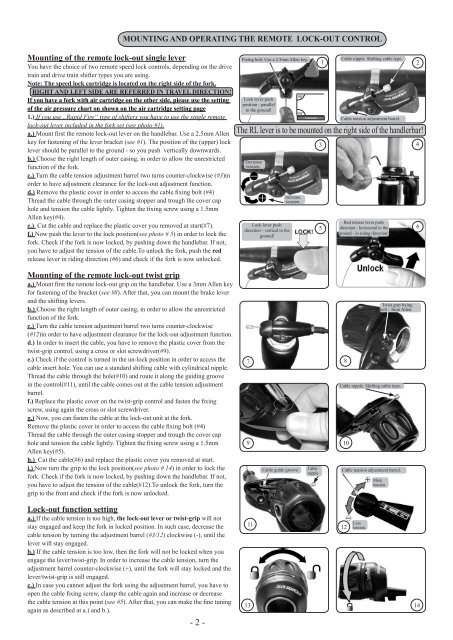
Mounting of the remote lock-out single lever<br />
You have the choice of two remote speed lock controls, depending on the drive<br />
train and drive train shifter types you are using.<br />
Note: The speed lock cartridge is located on the right side of the fork.<br />
RIGHT AND LEFT SIDE ARE REFERRED IN TRAVEL DIRECTION!<br />
If you have a fork with air cartridge on the other side, please use the setting<br />
of the air pressure chart on shown on the air cartridge setting page<br />
1.) If you use „Rapid Fire“ type of shifters you have to use the single remote<br />
lock-out lever included in the fork set (see photo #1).<br />
a.) Mount first the remote lock-out lever on the handlebar. Use a 2.5mm Allen<br />
key for fastening of the lever bracket (see #1). The position of the (upper) lock<br />
lever should be parallel to the ground - so you push vertically downwards.<br />
b.) Choose the right length of outer casing, in order to allow the unrestricted<br />
function of the fork.<br />
c.) Turn the cable tension adjustment barrel two turns counter-clockwise (#3)in<br />
order to have adjustment clearance for the lock-out adjustment function.<br />
d.) Remove the plastic cover in order to access the cable fixing bolt (#4)<br />
Thread the cable through the outer casing stopper and trough the cover cap<br />
hole and tension the cable lightly. Tighten the fixing screw using a 1.5mm<br />
Allen key(#4).<br />
e.) Cut the cable and replace the plastic cover you removed at start(#7).<br />
f,) Now push the lever to the lock position(see photo # 5) in order to lock the<br />
fork. Check if the fork is now locked, by pushing down the handlebar. If not,<br />
you have to adjust the tension of the cable.To unlock the fork, push the red<br />
release lever in riding direction (#6) and check if the fork is now unlocked.<br />
Mounting of the remote lock-out twist grip<br />
a.) Mount first the remote lock-out grip on the handlebar. Use a 3mm Allen key<br />
for fastening of the bracket (see #8). After that, you can mount the brake lever<br />
and the shifting levers.<br />
b.) Choose the right length of outer casing, in order to allow the unrestricted<br />
function of the fork.<br />
c.) Turn the cable tension adjustment barrel two turns counter-clockwise<br />
(#12)in order to have adjustment clearance for the lock-out adjustment function.<br />
d.) In order to insert the cable, you have to remove the plastic cover from the<br />
twist-grip control, using a cross or slot screwdriver(#9).<br />
e.) Check if the control is turned in the un-lock position in order to access the<br />
cable insert hole. You can use a standard shifting cable with cylindrical nipple.<br />
Thread the cable through the hole(#10) and route it along the guiding groove<br />
in the control(#11), until the cable comes out at the cable tension adjustment<br />
barrel.<br />
f.) Replace the plastic cover on the twist-grip control and fasten the fixing<br />
screw, using again the cross or slot screwdriver.<br />
g.) Now, you can fasten the cable at the lock-out unit at the fork.<br />
Remove the plastic cover in order to access the cable fixing bolt (#4)<br />
Thread the cable through the outer casing stopper and trough the cover cap<br />
hole and tension the cable lightly. Tighten the fixing screw using a 1.5mm<br />
Allen key(#5).<br />
h.) Cut the cable(#6) and replace the plastic cover you removed at start.<br />
i.) Now turn the grip to the lock position(see photo # 14) in order to lock the<br />
fork. Check if the fork is now locked, by pushing down the handlebar. If not,<br />
you have to adjust the tension of the cable(#12).To unlock the fork, turn the<br />
grip to the front and check if the fork is now unlocked.<br />
Lock-out function setting<br />
a.) If the cable tension is too high, the lock-out lever or twist-grip will not<br />
stay engaged and keep the fork in locked position. In such case, decrease the<br />
cable tension by turning the adjustment barrel (#3/12) clockwise (-), until the<br />
lever will stay engaged.<br />
b.) If the cable tension is too low, then the fork will not be locked when you<br />
engage the lever/twist-grip. In order to increase the cable tension, turn the<br />
adjustment barrel counter-clockwise (+), until the fork will stay locked and the<br />
lever/twist-grip is still engaged.<br />
c.) In case you cannot adjust the fork using the adjustment barrel, you have to<br />
open the cable fixing screw, clamp the cable again and increase or decrease<br />
the cable tension at this point (see #5). After that, you can make the fine tuning<br />
again as described at a.) and b.).<br />
- 2 -<br />
Fixing bolt. Use a 2.5mm Allen key.<br />
Lock lever push<br />
position - parallel<br />
to the ground!<br />
Decrease<br />
tension.<br />
Increase<br />
tension.<br />
Cable nipple. Shifting cable type.<br />
1 2<br />
3<br />
Cable tension adjustment barrel.<br />
The RL lever is to be mounted on the right side of the handlerbar!<br />
Lock lever push<br />
direction - vertical to the<br />
ground!<br />
7<br />
9 10<br />
11<br />
Cable guide groove<br />
90°<br />
90°<br />
Ground<br />
Cable<br />
nipple<br />
5<br />
Red release lever push<br />
direction - horizontal to the<br />
ground - in riding direction!<br />
8<br />
Cable tension adjustment barrel.<br />
12<br />
Less<br />
tension.<br />
Twist grip fixing<br />
bolt - 3mm Allen.<br />
Cable nipple. Shifting cable type.<br />
More<br />
tension.<br />
13 14<br />
4<br />
6


