Firefly SC and MZ User Manual, 813-0049c - Focus Enhancements
Firefly SC and MZ User Manual, 813-0049c - Focus Enhancements
Firefly SC and MZ User Manual, 813-0049c - Focus Enhancements

Create successful ePaper yourself
Turn your PDF publications into a flip-book with our unique Google optimized e-Paper software.
<strong>Firefly</strong> <strong>SC</strong> <strong>and</strong> <strong>MZ</strong><br />
Media Players<br />
Version 3.2<br />
<strong>User</strong> <strong>Manual</strong>
Trademarks<br />
The <strong>Focus</strong> <strong>Enhancements</strong>, Visual Circuits, <strong>and</strong> <strong>Firefly</strong> logos are<br />
registered trademarks in the United States <strong>and</strong> other countries. All<br />
other products, services or company names mentioned herein are<br />
claimed as trademarks <strong>and</strong> trade names by their respective<br />
companies.<br />
© <strong>Focus</strong> <strong>Enhancements</strong> (formerly Visual Circuits), 1999-2004.<br />
All rights reserved. No portion of this manual may be copied by<br />
any means without the prior consent of Visual Circuits.<br />
<strong>Focus</strong> <strong>Enhancements</strong><br />
5155 East River Road, Suite 401<br />
Minneapolis, MN 55421 USA<br />
http://www.visualcircuits.com<br />
Publication Number: <strong>813</strong>-<strong>0049c</strong><br />
All specifications, notices <strong>and</strong> warnings are subject to change<br />
without notice.
<strong>Firefly</strong> Safety Requirements<br />
IMPORTANT SAFETY INSTRUCTIONS:<br />
The following safety instructions apply to the<br />
Visual Circuits <strong>Firefly</strong>:<br />
1. Read <strong>and</strong> follow all warning notices <strong>and</strong> instructions marked on the<br />
product or included in this manual. Opening or removing covers <strong>and</strong>/or<br />
components may expose you to dangerous high voltage points or other<br />
risks. Qualified personnel should perform all servicing.<br />
2. The maximum ambient temperature for the <strong>Firefly</strong> is 114 degrees<br />
Fahrenheit (45 degrees Celsius). Care should be given to allow sufficient<br />
air circulation or space between units when <strong>Firefly</strong> is installed in a closed<br />
or multi-unit rack assembly because the operating ambient temperature<br />
of the rack environment must be greater than room ambient temperature.<br />
3. Slots <strong>and</strong> openings in the cabinet (chassis) are provided for ventilation.<br />
To ensure reliable operation of the product <strong>and</strong> to protect it from<br />
overheating, maintain a minimum of 1-inch (2.5-cm) clearance on the top<br />
<strong>and</strong> sides.<br />
4. Installation of the <strong>Firefly</strong> in a rack without sufficient airflow can be<br />
unsafe.<br />
5. If installed in a rack, the rack should safely support the combined weight<br />
of all equipment it supports. A fully loaded <strong>Firefly</strong> weighs 4 pounds (1.5<br />
kg).<br />
6. The connections <strong>and</strong> equipment of the <strong>Firefly</strong> should be capable of<br />
operating safely with the maximum power requirements of the <strong>Firefly</strong>. In<br />
the event of a power overload, the supply circuits <strong>and</strong> supply wiring<br />
should not become hazardous.<br />
7. External power supply AC power inputs are intended to be used with the<br />
three-wire grounding type plug (a plug that has a grounding pin). This is<br />
a safety feature. Equipment grounding is vital to ensure safe operation.<br />
Do not defeat the purpose of grounding type plugs by modifying the plug<br />
or using an adapter.<br />
8. If a three-wire grounding type power source is not available, consult a<br />
qualified electrician to determine another method of grounding the<br />
equipment.<br />
9. Install only in restricted areas in accordance with Articles 110-16, 100-17<br />
<strong>and</strong> 110-18 of the National Electrical Code, ANSI/NFPA 70.<br />
10. Do not allow anything to rest on the power cord <strong>and</strong> do not locate the<br />
product where persons will walk on or come in contact with the power<br />
cord.<br />
i
POWER AND GROUND REQUIREMENTS:<br />
Determine that the cumulative power requirements of the <strong>Firefly</strong><br />
plus other equipment in the rack do not overload the supply circuits<br />
<strong>and</strong>/or wiring.<br />
ii<br />
CAUTION<br />
If using a power strip or similar supply, make sure<br />
the power requirements of the chassis, plus the<br />
cumulative power draw of any other equipment in<br />
the rack, do not overload the supply circuit.<br />
WARNING<br />
For safe operation, this equipment must be properly<br />
grounded.<br />
The chassis should be reliably earth grounded to the<br />
rack equipment. This earth ground connection must be<br />
maintained when supply connection is other than direct<br />
connection to the branch circuit.
<strong>User</strong> <strong>Manual</strong> Regulatory Documentation<br />
Class A Statement<br />
FCC Part 15 (EN61000-3-2)<br />
CAUTION<br />
There is danger of explosion if the battery is<br />
incorrectly replaced.<br />
A lithium battery on the product provides backup power<br />
for the device’s timekeeping capability. The battery has<br />
an estimated life expectancy of ten years. When the<br />
battery starts to weaken, the date <strong>and</strong> time may become<br />
incorrect. If the battery fails, the unit must be sent back<br />
to Visual Circuits for battery replacement.<br />
WARNING<br />
An improperly grounded power supply can result in<br />
electrical shock.<br />
The AC power cord provided with your system has a<br />
grounded plug. Always use a grounded power cord with<br />
a properly grounded wall outlet.<br />
This equipment has been tested <strong>and</strong> found to comply with the<br />
limits for a Class A digital device, pursuant to Part 15 (EN61000-3-<br />
2) of the FCC Rules. These limits are designed to provide<br />
reasonable protection against harmful interference when the<br />
equipment is operated in a commercial environment. This<br />
equipment generates, uses, <strong>and</strong> can radiate radio frequency<br />
energy <strong>and</strong>, if not installed <strong>and</strong> used in accordance with this<br />
instruction manual, may cause harmful interference to radio<br />
communications. Operation of this equipment in a residential area<br />
is likely to cause harmful interference in which case the user will<br />
be required to correct the interference at his or her own expense.<br />
The <strong>Firefly</strong> complies with Part 15 (EN61000-3-2) of the FCC rules.<br />
iii
Operation is subject to the following two conditions:<br />
iv<br />
1. This device may not cause harmful interference.<br />
2. This device must accept any interference that may cause undesired<br />
operation.<br />
Industry Canada<br />
This Class A digital apparatus meets all requirements of the<br />
Canadian Interference-Causing Equipment Regulations.<br />
Cet appareil numerique de la classe A respecte toutes les<br />
exigences du Regulement sur le materiel brouilleur du Canada.<br />
EMC <strong>and</strong> Safety Directive<br />
Compliance<br />
The CE mark is affixed to this Visual Circuits<br />
Corporation product to confirm compliance with the following<br />
European Community Directives:<br />
Council Directive 89/336/EEC of 3 May 1989 on the approximation<br />
of the laws of Member States relating to electromagnetic<br />
compatibility.<br />
And<br />
WARNING<br />
Changes or modifications to this unit not expressly<br />
approved by the party responsible for compliance<br />
could void the user’s authority to operate the<br />
equipment.<br />
Council Directive 73/23/EEC of 19 February 1973 on the<br />
harmonization of the laws of Member States relating to electrical<br />
equipment designed for use within certain voltage limits:<br />
Each amended by Council Directive 93/68/EEC of 22 July 1993 on<br />
the harmonization of CE marking requirements.
Class A Warning (EN55024, EN55022)<br />
In a domestic environment this product may cause radio<br />
interference in which case the user may be required to take<br />
adequate measures.<br />
WARNING<br />
Failure to provide adequate surge protection may<br />
cause damage to the <strong>Firefly</strong>.<br />
Visual Circuits does not warranty damage caused by<br />
electrical surges to the system. Surge protection should<br />
be provided when connecting any peripheral device <strong>and</strong><br />
power to the system.<br />
v
CONTENTS<br />
Welcome to <strong>Firefly</strong> <strong>SC</strong> <strong>and</strong> <strong>MZ</strong> . . . . . . . . . . . . . . . . . . . . 1<br />
Quick Start Plug <strong>and</strong> Play . . . . . . . . . . . . . . . . . . . . . . . . . 3<br />
Before You Start, You Will Need. . . . . . . . . . . . . . . . . . . . . . . . . 3<br />
Installation Sequence . . . . . . . . . . . . . . . . . . . . . . . . . . . . . . . . . 4<br />
Install the <strong>Firefly</strong> . . . . . . . . . . . . . . . . . . . . . . . . . . . . . . . . . . . . . . . . 5<br />
Configure for Network . . . . . . . . . . . . . . . . . . . . . . . . . . . . . . . . . . . . 7<br />
Attaching a Laptop or PC . . . . . . . . . . . . . . . . . . . . . . . . . . . . . . 7<br />
Ethernet . . . . . . . . . . . . . . . . . . . . . . . . . . . . . . . . . . . . . . . . 7<br />
Serial . . . . . . . . . . . . . . . . . . . . . . . . . . . . . . . . . . . . . . . . . . 7<br />
Changing TCP/IP Settings. . . . . . . . . . . . . . . . . . . . . . . . . . 8<br />
WebView via Ethernet Port . . . . . . . . . . . . . . . . . . . . . . . . . 8<br />
External Control Comm<strong>and</strong>s . . . . . . . . . . . . . . . . . . . . . . . . 9<br />
Install Media Messenger . . . . . . . . . . . . . . . . . . . . . . . . . . . . . . . . . 10<br />
Configure FTP . . . . . . . . . . . . . . . . . . . . . . . . . . . . . . . . . . . . . . . . . 11<br />
Setup on-board <strong>Firefly</strong> FTP Server . . . . . . . . . . . . . . . . . . . . . . 11<br />
Configure <strong>Firefly</strong> Properties . . . . . . . . . . . . . . . . . . . . . . . . . . . 11<br />
Configuring the <strong>Firefly</strong> FTP Server . . . . . . . . . . . . . . . . . . . . . . 12<br />
How To Create a Basic Playlist . . . . . . . . . . . . . . . . . . . . . . . . . . . . 13<br />
Publish . . . . . . . . . . . . . . . . . . . . . . . . . . . . . . . . . . . . . . . . . . . . . . . 14<br />
Via FTP . . . . . . . . . . . . . . . . . . . . . . . . . . . . . . . . . . . . . . . . . . 14<br />
Via CD/DVD . . . . . . . . . . . . . . . . . . . . . . . . . . . . . . . . . . . . . . . 16<br />
Software Updating . . . . . . . . . . . . . . . . . . . . . . . . . . . . . . . . . . . . . . 17<br />
Encoding Requirements <strong>and</strong> Recommendations . . . . . 19<br />
Encoding Requirements. . . . . . . . . . . . . . . . . . . . . . . . . . . . . . . . . . 19<br />
Encoding Recommendations . . . . . . . . . . . . . . . . . . . . . . . . . . . . . . 20<br />
WEBVIEW. . . . . . . . . . . . . . . . . . . . . . . . . . . . . . . . . . . . . . . 23<br />
Accessing the WebView Interface . . . . . . . . . . . . . . . . . . . . . . . . . . 23<br />
Setup Procedures: . . . . . . . . . . . . . . . . . . . . . . . . . . . . . . . . . . 23<br />
Step 1: Connect to the Network. . . . . . . . . . . . . . . . . . . . . 23<br />
Step 2: Determine the Address of the <strong>Firefly</strong>. . . . . . . . . . . 24<br />
Step 3: Establishing Communication with the <strong>Firefly</strong>. . . . . 24<br />
Step 4: Enter Your <strong>User</strong> Name <strong>and</strong> Password . . . . . . . . . 25<br />
Forgot Name, Password, IP...???. . . . . . . . . . . . . . . . . . . . . . . 25<br />
Using the WebView Interface. . . . . . . . . . . . . . . . . . . . . . . . . . . . . . 26<br />
Transferring Media . . . . . . . . . . . . . . . . . . . . . . . . . . . . . . . . . . 27<br />
Webview Software Update . . . . . . . . . . . . . . . . . . . . . . . . . . . . 30<br />
vii
Contents<br />
viii<br />
Reviewing, Previewing <strong>and</strong> Deleting <strong>Firefly</strong> Media . . . . . . . . . . 31<br />
Reviewing Media <strong>and</strong> Storage Usage on the <strong>Firefly</strong> . . . . . 31<br />
Previewing Videos <strong>and</strong> Graphic Overlays<br />
on the <strong>Firefly</strong> . . . . . . . . . . . . . . . . . . . . . . . . . . . 32<br />
Deleting Media from the <strong>Firefly</strong> . . . . . . . . . . . . . . . . . . . . . 33<br />
Using the Playlist Editor . . . . . . . . . . . . . . . . . . . . . . . . . . . . . . 35<br />
Creating a New Playlist . . . . . . . . . . . . . . . . . . . . . . . . . . . 36<br />
Adding Videos to a Playlist . . . . . . . . . . . . . . . . . . . . . . . . 36<br />
Removing Videos from a Playlist . . . . . . . . . . . . . . . . . . . . 36<br />
Moving Videos Within a Playlist. . . . . . . . . . . . . . . . . . . . . 37<br />
Shuffling Video Playback on a Channel. . . . . . . . . . . . . . . 37<br />
Adding Graphic Overlays to a Playlist . . . . . . . . . . . . . . . . 37<br />
Working With Graphic Overlays in a Playlist . . . . . . . . . . . 39<br />
Adding Scrolling Text to a Playlist . . . . . . . . . . . . . . . . . . . 42<br />
Working With Scrolling Text in a Playlist . . . . . . . . . . . . . . 43<br />
Transparency Level . . . . . . . . . . . . . . . . . . . . . . . . . . . . . . 43<br />
Saving a Playlist. . . . . . . . . . . . . . . . . . . . . . . . . . . . . . . . . 44<br />
Playing a Playlist Quickly. . . . . . . . . . . . . . . . . . . . . . . . . . 45<br />
Using the Schedule Editor. . . . . . . . . . . . . . . . . . . . . . . . . . . . . 46<br />
Creating a New Schedule . . . . . . . . . . . . . . . . . . . . . . . . . 47<br />
Adding an Event to a Schedule . . . . . . . . . . . . . . . . . . . . . 48<br />
Deleting an Event from a Schedule . . . . . . . . . . . . . . . . . . 50<br />
Editing an Event within a Schedule . . . . . . . . . . . . . . . . . . 50<br />
Saving a Schedule. . . . . . . . . . . . . . . . . . . . . . . . . . . . . . . 52<br />
Additional Saving <strong>and</strong> Loading Methods . . . . . . . . . . . . . . 53<br />
Assigning Dates for Video Playback . . . . . . . . . . . . . . . . . 56<br />
Exiting the Schedule Editor . . . . . . . . . . . . . . . . . . . . . . . . 58<br />
Using the Player Control Panel. . . . . . . . . . . . . . . . . . . . . . . . . 59<br />
Diagnostics . . . . . . . . . . . . . . . . . . . . . . . . . . . . . . . . . . . . . . . . 60<br />
Diagnostics - General . . . . . . . . . . . . . . . . . . . . . . . . . . . . 61<br />
Diagnostics - Video . . . . . . . . . . . . . . . . . . . . . . . . . . . . . . 62<br />
Diagnostics - Playback. . . . . . . . . . . . . . . . . . . . . . . . . . . . 64<br />
Diagnostics - Logging . . . . . . . . . . . . . . . . . . . . . . . . . . . . 65<br />
System Settings . . . . . . . . . . . . . . . . . . . . . . . . . . . . . . . . . . . . 69<br />
General Settings . . . . . . . . . . . . . . . . . . . . . . . . . . . . . . . . 69<br />
Video Settings . . . . . . . . . . . . . . . . . . . . . . . . . . . . . . . . . . 71<br />
Audio Settings . . . . . . . . . . . . . . . . . . . . . . . . . . . . . . . . . . 73<br />
Control Settings . . . . . . . . . . . . . . . . . . . . . . . . . . . . . . . . 75<br />
Network Settings . . . . . . . . . . . . . . . . . . . . . . . . . . . . . . . . 77<br />
Logging Settings . . . . . . . . . . . . . . . . . . . . . . . . . . . . . . . . 82<br />
WebView Settings . . . . . . . . . . . . . . . . . . . . . . . . . . . . . . . 85<br />
FTP Auto-Update Settings. . . . . . . . . . . . . . . . . . . . . . . . . 87<br />
HTTP Auto-Update Settings . . . . . . . . . . . . . . . . . . . . . . . 89<br />
USB Devices . . . . . . . . . . . . . . . . . . . . . . . . . . . . . . . . . . . 91
Contents<br />
USB Devices Settings . . . . . . . . . . . . . . . . . . . . . . . . . . . . 92<br />
USB Network Settings . . . . . . . . . . . . . . . . . . . . . . . . . . . . 94<br />
Multicast. . . . . . . . . . . . . . . . . . . . . . . . . . . . . . . . . . . . . . . 96<br />
Advanced Settings. . . . . . . . . . . . . . . . . . . . . . . . . . . . . . . 99<br />
Networking. . . . . . . . . . . . . . . . . . . . . . . . . . . . . . . . . . . . 101<br />
Overview . . . . . . . . . . . . . . . . . . . . . . . . . . . . . . . . . . . . . . . . . . . . 101<br />
Getting Started . . . . . . . . . . . . . . . . . . . . . . . . . . . . . . . . . . . . . . . . 101<br />
Media Messenger Software . . . . . . . . . . . . . . . . . . . . . . . . . . . . 102<br />
Product Features: . . . . . . . . . . . . . . . . . . . . . . . . . . . . . . . . . . 102<br />
Benefits: . . . . . . . . . . . . . . . . . . . . . . . . . . . . . . . . . . . . . . . . . 102<br />
Updating Video Playback . . . . . . . . . . . . . . . . . . . . . . . . 103<br />
Automatic Updating:. . . . . . . . . . . . . . . . . . . . . . . . . . . . . . . . . . . . 103<br />
<strong>Manual</strong> Updating: . . . . . . . . . . . . . . . . . . . . . . . . . . . . . . . . . . . . . . 103<br />
FTP UPDATING. . . . . . . . . . . . . . . . . . . . . . . . . . . . . . . . . . . . . 103<br />
FTP Server. . . . . . . . . . . . . . . . . . . . . . . . . . . . . . . . . . . . 104<br />
Player Management. . . . . . . . . . . . . . . . . . . . . . . . . . . . . 104<br />
Creating a <strong>Firefly</strong> FTP Update Account . . . . . . . . . . . . . . 105<br />
/ . . . . . . . . . . . . . . . . . . . . . . . . . . . . . . . . . . . . . . . . . . . . 105<br />
/scripts . . . . . . . . . . . . . . . . . . . . . . . . . . . . . . . . . . . . . . . 105<br />
/updates . . . . . . . . . . . . . . . . . . . . . . . . . . . . . . . . . . . . . . 105<br />
FTP Update Process . . . . . . . . . . . . . . . . . . . . . . . . . . . . 106<br />
FTP Updating Order. . . . . . . . . . . . . . . . . . . . . . . . . . . . . 107<br />
FTP Font Files (.ttf) . . . . . . . . . . . . . . . . . . . . . . . . . . . . . 107<br />
Playlist Parsing Routine. . . . . . . . . . . . . . . . . . . . . . . . . . 107<br />
System Update Check . . . . . . . . . . . . . . . . . . . . . . . . . . . 108<br />
<strong>Firefly</strong> Storage Cleanup Routine . . . . . . . . . . . . . . . . . . . 108<br />
MULTICAST UPDATING. . . . . . . . . . . . . . . . . . . . . . . . . . . . . . . . 108<br />
Overview . . . . . . . . . . . . . . . . . . . . . . . . . . . . . . . . . . . . . 109<br />
Software Update Check. . . . . . . . . . . . . . . . . . . . . . . . . . 110<br />
System Settings for Multicasting . . . . . . . . . . . . . . . . . . . 111<br />
<strong>Manual</strong> Updating . . . . . . . . . . . . . . . . . . . . . . . . . . . . . . . . . . . . . . 112<br />
WebView Updating . . . . . . . . . . . . . . . . . . . . . . . . . . . . . . . . . 112<br />
Forgot Name, Password, IP...???. . . . . . . . . . . . . . . . . . . . . . 112<br />
Direct File Access Updating . . . . . . . . . . . . . . . . . . . . . . . . . . 113<br />
Log File Reporting . . . . . . . . . . . . . . . . . . . . . . . . . . . . . 115<br />
Overview . . . . . . . . . . . . . . . . . . . . . . . . . . . . . . . . . . . . . . . . . . . . 115<br />
Run Logs . . . . . . . . . . . . . . . . . . . . . . . . . . . . . . . . . . . . . . . . . . . . 116<br />
Diagnostic Logs . . . . . . . . . . . . . . . . . . . . . . . . . . . . . . . . . . . . . . . 116<br />
Log Format . . . . . . . . . . . . . . . . . . . . . . . . . . . . . . . . . . . . . . . 117<br />
Run Logs . . . . . . . . . . . . . . . . . . . . . . . . . . . . . . . . . . . . . 117<br />
ix
Contents<br />
x<br />
Diagnostic Logs . . . . . . . . . . . . . . . . . . . . . . . . . . . . . . . . 117<br />
DTDs (Document Type Definition). . . . . . . . . . . . . . . . . . 117<br />
Log Default Playlist . . . . . . . . . . . . . . . . . . . . . . . . . . . . . . . . . 117<br />
Maximum Log File Sizes. . . . . . . . . . . . . . . . . . . . . . . . . . . . . 117<br />
Uploading Log Files . . . . . . . . . . . . . . . . . . . . . . . . . . . . . . . . 118<br />
External Control Comm<strong>and</strong>s . . . . . . . . . . . . . . . . . . . . . 119<br />
Connecting via RS232 . . . . . . . . . . . . . . . . . . . . . . . . . . . 119<br />
Connecting via TCP/IP. . . . . . . . . . . . . . . . . . . . . . . . . . . 119<br />
Basic Hyper Terminal Setup . . . . . . . . . . . . . . . . . . . . . . . . . . 120<br />
VCC Control Comm<strong>and</strong>s:. . . . . . . . . . . . . . . . . . . . . . . . . . . . . . . . 121<br />
Playlist Playback Comm<strong>and</strong>s . . . . . . . . . . . . . . . . . . . . . . . . . 121<br />
Playing Individual Files . . . . . . . . . . . . . . . . . . . . . . . . . . . . . . 123<br />
Using Serial Comm<strong>and</strong>s To Create Playlists . . . . . . . . . . . . . 130<br />
. . . . . . . . . . . . . . . . . . . . . . . . . . . . . . . . . . . . . . . . . . . . . . . . 130<br />
<strong>Firefly</strong> System Comm<strong>and</strong>s . . . . . . . . . . . . . . . . . . . . . . . . . . . 131<br />
Callback Comm<strong>and</strong>s. . . . . . . . . . . . . . . . . . . . . . . . . . . . . . . . 132<br />
Audio <strong>and</strong> Video Setting Changes . . . . . . . . . . . . . . . . . . . . . 133<br />
Networking Comm<strong>and</strong>s. . . . . . . . . . . . . . . . . . . . . . . . . . . . . . 134<br />
LDV Control Comm<strong>and</strong>s . . . . . . . . . . . . . . . . . . . . . . . . . . . . . . . . 141<br />
Introduction . . . . . . . . . . . . . . . . . . . . . . . . . . . . . . . . . . . . . . . 141<br />
COM Port Settings . . . . . . . . . . . . . . . . . . . . . . . . . . . . . . . . . 141<br />
Error Codes. . . . . . . . . . . . . . . . . . . . . . . . . . . . . . . . . . . . . . . 142<br />
Comm<strong>and</strong> Syntax . . . . . . . . . . . . . . . . . . . . . . . . . . . . . . . . . . 143<br />
Address Arguments. . . . . . . . . . . . . . . . . . . . . . . . . . . . . . . . . 143<br />
Comm<strong>and</strong> Summary . . . . . . . . . . . . . . . . . . . . . . . . . . . . . . . . 144<br />
Playback Comm<strong>and</strong>s . . . . . . . . . . . . . . . . . . . . . . . . . . . . . . . 145<br />
External Control Comm<strong>and</strong>s<br />
Quick Reference Guide: . . . . . . . . . . . . . . . . . . . . . . . . . . . . . 159<br />
VCC Comm<strong>and</strong>s:. . . . . . . . . . . . . . . . . . . . . . . . . . . . . . . 159<br />
LDV Comm<strong>and</strong>s: . . . . . . . . . . . . . . . . . . . . . . . . . . . . . . . 159<br />
Troubleshooting . . . . . . . . . . . . . . . . . . . . . . . . . . . . . . . 161<br />
General Issues . . . . . . . . . . . . . . . . . . . . . . . . . . . . . . . . . . . . . . . . 161<br />
No Power to <strong>Firefly</strong> . . . . . . . . . . . . . . . . . . . . . . . . . . . . . . . . . 161<br />
No Video Playback . . . . . . . . . . . . . . . . . . . . . . . . . . . . . . . . . 161<br />
"Latent Images" or "Flashing" During Playback . . . . . . . . . . . 162<br />
Stuttering Files During Playback. . . . . . . . . . . . . . . . . . . . . . . 162<br />
Some files in the playlist do not play. . . . . . . . . . . . . . . . . . . . 163<br />
Smooth Transitions . . . . . . . . . . . . . . . . . . . . . . . . . . . . . . . . . 164<br />
SMPTE time codes are not recognized properly. . . . . . . . . . . 164<br />
Filename Already Exists . . . . . . . . . . . . . . . . . . . . . . . . . . . . . 164<br />
FTPing Font Files (.ttf) . . . . . . . . . . . . . . . . . . . . . . . . . . . . . . 164
Contents<br />
Insufficient Disk Space . . . . . . . . . . . . . . . . . . . . . . . . . . . . . . 164<br />
Forgot Name, Password, IP...???. . . . . . . . . . . . . . . . . . . . . . 165<br />
Preventing Cabling <strong>and</strong> Connection Problems. . . . . . . . . . . . . . . . 166<br />
<strong>Firefly</strong> Multi-Zone (<strong>MZ</strong>) . . . . . . . . . . . . . . . . . . . . . . . . 167<br />
Installing the <strong>MZ</strong> . . . . . . . . . . . . . . . . . . . . . . . . . . . . . . . . . . . . . . 167<br />
Video Output . . . . . . . . . . . . . . . . . . . . . . . . . . . . . . . . . . . . . . 167<br />
Functionality . . . . . . . . . . . . . . . . . . . . . . . . . . . . . . . . . . . . . . . . . . 168<br />
Software Update. . . . . . . . . . . . . . . . . . . . . . . . . . . . . . . . . . . . . . . 169<br />
Status LED . . . . . . . . . . . . . . . . . . . . . . . . . . . . . . . . . . . . . . . 169<br />
Using <strong>Firefly</strong> <strong>MZ</strong> to<br />
Create a Layout <strong>and</strong> Playlist . . . . . . . . . . . . . . . . . . . . . . . . . . 170<br />
Creating the Layout. . . . . . . . . . . . . . . . . . . . . . . . . . . . . . . . . 170<br />
Setting Display Parameters . . . . . . . . . . . . . . . . . . . . . . . 170<br />
Creating a <strong>MZ</strong> (multi-zone) Layout . . . . . . . . . . . . . . . . . 171<br />
Position Zones in Layout Workspace. . . . . . . . . . . . . . . . 172<br />
Creating the Playlist . . . . . . . . . . . . . . . . . . . . . . . . . . . . . . . . 173<br />
Link the Playlist to the <strong>Firefly</strong> . . . . . . . . . . . . . . . . . . . . . . . . . 175<br />
<strong>Firefly</strong> <strong>MZ</strong> Tips . . . . . . . . . . . . . . . . . . . . . . . . . . . . . . . . . . . . . . . . 177<br />
Technical Specifications . . . . . . . . . . . . . . . . . . . . . . . . 181<br />
Index. . . . . . . . . . . . . . . . . . . . . . . . . . . . . . . . . . . . . . . . . 183<br />
xi
xii
WELCOME TO<br />
FIREFLY <strong>SC</strong> AND <strong>MZ</strong><br />
Thank you for purchasing the <strong>Firefly</strong> <strong>SC</strong> or the <strong>Firefly</strong> <strong>MZ</strong> .<br />
The <strong>Firefly</strong> <strong>SC</strong> <strong>and</strong> <strong>MZ</strong> are the media players developed<br />
specifically for A/V professionals; combining the ease <strong>and</strong><br />
familiarity, flexibility <strong>and</strong> control of a disk-based, MPEG-2<br />
decoder. These players provide for playlist creation, time/date<br />
scheduling, graphic overlay capability, remote content updating,<br />
network compatibility <strong>and</strong> a web-based “control <strong>and</strong> monitor”<br />
interface.<br />
In addition, the <strong>Firefly</strong> <strong>MZ</strong> when teamed with Media Messenger<br />
software permits the creation of compelling multi-zone<br />
presentations.<br />
The <strong>Firefly</strong> <strong>SC</strong> <strong>and</strong> <strong>MZ</strong> belong to a new-generation of commercial<br />
media players that fit into a wide variety of st<strong>and</strong> alone or network<br />
attached applications, from trade shows <strong>and</strong> exhibitions to retail<br />
merch<strong>and</strong>ising, education <strong>and</strong> training, corporation<br />
communications <strong>and</strong> digital signage.<br />
The <strong>Firefly</strong> family continues to develop <strong>and</strong> evolve to meet the<br />
evolving dem<strong>and</strong>s of A/V contractors.<br />
Keep up with our latest product offerings by checking our web site<br />
at www.visualcircuits.com.<br />
1
Welcome to <strong>Firefly</strong> <strong>SC</strong> <strong>and</strong> <strong>MZ</strong><br />
Documentation Conventions<br />
The <strong>Firefly</strong> <strong>SC</strong> <strong>and</strong> <strong>MZ</strong> are single-channel devices that share many<br />
features <strong>and</strong> capabilities. Because of these similarities, this manual,<br />
in general, does not differentiate between these two players <strong>and</strong><br />
simply calls them either the <strong>Firefly</strong> or the player. Thus, unless<br />
specifically identified as belong to a particular player, the<br />
information in this manual applies to both.<br />
Information specific only to the <strong>MZ</strong> is found in the section, <strong>Firefly</strong><br />
Multi-Zone (<strong>MZ</strong>) on page 167.<br />
Notes<br />
2<br />
An exclamation point indicates information found in a Note.
QUICK START<br />
PLUG AND PLAY<br />
The <strong>Firefly</strong> is a single-channel output device that is simple to configure<br />
<strong>and</strong> can reside on a network or st<strong>and</strong> alone.<br />
Content Server<br />
LAN<br />
<strong>Firefly</strong> Players<br />
Before You Start, You Will Need<br />
Have the following items ready before installing the <strong>Firefly</strong> <strong>MZ</strong><br />
Media Player.<br />
• BNC Video cables<br />
• IP <strong>and</strong> FTP Information<br />
IP Addressing Mode (Static or DHCP)<br />
IP Address<br />
Hostname<br />
FTP Proxy IP Address <strong>and</strong> Port<br />
FTP <strong>User</strong>name <strong>and</strong> Password<br />
Display Devices<br />
3
Quick Start Plug <strong>and</strong> Play<br />
Installation Sequence<br />
4<br />
1. Install <strong>Firefly</strong> on network.<br />
a. Connect your video <strong>and</strong> audio cables to the back of the<br />
<strong>Firefly</strong>.<br />
b. Connect the video <strong>and</strong> audio cables from the <strong>Firefly</strong> to the<br />
inputs on the monitor <strong>and</strong> audio component.<br />
c. Connect the power cable to the back of the <strong>Firefly</strong> <strong>and</strong> plug<br />
it in to your power source.<br />
d. At start up, the <strong>Firefly</strong> runs through a a short series of selfdiagnostics<br />
before beginning automated playback.<br />
The <strong>Firefly</strong> comes loaded with sample videos that are useful<br />
as you become familiar with <strong>Firefly</strong>’s features <strong>and</strong> for<br />
diagnostic purposes. Video playback is typically controlled<br />
through a “playlist” that defines which videos are played<br />
<strong>and</strong> in what order. Only one playlist can be active at any<br />
time, though any number of playlists can be stored on<br />
<strong>Firefly</strong> for later use. Whenever <strong>Firefly</strong> is turned on, the<br />
playlist that was last used is reloaded <strong>and</strong> playback begins<br />
automatically.<br />
The default active playlist for a new <strong>Firefly</strong> is called<br />
“factory.fpl”. The fastest way to test <strong>Firefly</strong> is to simply<br />
plug it in, connect the cables <strong>and</strong> turn it on.<br />
The <strong>Firefly</strong>’s default factory setting plays component,<br />
1080i, <strong>and</strong> line-level audio. If your application requires the<br />
<strong>Firefly</strong> to employ a different video st<strong>and</strong>ard <strong>and</strong>/or video<br />
output type, use Webview to change the system settings<br />
as needed. See the section on Video Settings on page 71<br />
for more information.<br />
2. Configure <strong>Firefly</strong> for network, see page 7.<br />
3. Install Media Messenger application, refer to Media Messenger<br />
<strong>User</strong> <strong>Manual</strong> for details.<br />
4. Configure FTP.<br />
5. Creating a Layout <strong>and</strong> Playlist.<br />
6. Publishing via FTP or CD/DVD.
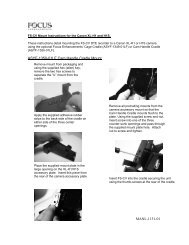
Install the <strong>Firefly</strong><br />
USB<br />
Power<br />
12 VDC<br />
1 2 3 4 5 6<br />
+ - + - + -<br />
Unbalanced<br />
(Left Right)<br />
Serial<br />
Digital<br />
S / PDIF<br />
Quick Start Plug <strong>and</strong> Play<br />
DVI-I<br />
10/100<br />
Network<br />
Component<br />
Pb Pr Y<br />
S-Video<br />
Y C<br />
Composite<br />
1. Attach the video cables to the <strong>Firefly</strong>.<br />
❏ For Composite monitors: Connect a BNC-ended<br />
composite cable (not included) to the composite connector<br />
on the back of the <strong>Firefly</strong>.<br />
❏ For S-Video monitors: Connect a BNC-ended Y s-video<br />
cable (not included) to the corresponding chroma (C) <strong>and</strong><br />
luma (Y) connectors on the back of the <strong>Firefly</strong>.<br />
❏ For Component monitors: Connect BNC-ended<br />
component cables (not included) to the corresponding Pr, Y<br />
<strong>and</strong> Pb connectors on the back of the <strong>Firefly</strong>.<br />
<strong>MZ</strong> RGB <strong>and</strong> Component Output<br />
For best quality video or to putput to an anology display device, it is<br />
necessary to use the <strong>MZ</strong>’s DVI output anlog with a DVI to VGA adapter,<br />
see for more details.<br />
5
Quick Start Plug <strong>and</strong> Play<br />
6<br />
2. Attach the audio cables to the <strong>Firefly</strong>.<br />
❏ For an unbalanced audio connection use audio cables with<br />
str<strong>and</strong>ed wire ends <strong>and</strong> connect to terminal 1 (Left +),<br />
terminal 4 (Right +), <strong>and</strong> terminals 2 <strong>and</strong> 4 (designated<br />
grounds).<br />
❏ If unbalanced audio cable lengths exceed 10 meters, use an<br />
Audio Line Amp/Balancer such as the Radio Design Labs,<br />
Stick On.<br />
❏ For a S/PDIF digital audio, use a str<strong>and</strong>ed audio cables <strong>and</strong><br />
connect to terminal 5 Digital Audio (+) <strong>and</strong> terminal 6 (-).<br />
3. Attach video <strong>and</strong> audio cables to the video <strong>and</strong> audio inputs on<br />
the video monitor <strong>and</strong> audio component.<br />
4. Cable the <strong>Firefly</strong> to the network.<br />
5. Plug in the power supply <strong>and</strong> attach the power cable to the<br />
<strong>Firefly</strong>. The <strong>Firefly</strong> powers up <strong>and</strong> performs a short series of<br />
self-diagnostics <strong>and</strong> then begins automated playback
Configure for Network<br />
Quick Start Plug <strong>and</strong> Play<br />
Often, the <strong>Firefly</strong> TCP/IP defaults must change to accommodate<br />
the network where it will reside. The best method is to attach a<br />
computer to the media player.<br />
Contact the Network Administrator for the correct network configuration<br />
information,<br />
Attaching a Laptop or PC<br />
Before beginning, verify that the computer <strong>and</strong>/or the <strong>Firefly</strong> are powered<br />
off. When connections are completed, power on the devices.<br />
Ethernet<br />
Serial<br />
❏ Connect the computer directly to the <strong>Firefly</strong> using an<br />
Ethernet crossover cable. or<br />
Ethernet via Hub or Switch.<br />
Ethernet via Cross-over Cable.<br />
❏ Connect using st<strong>and</strong>ard Ethernet cables <strong>and</strong> a hub or switch.<br />
Use a null modem cable, female DB-9 to female DB-9, RS232<br />
cable, when connecting to the <strong>Firefly</strong> via the serial port.<br />
7
Quick Start Plug <strong>and</strong> Play<br />
Changing TCP/IP Settings<br />
<strong>Firefly</strong> default TCP/IP settings:<br />
Static IP Address: 10.0.1.1<br />
Login (case sensitive): firefly<br />
Password: 123456<br />
There are two methods for initially changing the <strong>Firefly</strong> TCP/IP<br />
settings: WebView <strong>and</strong> serial comm<strong>and</strong>s.<br />
WebView via Ethernet Port<br />
WebView is a browser-based, administration tool-kit that resides<br />
on the <strong>Firefly</strong>.<br />
1. Set your PC’s IP address to a number in the same range as the<br />
<strong>Firefly</strong>, such as 10.0.1.2.<br />
8<br />
2. Open a browser <strong>and</strong> enter the default IP address 10.0.1.1 in the<br />
address field.<br />
3. Access WebView using the default <strong>Firefly</strong> login <strong>and</strong> password,<br />
shown above.<br />
4. Set the IP address <strong>and</strong> other TCP/IP parameters as required.<br />
5. Click on Update Settings to save.<br />
6. Click on Player Control.<br />
7. Click on Restart Player.<br />
This initializes the new settings.
Quick Start Plug <strong>and</strong> Play<br />
Restarting the <strong>Firefly</strong> is only necessary when updating the network<br />
settings in a DHCP environment, i.e. going from Static to DHCP mode,<br />
changing the Host Name, <strong>and</strong> so on. .<br />
External Control Comm<strong>and</strong>s<br />
External control comm<strong>and</strong>s require that the computer has an A<strong>SC</strong>II<br />
generating control program, such as Hyper Terminal. The<br />
parameters are:<br />
• Serial port 1<br />
• 9600 Bps<br />
• Echo typed letters locally<br />
Use the following Visual Circuits comm<strong>and</strong>s to configure the<br />
<strong>Firefly</strong>.<br />
<strong>Firefly</strong>SetIpAddress<br />
Syntax<br />
fireflysetipaddr IP Address<br />
<strong>Firefly</strong>SetNetmask<br />
Syntax<br />
fireflysetnetmask netmask<br />
<strong>Firefly</strong>SetGateway<br />
Syntax<br />
fireflysetgateway gateway<br />
<strong>Firefly</strong>SetNetworkType<br />
Syntax<br />
fireflysetnetworktype 1 (DHCP) or 2 (Static)<br />
Filenames <strong>and</strong> External Comm<strong>and</strong>s<br />
When using external comm<strong>and</strong>s to h<strong>and</strong>le files, it is necessary for those<br />
files to have names without, i.e. sales_video.mpg not sales video.mpg.<br />
One convention is to use underscores in place of spaces.<br />
For more information about External Control Comm<strong>and</strong>s see,<br />
External Control Comm<strong>and</strong>s on page 119, <strong>and</strong> for network<br />
configuration, see Network Settings on page 77.<br />
9
Quick Start Plug <strong>and</strong> Play<br />
Install Media Messenger<br />
Install Visual Circuit’s Media Messenger software from the Media<br />
Messenger CD by following the online screens <strong>and</strong> prompts. Refer<br />
to the Media Messenger <strong>User</strong> <strong>Manual</strong> for details.<br />
Whenever the installation sequence requests the Company Name or<br />
Registration Key, enter the name <strong>and</strong> key precisely as Visual Circuits<br />
provided it.<br />
10
Configure FTP<br />
Setup on-board <strong>Firefly</strong> FTP Server<br />
• Configure <strong>Firefly</strong> properties.<br />
• Configure <strong>Firefly</strong> FTP server.<br />
Configure <strong>Firefly</strong> Properties<br />
Quick Start Plug <strong>and</strong> Play<br />
1. Open the Main window of Media Messenger.<br />
2. Right-click in the <strong>Firefly</strong> object in the Network Pane <strong>and</strong><br />
display Player drop down menu.<br />
3. Click on Properties to display Player Configuration.<br />
4. Fill in the Player Configuration fields.<br />
Unique name to identify player<br />
(Host Name)<br />
Unique ID set in player before<br />
installation, Media Messenger<br />
uses it to identify the player.<br />
If player belongs to a group,<br />
select the group name fromlist.<br />
Physical location of the player.<br />
Set to one for <strong>Firefly</strong>.<br />
11
Quick Start Plug <strong>and</strong> Play<br />
Configuring the <strong>Firefly</strong> FTP Server<br />
12<br />
Network Administrator provides FTP configuration information.<br />
This may be the <strong>Firefly</strong> or an<br />
FTP server used for storing<br />
presentation content.<br />
When loading directly to <strong>Firefly</strong>,<br />
leave the Directory field<br />
blank <strong>and</strong> place files in FTP<br />
root directory.<br />
Security settings provided by<br />
Network Administrator.<br />
1. Click on Settings in the Main Menu list <strong>and</strong> select FTP Server<br />
Setup.<br />
2. Fill in the FTP Site Information Fields.<br />
a. IP Address/Hostname.<br />
Network Administrator provides the IP Address <strong>and</strong><br />
Hostname of the FTP server.<br />
b. Directory<br />
Name of the directory where the files go.<br />
c. FTP <strong>User</strong>Name<br />
d. FTP Password<br />
3. FTP Proxy<br />
Check this box if using a FTP Proxy server, then add its IP<br />
address <strong>and</strong> port.<br />
For additional information, see Updating Video Playback on<br />
page 103.
Quick Start Plug <strong>and</strong> Play<br />
How To Create a Basic Playlist<br />
Playing media on <strong>Firefly</strong> requires<br />
1. That the MPEG videos reside on the <strong>Firefly</strong>.<br />
2. That a valid playlist resides on the <strong>Firefly</strong>.<br />
There are several methods for creating a layout <strong>and</strong> playlist for the<br />
<strong>Firefly</strong>.<br />
1. WebView interface program (see Using the Playlist Editor on<br />
page 35).<br />
2. Media Messenger, refer to its user manual.<br />
3. <strong>Firefly</strong> <strong>MZ</strong>, which is an optional enhancement that works with<br />
Media Messenger, see Using <strong>Firefly</strong> <strong>MZ</strong> to Create a Layout<br />
<strong>and</strong> Playlist on page 170.<br />
13
Quick Start Plug <strong>and</strong> Play<br />
Publish<br />
Via FTP<br />
14<br />
1. Open WebView, click on System Settings, <strong>and</strong> select Network.<br />
Confirm that the network <strong>and</strong> security settings are correct.<br />
2. Return to the Media Messenger main workspace.<br />
3. Select the target player or player group in the Network Pane.<br />
4. Click on Publish in the Media Messenger, Main Menu List <strong>and</strong><br />
then select Publish to FTP.<br />
3<br />
2<br />
4 6<br />
6A<br />
5. Confirm that the Media Messenger FTP configuration is<br />
correct for the player: click on the FTP Setup button <strong>and</strong><br />
review setup data.<br />
7<br />
5
6. Select the Upload Option:<br />
a. a specific player,<br />
b. a group of players,<br />
c. all players,<br />
Quick Start Plug <strong>and</strong> Play<br />
6A If uploading to one specific <strong>Firefly</strong>, select the Direct<br />
Upload to <strong>Firefly</strong> option, otherwise leave unchecked.<br />
7. Click Begin Update button.<br />
When the upload completes, close the Update Control window.<br />
The <strong>Firefly</strong> <strong>MZ</strong> loads immediately <strong>and</strong> begins playing back the<br />
playlist. If using a schedule, the playback begins at the appropriate<br />
time.<br />
15
Quick Start Plug <strong>and</strong> Play<br />
Via CD/DVD<br />
Another method of transporting playlists, schedules, <strong>and</strong> media<br />
files is to create a media update disc.This process creates the<br />
content image of an autorun disc (CD/DVD).<br />
Media Messenger does not burn a CD or DVD. It prepares the<br />
necessary files so that when they are burned on to a disc, an<br />
autorun application is created.<br />
16<br />
1. Go to the Media Messenger main workspace <strong>and</strong> select the<br />
player or group that is to receive the update.<br />
2. Select the Publish to CD/DVD icon.<br />
6<br />
3. Verify that the correct destination for the files is shown in the<br />
destination field: change if necessary.<br />
4. Check the Copy All Needed ... box.<br />
5. Verify that the total space required does not exceed the<br />
capacity of the CD or DVD disc.<br />
6. Click on Create CD/DVD Files.<br />
7. Click on Close.<br />
8. Use CD/DVD creation application to burn files on a disc.<br />
2<br />
7<br />
1<br />
3<br />
4<br />
5
Software Updating<br />
Quick Start Plug <strong>and</strong> Play<br />
Visual Circuits is continuously looking for ways to improve <strong>and</strong><br />
exp<strong>and</strong> its features <strong>and</strong> product performance. We provide a variety<br />
of simple methods to keep your <strong>Firefly</strong> updated with the latest<br />
software for your application.<br />
Software updates are available from www.visualcircuits.com or by<br />
requesting a CD/DVD FROM a Visual Circuits representative.<br />
Software updates <strong>and</strong> upgrades are processed with the following<br />
methods.<br />
1. Multicast (optional) updating: An active update that finds a<br />
.upd file will automatically update <strong>and</strong> restart the system. See<br />
Multicast Updating on page 108<br />
2. HTTP/FTP updating: An active update that finds a .upd file in<br />
the /updates folder will automatically update & restart the<br />
system. See Automatic Updating: on page 103.<br />
3. Webview <strong>Firefly</strong> Update: Used to manually select the .upd file<br />
from your PC through the Webview interface. System<br />
automatically updates <strong>and</strong> restarts. See Webview Software<br />
Update on page 30<br />
WARNING<br />
Whenever performing a software update it is important to allow the<br />
update to complete before rebooting the <strong>Firefly</strong>.<br />
17
ENCODING REQUIREMENTS<br />
AND RECOMMENDATIONS<br />
In order to ensure proper playback on the <strong>Firefly</strong>, the MPEG<br />
content must be encoded following a particular set of encoding<br />
requirements. The Encoding Requirements, as well as the<br />
Encoding Recommendations, listed below provide a brief set of<br />
criteria to create MPEG files that will be compatible with the<br />
<strong>Firefly</strong> playback system.<br />
Encoding Requirements<br />
1. Files must be program stream MPEG2 or system stream<br />
MPEG1 of audio/video, or elementary stream MPEG2 or<br />
MPEG1 of video only or audio only.<br />
2. Use 4:2:0, not 4:2:2 encoding.<br />
3. In MPEG-2, both audio <strong>and</strong> video fields should be encoded.<br />
This is the normal default.<br />
4. Audio only (Dolby Digital or MPEG Layer 2) files cannot be<br />
mixed with files containing videos (MPEG, MPEG2 program<br />
stream, video only).<br />
5. <strong>Firefly</strong> – St<strong>and</strong>ard IDE Hard Drive): The total bit rate of a<br />
<strong>Firefly</strong> player must not exceed 40 mbps.<br />
6. The presentation time stamp (PTS) values contained in the<br />
audio <strong>and</strong> video streams in a file must be continuous <strong>and</strong><br />
increasing. In particular, the PTS values should not reset to 0 at<br />
any point in the file. The time between the first <strong>and</strong> last time<br />
stamps in a file should reflect the actual duration of the file.<br />
7. Files should be no less than 4 megabytes in size. If some of<br />
your files are smaller than 4 megabytes, use an editor to<br />
combine the files to create a single file at least 4 megabytes in<br />
size.<br />
8. Files should be no larger than 2 gigabytes in size.<br />
19
Encoding Requirements <strong>and</strong> Recommendations<br />
Encoding Recommendations<br />
20<br />
1. Resolution: 720 X 480 or 704 X 480 in NT<strong>SC</strong>; 704 X 576 in<br />
PAL.<br />
2. Closed GOP (Group of Pictures) with an “I-frame” every 15<br />
frames is recommended.<br />
3. The recommended audio bit rate is 384kbps <strong>and</strong> a sampling<br />
rate of 48khz. It is recommended to play back test files using<br />
the original source tapes to confirm audio levels prior to<br />
encoding an entire project. This will allow for calibration of<br />
the encoding system to obtain a st<strong>and</strong>ard audio level.<br />
4. Program stream files should have one end code (00 00 01 b9)<br />
at the very end of the file. The <strong>Firefly</strong> can h<strong>and</strong>le files without<br />
end codes, but it is still a good idea to include one.<br />
5. The bit rate can affect the size <strong>and</strong> transferability of the files.<br />
The recommended bit rates for various types of video content<br />
are as follows:<br />
Bit Rate Video Content<br />
4 mbps Good quality with low motion<br />
6 mbps Good quality with typical motion<br />
8 mbps Good quality with high motion<br />
10 mbps High quality with dem<strong>and</strong>ing content<br />
Table 1. Bit Rate Encoding Recommendations for <strong>Firefly</strong><br />
6. Although <strong>Firefly</strong> can transcode NT<strong>SC</strong> <strong>and</strong> PAL, it is<br />
recommended to encode to the video st<strong>and</strong>ard (NT<strong>SC</strong> or PAL)<br />
that you will be setting your <strong>Firefly</strong> to display.
Encoding Requirements <strong>and</strong> Recommendations<br />
7. When encoding files, annotate <strong>and</strong> store notes on the audio<br />
levels of both the source tape <strong>and</strong> input settings of the encoder.<br />
It will then be possible to verify audio levels of later encoding<br />
sessions. It is desirable to maintain a baseline audio level<br />
across all files of a presentation whether at single or multiple<br />
locations. If no encoding notes or data is available from<br />
previously encoded files, compare the files. When possible,<br />
measure audio levels of the source tapes <strong>and</strong> of the encoded<br />
files. At a minimum, listen to <strong>and</strong> compare files. Even if<br />
encoding is done at the same production facility, variances<br />
between sessions may occur. Once MPEGs are encoded, the<br />
audio level of a file cannot be changed unless the file is reencoded<br />
or a new audio track is mixed.<br />
8. MPEG files are constructed from intertwined (i.e. multiplexed)<br />
audio <strong>and</strong> video streams. The length of video <strong>and</strong> audio stream<br />
segments within MPEG files should be identical if possible.<br />
Ending the audio segment at a .5 second interval (i.e., at an “Iframe”)<br />
will ensure identical stream lengths, providing smooth<br />
<strong>and</strong> seamless looping playback.<br />
9. When encoding SMPTE tracks it is recommended to encode<br />
these tracks "hot"--at approximately +6db. This adjustment<br />
can compensate for some SMPTE information that may be lost<br />
during compression. Not all encoders will respond in the same<br />
way. Sample testing should be done with all SMPTE tracks.<br />
10. St<strong>and</strong>ard color bars <strong>and</strong> audio test tones: MPEG files may be<br />
encoded along with the content or source files for reference<br />
<strong>and</strong> calibration. These encoded display test/tuning files should<br />
be separate files--not headers or footers of the presentation.<br />
11. To play back still images or computer-based graphics, we<br />
recommend software encoders such as DVMPEG<br />
(www.darvision.com). Yet, whenever possible, hardware-based<br />
encoding systems are preferred.<br />
Multiplexing a blank audio track on all video only MPEG files is<br />
highly recommended.<br />
21
WEBVIEW<br />
The WebView interface allows you to access a <strong>Firefly</strong> over a<br />
network using only a conventional web browser. No special<br />
software is required. WebView is compatible with Microsoft<br />
Internet Explorer 5.5 <strong>and</strong> higher. While WebView may work<br />
with other web browsers, Visual Circuits cannot guarantee full<br />
compatibility.<br />
Accessing the WebView Interface<br />
<strong>Firefly</strong>-<strong>SC</strong> comes factory default with a static IP of 10.0.1.1 <strong>and</strong> can be<br />
modified to a different IP or changed to DHCP.<br />
Login = firefly<br />
Password = 123456<br />
Setup Procedures:<br />
Step 1: Connect to the Network<br />
To begin, both the <strong>Firefly</strong> <strong>and</strong> the computer you will be using to<br />
access the <strong>Firefly</strong> must be on a common network. If you need help<br />
setting up these connections you should contact your IS<br />
department.<br />
WARNING<br />
While it is possible to use WebView over the Internet, all security<br />
provisions must be provided by the user's network. <strong>Firefly</strong> does not<br />
include any special security measures <strong>and</strong> because the user name<br />
<strong>and</strong> password can be displayed as clear text through the on-screen<br />
menu system, it is possible for anyone with physical access to the<br />
unit to obtain this information.<br />
23
WEBVIEW<br />
Step 2: Determine the Address of the <strong>Firefly</strong><br />
Once proper network connections are confirmed on both the<br />
<strong>Firefly</strong> <strong>and</strong> the web browser computer, you will need to know the<br />
IP address or DNS name (if your network has a DNS server) of the<br />
<strong>Firefly</strong>.<br />
Using DHCP, you should also be able to use the address “http://<br />
hostname” or “http://hostname.yourdomain” to access the <strong>Firefly</strong> without<br />
knowing the exact IP address.<br />
Step 3: Establishing Communication with the <strong>Firefly</strong><br />
To begin working with the <strong>Firefly</strong> you should launch your Internet<br />
browser program <strong>and</strong> enter the IP address (or DNS name if<br />
appropriate) in the address field. If you have successfully<br />
established communication with the <strong>Firefly</strong>, you will see a screen<br />
like the one displayed here.<br />
Figure 1. Login Page<br />
24
Step 4: Enter Your <strong>User</strong> Name <strong>and</strong> Password<br />
All <strong>Firefly</strong>’s ship from the factory with a default user name of<br />
“firefly” <strong>and</strong> default password “123456”. If you have not yet<br />
changed those defaults, you should enter them at this time.<br />
Otherwise, if you have already created a new user name <strong>and</strong><br />
password, enter them now.<br />
Keep in mind that both the user name <strong>and</strong> password are case<br />
sensitive <strong>and</strong> require a minimum of 6, but no more than 30,<br />
characters.<br />
Forgot Name, Password, IP...???<br />
WEBVIEW<br />
If you’re in a situation where you cannot get into the Webview<br />
interface because of a misplaced “<strong>User</strong> Name, Password, IP<br />
address, DNS Name, etc. Or perhaps the system was inadvertently<br />
set to DHCP when you don’t even have a DHCP server. There’s<br />
still hope. See Basic Hyper Terminal Setup on page 120 &<br />
Networking Comm<strong>and</strong>s on page 134.<br />
WARNING<br />
Default user names <strong>and</strong> passwords are a favorite tool of hackers.<br />
Since many people never bother to change the defaults, once<br />
hackers learn them they will try them on every like product they<br />
find. Your first layer of security should always be to change the<br />
default settings immediately.<br />
25
WEBVIEW<br />
Using the WebView Interface<br />
Once you have logged onto the WebView Interface, your browser<br />
will go to the “Media Transfer” page as the default starting point<br />
(page 27). Along the left side of the page are the navigation buttons<br />
used to access different pages in the WebView interface. At the top<br />
is a link to download the <strong>Firefly</strong> <strong>User</strong> <strong>Manual</strong> in PDF format.<br />
There is a link to the Visual Circuits web site in the lower left<br />
corner of the page.<br />
The Visual Circuits web site link will actually take you out of the WebView<br />
interface to Visual Circuits Internet web site. If you are not connected to<br />
the Internet through your network, this link will not work. The user manual<br />
download, however, comes directly off of the <strong>Firefly</strong> <strong>and</strong> therefore will<br />
work even without an Internet connection.<br />
26
Transferring Media<br />
WEBVIEW<br />
From this page you can transfer media from your computer or<br />
network to the <strong>Firefly</strong>. Up to six media files can be transferred at<br />
once by simply specifying the files to be transferred in each of the<br />
Media 1 through Media 6 boxes.<br />
Figure 2. Media Transfer Page<br />
If you close or select another web page during a media transfer, the<br />
transfer will terminate. If you would like to multi-task during a transfer, you<br />
may open a new web browser <strong>and</strong> log in.<br />
WARNING<br />
Do not use the Internet Explorer “History” function within WebView.<br />
Because the WebView interface needs to query the <strong>Firefly</strong> player to<br />
refresh, pulling the history out of the Internet Explorer cache file will<br />
cause inconsistent results. For the same reason, do not use the<br />
Internet Explorer backward or forward navigation buttons. Use the<br />
WebView navigation buttons instead.<br />
27
WEBVIEW<br />
If you cannot remember the names <strong>and</strong> locations of the files you<br />
wish to transfer, simply click the Browse button to the right of the<br />
box you wish to fill in. This will bring up a window that allows<br />
you to search your hard drive(s) <strong>and</strong> network for the desired file.<br />
Figure 3. Browse for Files Window<br />
After you have selected all the media files you wish to transfer to<br />
the <strong>Firefly</strong>, clicking the Transfer Media button will initiate the<br />
transfer. If you wish to change your selections before the transfer<br />
begins, you can click the Reset button to clear all selections.<br />
While copying .jpg, .gif, .tga, .png or non 256-color .bmp image files,<br />
<strong>Firefly</strong> converts those files to a st<strong>and</strong>ard 8-bit, 256-color bitmap format<br />
<strong>and</strong> reduces the image sizes, if necessary, to the system maximum of<br />
720 x 480 for NT<strong>SC</strong>. As a result, all image files listed on the system have<br />
the file extension .bmp. The conversion to .bmp format ensures that all<br />
graphic overlays are consistent in appearance <strong>and</strong> functionality.<br />
An alternative to the auto-formatting performed by the <strong>Firefly</strong> is to create<br />
the images <strong>and</strong> convert them to the 8-bit st<strong>and</strong>ard mentioned above<br />
before importing them.<br />
28
WEBVIEW<br />
When WebView begins transferring the selected files, an animated<br />
sequence of flashing circles will appear over the Visual Circuits<br />
logo in the lower left portion of the page to let you know that the<br />
transfer is in progress.<br />
Because media files can be quite large, the transfer process can take<br />
several minutes depending on the size of files you have selected <strong>and</strong> the<br />
speed of your network connection.<br />
Figure 4. WebView Media Transfer In Progress<br />
After WebView has successfully transferred all of the selected files<br />
to the <strong>Firefly</strong>, a summary page will be displayed showing what was<br />
uploaded. If you wish to transfer more files to the <strong>Firefly</strong>, you may<br />
return to the Media Transfer page by clicking the Media Transfer<br />
navigation button on the left side of the screen.<br />
29
WEBVIEW<br />
Webview Software Update<br />
To update your <strong>Firefly</strong> using the Media Transfer-<strong>Firefly</strong> Update<br />
method, simply browse your PC for the .upd file you may have<br />
obtained from the Visual Circuits web site or CD ROM. Now<br />
select “<strong>Firefly</strong> Update”. After the file has been transferred, the<br />
system will immediately begin to process the update for approx. 60<br />
seconds <strong>and</strong> then restart the player.<br />
You may notice some video stuttering during the update, but this is<br />
completely normal as the update requires a significant amount of<br />
processing b<strong>and</strong>width. After the player has restarted, verify that the<br />
system version has changed, indicating a successful update.<br />
Figure 5. Media Transfer Summary Page<br />
30<br />
WARNING<br />
Do Not Reboot the <strong>Firefly</strong> while the update is going on.
Reviewing, Previewing <strong>and</strong> Deleting <strong>Firefly</strong><br />
Media<br />
WEBVIEW<br />
Within the WebView Media Review page, you will be able to<br />
review media <strong>and</strong> storage usage on the <strong>Firefly</strong>, preview video <strong>and</strong><br />
graphic overlay media on the <strong>Firefly</strong> <strong>and</strong> delete media from the<br />
<strong>Firefly</strong>.<br />
Figure 6. Media Review Page (Video)<br />
Reviewing Media <strong>and</strong> Storage Usage on the <strong>Firefly</strong><br />
The Media Review page allows you to review the video <strong>and</strong><br />
graphics overlay files that are currently on the <strong>Firefly</strong>.<br />
To review a video or graphic overlay:<br />
1. Select the proper file type tab (video or overlay) at the top.<br />
2. Select the file from the media list on the right.<br />
The media review box on the left will display the name of the file<br />
<strong>and</strong> its size (in MBs).<br />
31
WEBVIEW<br />
In addition, you will be able review the current storage status of the<br />
<strong>Firefly</strong> by observing the current “Used” space <strong>and</strong> “Free” space<br />
displayed in the upper left portion of the Media Review window.<br />
Previewing Videos <strong>and</strong> Graphic Overlays<br />
on the <strong>Firefly</strong><br />
Within the Media Review page, you will be able to view basic<br />
previews (thumbnail images) of videos <strong>and</strong> graphic overlays on the<br />
<strong>Firefly</strong>.<br />
To preview a video on the <strong>Firefly</strong>:<br />
1. Select the video tab at the top.<br />
2. Select the file from the media list on the right.<br />
The media review box on the left will display the name of the<br />
file <strong>and</strong> its size (in MBs).<br />
3. Click the “Preview” button.<br />
A short series of still, thumbnail images from the video will be<br />
displayed in an animated sequence. This is a useful feature for you<br />
to see what is in the video, especially when a file name is not<br />
descriptive.<br />
After you have previewed a particular video on the <strong>Firefly</strong> once,<br />
the thumbnail images will be stored on the <strong>Firefly</strong> allowing the<br />
preview to load automatically in successive review attempts.<br />
32<br />
In some cases, certain video files will be unavailable for preview.<br />
To preview a graphic overlay on the <strong>Firefly</strong>:<br />
1. Select the overlay tab at the top.<br />
2. Select the file from the media list on the right.<br />
The media review box on the left will display the name of the file,<br />
its size (in MBs) <strong>and</strong> a thumbnail preview of the graphic overlay<br />
image.
Figure 7. Media Review Page (Graphic Overlay)<br />
Deleting Media from the <strong>Firefly</strong><br />
WEBVIEW<br />
1. Select the proper file type tab (video, overlay, playlist or<br />
schedule) at the top.<br />
2. Select the file(s) from the media list on the right. If you would<br />
like to select multiple files at the same time, you can use the<br />
st<strong>and</strong>ard Windows ‘Shift/Control’ methods.<br />
The media review box on the left will display the name of the<br />
file <strong>and</strong> its size (in MBs). In cases where you have selected<br />
more than one file, all of the file names will be listed along<br />
with a total combined size (in MBs) for the group of files.<br />
3. Click the “Delete” button.<br />
The media file(s) will be deleted from the <strong>Firefly</strong> storage.<br />
33
WEBVIEW<br />
Figure 8. Media Review Page (Deleting Multiple Files)<br />
34<br />
WARNING<br />
You may delete any or all media files from the <strong>Firefly</strong> in this fashion.<br />
This includes files that may be in use by the current playlist. If you<br />
delete a file that is currently playing, it will be allowed to finish<br />
playing before the file is actually removed. The next time it is called<br />
by the playlist it will be skipped.<br />
There is no way to recover files after they have been deleted.
Using the Playlist Editor<br />
WEBVIEW<br />
Within the Playlist Editor, you will be able to arrange videos on the<br />
<strong>Firefly</strong> into a playlist. A playlist is essentially a group of videos<br />
arranged in a particular playback sequence. A playlist can be used<br />
for immediate playback or saved on the <strong>Firefly</strong> for future playback.<br />
In addition, within the Playlist Editor, you will be able to utilize<br />
graphic overlays. A graphic overlay is a static image (.bmp, .jpg,<br />
.gif, .tif, .tga or .png) placed over an associated video. You can<br />
assign individual graphic overlays to specific videos within a<br />
playlist or to all videos within a playlist if desired. The graphic<br />
overlay feature provides an effective way to display a company<br />
logo, sale sign or any other image over your regular video<br />
playback.<br />
To access the Playlist Editor, click on the Playlist Editor navigation<br />
button on the left side of the WebView interface.<br />
Figure 9. Playlist Editor Page<br />
35
WEBVIEW<br />
Creating a New Playlist<br />
The process for creating a new playlist may be started in one of<br />
two ways; by choosing “New Playlist” from the “Playlist” drop<br />
down menu or by clicking on the “New” button in the lower right<br />
corner.<br />
Adding Videos to a Playlist<br />
To add a video to a playlist:<br />
1. Browse the <strong>Firefly</strong> Media list to locate the video you wish to<br />
add.<br />
2. Once you have found the video you wish to add, select it <strong>and</strong><br />
then click on the button located on the center buttons<br />
panel.<br />
Additional videos you wish to add must be selected <strong>and</strong> added one<br />
at a time.<br />
36<br />
1. The chosen video file will always be added to the end of the list <strong>and</strong><br />
can be used multiple times.<br />
2. All MPEG files used in a given layout need to be of the same<br />
resolution <strong>and</strong> size. This provides for a smoother transition between<br />
the videos.<br />
Removing Videos from a Playlist<br />
To remove a video from the playlist:<br />
1. Select the video in the Video listbox.<br />
2. Click on the button located on the center buttons panel.<br />
This will remove the video from that specific playlist (not from<br />
the <strong>Firefly</strong> entirely).<br />
Additional videos you wish to be deleted must be selected <strong>and</strong><br />
deleted one at a time.
Moving Videos Within a Playlist<br />
WEBVIEW<br />
While you are creating or modifying a playlist, you may find<br />
yourself wanting to modify the order of the videos.<br />
To move a video up (towards the beginning) in a playlist:<br />
1. Select the video (from the Video list) you would like to move.<br />
2. Press the button until the video is where you want it within<br />
the playlist.<br />
To move a video down (towards the end) in a playlist:<br />
1. Select the video (from the Video list) you would like to move.<br />
2. Press the button until the video is where you want it within<br />
the playlist.<br />
Continue using the method outlined above to move other videos in<br />
order to create your desired playlist.<br />
Shuffling Video Playback on a Channel<br />
Occasionally, you may want to vary the playback order of your<br />
videos for a given playlist. The Shuffle playback feature within the<br />
Playlist Editor allows you to do just that. By activating Shuffle<br />
playback, videos within the playlist you are working with will be<br />
played back in r<strong>and</strong>om order.<br />
To turn Shuffle playback “On” or “Off” for a playlist, simply<br />
check (for On) or uncheck (for Off) the Shuffle checkbox located<br />
at the bottom right of the applicable playlist.<br />
Adding Graphic Overlays to a Playlist<br />
The process for adding graphic overlay files to a playlist is<br />
basically the same as the process of adding video files. The one<br />
significant difference, however, is that a graphic overlay is always<br />
linked to a particular video. Where adding a video creates a new<br />
line at the end of the playlist, adding a graphic overlay attaches the<br />
overlay to the currently selected video entry in the Video listbox.<br />
Therefore, at least one video must be in the Video listbox before<br />
you can add any type of graphic overlay.<br />
37
WEBVIEW<br />
There are two ways you can add a graphic overlay to a video.<br />
The first method is as follows:<br />
1. Click on the video within the playlist that you would like the<br />
overlay to associate with.<br />
2. Locate <strong>and</strong> then click on your desired graphic overlay from the<br />
<strong>Firefly</strong> Media list.<br />
3. Click on the button to add the graphic overlay.<br />
The graphic overlay you selected will appear across from its<br />
associated video in the Overlay listbox. The properties of the<br />
overlay will be set to the default settings. If you wish to modify the<br />
graphic overlay properties at this point, select either the video or<br />
the graphic overlay <strong>and</strong> then click on the button to display the<br />
Graphic Overlay Properties page. You may make your desired<br />
changes in this screen (see Working With Graphic Overlays in a<br />
Playlist on page 39 for details).<br />
If a graphic overlay is added while a video that already has an associated<br />
graphic overlay is selected on the playlist, the new selection will replace<br />
the original contents.<br />
The second method, which allows you to review <strong>and</strong>/or adjust the<br />
graphic overlay properties before saving, is as follows:<br />
38<br />
1. Click on the video within the playlist that you would like the<br />
overlay to associate with.<br />
2. Click on button to display the Graphic Overlay Properties<br />
window.<br />
3. Click on the Overlay Filename drop down menu to locate <strong>and</strong><br />
select your desired graphic overlay from the <strong>Firefly</strong> Media list.<br />
4. Review <strong>and</strong>/or adjust the overlay properties (see Working With<br />
Graphic Overlays in a Playlist on page 39 for details on this).<br />
5. Click the OK button.<br />
The graphic overlay you selected will appear across from its<br />
associated video in the Overlay listbox.
Working With Graphic Overlays in a Playlist<br />
WEBVIEW<br />
As previously noted, graphic overlays exist in a playlist as<br />
attributes of specific video entries. The only image types that are<br />
compatible with <strong>Firefly</strong> are .bmp, .jpg, .gif, .tga or .png.<br />
Figure 10. Graphic Overlay Properties Page<br />
While copying .jpg, .gif, .tga, .png or non 256-color .bmp image files,<br />
<strong>Firefly</strong> converts those files to a st<strong>and</strong>ard 8-bit, 256-color bitmap format<br />
<strong>and</strong> reduces the image sizes, if necessary, to the system maximum of<br />
720 x 480 for NT<strong>SC</strong>. As a result, all image files listed on the system have<br />
the file extension .bmp. The conversion to .bmp format ensures that all<br />
graphic overlays are consistent in appearance <strong>and</strong> functionality.<br />
An alternative to the auto-formatting performed by the <strong>Firefly</strong> is to create<br />
the images <strong>and</strong> convert them to the 8-bit st<strong>and</strong>ard mentioned above<br />
before importing them.<br />
39
WEBVIEW<br />
The process for altering the characteristics of a specific graphic<br />
overlay is as follows:<br />
(Skip steps 1 <strong>and</strong> 2 if you have already selected a graphic overlay<br />
<strong>and</strong> are within the Graphic Overlay Properties page).<br />
1. Select the video you would like the graphic overlay to be<br />
associated with <strong>and</strong> then click on the button to display the<br />
Graphic Overlay Properties page.<br />
2. Click on the Overlay Filename drop down menu to locate <strong>and</strong><br />
select your desired graphic overlay from the <strong>Firefly</strong> Media list.<br />
3. If desired, select a level of transparency between 0 <strong>and</strong> 100%.<br />
This value will adjust to what extent the graphic overlay covers<br />
the video below. If you want the graphic overlay to blend in<br />
with the video, you may select a higher transparency level.<br />
Conversely, if you would like the graphic overlay to st<strong>and</strong> out,<br />
you may select a lower or zero-value transparency level.<br />
4. If desired, adjust the key color. The key color property deals<br />
with blocking out or cropping specified colors within the<br />
graphic overlays. For example, if the image you are using is<br />
your company logo (in color) <strong>and</strong> is placed on top of a white<br />
rectangular background, you may only want to display the<br />
company logo, instead of the logo on top of the white<br />
background.<br />
Within the key color property, there are three options: None,<br />
Auto Key or RGB. You can choose None to not use the key<br />
color option at all. You can choose Auto Key have the system<br />
automatically make transparent the background color. The<br />
system selects the color in the upper left most corner of the<br />
image to determine which color to remove. In most instances,<br />
Auto Key will be the easiest to use <strong>and</strong> most effective “make<br />
transparent” method. Or you can choose to manually set the<br />
RGB (Red, Green <strong>and</strong> Blue) key color level. The RGB option<br />
requires you to know the specific RGB value of the color you<br />
would like to “make transparent”<br />
40
WEBVIEW<br />
Use a solid background (one color) in your graphic overlays<br />
for the Auto key feature to work properly.<br />
Entering your own RGB values for the key color feature only<br />
works with 8 bit bitmap graphics less than or equal to<br />
720x480 resolution.<br />
5. If desired, adjust the rate (in seconds) at which you would like<br />
the graphic overlay to fade in <strong>and</strong>/or out on the screen.<br />
6. If desired, select the position on the screen where you would<br />
like to have the graphic overlay located (example: left bottom).<br />
7. If desired, use the check boxes on the right side of the screen.<br />
The check boxes correspond to each of the graphic overlay<br />
properties. These check boxes can be used to copy the<br />
properties in their associated frames to all of the existing<br />
graphic overlays across all channels in a playlist. For example,<br />
if you would like ensure that all existing graphic overlays for a<br />
given playlist always appear in the lower right corner, then you<br />
would set the screen position attribute to right bottom <strong>and</strong><br />
would check the “Apply to All” box to the right of that frame.<br />
If, for example, you would like to have the same graphic<br />
overlay with all of the same properties applied to all of the<br />
videos in a given playlist, you would check each of the “Apply<br />
to All” boxes to the right of the option frames (Overlay<br />
Filename, Transparency, Key Color, Fade In/Out <strong>and</strong> Position<br />
on Screen).<br />
8. Click the OK button to save your changes <strong>and</strong> to return to the<br />
Playlist Editor screen.<br />
41
WEBVIEW<br />
Adding Scrolling Text to a Playlist<br />
The process for adding scrolling text to a playlist is basically the<br />
same as the process of adding video files. The one significant<br />
difference, however, is that scrolling text is always linked to a<br />
particular video. Where adding a video creates a new line at the<br />
end of the playlist, adding scrolling text attaches the text to the<br />
currently selected video entry in the Video listbox. Therefore, at<br />
least one video must be in the Video listbox before you can add<br />
any text.<br />
The Graphic Overlay & Scrolling Text features cannot be used<br />
simultaneously on a single video file.<br />
Adding Scrolling Text:<br />
1. In the Playlist Editor page, select the video file which you want<br />
to associate the scrolling text with <strong>and</strong> then select the icon.<br />
2. The Scrolling Text properties page will appear as seen in<br />
Figure 11 on page 43.<br />
3. You can type or paste text from another file into the “Scrolling<br />
Text String” window. A maximum of 500 character spaces is<br />
allowed.<br />
4. Select OK, then Play to preview. Once you are satisfied, make<br />
sure to Save your work.<br />
5. Once you are satisfied with the results, select ‘Save’ or ‘Save<br />
As’ another Playlist.<br />
The properties of the scrolling text will be set to the default<br />
settings. If you wish to modify the properties at this point, select<br />
either the video or the scrolling text file <strong>and</strong> then click on the<br />
button to display the Scrolling Text Properties page. You may<br />
make your desired changes in this screen (See Working With<br />
Scrolling Text in a Playlist on page 43 for more details).<br />
Characters & symbols, other than what is currently displayed on most<br />
keyboard key caps, are not supported. Be aware of Word Processing<br />
programs that have the “AutoCorrect” feature enabled.<br />
42
Working With Scrolling Text in a Playlist<br />
WEBVIEW<br />
As previously noted, scrolling text exist in a playlist as attributes of<br />
specific video entries.<br />
Figure 11. Scrolling Text Properties Page<br />
The process for altering the characteristics of a specific text file is<br />
as follows. Select the video you would like the scrolling text to be<br />
associated with <strong>and</strong> then click on the button to display the<br />
Scrolling Text Properties page:<br />
Transparency Level<br />
1. All - If desired, select a level of transparency between 0 <strong>and</strong><br />
100%. This value will adjust to what extent both background<br />
<strong>and</strong> text will “overlay” the video. If you want the background<br />
& text to blend in with the video, you may select a higher<br />
transparency level. Conversely, if you would like them both to<br />
st<strong>and</strong> out, you may select a lower or zero-value transparency<br />
level.<br />
2. Background - The same rules apply here as “All” except only<br />
the background is affected.<br />
43
WEBVIEW<br />
44<br />
3. Reverse - When Reverse is selected to the on position, the Text<br />
assumes the position of Background & visa versa.<br />
Entering your own RGB values for the background feature only works<br />
with 8 bit bitmap graphics less than or equal to 720x480 resolution.<br />
Saving a Playlist<br />
Once you have finished editing a playlist, you may save changes<br />
by clicking either the “Save” or “Save As” buttons at the bottom of<br />
the screen.<br />
❏ Clicking the “Save” button will overwrite the original<br />
playlist file using the same file name.<br />
❏ Clicking the “Save As” button will bring you to a screen<br />
where you will need to enter a new file name (maximum of<br />
14 characters).<br />
Figure 12. Save Playlist Dialog Box<br />
After entering the new file name, click the OK button to save the<br />
modified playlist <strong>and</strong> to return to the Playlist Editor main page.<br />
❏ If you check the “Load this playlist now” check box (found<br />
below the <strong>Firefly</strong> Media list), the modified playlist will<br />
begin playing on the <strong>Firefly</strong> as soon as you save it. If you do<br />
not check this box, the playlist will be saved, but playback<br />
will not be started until the playlist is later selected for<br />
playback.
Playing a Playlist Quickly<br />
WEBVIEW<br />
If you are browsing through your playlists <strong>and</strong> find one you would<br />
like to play right away, simply click the “Play” button, which is<br />
located in the lower right portion of the Playlist Editor screen.<br />
Clicking the “Play” button will overwrite the original playlist file<br />
using the same file name <strong>and</strong> will begin designated playback on the<br />
<strong>Firefly</strong> immediately.<br />
45
WEBVIEW<br />
Using the Schedule Editor<br />
Within the Schedule Editor, there are two separate pages: the<br />
Playlist Events Editor <strong>and</strong> the Video Dates Editor.<br />
Within the Playlist Events Editor you will be able to work with<br />
playback schedules. A schedule is a group of one or more playlist<br />
events. An event is composed of a single playlist with adjustable<br />
playback properties. Beyond simple start <strong>and</strong> stop times, events<br />
can be set to play on certain days of the week, interrupt other<br />
events, play just once or at certain repeating intervals.<br />
The Video Dates Editor allows you to assign a specific start date,<br />
end date or both a start <strong>and</strong> an end date for an individual video.<br />
This is especially useful when you have time sensitive media that<br />
you cannot have played before a certain date, after a certain date or<br />
outside a certain date range.<br />
To access the Schedule Editor, click on the Schedule Editor<br />
navigation button on the left side of the WebView interface. By<br />
default, the Playlist Events Editor will open.<br />
Figure 13. Schedule Editor - Playlist Events Editor Page<br />
46
Creating a New Schedule<br />
WEBVIEW<br />
The process for creating a new schedule may be started in one of<br />
two ways; by choosing “New Schedule” from the Schedule drop<br />
down menu or by clicking on the “New” button in the lower right<br />
corner.<br />
Within the Playlist Events Editor page, you will have to option to:<br />
add an event to a schedule, delete an event from a schedule, or edit<br />
an event within a schedule. In addition, (using the Video Dates<br />
Editor) you will be able to assign date rules to individual videos if<br />
desired.<br />
Each of the major tasks in the Playlist Events Editor involve<br />
adjusting the event property fields. The following table provides<br />
basic overviews <strong>and</strong> examples for each of the event property fields:<br />
Property Description<br />
Playlist<br />
Name<br />
Start Time<br />
Stop Time<br />
Days<br />
Interrupt<br />
Designates which playlist to play.<br />
Example: “I’d like to have my product<br />
demonstration playlist selected to play”.<br />
Designates time to start playing playlist.<br />
Example: “I’d like to have my playlist start playing<br />
at 9:00”.<br />
Designates time to stop playing playlist.<br />
Example: “I’d like to have my playlist stop playing<br />
at 18:00”.<br />
Designates days of week to play playlist.<br />
Example: “I’d like to have my playlist play only on<br />
Thursdays, Fridays <strong>and</strong> Saturdays”.<br />
Option to cut off video playing in previous playlist<br />
instead of waiting for video to finish playing.<br />
Example: “I’d like to have the video in my sales<br />
promotion playlist interrupt the video in my product<br />
demonstration playlist”.<br />
47
WEBVIEW<br />
Table 1. Event Property Field Examples<br />
Adding an Event to a Schedule<br />
To add an event to a schedule:<br />
48<br />
Property Description<br />
Play Once<br />
Interval<br />
Option to play playlist exactly once <strong>and</strong> then<br />
return to previously scheduled playlist.<br />
Example: “I’d like to play my one hour specials<br />
playlist just once during the business day”.<br />
Option to repeat a “play once” event<br />
periodically at a specified interval.<br />
Example: “I’d like to play my one hour specials<br />
playlist once every 2 hours throughout the<br />
business day”.<br />
1. Edit the event properties as described below.<br />
a. Playlist Name: Choose a playlist from the “Select a<br />
Playlist” drop down menu.<br />
b. Start Time: Set the specific start time for the playlist using<br />
the number keys on your keyboard.<br />
c. Stop Time: Set the specific stop time for the playlist using<br />
the number keys on your keyboard.<br />
d. Days: Click on any of the days to display the “Days of the<br />
Week” dialog box.
WEBVIEW<br />
Figure 14. Days of the Week Dialog Box<br />
Click on which days of the week you would like the playlist to play<br />
on. A “checked” box indicates the day is selected <strong>and</strong> an<br />
“unchecked” box indicates the day is not selected. If you would<br />
like to clear all of the day selections, click the Reset button. When<br />
you are done making any desired changes, click the OK button to<br />
return to the Schedule Editor screen.<br />
e. Interrupt: Click on the Interrupt check box to have the first<br />
video in a scheduled playlist start playing precisely at its<br />
schedule time (interrupting or “cutting off” the video<br />
playing in the previously scheduled playlist). This is useful<br />
if you have a time sensitive playlist. A “checked” box<br />
indicates that Interrupt is selected, interrupting the previous<br />
video <strong>and</strong> an “unchecked” box indicates that Interrupt is not<br />
selected, allowing the video to finish playing before the new<br />
playlist begins playing.<br />
f. Play Once: Click on the Play Once check box to choose to<br />
have the playlist played back only once (regardless of its<br />
time allotment). A “checked” box indicates that Play Once<br />
is selected <strong>and</strong> an “unchecked” box indicates that Play Once<br />
is not selected.<br />
g. Interval: Click on the Interval check box to choose to have<br />
a Play Once event played back once at a designated time<br />
interval. Set the interval time using the number keys on your<br />
keyboard.<br />
49
WEBVIEW<br />
50<br />
2. Once you have finished editing the schedule, you may save<br />
your changes by following the instructions found in Saving a<br />
Schedule on page 52.<br />
Deleting an Event from a Schedule<br />
To delete an event from a schedule, use the following steps:<br />
1. Locate the event (under playlist name) you would like to<br />
delete.<br />
2. Change the playlist to “Select a Playlist” from the playlist<br />
name drop down menu. When done, this will delete the<br />
playback event <strong>and</strong> its associated properties from the schedule.<br />
3. Once you have finished editing the schedule, you may save<br />
your changes by following the instructions found in Saving a<br />
Schedule on page 52.<br />
Editing an Event within a Schedule<br />
To edit an event within a schedule, use the following steps:<br />
1. Edit the event properties as described below.<br />
a. Playlist Name: Choose a playlist from the “Select a<br />
Playlist” drop down menu.<br />
b. Start Time: Set the specific start time for the playlist using<br />
the number keys on your keyboard.<br />
c. Stop Time: Set the specific stop time for the playlist using<br />
the number keys on your keyboard.<br />
d. Days: Click on any of the days to display the “Days of the<br />
Week” dialog box.
Figure 15. Days of the Week Dialog Box<br />
WEBVIEW<br />
Click on which days of the week you would like the playlist to play<br />
on. A “checked” box indicates the day is selected <strong>and</strong> an<br />
“unchecked” box indicates the day is not selected. If you would<br />
like to clear all of the day selections, click the Reset button. When<br />
you done making any desired changes, click the OK button to<br />
return to the Schedule Editor screen.<br />
e. Interrupt: Click on the Interrupt check box to have the first<br />
video in a scheduled playlist start playing precisely at its<br />
schedule time (interrupting or “cutting off” the video<br />
playing in the previously scheduled playlist). This is useful<br />
if you have a time sensitive playlist. A “checked” box<br />
indicates that Interrupt is selected, interrupting the previous<br />
video <strong>and</strong> an “unchecked” box indicates that Interrupt is not<br />
selected, allowing the video to finish playing before the new<br />
playlist begins playing.<br />
f. Play Once: Click on the Play Once check box to choose to<br />
have the playlist played back only once (regardless of its<br />
time allotment). A “checked” box indicates that Play Once<br />
is selected <strong>and</strong> an “unchecked” box indicates that Play Once<br />
is not selected.<br />
g. Interval: Click on the Interval check box to choose to have<br />
a Play Once event played back once at a designated time<br />
interval. Set the interval time using the number keys on your<br />
keyboard.<br />
51
WEBVIEW<br />
52<br />
2. Once you have finished editing the schedule, you may save<br />
your changes by following the Saving a Schedule instructions<br />
found below.<br />
Saving a Schedule<br />
Once you have finished editing a schedule, you may save changes<br />
on the <strong>Firefly</strong> by clicking either the “Save” or “Save As” buttons at<br />
the bottom of the screen.<br />
❏ Clicking the “Save” button will overwrite the original<br />
schedule file using the same file name.<br />
❏ Clicking the “Save As” button will bring you to a screen<br />
where you will need to enter a new file name (maximum of<br />
14 characters).<br />
Figure 16. Save Schedule Dialog Box<br />
After entering the new file name, click the OK button to save the<br />
modified schedule <strong>and</strong> to return to the Schedule Editor main page.<br />
❏ If you check the “Load this schedule now” check box<br />
(found above the New button), the modified schedule will<br />
begin playing on the <strong>Firefly</strong> as soon as you save it (if the<br />
active schedule coincides with the current day <strong>and</strong> time). If<br />
you do not check this box, the schedule will be saved, but<br />
playback will not be started until the schedule is later<br />
selected <strong>and</strong> scheduled for playback.
Additional Saving <strong>and</strong> Loading Methods<br />
WEBVIEW<br />
Beyond the st<strong>and</strong>ard saving <strong>and</strong> loading methods directly to <strong>and</strong><br />
from the <strong>Firefly</strong>, there are two local options available to you.<br />
Save Local:<br />
The Save Local option allows you to save a copy of the schedule<br />
file currently being edited to your local computer or network<br />
(examples: hard drive, floppy drive). This is a useful feature for<br />
transferring files to other <strong>Firefly</strong>’s or for backing up important<br />
data.<br />
To perform a local save:<br />
1. Click on the “Save Local” button at the bottom of the Schedule<br />
Editor screen. The following dialog box will appear:<br />
Figure 17. Save Local File Download Dialog Box<br />
2. Select “Save this file to disk” <strong>and</strong> click the “OK” button.<br />
The following Save As dialog box will appear:<br />
53
WEBVIEW<br />
Figure 18. Save As Local Dialog Box<br />
54<br />
3. Type in your desired name for the schedule file <strong>and</strong> click the<br />
“Save” button.<br />
When saving a schedule locally, you must add the schedule file<br />
extension “.fsc” to the end of all file names.<br />
Once saved, you will be returned to the Schedule Editor main<br />
screen.<br />
Load Local:<br />
The Load Local button allows you to load a schedule file from<br />
your local computer or network as opposed to directly from the<br />
<strong>Firefly</strong>. This is a useful feature because your schedule file(s) may<br />
only be available on another computer or removable media.<br />
To perform a local load:<br />
1. Click on the “Load Local” button at the bottom of the Schedule<br />
Editor screen. The following dialog box will appear:
Figure 19. Load Local Browse Dialog Box<br />
2. Click the “Browse” button.<br />
The following Choose File dialog box will appear:<br />
Figure 20. Load Local Save As Dialog Box<br />
WEBVIEW<br />
3. Locate your desired schedule file (.fsc). Once found, highlight<br />
it <strong>and</strong> click the “Open” button.<br />
4. The field will be populated with your desired schedule file<br />
name. If the file appears correct, click the “OK” button.<br />
55
WEBVIEW<br />
You will be returned to the Schedule Editor main screen. The<br />
schedule you just loaded will be open on your screen, ready for<br />
modifications if desired.<br />
Assigning Dates for Video Playback<br />
The Video Dates Editor allows you to designate the actual date(s) a<br />
particular video is allowed to play. By selecting a start date, an end<br />
date or both a start <strong>and</strong> an end date you can establish a “date rule”<br />
for the playback of a particular video.<br />
Figure 21. Schedule Editor - Video Dates Editor Page<br />
56
WEBVIEW<br />
Depending on your application, you may have a need for using any<br />
or all of the three previously mentioned date rules. The table below<br />
provides some “real world” examples for using the Video Dates<br />
Editor.<br />
Start<br />
Date<br />
Stop<br />
Date Description<br />
02/01/03 - -/- -/- - Start date with no stop date.<br />
Example: “I want my product demonstration video<br />
available to playlists the day the product is<br />
released, but no sooner than that”.<br />
- -/- -/- - 05/31/03 No start date with stop date.<br />
Example: “I want my new marketing campaign<br />
video available to playlists from now until the end<br />
of the spring months”.<br />
01/01/03 01/31/03 Both start date <strong>and</strong> stop date.<br />
Example: “I’ want my January promotions video<br />
available to playlists only during the month of<br />
January”.<br />
Table 2. Video Date Rule Examples<br />
To add a date rule for a video, use the following steps:<br />
1. (From the Schedule Editor main screen) Select the Video Dates<br />
Editor from the drop down menu. The Video Dates Editor<br />
screen will be displayed.<br />
2. From the “Select a video” drop down menu, select the video<br />
you would like to assign a date rule to.<br />
3. If desired, set the specific start date for the video using the<br />
number keys on your keyboard.<br />
4. If desired, set the specific stop date for the video using the<br />
number keys on your keyboard.<br />
5. Repeat steps 2 through 4 to add date rules to additional videos<br />
if desired.<br />
6. Once you have finished adding date rules, you may save your<br />
changes by following the instructions found in Saving a<br />
Schedule on page 52.<br />
57
WEBVIEW<br />
To delete a date rule for a video, use the following steps:<br />
1. (From the Schedule Editor main screen) Select the Video Dates<br />
Editor from the drop down menu. The Video Dates Editor<br />
screen will be displayed.<br />
2. Locate the video (under Video Name) you would like to delete<br />
the date rule for.<br />
3. Change the video to “Select a Video” from the Video Name<br />
drop down menu. When done, it will delete any previous video<br />
date rule.<br />
4. Repeat steps 2 <strong>and</strong> 3 to delete date rules for additional videos if<br />
desired.<br />
5. Once you have finished deleting date rules, you may save your<br />
changes by following the instructions found in Saving a<br />
Schedule on page 52.<br />
To edit a date rule for a video, use the following steps:<br />
58<br />
1. (From the Schedule Editor main screen) Select the Video Dates<br />
Editor from the drop down menu. The Video Dates Editor<br />
screen will be displayed.<br />
2. From the “Select a video” drop down menu, select the video<br />
you would like to assign or modify a date rule to.<br />
3. If desired, set or modify the specific start date for the video<br />
using the number keys on your keyboard.<br />
4. If desired, set or modify the specific stop date for the video<br />
using the number keys on your keyboard.<br />
5. Repeat steps 2 through 4 to edit date rules for additional videos<br />
if desired.<br />
6. Once you have finished editing date rules, you may save your<br />
changes by following the instructions found in Saving a<br />
Schedule on page 52.<br />
Exiting the Schedule Editor<br />
At any point while you are working within the Schedule Editor you<br />
may exit by clicking on any of the menu navigation buttons on the<br />
left side of the screen. Any unsaved changes you have made will<br />
be lost.
Using the Player Control Panel<br />
WEBVIEW<br />
The Player Control panel mirrors the basic functionality of the<br />
<strong>Firefly</strong> remote control. You will be able to Play, Pause <strong>and</strong> Stop<br />
the currently playing file (displayed on the output window). In<br />
addition, you will be able to skip to the Previous <strong>and</strong> Next video in<br />
a playlist using the respective Previous <strong>and</strong> Next buttons.<br />
Figure 22. Player Control Panel<br />
In addition to using the st<strong>and</strong>ard player controls, the Display<br />
Position checkboxes allow you to display the position bar. The<br />
Display Position indicator shows the current playback position<br />
within the file.<br />
59
WEBVIEW<br />
Diagnostics<br />
The Diagnostics pages display a number of statistics about what<br />
the <strong>Firefly</strong> is doing at a fairly technical level. The information<br />
found within these pages can serve as a tool to help the Visual<br />
Circuits technical support team work with you over the phone in<br />
the event that you are experiencing problems.<br />
The Diagnostics pages provide a snapshot of the system status at the<br />
time the pages were entered. The pages do not automatically update the<br />
information unless you click on the “Enable Auto Refresh” button.<br />
The Diagnostics pages contains four types of information: General,<br />
Video, Playback <strong>and</strong> Advanced.<br />
By default, when you click on the Diagnostics navigation button<br />
you will be routed to the <strong>Firefly</strong> Diagnostics - General page.<br />
Within this page you will find basic information about the <strong>Firefly</strong><br />
<strong>and</strong> the media being played on it.<br />
60
Figure 23. Diagnostics - General Page<br />
Diagnostics - General<br />
WEBVIEW<br />
Player version:Displays the version of the <strong>Firefly</strong> (incorporating<br />
both hardware <strong>and</strong> software).<br />
Currently loaded schedule:Displays the file name of the currently<br />
loaded schedule (if applicable) on the system.<br />
Currently loaded playlist:Displays the file name of the currently<br />
loaded playlist on the system.<br />
Video loaded:Displays the file name of the currently loaded video.<br />
Last FTP Update:Displays the date <strong>and</strong> time of the last FTP<br />
update.<br />
Last FTP Connect:Displays the date <strong>and</strong> time of the last FTP<br />
connect.<br />
Watchdog Restarts:Displays the number of times the Watchdog<br />
system has restarted the <strong>Firefly</strong>.<br />
System Starts:Displays the number of times the <strong>Firefly</strong> has been<br />
started.<br />
61
WEBVIEW<br />
Figure 24. Diagnostics - Video Page<br />
Diagnostics - Video<br />
Horizontal Size:Defines the horizontal resolution of the currently<br />
playing MPEG file in pixels.<br />
Vertical Size:Defines the vertical resolution of the currently<br />
playing MPEG file in pixels.<br />
Video Bitrate:Defines the Video Bitrate or data rate of the<br />
currently playing MPEG file.<br />
Audio Bitrate:Defines the Audio Bitrate or data rate of the<br />
currently playing MPEG file.<br />
Audio Frequency:Defines the frequency of the Audio stream.<br />
Frame Rate:Defines the frame rate of the currently playing MPEG<br />
file. The st<strong>and</strong>ard NT<strong>SC</strong> frame rate of 29.97 fps is shown as 2997.<br />
Current Frame:Displays the current frame number playing within<br />
the MPEG file (analogous to the timecode field but with a greater<br />
level of accuracy).<br />
62
WEBVIEW<br />
Timecode:Displays the current timecode within the playing MPEG<br />
file offset so that all files start at 00:00:00.<br />
File Type:Displays the type of MPEG file being played on the<br />
channel. The possible types are: mpeg1 - mpeg1 system stream,<br />
mpeg2 - program stream, mpg1v - mpeg1 video only, mpg2v -<br />
mpeg2 video only, mpg1a - audio only, ac3 - ac3 audio only, ??? -<br />
unknown type or no file loaded.<br />
63
WEBVIEW<br />
Figure 25. Diagnostics - Playback Page<br />
Diagnostics - Playback<br />
Interrupts:Displays the number of interrupts that have been<br />
received from the MPEG decoder.<br />
AV Syncs:Displays the number of times the audio or video streams<br />
had to be adjusted to maintain proper synchronization. (It is not<br />
uncommon for this to be a high number as this is a running total.<br />
Many functions such as fast forward, rewind <strong>and</strong> seek can cause<br />
large numbers of av syncs. It is only of concern if you see this<br />
number growing quickly during routine playback).<br />
Last Sync:Displays the number of frames that had to be skipped or<br />
repeated during the last av sync to bring the audio <strong>and</strong> video back<br />
into proper synchronization.<br />
Video Data:Displays the amount of data currently in the MPEG<br />
decoder’s video data buffer.<br />
64
WEBVIEW<br />
Audio Data:Displays the amount of data currently in the MPEG<br />
decoder’s audio data buffer.<br />
Raw Data: Bytes of MPEG data in RAM.<br />
Disk Underflow:Displays the number of disk underflows that have<br />
occurred. A disk underflow occurs when the <strong>Firefly</strong> is unable to<br />
get the data off the disk fast enough to keep the disk buffers from<br />
becoming empty.<br />
Data Underflow:Displays the number of data underflows that<br />
have occurred. A data underflow occurs when the <strong>Firefly</strong> is unable<br />
to transfer data into the MPEG decoder buffers fast enough to keep<br />
them from becoming empty. Note that during regular playback<br />
conditions it is normal to have a small number of Data Underflows<br />
in this field<br />
Diagnostics - Logging<br />
At the top of the Logging page, from the “Select Logfile” drop<br />
down menu, you can select the log file you would like to view.<br />
The two buttons located at the bottom of the Logging page,<br />
“Refresh” <strong>and</strong> “Auto Refresh”, allow you to manually refresh or<br />
have the system automatically refresh the logfile data as you view<br />
it.<br />
Refer to Log File Reporting on page 115 for information on setting<br />
up how your <strong>Firefly</strong> works with logfiles.<br />
Run Logs<br />
Run logs provide a record of which videos played (with which<br />
graphic overlays, if applicable), on which channels, starting at<br />
what dates/times, playing back what percentage of the video <strong>and</strong><br />
for how long.<br />
65
WEBVIEW<br />
Figure 26. Diagnostics - Logging Page (Run log)<br />
Once in the Run logfile viewer, the video playback data will be<br />
listed with one video per line <strong>and</strong> will be sorted by playback time<br />
(using <strong>Firefly</strong>’s internal 24-hour clock). You may move to the<br />
previous or next pages by clicking on the respective links. You can also move to view the playback data for a<br />
certain time of day by entering either hours, minutes <strong>and</strong>/or<br />
seconds in the time boxes <strong>and</strong> then clicking the “Go” button.<br />
Time:Displays the time of day the event was logged based on<br />
<strong>Firefly</strong>’s internal 24-hour clock.<br />
Filename:Displays the filename of the video.<br />
Overlay:Displays the filename of the graphic overlay that was<br />
associated with the video (if present).<br />
Duration:Displays the total amount of time (HH: MM: SS) that a<br />
video played.<br />
%:Displays the percentage played of the video.<br />
66
Diagnostic Logs<br />
WEBVIEW<br />
Diagnostic logs can be used to view a record of all media update<br />
transactions <strong>and</strong> any system errors on a <strong>Firefly</strong>.<br />
Information contained in the diagnostic log include:<br />
❏ FTP/DVD Updating data: Tracks date, time of connection/<br />
disconnection, errors- yes/no, files, sizes, percent<br />
transferred <strong>and</strong> FTP permission errors.<br />
❏ Storage Cleanup data: Records what media have been<br />
deleted by the automatic storage cleanup routine, including<br />
file names, sizes <strong>and</strong> dates.<br />
❏ Missing Elements Log: Records all missing media<br />
referenced by an active playlist or schedule, including date,<br />
time <strong>and</strong> file element.<br />
❏ Error Summary data: Records important user player<br />
diagnostic information, including the number of system<br />
restarts, number of watchdog restarts, the player version,<br />
etc.<br />
❏ Serial Comm<strong>and</strong>s: Records most incoming <strong>and</strong> outgoing<br />
external control comm<strong>and</strong>s.<br />
67
WEBVIEW<br />
Figure 27. Diagnostics - Logging Page (Diagnostic log)<br />
Once in the Diagnostic logfile viewer, the data will be listed with<br />
one diagnostic event per line <strong>and</strong> will be sorted by playback time<br />
(using <strong>Firefly</strong>’s internal 24-hour clock). You may move to the<br />
previous or next pages by clicking on the respective links. You can also move to view the diagnostic data for a<br />
certain time of day by entering either hours, minutes <strong>and</strong>/or<br />
seconds in the time boxes <strong>and</strong> then clicking the “Go” button.<br />
Time:Displays the time of day the event was logged based on<br />
<strong>Firefly</strong>’s internal 24-hour clock.<br />
Source:Displays the source of the diagnostic event (playback,<br />
multicast, system, etc.).<br />
Event:Displays the diagnostic event.<br />
68
System Settings<br />
Within the System Settings menu, the following options are<br />
available:<br />
General Settings<br />
Figure 28. Settings-General<br />
WEBVIEW<br />
When a field is edited in any one of the following Settings<br />
Categories, the text for that category will turn red until you update<br />
the settings.<br />
Site ID<br />
The Site ID uniquely identifies the <strong>Firefly</strong> as it updates via FTP. It<br />
is also used for Media Messenger software to enable automated<br />
management of content, playlists & schedule updates.<br />
Date/Time<br />
Sets the <strong>Firefly</strong> internal clock for date <strong>and</strong> time.<br />
69
WEBVIEW<br />
Time Zone<br />
Allows you to select the appropriate time zone (measured in hours<br />
<strong>and</strong> minutes plus or minus Greenwich Mean Time) for where the<br />
<strong>Firefly</strong> is being used.<br />
Version<br />
This is where to reference the software version for technical<br />
support purposes or verifying version change following a<br />
“software update”.<br />
Uptime<br />
This value indicates how long the unit has been in operation since<br />
the last power cycle.<br />
70
Video Settings<br />
Figure 29. Settings-Video<br />
Channel 1 Video<br />
Selects the st<strong>and</strong>ard for video output:<br />
❏ NT<strong>SC</strong> (USA)<br />
❏ PAL (European)<br />
❏ 480p<br />
❏ 576p<br />
❏ 720p<br />
❏ 1080i<br />
❏ NT<strong>SC</strong> Cropped<br />
❏ PAL Cropped<br />
WEBVIEW<br />
Interleave Mode<br />
When change frame size, select whether to use interleaving or not<br />
<strong>and</strong> the type.<br />
❏ None<br />
❏ Interleave<br />
71
WEBVIEW<br />
72<br />
❏ Bob (Bob <strong>and</strong> Weave)<br />
Display Mode<br />
❏ 720 x 480<br />
❏ 720 x 560<br />
❏ 640 x 480<br />
❏ 800 x 600<br />
❏ 840 x 480<br />
❏ 1024 x 768<br />
❏ 1024 x 852<br />
Channel 1 Video Out<br />
Selects the type of video output: Composite/S-video or<br />
Component. Composite <strong>and</strong> S-Video signals can be used<br />
simultaneously.
Audio Settings<br />
Figure 30. Settings-Audio<br />
Volume<br />
WEBVIEW<br />
This setting allows you to set the volume level for audio played<br />
back on the <strong>Firefly</strong>. The default volume setting is 10 on the 0-20<br />
scale.<br />
Audio Output<br />
<strong>Firefly</strong> gives you several audio output options depending on the<br />
configuration you use (see Table 3 on page 74). St<strong>and</strong>ard MPEG<br />
layer-2 files will output from both the digital <strong>and</strong> stereo analog<br />
outputs. Dolby Digital (AC3) files will output from the digital<br />
outputs only. However, by upgrading your unit/s. you can “mix<br />
down” AC3 files to the stereo analog outputs. If your application<br />
requires a 2-channel (stereo) mix of AC3, please contact a Visual<br />
Circuits representative for more information.<br />
73
WEBVIEW<br />
Config MPEG Audio Type<br />
Table 3. <strong>Firefly</strong> Audio Configurations<br />
<strong>Firefly</strong> Dolby Digital D/A decoding is only available when using the<br />
optional Dolby Digital Software Upgrade (config #4).<br />
74<br />
1<br />
2<br />
3<br />
4<br />
MPEG Layer 2<br />
Stereo Audio<br />
MPEG Layer 2<br />
Stereo Audio<br />
Dolby Digital Audio<br />
(AC3)<br />
Dolby Digital Audio<br />
(AC3)<br />
<strong>Firefly</strong> Audio Configurations<br />
<strong>Firefly</strong> Audio<br />
Setting:<br />
Digital<br />
Output<br />
Stereo Analog<br />
Output?<br />
Dolby Digital S/PDIF Yes<br />
Stereo PCM S/PDIF Yes<br />
Dolby Digital<br />
Stereo PCM (w/opt<br />
Upgrade)<br />
S/PDIF (Dolby<br />
Digital)<br />
No<br />
S/PDIF Stereo Yes (Decoded)
Control Settings<br />
Figure 31. Settings-Control<br />
Accept TCP/IP<br />
WEBVIEW<br />
In conjunction with RS232 serial communication, TCP/IP allows<br />
the user to remotely operate the <strong>Firefly</strong> by sending operation<br />
comm<strong>and</strong>s through a network or locally using an external PC or<br />
show controller (see External Control Comm<strong>and</strong>s on page 119).<br />
WARNING<br />
For security reasons, “Accept TCP/IP” is factory defaulted to “No”.<br />
Be aware that if you decide to use this feature over a large network<br />
(namely the Internet), the potential for outside intervention<br />
(hacking) is greatly increased because there is literally no security<br />
(protection) on this port. Enabling this option will open port 2180.<br />
Accept UDP<br />
Select to use <strong>User</strong> Datagram Protocol (UDP).<br />
75
WEBVIEW<br />
Auto Play<br />
Upon initial start up, <strong>Firefly</strong> will begin playing the latest loaded<br />
playlist/schedule automatically. Following start up, if you choose<br />
to begin playback manually via External comm<strong>and</strong>s, you can<br />
default this option to “Off” to deactivate automatic playback.<br />
Baud Rate<br />
Select an identical value to your external controller. The following<br />
options are available: 1200, 4800, 9600, 38400 & 115200. It is<br />
recommended starting with a Baud Rate of 9600 for your Hyper<br />
Terminal connection.<br />
Data Bits<br />
Select an identical value to your external controller. The following<br />
options are available: 5, 6, 7, & 8.<br />
Parity<br />
Select an identical value to your external controller. The following<br />
options are available: None, Odd & Even.<br />
76
Network Settings<br />
Figure 32. Settings-Network<br />
Host Name<br />
Choose a unique name that identifies each <strong>Firefly</strong> unit on the<br />
network.<br />
WEBVIEW<br />
77
WEBVIEW<br />
Mode<br />
DHCP (Dynamic Host Configuration Protocol) - A TCP/IP service<br />
protocol that offers dynamic leased configuration of host IP<br />
addresses <strong>and</strong> distributes other configuration parameters to eligible<br />
network clients. DHCP provides safe, reliable, <strong>and</strong> simple TCP/IP<br />
network configuration, prevents address conflicts, <strong>and</strong> helps<br />
conserve the use of client IP addresses on the network. DHCP uses<br />
a client/server model where the DHCP server maintains centralized<br />
management of IP addresses that are used on the network. DHCPsupporting<br />
clients can then request <strong>and</strong> obtain lease of an IP<br />
address from a DHCP server as part of their network start up<br />
process. See your Network Administrator for further information.<br />
STATIC -For a local area connection (LAN), in IP address, Subnet<br />
mask, <strong>and</strong> Default gateway, type the IP address, subnet mask, <strong>and</strong><br />
default gateway addresses. For all other connections, in IP address,<br />
type the IP address. See your Network Administrator for further<br />
information.<br />
IP Address<br />
A 32-bit address used to identify a node on an IP internetwork.<br />
Each node on the IP internetwork must be assigned a unique IP<br />
address, which is made up of a network identifier <strong>and</strong> a host<br />
identifier. This address is typically represented in dotted-decimal<br />
notation, with the decimal value of each octet separated by a<br />
period, for example, 192.168.7.27.<br />
You can configure the IP address statically or dynamically through<br />
DHCP. See your Network Administrator for further information.<br />
78
Netmask<br />
Specify a range that falls on subnet boundaries.<br />
WEBVIEW<br />
Most TCP/IP networks use subnets in order to manage routed IP<br />
addresses. For the range specified in From <strong>and</strong> To, Windows 2000<br />
calculates the closest matching subnet. The range of addresses in<br />
the closest matching subnet may exceed the range specified.<br />
Unless the addresses specified in From <strong>and</strong> To are subnet<br />
boundaries, the range based on the calculated subnet will be larger<br />
than the range specified. To avoid this, specify a range that falls on<br />
subnet boundaries, For example, if you are using the 10.0.0.0<br />
private network ID for your intranet, a range that falls on subnet<br />
boundaries is 10.0.1.168 to 10.0.1.175. Or, if you are using the<br />
192.168.0.0 private network ID for your intranet, a range that falls<br />
on subnet boundaries is 192.168.1.0 to 192.168.1.255. See your<br />
Network Administrator for further information.<br />
Gateway<br />
A service that allows <strong>Firefly</strong> to connect to other servers. Creating a<br />
gateway also allows client computers running only Microsoft client<br />
software to access server resources through the gateway. See your<br />
Network Administrator for further information.<br />
Nameserver<br />
The IP address for the server, local or ISP, that h<strong>and</strong>les URL name<br />
resolution for the network. Contact you system administrator for<br />
this information.<br />
FTP Proxy Type<br />
Select the type of FTP proxy best suited for application, i.e. None,<br />
Socks4, Socks5, USER usr@hst p, USER usr@hst:p, SITE<br />
usr@hst p, SITE usr@hst:p, NetCache or NAT Firewall.<br />
Note: The NAT Firewall setting will put the FTP client in passive<br />
mode.<br />
79
WEBVIEW<br />
FTP Proxy IP<br />
Enter the address for the proxy, in IP format.<br />
FTP Proxy Port<br />
The number of the port to be used to access the FTP proxy server.<br />
Contact you system administrator for this information.<br />
HTTP Proxy Type<br />
Select the type of HTTP proxy best suited for application.<br />
HTTP Proxy IP<br />
Enter the address for the proxy, in IP format.<br />
HTTP Proxy Port<br />
The number of the port to be used to access the HTTP proxy<br />
server. Contact you system administrator for this information.<br />
NTP Server<br />
The IP address of the NTP server the <strong>Firefly</strong> will time-sync with<br />
on the network.<br />
Enable SNMP (Simple Network Management Protocol)<br />
Allows you to enable or disable the SNMP feature. SNMP can be<br />
used to monitor the <strong>Firefly</strong> on your network. You can also retrieve<br />
<strong>and</strong> change settings on the <strong>Firefly</strong> in addition to monitoring the<br />
unit by using the <strong>Firefly</strong> MIB file.<br />
SNMP Network<br />
Designates the IP address of the system(s) you wish to be able to<br />
monitor <strong>and</strong> change settings on the <strong>Firefly</strong>. Notation must be<br />
dotted-decimal as with all IP settings on the <strong>Firefly</strong>. To allow an<br />
individual machine to control the <strong>Firefly</strong>, set to a specific IP<br />
address, (Ex. 1- 192.168.0.100). To allow a group of machines to<br />
control the <strong>Firefly</strong>, set the IP to a range, (Ex. 2 - 192.168.0.0).<br />
80
SNMP Netmask<br />
WEBVIEW<br />
Designates the Netmask information for the system(s) that will be<br />
able to monitor <strong>and</strong> control the <strong>Firefly</strong>. So for the individual<br />
example above you would set, (Ex. 1- 255.255.255.255) <strong>and</strong> for<br />
the range example above (Ex. 2- 255.255.255.0).<br />
Community<br />
The SNMP Community name defines the relationship between an<br />
SNMP server system (your <strong>Firefly</strong>) <strong>and</strong> the client systems. This<br />
acts like a password to control the clients’ access to the <strong>Firefly</strong>.<br />
Security Name<br />
SNMPv3 feature: Defines the security name for the authentication<br />
<strong>and</strong> encryption for SNMP transmissions.<br />
Auth Passphrase<br />
SNMPv3 feature: Provides authentication but no encryption on<br />
SNMP information.<br />
Priv Passphrase<br />
SNMPv3 feature: Provides authentication <strong>and</strong> encryption on<br />
SNMP information.<br />
81
WEBVIEW<br />
Logging Settings<br />
Figure 33. Settings-Logging<br />
Run Log<br />
Allows you turn to “On” or “Off” the run log. The run log provides<br />
a record of which videos played (with which graphic overlays, if<br />
applicable), starting at what dates/times, playing back what<br />
percentage of the video <strong>and</strong> for how long.<br />
Diagnostic Log<br />
Allows you to turn “On” or “Off” the diagnostic log. The<br />
diagnostic log can be used to view a record of all media update<br />
transactions <strong>and</strong> any system errors on a <strong>Firefly</strong>.<br />
Information contained in the diagnostic log include:<br />
❏ FTP/DVD Updating data: Tracks date, time of connection/<br />
disconnection, errors- yes/no, files, sizes, percent<br />
transferred <strong>and</strong> FTP permission errors.<br />
82
WEBVIEW<br />
❏ Storage Cleanup data: Records what media have been<br />
deleted by the automatic storage cleanup routine, including<br />
file names, sizes <strong>and</strong> dates.<br />
❏ Missing Elements Log: Records all missing media<br />
referenced by an active playlist or schedule, including date,<br />
time <strong>and</strong> file element.<br />
❏ Error Summary data: Records important user player<br />
diagnostic information, including the number of system<br />
restarts, number of watchdog restarts, the player version,<br />
etc.<br />
❏ Serial Comm<strong>and</strong>s: Records most incoming <strong>and</strong> outgoing<br />
external control comm<strong>and</strong>s.<br />
Log Format<br />
Allows you to set the output format of the run log file to<br />
either.CSV or.XML.<br />
Sample from a .CSV format run log:<br />
12-07-02 20:30:07,1,05saturn.mpg,3_ser220.BMP,1,00:01:01,100<br />
Sample from a .XML format run log:<br />
<br />
The format of the diagnostic log is in a simple “time - event” per<br />
line format.<br />
Log Default Playlist<br />
Allows you to designate whether or not the default playlist<br />
playback is included in the playback log file data. Choosing “Yes”<br />
includes the default playlist in the playback data. Conversely,<br />
choosing “No” excludes the default playlist from the log file data.<br />
If you are not using the scheduling feature (single playlist mode),<br />
note that the playlist will not be logged.<br />
83
WEBVIEW<br />
Max Log MBs<br />
Allows you to set a value (in megabytes) for the maximum size a<br />
log file is able to reach. The default value is 10 MB. You may want<br />
to keep this value relatively small if you wish to maintain a large<br />
amount of free space for videos <strong>and</strong> graphic overlays. However, if<br />
you do not reserve enough space, <strong>Firefly</strong> will delete the oldest<br />
residing logs in order to make room for the new ones.<br />
When the log files exceed the maximum amount of defined storage<br />
space, an automatic cleanup process will delete the oldest file as<br />
required to contain the total log file space under the set limits. In<br />
addition, files will be deleted (cut) after they are transferred to the<br />
FTP server or downloaded from the <strong>Firefly</strong> player.<br />
Upload Logs<br />
Allows “Yes” or “No” choice for uploading log files to the<br />
“logfiles” directory on your FTP server.<br />
If you choose “Yes” to have the log files uploaded, you may<br />
download the log files to your choice of storage options, such as a<br />
database you have designated for <strong>Firefly</strong> media playback data,<br />
from your FTP server.<br />
After log files have been successfully uploaded to your FTP server, they<br />
will be deleted from the <strong>Firefly</strong>.<br />
84
WebView Settings<br />
Figure 34. Settings-Logging<br />
WebView Enable<br />
WEBVIEW<br />
This feature gives the user access to <strong>Firefly</strong> over a network using a<br />
conventional web browser (see WebView on page 23).<br />
File Access<br />
Enable/Disable - Accesses the <strong>Firefly</strong> directly with an FTP client.<br />
<strong>User</strong>name<br />
Enter at least 6 (but no more than 15) alphanumeric characters<br />
here. This field is case sensitive.<br />
The user name <strong>and</strong> password are used for both WebView <strong>and</strong> the FTP<br />
server.<br />
85
WEBVIEW<br />
Password<br />
Enter at least 6 (but no more than 15) alphanumeric characters.<br />
This field is case sensitive.<br />
86<br />
WARNING<br />
It is strongly recommended to change the user name <strong>and</strong> password<br />
from their original default values for system security.
FTP Auto-Update Settings<br />
Figure 35. FTP Auto-Update Settings Screen<br />
FTP IP Address<br />
Enter the FTP server IP Address here.<br />
FTP Port<br />
WEBVIEW<br />
Allows you to enter the port for the FTP server. If left blank during<br />
an update, this field will continue to show a blank value, <strong>and</strong> FTP<br />
will use port 21. Once you enter a value for the port <strong>and</strong> save, your<br />
new value will populate this field.<br />
<strong>User</strong>name<br />
Enter the FTP server username here. Leave this blank if no<br />
username is present.<br />
Password<br />
Enter the FTP server password name here. Leave this blank if no<br />
user password is present.<br />
87
WEBVIEW<br />
Directory<br />
It is advised that you leave this blank <strong>and</strong> use the home directory of<br />
your FTP account to place your media, playlists, schedules <strong>and</strong>/or<br />
updates folders. In the case where you are using multiple <strong>Firefly</strong>’s<br />
with different content for each unit, single <strong>and</strong> or multiple<br />
directories can come in h<strong>and</strong>y.<br />
Update Interval<br />
Allows you to schedule FTP updates every 30 minutes, 1, 2, 4 or<br />
12 hours, 1 day or at a fixed time.<br />
Fixed Update Time<br />
Allows you to set an actual fixed time (on an hourly basis) for an<br />
FTP update (Example: 14:00). In order for this feature to be<br />
accessible, you must have the Update Interval set to “Use fixed<br />
time”.<br />
Delete Content<br />
FTP Update Now<br />
<strong>Firefly</strong> will immediately download any new media, playlists,<br />
schedules <strong>and</strong>/or updates.<br />
88
HTTP Auto-Update Settings<br />
Figure 36. Settings-HTTP Auto Update<br />
HTTP Address<br />
Enter the HTTP server IP Address here.<br />
HTTP Port<br />
WEBVIEW<br />
Allows you to enter the port for the HTTP server. If left blank<br />
during an update, this field will continue to show a blank value,<br />
<strong>and</strong> HTTP will use port 80. Once you enter a value for the port <strong>and</strong><br />
save, your new value will populate this field.<br />
HTTP Directory<br />
It is advised that you leave this blank <strong>and</strong> use the home directory of<br />
your HTTP account to place your media, playlists, schedules <strong>and</strong><br />
or updates folders. In the case where you are using multiple<br />
directories can come in h<strong>and</strong>y.<br />
89
WEBVIEW<br />
Update Interval<br />
Allows you to schedule HTTP updates every 30 minutes, 1, 2, 4 or<br />
12 hours, 1 day or at a fixed time.<br />
Fixed Update Time<br />
Allows you to set an actual fixed time (on an hourly basis) for an<br />
HTTP update (Example: 14:00). In order for this feature to be<br />
accessible, you must have the Update Interval set to “Use fixed<br />
time”.<br />
HTTP Update Now Button<br />
By pressing this button in Webview will initiate the <strong>Firefly</strong> to<br />
immediately download any new media, playlists, schedules <strong>and</strong> or<br />
updates.<br />
90
USB Devices<br />
Figure 37. Settings-USB Devices<br />
WEBVIEW<br />
91
WEBVIEW<br />
USB Devices Settings<br />
Figure 38. Settings-USB Modem<br />
Enable Dialup<br />
If dialup is required.<br />
Phone Number<br />
<strong>User</strong>name<br />
Enter the USB server username here. Leave this blank if no<br />
username is present.<br />
Password<br />
Enter the password required for access to the USB server.<br />
Nameserver<br />
The IP address for the server, local or ISP, that h<strong>and</strong>les URL name<br />
resolution for the network. Contact you system administrator for<br />
this information.<br />
92
Gateway<br />
WEBVIEW<br />
A service that allows <strong>Firefly</strong> to connect to other servers. Creating a<br />
gateway also allows client computers running only Microsoft client<br />
software to access server resources through the gateway. See your<br />
Network Administrator for further information.<br />
Connect Type<br />
❏ Disabled<br />
❏ On Dem<strong>and</strong><br />
❏ Use Fixed Time<br />
Connect Time<br />
93
WEBVIEW<br />
USB Network Settings<br />
Figure 39. Settings USB Network<br />
Mode<br />
Type of network being accessed: Dynamic or Static.<br />
IP Address<br />
A 32-bit address used to identify a node on an IP internetwork.<br />
Each node on the IP internetwork must be assigned a unique IP<br />
address, which is made up of a network identifier <strong>and</strong> a host<br />
identifier. This address is typically represented in dotted-decimal<br />
notation, with the decimal value of each octet separated by a<br />
period, for example, 192.168.7.27.<br />
You can configure the IP address statically or dynamically through<br />
DHCP. See your Network Administrator for further information.<br />
Netmask<br />
Specify a range that falls on subnet boundaries.<br />
94
WEBVIEW<br />
Most TCP/IP networks use subnets in order to manage routed IP<br />
addresses. For the range specified in From <strong>and</strong> To, Windows 2000<br />
calculates the closest matching subnet. The range of addresses in<br />
the closest matching subnet may exceed the range specified.<br />
Unless the addresses specified in From <strong>and</strong> To are subnet<br />
boundaries, the range based on the calculated subnet will be larger<br />
than the range specified. To avoid this, specify a range that falls on<br />
subnet boundaries, For example, if you are using the 10.0.0.0<br />
private network ID for your intranet, a range that falls on subnet<br />
boundaries is 10.0.1.168 to 10.0.1.175. Or, if you are using the<br />
192.168.0.0 private network ID for your intranet, a range that falls<br />
on subnet boundaries is 192.168.1.0 to 192.168.1.255. See your<br />
Network Administrator for further information.<br />
Gateway<br />
A service that allows <strong>Firefly</strong> to connect to other servers. Creating a<br />
gateway also allows client computers running only Microsoft client<br />
software to access server resources through the gateway. See your<br />
Network Administrator for further information.<br />
Nameserver<br />
The IP address for the server, local or ISP, that h<strong>and</strong>les URL name<br />
resolution for the network. Contact you system administrator for<br />
this information.<br />
95
WEBVIEW<br />
Multicast<br />
Figure 40. Settings-Multicast<br />
96<br />
Multicasting is an optional feature enabled by a software upgrade.<br />
If your <strong>Firefly</strong> does not have the optional Multicasting feature (menu items<br />
are “grayed out”) <strong>and</strong> your application requires it, contact a Visual Circuits<br />
representative at 1-800-250-5533.<br />
Client<br />
Select the name of the content provider.<br />
Client Enable<br />
Allows option to enable or disable the multicast client.<br />
Note that if you make changes to other Multicast settings, you<br />
must also toggle the Client Enable setting from “Disabled” to<br />
“Enabled” for the changes to apply.<br />
For more information on multicasting, see Multicast Updating on<br />
page 108.
Channel<br />
WEBVIEW<br />
Like presets, you can assign a Channel number for each “Listen”<br />
configuration. This allows you to easily recall up to 99 Channels<br />
of Listen Address & Port combinations.<br />
Listen Address<br />
The IP address that the multicast client will listen on. The value<br />
must be a Class D multicast address, which will typical start with<br />
224.xxx.xxx.xxx.<br />
Because some addresses may be reserved (see below), consult your<br />
networking specialist for assistance.<br />
- 224.0.0.0/24 is reserved by RFC.<br />
- 224.0.1.0/24 is used by specific applications (NTP).<br />
Listen Port<br />
The port address that the multicast client will listen on.<br />
Transfer Order<br />
Allows the option to choose the order in which items are<br />
transferred: package mode (see page 109 for details) or script last<br />
mode (see page 110 details).<br />
Multicasting is an optional feature enabled by a software upgrade.<br />
If your <strong>Firefly</strong> does not have the Multicasting feature (menu items are<br />
“grayed out”) <strong>and</strong> you would like to purchase it, contact a Visual Circuits<br />
representative at 1-800-250-5533.<br />
97
WEBVIEW<br />
Reserves MBs<br />
Allows you to allocate a fixed amount of <strong>Firefly</strong>’s internal storage<br />
space for receiving a multicast update. To determine this value,<br />
you will need to estimate the largest multicast update you will ever<br />
receive (example: 1000 MBs). Then, double that amount (example:<br />
1000 MBs x 2 = 2000 MBs) to allow room for both the<br />
compressed archive <strong>and</strong> the extraction process. Once you have<br />
determined this value, enter it for the Reserve MBs.<br />
Delete Channel<br />
Quickly defaults back to blank “Listen” fields for the chosen<br />
deleted Channel.<br />
98
Advanced Settings<br />
Figure 41. Settings-Advanced<br />
Audio/Video Sync<br />
WEBVIEW<br />
Turns audio/video synchronization on <strong>and</strong> off. Turning the audio to<br />
video synchronization or “lip sync” off, sometimes eliminates<br />
stuttering video playback. This may however result in poor audio<br />
to video synchronization. Consult with a Visual Circuits<br />
representative if the problem continues.<br />
Merge Playlists<br />
The behavior of the “Merge Playlists” feature depends upon which<br />
mode you are in (Single Playlist Mode vs. Schedule Mode) with<br />
your <strong>Firefly</strong>.<br />
If you are in “Single Playlist Mode”, the existing playlist is<br />
ignored, i.e., the incoming playlist is merged with the current<br />
playing one regardless of the playlist filename.<br />
99
WEBVIEW<br />
If you are in “Schedule Mode”, if a new playlist has the same<br />
filename as a playlist already on the system, then any empty<br />
channels on the new playlist will utilize the channels from the<br />
original playlist.<br />
Reset Stats<br />
Allows you to reset the basic system statistics (number of<br />
Watchdog Restarts <strong>and</strong> System Starts) as viewable in the<br />
WebView Diagnostics/General page may be reset to zero.<br />
100
NETWORKING<br />
Overview<br />
<strong>Firefly</strong> players can be deployed as a network of media playback<br />
nodes. Because <strong>Firefly</strong> can be placed on a network, st<strong>and</strong>ard<br />
network setup (i.e. establishing a <strong>User</strong>name, IP configuration, etc.)<br />
is fully supported. <strong>Firefly</strong> comes st<strong>and</strong>ard with fully integrated<br />
FTP functionality.<br />
Developing a network of centrally managed <strong>and</strong> controlled <strong>Firefly</strong>s<br />
virtually creates a private broadcast network. This network can be<br />
used to advertise, educate, instruct or entertain. With centralized<br />
control <strong>and</strong> unattended playback, <strong>Firefly</strong> nodes respond as<br />
directed. Modular in design, <strong>Firefly</strong> is an ideal addition to any<br />
existing network or for creation of a new network.<br />
Getting Started<br />
The following questions should be considered when establishing a<br />
network:<br />
❏ Number of <strong>Firefly</strong>s <strong>and</strong> update method?<br />
❏ B<strong>and</strong>width of communication to each <strong>Firefly</strong>?<br />
❏ Playback programming: scripted/show controller/<br />
combined?<br />
❏ Creation of MPEG2 videos. (Pre-production/ Postproduction)?<br />
❏ Service <strong>and</strong> maintenance of deployed systems?<br />
❏ Installation of displays, cabling, control devices, etc.?<br />
To simplify the process of <strong>Firefly</strong> network management, Visual<br />
Circuits developed a software system called Media Messenger, see<br />
the following page.<br />
101
Networking<br />
Media Messenger Software<br />
Visual Circuits Media Messenger software (sold separately)<br />
combined with <strong>Firefly</strong> Media Player creates a simple, yet powerful,<br />
end-to-end solution for the distribution <strong>and</strong> utilization of highquality<br />
digital media.<br />
Product Features:<br />
102<br />
❏ Windows XP/2000 compatible<br />
❏ <strong>Firefly</strong> Network Manager - for grouping <strong>and</strong> organizing<br />
<strong>Firefly</strong> Media Players graphically<br />
❏ Playlist Editor - for generating customized playlists of<br />
videos <strong>and</strong> graphic overlays<br />
❏ Schedule Editor - for scheduling target programming by<br />
date <strong>and</strong>/or time<br />
❏ Media Messenger Publisher - for publishing unique content<br />
centrally via FTP<br />
❏ Media Messenger CD/DVD Creator - for creating Media<br />
Update Discs for global or site-specific content distribution<br />
Benefits:<br />
❏ Provides centralized management of a network of <strong>Firefly</strong><br />
Media Players<br />
❏ Creates diverse programming by integrating video <strong>and</strong><br />
graphics into playlists<br />
❏ Facilitates easy playback <strong>and</strong> updating of programming<br />
based on date, time, region or sub-grouping of locations<br />
❏ Delivers content rapidly over the internet using FTP<br />
❏ Manages content centrally while allowing for local<br />
updating<br />
❏ Eliminates system intervention at local venue level<br />
❏ Publishes content via CD/DVD, minimizing networking<br />
<strong>and</strong> distribution expenses<br />
❏ Supports scalable expansion<br />
To learn more about Media Messenger, contact a Visual Circuits<br />
representative at 1-800-250-5533 or visit our web site at<br />
www.visualcircuits.com.
UPDATING<br />
VIDEO PLAYBACK<br />
<strong>Firefly</strong> players can be updated in a variety of ways using a couple<br />
different interfaces. These updating processes include both<br />
automatic (minimal interaction) <strong>and</strong> manual methods.<br />
Automatic Updating:<br />
❏ FTP, HTTP & Multicast Auto-Update - allows regular<br />
scheduled updating via FTP of any new media, playlists,<br />
schedules <strong>and</strong>/or system updates.<br />
<strong>Manual</strong> Updating:<br />
❏ WebView - web-based interface that can be used to transfer<br />
media from your computer <strong>and</strong>/or network to the <strong>Firefly</strong>, in<br />
addition to being able to create, edit or delete playlists <strong>and</strong>/<br />
or schedules on the <strong>Firefly</strong>.<br />
❏ Direct File Access - accesses the <strong>Firefly</strong> directly with an<br />
FTP client.<br />
FTP Updating<br />
FTP (File Transfer Protocol) is a st<strong>and</strong>ardized convention to<br />
deliver digital data via TCP/IP. TCP/IP is a set of common<br />
network protocols for communicating digital data <strong>and</strong> is commonly<br />
used by networking systems, such as the internet.<br />
Using FTP, each <strong>Firefly</strong> can update itself automatically when<br />
connected to a static network connection. New media, playlists,<br />
schedules <strong>and</strong>/or system updates can be downloaded using this<br />
connection to an FTP site. A static network connection may be a<br />
DSL, cable modem, or a connection to a Local Area Network<br />
103
Updating Video Playback<br />
(LAN). Often LAN connections have access to the internet, but be<br />
sure to check with a networking specialist for information on<br />
setting up an account if internet access is required to reach the FTP<br />
server. Often internet access from a LAN requires the use of a<br />
proxy server <strong>and</strong> fire wall permissions.<br />
Although there are many types of FTP software packages<br />
available, Visual Circuits recommends Serve-U. You can download<br />
a trial version at www.Serve-U.com<br />
FTP Server<br />
FTP servers are programs that reside on a PC <strong>and</strong> may be<br />
Windows, Unix, or Linux-based. FTP servers monitor users that<br />
log in to it <strong>and</strong> regulate what folders <strong>and</strong> videos a user may access.<br />
When a <strong>Firefly</strong> performs an update, the FTP server sees it as a<br />
user.<br />
Each <strong>Firefly</strong> should be setup with its own site ID established prior to<br />
installation. Update files created for <strong>Firefly</strong> can then be named according<br />
to the unique <strong>Firefly</strong> ID.<br />
In order for a <strong>Firefly</strong> to perform an update, the <strong>Firefly</strong> must be<br />
configured with the network address of the FTP server <strong>and</strong> login<br />
information (username <strong>and</strong> password) of an account on the FTP<br />
server. The account should have read <strong>and</strong> write permission on the<br />
FTP server.<br />
Player Management<br />
Scripts <strong>and</strong> videos must be posted in the correct directories at the<br />
update location. Usually the person performing this update will be<br />
familiar with the videos to be shown <strong>and</strong> how the presentation<br />
should appear (i.e. which files should play on which channel <strong>and</strong><br />
their sequence within that list, if more than one).<br />
104
Updating Video Playback<br />
This person does not need to be familiar with how the network is<br />
maintained technically, or how the <strong>Firefly</strong> nodes are serviced <strong>and</strong><br />
maintained. What is crucial is the quality assurance <strong>and</strong> review of<br />
the videos. This review of videos <strong>and</strong> scripts is critical prior to<br />
posting for update to make sure that the intended results are<br />
achieved. It is likely that this person is not the network<br />
administrator or web master. Only access to the network <strong>and</strong> a<br />
working knowledge of the network is required.<br />
Creating a <strong>Firefly</strong> FTP Update Account<br />
After <strong>Firefly</strong> logs in, it will be looking for the following directories<br />
for updating:<br />
/<br />
All media files are posted in the login directory, unless the<br />
Directory setting in FTP Auto-Update Settings is used (see<br />
Directory on page 88), in which case the <strong>Firefly</strong> will change that<br />
directory after logging in.<br />
/scripts<br />
All update packet files with .tar, .fpl or .fsc extensions are posted<br />
here.<br />
In most instances, either a single update packet will be posted for all<br />
players to download or a playlist will be posted for each <strong>Firefly</strong>. Each time<br />
a download occurs, playback will be momentarily interrupted for several<br />
seconds as playback is reset with the new playlist.<br />
/updates<br />
System software updates, files with a .upd extension, are posted<br />
here. This software update for the player will automatically take<br />
effect <strong>and</strong> reset playback. The system software has a version.<br />
105
Updating Video Playback<br />
FTP Update Process<br />
When an FTP update is initiated on the <strong>Firefly</strong>, either by selecting<br />
Update Now or by a regular update interval or fixed time trigger,<br />
the <strong>Firefly</strong> will try to establish communications with the specified<br />
FTP site. If communication is established, the <strong>Firefly</strong> will first<br />
search the update packets directory under the home directory of the<br />
FTP site for a .tar file in the scripts directory targeted specifically<br />
for this <strong>Firefly</strong>. This is done by checking for a .tar file with a name<br />
that matches the site ID of this <strong>Firefly</strong>. If for example, the site ID<br />
of the <strong>Firefly</strong> is set to “location1”, <strong>Firefly</strong> will look for a file by the<br />
name of “location1.tar” If such a file is found, it will be copied to<br />
the <strong>Firefly</strong> <strong>and</strong> the <strong>Firefly</strong> will move on to the playlist parsing<br />
routine.<br />
If <strong>Firefly</strong> does not detect an update packet with a name matching<br />
the site ID, it will next search for a generic package file by the<br />
name of “firefly.tar”. If this package is found, it will copy it to the<br />
<strong>Firefly</strong> <strong>and</strong> move on to the parsing routine.<br />
Alternatively, instead of a package file, you may also use a playlist<br />
(.fpl) or schedule (.fsc) file.<br />
106<br />
File Name Definition<br />
siteid.* a specific <strong>Firefly</strong> player<br />
firefly.* any <strong>Firefly</strong> player<br />
File Extension Definition<br />
.tar schedule/playlist package file<br />
.fsc single schedule file (playlist must already<br />
reside on <strong>Firefly</strong> player)<br />
.fpl single playlist file
FTP Updating Order<br />
Updating Video Playback<br />
The <strong>Firefly</strong> system will look for an update file following a specific<br />
order. It will proceed sequentially through this order until it finds a<br />
matching file <strong>and</strong> will then proceed to the When moving font files<br />
(.ttf) via FTP, set FTP mode to binary. on page 107.<br />
1. siteid.tar<br />
2. firefly.tar<br />
3. siteid.fpl<br />
4. firefly.fpl<br />
5. siteid.fsc<br />
6. firefly.fsc<br />
FTP Font Files (.ttf)<br />
When moving font files (.ttf) via FTP, set FTP mode to binary.<br />
Playlist Parsing Routine<br />
Once the new playlist(s) has been copied to the <strong>Firefly</strong>, it is<br />
analyzed to determine which MPEG video files are required to<br />
play it. <strong>Firefly</strong> then checks its own storage to determine if any of<br />
these videos are already present. Any files that are not present are<br />
copied from the FTP site. Any files that are found to exist already<br />
on the <strong>Firefly</strong>'s hard drive are compared against the file by the<br />
same name on the FTP site. If the file on the FTP site is found to<br />
be identical in size, this file is not copied. If the file on the FTP site<br />
is found to be of a different size, the file is copied from the FTP<br />
site to overwrite the pre-existing file. The file size is chosen as the<br />
key in this decision as it is virtually impossible to create two<br />
MPEG files with different content that come out to be exactly the<br />
same size. This is a much more reliable indicator than creation date<br />
or other conventional means.<br />
Once all of the required video files are copied from the FTP site,<br />
the <strong>Firefly</strong> will begin playing the new playlist or schedule.<br />
107
Updating Video Playback<br />
System Update Check<br />
After <strong>Firefly</strong> has finished its update routine it will search the<br />
/updates directory under the home directory of the FTP site for<br />
any valid software updates. If it finds a file in this directory with<br />
the extension “.upd” this file will be copied to <strong>Firefly</strong>’s internal<br />
storage <strong>and</strong> executed. A .upd file is a file designated for making a<br />
software update to <strong>Firefly</strong>(s). For more on the behavior of each<br />
.upd file refer to the software release notes that came with the<br />
update file.<br />
<strong>Firefly</strong> Storage Cleanup Routine<br />
While you copy files to <strong>Firefly</strong>’s internal storage, <strong>Firefly</strong> compares<br />
the total amount of space required to copy the files against the<br />
available storage space on the <strong>Firefly</strong>. If the <strong>Firefly</strong> player<br />
determines there is inadequate space to copy a file, it performs a<br />
cleanup routine to make room. This cleanup routine deletes the<br />
oldest MPEG files on the system that are not used by any incoming<br />
playlists. The criteria used to identify the oldest videos on the<br />
<strong>Firefly</strong> is simply the date the videos were originally transferred to<br />
the system (regardless of the media transfer method used).<br />
Multicast Updating<br />
<strong>Firefly</strong> Media Player is equipped with a multicast client (optional<br />
feature). The multicast client h<strong>and</strong>les the task of receiving <strong>and</strong><br />
writing media files to <strong>Firefly</strong>’s internal storage.<br />
Note that for this section of the <strong>Firefly</strong> user manual, it is assumed<br />
that you have basic knowledge of multicasting <strong>and</strong> networking.<br />
In addition, throughout the Multicast Updating section, there will<br />
be various references to the term “script”. For the purpose of this<br />
section, a script may be made up of a playlist (.fpl) file <strong>and</strong>/or an<br />
update packet (.tar) file.<br />
If your <strong>Firefly</strong> does not have the Multicasting feature (menu items are<br />
“grayed out”) <strong>and</strong> you would like to purchase it, contact a Visual Circuits<br />
representative at 1-800-250-5533.<br />
108
Overview<br />
Updating Video Playback<br />
Each <strong>Firefly</strong> on your network must have a unique serial number.<br />
This serial number will be used to identify the individual <strong>Firefly</strong><br />
during a multicast update to ensure that the proper media goes to<br />
the correct player.<br />
Within <strong>Firefly</strong> multicasting, two multicast modes are available:<br />
Package Mode <strong>and</strong> Script Last Mode.<br />
Package Mode:<br />
In Package Mode, a package must be created <strong>and</strong> sent to the <strong>Firefly</strong><br />
system. It must contain a script (playlist .fpl / update packet .tar)<br />
<strong>and</strong> the inclusion of videos <strong>and</strong> graphic overlays is optional. Any<br />
videos or graphic overlays not referenced by the script will be<br />
deleted upon arrival.<br />
After the transfer is complete, the st<strong>and</strong>ard cleanup routine will<br />
take place to reduce the amount of content on the system to<br />
maintain a “Reserve MBs” of free space. This extra free space is<br />
needed to ensure that the next incoming multicast transfer has<br />
adequate space to complete. The amount of free space you will<br />
need to maintain will need to be twice as much as your largest ever<br />
anticipated update. See Reserves MBs: on page 111 for details.<br />
St<strong>and</strong>ard “SiteID” naming of scripts can be used with Package<br />
Mode to remove unneeded content on the <strong>Firefly</strong>(s) if you wish to<br />
send the same package to all <strong>Firefly</strong>s in your network.<br />
109
Updating Video Playback<br />
Script Last Mode:<br />
In Script Last Mode, individual files can be sent to the <strong>Firefly</strong>. Any<br />
content will be stored on the system (unless none of its files are on<br />
the system). Any .tar/.fpl sent will be processed <strong>and</strong> played as long<br />
as it has at least one content file on the <strong>Firefly</strong>.<br />
Script Last Mode allows you to simply “send content” to the<br />
<strong>Firefly</strong> to load it, without the need for a script. This is made<br />
possible because auto-deletion of content is not performed, other<br />
than the st<strong>and</strong>ard cleanup routine. See <strong>Firefly</strong> Storage Cleanup<br />
Routine on page 108 for details.<br />
Whether all content is sent to all sites is determined by your head<br />
end software.<br />
Moreover, note that with multicast updating, new schedules <strong>and</strong><br />
playlists play immediately on the <strong>Firefly</strong>.<br />
Be sure not to mix update files (.upd) with content files when completing<br />
multicast updating.<br />
Software Update Check<br />
A software update check searches for any valid software updates.<br />
If it receives a file in this directory with the extension “.upd” this<br />
file will be copied to <strong>Firefly</strong>’s internal storage <strong>and</strong> executed. A<br />
.upd file is a file designated for making a software update to<br />
<strong>Firefly</strong>(s). For more on the behavior of each .upd file refer to the<br />
software release notes that came with the update file.<br />
If a <strong>Firefly</strong> receives a .upd file during a multicast transmission, the<br />
system will apply the update.<br />
110<br />
WARNING<br />
Do Not Reboot the <strong>Firefly</strong> during the update process.<br />
The Status LED on the <strong>Firefly</strong> <strong>MZ</strong> will turn red <strong>and</strong> flicker indicating<br />
that a update is in process. The <strong>SC</strong> does not.
System Settings for Multicasting<br />
Updating Video Playback<br />
The System Settings for Multicasting detailed below are accessible<br />
via either the remote control, WebView or Front Panel interfaces.<br />
Client Enable:<br />
Allows option to enable or disable the multicast client.<br />
Note that if you make changes to other Multicast settings, you<br />
must also toggle the Client Enable setting from “Disabled” to<br />
“Enabled” for the changes to apply.<br />
Listen Address:<br />
The IP address that the multicast client will listen on. The value<br />
must be a Class D multicast address, which will typical start with<br />
224.xxx.xxx.xxx.<br />
Because some addresses may be reserved (see below), consult your<br />
networking specialist for assistance.<br />
224.0.0.0/24 is reserved by RFC.<br />
224.0.1.0/24 is used by specific applications (NTP).<br />
Listen Port:<br />
The port address that the multicast client will listen on.<br />
Transfer Order:<br />
Allows the option to choose the order in which items are<br />
transferred: package mode (see page 109 for details) or script last<br />
mode (see page 110 details).<br />
Reserves MBs:<br />
Allows you to allocate a fixed amount of <strong>Firefly</strong>’s internal storage<br />
space for receiving a multicast update. To determine this value,<br />
you will need to estimate the largest multicast update you will ever<br />
receive (example: 1000 MBs). Then, double that amount (example:<br />
1000 MBs x 2 = 2000 MBs) to allow room for both the<br />
compressed archive <strong>and</strong> the extraction process. Once you have<br />
determined this value, enter it for the Reserve MBs.<br />
111
Updating Video Playback<br />
<strong>Manual</strong> Updating<br />
WebView Updating<br />
WebView is a web-based interface that can be used to transfer<br />
media from your computer <strong>and</strong>/or network to the <strong>Firefly</strong>. See<br />
Transferring Media on page 27 for instructions on transferring<br />
media to the <strong>Firefly</strong> using the WebView interface.<br />
In addition, WebView may be used to create, edit or delete playlists<br />
<strong>and</strong>/or schedules. See Using the Playlist Editor on page 35 for<br />
information on working with playlists or Using the Schedule Editor<br />
on page 46 for information on working with schedules.<br />
Forgot Name, Password, IP...???<br />
If you’re in a situation where you cannot get into the Webview<br />
interface because of a misplaced “<strong>User</strong> Name, Password, IP<br />
address, DNS Name, etc. Or perhaps the system was inadvertently<br />
set to DHCP when you don’t even have a DHCP server? All is not<br />
lost (see Basic Hyper Terminal Setup on page 120 & Networking<br />
Comm<strong>and</strong>s on page 134).<br />
While copying .jpg, .gif, .tga, .png or non 256-color .bmp image files,<br />
<strong>Firefly</strong> converts those files to a st<strong>and</strong>ard 8-bit, 256-color bitmap format<br />
<strong>and</strong> reduces the image sizes, if necessary, to the system maximum of<br />
720 x 480 for NT<strong>SC</strong>. This is necessary to ensure that all image files used<br />
for graphic overlays are consistent in appearance <strong>and</strong> functionality. As a<br />
result, all image files listed under “Loaded Media” will appear with “.bmp”<br />
as their extension.<br />
If you do not want your images to be converted by <strong>Firefly</strong>, create them<br />
according to the parameters outlined above before transferring.<br />
112
Direct File Access Updating<br />
Updating Video Playback<br />
Direct File Access (enabled in “Web” screen within <strong>Firefly</strong> System<br />
Settings) can be used to update the <strong>Firefly</strong> directly with an FTP<br />
client. Programs such as FlashFXP (see description below) may be<br />
used.<br />
Figure 1. Example of Direct File Access Using FlashFXP<br />
Direct File Access is a powerful way to work with your <strong>Firefly</strong>.<br />
Using a program such as FlashFXP, your PC hard drive or<br />
computer network will appear on the left pane with the <strong>Firefly</strong><br />
appearing on the right.<br />
WARNING<br />
The File Access feature is disabled by default because of an<br />
inherent security risk. By enabling File Access, you are opening the<br />
FTP port, which opens your <strong>Firefly</strong> up to potential unauthorized<br />
access via a network, such as the internet. Underst<strong>and</strong> that all<br />
security provisions must be provided by your network. <strong>Firefly</strong> does<br />
not include any special security measures for this feature.<br />
113
Updating Video Playback<br />
Some of the options available to you include:<br />
❏ Viewing the contents of your <strong>Firefly</strong>.<br />
❏ Deleting files from your <strong>Firefly</strong>.<br />
❏ Downloading files from your <strong>Firefly</strong> to your PC or network.<br />
❏ Uploading files from your PC or network drive to the<br />
<strong>Firefly</strong>.<br />
114<br />
WARNING<br />
While using an FTP client, keep in mind that you will be able to<br />
view <strong>and</strong> access special system file sub-directories that should<br />
remain unaltered. To prevent potential damage to the operation of<br />
your <strong>Firefly</strong> Media Player, do not open or delete any files from<br />
these system file sub-directories.
LOG FILE REPORTING<br />
Overview<br />
The logging of playback verification data, as well as diagnostic<br />
data, provides for easier <strong>and</strong> more powerful management of a<br />
<strong>Firefly</strong> Media Player network.<br />
There are two types of data logs available on the <strong>Firefly</strong>: run logs<br />
<strong>and</strong> diagnostic logs. You can enable or disable these capturing of<br />
these logs in any combination.<br />
Each of the settings related to log file reporting are found in the<br />
System Settings menu, accessible via WebView.<br />
Figure 1. Example of WebView’s Logfile Viewer (see Diagnostics<br />
- Logging on page 65 for more information)<br />
115
Log File Reporting<br />
Run Logs<br />
The run log provides a record of which videos played (with which<br />
graphic overlays, if applicable), on which channels, starting at<br />
what dates/times, playing back what percentage of the video <strong>and</strong><br />
for how long.<br />
The primary uses for this feature are for verification of playback<br />
schedules <strong>and</strong> for compliance to paid playback agreements. The<br />
resulting data can be used for something as simple as ‘X’ video<br />
played at ‘Y’ time for a total of ‘Z’ occurrences or for more<br />
detailed reports, taking into account graphic overlays, playback<br />
duration <strong>and</strong> channels numbers.<br />
Diagnostic Logs<br />
The diagnostic log can be used to view a record of all media update<br />
transactions <strong>and</strong> any system errors on a <strong>Firefly</strong>.<br />
Information contained in the diagnostic log include:<br />
❏ FTP/DVD Updating data: Tracks date, time of connection/<br />
disconnection, errors- yes/no, files, sizes <strong>and</strong> percent<br />
transferred.<br />
❏ Storage Cleanup data: Records what media have been<br />
deleted by the automatic storage cleanup routine, including<br />
file names, sizes <strong>and</strong> dates.<br />
❏ Missing Elements Log: Records all missing media<br />
referenced by an active playlist or schedule, including date,<br />
time <strong>and</strong> file element.<br />
❏ Error Summary data: Records important user player<br />
diagnostic information, including the number of system<br />
restarts, number of watchdog restarts, the player version,<br />
etc.<br />
❏ Serial Comm<strong>and</strong>s: Records most incoming <strong>and</strong> outgoing<br />
external control comm<strong>and</strong>s.<br />
The create diagnostic log option (On or Off) is found in WebView<br />
System Settings.<br />
116
Log Format<br />
Run Logs<br />
Log File Reporting<br />
The available output formats for a <strong>Firefly</strong> run log file are either<br />
.CSV or .XML<br />
Sample from a .CSV format run log:<br />
12-07-02 20:30:07,1,05saturn.mpg,3_ser220.BMP,1,00:01:01,100<br />
Sample from a .XML format run log:<br />
<br />
Diagnostic Logs<br />
The format of the diagnostic log is in a simple “time - event” per<br />
line format.<br />
DTDs (Document Type Definition)<br />
DTDs can be used to import data from a log file into a database.<br />
Log Default Playlist<br />
You have the option to designate whether or not the default playlist<br />
playback is included in the playback log file data. Choosing “Yes”<br />
includes the default playlist in the playback data. Conversely,<br />
choosing “No” excludes the default playlist from the log file data.<br />
Maximum Log File Sizes<br />
You have the option to set a value (in megabytes) for the<br />
maximum size a log file is able to reach. The default value is 10<br />
MB. You may want to keep this value relatively small if you wish<br />
to maintain a large amount of free space for videos <strong>and</strong> graphic<br />
overlays.<br />
117
Log File Reporting<br />
When the log files exceed the maximum amount of defined storage<br />
space, an automatic cleanup process will delete the oldest file as<br />
required to contain the total log file space under the set limits. In<br />
addition, files will be deleted after they are transferred to the FTP<br />
server or downloaded from the <strong>Firefly</strong> player.<br />
Uploading Log Files<br />
You have a “Yes” or “No” choice for uploading log files to the<br />
“logfiles” directory on your FTP server.<br />
If you choose “Yes” to have the log files uploaded, you may<br />
download the log files to your choice of storage options, such as a<br />
database you have designated for <strong>Firefly</strong> media playback data,<br />
from your FTP server.<br />
118
EXTERNAL CONTROL<br />
COMMANDS<br />
Within this chapter, there are two types of external control<br />
comm<strong>and</strong>s that are described: Visual Circuits Corporation (VCC)<br />
control comm<strong>and</strong>s <strong>and</strong> Laserdisc emulation (LDV) control<br />
comm<strong>and</strong>s. Please note that the VCC control comm<strong>and</strong>s are<br />
proprietary in nature, <strong>and</strong> therefore are not designed to be mixed<br />
with LDV control comm<strong>and</strong>s. Doing so, could cause inconsistent<br />
results <strong>and</strong> is not recommended.<br />
The following list of comm<strong>and</strong>s may be sent via RS232 or TCP/IP<br />
to <strong>Firefly</strong> to direct playback. Any st<strong>and</strong>ard show control system or<br />
A<strong>SC</strong>II generating control program may be used. For RS232 it is<br />
recommended to use a null modem cable. For TCP/IP connections<br />
consult the control device specification to see if a cross over<br />
network patch cable is required.<br />
Connecting via RS232<br />
❏ The RS232 9-pin D-sub connector is located on the back of<br />
the <strong>Firefly</strong> between the audio connectors <strong>and</strong> the USB<br />
connectors.<br />
❏ Configure the <strong>Firefly</strong> Control Settings (see Control Settings<br />
on page 75) to be compatible with your show controller.<br />
Connecting via TCP/IP<br />
❏ Set “Accept TCP/IP” to “Yes” within the <strong>Firefly</strong> Control<br />
Settings screen. This allows anyone on the network to send<br />
comm<strong>and</strong>s to the <strong>Firefly</strong> if they know its network address.<br />
❏ The TCP/IP (ethernet) connector is located on the back of<br />
the <strong>Firefly</strong> under the Video In connector, to the right of the<br />
RS232 connector.<br />
❏ Configure the network settings (see the section on Network<br />
Settings on page 77 for details on how to do this).<br />
❏ Connect to port 2180.<br />
119
External Control Comm<strong>and</strong>s<br />
Basic Hyper Terminal Setup<br />
You will need a PC with Hyper Terminal (all Windows machines<br />
contain this under “Start/Programs/Accessories/Commuications”)<br />
<strong>and</strong> a null modem cable (female 9 pin ‘D” to female 9 pin D - RS-<br />
232 cable). Connect cable <strong>and</strong> start Hyper Terminal. Select Serial<br />
Port 1 & 9600BPS. Hit the enter key <strong>and</strong> you should see a “NAK”<br />
appear on the screen. If this takes a long time or not at all, you<br />
need to recheck connection <strong>and</strong> be sure that COM 1 is enabled in<br />
your BIOS setting. Also make sure nothing else is using COM 1.<br />
Once you’ve established connection, select File/Properties/Settings<br />
Tab/A<strong>SC</strong>II Setup button. Check the “Echo typed characters<br />
locally” box <strong>and</strong> select OK twice. Now you can proceed with<br />
typing in the Syntax desired. A correct responce will return<br />
“ACK”. If you mispell, hit enter <strong>and</strong> try again (i.e., don’t try to<br />
correct). Please consult the Hyper Terminal Help file or see your<br />
Network Administrator for further assistance.<br />
Upon initial start up, <strong>Firefly</strong> will begin playing the latest loaded playlist/<br />
schedule automatically. Following start up, if you choose to begin<br />
playback manually via External comm<strong>and</strong>s, you can default this option to<br />
“No”.<br />
120
VCC Control Comm<strong>and</strong>s:<br />
External Control Comm<strong>and</strong>s<br />
Filenames <strong>and</strong> External Comm<strong>and</strong>s<br />
When using external comm<strong>and</strong>s to h<strong>and</strong>le files, it is necessary for those<br />
files to have names without, i.e. sales_video.mpg not sales video.mpg.<br />
One convention is to use underscores in place of spaces.<br />
Playlist Playback Comm<strong>and</strong>s<br />
Playlistload<br />
This comm<strong>and</strong> allows you to preload a playlist preparing it for<br />
playback. Playlistload loads up a playlist preparing it for playback.<br />
This comm<strong>and</strong> allows you to initiate playback when precision<br />
timing is desired. An mpgPlay or mpgPlayAll comm<strong>and</strong> is<br />
required to start playback.<br />
Syntax<br />
Playlistload name once<br />
Parameters (optional)<br />
name<br />
Name of the playlist file (e.g., loop1.fpl). You do not need to include the<br />
.fpl extension.<br />
once<br />
0 loops the playlist endlessly (default). 1 plays the playlist once through<br />
<strong>and</strong> stops.<br />
121
External Control Comm<strong>and</strong>s<br />
Playlistplay<br />
This comm<strong>and</strong> initiates playback as soon as the files are fully<br />
queued up <strong>and</strong> loaded. There may be a slight delay between this<br />
comm<strong>and</strong> <strong>and</strong> playback.<br />
The Playlistplay <strong>and</strong> Playlistload comm<strong>and</strong>s behave the same<br />
except Playlistplay starts playback automatically, whereas<br />
Playlistload only loads up the playlist. Yet, an Mpgplayall<br />
comm<strong>and</strong> is required to actually start playback. Playlistload is for<br />
when you need to control the exact time the playback begins.<br />
Syntax<br />
playlistplay name once<br />
Parameters (optional)<br />
name<br />
Name of the playlist file (e.g., loop1.fpl). You do not need to include the<br />
.fpl extension.<br />
once<br />
0 loops the playlist endlessly (default). 1 plays the playlist once through<br />
<strong>and</strong> stops.<br />
122
Playing Individual Files<br />
External Control Comm<strong>and</strong>s<br />
To accurately control the playback of individual videos, the<br />
following comm<strong>and</strong>s are used:<br />
The channel parameter is required for certain comm<strong>and</strong>s. These same<br />
External Control Comm<strong>and</strong> parameters are also used in Visual Circuits<br />
multi-channel products. The default channel for the <strong>Firefly</strong>-<strong>SC</strong> (single<br />
channel player) should always be ‘0’.<br />
mpgLoad<br />
This comm<strong>and</strong> loads an MPEG file for playback on the specified<br />
channel. This comm<strong>and</strong> does not play the file.<br />
Syntax<br />
mpgLoad 0 channel videoname<br />
Parameters<br />
channel<br />
The channel on the <strong>Firefly</strong> (0)<br />
videoname<br />
The storage path <strong>and</strong> video name of the MPEG file to load. If no path is<br />
designated, <strong>Firefly</strong> will default to local storage.<br />
Return Values<br />
This comm<strong>and</strong> returns ACK if the file load was started<br />
successfully, or NAK if the file could not be loaded (e.g., the file<br />
was not found).<br />
123
External Control Comm<strong>and</strong>s<br />
mpgLoadNext<br />
This comm<strong>and</strong> queues an MPEG file to play when the current<br />
video file finishes. This file will play once.<br />
Syntax<br />
mpgLoadNext 0 channel videoname<br />
Parameters<br />
channel<br />
The channel on the <strong>Firefly</strong> (0)<br />
videoname<br />
The full path <strong>and</strong> video name of the MPEG file to load. (See description<br />
for mpgLoad.)<br />
Return Values<br />
This comm<strong>and</strong> returns ACK to indicate that the file was loaded<br />
successfully, or NAK to indicate that the file could not be loaded<br />
(e.g., the file was not found).<br />
mpgLoadDef<br />
This comm<strong>and</strong> loads an MPEG file for playback on the specified<br />
channel. This comm<strong>and</strong> does not play the file. Videoname should<br />
include the storage path. If files are stored locally on <strong>Firefly</strong> no<br />
storage path designation is required. This comm<strong>and</strong> will loop the<br />
file indefinitely.<br />
Syntax<br />
mpgLoaddef 0 channel videoname<br />
Parameters<br />
channel<br />
The channel on the <strong>Firefly</strong> (0)<br />
videoname<br />
The storage path <strong>and</strong> video name of the MPEG file to load. If no path is<br />
designated, <strong>Firefly</strong> will default to local storage.<br />
Return Values<br />
This comm<strong>and</strong> returns ACK if the file load was started successfully, or NAK if<br />
the file could not be loaded (e.g., the file was not found).<br />
124
External Control Comm<strong>and</strong>s<br />
mpgLoadNextDef<br />
This comm<strong>and</strong> queues an MPEG file to play when the current<br />
video file finishes. This comm<strong>and</strong> adds file to a looping playlist.<br />
Syntax<br />
mpgLoadNextdef 0 channel videoname<br />
Parameters<br />
channel<br />
The channel on the <strong>Firefly</strong> (0)<br />
videoname<br />
The full path <strong>and</strong> video name of the MPEG file to load. (See description<br />
for mpgLoad.)<br />
Return Values<br />
This comm<strong>and</strong> returns ACK to indicate that the file was loaded<br />
successfully, or NAK to indicate that the file could not be loaded<br />
(e.g., the file was not found).<br />
mpgClearDef<br />
This comm<strong>and</strong> clears the default (looping) playlist. This cancels<br />
the playlist defined by mpgLoadDef <strong>and</strong> mpgLoadNextDef <strong>and</strong> the<br />
playlist loaded by the <strong>Firefly</strong> at startup.<br />
Syntax<br />
mpgClearDef 0 channel<br />
Parameters<br />
channel<br />
The channel on the <strong>Firefly</strong> (0)<br />
Return Values<br />
This comm<strong>and</strong> returns ACK if the file load was started<br />
successfully, or NAK if the file could not be loaded (e.g., the file<br />
was not found).<br />
125
External Control Comm<strong>and</strong>s<br />
mpgPlay<br />
This comm<strong>and</strong> plays a previously loaded MPEG file on the<br />
specified channel. The file must have already been loaded using<br />
the mpgLoad comm<strong>and</strong>.<br />
Syntax<br />
mpgPlay 0 channel<br />
Parameters<br />
channel<br />
The channel on the <strong>Firefly</strong> (0)<br />
Return Values<br />
This comm<strong>and</strong> returns ACK if playback was started successfully,<br />
or NAK if playback could not be started (e.g., no file previously<br />
loaded).<br />
mpgStop<br />
This comm<strong>and</strong> stops playback of an MPEG file that is currently<br />
playing on the specified channel.<br />
Syntax<br />
mpgStop 0 channel<br />
Parameters<br />
channel<br />
The channel on the <strong>Firefly</strong> (0)<br />
Return Values<br />
This comm<strong>and</strong> returns ACK if playback was stopped successfully,<br />
or NAK if playback could not be stopped (e.g., no file currently<br />
playing).<br />
126
External Control Comm<strong>and</strong>s<br />
mpgPlayAll<br />
This comm<strong>and</strong> starts playback on all channels simultaneously. The<br />
files for each channel to play must have been previously loaded<br />
using the mpgLoad comm<strong>and</strong>.<br />
Syntax<br />
mpgPlayAll<br />
Parameters<br />
None<br />
Return Values<br />
This comm<strong>and</strong> returns ACK to indicate that playback was started<br />
successfully, or NAK to indicate that playback could not be started<br />
on all channels.<br />
mpgSetInitOnOpen<br />
This comm<strong>and</strong> controls the video loading behavior of all channels.<br />
Syntax<br />
mpgSetInitOnOpen on<br />
Parameters<br />
on<br />
on=1, output goes black, playback memory is cleared.<br />
on=0, seamless transition to new video, no output reset. Last played frame of<br />
video remains until next video is played. May reduce display rolls or opening<br />
flicker.<br />
127
External Control Comm<strong>and</strong>s<br />
mpgBlack<br />
This comm<strong>and</strong> covers MPEG video on a channel, causing the<br />
corresponding video displays to go “black.” Note: This black may<br />
not be recognized by all displays as a true video signal.<br />
To cover the video again, use the mpgUnblack comm<strong>and</strong>.<br />
Syntax<br />
mpgBlack 0 channel<br />
Parameters<br />
channel<br />
The channel on the <strong>Firefly</strong> (0)<br />
Return Values<br />
This comm<strong>and</strong> returns ACK if mpgBlack was started successfully,<br />
or NAK if mpgBlack could not be started.<br />
Remarks<br />
Video playback is completely independent of whether the video is<br />
muted with mpgBlack. Videos will play “underneath” the black<br />
normally, audio will be unaltered <strong>and</strong> callbacks will be sent<br />
normally.<br />
If a playlist is played with one of the comm<strong>and</strong>s, such as<br />
playlistPlay, unused channels (channels with no video files) will be<br />
set to the blackened state. Therefore, you must call mpgUnblack on<br />
those channels if you intend to play video on them with comm<strong>and</strong>s<br />
such as mpgLoad/mgpPlay.<br />
See mpgUnblack for more information on “unblacking” video.<br />
128
External Control Comm<strong>and</strong>s<br />
mpgUnblack<br />
This comm<strong>and</strong> uncovers MPEG video, reversing the effects of the<br />
mpgBlack comm<strong>and</strong>.<br />
To cover the video again, use the mpgBlack comm<strong>and</strong>.<br />
Syntax<br />
mpgUnblack 0 channel<br />
Parameters<br />
channel<br />
The channel on the <strong>Firefly</strong> (0)<br />
Return Values<br />
This comm<strong>and</strong> returns ACK if mpgUnblack was started<br />
successfully, or NAK if mpgUnblack could not be started.<br />
Remarks<br />
See mpgBlack on page 128 for more information on “blacking out”<br />
video.<br />
129
External Control Comm<strong>and</strong>s<br />
Using Serial Comm<strong>and</strong>s To Create Playlists<br />
You can create a playlist “on the fly” with the mpgLoadDef <strong>and</strong><br />
mpgLoadNextDef comm<strong>and</strong>s. These two comm<strong>and</strong>s are used to<br />
define a “default” (i.e. looping) playlist of MPEG files.<br />
To make a playlist:<br />
❏ call mpgClearDef to clear the old default playlist.<br />
❏ call mpgLoadDef to specify the first file in the list.<br />
❏ call mpgLoadNextDef once for each additional file, the<br />
order they should play.<br />
❏ wait a few seconds for the files to load.<br />
❏ call mpgPlay to start playback.<br />
If you want to create a playlist that only plays once, use the mpgLoad <strong>and</strong><br />
mpgLoadNext comm<strong>and</strong>s as follows:<br />
130<br />
❏ call mpgClearDef to clear the old default playlist.<br />
❏ call mpgLoad to specify the first file in the list.<br />
❏ call mpgLoadNext once for each additional file, the order<br />
they should play.<br />
❏ wait a few seconds for the files to load.<br />
❏ call mpgPlay to start playback.<br />
To interactively insert “one time” files into the default playlist you<br />
can use the mpgLoad <strong>and</strong> mpgLoadNext comm<strong>and</strong>s without<br />
calling mpgClearDef. A list of files specified with these comm<strong>and</strong>s<br />
will interrupt the default playlist <strong>and</strong> play once. When the last file<br />
specified ends, the default playlist will resume, from the point<br />
where it was interrupted.<br />
The last value passed to mpgSetInitOnOpen effect the type of<br />
transition when mpgLoad or mpgLoadDef is called. For seamless<br />
transitions, send mpgSetinitOnopen 0 before the load comm<strong>and</strong>s.
<strong>Firefly</strong> System Comm<strong>and</strong>s<br />
External Control Comm<strong>and</strong>s<br />
fireflyFtpUpdate<br />
This comm<strong>and</strong> enables <strong>Firefly</strong> to update video content, playlists/<br />
schedules <strong>and</strong> software via an FTP server (see FTP Updating on<br />
page 103 for more information).<br />
fireflyRestart<br />
This comm<strong>and</strong> restarts the entire <strong>Firefly</strong> system. This process<br />
normally takes about 1 minute to complete.<br />
131
External Control Comm<strong>and</strong>s<br />
Callback Comm<strong>and</strong>s<br />
mpgCallback<br />
Turns on/off callback (play complete).<br />
Syntax<br />
mpgCallback on<br />
Parameters<br />
on<br />
on=1, send callbacks (default off).<br />
Play Complete Callback<br />
Each time a file ends <strong>and</strong> another file is started, a string is sent<br />
back to the controller over the serial port. This string has the<br />
following format:<br />
CB 0 channel 2<br />
“0” is the <strong>Firefly</strong> channel <strong>and</strong> “2” equals the end of the file.<br />
132
Audio <strong>and</strong> Video Setting Changes<br />
External Control Comm<strong>and</strong>s<br />
mpgSetVolumeLeftRight<br />
The mpgSetVolumeLeftRight comm<strong>and</strong> sets the left <strong>and</strong> right audio<br />
volumes independently. The default volume level is 124. Lowering<br />
this value will make the volume softer or raising this value will<br />
make the volume louder.<br />
mpgSetVolumeLeftRight 0 channel leftVolume rightVolume<br />
Parameters<br />
channel<br />
0 based index of the channel on the <strong>Firefly</strong>.<br />
leftVolume<br />
0-255 the audio level on the left channel.<br />
rightVolume<br />
0-255 the audio level on the right channel.<br />
mpgMute<br />
The mpgMute comm<strong>and</strong> turns off the audio.<br />
mpgMute 0 channel<br />
Parameters<br />
channel<br />
0 based index of the channel on the <strong>Firefly</strong> (0).<br />
mpgUnMute<br />
The mpgUnMute comm<strong>and</strong> turns on the audio.<br />
mpgUnMute 0 channel<br />
Parameters<br />
channel<br />
0 based index of the channel on the <strong>Firefly</strong> (0).<br />
133
External Control Comm<strong>and</strong>s<br />
Networking Comm<strong>and</strong>s<br />
<strong>Firefly</strong>SetDefault<br />
This comm<strong>and</strong> sets the networking back to it’s factory state:<br />
IP Address - 10.0.1.1<br />
Gateway - 255.255.255.0<br />
Netmask -<br />
Network Type - Static (2)<br />
Web Enable - On (0)<br />
Web <strong>User</strong> Name - firefly<br />
Web Password - 123456<br />
Syntax<br />
fireflysetdefault<br />
Parameters<br />
None<br />
Remarks<br />
This comm<strong>and</strong> is useful for situations where you simply would like<br />
to “clean house” <strong>and</strong> start over. If you’ve forgotten an IP address,<br />
password, etc., you mightfind the following network comm<strong>and</strong>s<br />
more useful.<br />
<strong>Firefly</strong>SetIpAddr<br />
The <strong>Firefly</strong>SetIpAddr comm<strong>and</strong> will allow you to change the<br />
players IP Address.<br />
Syntax<br />
fireflysetipaddr IP Address<br />
Parameters<br />
IP Address<br />
32 bit address used to identify a player on any Network.<br />
134
External Control Comm<strong>and</strong>s<br />
<strong>Firefly</strong>SetGateway<br />
The <strong>Firefly</strong>SetGateway comm<strong>and</strong> will allow you to change the<br />
players network Gateway.<br />
Syntax<br />
fireflysetgateway gateway<br />
Parameters<br />
Gateway<br />
A service that allows <strong>Firefly</strong> to connect to other servers. Creating a gateway also<br />
allows client computers running only Microsoft client software to access server<br />
resources through the gateway.<br />
<strong>Firefly</strong>SetNetmask<br />
The <strong>Firefly</strong>SetNetmask comm<strong>and</strong> will allow you to change the<br />
players Netmask parameter.<br />
Syntax<br />
fireflysetnetmask netmask<br />
Parameters<br />
Netmask<br />
Defines a subnet boundry range.<br />
<strong>Firefly</strong>SetNetworkType<br />
The <strong>Firefly</strong>SetNetworkType comm<strong>and</strong> defines whether the media<br />
player is on a Network using a DHCP server or simply set up<br />
Statically.<br />
Syntax<br />
fireflysetnetworktype 1 (DHCP) or 2 (Static)<br />
Parameters<br />
DHCP (Dynamic Host Configuration Protocol) - A TCP/IP service protocol<br />
that offers dynamic leased configuration of host IP addresses <strong>and</strong> distributes other<br />
configuration parameters to eligible network clients.<br />
Static For a local area connection (LAN), in IP address, Subnet mask, <strong>and</strong><br />
Default gateway, type the IP address, subnet mask, <strong>and</strong> default gateway addresses.<br />
135
External Control Comm<strong>and</strong>s<br />
<strong>Firefly</strong>SetWeb_Enable<br />
The <strong>Firefly</strong>SetWeb_Enable comm<strong>and</strong> gives the user the option to<br />
turn on & off network communication to Webview.<br />
Syntax<br />
fireflysetweb_enable 0 (enable) or 1 (disable)<br />
<strong>Firefly</strong>GetIpAddr<br />
The <strong>Firefly</strong>GetIpAddr comm<strong>and</strong> retrieves current setting.<br />
Syntax<br />
fireflygetIpAddr<br />
<strong>Firefly</strong>GetGateway<br />
The <strong>Firefly</strong>GetGateway comm<strong>and</strong> retrieves current setting.<br />
Syntax<br />
fireflysetgateway<br />
<strong>Firefly</strong>GetNetmask<br />
The <strong>Firefly</strong>GetNetmask comm<strong>and</strong> retrieves current setting.<br />
Syntax<br />
fireflygetnetmask<br />
<strong>Firefly</strong>GetNetworkType<br />
The <strong>Firefly</strong>GetNetworkType comm<strong>and</strong> retrieves current setting.<br />
Syntax<br />
fireflygetnetworktype<br />
136
External Control Comm<strong>and</strong>s<br />
<strong>Firefly</strong>GetWeb_Enable<br />
The <strong>Firefly</strong>GetWeb_Enable comm<strong>and</strong> retrieves current setting.<br />
Syntax<br />
fireflygetweb_enable<br />
Remarks<br />
0 = Enabled<br />
1 = Disabled<br />
137
External Control Comm<strong>and</strong>s<br />
Media Calls<br />
mpgDir<br />
This comm<strong>and</strong> returns the names of all files on the <strong>Firefly</strong>.<br />
Syntax<br />
mpgDir<br />
mpgDelete<br />
This comm<strong>and</strong> permanently removes a media file from the <strong>Firefly</strong>.<br />
Syntax<br />
mpgDelete name<br />
Parameters<br />
name<br />
The full name of the media file (video or graphic overlay) to remove. The<br />
list of all media can be obtained with the mpgDir comm<strong>and</strong>.<br />
138
Information Calls<br />
infoGetFile<br />
Syntax<br />
infoGetFile 0 channel<br />
Returns the file playing the channel.<br />
Parameters<br />
channel<br />
The channel on the <strong>Firefly</strong> (0)<br />
infoGetPlaylist<br />
Syntax<br />
infoGetPlaylist 0 channel<br />
Returns the current playlist.<br />
Parameters<br />
channel<br />
The channel on the <strong>Firefly</strong> (0)<br />
infoGetSchedule<br />
Syntax<br />
infoGetSchedule 0 channel<br />
Returns the current schedule (or None).<br />
Parameters<br />
channel<br />
The channel on the <strong>Firefly</strong> (0)<br />
External Control Comm<strong>and</strong>s<br />
139
External Control Comm<strong>and</strong>s<br />
infoGetState<br />
Syntax<br />
infoGetState 0 channel<br />
140<br />
Returns the current playback state of the player.<br />
Parameters<br />
channel<br />
The channel on the <strong>Firefly</strong> (0)<br />
Return Values<br />
“STATE_PLAY”,<br />
“STATE_STOP”,<br />
“STATE_PAUSE”,<br />
“STATE_REW”,<br />
“STATE_FF”,
LDV Control Comm<strong>and</strong>s<br />
Introduction<br />
External Control Comm<strong>and</strong>s<br />
<strong>Firefly</strong> may be controlled serially via the Laserdisc emulation<br />
control set described in this section. This interface sends<br />
comm<strong>and</strong>s to <strong>Firefly</strong> dictating video playback, player settings or to<br />
report back system information. Comm<strong>and</strong>s received <strong>and</strong><br />
recognized by <strong>Firefly</strong> will return an “R” (ACK). Comm<strong>and</strong>s not<br />
recognized will be reported back to the controller as an error. The<br />
following sections describe setting up communication <strong>and</strong><br />
programming the show controller.<br />
As previously noted, the Visual Circuits Corporation (VCC)<br />
control comm<strong>and</strong>s are proprietary in nature, <strong>and</strong> therefore <strong>and</strong> not<br />
designed to be mixed with Laserdisc emulation (LDV) control<br />
comm<strong>and</strong>s. Doing so, could cause inconsistent results <strong>and</strong> is not<br />
recommended.<br />
COM Port Settings<br />
Any serial device controller may be used to control <strong>Firefly</strong>. Some<br />
manufacturers of these controllers include Crestron, AMX, Triad,<br />
Alcorn McBride <strong>and</strong> Sky Skan. This list of controllers is not all<br />
inclusive nor is it an endorsement of any one device.<br />
The controllers communication port, or COM port, should be<br />
configured to properly communicate data to <strong>Firefly</strong>. These<br />
comm<strong>and</strong>s are A<strong>SC</strong>II characters either upper <strong>and</strong>/or lower case.<br />
Other A<strong>SC</strong>II arguments such as (carriage return) are used.<br />
The <strong>Firefly</strong>’s COM port is set up with the following factory default settings:<br />
Field Setting<br />
Baud Rate 9600<br />
Parity None<br />
Stop Bit 1<br />
Data Bit 8<br />
141
External Control Comm<strong>and</strong>s<br />
Other optional settings include:<br />
Be sure that the control device <strong>and</strong> <strong>Firefly</strong>’s COM port settings are<br />
the same.<br />
For Laserdisc Video serial communications, “LDV” must be selected in<br />
the Comm<strong>and</strong> Mode under System Settings.”VCC” is set for factory<br />
default.<br />
Error Codes<br />
If <strong>Firefly</strong> acknowledges a comm<strong>and</strong>, the return from the player will be .<br />
Anytime an invalid comm<strong>and</strong> or address argument is received, that comm<strong>and</strong> will<br />
be ignored <strong>and</strong> an error code will be returned. In the event that the comm<strong>and</strong> was<br />
global, again each channel will report back independently.<br />
The following table describes the system error codes:<br />
142<br />
Field Setting<br />
Baud Rate Either 4800 or 1200<br />
Parity Odd or Even<br />
Stop Bit 2<br />
Data Bit 7<br />
Code Message Meaning<br />
NAK Communication<br />
Error<br />
Comm<strong>and</strong> or address argument<br />
cannot be parsed - invalid syntax.<br />
E06 Missing Argument Necessary parameter is not<br />
specified.<br />
E11 Playlist not loaded This error will occur any time a<br />
player control comm<strong>and</strong> is<br />
received while no playlist is loaded.<br />
E12 Search Error Search or stop marker address<br />
cannot be found.
Comm<strong>and</strong> Syntax<br />
External Control Comm<strong>and</strong>s<br />
All comm<strong>and</strong>s shown in this section will be upper case. There are<br />
no spaces in the comm<strong>and</strong> argument itself. However, between<br />
comm<strong>and</strong>s there will be spaces. A sequence such as<br />
(space)(space)(space)<br />
would indicate four separate comm<strong>and</strong>s to be<br />
executed. Some address arguments are optional <strong>and</strong> some are<br />
required to execute a comm<strong>and</strong>. Where an address is optional, it<br />
will be shown as “(address)”. Whenever an address is required for<br />
a comm<strong>and</strong>, it will be shown as “”.<br />
Address Arguments<br />
Some comm<strong>and</strong>s permit or require address arguments. These arguments can be<br />
used to specify a position (frame or timecode) address within a video or an<br />
address which identifies the position or sequence order of a video within a list of<br />
videos. A list of videos playing back to back are commonly referred to as a<br />
playlist.<br />
Laserdisc refers to a video playlist as a Chapter or CH. To specify a file address<br />
within a chapter, the sequential position is indicated by “x”. CH5, for example,<br />
would indicate the fifth file in the playlist or chapter. Designating the file position<br />
“x” is also accepted.<br />
It is also possible to define an address within a video itself. FRx indicates a frame<br />
number within a video where “FR” denotes frame <strong>and</strong> “x” refers to the frame<br />
number. FR3000, for example, would refer to the frame 3000 of the current<br />
video. This equates to 100 seconds or 1 minute 40 seconds into the file. The<br />
frame number refers to actual video frames <strong>and</strong> calculating at 30 frames per<br />
second non drop, which is the NT<strong>SC</strong> st<strong>and</strong>ard, gives you the time elapsed at this<br />
frame of video.<br />
TMx indicates a time code value using the format HHMMSSFF within the video.<br />
H=Hour<br />
M=Minute<br />
S=Second<br />
F=Frame<br />
For example, TM1263212 would refer to the point at 1 hour, 26 minutes, 32<br />
seconds <strong>and</strong> 12 frames in the video. The TM values will always be interpreted as<br />
a right justified value so TM 3415 would reference the position 34 seconds <strong>and</strong> 15<br />
frames into the video.<br />
143
External Control Comm<strong>and</strong>s<br />
Comm<strong>and</strong> Summary<br />
Remember all comm<strong>and</strong>s are either upper case or lower case<br />
characters as well as other A<strong>SC</strong>II characters. Some address<br />
arguments are optional <strong>and</strong> will be designated by () whereas<br />
m<strong>and</strong>atory addresses will be designated by .<br />
The channel parameter is required for certain comm<strong>and</strong>s. These same<br />
External Control Comm<strong>and</strong> parameters are also used in Visual Circuits<br />
multi-channel products. The default channel for the <strong>Firefly</strong>-<strong>SC</strong> (single<br />
channel player) should always be ‘0’.<br />
144
Playback Comm<strong>and</strong>s<br />
Play (PL)<br />
External Control Comm<strong>and</strong>s<br />
Comm<strong>and</strong>:<br />
Plays from the current file position <strong>and</strong> continues to play until the<br />
(address) value is reached. If no (address) is specified, play mode<br />
continues indefinitely.<br />
Format:<br />
(address)PL<br />
Response:<br />
R<br />
Explanation:<br />
This comm<strong>and</strong> is used to begin playback from the current file<br />
position. If an address value is included in the comm<strong>and</strong>, this will<br />
define the point at which playback is to automatically pause. If a<br />
PL comm<strong>and</strong> with an address is received while playback is already<br />
in progress, playback will continue uninterrupted <strong>and</strong> the pause<br />
address will be set as specified. If a PL comm<strong>and</strong> with no address<br />
is received while playback is already in progress playback will<br />
continue uninterrupted <strong>and</strong> any previously set pause address will<br />
be cleared. In the event that a play comm<strong>and</strong> is received with an<br />
out of range address value (i.e. – time code greater than the length<br />
of the current file or chapter number higher than the number of<br />
files in the playlist) the play comm<strong>and</strong> will not be processed <strong>and</strong><br />
the error code “E12” will be returned.<br />
Examples:<br />
0@TM13000PL<br />
Play from the current file position until the time code reaches 1 minute 30 seconds<br />
0 frames <strong>and</strong> then pause.<br />
0@CH5PL<br />
Play from the current file position until the head of chapter 5 is reached <strong>and</strong> then<br />
pause<br />
PL<br />
Start playing from the current file positions <strong>and</strong> continue playback until receiving<br />
another comm<strong>and</strong>. If a pause address had been set in any channel, clear<br />
that pause address.Play (PL)<br />
145
External Control Comm<strong>and</strong>s<br />
Reject “Stop” (RJ)<br />
Comm<strong>and</strong>:<br />
Stops playback <strong>and</strong> resets the file pointer to the head of the playlist<br />
(equivalent to a stop button on a DVD or CD player).<br />
Format:<br />
RJ<br />
Response:<br />
R<br />
Examples:<br />
RJ<br />
Stops playback <strong>and</strong> resets playback pointers to head of playlist.<br />
146
Pause (PA)<br />
External Control Comm<strong>and</strong>s<br />
Comm<strong>and</strong>:<br />
Pauses the current file position <strong>and</strong> blacks out the picture.<br />
Format:<br />
PA<br />
Response:<br />
R<br />
Explanation:<br />
The PA comm<strong>and</strong> will pause playback, Scan Reverse or Scan<br />
Forward. While having no visible effect on screen, it should also<br />
transition from Stop to Pause holding on frame 1 of the first file of<br />
the playlist. This is simply for compatibility with LDV devices<br />
which can use PA as a means of spinning up the disc without<br />
actually beginning playback. By transitioning from Stop to Pause<br />
the <strong>Firefly</strong> will<br />
give the control system the expected response if a status request is<br />
made later. In all cases, PA results in video being blacked out until<br />
another comm<strong>and</strong> is received. The Blackout will only remain in<br />
effect for as long as the unit is in Pause mode. Any comm<strong>and</strong><br />
which transitions out of Pause mode will also unmute the video.<br />
Examples:<br />
PA<br />
Pauses the <strong>Firefly</strong> <strong>and</strong> blacks out the video outputs.<br />
0@PA<br />
Pauses the <strong>Firefly</strong> <strong>and</strong> blacks out the video output.<br />
147
External Control Comm<strong>and</strong>s<br />
Still (ST)<br />
Comm<strong>and</strong>:<br />
Pauses the current file position <strong>and</strong> freezes the picture.<br />
Format:<br />
ST<br />
Response:<br />
R<br />
Explanation:<br />
ST is treated exactly the same as PA except that instead of the<br />
video output going black, the current video frame is held on screen.<br />
If an ST comm<strong>and</strong> is received after a PA the effect will simply be<br />
to unmute the video output. Likewise, if a PA is received after an<br />
ST, the effect will simply be to mute the video.<br />
Examples:<br />
ST<br />
Pauses the <strong>Firefly</strong> <strong>and</strong> freezes the current frame on each video<br />
output.<br />
0@ST<br />
Pauses the <strong>Firefly</strong> <strong>and</strong> freezes the current frame video output.<br />
148
Search (SE)<br />
External Control Comm<strong>and</strong>s<br />
Comm<strong>and</strong>:<br />
Jumps to the specified position within the current MPEG file or<br />
playlist.<br />
Format:<br />
SE<br />
Response:<br />
R<br />
Explanation:<br />
The Search comm<strong>and</strong> can jump to any I-frame within the current<br />
file or the head of any other file within the playlist. After executing<br />
the search comm<strong>and</strong> the video will transition to Still mode until<br />
another comm<strong>and</strong> is received. In the event that a search comm<strong>and</strong><br />
is received with an out of range address value (i.e. – chapter<br />
number higher than the number of files in the playlist) the search<br />
comm<strong>and</strong> will not be processed <strong>and</strong> the error code “E12” will be<br />
returned.<br />
Examples:<br />
0@CH15SE<br />
Jumps to the head of the 15 th file in the playlist <strong>and</strong> then transitions<br />
to still mode. If there are fewer than 15 files in the playlist an error<br />
code E12 is returned <strong>and</strong> no change is made.<br />
149
External Control Comm<strong>and</strong>s<br />
Multi-Track Jump Forward (JF)<br />
Comm<strong>and</strong>:<br />
Jumps forward in the current MPEG file or playlist by the amount<br />
specified in the argument.<br />
Format:<br />
JF<br />
Response:<br />
R<br />
Explanation:<br />
The Jump Forward comm<strong>and</strong> is similar to the search comm<strong>and</strong><br />
accept that the address argument is interpreted relative to the<br />
current file <strong>and</strong> playlist position <strong>and</strong> the new position is always<br />
forward of the current position. In the event that a Jump Forward<br />
comm<strong>and</strong> is received with an out of range address value (i.e. –<br />
chapter number greater than the remaining number of files in the<br />
playlist) the Jump Forward comm<strong>and</strong> will not be processed <strong>and</strong> the<br />
error code “E12” will be returned.<br />
Examples:<br />
0@CH3JF<br />
Jumps to the head of the file 3 places down in the playlist <strong>and</strong> then<br />
transitions to still mode. If for example file 1 is currently playing,<br />
this comm<strong>and</strong> would advance to the head of file 4. If there are<br />
fewer than 3 files remaining in the playlist for channel 2 error code<br />
E12 is returned <strong>and</strong> no change is made.<br />
150
Multi-Track Jump Reverse (JR)<br />
External Control Comm<strong>and</strong>s<br />
Comm<strong>and</strong>:<br />
Jumps backward in the current MPEG file or playlist by the<br />
amount specified in the argument.<br />
Format:<br />
JR<br />
Response:<br />
R<br />
Explanation:<br />
The Jump Reverse comm<strong>and</strong> is similar to the search comm<strong>and</strong><br />
accept that the address argument is interpreted relative to the<br />
current file <strong>and</strong> playlist position <strong>and</strong> the new position is always<br />
before the current position. In the event that a Jump Reverse<br />
comm<strong>and</strong> is received with an out of range address value (i.e. –<br />
chapter number greater than the current file in the playlist) the<br />
Jump Reverse comm<strong>and</strong> will not be processed <strong>and</strong> the error code<br />
“E12” will be returned.<br />
Examples:<br />
0@CH1JR<br />
Jumps to the head of the current file <strong>and</strong> then transitions to still<br />
mode. The only condition under which this comm<strong>and</strong> could<br />
generate an error code would be if video was stopped or if no<br />
playlist was loaded.<br />
0@CH3JR<br />
Jumps to the head of the second file before the currently playing<br />
file <strong>and</strong> then transitions to still mode. If for example file 4 is<br />
currently playing, this comm<strong>and</strong> would advance to the head of file<br />
2. If the currently playing file is less than the third file in the<br />
playlist error code E12 is returned <strong>and</strong> no change is made.<br />
151
External Control Comm<strong>and</strong>s<br />
Display Control (DS)<br />
Comm<strong>and</strong>:<br />
Turns the on screen status display on or off .<br />
Format:<br />
xDS<br />
Response:<br />
R<br />
Explanation:<br />
This comm<strong>and</strong> is used to call up a graphic overlay. All elements<br />
of that overlay except the border box around the edge of the picture<br />
are included. A value of 0 for x will turn on the graphic overlay<br />
while a value of 1 will turn off the graphic overlay. Any other<br />
value is considered invalid <strong>and</strong> will return an error code of NAK<br />
without changing the state of the graphic overlay.<br />
Examples:<br />
0DS<br />
Turns on the graphic overlay for the <strong>Firefly</strong>. If the graphic overlay<br />
was already enabled on a channel at the time this comm<strong>and</strong> was<br />
received, no change is made.<br />
0@0DS<br />
Turns off the graphic overlay. If the graphic overlay was already<br />
off, no change is made.<br />
152
Frame Number Request (?F)<br />
External Control Comm<strong>and</strong>s<br />
Comm<strong>and</strong>:<br />
Requests the file position in the current MPEG file in frame<br />
number format.<br />
Format:<br />
?F<br />
Response:<br />
<br />
Examples:<br />
Comm<strong>and</strong> Response<br />
0@?F 02045 <br />
153
External Control Comm<strong>and</strong>s<br />
Time Code Request (?T)<br />
Comm<strong>and</strong>:<br />
Requests the file position in the current MPEG file in time code<br />
format.<br />
Format:<br />
?T<br />
Response:<br />
<br />
Explanation:<br />
This comm<strong>and</strong> can be global specific. If received as a global<br />
comm<strong>and</strong>, the <strong>Firefly</strong> will respond with the file position.<br />
Examples:<br />
Comm<strong>and</strong> Response Meaning<br />
0@?T 0123329 0Hr 12Min 33sec 29Fr<br />
?T 0011402 <br />
1081622 <br />
0000612 <br />
0103729 <br />
154<br />
0Hr 1Min 14Sec 2Fr<br />
1Hr 8Min 16Sec 22Fr<br />
0Hr 0Min 6Sec 12Fr<br />
0Hr 10Min 37Sec 29Fr
Chapter Number Request (?C)<br />
Comm<strong>and</strong>:<br />
Requests the position in the current playlist.<br />
Format:<br />
?C<br />
Response:<br />
<br />
Explanation:<br />
This comm<strong>and</strong> can be global specific.<br />
Examples:<br />
Comm<strong>and</strong> Response<br />
0@?C 3 <br />
?C 3 <br />
1 <br />
3 <br />
7 <br />
External Control Comm<strong>and</strong>s<br />
155
External Control Comm<strong>and</strong>s<br />
Player Active Mode Request (?P)<br />
Comm<strong>and</strong>:<br />
Requests the current mode.<br />
Note: The state after a reject comm<strong>and</strong> (RJ) will be P05 (stilled),<br />
not P01 (stopped).<br />
Format:<br />
?P<br />
Response:<br />
Examples:<br />
156<br />
Response<br />
P01 indicates video is stopped<br />
P04 indicates video is playing<br />
P05 indicates video is stilled (paused with image<br />
frozen)<br />
P06 indicates video is paused (paused with black<br />
screen)<br />
P08 indicates video is in fast forward or rewind<br />
Comm<strong>and</strong> Response Meaning<br />
1@?P P04 Playing<br />
?P P04 Video is Playing
<strong>Firefly</strong> Model Request (?X)<br />
Comm<strong>and</strong>:<br />
Requests the software version.<br />
Format:<br />
?X<br />
Response:<br />
V<br />
Explanation:<br />
This comm<strong>and</strong> is always global specific.<br />
Examples:<br />
Comm<strong>and</strong> Response Meaning<br />
External Control Comm<strong>and</strong>s<br />
?X 4V2.00 4 channels ver 2.00 software<br />
?X 2V3.12 2 channels ver 3.12 software<br />
157
External Control Comm<strong>and</strong>s<br />
Load Playlist/Schedule (LD)<br />
Comm<strong>and</strong>:<br />
Loads a playlist/schedule.<br />
Format:<br />
“”LD<br />
Response:<br />
R<br />
Explanation:<br />
This comm<strong>and</strong> is used to load a new playlist/schedule. When this<br />
comm<strong>and</strong> is received a check is done to be sure the specified<br />
filename actually exists on the <strong>Firefly</strong> hard drive. If it does not<br />
exist, then the error code E12 is returned <strong>and</strong> playback continues<br />
uninterrupted with the previous playlist/schedule.<br />
If the specified playlist/schedule is found on the hard disk, then<br />
playback of the previous playlist/schedule is halted <strong>and</strong> the new<br />
playlist/schedule is loaded.<br />
If “Auto Play” is enabled, playback will automatically start when a<br />
new playlist/schedule is loaded via the LD comm<strong>and</strong>. However, if<br />
“Auto Play” is disabled, playback will NOT automatically start;<br />
playback of the playlist/schedule must be started with the play (PL)<br />
comm<strong>and</strong>.<br />
Examples:<br />
“Tuesday.fpl”LD<br />
Halts playback <strong>and</strong> loads the playlist named “Tuesday.fpl”.<br />
“Summer1.fsc”LD<br />
Halts playback <strong>and</strong> loads the schedule named “Summer1.fsc”<br />
Note that the LD comm<strong>and</strong> requires quotes around the playlist/schedule name.<br />
158
External Control Comm<strong>and</strong>s<br />
External Control Comm<strong>and</strong>s<br />
Quick Reference Guide:<br />
VCC Comm<strong>and</strong>s:<br />
Playlistload<br />
Playlistplay<br />
mpgLoad<br />
mpgLoadDef<br />
mpgLoadNextDef<br />
mpgLoadNext<br />
mpgClearDef<br />
mpgPlay<br />
mpgStop<br />
mpgSetInitOnOpen<br />
mpgBlack<br />
fireflyFTPUpdate<br />
<strong>Firefly</strong>SetDefault<br />
fireflySetIPAddr<br />
fireflySetGateway<br />
fireflySetNetmask<br />
fireflySetNetworkType<br />
fireflySetWeb_Enable<br />
fireflyGetIPAddr<br />
fireflyGetGateway<br />
fireflyGetNetmask<br />
fireflyGetNetworkType<br />
fireflyGetWeb_Enable<br />
mpgCallback<br />
Play Complete Callback<br />
mpgSetVolumeLeftRight<br />
osdLoadBMP<br />
osdShow<br />
osdHide<br />
osdSetXYMix<br />
genSetVideo<br />
genSetAudio 0 chip Source<br />
mpgDir<br />
infoGetFile<br />
infoGetPlaylist<br />
infoGetSchedule<br />
infoGetState<br />
LDV Comm<strong>and</strong>s:<br />
Play (PL)<br />
Reject “Stop” (RJ)<br />
Pause (PA)<br />
Still (ST)<br />
Search (SE)<br />
Multi-Track Jump Forward (JF)<br />
Multi-Track Jump Reverse (JR)<br />
Key Lock (KL)<br />
Display Control (DS)<br />
Frame Number Request (?F)<br />
Time Code Request (?T)<br />
Chapter Number Request (?C)<br />
Player Active Mode Request (?P)<br />
<strong>Firefly</strong> Model Request (?X)<br />
Load Playlist/Schedule (LD)<br />
159
160
TROUBLESHOOTING<br />
General Issues<br />
No Power to <strong>Firefly</strong><br />
<strong>Firefly</strong> should automatically start up when power is applied <strong>and</strong><br />
begin playing back video.<br />
If there is no power indicator:<br />
1. Confirm power sources by plugging in another electrical<br />
device.<br />
2. Verify that electrical plug is fully seated in power supply <strong>and</strong> or<br />
the video player.<br />
3. Test power cable in alternate device or use different power<br />
cable.<br />
4. If there is still no power, please contact your technical support<br />
representative.<br />
No Video Playback<br />
<strong>Firefly</strong> should automatically begin playing videos when power is<br />
applied. Videos play off of the internal storage of the player.<br />
If there is power to the <strong>Firefly</strong>, but no video playback:<br />
1. Run “Play Test File”<br />
2. To stop the test file playback, simply press any button on the<br />
front of the player. For further instructions, refer to the “Front<br />
Panel Display” chapter of this user manual.<br />
161
Troubleshooting<br />
"Latent Images" or "Flashing" During Playback<br />
1. Incorrect timecodes or improperly closed encoding session. If<br />
the incorrect timecode is given for a particular file it is possible<br />
to actually encode a frame or two of the trailer or header<br />
information from the source. Often this "extra" frame is seen<br />
only briefly <strong>and</strong> may appear as a "flash" on the screen. Review<br />
the original source of the encoding <strong>and</strong> determine if the<br />
timecodes are correct or if the encoding session was actually<br />
closed on the proper frame.<br />
2. Playing MPEG 1 <strong>and</strong> MPEG2 files back to back: The<br />
resolution switch from MPEG 1 files (342X240) to MPEG2<br />
files (720X480) causes a "latent image" or a "quadrant display"<br />
of the last played file's image. The only way to perform<br />
seamless playback when using a playlist of files is to insert an<br />
encoded "black file" with blank audio track, between MPEG 1<br />
<strong>and</strong> MPEG 2 files. The black MPEG file preceding the<br />
playback file should be of the same st<strong>and</strong>ard. In other words,<br />
prior to an MPEG 1 file the "black file"--again with a blank<br />
audio track--should be MPEG 1 <strong>and</strong> vice versa.<br />
Stuttering Files During Playback<br />
Irregular playback can be caused by a number of conditions:<br />
1. Mixed video only MPEG files with MPEG with video <strong>and</strong><br />
audio data: Confirm that all files are either video only, audio<br />
only, or audio/video files. It is recommended to have a "blank"<br />
audio track encoded with all MPEG files--even if no audio is<br />
present on the source material. This will ensure compatibility,<br />
if MPEGs with audio/video information are introduced at a<br />
later date.<br />
2. Dolby Digital files: Dolby Digital files can not be mixed with<br />
any other type of file. Ensure that all of the file types are the<br />
same.<br />
162
Troubleshooting<br />
3. The bit rate of the MPEG files being played exceed the system<br />
capabilities: The Visual Circuit MPEG decoder boards <strong>and</strong><br />
digital servers all have a maximum sustained bit rate that can<br />
be delivered. Refer to the system capabilities above for basic<br />
information. Consult your Visual Circuits representative prior<br />
to encoding or designing your installation if there are any<br />
questions.<br />
4. Uneven audio to video track lengths: Confirm the length of the<br />
audio track to the length of the video track. The Visual Circuits<br />
driver aggressively synchronizes the audio <strong>and</strong> video data of<br />
the MPEG file to maintain Audio/Video (AV) Sync. If the<br />
MPEG file's audio <strong>and</strong> video tracks are uneven in length, the<br />
driver's attempt to synchronize these uneven tracks will result<br />
in poor performance. Mismatched AV track lengths will result<br />
in overall degradation of system performance. Often a "bad"<br />
file will cause uneven or stuttering playback on other channels<br />
of the system as well. Through digital editing, MPEG 2 files<br />
can be "demultiplexed" (separating the audio from video<br />
information). The audio <strong>and</strong> video tracks can then be edited to<br />
match. The two tracks can then be "multiplexed" back together.<br />
Always test files individually if a file (or system) is suspected<br />
to have playback problems.<br />
Some files in the playlist do not play<br />
1. All files on a playlist channel must be the same type.<br />
If some are elementary stream (video only) <strong>and</strong> others are<br />
program stream (audio & video), some files will be<br />
automatically skipped in order to keep playback running<br />
smoothly.<br />
2. Filenames <strong>and</strong> External Comm<strong>and</strong>s<br />
When using external comm<strong>and</strong>s to h<strong>and</strong>le files, it is necessary<br />
for those files to have names without, i.e. sales_video.mpg not<br />
sales video.mpg. One convention is to use underscores in place<br />
of spaces.<br />
163
Troubleshooting<br />
Smooth Transitions<br />
For smoother transitions, MPEG files in the same playlist should<br />
be encoded at the same resolution <strong>and</strong> size (height x width).<br />
SMPTE time codes are not recognized properly<br />
Some SMPTE tracks loose information during compression <strong>and</strong><br />
may not "trigger" events as required. It is recommended to encode<br />
these tracks "hot"--adding approximately +6 db to the track while<br />
encoding. Again, testing is essential to account for variances in<br />
encoders <strong>and</strong> SMPTE devices involved. Note: Simple audio<br />
filters <strong>and</strong> or unbalanced to balanced transformers, used at the<br />
installation site, are also useful in eliminating "noise" <strong>and</strong> cleaning<br />
up the SMPTE signal.<br />
Filename Already Exists<br />
This is considered a non-fatal error <strong>and</strong> you will be given the<br />
opportunity through the dialog box below to make the decision as<br />
to how to h<strong>and</strong>le this condition.<br />
FTPing Font Files (.ttf)<br />
When FTPing font files (.ttf) set FTP to binary files.<br />
Insufficient Disk Space<br />
A check for this condition will be performed after you confirm the<br />
intent to copy files, but before the actual copying begins. This<br />
check compares the total amount of space required to copy all<br />
selected files against the available disk space on the internal<br />
storage. A safety margin of 300 MB available disk space will have<br />
to remain after the copy for this test to pass.<br />
164
Forgot Name, Password, IP...???<br />
Troubleshooting<br />
If you’re in a situation where you cannot get into the Webview<br />
interface because of a misplaced “<strong>User</strong> Name, Password, IP<br />
address, DNS Name, etc. Or perhaps the system was inadvertantly<br />
set to DHCP when you don’t even have a DHCP server? All is not<br />
lost (see Basic Hyper Terminal Setup on page 120 & Networking<br />
Comm<strong>and</strong>s on page 134).<br />
165
Troubleshooting<br />
Preventing Cabling <strong>and</strong><br />
Connection Problems<br />
The suggestions listed below provide basic tips for preventing or<br />
minimizing problems related to cabling <strong>and</strong> connections to <strong>and</strong><br />
from the <strong>Firefly</strong>.<br />
❏ Use the best cable you can afford.<br />
❏ Use the shortest cables possible.<br />
For composite video, PAL or NT<strong>SC</strong>, RG-59 cable can be<br />
used for distances of up to 20 meters between the video<br />
source <strong>and</strong> the acceptor. No signal deterioration should<br />
show on the screen. For longer distances, up to 30 meters,<br />
use RG-11 type cable. For s-video, st<strong>and</strong>ard, inexpensive<br />
cables allow operating distances of 5-7 meters. Very little<br />
deterioration is apparent. For component video, RG-59<br />
cables are suitable for up to 10 meters. For longer distances,<br />
up to 20-25 meters, a better cable should be used, such as<br />
RG-11.<br />
❏ Check that impedance of the cable really matches your<br />
application. <strong>Firefly</strong> is terminated at 75 ohms.<br />
❏ Check the connectors on the cables. Poor quality connectors<br />
may have worse effects than the cables themselves.<br />
❏ Use appropriate amplifiers if needed. Because <strong>Firefly</strong>-<strong>SC</strong><br />
uses unbalanced audio, it is recommended that distances<br />
over 10 meters use a “Audio Line Amp/Balancer”, such as<br />
Radio Design Labs “Stick On”.<br />
❏ Keep cables away from sources of interference - electric<br />
motors, main cables, transmitters, light dimmers, etc.<br />
166
FIREFLY MULTI-ZONE <br />
(<strong>MZ</strong>)<br />
Installing the <strong>MZ</strong><br />
Video Output<br />
DVI<br />
For best quality video out put <strong>and</strong> for output to analog displays, it<br />
is necessary to attach a DVI to VGA adapter to the <strong>MZ</strong>’s DVI<br />
output.<br />
This connector is provided with the <strong>Firefly</strong> <strong>MZ</strong>.<br />
S-VideO<br />
167
<strong>Firefly</strong> Multi-Zone (<strong>MZ</strong>)<br />
Functionality<br />
<strong>Firefly</strong> Multi-Zone functionality is available through the Media<br />
Messenger Multi-Zone Layout Editor that provides the ability to<br />
integrate high-resolution, rich-content graphics with dynamic video<br />
<strong>and</strong> scrolling text in a simultaneous display. The Layout Editor<br />
does this by dividing the screen into a variety of content zones.<br />
These zones are extremely flexible as to their content type <strong>and</strong><br />
their size <strong>and</strong> position within the display area.<br />
Table 1. Media Formats<br />
The sequence of steps for creating a playlist <strong>and</strong> distributing it to a<br />
<strong>Firefly</strong> <strong>MZ</strong> Media Player are:<br />
1. Set Display Parameters, see Setting Display Parameters on<br />
page 170.<br />
2. Create the layout, Creating the Layout on page 170.<br />
3. Create a playlist <strong>and</strong> add content to it, Creating the Playlist on<br />
page 173.<br />
4. Create a schedule for the Playlist (optional).<br />
Refer to the Media Messenger online Help for details.<br />
5. Link the playlist or schedule, if used, or to the <strong>Firefly</strong> <strong>MZ</strong>, Link<br />
the Playlist to the <strong>Firefly</strong> on page 175.<br />
6. Upload playlist <strong>and</strong> files to <strong>Firefly</strong> <strong>MZ</strong> via FTP, Publish on<br />
page 14.<br />
<strong>Firefly</strong> <strong>MZ</strong> offers the capability to create a variety of professional,<br />
high-quality layouts from the simple to the dynamic. Below are<br />
two layout examples.<br />
168<br />
Content Type Format<br />
Video St<strong>and</strong>ards NT<strong>SC</strong> <strong>and</strong> PAL<br />
Video MPEG-1, MPEG-2, Unencrypted DVD<br />
Graphics BMP, GIF, JPG, PNG, TGA, TIF
Software Update<br />
<strong>Firefly</strong> Multi-Zone (<strong>MZ</strong>)<br />
The <strong>MZ</strong> h<strong>and</strong>les software updates in the same manner as the <strong>SC</strong>.<br />
There is one diffence, however.<br />
Status LED<br />
The <strong>MZ</strong> Status LED displays RED while an update is occuring<br />
while te <strong>SC</strong> does not indicate that a update is in progress.<br />
WARNING<br />
Do Not Reboot <strong>Firefly</strong> <strong>SC</strong> or <strong>MZ</strong> during an update.<br />
169
<strong>Firefly</strong> Multi-Zone (<strong>MZ</strong>)<br />
Using <strong>Firefly</strong> <strong>MZ</strong> to<br />
Create a Layout <strong>and</strong> Playlist<br />
Creating a Playlist requires:<br />
1. Setting Display Parameters.<br />
2. Creating the <strong>MZ</strong> (multi-zone) layout.<br />
3. Creating a playlist <strong>and</strong> attaching layout to it.<br />
4. Adding content to playlist.<br />
5. Creating a schedule for the Playlist (optional).<br />
Refer to the Media Messenger online Help for details.<br />
6. Linking the playlist or schedule (if used) to the <strong>Firefly</strong> <strong>MZ</strong>.<br />
Creating the Layout<br />
The layout is a template used to position <strong>and</strong> size the playlist<br />
content. A playlist has only one layout.<br />
Setting Display Parameters<br />
Set the Layout Editor workspace to the appropriate video st<strong>and</strong>ard<br />
<strong>and</strong> resolution for the display device.<br />
1. Open Media Messenger.<br />
2. Click on the Layout button.<br />
170<br />
Edit Schedule<br />
Edit Playlist<br />
Edit Layout
<strong>Firefly</strong> Multi-Zone (<strong>MZ</strong>)<br />
3. Select the New Layout, give the layout a name, <strong>and</strong> click OK<br />
4. Return to the Layout button, select Screen Resolution <strong>and</strong><br />
choose the appropriate setting.<br />
5. Next select Video Resolution <strong>and</strong> choose the appropriate video<br />
st<strong>and</strong>ard.<br />
6. Save.<br />
Creating a <strong>MZ</strong> (multi-zone) Layout<br />
Go to the Layout Editor workspace:<br />
Video Zone<br />
Graphic Zone<br />
Scrolling Text<br />
Zone Parameters<br />
Auto-stretch Sizing<br />
Snap Positioning<br />
Delete<br />
Save Zone Settings<br />
Save Workspace<br />
171
<strong>Firefly</strong> Multi-Zone (<strong>MZ</strong>)<br />
Position Zones in Layout Workspace<br />
1. Create the Video Zone first.<br />
2. Add Scrolling Text Zone if required.<br />
3. Add Graphics Zones<br />
172<br />
Video Zone<br />
The Layout must have a video zone with a video file to function.<br />
There is only one video zone in a layout.<br />
Scrolling Text Zone<br />
There is only one scrolling text zone per layout.<br />
Scrolling text zones can overlay the video or graphics zones.<br />
Graphics Zones<br />
To eliminate the potential of left over images after a transition<br />
from one playlist layout to another, create a black graphic zone<br />
that masks all unused areas within the layout.
4. Save the layout.<br />
Creating the Playlist<br />
Navigation Pane Playlist Menu Scheduling Pane<br />
Playlist Pane<br />
Schedule Menu<br />
<strong>Firefly</strong> Multi-Zone (<strong>MZ</strong>)<br />
1. Return to the Media Messenger main workspace.<br />
2. Open the Playlist Editor.<br />
3. Verify that the correct playlist is shown in the Playlist Menu<br />
field.<br />
173
<strong>Firefly</strong> Multi-Zone (<strong>MZ</strong>)<br />
4. Verify that the Navigation Pane lists the layout content zones.<br />
5. Right-click on the Default Video Zone <strong>and</strong> insert a video file.<br />
174<br />
.To locate files to insert into the content zone, use the file<br />
browser or, if the file is already resident on the <strong>Firefly</strong> <strong>MZ</strong> Media<br />
Player, enter the filename with its extension when it is requested by<br />
application. The full path is not required provided that all the files for<br />
the playlist are transferred to the same directory on the player<br />
File Formats<br />
Video: Mpeg-1, Mpeg-2, Unencrypted DVD<br />
Graphics: BMP, GIF, JPG, PNG, TGA, TIF<br />
6. If required, add content to the default Scrolling Text <strong>and</strong><br />
Graphics Zones.
<strong>Firefly</strong> Multi-Zone (<strong>MZ</strong>)<br />
7. Insert additional video files in to the video zone to create the<br />
rest of the playlist.<br />
8. Insert he graphic or scrolling text objects belonging to each<br />
video.<br />
9. Save the playlist by clicking on the Close button in the Playlist<br />
Editor workspace.<br />
Refer to the Media Messenger Help for more information about<br />
playlists, schedules, <strong>and</strong> updating the <strong>Firefly</strong> media player.<br />
Link the Playlist to the <strong>Firefly</strong><br />
Each new video zone is a parent to<br />
a family of child content zones that<br />
are clones of the default zones.<br />
Child content zones display at the<br />
same time as the parent video.<br />
A default content zone displays<br />
whenever one of its clones is left<br />
empty.<br />
If both the default <strong>and</strong> one of its<br />
clones are left empty, the presentation<br />
background displays.<br />
With the playlist completed, publish it to the <strong>Firefly</strong>. This involves<br />
linking the playlist or a schedule to the player.<br />
• Link the playlist to the player, if only this playlist is to playback.<br />
• If multiple playlists are to playback on the <strong>Firefly</strong>, create a<br />
schedule. Use Media Messenger to generate a schedule that<br />
determines when <strong>and</strong> for how long each playlist runs on the<br />
player. Refer to Media Messenger Help for details about setting<br />
up schedules.<br />
175
<strong>Firefly</strong> Multi-Zone (<strong>MZ</strong>)<br />
This procedure links the playlist to the player. Linking a schedule<br />
to the player is similar but initiates through the Schedules Pane.<br />
1. Return to main Media Messenger workspace..<br />
2. Verify that the correct playlist is displayed in the Playlists<br />
Pane.<br />
3. Select the player by clicking on its icon in the Network Pane.<br />
4. Click on the Link button. This instructs the player or group of<br />
players to playback that particular playlist.<br />
176<br />
The Playlists Pane displays a list of the<br />
videos used in the playlist.
<strong>Firefly</strong> <strong>MZ</strong> Tips<br />
<strong>Firefly</strong> Multi-Zone (<strong>MZ</strong>)<br />
1. A layout has only one Video <strong>and</strong> one Scrolling Text zone.<br />
2. A layout can have unlimited graphics zones although large<br />
numbers do impact performance.<br />
3. The Video Zone can have multiple video files inserted into it, n<br />
which case, they play in the order they appear in the playlist.<br />
4. Each video file has a set of content zones cloned from the<br />
original default zones.<br />
5. Zone shapes are modified in three ways.<br />
<strong>Manual</strong>ly, by dragging a side or corner.<br />
To maintain the aspect ratio of zone, hold down the Shift key<br />
while dragging.<br />
Automatically, by using the Auto-stretch buttons.<br />
Precisely, by using the Width <strong>and</strong> Height fields. Save the size<br />
settings by clicking the Assign button.<br />
6. Zone positions are modified in three ways.<br />
<strong>Manual</strong>ly, by dragging the zone to its position.<br />
Automatically, by using the Snap buttons.<br />
Precisely, by using the Left <strong>and</strong> Top fields. Save the position<br />
settings by clicking the Assign button.<br />
7. Graphic or Scrolling Text zones can overlay the Video.<br />
8. To view the layout associated with a particular video instance,<br />
click on that video object in the Network Pane.<br />
177
<strong>Firefly</strong> Multi-Zone (<strong>MZ</strong>)<br />
9. Graphics Quality<br />
Most often, the automatic sizing <strong>and</strong> color-depth conversion<br />
performed by the <strong>Firefly</strong> meets the needs of the presentation.<br />
Occasionally however, it may be necessary to adjust a graphic<br />
so that it displays precisely as required. For the highest quality<br />
rendition of a graphic it is important to consider two things:<br />
color-depth <strong>and</strong> precise sizing.<br />
a. Color-depth<br />
The <strong>Firefly</strong> <strong>MZ</strong> is a 16-bit color device that maps the native<br />
color of the graphic to the player’s 16-bit display buffer.For<br />
best results convert graphics to a st<strong>and</strong>ard (1-, 2-, 4-, 8-, or<br />
24-bit) JPEG or PNG format before inserting it into a<br />
content zone.<br />
b. Sizing Graphics<br />
For highest quality results, make certain that the dimensions<br />
are the same for the content zone <strong>and</strong> source graphic. Sizing<br />
a graphic by dragging a content zone h<strong>and</strong>le or changing the<br />
content zone dimensions does not always produce the best<br />
visual results. There are two sizing methods that provide the<br />
most precise images:<br />
178<br />
Create the layout design in Media Messenger using the<br />
content zone objects <strong>and</strong> then size the graphics to fit in the<br />
zones.<br />
Create a layout design in another program such as Adobe<br />
Photoshop, with the graphics <strong>and</strong> other elements sized<br />
exactly as they should appear when displayed. Then, using<br />
the sizing information from that design, create a<br />
corresponding multi-zone layout using the Layout Editor in<br />
Media Messenger.<br />
10. Animated GIFs (classifed as graphics)Animated GIF files must<br />
be non-optimized. In addition, the <strong>MZ</strong> does not support<br />
transparency for these files.
<strong>Firefly</strong> Multi-Zone (<strong>MZ</strong>)<br />
11. Smooh Video Transitions<br />
MPEG files used in a layout should be of the same resolution<br />
<strong>and</strong> size (height x width).<br />
179
180
TECHNICAL<br />
SPECIFICATIONS<br />
Option Description<br />
Basic<br />
Configuration<br />
40GB HDD storage<br />
NT<strong>SC</strong>, PAL<br />
Decodes all 18 AT<strong>SC</strong> formats up to 1920x1080p<br />
4:3, or 16.9 aspect ratios<br />
Composite, Component (PbPrY), S-video<br />
32-bit OSD; 256-level transparency<br />
32-bit high-resolution accelerated graphics<br />
Video Output Composite, S-video, Component<br />
Audio Output Stereo or Dolby Digital via S/PDIF;<br />
stereo analog MPEG Layers 1, 2, 3<br />
Networking 10/100 Mbps Ethernet<br />
Integrated KenCast FAZZT client (option)<br />
FTP, HTTP auto-updating<br />
Software WebView — HTML-based setup, monitor <strong>and</strong> control<br />
interface. Requires Internet Explorer 5.5 or higher.<br />
Media Messenger — for managing <strong>and</strong> distributing media<br />
via FTP or HTTP to a single Mantis MC server<br />
Media Messenger Multi-player version (optional) — for<br />
managing <strong>and</strong> distributing media via FTP, HTTP or multicast<br />
to groups of networked Mantis, <strong>Firefly</strong> or POPVideo servers<br />
Video MPEG-1 ISO 11172<br />
MPEG-2 ISO/13818-2<br />
Program, transport <strong>and</strong> elementary streams<br />
NT<strong>SC</strong>/PAL transcoding<br />
Constant or variable bit rate decoding<br />
45 Mbps maximum bit rate (includes text)<br />
Dimensions 1.75 in. (4.45 m) high (1RU) x 10 in. (25.4 cm) wide x<br />
8.25 in. (20.1 cm) deep<br />
Weight Approximately 3.5 lbs. (1.59 kg)<br />
Power 100 ~ 240v, 50 - 60Hz, 14W @ 115VAC<br />
Temperature<br />
Range<br />
Certification /<br />
Regulation<br />
0 o - 40 o Celsius continuous operation<br />
(0 o - 65 o C short-term)<br />
FCC - Part 15, Class A; CE<br />
181
182
INDEX<br />
A<br />
Advanced Settings 99<br />
audio/video sync 99<br />
merge playlists 99<br />
animated GIF files 178<br />
audio<br />
cabling 166<br />
Dolby Digital 19, 162<br />
line-level 4<br />
multiplexing 21<br />
output 181<br />
S/PDIF 6<br />
stream 21<br />
test tones 21<br />
unbalanced 6<br />
Audio Output 73<br />
Audio Settings 73<br />
volume 73<br />
audio/video sync 64, 99, 163<br />
Auth Passphrase 81<br />
auto play 75<br />
B<br />
basic configuration 181<br />
baud rate 76<br />
bit rates 19, 20, 62, 163<br />
C<br />
cable<br />
null modem 7<br />
cabling 166<br />
impedance 166<br />
CD/DVD<br />
publish playlist 16<br />
183<br />
certification <strong>and</strong> regulation 181<br />
Channel 97<br />
cleanup routine 108<br />
client enable 96, 111<br />
color bars 21<br />
color depth<br />
<strong>MZ</strong> 178<br />
Community 81<br />
component 5, 72, 166<br />
composite 5, 72, 166<br />
configure<br />
network 7<br />
via ethernet 7<br />
via serial port 7<br />
connecting<br />
audio cables 166<br />
video cables 166<br />
Control Settings 75<br />
auto play 75<br />
baud rate 76<br />
data bits 76<br />
parity 76<br />
conventions, documentation 2<br />
creating a layout 170<br />
D<br />
data bits 76<br />
data underflow 65<br />
date rules 56<br />
adding 57<br />
deleting 58<br />
editing 58<br />
decoding<br />
video 181<br />
default video zone 174<br />
DHCP 24
Index<br />
diagnostic logs 67, 82, 116<br />
Diagnostics 60<br />
general 61<br />
logging 65<br />
playback 64<br />
video 62<br />
dimensions 181<br />
direct file access updating 113<br />
directories 88<br />
disk underflow 64<br />
display parameters, setting 170<br />
DNS name 24<br />
Dolby Digital 19, 162<br />
DTDs 117<br />
DVMPEG 21<br />
E<br />
elementary stream 19<br />
encoding 19, 162<br />
bit rates 19, 20, 62, 163<br />
Dolby Digital 19<br />
MPEG 19<br />
MPEG2 19<br />
multiplexing 21<br />
program stream 19<br />
PTS values 19<br />
recommendations 19<br />
requirements 19<br />
SMPTE 21<br />
end code 20<br />
errors<br />
external control comm<strong>and</strong>s<br />
142<br />
events 46<br />
adding 48<br />
days of week 47<br />
deleting 50<br />
editing 50<br />
interrupt 47<br />
184<br />
interval 48<br />
play once 48<br />
playlist name 47<br />
properties 47<br />
start time 47<br />
stop time 47<br />
External Control Comm<strong>and</strong>s 159<br />
external control comm<strong>and</strong>s 9, 119<br />
error codes 142<br />
quick reference guide 159<br />
F<br />
fade in rate 41<br />
fade out rate 41<br />
file access 85, 113<br />
<strong>Firefly</strong><br />
changing TCP/IP settings 8<br />
configure for network 7<br />
configuring properties 11<br />
onboard FTP server 11<br />
overview 1<br />
<strong>Firefly</strong> Audio Configurations 74<br />
<strong>Firefly</strong> <strong>MZ</strong><br />
tips 177<br />
fixed update interval 88<br />
frame rate 62<br />
FTP<br />
client 114<br />
configuring <strong>Firefly</strong> properties<br />
11<br />
onboard server 11<br />
password 87<br />
port 113<br />
publish playlist 14<br />
server 104<br />
update account 105<br />
update now 88<br />
update process 106<br />
updating 61, 103
Index<br />
updating order 107<br />
FTP Auto-Update Settings 87, 96<br />
directory 88<br />
fixed update interval 88<br />
FTP update now 88<br />
password 87<br />
site ID 69<br />
update interval 88<br />
username 87<br />
G<br />
gateway 79<br />
General Settings 69<br />
time zone 70<br />
GIF, animated 178<br />
GOP 20<br />
graphic overlays 35<br />
adding 37<br />
fade in rate 41<br />
fade out rate 41<br />
key color 40<br />
positioning 41<br />
previewing 32<br />
properties 39, 43<br />
serial comm<strong>and</strong>s 134<br />
transparency level 40, 43<br />
working with 39, 43<br />
graphic zones 174<br />
graphics<br />
sizing 178<br />
Group of Pictures 20<br />
H<br />
host name 77<br />
HTTP Address 89<br />
HTTP Auto-Update Settings 89<br />
HTTP Directory 89<br />
HTTP Port 89<br />
185<br />
HTTP Proxy Port 89<br />
HTTP Update Now Button 90<br />
Hyper Terminal 120<br />
I<br />
insufficient free space 164<br />
IP address 24, 78<br />
K<br />
KenCast 96, 108<br />
package mode 109<br />
script last mode 110<br />
key color 40<br />
L<br />
latent images 162<br />
layout creating<br />
<strong>MZ</strong> 171<br />
layout, creating 170<br />
LDV control comm<strong>and</strong>s 141<br />
LED, status 169<br />
listen address 97, 111<br />
listen port 97, 111<br />
loading a file 124<br />
loading locally 54<br />
local load 54<br />
local save 53<br />
log default playlist 83, 117<br />
log files 115<br />
diagnostic logs 82, 116<br />
log default playlist 83<br />
log format 83<br />
max log MBs 84<br />
run logs 82, 116<br />
upload logs 84<br />
uploading 118
Index<br />
WebView 65<br />
log format 83, 117<br />
logging 115<br />
diagnostic logs 67, 82, 116<br />
log default playlist 83<br />
log format 83<br />
max log MBs 84<br />
run logs 65, 82, 116<br />
upload logs 84<br />
WebView 65<br />
Logging Settings 82<br />
diagnostic log 82<br />
log default playlist 83, 117<br />
log format 83, 117<br />
max log MBs 84, 117<br />
run log 82<br />
upload logs 84<br />
Login 23<br />
M<br />
manual updating 112<br />
max log MBs 84, 117<br />
media<br />
deleting 31, 33, 34<br />
previewing 31, 32<br />
reviewing 31<br />
transferring 27<br />
Media Messenger 102<br />
layout, creating 170<br />
linking playlist to <strong>Firefly</strong> 175<br />
parameters, display, setting<br />
170<br />
playlist, creating 173<br />
merge playlists 99<br />
mode 78<br />
MPEG 19, 21, 162<br />
encoding 19<br />
program stream 19<br />
MPEG1 19, 162<br />
186<br />
MPEG2 19, 162<br />
mpgLoadNext 124<br />
mpgPlay 126<br />
mpgPlayAll 127<br />
mpgSetVolumeLeftRight 133<br />
mpgStop 126<br />
multicast<br />
client enable 96<br />
KenCast 96, 108<br />
listen address 97<br />
listen port 97<br />
package mode 109<br />
reserve MBs 98<br />
script last mode 110<br />
transfer order 97<br />
updating 108<br />
Multicast Settings<br />
client enable 96, 111<br />
listen address 97, 111<br />
port address 97, 111<br />
reserve MBs 98, 111<br />
transfer order 97, 111<br />
multicast updating 108<br />
multiplexing 21, 163<br />
<strong>MZ</strong><br />
animated GIF 178<br />
auto-stretch 177<br />
color depth 178<br />
layout, creating 171<br />
scrolling text zone 177<br />
video zone 177<br />
workspace 172<br />
zone shapes 177<br />
zones, positioning 172<br />
N<br />
NAK 142<br />
netmask 79<br />
Network Settings 77
Index<br />
gateway 79<br />
host name 77<br />
IP address 78<br />
mode 78<br />
netmask 79<br />
proxy address 80<br />
proxy type 79, 80<br />
Networking 101, 134<br />
Networking Comm<strong>and</strong>s 134<br />
NT<strong>SC</strong> 20, 71, 166<br />
null modem cable 7<br />
O<br />
output<br />
audio 181<br />
video 181<br />
P<br />
package mode 109<br />
PAL 20, 71, 166<br />
parameters<br />
display 170<br />
parity 76<br />
parsing routine 107<br />
Password 23, 25<br />
pause 59<br />
play 59<br />
play button 45<br />
Player 104<br />
Player Control Panel 59<br />
Player Management 104<br />
playing a file 126, 127<br />
playlist<br />
creating 173<br />
Playlist Editor<br />
WebView 35<br />
playlists 4, 35<br />
adding graphic overlays 37<br />
187<br />
adding videos 36<br />
creating 13, 36<br />
default active 4<br />
factory.fpl 4<br />
graphic overlays 39, 43<br />
linkin to <strong>Firefly</strong> 175<br />
moving videos 37<br />
new 36<br />
parsing routine 107<br />
playing 45<br />
removing videos 36<br />
saving 44<br />
port 2180 75, 119<br />
positioning 41<br />
power specidicarions 181<br />
presentation time stamp 19<br />
previewing media 31, 32<br />
Priv Passphrase 81<br />
program stream 19, 163<br />
MPEG2 19<br />
properties<br />
configuring 11<br />
proxy address 80<br />
proxy type 79, 80<br />
PTS 19<br />
Publish<br />
CD/DVD 16<br />
FTP 14<br />
R<br />
reserve MBs 98, 111<br />
resolution 20<br />
restoration mode 161<br />
RG-11 166<br />
RG-59 166<br />
RGB 72<br />
RS232 75, 119<br />
run logs 65, 82, 116
Index<br />
S<br />
S/PDIF 6<br />
saving locally 53<br />
Schedule Editor 46<br />
exiting 58<br />
schedules 46<br />
adding events 48<br />
creating 47<br />
deleting events 50<br />
editing events 50<br />
new 47<br />
saving 52<br />
script last mode 110<br />
Scrolling Text 42<br />
scrolling text<br />
<strong>MZ</strong> 177<br />
scrolling text zones 174<br />
Security Name 81<br />
serial port<br />
configuring <strong>Firefly</strong> 7<br />
shuffle 37<br />
Simple Network Management<br />
Protocol 80<br />
site ID 69<br />
sizing graphics 178<br />
smooth video transitions 179<br />
SMPTE 21, 164<br />
SNMP 80<br />
SNMP Netmask 81<br />
SNMP Network 80<br />
Software 30<br />
software<br />
update 17<br />
Software Update 30<br />
Software Update Check 110<br />
specifications<br />
power 181<br />
specifications, technical 181<br />
start dates 57<br />
static IP 78<br />
188<br />
status<br />
LED 169<br />
updating 169<br />
stop 59<br />
stop dates 57<br />
stopping playback 126<br />
s-video 5, 72, 166<br />
System Comm<strong>and</strong>s 131<br />
System Settings 69<br />
Advanced Settings 99<br />
Audio Settings 73<br />
Control Settings 75<br />
FTP Auto-Update Settings 87,<br />
96<br />
General Settings 69<br />
Logging Settings 82<br />
Network Settings 77<br />
Video Settings 71<br />
WebView Settings 85<br />
system update check<br />
updating<br />
system 108<br />
T<br />
TCP/IP 103, 119<br />
changing <strong>Firefly</strong> settings 8<br />
technical specifications 181<br />
audio output 181<br />
basic configuration 181<br />
certification <strong>and</strong> regulation<br />
181<br />
dimensions 181<br />
power 181<br />
software 181<br />
temperature range 181<br />
video decoding 181<br />
video output 181<br />
weight 181<br />
tecnical specifications
Index<br />
networking 181<br />
temperature range 181<br />
test files 161<br />
time codes 63, 162<br />
time zone 70<br />
tips<br />
<strong>Firefly</strong> <strong>MZ</strong> 177<br />
transfer order 97, 111<br />
transparency<br />
animated GIF 178<br />
transparency level 40, 43<br />
Troubleshooting 161<br />
U<br />
unbalanced audio 6<br />
Update 30<br />
update<br />
software 17<br />
update interval 88<br />
updating<br />
direct file access 113<br />
FTP 103<br />
manual 112<br />
multicast 108<br />
status LED 169<br />
WebView 112<br />
uploading log files 84, 118<br />
Uptime 70<br />
username 85, 87<br />
V<br />
VCC control comm<strong>and</strong>s 121<br />
Version 70<br />
video<br />
cabling 166<br />
component 5<br />
composite 5<br />
date rules 56<br />
189<br />
dates 56<br />
decoding 181<br />
mode 4<br />
output 181<br />
previewing 32<br />
resolution 20<br />
st<strong>and</strong>ard 4<br />
stream 21<br />
s-video 5<br />
Video Dates Editor 46, 56<br />
video output 72<br />
Video Settings 71<br />
video output 72<br />
video st<strong>and</strong>ard 71<br />
video st<strong>and</strong>ard 71<br />
video zone<br />
default 174<br />
videos<br />
shuffling 37<br />
smooth transition 179<br />
volume 73<br />
W<br />
Watchdog 61, 100<br />
web browser 23<br />
WebView 23, 85<br />
deleting media 31<br />
Diagnostics 60<br />
log files 65<br />
logging 65<br />
password 25, 86<br />
Player Control Panel 59<br />
Playlist Editor 35<br />
previewing media 31<br />
reviewing media 31<br />
Schedule Editor 46<br />
setup procedures 23<br />
System Settings 69<br />
transferring media 27
Index<br />
uploading 29<br />
username 25<br />
Video Dates Editor 56<br />
WebView Settings 85<br />
file access 85<br />
password 86<br />
username 85<br />
WebView 85<br />
weight 181<br />
Z<br />
zone<br />
video, default 174<br />
zones<br />
graphic 174<br />
scrolling text 174<br />
190
<strong>813</strong>-<strong>0049c</strong><br />
© 2004 <strong>Focus</strong> <strong>Enhancements</strong>