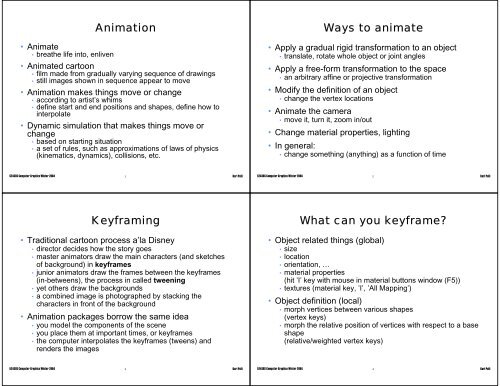
Animation Ways to animate Keyframing What can you keyframe?
Animation Ways to animate Keyframing What can you keyframe?
Animation Ways to animate Keyframing What can you keyframe?

You also want an ePaper? Increase the reach of your titles
YUMPU automatically turns print PDFs into web optimized ePapers that Google loves.
• Animate<br />
• breathe life in<strong>to</strong>, enliven<br />
<strong>Animation</strong><br />
• Animated car<strong>to</strong>on<br />
• film made from gradually varying sequence of drawings<br />
• still images shown in sequence appear <strong>to</strong> move<br />
• <strong>Animation</strong> makes things move or change<br />
• according <strong>to</strong> artist’s whims<br />
• define start and end positions and shapes, define how <strong>to</strong><br />
interpolate<br />
• Dynamic simulation that makes things move or<br />
change<br />
• based on starting situation<br />
• a set of rules, such as approximations of laws of physics<br />
(kinematics, dynamics), collisions, etc.<br />
52438S Computer Graphics Winter 2004 1<br />
Kari Pulli<br />
<strong>Keyframing</strong><br />
• Traditional car<strong>to</strong>on process a’la Disney<br />
• direc<strong>to</strong>r decides how the s<strong>to</strong>ry goes<br />
• master anima<strong>to</strong>rs draw the main characters (and sketches<br />
of background) in <strong>keyframe</strong>s<br />
• junior anima<strong>to</strong>rs draw the frames between the <strong>keyframe</strong>s<br />
(in-betweens), the process in called tweening<br />
• yet others draw the backgrounds<br />
• a combined image is pho<strong>to</strong>graphed by stacking the<br />
characters in front of the background<br />
• <strong>Animation</strong> packages borrow the same idea<br />
• <strong>you</strong> model the components of the scene<br />
• <strong>you</strong> place them at important times, or <strong>keyframe</strong>s<br />
• the computer interpolates the <strong>keyframe</strong>s (tweens) and<br />
renders the images<br />
52438S Computer Graphics Winter 2004 3<br />
Kari Pulli<br />
<strong>Ways</strong> <strong>to</strong> <strong>animate</strong><br />
• Apply a gradual rigid transformation <strong>to</strong> an object<br />
• translate, rotate whole object or joint angles<br />
• Apply a free-form transformation <strong>to</strong> the space<br />
• an arbitrary affine or projective transformation<br />
• Modify the definition of an object<br />
• change the vertex locations<br />
• Animate the camera<br />
• move it, turn it, zoom in/out<br />
• Change material properties, lighting<br />
• In general:<br />
• change something (anything) as a function of time<br />
52438S Computer Graphics Winter 2004 2<br />
Kari Pulli<br />
<strong>What</strong> <strong>can</strong> <strong>you</strong> <strong>keyframe</strong>?<br />
• Object related things (global)<br />
• size<br />
• location<br />
• orientation, …<br />
• material properties<br />
(hit ’I’ key with mouse in material but<strong>to</strong>ns window (F5))<br />
• textures (material key, ’I’, ’All Mapping’)<br />
• Object definition (local)<br />
• morph vertices between various shapes<br />
(vertex keys)<br />
• morph the relative position of vertices with respect <strong>to</strong> a base<br />
shape<br />
(relative/weighted vertex keys)<br />
52438S Computer Graphics Winter 2004 4<br />
Kari Pulli
<strong>Keyframing</strong> in Blender<br />
• Create an object, place it<br />
• hit ’TAB’ <strong>to</strong> leave edit mode<br />
• Insert a key for location<br />
• hit ’I’, select ’Loc’<br />
• Advance the current frame <strong>to</strong> 50<br />
• use cursor keys<br />
• Move the object (’G’ <strong>to</strong> grab), insert key<br />
• When <strong>you</strong> change the frame ( <strong>to</strong>o wiggly, hard <strong>to</strong> control<br />
low degree polynomials => must concatenate segments =><br />
beziers or splines<br />
• Positions are easier <strong>to</strong> interpolate than orientations<br />
• positions: just interpolate…<br />
• orientations: <strong>can</strong> be ambiguous<br />
usually best: there is a unique rotation axis that rotates one<br />
orientation <strong>to</strong> another, take the shorter of the two rotations,<br />
T<br />
interpolate the rotation angle<br />
R R = R ⇒ R = R R<br />
convert R <strong>to</strong> quaternion q,<br />
get axis a and angle θ<br />
intepolate θ,<br />
get new quaternion q',<br />
convert <strong>to</strong> R'<br />
new interpolated<br />
orientation<br />
is R R'<br />
1<br />
52438S Computer Graphics Winter 2004 7<br />
Kari Pulli<br />
1<br />
2<br />
1<br />
2<br />
Rendering the animation<br />
S<strong>to</strong>re the result in Display but<strong>to</strong>ns<br />
/render/sph0001_0050.avi (F10)<br />
Current<br />
frame<br />
No antialiasing<br />
(OSA = OverSAmpling)<br />
or motion blur<br />
or shadow calculations Rendering at<br />
100% of<br />
selected size<br />
Create<br />
animation<br />
Play it<br />
back<br />
Start and<br />
end frames<br />
Enable<br />
sequence<br />
edi<strong>to</strong>r<br />
Size of the<br />
rendering<br />
Type of output<br />
AVI Jpeg @ 25 frm/sec,<br />
RGB<br />
Same animation:<br />
AVI raw: 12 005kB<br />
AVI Jpeg: 447kB<br />
AVI codec (DIVX): 87kB<br />
52438S Computer Graphics Winter 2004 6<br />
Kari Pulli<br />
Interpolation curves (IPOs)<br />
• Keyframes add vertices <strong>to</strong> IPOs<br />
• select object in 3D window<br />
• change window by SHFT-F6<br />
• press home <strong>to</strong> view curves<br />
• Axes<br />
• horizontal: frames (time)<br />
• vertical: value<br />
• You <strong>can</strong> edit them directly<br />
• select curve (Rclick) and TAB <strong>to</strong> edit mode, …<br />
• constrained <strong>to</strong> be function of time<br />
• 3 interpolation types (hit ’T’)<br />
• constant, linear, bezier<br />
• 4 extrapolation types<br />
• constant, extrapolate, cyclic, cyclic extrapolate<br />
• Back <strong>to</strong> 3D window with SFHT-F5<br />
Material IPOs<br />
available only if a<br />
material is defined<br />
52438S Computer Graphics Winter 2004 8<br />
Kari Pulli
Vertex <strong>keyframe</strong>s<br />
• Morph between shapes<br />
• How <strong>to</strong> do it in Blender<br />
• add keys by Insert Key ’Mesh’<br />
(or Surface or Curve) in 3D<br />
window (choose absolute)<br />
• when not in EDIT MODE<br />
(TAB) select the current key<br />
(RClick) in the IPO window<br />
(SHFT-F6)<br />
• edit the vertex locations of the<br />
selected keys in EDIT MODE<br />
Key 1 tween Key 2<br />
three<br />
keys (1,2,3)<br />
current frame<br />
show vertex keys<br />
52438S Computer Graphics Winter 2004 9<br />
Kari Pulli<br />
Relative vertex keys<br />
• If we have many independent parts that we want <strong>to</strong><br />
<strong>animate</strong> in synch, vertex key morphing is difficult <strong>to</strong><br />
use<br />
• Take face animation<br />
• basic neutral face<br />
• want <strong>to</strong> move eyes, mouth, etc., relative <strong>to</strong> the neutral face<br />
• move parts independently but in a coordinated fashion<br />
• Sequence of operations<br />
• define the basic shape, insert key<br />
• starting from it, modify a part of the shape, insert a key<br />
• repeat for the other parts<br />
• each key gets a weight curve that is used <strong>to</strong> tell how much<br />
of the relative change is applied at a given point of time<br />
• weight > 1.0 extrapolates, weight < 0.0 does the opposite<br />
motion<br />
52438S Computer Graphics Winter 2004 11<br />
Kari Pulli<br />
IPO for vertex keys<br />
• There are three keys<br />
• horizontal lines at 0.0, .5, 1.0<br />
• at first they appear on <strong>to</strong>p of each<br />
other, but <strong>you</strong> <strong>can</strong> move them up and<br />
down (’G’)<br />
• the orange one is the 1st key<br />
(yellow when selected)<br />
• all others are blue<br />
(light blue when selected)<br />
• Current frame is 36<br />
• vertical green line<br />
• The red curve is the speed curve<br />
• a Bezier curve, modifiable<br />
• in this picture it’s been made<br />
cyclically continuous (repeats)<br />
• intersection with green line tells that<br />
we are roughly halfway between the<br />
2 nd and 3 rd key<br />
speed curve<br />
current frame<br />
3 rd key<br />
currently selected<br />
key (2 nd )<br />
52438S Computer Graphics Winter 2004 10<br />
Kari Pulli<br />
Relative vertex key example<br />
• ”Smile -> surprise -> laugh” reaction<br />
• Faces: smile, eye brows raised, neutral<br />
• Each has a key (horizontal) and a weight<br />
• Mouth: half-smile -> neutral -> big smile<br />
• Brows: up -> down -> wiggles up<br />
2 weight<br />
curves<br />
3 vertex<br />
keys<br />
mouth<br />
key (1)<br />
brow<br />
key (2)<br />
neutral<br />
basis<br />
52438S Computer Graphics Winter 2004 12<br />
Kari Pulli
Recipe for the previous slide<br />
• Create the neutral face<br />
• Use Mesh->Plane <strong>to</strong> start<br />
• SHFT-D <strong>to</strong> duplicate<br />
• CTRL-J <strong>to</strong> join in<strong>to</strong> single mesh<br />
in the end<br />
• Add three vertex keys<br />
• ’I’ ’Mesh’ Relative<br />
• Move them apart (’G’) for<br />
selection, their location is<br />
irrelevant<br />
• Edit two of the (blue) keys<br />
• Select a blue key in IPO<br />
window by right clicking<br />
• Edit the mouth (in<br />
3D, edit mode (TAB))<br />
• Exit edit mode (TAB), select the<br />
other blue key in IPO, edit brow<br />
• Now if <strong>you</strong> select the 3 keys, <strong>you</strong><br />
get either neutral face, smile, or<br />
raised brows<br />
• Add weight curves<br />
• When the ‘----’ above Key 1,<br />
etc., is selected, <strong>you</strong> see the<br />
keys<br />
• Select mouth key, then Leftclick<br />
Key 1, CTRL Left-click <strong>to</strong><br />
add curve (now flat)<br />
• Select ‘----’, select brow key,<br />
select Key 2, add another curve<br />
• SHIFT Left-click Key 1 and Key<br />
2 <strong>to</strong> see both lines<br />
• Modify the weight curves<br />
• Select a curve, add new control<br />
points with CTRL Left-click<br />
• You <strong>can</strong> modify the curve points<br />
in edit mode<br />
• Review animation<br />
• by ALT-A in 3D window<br />
• or if <strong>you</strong> move the green bar<br />
that selects current frame<br />
52438S Computer Graphics Winter 2004 13<br />
Kari Pulli<br />
Blender example<br />
• Create a simple robot<br />
• a cube for the base<br />
exit edit mode (TAB) so next one is a separate object<br />
• combine a cylinder and a box <strong>to</strong> make an arm<br />
new parts in edit mode extend the same object<br />
• place rotation center at center of cylinder<br />
select cylinder center, move cursor there with SHFT-S<br />
4, exit edit mode (TAB), ”Center cursor” at edit<br />
but<strong>to</strong>ns<br />
• duplicate arm (SHFT-D) twice and shrink (S)<br />
after shrinking, CTRL-A <strong>to</strong> "apply scale <strong>to</strong> vertices"<br />
• Forward kinematics is simple<br />
• make the base arm the parent of the middle arm<br />
Rclick middle arm, SHFT-Rclick base arm, CTRL-P, OK<br />
• repeat for the other segments, and arms <strong>to</strong> base<br />
• now if <strong>you</strong> rotate (R) base or one of the arms, the<br />
rest will follow<br />
52438S Computer Graphics Winter 2004 15<br />
Kari Pulli<br />
Kinematics<br />
• Given this robot arm<br />
• the shapes and dimensions of its parts (base, lower arm,<br />
upper arm)<br />
• the current configuration (rotations by θ, φ, ψ)<br />
• Where is the end effec<strong>to</strong>r?<br />
• Kinematics gives the solution<br />
• go <strong>to</strong> the end of one limb at a time, starting from the base,<br />
applying the transformations due <strong>to</strong> the rotations<br />
52438S Computer Graphics Winter 2004 14<br />
Kari Pulli<br />
Inverse kinematics<br />
• Kinematics (aka forward kinematics) is very easy<br />
• always a unique solution<br />
• but usually we want <strong>to</strong> do the opposite<br />
• Inverse kinematics turns the situation around<br />
• given the shapes of the robot arm and the location where<br />
its end effec<strong>to</strong>r should reside<br />
• Which configuration should the robot be in?<br />
• Not so straightforward<br />
• there may be multiple, even infinite number of solutions<br />
• there may be no solution<br />
• In animation: could just try configurations<br />
• when the constraints are not satisfied, backtrack<br />
• <strong>can</strong> be very tedious<br />
52438S Computer Graphics Winter 2004 16<br />
Kari Pulli
Inverse kinematics in Blender<br />
• IK in Blender is called "Armatures" since Blender 2.20<br />
• before that they were "IKAs", not available any more<br />
• an armature is like the skele<strong>to</strong>n, made of bones (arms, legs,<br />
spine, …)<br />
• separate bones added in edit mode are part of the same armature<br />
• Here are links <strong>to</strong> a few tu<strong>to</strong>rials<br />
• http://www.ualberta.ca/~cwant/blender/char_doc/character_animation.php.html<br />
• http://members.lycos.co.uk/kurppa/blender/ik.html<br />
• http://members.<strong>you</strong>rlink.net/gruff/bones/index.html<br />
• http://blenderchar.weirdhat.com/handtute/<br />
• http://csshaun.ict.ru.ac.za/BlenderTu<strong>to</strong>rials/Armature/<br />
52438S Computer Graphics Winter 2004 17<br />
Kari Pulli<br />
IK cont.<br />
• Set constraints<br />
• in pose mode (CTRL-TAB, or<br />
click the "smiley face"), select B4<br />
• select Object panel (F7), constraint<br />
but<strong>to</strong>ns, add ”IK Solver”<br />
• fill in the name of the armature<br />
(Armature) and the control bone<br />
(Bone)<br />
• Now if <strong>you</strong> select and move<br />
Bone, the rest of the armature<br />
follows it<br />
• the orientations and locations of<br />
the segments are recalculated<br />
52438S Computer Graphics Winter 2004 19<br />
Kari Pulli<br />
Inverse kinematics<br />
• Need an armature for IK<br />
• select the first arm segment (Rclick),<br />
move cursor <strong>to</strong> it (SHFT-S 4)<br />
• add four bones of armature (Lclick),<br />
ESC quits<br />
• Name the bones<br />
• with armature selected, in editmode,<br />
select all (A), in edit but<strong>to</strong>ns (F9) hit<br />
”Draw Names” and rename bones (in<br />
”Selected Bones”)<br />
• Add moving bone<br />
• select sphere btw. B3 & B4, add a<br />
single bone by extruding (E)<br />
• it’s a ”handle” for moving the whole set<br />
52438S Computer Graphics Winter 2004 18<br />
Kari Pulli<br />
IK cont.<br />
• Attach geometry <strong>to</strong> armature<br />
• get out of pose mode (TAB) and<br />
edit mode (TAB)<br />
• select a robot segment (Rclick),<br />
and the armature (SHFT-Rclick),<br />
make the armature parent<br />
(CTRL-P), use bone B1<br />
• repeat for the other segments<br />
• note: may need <strong>to</strong> reposition and<br />
orient the parts<br />
• Now in pose mode (select<br />
armature, CTRL-TAB) <strong>you</strong> <strong>can</strong><br />
move the robot arm<br />
52438S Computer Graphics Winter 2004 20<br />
Kari Pulli
Skinning<br />
• If <strong>you</strong> just attach rigid geometry <strong>to</strong> bones, they don’t<br />
behave naturally at the seams<br />
• they look very stiff, like a robot<br />
• between segments <strong>you</strong> <strong>can</strong> see cracks instead of<br />
continuous joints<br />
• with the robot, we dealt with that by hiding joints with cylinders<br />
• Solution<br />
• associate a vertex with several bones<br />
• weight each association<br />
• when transforming bones, apply a weighted<br />
combination of the transforms <strong>to</strong> each vertex<br />
• In Blender this is done by<br />
• assigning vertex groups <strong>to</strong> bones,<br />
http://blenderchar.weirdhat.com/handtute/<br />
• painting a vertex weight, http://mmaigrot.free.fr/didac-blender/ikas/ikas-eng/ikp5.php<br />
52438S Computer Graphics Winter 2004 21<br />
Kari Pulli<br />
Particle systems<br />
• Use particle systems <strong>to</strong> model various natural phenomena<br />
• dynamic:<br />
• fire, explosions (flames, sparks)<br />
• smoke (soot)<br />
• rain, snow (rain drops, snow flakes)<br />
• static<br />
• grass<br />
• fur<br />
• Properties of particles<br />
• they are created, grow in age, may breed, get old and die<br />
• their colors and shapes may evolve<br />
• they <strong>can</strong> be affected by forces (wind, gravity, …)<br />
• Flocking behavior<br />
• if <strong>you</strong> add an AI component, <strong>you</strong> <strong>can</strong> model the behavior of flock of<br />
birds, school of fish, pack of dinosaurs, …<br />
• widely used in movies (Jurassic Park, Quasimodo, …)<br />
52438S Computer Graphics Winter 2004 23<br />
Kari Pulli<br />
Dynamics<br />
• Definitions:<br />
• Kinematics: how the positions of the parts vary as a<br />
function of the joint angles<br />
• Dynamics: how the positions of the parts vary as a<br />
function of applied forces<br />
• Requires real physics simulation<br />
• Forward dynamics<br />
• integrate the effects of the forces as a function of time<br />
• Inverse dynamics<br />
• given the desired path / behavior, which forces are needed?<br />
• This is already rocket science<br />
• control theory<br />
52438S Computer Graphics Winter 2004 22<br />
Kari Pulli<br />
Particles in Blender<br />
• Create a plane<br />
• Go <strong>to</strong> Anim But<strong>to</strong>ns (F7)<br />
• New Effect, change Build <strong>to</strong><br />
Particles<br />
• Norm = 0.100 <strong>to</strong> emit<br />
particles with initial speed<br />
along plane normals<br />
• Rand = 0.100 <strong>to</strong> add<br />
randomness<br />
• Force Z = -0.070 <strong>to</strong> add gravity<br />
Randomness<br />
of particle age<br />
Total number<br />
of particles<br />
Particle generation<br />
start & end (frames)<br />
Duration of<br />
particles &<br />
their children<br />
Damping<br />
works like<br />
friction<br />
52438S Computer Graphics Winter 2004 24<br />
Kari Pulli
Example: fire<br />
• Create a plane<br />
• Subdivide selected vertices (TAB, A, W 1)<br />
• Add particles, use these values<br />
• Add material (F5) <strong>to</strong> emitter (plane)<br />
• select Halo, HaloTex<br />
• RGB = (1,0,0), Alpha = 0.7, Add = 0.7<br />
• Cloud texture for more realism<br />
• NoiseSize = 0.600<br />
• texture color <strong>to</strong> yellow (Map To), Ysize = 0.30 (Map input)<br />
• Animate alpha (<strong>to</strong> fade flame away)<br />
• when animating materials of particles, frame<br />
1=birth, 100=death<br />
• add key (I) at frame 1 in material but<strong>to</strong>ns<br />
• at frame 100, set Alpha = 0.0, add key<br />
52438S Computer Graphics Winter 2004 25<br />
Kari Pulli<br />
Example: Constrain a sphere<br />
above ground<br />
• Write a script file, open<br />
in text edit window (S-F11)<br />
• Create a sphere, rename it <strong>to</strong><br />
'Pallo' in edit but<strong>to</strong>ns<br />
• Select script but<strong>to</strong>ns, and object<br />
script links<br />
• Add a scriptlink (New), name it,<br />
set <strong>to</strong> Redraw<br />
• Try moving the sphere down,<br />
it sticks at z = 0.0 as every<br />
redraw calls the script<br />
import Blender<br />
obj = Blender.Object.Get('Pallo')<br />
if obj and obj.LocZ < 0.0:<br />
obj.LocZ = 0.0<br />
52438S Computer Graphics Winter 2004 27<br />
Kari Pulli<br />
Python scripting in Blender<br />
• Blender supports scripting in Python<br />
• modeling and animation <strong>to</strong>ol (create and modify objects)<br />
• import and export scripts <strong>to</strong> other formats than *.blend<br />
• Information at http://www.blender.org/<br />
• click documentation<br />
• Developer documentation for the Python API (a bit old)<br />
• Blender 2.31 Python API Reference (new)<br />
• Editing<br />
• edit window SHFT-F11, R-click <strong>to</strong> open or load a document<br />
• editing best done with an external edi<strong>to</strong>r (e.g., Emacs)<br />
• after opening a document and editing in Emacs, reload by CTRL-R<br />
• Run by hitting ALT-P in the edit window<br />
52438S Computer Graphics Winter 2004 26<br />
Kari Pulli<br />
Example: modeling and animation<br />
• You <strong>can</strong> create or modify object<br />
geometry, attributes, location,<br />
orientation, etc.<br />
• This time the script is not linked <strong>to</strong><br />
an object, but the whole scene<br />
• use the scriptlink but<strong>to</strong>n with a small<br />
globe, Scene scriptlink<br />
• set <strong>to</strong> FrameChanged, so it’s called for<br />
each frame<br />
• We’ll create a tetrahedron and spin<br />
it around on an elliptical path<br />
52438S Computer Graphics Winter 2004 28<br />
Kari Pulli
import Blender<br />
from Blender import NMesh<br />
from math import *<br />
Modeling and animation<br />
def add_face(m, inds):<br />
f = NMesh.Face() # create a face<br />
for i in inds: f.v.append(m.verts[i]) # add vertices<br />
m.faces.append(f) # add face <strong>to</strong> mesh<br />
def create_tetra():<br />
me = NMesh.GetRaw() # create a mesh<br />
for v in [[1,1,1],[-1,-1,1],[-1,1,-1],[1,-1,-1]]:<br />
me.verts.append(NMesh.Vert(v[0],v[1],v[2])) # add vertices<br />
for inds in [ [0,2,1],[0,1,3],[0,2,3],[1,2,3] ]:<br />
add_face(me, inds) # add faces<br />
obj = NMesh.PutRaw(me, 'tetra', 1) # add <strong>to</strong> scene<br />
obj.name = 'tetra’ # change name<br />
if Blender.Get('curframe') == 1: create_tetra() # create @ frame 1<br />
tetra = Blender.Object.Get('tetra') # get a link<br />
angle = (2*pi* Blender.Get('curframe'))/100 # vary rot angle<br />
tetra.LocX, tetra.LocY = 5*sin(angle), 3*cos(angle) # move around<br />
52438S Computer Graphics Winter 2004 29<br />
Kari Pulli<br />
Add second film (now<br />
an avi): SHFT-A,<br />
movie, place it down<br />
with some overlap<br />
Select first (Rclick),<br />
then second (SHFT-<br />
Rclick), then add<br />
(SHFT-A) Cross,<br />
move timeline<br />
(SHFT-UP/DOWN)<br />
there<br />
Then add some<br />
<strong>keyframe</strong> <strong>animate</strong>d<br />
text in 3D view<br />
Postprocessing…<br />
Finally add a scene,<br />
select 1 st film and<br />
scene, add alphaover<br />
effect<br />
52438S Computer Graphics Winter 2004 31<br />
Kari Pulli<br />
Postprocessing with sequence<br />
edi<strong>to</strong>r<br />
• You <strong>can</strong> render things in pieces and<br />
then combine them<br />
• You <strong>can</strong> mix and match video clips<br />
and 3D animation<br />
• Example:<br />
• I have two prerendered animations<br />
• combine them with fading in<br />
• add a 3d text on <strong>to</strong>p in the<br />
beginning<br />
Add 1 st sequence<br />
SHFT-A in sequencer window,<br />
Images, select and get a sequence<br />
of images<br />
set from frame 1 <strong>to</strong> 100<br />
Go <strong>to</strong> sequencing<br />
screen<br />
52438S Computer Graphics Winter 2004 30<br />
Kari Pulli<br />
Filename<br />
Postprocessing<br />
Enable sequence<br />
rendering<br />
Do it!<br />
1 st clip and 3D text Fading between clips<br />
52438S Computer Graphics Winter 2004 32<br />
Kari Pulli
Motion capture<br />
• Animating humanoid characters is difficult<br />
• even for artists, and with <strong>to</strong>ols such as inverse kinematics<br />
• humans are <strong>to</strong>o good in detecting which behavior looks real!<br />
• Solution: track a real person<br />
• facial features<br />
• limb joints<br />
• Apply the tracked<br />
motions <strong>to</strong> a CG<br />
model<br />
52438S Computer Graphics Winter 2004 33<br />
Kari Pulli<br />
Creating a sketch / plan / movie<br />
script<br />
• Always plan a bit first<br />
• think about a key idea<br />
• brains<strong>to</strong>rm with <strong>you</strong>r partner<br />
• first the s<strong>to</strong>ry,<br />
only then how <strong>to</strong> implement it<br />
• Write / draw a s<strong>to</strong>ryboard<br />
• <strong>What</strong> is the s<strong>to</strong>ry?<br />
• How will <strong>you</strong> break<br />
it <strong>to</strong> scenes?<br />
• Which camera angles are <strong>you</strong> going <strong>to</strong> use?<br />
a scene from Spiderman<br />
• Implement it with Blender<br />
• Which elements of Blender do <strong>you</strong> need <strong>to</strong> implement <strong>you</strong>r<br />
plan?<br />
Which tu<strong>to</strong>rials do <strong>you</strong> need <strong>to</strong> do?<br />
• <strong>What</strong> is the work flow?<br />
• How will <strong>you</strong> divide the tasks with <strong>you</strong>r partner?<br />
52438S Computer Graphics Winter 2004 34<br />
Kari Pulli