built -in dishwasher/lavaplatos instruction manual ... - Avanti Products
built -in dishwasher/lavaplatos instruction manual ... - Avanti Products
built -in dishwasher/lavaplatos instruction manual ... - Avanti Products

Create successful ePaper yourself
Turn your PDF publications into a flip-book with our unique Google optimized e-Paper software.
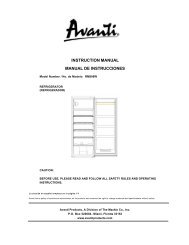
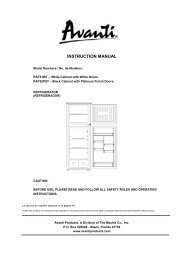
BUILT -IN DISHWASHER/LAVAPLATOS<br />
INSTRUCTION MANUAL/MANUAL DE INSTRUCCIONES<br />
Model Number/Número de Modelo: DW18 / DW181SS / DW19PS<br />
BEFORE USE, PLEASE READ AND FOLLOW ALL SAFETY RULES AND OPERATING<br />
INSTRUCTIONS.<br />
<strong>Avanti</strong> has a policy of cont<strong>in</strong>uous improvement on its products and reserves the right to change materials and specifications<br />
without notice.<br />
La sección en español empieza en la pág<strong>in</strong>a 20.<br />
<strong>Avanti</strong> <strong>Products</strong>, A Division of The Mackle Co., Inc.<br />
P.O. Box 520604 - Miami, Florida 33152<br />
www.avantiproducts.com
REGISTRATION INFORMATION<br />
Thank you for purchas<strong>in</strong>g this f<strong>in</strong>e <strong>Avanti</strong> product. Please fill out this card and return it with<strong>in</strong> 100 days<br />
of purchase and receive these important benefits to the follow<strong>in</strong>g address:<br />
<strong>Avanti</strong> <strong>Products</strong>, A Division of The Mackle Co., Inc.<br />
P.O. Box 520604 - Miami, Florida 33152 USA<br />
� Protect your product:<br />
We will keep the model number and date of purchase of your new <strong>Avanti</strong> product on file to help<br />
you refer to this <strong>in</strong>formation <strong>in</strong> the event of an <strong>in</strong>surance claim such as fire or theft.<br />
� Promote better products:<br />
We value your <strong>in</strong>put. Your responses will help us develop products designed to best meet your<br />
future needs.<br />
----------------------------------------------------- (detach here)----------------------------------------------------------------<br />
<strong>Avanti</strong> Registration Card<br />
__________________________________ ______________________________________<br />
Name Model # Serial #<br />
__________________________________ ______________________________________<br />
Address Date Purchased Store/Dealer Name<br />
__________________________________ _______________________________________<br />
City State Zip Occupation<br />
__________________________________ As Your Primary Residence, Do You:<br />
Area Code Phone Number �Own �Rent<br />
Did You Purchase An Additional Warranty: Your Age:<br />
�Extended �None �under 18 �18-25 �26-30<br />
Reason For Choos<strong>in</strong>g This <strong>Avanti</strong> Product: �31-35 �36-50 �over 50<br />
Please <strong>in</strong>dicate the most important factors Marital Status:<br />
that <strong>in</strong>fluenced your decision to purchase �Married �S<strong>in</strong>gle<br />
this product. Is This Product Used In The:<br />
�Price �Home �Bus<strong>in</strong>ess<br />
�Product Features How Did You Learn About This Product:<br />
�<strong>Avanti</strong> Reputation �Advertis<strong>in</strong>g<br />
�Product Quality �In Store Demo �Personal Demo<br />
�Salesperson Recommendation �Other______________________________<br />
�Friend/Relative Recommendation Comments____________________________<br />
�Warranty _____________________________________<br />
�Other_______________________ _____________________________________<br />
2
Read this guide carefully.<br />
It is <strong>in</strong>tended to help you operate and ma<strong>in</strong>ta<strong>in</strong><br />
your new <strong>dishwasher</strong> properly.<br />
Keep it handy to answer your questions.<br />
If you don't understand someth<strong>in</strong>g or you need<br />
more assistance, please call:<br />
<strong>Avanti</strong> Customer Service<br />
800-220-5570<br />
Keep proof of orig<strong>in</strong>al purchase date (such as<br />
your sales slip) with this guide to establish the<br />
warranty period.<br />
We're proud of our service and want you to be<br />
pleased. If for some reason you are not happy<br />
with the service you receive, here are some<br />
steps to follow for further assistance.<br />
FIRST, contact the people who serviced your<br />
<strong>dishwasher</strong>. Expla<strong>in</strong> why you are not pleased.<br />
In most cases, this will solve the problem.<br />
HELP US HELP YOU...<br />
IF YOU NEED SERVICE<br />
4<br />
Write down the model and serial numbers.<br />
You'll f<strong>in</strong>d them on a plate located on the door<br />
upper edge of the <strong>dishwasher</strong>.<br />
Please write these numbers here:<br />
____________________________________<br />
Date of Purchase<br />
____________________________________<br />
Model Number<br />
____________________________________<br />
Serial Number<br />
Use these numbers <strong>in</strong> any correspondence or<br />
service calls concern<strong>in</strong>g your <strong>dishwasher</strong>.<br />
If you received a damaged <strong>dishwasher</strong>,<br />
immediately contact the dealer (or builder) that<br />
sold you the <strong>dishwasher</strong>.<br />
Save time and money. Before you call for<br />
service, check the Troubleshoot<strong>in</strong>g Guide. It<br />
lists causes of m<strong>in</strong>or operat<strong>in</strong>g problems that<br />
you can correct yourself.<br />
NEXT, if you are still not pleased, write all the<br />
details, <strong>in</strong>clud<strong>in</strong>g your telephone number, and<br />
send it to:<br />
Customer Service<br />
<strong>Avanti</strong> <strong>Products</strong><br />
10880 NW 30 th Street<br />
Miami, FL 33172 USA
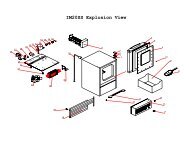
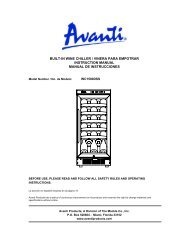
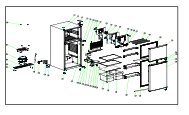
1. UPPER RACK<br />
2. SPRAY ARMS<br />
3. LOWER RACK<br />
4. MAIN FILTER<br />
5. DETERGENT DISPENSER<br />
6. CUP SHELF<br />
7. SILVERWARE BASKET<br />
PARTS AND FEATURES<br />
5<br />
8. COARSE FILTER<br />
9. RINSE AID DISPENSER<br />
10. DRAIN HOSE<br />
11. INLET VALVE<br />
12. JUNCTION BOX<br />
13. LEVELING LEGS
TABLE OF CONTENTS<br />
Registration Information 2<br />
Help Us Help You … 4<br />
Parts And Features 5<br />
Important Safety Instructions 7<br />
Operat<strong>in</strong>g Instructions 8<br />
Before us<strong>in</strong>g Your Dishwasher 8<br />
Electrical Connection 8<br />
Control Panel of Dishwasher 9<br />
Control Sett<strong>in</strong>gs 9<br />
Overflow Protection 10<br />
Detergent Dispenser 10<br />
R<strong>in</strong>se Aid Dispenser 10<br />
Load The Dishwasher Racks 11<br />
Start<strong>in</strong>g A Wash Cycle 12<br />
Cancel<strong>in</strong>g Or Modify<strong>in</strong>g A Wash Cycle Sett<strong>in</strong>g 12<br />
At The End Of The Wash Cycle 12<br />
Forgot To Add A Dish? 13<br />
Filter<strong>in</strong>g System 13<br />
Care And Ma<strong>in</strong>tenance 13<br />
Protect Aga<strong>in</strong>st Freez<strong>in</strong>g 13<br />
Clean<strong>in</strong>g The Spray Arms 13<br />
Clean<strong>in</strong>g The Filters 13<br />
Clean<strong>in</strong>g The Door 14<br />
Clean<strong>in</strong>g The Dra<strong>in</strong> Pump 14<br />
How To Keep You Dishwasher In Shape 14<br />
Troubleshoot<strong>in</strong>g Guide 15<br />
Service For Your Dishwasher 17<br />
Your <strong>Avanti</strong> <strong>Products</strong> Warranty 18<br />
Wir<strong>in</strong>g Diagram 19<br />
INSTRUCCIONES EN ESPAÑOL 20~26<br />
6
IMPORTANT SAFETY INSTRUCTIONS<br />
To reduce the risk of fire, electrical shock,<br />
�WARNING�<br />
or <strong>in</strong>jury when us<strong>in</strong>g your <strong>dishwasher</strong>,<br />
follow these basic precautions:<br />
? Read all <strong>in</strong>structions before us<strong>in</strong>g the <strong>dishwasher</strong>.<br />
? DANGER or WARNING: Risk of child entrapment.<br />
Child entrapment and suffocation are not problems of the past. Junked or abandoned<br />
<strong>dishwasher</strong>s are still dangerous. . . even if they will “just sit <strong>in</strong> the garage a few days.”<br />
? Before you throw away your old <strong>dishwasher</strong>: Take off the door. Leave the shelves <strong>in</strong> place<br />
so that children may not easily climb <strong>in</strong>side.<br />
? Never allow children to operate, play with, or crawl <strong>in</strong>side the <strong>dishwasher</strong>.<br />
? Do not allow children to play around <strong>dishwasher</strong> when open<strong>in</strong>g or clos<strong>in</strong>g door due to the<br />
possibility of small f<strong>in</strong>gers be<strong>in</strong>g p<strong>in</strong>ched <strong>in</strong> door.<br />
? Under certa<strong>in</strong> conditions hydrogen may be produced <strong>in</strong> a water heater that has not been used<br />
for two weeks or more. HYDROGEN GAS IS EXPLOSIVE.<br />
If the hot water has not been use for two weeks or more, prevent the possibility of damage or<br />
<strong>in</strong>jury by turn<strong>in</strong>g on all hot water faucets and allow them to run for several m<strong>in</strong>utes. Do this<br />
before us<strong>in</strong>g any electrical appliance which is connected to the hot water system. This simple<br />
procedure will allow any <strong>built</strong>-up hydrogen gas to escape. S<strong>in</strong>ce the gas is flammable, do not<br />
smoke or use an open flame or appliance dur<strong>in</strong>g this process.<br />
? Never clean <strong>dishwasher</strong> parts with flammable fluids. The fumes can create a fire hazard or<br />
explosion.<br />
? Do not store or use gasol<strong>in</strong>e or any other flammable vapors and liquids <strong>in</strong> the vic<strong>in</strong>ity of this or<br />
any other <strong>dishwasher</strong>. The fumes can create a fire hazard or explosion.<br />
? This <strong>dishwasher</strong> must be properly grounded for your safety. Do not under any circumstances<br />
cut or remove the third (ground) wire from the power cord. Any questions concern<strong>in</strong>g power<br />
and/or ground<strong>in</strong>g should be directed toward a certified electrician or an authorized <strong>Avanti</strong><br />
<strong>Products</strong> service center.<br />
? Do not tamper with controls.<br />
? Do not abuse, sit on, or stand on the door or dish rack of the <strong>dishwasher</strong>.<br />
? Do not touch the heat<strong>in</strong>g element dur<strong>in</strong>g or immediately after use.<br />
? Do not wash plastic items unless they are marked <strong>dishwasher</strong> safe or the equivalent. For<br />
plastic items not so marked, check the manufacturer recommendations.<br />
? Non-Dishwasher Items: Do not wash items such as electronic air cleaner filters, furnace filters<br />
and pa<strong>in</strong>t brushes <strong>in</strong> your <strong>dishwasher</strong>. Damage to <strong>dishwasher</strong> and discoloration or sta<strong>in</strong><strong>in</strong>g of<br />
<strong>dishwasher</strong> may result.<br />
? When us<strong>in</strong>g your <strong>dishwasher</strong>, you should prevent plastic items form contact<strong>in</strong>g with heat<strong>in</strong>g<br />
element.<br />
? Use only detergent and r<strong>in</strong>se additives designed for an automatic <strong>dishwasher</strong>. Us<strong>in</strong>g detergent<br />
that is not specifically designed for <strong>dishwasher</strong>s will cause the <strong>dishwasher</strong> to fill with suds.<br />
? Keep children away from detergent and r<strong>in</strong>se aid, keep children away from the open door of the<br />
<strong>dishwasher</strong>, there could still be some detergent left <strong>in</strong>side.<br />
? The door should not be left <strong>in</strong> the open position s<strong>in</strong>ce this could present a tripp<strong>in</strong>g hazard.<br />
? Dur<strong>in</strong>g <strong>in</strong>stallation, the power supply must not be excessively bent or flattened.<br />
? Do not operate your <strong>dishwasher</strong> unless all enclosure panels are properly <strong>in</strong> place. Open the<br />
door very carefully if the <strong>dishwasher</strong> is operat<strong>in</strong>g, there is a risk of water squirt<strong>in</strong>g out.<br />
? Do not place any heavy objects or stand on the door when it is open. The appliance could tip<br />
forward.<br />
? When load<strong>in</strong>g items to be washed:<br />
1) Locate sharp items so that they are not likely to damage the door seal.<br />
2) Load sharp knives with the handles up to reduce the risk of cut-type <strong>in</strong>juries.<br />
? Use this <strong>dishwasher</strong> only for its <strong>in</strong>tended purpose as described <strong>in</strong> this Instruction Manual.<br />
? Please dispose of pack<strong>in</strong>g materials properly.<br />
-Save these <strong>in</strong>structions-<br />
7
OPERATING INSTRUCTIONS<br />
� Before Us<strong>in</strong>g Your Dishwasher<br />
? Remove the exterior and <strong>in</strong>terior pack<strong>in</strong>g.<br />
? Check to be sure you have all of the follow<strong>in</strong>g parts:<br />
? 1 Upper Rack<br />
? 1 Lower Rack<br />
? 1 Cup Shelf<br />
? 1 Silverware Basket<br />
? 2 Wood Screws<br />
? 1 Instruction Manual<br />
? Clean the <strong>in</strong>terior surface with lukewarm water us<strong>in</strong>g a soft cloth.<br />
� Electrical Connection<br />
? This <strong>dishwasher</strong> must be properly grounded for your safety. The power cord of this <strong>dishwasher</strong> is<br />
equipped with a ground lead which can connect to your grounded permanent wir<strong>in</strong>g system.<br />
? Do not under any circumstances cut or remove the third ground lead from the power cord<br />
supplied. Any questions concern<strong>in</strong>g power and/or ground<strong>in</strong>g should be directed toward a certified<br />
electrician or an authorized <strong>Avanti</strong> <strong>Products</strong> service center.<br />
? Never use an extension cord to connect power to the unit. If the power cord is too short, have a<br />
qualified electrician or service technician <strong>in</strong>stall an outlet near the appliance.<br />
? Never use a two-prong ground<strong>in</strong>g adapter.<br />
�Warn<strong>in</strong>g�<br />
Improper use of the grounded plug can result <strong>in</strong> the risk of electrical shock. If the power cord is<br />
damaged, have it replaced by an authorized <strong>Avanti</strong> <strong>Products</strong> service center.<br />
? Do not use an adapter plug with this appliance.<br />
? Where a two-prong wall receptacle is encountered, contact a qualified electrician to have it<br />
replaced with a 3-prong receptacle <strong>in</strong> accordance with applicable electrical codes.<br />
? This <strong>dishwasher</strong> requires a standard 110/120Volts A.C.~/60Hz electrical power with three -prong<br />
ground.<br />
? The cord should be secured beh<strong>in</strong>d the <strong>dishwasher</strong> and not left exposed or dangl<strong>in</strong>g to prevent<br />
accidental <strong>in</strong>jury.<br />
? Connect to a grounded metal, permanent wir<strong>in</strong>g system; or run an equipment-ground<strong>in</strong>g<br />
conductor with the circuit conductors and connect to the equipment-ground<strong>in</strong>g term<strong>in</strong>al or lead of<br />
the appliance.<br />
? Improper connection of the equipment-ground<strong>in</strong>g conductor can result <strong>in</strong> a risk of electric shock.<br />
Check with a qualified electrician or service representative if you are <strong>in</strong> doubt whether the<br />
appliance is properly grounded.<br />
? Do not attempt to repair or replace any part of your <strong>dishwasher</strong> unless it is specifically<br />
recommended <strong>in</strong> this <strong>manual</strong>. All other servic<strong>in</strong>g should be referred to a qualified technician.<br />
? To m<strong>in</strong>imize the possibility of electric shock, disconnect this appliance form the power supply<br />
before attempt<strong>in</strong>g any ma<strong>in</strong>tenance.<br />
Note: Turn<strong>in</strong>g the <strong>dishwasher</strong> off does not disconnect the appliance from the power supply. We<br />
recommend hav<strong>in</strong>g a qualified technician service your appliance.<br />
8
� Control Panel of Dishwasher<br />
� Control Sett<strong>in</strong>gs<br />
Wash Cycles<br />
PLUS RAPID R<strong>in</strong>se<br />
Detergent Time<br />
Cycle Button Button Aid Cycle Sequence<br />
pre/ma<strong>in</strong> (approx.)<br />
NORMAL ? Pre-r<strong>in</strong>se Wash(125? ) R<strong>in</strong>se R<strong>in</strong>se(160? ) Dry<strong>in</strong>g 4/20gr. 100m<strong>in</strong>.<br />
HEAVY ? ? Pre-r<strong>in</strong>se(125? ) Wash(140? ) R<strong>in</strong>se R<strong>in</strong>se R<strong>in</strong>se(160? ) Dry<strong>in</strong>g 4/20gr. 110m<strong>in</strong>.<br />
LIGHT ? Wash(125? ) R<strong>in</strong>se R<strong>in</strong>se(160? ) Dry<strong>in</strong>g 20gr. 90m<strong>in</strong>.<br />
RINSE ? R<strong>in</strong>se R<strong>in</strong>se(160? ) Dry<strong>in</strong>g 65m<strong>in</strong>.<br />
GLASS WARE R<strong>in</strong>se R<strong>in</strong>se(160? ) Dry<strong>in</strong>g 15gr. 42m<strong>in</strong>.<br />
RAPID ? R<strong>in</strong>se R<strong>in</strong>se(125? ) Dry<strong>in</strong>g 15gr. 38m<strong>in</strong>.<br />
SOAK Pre-r<strong>in</strong>se 7m<strong>in</strong>.<br />
Notes:<br />
1. Power ON Indicator<br />
2. R<strong>in</strong>se Aid Warn<strong>in</strong>g Indicator<br />
3. ON/OFF Button<br />
? NORMAL WASH<br />
? HEAVY WASH<br />
? LIGHT WASH<br />
? RINSE<br />
? GLASS WARE<br />
? RAPID<br />
? SOAK<br />
PLUS Button for HEAVY WASH<br />
? This button is used with the normal cycle <strong>in</strong> the case where pots and pans with dry caked-on<br />
food must be washed.<br />
? This is not recommended for delicate items <strong>in</strong> so far as the high temperature could make their<br />
surfaces opaque or lighten decorative colors after repeated wash<strong>in</strong>g.<br />
RAPID Button for RAPID<br />
? This button when pressed with wash cycle 4 (glassware) makes it possible to run the wash<br />
cycle at a lower temperature (125? ) and elim<strong>in</strong>ates the dry<strong>in</strong>g phase.<br />
9<br />
4. RAPID Button<br />
5. PLUS Button<br />
6. Wash Cycles<br />
For normally soiled loads, such as pots, plates, glasses and lightly soiled<br />
pans, standard daily cycles.<br />
For the heavily soiled loads, such as pots, pans, casserole dishes and<br />
dishes that have been sitt<strong>in</strong>g with dried-on soils.<br />
For lightly soiled loads, such as plates, glasses, bowls and lightly soiled<br />
pans.<br />
For dishes that need to be r<strong>in</strong>sed and dry only.<br />
For lightly soiled loads, such as glasses, crystal and f<strong>in</strong>e ch<strong>in</strong>a.<br />
For lightly soiled loads that do not need dry<strong>in</strong>g.<br />
For r<strong>in</strong>s<strong>in</strong>g partial loads that will be washed later.
� Overflow Protection<br />
Our <strong>Avanti</strong> <strong>dishwasher</strong> has an overfill protection device which could automatically shut off the <strong>in</strong>let valve<br />
and start the dra<strong>in</strong> pump if the water overflow. If this occurs, turn off the ma<strong>in</strong> water supply before call<strong>in</strong>g<br />
a servicer. If there is water <strong>in</strong> the base pan because of an overfill or small leak, the water should be<br />
removed before restart<strong>in</strong>g the <strong>dishwasher</strong>.<br />
� Detergent Dispenser<br />
The dispenser must be refilled before the start of each wash cycle accord<strong>in</strong>g to the <strong>in</strong>structions provided<br />
<strong>in</strong> the “Wash Cycles”. Our <strong>dishwasher</strong>s use less detergent and r<strong>in</strong>se aid than conventional<br />
<strong>dishwasher</strong>s. Generally, only one tablespoon of detergent is needed for a normal wash load. Also, more<br />
heavily soiled items need more detergent. Always add the detergent just before start<strong>in</strong>g <strong>dishwasher</strong>,<br />
otherwise it could get damp and will not dissolve properly.<br />
1. Ma<strong>in</strong> Wash Detergent<br />
2. Dispenser Lid Lever<br />
3. Prewash Detergent Compartment<br />
4. R<strong>in</strong>se Aid Level Indicator<br />
5. R<strong>in</strong>se Aid Compartment<br />
6. Detergent Compartment Lid<br />
Amount of Detergent to Use<br />
The amount of detergent to use depends on whether your water is hard or soft. To determ<strong>in</strong>e the water<br />
hardness <strong>in</strong> your area, contact your local water utility or area water soften<strong>in</strong>g company. The harder the<br />
water, the more detergent you may need. Remember, you should adjust the amount of detergent you<br />
use little by little until you f<strong>in</strong>d the correct amount.<br />
Notes: Even if the water isn’t too hard, you may also prevent the formation of deposits by add<strong>in</strong>g<br />
detergent.<br />
Remov<strong>in</strong>g Hard Water Spots From Dishes<br />
To remove hard water spots, try the follow<strong>in</strong>g:<br />
? Run dishes through a normal wash program.<br />
? Remove all metal dishware, such as cutlery, pans, etc., from the <strong>dishwasher</strong>.<br />
? Do not a dd detergent.<br />
? Pour two cups of v<strong>in</strong>egar <strong>in</strong>to a bowl and set the bowl face up on the lower rack of the <strong>dishwasher</strong>.<br />
? Run the dishes through a normal wash program.<br />
If this doesn’t work, try the same process with ¼ cup of citric acid crystals <strong>in</strong>stead of v<strong>in</strong>egar .<br />
Proper Use Of Detergent<br />
Use only detergent specifically made for use <strong>in</strong> <strong>dishwasher</strong>. Keep your detergent fresh and dry. Don’t<br />
put powder detergent <strong>in</strong>to the dispenser until you’re ready to wash dishes.<br />
� R<strong>in</strong>se Aid Dispenser<br />
The r<strong>in</strong>se aid is released dur<strong>in</strong>g the f<strong>in</strong>al r<strong>in</strong>se to prevent water from form<strong>in</strong>g droplets on your dishes that<br />
can leave spots and streaks. It also improves dry<strong>in</strong>g by allow<strong>in</strong>g water to “sheet” off the dishes.<br />
Our <strong>dishwasher</strong>s are designed to use liquid r<strong>in</strong>se aid. The r<strong>in</strong>se aid<br />
Dispenser is located <strong>in</strong>side the door next to the detergent dispenser.<br />
To fill the dispenser, follow<strong>in</strong>g the follow<strong>in</strong>g steps to open the cap<br />
and pour the r<strong>in</strong>se aid <strong>in</strong>to the dispenser until the level <strong>in</strong>dicator turns<br />
completely black. The dispenser holds about 100 ml of liquid r<strong>in</strong>se aid.<br />
1. To open the dispenser, turn the cap to the “open” (left) arrow<br />
10
and lift it out.<br />
2. Pour the r<strong>in</strong>se aid <strong>in</strong>to the dispenser, be<strong>in</strong>g careful not to overflow.<br />
3. Replace the cap by <strong>in</strong>sert<strong>in</strong>g it aligned with “open” arrow and turn<strong>in</strong>g it to the “close” (right)<br />
arrow.<br />
Be careful not to overfill the dispenser, because this could cause over suds<strong>in</strong>g. Wipe away any spills<br />
with a damp cloth. Don’t forget to replace the cap before you close the <strong>dishwasher</strong> door. If you have soft<br />
water, you may not need r<strong>in</strong>se aid because it may cause a white film to develop on your dishes.<br />
Adjust<strong>in</strong>g R<strong>in</strong>se Aid Dispenser<br />
A measured amount of r<strong>in</strong>se aid is released dur<strong>in</strong>g the f<strong>in</strong>al r<strong>in</strong>se. As with detergent,<br />
the amount of r<strong>in</strong>se aid needed for your dishes depends on the hardness of the water<br />
<strong>in</strong> your area. Too much r<strong>in</strong>se aid can result <strong>in</strong> lather of foam<strong>in</strong>g and cause cloud<strong>in</strong>ess<br />
or streaks on your dishes. If the water <strong>in</strong> you area is very soft, you may not need r<strong>in</strong>se<br />
aid. If you do, you can dilute the r<strong>in</strong>se aid with an equal amount of water.<br />
The r<strong>in</strong>se aid dispenser has six sett<strong>in</strong>gs. Always start with the dispenser set on “1”. If there are r<strong>in</strong>gs of<br />
calcium (hard water) spots on dishes and dry<strong>in</strong>g problems, <strong>in</strong>crease the amount of r<strong>in</strong>se aid dispensed<br />
by remov<strong>in</strong>g the dispenser lid and rotat<strong>in</strong>g the dial to “2”. IF the dishes still are not dry<strong>in</strong>g properly or are<br />
spotted, adjust the dial to the next higher number until your dishes are spot-free. We suggest you to set<br />
on”4”.<br />
When To Refill The R<strong>in</strong>se Aid Dispenser<br />
When dispenser needs to be refilled the r<strong>in</strong>se aid warn<strong>in</strong>g <strong>in</strong>dicator<br />
will be ON. If there is no r<strong>in</strong>se aid warn<strong>in</strong>g <strong>in</strong>dicator on the control<br />
panel, you can judge the amount of r<strong>in</strong>se aid by the follow<strong>in</strong>g means.<br />
The black dot on the r<strong>in</strong>se aid dispenser <strong>in</strong>dicates the amount of r<strong>in</strong>se<br />
aid <strong>in</strong> th e dispenser. As the r<strong>in</strong>se aid dim<strong>in</strong>ishes, the size of the black<br />
dot decreases. You should never let the r<strong>in</strong>se aid get below ¼ full.<br />
� Load<strong>in</strong>g The Dishwasher Racks<br />
For best performance of the <strong>dishwasher</strong>, follow these load<strong>in</strong>g guidel<strong>in</strong>es.<br />
How to Use the Upper Rack<br />
The upper rack is designed to hold more delicate and lighter dishware such as glasses, coffee and tea<br />
cup and saucers, as well as plates, small bowls and shallow pans (as long as they are not too dirty).<br />
Position the dishes and cookware so that th ey do not get moved by the spray of water.<br />
The upper rack can be adjusted for height by putt<strong>in</strong>g wheels of different height <strong>in</strong>to the rails.<br />
1. Cups<br />
2. Small Serv<strong>in</strong>g Bowl<br />
3. Large Serv<strong>in</strong>g Bowl<br />
4. Glasses<br />
5. Saucers<br />
6. Dish<br />
7. Plates<br />
How To Use The Lower Rack<br />
We recommend that you place large items which are most difficult to clean <strong>in</strong>to the lower rack: pots,<br />
pans, lids, serv<strong>in</strong>g dishes and bowls, as shown <strong>in</strong> the figure.<br />
11
It is preferable to place serv<strong>in</strong>g dishes and lids on the side of the racks <strong>in</strong> order to avoid block<strong>in</strong>g the<br />
rotation of the top spray arm.<br />
? Pots, serv<strong>in</strong>g bowls, etc, must always be placed top down.<br />
? Deep pots should be slanted to allow water to flow out.<br />
? The bottom rack feature folds down t<strong>in</strong>e rows so that larger or more pots and pans can be loaded.<br />
1. Oval Platter<br />
2. D<strong>in</strong>ner Plates<br />
3. Soup Plates<br />
4. Dessert Dishes<br />
5. Silverware Basket<br />
ilverware Basket<br />
Silverware should be placed <strong>in</strong> the silverware basket with handles at the bottom:<br />
if the rack has side baskets, the spoon should be loaded <strong>in</strong>dividually <strong>in</strong>to the<br />
appropriate slots, especially long utensils should be placed <strong>in</strong> the horizontal<br />
position at the front of the upper rack.<br />
WARNING: Do not let any item extend through bottom.<br />
� Start<strong>in</strong>g A Wash Cycle<br />
? Make sure that the <strong>dishwasher</strong> is energized.<br />
? Make sure the water supply is turned on to full pressure.<br />
? Load the <strong>dishwasher</strong>.<br />
? Pour <strong>in</strong> the detergent.<br />
? Slowly turn the wash cycles knob to the desired position <strong>in</strong> the clockwise direction. Don’t turn it<br />
past that position, or you could accidentally miss a cycle.<br />
? Press the ON/OFF button, and the POWER <strong>in</strong>dicator will turn on. At this po<strong>in</strong>t, the wash cycle will<br />
beg<strong>in</strong>. There is a time delay between start-up and water fill so you will not hear any wash action<br />
right away.<br />
� Cancel<strong>in</strong>g Or Modify<strong>in</strong>g A Wash Cycle Sett<strong>in</strong>g<br />
Premise: A cycle that is underway can only be modified if it has only been runn<strong>in</strong>g for a short time.<br />
Otherwise, the detergent may have already been release, and the appliance may have already dra<strong>in</strong>ed<br />
the wash water. If this is the case, the detergent dispenser must be refilled.<br />
Press the ON/OFF button, and the POWER <strong>in</strong>dicator will turn off. Rotate the knob <strong>in</strong> the clockwise<br />
direction to the desired cycle sett<strong>in</strong>g. Then, turn the <strong>dishwasher</strong> back on by press<strong>in</strong>g the ON/OFF<br />
button.<br />
� At The End Of The Wash Cycle<br />
When the knob stops turn<strong>in</strong>g and is aligned with a STOP mark, the cycle has<br />
f<strong>in</strong>ished. Turn off the appliance us<strong>in</strong>g the ON/OFF button, shut off the water supply<br />
and open the door of the <strong>dishwasher</strong>. Wait a few m<strong>in</strong>utes before unload<strong>in</strong>g the<br />
<strong>dishwasher</strong> to avoid handl<strong>in</strong>g the dishes and utensils while they are still hot and<br />
more susceptible to breakage. They will also dry better.<br />
12
� Forgot To Add A Dish?<br />
A forgotten dish can be added any time before the detergent cup opens.<br />
Pull the door handle.<br />
Do not open the door until the water spray action stops. Steam may rise out of the <strong>dishwasher</strong>.<br />
Add forgotten dishes.<br />
Push the door to close it. When the door is closed right a click will be heard.<br />
� Filter<strong>in</strong>g System<br />
For your convenience, we have placed the dra<strong>in</strong> pump and filter<strong>in</strong>g system with<strong>in</strong> easy reach <strong>in</strong>side the<br />
tub. There are three components of the filter<strong>in</strong>g system: the ma<strong>in</strong> filter, the coarse filter and the f<strong>in</strong>e<br />
filter.<br />
1. Ma<strong>in</strong> Filter<br />
Food and soil particles trapped by this filter are pulverized by a special jet on the lower spray arm and<br />
washed down the dra<strong>in</strong>.<br />
2. Coarse Filter<br />
Larger items, such as pieces of bone or glass, that could clog the dra<strong>in</strong> are<br />
trapped <strong>in</strong> the coarse filter. To remove an item caught <strong>in</strong> this filer, gently<br />
squeeze the tabs on top of this filter and lift out.<br />
3. F<strong>in</strong>e Filter<br />
This filter holds soil and food residue <strong>in</strong> the sump area and prevents it from<br />
be<strong>in</strong>g redeposited on the dishes dur<strong>in</strong>g a cycle.<br />
CARE AND MAINTENANCE<br />
To clean the control panel, use a lightly dampened cloth then dry thoroughly. To clean the exterior, use<br />
a good appliance polish wax.<br />
Never use sharp objects, scour<strong>in</strong>g pads or harsh cleaners on any part of the <strong>dishwasher</strong>.<br />
� Protect Aga<strong>in</strong>st Freez<strong>in</strong>g<br />
If you <strong>dishwasher</strong> is left <strong>in</strong> an unheated place dur<strong>in</strong>g the w<strong>in</strong>ter, ask a service technician to:<br />
1. Cut off electrical power to the <strong>dishwasher</strong>. Remove fuses or tip circuit breaker.<br />
2. Turn off the water supply and disconnect the water <strong>in</strong>let l<strong>in</strong>e from the water valve.<br />
3. Dra<strong>in</strong> water from the <strong>in</strong>let l<strong>in</strong>e and water valve. (Use a pan to catch the water.)<br />
4. Reconnect the water <strong>in</strong>let l<strong>in</strong>e to the water valve.<br />
5. Remove the plastic sump cover <strong>in</strong> the bottom of thetub and use a sponge to soak up water <strong>in</strong> rubber<br />
boot.<br />
� Clean<strong>in</strong>g The Spray Arms<br />
Because hard water chemicals will clog the spray arm jets and bear<strong>in</strong>gs, it is necessary to clean the<br />
spray arms regularly. To remove the spray arm, screw off the nut to take out the washer on top of the<br />
spray arm and remove the arm. Wash the arms <strong>in</strong> soapy and warm water and use a soft brush to clean<br />
the jets. Replace them after r<strong>in</strong>s<strong>in</strong>g them thoroughly.<br />
� Clean<strong>in</strong>g The Filters<br />
For best performance and results, the filter assembly must be cleaned.<br />
The filter efficiently removes food particles form the wash water, allow<strong>in</strong>g water<br />
to be recirculated dur<strong>in</strong>g the cycle. For this reason, it is a good idea to remove<br />
the larger food particles trapped <strong>in</strong> the filter after each wash cycle by r<strong>in</strong>s<strong>in</strong>g the<br />
ma<strong>in</strong> filter and cup under runn<strong>in</strong>g water. To remove the filter assembly, pull on<br />
13
the cup handle <strong>in</strong> the upward direction. The entire filter assembly should be cleaned at least once a<br />
month.<br />
To clean the ma<strong>in</strong> filter and the f<strong>in</strong>e filter, use a clean<strong>in</strong>g brush. Then, reassemble the filter parts as<br />
shown <strong>in</strong> the illustration and re<strong>in</strong>sert the entire assembly <strong>in</strong> the <strong>dishwasher</strong>, position<strong>in</strong>g it <strong>in</strong> place and<br />
press<strong>in</strong>g downward.<br />
The <strong>dishwasher</strong> must never be used without the filters. Improper replacement of the filter may reduce<br />
the performance level of the appliance and damage dishes and utensils.<br />
WARNIING : Never run the <strong>dishwasher</strong> without the filters <strong>in</strong> place.<br />
� Clean<strong>in</strong>g The Door<br />
To clean the edge around the door, you should use only a soft warm, damp<br />
rag. To prevent penetration of water <strong>in</strong>to the door lock and electrical<br />
components, do not use a spray cleaner of any k<strong>in</strong>d.<br />
Also, never use abrasive cleaners or scour<strong>in</strong>g pads on the outer surfaces<br />
because they will scratch the f<strong>in</strong>ish. Some papers towels can also scratch<br />
or leave marks on the surface.<br />
WARNING: Never use a spray cleaner to clean the door panel because it could damage the door lock<br />
and electrical components. It is not allowed to use the abrasive agent or some paper towel because of<br />
the risk of scratch<strong>in</strong>g or leav<strong>in</strong>g spots on the sta<strong>in</strong>less steel surface.<br />
� Clean<strong>in</strong>g The Dra<strong>in</strong> Pump<br />
Someth<strong>in</strong>g will occasionally move <strong>in</strong>to the filters and the dra<strong>in</strong> pump. If this<br />
occurs, th e dra<strong>in</strong> pumps employed <strong>in</strong> our <strong>dishwasher</strong> are designed to<br />
automatically reverse, eject<strong>in</strong>g the item back <strong>in</strong>to the sump area or down the<br />
dra<strong>in</strong>. IF you have to remove an obstacle from the dra<strong>in</strong> pump, before you<br />
remove the filters, you should turn off the power, then remove the small black<br />
<strong>in</strong>sert form the sump area. (You might want to remove any stand<strong>in</strong>g water<br />
first.) Scoop out the item that is probably <strong>in</strong> the sump area and causes the<br />
obstruction. Remember to replace the black <strong>in</strong>sert before you put the filters<br />
back <strong>in</strong>.<br />
� How To Keep You Dishwasher In Shape<br />
? After every wash<br />
After every wash, turn off the water supply to the appliance and leave the door slightly ajar so that<br />
moisture and odors are not trapped <strong>in</strong>side.<br />
? No solvents or abrasive clean<strong>in</strong>g products<br />
To clea n the exterior and rubber parts of the <strong>dishwasher</strong>, do not use solvents or abrasive clean<strong>in</strong>g<br />
products. Rather, use only a cloth and warm soapy water. To remove spots or sta<strong>in</strong>s from the surface of<br />
the <strong>in</strong>terior, use a cloth dampened with water and a little white v<strong>in</strong>egar, or a clean<strong>in</strong>g product made<br />
specifically for <strong>dishwasher</strong>s.<br />
? When you go on Holiday<br />
When you go on holiday, it is recommended that you run a wash cycle with the <strong>dishwasher</strong> empty and<br />
them de -energize the <strong>dishwasher</strong>, turn off the water supply and leave the door slightly ajar. This will<br />
help the seals last longer and prevent odors from form<strong>in</strong>g with<strong>in</strong> the <strong>dishwasher</strong>.<br />
? Seals<br />
One of the factors that cause odors to form <strong>in</strong> the <strong>dishwasher</strong> is food that rema<strong>in</strong>s trapped <strong>in</strong> the seals.<br />
Periodic clean<strong>in</strong>g with a damp sponge will prevent this from occurr<strong>in</strong>g.<br />
14
PROBLEMS WITH YOUR DISHWASHER?<br />
You can solve many common <strong>dishwasher</strong> problems easily, sav<strong>in</strong>g you the cost of a possible service<br />
call. Try the suggestions below to see if you can solve the problem before call<strong>in</strong>g the servicer.<br />
TROUBLESHOOTING GUIDE<br />
PROBLEM POSSIBLE CAUSES WHAT TO DO<br />
Dishwasher does not<br />
operate.<br />
Dra<strong>in</strong> pump doesn’t<br />
stop<br />
The circuit breaker tripped or blown<br />
fuse.<br />
Power supply is not turned on.<br />
Water pressure is low.<br />
15<br />
Replace fuse or reset circuit breaker.<br />
Remove any other appliances shar<strong>in</strong>g the<br />
same circuit with the <strong>dishwasher</strong>.<br />
Make sure the <strong>dishwasher</strong> is turned on and<br />
the door is closed securely.<br />
Make sure the power cord is properly<br />
connected.<br />
Check that the water supply is connected<br />
properly and the water is turned on.<br />
Overflow The system is designed to detect an overflow.<br />
When it does, it shuts off the circulation pump<br />
Noise Some audible sounds are normal.<br />
Utensils are not secure <strong>in</strong> the racks or<br />
someth<strong>in</strong>g small has dropped <strong>in</strong>to the<br />
rack.<br />
Motor hums.<br />
Suds <strong>in</strong> the tub Improper detergent.<br />
Spilled r<strong>in</strong>se agent.<br />
Sta<strong>in</strong>ed tub <strong>in</strong>terior Detergent with colorant was used.<br />
Some tomato-based foods can sta<strong>in</strong><br />
Dishes don’t dry R<strong>in</strong>se agent dispenser is empty.<br />
Low <strong>in</strong>let water temperature.<br />
Dishes and flatware<br />
not clean.<br />
Improper program.<br />
Improper rack load<strong>in</strong>g.<br />
and turns on the dra<strong>in</strong> pump.<br />
Sound from soft food shredd<strong>in</strong>g action and<br />
detergent cup open<strong>in</strong>g.<br />
Ensure everyth<strong>in</strong>g is secured <strong>in</strong> the<br />
<strong>dishwasher</strong>.<br />
Dishwasher has not been used regularly. If<br />
you do not use it often, remember to set it to<br />
fill and pump out every week, which will help<br />
keep the seal moist.<br />
Use only the special <strong>dishwasher</strong> detergent to<br />
avoid suds.<br />
To remove suds from the tub, open the<br />
<strong>dishwasher</strong> and let suds evaporate.Add 1<br />
gallon of cold water to the tub. Close and<br />
latch the <strong>dishwasher</strong>, pump out water by<br />
slowly turn<strong>in</strong>g the dial until a dra<strong>in</strong> period is<br />
reached. Repeat if necessary.<br />
Always wipe up r<strong>in</strong>se agent spills<br />
immediately.<br />
Make sure that the detergent is the one<br />
without colorant.<br />
Use of the RINSE ONLY cycle after add<strong>in</strong>g<br />
the dish to the load can decrease the level of<br />
sta<strong>in</strong><strong>in</strong>g.<br />
Check the r<strong>in</strong>se agent dispenser.<br />
Make sure <strong>in</strong>let water temperature is correct.<br />
Select a stronger program.<br />
Make sure large dishware does not block the<br />
detergent dispenser or the wash arms.<br />
Make sure <strong>in</strong>let water temperature is correct.<br />
Cloud<strong>in</strong>ess on<br />
Low <strong>in</strong>let water temperature.<br />
Comb<strong>in</strong>ation of soft water and too This is called etch<strong>in</strong>g and is permanent. To
glassware. much detergent.<br />
Yellow or brown film<br />
on <strong>in</strong>side surfaces.<br />
White film on <strong>in</strong>side<br />
surfaces.<br />
Too high <strong>in</strong>let water temperature.<br />
Tea or coffee sta<strong>in</strong>s.<br />
Iron deposits <strong>in</strong> water can cause an<br />
overall film.<br />
16<br />
prevent this from happen<strong>in</strong>g, use less<br />
detergent if you have soft water. Wash<br />
glassware <strong>in</strong> the shortest cycle that will get<br />
them clean.<br />
Make sure <strong>in</strong>let water temperature is correct.<br />
Us<strong>in</strong>g a solution of ½ cup bleach and 3 cups<br />
warm water to remove the sta<strong>in</strong>s by hand.<br />
Warn<strong>in</strong>g: Before clean<strong>in</strong>g <strong>in</strong>terior wait at<br />
least 20 m<strong>in</strong>utes after a cycle for the heat<strong>in</strong>g<br />
elements to cool down. Failure to do so can<br />
result <strong>in</strong> burns.<br />
A special filter <strong>in</strong> the water supply l<strong>in</strong>e is the<br />
only way to correct this problem. Contact a<br />
water softener company for a special filter.<br />
Hard water m<strong>in</strong>erals. To clean the <strong>in</strong>terior, apply <strong>dishwasher</strong><br />
detergent to a damp sponge. Wear rubber<br />
gloves. Do NOT use any other cleaner than<br />
<strong>dishwasher</strong> detergent for the risk of foam<strong>in</strong>g<br />
or suds.<br />
Dishes block detergent cups. Re-load the dishes properly.<br />
Detergent left <strong>in</strong><br />
dispenser cups.<br />
Steam This is normal. Steam comes through the vent dur<strong>in</strong>g<br />
wash<strong>in</strong>g, dry<strong>in</strong>g and when water is be<strong>in</strong>g<br />
Black or gray marks<br />
on dishes.<br />
Alum<strong>in</strong>um utensils have rubbed<br />
aga<strong>in</strong>st dishes.<br />
pumped out.<br />
Remove marks with a mild, abrasive cleaner.<br />
Water stand<strong>in</strong>g <strong>in</strong> the<br />
bottom of the tub.<br />
This is normal. A small amount of clean water around the<br />
outlet on the tub bottom at the back of the tub<br />
keeps the water seal lubricated.<br />
Water doesn’t pump Dra<strong>in</strong> is clogged. If you have an air gap, clean it.<br />
out of the tub.<br />
Make sure the kitchen s<strong>in</strong>k is dra<strong>in</strong><strong>in</strong>g well.<br />
If the <strong>dishwasher</strong> dra<strong>in</strong>s <strong>in</strong>to a disposer, run it<br />
clear.<br />
Dishwasher leaks. Overfill dispenser or r<strong>in</strong>se aid spills. Be careful not to overfill the r<strong>in</strong>se aid<br />
dispenser. Spilled r<strong>in</strong>se aid could cause<br />
oversuds<strong>in</strong>g and lead to overflow<strong>in</strong>g. Wipe<br />
away any spills with a damp cloth.<br />
Dishwasher isn’t level.<br />
Make sure the <strong>dishwasher</strong> is level.<br />
Spots and film<strong>in</strong>g on Extremely hard water<br />
To remove stubborn spots and pre-exist<strong>in</strong>g<br />
glasses and flatware Low <strong>in</strong>let water temperature<br />
Overload<strong>in</strong>g the <strong>dishwasher</strong><br />
Improper load<strong>in</strong>g<br />
Old or damp powder detergent<br />
R<strong>in</strong>se agent dispenser empty<br />
Too little detergent<br />
film from glassware:<br />
1. Remove all metal utensils from the<br />
<strong>dishwasher</strong>.<br />
2. Do not add detergent.<br />
3. Choose the HEAVY cycles.<br />
4. Start the <strong>dishwasher</strong> and allow to run for<br />
30 m<strong>in</strong>utes. Dishwasher will now be <strong>in</strong><br />
the ma<strong>in</strong> wash.<br />
5. Open the door and pour 2 cups (500ml)<br />
of white v<strong>in</strong>egar <strong>in</strong>to the bottom of the<br />
<strong>dishwasher</strong>.<br />
6. Close the door and allow to complete the<br />
cycle. If v<strong>in</strong>egar r<strong>in</strong>se doesn’t work:
SERVICE FOR YOUR DISHWASHER<br />
17<br />
Repeat as above, except use 60ml of<br />
citric acid crystals <strong>in</strong>stead of v<strong>in</strong>egar.<br />
We are proud of our customer service organization and the network of professional service technicians<br />
that provide service on your <strong>Avanti</strong> <strong>dishwasher</strong>s. With the purchase of your <strong>Avanti</strong> <strong>dishwasher</strong>, you can<br />
have the confidence that if you ever need additional <strong>in</strong>formation or assistance, the <strong>Avanti</strong> <strong>Products</strong><br />
Customer Service team will be here for you. Just call us toll-free.<br />
Product Information<br />
800-323-5029<br />
Part Orders<br />
800-220-5570<br />
In-Home Repair Service<br />
800-220-5570<br />
AVANTI PRODUCTS CUSTOMER SERVICES<br />
Whatever your questions are about our products,<br />
help is available.<br />
You may order parts and accessories that will be<br />
delivered directly to your home, by personal<br />
check, money order, Master Card, or Visa.<br />
An <strong>Avanti</strong> <strong>Products</strong> authorized service center will<br />
provide expert repair service, scheduled at a time<br />
that is convenient for you. Our tra<strong>in</strong>ed servicers<br />
know your <strong>dishwasher</strong> <strong>in</strong>side and out.
YOUR <strong>Avanti</strong> <strong>Products</strong> WARRANTY Staple your sales receipt here. Proof of<br />
orig<strong>in</strong>al purchase date is needed to obta<strong>in</strong><br />
service under warranty.<br />
WHAT IS COVERED<br />
LIMITED ONE-YEAR<br />
WARRANTY<br />
For one year from the date of purchase<br />
by the orig<strong>in</strong>al owner, <strong>Avanti</strong> <strong>Products</strong><br />
will, at its option, repair or replace any<br />
part of the <strong>dishwasher</strong> which proves to<br />
be defective <strong>in</strong> material or<br />
workmanship under normal use.<br />
Dur<strong>in</strong>g this period <strong>Avanti</strong> <strong>Products</strong> will<br />
provide all parts and labor necessary to<br />
correct such defects free of charge, so<br />
long as the <strong>dishwasher</strong> has been<br />
<strong>in</strong>stalled and operated <strong>in</strong> accordance<br />
with the written <strong>in</strong>structions <strong>in</strong> this<br />
<strong>manual</strong>. In rental or commercial use,<br />
the warranty period is 90 days.<br />
? Incidental or consequential damages.<br />
? Parts and labor costs for the follow<strong>in</strong>g will<br />
not be considered as warranty:<br />
? Doors, door spr<strong>in</strong>gs, and/or frames.<br />
? Inner door panels, door shelves, door<br />
rails, and/or door supports.<br />
? Light bulbs and/or plastic hous<strong>in</strong>g.<br />
? Plastic cab<strong>in</strong>et l<strong>in</strong>ers.<br />
? Proper <strong>in</strong>stallation is the responsibility of<br />
the <strong>in</strong>staller. Product failure due to<br />
improper <strong>in</strong>stallation is not covered under<br />
the <strong>Avanti</strong> <strong>Products</strong> Warranty.<br />
WHAT IS NOT COVERED<br />
18<br />
? Repairs performed by unauthorized<br />
servicers.<br />
? Service calls that do not <strong>in</strong>volve defects <strong>in</strong><br />
material or workmanship such as<br />
customer education, door reversal, or<br />
proper <strong>in</strong>stallation.<br />
? Service calls that are related to external<br />
problems, such as abuse, misuse,<br />
<strong>in</strong>adequate electrical power, accidents,<br />
fire, floods, or acts of God.<br />
? Replacement of house fuses or resett<strong>in</strong>g<br />
circuit breakers.<br />
? Failure of the product if it is used for other<br />
than its <strong>in</strong>tended purpose.<br />
? This warranty does not apply outside the<br />
Cont<strong>in</strong>ental U.S.A..
WIRING DIAGRAM<br />
19
INSTRUCCIONES EN ESPAÑOL<br />
PRECAUCION<br />
Para reducir el riesgo de <strong>in</strong>cendio, descarga<br />
eléctrica, o daño cuando use su<br />
electrodoméstico, siga las siguientes<br />
precauciones.<br />
Lea todas las <strong>in</strong>strucciones antes de usar su electrodoméstico.<br />
Peligro o Precaución: Existe el riesgo que los niños queden atrapados.<br />
Niños atrapados o sofocamiento no son un problema del pasado. Los electrodomésticos son<br />
peligrosos aún si solo los deja en el garaje por un par de días.<br />
Antes de desechar su equipo usado: quítele las puertas. Deje la parrillas en su lugar para<br />
evitar que los niños se queden atrapados.<br />
No permita que los niños manejen, jueguen o entren dentro del electrodoméstico.<br />
No limpie su electrodoméstico con líquidos <strong>in</strong>flamables. Los gases pueden ocasionar fuego o<br />
una explosión.<br />
No guarde ni use gasol<strong>in</strong>a u otros líquidos <strong>in</strong>flamables cerca de este o de cualquier otro<br />
electrodoméstico. Los vapores pueden ocasionar fuego o explosión.<br />
LAVAPLATOS AVANTI<br />
- Guarde estas <strong>in</strong>strucciones.-<br />
INFORMACIONES IMPORTANTES DE SEGURIDAD<br />
LEA TODAS LAS INSTRUCCIONES ANTES DE USAR EL EQUIPO<br />
ADVERTENCIA<br />
Cuando use el <strong>lavaplatos</strong> siga las <strong>in</strong>strucciones básicas <strong>in</strong>dicadas a cont<strong>in</strong>uación<br />
ADVERTENCIA. EL HIDROGENO ES UN GAS EXPLOSIVO<br />
Bajo ciertas condiciones, el gas de hidrogeno se puede producir en un sistema de agua caliente que no ha<br />
sido usado por mas de dos semanas. EL HIDROGENO ES UN GAS EXPLOSIVO.<br />
Si el sistema de agua caliente no va a ser usado por un periodo de tiempo, cierre todas las llaves de agua<br />
caliente y deje correr el agua caliente por varios m<strong>in</strong>utos antes de usar el <strong>lavaplatos</strong>. Esto liberará cualquier<br />
residuo de gas hidrógeno acumulado. Debido a lo <strong>in</strong>flamable de este gas, no fume o abra fuego alrededor.<br />
INSTRUCCIONES DE ALAMBRADO<br />
Tipos de Cable Alambrado<br />
Este equipo debe estar alambrado a tierra. En el evento en que ocurra alguna rotura o mal funcionamiento, el<br />
alambrado a tierra reducirá el riesgo de descarga eléctrica proveyendo un cam<strong>in</strong>o de menor resistencia para la<br />
corriente eléctrica. Este equipo viene con un cable con enchufe a tierra. El cable debe estar conectado a un<br />
enchufe apropiado, el cual deberá cumplir todas las ordenanzas y códigos locales.<br />
ADVERTENCIA<br />
La conexión <strong>in</strong>apropiada del cable a tierra <strong>in</strong>crementará el riesgo de descargas eléctricas. Verifique con un<br />
electricista o personal de servicio calificados la conexión apropiada del equipo. Si nec esita realizar alguna<br />
modificación en el enchufe a tierra, le recomendamos contratar los servicios de un electricista.<br />
20
USO APROPIADO<br />
No maltrate, se siente o se pare en la puerta o la bandeja del <strong>lavaplatos</strong>.<br />
No toque el calentador durante o justamente después de usar el <strong>lavaplatos</strong>.<br />
No lave artículos de plástico, a menos que estos <strong>in</strong>diquen que son aptos para <strong>lavaplatos</strong>, para los artículos<br />
que no lleven <strong>in</strong>dicación, lea las recomendaciones del fabricante.<br />
Use sólo detergentes y aditivos de enjuague diseñados para <strong>lavaplatos</strong> automáticos. No use jabón,<br />
detergente para ropa o detergente de lavado a mano en su equipo.<br />
Mantenga el detergente y los aditivos de enjuague fuera del alcance de los niños. Mantenga a los niños<br />
lejos del <strong>lavaplatos</strong> cuando la puerta esté abierta, ya que podrían quedar residuos de detergente en el<br />
<strong>in</strong>terior.<br />
La puerta no debe quedar abierta, ya que podría causar tropiezos y caídas.<br />
Durante la <strong>in</strong>stalación, el sistema de sum<strong>in</strong>istro eléctrico no debe estar doblado o aplanado.<br />
Para reducir el riesgo de accidentes, no permita a los niños jugar en o con el <strong>lavaplatos</strong>.<br />
No utilice su <strong>lavaplatos</strong> a menos que todos los paneles <strong>in</strong>teriores estén en su lugar. Abra cuidadosamente<br />
el <strong>lavaplatos</strong> si este esta operando, existe el riesgo de una fuga de agua.<br />
No coloque objetos pesados sobre la puerta abierta. El equipo podría <strong>in</strong>cl<strong>in</strong>arse hacia adelante.<br />
Cuando esté cargando los artículos a limpiar:<br />
Coloque los artículos afilados de manera que no dañen el sello de la puerta.<br />
Coloque los filos de los cuchillos hacia abajo para reducir el riesgo de cortes.<br />
Si el cordón del enchufe esta dañado, deberá ser reemplazado por el fabricante, su agente de servicios o<br />
una persona calificada.<br />
Deshágase de los materiales de empaque apropiadamente.<br />
Use el <strong>lavaplatos</strong> sólo para las funciones para las que fue diseñado.<br />
Quite la puerta del compartimiento de lavado cuando cambie o deseche un <strong>lavaplatos</strong>.<br />
No juegue con los controles.<br />
LEA Y SIGA CUIDADOSAMENTE ESTA INFORMACION DE SEGURIDAD<br />
GUARDE ESTAS INSTRUCCIONES<br />
TABLA DE CICLO DE LAVADO<br />
Programa Ciclo Botón Botón Información de Descripción Detergente Aditiv<br />
Adic Rapid Selección de Ciclo de ciclo pre/pr<strong>in</strong>cipal Enjuag<br />
Normal Lavado<br />
Normal<br />
Intensivo Lavado X<br />
Normal<br />
Económico Lavado<br />
Ligero<br />
Para cargas de suciedad<br />
normal<br />
Como ollas, platos, vasos y<br />
Pre-enjuague 4/20 gr X<br />
sartenes Lavado (52 ºC)<br />
ligeramente sucias. Enjuague<br />
Ciclo diario estándar Enjuague (72 ºC)<br />
Secado<br />
Para cargas de mucha Pre-enjuague(50<br />
suciedad,<br />
Como ollas, sartenes,<br />
ºC) 4/20 gr X<br />
cacerolas<br />
y platos con comida seca, por<br />
Lavado (60 ºC)<br />
un Enjuague<br />
Mayor tiempo Enjuague<br />
Enjuague (72 ºC)<br />
Secado<br />
Para cargas de suciedad<br />
ligera<br />
como platos, vasos,<br />
Lavado (52 ºC) 20 gr X<br />
ensaladeras<br />
y sartenes ligeramente<br />
Enjuague<br />
sucias. Enjuague (72 ºC)<br />
21
Enjuague Enjuague Para platos que necesitan ser Enjuague X<br />
enjuagados y secados<br />
solamente Enjuague (72 ºC)<br />
Secado<br />
Vidrio Cristales<br />
Para cargas de suciedad<br />
ligera Enjuague 15 gr<br />
Vidrio como vasos, cristales y vajilla Enjuague (72 ºC)<br />
Rápido Cristales X<br />
Vidrio<br />
Remojar Remojar<br />
Ch<strong>in</strong>a Secado<br />
Pequeño lavado para cargas<br />
de<br />
suciedad ligera que no<br />
Enjuague 15 gr<br />
necesitan Enjuague (50 ºC)<br />
Para enjuagar platos que<br />
planee Pre-enjuague<br />
lavar mas tarde ese mismo<br />
día<br />
BOTONES DE AJUSTE DE CICLO DE EL LAVADO<br />
Botón de adición<br />
Este botón (vea “Panel de Control”) es usado con el ciclo normal en el caso en que ollas y sartenes con comida<br />
seca deban ser lavados.<br />
Botón Rápido<br />
Cuando usa este botón (vea “Panel de Control”) en el programa “Rápido” (Cristales-Vidrio) el ciclo de lavado<br />
se realiza a una temperatura menor (50 ºC) y elim<strong>in</strong>a el ciclo de secado.<br />
Protección contra el sobre flujo de agua<br />
Este <strong>lavaplatos</strong> cuenta con un sistema de protección contra el sobre flujo de agua, el mismo cierra la válvula<br />
de entrada de agua y activa la bomba de drenaje cuando el nivel del agua sube demasiado. Si esto ocurre,<br />
cierre la llave pr<strong>in</strong>cipal de entrada de agua antes de llamar al personal de servicio. Si hay agua en la bandeja<br />
de la base debido al sobre flujo o existe algún tipo de goteo, el agua deberá retirarse antes de re<strong>in</strong>iciar el<br />
funcionamiento del <strong>lavaplatos</strong>.<br />
Dispensador de Detergente<br />
El dispensador debe rellenarse antes de comenzar cada ciclo de lavado de acuerdo a las <strong>in</strong>strucciones<br />
detalladas en la tabla de ciclo de lavado. Este <strong>lavaplatos</strong> usa menor cantidad de detergente y aditivos de<br />
enjuague que los <strong>lavaplatos</strong> convencionales. Generalmente, sólo se necesitará una cucharada de detergente<br />
para una carga en el programa de lavado normal. Los artículos más sucios necesitaran mayor cantidad de<br />
detergente. Siempre añada el detergente justo antes de <strong>in</strong>iciar el <strong>lavaplatos</strong>, de otra manera podría<br />
humedecerse y no disolverse apropiadamente.<br />
Cantidad de detergente a usar<br />
SI EL AGUA NO ES MUY DURA, USTED PODRA PREVENIR LA FORMACION DE DEPOSITOS<br />
ANADIENDO DETERGENTE.<br />
La cantidad de detergente que necesite variara dependiendo de la dureza del agua. Para determ<strong>in</strong>ar la dureza<br />
del agua en su localidad, comuniquese con su compañía proveedora de agua. Mientras más dura sea el agua,<br />
mayor será la cantidad de detergente a utilizar. Recuerde, usted debe encontrar la cantidad de detergente que<br />
debe usar añadiendo pequeñas cantidades hasta encontrar la medida exacta.<br />
22
Dibujo pg. Esta no es la pág<strong>in</strong>a<br />
1. Depósito pr<strong>in</strong>cipal de detergente<br />
2. Palanca de la tapa del dispensador<br />
3. Depósito de detergente de pre-lavado<br />
4. Indicador de nivel de aditivos de enjuague<br />
5. Depósito de aditivos de enjuague<br />
6. Tapa del depósito de detergente<br />
Quitando manchas de agua dura de los platos<br />
Para quitar las manchas producidas por el agua dura, siga estos consejos:<br />
Ponga los platos en el programa de lavado normal.<br />
Quite todo objeto metálico, como cubiertos, sartenes, etc.) del <strong>lavaplatos</strong>.<br />
No añada detergente.<br />
Eche dos tazas de v<strong>in</strong>agre en una ensaladera, colóquela en la rejilla <strong>in</strong>ferior del <strong>lavaplatos</strong>. Inicie el programa<br />
de lavado normal.<br />
Si esto no funciona, realice el mismo proceso usando ¼ de taza de cristales de ácido cítrico en lugar del<br />
v<strong>in</strong>agre.<br />
Uso adecuado del detergente<br />
Solamente use detergente para <strong>lavaplatos</strong>.<br />
Conserve el detergente en un lugar fresco y seco.<br />
No vierta el detergente en polvo hasta el momento mismo de lavar los platos.<br />
ADVERTENCIA!<br />
El detergente para <strong>lavaplatos</strong> es corrosivo. Tenga el cuidado de mantenerlo lejos del alcance de los niños.<br />
DEPOSITO DE ADITIVOS DE ENJUAGUE<br />
Para abrir el depósito, gire a la tapa hacia la flecha izquierda (“open”) y tire de ella.<br />
Vierta el aditivo de enjuague en el depósito, tenga cuidado d e no sobrepasar el tope de llenado.<br />
Coloque la tapa al<strong>in</strong>eada con la flecha izquierda (“open”) y dándole vuelta hacia la flecha derecha para<br />
cerrarla (“close”).<br />
Los aditivos de enjuague se liberarán durante el enjuague f<strong>in</strong>al para prevenir que el agua forme gotas en sus<br />
platos las que podrían dejar manchas y rayas. También mejoran el secado permitiendo que el agua se escurra<br />
más fácilmente de los platos.<br />
Este <strong>lavaplatos</strong> esta diseñado para usar aditivos de enjuague líquidos. El depósito está situado dentro de la<br />
puerta, junto al depósito de detergente<br />
Para llenar el depósito, abra la tapa y eche el aditivo de enjuague hasta que el <strong>in</strong>dicador de nivel se torne<br />
completamente negro. El depósito tiene capacidad para 100 ml<br />
Debe tener cuidado de no llenar el depósito por encima del nivel permitido, esto podría causar excesos de<br />
espuma. Limpie con un paño húmedo cualquier derrame o salpicadura. No se olvide de colocar la tapa en su<br />
lugar antes de cerrar la puerta del <strong>lavaplatos</strong>.<br />
Si su localidad tiene agua blanda, no deberá usar el aditivo de enjuague ya que éste podría dejar una película<br />
blanca sobre sus platos.<br />
Como usar la parrilla <strong>in</strong>ferior<br />
Le recomendamos que coloque los artículos grandes y los más difíciles de limpiar, en la parrilla <strong>in</strong>ferior: ollas,<br />
sartenes, tapas, platos de servicio y ensaladeras, como se muestra en la figura.<br />
Es preferible que coloque los platos de servicio y las tapas en los lados de la parrilla para que no <strong>in</strong>terrumpan<br />
la rotación del brazo distribuidor.<br />
Las ollas, ensaladeras, etc., se deben poner boca abajo.<br />
Las ollas hondas deben estar colocadas de manera que permitan el flujo adecuado del agua.<br />
23
La parrilla <strong>in</strong>ferior se puede acomodar para que mas ollas u ollas más grandes y sartenes puedan ser<br />
<strong>in</strong>cluidas.<br />
Bandejas Ovaladas<br />
Platos de comida<br />
Platos de sopa<br />
Platos de postre<br />
Canasta para cubiertos<br />
Canasta para cubiertos<br />
Los cubiertos se deben colocar en las áreas designadas en la canasta de cubiertos con los mangos hacia<br />
abajo: Si la rejilla tiene canastas laterales, las cucharas deberán <strong>in</strong>sertarse <strong>in</strong>dividualmente en las ranuras<br />
apropiadas, los utensilios especialmente largos, deben colocarse en posición horizontal al frente de la rejilla<br />
superior.<br />
Tenedores<br />
Cucharas de sopa<br />
Cucharas de postre<br />
Cucharitas de té<br />
Cuchillos<br />
Cucharas de servicio<br />
Cucharón de salsa<br />
Tenedores de servicio<br />
Limpiando los brazos distribuidores<br />
Es necesario limpiar los brazos distribuidores regularmente, los químicos del agua dura pueden tupir el brazo<br />
distribuidor y el eje. Para sacar el brazo distribuidor, desenrosque la tuerca para sacar el limpiador de la parte<br />
superior del brazo distribuidor. Limpie los brazos con agua tibia y jabonosa, use una pequeña brocha para<br />
limpiar los distribuidores. Re<strong>in</strong>stálelos después de haberlos secado.<br />
Limpiando los filtros<br />
Es n ecesario sacar y limpiar el filtro periódicamente removiendo las particulas de comida en el agua de lavado<br />
permitiendo que recircule durante el ciclo.<br />
Ensamble del filtro.<br />
Para mejores resultados, limpie el filtro.<br />
El filtro remueve partículas de comida del agua de lavado, permitiendo que recircule durante el ciclo. Por esta<br />
razón, es una buena idea quitar las grandes partículas de comida atrapadas en el filtro después de cada ciclo<br />
de lavado enjuagando el filtro semicircular y la taza.<br />
Para sacar el sistema del filtro, hale la manija de la taza hacia arriba. El sistema entero del filtro deberá ser<br />
limpiado al menos una vez al mes.<br />
Para limpiar el filtro grueso y el f<strong>in</strong>o use un cepillo limpiador, luego ensamble nuevamente las partes del filtro<br />
como se muestra en las figuras de la izquierda y re<strong>in</strong>serte el ensamblaje completo en el <strong>lavaplatos</strong>, ubicándolo<br />
en su sitio y presionando hacia abajo.<br />
El <strong>lavaplatos</strong> no debe usarse s<strong>in</strong> el filtro. El reemplazo <strong>in</strong>apropiado del filtro reducirá los niveles de<br />
funcionamiento del equipo así como también dañando platos y utensilios.<br />
ADVERTENCIA<br />
Nunca use el <strong>lavaplatos</strong> s<strong>in</strong> filtro.<br />
Limpiando la puerta<br />
Para limpiar el borde alrededor de la puerta use un paño húmedo, suave y tibio. Para prevenir el <strong>in</strong>greso de<br />
agua al seguro de la puerta y a componentes eléctricos, no use limpiadores en aerosol de n<strong>in</strong>guna clase.<br />
Tampoco use limpiadores con abrasivos o paños desgrasadores ya que podrían arañar la superficie. Algunos<br />
papeles toalla podrían también arañar o dejar marcas en la superficie.<br />
24
ADVERTENCIA<br />
Tampoco use agentes abrasivos o papel toalla áspero debido al riesgo de arañar el equipo o dejar manchas<br />
en las superficies de acero <strong>in</strong>oxidable.<br />
Limpiando la Bomba de Drenaje<br />
Ocasionalmente algo caerá dentro del filtro y la bomba de drenaje. Si esto ocurre, la bomba de drenaje<br />
empleada en este equipo, está diseñada para revertir el sistema de drenaje automáticamente, de manera que<br />
devolverá el artículo en el desagüe. Si por algún motivo usted tuviera que retirar <strong>manual</strong>mente un artículo de la<br />
bomba de drenaje, antes de quitar los filtros, usted deberá apagar y desconectar el equipo de la corriente<br />
luego quitar el pequeño <strong>in</strong>serto negro del sumidero. En caso de haber residuos de agua, estos deberán ser<br />
secados antes de proseguir. Saque el artículo que causa la obstrucción, este debe encontrarse en el<br />
sumidero. Recuerde colocar el <strong>in</strong>serto negro antes de re-<strong>in</strong>stalar los filtros.<br />
MANTENIMIENTO<br />
Después de cada lavado<br />
Cierre la llave del <strong>in</strong>greso de agua y deje la puerta ligeramente entreabierta, de esta manera la humedad y los<br />
malos olores no quedarán atrapados en el <strong>in</strong>terior.<br />
No use productos de limpieza solventes o abrasivos<br />
Para limpiar las superficies exteriores y las partes de goma no use productos de limpieza solventes o<br />
abrasivos. En lugar de estos productos use un paño limpio y agua tibia jabonosa. Para quitar manchas u óxido<br />
de la superficie <strong>in</strong>terior del equipo use un paño humedecido con agua y un poco de v<strong>in</strong>agre o un producto de<br />
limpieza diseñado específicamente para <strong>lavaplatos</strong>.<br />
Cuando se vaya de vacaciones<br />
Se recomienda que realice un ciclo de lavado con el <strong>lavaplatos</strong> vacío, desenchufe el equipo, cierre la llave de<br />
entrada de agua y deje la puerta del <strong>lavaplatos</strong> ligeramente entreabierta. Esto alargará la vida de los sellos del<br />
equipo y prevendrá la formación de malos olores en el <strong>in</strong>terior del mismo.<br />
Sellos<br />
Uno de los factores que causa el mal olor en el <strong>lavaplatos</strong> es la comida que queda atrapada en los sellos.<br />
Periódicamente límpielos con una esponja húmeda, lo cual prevendrá la formación de los mismos.<br />
25
ANTES DE LLAMAR AL SERVICIO TECNICO<br />
Problema Posibles Que hacer?<br />
Causas Selección de Ciclo<br />
Hay una película Comb<strong>in</strong>ación de agua blanda y<br />
Use menos detergente si tiene agua blanda y<br />
seleccione un ciclo de lavado mas corto para<br />
blanca en los platos mucho detergente<br />
lavar la cristalería.<br />
Hay una película Manchas de té o café<br />
amarilla o marrón en Los depósitos de hierro en el agua Use una mezcla de 1/2 taza de blanqueador y 3<br />
las superficies pueden causar una película en todo tazas de agua tibia para quitar <strong>manual</strong>mente las<br />
<strong>in</strong>ternas<br />
Hay una película<br />
el equipo<br />
manchas.<br />
blanca en las<br />
Llamar a la compañía de agua y pida un filtro<br />
superficies <strong>in</strong>ternas M<strong>in</strong>erales de agua dura<br />
especial.<br />
Para limpiar el <strong>in</strong>terior, use una esponja húmeda<br />
con detergente para <strong>lavaplatos</strong> y use guantes de<br />
goma.<br />
Nunca use otra clase de limpiador que no sea el<br />
Hay detergente en las Los platos bloquean las tazas de diseñado específicamente para <strong>lavaplatos</strong>.<br />
tazas dispensadoras detergente<br />
Reacomode los platos apropiadamente.<br />
Siempre habrá algo de vapor que se escape por<br />
Vapor Normal<br />
entre la puerta durante el desagüe y el secado.<br />
Manchas negras y Artículos de alum<strong>in</strong>io junto a los Use un limpiador abrasivo suave para elim<strong>in</strong>ar<br />
grises en los platos platos<br />
esas marcas.<br />
Un poco de agua limpia cerca del <strong>in</strong>greso de<br />
Hay agua en el fondo<br />
agua en el fondo de la t<strong>in</strong>a mantendrá el sello de<br />
de la t<strong>in</strong>a Normal<br />
agua lubricado.<br />
Asegúrese que el lavadero de la coc<strong>in</strong>a este<br />
El agua en la t<strong>in</strong>a no<br />
drenando bien. Si su equipo drena en un<br />
drena El desagüe esta tupido<br />
regulador, debe limpiarlo o destupirlo.<br />
Asegúrese de no sobrecargar el depósito de<br />
aditivos para el enjuague. El derrame de este<br />
fluido puede causar exceso de espuma y<br />
Depósitos sobrecargados o el derrames.<br />
aditivo de enjuague se está Limpie cualquier salpicadura o exceso con un<br />
El <strong>lavaplatos</strong> gotea derramando<br />
paño húmedo.<br />
El <strong>lavaplatos</strong> hace<br />
Asegúrese de nivelar correctamente el<br />
ruido El <strong>lavaplatos</strong> está desnivelado <strong>lavaplatos</strong>.<br />
26<br />
PRINTED IN CHINA