Line Tracking Basic Lesson - ROBOTC.net
Line Tracking Basic Lesson - ROBOTC.net
Line Tracking Basic Lesson - ROBOTC.net

You also want an ePaper? Increase the reach of your titles
YUMPU automatically turns print PDFs into web optimized ePapers that Google loves.
Sensing<br />
<strong>Line</strong> <strong>Tracking</strong> <strong>Basic</strong> <strong>Lesson</strong><br />
Now that you’re familiar with a few of the key NXT sensors, let’s do something a little more<br />
interesting with them. This lesson will show you how to use the Light Sensor to track a line.<br />
The trick to getting the robot to move along the line is to always aim toward the edge of the line.<br />
For this example, we’ll use the left edge.<br />
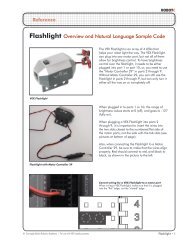
Track the left side<br />
The Light Sensor will be positioned<br />
and programmed to track the left<br />
side of the black line.<br />
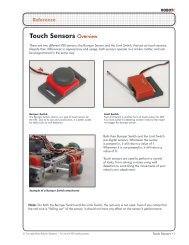
Put yourself in the robot’s position. If the only dark surface is the line, then seeing dark means you<br />
are on top of it, and the edge would be to your left. So you move toward it by going forward and<br />
left by performing a Swing Turn.<br />
Light Sensor sees dark<br />
The robot is over the dark surface. The left<br />
edge of the line must be to the robot’s left.<br />
Swing turn left<br />
Therefore, turn left toward the edge of the line.<br />
© Carnegie Mellon Robotics Academy / For use with LEGO ® MINDSTORMS® Education NXT software and base set 9797<br />
<strong>Line</strong> <strong>Tracking</strong> •
Sensing<br />
<strong>Line</strong> <strong>Tracking</strong> <strong>Basic</strong> (cont.)<br />
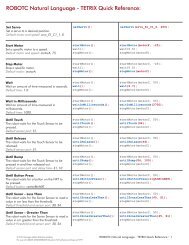
The only time we should see Light is when we’ve driven off the line to the left. If we need to get to<br />
the left edge, it’s always a right turn to get back to line. Make the forward-right turn as long as<br />
you’re seeing Light, and eventually, you’re back to seeing Dark!<br />
Light Sensor sees light<br />
The robot is now over the light surface. The left<br />
edge of the line must be to the robot’s right.<br />
Swing turn right<br />
Therefore, turn right toward the edge of the line.<br />
Put those two behaviors in a loop, and you will see that the robot will bounce back and forth<br />
between the light and dark areas. The robot will eventually bobble its way down the line.<br />
© Carnegie Mellon Robotics Academy / For use with LEGO ® MINDSTORMS® Education NXT software and base set 9797<br />
Track the line:<br />
The robot will perform the line track<br />
behavior to the end of the line<br />
<strong>Line</strong> <strong>Tracking</strong> •
Sensing<br />
<strong>Line</strong> <strong>Tracking</strong> <strong>Basic</strong> (cont.)<br />
In this lesson you will learn how to use the light sensor to follow a line, using behaviors similar<br />
to the Wait for Dark (and Wait for Light) behaviors you have already worked with.<br />
1. Start with a new, clean program.<br />
1. Create new program<br />
Select File > New to create a<br />
blank new program.<br />
2. The first step is to configure the Light Sensor. Go to the Motors and Sensors Setup menu.<br />
Click “Robot” then choose the “Motors and Sensors Setup”.<br />
© Carnegie Mellon Robotics Academy / For use with LEGO ® MINDSTORMS® Education NXT software and base set 9797<br />
2. Open “Motors and Sensors Setup”<br />
Select Robot > Motors and Sensors Setup to<br />
open the Motors and Sensors Setup menu.<br />
<strong>Line</strong> <strong>Tracking</strong> •
Sensing<br />
<strong>Line</strong> <strong>Tracking</strong> <strong>Basic</strong> (cont.)<br />
3. Configure an Active Light Sensor named “lightSensor” on Port1.<br />
4. Press OK, and you will be prompted to save the changes you have just made. Press Yes to save.<br />
5. Save this program as “<strong>Line</strong>Track1”.<br />
4. Select “Yes”<br />
Save your program when prompted.<br />
© Carnegie Mellon Robotics Academy / For use with LEGO ® MINDSTORMS® Education NXT software and base set 9797<br />
3a. Open A/D Sensors Tab<br />
Click the A/D Sensors tab<br />
3b. Name the sensor<br />
Name the Light Sensor on<br />
port S1 “lightSensor”.<br />
3c. Set Sensor Type<br />
Identify the Sensor Type as a<br />
“Light Active” sensor.<br />
5a. Name the program<br />
Give this program the name<br />
“<strong>Line</strong>Track1”.<br />
5b. Save the program<br />
Press Save to save the program<br />
with the new name.<br />
<strong>Line</strong> <strong>Tracking</strong> •
Sensing<br />
<strong>Line</strong> <strong>Tracking</strong> <strong>Basic</strong> (cont.)<br />
Checkpoint<br />
Your program should look like the one below. The Light Sensor is configured, and we can now<br />
start with the rest of the code.<br />
6. Let’s start by putting the “easy” stuff in first: task main, parentheses, and curly braces.<br />
2<br />
3<br />
4<br />
5<br />
6<br />
task main()<br />
{<br />
}<br />
7. Recall that in order to seek the left edge of the line, the robot must go forward-left for as<br />
long as it sees dark, until it reaches the light area. Similar to the Forward Until Dark behavior<br />
you wrote earlier, this uses a while() loop that runs “while” the SensorValue of the<br />
lightSensor is less than the threshold (which you must calculate as before).<br />
2<br />
3<br />
4<br />
5<br />
6<br />
7<br />
8<br />
9<br />
10<br />
11<br />
12<br />
13<br />
task main()<br />
{<br />
}<br />
while(SensorValue(lightSensor) < 45)<br />
{<br />
}<br />
motor[motorC] = 0;<br />
motor[motorB] = 80;<br />
7b. Add this code<br />
Instead of moving forward like<br />
Forward Until Dark, the robot<br />
should turn forward-left.<br />
Left motor stationary, with right<br />
motor at 80% creates this motion.<br />
© Carnegie Mellon Robotics Academy / For use with LEGO ® MINDSTORMS® Education NXT software and base set 9797<br />
6. Add this code<br />
These lines form the main body<br />
of the program, as they do in<br />
every <strong>ROBOTC</strong> program.<br />
7a. Add this code<br />
This while() loop functions like<br />
the Forward Until Dark behavior<br />
you wrote earlier.<br />
It will run the code inside the braces<br />
as long as the SensorValue of<br />
the lightSensor is less than the<br />
threshold value of 45.<br />
<strong>Line</strong> <strong>Tracking</strong> •
Sensing<br />
<strong>Line</strong> <strong>Tracking</strong> <strong>Basic</strong> (cont.)<br />
8. The robot has presumably driven off the line, and must now turn back toward it. The robot<br />
must turn forward-right as long is it continues to see the light table surface (i.e. until it sees the<br />
dark line again).<br />
2<br />
3<br />
4<br />
5<br />
6<br />
7<br />
8<br />
9<br />
10<br />
11<br />
12<br />
13<br />
14<br />
15<br />
16<br />
17<br />
18<br />
19<br />
20<br />
21<br />
task main()<br />
{<br />
}<br />
while(SensorValue(lightSensor) < 45)<br />
{<br />
}<br />
motor[motorC] = 0;<br />
motor[motorB] = 80;<br />
while(SensorValue(lightSensor) >= 45)<br />
{<br />
}<br />
motor[motorC] = 80;<br />
motor[motorB] = 0;<br />
© Carnegie Mellon Robotics Academy / For use with LEGO ® MINDSTORMS® Education NXT software and base set 9797<br />
8a. Add this code<br />
This while() loop is very<br />
similar to the one above it,<br />
except that it will run the code<br />
inside it while the light sensor<br />
sees light, rather than dark.<br />
8b. Add this code<br />
This turns the robot forward-right by<br />
running the left motor at 80% while<br />
holding the right motor stationary.<br />
Checkpoint<br />
The code currently handles only one “bounce” off and back onto the line.<br />
However, to track a line, the robot must repeat these two operations over and over again.<br />
This will be accomplished using another while() loop, set to repeat forever. “Forever” will<br />
be achieved in a somewhat creative way...<br />
Discussing Concepts Using Pseudocode<br />
Often when discussing programs and robot behaviors, it is useful for programmers<br />
to use language that is a mixture of English and code. This hybrid language is<br />
called “pseudocode” and allows programmers to discuss programming concepts in<br />
a natural way. Pseudocode is not a formal language, and therefore there is no one<br />
“right” way to do it, but it often involves simplifications to aid in discussion.<br />
(continued on next page...)<br />
<strong>Line</strong> <strong>Tracking</strong> •
Sensing<br />
<strong>Line</strong> <strong>Tracking</strong> <strong>Basic</strong> (cont.)<br />
9. Create a while() loop around your existing code. Position the curly braces so that both<br />
of the other while loop behaviors are inside this new while loop. For this new while loop’s<br />
condition, enter “1==1”, or “one is equal to one”.<br />
2<br />
3<br />
4<br />
5<br />
6<br />
7<br />
8<br />
9<br />
10<br />
11<br />
12<br />
13<br />
14<br />
15<br />
16<br />
17<br />
18<br />
19<br />
20<br />
21<br />
22<br />
23<br />
24<br />
25<br />
26<br />
task main()<br />
{<br />
}<br />
while(1==1)<br />
{<br />
}<br />
while(SensorValue(lightSensor) < 45)<br />
{<br />
}<br />
motor[motorC] = 0;<br />
motor[motorB] = 80;<br />
while(SensorValue(lightSensor) >= 45)<br />
{<br />
}<br />
motor[motorC] = 80;<br />
motor[motorB] = 0;<br />
Discussing Concepts Using Pseudocode (cont.)<br />
The program on this page might<br />
look like this in pseudocode:<br />
© Carnegie Mellon Robotics Academy / For use with LEGO ® MINDSTORMS® Education NXT software and base set 9797<br />
9. Add this code<br />
The new while() loop goes<br />
around most of the existing<br />
code, so that it will repeat<br />
those behaviors over and over.<br />
The loop will run as long as<br />
“1==1”, or “one is equal<br />
to one”. This is always true,<br />
hence the loop will run forever.<br />
repeat forever<br />
{<br />
while(the light sensor sees dark)<br />
{<br />
turn forward-left;<br />
}<br />
while(the light sensor sees light)<br />
{<br />
turn forward-right;<br />
}<br />
}<br />
<strong>Line</strong> <strong>Tracking</strong> • 7
Sensing<br />
<strong>Line</strong> <strong>Tracking</strong> <strong>Basic</strong> (cont.)<br />
End of Section<br />
Now that your program is complete, check to see if it works. Save your program, and then<br />
download it to the robot and run. If you see that your robot is moving off the line in one direction,<br />
it means that your threshold is set wrong. The robot thinks it’s seeing dark even on light, or light<br />
even on dark, and it’s just waiting to see the other, which probably won’t happen if the values are<br />
wrong. If, however, you see your robot bouncing back and forth, moving down the line, then your<br />
robot is working correctly, and it’s time to move on to the next lesson.<br />
© Carnegie Mellon Robotics Academy / For use with LEGO ® MINDSTORMS® Education NXT software and base set 9797<br />
<strong>Line</strong> <strong>Tracking</strong> •
Sensing<br />
<strong>Line</strong> <strong>Tracking</strong> Better <strong>Lesson</strong><br />
In the previous lesson we learned the basics of how to use the light sensor to follow a line. That<br />
version of the line tracker runs forever, and cannot be stopped except by manually stopping the<br />
program. To be more useful, the robot should be able to start and stop the line tracking behavior<br />
on cue. For example, the robot should be able to stop following a line when it reaches a wall at<br />
the end of its path.<br />
In principle, we should be able to do this pretty easily, all we need to do is change the “looping<br />
forever” part to “loop while the touch sensor is unpressed.”<br />
© Carnegie Mellon Robotics Academy / For use with LEGO ® MINDSTORMS® Education NXT software and base set 9797<br />
<strong>Line</strong> <strong>Tracking</strong> • 9
Sensing<br />
<strong>Line</strong> <strong>Tracking</strong> Better (cont.)<br />
In this lesson, you will adapt your line tracking program to stop when a Touch Sensor is<br />
pressed, and then make it more robust by replacing risky nested loops with if-else statements.<br />
1. Save your existing program from the previous lesson under a new name, “<strong>Line</strong>Track2”.<br />
2. Open the Motors and Sensors Setup menu.<br />
3. You will be adding a second sensor for this lesson. Configure a Touch Sensor called<br />
“touchSensor” on S2.<br />
© Carnegie Mellon Robotics Academy / For use with LEGO ® MINDSTORMS® Education NXT software and base set 9797<br />
1a. Save program As...<br />
Select File > Save As... to save your<br />
program under a new name.<br />
1b. Name the program<br />
Give this program the name<br />
“<strong>Line</strong>Track2”.<br />
1c. Save the program<br />
Press Save to save the program<br />
with the new name.<br />
2. Open “Motors and Sensors<br />
Setup”<br />
Select Robot > Motors and Sensors<br />
Setup to open the Motors and<br />
Sensors Setup menu.<br />
3a. Open A/D Sensors Tab<br />
Click the A/D Sensors tab<br />
3b. Name the sensor<br />
Name the Touch Sensor on<br />
port S2 “touchSensor”.<br />
3c. Set Sensor Type<br />
Identify the Sensor Type as a<br />
“Touch” sensor.<br />
<strong>Line</strong> <strong>Tracking</strong> • 0
Sensing<br />
<strong>Line</strong> <strong>Tracking</strong> Better (cont.)<br />
4. On your physical robot, plug the Touch Sensor into Port 2.<br />
5. Press OK on the Motors and Sensors Setup menu.<br />
© Carnegie Mellon Robotics Academy / For use with LEGO ® MINDSTORMS® Education NXT software and base set 9797<br />
5. Press OK<br />
Accept the changes to the sensor<br />
setup and close the window.<br />
<strong>Line</strong> <strong>Tracking</strong> •
Sensing<br />
<strong>Line</strong> <strong>Tracking</strong> Better (cont.)<br />
6. Replace the “forever” condition 1==1 with the condition “the touch sensor is unpressed”,<br />
the same condition you used to “run until pressed” in the Wall Detection (Touch) lesson.<br />
This condition will be true when the SensorValue of touchSensor is equal to 0.<br />
2<br />
3<br />
4<br />
5<br />
6<br />
7<br />
8<br />
9<br />
10<br />
11<br />
12<br />
13<br />
14<br />
15<br />
16<br />
17<br />
18<br />
task main()<br />
{<br />
while(SensorValue(touchSensor) == 0)<br />
{<br />
while(SensorValue(lightSensor) < 45)<br />
{<br />
}<br />
motor[motorC] = 0;<br />
motor[motorB] = 80;<br />
while(SensorValue(lightSensor) >= 45)<br />
{<br />
© Carnegie Mellon Robotics Academy / For use with LEGO ® MINDSTORMS® Education NXT software and base set 9797<br />
6. Modify this code<br />
Change the condition<br />
in parentheses to check<br />
whether the “touch sensor<br />
is unpressed” instead.<br />
The condition will be true<br />
when the touch sensor’s<br />
value is equal to 0.<br />
7. Elevate (“block up”) the robot so that you can test it without its wheels touching the ground.<br />
Note that the light sensor now hangs in the air. Download and run your program.<br />
7a. Block up the robot<br />
Place an object under the robot<br />
so that its wheels don’t reach<br />
the table. The robot can now<br />
run without moving.<br />
7b. Download the program<br />
Click Robot > Compile and<br />
Download Program.<br />
7c. Run the program<br />
Click “Start” on the onscreen<br />
Program Debug window, or<br />
use the NXT’s on-brick menus.<br />
<strong>Line</strong> <strong>Tracking</strong> •
Sensing<br />
<strong>Line</strong> <strong>Tracking</strong> Better (cont.)<br />
Checkpoint<br />
Check that your <strong>Line</strong> <strong>Tracking</strong> behavior is correctly responding to light and dark by placing light-<br />
and dark-colored objects or paper under the light sensor.<br />
Simulated dark line<br />
Using a dark-colored object (or the naturally low<br />
value of the sensor when held in the air like this),<br />
confirm that the robot exhibits the correct motor<br />
behaviors when the sensor sees “dark”.<br />
Simulated light surface<br />
Place a sheet of white paper under the sensor<br />
to simulate the robot traveling off the line and<br />
onto the light table surface. Watch for the<br />
motors to change behaviors accordingly.<br />
We modified the program so that the (condition) of the while() loop would only be true as long as<br />
the Touch Sensor was unpressed. When the sensor is pressed, the loop should end, and move on.<br />
© Carnegie Mellon Robotics Academy / For use with LEGO ® MINDSTORMS® Education NXT software and base set 9797<br />
Touch the Sensor<br />
Press in the bumper<br />
on the robot to trigger<br />
the Touch Sensor.<br />
Observe motors<br />
Do the motors stop like<br />
they should at the end<br />
of the program?<br />
Light/Dark again<br />
Release the Touch<br />
sensor, and see if the<br />
robot still responds to<br />
light and dark.<br />
Light/Dark pressed<br />
Hold down the Touch<br />
Sensor bumper, and try<br />
light/dark again. Does<br />
anything happen?<br />
<strong>Line</strong> <strong>Tracking</strong> •
Sensing<br />
<strong>Line</strong> <strong>Tracking</strong> Better (cont.)<br />
The robot responds strangely. When you pressed the touch sensor, it didn’t respond. But when you<br />
held the touch sensor and waved the paper underneath it, the robot did stop. The touch sensor<br />
seems to be doing its job of stopping the loop... sometimes? Let’s step through the code.<br />
2<br />
3<br />
4<br />
5<br />
6<br />
7<br />
8<br />
9<br />
10<br />
11<br />
12<br />
13<br />
14<br />
15<br />
16<br />
17<br />
18<br />
task main()<br />
{<br />
while(SensorValue(touchSensor) == 0)<br />
{<br />
while(SensorValue(lightSensor) < 45)<br />
{<br />
}<br />
motor[motorC] = 0;<br />
motor[motorB] = 80;<br />
while(SensorValue(lightSensor) >= 45)<br />
{<br />
2<br />
3<br />
4<br />
5<br />
6<br />
7<br />
8<br />
9<br />
10<br />
11<br />
12<br />
13<br />
14<br />
15<br />
Key concept: While() loops do not continually monitor their<br />
(conditions). They only check when the program reaches the<br />
“while” line containing the condition.<br />
task main()<br />
{<br />
while(SensorValue(touchSensor) == 0)<br />
{<br />
while(SensorValue(lightSensor) < 45)<br />
{<br />
motor[motorC] = 0;<br />
motor[motorB] = 80;<br />
© Carnegie Mellon Robotics Academy / For use with LEGO ® MINDSTORMS® Education NXT software and base set 9797<br />
}<br />
a. Touch Sensor check<br />
The program checks the<br />
condition only at this<br />
point. It’s true when we<br />
start, so the program<br />
goes “inside” the loop.<br />
b. Inner loop<br />
As long as the robot<br />
continues to see dark,<br />
it enters and remains<br />
in this loop.<br />
What was the program was doing while the robot saw the dark object (or dark space below its<br />
sensor)? The program reached and went inside the while(dark) loop, (b) above, and remained<br />
inside as long as the Light Sensor continued seeing dark. Consider which lines check the Touch<br />
Sensor. While the program was inside the inner while() loop, was it ever able to reach those lines?<br />
Code must reach<br />
this point<br />
The Touch Sensor is<br />
only checked when<br />
the program reaches<br />
this line.<br />
Code is stuck here<br />
Until the Light Sensor<br />
stops seeing dark,<br />
the program doesn’t<br />
leave this loop.<br />
The current program contains flawed logic. Until the robot stops seeing dark, there’s no<br />
way for the program to reach the line that checks the touch sensor! This “stuck in the inner loop”<br />
problem will always be a danger any time we place one loop inside another, a structure called a<br />
“nested loop”. We were only able to get the robot to recognize touch by waving the light object in<br />
front of it to force it out of the while(dark) loop, and back around to check the Touch Sensor again.<br />
<strong>Line</strong> <strong>Tracking</strong> •
Sensing<br />
<strong>Line</strong> <strong>Tracking</strong> Better (cont.)<br />
The solution requires a little shift in thinking. The program as it is now involves running trough an<br />
“inner” while loop, where it has the potential to get stuck, oblivious to the outside world. We need<br />
to get rid of the nested loop. If, instead, we break down the robot’s actions into a series of tiny,<br />
instantaneous decisions that will always pick the correct direction, we can avoid the need to go<br />
“inside” a loop that might not end in time. Enter the if-else statement.<br />
7. Replace the inner while() loops with a simpler, lightweight decision-making structure called<br />
a conditional statement, or if-else statement.<br />
7<br />
8<br />
9<br />
10<br />
11<br />
12<br />
13<br />
14<br />
15<br />
16<br />
17<br />
18<br />
19<br />
20<br />
21<br />
22<br />
23<br />
if(SensorValue(lightSensor) < 45)<br />
{<br />
}<br />
else<br />
{<br />
}<br />
motor[motorC] = 0;<br />
motor[motorB] = 80;<br />
motor[motorC] = 80;<br />
motor[motorB] = 0;<br />
In the same way that the while loop started with the word “while”, the if-else starts with the<br />
word “if”. It, like the while loop, is followed immediately by a condition in parentheses. In fact, it<br />
uses the same condition as the old program to check the light sensor. The difference is that the<br />
if-else statement will only run the commands in the brackets once, regardless of the light or touch<br />
sensor readings.<br />
If the SensorValue of the lightSensor is less than the threshold, then the code directly after will<br />
execute, once. The else, followed by another set of curly braces, represents what the program<br />
should do if the condition is not true.<br />
if(condition)<br />
{<br />
true-commands;<br />
}<br />
else<br />
{<br />
false-commands;<br />
}<br />
General form<br />
Conditional (if-else) loops always follow the pattern shown here.<br />
If the (condition) is true, the true-commands will run.<br />
If the (condition) is false, the false-commands will run instead.<br />
Note, however, that whichever set of commands is chosen, they<br />
are only run once, and not looped!<br />
© Carnegie Mellon Robotics Academy / For use with LEGO ® MINDSTORMS® Education NXT software and base set 9797<br />
7a. Modify this code<br />
Replace while with if.<br />
If the light sensor value is<br />
less than 45, run the code<br />
between the curly braces,<br />
once only, then move on.<br />
7b. Modify this code<br />
Replace the while() line with<br />
the keyword else.<br />
If the code in the if statement’s<br />
brackets did not run, the code in<br />
the else statement’s brackets<br />
will instead (once). This should<br />
only happen when the light<br />
sensor is seeing a value >= 45<br />
(i.e .light).<br />
<strong>Line</strong> <strong>Tracking</strong> •
Sensing<br />
<strong>Line</strong> <strong>Tracking</strong> Better (cont.)<br />
8. As a final touch, add a Stop motors behavior into the program, right before the final bracket.<br />
This ensures that you’ll see an immediate reaction when the robot gets out of the loop.<br />
15<br />
16<br />
17<br />
18<br />
19<br />
20<br />
21<br />
22<br />
23<br />
24<br />
25<br />
26<br />
27<br />
28<br />
29<br />
}<br />
}<br />
else<br />
{<br />
}<br />
motor[motorC] = 80;<br />
motor[motorB] = 0;<br />
motor[motorC] = 0;<br />
motor[motorB] = 0;<br />
End of Section<br />
Save your program, download, and run.<br />
© Carnegie Mellon Robotics Academy / For use with LEGO ® MINDSTORMS® Education NXT software and base set 9797<br />
8. Add this code<br />
Stop both motors. Because these<br />
lines come outside the while()<br />
loop, they will run after the<br />
while() loop has completed.<br />
The robot no longer gets stuck in the “inner” while() loop, and successfully tracks the line until the<br />
touch sensor is triggered.<br />
<strong>Line</strong> <strong>Tracking</strong> •
Sensing<br />
<strong>Line</strong> <strong>Tracking</strong> Timer <strong>Lesson</strong><br />
The behavior we programmed in the previous lesson is great for those situations where you want<br />
the robot to follow a line straight into a wall, and stop. However, let’s see if there are any good<br />
ways to make the robot line track until something else happens.<br />
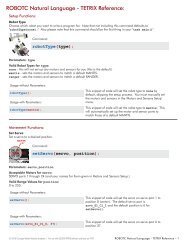
To make the robot go straight for 3 seconds, we gave it motor commands, followed by a<br />
wait1Msec(time)command. How would this work with line tracking?<br />
2<br />
3<br />
4<br />
5<br />
6<br />
7<br />
8<br />
9<br />
10<br />
11<br />
12<br />
13<br />
14<br />
15<br />
16<br />
17<br />
18<br />
19<br />
20<br />
21<br />
22<br />
23<br />
24<br />
25<br />
26<br />
27<br />
28<br />
29<br />
30<br />
31<br />
task main()<br />
{<br />
}<br />
while(SensorValue(touchSensor) == 0)<br />
{<br />
}<br />
if(SensorValue(lightSensor) < 45)<br />
{<br />
}<br />
motor[motorC] = 0;<br />
motor[motorB] = 80;<br />
wait1Msec(3000);<br />
else<br />
{<br />
}<br />
motor[motorC] = 80;<br />
motor[motorB] = 0;<br />
motor[motorC] = 0;<br />
motor[motorB] = 0;<br />
© Carnegie Mellon Robotics Academy / For use with LEGO ® MINDSTORMS® Education NXT software and base set 9797<br />
Location A<br />
Does the wait1Msec<br />
command go here?<br />
Location B<br />
Here?<br />
Location C<br />
How about here like this?<br />
Location D<br />
Or here?<br />
Option E<br />
Both B and D together.<br />
Which one of the above locations is the right place to put the wait1Msec command?<br />
The correct answer is: none. There is no right place to put a wait1Msec command to get the<br />
robot to line track for 3 seconds. Wait1Msec does not mean “continue the last behavior for this<br />
many milliseconds,”it means, “go to sleep for this many milliseconds.”<br />
You’ve really told the robot to put its foot on the gas pedal, and go to sleep. That doesn’t work<br />
when the robot needs to watch the road. Instead, we’ll keep the robot awake and attentive, using<br />
a Timer (rather than just Time) to decide when to stop.<br />
<strong>Line</strong> <strong>Tracking</strong> • 7
Sensing<br />
<strong>Line</strong> <strong>Tracking</strong> Timer (cont.)<br />
Your robot is equipped with four Timers, T1 through T4, which you can think of as Time Sensors,<br />
or if you prefer, programmable stopwatches.<br />
Using the Timers is pretty straightforward: you reset a timer with the ClearTimer() command,<br />
and it immediately starts counting time.<br />
Then, when you want to find out how long it’s been since then, you just use time1[TimerName],<br />
and it will give you the value of the timer, in the same way that SensorValue(SensorName)<br />
gives you the value of a sensor.<br />
ClearTimer(TimerName);<br />
while(time1[TimerName] < 5000)<br />
Timer Tips<br />
Timers should be reset when you are ready to start counting.<br />
time1[TimerName] represents the timer value in milliseconds<br />
since the last reset. It is shown here being used to make a while<br />
loop run until 5 seconds have elapsed.<br />
© Carnegie Mellon Robotics Academy / For use with LEGO ® MINDSTORMS® Education NXT software and base set 9797<br />
<strong>Line</strong> <strong>Tracking</strong> •
Sensing<br />
<strong>Line</strong> <strong>Tracking</strong> Timer (cont.)<br />
In this lesson you will learn how to use Timers to make a line-tracking behavior run for a set<br />
amount of time.<br />
1. Open the Touch Sensor <strong>Line</strong> <strong>Tracking</strong> program “<strong>Line</strong>Track2”.<br />
2. Save this program under a new name, “<strong>Line</strong>TrackTimer”. (Note the “r” at the end of “timer”)<br />
© Carnegie Mellon Robotics Academy / For use with LEGO ® MINDSTORMS® Education NXT software and base set 9797<br />
1a. Open Program<br />
Select File > Open and Compile to<br />
retrieve your old program.<br />
1b. Select the program<br />
Select “<strong>Line</strong>Track2”.<br />
1c. Open the program<br />
Press Open to open the saved<br />
program.<br />
2a. Save program As...<br />
Select File > Save As... to save your<br />
program under a new name.<br />
2b. Name the program<br />
Give this program the name<br />
“<strong>Line</strong>TrackTimer”.<br />
2c. Save the program<br />
Press Save to save the program<br />
with the new name.<br />
<strong>Line</strong> <strong>Tracking</strong> • 9
Sensing<br />
<strong>Line</strong> <strong>Tracking</strong> Timer (cont.)<br />
Checkpoint<br />
The program on your screen should again look like the one below.<br />
2<br />
3<br />
4<br />
5<br />
6<br />
7<br />
8<br />
9<br />
10<br />
11<br />
12<br />
13<br />
14<br />
15<br />
16<br />
17<br />
18<br />
19<br />
20<br />
21<br />
22<br />
23<br />
24<br />
25<br />
26<br />
27<br />
28<br />
29<br />
3. Before a timer can be used, it has to be cleared, otherwise it may have an unwanted<br />
time value still stored in it.<br />
2<br />
3<br />
4<br />
5<br />
6<br />
7<br />
8<br />
9<br />
10<br />
task main()<br />
{<br />
}<br />
while(SensorValue(touchSensor) == 0)<br />
{<br />
}<br />
if(SensorValue(lightSensor) < 45)<br />
{<br />
}<br />
else<br />
{<br />
}<br />
motor[motorC] = 0;<br />
motor[motorB] = 80;<br />
motor[motorC] = 80;<br />
motor[motorB] = 0;<br />
motor[motorC] = 0;<br />
motor[motorB] = 0;<br />
task main()<br />
{<br />
ClearTimer(T1);<br />
while(SensorValue(touchSensor) == 0)<br />
{<br />
if(SensorValue(lightSensor) < 45)<br />
© Carnegie Mellon Robotics Academy / For use with LEGO ® MINDSTORMS® Education NXT software and base set 9797<br />
3. Add this code<br />
Reset the Timer T1 to 0 and<br />
start it counting just before<br />
the loop begins.<br />
<strong>Line</strong> <strong>Tracking</strong> • 0
Sensing<br />
<strong>Line</strong> <strong>Tracking</strong> Timer (cont.)<br />
4. Now, change the while loop’s (condition) to check the timer instead of the touch sensor.<br />
The robot should line track while the timer T1 reads less than 3000 milliseconds.<br />
2<br />
3<br />
4<br />
5<br />
6<br />
7<br />
8<br />
9<br />
10<br />
11<br />
12<br />
13<br />
14<br />
15<br />
16<br />
17<br />
18<br />
19<br />
20<br />
21<br />
task main()<br />
{<br />
End of Section<br />
Download and Run.<br />
ClearTimer(T1);<br />
while(time1[T1] < 3000)<br />
{<br />
if(SensorValue(lightSensor) < 45)<br />
{<br />
}<br />
else<br />
{<br />
motor[motorC] = 0;<br />
motor[motorB] = 80;<br />
motor[motorC] = 80;<br />
<strong>Line</strong> <strong>Tracking</strong> for Time(r)<br />
The robot tracks the line for a set<br />
amount of time. But is time really<br />
what you want to measure?<br />
© Carnegie Mellon Robotics Academy / For use with LEGO ® MINDSTORMS® Education NXT software and base set 9797<br />
4. Modify this line<br />
Base the decision about whether<br />
to continue running, on how<br />
much time has passed since T1’s<br />
last reset.<br />
<strong>ROBOTC</strong> gives you four different timers to work with: T1, T2, T3, and T4. They can be reset and<br />
run independently, in case you need to time more than one thing. You reset them the same way<br />
– ClearTimer(T2); – and you check them the same way – time1[T2].<br />
Still, there’s the issue of timing itself. Motors, even good ones, aren’t perfectly precise. By<br />
assuming that you’re going a certain speed, and therefore will go a certain distance in a set<br />
amount of time, you are making a pretty bold assumption.<br />
In the next part of this lesson, you’ll find out how to track a line for a certain distance, instead of<br />
tracking for time and hoping that it equates to the correct distance.<br />
<strong>Line</strong> <strong>Tracking</strong> •
Sensing<br />
<strong>Line</strong> <strong>Tracking</strong> Rotation<br />
In this lesson we’ll find out how to watch for distance, instead of watching for time and hoping that<br />
the robot moves the correct distance, like in our previous program.<br />
© Carnegie Mellon Robotics Academy / For use with LEGO ® MINDSTORMS® Education NXT software and base set 9797<br />
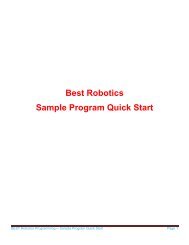
NXT Motors<br />
Rotation sensors are built into<br />
every NXT motor.<br />
A rotation sensor is a patterned disc attached to the inside of the motor. By monitoring the<br />
orientation of the disc as it turns, the sensor can tell you how far the motor has turned, in<br />
degrees. Since the motor turns the axle, and the axle turns the wheel, the rotation sensor can tell<br />
you how much the wheel has turned. Knowing how far the wheel has turned can tell you how far<br />
the robot has traveled. Setting the robot to move until the rotation sensor count reaches a certain<br />
point allows you to accurately program the robot to travel a set distance.<br />
<strong>Line</strong> <strong>Tracking</strong> •
Sensing<br />
<strong>Line</strong> <strong>Tracking</strong> Rotation (cont.)<br />
Review<br />
The last program we’re going to visit in the <strong>Line</strong> <strong>Tracking</strong> lesson is perhaps the most useful<br />
form, but it’s taken us awhile to get here. Progress in engineering and programming projects is<br />
often made in this “iterative” way, by making small, directed improvements that build upon one<br />
another. Let’s quickly review what we have done in some of the previous lessons.<br />
We started with figuring out that a line tracking behavior consists of bouncing back and forth<br />
between light and dark areas in an effort to follow the edge of a line.<br />
© Carnegie Mellon Robotics Academy / For use with LEGO ® MINDSTORMS® Education NXT software and base set 9797<br />
<strong>Line</strong> <strong>Tracking</strong> •
Sensing<br />
<strong>Line</strong> <strong>Tracking</strong> Rotation (cont.)<br />
We then implemented a naive version of the line tracking behavior using while() loops, inside<br />
other while() loops.<br />
2<br />
3<br />
4<br />
5<br />
6<br />
7<br />
8<br />
9<br />
10<br />
11<br />
12<br />
13<br />
14<br />
15<br />
16<br />
17<br />
18<br />
19<br />
20<br />
21<br />
22<br />
23<br />
24<br />
25<br />
26<br />
task main()<br />
{<br />
}<br />
while(1 == 1)<br />
{<br />
}<br />
while(SensorValue(lightSensor) < 45)<br />
{<br />
}<br />
motor[motorC] = 0;<br />
motor[motorB] = 80;<br />
while(SensorValue(lightSensor) >= 45)<br />
{<br />
}<br />
motor[motorC] = 80;<br />
motor[motorB] = 0;<br />
But, we found that the program could get stuck inside one of those inner loops, preventing it from<br />
checking the sensor that we wanted to use to stop the tracking.<br />
© Carnegie Mellon Robotics Academy / For use with LEGO ® MINDSTORMS® Education NXT software and base set 9797<br />
<strong>Line</strong> <strong>Tracking</strong> •
Sensing<br />
<strong>Line</strong> <strong>Tracking</strong> Rotation (cont.)<br />
We then implemented if-else conditional statements, which allow instantaneous sensor checking,<br />
and thus avoid the “nesting” of loops inside other loops, which had caused the program to get stuck.<br />
7<br />
8<br />
9<br />
10<br />
11<br />
12<br />
13<br />
14<br />
15<br />
16<br />
17<br />
18<br />
19<br />
20<br />
21<br />
22<br />
23<br />
24<br />
25<br />
Then, we upgraded from checking a Touch Sensor, to being able to use an independent timer to<br />
determine how long to run the line tracker.<br />
2<br />
3<br />
4<br />
5<br />
6<br />
7<br />
8<br />
9<br />
10<br />
11<br />
12<br />
13<br />
14<br />
15<br />
16<br />
17<br />
18<br />
19<br />
20<br />
21<br />
}<br />
if(SensorValue(lightSensor) < 45)<br />
{<br />
}<br />
else<br />
{<br />
}<br />
task main()<br />
{<br />
motor[motorC] = 0;<br />
motor[motorB] = 80;<br />
motor[motorC] = 80;<br />
motor[motorB] = 0;<br />
ClearTimer(T1);<br />
while(time1[T1] < 3000<br />
{<br />
if(SensorValue(lightSensor) < 45)<br />
{<br />
}<br />
else<br />
{<br />
motor[motorC] = 0;<br />
motor[motorB] = 80;<br />
motor[motorC] = 80;<br />
© Carnegie Mellon Robotics Academy / For use with LEGO ® MINDSTORMS® Education NXT software and base set 9797<br />
<strong>Line</strong> <strong>Tracking</strong> •
Sensing<br />
<strong>Line</strong> <strong>Tracking</strong> Rotation (cont.)<br />
Now, let’s improve upon the Timer-based behavior by using a sensor more fundamentally<br />
connected to the quantity we wish to measure: distance traveled, using the Rotation Sensor.<br />
In this lesson you will learn how to use the Rotation Sensors built into every NXT motor to<br />
make a line tracking behavior run for a set distance.<br />
1. Start by opening the <strong>Line</strong> <strong>Tracking</strong> Timer Program “<strong>Line</strong>TrackTimer”.<br />
2. Save this program under a new name, “<strong>Line</strong>TrackRotation”.<br />
© Carnegie Mellon Robotics Academy / For use with LEGO ® MINDSTORMS® Education NXT software and base set 9797<br />
1a. Open Program<br />
Select File > Open and Compile to<br />
retrieve your old program.<br />
1b. Select the program<br />
Select “<strong>Line</strong>TrackTimer”.<br />
1c. Open the program<br />
Press Open to open the saved<br />
program.<br />
2a. Save program As...<br />
Select File > Save As... to save your<br />
program under a new name.<br />
2b. Name the program<br />
Give this program the name<br />
“<strong>Line</strong>TrackRotation”.<br />
2c. Save the program<br />
Press Save to save the program<br />
with the new name.<br />
<strong>Line</strong> <strong>Tracking</strong> •
Sensing<br />
<strong>Line</strong> <strong>Tracking</strong> Rotation (cont.)<br />
Checkpoint<br />
Your starting program for this lesson should look like the one below.<br />
2<br />
3<br />
4<br />
5<br />
6<br />
7<br />
8<br />
9<br />
10<br />
11<br />
12<br />
13<br />
14<br />
15<br />
16<br />
17<br />
18<br />
19<br />
20<br />
21<br />
22<br />
23<br />
24<br />
25<br />
26<br />
27<br />
28<br />
29<br />
30<br />
31<br />
task main()<br />
{<br />
}<br />
ClearTimer(T1);<br />
while(time1[T1] < 3000)<br />
{<br />
}<br />
if(SensorValue(lightSensor) < 45)<br />
{<br />
}<br />
else<br />
{<br />
}<br />
motor[motorC] = 0;<br />
motor[motorB] = 80;<br />
motor[motorC] = 80;<br />
motor[motorB] = 0;<br />
motor[motorC] = 0;<br />
motor[motorB] = 0;<br />
It’s time to start changing the program to use the Rotation sensors. Rotation sensors have<br />
no guaranteed starting position, so, you must first reset the rotation sensor count. It will take<br />
the place of the equivalent reset code used for the Timer.<br />
In the robotics world, the term “encoder” is often used to refer to any device that measures<br />
rotation of an axle or shaft, such as the one that spins in your motor. Consequently, the <strong>ROBOTC</strong><br />
word that is used to access a Rotation Sensor value is nMotorEncoder[MotorName].<br />
Unlike the Timer, which has its own ClearTimer command, the rotation sensor (motor encoder)<br />
value must be manually set back to zero to reset it. The command to do so will look like this:<br />
Example:<br />
nMotorEncoder[motorC] = 0;<br />
© Carnegie Mellon Robotics Academy / For use with LEGO ® MINDSTORMS® Education NXT software and base set 9797<br />
<strong>Line</strong> <strong>Tracking</strong> • 7
Sensing<br />
<strong>Line</strong> <strong>Tracking</strong> Rotation (cont.)<br />
3. Start with the left wheel, attached to Motor C on your robot. Reset the rotation sensor on<br />
that motor to 0.<br />
2<br />
3<br />
4<br />
5<br />
6<br />
7<br />
8<br />
9<br />
10<br />
11<br />
12<br />
13<br />
14<br />
15<br />
16<br />
17<br />
18<br />
19<br />
20<br />
21<br />
22<br />
23<br />
24<br />
25<br />
26<br />
27<br />
28<br />
29<br />
30<br />
31<br />
task main()<br />
{<br />
}<br />
nMotorEncoder[motorC] = 0;<br />
while(time1[T1] < 3000)<br />
{<br />
}<br />
if(SensorValue(lightSensor) < 45)<br />
{<br />
}<br />
else<br />
{<br />
}<br />
motor[motorC] = 0;<br />
motor[motorB] = 80;<br />
motor[motorC] = 80;<br />
motor[motorB] = 0;<br />
motor[motorC] = 0;<br />
motor[motorB] = 0;<br />
© Carnegie Mellon Robotics Academy / For use with LEGO ® MINDSTORMS® Education NXT software and base set 9797<br />
3. Modify this code<br />
Instead of resetting a Timer,<br />
reset the rotation sensor in<br />
MotorC to a value of 0. Replace<br />
ClearTimer(T1); with<br />
nMotorEncoder[motorC]=0;<br />
<strong>Line</strong> <strong>Tracking</strong> •
Sensing<br />
<strong>Line</strong> <strong>Tracking</strong> Rotation (cont.)<br />
4. Reset the other motor’s rotation sensor, nMotorEncoder[motorB] = 0;<br />
2<br />
3<br />
4<br />
5<br />
6<br />
7<br />
8<br />
9<br />
10<br />
11<br />
12<br />
13<br />
14<br />
15<br />
16<br />
17<br />
18<br />
19<br />
20<br />
21<br />
22<br />
23<br />
24<br />
25<br />
26<br />
27<br />
28<br />
29<br />
30<br />
31<br />
32<br />
task main()<br />
{<br />
}<br />
nMotorEncoder[motorC] = 0;<br />
nMotorEncoder[motorB] = 0;<br />
while(time1[T1] < 3000)<br />
{<br />
}<br />
if(SensorValue(lightSensor) < 45)<br />
{<br />
}<br />
else<br />
{<br />
}<br />
motor[motorC] = 0;<br />
motor[motorB] = 80;<br />
motor[motorC] = 80;<br />
motor[motorB] = 0;<br />
motor[motorC] = 0;<br />
motor[motorB] = 0;<br />
© Carnegie Mellon Robotics Academy / For use with LEGO ® MINDSTORMS® Education NXT software and base set 9797<br />
4. Add this code<br />
Reset the rotation sensor in<br />
MotorB to 0 as well.<br />
<strong>Line</strong> <strong>Tracking</strong> • 9
Sensing<br />
<strong>Line</strong> <strong>Tracking</strong> Rotation (cont.)<br />
5. The NXT motor encoder measures in degrees, so it will count 360 for every full rotation<br />
the motor makes. Change the while() loop’s condition to make this loop run while the<br />
nMotorEncoder value of motorC is less than 1800 degrees, five full rotations.<br />
2<br />
3<br />
4<br />
5<br />
6<br />
7<br />
8<br />
9<br />
10<br />
11<br />
12<br />
13<br />
14<br />
15<br />
16<br />
17<br />
18<br />
19<br />
20<br />
21<br />
task main()<br />
{<br />
nMotorEncoder[motorC] = 0;<br />
nMotorEncoder[motorB] = 0;<br />
while(nMotorEncoder[motorC] < 1800)<br />
{<br />
if(SensorValue(lightSensor) < 45)<br />
{<br />
}<br />
else<br />
{<br />
motor[motorC] = 0;<br />
motor[motorB] = 80;<br />
motor[motorC] = 80;<br />
© Carnegie Mellon Robotics Academy / For use with LEGO ® MINDSTORMS® Education NXT software and base set 9797<br />
5. Modify this code<br />
Set MotorC to run for five full<br />
rotations or 1800 degrees.<br />
Checkpoint<br />
Save, download and run your program. You may want to mark one of the wheels<br />
with a piece of tape so that you can count the rotations.<br />
<strong>Line</strong> <strong>Tracking</strong> • 0
Sensing<br />
<strong>Line</strong> <strong>Tracking</strong> Rotation (cont.)<br />
6. We only checked one wheel and not the other. Add a check for the other motor’s encoder<br />
value to the condition. The {condition} will now be satisfied and loop as long as BOTH motors<br />
remain below the distance threshold of 1800 degrees.<br />
2<br />
3<br />
4<br />
5<br />
6<br />
7<br />
8<br />
9<br />
10<br />
task main()<br />
{<br />
nMotorEncoder[motorC] = 0;<br />
nMotorEncoder[motorB] = 0;<br />
while(nMotorEncoder[motorC] < 1800 && nMotorEncoder[motorB] < 1800)<br />
{<br />
6. Add this code<br />
This change sets the condition<br />
to run while “the motor encoder<br />
on motorC reads less than 1800<br />
degrees, AND the motor encoder<br />
for motorB also reads less than<br />
1800 degrees.<br />
End of Section<br />
Download and run this program, and you will see that on curves going to the left, where the right<br />
motor caps out at 1800 first, this program will stop sooner than the one that just waited for the<br />
left motor (remember, the left motor is traveling less when making a left turn).<br />
Take a step back, and look at what you have. Your robot is now able to perform a behavior<br />
using one sensor, while watching another sensor to know when to stop. Using the rotation sensor<br />
means that your robot can now travel for a set distance along the line, and be pretty sure of how<br />
far it’s gone. These capabilities can be applied to more than just line tracking, however. You can<br />
now build any number of environmentally-aware decision-making behaviors, and run them until<br />
you have a good reason to stop. This pattern of while and conditional loops is one of the most<br />
frequently used setups in robot programming. Learn it well, and you will be well prepared for<br />
many roads ahead.<br />
© Carnegie Mellon Robotics Academy / For use with LEGO ® MINDSTORMS® Education NXT software and base set 9797<br />
<strong>Line</strong> <strong>Tracking</strong> •