Manual Bluetooth Headset handsfree & wireless - Agk Nordic
Manual Bluetooth Headset handsfree & wireless - Agk Nordic
Manual Bluetooth Headset handsfree & wireless - Agk Nordic

You also want an ePaper? Increase the reach of your titles
YUMPU automatically turns print PDFs into web optimized ePapers that Google loves.
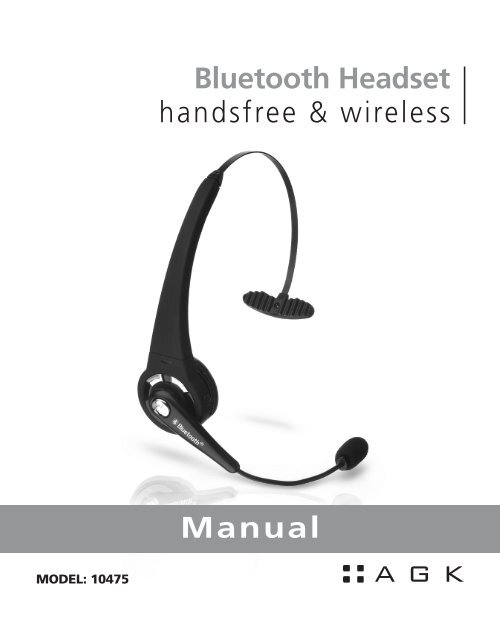
Model: 10475<br />
<strong>Bluetooth</strong> <strong>Headset</strong><br />
<strong>handsfree</strong> & <strong>wireless</strong><br />
<strong>Manual</strong>
Important before use<br />
Thank you for purchasing the <strong>Bluetooth</strong> headset. Please check the contents of<br />
this package to verify the items listed in the Package contents list below are included<br />
in your package. Please check and read this User Guide before you use<br />
the headset. The <strong>Bluetooth</strong> headset has been developed using <strong>Bluetooth</strong> <strong>wireless</strong><br />
technology and is capable of connecting with <strong>Bluetooth</strong> devices designed with<br />
Audio Gateway and PDAs. Desktop and notebook computers can be connected<br />
and paired with the headset using a USB <strong>Bluetooth</strong> Dongle. Before using the<br />
headset please verify your <strong>Bluetooth</strong> device (phone, PDA) complies with <strong>Bluetooth</strong><br />
V2.1 and supports the <strong>Bluetooth</strong> headset or hand free profile.<br />
Specifications<br />
Standard convention/signal output <strong>Bluetooth</strong> V2.0, Class II<br />
Frequency Band 2.4GHz~2.4835GHz, ISM Band<br />
Talk/ stand by time Up to 8 hours/ Up to 200 hours<br />
Supporting profile <strong>Headset</strong> and hand free<br />
Connection Peer to Peer<br />
Data encryption 128 bits encrypted<br />
Power capacity Rechargeable Li-Polymer<br />
Power supply 5V DC, 100~240V AC adapter<br />
Operation temperature -10 ~ 55 °C<br />
Facility saving temperature -20 ~ 60 °C<br />
Operation moisture 10% ~ 90 %( non-concrete status)<br />
Weight 41g (battery included)<br />
Size 150 x 140 x 47 mm<br />
Safety regulation CE, FCC, BQB<br />
2
Product introduction<br />
Functions (answering / ending / on / off) Button #3<br />
LED indicator light<br />
Receiver / speaker<br />
Microphone<br />
Power interface / adapter for charging the unit<br />
Ear hook<br />
Decrease volume key (-) 1<br />
Increase volume key (+) 2<br />
NOTE: Before using the headset the first time, fully charge the unit in 8-10<br />
hours.<br />
Charging the headset<br />
The <strong>Bluetooth</strong> headset comes with a built in Lithium Polymer battery. To charge<br />
the unit:<br />
a. Plug the travel charger into an electrical outlet.<br />
b. Plug the unit end of the travel charger into the power interface adapter on<br />
the headset.<br />
c. While charging, the LED indicator light will turn red. When charging is complete,<br />
the red indicator light will shut off or flash red to alert you that the unit<br />
is fully charged and ready to use.<br />
3
NOTE:<br />
• For first time use, make sure to fully charge the <strong>Headset</strong> in 8-10 hours.<br />
• If the headset has not been used for more than 21 days, when recharging it<br />
please charge the unit at least 4 hours, preferably 8-10 hours, as the battery will<br />
need a full charge and be aware the LED indicator light may take several hours<br />
to show recharging is complete.<br />
• While charging the unit, please do not use the headset.<br />
• Please use the original charger included with the headset to charge/recharge<br />
the unit.<br />
• When the LED indicator light flashes red during usage or while on standby, the<br />
battery is low and you should recharge the unit as soon as possible.<br />
• Please recharge the headset in room temperatures of no less than -10 °C to<br />
+45°C.<br />
Power on / off<br />
a. To TURN THE UNIT ON, PRESS AND HOLD THE function button for 5 seconds.<br />
The power will turn on after the LED indicator light flashes blue 3 times.<br />
b. To turn the unit off, press and hold the function button for 5 SECONDS UNTIL<br />
THE RED indicator light flashes 3 times.<br />
NOTE:<br />
• While turning the headset on, you will hear a “Du Du” sound from the receiver.<br />
The blue indicator light will flash 5 times, then 2 times, and after repeating this<br />
for 5 cycles, the indicator light will flash the blue light every 3 seconds until the<br />
unit adjusts into standby mode.<br />
• While the <strong>Headset</strong> is turned on, it will automatically search for the paired device.<br />
Under the “ON” mode and within the effective range of 30 feet from the<br />
headset, the indicator will flash blue to indicate that it entered the connecting<br />
mode.<br />
• When turning the headset off, you will hear one “Bi” sound followed by two<br />
“Du” sounds, then the indicator will shut off after flashing the red light a few<br />
times.<br />
Pairing the headset with a <strong>Bluetooth</strong> device<br />
Before you use the headset the first time, you must pair the unit with a <strong>Bluetooth</strong><br />
device i.e. cellular phone. To set up the pairing:<br />
a. Insure your mobile phone is <strong>Bluetooth</strong> capable<br />
4
. Make sure the headset is turned off.<br />
c. Press and hold the function button for 10 seconds until the indicator light<br />
flashes alternating “Red – Blue – Red – Blue” to enter the pairing mode.<br />
d. On your mobile device start the <strong>Bluetooth</strong> search function. Refer to the mobile<br />
device manufacturer’s instructions regarding pairing the device to the HC-<br />
PS3052 <strong>Bluetooth</strong> headset.<br />
e. When your mobile device is in the stage of searching for a new <strong>Bluetooth</strong><br />
device, it should locate and pair with the HC-PS3052.<br />
f. On your mobile device, please choose and confirm the HC-PS3052 as your<br />
<strong>Bluetooth</strong> paired device.<br />
g. Key in the headset passcode-“0000” and press “YES”. If the pairing is successful,<br />
the indicator light on the headset will flash the blue light only. For some<br />
mobile phones, after pairing you may have to select and reconfirm HC-PS3052<br />
PAIRING EACH TIME YOU TURN ON THE PHONE. Please read you phone manufacturer’s<br />
instructions regarding <strong>Bluetooth</strong> devices.<br />
h. The headset should now be in standby mod – ready to send and receive calls.<br />
NOTE:<br />
If the pairing is not successful the first time, the headset will return to standby<br />
mode. Please repeat the pairing process and refer to the mobile device’s manufacturer’s<br />
instructions for additional information.<br />
a. While pairing, it is better to keep the distance between the mobile device<br />
and the headset to approximately 3 inches to 1 foot and make sure no metal<br />
objects are between them.<br />
b. While pairing the headset with other <strong>Bluetooth</strong> devices, when the device asks<br />
for the passcode, key in “0000”- the headset passcode. For more details, refer<br />
to the mobile device’s manufacturer’s instructions for HC-PS3052 additional<br />
information.<br />
c. Should one of the following occur, the paired devices should remain paired:<br />
1. The power for or of the devices is off.<br />
2. The service or one of the devices is off.<br />
3. One of the devices is re-switched on.<br />
5
Wearing the headset<br />
According to your preference, adjust the headset<br />
on your left or right ear.<br />
Answer calls<br />
a. When a call is received, wait<br />
until you hear the ringing from<br />
your headset receiver to press<br />
the function button to answer<br />
the call.<br />
b. If the mobile device is ringing<br />
first, wait until the headset is<br />
ringing, then press the function<br />
button.<br />
c. While answering calls, the blue indicator light flashes 4 times each second.<br />
d. If the mobile device is ringing and your headset is off, turn the headset on first,<br />
and then press the function button to answer the call.<br />
e. If your mobile device has “automatic answer” feature and it already set up to<br />
answer using this function, while the call is coming in, your headset can receive<br />
the call automatically without pressing the function button..<br />
NOTE:<br />
• For some mobile phones, the ringing sound of the headset may be the same as<br />
the ringing sound of the phone i.e. Nokia.<br />
• For some mobile phones, the ringing sound of the headset is different than the<br />
phone i.e. Motorola.<br />
Ignore calls<br />
To refuse a call, wait to hear from our receiver, then press and hold the function<br />
button 2-3 seconds until you hear the “Du” sound to refuse the call. If you have<br />
the mobile device set to automatically answer calls, refusing call as described<br />
here will not apply.<br />
End Calls<br />
a. When the call is complete, press the function button to end the call.<br />
b. You can also wait until your caller hangs up and the call will be disconnected<br />
automatically.<br />
6
Voice Dialing<br />
a. If your mobile phone supports Voice Dialing, you can use this function with<br />
your headset also.<br />
b. Under the standby or connecting mode, press the function button on the<br />
headset and follow the mobile devices’ manufacturer’s instructions to proceed<br />
with Voice Dialing.<br />
NOTE:<br />
• The activation of Voice Dialing will depend on the design of your mobile device.<br />
• The working range of the <strong>Bluetooth</strong> headset is approximately 5 meters indoors<br />
and 5 -10 meters outdoors.<br />
Redialing<br />
a. If your mobile device supports the redialing feature, you can also use this<br />
function with your headset.<br />
b. Under the standby or connecting mode, press the decrease volume key (-) of the<br />
headset for 2-3 seconds until you hear the “Du” sound to redial the last call.<br />
Mute<br />
a. During a phone conversation, press the decrease volume key (-) and increase<br />
volume key (+) at the same time until you hear the “Du” sound to begin the<br />
mute function of the headset.<br />
b. While in mute mode, you will hear an intermittent “Du” sound<br />
c. To cancel the mute mode, press either decrease volume key (-) or the increase<br />
volume key (+) to end this function.<br />
Transferring calls<br />
a. Transfer a call from the headset to the mobile device. While a call is in progress,<br />
press the increase volume key (+) for 2-3 seconds until you hear one “Du”<br />
sound.<br />
b. Transfer a call from the mobile device to the headset. While a call is in progress,<br />
press the increase volume key (+) for 2-3 seconds until you hear one “Du”<br />
sound. Note that some phones may require a 2-3 seconds press of the function<br />
button instead of the increase volume key (+) to perform this function.<br />
NOTE:<br />
To activate this function, your mobile device must support the hand free mode.<br />
For more details, please check your mobile device’s manufacturer’s instructions<br />
for additional information.<br />
7
Adjusting the volume<br />
During a call, you may adjust the headset’s volume.<br />
a. To increase the volume, press the increase volume key (+).<br />
b. To decrease the volume, press the decrease volume key (-).<br />
NOTE:<br />
You will hear the “Du Du” sound while adjusting the volume to the highest and<br />
lowest settings.<br />
Safety instructions<br />
a. Read this headset manual carefully and use the headset correctly at all times by<br />
following the instructions.<br />
b. THIS IS NOT A TOY. Keep the headset away from children and avoid children<br />
chewing on the headset or its components or accidentally swallowing any<br />
pieces.<br />
c. To clean the headset, wipe it with a soft, dry static-free cleaning cloth.<br />
d. NEVER use cleaning liquids, solvents, or sprays to clean the headset.<br />
e. Do not clean the headset while charging.<br />
f. Do not dissemble the headset. If you encounter any problems, contact the<br />
retailer immediately.<br />
IMPORTANT WHEN OPERATING<br />
• If you encounter a problem, turn the headset off immediately.<br />
• If the inside component(s) break, please contact the retailer for a repair center<br />
and instructions for immediate service and support.<br />
Package content list<br />
Please inspect this package and refer to the package contents list below to verify<br />
all items are included in this package.<br />
1 x <strong>Bluetooth</strong> headset<br />
1 x User guide<br />
1 x Travel charger<br />
INPUT: AC 100-240V, 50/60Hz<br />
OUTPUT: DC5.1V, 120Ma<br />
If you find any items are not included please contact your retailer where you<br />
purchased this product.<br />
8
Diagnosing problems<br />
a. If the headset LED indicator light is flashing red, the battery is low and the unit<br />
needs to be recharged immediately.<br />
b. If, after recharging for 20 minutes, the headset does not turn on: for initial<br />
use, the power will be on after charging the headset at least 40 minutes. The<br />
manufacturer’s recommended initial charging time is no less than 4 hours,<br />
preferably 8-10 hours.<br />
c. If the headset does not show the recharging sign: the battery is completed<br />
depleted or the headset has not been used for 21 days, when charging the red<br />
indicator light will be lit after a few minutes.<br />
d. You hear no sound coming from the headset:<br />
• Make sure the headset is turned on.<br />
• Make sure the headset has been paired with a <strong>Bluetooth</strong> enabled device.<br />
• Make sure the distance between the headset AND THE PAIRED <strong>Bluetooth</strong><br />
device is no more than 10 meters.<br />
• Some <strong>Bluetooth</strong> mobile phones support only one headset. In this case, if<br />
you pair the headset with the device, the other <strong>Bluetooth</strong> headsets may be<br />
deactivated. Likewise, if you pair other <strong>Bluetooth</strong> headsets with this type of<br />
mobile device, the headset may become deactivated.<br />
<strong>Headset</strong> storage<br />
• Use of accessories other than the manufacturer’s originally supplied accessories<br />
may cause the headset to malfunction or fail. In addition, product damage,<br />
electrical conflicts with non-manufacturer chargers may occur resulting in the<br />
cancellation of the product warranty.<br />
• Do not disassemble the headset for any reason. This may damage the headset<br />
accidentally and void the manufacturer’s warranty.<br />
• Please store the headset away from dust, heat and areas where it might accidentally<br />
fall or other damage may occur.<br />
• Use a clean, soft static-free cloth to clean the headset’s surfaces.<br />
• You can put the headset in a pocket while not in use.<br />
• Do not let children play with the headset.<br />
• Avoid storing the headset and chargers in extreme temperatures.<br />
Travel charger<br />
1. The travel charger is designed for indoor use and not to be used outdoors.<br />
2. Connect the travel charger with the appropriate power supply.<br />
9
3. Do not unplug the travel charger from the electrical outlet by the cord. Use the<br />
wall plug to pull the charger from the electrical outlet.<br />
BATTERY<br />
1. New battery: For first time use, charge the battery at least 4 hours, preferably<br />
8-10 hours.<br />
2. Only manufacturer authorized personnel can perform battery replacement.<br />
3. Under normal usage, the built in battery should be viable for up to 24 months<br />
or longer depending on usage.<br />
4. The battery must be recharged in room temperatures of no less than -10 °C<br />
+45 °C to remain under warranty and to maximize the life of the battery.<br />
5. Using the headset in normal room temperatures enables the battery to maximize<br />
its life.<br />
6. When used in colder weather, the headset’s battery life may decrease.<br />
7. Recharge the headset at least every two months whether it is used or not.<br />
10
eNVIRoNMeNTAl ReCoMMeNdATIoN<br />
An electrical/electronic product should be disposed of in a manner that minimises environmental impact as<br />
much as possible. The device should be disposed of according to local guidelines. The device can usually be<br />
disposed of at the local recycling station.<br />
The WEEE Directive<br />
The directive on waste electrical and electronic equipment (WEEE), which became European law on<br />
the 13th of February 2003, has led to a radical change in the handling of waste electrical and electronic<br />
equipment. First and foremost, the purpose of this directive is to reduce WEEE and also to promote recycling,<br />
reuse and other types of recovery of this type of waste in order to reduce the amounts for disposal.<br />
The WEEE logo on the product or on its packaging indicates that this product should not be treated as household<br />
waste. You are responsible for handing over all your electrical or electronic waste to the applicable collection<br />
points for the recycling of this type of hazardous waste. Separate and correct recovery of your electric<br />
and electronic equipment when it is discarded contributes to conservation of natural resources. Furthermore,<br />
correct reuse of electric and electronic waste contributes to the protection of human health and the environment.<br />
For more detailed information about disposal of electric and electronic waste, recycling and collection<br />
points, please contact your local city government, your household waste disposal service, the shop where you<br />
purchased the product or the manufacturer of the product.<br />
The RoHS Directive<br />
On July 1, 2006, the RoHS Directive (www.thiim.com/pdf/rohs.pdf) (2002/95/EC) came into effect.<br />
The aim of this Directive is to limit the use af hazardous substances in electrical and electronic equipment<br />
and to contribute to human health protection as well as environmentally sound utilization and disposal of<br />
electrical and electronic waste.<br />
The guARANTee Is INVAlId<br />
• If the above is not observed.<br />
• If the device has been abused, exposed to force or other type of damage.<br />
• If there has been any unauthorized intervention in the device.<br />
IMpoRTeR<br />
AGK <strong>Nordic</strong> A/S<br />
www.agknordic.com<br />
Copyright 2010. All rights reserved<br />
Printed and published by <strong>Agk</strong> <strong>Nordic</strong> A/S. 20.05.10<br />
Hereby, <strong>Agk</strong> <strong>Nordic</strong> A/S, declares that this 10475 is in compliance with the essential requirements and other<br />
relevant provisions of Directive 1999/5/EC. The declaration of conformity for 10475 can be obtained at the<br />
following address:<br />
<strong>Agk</strong> <strong>Nordic</strong> A/S<br />
Norddigesvej 2<br />
DK-8240 Risskov<br />
Denmark<br />
11
Vigtigt inden brug<br />
Tillykke med dit nye <strong>Bluetooth</strong> headset. Kontrollér venligst, at alle dele på listen<br />
nedenfor, er del af pakken. Kontrollér det og læs derefter brugermanualen inden<br />
brug af dit headset. Dit <strong>Bluetooth</strong> headset er udviklet ved hjælp af <strong>Bluetooth</strong><br />
trådløs teknologi og kan forbindes med <strong>Bluetooth</strong> enheder, der råder over Audio<br />
Gateway samt med PDA’er. Desktop og notebook computere kan ligeledes<br />
forbindes med dit headset ved hjælp af en USB <strong>Bluetooth</strong> Dongle. Inden brug af<br />
dit headset, bør du kontrollere, at din <strong>Bluetooth</strong> enhed (telefon, PDA) er kompatibel<br />
med <strong>Bluetooth</strong> V2.1 og understøtter <strong>Bluetooth</strong> headset eller håndfrie<br />
profiler.<br />
Specifikationer<br />
Standard konvertion/signal output <strong>Bluetooth</strong> V2.0, Klasse II<br />
Frekvensbånd 2.4GHz~2.4835GHz, ISM bånd<br />
Tale/ stand by tid op til 8 timer/ op til 200 timer<br />
Understøttende profiler <strong>Headset</strong> og håndfri<br />
Forbindelse En til en<br />
Datakryptering 128 bits krypteret<br />
Kapacitet Genopladeligt Li-Polymer<br />
Strømtilførsel 5V DC, 100~240V AC adapter<br />
Arbejdstemperatur -10 ~ 55 °C<br />
Opbevaringstemperatur -20 ~ 60 °C<br />
Arbejdsfugtighed 10% ~ 90 %( ikke konkret status)<br />
Vægt 41 g (inklusiv batteri)<br />
Størrelse 150 x 140 x 47 mm<br />
Sikkerhedsregulativer CE, FCC, BQB<br />
12
Produktintroduktion<br />
Funktioner (svar /afslut /tænd / sluk) knap #3<br />
LED indikatorlys<br />
Modtager /speaker<br />
Mikrofon<br />
Strømdisplay / adapter til opladning af enheden<br />
Øresnegl<br />
Reducere lydstyrke (-) 1<br />
Øge lydstyrke (+) 2<br />
BEMÆRK:<br />
Inden headsettet tages i brug første gang, skal det oplades i 8-10 timer.<br />
Opladning af headsettet<br />
Dette <strong>Bluetooth</strong> headset leveres med et indbygget Lithium Polymer batteri.<br />
Opladning:<br />
a. Sæt opladeren i strømstikket.<br />
b. Forbind opladeren med strømadapteren på headsettet.<br />
c. LED indikatoren lyser rødt under opladningen. Når enheden er fuldt opladet,<br />
slukkes det røde lys eller blinker rødt for at vise, at enheden er opladet og<br />
klar til brug.<br />
BEMÆRK:<br />
• Inden headsettet tages i brug første gang, skal det oplades i 8-10 timer.<br />
• Hvis headsettet ikke er blevet brugt i mere end 21 dage, skal det oplades i<br />
mindst 4 timer, dog helst 8-10 timer, da batteriet så skal fuldt oplades igen. Vær<br />
opmærksom på, at det røde LED indikatorlys måske først lyser efter flere timer.<br />
13
• Benyt ikke headsettet, mens det oplades.<br />
• Benyt den originale oplader, der leveres sammen med headsettet til opladning/<br />
genopladning.<br />
• Når LED indikatorlyset blinker rødt under brug eller på standby, er batteriniveauet<br />
lavt og enheden skal oplades hurtigst muligt.<br />
• Opladning af headsettet skal ske i en rumtemperatur på mellem -10 °C til<br />
+45 °C.<br />
Tænd/sluk<br />
a. For at TÆNDE ENHEDEN, HOLDES FUNKTIONSKNAPPEN TRYKKET IND i 5<br />
sekunder. Enheden tændes og LED indikatoren blinker blåt 3 gange.<br />
b. For at slukke enheden, holdes funktionsknappen trykket i 5 sekunder, INDTIL<br />
DET RØDE LYS blinker 3 gange.<br />
BEMÆRK:<br />
• Mens headsettet tændes, høres en “Du Du” lyd fra modtageren. Det blå indikatorlys<br />
blinker 5 gange, derefter 2 gange og efter at have gjort dette i alt 5<br />
gange, blinker det blå indikatorlys hvert 3. sekund indtil enheden går på stand<br />
by.<br />
• Mens headsettet er tændt, søger det automatisk efter enheder til forbindelse.<br />
Når det er på “TÆNDT” modus og inden for 10 meters afstand, blinker indikatorlyset<br />
blåt for at vise, at der er forbindelse.<br />
• Når headsettet slukkes, høres en “Bi” lyd, efterfulgt at to gange “Du”, så<br />
slukkes indikatoren efter at have blinket rødt enkelte gange.<br />
Forbindelse af headset med <strong>Bluetooth</strong> enhed<br />
Inden headsettet tages i brug første gang, skal enheden forbindes med en <strong>Bluetooth</strong>-enhed,<br />
f.eks. en mobiltelefon. Sådan oprettes forbindelse:<br />
a. Undersøg om din mobiltelefon har <strong>Bluetooth</strong>-funktion.<br />
b. Vær sikker på at headsettet er slukket.<br />
c. Hold funktionsknappen trykket i 10 sekunder indtil indikatorlyset blinker “rødt–<br />
blåt – rødt – blåt” på skift og går i forbindelsesmodus.<br />
d. Tænd <strong>Bluetooth</strong>-søgningen på din mobiltelefon. Følg producentens instruktioner<br />
om forbindelse til HC-PS3052 <strong>Bluetooth</strong> headsettet.<br />
e. Når mobilenheden er i gang med søgning efter nye <strong>Bluetooth</strong>-enheder, bør<br />
den finde og oprette forbindelse med HC-PS3052.<br />
f. Vælg HC-PS3052 som forbindelsesenhed.<br />
14
g. Indtast headsettets kode “0000” og godkend med “JA”. Hvis forbindelsen<br />
lykkedes, lyser indikatorlyset kun blåt. På nogle mobiltelefoner skal du vælge<br />
og bekræfte forbindelsen til HC-PS3052 HVER GANG DU TÆNDER FOR<br />
TELEFONEN. Læs producentens instruktioner vedrørende <strong>Bluetooth</strong>-enheder.<br />
h. <strong>Headset</strong>tet bør nu være i standby modus – parat til at sende og modtage<br />
opkald.<br />
BEMÆRK:<br />
Hvis oprettelse af forbindelse ikke lykkes første gang, går headsettet tilbage i<br />
standby modus. Gentag forbindelsesforsøget og se producentens instruktioner<br />
for nærmere information.<br />
a. Under oprettelse af forbindelse, bør der holdes en ca. afstand på mellem 2 og<br />
30 cm mellem mobilenheden og headsettet, således at der ingen metalgenstande<br />
er mellem enhederne.<br />
b. Når der skal oprettes forbindelse mellem headsettet og andre <strong>Bluetooth</strong>-enheder,<br />
er koden, der spørges efter altid “0000”- headsettets kode. For flere<br />
detaljer henvises til producentens yderligere instruktioner for HC-PS3052.<br />
c. Ved følgende hændelser, bør forbindelsen opretholdes:<br />
1. Strømmen til eller på enhederne er slukket.<br />
2. Enhederne har intet netværk.<br />
3. En af enhederne slukkes og tændes på ny.<br />
Brug af headsettet<br />
<strong>Headset</strong>tet tilpasses enten venstre eller<br />
højre øre efter behag.<br />
Modtage opkald<br />
a. Når telefonen ringer, svares der først,<br />
når ringetonen høres i headsettet.<br />
b. Hvis mobilenheden ringer først, ventes<br />
der med at svare, til headsettet ligeledes ringer.<br />
c. Når der modtages opkald, blinker indikatorlyset<br />
blåt 4 gange i sekundet.<br />
d. Hvis mobilenheden ringer og headsettet er slukket,<br />
tændes først for headsettet og så svares der ved hjælp af funktionsknappen.<br />
15
e. Hvis mobilenheden råder over funktionen “automatisk svar” og den er opsat til<br />
at svare således, mens opkaldet sker, modtages opkaldet automatisk af headsettet<br />
uden at der skal trykkes på funktionsknappen.<br />
BEMÆRK:<br />
• For nogle mobiltelefoner er ringetonen den samme for headsettet som for telefonen,<br />
f. eks. Nokia.<br />
• For nogle mobiltelefoner er ringetonen ikke den samme for headsettet som for<br />
telefonen, f. eks. Motorola.<br />
Afvise opkald<br />
For at afvise et opkald, skal dette først registreres over modtageren, derefter<br />
holdes funktionsknappen trykket i 2-3 sekunder, indtil lyden “Du” høres og opkaldet<br />
afvises. Hvis mobilenheden er indstillet til at modtage opkald automatisk,<br />
kan opkald ikke afvises som beskrevet her.<br />
Afslutte opkald<br />
a. Når samtalen er slut, trykkes funktionsknappen for at afbryde forbindelsen.<br />
b. Alternativt kan der ventes, indtil personen i den anden ende lægger på. Således<br />
afsluttes forbindelsen automatisk.<br />
Stemmestyring<br />
a. Hvis mobiltelefonen råder over stemmestyring, kan denne funktion også<br />
benyttes sammen med headsettet.<br />
b. I standby eller forbundet modus, trykkes der på headsettets funktionsknap og<br />
herefter følges producentens instruktioner vedrørende brug af stemmestyring.<br />
BEMÆRK:<br />
• Stemmestyringen afhænger af mobilenhedens opsætning.<br />
• Rækkevidden på dette <strong>Bluetooth</strong> headset er ca. 5 meter indendørs og 5 – 10<br />
meter udendørs.<br />
Genopkald<br />
a. Hvis mobilenheden råder over funktionen genopkald, kan denne funktion også<br />
benyttes sammen med headsettet.<br />
b. I standby eller forbundet modus, trykkes der på knappen for reducering af lydstyrke<br />
(-) i 2-3 sekunder, indtil “Du” høres og sidste nummer genopkaldes.<br />
16
Lydløs<br />
a. Under en telefonsamtale, trykkes knappen for reducering af lydstyrke (-) og<br />
knappen for øget lydstyrke (+) på samme tid, indtil lyden “Du” høres og headsettet<br />
bliver lydløst.<br />
b. Mens den er i lydløs modus, høres gentagne gange lyden “Du”.<br />
c. For at deaktivere lydløs modus, trykkes der enten på knappen for reducering af<br />
lydstyrke (-) eller knappen for øget lydstyrke (+).<br />
Viderestilling af opkald<br />
a. Viderestilling af et opkald fra headset til den mobile enhed. Under en telefonsamtale,<br />
trykkes knappen for øget lydstyrke (+) i 2-3 sekunder, indtil lyden<br />
“Du” høres én gang.<br />
b. Viderestilling af et opkald fra den mobile enhed til headsettet. Under en<br />
telefonsamtale, trykkes knappen for øget lydstyrke (+) i 2-3 sekunder, indtil<br />
lyden “Du” høres én gang. Bemærk, at der på nogle telefoner skal trykkes 2-3<br />
sekunder på funktionsknappen i stedet for på knappen for øget lydstyrke (+)<br />
for at funktionen virker.<br />
BEMÆRK: For at aktivere denne funktion, skal din mobile enhed råde over håndfri-modus.<br />
For flere detaljer, kontrollér venligst producentens instruktioner.<br />
Tilpasning af lydstyrke<br />
Lydstyrken på headsettet kan tilpasses under samtale.<br />
a. For at øge lydstyrken, trykkes på knappen for øget lydstyrke (+).<br />
b. For at reducere lydstyrken, trykkes på knappen for reduceret lydstyrke (-).<br />
BEMÆRK: Lyden “Du Du” høres, mens lydstyrken tilpasses.<br />
Sikkerhedsinstruktioner<br />
a. Læs denne vejledning til headsettet omhyggeligt og brug headsettet korrekt<br />
ved at følge instruktionerne.<br />
b. DETTE ER IKKE ET STYKKE LEGETØJ, og bør opbevares utilgængeligt for børn;<br />
Undgå at børn tygger på headsettet eller sluger mindre dele af headsettet.<br />
c. <strong>Headset</strong>tet rengøres med en blød, tør og antistatisk klud.<br />
d. Benyt ALDRIG rengøringsmidler, opløsningsmidler eller spray til at rengøre<br />
headsettet med.<br />
e. Rengør ikke headsettet mens det oplades.<br />
f. Skil ikke headsettet ad. Hvis der opstår problemer, skal forhandleren omgående<br />
kontaktes.<br />
17
VIGTIGT VED BRUG<br />
• Hvis der opstår problemer, bør headsettet omgående slukkes.<br />
• Hvis indre dele af headsettet går itu, skal forhandleren omgående kontaktes<br />
vedrørende reparation samt service og support.<br />
Specifikationer<br />
Kontrollér venligst, at alle dele på listen nedenfor, er del af pakken.<br />
1 x <strong>Bluetooth</strong> headset<br />
1 x Brugermanual<br />
1 x Oplader<br />
INPUT: AC 100-240V, 50/60Hz<br />
OUTPUT: DC5.1V, 120Ma<br />
Hvis der mangler dele, kontaktes forhandleren.<br />
Diagnose af problemer<br />
a. Hvis headsettets LED indikatorlys blinker rødt, er batteriniveauet lavt og<br />
enheden skal omgående oplades.<br />
b. Hvis headsettet efter 20 minutters opladning ikke kan tændes: første gang<br />
headsettet skal benyttes, kan det normalt tændes efter 40 minutter. Producenten<br />
anbefaler at headsettet første gang oplades mindst 4 timer, dog helst<br />
8-10 timer.<br />
c. Hvis headsettet ikke viser opladningstegn: batteriet er fuldstændig afladet eller<br />
headsettet har ikke været i brug i 21 dage, hvorfor det røde indikatorlys først<br />
blinker efter få minutter.<br />
d. <strong>Headset</strong>tet er uden lyd:<br />
• Kontrollér at headsettet er tændt.<br />
• Kontrollér at headsettet er forbundet med en <strong>Bluetooth</strong>-enhed.<br />
• Kontrollér at afstanden mellem headset og den FORBUNDNE <strong>Bluetooth</strong>enhed<br />
ikke er mere end 10 meter.<br />
• Nogle <strong>Bluetooth</strong> mobiltelefoner understøtter kun ét headset. Er dette tilfældet,<br />
deaktiveres andre headset, når dette headset forbindes med enheden.<br />
Hvis der ligeledes forbindes andre <strong>Bluetooth</strong> headset med denne typer<br />
mobilenheder, deaktiveres dette headset måske.<br />
18
Opbevaring af headsettet<br />
• Bruges andet tilbehør end det, producenten leverer, kan der opstå skader eller<br />
fejl. Opstår der således fejl eller elektriske skader i forbindelse med brug af<br />
fremmede opladere, bortfalder garantien.<br />
• Skil ikke headsettet ad. Dette kan føre til skader på headsettet og producentens<br />
garanti bortfalder.<br />
• <strong>Headset</strong>tet bør opbevares støvfrit, fjernt fra varmekilder og ej steder, hvor det<br />
ved uheld kan falde ned eller gå itu.<br />
• <strong>Headset</strong>tets overflader rengøres med en blød, tør og antistatisk klud.<br />
• Opbevar evt. headsettet i en lomme, når det ikke bruges.<br />
• Opbevar headsettet utilgængeligt for børn.<br />
• Undgå at opbevare headsettet og oplader under ekstreme temperaturer.<br />
Oplader<br />
1. Opladeren er designet til indendørs brug og bør ikke bruges udendørs.<br />
2. Opladeren sættes i passende strømkontakt.<br />
3. Træk ikke stikket på opladeren ud ved at rive i ledningen. Træk stikket ud ved<br />
strømkontakten.<br />
BATTERI<br />
1. Nyt batteri: Første gang bør batteriet oplades i mindst 4 timer, dog helst 8-10<br />
timer.<br />
2. Batteriet må kun udskiftes af autoriseret personale.<br />
3. Ved normal brug bør batteriet have en levetid på mindst 24 måneder eller<br />
længere, afhængig af brugen.<br />
4. Batteriet skal oplades ved en rumtemperatur på mellem -10 °C til +45 °C for<br />
at garantien opretholdes og batteriets levetid forlænges.<br />
5. Bruges headsettet ved normal rumtemperatur, forlænges batteriets levetid.<br />
6. Bruges headsettet ved kolde temperaturer, forkortes batteriets levetid.<br />
7. <strong>Headset</strong>tet bør oplades mindst hver anden måned, uanset om det benyttes<br />
eller ej.<br />
19
MIljøANbefAlINg<br />
Et elektronisk produkt bør, når det ikke længere er funktionsdygtigt, bortskaffes med mindst mulig miljøbelastning.<br />
Apparatet skal bortskaffes efter de lokale regler i din kommune, men i de fleste tilfælde kan du<br />
aflevere produktet på den lokale genbrugsstation.<br />
Weee-Direktivet<br />
Direktivet om affald af elektrisk og elektronisk udstyr (WEEE), der trådte i kraft som europæisk lov<br />
den 13. februar 2003, har medført en radikal ændring i behandlingen af elektrisk udstyr, som er udtjent.<br />
Formålet med dette direktiv er først og fremmest at reducere WEEE og dertil at fremme genbrug, genanvendelse<br />
og andre former for genindvinding af sådant affald for at mindske mængden til bortskaffelse.<br />
WEEE-logoet på produktet eller dets kasse angiver, at dette produkt ikke må kasseres eller smides ud<br />
sammen med husholdningsaffald. Du er ansvarlig for at kassere alt dit elektroniske eller elektriske affald<br />
på angivne indsamlingssteder for genanvendelse af sådant farligt affald. Isoleret indsamling og korrekte<br />
genvinding af dit elektroniske og elektriske affald på kasseringstidspunktet bidrager til at bevare naturressourcerne.<br />
Derudover vil korrekt genanvendelse af elektronisk og elektrisk affald medvirke til beskyttelse<br />
af den menneskelige sundhed og miljøet. Yderligere oplysninger om kassering af elektronisk og elektrisk<br />
affald, genanvendelse og indsamlingspunkter fås ved at kontakte det lokale bystyre, renovationsselskabet,<br />
butikken, hvor du købte udstyret eller producenten af udstyret.<br />
Rohs-Direktivet<br />
Fra 1. juli 2006 trådte RoHS direktivet (2002/95/EC) i kraft. Formålet med dette direktiv er at<br />
begrænse anvendelsen af farlige stoffer i elektrisk og elektronisk udstyr og at bidrage til beskyttelse af<br />
menneskers sundhed samt miljørigtig nyttiggørelse og bortskaffelse af affald af elektrisk og elektronisk<br />
udstyr.<br />
gARANTIeN gældeR Ikke:<br />
• Hvis ovennævnte ikke overholdes.<br />
• Hvis apparatet har været misligholdt, været udsat for vold, eller lidt anden form for overlast.<br />
• Hvis der har været foretaget uautoriseret indgreb i apparatet.<br />
IMpoRTøR:<br />
<strong>Agk</strong> <strong>Nordic</strong> A/S<br />
www.agknordic.com<br />
Copyright 2010. Alle rettigheder forbeholdes.<br />
Trykt og udgivet af <strong>Agk</strong> <strong>Nordic</strong> A/S. 20.05.2010<br />
Undertegnede <strong>Agk</strong> <strong>Nordic</strong> A/S erklærer herved, at følgende udstyr 10475 overholder de væsentlige<br />
krav og øvrige relevante krav i direktiv 1999/5/EF. Overensstemmelseserklæring på 10475 kan per<br />
brev rekvireres på følgende adresse:<br />
<strong>Agk</strong> <strong>Nordic</strong> A/S<br />
Norddigesvej 2<br />
DK-8240 Risskov<br />
Danmark