Installation and Operating Instructions DÜRR ... - duerr-ndt.de
Installation and Operating Instructions DÜRR ... - duerr-ndt.de
Installation and Operating Instructions DÜRR ... - duerr-ndt.de

You also want an ePaper? Increase the reach of your titles
YUMPU automatically turns print PDFs into web optimized ePapers that Google loves.
<strong>Installation</strong> <strong>and</strong> <strong>Operating</strong> <strong>Instructions</strong><br />
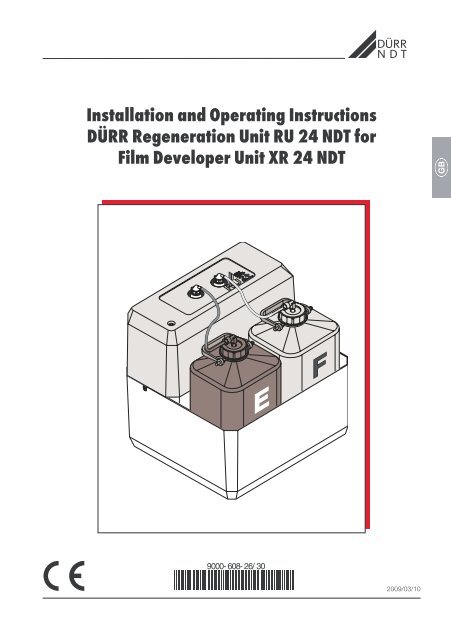
<strong>DÜRR</strong> Regeneration Unit RU 24 NDT for<br />
Film Developer Unit XR 24 NDT<br />
2009/03/10
Contents<br />
Important information<br />
1. General ...................................................4<br />
1.1 Official gui<strong>de</strong>lines...............................4<br />
1.2 Notes ................................................4<br />
1.3 Disposal of appliance .......................4<br />
1.5 Correct Usage...................................4<br />
1.6 Incorrect usage ................................4<br />
1.7 Using Peripheral Devices ...................5<br />
2. Safety .....................................................5<br />
2.1 General notes on safety.....................5<br />
2.2 Electrical safety instructions...............5<br />
3. Warning <strong>and</strong> symbols ............................6<br />
3.1 Mo<strong>de</strong>l i<strong>de</strong>ntification plate ...................6<br />
4. Delivery contents ...................................6<br />
4.1 Accessories.......................................6<br />
5. Technical data ........................................6<br />
6. Functional diagram ...............................7<br />
7. Functional Description ..........................7<br />
<strong>Installation</strong><br />
8. Regeneration unit set up .......................8<br />
9. Hose connection ....................................9<br />
10. Electrical connections............................9<br />
11. Setting the regeneration electronics ..10<br />
12. Check settings......................................11<br />
13. Regeneration pump setting .................11<br />
14. Commissioning ....................................12<br />
Usage<br />
15. Cleaning the regeneration unit ............12<br />
Every three months.................................12<br />
16. Disposal of chemicals ..........................12<br />
Troubleshooting<br />
17. Tips for Operators <strong>and</strong> Technicians ....13<br />
3
1. General<br />
4<br />
Important information<br />
1.1 Official gui<strong>de</strong>lines<br />
The product has been subjected to a conformity<br />
evaluation process <strong>and</strong> conforms to the fundamental<br />
requirements of the applicable European<br />
directives.<br />
1.2 Notes<br />
• The <strong>Installation</strong> <strong>and</strong> <strong>Operating</strong> <strong>Instructions</strong><br />
constitute a part of the appliance. They must<br />
be ma<strong>de</strong> available to the operator. Correct<br />
observance of the <strong>Installation</strong> <strong>and</strong> <strong>Operating</strong><br />
<strong>Instructions</strong> is is a basic requirement for using<br />
the appliance properly <strong>and</strong> safely, <strong>and</strong> new<br />
personnel must be instructed accordingly.<br />
These <strong>Installation</strong> <strong>and</strong> <strong>Operating</strong> <strong>Instructions</strong><br />
must be h<strong>and</strong>ed over to any subsequent<br />
owner or operator of this appliance.<br />
• The safety of the operator <strong>and</strong> trouble-free<br />
operation of the appliance can only be<br />
ensured where original engineering manufactured<br />
parts are used. Additionally, only those<br />
accessories listed in the <strong>Installation</strong> <strong>and</strong> <strong>Operating</strong><br />
<strong>Instructions</strong> may be used or parts or<br />
accessories expressly approved by Dürr NDT.<br />
If accessories are used manufactured by third<br />
parties, then Dürr NDT can no longer provi<strong>de</strong><br />
any guarantee for safe operation or correction<br />
functioning. Any claims arising from damage<br />
or injury when using third party or unapproved<br />
parts are invalid.<br />
• Dürr NDT cannot be held responsible for the<br />
appliance with regard to safety, reliability <strong>and</strong><br />
function where installation, reset, alterations,<br />
extension or repairs were not carried out<br />
either by or for Dürr NDT or by a third party<br />
specifically approved by Dürr NDT, or if the<br />
appliance is not used <strong>and</strong> operated according<br />
to the instructions laid down in the <strong>Installation</strong><br />
<strong>and</strong> <strong>Operating</strong> <strong>Instructions</strong>.<br />
• These <strong>Installation</strong> <strong>and</strong> <strong>Operating</strong> <strong>Instructions</strong><br />
accord with the features of the appliance <strong>and</strong><br />
the level of engineering at the time of first<br />
introduction of the mo<strong>de</strong>l. All circuits, procedures,<br />
proprietary names, software programs<br />
<strong>and</strong> <strong>de</strong>vices are un<strong>de</strong>r patent or copyright<br />
protection.<br />
• This translation of the <strong>Installation</strong> <strong>and</strong> <strong>Operating</strong><br />
<strong>Instructions</strong> has been carried out in good<br />
faith. Liabilty for incorrect translation will not<br />
be accepted. The accompanying German<br />
version of these <strong>Installation</strong> <strong>and</strong> <strong>Operating</strong><br />
<strong>Instructions</strong> are to be used as reference; if you<br />
have any doubt to the correct interpretation of<br />
the instructions please consult your <strong>de</strong>aler.<br />
• A reprint of the <strong>Installation</strong> <strong>and</strong> <strong>Operating</strong><br />
<strong>Instructions</strong>, also parts of it, is only permitted<br />
after written approval of the company Dürr<br />
NDT.<br />
• Keep original packing for possible return of<br />
the appliance to the supplier. Do not let the<br />
packaging fall into the h<strong>and</strong>s of children. Only<br />
the original packing ensures optimum protection<br />
for the appliance during transport.<br />
If, during the period of guarantee, return of<br />
the appliance is necessary, Dürr NDT will not<br />
accept claims for damage arising from using<br />
incorrect packaging during transport!<br />
1.3 Disposal of appliance<br />
EU Directive(s) 2002/96/EG - WEEE (Waste<br />
Electric <strong>and</strong> Electronic Equipment) of 27th<br />
January 2003 <strong>and</strong> their current application in<br />
national law states that products covered by the<br />
above directive within the European Union must<br />
be disposed of as special waste.<br />
If you have any questions concerning the<br />
correct disposal of this product please contact<br />
Dürr NDT.<br />
1.5 Correct Usage<br />
The <strong>DÜRR</strong> regeneration unit RU 24 is solely<br />
<strong>de</strong>signed for use in connection with the <strong>DÜRR</strong><br />
X-ray film <strong>de</strong>veloper unit XR 24 NDT.<br />
Correct usage of the appliance also involves<br />
observance of the <strong>Installation</strong> <strong>and</strong> <strong>Operating</strong><br />
<strong>Instructions</strong> as well as keeping to set up, operating<br />
<strong>and</strong> maintenance procedures.<br />
1.6 Incorrect usage<br />
Any other usage or usage beyond it is not<br />
consi<strong>de</strong>red the <strong>de</strong>signated usage. The manufacturer<br />
will accept no claims for any damage or<br />
injury arising thereby. All risks will be borne by<br />
the operator <strong>and</strong>/or owner.
1.7 Using Peripheral Devices<br />
Appliances may only be connected together or<br />
connected to parts of other units where it has<br />
been absolutely established that such connections<br />
will not endanger the safety of the operator<br />
<strong>and</strong> the environment will not be affected in any<br />
negative way.<br />
If it is not clear from the appliance documentation<br />
that such connection is possible then the<br />
operator / owner must establish this beyond<br />
reasonable doubt, e.g. by contacting the manufacturer<br />
or another expert, to ensure that the<br />
required safety of the operator <strong>and</strong> the environment<br />
are not put at risk.<br />
2. Safety<br />
2.1 General notes on safety<br />
This appliance has been <strong>de</strong>signed <strong>and</strong> manufactured<br />
by Dürr NDT so that correct usage<br />
will result in no danger to operator or patient.<br />
However, we feel it is important to <strong>de</strong>scribe the<br />
following safety measures in or<strong>de</strong>r to remove<br />
any likelihood of danger.<br />
• When operating this appliance all local <strong>and</strong><br />
national rules <strong>and</strong> regulations must be observed!<br />
This appliance must not be converted or altered<br />
in any way. Dürr NDT accepts no liability<br />
claims where an appliance has been converted<br />
or altered in any way. In the interests of<br />
safe usage of the appliance both operator<br />
<strong>and</strong> owner are responsible for seeing that all<br />
relevant appliance are observed.<br />
• <strong>Installation</strong> must be executed by a technical<br />
expert.<br />
• The operator must carefully check the appliance<br />
for safety of function <strong>and</strong> the proper<br />
working condition before every use.<br />
• The operator must be trained in the correct<br />
operation of the appliance.<br />
• This product is not to be operated in an area<br />
at risk through explosion, or an area with a<br />
combustible atmosphere.<br />
2.2 Electrical safety instructions<br />
• The appliance may only be connected to a<br />
correctly installed electrical socket.<br />
• Before connecting the appliance check carefully<br />
that the supply voltage <strong>and</strong> the supply<br />
frequency of the appliance <strong>and</strong> the local<br />
electrical supply are compatible.<br />
• Before commissioning or before first use the<br />
appliance <strong>and</strong> all supply lines must be checked<br />
for any signs of damage. Any damaged<br />
supply lines or connections must be replaced<br />
immediately.<br />
• When working with the appliance all appropriate<br />
electrical safety procedures must be<br />
observed.<br />
5
3. Warning <strong>and</strong> symbols<br />
The <strong>Installation</strong> <strong>and</strong> <strong>Operating</strong> <strong>Instructions</strong><br />
makes use of the following terms <strong>and</strong> symbols<br />
for important information:<br />
6<br />
Information including preventative<br />
measures to protect injury to persons<br />
or damage.<br />
Special information regarding the economical<br />
use of the equipment <strong>and</strong> other<br />
information<br />
Observe the <strong>Operating</strong> <strong>Instructions</strong><br />
CE-Kennzeichnung<br />
3.1 Mo<strong>de</strong>l i<strong>de</strong>ntification plate<br />
The mo<strong>de</strong>l i<strong>de</strong>ntification plate can be found<br />
on the rear si<strong>de</strong> of the appliance towards the<br />
middle<br />
REF Or<strong>de</strong>r no. / mo<strong>de</strong>l no.<br />
SN Serial-No.<br />
Refer to accompanying documentation!<br />
Date of manufacture<br />
Dispose of correctly in accordance with<br />
EU-gui<strong>de</strong>lines (2002/96/EG-WEE)<br />
4. Delivery contents<br />
Regeneration unit RU 24 NDT for <strong>de</strong>veloper<br />
unit XR 24 NDT<br />
230V - 240V, 50Hz - 60Hz ........... 1734-820-00<br />
4.1 Accessories<br />
1 <strong>Installation</strong> kit XR 24 NDT ........1734-820-04<br />
5. Technical data<br />
Mo<strong>de</strong>l 1734-820-00<br />
Voltage (V) 230 - 240<br />
Frequency (Hz) 5060<br />
Current consumption (A) 0.9 / 0.65<br />
Output (W) 50 - 80<br />
Dimensions (cm, L x W x H) 32 x 36 x 37<br />
Weight (empty) (kg) 4
6. Functional diagram<br />
Regeneration unit RU 24 NDT in combination with <strong>de</strong>veloper unit XR 24 NDT<br />
J<br />
H<br />
B<br />
7. Functional Description<br />
Using the XR 24 NDT the regeneration pump switches on after every 100 cm of <strong>de</strong>veloped film material.<br />
For the period that the film insert flap (light sensor H) is operated, impulses are generated in proportion<br />
to the length of film used, <strong>and</strong> these are then counted by a impulse generator.<br />
The software of the service program of the XR 24 NDT allows the running time of the regeneration<br />
pump to be set infinitely between 0 s <strong>and</strong> 60 s.<br />
The pump running time is factory set at 56 s. During this time the pump supplies ca. 300 ml of fresh<br />
chemicals from<br />
the 5 l container of the regeneration unit to the <strong>de</strong>veloper bath (D) <strong>and</strong> ca. 600 ml to the fixer bath of<br />
the <strong>de</strong>veloper unit.<br />
Switching off the pump after a regeneration impulse also sets the clock back to 0. On the other h<strong>and</strong>,<br />
when switching off the <strong>de</strong>veloper unit or as a result of a power outage the clock will maintain the current<br />
value.<br />
A) Impulse generator drive motor XR 24 NDT<br />
B) Regeneration unit RU 24 NDT<br />
H) Light barrier to film insert flap<br />
I) PCB<br />
J) Display<br />
A<br />
I<br />
7
8<br />
1<br />
<strong>Installation</strong><br />
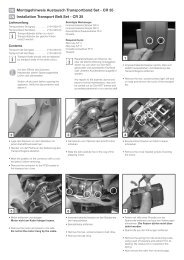
8. Regeneration unit set up<br />
• Set up the regeneration unit RU 24 NDT next<br />
to the <strong>de</strong>veloper unit:<br />
Where sufficient space allows, always choose<br />
this option.<br />
• Set up the regeneration unit RU 24 NDT in a<br />
cupboard below the <strong>de</strong>veloper:<br />
Instruct the operator to check the level of chemicals<br />
frequently .<br />
Setting up the regeneration unit<br />
RU 24 NDT above the <strong>de</strong>veloper<br />
unit is not permitted, as this set up<br />
means that it is possible that chemicals<br />
can drip or splash or even be<br />
fed into the baths of the <strong>de</strong>veloper<br />
unit uncontrollably.<br />
Make sure that the connecting hoses from the<br />
regeneration unit RU 24 to the <strong>de</strong>veloper are<br />
laid with no kinks or bends. The distance between<br />
the regeneration unit <strong>and</strong> the <strong>de</strong>veloper<br />
must not exceed 2m.<br />
Ensure during set up that <strong>de</strong>veloper unit <strong>and</strong> the<br />
collecters are easily accessible for staff.
2<br />
3<br />
4<br />
F<br />
D<br />
1<br />
2<br />
3<br />
9. Hose connection<br />
Connection of the regeneration unit is<br />
ma<strong>de</strong> via inlet pipe (1).<br />
Use installation set 1734-284-00 "Inlet pipe for<br />
regeneration unit" with installation instructions<br />
(9000-608-39/01) inclu<strong>de</strong>d.<br />
10. Electrical connections<br />
• Remove the circular cap (3) from the hole in<br />
the rear si<strong>de</strong> of the <strong>de</strong>veloper unit.<br />
• Take the connection interface (2) from the<br />
installation set provi<strong>de</strong>d 1734-284-00.<br />
• Insert the connection piece into the hole provi<strong>de</strong>d<br />
<strong>and</strong> secure using the 4 screws.<br />
• Connect the cables according to the circuit<br />
diagram (fig. 4).<br />
• Connect the regeneration connector to the<br />
interface socket <strong>and</strong> secure using the locking<br />
ring.<br />
XR 24 NDT circuit diagram<br />
X1/X2 Appliance sockets<br />
X3 Regeneration unit<br />
9
5<br />
11. Setting the regeneration<br />
electronics<br />
10<br />
Before setting up the regeneration<br />
electronics be sure to fill the baths of<br />
the <strong>de</strong>veloper unit with water.<br />
The setting for the pump running time<br />
should be individually set according to<br />
the type of film being used.<br />
The regeneration function ON / OFF as well as<br />
the regeneration time set will appear on the<br />
display (fig. 5) of the <strong>de</strong>veloper unit.<br />
Refer to the <strong>Installation</strong> <strong>and</strong> <strong>Operating</strong> <strong>Instructions</strong><br />
X-ray film <strong>de</strong>veloper unit XR 24 NDT<br />
(9000-608-25/30).<br />
See section 19.6 Service program sequence.<br />
• Start service function<br />
Switch off unit at main power switch<br />
(press min. 2 s)<br />
+ simultaneously press (min. 4 s)<br />
unit in service mo<strong>de</strong><br />
• Servicefunktion anwählen<br />
Use keys <strong>and</strong> to select REGENERA-<br />
TION then choose REGEN.ON.<br />
• Change settings<br />
(factory set at 56 s)<br />
Use or to alter parameters<br />
Use 1 s, to confirm new value<br />
• End service function<br />
Switch off unit using power switch<br />
(press min. 2 s)
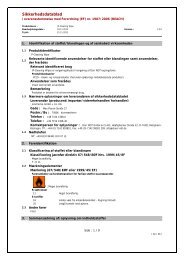
6<br />
% OF STROKE<br />
100<br />
75<br />
50<br />
25<br />
0<br />
4<br />
5<br />
12. Check settings<br />
Check regeneration impuls for film length<br />
• Switch on <strong>de</strong>veloper unit <strong>and</strong> select program<br />
"FINE GRAIN" . (film processing time 5:30 min)<br />
• Place a film into the film insertion slot in such<br />
a way that it is not transported but still the flap<br />
is activated. After ca. 7.5 min the regeneration<br />
pump must switch on <strong>and</strong> <strong>de</strong>veloper <strong>and</strong> fixer<br />
fluids are pumped into the baths of the <strong>de</strong>veloper<br />
unit.<br />
• Check system for any signs of leaks.<br />
Check the amount of fluid pumped by the<br />
regeneration unit.<br />
The <strong>de</strong>veloper <strong>and</strong> fixer pumps transport<br />
at a ratio of 1:2 = <strong>de</strong>veloper:fixer into<br />
the baths.<br />
• Fill two measuring beakers with water (ca. 0.5<br />
Liter) <strong>and</strong> place these into the regeneration<br />
unit. Position the suction tubes of the regeneration<br />
unit into the measuring beakers.<br />
• The pumps can be operated using the service<br />
mo<strong>de</strong> of the XR 24 NDT in or<strong>de</strong>r to check the<br />
flow amounts of fluids actually transported.<br />
(See <strong>Installation</strong> <strong>and</strong> <strong>Operating</strong> <strong>Instructions</strong><br />
X-ray film <strong>de</strong>veloper XR 24 NDT,<br />
or<strong>de</strong>r number 9000-608-25/30 section18.6<br />
Service operation sequence)<br />
13. Regeneration pump<br />
setting<br />
The optimum flow rate of the pumps is<br />
factory set as follows:<br />
Ratio 1:2 = <strong>de</strong>veloper:fixer<br />
Setting the piston stroke in the regeneration unit<br />
allows the flow of the chemicals supplied to be<br />
regulated (fig. 6).<br />
• Loosen the hex. socket screw (5).<br />
• Alter the setting on the piston stroke by altering<br />
the hex. screw (4) with a screwdriver or<br />
wrench:<br />
Pointer towards 100% = greater flow<br />
Pointer towards 0% = less flow.<br />
• Finally tighten the hex. socket screw again (4).<br />
11
14. Commissioning<br />
After completion of the setting procedure, drain<br />
off the water from the regeneration containers<br />
<strong>and</strong> from the baths of the <strong>de</strong>veloper unit <strong>and</strong><br />
make up the chemicals according to the <strong>Installation</strong><br />
<strong>and</strong> <strong>Operating</strong> <strong>Instructions</strong>.<br />
12<br />
Usage<br />
15. Cleaning the regeneration<br />
unit<br />
Every three months<br />
• Check that the collector vessel of the <strong>de</strong>veloper<br />
is empty, if not empty contents into collection<br />
container.<br />
It is important that the collector is empty,<br />
otherwise there is the danger of overflowing<br />
when the chemicals are now<br />
drained from the baths.<br />
• Drain the chemicals from the baths of the <strong>de</strong>veloper<br />
unit <strong>and</strong> of the regeneration container<br />
<strong>and</strong> rinse these with warm water. Fill both<br />
the unit <strong>and</strong> the regeneration containers with<br />
warm water <strong>and</strong> close the lids.<br />
• Switch on <strong>de</strong>veloper unit <strong>and</strong> select program<br />
"FINE GRAIN". (Film processing time is<br />
5:30 min)<br />
• Place a film into the film insertion slot in such<br />
a way that it is not transported but still the flap<br />
is activated.<br />
• Wait ca. 30 min until the regeneration unit<br />
has operated 4 times. Remove the film from<br />
the insertion slot <strong>and</strong> allow the final cycle to<br />
complete. (Lifting bath in upper position.)<br />
• Switch off <strong>de</strong>veloper unit.<br />
16. Disposal of chemicals<br />
When disposing of <strong>de</strong>veloper <strong>and</strong><br />
fixer observe regional rules <strong>and</strong><br />
regulations!<br />
In Germany <strong>and</strong> several other countries<br />
x-ray waste must be disposed<br />
of as special waste.
Troubleshooting<br />
17. Tips for Operators <strong>and</strong> Technicians<br />
Repair work <strong>and</strong> maintenance above <strong>and</strong> beyond normal routine maintenance of the appliance<br />
may only be carried out by suitably qualified personnel or by one of our service technicians.<br />
Before any trouble shooting, switch off all power.<br />
Problem Probable cause Solution<br />
1. Regeneration<br />
vessels are empty<br />
within a few hours<br />
2. Films not sufficiently<br />
fixed<br />
- causing increased<br />
background<br />
fogginess<br />
3. Regeneration<br />
pump does not<br />
operate<br />
• Regeneration time set too long. • Check regeneration time, <strong>and</strong> regeneration<br />
amounts.<br />
• Electronics do not switch off. •Change electronic parts.<br />
• Regeneration tank empty. • Refill regeneration tank. If there is still<br />
no improvement, change chemicals<br />
in unit.<br />
• Pump cycle too short.<br />
• Regenering tank or connection<br />
hoses incorrectly connected.<br />
• Nonreturn valve of the regenerating<br />
pump blocked or incorrectly<br />
set up.<br />
• Regeneration hoses blocked or<br />
kinked (from regeneration unit to<br />
<strong>de</strong>veloper unit).<br />
• Film shelf life excee<strong>de</strong>d.<br />
• Chemical shelf life excee<strong>de</strong>d.<br />
• Tachogenerator of motor or<br />
electronics <strong>de</strong>fect.<br />
• Cable connection to regeneration<br />
unit looose or interrupted.<br />
• Regeneration pump motor<br />
blocked.<br />
• Set higher pump cycle time.<br />
• Drain the chemicals from the unit<br />
<strong>and</strong> clean thoroughly. Insert <strong>and</strong><br />
secure the regenerating vessels <strong>and</strong><br />
use fresh chemicals.<br />
• Clean non-return valve, replace if<br />
required.<br />
Ensure correct placement of parts!<br />
• Lay hoses without kinks <strong>and</strong> bends.<br />
• Observe shelf life on film packaging.<br />
• Observe shelf life on chemicals packaging.<br />
Where shelf life excee<strong>de</strong>d,<br />
dispose of correctly.<br />
• Check the impulse of the light barrier<br />
against impulses of the drive motor<br />
or replace the electronics.<br />
• Check all cable connections.<br />
• Check the motor for mechanic fault<br />
(e.g. rotate ventilation wheel).<br />
13
Dürr NDT GmbH & Co. KG<br />
Höpfigheimer Str. 22 · D-74321 Bietigheim-Bissingen<br />
Tel: +49 (0) 7142/993811-0 · Fax: +49 (0) 7142/993811-299<br />
info@<strong>duerr</strong>-<strong>ndt</strong>.<strong>de</strong> · www.<strong>duerr</strong>-<strong>ndt</strong>.<strong>de</strong>