Assembling and Using Your Bag Boy Mini GT Cart
Assembling and Using Your Bag Boy Mini GT Cart
Assembling and Using Your Bag Boy Mini GT Cart

You also want an ePaper? Increase the reach of your titles
YUMPU automatically turns print PDFs into web optimized ePapers that Google loves.
<strong>Mini</strong> <strong>GT</strong> <strong>Cart</strong> • No tools required for assembly<br />
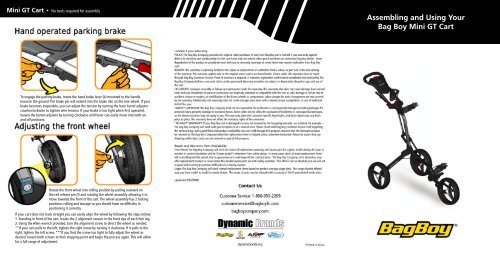
To engage the parking brake, rotate the h<strong>and</strong> brake lever (b) mounted to the h<strong>and</strong>le<br />
towards the ground. The brake pin will extend into the brake ribs on the rear wheel. If your<br />
brake becomes inoperable, you can adjust the tension by turning the lever barrel adjuster<br />
counterclockwise to tighten wire tension. If your brake is too tight when first operated,<br />
loosen the barren adjuster by turning clockwise until lever can easily move into both on<br />
<strong>and</strong> off positions.<br />
Rotate the front wheel into rolling position by pulling outward on<br />
the red release pin (f) <strong>and</strong> rotating the wheel assembly allowing it to<br />
move towards the front of the cart. The wheel assembly has 2 locking<br />
positions; rolling <strong>and</strong> storage so you should have no difficulty in<br />
positioning it correctly.<br />
If your cart does not track straight you can easily align the wheel by following the steps below:<br />
1. St<strong>and</strong>ing in front of the cart, locate the 2 alignment screws in the front tips of each fork leg.<br />
2. <strong>Using</strong> the Allen wrench provided, turn the alignment screw to direct the wheel as needed.<br />
**If your cart pulls to the left, tighten the right screw by turning it clockwise. If it pulls to the<br />
right, tighten the left screw. ***If you find the screw too tight to fully adjust the wheel as<br />
desired, loosen both screws to their stopping point <strong>and</strong> begin the process again. This will allow<br />
for a full range of adjustment.<br />
<strong>Assembling</strong> <strong>and</strong> <strong>Using</strong> <strong>Your</strong><br />
<strong>Bag</strong> <strong>Boy</strong> <strong>Mini</strong> <strong>GT</strong> <strong>Cart</strong>
<strong>Assembling</strong> <strong>Your</strong> New <strong>Bag</strong> <strong>Boy</strong> <strong>Mini</strong> <strong>GT</strong> • No tools required for assembly<br />
H<strong>and</strong> Brake Lever<br />
Release Lever<br />
1. Remove cart from the box <strong>and</strong> check that the following<br />
items are included:<br />
• <strong>Cart</strong> frame with front <strong>and</strong> rear wheels attached<br />
• Allen wrench<br />
Wheel Locking Lever<br />
H<strong>and</strong>le Adjustment<br />
Lever<br />
Red Release Pin<br />
Locking Lever<br />
2. Once the frame is partially unfolded,<br />
finish the motion by pushing down on the<br />
locking lever (e) to secure the main frame<br />
in position. Once the frame is locked, adjust<br />
the h<strong>and</strong>le to your desired position.<br />
1. Before unfolding, check the h<strong>and</strong>le<br />
adjustment lever (d) <strong>and</strong> make sure it is<br />
locked in place. St<strong>and</strong> behind the cart <strong>and</strong><br />
unfold the main cart frame by pressing<br />
the release lever (a) <strong>and</strong> simultaneously<br />
lifting the cart h<strong>and</strong>le allowing the frame<br />
to begin to unfold.<br />
3. Pull outward on the red wheel release<br />
pin (f) <strong>and</strong> rotate the front wheel<br />
forward. While rotating the wheel into<br />
place, release the locking pin, it will<br />
snap into place when the front wheel is<br />
in the correct rolling position.<br />
2. Open the h<strong>and</strong>le adjustment<br />
lever (d) by rotating it away<br />
from the cart frame while<br />
holding the h<strong>and</strong>le by<br />
the grip.<br />
4. The frame will lock in the folded<br />
position when the release lever<br />
(a) inserts into the frame <strong>and</strong><br />
clicks into place, you will hear<br />
the connection when made.<br />
1. Grasp the front wheel <strong>and</strong> pull<br />
outward on the red release pin (f).<br />
Rotate the front wheel into the rear<br />
folded position <strong>and</strong> the pin will lock<br />
into place automatically.<br />
3. Release the locking lever (e) by<br />
pulling up <strong>and</strong> begin to depress<br />
cart frame down to start the<br />
folding operations.