MB Key Programmer Manual
MB Key Programmer Manual
MB Key Programmer Manual

You also want an ePaper? Increase the reach of your titles
YUMPU automatically turns print PDFs into web optimized ePapers that Google loves.
Introduction<br />
<strong>MB</strong> <strong>Key</strong> <strong>Programmer</strong> <strong>Manual</strong><br />
Mercedes Benz key programming device and software are for vehicles W140, W163, from 1995 to 2000 that have<br />
“DAS BOX” or “AAM BOX”, You can program new keys by this device once all keys are lost or stolen. Of cause<br />
be able to add new keys for the vehicle.<br />
You will feel it is easy to finish your operations by this friendly software.<br />
:<br />
Feature<br />
Read the information from DAS & AAM , Program keys<br />
USB Interface: easy for using<br />
Support MCU type: 0D53J, 0D69J, 0D62J, 0G47V<br />
Support transponder type: PCF7935, PCF7930<br />
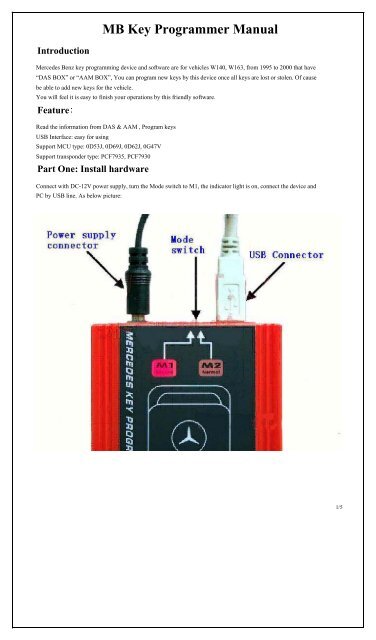
Part One: Install hardware<br />
Connect with DC-12V power supply, turn the Mode switch to M1, the indicator light is on, connect the device and<br />
PC by USB line. As below picture:<br />
1/5
Part Two: Port setting<br />
If the Serial Port Number is greater than COM4, you must choose the port in COM1-COM4.<br />
Go to [Device Manager] , it shows as below:<br />
Choose [QCET BENZ KEY Pro COM PORT (COM5)] , right cli ck choose Properties, it shows as below:<br />
2/5
Go to [Port Settings] panel, then clic k [Advanced…], it shows as below: Choose one COM Port Number<br />
(COM1-COM4), and then click OK t o finish the operation.<br />
Part Three: Operations<br />
<strong>Key</strong> <strong>Programmer</strong> principle: Use the device to read the data of DAS & AAM , then write the data into a new<br />
key or key-chip. Please note, a key or key-chip can be written just once, can not be rewritten. That means<br />
the old key cannot be programmed again. The key or key-chip which you want to be programmed must be<br />
n ew.<br />
1. Re ad the Data from DAS & AAM: Remove the MCU from DAS & AAM Board. Solder it on the adapte r<br />
carefully. Connect the adapter at the right position, as below show.<br />
3/5
2. Open the software. You need click [Check Port] first, software will remind you switch to M1 mode, the red<br />
indicator light should light, and then click [OK] . It will fin d out the right COM-PORT automatically. Please note<br />
th at: COM-PORT must be in “COM1-COM4” you can get more information at previous page, “PART TWO: Port<br />
S etting” . After that, the software will show the correct port that you are using now. As below shows:<br />
3. Choose the right vehicle type which you have. Click [Zoom In] if you want to see the large picture. And then<br />
Click [NEXT] , Click [Read] , then [SAVE] data, please mark down the save path, usually the defau lt save path is<br />
C:\Program Files\BENZ_KEY\UserBackfile .<br />
Please also memorize the file name, such as [ AAM_0G47V_xxx<br />
x_2008-03-10_0001.BIN ]. Save the data then<br />
click [Make KEY] , now it will display as below. In addition, [Open] and [Write] button is us ed for writing or<br />
other purpose by well-informed user. So these two buttons are out of the scope of regular operations.<br />
4/5
Operation steps: Switch to M2 mode, the M2 indicator light should light.<br />
First Step: Choose the Chip_Maska or Vehicle type.<br />
Second Step: Choose the right COM port (COM1-COM4), ( Must the same as that one you test just now.<br />
Third step: Click [Load EE] to open the <strong>Key</strong> matching file. Find the file on original save path, usually on path<br />
C:\Program Files\ BENZ_KEY\UserBackFile . Click [Open] .<br />
Forth step: Select the key serial number (1~8), recommend input upward of number 4.<br />
Fifth step: Put the new key or key-chip on the inductive area properly, then click [Write <strong>Key</strong>] .<br />
5/5