NetWare 5.1 Upgrade Consulting Guide - ITwelzel.biz
NetWare 5.1 Upgrade Consulting Guide - ITwelzel.biz
NetWare 5.1 Upgrade Consulting Guide - ITwelzel.biz

You also want an ePaper? Increase the reach of your titles
YUMPU automatically turns print PDFs into web optimized ePapers that Google loves.
NOVELL PARTNER CONSULTING SERVICE OFFERINGS<br />
NOVELL PARTNERNET CONFIDENTIAL<br />
®<br />
<strong>NetWare</strong> <strong>5.1</strong> <strong>Upgrade</strong><br />
CONSULTANT GUIDE
Table of Contents<br />
<strong>NetWare</strong> <strong>5.1</strong> <strong>Upgrade</strong> <strong>Consulting</strong> <strong>Guide</strong> .................................................................................... 4<br />
Target Audience...........................................................................Error! Bookmark not defined.<br />
Terminology......................................................................................................................... 4<br />
Skill Set............................................................................................................................... 4<br />
Purpose ............................................................................................................................... 5<br />
Acknowledgements.......................................................................Error! Bookmark not defined.<br />
<strong>NetWare</strong> <strong>5.1</strong> Training Curriculum ............................................................................................ 6<br />
Curriculum for <strong>NetWare</strong> <strong>5.1</strong> .................................................................................................... 6<br />
Curriculum for <strong>NetWare</strong> 5 CNE ............................................................................................... 6<br />
Reference Material ...............................................................................................................10<br />
Books .............................................................................................................................10<br />
AppNotes ........................................................................................................................10<br />
<strong>NetWare</strong> Connection Articles ..............................................................................................11<br />
Technical Information Documents (TIDs)..............................................................................11<br />
<strong>NetWare</strong> <strong>5.1</strong> <strong>Upgrade</strong> Solution Development.............................................................................12<br />
Subprocess 1—Start the Project...............................................................................................13<br />
Task 1—Conduct Initial Engagement Meeting........................................................................14<br />
Task 2—Prepare Preliminary Report.....................................................................................15<br />
Task 3—Review and Deliver Preliminary Report ....................................................................15<br />
Subprocess 2—Perform a Technical Assessment and Impact Study................................................16<br />
Task 1—Analyze Customer’s Current Environment.................................................................16<br />
Task 2—Prepare Technical Assessment/Impact Study Report....................................................47<br />
Task 3—Review and Deliver Technical Assessment and Impact Study Report..............................47<br />
Subprocess 3—Develop Solution Design ..................................................................................48<br />
Task 1—Determine Appropriate Solution Design for the <strong>NetWare</strong> <strong>5.1</strong> <strong>Upgrade</strong> ............................49<br />
Task 2—Prepare Solution Design Report...............................................................................68<br />
Task 3—Review and Deliver Solution Design Report ..............................................................68<br />
Subprocess 4—Test Solution Design in the Lab .........................................................................69<br />
Task 1—Plan Prototype......................................................................................................70<br />
Task 2—Build Prototype ....................................................................................................71<br />
Task 3—Test Prototype......................................................................................................72<br />
Task 4—Modify and Retest Prototype as Required ..................................................................96<br />
Task 5—Document Solution Design .....................................................................................96<br />
Task 6—Review and Deliver Solution Design Report to Customer .............................................97<br />
Task 7—(Conditional) Negotiate Pilot WOA..........................................................................97<br />
Subprocess 5—Perform the Pilot .............................................................................................98<br />
Task 1—Identify Pilot Sites ................................................................................................98<br />
Task 2—Prepare Pilot Implementation Plan ...........................................................................99<br />
Task 3—Prepare Pilot Test Plan...........................................................................................99<br />
Task 4—Perform the Pilot ..................................................................................................99<br />
Task 5—Modify Implementation Plan (if appropriate)..............................................................99<br />
Task 6—Document Final Solution Design .............................................................................99<br />
Task 7—Create the Closing Report.......................................................................................99<br />
Task 8—Review and Deliver Final Solution Design and Closing Reports to Customer ...................99<br />
Deploying Novell Distributed Print Services (NDPS) ................................................................101<br />
Subprocess 1—Designing and Implementing NDPS..................................................................106<br />
Page 2 of 317 Novell PartnerNet Confidential 07/24/00<br />
Copyright © 2000 by Novell, Inc.
Task 1—NDPS Design.....................................................................................................106<br />
Task 2—NDPS Deployment..............................................................................................109<br />
Subprocess 2—Implementing Internet Printing Protocol (IPP).....................................................114<br />
Subprocess 3—Implementing Line Printer/Line Printer Daemon (LPR/LPD).................................117<br />
Subprocess 4—QMS to NDPS Migration................................................................................119<br />
Subprocess 5—Troubleshooting / Real World Issues.................................................................119<br />
Subprocess 6—Create the NDPS Report .................................................................................119<br />
Subprocess 7—Review and Deliver NDPS Report to Customer...................................................119<br />
Integrating Office 2000 with <strong>NetWare</strong> <strong>5.1</strong> ...............................................................................121<br />
Subprocess 1—How to Integrate <strong>NetWare</strong> <strong>5.1</strong> and Office 2000 ...................................................123<br />
Subprocess 2—Creating Web Folders.....................................................................................124<br />
Subprocess 3—Accessing Documents and Web Folders.............................................................129<br />
Subprocess 4—WebDAV and Home Directory (~homedir) ........................................................129<br />
Subprocess 5—Using NDSDAV ...........................................................................................131<br />
Subprocess 6—Create the WebDAV Report ............................................................................137<br />
Subprocess 7—Review and Deliver WebDAV Report to Customer..............................................138<br />
Appendix A—IPX-Dependent Applications Worksheet ............................................................139<br />
Appendix B—CMD Essentials ...............................................................................................140<br />
Appendix C—ACU Client Deployment ...................................................................................167<br />
Appendix D—SLP................................................................................................................181<br />
Appendix E—Double-Byte Compatibility Issues ......................................................................252<br />
Appendix F—NDS HealthCheck “Lite” ..................................................................................254<br />
Appendix G—<strong>NetWare</strong> <strong>5.1</strong> Rapid Deployment and Standardization Strategies ...........................255<br />
Appendix H—SAP Types ......................................................................................................266<br />
Appendix I—Steps for Transitioning to Pure IP.......................................................................289<br />
Appendix J—Lab Requirements for <strong>NetWare</strong> <strong>5.1</strong> <strong>Upgrade</strong> Testing............................................295<br />
Appendix K—What’s New (Included) in <strong>NetWare</strong> <strong>5.1</strong> ..............................................................297<br />
Appendix L—Time Sync.......................................................................................................299<br />
Appendix M—<strong>NetWare</strong>/IP....................................................................................................309<br />
Appendix N—<strong>NetWare</strong> Management Portal............................................................................310<br />
Appendix O—Template Preliminary Report ...........................................................................314<br />
Appendix P—Template Technical Assessment and Impact Study Report....................................317<br />
Page 3 of 317 Novell PartnerNet Confidential 07/24/00<br />
Copyright © 2000 by Novell, Inc.
<strong>NetWare</strong> <strong>5.1</strong> <strong>Upgrade</strong> <strong>Consulting</strong> <strong>Guide</strong><br />
This <strong>NetWare</strong> <strong>5.1</strong> <strong>Upgrade</strong> <strong>Consulting</strong> <strong>Guide</strong> includes:<br />
• <strong>NetWare</strong> 3.x to <strong>NetWare</strong> <strong>5.1</strong> upgrades<br />
• <strong>NetWare</strong> 4.x to <strong>NetWare</strong> <strong>5.1</strong> upgrades<br />
• <strong>NetWare</strong> 5.0 to <strong>NetWare</strong> <strong>5.1</strong> upgrades<br />
• NDS eDirectory (NDS 8) versus NDS 7 considerations<br />
• <strong>NetWare</strong> Deployment Manager<br />
• Designing and implementing Novell Distributed Print Services (NDPS)<br />
• Office 2000 Integration (WebDAV) with <strong>NetWare</strong> <strong>5.1</strong><br />
• <strong>NetWare</strong> Portal Manager<br />
Although a sample reports package has not been developed yet, there is sample text included throughout<br />
each section which can be copied into the appropriate report (as noted throughout this consultant guide).<br />
Additionally, some sample reports have been included in the appendices (and are also noted throughout this<br />
consultant guide). This consultant guide assumes four reports are deliverable to the customer:<br />
Terminology<br />
Skill Set<br />
• Preliminary Report<br />
• Technical Assessment / Impact Study Report<br />
• Design Report<br />
• Closing (Final) Report<br />
• <strong>Consulting</strong> Project Lead = CPL, i.e., the lead consultant for this engagement (if appropriate)<br />
• Lead consultant = technical lead on site with the other consultant(s) assigned to the project<br />
• NDS 8 is now referred to as NDS eDirectory, shipping with <strong>NetWare</strong> <strong>5.1</strong>.<br />
• <strong>NetWare</strong> 3.x = <strong>NetWare</strong> 3.12 and <strong>NetWare</strong> 3.2; <strong>NetWare</strong> 3.11 and earlier is not assumed unless<br />
specifically referenced<br />
• <strong>NetWare</strong> 4.x = <strong>NetWare</strong> 4.10+; <strong>NetWare</strong> 4.02 and earlier is not assumed unless specifically<br />
referenced<br />
• <strong>NetWare</strong> 5.x = <strong>NetWare</strong> 5.0 or <strong>NetWare</strong> <strong>5.1</strong><br />
This <strong>NetWare</strong> <strong>5.1</strong> upgrade consultant guide assumes that you have experience with installing and<br />
administering <strong>NetWare</strong> 5.x and NDS. If you are not yet familiar with <strong>NetWare</strong> 5.x, you must have a solid<br />
understanding of <strong>NetWare</strong> 4.x and NDS in addition to having lab time with <strong>NetWare</strong> 5.x. Specifically, you<br />
must have a thorough understanding of:<br />
• NDS and <strong>NetWare</strong> 5.x<br />
• NDS design<br />
• Time synchronization design<br />
• Licensing (NLS)<br />
Page 4 of 317 Novell PartnerNet Confidential 07/24/00<br />
Copyright © 2000 by Novell, Inc.
• <strong>NetWare</strong> 3.x, if upgrading from this operating system<br />
• <strong>NetWare</strong> 4.x, if upgrading from this operating system<br />
• IPX to IP migrations, including SLP and CMD<br />
The following skill sets would be very beneficial:<br />
Purpose<br />
• Standard <strong>NetWare</strong> 5 CNE Curriculum<br />
• Protocols<br />
• IPX<br />
• TCP/IP<br />
• DNS/DCHP<br />
• Packet Filtering<br />
• NDPS<br />
• LPR/Unix print services<br />
• WebDAV<br />
• Routing (CISCO, MPR Certification, Bay Networks, etc.)<br />
• Routing protocols<br />
• RIP/SAP<br />
• NLSP<br />
• WAN topology/technology<br />
• <strong>NetWare</strong>/IP<br />
• Project management<br />
This consultant guide is intended to assist you with:<br />
• Upgrading <strong>NetWare</strong> 3.x, 4.x, and 5.0 to <strong>NetWare</strong> <strong>5.1</strong><br />
• Designing and implementing Novell Distributed Print Services (NDPS)<br />
• Setting up Office 2000 Integration (via WebDAV) with <strong>NetWare</strong> <strong>5.1</strong><br />
This consultant guide not designed to “do all,” “train all” or “teach all,” nor does it replace any Novell<br />
product documentation. References may be given to other documents to help you understand certain<br />
concepts or to help you implement certain steps.<br />
This guide is a living document that will be refined as new knowledge and experience is obtained, and as<br />
underlying technology changes. In general, this guide is designed to help you be successful the first time<br />
with a <strong>NetWare</strong> <strong>5.1</strong> upgrade, designing and installing NDPS, and Office 2000 Integration with <strong>NetWare</strong><br />
<strong>5.1</strong>.<br />
Page 5 of 317 Novell PartnerNet Confidential 07/24/00<br />
Copyright © 2000 by Novell, Inc.
<strong>NetWare</strong> <strong>5.1</strong> Training Curriculum<br />
Curriculum for <strong>NetWare</strong> <strong>5.1</strong><br />
The following Novell Education Courses provide the fundamental knowledge of <strong>NetWare</strong> 5.x and Novell<br />
Directory Services required to implement the <strong>NetWare</strong> <strong>5.1</strong> methodology. Please check out<br />
http://education.novell.com for the latest courses available.<br />
Novell Course 529: <strong>NetWare</strong> 4.11 to <strong>NetWare</strong> <strong>5.1</strong> Update<br />
This five-day course brings participants up to date on the latest in <strong>NetWare</strong> <strong>5.1</strong>. The course provides<br />
information on upgrading from <strong>NetWare</strong> 4.11 and adds a critical introduction to IP. Additional new topics<br />
include:<br />
• Building a TCP/IP network with <strong>NetWare</strong> <strong>5.1</strong><br />
• Building an Internet infrastructure with <strong>NetWare</strong> <strong>5.1</strong> (using the Novell Web and FTP servers as<br />
well as multiple other new servers)<br />
• Managing TCP/IP public and private key security<br />
• Migrating to IP from IPX<br />
• Managing NDS with ConsoleOne<br />
• Increasing network scalability with NDS eDirectory and LDAP<br />
• Synchronizing Time over TCP/IP (critical for multiprotocol, multiplatform environments)<br />
• Managing <strong>NetWare</strong> servers through a Web browser with the <strong>NetWare</strong> Management Portal<br />
• Optimizing the <strong>NetWare</strong> platform<br />
Curriculum for <strong>NetWare</strong> 5 CNE<br />
Novell Course 529: <strong>NetWare</strong> 4.11 to <strong>NetWare</strong> 5 Update (or courses 560 and<br />
570)<br />
This course focuses on introducing, explaining, and comparing significant changes, updates, and new<br />
features found in <strong>NetWare</strong> 5. The course assumes the student has prior experience with <strong>NetWare</strong> 3,<br />
<strong>NetWare</strong> 4, or IntranetWare. Literacy, and the ability to anticipate, design, and use the new feature set of<br />
<strong>NetWare</strong> 5 are central goals to the course. The course materials are designed to provide a continuous<br />
reference that will be useful at the student's worksite.<br />
Skills<br />
• Know the technical relevance of <strong>NetWare</strong> 5's key new features<br />
• <strong>Upgrade</strong> an existing <strong>NetWare</strong> network to <strong>NetWare</strong> 5<br />
• Use Java and ConsoleOne services on a <strong>NetWare</strong> 5 server<br />
• Configure and use DNS and DHCP services<br />
Page 6 of 317 Novell PartnerNet Confidential 07/24/00<br />
Copyright © 2000 by Novell, Inc.
• Configure and use the Netscape FastTrack Web Server for <strong>NetWare</strong><br />
• Implement and use Novell Distributed Print Services (NDPS)<br />
• Manage workstations using ZENworks<br />
• Create and manage NSS volumes on a <strong>NetWare</strong> 5 server<br />
Course Topics<br />
• Upgrading to <strong>NetWare</strong> 5<br />
• Using Java Console Services<br />
• Using DNS/DHCP Services<br />
• Using the Netscape FastTrack Server for <strong>NetWare</strong><br />
• Implementing Novell Distributed Print Services (NDPS)<br />
• Managing Workstations with ZENworks<br />
Novell Course 560: <strong>NetWare</strong> 5 Administration<br />
In this course you will learn how to accomplish fundamental network management tasks on a <strong>NetWare</strong> 5<br />
network.<br />
Skills<br />
• <strong>NetWare</strong> 5 and role of NDS<br />
• How to use a workstation<br />
• Network access for users<br />
• Novell Distributed Print Services<br />
• Network file system<br />
• File system security<br />
• Login scripts for NDS objects<br />
• NDS security<br />
• Network applications with ZENworks<br />
• Workstations in an NDS environment<br />
• Basic network services in a multicontext environment<br />
• Manage and install <strong>NetWare</strong> user licenses<br />
Course Topics<br />
• Introduction to <strong>NetWare</strong> 5 and NDS<br />
• Using a Workstation<br />
• Setting Up and Managing Network Access for Users<br />
• Printing with Novell Distributed Print Services<br />
• Managing the File System<br />
• Managing File System Security<br />
• Creating and Managing Login Scripts<br />
• Managing NDS Security<br />
Page 7 of 317 Novell PartnerNet Confidential 07/24/00<br />
Copyright © 2000 by Novell, Inc.
• Distributing and Managing Network Applications with ZENworks<br />
• Managing Workstation in an NDS Environment with ZENworks<br />
• Managing Resources in a multicontext environment<br />
• Installing <strong>NetWare</strong> 5<br />
Novell Course 570: <strong>NetWare</strong> 5 Advanced Administration<br />
This course provides students with the knowledge and skills they need to design, configure and administer<br />
a complex <strong>NetWare</strong> 5 network. Skills learned include upgrading from a <strong>NetWare</strong> 3 environment, migrating<br />
to <strong>NetWare</strong> Distributed Print Services, executing Java-based utilities, network backup and configuring<br />
<strong>NetWare</strong> 5 for remote access.<br />
Skills<br />
• <strong>Upgrade</strong> <strong>NetWare</strong> 3.1x to <strong>NetWare</strong> 5<br />
• <strong>Upgrade</strong> queue-based printing to <strong>NetWare</strong> Distributed Print Services<br />
• Perform a custom install of <strong>NetWare</strong> 5<br />
• Access the server from a remote console<br />
• Execute Java-based utilities<br />
• Optimize through server statistics and utilities<br />
• Provide appropriate TCP/IP functionality for workstations<br />
• Backup/restore NDS and file system information<br />
• Install/configure a FastTrack Web server<br />
• Plan NDS security<br />
• Configure for remote and mobile access<br />
Course Topics<br />
• Upgrading to <strong>NetWare</strong> 5<br />
• Server console<br />
• Queue-based network printing<br />
• Network file system<br />
• Optimizing the network and server<br />
• Backing up servers and workstations<br />
• DNS/DHCP services<br />
• Installing a Web server and an FTP server<br />
• Securing the NDS tree<br />
• Novell Directory Services<br />
• Server remote access and mobile clients<br />
• Integrating other Novell services<br />
Page 8 of 317 Novell PartnerNet Confidential 07/24/00<br />
Copyright © 2000 by Novell, Inc.
Novell Course 570: NDS Design and Implementation<br />
This course teaches network administrators, network designers, and networking consultants the skills<br />
needed to create an NDS design and implementation strategy. Students will complete an NDS design<br />
strategy and implementation schedule using templates that they can re-use to create a design for their<br />
workplaces. Students will then use these strategies and schedules to complete a <strong>NetWare</strong> implementation in<br />
a hands-on environment. The processes taught in this course for creating a solid <strong>NetWare</strong> design have been<br />
proven in use with Novell Services.<br />
Skills<br />
• Identify critical factors and expectations for designing a <strong>NetWare</strong> network.<br />
• Document current network configurations.<br />
• Determine pre-optimization and clean-up strategies for implementation.<br />
• Determine directory tree structure and object placement.<br />
• Create a time synchronization strategy.<br />
• Determine a strategy for login scripts, groups, and security needs.<br />
• Create an implementation strategy.<br />
• Using schedules and plans, implement a <strong>NetWare</strong> network.<br />
Course Topics<br />
• Preparing for NDS design<br />
• Designing an NDS tree<br />
• Partition and replica strategy<br />
• Planning a time synchronization strategy<br />
• Planning the user environment<br />
• Implementing an NDS design<br />
Novell Course 991: Advanced NDS Tools and Diagnostics<br />
This course raises the level of NDS expertise among networking professionals so they can maintain and<br />
troubleshoot some of the most common NDS issues. Someone who takes this course should not need to call<br />
Novell technical support regarding an NDS issue except to report an NDS bug or to request help on issues<br />
requiring DSDUMP.<br />
Skills<br />
• List tasks needed to proactively maintain an NDS tree<br />
• Properly perform NDS operations<br />
• Describe NDS tools used to identify and resolve NDS issues<br />
• Maintain a server in an NDS environment<br />
• Resolve NDS issues<br />
Course Topics<br />
• Proactively maintaining NDS<br />
Page 9 of 317 Novell PartnerNet Confidential 07/24/00<br />
Copyright © 2000 by Novell, Inc.
• Performing NDS operations<br />
• NDS tools<br />
• Server maintenance<br />
• Resolving NDS issues<br />
Reference Material<br />
Books<br />
AppNotes<br />
• <strong>NetWare</strong> 5 and TCP/IP. This is a good reference for installing and configuring Novell’s<br />
DNS/DHCP.<br />
• “DNS and BIND”, Paul Albitz & Cricket Liu (O’Reilly & Associates, Inc.). This is an excellent<br />
book for generic information on DNS and BIND.<br />
AppNotes are on-line at http://developer.novell.com.<br />
<strong>NetWare</strong> <strong>5.1</strong><br />
• “What’s New in <strong>NetWare</strong> <strong>5.1</strong>: The Complete Solution for Web-Based Networking,” January 2000<br />
• “Rolling Out <strong>NetWare</strong> <strong>5.1</strong> with the <strong>NetWare</strong> Deployment Manager,” January 2000<br />
• “Upgrading Novell Client Software Across the Network Using ACU.EXE,” January 2000<br />
• “An Overview of <strong>NetWare</strong> <strong>5.1</strong>’s Management Portal Utility,” January 2000<br />
<strong>NetWare</strong> 5.0<br />
• “Removing IPX from WAN Segments During an <strong>Upgrade</strong> to <strong>NetWare</strong> 5: A Case Study,”<br />
September 1999<br />
• “Using Novell <strong>Upgrade</strong> Wizard 3.0,” August 1999<br />
• “Understanding SCMD Mechanics and Processes,” August 1999<br />
• “More About Automating the <strong>NetWare</strong> 5 Installation with a Response File,” February 1999<br />
• “Automating the <strong>NetWare</strong> 5 Installation with a Response File,” December 1998<br />
• “Compatibility Mode Installation and Configuration,” September 1998<br />
• “Migrating to pure IP with <strong>NetWare</strong> 5,” September 1998<br />
• “Maintaining IPX Compatibility During a Migration to TCP/IP on <strong>NetWare</strong> Network,” March<br />
1998<br />
• “<strong>NetWare</strong> Over TCP/IP: Integrating <strong>NetWare</strong> Services into the TCP/IP Environment,” March<br />
1997<br />
NDPS<br />
• “Printing in <strong>NetWare</strong> 5 with NDPS 2.0,” September 1998<br />
• “An Introduction to Novell Distributed Print Services (NDPS),” April 1998<br />
Page 10 of 317 Novell PartnerNet Confidential 07/24/00<br />
Copyright © 2000 by Novell, Inc.
<strong>NetWare</strong> Connection Articles<br />
NDPS<br />
• http://www.nwconnection.com/dec.99/nepsd9/index.html “<strong>NetWare</strong> Enterprise Print Services”<br />
• “NDPS: Good-bye, Queue World!,” <strong>NetWare</strong> Connection, Oct. 1997, pp. 6-22. You can download<br />
this article from http://www.nwconnection.com/past. )<br />
Technical Information Documents (TIDs)<br />
TIDs are constantly being created and updated. Review http://support.novell.com for the latest information.<br />
• Understanding <strong>NetWare</strong> 5 Licensing, TID 2943750<br />
• Installing MLA License Certificates, TID 10013067<br />
• NW5 Installing MLA License Certificates, TID 2944797<br />
• Installing 5.0 Servers into Mixed 4.10/4.11, TID 2943193<br />
• NW5 OS Installation Issues, TID 2942539<br />
• NW5 Minimum Requirements for <strong>NetWare</strong>5 Install, TID 2941199<br />
• 4.x or 5.x Migration / DSMaint Procedure, TID 2934033<br />
• TimeSync Frequently Asked Questions, TID 2949745<br />
• SLP Terms and Configuration Reference, TID 2951567<br />
• Configuring SLP for a <strong>NetWare</strong> Client, TID 2951560<br />
• Configuring SLP for a <strong>NetWare</strong> Server, TID 2951564<br />
• Configuring a LAN/WAN Infrastructure for SLP, TID 2951566<br />
• Search for keyword “<strong>NetWare</strong> <strong>5.1</strong>” to get up-to-date information.<br />
• Search for keyword “NDPS” to get up-to-date information.<br />
• Search for keyword “WebDAV” to get up-to-date information.<br />
Page 11 of 317 Novell PartnerNet Confidential 07/24/00<br />
Copyright © 2000 by Novell, Inc.
<strong>NetWare</strong> <strong>5.1</strong> <strong>Upgrade</strong> Solution Development<br />
Before you begin developing a solution for a <strong>NetWare</strong> <strong>5.1</strong> upgrade, you should make sure that your project<br />
manager has completed the requirements analysis for this engagement. The requirements analysis should<br />
have resulted in two documents:<br />
• Problem analysis report<br />
• Feasibility study<br />
Get a copy of these two completed documents from the project manager before proceeding with this<br />
process.<br />
These two documents were not given to the customer; rather, this information was gathered to assist the<br />
project manager in defining the scope of this engagement and to assist you in the solution development<br />
process.<br />
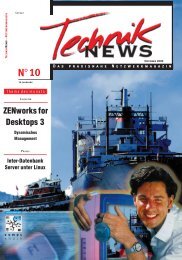
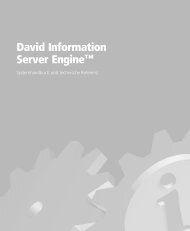
In the solution development process, you will be performing five major subprocesses (as denoted below in<br />
Figure 1 as SP1-SP5). The following subsections provide further details on the specific tasks within each<br />
subprocess. Reports will be the output or deliverable to the customer for each subprocess below:<br />
P3<br />
Solution<br />
Development<br />
SP1<br />
Initiate<br />
Engagement<br />
(Project leader)<br />
Conduct initial<br />
engagement meeting<br />
with customer<br />
(Consultant) Prepare<br />
preliminary report<br />
(Consultant) Deliver<br />
preliminary report<br />
to customer<br />
SP2<br />
Perform a<br />
Technical<br />
Assessment and<br />
Impact Study<br />
Perform technical<br />
assessment and<br />
impact study<br />
Develop technical<br />
assessment and<br />
impact study report<br />
Deliver<br />
technical assessment<br />
and impact study<br />
report to customer<br />
SP3<br />
Develop<br />
Solution<br />
Design<br />
Develop and<br />
document detailed<br />
solution designs<br />
Develop and<br />
document test and<br />
acceptance plans<br />
Deliver designs and<br />
plans to customer<br />
Figure 1. Solution Development<br />
SP4<br />
Validate<br />
and Test<br />
System Design<br />
Instruct customer<br />
to assemble test<br />
environment<br />
Build prototype<br />
Test prototype<br />
Modify and retest<br />
prototype<br />
Document final<br />
system design<br />
Prepare and present<br />
revised designs and<br />
validation results<br />
(Conditional)<br />
CBM prepares and<br />
negotiates WOA for<br />
pilot implementation<br />
SP5<br />
Implement<br />
and Test<br />
Pilot Systems<br />
Prepare draft<br />
deployment plan<br />
Identify pilot sites<br />
Develop system<br />
implementation plans<br />
Implement and test<br />
pilot systems<br />
Modify and retest<br />
pilot systems<br />
Prepare and deliver<br />
final design and<br />
validation results<br />
Validated System<br />
Design and<br />
Deployment Plan<br />
Page 12 of 317 Novell PartnerNet Confidential 07/24/00<br />
Copyright © 2000 by Novell, Inc.
Subprocess 1—Start the Project<br />
Either you or the lead consultant (if one has been assigned) will conduct the preliminary meeting. This<br />
preliminary meeting is appropriate to ensuring that the engagement starts off on the right track.<br />
Deliverable: Sample prelimimary report is included in Appendix O.<br />
Key Inputs<br />
Personnel<br />
• Lead consultant (if one has been assigned)<br />
• All consulting team members<br />
• Customer contacts<br />
• Your project manager (optional)<br />
Resources / Tools<br />
Data / Reports<br />
• Signed statement of work<br />
• Completed preflight checklist<br />
• Summary of problem analysis<br />
• Summary of feasibility study<br />
<strong>NetWare</strong> <strong>5.1</strong> <strong>Upgrade</strong>—Solution Development<br />
Subprocess 1—Start the Project<br />
Task Summary<br />
Key Outputs<br />
Personnel<br />
• Lead consultant<br />
Outputs / Deliverables<br />
• Preliminary report<br />
Data / Reports<br />
• Preliminary report<br />
• Weekly status reports<br />
Customer Sign-Off<br />
• Project manager<br />
• Preliminary report<br />
• Fax Copy to project manager<br />
1. Lead consultant conducts a meeting with the customer to accomplish the following:<br />
• Review and set customer expectations.<br />
• Review approach.<br />
• Verify that the required preflight checklist and other requested information is on hand and complete.<br />
• Identify the customer's interfaces and contacts.<br />
• Clearly identify the roles and responsibilities.<br />
2. Prepare preliminary report.<br />
3. Review and deliver preliminary report to customer.<br />
The statement of work and purchase order are signed, in place, and the engagement is ready to start. The<br />
lead consultant calls the customer to set up this first meeting and schedules at least a four-hour block of<br />
Page 13 of 317 Novell PartnerNet Confidential 07/24/00<br />
Copyright © 2000 by Novell, Inc.
time in which to meet with the customer’s appropriate personnel (for example, their project manager, their<br />
technical engineers, and so forth). All consulting team members should be at this meeting. The lead<br />
consultant conducts this meeting.<br />
The purpose of this meeting is to:<br />
• Ensure that the statement of work has been properly scoped for this project; if not, discuss the<br />
scope with the project manager after the meeting.<br />
• Obtain the information needed to start preparing the technical assessment and impact study reports<br />
(subprocess 2) and the overall solution design (subprocess 3) that will be used to test the upgrade<br />
to <strong>NetWare</strong> <strong>5.1</strong> in the lab (subprocess 4).<br />
Before this meeting, you should:<br />
• Be familiar with the statement of work. Bring a hard copy (preferably signed) to this meeting.<br />
• Be familiar with the problem analysis and feasibility study output from the requirements analysis<br />
(process 2). This documentation is available from the project manager. Bring a hard copy of these<br />
documents to the meeting.<br />
• Be very familiar with the <strong>NetWare</strong> <strong>5.1</strong> <strong>Upgrade</strong> consultant guide (this document). Bring either a<br />
hard or soft copy to this meeting for reference.<br />
• Be prepared to “chalk-talk” or provide a slide show presentation on the products and solution(s)<br />
you suggest.<br />
You should ensure that the following information is available at this initial engagement meeting:<br />
• LAN/WAN diagrams. If this information is not available, determine when you can get it. This<br />
information is necessary to design and/or review NDS partitions and replicas. The LAN/WAN<br />
diagrams are also necessary if you are going to design an IP/CMD, an IP/MA with/without CMD,<br />
and/or an SLP infrastructure solution for the customer. It is important to note that if pure IP or<br />
IP/CMD is in use in the customer network or if the customer intends to prefer the IP protocol on<br />
their clients or <strong>NetWare</strong> <strong>5.1</strong> servers, an SLP design is a requirement.<br />
• TCP/IP infrastructure (DNS, DHCP). If this information is not available, determine when you can<br />
get it. You need to determine if the customer’s TCP/IP infrastructure is already in place or if it will<br />
need to be set up (assuming the customer will be implementing IP with <strong>NetWare</strong> <strong>5.1</strong>).<br />
• NDS design documents.<br />
Task 1—Conduct Initial Engagement Meeting<br />
You need to cover and document the following bulleted list at this initial engagement meeting. This<br />
information will become part of the preliminary report:<br />
• Introduce the team members and their roles.<br />
• Introduce the customer’s team members and their roles—for example, their project manager, their<br />
NDS “expert,” their client “expert,” and so forth.<br />
• Determine what the expectations are for you (in essence you are just verifying that the statement<br />
of work was properly scoped).<br />
• Gather the following documents from the customer (from above, the ones you should have asked<br />
be at this meeting):<br />
• Completed Pre-flight Checklist (PFC)<br />
Page 14 of 317 Novell PartnerNet Confidential 07/24/00<br />
Copyright © 2000 by Novell, Inc.
• LAN/WAN Diagrams<br />
• TCP/IP Infrastructure Diagrams (DNS, DHCP)<br />
• NDS Design Documents<br />
Note which documents are missing, who is responsible for gathering these documents, and when<br />
they will be available.<br />
• Discuss the necessary lab requirements (see Appendix J).<br />
• Determine critical success factors for this project.<br />
• Find out what additional <strong>NetWare</strong> <strong>5.1</strong> products need to be installed on the <strong>NetWare</strong> <strong>5.1</strong> servers (if<br />
any). For example, NDPS, <strong>NetWare</strong> Enterprise Web Server (for Office 2000/WebDAV<br />
Integration), DNS/DHCP. For a complete listing of products that ship with <strong>NetWare</strong> <strong>5.1</strong>, see<br />
Appendix K.<br />
• Find out if the customer will be implementing NDS eDirectory (NDS 8) or Legacy NDS (NDS 7).<br />
Note: The NDS eDirectory methodology is not yet written; however, you need to determine if<br />
NDS eDirectory (or “legacy” NDS) will be used.<br />
• Find out if the customer is MLA or non-MLA. This determines the <strong>NetWare</strong> <strong>5.1</strong> licensing design<br />
scheme that will be used. Options: CLA, VLA, SLA, MLA, Red Box.<br />
• Determine the customer’s timeframe for upgrading to <strong>NetWare</strong> <strong>5.1</strong>. This may help determine the<br />
upgrade method used (in subprocess 3).<br />
Task 2—Prepare Preliminary Report<br />
The preliminary report is based upon the findings in the initial engagement meeting. A template<br />
Preliminary Report is included in Appendix O.<br />
While writing this report, ask yourself these questions (but DO NOT cover this in the Preliminary Report):<br />
• Is the product or solution valid for the customer’s perceived problem? If not, was the incorrect<br />
Novell product or solution sold to the customer?<br />
• Can a customized consulting solution be developed?<br />
• Are there other products or solutions from Novell that might help the customer meet their business<br />
objectives?<br />
Task 3—Review and Deliver Preliminary Report<br />
Activity 1—Project Manager Review<br />
The project manager should review your preliminary report and make any recommendations or<br />
suggestions.<br />
Activity 2—Deliver Report<br />
Deliver the preliminary report to the customer.<br />
Page 15 of 317 Novell PartnerNet Confidential 07/24/00<br />
Copyright © 2000 by Novell, Inc.
Subprocess 2—Perform a Technical Assessment and<br />
Impact Study<br />
Deliverable: A sample technical assessment and impact study report is included in Appendix P.<br />
Key Inputs<br />
Personnel<br />
• Lead consultant<br />
• <strong>Consulting</strong> team members<br />
• Customer contacts/interfaces<br />
Resources / Tools<br />
Data / Reports<br />
• Signed statement of work<br />
• Problem analysis<br />
• Feasibility study<br />
• Preliminary report<br />
<strong>NetWare</strong> <strong>5.1</strong> <strong>Upgrade</strong>— Solution Development<br />
Subprocess 2—Perform a Technical Assessment and Impact Study<br />
Task Summary<br />
Key Outputs<br />
Personnel<br />
• Lead consultant<br />
Outputs / Deliverables<br />
• Technical assessment and impact study report<br />
Data / Reports<br />
• Weekly status reports<br />
• Technical assessment and impact study report<br />
1. Perform a technical assessment and impact study of the customer's supporting environment.<br />
2. Prepare technical assessment and impact study report.<br />
3. Deliver technical assessment and impact study report to customer.<br />
Many customer projects have suffered limited success or even failure as a result of their not properly<br />
assessing the current environment prior to embarking on an upgrade. Post-upgrade problems can be<br />
minimized greatly by careful review of the current environment. To minimize the risk of post-upgrade<br />
problems, a technical assessment and impact study of the customer’s current environment to determine if it<br />
is capable of sustaining the upgrade to <strong>NetWare</strong> <strong>5.1</strong>, should take place.<br />
Task 1—Analyze Customer’s Current Environment<br />
1. Compare the <strong>NetWare</strong> <strong>5.1</strong> prerequisites (listed under the corresponding activities below) with the<br />
LAN/WAN diagrams, and TCP/IP infrastructure diagrams. This task has been organized so that<br />
Activity 1 corresponds with PFC Table 1.<br />
Page 16 of 317 Novell PartnerNet Confidential 07/24/00<br />
Copyright © 2000 by Novell, Inc.
2. Determine whether the analyzed component in each activity meets the Novell recommendations. Be<br />
aware that requirements can vary widely depending upon the customer’s computing environment, upon<br />
applications existing on the current and future servers, and upon the customer’s future requirements<br />
(for example, server consolidations). Some aspects of your technical assessment may need to be stress<br />
tested in the lab environment.<br />
3. Document the “deficiencies” between #1 and #2.<br />
Note: Some information requested in the PFC will not be analyzed here.<br />
Page 17 of 317 Novell PartnerNet Confidential 07/24/00<br />
Copyright © 2000 by Novell, Inc.
Activity 1—Review Workstation Operating Systems<br />
Compare client workstations and operating systems from PFC table 1 with the following <strong>NetWare</strong> <strong>5.1</strong><br />
requirements:<br />
OS Minimum Version or<br />
Patch Level<br />
Comments<br />
DOS This OS is difficult to make Y2K compliant.<br />
Windows (16 bit) V3.1 or higher This OS is difficult to make Y2K compliant.<br />
Win95 Service Pack 1 or<br />
higher<br />
Recommend minimum of 16MB RAM.<br />
Win98 Base product Recommend minimum of 16MB RAM.<br />
WinNT 3.51 OS Patch 3 or higher Recommend minimum of 24MB RAM.<br />
WinNT 4 Service Pack 3 or<br />
higher<br />
Windows 2000 Base product<br />
Recommend minimum of 24MB RAM.<br />
MacOS Check with Prosoft Current support and development for Macintosh connectivity to<br />
<strong>NetWare</strong> is performed by Prosoft. Their web site is<br />
http://www.prosofteng.com.<br />
Unix NFS The recommended solution for Unix connectivity is through NFS.<br />
More information on NFS can be found at<br />
http://www.novell.com/documentation/<br />
Linux<br />
OS/2 V2.1 or higher Additional patches may be required if using Warp 3.<br />
Page 18 of 317 Novell PartnerNet Confidential 07/24/00<br />
Copyright © 2000 by Novell, Inc.
Activity 2a—Assess Client Software<br />
Note: Please see Appendix C “ACU Client Deployment” if the customer’s client software needs to be<br />
upgraded.<br />
Compare client software and versions from PFC table 2 with the following <strong>NetWare</strong> <strong>5.1</strong> requirements:<br />
OS Client Functionality Comments<br />
NDS Pure IP<br />
DOS/Win3.x NETx N/A N/A Discontinued.<br />
Must use bindery support on<br />
servers.<br />
DOS/Win3.x VLM Limited N/A Discontinued.<br />
Not tested with <strong>NetWare</strong> <strong>5.1</strong>.<br />
ZEN2, NDPS, not supported.<br />
DOS/Win3.x 32-bit<br />
v2.71<br />
X Limited No support for Pure IP<br />
functionality; IP functionality not<br />
tested.<br />
Final release: v2.71<br />
Win95/Win98 MS Client N/A N/A Must use bindery support on<br />
server.<br />
Win95/Win98 MS Client Limited N/A Multi-tree support missing.<br />
w/NDS<br />
ZEN2, NDPS, not supported.<br />
Win95/Win98 V3.2 X X<br />
WinNT 3.51 V4.11b X N/A Final release: v4.11b<br />
WinNT 4 V4.7 X X<br />
Windows 2000 V4.7 X X The WinNT 4.7 client is the W2K<br />
client. A Client Support Pack will<br />
be released after the official<br />
release of W2K to solve any kind of<br />
issues encountered in between.<br />
MacOS Prosoft Prosoft Prosoft Check http://www.prosofteng.com<br />
for details.<br />
Unix (non-NFS) N/A<br />
Linux A Linux distribution from Caldera<br />
(<strong>NetWare</strong> for Linux) has <strong>NetWare</strong><br />
Client support; the base is Red Hat<br />
Linux and Caldera has added its<br />
Network Desktop products. The<br />
client gives you full access to<br />
<strong>NetWare</strong> servers and it includes<br />
features such as support for NDS<br />
and RSA encryption. You can get<br />
more information and details from<br />
Calder’a web site at<br />
www.caldera.com.<br />
OS/2 V2.12 X N/A Final release: v2.12<br />
Note: If your customer has a client version that supports <strong>NetWare</strong> 5.0 (which you can determine from the<br />
Client Release Roadmap URL below) you will be fine as far as <strong>NetWare</strong> <strong>5.1</strong> functionality.<br />
Page 19 of 317 Novell PartnerNet Confidential 07/24/00<br />
Copyright © 2000 by Novell, Inc.
To find the current shipping version of a particular client, try one of the following URLs:<br />
•<br />
•<br />
•<br />
http://support.novell.com – minimum patch list<br />
http://www.novell.com/download<br />
http://support.novell.com/Ftp/Updates/nw/nwclients/Date0.html<br />
Note: Just because a client has certain functionality does not mean that it is the most appropriate client to<br />
use. Novell is continually improving the clients for current operating systems. Consequently, it is a good<br />
idea to plan to bring the client versions up to date even if they initially appear to work with <strong>NetWare</strong> <strong>5.1</strong>.<br />
The following table lists some of the common issues that arise when the current clients are not installed.<br />
Some options for how to address these issues are also offered.<br />
Possible Issues Possible Results or Impacts Options<br />
• Novell client software is not at<br />
the latest level.<br />
• Microsoft Client for <strong>NetWare</strong><br />
Networks is being used.<br />
• OS/2 workstations connected<br />
to <strong>NetWare</strong> servers.<br />
• UNIX (non-NFS) workstations<br />
connect to <strong>NetWare</strong> servers.<br />
• Macintosh workstations and<br />
servers run AppleTalk and<br />
connect to <strong>NetWare</strong> servers.<br />
• Cannot work with pure IP.<br />
• Cannot take full advantage of<br />
NDS (multi-tree, ZEN, NDPS,<br />
etc.).<br />
• May not be able to connect to<br />
server (if upgrading).<br />
• <strong>Upgrade</strong> to latest client<br />
version.<br />
• Continue using same version<br />
(and sacrifice NDS and/or<br />
pure IP functionality).<br />
• Bindery support only. • <strong>Upgrade</strong> to Novell Client<br />
software.<br />
• Run <strong>NetWare</strong> <strong>5.1</strong> with Bindery<br />
Services for Microsoft client<br />
workstations.<br />
• OS/2 workstations will not<br />
connect to pure IP<br />
<strong>NetWare</strong> <strong>5.1</strong> servers.<br />
• UNIX workstations will not<br />
connect to pure IP<br />
<strong>NetWare</strong> <strong>5.1</strong> servers.<br />
• Macintosh computers cannot<br />
connect to the network<br />
(<strong>NetWare</strong> <strong>5.1</strong> does not include<br />
Mac client).<br />
• Macintosh computers cannot<br />
see the <strong>NetWare</strong> volumes<br />
(<strong>NetWare</strong> <strong>5.1</strong>does not include<br />
Mac file system).<br />
Activity 2b—Assess Client Internet Browsers<br />
• Maintain IPX on <strong>NetWare</strong><br />
servers that require OS/2<br />
connectivity.<br />
• Maintain IPX on servers that<br />
require UNIX connectivity.<br />
• Run NFS 5 on <strong>NetWare</strong> <strong>5.1</strong><br />
servers, and NFS on UNIX<br />
workstations.<br />
• Obtain current client/file<br />
system from Prosoft<br />
(www.prosofteng.com).<br />
• Leave AppleTalk clients<br />
connected to current server<br />
and version.<br />
Compare client Internet browsers and versions from PFC table 2 with the following Office 2000<br />
(WebDAV) Integration with <strong>NetWare</strong> <strong>5.1</strong> requirements:<br />
• Internet Explorer 5.0 running on workstations<br />
Page 20 of 317 Novell PartnerNet Confidential 07/24/00<br />
Copyright © 2000 by Novell, Inc.
Note: Internet Explorer 4.0 and Netscape’s browsers have limited functionality with the<br />
WebDAV protocol and they do not support Web Folders.<br />
Page 21 of 317 Novell PartnerNet Confidential 07/24/00<br />
Copyright © 2000 by Novell, Inc.
Activity 3—Assess <strong>NetWare</strong> Server Information<br />
Compare <strong>NetWare</strong> server information from PFC table 3 with the following <strong>NetWare</strong> <strong>5.1</strong> requirements:<br />
Step 1—Assess <strong>NetWare</strong> Operating System Version and Installed Support Packs<br />
• For an in-place upgrade to <strong>NetWare</strong> <strong>5.1</strong>, the following requirements must be met:<br />
• <strong>NetWare</strong> 3.12+ with the latest support pack<br />
• <strong>NetWare</strong> 4.10+ with the latest support pack<br />
• <strong>NetWare</strong> 5.0 with the latest support pack<br />
• For an across-the-wire upgrade (using the <strong>Upgrade</strong> Wizard 3.0) to <strong>NetWare</strong> <strong>5.1</strong>, the following<br />
requirements must be met:<br />
• <strong>NetWare</strong> 3.12+ with the latest support pack (<strong>Upgrade</strong> Wizard 3.0+ provides this capability)<br />
• <strong>NetWare</strong> 4.10+ with the latest support pack (<strong>Upgrade</strong> Wizard 3.0+ provides this capability)<br />
• For an accelerated upgrade:<br />
• <strong>NetWare</strong> 3.12+ with the latest support pack<br />
• <strong>NetWare</strong> 4.10+ with the latest support pack<br />
• <strong>NetWare</strong> 5.0 with the latest support pack<br />
Note: <strong>NetWare</strong> 5.0 uses an upgrade script to do the upgrade; <strong>NetWare</strong> <strong>5.1</strong> uses a Java client which<br />
executes upgrade script commands.<br />
See http://support.novell.com for current minimum patch listings as the above may change.<br />
If support packs are installed for other applications (NLMs) on this server, determine if a different support<br />
pack or revision level needs to be installed for the <strong>NetWare</strong> <strong>5.1</strong> version of the NLM.<br />
Possible Issues Possible Results or Impacts Options<br />
• Patches are not at most<br />
current levels.<br />
Step 2—Assess CLIB Patch Level<br />
• No guaranteed stability.<br />
• Cannot take advantage of<br />
certain functionality and<br />
enhancements.<br />
• Inability to leverage technical<br />
support (problem resolution).<br />
• Apply latest patches (this is<br />
recommended).<br />
• Do nothing (and sacrifice<br />
functionality).<br />
The latest CLIB fixes many “LOADER CANNOT FIND PUBLIC SYMBOL” error messages. It is<br />
generally necessary with newer versions of LAN drivers.<br />
Step 3—Assess DS Version<br />
The latest DS.NLM should be installed on all <strong>NetWare</strong> 4 and <strong>NetWare</strong> 5 servers to ensure DS<br />
interoperability with <strong>NetWare</strong> <strong>5.1</strong> and, more importantly, <strong>NetWare</strong> <strong>5.1</strong> products which may extend the<br />
schema. The latest DS may or may not be part of the latest support pack.<br />
Page 22 of 317 Novell PartnerNet Confidential 07/24/00<br />
Copyright © 2000 by Novell, Inc.
Step 4—Assess Server Make (Manufacturer) and Model<br />
You should ensure that the server hardware is “Yes, Tested and Approved” at<br />
http://developer.novell.com/prodcert/<br />
Step 5—Assess CPU<br />
Ensure the server is a server-class PC with a Pentium or higher processor; 200 MHz+ is recommended.<br />
Possible Issues Possible Results or Impacts Options<br />
• The server does not meet<br />
recommended CPU<br />
requirements.<br />
Step 6—Assess Server Operating System RAM<br />
• Cannot upgrade this particular<br />
server to next OS version.<br />
• <strong>Upgrade</strong> the CPU to<br />
recommended level.<br />
• Obtain a new server.<br />
• Consider consolidation of this<br />
server with other servers.<br />
• Leave the server at its current<br />
<strong>NetWare</strong> version.<br />
<strong>NetWare</strong> <strong>5.1</strong> requires a base minimum of 128MB, which includes RAM for the standard <strong>NetWare</strong><br />
products.<br />
Possible Issues Possible Results or Impacts Options<br />
• Server does not have the<br />
minimum 128MB of RAM.<br />
Step 7—Assess Other RAM Requirements<br />
• Server may not run<br />
<strong>NetWare</strong> <strong>5.1</strong>.<br />
• Cannot upgrade this particular<br />
server due to RAM limitations.<br />
• Purchase more RAM for<br />
selected server (if capable).<br />
• Consider consolidation of this<br />
server with another one.<br />
• Get a new server.<br />
• Leave server at the current<br />
<strong>NetWare</strong> version.<br />
In addition to the base 128MB of RAM, you must factor in RAM requirements for additional applications<br />
(NLMs) running on the server, additional <strong>NetWare</strong> <strong>5.1</strong> components, and total disk space on the server for<br />
proper cache allocation and plan your disk space use accordingly. DSMASTER servers and servers running<br />
other software (e.g., GroupWise, Java applications, etc.), may need more than the minimum of 128MB<br />
RAM. For example:<br />
• The <strong>NetWare</strong> <strong>5.1</strong> GUI utilities need approximately 30MB to 50MB of free memory.<br />
• ConsoleOne requires 50MB of free memory after all processes are loaded.<br />
• WebSphere Application Server for <strong>NetWare</strong>—256 MB (512 MB recommended) in addition to<br />
Standard <strong>NetWare</strong> products<br />
• Oracle8i with WebDB—128 MB (256 MB recommended) in addition to Standard <strong>NetWare</strong><br />
products<br />
Possible Issues Possible Results or Impacts Options<br />
Page 23 of 317 Novell PartnerNet Confidential 07/24/00<br />
Copyright © 2000 by Novell, Inc.
• Server does not meet RAM<br />
requirements for applications<br />
that will be running on it.<br />
• Server is going to be a<br />
dedicated DS replica server.<br />
Step 8—Assess CD-ROM<br />
The following CD-ROM requirements must be met:<br />
• Server may not run specific<br />
application.<br />
• May not complete NDS<br />
synchronization within the<br />
recommended 30-minute<br />
period.<br />
• Purchase more RAM for<br />
server.<br />
• Move application to another<br />
server.<br />
• Get a new server.<br />
• Consider consolidation with<br />
another server that has<br />
enough RAM.<br />
• <strong>Upgrade</strong> to at least 128 MB of<br />
RAM (recommended for a<br />
dedicated DS replica server.<br />
• The CD-ROM drive must be able to read ISO 9660-formatted CD-ROM disks.<br />
• Computers with bootable CD-ROM drives must fully support the El Torito specification.<br />
Options:<br />
• Client connection to the network to perform the installation.<br />
• If the server is being upgraded “across-the-wire,” a CD-ROM is not required.<br />
Step 9—Assess Server Video<br />
The <strong>NetWare</strong> <strong>5.1</strong> operating system requires the following:<br />
• A VGA monitor for ConsoleOne support (SVGA recommended).<br />
• A VGA monitor for the GUI install (SVGA recommended).<br />
Possible Issues Possible Results or Impacts Options<br />
• Server does not have a VGA<br />
monitor.<br />
Step 10—Assess Server Mouse<br />
<strong>NetWare</strong> <strong>5.1</strong> requires the following:<br />
• Mouse support for ConsoleOne<br />
• Mouse support for the GUI installation.<br />
You may use either a serial or PS/2 mouse.<br />
• Cannot use GUI install.<br />
• Cannot use ConsoleOne.<br />
• Use another <strong>NetWare</strong> <strong>5.1</strong><br />
installation method besides<br />
the GUI installation.<br />
• Do all <strong>NetWare</strong> management<br />
from a workstation.<br />
• Get a VGA monitor.<br />
Page 24 of 317 Novell PartnerNet Confidential 07/24/00<br />
Copyright © 2000 by Novell, Inc.
Note: The Microsoft Serial Mouse has been known to cause the Netware <strong>5.1</strong> GUI to hang.<br />
Note: A separate mouse may be needed if using certain switch boxes.<br />
Possible Issues Possible Results or Impacts Options<br />
• Server does not have mouse<br />
capability (IRQ or port<br />
availability).<br />
• Cannot use GUI install<br />
efficiently.<br />
• Potential delay in upgrading<br />
this particular server to<br />
<strong>NetWare</strong> <strong>5.1</strong>.<br />
Step 11— <strong>NetWare</strong> 5 DOS Partition setup suggestions:<br />
• Free up the IRQ (reconfigure<br />
other device to another IRQ if<br />
available).<br />
• Obtain a mouse for this server<br />
(use a COM port or mouse<br />
port as applicable).<br />
After the file server is set up, check the AUTOEXEC.BAT file. It should only contain the following<br />
entries:<br />
@echo off<br />
C:<br />
CD \NWSERVER<br />
SERVER<br />
After the file server is set up, check the CONFIG.SYS file. It should only contain the following entries:<br />
FILES=30<br />
BUFFERS=30<br />
It is very important that LASTDRIVE=Z is removed from CONFIG.SYS if it had been used previously to<br />
log into a remote file server during the installation. It is also very important to remove any DOS CD-ROM<br />
drivers and configurations from CONFIG.SYS.<br />
You may want to create a DOS menu using DR DOS that will do such things as:<br />
• Boot with DOS CD-ROM support<br />
• Launch the DOS 32-bit Client<br />
• Wait 10 seconds and launch <strong>NetWare</strong><br />
Page 25 of 317 Novell PartnerNet Confidential 07/24/00<br />
Copyright © 2000 by Novell, Inc.
Listed below is the syntax for DR DOS menus:<br />
CONFIG.SYS AUTOEXEC.BAT<br />
TIMEOUT = 10<br />
Echo = 1) <strong>NetWare</strong> Server<br />
Echo = 2) Plain DOS<br />
Echo = 3) DOS Workstation Client<br />
Echo = 4) DOS Workstation CD<br />
Echo = Please select option 1, 2, 3, or<br />
4?<br />
Switch NWSERVER, DOS, CLIENT, CD<br />
Exit<br />
:NWSERVER<br />
set config=NWSERVER<br />
Files=30<br />
Buffers=30<br />
Return<br />
:DOS<br />
Set config=DOS<br />
Files=30<br />
Buffers=30<br />
Return<br />
:CLIENT<br />
set config=CLIENT<br />
Files=50<br />
Buffers=30<br />
Return<br />
:CD<br />
set config=CD<br />
Files=50<br />
Buffers=30<br />
Device=C:\CDROM\CDROM.SYS /D:MSCD0001<br />
Return<br />
@echo off<br />
prompt $p$g<br />
goto %config%<br />
goto end<br />
:NWSERVER<br />
CD\NWSERVER<br />
SERVER<br />
Goto end<br />
:CLIENT<br />
CD\NOVELL\CLIENT32<br />
STARTNET<br />
Goto end<br />
:CD<br />
C:\DOS\MSCDEX /D:MSCD0001 /L:D<br />
Page 26 of 317 Novell PartnerNet Confidential 07/24/00<br />
Copyright © 2000 by Novell, Inc.<br />
:DOS<br />
:END
Activity 4—Assess Server Network Interface Cards<br />
Step 1—Assess Server LAN Adapters (ODI Spec)<br />
LAN drivers must be written to the ODI 3.30 or ODI 3.31 HSM assembler specification or 1.1 HSM C<br />
specification.<br />
With the implementation of the Virtual Memory feature in <strong>NetWare</strong> 5.0, LAN drivers that assume that<br />
logical addresses are equal to physical addresses can cause intermittent data corruption. This problem is<br />
most likely to manifest itself in DMA adapters certified before 11/1/97. We recommend that you run<br />
certified <strong>NetWare</strong> <strong>5.1</strong> LAN drivers delivered with the software.<br />
Essentially, the same drivers that work with <strong>NetWare</strong> 4.11+ SP6 will work with <strong>NetWare</strong> <strong>5.1</strong>. You need to<br />
ensure that any <strong>NetWare</strong> 3 LAN drivers are compliant with <strong>NetWare</strong> <strong>5.1</strong>. Sometimes, the 3.30 specification<br />
does not work properly with <strong>NetWare</strong> <strong>5.1</strong>; in these cases, see if there is a 3.31/1.11 LAN driver available.<br />
The latest operating system (support pack) and CLIB patches must be applied before the latest LAN drivers<br />
can be deployed.<br />
Possible Issues Possible Results or Impacts Options<br />
• LAN Driver is not capable of<br />
ODI spec 3.30.<br />
• Can’t upgrade to <strong>NetWare</strong> <strong>5.1</strong>.<br />
• Could cause corrupted<br />
packets as other servers get<br />
upgraded.<br />
• Project delays.<br />
Step 2—Assess Server LAN Adapter (Address Setting)<br />
Network interface cards should not be set at memory address A000.<br />
• <strong>Upgrade</strong> LAN driver for NIC to<br />
appropriate ODI specification.<br />
• Replace network interface<br />
card.<br />
Possible Issues Possible Results or Impacts Options<br />
• Server NIC address set to<br />
A000.<br />
• This address will conflict with<br />
<strong>NetWare</strong> <strong>5.1</strong>’s graphical<br />
interface.<br />
• Cannot upgrade this server to<br />
<strong>NetWare</strong> <strong>5.1</strong>.<br />
Step 3—Assess Server LAN Adapter (Frame Types)<br />
All servers must be running the same frame format to communicate.<br />
• Modify NIC settings.<br />
• Replace NIC.<br />
• Do not upgrade this server to<br />
<strong>NetWare</strong> <strong>5.1</strong>.<br />
Possible Issues Possible Results or Impacts Options<br />
• NIC is running 802.3 (potential<br />
issue with older Cisco IOS<br />
versions).<br />
Step 4—Assess <strong>NetWare</strong> TCP/IP Stack<br />
An IP stack is needed in the following situations:<br />
• Cisco IOS version could cause<br />
NDS corruption.<br />
• Standardize on 802.2.<br />
• <strong>Upgrade</strong> Cisco IOS.<br />
Page 27 of 317 Novell PartnerNet Confidential 07/24/00<br />
Copyright © 2000 by Novell, Inc.
• To get to a pure IP environment.<br />
• To use the accelerated upgrade.<br />
Possible Issues Possible Results or Impacts Options<br />
• No IP stack. • Cannot use accelerated<br />
upgrade.<br />
• Cannot get to pure IP.<br />
• Implement IP stack on<br />
servers.<br />
• Do without IP.<br />
Page 28 of 317 Novell PartnerNet Confidential 07/24/00<br />
Copyright © 2000 by Novell, Inc.
Activity 5—Assess Drive Array Controllers<br />
Step 1—Assess Server Disk Drivers<br />
The following disk driver requirements must be met:<br />
• The latest HAM and CDM drivers must be used with <strong>NetWare</strong> <strong>5.1</strong>. <strong>NetWare</strong> <strong>5.1</strong> will not run with<br />
DSK drivers.<br />
• The drive type (especially SCSI) must be supported with <strong>NetWare</strong> <strong>5.1</strong>.<br />
• A good place to check for compatibility is the following “Yes Testeded and Approved” web site:<br />
http://developer.novell.com/prodcert/<br />
Possible Issues Possible Results or Impacts Options<br />
• HAM and CDM drivers are not<br />
available for the hard drive or<br />
array controllers.<br />
• Cannot upgrade to<br />
<strong>NetWare</strong> <strong>5.1</strong>.<br />
• Update controllers.<br />
Page 29 of 317 Novell PartnerNet Confidential 07/24/00<br />
Copyright © 2000 by Novell, Inc.
Activity 6—Assess Server Volume Structure<br />
Step 1—Assess Server Volumes (Free Space)<br />
• Novell recommends at least 2 GB of free space on SYS to allow for future implementation of<br />
NDS-enabled applications such as ZENworks, NDS for NT, NDS eDirectory, and so forth.<br />
• Non-SYS volumes should have as much additional disk space as possible for file and application<br />
storage.<br />
• Required available disk space on SYS:<br />
• Standard <strong>NetWare</strong> products—750 MB<br />
• Standard <strong>NetWare</strong> products and WebSphere Application Server for <strong>NetWare</strong>—1.3 GB<br />
Possible Issues Possible Results or Impacts Options<br />
• SYS volume does not have at<br />
least 750 MB of free space.<br />
• NDS relies on the SYS volume<br />
for storage of the NDS<br />
database. Limited capacity will<br />
restrict NDS.<br />
• Backup SYS and other<br />
volumes. Reallocate more<br />
space to the SYS volume.<br />
• Purchase an additional hard<br />
disk to support the SYS<br />
volume.<br />
Step 2—Assess Server Volumes (Block Size)<br />
• Recommended for non-NSS (“legacy”) volumes:<br />
• 64K block size with suballocation enabled<br />
• SYS must be legacy file system<br />
• Compression is a useful option on legacy volumes but must be used wisely; consider the<br />
following:<br />
• Databases (Oracle, etc.) – Don’t use compression = bad thing.<br />
• Web Servers -- Files not around long enough to be compressed.<br />
• GroupWise – It’s a database, no need for disk quota or compression - done in<br />
GroupWise.<br />
• Recommended for NSS volumes:<br />
• 4K block size only (not configurable)<br />
• No file compression; no suballocation<br />
• SYS cannot be NSS<br />
Page 30 of 317 Novell PartnerNet Confidential 07/24/00<br />
Copyright © 2000 by Novell, Inc.
Possible Issues Possible Results or Impacts Options<br />
• Volumes are at less than 64<br />
KB block size, and<br />
suballocation is, or will be,<br />
enabled. (A 64 KB block size<br />
is not an issue if the volume<br />
will support NSS.)<br />
Step 3—Assess DOS Partition Size<br />
• File system is not performing<br />
at enhanced level.<br />
• Backup volume, delete<br />
volume, recreate volume, and<br />
restore volume.<br />
• Do nothing.<br />
• Back up the volume and use<br />
<strong>Consulting</strong> Services<br />
RESIZE.NLM.<br />
DOS partitions are necessary for the initial loading of the <strong>NetWare</strong> <strong>5.1</strong> operating system. Drivers are also<br />
loaded here. It is important to verify that enough space exists on both the SYS volume and the DOS<br />
partition to facilitate the upgrade. Without the necessary available space, copying files to these areas will be<br />
limited, and an upgrade will be incomplete.<br />
An in-place upgrade requires a 50MB DOS partition with 35 MB of free space. Recommended total DOS<br />
space in the past has been 1 GB to accommodate a core dump to be saved to the DOS partition (although<br />
this depends upon the amount of RAM installed in the server). Now, however, there is a tool to core dump<br />
to another machine (DBNET5.NLM in <strong>NetWare</strong> 5 Support Pack 3), so 1 GB may be excessive. In these<br />
cases, our recommendation is 50 MB (with 35 MB free) plus total amount of RAM in the server (for core<br />
dumps).. This is also our recommendation for new server hardware.<br />
Possible Issues Possible Results or Impacts Options<br />
• DOS partition has less than 35<br />
MB of free space.<br />
Step 4—Assess Additional Name Space Modules<br />
• Unable to perform an in-place<br />
upgrade.<br />
• Run out of space during inplace<br />
upgrade and cause<br />
problems.<br />
• Recovery of a failed in-place<br />
upgrade is very difficult.<br />
• Leverage Partition<br />
Magic/Server Magic (TID<br />
2926225).<br />
• Get a new server (across-thewire<br />
upgrade).<br />
Long name space allows long file names and additional file attributes to be stored on a <strong>NetWare</strong> <strong>5.1</strong><br />
volume. The long space NLMs are somewhat specific to the file system desired. The following NLMs are<br />
available:<br />
• LONG.NAM (extending the 8.3 naming convention for PC machines and 32-bit desktop operating<br />
systems).<br />
Note: For <strong>NetWare</strong> 3, ensure that there are less than 1 million directory entry tables (DETs) on the server<br />
before loading LONG.NAM.<br />
• NFS.NAM (UNIX file system support)<br />
• MAC.NAM (support for the Macintosh file system to include resource forks)<br />
Possible Issues Possible Results or Impacts Options<br />
Page 31 of 317 Novell PartnerNet Confidential 07/24/00<br />
Copyright © 2000 by Novell, Inc.
• No additional name space<br />
modules are loaded.<br />
• Cannot use GroupWise<br />
WebAccess.<br />
• Cannot use accelerated<br />
upgrade.<br />
• No long filename support.<br />
Step 5—Assess Unnecessary Name Space Modules<br />
• Load appropriate name space<br />
modules.<br />
• Live without name space.<br />
Name space modules should only be loaded for the required file system support. As an example, if NFS<br />
support is not needed, then the name space modules should be removed since the directory entry table<br />
(DET) contains an entry for each file for each name space which in turn increases the server’s memory<br />
requirements.<br />
Possible Issues Possible Results or Impacts Options<br />
• Unnecessary name space<br />
modules are loaded.<br />
• DET is larger than necessary.<br />
• Slower volume mounts.<br />
• Increased RAM requirements.<br />
• Unload unnecessary name<br />
space modules and remove<br />
name space with VREPAIR.<br />
• Live with unnecessary name<br />
space.<br />
Page 32 of 317 Novell PartnerNet Confidential 07/24/00<br />
Copyright © 2000 by Novell, Inc.
Activity 7—Assess Router Configuration and SAP Usage<br />
Possible Issues Possible Results or Impacts Options<br />
• SAP is being filtered. • NDS cannot synchronize.<br />
• Time cannot synchronize.<br />
• RCONSOLE cannot function.<br />
• Disable SAP filtering.<br />
• Do not filter SAP types:<br />
• 0x004 (file server).<br />
• 0x278 (directory services).<br />
• Depending upon time sync<br />
scheme, do not filter 0x26B<br />
(time sync).<br />
• Consider how remote<br />
management of servers will be<br />
handled and, if appropriate, do<br />
not filter 0x107 (Rconsole).<br />
Service advertising protocols are used by IPX-based devices and/or services to advertise themselves as<br />
available for use. Due to the nature of SAP (which can be “chatty”), most routers have been configured to<br />
filter (or not forward) specific SAP types. In an NDS environment that has IPX requirements, it is<br />
necessary to verify that the required SAPs are available. (See Appendix H for a list of SAP types.)<br />
Page 33 of 317 Novell PartnerNet Confidential 07/24/00<br />
Copyright © 2000 by Novell, Inc.
Activity 8—Assess NT Server Information<br />
• Might be an opportunity to sell NDS for NT<br />
Page 34 of 317 Novell PartnerNet Confidential 07/24/00<br />
Copyright © 2000 by Novell, Inc.
Activity 9—Assess Non-<strong>NetWare</strong> Server Operating System Platforms<br />
• Might be an opportunity to sell the appropriate “NDS for xxx” product.<br />
Page 35 of 317 Novell PartnerNet Confidential 07/24/00<br />
Copyright © 2000 by Novell, Inc.
Activity 10—Assess Server Applications (NLMs)<br />
Analysis Possible Results or Impacts Options<br />
• Third-party or other NLMs are<br />
not <strong>NetWare</strong> <strong>5.1</strong> certified.<br />
• Server abends and/or other<br />
difficulties.<br />
• Server upgrade delays.<br />
• Update to a certified version.<br />
• Find an alternate solution.<br />
• Isolate the NLM.<br />
Most servers run additional applications. These programs must be <strong>NetWare</strong> <strong>5.1</strong> compatible and should<br />
ideally be IP-enabled. Without the appropriate upgrade path or availability of an upgraded version,<br />
compatibility mode will need to be enabled for the segments of servers that host these applications.<br />
<strong>NetWare</strong> <strong>5.1</strong> and IP certification can be obtained from Novell Labs. Visithttp://developer.novell.com/prodcert/<br />
Page 36 of 317 Novell PartnerNet Confidential 07/24/00<br />
Copyright © 2000 by Novell, Inc.
Activity 11—Assess NDS Partition Replica Matrix<br />
• Take note of the server that holds the replicas of [Root], especially the Master.<br />
• Use this table to determine if a NDS redesign is necessary.<br />
Page 37 of 317 Novell PartnerNet Confidential 07/24/00<br />
Copyright © 2000 by Novell, Inc.
Activity 12—Assess WAN Architecture<br />
Multicast is a type of broadcast for the IP protocol. Without multicast, browsing capabilities are not<br />
available. Based upon customer requirements, multicast can be utilized or a valid SLP infrastructure design<br />
can be utilized for optimal performance. SLP directory agents should be utilized for all but very small<br />
environments for performance and scalability reasons. SLP directory agents can still make use of multicast<br />
if it is available.<br />
Possible Issues Possible Results or Impacts Options<br />
• Slow/congested WAN links • Poor time sync<br />
• Poor NDS sync<br />
• Won’t accept additional traffic<br />
• Application/connection<br />
timeouts<br />
• Inadequate resources on<br />
routers to handle SAP<br />
increases<br />
• Lack of reliability/fault<br />
tolerance<br />
• Router failures<br />
• RIP/SAP corruption<br />
• Multicast is turned off on WAN • You must manually design an<br />
SLP infrastructure deployment<br />
plan.<br />
• Enable compression<br />
• <strong>Upgrade</strong> link speed<br />
• Design solutions around the<br />
links<br />
• Add memory/resources to<br />
existing hardware<br />
• <strong>Upgrade</strong> hardware/firmware<br />
• Service interruptions • Encourage fault tolerance<br />
• Limit service dependencies on<br />
WAN links<br />
• Provide fail-over mechanism<br />
for service dependencies<br />
• Design SLP appropriately<br />
• Turn on multicast on the WAN<br />
(not recommended)<br />
Page 38 of 317 Novell PartnerNet Confidential 07/24/00<br />
Copyright © 2000 by Novell, Inc.
Activity 13—Assess TCP/IP Infrastructure<br />
Using the customer’s documentation, assess their TCP/IP infrastructure.<br />
Possible Issues Possible Results or Impacts Options<br />
• Misconfigured TCP/IP<br />
infrastructure. For example,<br />
incorrect default gateways,<br />
incorrect subnet masks, or<br />
duplicate addressing<br />
schemes.<br />
• Non-existent TCP/IP<br />
infrastructure.<br />
• Unreliable TCP/IP<br />
infrastructure.<br />
• Lack of formal DNS<br />
infrastructure for name<br />
resolution.<br />
• Lack of formal DHCP<br />
infrastructure.<br />
• Deficient formal DHCP<br />
infrastructure.<br />
• TCP/IP routing protocols<br />
incompatible with<br />
<strong>NetWare</strong> <strong>5.1</strong>.<br />
• Not all clients and servers will<br />
be able to successfully<br />
communicate with other hosts.<br />
• No TCP/IP based networking<br />
possible.<br />
• Not all clients and servers will<br />
be able to successfully<br />
communicate with other hosts.<br />
• A global mechanism of name<br />
resolution for <strong>NetWare</strong> <strong>5.1</strong><br />
clients is not available, which<br />
limits name resolution options.<br />
• A TCP/IP-based deployment<br />
of <strong>NetWare</strong> <strong>5.1</strong> becomes more<br />
difficult and less fault tolerant.<br />
• Inability to dynamically deliver<br />
client configuration options.<br />
• Inability to dynamically deliver<br />
client configuration options.<br />
• Servers participating in the<br />
routing infrastructure will not<br />
send or receive routing<br />
updates.<br />
• Insufficient IP addresses. • Cannot upgrade all<br />
clients/servers to TCP/IP.<br />
• Reconfigure TCP/IP<br />
infrastructure.<br />
• Propose <strong>NetWare</strong> <strong>5.1</strong><br />
installation using IPX only.<br />
• Discuss extension of scope of<br />
work with client to design<br />
TCP/IP infrastructure. Notify<br />
project manager.<br />
• Identify points of failure and<br />
recommend strategy to<br />
address issues.<br />
• Design around lack of formal<br />
DNS infrastructure.<br />
• Propose formal DNS<br />
infrastructure for name<br />
resolution.<br />
• Propose formal DHCP<br />
infrastructure preferably using<br />
<strong>NetWare</strong> <strong>5.1</strong> DHCP.<br />
• Static configuration of TCP/IP<br />
environment.<br />
• Determine if current DHCP<br />
environment is extensible to<br />
support DHCP options. –or-<br />
• Propose formal DHCP<br />
infrastructure based upon<br />
<strong>NetWare</strong> <strong>5.1</strong> DHCP. –or-<br />
• Augment existing DHCP<br />
environment with <strong>NetWare</strong> <strong>5.1</strong><br />
DHCP delivering only SLP and<br />
CMD options.<br />
• Required static configuration<br />
of TCP/IP on <strong>NetWare</strong> <strong>5.1</strong><br />
servers.<br />
• Create private addressing<br />
scheme with NAT for Internet<br />
access.<br />
• Look at TCP/IP subnetting<br />
strategies.<br />
• Acquire more public<br />
addresses.<br />
Page 39 of 317 Novell PartnerNet Confidential 07/24/00<br />
Copyright © 2000 by Novell, Inc.
Activity 14—Assess <strong>NetWare</strong>/IP Infrastructure<br />
There are some issues that need to be addressed with <strong>NetWare</strong>/IP before any progress can be made in a<br />
<strong>NetWare</strong> <strong>5.1</strong> upgrade (see Appendix M). <strong>NetWare</strong> <strong>5.1</strong> is often viewed as a solution to migrate away from<br />
an existing, ailing <strong>NetWare</strong>/IP infrastructure. Document the following possible deficiencies, impacts, and<br />
options:<br />
Possible Deficiencies Possible Results or Impacts Options<br />
• The existing NWIP<br />
environment is unhealthy.<br />
• Exacerbating the problem you<br />
are trying to solve. The<br />
upgrade to <strong>NetWare</strong> <strong>5.1</strong> is<br />
often considered a<br />
solution/remedy for the NWIP<br />
environment.<br />
• The NWIP environment must<br />
be stabilized. –or-<br />
• A migration strategy needs to<br />
be carefully planned one<br />
NWIP site at a time.<br />
An existing <strong>NetWare</strong>/IP infrastructure will impact IPX to IP migration strategies. It is critical to have an<br />
understanding of how the client’s current <strong>NetWare</strong>/IP infrastructure functions. Remember that DSS servers<br />
are pivotal to the NWIP environment and are the last servers to be decommissioned when that environment<br />
is dismantled.<br />
NWIP Functionality Deployed Results or Impacts Potential Migration Options<br />
• Only forwarding gateways<br />
deployed.<br />
• NWIP deployed to servers and<br />
clients<br />
• Encapsulated IPX on WAN<br />
links.<br />
• IPX on LAN wire.<br />
• Encapsulated IPX on LAN and<br />
WAN.<br />
• No IPX on any wire<br />
• Use dual-stack approach with<br />
existing NWIP infrastructure.<br />
Follow dual-stack design<br />
strategy. –or-<br />
• Replace NWIP infrastructure<br />
with Migration Agents in<br />
Backbone Support mode.<br />
Follow the IP/CMD migration<br />
strategy.<br />
• Create coexistent CMD<br />
infrastructure and convert<br />
NWIP servers and clients to<br />
CMD. Follow the IP/CMD<br />
migration strategy.<br />
Page 40 of 317 Novell PartnerNet Confidential 07/24/00<br />
Copyright © 2000 by Novell, Inc.
Activity 15—Assess DSS Filtering<br />
Page 41 of 317 Novell PartnerNet Confidential 07/24/00<br />
Copyright © 2000 by Novell, Inc.
Activity 16—Assess Printer Infrastructure<br />
Step 1—Determine Print Server Capabilities<br />
Using the data from PFC table 16, see if the print servers work with IPX, IP, or NDS.<br />
Possible Issues Possible Results or Impacts Options<br />
• Print servers do not have an<br />
IP stack.<br />
• Print servers do not work with<br />
NDS.<br />
Step 2—Determine Action Plan<br />
• This forces IPX to be used on<br />
the LAN.<br />
• The implementation of pure IP<br />
(SLP design, use of dual<br />
stacks, etc.) will be affected.<br />
• This forces <strong>NetWare</strong> <strong>5.1</strong><br />
servers to do bindery<br />
emulation.<br />
• Design SLP appropriately for<br />
CMD support.<br />
• Implement dual stacks on<br />
<strong>NetWare</strong> servers associated<br />
with the IPX print servers.<br />
• <strong>Upgrade</strong> print servers<br />
firmware or replace with newer<br />
technology.<br />
• If print servers support IP, use<br />
LPR/LPD or IPP.<br />
• Maintain bindery emulation on<br />
appropriate <strong>NetWare</strong> <strong>5.1</strong><br />
servers. This will require IPX<br />
and corresponding changes to<br />
SLP/pure IP design.<br />
There are several different ways to print from a workstation to a networked printer. The following table<br />
shows three of the most popular methods and relates those methods to the needed capabilities for the print<br />
servers.<br />
Print Method Print Server Supports Notes<br />
Legacy <strong>NetWare</strong> Printing<br />
through bindery print queues<br />
Legacy <strong>NetWare</strong> Printing<br />
through NDS<br />
• IPX • IPX support should be a given, if the print server<br />
is already being used in a <strong>NetWare</strong> 3.x or<br />
<strong>NetWare</strong> 4.x environment.<br />
• Adversely affects SLP/pure IP design.<br />
• IPX<br />
• NDS<br />
• Adversely affects SLP/pure IP design.<br />
LPR/LPD • IP • Any system that can submit jobs via the LPR/LPD<br />
standard can print directly to a NDPS 2.1.1<br />
printer.<br />
• Requires an SLP infrastructure.<br />
IPP • IP • Send print jobs to printers on intranets or on the<br />
Internet in the same way you send print jobs to a<br />
printer on your desk.<br />
NDPS 2.1.1 • IP • IP solution that provides enhanced management<br />
and print driver distribution capabilities.<br />
• Requires SLP to be configured.<br />
Page 42 of 317 Novell PartnerNet Confidential 07/24/00<br />
Copyright © 2000 by Novell, Inc.
Activity 17—Print Queues<br />
Using the information from PFC table 17, assess the print queues.<br />
Page 43 of 317 Novell PartnerNet Confidential 07/24/00<br />
Copyright © 2000 by Novell, Inc.
Activity 18—Assess SET Parameters<br />
Using information from the PFC (no table), assess the SET parameters.<br />
Possible Issues Possible Results or Impacts Options<br />
• Certain SET parameters are<br />
not at optimal setting.<br />
• Could cause memory<br />
corruption.<br />
• Could cause abends.<br />
• Performance is degraded.<br />
• NDS corruption occurs.<br />
• File system corruption occurs.<br />
• Inconsistent time<br />
synchronization occurs.<br />
• Restore default settings.<br />
• Once the server has optimally<br />
tuned its own settings over a<br />
period of time, compare the<br />
server’s dynamic settings to<br />
the Novell recommended<br />
settings.<br />
• Thoroughly analyze each SET<br />
parameter for the<br />
environment.<br />
Server SET parameters are a set of tuning parameters to optimize <strong>NetWare</strong> performance based on how the<br />
server is used. <strong>NetWare</strong> primarily tunes itself to optimal settings over a period of time. These settings are<br />
dynamic, in that, if not specifically “set” in the appropriate manner, the default values will be utilized upon<br />
server restart.<br />
Page 44 of 317 Novell PartnerNet Confidential 07/24/00<br />
Copyright © 2000 by Novell, Inc.
Activity 19—Determine IPX-Dependent NLMs<br />
Note: You do not need to do this task if IPX will remain on <strong>NetWare</strong> <strong>5.1</strong> servers.<br />
Input: IPX-Dependent Applications Worksheet (see Appendix A).<br />
Output: Completed worksheet will become part of the technical assessment and impact study report.<br />
Network applications may be affected by network protocol changes. IPX-dependent applications,<br />
for example, will “break” when run on pure IP networks. The information recorded in this table<br />
helps to determine whether existing network applications will run over IP.<br />
Possible Issues Possible Results or Impacts Options<br />
• A particular application is IPX<br />
dependent.<br />
Step 1—Analyze Network SAP Information<br />
• Cannot move to a pure IP<br />
environment.<br />
• <strong>Upgrade</strong> the application to an<br />
IP-based version.<br />
• Remove the application from<br />
the network.<br />
• Provide support for the<br />
application through SCMD<br />
(compatibility mode).<br />
Using the information gathered, analyze the SAP types present on the network. (See Appendix H for a list<br />
of SAP types.)<br />
The SAP tables can help identify approximately 90% of the IPX-dependent applications. Utilities such as<br />
IPXCON.NLM and SAPMON.EXE (a consulting-developed tool) can be used. If there is no SAP for an<br />
application, then it is NCP-based (vs. IPX-based). With <strong>NetWare</strong> <strong>5.1</strong>, NCP-based applications are<br />
redirected over IP. You will need to discuss with the customer (or work in the lab environment) to<br />
determine the remaining 10% of IPX-dependent applications not discovered when looking at the SAP<br />
tables.<br />
Step 2—Document IPX-Dependent Applications<br />
These will be the applications discovered in step 1. Fill in the first three columns of the table in Appendix<br />
A.<br />
Step 3—Determine Availability of IP Applications<br />
For each IPX-dependent application listed in the table in Appendix A, determine if the application is any of<br />
the following:<br />
• Mission critical (enter this in column 4 of table 1)<br />
• An IP version is or will be available (enter this in column 5)<br />
• The date the IP version will be available (enter this in column 5)<br />
• If the customer plans to upgrade to the IP version (enter this in column 5)<br />
Step 4—Plan Future of IPX-Only Applications<br />
Determine what to do with IPX-only applications.<br />
Page 45 of 317 Novell PartnerNet Confidential 07/24/00<br />
Copyright © 2000 by Novell, Inc.
Decisions regarding whether to provide network support for IPX-dependent applications are based upon<br />
business and network objectives, and upon how critical these applications are to the success of the<br />
company. The customer must decide to either provide network support for IPX-dependent applications, or<br />
not provide network support (making the IPX-dependent applications obsolete in an IP-only network<br />
environment).<br />
• If the customer will support an application on IPX, enter this in column 6 of the table in Appendix<br />
A.<br />
• With this solution, you will need to continue to run CMD on the servers that house these IPXdependent<br />
applications. You can still have pure IP “on the wire” but CMD and a migration<br />
gateway will be required as long as there are IPX-dependent applications in the environment.<br />
Clients can be pure IP and still access this IPX-dependent application as long as a migration<br />
gateway is accessible to them.<br />
• If the customer will not support an application on IPX, enter this in column 6 of the table in<br />
Appendix A.<br />
• This solution means that the server will not run IPX and that the customer will lose the<br />
functionality of this NLM. This is a quick and easy way to get to pure IP. There will be no IPX or<br />
CMD anywhere.<br />
Page 46 of 317 Novell PartnerNet Confidential 07/24/00<br />
Copyright © 2000 by Novell, Inc.
Task 2—Prepare Technical Assessment/Impact Study Report<br />
Note: A template technical assessment and impact study report is included in Appendix P.<br />
The technical assessment and impact study report is a very important document for ensuring that the<br />
prerequisites are addressed and met before the <strong>NetWare</strong> <strong>5.1</strong> upgrade pilot. The following things must be<br />
done to complete the report:<br />
• Document the issues from task 1 above.<br />
• Document the solutions for resolving these issues. You can use the options listed in the tables<br />
above, your own experience, or even note that further testing needs to be done in the lab.<br />
• Document the possible impacts if these issues are not resolved before the upgrade—again using<br />
the information in the tables above, your own experience, or even noting that further testing needs<br />
to be done in the lab.<br />
• Include the completed table from Appendix A (IPX-Dependent Applications Worksheet) as part of<br />
this report.<br />
Task 3—Review and Deliver Technical Assessment and Impact Study<br />
Report<br />
Activity 1—Project Manager Review<br />
The project manager should review your technical assessment and impact study report and make any<br />
recommendations or suggestions.<br />
Activity 2—Deliver report<br />
Deliver technical assessment and impact study report to the customer.<br />
Page 47 of 317 Novell PartnerNet Confidential 07/24/00<br />
Copyright © 2000 by Novell, Inc.
Subprocess 3—Develop Solution Design<br />
Key Inputs<br />
Personnel<br />
• Lead consultant<br />
• <strong>Consulting</strong> team members<br />
• Customer contacts/interfaces<br />
Resources / Tools<br />
Data / Reports<br />
• Signed statement of work<br />
• Summary of problem analysis<br />
• Summary of feasibility study<br />
• Completed preliminary report<br />
• Completed technical assessment and impact study<br />
• Conceptual solution design<br />
• Critical success factors<br />
1. Prepare a solution design for the <strong>NetWare</strong> <strong>5.1</strong> upgrade.<br />
<strong>NetWare</strong> <strong>5.1</strong> <strong>Upgrade</strong>—Solution Development<br />
Subprocess 3—Develop Solution Design<br />
Task Summary<br />
Key Outputs<br />
Personnel<br />
• Lead consultant<br />
Outputs / Deliverables<br />
• Test and acceptance plan<br />
Data / Reports<br />
• Weekly status reports<br />
• Design report<br />
2. Develop and document test and acceptance plans from success factors and customer requirements.<br />
3. Deliver solution design to customer.<br />
In this subprocess, you create a design report for the customer documenting the overall process (approach)<br />
that we recommend for upgrading to <strong>NetWare</strong> <strong>5.1</strong>.<br />
Note: This subprocess assumes the customer is at or will be at a baseline system* before upgrading to<br />
<strong>NetWare</strong> 5,1; therefore, this report does not have to contain anything that should have been discussed in the<br />
report generated in subprocess 3. The design report should state that a baseline system is assumed.<br />
*A baseline system is one that has been prepared for the upgrade process. It meets the requirements set<br />
forth in the report from the previous subprocess. This may include hardware and software upgrades,<br />
consolidation of equipment, and further work prior to the upgrade process.<br />
Page 48 of 317 Novell PartnerNet Confidential 07/24/00<br />
Copyright © 2000 by Novell, Inc.
Task 1—Determine Appropriate Solution Design for the <strong>NetWare</strong> <strong>5.1</strong><br />
<strong>Upgrade</strong><br />
These activities need to be completed when upgrading to <strong>NetWare</strong> <strong>5.1</strong>—and generally in the following<br />
recommended order.<br />
Activity 1—Develop and Document NDS Design<br />
The following flowchart illustrates the steps one should take when devising and documenting the proposed<br />
NDS structure:<br />
Start<br />
Does NDS<br />
tree exist?<br />
NO<br />
NDS design<br />
NDS design<br />
report<br />
Yes<br />
Activity 1—NDS Design or Review<br />
<strong>NetWare</strong> 3.x to <strong>NetWare</strong> <strong>5.1</strong>: NDS Design<br />
NDS<br />
HealthCheck<br />
NDS review/<br />
re-design<br />
For detailed information, see the NDS Design <strong>Consulting</strong> guide (not included here, available on<br />
http://partnerweb.novell.com ).<br />
Page 49 of 317 Novell PartnerNet Confidential 07/24/00<br />
Copyright © 2000 by Novell, Inc.
The first thing that should be done for a <strong>NetWare</strong> 3.x to <strong>NetWare</strong> <strong>5.1</strong> upgrade is an NDS design (including<br />
naming standards, partitioning and replication, time synchronization, and so forth). Other activities rely<br />
upon an NDS design being in place, such as setting up the appropriate NAME CONTEXT statements for<br />
users and setting the appropriate BINDERY CONTEXT on <strong>NetWare</strong> <strong>5.1</strong> servers (where appropriate).<br />
Additionally, the lab environment (subprocess 5) should be set up to mimic the customer’s production NDS<br />
design.<br />
Deliverable: A completed NDS design document including time sync. See the NDS Design <strong>Consulting</strong><br />
guide (not included here) for complete information on doing an NDS design and time sync design. For<br />
your convenience, a brief section on what’s new with time sync in <strong>NetWare</strong> <strong>5.1</strong> is included here in<br />
Appendix L.<br />
<strong>NetWare</strong> 4.x and <strong>NetWare</strong> 5.0 to <strong>NetWare</strong> <strong>5.1</strong>: NDS Review/Re-design<br />
The first thing that should be done for a <strong>NetWare</strong> 4.x or <strong>NetWare</strong> 5.0 to <strong>NetWare</strong> <strong>5.1</strong> upgrade is an NDS<br />
HealthCheck. The NDS tree must be healthy prior to any upgrades or implementations to ensure success.<br />
See Appendix F, “NDS HealthCheck Lite” for more information.<br />
The next thing to be done for a <strong>NetWare</strong> 4.x or <strong>NetWare</strong> 5.0 to <strong>NetWare</strong> <strong>5.1</strong> upgrade is an NDS<br />
Review/Redesign (including naming standards, partitioning/replication, time synchronization, etc.). Other<br />
steps rely upon an NDS design being in place, such as setting up the appropriate NAME CONTEXT<br />
statement for users and setting the appropriate BINDERY CONTEXT on <strong>NetWare</strong> <strong>5.1</strong> servers (where<br />
appropriate).<br />
Deliverable: A completed NDS design document. For your convenience, a brief section on what’s new<br />
with time sync in <strong>NetWare</strong> <strong>5.1</strong> is included here in Appendix L.<br />
Page 50 of 317 Novell PartnerNet Confidential 07/24/00<br />
Copyright © 2000 by Novell, Inc.
Activity 2—Update Novell Client Software<br />
Start<br />
Latest client?<br />
No<br />
Select client version<br />
ZENworks?<br />
No<br />
NAL?<br />
No<br />
Manual update<br />
Client design<br />
report<br />
Yes<br />
Yes<br />
Yes<br />
Activity 2—Update Novell Client Software<br />
Page 51 of 317 Novell PartnerNet Confidential 07/24/00<br />
Copyright © 2000 by Novell, Inc.
Deliverable:<br />
The report should include:<br />
• When client software will be updated (before or after upgrading to <strong>NetWare</strong> <strong>5.1</strong>, including the<br />
rationale for this decision). Sample text follows:<br />
We recommend installing the latest <strong>NetWare</strong> <strong>5.1</strong> client software on the <strong>NetWare</strong> client<br />
workstations before upgrading to <strong>NetWare</strong> <strong>5.1</strong> for the following reasons:<br />
• The current shipping client is tested and proven to work in a <strong>NetWare</strong> <strong>5.1</strong> environment. By<br />
upgrading the current client before proceeding with <strong>NetWare</strong> <strong>5.1</strong> installations, you reduce the<br />
number of potential support calls you receive from upset users.<br />
• Only the most recent clients support a pure IP environment. If you don’t upgrade the clients<br />
before upgrading the servers, you will increase the complexity of the SLP design. Network<br />
performance could be degraded until the clients are upgraded to pure IP functionality.<br />
• NETx forces you to maintain a bindery emulation environment on the servers. Although this<br />
may be an advantage for old legacy program compatibility, there are many disadvantages<br />
associated with continuing bindery emulation. When considering the importance of<br />
maintaining bindery support for old technology, there are questions to ask yourself:<br />
Is this legacy client software Y2K compliant?<br />
Chances are the answer is “no.” Chances are also likely that the replacement technology will<br />
work with NDS. If you want NDS support, you’ll need to upgrade the NETx clients.<br />
• NAME CONTEXT statements<br />
• Preferred server statements<br />
• Preferred tree statements<br />
• Protocol preferences<br />
• Client settings needing customization<br />
• Completed tables from Appendix C<br />
Using the Automatic Client Update (ACU) Utility<br />
See Appendix C.<br />
Distribution through ZENworks<br />
If the clients are already of a high enough version to work with the Network Application Launcher (NAL),<br />
then this is another method for automatically “pushing” the update to the workstations without needing user<br />
interaction.<br />
It is not in the scope for this methodology to address the details of using ZENworks. For details, check the<br />
ZENworks documentation or the ZENworks Consuling methodology available on<br />
http://partnerweb.novell.com .<br />
Page 52 of 317 Novell PartnerNet Confidential 07/24/00<br />
Copyright © 2000 by Novell, Inc.
Activity 3—Analyze the Transition Path to IP<br />
Start<br />
Dual stack?<br />
Yes<br />
Design dual stack<br />
implementation<br />
strategy<br />
Design plan for<br />
migrating existing<br />
IPX-dependent<br />
applications to IP<br />
Design plan for<br />
migrating existing<br />
IPX-dependent<br />
devices to IP<br />
Design plan for<br />
migrating existing<br />
IPX-dependent<br />
routers to IP<br />
Dual stack design<br />
report<br />
Yes<br />
No<br />
Application<br />
IPX to IP<br />
migration<br />
report<br />
Design print<br />
services using<br />
NDPS or other<br />
Router IPX to IP<br />
migration<br />
report<br />
Design SLP<br />
infrastructure<br />
Design MA-MA<br />
protocol<br />
infrastructure<br />
IP on WAN,<br />
limited IPX on<br />
LAN<br />
Full CMD<br />
implementation<br />
method;<br />
Design CMD/MA<br />
island<br />
Device IPX to IP<br />
migration<br />
report<br />
Activity 3—Analyze the Transition Path to IP<br />
SLP design report<br />
MA-MA protocol<br />
design report<br />
CMD/MA island<br />
report<br />
Page 53 of 317 Novell PartnerNet Confidential 07/24/00<br />
Copyright © 2000 by Novell, Inc.<br />
No
Note: Before proceeding with this section, we strongly recommend that you read both Appendix D, SLP<br />
Design and Appendix B, CMD Essentials.<br />
Deliverable:<br />
The report should include:<br />
• The method the customer will use to transition to Pure IP and why this method was chosen (you<br />
can use the verbiage supplied in this section)<br />
• The steps that will be used to transition to pure IP (you can use the steps given in Appendix I)<br />
The ultimate goal of a migration to pure IP is to remove all IPX dependencies. This is true of all client and<br />
server-based applications, as well as Novell and non-Novell devices and technologies. With this goal in<br />
mind, you should take care to not introduce any new IPX dependencies throughout the migration process.<br />
Note: In the following descriptions, pure IP means no IPX anywhere on the network and, therefore, no<br />
capability for running IPX-dependent applications, printing services, and so forth. The assumption is that<br />
pure IP is the ultimate goal. When referring to other Novell documentation, keep in mind that not all Novell<br />
documentation defines pure IP this way.<br />
Determine Which Migration Strategy to Use<br />
Two main migration strategies are presented here:<br />
• Transitioning to IP Using a Dual Stack Strategy<br />
• Transitioning to IP Using CMD<br />
The intention is not to imply that these are the only options available for protocol migration. This is<br />
especially true when using CMD. Many hybrid solutions can be developed, depending on the customer’s<br />
priorities and limitations.<br />
• Transitioning to IP Using a Dual Stack Strategy<br />
Using the dual stack migration strategy is the upgrade method recommended by Novell because<br />
there is no need to set up and maintain a CMD infrastructure, which significantly increases the<br />
time, complexity, and planning required to migrate to pure IP. At first it may seem that using<br />
CMD will allow you to achieve the goal of pure IP more quickly than using the dual stack<br />
approach; however, this is not necessarily true. Using a dual stack approach provides a “seamless”<br />
migration that provides the simplest way to transition to a pure IP environment. This approach<br />
allows the use of the IPX protocol to simply and automatically fade away.<br />
The dual stack migration strategy provides a simple strategy that leverages an existing IPX<br />
infrastructure to migrate to pure IP. As a result it also has the least impact on the existing<br />
enterprise and IT resources. Servers and clients can be upgraded in no special order since each<br />
server/client that is upgraded has both IP and IPX communication capabilities to <strong>NetWare</strong> <strong>5.1</strong><br />
servers.<br />
See Appendix I for specific steps on implementing this strategy.<br />
The dual stack migration strategy has the following advantages and disadvantages:<br />
Dual Stack Approach<br />
Advantages Disadvantages<br />
Page 54 of 317 Novell PartnerNet Confidential 07/24/00<br />
Copyright © 2000 by Novell, Inc.
Not using CMD avoids the following issues:<br />
• Planning and implementation of a CMD<br />
environment.<br />
• Training time and costs associated with<br />
implementing a CMD environment<br />
• Possible increased server hardware<br />
requirement to support a CMD<br />
infrastructure<br />
• NDS and SLP considerations for CMD<br />
• Servers and clients can be upgraded in a<br />
less controlled way without impacting the<br />
enterprise.<br />
• Servers and workstations do not have to be<br />
upgraded at the same time or in a specific<br />
order if a <strong>NetWare</strong> <strong>5.1</strong> supported client is<br />
being used.<br />
• IPX-dependent applications can continue to<br />
run without problems. As IPX<br />
dependencies are eliminated, the system<br />
can evolve into a pure IP environment.<br />
• Leverages a mature, stable, and well<br />
known IPX infrastructure.<br />
• There is a reduced risk of service<br />
interruption because the wire will carry both<br />
the IP and IPX protocols.<br />
Note: Both servers and clients will, by<br />
default, “prefer” to use IP for all NCP-based<br />
communications.<br />
• You must continue to manage two<br />
protocols on the network until migration is<br />
complete.<br />
• The advantages of a single protocol are<br />
realized only as quickly as IPX<br />
dependencies can be removed.<br />
• At least some IPX broadcast traffic will<br />
continue to exist in the network until the<br />
migration is complete and IPX is unbound<br />
from servers and routers.<br />
• Transitioning to IP Using CMD<br />
The SCMD NLM is a multi-faceted solution to protocol migration. IP with CMD (IP/CMD)<br />
means that IPX is off the wire, but servers and clients maintain CMD for IPX-dependent<br />
applications. Novell strongly recommends that if CMD must be used it should be eliminated from<br />
the environment as soon as possible. It is important to keep in mind that CMD is not a solution but<br />
a migration mechanism only. This technology has the potential to place severe overhead on SLP<br />
and NDS and should be used only as an intermediary step between IPX and pure IP networking.<br />
Removal of CMD will require the elimination of all IPX dependent applications.<br />
There are two options presented for performing the transition:<br />
Page 55 of 317 Novell PartnerNet Confidential 07/24/00<br />
Copyright © 2000 by Novell, Inc.
1. Pure IP via the MA to MA Protocol of CMD<br />
Migrate the backbone (WAN) to IP first, using the MA to MA protocol feature of CMD;<br />
then migrate to pure IP on the LAN segments using dual stacks.<br />
One of the most compelling reasons to move to pure IP is to prevent IPX SAP/RIP from<br />
traversing WAN links. This method concentrates on removing all native IPX packets<br />
from the WAN as quickly as possible. The MA to MA protocol feature of CMD is used<br />
to encapsulate IPX packets into IP packets between each MA in a given CMD network.<br />
This will effectively replace the existing IPX routing infrastructure between sites.<br />
Once this new “MA backbone” is in place, IPX is eliminated from the WAN “wire,” and<br />
now the LAN segments can be migrated at a more leisurely pace (if desired). Each LAN<br />
will use IP and IPX (dual stacks); once the IPX dependencies are eliminated, IPX can be<br />
removed from the LAN.<br />
See Appendix I for specific steps on implementing this strategy.<br />
The Pure IP via the MA to MA Protocol of CMD strategy has the following advantages and disadvantages:<br />
Advantages Disadvantages<br />
• Accommodates IPX dependencies without<br />
the need for IPX traffic across WAN links.<br />
• Addresses the major consequences of IPX<br />
SAP/RIP more quickly than dual stacks – at<br />
least on the WAN.<br />
• Provides more time to replace or eliminate<br />
IPX dependencies.<br />
• This option addresses the administrative<br />
costs of maintaining IPX over the WAN at<br />
the start of the transition instead of the end.<br />
• IPX communication will still exist but will be<br />
hidden by the MA to MA protocol.<br />
• Requires a comprehensive understanding of<br />
the existing IPX environment.<br />
• Depending on the environment, server<br />
hardware requirements may be significant.<br />
• High Design Complexity. Disperse network<br />
environments will require a very complex MA<br />
to MA design in order to avoid bandwidth<br />
consumption equal to that of SAP/RIP levels.<br />
• Higher Risk—If implementation mistakes are<br />
made they can result in network-wide<br />
outages.<br />
• As with any CMD-based solution, it is<br />
temporary.<br />
• IPX will be used at the LAN level until all IPX<br />
dependencies can be removed.<br />
Page 56 of 317 Novell PartnerNet Confidential 07/24/00<br />
Copyright © 2000 by Novell, Inc.
2. Full CMD Implementation Method (using IP/CMD “islands” and the MA to MA<br />
Protocol).<br />
This method uses both the MA to MA feature of CMD as well and the IP/CMD aspect on<br />
all servers and clients in an attempt to remove all IPX on the wire. The MA provides the<br />
IPX connectivity to and from the rest of the NDS servers (and other IPX dependent<br />
devices) during migration. <strong>NetWare</strong> <strong>5.1</strong> IP/CMD servers and clients will use the CMD<br />
protocol to “talk” to these legacy devices through the MA. IP/CMD clients can use IPX<br />
dependent applications on <strong>NetWare</strong> <strong>5.1</strong> servers via the CMD protocol without the use of<br />
an MA.<br />
Complete removal of IPX on the LAN and WAN will only be possible if all <strong>NetWare</strong><br />
servers, clients, and IPX devices support CMD or the only IPX dependencies are<br />
applications running on the <strong>NetWare</strong> <strong>5.1</strong> servers. If all IPX dependent devices cannot be<br />
eliminated, then at least one IPX segment must exist on the LAN segment where the MA<br />
resides. On that segment must reside all the IPX dependent devices at the site. Note that<br />
any <strong>NetWare</strong> 3.x or 4.x server is an IPX dependent device. Now any communication to<br />
such a device must communicate through the MA.<br />
A full IP/CMD migration plan is most useful when the only IPX dependencies are<br />
applications running on <strong>NetWare</strong> <strong>5.1</strong> servers. IPX dependency analysis is crucial when<br />
evaluating this approach.<br />
CMD is a temporary technology to allow backward compatibility to IPX-dependent<br />
applications. A CMD implementation will require a significant amount of planning and<br />
training, all to support a temporary solution. Since most IT staffs are not familiar with<br />
CMD, a steep learning curve introduces a risk factor that also must be considered.<br />
CMD implementations can also put a considerable burden on NDS and SLP.<br />
See Appendix I for specific steps on implementing this strategy.<br />
The Full CMD Implementation Method (using IP/CMD “islands” and the MA to MA Protocol) strategy has<br />
the following advantages and disadvantages:<br />
Advantages Disadvantage<br />
• Can accommodate IPX dependencies<br />
without the need for IPX traffic across WAN<br />
links.<br />
• May address the major consequences of<br />
IPX SAP/RIP more quickly than dual stack.<br />
• May remove IPX protocol from the LAN most<br />
quickly.<br />
• This option allows the network administrator<br />
to focus IPX traffic removal efforts on<br />
specific sites/network LAN segments first.<br />
• IPX communication will still exist but will be<br />
hidden by CMD and the MA to MA protocols.<br />
• Requires a comprehensive understanding of<br />
the existing IPX environment.<br />
• Depending on the environment, server<br />
hardware requirements may be significant.<br />
• Higher Risk -- If implementation mistakes are<br />
made they can result in network-wide<br />
outages.<br />
• As with any CMD based solution, it is<br />
temporary.<br />
• Requires three configurations of clients before<br />
pure IP is fully realized.<br />
• The advantages of a single protocol are<br />
realized only as quickly as IPX dependent<br />
devices can be removed.<br />
• High Design Complexity. Disperse network<br />
environments will require a very complex MA<br />
to MA design in order to avoid bandwidth<br />
consumption equal to that of SAP/RIP levels.<br />
Page 57 of 317 Novell PartnerNet Confidential 07/24/00<br />
Copyright © 2000 by Novell, Inc.
Using IP with CMD primarily focuses on hiding IPX from the wire. The disadvantage is that you must set<br />
up and maintain a CMD environment. This significantly increases planning time, design time, migration<br />
time, implementation costs, and migration costs. This increased cost is further exacerbated by the fact that<br />
CMD technology is a temporary, “throw-away” solution that is abandoned once the migration process is<br />
complete and IPX dependencies are eliminated. For these reasons, Novell strongly recommends the dual<br />
stack migration strategy.<br />
Notes:<br />
• Ultimately the customer must decide which method to use. However, as a Novell partner, you<br />
should encourage them to adopt the dual stacks option, citing the various reasons given above.<br />
• Performing the migration to pure IP at the same time as upgrades to <strong>NetWare</strong> <strong>5.1</strong> will significantly<br />
increase the cost and complexity of both the migration and the protocol transition process. For this<br />
reason, we strongly recommends that the protocol transition to pure IP occur after the <strong>NetWare</strong> <strong>5.1</strong><br />
upgrade process has been successfully completed and we has determined that an IP infrastructure<br />
capable of supporting the transition to pure IP is in place.<br />
• We strongly recommends that if CMD must be used it should be eliminated from the environment<br />
as soon as possible. It is important to keep in mind that CMD is not a solution but a migration<br />
mechanism only. This technology has the potential to place severe overhead on SLP and NDS and<br />
should be used only as an intermediary step between IPX and pure IP networking. Removal of<br />
CMD will require the elimination of all IPX dependent applications.<br />
Page 58 of 317 Novell PartnerNet Confidential 07/24/00<br />
Copyright © 2000 by Novell, Inc.
Activity 4—Determine Licensing Scheme<br />
Deliverable:<br />
The report should include:<br />
• The licensing scheme that the customer will use and why (you can use the verbiage supplied in<br />
this section)<br />
• Each server must run NLSLSP.NLM.<br />
• Each server must have an NLS_LSP_servername object in NDS.<br />
• Each server must have one base server license, which must be unique throughout the tree. Install<br />
the base server license in the same container as the server.<br />
• If a connection license is installed in each container, servers in that container will “share” the<br />
connection license. In this case, you should not make any server assignments to these connection<br />
licenses. On the other hand, if you want a specific connection license to apply to a specific server,<br />
install the connection license in the same container as the server and make a server assignment to<br />
this connection license.<br />
• Each certificate must have an owner who is the only person able to manage the certificate.<br />
• The server object must be in the same container as, or lower, than the certificate.<br />
Terminology used in licensing:<br />
• A certificate is a license.<br />
• An envelope is a file with one or more certificates in it.<br />
• A base server license is a required license for the server (a.k.a. server base license).<br />
• A connection license is a required license for a user to log in to the server.<br />
• A license server provider is a server running NLSLSP.NLM.<br />
In <strong>NetWare</strong> <strong>5.1</strong> as with <strong>NetWare</strong> 4.x, licensing is server-centric—a user consumes a license for each server<br />
to which they map a drive. However, in <strong>NetWare</strong> <strong>5.1</strong>, the license certificate is stored in NDS instead of on<br />
the hard drive of the server as in <strong>NetWare</strong> 4.x. Additionally, <strong>NetWare</strong> <strong>5.1</strong> uses a server-centric licensing<br />
mode, which means that the license search starts in the server context.<br />
Additionally, while Novell Licensing Services (NLS) is available in <strong>NetWare</strong> 4.x to track application usage<br />
(for example, BorderManager), <strong>NetWare</strong> 4.x does not ship with a utility to track <strong>NetWare</strong> 4 server<br />
licenses—as it does with <strong>NetWare</strong> <strong>5.1</strong>.<br />
• The server-side NLS component is NLSLSP.NLM.<br />
• The client-side NLS components are LSAPI.NLM and NLSAPI.NLM.<br />
There are three NLS objects:<br />
1. NLS license server provider (LSP) represented as a leaf object named<br />
NLS_LSP_servername. An LSP is licensing software that is contained in the NLSLSP.NLM<br />
that provides the actual licensing service and maintains the license certificates. By default,<br />
LSP objects are created in the same container as the server running NLSLSP.NLM. Every<br />
<strong>NetWare</strong> <strong>5.1</strong> server installed must have its own NLS_LSP_servername object in order to<br />
determine where to look for licensing and to provide the licensing on each server.<br />
Page 59 of 317 Novell PartnerNet Confidential 07/24/00<br />
Copyright © 2000 by Novell, Inc.
2. NLS product containers (2). These are NDS container-class objects that hold license<br />
certificates. The two NLS product containers are<br />
• Novell+<strong>NetWare</strong>5Server+500, which holds installed base server licenses.<br />
• Novell+<strong>NetWare</strong>5ConnSLC+500, which holds installed user connection<br />
licenses (where 500 refers to the version of <strong>NetWare</strong>, not the number of<br />
connections).<br />
These NLS product containers must be in the same container as the<br />
<strong>NetWare</strong> server object or in a container above the one which contains the<br />
<strong>NetWare</strong> server object.<br />
3. NLS license certificates (2):<br />
• Base server license, installed into Novell+<strong>NetWare</strong>5Server+500 NLS<br />
product container (from above).<br />
• User connection licenses, installed into Novell+<strong>NetWare</strong>5ConnSLC+500<br />
NLS product container (from above).<br />
The <strong>NetWare</strong> <strong>5.1</strong> license file comes in one of two formats:<br />
• Certificate envelope (*.NLF)<br />
An envelope is a method that enables multiple license certificates (for<br />
example, the base server license and the connection license) to be<br />
distributed as a single file. An envelope is simply an *.NLF file that<br />
contains one or more license certificates.<br />
MLA licenses are distributed as envelopes. Non-MLA licenses are<br />
distributed either as envelopes or as separate license certificates.<br />
• Connection licenses<br />
Base server license (*.NLS) and connection license (*.CLS)<br />
There are two types of license certificates: manufactured and metered. A manufactured license has an<br />
enforcement model provided by the manufacturer. A manufactured license certificate usually has digital<br />
security and is tied to a specific product. <strong>NetWare</strong> <strong>5.1</strong> has a manufactured license.<br />
When a customer purchases <strong>NetWare</strong> <strong>5.1</strong>, they get license certificates from Novell that are required to run<br />
the product. End users cannot create their own <strong>NetWare</strong> <strong>5.1</strong> licenses because they do not have the ability to<br />
create one with the Novell secret digital signature.<br />
<strong>NetWare</strong> <strong>5.1</strong> allows two grace login connections without any license installed before error messages are<br />
displayed on the file server console.<br />
See the January 1999 AppNote “A Closer Look at Novell Licensing Services in <strong>NetWare</strong> 5” for more<br />
information on NLS. Visit - http://shop.novell.com/shopnovell/GroupDisplay.jsp?group=74840<br />
Page 60 of 317 Novell PartnerNet Confidential 07/24/00<br />
Copyright © 2000 by Novell, Inc.
Activity 5—Determine <strong>Upgrade</strong> Method to Use<br />
Start<br />
First <strong>NetWare</strong><br />
5 server in<br />
tree?<br />
No<br />
Replace<br />
hardware?<br />
No<br />
Start <strong>NetWare</strong><br />
3.x ?<br />
No<br />
Custom<br />
large #s<br />
standardization<br />
No<br />
In-place upgrade<br />
Yes<br />
Yes<br />
Yes<br />
Yes<br />
In-place upgrade<br />
of R/W replica of<br />
root server<br />
<strong>Upgrade</strong> (ATW)<br />
Wizard<br />
In-place upgrade<br />
Accelerated<br />
upgrade<br />
Activity 5—Determine <strong>Upgrade</strong> Method to Use<br />
Page 61 of 317 Novell PartnerNet Confidential 07/24/00<br />
Copyright © 2000 by Novell, Inc.
Deliverable:<br />
The report should include:<br />
• The upgrade method(s) that the customer will use and why (you can use the verbiage supplied in<br />
this section)<br />
Note: See Appendix G “<strong>NetWare</strong> <strong>5.1</strong> Rapid Deployment and Standardization Strategies” for options for<br />
customizing <strong>NetWare</strong> <strong>5.1</strong> upgrades and installations.<br />
Prerequisites . Before installing <strong>NetWare</strong> <strong>5.1</strong>, read the README!! Here are some things you should be<br />
aware of:<br />
• Packet Receive Buffers: IP communication uses a lot of packet receive buffers. If you use IP<br />
products, increase your minimum and maximum packet receive buffers. You can modify the<br />
packet receive buffers through Monitor or Portal. Portal is recommended.<br />
• Never set the Maximum Physical Receive Buffer Size value lower than the default minimum (4K).<br />
Several widely used LAN adapters need to have this minimum buffer size to operate.<br />
• Connectivity to a Shared Medium: Remove all connectivity to a shared medium, for example from<br />
the SAN/CLUSTER, during installation of the server or patches. You can disconnect by removing<br />
the FibreChannel or shared SCSI connector.<br />
• Before installing the server, set FILES=30 in the CONFIG.SYS file.<br />
• Licensing Services: You must use the supplied <strong>NetWare</strong> <strong>5.1</strong> licenses to run the <strong>NetWare</strong> <strong>5.1</strong><br />
server. The <strong>NetWare</strong> <strong>5.1</strong> Licensing Service, however, does interoperate with the <strong>NetWare</strong> 5.0<br />
Licensing Services.<br />
• You can install a <strong>NetWare</strong> <strong>5.1</strong> server into a <strong>NetWare</strong> 5 tree.<br />
• If you are installing <strong>NetWare</strong> <strong>5.1</strong> into a <strong>NetWare</strong> 4.x tree, run SETUPNLS.EXE from a Windows<br />
client. SETUPNLS.EXE will install NLS onto appropriate <strong>NetWare</strong> 4.x and <strong>5.1</strong> servers.<br />
• Installing from a Bootable CD-ROM: If your server supports bootable CD-ROM and you want to<br />
boot to the Operating System CD, you need to ensure that the machine boot order specifies that<br />
the CD boots before the hard drive. This ensures that the CD is available for booting and<br />
formatting the hard disk.<br />
• To boot to the <strong>NetWare</strong> <strong>5.1</strong> Operating System CD, the server must have a ROM BIOS that fully<br />
supports the El Torito specification---including a hard disk image. Booting on a machine where<br />
the specification is not supported may result in hangs after starting Caldera DR DOS or messages<br />
such as “No operating system found.” If your computer or storage adapter is not working, contact<br />
the vendor for updated BIOS.<br />
• Read the README!!<br />
<strong>NetWare</strong> 3.x and <strong>NetWare</strong> 4.x to <strong>NetWare</strong> <strong>5.1</strong> Methods(s) – three of them are<br />
documented here:<br />
(1) In-Place <strong>Upgrade</strong><br />
Note: An in-place upgrade means that the customer will use their existing <strong>NetWare</strong> “box” for <strong>NetWare</strong><br />
<strong>5.1</strong>. In this case, you must ensure that this box meets the <strong>NetWare</strong> <strong>5.1</strong> specifications. Refer back to<br />
Subprocess 2 “Perform a Technical Assessment and Impact Study.”<br />
In-Place <strong>Upgrade</strong><br />
Page 62 of 317 Novell PartnerNet Confidential 07/24/00<br />
Copyright © 2000 by Novell, Inc.
Advantages Disadvantages<br />
Retains all trustee assignments. The in-place upgrade is more “risky” in that if<br />
something goes wrong, the <strong>NetWare</strong> server must<br />
be reinstalled from backup media and the upgrade<br />
started again. If the upgrade needs to be completed<br />
overnight (and the users up and running on<br />
<strong>NetWare</strong> <strong>5.1</strong> in the morning) there may not be time<br />
to “recover” from any problems with this method.<br />
Retains passwords. Disk allocation block (DAB) size cannot be<br />
changed. <strong>NetWare</strong> 3.x servers will usually have a<br />
default DAB of 4 KB; Netware 4.x servers may have<br />
been set to 64 KB. If you use suballocation with<br />
<strong>NetWare</strong> <strong>5.1</strong>, you should use a DAB of 64 KB. If<br />
appropriate, the <strong>NetWare</strong> 3.x server can be<br />
completely backed up, reinstalled with 64 KB, then<br />
restored from backup before doing an in-place<br />
upgrade.<br />
Note: The DAB is not an issue with NSS, as NSS<br />
will “create” a new 4 KB DAB on the NSS volumes.<br />
If the DOS partition does not have enough free<br />
space (35-50 MB is the minimum recommended),<br />
the in-place upgrade cannot be used. The goal is to<br />
have enough free DOS partition space so that the<br />
C:\ directory and its files can be left in<br />
place, for backup purposes. The DOS partition can<br />
be resized using Partition Magic; however, there<br />
must be free space available. It is not<br />
recommended to resize the <strong>NetWare</strong> partition to get<br />
this free space.<br />
Note: TID 2926225, “Increasing the Size of a DOS<br />
Partition,” discusses this issue.<br />
(2) <strong>NetWare</strong> <strong>5.1</strong> <strong>Upgrade</strong> Wizard Version 3.0 (Across-the-Wire [ATW] method)<br />
Note: An ATW method means that the customer has purchased a new “box” for <strong>NetWare</strong> <strong>5.1</strong> and the old<br />
data and bindery/NDS database from the old version of <strong>NetWare</strong> will be transferred over. <strong>NetWare</strong> <strong>5.1</strong><br />
gets installed on the new box first.<br />
<strong>NetWare</strong> <strong>5.1</strong> <strong>Upgrade</strong> Wizard Version 3.0 (ATW method)<br />
Advantages Disadvantages<br />
Retains all trustee assignments. Slower, because a workstation (which is the<br />
“bottleneck”) is involved in this upgrade process.<br />
How fast the file copy process goes depends on a<br />
number of factors, such as file size and workstation<br />
speed. It is not uncommon to see this file copy<br />
process be 40% slower that a server-to-server file<br />
copy.<br />
Retains passwords.<br />
If something happens during the upgrade process,<br />
the original <strong>NetWare</strong> server is still in place and is<br />
unchanged.<br />
Note: The source server would need DSMAINT,<br />
menu option “Recover Directory Services after a<br />
Hardware <strong>Upgrade</strong>.” It would recover the “source<br />
code” (backup of NDS). You would then need to<br />
restart the server.<br />
Page 63 of 317 Novell PartnerNet Confidential 07/24/00<br />
Copyright © 2000 by Novell, Inc.
DAB can be set to 64 KB on the freshly-installed<br />
<strong>NetWare</strong> <strong>5.1</strong> server.<br />
DOS partition size is not an issue since it can be set<br />
appropriately on the freshly-installed <strong>NetWare</strong> <strong>5.1</strong><br />
server.<br />
(3) Manual <strong>Upgrade</strong><br />
Note: The process discussed here is for <strong>NetWare</strong> 3.x to <strong>NetWare</strong> <strong>5.1</strong>. Also, this process is generally used<br />
because sometimes the <strong>Upgrade</strong> Wizard does not copy over all files/trustee assignments (i.e., it “bombs<br />
out” during this process).<br />
The overall process is essentially the same as with the upgrade wizard except the <strong>NetWare</strong> 3.x bindery is<br />
manually “imported” into the freshly-installed <strong>NetWare</strong> <strong>5.1</strong> server and the copying of files is done with<br />
tape backup server-to-server copy (ArcServe has a server-to-server copy option which preserves trustee<br />
assignments). 3 GB of data an hour can be copied on a 100 MB channel between the <strong>NetWare</strong> 3.x and<br />
<strong>NetWare</strong> <strong>5.1</strong> servers. Both the <strong>NetWare</strong> 3.x and <strong>NetWare</strong> <strong>5.1</strong> servers should be placed on a 100 MB<br />
channel, if possible, to speed up the copy process. Additionally, with ArcServe, 70 MB of data per minute<br />
has been reported on 100 MB Ethernet on large (graphic-size) files.<br />
Note: Further testing needs to be done to determine if this method will support Asian double-byte<br />
characters. See Appendix E, Double-Byte Compatibility Issues, for more information.<br />
Across-the-Wire <strong>Upgrade</strong> (Manual)<br />
Advantages Disadvantages<br />
Advantage of this versus copying files with the<br />
<strong>Upgrade</strong> Wizard is speed (i.e., with the <strong>Upgrade</strong><br />
Wizard the “bottleneck” will be the workstation that is<br />
involved and necessary). With the manual upgrade<br />
there is no such bottleneck, especially if the<br />
<strong>NetWare</strong> 3.x and <strong>NetWare</strong> <strong>5.1</strong> servers are on a<br />
100MB channel link.<br />
Retains all trustee assignments (assuming the<br />
backup software is capable of this).<br />
Retains passwords.<br />
If something happens during the upgrade, the<br />
original <strong>NetWare</strong> server is still in place and is<br />
unchanged.<br />
File copy is faster than the upgrade wizard;<br />
therefore, this may be the appropriate solution if the<br />
upgrade time window is tight.<br />
DAB can be set to 64 KB on the newly-installed<br />
<strong>NetWare</strong> <strong>5.1</strong> server.<br />
DOS partition size is not an issue since it can be set<br />
appropriately on the newly-installed <strong>NetWare</strong> <strong>5.1</strong><br />
server.<br />
No GUI-based utility; manual process. May not be<br />
appropriate for inexperienced installers.<br />
<strong>NetWare</strong> 5.0 to <strong>NetWare</strong> <strong>5.1</strong> Methods(s) – two of them are documented here<br />
Note: Before you upgrade from <strong>NetWare</strong> 5.0 to <strong>NetWare</strong> <strong>5.1</strong>, apply the latest support pack for <strong>NetWare</strong><br />
5.0.<br />
Page 64 of 317 Novell PartnerNet Confidential 07/24/00<br />
Copyright © 2000 by Novell, Inc.
(1) In-Place <strong>Upgrade</strong><br />
Generally speaking, a <strong>NetWare</strong> 5.0 to <strong>NetWare</strong> <strong>5.1</strong> upgrade will be done in place; this is simply because<br />
the customer probably already purchased new hardware for <strong>NetWare</strong> 5.0. Down the server, install the CD,<br />
and you’re on your way!<br />
(2) <strong>NetWare</strong> <strong>5.1</strong> <strong>Upgrade</strong> Wizard Version 3.0 (Across-the-Wire [ATW] method)<br />
Note: Same as documented above for <strong>NetWare</strong> 3.x/4.x to <strong>NetWare</strong> <strong>5.1</strong>.<br />
• If you plan to install <strong>NetWare</strong> <strong>5.1</strong> across the wire, you must use IPX.<br />
Installing a <strong>NetWare</strong> <strong>5.1</strong> Server into a <strong>NetWare</strong> 4.11 Environment<br />
Before installing a <strong>NetWare</strong> <strong>5.1</strong> server into a <strong>NetWare</strong> 4.11 environment<br />
• Install NLS (Novell Licensing Services) for <strong>NetWare</strong> <strong>5.1</strong> on at least one <strong>NetWare</strong> 4.11 server in<br />
every partition of the NDS tree. You could, of course, upgrade one <strong>NetWare</strong> 4.11 server in each<br />
partition of the NDS tree to <strong>NetWare</strong> <strong>5.1</strong> which accomplishes the same result. The key is you<br />
want <strong>NetWare</strong> <strong>5.1</strong> license schema extensions in the <strong>NetWare</strong> 4.11 tree.<br />
1. Select a <strong>NetWare</strong> 4.11 server that has a read/write replica.<br />
2. Follow instructions at http:www.novell.com/documentation/lg/nw5 in <strong>NetWare</strong> 5<br />
Overview and Installation.<br />
3. (Optional) Run setupnls.nlm<br />
• You can install a <strong>NetWare</strong> <strong>5.1</strong> server directly into an NDS tree that has <strong>NetWare</strong> 4.11 servers if:<br />
• The <strong>NetWare</strong> <strong>5.1</strong> server will automatically receive a read/write replica upon insertion into the<br />
tree.<br />
• The read/write replica is in the NDS partition where the read/write activity will take place.<br />
Important: Only experienced network administrators should use this option. If the NDS tree already has a<br />
master replica and two read/write replicas, you won’t be able to use this option. This is because the fourth<br />
server installed into the tree does not automatically receive a read/write replica.<br />
• The following table shows the specific DSREPAIR versions that need to be run on existing servers<br />
before the first <strong>NetWare</strong> <strong>5.1</strong> server is installed in the tree:<br />
The server is running…. <strong>NetWare</strong> Version & # NDS Version DSRepair from NW<strong>5.1</strong> CD<br />
4.11 NLM 4.68 Any /patches/netware/nw4x/DSREPAIR.NLM<br />
5.0 NLM 5.21 Pres-NDS8 /patches/netware/nw5x/DSREPAIR.NLM<br />
5.0 NLM 6.32 NDS 8 /patches/netware/nnds8/DSREPAIR.NLM<br />
5.0 NLM 7.16 NDS 8 NW<br />
Update<br />
/netware/sys/system/DSREPAIR.NLM<br />
Comparison of <strong>NetWare</strong> 5.0 and <strong>NetWare</strong> <strong>5.1</strong> <strong>Upgrade</strong> and Installation Processes<br />
Installing and/or upgrading to <strong>NetWare</strong> 5.0 is very similar to installing and/or upgrading to <strong>NetWare</strong> <strong>5.1</strong>.<br />
Being a newer product, <strong>NetWare</strong> <strong>5.1</strong> does offer some differences. These differences are outlined below.<br />
• <strong>NetWare</strong> <strong>5.1</strong> comes with Deployment Manager, which is a client utility that checks (among other<br />
things) the state of the existing servers in the tree.<br />
Page 65 of 317 Novell PartnerNet Confidential 07/24/00<br />
Copyright © 2000 by Novell, Inc.
<strong>NetWare</strong> Deployment Manager is a client-based executable file that automatically runs when the<br />
CD is inserted into a client workstation. This Java-based, GUI program will run and pop up with a<br />
dialog box of steps and comments that will assist you in preparing the NDS tree for <strong>NetWare</strong> <strong>5.1</strong>.<br />
Deployment Manager updates and installs NLS code to version 5.02 ; this is critical, and this step<br />
cannot be missed . The Deployment Manager will not upgrade a <strong>NetWare</strong> 4.10 server or tree for<br />
NDS eDirectory; you must have <strong>NetWare</strong> 4.11 or higher.<br />
Note: Deployment Manager is hard-coded to look for a server with a R/W replica of [Root],<br />
which will not work, therefore, in a single-server tree or in a tree where a R/W replica of [Root]<br />
cannot be contacted.<br />
Deployment Manager will suggest that you use NDS 8 (NDS eDirectory), which is the default<br />
NDS version installed with <strong>NetWare</strong> <strong>5.1</strong>. The advantages of going to NDS eDirectory are:<br />
• More objects per container/partition<br />
• Better database engine (FLAIM)<br />
• LDAP v3.3 now supports NDS eDirectory<br />
Note: NDS eDirectory is NDS 8 on Solaris, NT, <strong>NetWare</strong>; Linux should be available in the 1H00.<br />
NDS Corporate Edition is NDS eDirectory plus the OS integration technology commonly referred<br />
to as redirection. NDS Corporate Edition replaces what used to be known as NDS for NT, NDS<br />
for Solaris, and so on. If your customer purchases NDS Corporate Edition, they get all of the<br />
platforms Novell supports in one package for one price.<br />
• DNS Server Install. The <strong>NetWare</strong> <strong>5.1</strong> install routine will test to see if you have a DNS server up<br />
and running. It is highly recommended that a DNS server be in place before installing <strong>NetWare</strong><br />
<strong>5.1</strong>, as <strong>NetWare</strong> will attempt to verify the host name.<br />
• <strong>NetWare</strong> <strong>5.1</strong> has added the feature in the “Protocols and IPX Compatibility Tab” to load the<br />
Migration Agent (MA) from the GUI install. You can, if you do not see this tab, install the MA<br />
NLM later.<br />
• <strong>NetWare</strong> <strong>5.1</strong> does not include the Unix Print Services; but, you can call Novell Technical Services<br />
to get this product. However, Novell recommends the use of NDPS instead.<br />
• The <strong>NetWare</strong> <strong>5.1</strong> Java install routine provides a “Components” dialog box. If a product requires a<br />
supporting product, the check box will automatically be checked (you will see it checked and<br />
greyed out meaning those options cannot be deselected). Default selected greyed checks are<br />
Novell Certificate Server, LDAP services, <strong>NetWare</strong> Management Portal, Storage Management<br />
Services, <strong>NetWare</strong> Web Manager. Along with the greyed, checked applications there are some<br />
“default” checked applications; they are NDPS, <strong>NetWare</strong> Enterprise Web Server, and <strong>NetWare</strong><br />
FTP Server. Those options can be deselected. All others listed can be selected and installed at<br />
this time. If no other applications are installed at this time, they can be installed later.<br />
• Novell Certificate Server 2.0 (PKIS) objects. If more than one server is being installed at the same<br />
time, the first server to complete the installation process will host the Certificate Authority.<br />
Novell Certificate Server is automatically installed during the product installation. If you uncheck<br />
the creation of server certificates for this server, applications which rely on the existence of these<br />
certificates (e.g., LDAP, <strong>NetWare</strong> Portal Manager, and Web Server) will not be set up properly at<br />
install time and will need to be manually configured later.<br />
If you are installing a new tree, the server upon which the Organizational CA is created (normally<br />
the first server, if defaults are taken) needs to go the through the “Restart Server” process before<br />
other servers are added into the tree. Otherwise, a -1230 error is generated when a second or<br />
subsequent server attempts to create the Organizational CA object.<br />
The Organizational CA server must have, as a minimum, a read/write replica of the partition<br />
which holds the Security container. If this is not done, -601 and -603 errors may occur when<br />
creating server certificates.<br />
Page 66 of 317 Novell PartnerNet Confidential 07/24/00<br />
Copyright © 2000 by Novell, Inc.
eDirectory (NDS 8) versus NDS 7 Considerations<br />
Two versions of NDS are included with <strong>NetWare</strong> <strong>5.1</strong>:<br />
• NDS 7<br />
• NDS eDirectory (NDS 8), Novell's highly scalable, native LDAP, and cross-platform directory<br />
service<br />
The <strong>NetWare</strong> <strong>5.1</strong> default installation installs NDS eDirectory. Once installed, you should use<br />
ConsoleOne to administer NDS eDirectory. If you would prefer to use NDS 7, choose the Custom<br />
installation option and deselect NDS eDirectory.<br />
If you are using NDS version 7.33, use <strong>NetWare</strong> Administrator to administer it. The LDAP snapin required<br />
for version 7.33 is not installed for ConsoleOne. You also need to give trustee rights to [Public] for the<br />
container that you want users to browse.<br />
EDirectory is more scaleable, more reliable. It is the building block of Novell’s E-commerce strategy, like<br />
I-chain, DirXML, e-Directory, cross platform. Installing eDirectory will update the schema and a server<br />
holding a R/W replica. If you choose eDirectory as the database foundation (which is Novell’s<br />
recommendation), the entire tree has to be updated. To update the NDS tree, you must run Deployment<br />
Manager.<br />
Merging <strong>NetWare</strong> 4.1x and <strong>NetWare</strong> 5 Trees with <strong>NetWare</strong> 5 for NDS 7<br />
You must use the DSMERGE.NLM that ships with <strong>NetWare</strong> <strong>5.1</strong> when merging <strong>NetWare</strong> <strong>5.1</strong> trees. This<br />
version of DSMERGE.NLM must be loaded on the source tree on the <strong>NetWare</strong> <strong>5.1</strong> server that contains the<br />
master replica of the root partition. This means that to successfully merge, the server in the source tree that<br />
contains the master replica of the root partition must be <strong>NetWare</strong> <strong>5.1</strong>. The remaining servers can be<br />
<strong>NetWare</strong> 4.1x or <strong>NetWare</strong> 5.0/<strong>5.1</strong> servers.<br />
Merge Scenarios:<br />
• <strong>NetWare</strong> <strong>5.1</strong> installed on both target and source trees.<br />
To merge a <strong>NetWare</strong> <strong>5.1</strong> tree into another <strong>NetWare</strong> <strong>5.1</strong> tree, run DSMERGE on the source tree<br />
server that contains the master replica of the root partition.<br />
Note: If DSMERGE is loaded on a server that does not hold the master replica, it will report back<br />
the name of the correct server from which to run.<br />
• <strong>NetWare</strong> 4.1x installed on the target tree and <strong>NetWare</strong> <strong>5.1</strong> installed on the source tree.<br />
Run DSMERGE on the source tree on the server that contains the master replica of the root<br />
partition.<br />
• <strong>NetWare</strong> <strong>5.1</strong> installed on the target tree and <strong>NetWare</strong> 4.1x installed on the source tree.<br />
You must first upgrade to <strong>NetWare</strong> <strong>5.1</strong>. Only the server in the 4.1x source tree that contains the<br />
master replica of the root partition needs to be upgraded. Then run DSMERGE on that server.<br />
Note: If the server holding the master cannot be upgraded, you can select another server to be the<br />
master, as long as it is running <strong>NetWare</strong> <strong>5.1</strong> at the time of the merge.<br />
Page 67 of 317 Novell PartnerNet Confidential 07/24/00<br />
Copyright © 2000 by Novell, Inc.
Task 2—Prepare Solution Design Report<br />
In this report, document the process for upgrading to <strong>NetWare</strong> <strong>5.1</strong>, incorporating the above information.<br />
The information in this report will then be set up and tested in the lab (in subprocess 5).<br />
It is possible that more than one upgrade method will be used for different servers, as determined in the<br />
relevant sections from above.<br />
Task 3—Review and Deliver Solution Design Report<br />
Activity 1—Project Manager Review<br />
The project manager should review your solution design report and make any recommendations or<br />
suggestions.<br />
Activity 2—Deliver report<br />
Deliver solution design report to the customer.<br />
Page 68 of 317 Novell PartnerNet Confidential 07/24/00<br />
Copyright © 2000 by Novell, Inc.
Subprocess 4—Test Solution Design in the Lab<br />
Key Inputs<br />
Personnel<br />
• Lead consultant<br />
• <strong>Consulting</strong> team members<br />
• Customer contacts/interfaces<br />
Resources / Tools<br />
Data / Reports<br />
• Recommended solution design<br />
• Impact study report<br />
• Preflight checklist information<br />
• Critical success factors<br />
<strong>NetWare</strong> <strong>5.1</strong> <strong>Upgrade</strong>—Solution Development<br />
Subprocess 4—Test Solution Design in the Lab<br />
Task Summary<br />
Key Outputs<br />
Personnel<br />
• Lead consultant<br />
Outputs / Deliverables<br />
• Prototype system<br />
• Prototype system documentation<br />
Data / Reports<br />
• Weekly status reports<br />
• Test and acceptance results report<br />
1. Build the prototype in the customer’s lab, using the solution design document from subprocess 3.<br />
2. Test the prototype solution in the customer's lab environment.<br />
3. Modify and retest the prototype solution as required, updating documentation as needed.<br />
4. Document the final solution design in a prototype test report, including test results.<br />
5. Review and deliver the prototype test report to the customer.<br />
6. (Conditional) CBM prepares and negotiates a work order agreement for pilot implementation.<br />
A prototype will be created and used to test the appropriate solution design(s) from subprocess 3.<br />
A prototype is a subset of the production environment containing representative key components. This<br />
prototype should mirror the production environment as closely as possible. It should be isolated from the<br />
corporate network to prevent intrusion or downtime on the production network. The prototype is needed to<br />
ensure successful pilot and implementation phases.<br />
The consultant will work with the customer to prepare the prototype test environment and will compile a<br />
prototype test proposal. The consultant and customer then test the prototype using the solution design<br />
recommendations, resolve any problems that may exist, and revise the test procedures—preparing for the<br />
subsequent pilot test. The results of the prototype test, along with any suggested design modifications, are<br />
then incorporated into the proposal to create a final prototype test report.<br />
Page 69 of 317 Novell PartnerNet Confidential 07/24/00<br />
Copyright © 2000 by Novell, Inc.
Task 1—Plan Prototype<br />
Activity 1—Develop Prototype Design and Specifications<br />
The consultant should develop a design for the prototype test, which will be conducted in a lab. This design<br />
should include specifications for hardware, software, applications, network, upgrade methods, and so forth.<br />
A <strong>NetWare</strong> 3.x, <strong>NetWare</strong> 4.x, or <strong>NetWare</strong> 5.0 environment must include the following items to be a<br />
successful prototype:<br />
Hardware<br />
• The production client workstations must be duplicated in the prototype environment to<br />
appropriately test access to all resources. Identical hardware must be used to prevent unforeseen<br />
consequences. If identical hardware is not available, use similar hardware.<br />
• The production server hardware must be duplicated in the prototype environment so that<br />
applications (NLMs) can be tested appropriately. Identical hardware must be used to prevent<br />
unforeseen consequences. If identical hardware is not available, use similar hardware.<br />
Software<br />
• It is assumed that an approved Novell NDS tree has been designed and will be implemented as<br />
part of the prototype. This includes locations of replicas, time synchronization, and naming<br />
standards.<br />
• Simulate the existing <strong>NetWare</strong> production printing environment so that printing environment<br />
migration can be tested. You may determine from the prototype test that creating new print queues<br />
may be easier than migrating bindery print queues.<br />
• A complete installation of the current <strong>NetWare</strong> operating system and third-party NLMs running in<br />
the production environment must be transferred to the prototype to ensure compatibility with<br />
<strong>NetWare</strong> <strong>5.1</strong>. You can use a backup/restore utility to back up existing production <strong>NetWare</strong> servers<br />
and to restore the backup to the customer’s existing <strong>NetWare</strong> lab server (including the bindery for<br />
<strong>NetWare</strong> 3.x or NDS database for <strong>NetWare</strong> 4.x/<strong>NetWare</strong> 5.0).<br />
• For <strong>NetWare</strong> 3.x: If you only want the bindery and not the complete file system, follow these<br />
steps:<br />
1. Execute BINDFIX.EXE twice.<br />
2. Copy the *.OLD files from the production to the prototype server’s<br />
SYS:SYSTEM directory.<br />
3. Execute the BINDREST.EXE utility to fully populate the bindery files<br />
identical to the production environment.<br />
• For <strong>NetWare</strong> 4.x or <strong>NetWare</strong> 5.0: You can create a tree design in the prototype that is identical<br />
to the production environment by using the oexport utility to export the entire tree to a *.dat file.<br />
You can use the oimport utility in the prototype tree to import the *.dat file from the production<br />
environment. Having the exact environment duplicated in the prototype will help assess any<br />
obstacles affecting the engagement.<br />
Applications<br />
• Test the compatibility of existing applications with users who are connected to the server with a<br />
connection number greater than 250.<br />
Page 70 of 317 Novell PartnerNet Confidential 07/24/00<br />
Copyright © 2000 by Novell, Inc.
• A major difference between <strong>NetWare</strong> 3.x and <strong>NetWare</strong> <strong>5.1</strong> is the ability for <strong>NetWare</strong> <strong>5.1</strong> to<br />
support more than 250 connections (users). This is achieved by using a double-byte field (more<br />
than 256) for the connection number. Some older applications may not be able to handle the<br />
double-byte connection ID correctly.<br />
Network<br />
• The cabling system used to test the upgrade in the lab should be the same as cabling used in<br />
production. This enables the upgrade time to be estimated.<br />
• Duplicate as closely as possible the bandwidth in the production environment. This includes<br />
simulated WAN links, asynchronous connectivity, and any other routes of communication. The<br />
prototype bandwidth should be identical to that of the production network; this helps determine if<br />
line upgrades are needed before implementing the new version of <strong>NetWare</strong>.<br />
The prototype design and specifications should be included in the prototype test proposal (see activity 3<br />
below).<br />
Activity 2—Develop Prototype Test Plan<br />
The prototype test plan should specify how the prototype tests will be conducted, and the order in which the<br />
tests will be conducted—based on solution designs from subprocess 3. The consultant should document the<br />
sequence of events and specify and document the steps to make the prototype test successful.<br />
The test plan must include test criteria that verify that the implementation is complete, and that the desired<br />
goals have been met. Use the sample test criteria (documented below) and add additional test criteria as<br />
necessary.<br />
The test plan should be included in the prototype test proposal (see activity 3 below).<br />
Activity 3—Compile Prototype Test Proposal<br />
The prototype test proposal should include the prototype test design and specifications, and the prototype<br />
test plan. The proposal should contain information about required resources, information about the<br />
sequence of events, and information about what to measure to ensure that the prototype test was successful.<br />
This proposal will be the basis of the prototype system test, which will be carried out in the customer’s lab<br />
environment.<br />
After the prototype system is built (task 2) and tested (task 3), take careful notes about variances in design<br />
setup, test implementation methods, test results, and so forth. This information will be added to the<br />
prototype test proposal. The combined documents will be used to create the prototype test report that will<br />
be delivered to the customer (task 5).<br />
Task 2—Build Prototype<br />
Using the solution design specifications from task 1, build the prototype in the customer’s lab environment.<br />
Page 71 of 317 Novell PartnerNet Confidential 07/24/00<br />
Copyright © 2000 by Novell, Inc.
Activity 1—Organize Test Teams<br />
Your test team should include people who have the skills and understanding necessary to thoroughly test<br />
the <strong>NetWare</strong> <strong>5.1</strong> upgrade in the prototype environment:<br />
• Choose team members to prepare the test hardware.<br />
• Organize the <strong>NetWare</strong> <strong>5.1</strong> software so that it is readily available with applicable patches provided.<br />
• Organize the application software and provide current patches.<br />
• Choose team members whose expertise matches the tasks to be completed during the test.<br />
• Assign tasks to be completed by each team member.<br />
• Where appropriate, assign members of the customer staff to consulting teams to incorporate<br />
training and knowledge transfer.<br />
Activity 2—Set Up Prototype Test Environment<br />
Set up the lab environment so that the solution design (from subprocess 3) can be tested and validated<br />
before the pilot (subprocess 5).<br />
Task 3—Test Prototype<br />
Activity 1—Test Procedures<br />
Test the procedures used to upgrade the client software.<br />
Note: See Appendix C.<br />
Activity 2—Test Steps<br />
Test the steps that will be used to upgrade to <strong>NetWare</strong> <strong>5.1</strong> using one or more of the following methods:<br />
• In-place upgrade (<strong>NetWare</strong> 3.x, 4.x, or 5.0 to <strong>NetWare</strong> <strong>5.1</strong>)<br />
• <strong>Upgrade</strong> using <strong>Upgrade</strong> Wizard (<strong>NetWare</strong> 3.x or 4.x to <strong>NetWare</strong> <strong>5.1</strong>)<br />
• Manual upgrade (<strong>NetWare</strong> 3.x or 4.x to <strong>NetWare</strong> <strong>5.1</strong>)<br />
• Accelerated upgrade (<strong>NetWare</strong> 4.x to <strong>NetWare</strong> <strong>5.1</strong>)<br />
• DSMAINT upgrade (<strong>NetWare</strong> 4.x to <strong>NetWare</strong> <strong>5.1</strong>)<br />
In-Place <strong>Upgrade</strong><br />
You can use an in-place upgrade to upgrade either a <strong>NetWare</strong> 3.x, 4.x, of 5.0 server to <strong>NetWare</strong> <strong>5.1</strong>.<br />
Note: The steps (and dialog) are to be tested and verified in the lab environment. Make the necessary<br />
changes (as appropriate), after which the completed process can be given to the customer as part of their<br />
implementation plan to be used in the pilot (subprocess 5).<br />
Page 72 of 317 Novell PartnerNet Confidential 07/24/00<br />
Copyright © 2000 by Novell, Inc.
Assess Server Status<br />
Ensure that the customer’s existing <strong>NetWare</strong> server meets the <strong>NetWare</strong> <strong>5.1</strong> prerequisites. Refer back to the<br />
technical assessment and impact study process and report.<br />
The following bulleted items are some of the bigger “gotchas.” The entire list of prerequisites is not<br />
reiterated here since those prerequisites should have been completed during the technical assessment and<br />
impact study phase. Do not attempt the in-place upgrade in a production environment until all <strong>NetWare</strong> <strong>5.1</strong><br />
prerequisites are met and, ideally, the in-place upgrade has been tested in a lab environment with the<br />
appropriate “back-out” measures defined.<br />
The major prerequisites include the following:<br />
• A minimum of 35-50 MB of free space remaining on the DOS partition to support the<br />
<strong>NetWare</strong> <strong>5.1</strong> files that will be copied there during the upgrade. Lack of sufficient DOS space is<br />
the number one reason for in-place upgrade failures.<br />
• Current <strong>NetWare</strong> <strong>5.1</strong> disk drivers for the existing <strong>NetWare</strong> server being upgraded, including a<br />
written list of driver names, interrupt settings, and so forth<br />
Note: <strong>NetWare</strong> <strong>5.1</strong> no longer supports the DSK hard disk controller files, and the upgrade will not continue<br />
until HAM drivers are installed. Ensure that the latest HAM files for the controller hardware are on the<br />
<strong>NetWare</strong> <strong>5.1</strong> CD; if not, download them from either http://support.novell.com or from the hardware<br />
manufacturer’s web site.<br />
• Current <strong>NetWare</strong> <strong>5.1</strong> LAN drivers for the existing <strong>NetWare</strong> server being upgraded, including a<br />
written list of driver names, interrupt settings, and so forth.<br />
Note: Verify that the latest LAN drivers are on the <strong>NetWare</strong> <strong>5.1</strong> CD; if not, download them from either<br />
http://support.novell.com or from the hardware manufacturer’s web site. Although some of the older<br />
<strong>NetWare</strong> LAN drivers will work with <strong>NetWare</strong> <strong>5.1</strong>, you should upgrade to the <strong>NetWare</strong> <strong>5.1</strong> LAN drivers<br />
before performing the upgrade. This eliminates one troubleshooting variable to handle after the upgrade to<br />
<strong>NetWare</strong> <strong>5.1</strong>.<br />
For <strong>NetWare</strong> 3.x servers: The latest <strong>NetWare</strong> <strong>5.1</strong> LAN drivers can be loaded on <strong>NetWare</strong> 3.x servers after<br />
the latest support pack and CLIB are installed. The following coding should work in AUTOEXEC.NCF:<br />
LOAD NBI31x<br />
LOAD MSM31x<br />
LOAD ETHERTSM<br />
LOAD *.LAN<br />
Prepare <strong>NetWare</strong> 3.x Servers<br />
The following steps should be done the day before the actual upgrade to ensure there will be no significant<br />
changes to the bindery and file system:<br />
1. Delete old and unused bindery information such as users, groups, print servers, and print<br />
queues.<br />
2. Run SYS:SYSTEM\BINDFIX to remove obsolete MAIL directories and trustee<br />
assignments, and to compress the bindery files.<br />
3. Run BINDFIX a second time to obtain a set of “clean” bindery files.<br />
Page 73 of 317 Novell PartnerNet Confidential 07/24/00<br />
Copyright © 2000 by Novell, Inc.
4. Save the files NET$VAL.OLD, NET$PROP.OLD, and NET$OBJ.OLD to a safe<br />
location (diskette would be appropriate).<br />
5. Run VREPAIR to correct any file system errors. Begin the upgrade only after VREPAIR<br />
completes with no errors.<br />
6. Create two complete backups of the “cleaned up” (after steps 2 and 3 above are done)<br />
<strong>NetWare</strong> 3.x server. Ensure that these backups can be restored.<br />
7. Print out the system login script (NET$LOG.DAT). This information is useful if you<br />
later need to update the container login script.<br />
8. Make sure the DOS-based CD-ROM drivers are installed (and working) on the<br />
<strong>NetWare</strong> 3.x server being upgraded.<br />
Completed Information Needed During the <strong>Upgrade</strong> Process<br />
The following items and information need to be on-hand during the upgrade:<br />
• <strong>NetWare</strong> <strong>5.1</strong> license disks<br />
• Latest HAM drivers (as discussed above)<br />
• Latest LAN drivers (as discussed above)<br />
• Protocols to install on the server (such as IPX, IP, IP/CMD)<br />
• Completed NDS design document from the PFC. This includes:<br />
• Where the server will be placed in the tree (tree name and context)<br />
• The appropriate time zone information for the server<br />
• The type of time server (reference, single reference, primary, secondary)<br />
• What replicas will be stored on the server<br />
• Bindery context needed for the server<br />
• Admin context and password (if NDS tree exists already)<br />
• Additional <strong>NetWare</strong> <strong>5.1</strong> components to install from Novell product CDs and/or third-party<br />
CDs.<br />
• Licensing scheme.<br />
• SLP design.<br />
Perform the In-Place <strong>Upgrade</strong><br />
An in-place upgrade installs <strong>NetWare</strong> <strong>5.1</strong> directly on top of the existing <strong>NetWare</strong> operating system. On a<br />
<strong>NetWare</strong> 3.x server, all objects in the server’s bindery become part of the NDS container that the server<br />
object is placed into. On a <strong>NetWare</strong> 4.x and <strong>NetWare</strong> 5.0 server, this kind of upgrade is relatively stable<br />
and experiences few problems with the existing NDS tree.<br />
Do the following steps to perform an in-place upgrade:<br />
1. Log out all users from the <strong>NetWare</strong> server.<br />
2. Down the <strong>NetWare</strong> server and return to a DOS prompt.<br />
The DOS-based CD-ROM drivers must be loaded to properly detect the CD-ROM drive.<br />
3. Load the <strong>NetWare</strong> <strong>5.1</strong> installation CD; then, at the DOS prompt for the CD-ROM drive,<br />
type INSTALL and press Enter.<br />
Page 74 of 317 Novell PartnerNet Confidential 07/24/00<br />
Copyright © 2000 by Novell, Inc.
4. Review the <strong>NetWare</strong> <strong>5.1</strong> license agreement that appears, then press F10 to accept it.<br />
Note: At any point during the upgrade, press F1 on the install screens for help.<br />
At this point a new screen appears asking if you are installing a new server or performing<br />
an upgrade.<br />
5. Since this is an upgrade, select Modify and change the prompt to read “<strong>Upgrade</strong> from 3.x<br />
or 4.x.”<br />
For <strong>NetWare</strong> 3.x Servers: If you have the space in the DOS partition, leave the startup<br />
directory as C:\NWSERVER so that your existing <strong>NetWare</strong> 3.x drivers are not<br />
overwritten by the upgrade. You can delete the old 3.x subdirectory after the upgrade<br />
completes successfully.<br />
6. Select Continue to proceed.<br />
A new screen asks you to specify the mouse and video. The mouse is necessary to use<br />
the <strong>NetWare</strong> <strong>5.1</strong> ConsoleOne graphical server console.<br />
7. Choose the correct port (PS/2 or COM1).<br />
Note: If you accidentally select the wrong mouse or video type, you can redetect either<br />
mode after the operating system is completely installed.<br />
8. Type “vesa_rsp” at the system console prompt.<br />
<strong>NetWare</strong> <strong>5.1</strong> proceeds to copy files to the DOS partition of the server.<br />
After the files are copied, a new page identifies the support modules and storage adapters<br />
installed on the server. These devices are “best guess” identifications and should be<br />
verified with the hardware list you compiled in preparation for this upgrade.<br />
9. Make needed modifications to the identified hardware, then select Continue to proceed.<br />
A new page presents a list of the storage devices on the server.<br />
10. Verify the list of storage devices for accuracy, then select Continue to proceed.<br />
The installation utility installs the drivers selected in the previous pages, then presents a<br />
list of network adapter cards in the server.<br />
11. Verify the list of network adapter cards for accuracy, then select Continue to proceed.<br />
Note: If your server uses more than one network card and both cards are of the same<br />
make and model, you need to load only one driver, but that driver will have to be loaded<br />
twice, once for each card.<br />
The installation utility now copies the system and Java files necessary to load the<br />
ConsoleOne utility. At this point, the mouse should be operational. If not, you can still<br />
navigate your way around the ConsoleOne screen using the arrow keys on the keyboard.<br />
The first page to appear lets you select the protocols that you wish to run on the network<br />
card.<br />
12. Choose IPX, IP, or both, then click Next to continue.<br />
If you choose IP, then you need to know the server’s IP address, subnet mask, and<br />
gateway address.<br />
A new page appears that lets you choose your time zone.<br />
13. Click your time zone, and click Next to continue.<br />
The next page to appear begins the installation of NDS. You can either install the server<br />
into an existing NDS tree, or you can install a new tree.<br />
Page 75 of 317 Novell PartnerNet Confidential 07/24/00<br />
Copyright © 2000 by Novell, Inc.
14. Make your NDS installation selection, and click Next to continue.<br />
A new page appears and asks you to specify the following:<br />
• The NDS tree into which the server should be installed<br />
• The tree context where the server should reside<br />
• The full-distinguished name of the ADMIN login<br />
• The ADMIN password<br />
15. Enter the required information from step 14, and click Next to continue.<br />
For <strong>NetWare</strong> 3.x Servers: A dialog box appears requesting resolution for bindery<br />
objects with the same name as NDS objects.<br />
For <strong>NetWare</strong> 4.x and 5.0 Servers: If you are upgrading an existing NDS tree, the<br />
system will upgrade the server to the appropriate DS version for <strong>NetWare</strong> <strong>5.1</strong> and<br />
perform any schema extensions needed to complete the installation.<br />
16. Select the correct resolution, and choose OK.<br />
A new page displays a summary of the NDS tree that was created.<br />
For <strong>NetWare</strong> 4.x and 5.0 Servers: If you are upgrading an existing NDS tree, you may<br />
not see this summary page.<br />
17. Important: If you created a new NDS tree, write down the summary information, then<br />
click Next to continue.<br />
The next page installs the server license.<br />
18. Insert the license diskette into the floppy drive, and click Next to continue.<br />
A new screen appears and prompts you to choose all of the additional products that you<br />
would like installed on the server.<br />
19. Check the products you would like installed, and uncheck the products you would not<br />
like installed. Pay particular attention to the following products:<br />
LDAP<br />
If you choose to install LDAP, you will be asked if you would like the LDAP<br />
catalog maintained on this server. LDAP catalog allows faster login to the<br />
network since only the catalog is scanned when a user logs in, instead of the<br />
entire tree.<br />
19a. Maintain one LDAP catalog on a server in each geographical location.<br />
Because LDAP is maintained as part of NDS, you can maintain backups of the<br />
catalog by replicating NDS on other servers. If you need more information<br />
regarding LDAP, click Help.<br />
DNS/DHCP<br />
If you chose to install DNS/DHCP, you can specify the context in the NDS tree<br />
where you would like DNS/DHCP information to be maintained.<br />
19b. Specify the context, then click Next to continue.<br />
Note: You can install DNS/DHCP later if you want root object placement to be<br />
someplace other than the server location (files are always installed anyway).<br />
Use DNIPINST to extend the schema afterwards.<br />
20. Click Next to continue.<br />
At this point a summary screen will appear listing the products that you wish to install.<br />
Page 76 of 317 Novell PartnerNet Confidential 07/24/00<br />
Copyright © 2000 by Novell, Inc.
21. If you wish to customize any applications, click Customize.<br />
For example, to load the migration gateway, click Protocols from the list, then click<br />
Properties. Select the IPX compatibility tab, and check Load the Migration Agent. You<br />
can specify the compatibility mode network number at this time.<br />
22. Make your changes, and click OK.<br />
23. Click Close to end product customization.<br />
24. Click Finish to continue.<br />
The process will proceed automatically at this point.<br />
Note: The file copy procedure takes about 30-45 minutes, depending on server speed.<br />
25. Restart your server by removing any floppy disks and CDs from the server, and then<br />
clicking “Yes.”<br />
You should review the ReadMe file.<br />
At this point the in-place upgrade is complete. Go to the section “Test Criteria,” and follow the manual<br />
upgrade instructions (found later in this document).<br />
<strong>Upgrade</strong> Wizard Version 3.0<br />
• If you are upgrading from <strong>NetWare</strong> 3.x to <strong>NetWare</strong> <strong>5.1</strong>, follow the steps outlined in the<br />
<strong>NetWare</strong> 3.x to <strong>NetWare</strong> <strong>5.1</strong> <strong>Upgrade</strong> Wizard section.<br />
• If you are upgrading from <strong>NetWare</strong> 4.x to <strong>NetWare</strong> <strong>5.1</strong>, follow the steps outlined in the<br />
<strong>NetWare</strong> 4.x to <strong>NetWare</strong> 5.x <strong>Upgrade</strong> Wizard section.<br />
• If you are upgrading from <strong>NetWare</strong> 5.0 to <strong>NetWare</strong> <strong>5.1</strong>, the steps are not documented here because<br />
generally these will be performed as in-place upgrades.<br />
<strong>NetWare</strong> 3.x to <strong>NetWare</strong> <strong>5.1</strong> <strong>Upgrade</strong> Wizard<br />
The steps (and dialog) are to be tested and verified in the lab environment. Make the necessary changes (as<br />
appropriate). The completed process can be given to the customer as part of their implementation plan to be<br />
used in the pilot (subprocess 6).<br />
Set Up the <strong>Upgrade</strong> Wizard Workstation<br />
The Novell <strong>Upgrade</strong> Wizard is a GUI-based workstation utility that helps you copy the files and bindery<br />
objects from a source server running <strong>NetWare</strong> 3.x to a destination server running <strong>NetWare</strong> <strong>5.1</strong> with NDS.<br />
When copied to the destination server, bindery objects are placed in the NDS tree and automatically<br />
converted to NDS objects.<br />
Get the latest <strong>NetWare</strong> 3.x to <strong>NetWare</strong> <strong>5.1</strong> <strong>Upgrade</strong> Wizard from http://support.novell.com. The<br />
installation process is straightforward.<br />
The prerequisites for upgrading with <strong>Upgrade</strong> Wizard are:<br />
• A Windows 95/98 workstation with 25 MB of available disk space. This workstation must be<br />
running Novell Client for Windows 95/98 version 3.0.1.0 or later.<br />
-or-<br />
• A Windows NT (4.0 or later) workstation with 25 MB of available disk space. This workstation<br />
must be running Novell Client for Windows NT version 4.50.819 or later.<br />
Page 77 of 317 Novell PartnerNet Confidential 07/24/00<br />
Copyright © 2000 by Novell, Inc.
• The <strong>Upgrade</strong> Wizard workstation should be the fastest PC available in your environment, since it<br />
must copy all of the data and convert the <strong>NetWare</strong> 3.x bindery into the <strong>NetWare</strong> <strong>5.1</strong> NDS<br />
structure.<br />
• The client workstation must be able to simultaneously connect to the source (<strong>NetWare</strong> 3.x) and<br />
destination (<strong>NetWare</strong> <strong>5.1</strong>) servers using IPX.<br />
• A supervisor or supervisor-equivalent password is required for the <strong>NetWare</strong> 3.x server. An admin<br />
or admin-equivalent context and password is required for the <strong>NetWare</strong> <strong>5.1</strong> server. Additionally,<br />
the RCONSOLE password is needed for both the <strong>NetWare</strong> 3.x and <strong>NetWare</strong> <strong>5.1</strong> server.<br />
Install the <strong>NetWare</strong> <strong>5.1</strong> Server<br />
The <strong>NetWare</strong> <strong>5.1</strong> server must be installed with the latest patches and must meet the minimum <strong>NetWare</strong> <strong>5.1</strong><br />
prerequisites. To do this, complete the following steps:<br />
1. Use the completed NDS Design document to properly determine and set up the<br />
following:<br />
• Where the server will be placed in the tree (tree name and context)<br />
• Appropriate time zone information for the server<br />
• The type of time server (i.e., reference, single reference, primary, secondary)<br />
• Replicas to be stored on the server<br />
• The bindery context needed for the server<br />
• Admin context and password (if an NDS tree already exists)<br />
2. Install the appropriate <strong>NetWare</strong> <strong>5.1</strong> components.<br />
3. Set up and install the appropriate licensing scheme.<br />
4. Load and bind the appropriate protocols on the server (such as IPX, IP, IP/CMD, and so<br />
forth) as identified in the PFC.<br />
Note: To use the <strong>Upgrade</strong> Wizard, IPX must be bound on the <strong>NetWare</strong> <strong>5.1</strong> server. You<br />
can unbind IPX afterwards (if appropriate).<br />
5. Set up the appropriate SLP design from the SLP design recommendations in the<br />
appendicies of this document.<br />
6. If any volumes you are going to migrate from <strong>NetWare</strong> 3.x contain files with non-DOS<br />
naming conventions, you must load the appropriate name spaces on the destination<br />
volumes of the <strong>NetWare</strong> <strong>5.1</strong> server and then add the name spaces to the volume prior to<br />
the migration.<br />
• Windows 95, Windows NT, and OS/2 name spaces are loaded through<br />
LONG.NAM (long names).<br />
• The NFS name space is loaded through NFS.NAM.<br />
• The Macintosh name space is loaded through MAC.NAM.<br />
Prepare the <strong>NetWare</strong> 3.x Server<br />
The following steps can and should (optimally) be done the day before the actual upgrade to ensure there<br />
will not be significant changes to the bindery and file system:<br />
1. Delete old and unused bindery information such as users, groups, print servers, print<br />
queues.<br />
2. Run SYS:SYSTEM\BINDFIX to remove obsolete mail directories and trustee<br />
assignments, and to compress the bindery files.<br />
Page 78 of 317 Novell PartnerNet Confidential 07/24/00<br />
Copyright © 2000 by Novell, Inc.
3. Run BINDFIX a second time to obtain a set of “clean” bindery files.<br />
4. Save the files NET$VAL.OLD, NET$PROP.OLD, and NET$OBJ.OLD to a safe<br />
location (diskette would be appropriate).<br />
5. Run VREPAIR to correct any file system errors. Begin the upgrade only after VREPAIR<br />
completes with no errors.<br />
6. Optional: Create two complete backups of the cleaned up <strong>NetWare</strong> 3.x server (after<br />
steps 1 and 2 above). Ensure that these backups can be restored. Since the <strong>NetWare</strong> 3.x<br />
server remains up, backups are not as crucial but are still recommended.<br />
7. Print out the system login script (NET$LOG.DAT). This information is useful if you<br />
later need to update the container login script.<br />
Isolate <strong>NetWare</strong> 3.x Server<br />
Isolate the <strong>NetWare</strong> 3.x server from the rest of your network. The entire migration setup should consist of<br />
the source server (<strong>NetWare</strong> 3.x), the destination server (<strong>NetWare</strong> <strong>5.1</strong>), and the <strong>Upgrade</strong> Wizard<br />
workstation. Place these three nodes on a fast link, for example 100 MB Ethernet.<br />
Update NLMs<br />
<strong>Upgrade</strong> Wizard workstation<br />
Netware 3<br />
source server Netware 5<br />
destination server<br />
Figure 2. Isolate the <strong>NetWare</strong> 3.x Server<br />
Make sure that the following NLM programs are updated to the latest versions on the <strong>NetWare</strong> 3.x server:<br />
• A3112.NLM<br />
• AFTER311.NLM<br />
• CLIB.NLM<br />
• MAC.NAM<br />
• SMDR.NLM<br />
• SPXS.NLM<br />
• STREAMS.NLM<br />
• TLI.NLM<br />
• TSA311.NLM<br />
• TSA312.NLM<br />
Page 79 of 317 Novell PartnerNet Confidential 07/24/00<br />
Copyright © 2000 by Novell, Inc.
These updated files are found on the <strong>Upgrade</strong> Wizard workstation after the <strong>Upgrade</strong> Wizard is installed.<br />
They are located at<br />
C:\PROGRAM FILES\UPGRADE\PRODUCTS\NW3X<br />
Load TSA500 on <strong>NetWare</strong> <strong>5.1</strong> Server<br />
TSA500 is the <strong>NetWare</strong> <strong>5.1</strong> target service agent (TSA) used to carry out tasks for SMS-compliant backup<br />
engines like SBACKUP. The <strong>Upgrade</strong> Wizard uses TSA to move the data from the source server to the<br />
destination server. TSA500 automatically loads SMDR.NLM (the storage management data requestor),<br />
which passes commands between the <strong>Upgrade</strong> Wizard processes and the target service agent. To do this,<br />
complete the following steps:<br />
1. Load TSA500.NLM on the <strong>NetWare</strong> <strong>5.1</strong> server.<br />
The SMDR configuration screen immediately appears and prompts you for the SMDR<br />
group context.<br />
2. Enter the SMDR group context or press Enter to select the default.<br />
A new screen appears and prompts you for the SMDR context.<br />
3. Enter the SMDR context or press Enter to select the default.<br />
Next you are prompted for the fully-distinguished name of the managing user login.<br />
4. Use the fully-distinguished name of ADMIN, and Press Enter.<br />
5. Type in the ADMIN password, and Press Enter.<br />
The target service agent is now successfully loaded.<br />
Verify Communication between Servers<br />
Make sure each server can see the other server across the network by executing the command DISPLAY<br />
SERVERS at the console prompt of each server. The output of this command should reveal the name of the<br />
opposite server. If the servers are not able to see each other, then unbind IPX from the network cards.<br />
Rebind IPX making sure that the IPX external network number reference (in the NET= parameter of the<br />
BIND command) matches for both servers.<br />
Launch the Novell <strong>Upgrade</strong> Wizard<br />
Do the following to launch the Novell <strong>Upgrade</strong> Wizard:<br />
1. Click the Windows 95 or Windows NT Start menu.<br />
2. Choose Programs > Novell > Novell <strong>Upgrade</strong> Wizard.<br />
Once the utility is launched, the Startup dialog box appears, ready for you to create a new project.<br />
Create an <strong>Upgrade</strong> Wizard Project<br />
A project is a model you use to place <strong>NetWare</strong> 3.x objects in the NDS tree. A project is created and<br />
completed before the actual migration can take place.<br />
1. In the Startup dialog box, choose Create New <strong>Upgrade</strong> Project, and click OK.<br />
A wizard is launched. The first page of the wizard asks you for the name and location of<br />
the new project.<br />
Page 80 of 317 Novell PartnerNet Confidential 07/24/00<br />
Copyright © 2000 by Novell, Inc.
2. Type a project name, and use the browse button to indicate the location where you want<br />
the project saved. Then click Next.<br />
A new page appears asking you to indicate the <strong>NetWare</strong> 3.x server you are migrating<br />
from (the source) and the NDS tree you are migrating to (the destination).<br />
3. Use the two drop-down list boxes to indicate the source server and destination tree.<br />
If the desired source server and/or destination tree are not displayed, use the server<br />
button or tree button to log in to a server or NDS tree.<br />
4. Once you have indicated the source server and NDS tree, click Next.<br />
A new wizard page displays information about the utility’s database.<br />
5. Click Create to create the upgrade project.<br />
6. Move objects in the project window as necessary.<br />
The indicated source server and destination tree are displayed in the project window<br />
where bindery objects and volume data from the source server can be dragged and<br />
dropped to desired locations in the NDS tree. A sample project window is shown below.<br />
Create Subordinate Objects (conditional)<br />
Figure 3. Sample Project Window<br />
Before dragging and dropping the bindery or volume data, first determine where in the destination tree you<br />
want each to be copied to. If the desired container (for the bindery) or folder (for the volume data) does not<br />
already exist in the NDS tree, right-click the “parent” (container for the bindery, folder or volume for the<br />
volume data). Create and name the new container or folder as shown here:<br />
Figure 4. Create a New Organizational Unit<br />
Page 81 of 317 Novell PartnerNet Confidential 07/24/00<br />
Copyright © 2000 by Novell, Inc.
Move Objects<br />
Click and drag the bindery or volume objects from the source area to the desired location in the destination<br />
area.<br />
Figure 5. Sample Project Window with Dragged and Dropped Objects<br />
Verify Migration Readiness<br />
Once the bindery and volumes have been moved to the destination area, you should verify that the<br />
migration can proceed as indicated in the project window. The verification process checks for object<br />
conflicts, sufficient NDS and file system rights, disk space limitations, and a variety of other things that<br />
could impede the migration. To verify that the migration can proceed, complete the following steps:<br />
1. From the toolbar, click Verification, or choose Project > Verify.<br />
A new wizard is launched. The first wizard page gives an overview of how the<br />
verification process works.<br />
2. Click Next.<br />
A new page appears, allowing you to indicate if you would like to migrate your print<br />
information, and if so, to which volume. This lets you place your existing <strong>NetWare</strong> print<br />
queues, print servers, and printers into desired locations in the new NDS tree.<br />
3. Choose whether to migrate your print information.<br />
(3a) If you do not want to migrate the print information, remove the check from the box<br />
at the top of the page.<br />
(3b) If you want to migrate the print information, choose the desired volume in the tree<br />
browser, and click Next.<br />
A new page appears, allowing you to apply an existing NDS template object to all users<br />
being migrated. A template object allows you to easily establish a common set of<br />
properties for the new NDS users, rather than setting those properties individually. The<br />
properties of the template object are applied only to new user objects created after the<br />
migration process is completed as new users are added to the NDS tree.<br />
Page 82 of 317 Novell PartnerNet Confidential 07/24/00<br />
Copyright © 2000 by Novell, Inc.
4. Decide whether to apply a template object.<br />
If you would like to create a template object, you can do so in the next screen.<br />
(4a) If you do not want to apply a template object, remove the check from the box at the<br />
top of the page.<br />
(4b) If you want to apply a template object locate, choose the desired template object (if<br />
one already exists), and click Next.<br />
A new page appears giving you the option to create a template object. You can then<br />
apply this template when you set up new users in the NDS tree.<br />
5. If you want to create a template, check the box and enter a name for the template, then<br />
click Next.<br />
A new page appears asking what you would like to do to resolve duplicate files.<br />
6. Make a selection, and click Next to continue.<br />
A new page appears, prompting you for the password to the source server and destination<br />
tree.<br />
7. Enter the passwords, and click Next.<br />
A new wizard page lets you indicate the type of verification to be performed. Check<br />
boxes let you indicate what categories are verified.<br />
8. Mark the appropriate boxes to indicate what you want verified, and click Next.<br />
After running the verification, a wizard page appears showing remaining naming<br />
conflicts between same-type objects.<br />
9. Correct naming conflicts between same type objects. To correct the naming conflicts do<br />
one of the following:<br />
• Let the wizard rename the object automatically.<br />
• Choose to not migrate the object.<br />
• Merge the objects and maintain the bindery properties.<br />
• Merge the objects and maintain the NDS properties.<br />
If you find no naming conflicts, the list box in the wizard page is blank. Click next to<br />
continue.<br />
A new wizard page appears showing any naming conflicts between different type<br />
objects, or items that cannot be merged. These include print forms, print devices, and<br />
print configurations.<br />
10. Correct naming conflicts between different type objects. To correct the naming conflicts<br />
do one of the following:<br />
• Let the wizard rename the object automatically.<br />
• Choose to not upgrade the object.<br />
If you do not choose a conflict resolution option, the object will be renamed.<br />
If you find no naming conflicts, the list box in the wizard page is blank.<br />
Address TSA500 Errors<br />
If the verification results page returns the error “Can’t load the TSA500.NLM,” resolve it by completing<br />
the following steps:<br />
1. Save the current project.<br />
2. Close the migration wizard on the workstation.<br />
Page 83 of 317 Novell PartnerNet Confidential 07/24/00<br />
Copyright © 2000 by Novell, Inc.
3. Load TSA500.NLM on the <strong>NetWare</strong> <strong>5.1</strong> server.<br />
The SMDR configuration screen immediately appears. You are prompted for the SMDR<br />
group context.<br />
4. Enter the SMDR group context, or press Enter to select the default.<br />
Next you are prompted for the SMDR context.<br />
5. Enter the SMDR context, or press Enter to select the default.<br />
Next you are prompted for the full-distinguished name of the managing login (use the<br />
ADMIN login).<br />
6. Enter the fully-distinguished name of the ADMIN login, and press Enter.<br />
7. Enter the ADMIN password, and press Enter.<br />
The target service agent is now successfully loaded.<br />
8. Run the migration wizard again.<br />
9. Open the last project.<br />
10. From the menu bar, click Project, Verify Project.<br />
11. Repeat the steps from step 2 onward until project verification is finished.<br />
All errors must be resolved before the migration wizard lets you continue.<br />
12. Click Next to continue.<br />
A verification summary page appears with verification results.<br />
13. Read through the text, and click Finish.<br />
Migrate Across-the-Wire<br />
When the project window and verification are completed, and all conflicts, warnings, and errors have been<br />
addressed, you are ready to migrate the bindery and file system across-the-wire. Do it by completing the<br />
following steps:<br />
1. From the toolbar, click the <strong>Upgrade</strong> button, or choose Project, <strong>Upgrade</strong>.<br />
A new wizard launches. The first wizard page describes how the upgrade works.<br />
2. Click Next.<br />
Note: From this point, the upgrade repeats all verification steps listed earlier. One<br />
exception is that the Finish button in step 12 above is now an <strong>Upgrade</strong> button.<br />
Any conflicts shown during the previous verification but not corrected are indicated by a check through the<br />
icon, indicating that the conflict has already been seen.<br />
3. If you have corrected all the errors, begin the migration by clicking the <strong>Upgrade</strong> button.<br />
The wizard first copies the bindery contents, and then the file system (according to where<br />
you dragged objects in the project window).<br />
A progress bar indicates the relative percentage of upgraded objects and those yet to be<br />
upgraded.<br />
Note: You can stop the migration by clicking Stop. A dialog box appears asking you to<br />
confirm your choice. If you still want to stop the migration, click Yes.<br />
The migration is terminated. All <strong>NetWare</strong> 3.1x server bindery and file contents copied to<br />
that point remain in their destinations in the NDS tree until you delete them manually.<br />
If you did not stop the migration, then the process performed by the <strong>Upgrade</strong> Wizard finishes.<br />
Go to the “Test Criteria” section later in this subprocess.<br />
Page 84 of 317 Novell PartnerNet Confidential 07/24/00<br />
Copyright © 2000 by Novell, Inc.
<strong>NetWare</strong> 4.x to <strong>NetWare</strong> <strong>5.1</strong> <strong>Upgrade</strong> Wizard<br />
You must use <strong>Upgrade</strong> Wizard 3.0 for a <strong>NetWare</strong> 4.x to <strong>5.1</strong> upgrade. Older versions of the <strong>Upgrade</strong> Wizard<br />
will not work with an upgrade of <strong>NetWare</strong> 4.x to <strong>5.1</strong>. The <strong>Upgrade</strong> Wizard helps you through the process<br />
by checking and verifying migration actions prior to the actual migration to minimize risk.<br />
This upgrade requires a “source” and a “destination” server. The “destination” server will be the new<br />
upgraded server and can be pre-installed with the new version prior to the upgrade.<br />
The <strong>Upgrade</strong> Wizard does the following:<br />
• Migrates passwords, other bindery and directory objects, and files with trustee assignments/rights<br />
to the new server hardware.<br />
• Handles a number of pre-migration validations to increase confidence (for both you and your<br />
customer).<br />
• Copies files during business hours (if desired) to minimize file copy time during actual migration<br />
when you can recopy changed files.<br />
• Restores all trustees and ownership of files copied.<br />
• Lets you edit files on the new server while comparing them to their counterparts on the<br />
old server.<br />
• Supports license installation (see Licensing Task for more details).<br />
For an across-the-wire <strong>NetWare</strong> 4.x to <strong>5.1</strong> upgrade:<br />
1. Log in to both servers (source and destination) from a workstation. (You must have [Root]<br />
Admin privileges on the 4.x and <strong>5.1</strong> systems.)<br />
2. Patch the system.<br />
Apply patches as indicated on http://support.novell.com .<br />
3. Run Vrepair.nlm on all volumes.<br />
Document and resolve any errors. Be sure the appropriate VREPAIR name space support<br />
modules are loaded during the repair.<br />
4. Perform an NDS HealthCheck (see Appendix F, NDS HealthCheck Lite, for specific<br />
information on how to do this).<br />
5. Perform the upgrade using the <strong>Upgrade</strong> Wizard, which will walk you through the process.<br />
Using the Novell <strong>Upgrade</strong> Wizard is the Novell recommended way to upgrade (across-the-wire) from<br />
<strong>NetWare</strong> 4.x.<br />
<strong>NetWare</strong> 3.x to <strong>NetWare</strong> <strong>5.1</strong> Manual <strong>Upgrade</strong><br />
You can only use the manual upgrade option for upgrading from <strong>NetWare</strong> 3.x to <strong>NetWare</strong> <strong>5.1</strong>. This option<br />
is not applicable to a <strong>NetWare</strong> 4.x to <strong>NetWare</strong> <strong>5.1</strong> upgrade.<br />
Note: The steps (and dialog) are to be tested and verified in the lab environment. Make the necessary<br />
changes (as appropriate). The completed status report can be given to the customer as part of their<br />
implementation plan to be used in the pilot test (subprocess 5).<br />
A manual upgrade logically follows the same process flow as the <strong>NetWare</strong> 3.x to <strong>NetWare</strong> <strong>5.1</strong> <strong>Upgrade</strong><br />
Wizard except that the process of upgrading the bindery and copying the file system is done without<br />
<strong>Upgrade</strong> Wizard assistance. This makes the upgrade faster since no workstation is involved.<br />
Page 85 of 317 Novell PartnerNet Confidential 07/24/00<br />
Copyright © 2000 by Novell, Inc.
Install the <strong>NetWare</strong> <strong>5.1</strong> Server<br />
The <strong>NetWare</strong> <strong>5.1</strong> server must be installed with the latest patches and must meet the <strong>NetWare</strong> <strong>5.1</strong> minimum<br />
prerequisites. To do this, complete the following steps:<br />
1. Use the completed NDS design document to properly determine and set up the<br />
following:<br />
• Where the server will be placed in the tree (tree name and context)<br />
• The appropriate server time zone information<br />
• The type of time server (such as reference, single reference, primary,<br />
secondary)<br />
• Replicas to be stored on the server<br />
• The bindery context needed for the server<br />
• Admin context and password (if an NDS tree already exists)<br />
2. Install the appropriate <strong>NetWare</strong> <strong>5.1</strong> components.<br />
3. Set up and install the appropriate licensing scheme.<br />
4. Load and bind the appropriate protocols on the server (such as IPX, IP, IP/CMD, and so<br />
forth).<br />
Note: To use the <strong>Upgrade</strong> Wizard, IPX must be bound on the <strong>NetWare</strong> <strong>5.1</strong> server.<br />
You can unbind IPX afterwards (if appropriate).<br />
5. Set up the appropriate SLP.<br />
6. If volumes to be migrated from <strong>NetWare</strong> 3.x contain files with non-DOS naming<br />
conventions, you must load the appropriate name spaces on the destination volumes of<br />
the <strong>NetWare</strong> <strong>5.1</strong> server and add the name spaces to the volume prior to the migration.<br />
• Windows 95, Windows NT, and OS/2 name spaces are loaded through<br />
LONG.NAM (long names).<br />
• The NFS name space is loaded through NFS.NAM.<br />
• The Macintosh name space is loaded through MAC.NAM.<br />
Prep the <strong>NetWare</strong> 3.x Server<br />
The following can and should be done the day before the actual upgrade to ensure that there are no<br />
significant changes to the bindery and file system:<br />
1. Delete old and unused bindery information such as users, groups, print servers, and print<br />
queues.<br />
2. Run SYS:SYSTEM\BINDFIX to remove obsolete MAIL directories and trustee<br />
assignments, and to compress the bindery files.<br />
3. Run BINDFIX a second time to obtain a set of clean bindery files.<br />
4. Save the files NET$VAL.OLD, NET$PROP.OLD, and NET$OBJ.OLD to a safe<br />
location (diskette would be appropriate).<br />
5. Run VREPAIR to correct any file system errors. Begin the upgrade only after VREPAIR<br />
completes with no errors.<br />
6. Optional: Create two complete backups of the cleaned up <strong>NetWare</strong> 3.x server (after<br />
steps 1 and 2 above are done).<br />
Ensure that these backups can be restored. Since the <strong>NetWare</strong> 3.x server remains up, the<br />
backups are not crucial but are still recommended.<br />
Page 86 of 317 Novell PartnerNet Confidential 07/24/00<br />
Copyright © 2000 by Novell, Inc.
7. Print out the system login script (NET$LOG.DAT). This information is useful if you<br />
later need to update the container login script.<br />
Perform the Manual <strong>Upgrade</strong><br />
Important: The bindery must be upgraded into NDS first. If the bindery is not in place before the file<br />
system is restored, all trustee assignments will be lost.<br />
1. Run SYS:SYSTEM\BINDFIX to remove obsolete MAIL directories and trustee<br />
assignments, and to compress the bindery files.<br />
2. Run BINDFIX a second time to obtain a set of clean bindery (*.OLD) files.<br />
2. Copy these *.OLD files to the SYS:SYSTEM directory on the <strong>NetWare</strong> <strong>5.1</strong> server, and<br />
rename them to *.SYS files.<br />
3. Set BINDERY CONTEXT on the <strong>NetWare</strong> <strong>5.1</strong> server to the container you want the<br />
bindery objects imported to. The <strong>NetWare</strong> <strong>5.1</strong> server must have a read-write or higher<br />
replica of container you are setting bindery context to.<br />
4. Import the <strong>NetWare</strong> 3.x bindery files into <strong>NetWare</strong> <strong>5.1</strong>/NDS using one of the following:<br />
• NWCONFIG<br />
• Directory options<br />
• <strong>Upgrade</strong> <strong>NetWare</strong> 3.x bindery information into the directory<br />
At this point, the <strong>NetWare</strong> 3.x bindery is migrated into NDS.<br />
Copy the File System from <strong>NetWare</strong> 3.x to <strong>NetWare</strong> <strong>5.1</strong><br />
The necessary <strong>NetWare</strong> 3.x files can be copied to the <strong>NetWare</strong> <strong>5.1</strong> server. Novell recommends a server-toserver<br />
restore (for speed) or another option that will preserve trustee assignments, name space, IRM, and<br />
directory restrictions.<br />
Note: Do not use COPY or NCOPY because these two utilities change ownership to the UserID<br />
performing the copy and all trustee assignments are lost.<br />
Cleaning Up NDS After a Manual <strong>Upgrade</strong><br />
If users have multiple accounts on multiple <strong>NetWare</strong> 3.x servers and all of these <strong>NetWare</strong> 3.x users and<br />
servers are placed into the same NDS container, the upgrade utility will ask or handle how to merge likenamed<br />
user accounts. However, if users and servers are not upgraded into the same NDS container, you<br />
need to decide which user account to keep in NDS, as the NDS goal is one user account per tree.<br />
The MERGEGROUP utility available from http://www.dreamlan.com can be used to combine the group<br />
membership list for a user.<br />
The CLEANUP utility can be used in NDS to convert uppercase names (which is how they are represented<br />
in the bindery) to lowercase names. Additionally, this utility replaces spaces in names with underscores.<br />
Accelerated <strong>Upgrade</strong><br />
This is for <strong>NetWare</strong> 4.x or 5.0 to <strong>NetWare</strong> <strong>5.1</strong> upgrades.<br />
Before you begin the upgrade, you must already have one <strong>NetWare</strong> <strong>5.1</strong> server that was installed as an inplace<br />
upgrade in order to use the accelerated upgrade utility; this is because the accelerated upgrade utility<br />
does not extend the schema.<br />
Page 87 of 317 Novell PartnerNet Confidential 07/24/00<br />
Copyright © 2000 by Novell, Inc.
Do these steps to prepare for an accelerated upgrade:<br />
1. Copy the accelerated upgrade utility (UPGRADE.IPS) to the source server (use your<br />
existing <strong>NetWare</strong> <strong>5.1</strong> server with the CD mounted).<br />
2. Prepare the destination server (the server to be upgraded—your existing 4.x server).<br />
3. Make a backup of the DOS partition. If downtime is a concern, try using MOUNTDOS.EXE<br />
(a third-party utility) to mount the DOS partition as a volume, and copy the data elsewhere<br />
to another location (your workstation or an existing server not affected by this upgrade).<br />
Do these steps to complete the upgrade:<br />
1. Access the <strong>NetWare</strong> 4.x console (either directly or via RCONSOLE).<br />
2. Load INSTALL.NLM.<br />
3. Select Product Options, then select Install a Product Not Listed.<br />
4. Press F3, and enter the path to the directory (on your source server) where the accelerated<br />
upgrade utility is located (UPGRADE.IPS).<br />
5. Log in to the source server (must have admin equivalency).<br />
6. Select the tasks to be performed. Normally, select all the tasks unless you need to do<br />
something unique.<br />
7. Enter the directory of the <strong>NetWare</strong> <strong>5.1</strong> CDROM (sourceservername/volume:)<br />
8. Verify the directory name for DOS partition files (default is C:\NWSERVER).<br />
Once steps 1-8 are done, the utility will copy the necessary files, reboot, and automatically run the<br />
hardware detection NLMs. The auto-detection code will then replace your existing STARTUP.NCF, to<br />
load the appropriate .HAM and .CDM drivers when it reboots. As a backup, the existing drivers will<br />
automatically be renamed with a .OLD extension.<br />
By default, the server will allow three connections to the new server before licensing is installed. The<br />
upgrade utility does not allow for licensing. You must use NWCONFIG.NLM to install the appropriate<br />
license after the server is up. (According to documentation, licensing can now be handled by the<br />
Accelerated <strong>Upgrade</strong> utility; as of this writing, it has not been tested or verified.)<br />
Note: An accelerated upgrade is a utility that lets you quickly upgrade a <strong>NetWare</strong> 4.11+ server to<br />
<strong>NetWare</strong> <strong>5.1</strong> without having to be at the server console. The accelerated upgrade utility assumes that the<br />
baseline configuration has been met (hardware requirements, etc.) from PFC information previously<br />
gathered. It uses a text-based script to copy all the files necessary for the upgrade. You can help yourself by<br />
either pre-mounting the <strong>NetWare</strong><strong>5.1</strong> CD in a server, or by having these files available elsewhere on the<br />
network. You must access the target server’s console directly or via RCONSOLE. Using a source server<br />
eliminates the need to physically access the server being upgraded.<br />
An accelerated upgrade has the following limitations:<br />
• The server cannot be the first <strong>NetWare</strong> <strong>5.1</strong> server in the tree.<br />
• The server must be running <strong>NetWare</strong> 4.10?? or 4.11 (patched).<br />
If it is a <strong>NetWare</strong> 4.10 server, it must already have long name space on all volumes, and not have<br />
more than 1 million directory entries on any volume. (Does not apply to 4.11).<br />
• The server cannot be running SFT-III.<br />
• The server cannot be running HCSS.<br />
• The server must already have IP bound to the LAN adapters. (You cannot add IP during the<br />
accelerated upgrade. Technically, you could add IP after installation is completed.)<br />
• The REMOTE.nlm and RSPX.NLM must be loaded.<br />
Page 88 of 317 Novell PartnerNet Confidential 07/24/00<br />
Copyright © 2000 by Novell, Inc.
The following are the minimum requirements for using an accelerated upgrade:<br />
• The server must meet the Novell recommended <strong>NetWare</strong> <strong>5.1</strong> hardware specifications (see<br />
“<strong>NetWare</strong> <strong>5.1</strong> Prerequisites”).<br />
• There must be 35-50MB of disk space available on the DOS partition (you can get by with 25MB)<br />
and 250MB available on the SYS: volume (purge the volume first). You can get by with the<br />
25MB available on the DOS partition if and only if you are copying over existing files (i.e.<br />
C:\NWSERVER.)<br />
• Access to the accelerated upgrade script (UPGRADE.IPS).<br />
• Access to the upgrade files on the network (the <strong>NetWare</strong> <strong>5.1</strong> CD).<br />
• Access to the license disk (you can always add the license later after the server reboots).<br />
The accelerated upgrade is used for <strong>NetWare</strong> 4.x customers to quickly get upgraded to <strong>NetWare</strong> <strong>5.1</strong>. This<br />
utility is not available for <strong>NetWare</strong> 3.x customers.<br />
DSMAINT<br />
DSMAINT requires that you have an NDS version of <strong>NetWare</strong> (non <strong>NetWare</strong> 3.x servers). This upgrade is<br />
similar to the across-the-wire upgrade in that it requires a “source” and “destination” server.<br />
This document briefly describes how to use DSMAINT.NLM to upgrade a <strong>NetWare</strong> server to newer<br />
hardware. For purposes of this document, the term “Server A” refers to the <strong>NetWare</strong> server being replaced.<br />
The term “Server B” refers to the new server. Server B will completely replace Server A in the tree.<br />
The following tasks outline the overall procedure:<br />
1. Ensure the NDS tree is healthy on Server A.<br />
2. Back up Server A with SMS compliant software.<br />
3. Log in to Server A.<br />
4. Use DSMAINT.NLM to back up directory services.<br />
5. Copy the backup.ds file to a local client hard drive.<br />
6. Install Server B into a “bogus” tree with the same name and IPX number as Server A.<br />
7. Log in to Server B and copy backup.ds to the SYS:\SYSTEM directory.<br />
8. Remove directory services from Server B.<br />
9. Use DSMAINT.NLM or INSTALL.NLM to restore directory services to Server B.<br />
10. Reinstall the backup software to Server B and restore the file system and trustees from tape.<br />
11. Verify the integrity of the migration.<br />
Ensure that the NDS tree is healthy on Server A.<br />
The NDS tree must be healthy before anything is done. There cannot be any communication<br />
(-625), synchronization, or TTS (-621) errors in the tree. There will be problems with the upgrade if these<br />
errors are not resolved.<br />
1. Load DSREPAIR.NLM on the server that holds the master of the [Root] partition and run<br />
Time Synchronization. Make sure that all servers are synchronized and error free.<br />
If there are time sync problems, see TID 2930686 for help in resolving them.<br />
Page 89 of 317 Novell PartnerNet Confidential 07/24/00<br />
Copyright © 2000 by Novell, Inc.
2. Run “Report Synchronization Status” on the Master of [Root].<br />
If there are any errors, resolve them. For example, a -625 error means there is a<br />
communication error with a specific server. Search the web for specific references to these<br />
problems and how to resolve them, or talk with Novell Technical Support about fixing them.<br />
3. If necessary, repair the directory services database of Server A.<br />
Load DSREPAIR.NLM, Advanced Options, Repair Local DS Database.<br />
Set every option to “No” except for “Check Local References.”<br />
Press F10 to run the repair.<br />
Save the database if the number of errors is low (fewer than 20). Run DSREPAIR and save<br />
until there are no more errors. Review the log file to determine what errors occurred.<br />
If there are no errors in either time synchronization or report synchronization status, the Tree<br />
is healthy. However, if the Tree is large, you may run this procedure (time synchronization<br />
and report synchronization status) at different points in the Tree to guarantee that there are<br />
no problems.<br />
Performing a DSMAINT procedure on a server that holds the master replica of a partition ([Root] or<br />
another partition) is not necessary with <strong>NetWare</strong> 4.1x and <strong>NetWare</strong> <strong>5.1</strong> as it was with <strong>NetWare</strong> 4.0x.<br />
Beginning with <strong>NetWare</strong> 4.1x, NDS recognizes that the master replica is down and all requests are routed<br />
through a read/write replica of the partition. When a new server is brought online, it receives all of the<br />
updates that occurred while that master replica was offline.<br />
The master replica of a partition is needed for:<br />
• Partitioning operations<br />
• Janitor process (cleaning up deleted, renamed, or moved objects)<br />
• Limber process (server address and name checking)<br />
• Other NDS background processes<br />
Note: When using DSMAINT on a server that holds the master replica of a partition, do not perform<br />
partitioning operations, move, delete, or rename objects in the tree while the server is offline.<br />
Because every 4.x server (or above) contains a directory services database, DSMAINT can even be used on<br />
a server that does not hold any replicas (external reference server). External reference servers do not hold<br />
real objects like a server that has a read/write or master replica, but pieces of objects are located on them.<br />
The external references comprise the DS database on this type of server. If DSMAINT is not used, the<br />
printing, trustees, and anything else specifically identified with the server will be lost and will have to be<br />
recreated by hand.<br />
Back up Server A with SMS compliant software.<br />
SMS compliant software includes ARCserve, Backup Exec, and SBACKUP.NLM. The backup must use<br />
Novell’s TSAs in order to copy data and trustees from the server.<br />
You must enable a switch in ARCserve because it does not back up <strong>NetWare</strong> trustees by default. Go to the<br />
ARCserve Scheduler console screen and into “Configure ARCserve server.” Make sure that “Use SMS<br />
logic for DOS and Mac files also” is set to “Yes.”<br />
If your backup program does not use Novell’s TSAs, the trustees on every volume must be reassigned<br />
manually on Server B.<br />
Page 90 of 317 Novell PartnerNet Confidential 07/24/00<br />
Copyright © 2000 by Novell, Inc.
Note: Some customers have tried to copy data from Server A to Server B (before making the DS switch).<br />
When this occurs, the trustees—ownership and file rights—are not copied.<br />
Directory services must go on before the trustees are laid down with the file system. Trustees are not a part<br />
of directory services. They are a part of the file system, so restoring directory services will not restore<br />
trustees. Trustees are re-linked to directory services by their full distinguished names (cn=admin.o=novell).<br />
If that name does not exist in directory services, the trustee is deleted. Therefore, NCOPY (which does not<br />
copy trustees) will not work by itself. The TCOPY or TBACK utilities from the support.novell.com site<br />
have to be used also. Restoring the file system and trustees before NDS is restored does not work either<br />
because the trustees have nothing to link to, or they will try to link to a name that does not exist in NDS.<br />
The trustees will be invalid and will be deleted. Replace NDS first, then trustees.<br />
Novell has programs on its web site that may ease this problem. TCOPY is a file migration utility.<br />
However, it only works in 4.x to 4.x (or 5.x) environments and both servers must be up and operating. This<br />
means that the <strong>NetWare</strong> OS cannot be upgraded because both servers cannot be on the wire at the same<br />
time. Using TCOPY alone is the same as restoring the file system before the directory is restored.<br />
TBACKUP, on the other hand, will back up trustees and let you restore them afterwards (IRF, ownership,<br />
rights, etc.). To use this program, copy the data from Server A to Server B. After the directory is moved<br />
over, use the TBACKUP file from Server A to restore the trustee rights. Both TCOPY and TBACKUP can<br />
be found on the minimum patch list page at http://support.novell.com.<br />
If you have an SMS compliant backup program, use it and don’t bother with the other methods. It depends<br />
on your schedule and what you can accomplish ahead of time to prevent a long day.<br />
1. Make sure you use the latest version of target service agents (TSAs) on the server.<br />
2. If necessary, apply the server patch kit for 4.11 (IWSP5b) or SMSUP6 for <strong>NetWare</strong> 4.10.<br />
Note: The version of the TSAs used is critical because the storage of the full distinguished<br />
name in the trustees list depends upon it.<br />
3. Do the SMS-compliant backup.<br />
Use DSMAINT.NLM to back up directory services.<br />
1. Log in to Server A as admin or admin equivalent, and map a drive to the system directory.<br />
Note: You must log in to Server A before backing up the directory; once the backup begins<br />
directory services are locked and login is disabled.<br />
2. Search the system directory for a file called “backup.ds” or “backup.nds.” If either file<br />
exists, delete or rename it.<br />
Note: Rename or delete the backup.ds or backup.nds file before running DSMAINT;<br />
otherwise, problems will occur. DSMAINT creates backup.ds, and INSTALL.NLM creates<br />
backup.nds during a backup of directory services.<br />
3. If necessary, upgrade Server A to the latest version of DS (DS411L.EXE). The latest version<br />
of DS also updates DSMAINT.NLM and others.<br />
You are now ready to back up directory services.<br />
Note: If DS411L.EXE, or later, is installed on the <strong>NetWare</strong> 4.11server (includes DS.NLM<br />
version 5.99a), follow the 4.10 procedure with DSMAINT. Use the improved version of<br />
DSMAINT included with DS411L.EXE; otherwise, load INSTALL.NLM at the system<br />
console prompt. Choose “Directory Options” and then “Directory Backup and Restore<br />
Options.” Then select “Save Local DS Information Prior to Hardware <strong>Upgrade</strong>.”<br />
4. Establish an RCONSOLE session with Server A, and load DSMAINT.NLM.<br />
5. Select the option to back up directory services. Read the warning screen that appears.<br />
Page 91 of 317 Novell PartnerNet Confidential 07/24/00<br />
Copyright © 2000 by Novell, Inc.
6. Log in as the system administrator using the full context (.admin.novell, for example). If you<br />
do not use the full context for the administrator, a -601 error appears saying, “unable to<br />
locate object.”<br />
7. Redirect and save the NDS backup file to SYS:\SYSTEM.<br />
Note: Some versions of DSMAINT.NLM will ask for an alternate path to store the backup<br />
file. Always redirect the file to SYS:\SYSTEM. (Remember, you are logged into this server<br />
from your PC and probably running this utility via an RCONSOLE session.)<br />
Never save the file to Drive A:\. Most customers have NDS databases that are larger than<br />
1.44 MB. DSMAINT.NLM does not provide a way to span diskettes. If you accidentally<br />
choose to store the NDS backup file on drive A: and your database is larger than 1.44 MB, it<br />
won’t work.<br />
Note: After the backup is complete, Server A’s directory services database is locked. No<br />
one can log in to the server, and no changes can take place in its database. (Do not perform<br />
any other DS maintenance tasks at all until this entire process is completed.)<br />
Since NDS is a dynamic environment, DSMAINT.NLM locks the NDS database to create a<br />
static copy of it. Backing up NDS and letting it remain open guarantees that changes will<br />
occur between the time the backup is performed and when NDS is restored to the network.<br />
Often the consequences of those changes are not easy to fix. Turning a dynamic process to a<br />
static one creates a point of reference so that when NDS is restored to Server B, the other<br />
servers in the network will know exactly where to pick up and send updates.<br />
8. Once the backup of directory services is complete, go to the client workstation that is<br />
already logged in and retrieve the backup.nds file (backup.ds for DSMAINT.NLM users),<br />
and copy it to the local hard drive.<br />
Note: Do not delete this file on either the client or server—it is the only copy of Server A’s<br />
directory. If there are any problems with the new server (Server B), this file lets you unlock<br />
DS on Server A so that it can still function while problems with Server B are being<br />
addressed. Just leave it alone. If there are multiple instances of the file, check the date and<br />
time and copy the most recent one.<br />
9. Down Server A and remove it from the network. Set Server A aside until Server B is on the<br />
network and functioning properly.<br />
Note: For now, ignore Server A. Do not FDISK or reformat the hard drive. Do not run it as<br />
a client workstation.<br />
Install <strong>NetWare</strong> on Server B.<br />
When <strong>NetWare</strong> is installed on Server B, make sure it is identical to Server A. For instance, if compression<br />
was enabled on Server A, enable compression on Server B. (Use INSTALL.NLM to check compression in<br />
“Volume Options.”) If name spaces were installed on Server A, make sure name spaces are installed on<br />
Server B. (Type “volumes” at the system console.)<br />
Sub-allocation and block sizes can differ from Server A to Server B. In other words, Server A could have a<br />
volume with sub-allocation disabled and a 4KB block size while Server B’s corresponding volume could<br />
have sub-allocation enabled and a 64KB block size. The specific difference doesn’t matter. Consider<br />
copying the contents of the DOS partition from server to server—including the startup.ncf file. This is a<br />
convenient way to apply all of the patches from one server to the other. However, the drivers in the<br />
startup.ncf will probably change because the new server will likely have different hardware and will<br />
therefore need different drivers and settings in the startup.ncf file. Do not copy the patches from a<br />
<strong>NetWare</strong> 4.10 to 4.11 server—they are not compatible. Install the service pack to enable the patches.<br />
Page 92 of 317 Novell PartnerNet Confidential 07/24/00<br />
Copyright © 2000 by Novell, Inc.
1. Give Server B the same name and internal IPX number as Server A.<br />
Note: As long as Server A is no longer on the network, you shouldn’t experience any LAN<br />
communication problems. Having two servers on the same network with identical IPX<br />
numbers and names can prevent routers from finding the correct server to address data to<br />
because each server is broadcasting itself as the correct route. To address this problem,<br />
either install <strong>NetWare</strong> with Server B offline, or insert Server B into the production LAN<br />
only after server A has been turned off.<br />
2. Create a temporary (new) NDS Tree for Server B unless Server A was the only server on the<br />
network.<br />
Note: <strong>NetWare</strong> does not process Directory Services SAP traffic across Trees, so even<br />
though Server B has the same name and IPX number as Server A, it isn’t known to the rest<br />
of the servers on the network. The other <strong>NetWare</strong> servers still believe Server A is down. If<br />
server B is installed into the same Tree as Server A and the other server or servers<br />
communicate with it, NDS will not synchronize properly.<br />
3. <strong>Upgrade</strong> DS.NLM to the latest version and apply the appropriate patches to Server B.<br />
4. Log in to Server B as admin or an admin equivalent and copy the backup.ds or backup.nds<br />
file from Server A to the SYS:\SYSTEM directory. (Backup.ds is the file that<br />
DSMAINT.NLM creates and uses. Backup.nds is the file that INSTALL.NLM creates and<br />
uses.)<br />
5. Load INSTALL.NLM, and remove Directory Services from Server B. Select “Directory<br />
Options,” then “Remove Directory Services from this Server.”<br />
6. Log in as admin using the full context and make sure that Directory Services are removed.<br />
Note: Because Server B is the only one in the temporary tree, it holds the Master replica of<br />
[Root] and is a Single time source. Error messages to that effect will warn you not to<br />
continue. Ignore them and go on.<br />
7. Restore backup.ds or backup.nds using DSMAINT.NLM or INSTALL.NLM as appropriate.<br />
Note: Novell recommends using the same program to restore the file that you used to back it<br />
up. Ideally, DSMAINT.NLM should be used throughout the procedure instead of<br />
INSTALL.NLM.<br />
<strong>NetWare</strong> 4.11 and <strong>NetWare</strong> <strong>5.1</strong> do not come with DSMAINT.NLM installed on the server<br />
by default. A directory services patch must be applied to <strong>NetWare</strong> 4.11. For <strong>NetWare</strong> <strong>5.1</strong>,<br />
DSMAINT.NLM can be found in a <strong>NetWare</strong> 4.11directory services patch. Check<br />
http://support.novell.com on the minimum patch list page for this patch.<br />
8. Edit Server B’s AUTOEXEC.NCF and change the time server type from Single to<br />
Secondary.<br />
9. Using INSTALL.NLM or DSMAINT.NLM, restore Directory Services, and place Server B<br />
in the “original” (production) tree. (Do not choose to restore server references or anything<br />
like that—leave these options alone. The top two options are the only ones used in this<br />
procedure.)<br />
Note: If you are asked to log in, make sure it is with full context (.admin.novell).<br />
Some errors may result at this point if the procedure was not followed correctly.<br />
If all of the servers are not up and communicating (except Server A), the file will not be<br />
restored. This program “talks” with every server that Server A knew about. If one is down,<br />
the restore will error out and fail.<br />
If the IPX internal network number and the name of Server B are not the same as server A’s,<br />
the restore will fail. If this happens an error message will inform you that the IPX numbers<br />
are different between the servers and that backup.ds cannot be restored.<br />
Page 93 of 317 Novell PartnerNet Confidential 07/24/00<br />
Copyright © 2000 by Novell, Inc.
Restore the file system and trustees to Server B.<br />
1. Install the backup software to Server B.<br />
Note: Use the same program and version that you used to back up Server A.<br />
2. Restore the file system and trustees.<br />
Note: Never restore NDS from your tape backup during a dsmaint procedure.<br />
Common questions and answers concerning the restoration of files<br />
Questions Answers<br />
If the server is upgraded to a<br />
newer version (4.10 to 4.11, for<br />
example), should every file be<br />
copied—including the system<br />
and public files?<br />
If the server is not upgraded to a<br />
newer version of <strong>NetWare</strong>,<br />
should every file be copied?<br />
No. There are four directories you will<br />
probably not copy from the SYS volume:<br />
SYSTEM, PUBLIC, LOGIN, and ETC.<br />
However, some of the configuration files in<br />
the ETC directory should be brought across<br />
if the server used MPR or NFS, for<br />
example. Mail directories may need to be<br />
copied across if there are users who<br />
authenticate to the server with a bindery<br />
connection, or if programs, such as Pegasus<br />
Mail used the mail directory. You may also<br />
need to restore the Queue directories so that<br />
Server B can use Server A’s print queues.<br />
Yes. By default, this type of migration<br />
means that the two servers will be the same.<br />
Note: If you accidentally restore NDS (from the tape backup software) to Server B, there<br />
will be big problems if it is left in the production environment. To fix these problems,<br />
remove directory services, restore the backup.ds file using DSMAINT.NLM, and restore the<br />
file system again. The file system must be restored again because directory services was<br />
removed. When directory services are removed from a server, all of the trustees to every<br />
volume are removed too.<br />
1. Use NWADMIN to make sure trustees and rights were restored correctly. Make sure that<br />
printing works correctly, the login scripts function, and anything else you feel important is<br />
running well.<br />
2. Allow the server 20-30 minutes to contact other servers on the LAN and re-establish its<br />
synchronization ring.<br />
3. Use DSREPAIR to check synchronization status.<br />
What to do if Server B doesn’t work correctly and Server A needs to come back up:<br />
1. Take Server B off the network. (Unplug the LAN cable or down the server.)<br />
2. Connect Server A to the network and bring it up.<br />
Note: Server A will report an error immediately after mounting the SYS volume that the<br />
local database is inconsistent and cannot be opened. <strong>NetWare</strong> will suggest using<br />
DSREPAIR to fix the problem. Ignore this message. DSREPAIR cannot fix this problem.<br />
The error is a result of the database changes made to NDS while DSMAINT performed the<br />
backup.<br />
Page 94 of 317 Novell PartnerNet Confidential 07/24/00<br />
Copyright © 2000 by Novell, Inc.
3. Load DSMAINT.NLM or INSTALL.NLM (whichever one was used to do the backup), and<br />
choose the option to restore directory services after a hardware upgrade. If asked, direct the<br />
program to SYS:\SYSTEM for the backup.ds file. Directory services will be restored from<br />
the backup.ds file on Server A. After the restore, Server A should function as before.<br />
4. Use INSTALL.NLM to remove directory services from Server B so that the DSMAINT<br />
process can be repeated cleanly.<br />
Note: If this does not work, you can log an incident with Novell Technical Support who can<br />
provide additional help with the restoration of backup.ds. Do not forcefully remove<br />
directory services from Server A until you have talked with Novell about this problem<br />
unless you are confident that removing DS from Server A will result in a faster resolution.<br />
Removing DS problems (usually happens with Server A after Server B is working properly):<br />
If you have problems removing directory services from a server, type “load install – dsremove” at the<br />
command line to remove it forcefully.<br />
INSTALL.NLM will go down the same code path to remove directory services as if the<br />
“– dsremove” switch was not loaded. However, install will not stop the removal of directory services when<br />
errors are encountered as it normally does. It will continue until removal is complete despite any errors that<br />
come up. Essentially it will remove the NDS files from the server no matter what. Ignore any errors that<br />
come up even if Install says, “directory services was not successfully removed.” If it prompts you to log in,<br />
press Esc, and skip the login prompt.<br />
Normally, INSTALL.NLM will contact the other servers in the Tree and tell them that a specific server is<br />
having its directory services database removed. These servers will remove all references to that server.<br />
When communication has broken down between servers, INSTALL.NLM has a hard time contacting other<br />
servers to inform them of changes. Forcefully removing directory services from a server can leave behind<br />
remnants of the directory that will cause problems if they’re not taken care of.<br />
If directory services will not come off Server B, remove them (offline) using the “– dsremove” switch.<br />
Conversely, if Server B is successfully placed into the Tree, but Server A’s directory services will not come<br />
off, remove them forcefully. There will be no consequences in removing directory services from Server A<br />
because Server B has replaced it.<br />
Warning: Do not remove directory services forcefully from a server unless you understand all of the<br />
consequences and are prepared to deal with them.<br />
Test Criteria<br />
The following criteria must be tested and validated in the prototype to verify the success of the conversion.<br />
Determine what the customer’s pass/fail criteria are for the upgrade to <strong>NetWare</strong> <strong>5.1</strong>. It will be necessary to<br />
document, discuss, and troubleshoot issues as they arise during the test and validation phase. Any items that<br />
fail must be properly resolved. The resolution must be documented. Each and every item test criteria item<br />
must pass before the engagement can continue.<br />
Log in as a typical user (not Admin), and verify authentication to NDS.<br />
❏ ❏ Verify conversion of login scripts and proper execution.<br />
Page 95 of 317 Novell PartnerNet Confidential 07/24/00<br />
Copyright © 2000 by Novell, Inc.
❏ ❏<br />
Note: Don’t forget the user login scripts (if appropriate). The MAIL<br />
directories become messy, since all user object IDs are changed during<br />
an across-the-wire (ATW) upgrade (not during an in-place upgrade).<br />
Verify that drive mappings are correct and functional.<br />
❏ ❏ Verify that print queues are captured.<br />
❏ ❏ Verify printing from all applications that existed pre-migration.<br />
❏ ❏ Verify rights to objects and containers (this also may include<br />
ACL/filters, etc.).<br />
❏ ❏ Verify SAP/RIP by display servers at the console.<br />
❏ ❏ Verify that volumes are mounted (VOLINFO or volumes at the system<br />
console).<br />
❏ ❏ Verify that IP/IPX is bound (if it is the desired protocol).<br />
❏ ❏ Verify that pre-migration applications run in accordance with the<br />
prototype.<br />
❏ ❏ Verify that all pre-migration NLMs are loaded and functional (a list of<br />
pre-migration from the PFC).<br />
❏ ❏ Verify that the files were migrated.<br />
Note: It has been reported in the support forums that the <strong>Upgrade</strong><br />
Wizard indicates that it is migrating files when it actually is not.<br />
❏ ❏ Load common utilities (install.nlm/monitor/nwconfig), and verify that<br />
utilization is normal.<br />
❏ ❏ Verify that all memory can be seen and is available.<br />
❏ ❏ Verify that licensing is functional as per the design document.<br />
❏ ❏ Verify that VREPAIR can be run successfully.<br />
Task 4—Modify and Retest Prototype as Required<br />
Update all process documentation until the process works without error in the lab.<br />
Task 5—Document Solution Design<br />
Update the solution design report to include lab testing results. This document will now be used for the<br />
pilot.<br />
The customer should sign off on the lab testing. Everything should be in a pass state before proceeding to<br />
the pilot test (subprocess 5).<br />
Page 96 of 317 Novell PartnerNet Confidential 07/24/00<br />
Copyright © 2000 by Novell, Inc.
Task 6—Review and Deliver Solution Design Report to Customer<br />
Activity 1—Project Manager Review<br />
The project manager should review your solution design report and make any recommendations or<br />
suggestions.<br />
Activity 2—Deliver Solution Design Report<br />
Deliver the solution design report to the customer.<br />
Task 7—(Conditional) Negotiate Pilot Work Order<br />
(Conditional) Prepare, present, and negotiate a work order agreement for pilot implementation.<br />
Page 97 of 317 Novell PartnerNet Confidential 07/24/00<br />
Copyright © 2000 by Novell, Inc.
Subprocess 5—Perform the Pilot<br />
The pilot is performed on production workstations (a small subset).<br />
Key Inputs<br />
Personnel<br />
• Lead consultant<br />
• <strong>Consulting</strong> team members<br />
• Customer contacts<br />
Resources / Tools<br />
Data / Reports<br />
• Suggested pilot sites with site surveys<br />
• Solution design<br />
• Modified system implementation plan<br />
• Modified test and acceptance plan<br />
1. Prepare a draft deployment plan and pilot test report.<br />
<strong>NetWare</strong> <strong>5.1</strong> <strong>Upgrade</strong>—Solution Development<br />
Subprocess 5—Perform the Pilot<br />
Task Summary<br />
Key Outputs<br />
Personnel<br />
• Lead consultant<br />
Outputs / Deliverables<br />
• Identified pilot sites w/site surveys<br />
• Pilot systems<br />
• Pilot results<br />
• Pilot system documentation<br />
• Test and acceptance documents of pilot systems<br />
• Debriefing<br />
Data / Reports<br />
• Weekly status reports<br />
• Closing report<br />
2. Identify potential pilot sites; gather site surveys, evaluate and select pilot sites.<br />
3. Develop a detailed system implementation plan for each pilot site.<br />
4. Build and test pilot systems per solution design specifications.<br />
5. Modify and retest pilot system as required.<br />
6. Document final solution design and reports.<br />
7. Review and deliver reports to customer.<br />
Task 1—Identify Pilot Sites<br />
Choose a fairly technical department within the company to act as the pilot site (such as the MIS<br />
department). These people are used to dealing with computer problems and can provide good input if<br />
something goes wrong. They may even know how to resolve the problem. This department can be around<br />
30 to 50 people. Avoid selecting a department with sales people or high-level executives.<br />
User feedback is critical during the pilot test, so select pilot users carefully. The pilot group should be<br />
located physically near your IS staff so that problems can be documented and fixed quickly and in-person.<br />
Page 98 of 317 Novell PartnerNet Confidential 07/24/00<br />
Copyright © 2000 by Novell, Inc.
Task 2—Prepare Pilot Implementation Plan<br />
The pilot implementation plan provides information, logic, and recommendations for performing the<br />
<strong>NetWare</strong> <strong>5.1</strong> upgrade in the limited production environment. The pilot implementation plan is based upon<br />
your testing and reports from the lab (subprocess 4).<br />
This plan should contain information about the upgrade hierarchy (or order) for implementing <strong>NetWare</strong><br />
<strong>5.1</strong>. The order depends on the network design and on the customer’s network protocol migration objectives.<br />
For example, if the customer chooses to upgrade the servers using the dual stacks approach, then few<br />
restrictions exist regarding the network upgrade order. On the other hand, if the customer chooses a rapid<br />
IP transition option, then the upgrade sequence will be more tightly controlled. The plan should also<br />
include information about pilot test sites, which reside in the customer’s production network.<br />
At this stage the implementation plan will be considered a “draft” and will be updated appropriately based<br />
upon the pilot results.<br />
Task 3—Prepare Pilot Test Plan<br />
This plan will document what will be tested after the upgrade, to determine whether or not the upgrade was<br />
successful. You can use the Test Criteria from the previous subprocess; additional examples include:<br />
• Can the workstation log in?<br />
• Can they run NAL-delivered applications (if appropriate)?<br />
• Can they print?<br />
• Etc.<br />
Task 4—Perform the Pilot<br />
Use the information from tasks 1-3.<br />
Task 5—Modify Implementation Plan (if appropriate)<br />
Note anything that did not work as expected in the pilot and revise for the full implementation. If<br />
appropriate, you can retest again in the lab before implementation to the rest of the production<br />
environment.<br />
Task 6—Document Final Solution Design<br />
Update the implementation plan created in task 2 using information from the pilot. This report should<br />
include final recommendations on steps the customer should take to complete the project.<br />
Task 7—Create the Closing Report<br />
The closing report summarizes the information, design considerations, and recommendations for the<br />
<strong>NetWare</strong> <strong>5.1</strong> upgrade project. The report summarizes project status, key project issues, and outstanding<br />
issues or concerns. The report also discusses future considerations and recommendations.<br />
Task 8—Review and Deliver Final Solution Design and Closing<br />
Page 99 of 317 Novell PartnerNet Confidential 07/24/00<br />
Copyright © 2000 by Novell, Inc.
Reports to Customer<br />
Activity 1—Project Manager Review<br />
The project manager should review your final solution design and closing reports and make any<br />
recommendations or suggestions.<br />
Activity 2—Deliver Final Solution Design and Closing Reports<br />
Deliver final solution design and closing reports to the customer.<br />
Consider sending copies of the report to the Novell sales representative and to the Novell service account<br />
manager (SAM).<br />
Page 100 of 317 Novell PartnerNet Confidential 07/24/00<br />
Copyright © 2000 by Novell, Inc.
Deploying Novell Distributed Print Services<br />
(NDPS)<br />
<strong>NetWare</strong> <strong>5.1</strong> provides support for, and ships with, the following methods of network printing:<br />
Notes:<br />
• Legacy <strong>NetWare</strong> queue-based printing (QMS)<br />
Note: Upgrading to <strong>NetWare</strong> <strong>5.1</strong> will not disable queue-based printing (as it states in the<br />
README). What the documentation people were trying to say is that there is no IP support for<br />
queue-based printing.<br />
• Novell Distributed Print Services (NDPS) Version 2.1.1 which includes these new features:<br />
• Internet Printing Protocol (IPP)<br />
• Line Printer/Line Printer Daemon (LPR/LPD)<br />
• Vendor-specific gateways<br />
• <strong>NetWare</strong> Print Services for Unix does not ship with <strong>NetWare</strong> <strong>5.1</strong> (it did with <strong>NetWare</strong> 5.0).<br />
Please contact Novell Support to obtain this product. However, Novell recommends that you try<br />
to get the customer to transition to using NDPS. Setting up <strong>NetWare</strong> Print Services for Unix will<br />
not be discussed here.<br />
• NDPS Version 2.1.1 ships with <strong>NetWare</strong> <strong>5.1</strong> and only runs on <strong>NetWare</strong> <strong>5.1</strong><br />
• NDPS Version 2.0 is used with <strong>NetWare</strong> 5.0.<br />
• NDPS 1.0 (or the new NEPS) runs on <strong>NetWare</strong> 4.11 or <strong>NetWare</strong> 4.2.<br />
What’s New With NDPS 2.1.1<br />
New in NDPS 2.1.1 as compared to NDPS 2.0 are:<br />
• LPR Server -- NDPS connectivity for users who have access to LPR (Unix, Mac, etc.).<br />
• IPP Server -- NDPS connectivity for users who have access to IPP (small now but growing).<br />
• New third party gateway support - Kyocera, Lexmark, Epson, Tektronix, Axis, Extended Systems.<br />
• More features will be exposed in Support Pack 1.<br />
New in NDPS 2.0 as compared to NDPS 1.0:<br />
• Fault Tolerance. NDPS 1.0 did not allow you to load the NDPS Manager on any server other than<br />
the server on which you originally created the NDPS Manager. NDPS 2.0 allows you to load the<br />
NDPS Manager on other servers. If you shut down the server on which the NDPS Manager is<br />
running or if that server abends, you can load the NDPS Manager on another server and continue<br />
to provide print services without interruption<br />
• NDPS Client Software for Windows NT and Windows 98 clients. NDPS 1.0 provided client<br />
software only for Windows 95 and 3.1x clients.<br />
• Support for Windows Add Printer Wizard. With NDPS 1.0, you had to install printers on NDPS<br />
clients using NWPM.EXE (available on each client desktop). Alternately, you could remotely<br />
install printers using PSETUP.EXE. With NDPS 2.0, NDPS users can use the Add Printer Wizard<br />
utility available on Windows clients to install printers on their desktop.<br />
Page 101 of 317 Novell PartnerNet Confidential 07/24/00<br />
Copyright © 2000 by Novell, Inc.
• Improved Utility for Remotely Installing NDPS Printers. NDPS 1.0 provided a way to remotely<br />
install NDPS printers on desktops through the PSETUP.EXE file, which worked but had several<br />
limitations. NDPS 2.0 includes the Remote Printer Management utility, which overcomes the<br />
limitations of PSETUP.EXE. The Remote Printer Management utility offers the following<br />
improvements to PSETUP.EXE:<br />
• Enables you to install and uninstall public access printers (as well as controlled access<br />
printers).<br />
• Uses time-stamping to determine whether or not an NDPS client requires updating<br />
at login time.<br />
• Enables you to load new printer drivers for NDPS printers that are already installed on client<br />
desktops without disturbing the clients’ printer profiles.<br />
• Enables you to access the utility through the <strong>NetWare</strong> Administrator (NWADMIN) utility.<br />
• Support for Printers on IP Networks. NDPS 1.0 provided no way to print in IP-only environments.<br />
NDPS 2.0 includes an NDPS Gateway to support Line Printer Remote/Line Printer Daemon<br />
(LPR/LPD) printers on IP networks and an enhanced Hewlett-Packard gateway, which can print<br />
over both IP and IPX to JetDirect cards.<br />
• Support for Simple Mail Transfer Protocol (SMTP). NDPS 1.0 did not support SMTP. NDPS 2.0<br />
supports SMTP. As a result, NDPS can notify users of printer and job events through any e-mail<br />
system that also supports SMTP.<br />
• Customizable Server Install. NDPS 1.0 server installation program copied not only system and<br />
public files but also resource management files to the <strong>NetWare</strong> installation volume. NDPS 2.0<br />
allows you to customize the server installation program to install only system and public files,<br />
enabling you to install resource management files only when necessary.<br />
Queue-Based Printing<br />
The following table helps illustrate some common points concerning the use of the legacy <strong>NetWare</strong> (QMS)<br />
printing environment after upgrading to <strong>NetWare</strong> <strong>5.1</strong>:<br />
Benefits Issues<br />
Less thought about printing is required<br />
during the upgrade process.<br />
Works for bindery-based programs and<br />
workstations.<br />
The environment is IPX dependent. This<br />
prevents a pure IP environment and impacts the<br />
SLP design, because MAs must be used for<br />
connectivity.<br />
Each printer in the printing environment requires<br />
at least three separate NDS objects in the tree. If<br />
there are many networked printers, there could<br />
be a noticeable impact on the size and speed of<br />
NDS.<br />
Printers can get automatically logged off from the<br />
<strong>NetWare</strong> servers because of lost watchdog<br />
packets. This creates a service interruption for<br />
the users.<br />
Workstation-based connections to printers often<br />
have to be re-established after a network<br />
upgrade. If workstations need reconfiguration,<br />
the incremental cost to configure them for an<br />
alternative print solution would be minimal.<br />
Page 102 of 317 Novell PartnerNet Confidential 07/24/00<br />
Copyright © 2000 by Novell, Inc.
Novell Distributed Print Services (NDPS)<br />
The NDPS printing environment is a TCP/IP-based solution that integrates printing with the NDS<br />
infrastructure. NDPS was developed to simplify management and reduce the expenses related to<br />
maintaining network printing. The functionality of NDPS is possible because of NDS, which allows<br />
administrators to centrally manage NDPS from the <strong>NetWare</strong> Administrator utility.<br />
NDPS automates and eases most aspects of network-based printing by providing:<br />
• Solid integration with NDS<br />
• Usability in a pure IP-based or IPX-based environment (or a mixture of both)<br />
• Simplified and centralized administration of all printing resources through NWAdmn32; this<br />
administration is done on a container basis; user and group functionality should be added around<br />
the BrainShare 2000 time frame<br />
• Automatic printer driver download and installation<br />
• Bi-directitonal feedback and control of printers and jobs<br />
• Support for existing printers and printing technologies (full backward compatibility)<br />
• New printer and job configuration options for specific printers<br />
• New print job scheduling and notification options (e.g., scheduling jobs according to time of day<br />
or size)<br />
• Remote workstation printer management capabilities<br />
The following table helps illustrate some common points concerning the transition to an NDPS printing<br />
environment during a <strong>NetWare</strong> <strong>5.1</strong> upgrade:<br />
Benefits Issues<br />
NDPS is easy to set up and administer.<br />
Once the software is installed on the servers<br />
and clients, the configuration within NDS is<br />
centrally managed.<br />
The NDPS server is less likely to have a<br />
failure than the legacy print servers.<br />
NDPS is a TCP/IP-based printing solution. It<br />
will remove the IPX dependencies from the<br />
printing environment.<br />
Print driver distribution is automated through<br />
NDPS. Each NDPS server has a database<br />
of print drivers that are distributed to the<br />
workstations when print services are<br />
requested. This driver database is<br />
customizable so new printers can be<br />
managed through NDPS as long as a driver<br />
is provided from the printer manufacturer.<br />
NDPS provides manageability to the printing<br />
environment. When using NDPS controlled<br />
access printers, print jobs can be monitored,<br />
paused, and deleted.<br />
NDPS requires <strong>NetWare</strong> <strong>5.1</strong> servers to run<br />
NDPS related NLMs to provide the printing<br />
services. Loading these NLMs will increase<br />
resource utilization on a <strong>NetWare</strong> <strong>5.1</strong> server.<br />
The NDPS server becomes a point of failure in<br />
the printing environment. In the event the NDPS<br />
server goes down, the printers associated with<br />
that server will not be available.<br />
The workstations need relatively new clients (that<br />
support NDS, IP, and NDPS).<br />
If the print server hardware does not natively<br />
support NDPS, a NDPS gateway will need to be<br />
loaded and configured to enable non-NDPS<br />
printers to work with NDPS.<br />
An SLP infrastructure is required.<br />
Page 103 of 317 Novell PartnerNet Confidential 07/24/00<br />
Copyright © 2000 by Novell, Inc.
NDPS controlled access printers require<br />
only one NDS object per printer versus<br />
legacy printing; this reduces the number of<br />
NDS objects required in the NDS tree for<br />
printing.<br />
To print in a pure IP environment, external print<br />
server hardware, such as JetDirect cards, must<br />
support the TCP/IP protocol.<br />
As a printing solution, NDPS makes the most sense for clients who plan to utilize TCP/IP. However, the<br />
NDPS printing environment must be carefully planned before it is implemented. A poor implementation of<br />
NDPS will cause excessive network traffic, and it may adversely affect the performance of other services<br />
on the network if loaded on the wrong servers.<br />
NDPS Components<br />
There are four main components to NDPS that need to be discussed so that an efficient NDPS infrastructure<br />
can be designed.<br />
(1) NDPS Broker<br />
The broker (BROKER.NLM) is loaded on a <strong>NetWare</strong> <strong>5.1</strong> server to perform the overall NDPS management<br />
of the system including automatically pushing down the print driver files. (The NDPS broker is not in the<br />
print path.) There are three services associated with the broker; by default, they are all enabled when you<br />
load BROKER.NLM. They can be individually disabled within the BROKER.NLM menu. The three<br />
services associated with the broker and their functions are:<br />
Event Notification Service (ENS) — This is the service that notifies users or administrators of events<br />
associated with the printing environment. For example, when a print job completes and user notification<br />
has been enabled, it is the ENS that informs the user the print job has finished.<br />
Resource Management Service (RMS) — This is the service that holds the print drivers, banner files, and<br />
Novell printer definition files (*.PDF) for each broker. This service is not “shared” among brokers; so, if<br />
you have two NDPS brokers on a segment and you want to add a printer driver to both, you must do it<br />
twice – once for each broker.<br />
Note: Do not disable the RMS.<br />
Service Registry Service (SRS) — This is the service that is required for public access printing .<br />
Note: Disable this service if you will not be using public access printers. This is a bandwidth-saving<br />
feature because if SRS is on, every broker registers with every other broker on the network. And, every<br />
printer agent is registered with every broker on the network. These services are registered (through SAP or<br />
SLP) when the NDPS Manager comes up and deregistered when the NDPS Manager goes down.<br />
Therefore, any time that you take down NDPS Manager, it deregisters itself with every broker running SRS<br />
on the network. In the worst case, this can hang the NDPS Manager “box” if there are WAN problems.<br />
SRS is the only component of NDPS that requires SAP or SLP, for finding Public Access Printers.<br />
(2) NDPS Manager<br />
The NDPS Manager (NDPSM.NLM) is loaded on <strong>NetWare</strong> <strong>5.1</strong> servers. This component is roughly<br />
equivalent to PSERVER.NLM in a QMS environment. The NDPS Manager is responsible for managing<br />
the printer agents with which it is associated. This is the piece of NDPS that is required for processing the<br />
print jobs from the clients and forwarding them to the printer agents on the network (NDPS Manager is in<br />
the print path). Clients resolve printing services through the NDS tree and their jobs are spooled to the<br />
Page 104 of 317 Novell PartnerNet Confidential 07/24/00<br />
Copyright © 2000 by Novell, Inc.
NDPS Manager that manages that specific printer. The job is then sent from the NDPS Manager to the<br />
printer via TCP/IP.<br />
(3) NDPS Printer Agent<br />
With NDPS, printer and print queue functions are combined into a single entity called the Printer Agent<br />
(vs. having two separate NDS objects with QMS printing). There is a one-to-one correlation between<br />
physical printers on the network and the Printer Agent. Printer Agents eliminate the need to create print<br />
queues and allow users to send print job directly to printers.<br />
Note: Even though NDPS does not require print queues, your network may continue to include queuebased<br />
printers and clients not currently configured to support NDPS. The backward compatibility of NDPS<br />
allows you to continue using these queue-based services and resources transparently. Although NDPS can<br />
take jobs from a print queue, it does not use QMS; rather, it does spooling on the <strong>NetWare</strong> file system or<br />
can do the spooling local.<br />
NDPS-Embedded Printers<br />
The NDPS Manager communicates directly with the printer to process the print job.<br />
Note: As of January 2000, there are currently no NDPS-embedded (“native NDPS”) printers on the<br />
market. Novell is in the process of signing up partners to embed NDPS into their printers. If you can<br />
provide information on customer demand for NDPS-embedded printers, it would be a great help in our<br />
effort to get printer vendors committed. Some of the customer benifits that have been identified for<br />
NDPS-embedded printers are:<br />
• Ease of installation to the network. True plug-and-print functionality is available for NDPSembedded<br />
printers.<br />
• Improved printer bi-directionality and manageability. NDPS gateways provide different levels of<br />
bi-directionality and manageability to non-NDPS-embedded printers.<br />
• No unnecessary WAN/LAN traffic:<br />
• Print jobs (typically .5-3 MB in size) do not have to make a “pit stop” at a <strong>NetWare</strong> <strong>5.1</strong> server<br />
before going to the printer. For remote “satellite” offices without a <strong>NetWare</strong> <strong>5.1</strong> server, this<br />
means that the print job does not have to cross the WAN twice; in fact, the print job would<br />
never cross the WAN.<br />
• NDPS-embedded printers do not SAP. This delivers recovered bandwith in IPX installations.<br />
• NDPS-embedded printers report status and other information without polling. The<br />
WAN/LAN is only used when an event occurs. Some gateway solutions poll their printers to<br />
get this information.<br />
• No <strong>NetWare</strong> <strong>5.1</strong> server utilization impact. Interaction with the printer is between the client and<br />
the printer only.<br />
• High availability of printers. Because print jobs are sent directly to the printer without required<br />
<strong>NetWare</strong> <strong>5.1</strong> server involvement, printing on the network is possible even when the network is<br />
having problems.<br />
Non-NDPS-Embedded Printers<br />
For non-NDPS-embedded printers, the printer agent resides within NDS as an NDPS printer object. But<br />
because the printer hardware itself cannot natively process NDPS commands, a gateway component to<br />
NDPS is required (next).<br />
Page 105 of 317 Novell PartnerNet Confidential 07/24/00<br />
Copyright © 2000 by Novell, Inc.
(4) NDPS Gateway<br />
Note: NDPS-embedded printers (when available) will not require the NDPS Gateway.<br />
Non-NDPS-embedded printers can be brought into the NDPS system through the use of gateways. NDPS<br />
ships with a generic gateway (Novell Printer Gateway); therefore, all printers can be used with NDPS.<br />
Printer vendors are working to deliver NDPS gateways to support their currently shipping printer product<br />
lines. The NDPS gateway software allows the NDPS infrastructure to communicate with non-NDPSembedded<br />
printers. The gateway software is loaded on <strong>NetWare</strong> <strong>5.1</strong> servers and its sole responsibility is to<br />
take NDPS formatted print jobs and reformat them in a language the printer can understand. <strong>NetWare</strong> <strong>5.1</strong><br />
comes with the following NDPS gateways on its installation CD:<br />
• Axis Gateway<br />
• EpsonNet NDPS Gateway<br />
• Extended Systems Gateway<br />
• Hewlett-Packard IP/IPX Printer Gateway<br />
• Kyocera NDPS Gateway<br />
• Lexmark IP Printer Gateway<br />
• Novell Printer Gateway<br />
• Tektronix Printer Gateway<br />
• Xerox Printer Gateway (IP/IPX)<br />
Note: It is to your advantage to use a vendor-supplied NDPS Gateway (if possible) versus the Novell<br />
Printer Gateway; this is because the Novell Printer Gateway is “generic” and, therefore, does not support<br />
all of the available NDPS features.<br />
The NDPS Gateways are NLMs that run on <strong>NetWare</strong> <strong>5.1</strong> servers. Until print server manufacturers start<br />
adding NDPS Printer Agents to their hardware, most customers will need to install an NDPS Gateway to<br />
get their printers to work in an NDPS environment.<br />
Subprocess 1—Designing and Implementing NDPS<br />
Note: Check for the latest NDPS 2.1.1 support pack at http://support.novell.com .<br />
Task 1—NDPS Design<br />
ENS<br />
Deliverable:<br />
NDPS Brokers<br />
RMS<br />
• A report detailing how NDPS will be designed. You can expand and complete the following table<br />
and include as part of the report.<br />
SRS<br />
NDPS Managers NDPS Printer<br />
Agents<br />
CAP PAP<br />
NDPS Gateways Comments<br />
Page 106 of 317 Novell PartnerNet Confidential 07/24/00<br />
Copyright © 2000 by Novell, Inc.
The design of the NDPS environment needs to reflect the physical topology of the network as well as the<br />
distribution of the printers in the network environment. If there are printers distributed everywhere on the<br />
network, NDPS servers will also need to be widely distributed.<br />
NDPS Brokers<br />
• Install NDPS Broker software (BROKER.NLM) on at least one <strong>NetWare</strong> <strong>5.1</strong> server per physical<br />
location. This recommendation is because if the NDPS Manager needs the broker and it is not<br />
local, it will walk the NDS tree to find it, which can cause unnecessary traffic on WAN links.<br />
Additional brokers can be installed at each physical site for fault tolerance purposes; however, a<br />
maximum of two brokers per site is recommended for minimizing traffic. At a minimum, you<br />
should have at least two brokers per tree, at central points in the WAN infrastructure. Place<br />
LOAD BROKER.NLM in the AUTOEXEC.NCF file.<br />
• Determine which of the three services (i.e., ENS, RMS, SRS) need to be enabled on the brokers.<br />
As stated above you should never turn off RMS; ENS should be left on for notification purposes,<br />
and SRS should be disabled if you are not using Public Access Printers.<br />
NDPS Managers<br />
• Install NDPS Manager software (NDPSM.NLM) on at least one <strong>NetWare</strong> <strong>5.1</strong> server per physical<br />
site and, preferably, on the same server that is hosting BROKER.NLM. Installing the NDPS<br />
Manager software will autoload NDPSM.NLM; however, you must go back and manually add this<br />
line to the AUTOEXEC.NCF file. Also, if you create a Public Access printer before you create a<br />
Controlled Access printer, you must manually load NDPSM.NLM then put this statement in<br />
AUTOEXEC.NCF. –or–<br />
• Another option is to install NDPS Manager on each workgroup’s file server per physical site and<br />
control those workgroup’s printers. Rationale: No good reason for centralization; using <strong>NetWare</strong><br />
Administrator you don’t need to know what file server the NDPS Manager is on; you don’t want<br />
one group’s file server to disable printing for another group.<br />
Server Requirements<br />
In a high-volume printing environment, NDPS servers (i.e., those running the NDPS Broker and NDPS<br />
Manager software) could experience a fairly high load. Extra care needs to be taken to make sure the NDPS<br />
servers have more than enough resources (RAM, CPU, etc.). This is especially true if mail, database, or<br />
other mission critical high load functions are also going to be running on that same server.<br />
Approximately 10-20KB of memory per NDPS printer is required after the first printer. A server running<br />
the NDPS Broker, Manager, and HP Gateway should expect less than 20% utilization for 100 printers.<br />
The NDPS environment has been tested with 600 NDPS printers being serviced by the same NDPS<br />
Manager. While this is not a recommended configuration for NDPS, it does prove the scalability of the<br />
NDPS technology. In an environment where hundreds of printers will be handled by a single NDPS server,<br />
Novell would recommend using a server dedicated to NDPS management.<br />
Page 107 of 317 Novell PartnerNet Confidential 07/24/00<br />
Copyright © 2000 by Novell, Inc.
NDPS Printers<br />
• Determine whether the customer should use Controlled Access NDPS Printers or Public Access<br />
NDPS Printers. Discuss the advantages/disadvantages from this chart:<br />
Controlled Access NDPS printers Public Access NDPS printers<br />
Intended for large printing environments<br />
where control is wanted over who can print<br />
to what printers.<br />
Controlled Access NDPS printers have<br />
corresponding NDS objects. You browse<br />
through the tree structure to find them.<br />
The driver can be set up to automatically<br />
download to workstations by:<br />
• NDPS Remote Printer Manager Tab<br />
on the Controlled Access printer<br />
object.<br />
The drivers will install and the printer icon<br />
will appear in the printer folder.<br />
Another tab shows who can “see” the<br />
Controlled Access printer:<br />
If the driver is not set up to automatically<br />
download, you can manually install the<br />
printer driver with Microsoft’s Printer Wizard<br />
or the NWPM32 utility.<br />
Intended use was for “Mom and Pop” shops<br />
where everyone prints to all printers. The<br />
[Public] object is given all rights to Public Access<br />
printers.<br />
Public Access printers are not NDS objects.<br />
They are discovered via SAP or SLP. You can<br />
see a list of NDPS Public Access Printers within<br />
NWAdmn from “Tools, NDPS Public Access<br />
Printers.”<br />
The driver can be set up to automatically<br />
download to workstation by one of two methods:<br />
• NWAdmn32, Tools, NDPS Public Access<br />
Printers<br />
• NWPMW32.EXE<br />
The drivers will install and the printer icon will<br />
appear in the printer folder.<br />
If the driver is not set up to automatically<br />
download you will have to manually install the<br />
printer driver with the NWPMW32 utility. You<br />
cannot use the Microsoft Printer Wizard because<br />
a Public Access NDPS printer has no<br />
corresponding NDS object.<br />
• Create and configure NDPS Printer Agents – one to represent each NDPS printer.<br />
• Install printer drivers on NDPS workstations.<br />
The method of manually installing the print driver for a Public Access NDPS printer (or for a nonconfigured<br />
Controlled Access Printer) differs depending on if you are using the Microsoft Printer<br />
Wizard or the Novell Printer Manager (NWPMW32.EXE):<br />
• If you are using the Microsoft Printer Wizard, going through the network printer setup process<br />
will only create a port. You will then have to go back into the Microsoft Printer Wizard and<br />
create the print icon as if it were a local printer (you will need to manually install the print<br />
driver and select the now-installed NDPS port).<br />
• If you are using the Novell Printer Manager (NWPMW32.EXE), you will see a dialog box.<br />
You may modify the printer name that appears and select a pre-defined configuration. If the<br />
default driver is not the one you want, you can change it through the Configuration tabs. If<br />
you cannot find the appropriate driver, check the <strong>NetWare</strong> 5 .1documentation for details on<br />
how to add to the driver list. This utility is easier and the utility can be distributed with<br />
ZENworks.<br />
NDPS Gateways<br />
• Install and configure the appropriate NDPS Gateway(s), if you don’t have NDPS-embedded<br />
printers.<br />
Page 108 of 317 Novell PartnerNet Confidential 07/24/00<br />
Copyright © 2000 by Novell, Inc.
SLP Considerations<br />
If you are using TCP/IP and are planning to use Public Access Printers, you must have an SLP<br />
infrastructure. This is because workstations use SLP to communicate with the broker’s SRS service in the<br />
following situations:<br />
• When browsing for public access NDPS printers to set up on the workstation<br />
• When the first print job is sent from a workstation to a public access printer<br />
• After a communications failure between a workstation and a public access printer<br />
• Printers use SLP to register with the SRS service<br />
NDS Considerations<br />
The <strong>NetWare</strong> <strong>5.1</strong> server running the NDPS Manager software should contain a replica of the partition in<br />
which the associated users and printer agents are located. This will allow for an efficient printing<br />
environment, as no tree walking will be required to resolve print services available on the network.<br />
Placement Example<br />
The following figure shows the distribution of NDPS brokers, managers, and gateways for a hypothetical<br />
network. This distribution should provide for the isolation of printing traffic on the network, which will<br />
make the performance of the WAN links the most efficient.<br />
NDPS Services<br />
BROKER.NLM<br />
NDPSM.NLM<br />
HPGATE.NLM<br />
Remote<br />
Site #1<br />
175 Printers<br />
Dedicated NDPS Server<br />
BROKER.NLM<br />
NDPSM.NLM<br />
HPGATE.NLM<br />
NDPS1<br />
10 Printers 25 Printers<br />
Task 2—NDPS Deployment<br />
Main Ring<br />
Page 109 of 317 Novell PartnerNet Confidential 07/24/00<br />
Copyright © 2000 by Novell, Inc.<br />
Remote<br />
Site #2<br />
RMT1_FS1 RMT2_FS1<br />
NDPS Services<br />
BROKER.NLM<br />
NDPSM.NLM<br />
HPGATE.NLM<br />
Once the first <strong>NetWare</strong> <strong>5.1</strong> servers are in place, the printing environment upgrade can begin. There are<br />
server and client factors to keep in mind while laying out the deployment schedule:<br />
Configuring <strong>NetWare</strong> <strong>5.1</strong> servers to support NDPS 2.1.1<br />
• Any server that is going to act as a NDPS 2.1.1 server will need to be upgraded to <strong>NetWare</strong> <strong>5.1</strong><br />
before NDPS 2.1.1 can be installed.<br />
• Any print server hardware that is not NDPS-aware but you want to print to it using TCP/IP, will<br />
need to be upgraded and/or replaced with new hardware that supports LPR/LPD printing.
Configuring <strong>NetWare</strong> clients to support NDPS 2.1.1<br />
• Each workstation should have the Novell Client that ships with <strong>NetWare</strong> <strong>5.1</strong> installed. The<br />
minimum client necessary to support NDPS 2.1.1 (including LPR/LPD and IPP) is ___________.<br />
• Configure the clients to support NDPS. If you select the Custom install option, make sure you<br />
choose the option to install NDPS. The NDPS components of the Novell Client require<br />
approximately 800 KB of RAM.<br />
• If the client needs to access NDPS public access printers, the workstation will need to access the<br />
SLP scope where that information resides. Depending on the SLP design, this may require<br />
additional configuration on the client.<br />
• Install NDPS printers in any of the following ways:<br />
Automatic Printer Installation<br />
While NDPS allows users to download and install printers on their workstations, it also allows<br />
administrators to designate printers to be downloaded and installed automatically. These printers then<br />
appear on the user’s installed printers list with no action required by the user.<br />
You can designate a printer to be installed automatically by using the Remote Printer Management feature<br />
in <strong>NetWare</strong> Administrator. Here is how Remote Printer Management works:<br />
• After a printer has been designated for automatic installation on a user's workstation, this<br />
information is stored on the NDSTM container object where the administrator has configured it.<br />
• When a user logs in after the machine is rebooted, the workstation's client software checks the<br />
container object where the User object resides for the Remote Printer Management configuration.<br />
• The client software compares "time stamps" stored on the workstation and in NDS to determine<br />
whether any changes have occurred.<br />
• If the time stamp is different, action is taken, and the printer list on the client is automatically<br />
updated to match the printer list maintained by NDS on the container.<br />
• If the client finds a printer designated for installation that has not yet been installed, it is<br />
automatically installed.<br />
• If a currently installed printer is added to the Printers to Remove list, that printer will be<br />
uninstalled automatically.<br />
• If you designate a different printer to be the default in the Remote Printer Management list, the<br />
change will be automatically made on each client when it logs in.<br />
• If the "Do not update workstations” control is checked, you can update the Remote Printer<br />
Management configuration, but no changes will occur on the workstation.<br />
Here are some issues to keep in mind when using Remote Printer Management:<br />
• A log file named dprpmlog.txt is created in the drive:/windows directory of each workstation<br />
where Remote Printer Management has installed one or more printers. This log file is limited to 5<br />
KB and can be turned off in the Windows Registry. (Type regedit, then select<br />
HK_KEY_LOCAL_MACHINE/SOFTWARE/NDPS/RPM and set the error log setting to 0 to<br />
disable it.) You can only do this after you have used the Remote Printer Management tool.<br />
• When you install a printer using Remote Printer Management or the Novell Printer Manager, its<br />
installed name will be limited to no more than 31 characters (including the periods). The name<br />
will be broken off at a logical point from the beginning of the installed name. This will not affect<br />
the ability of the printer to service jobs.<br />
Page 110 of 317 Novell PartnerNet Confidential 07/24/00<br />
Copyright © 2000 by Novell, Inc.
The reason that names are limited to this length is that some applications cannot handle printer names of<br />
over 31 characters.<br />
Remote Printer Management can be accessed in any of the following ways. Somewhat different<br />
functionality is available at each location.<br />
• From the Tools menu in <strong>NetWare</strong> Administrator. By selecting the NDPS Remote Printer<br />
Management option from this menu, you can manage printers in all containers to which you have<br />
Supervisor rights on the container object.<br />
• From the Details page for the Container object. By pressing the NDPS Remote Printer<br />
Management button from this page, you can manage printers for this container only.<br />
• From the Details page for a specific printer. By pressing the NDPS Remote Printer Management<br />
button from this page, you can remotely manage that printer.<br />
• From the Public Access Printers view under the Tools menu. By highlighting a printer and<br />
selecting the Object/Details option, you can access the Printer Control page for that printer. Then,<br />
by pressing the NDPS Remote Printer Management button from this page, you can remotely<br />
manage that printer.<br />
Manual Printer Installation<br />
The are two methods for manually installing an NDPS printer on a workstation:<br />
• For Win95/98/NT4 workstations, the user can use the Windows Add Printers wizard in the<br />
Windows Printers folder to install NDPS printers.<br />
• The user can install the NDPS printer through use of the Novell Printer Manager utility.<br />
To run the Novell Print Manager, do the following:<br />
• For a Win3.x workstation, run SYS:PUBLIC\NWPMW16.EXE<br />
• For a Win95/98/NT workstation, run SYS:PUBLIC\WIN32\NWPMW32.EXE<br />
Once you are in the Printer Manager utility (or in the Print Wizard), you can browse for the appropriate<br />
NDPS public access or controlled access printers.<br />
The method of manually installing the print driver for a Public Access NDPS printer (or for a nonconfigured<br />
controlled access printer) differs depending on if you are using the Print Wizard or the Printer<br />
Manager:<br />
• If you are using the Print Wizard, going through the network printer setup process will only create<br />
a port. You will then have to go back into the Print Wizard and create the print icon as if it were a<br />
local printer (you will need to manually install the print driver and select the now-installed NDPS<br />
port).<br />
• If you are using the Printer Manager, you will see a dialog box. You may modify the printer name<br />
that appears and select a pre-defined configuration. If the default driver is not the one you want,<br />
you can change it through the Configuration tabs. If you cannot find the appropriate driver, check<br />
the <strong>NetWare</strong> <strong>5.1</strong> documentation for details on how to add to the driver list.<br />
• By allowing workstation users to install printers on their workstations by using the Novell<br />
Printer Manager.<br />
• By allowing Win95 and WinNT workstation users to install printers on their workstation with<br />
the Windows Add Printers wizard in the Windows Printers folder.<br />
Page 111 of 317 Novell PartnerNet Confidential 07/24/00<br />
Copyright © 2000 by Novell, Inc.
Note: Certain print drivers (mostly older drivers) will not work when the printer name/port name<br />
has a long name (32 characters or more). The port name looks something like<br />
\TREE_NAME\SERVER_NAME\installed printer name. To resolve this problem for NDPS, a<br />
new flag has been added to the registry for Windows 95 and Windows NT that will allow for<br />
printer names to be less than 31 characters in length so that old applications can still print. The key<br />
is as follows:<br />
HKEY_LOCAL_MACHINE\Software\NDPS\RPM\TruncatePrinterNames<br />
0 = use long names<br />
1 = truncate the printer names<br />
Enabling NDPS on a Previously Installed Client<br />
It is possible to install the correct version of the Novell Client without enabling NDPS. To enable NDPS at<br />
a later time, you can do so by adding the service through the Network Neighborhood properties. Some<br />
points to consider:<br />
• You will need the Novell Client CD-ROM, or access to whatever storage media you have placed<br />
the current Novell client.<br />
• On Windows 3.x workstations, you must reinstall the Client to enable NDPS.<br />
SAA Host Print to an NDPS Printer<br />
This is possible following these steps:<br />
• Associate a Host Print printer with an NDS or Bindery queue<br />
• Configure the NDPS printer to service this NDS or Bindery queue<br />
Steps to configure NDPS printer to services bindery queues are:<br />
• Select details on the NDPS Printer object you want to print to<br />
• Select the Jobs button<br />
• Select Spooling Configuration<br />
• Select Service Jobs from <strong>NetWare</strong> Queues<br />
• Select the Add button and select the appropriate queue for your host print session<br />
Removing Old Legacy Dependencies<br />
Once NDPS has been setup on all appropriate workstations, the last step is to cleanup the old legacy<br />
printing environment. It would be a good idea to wait until your new NDPS system has been tested<br />
thoroughly before removing these dependencies.<br />
Removing the legacy print queues and related NDS objects is easy to do through <strong>NetWare</strong> Administrator,<br />
but the following actions should be kept in mind:<br />
• The appropriate print servers (such as HP JetDirects) must be reconfigured to no longer attempt to<br />
service the legacy print queues.<br />
• Many workstation Operating Systems allow the users to establish persistent network connections<br />
such as drive mappings and printer connections. If the legacy print queues are removed without<br />
first cleaning up these workstation connections, users will see error messages.<br />
Page 112 of 317 Novell PartnerNet Confidential 07/24/00<br />
Copyright © 2000 by Novell, Inc.
• Existing CAPTURE commands should be removed. These statements might exist in container or<br />
user login scripts, in the bindery login script (SYS:PUBLIC/NET$LOG.DAT), in batch files, or<br />
other locations. If the legacy print queues are removed without first removing the CAPTURE<br />
commands, users will see error messages.<br />
Page 113 of 317 Novell PartnerNet Confidential 07/24/00<br />
Copyright © 2000 by Novell, Inc.
Subprocess 2—Implementing Internet Printing<br />
Protocol (IPP)<br />
IPP is a new printing protocol that makes it possible to send print jobs to printers on intranets or on the<br />
Internet in the same way you send print jobs to a printer on your desk. IPP is growing to become a<br />
standards-based version of NDPS.<br />
IPP Requirements<br />
Novell’s implementation of the Internet Printing Protocol allows users running IPP clients to send print<br />
jobs addressed to a URL. The IPPServer runing on the Novell Server, where the NDPS Printer Agent that is<br />
setup to receive the URL, converts the http data stream and sends the information to the NDPS Printer<br />
Agent.<br />
Requirements for IPP:<br />
• Netscape Enterprise Server for <strong>NetWare</strong><br />
• Follow the instructions found in server\SYS:SYSTEM\IPP\NDPSIPP.TXT<br />
• Enable IPP on an NDPS Printer Agent<br />
• Clients that want to print to IPP printers need an IPP client<br />
The following is a screen shot of a IPP-enabled NDPS Printer Agent. The IPP URL field is the URL that<br />
the IPP client software would need to print to the NDPS Printer Agent.<br />
Page 114 of 317 Novell PartnerNet Confidential 07/24/00<br />
Copyright © 2000 by Novell, Inc.
To use IPP, you need:<br />
• an IPP client<br />
• an IPP printer (or print server)<br />
both of which must have the HTTP 1.1 stack (which is what IPP 1.0 uses).<br />
The IPP client encodes requests, uses HTTP 1.1 to send these requests across the wire, and decodes<br />
responses from IPP printers. For a printer to receive and understand print requests from IPP clients, it needs<br />
IPP server software, either embedded on the printer itself or running on the print server. The IPP server<br />
software decodes the IPP client requests it receives, translates those requests into a language the printer can<br />
understand, and encodes any responses from the printer back into a language the IPP client can understand.<br />
With IPP client software running on users’ desktops, users can install the IPP printers on the desktops to<br />
which they want to print. When users with IPP client software first install IPP printers on their desktops,<br />
they also need to install the appropriate printer driver, just as they would to install any printer. Users must<br />
also specify the printer’s URL. Users then can make the IPP printer their default printer (which may be<br />
preferable on an intranet), or they can choose the printer each time they print.<br />
IPP Clients<br />
IPP client software for both Windows and UNIX platforms is available from several vendors, including:<br />
Page 115 of 317 Novell PartnerNet Confidential 07/24/00<br />
Copyright © 2000 by Novell, Inc.
• Hewlett-Packard<br />
• Microsoft<br />
For more information about IPP on Windows 95, see<br />
http://www.microsoft.com/Windows95/downloads/contents/WUPreviews/IPP/Default.asp<br />
For more information about IPP on Windows 98, see<br />
http://www.microsoft.com/Windows98/downloads/contents/WUPreviews/IPP/Default.asp<br />
• ShineSoft<br />
• Easy Software Products<br />
Easy Software Products has had IPP client software available for about nine months as part of its<br />
Common UNIX Printing System (CUPS). CUPS replaces the System V and Berkeley print<br />
systems included in most versions of UNIX with a compatible IPP-based printing system. CUPS<br />
also uses Adobe PostScript Printer Description (PPD) files and a MIME-type filter database that<br />
together enable you to print to PostScript printers--and use all of their capabilities--just by<br />
grabbing the appropriate PPD file. For more information about CUPS, visit http://www.cups.org.<br />
Easy Software Products also provides ESP Print Pro software, which is based on CUPS and<br />
includes drivers for more than 1600 PostScript and non-PostScript printers. (For more<br />
information, visit http://www.easysw.com/printpro. )<br />
• Apple Computer has also announced plans to support IPP in future versions of the Macintosh<br />
operating system.<br />
For an updated list of IPP client software and other IPP products, visit ftp://ftp.pwg.org/pub/pwg/ipp and<br />
open the Products folder.<br />
IPP Printers and Print Servers<br />
Printers with embedded IPP software are available from Lexmark and Xerox. Small print servers that can<br />
accept IPP requests for jobs intended for specific printers are available from Hewlett-Packard, i-data, and<br />
Tally. Large print servers, such as the NDPS IPP server, that can accept IPP requests are also available.<br />
NDPS IPP Server<br />
The NDPS IPP server supports IPP 1.0, as described in the IETF Requests for Comments (RFCs) numbers<br />
2565 through 2569 and 2639. You can download these RFCs by visiting<br />
http://www.pwg.org/ipp/index.html and clicking the hypertext links to those documents. IPP 1.0 describes<br />
how IPP clients can submit jobs to IPP printers and find out about IPP printers’ capabilities and status.<br />
NDPS also supports IPP Optional Operations--Set 1, which is described in the IPP/1.1 IETF Internet-Draft.<br />
You can view this document at http://www.ietf.org/internet-drafts/draft-ietf-ipp-model-v11-04.txt. As the<br />
name suggests, these IPP Optional Operations describe additional operations (such as hold job, restart job,<br />
pause printer, and resume printer) that vendors have the option to include in their implementation of IPP.<br />
The NDPS IPP server sits in front of NDPS Printer Agents, translating requests from IPP clients into a<br />
language NDPS Printer Agents can understand and coding responses from NDPS Printer Agents into a<br />
language that IPP clients can understand. The result is that any IPP client can print to any NDPS printer,<br />
assuming, of course, that there are printer drivers available for the printers to which the IPP client wants to<br />
print.<br />
Page 116 of 317 Novell PartnerNet Confidential 07/24/00<br />
Copyright © 2000 by Novell, Inc.
Subprocess 3—Implementing Line Printer/Line Printer<br />
Daemon (LPR/LPD)<br />
The LPR/LPD server is an NLM that is automatically loaded when you use the NWADMIN utility to<br />
configure a Printer Agent to support LPR/LPD. To configure a Printer Agent to support LPR/LPD, you<br />
complete three simple steps:<br />
• Using the NWADMIN utility, double click to open the NDPS Printer object (also known as a<br />
controlled access printer) or Public Access Printer that represents the physical printer for which<br />
you want to enable LPR/LPD support.<br />
• Click the “Enterprise NDPS LPR/LPD Support” button.<br />
• Click “Enable LPR/LPD services for this printer.”<br />
By configuring the Printer Agent to support LPR/LPD, you enable any system that can submit jobs via the<br />
LPR/LPD standard to print directly to the NDPS printer that this Printer Agent supports. UNIX,<br />
Macintosh, and even some mainframes support LPR/LPD. Clients that need to connect to the NDPS Printer<br />
Agent that is acting as LPR/LPD printer need the IP address or the DNS name of the server running the<br />
NDPS Manager process where the NDPS Print Agent is defined, as well as the leaf object name of the<br />
NDPS Printer Agent.<br />
Unix<br />
By default UNIX workstations print using LPR/LPD. After you have enabled a Printer Agent to accept<br />
LPR/LPD print jobs, the UNIX users need only load the correct driver on their workstations to send jobs to<br />
this printer.<br />
Macintosh<br />
You can configure Macintosh workstations to print to NDPS printers by changing the desktop default<br />
settings from printing via AppleTalk to printing using LPR/LPD. You can configure Macintosh<br />
workstations to print using LPR/LPD when you create new printers to represent the NDPS printers to<br />
which the Macintosh users will print.<br />
For more information about configuring Macintosh workstations to print using LPR/LPD, see “How Do<br />
You Get From Mac to NDPS? [No Queues Please!]” available at http://www.nwconnection.com.<br />
Mainframes<br />
You can configure many mainframes to print to NDPS printers using LPR/LPD via TCP/IP services. For<br />
example, to configure systems running Open Virtual Memory System (OpenVMS) to print via LPR/LPD,<br />
you can use a product such as Compaq’s Digital TCP/IP Services for OpenVMS software. For more<br />
information, see http://www.openvms.digital.com:8000/72final/6525/6525profile_015.html#print_chap .<br />
To configure IBM systems running the Virtual Storage Extended (VSE) operating system (such as IBM<br />
4381s and IBM 9870s) to print via LPR/LPD, you can use a product such as Connectivity Systems’ TCP/IP<br />
for VSE. For more information, see http://www.tcpip4vse.com/concept.htm .<br />
To configure IBM systems running Multiple Virtual Storage (MVS) operating system and systems running<br />
Virtual Machine (VM) operating system to print via LPR/LPD, you can use IBM’s TCP/IP services for<br />
those operating systems. For more information, see<br />
http://www.redbooks.ibm.com/abstracts/gg243376.html .<br />
Page 117 of 317 Novell PartnerNet Confidential 07/24/00<br />
Copyright © 2000 by Novell, Inc.
Caveats<br />
The above non-Windows users do not get all of the advantages that Windows users do because there is no<br />
NDPS client software for non-Windows platforms. So, the good news for UNIX, Macintosh, and<br />
mainframe users is they don’t have to install any software to be able to print directly to NDPS printers.<br />
However, the “bad” news is that because they haven’t installed any software, they don’t have the NDPS<br />
benefit of automatically loading drivers. Additionally, you cannot notify non-Windows clients of a<br />
printer’s characteristics or of a print job’s status.<br />
In other words, the value in supporting UNIX, Macintosh, and mainframe clients (through the LPR/LPD<br />
server) is not to the end user but rather to the network administrator.<br />
IPP versus LPR/LPD<br />
For UNIX and Macintosh users, IPP offers much richer features than those offered by LPR/LPD. For<br />
example, using the NDPS IPP server, IPP clients on an NDPS network can discover the capabilities of an<br />
NDPS printer, such as the printer’s speed or whether or not the printer supports color. IPP clients on an<br />
NDPS network can also collect information about a print job (such as whether or not the job has been<br />
completed or was cancelled) after it is sent to an NDPS printer. In other words, the level of information that<br />
UNIX and Macintosh users can get using IPP is “orders of magnitude above” the information they can get<br />
using LPR/LPD.<br />
UNIX, Macintosh, and Windows users with IPP client software can also print to an NDPS printer via the<br />
NDPS IPP server without having to log in to the network. However, you can still control which users are<br />
able to print to printers for which you have configured NDPS to allow IPP services. Because users can print<br />
to NDPS printers without having to log in to the network, users can finish up a document from a home<br />
computer or a laptop that is not running NDPS client software and send this document to the printer on<br />
their desk at work.<br />
Page 118 of 317 Novell PartnerNet Confidential 07/24/00<br />
Copyright © 2000 by Novell, Inc.
Subprocess 4—QMS to NDPS Migration<br />
The upgrade from QMS to NDPS is a two-step process:<br />
(1) Back-end <strong>Upgrade</strong>. Take one print server and create an NDPS printer for each printer it services.<br />
• Use the appropriate NDPS printer gateway<br />
• Configure NDPS to service QMS queues<br />
• UNLOAD PSERVER.NLM<br />
• LOAD NDPSM.NLM<br />
At this point, the backend is NDPS and nothing has been done to the clients yet.<br />
(2) Front-end <strong>Upgrade</strong>. Client upgrades.<br />
• If latest Novell Client (Version ____) is already installed, just need to create the NDPS printers<br />
using one of the methods described above.<br />
• Delete Pserver and Printer objects (non-NDPS).<br />
• Can delete old print queues because <strong>NetWare</strong> <strong>5.1</strong> (NDPS 2.1.1) supports DOS box printing<br />
(<strong>NetWare</strong> 5.0/NDPS 2.0 does not).<br />
Subprocess 5—Troubleshooting / Real World Issues<br />
• NDPS relies upon STREAMS, CLIB, and TLI; therefore, check to see if the NDPS servers are<br />
running the latest of these NLMs.<br />
• NWAdmin is used to troubleshoot printing problems; future will be <strong>NetWare</strong> Portal Manager.<br />
Working to enable it with ConsoleOne (hopefully a demo at BrainShare 2000).<br />
• Debugging tool console command: NDPS Manager. Typing this alone gives you the list of<br />
available switches. Once you type NDPS Manager you are switched to that screen<br />
where you can type “o” for options.<br />
Subprocess 6—Create the NDPS Report<br />
Document for the customer how to implement NDPS.<br />
Subprocess 7—Review and Deliver NDPS Report to<br />
Customer<br />
Activity 1—Project Manager Review<br />
The project manager should review your NDPS report and make any recommendations or suggestions.<br />
Activity 2—Deliver NDPS Report<br />
Deliver NDPS report to the customer.<br />
Page 119 of 317 Novell PartnerNet Confidential 07/24/00<br />
Copyright © 2000 by Novell, Inc.
Page 120 of 317 Novell PartnerNet Confidential 07/24/00<br />
Copyright © 2000 by Novell, Inc.
Integrating Office 2000 with <strong>NetWare</strong> <strong>5.1</strong><br />
This section will help you integrate Microsoft Office 2000 applications and Web Folders in a <strong>NetWare</strong> <strong>5.1</strong><br />
environment using the protocol WebDAV.<br />
Introduction<br />
WebDAV allows users and administrators the ability to use new methods of collaborating and sharing of<br />
resources on a network, Intranet or the Internet, using Microsoft Office 2000 and Web folders. The<br />
<strong>NetWare</strong> <strong>5.1</strong> file system has been written to allow every document and directory to have a URL associated<br />
with it, to support the access of files and folders through the use of a web browser. Through the use of the<br />
WebDAV protocol and <strong>NetWare</strong> <strong>5.1</strong> users and administrators can collaborate on documents via traditional<br />
means (e.g., shared network drives on a <strong>NetWare</strong> server) as well as through the web. WebDAV takes<br />
advantage of the new features incorporated into Office 2000, such as Web Folders and “Save as Web<br />
Page.” WebDAV allows users to access documents through the Internet and open, edit and save a<br />
document in its originally created application, e.g. Word, Excel. This functionality allows for easier<br />
document collaboration. For example, instead of emailing a document to another user, you simply send a<br />
URL. The recipient clicks on the URL from the email and opens the document from its original location,<br />
makes changes, and saves it. The document never leaves its original location and is opened in the<br />
authoring application.<br />
It is <strong>NetWare</strong> <strong>5.1</strong> that “extends” the file system to allow documents and directories the ability to have<br />
URLs associated with them. It is the WebDAV protocol that allows access to the URLs through a browser.<br />
The presence of a “client” has always been a requirement for modifying and manipulating files on a server.<br />
The need for a client-based login to servers in order to view, edit and save data files has been replaced by<br />
WebDAV, or Web-based DAV (Distributed Authoring and Versioning.) WebDAV is the beginning of the<br />
completion of the Internet’s vision of a collaborative network of resources. The vision of the WebDAV<br />
creators is to be able to access a resource from anywhere without having a specific client and be able to<br />
open, edit, and save a document using the application the document was created in.<br />
What is WebDAV?<br />
WebDAV is a protocol (RFC 2518) that extends HTTP 1.1 to provide a standards-based infrastructure for<br />
asynchronous collaborative authoring using the Internet as the backbone, as if the documents were on the<br />
local workstation. The WebDAV extensions support the use of HTTP for interoperable publishing of a<br />
variety of content, providing a common interface to many types of repositories and making the Web<br />
analogous to a large-grain, network-accessible file system 1 .<br />
The WebDAV protocol has been accepted as an industry standard and potentially there will be widespread<br />
support for it in more and more applications. Novell and Microsoft are just a couple of the first to support<br />
WebDAV interoperability with the file system and document authoring applications. Note that other<br />
applications may have the WebDAV capability in the future; therefore, WebDAV may have benefits<br />
beyond Office 2000.<br />
WebDAV Benefits<br />
WebDAV uses a Web browser as the client instead of the traditional method of client connectivity. By<br />
simply using a browser like Microsoft Internet Explorer 5.0 or any HTTP browser that supports the<br />
1 WebDAV: IETF Standard for Collaborative Authoring on the Web. E. James Whitehead, Jr. p.1<br />
Page 121 of 317 Novell PartnerNet Confidential 07/24/00<br />
Copyright © 2000 by Novell, Inc.
WebDAV protocol, one can access files and folders located on the network file system. The browser-based<br />
connection is then authenticated, if required, for a particular location and user rights are applied to the file<br />
system. WebDAV being a protocol and not a specific client brings many benefits to the network-computing<br />
world. Some of the features of Novell’s implementation are:<br />
• WebDAV is a protocol (see the RFC and footnote reference at the end of this section)<br />
• No client required<br />
• Authenticated and encrypted access using SSL, by default<br />
• Access control through NDS<br />
• Every document and directory has a URL<br />
• Will force users to log in, if required<br />
• Support for ease of web page authoring and modification<br />
To share documents with WebDAV, you will only have to e-mail a URL in order for a person to access a<br />
document. Document sharing can be accomplished through the use of Web folders instead of through the<br />
sending of e-mail attachments. By not having to send a changed or “versioned” document through e-mail<br />
repeatedly to other team members, collaboration is more fully realized and there are not different versions<br />
of the same document floating around. Instead documents are instantly accessible to a workgroup from one<br />
location through a browser.<br />
WebDAV extends HTTP to allow six capabilities, three of which are fully implemented and are discussed<br />
below:<br />
• Overwrite prevention<br />
• Properties<br />
• Name space management<br />
The other three extensions:<br />
• Version management<br />
• Advanced collections<br />
• Access control<br />
are scheduled for completion in the fall of 2000. However, Novell uses NDS for access control and does<br />
not fully support version management and advanced collections at this time.<br />
Overwrite Prevention<br />
WebDAV has overwrite prevention or “locking” to overcome the “lost update problem.” WebDAV<br />
provides an exclusive write lock, which guarantees that only the lock owner can overwrite a locked<br />
resource. These locks are applied when a user accesses and opens a document; in essence a copy of the<br />
document is opened on the local workstation allowing the document on the server to be locked. Once the<br />
document is closed on the server the lock is released and the next person can have full access to the file. If<br />
a person accesses an already locked file, that person is notified by the usual message “someone else has this<br />
file in use, would you like to make a copy?” The user answers yes and they have a locally loaded copy in<br />
read-only mode.<br />
Properties (metadata)<br />
All published information on the Web has additional pieces of information associated to it, such as title,<br />
subject, creator, publisher, length and creation date. These properties of the information as WebDAV<br />
Page 122 of 317 Novell PartnerNet Confidential 07/24/00<br />
Copyright © 2000 by Novell, Inc.
knows them are also known as metadata. The use of metadata in, for example, a search will allow a search<br />
to be more specific, because the specifics about a document are stored in the metadata, this will allow a<br />
search to be able to focus on particular properties of information, i.e. Author = “John Doe” therefore<br />
allowing searches to be faster and retrieve more relevant results.<br />
Name Space Management<br />
Name space management is the ability to conveniently manage Internet files and directories, to include the<br />
ability to move and copy files. This also allows the creation of directories and the organization of files in<br />
directories, much like a word processing application does to documents and directories.<br />
Additional Resources on WebDAV<br />
•<br />
•<br />
http://www.ics.uci.edu/pub/ietf/webdav (IETF Working group Website)<br />
http://www.excosoft.se/dev/webdav/slides/ppframe.htm (Introduction to WebDAV)<br />
What are Web Folders?<br />
Microsoft Office 2000 installs an Icon in “My Computer” and extends Windows Explorer to include a new<br />
type of folder called a “Web Folder.” Web folders are setup using the Add Web Folder wizard, once the<br />
initial installation of Web folders is complete they are available for use with the WebDAV protocol through<br />
Internet Explorer 5.0.<br />
A Web folders button is available in all Microsoft Office 2000 applications and allows documents to be<br />
saved to Web folders locations. Once Office 2000 is installed, dialogs are available through the standard<br />
File, Save, then choose “Web Folders” on the bottom left of the dialog box. Also this makes it easy for<br />
Web Page administrators to update changes to content and save it to a Web location, without having to be<br />
an FTP and Namespace expert.<br />
Subprocess 1—How to Integrate <strong>NetWare</strong> <strong>5.1</strong> and<br />
Office 2000<br />
Requirements<br />
One <strong>NetWare</strong> <strong>5.1</strong> server running:<br />
• The <strong>NetWare</strong> Enterprise Web Server (which installs by default with <strong>NetWare</strong> <strong>5.1</strong>)<br />
• WebDAV.NLM(which loads by default with the Enterprise Web Server)<br />
Provides support for WebDAV<br />
• Office 2000 running on workstations<br />
Extends “My Computer” to allow Web folders functionality<br />
• Internet Explorer 5.0 running on workstations<br />
Note: Internet Explorer 4.0 and Netscape’s browsers do not support the WebDAV protocol and<br />
they do not support Web Folders. However, the WebDAV.NLM does provide some administrative<br />
functionality that uses the standard HTTP protocol without the WebDAV enhancements.<br />
Page 123 of 317 Novell PartnerNet Confidential 07/24/00<br />
Copyright © 2000 by Novell, Inc.
• NDS 7 or NDS 8 – However, the WebDAV.NLM uses features of <strong>NetWare</strong> <strong>5.1</strong> that are not<br />
present in prior versions, this is not NDS related, but a dependency of <strong>NetWare</strong> <strong>5.1</strong>.<br />
• NICI 1.3.1 Novell International Cryptographic Infrastructure<br />
• NICIU0 1.3.1 NICI U.S./Canada (128bit) Cryptographic Engine XENG<br />
• PKIS 2.0.1 Novell Certificate Server v2.01<br />
• SAS 1.4.0 Secure Authentication Services<br />
• SPACK 5.0.4 v4.0 Support Pack for <strong>NetWare</strong> 5<br />
• TCP/IP running on <strong>NetWare</strong> <strong>5.1</strong>/Enterprise Web Server<br />
• DNS running (ideal): if not, the name of the <strong>NetWare</strong> <strong>5.1</strong>/Enterprise Web server must be in its<br />
SYS:ETC\HOSTS file and client hosts file also.<br />
• Optional: LDAP is a nicety in that you can do LDAP queries to the server (vs. using a browser).<br />
LDAP is not a requirement<br />
• Optional: NDS-DAV (discussed later)<br />
• Optional: 256 MB of RAM on the <strong>NetWare</strong> <strong>5.1</strong>/Enterprise Web Server to use the WebBench tune<br />
feature for optimal performance of the Web server.<br />
Note: The Novonyx group recommends this. This greatly increases the available cache size for<br />
keeping static pages & images. There are also going to be additional instructions in the README<br />
concerning the optimal settings for running WebBench tests, etc.<br />
Subprocess 2—Creating Web Folders<br />
2<br />
Web Folders install as a namespace (or shell) extension with an icon in My Computer (root object in<br />
Windows Explorer). This root object is a container for shortcuts to your Web publishing sites. You can use<br />
Windows Explorer to view, move, copy, rename, delete, create new, sort/group files by properties, and<br />
view property sheet information for files in a Web Folder depending on your authoring and security<br />
permissions on the Web server.<br />
The namespace extension observes the viewing preferences you set in the Folder Options dialog box in<br />
Windows Explorer. If you choose not to view files with registered system extensions (for example, .dll,<br />
.drv, .pnf, etc.), files in a Web Folder with one of these extensions are not shown.<br />
NOTE: Files that generate a Hypertext Markup Language (HTML) view of the folder (for example, scripts<br />
with a .asp or .cgi extension), and other files that may not be intended to be edited by users (for example,<br />
executable files with a .exe or .dll extension), may appear in the Web Folders view of a folder.<br />
Administrators may want to use file system permissions or some other method to prevent editing of these<br />
files by users 2 .<br />
Creating Web Folders<br />
To create a Web Folder, use one of the following methods:<br />
Method 1:<br />
In Internet Explorer, click Open on the File menu.<br />
http://support.microsoft.com/support/kb/articles/Q195/8/51.ASP )<br />
Page 124 of 317 Novell PartnerNet Confidential 07/24/00<br />
Copyright © 2000 by Novell, Inc.
3<br />
In the Open box, type http://server name/folder name, where server name is the name of the appropriate<br />
server and folder name is the name of the appropriate folder.<br />
Click the Open As Web Folder check box to select it, and then click OK.<br />
Method 2:<br />
In My Computer, double-click Web Folders, and then double-click Add Web Folder.<br />
In the Type the Location to Add box, type http://server name/folder name, where server name is the<br />
name of the appropriate server, and folder name is the name of the appropriate folder. And then click Next.<br />
Type a descriptive name for your Web Folder shortcut, and then click Finish 3 .<br />
Once Microsoft Office 2000 is installed access My Computer, there you will notice the Web Folders icon.<br />
http://support.microsoft.com/support/kb/articles/Q195/8/51.ASP )<br />
Page 125 of 317 Novell PartnerNet Confidential 07/24/00<br />
Copyright © 2000 by Novell, Inc.
Double click the Web folder and it should install the Web folder functionality, this happens only the initial<br />
time, then a Web folder dialog box is displayed, view Figure below.<br />
Next, type the location of the server you wish to access folders from and be sure to use an https:// secure<br />
connection URL to attach to the <strong>NetWare</strong> <strong>5.1</strong> server, since SSL is installed by default. If you do not know a<br />
specific location choose the browse button and Internet Explorer (IE) 5.0 will open. This will allow you to<br />
type the server name either ( http://servername or IP address) or ( https://servername/ or IP address) location<br />
and the default, or index.html page, will open. See illustration below.<br />
Page 126 of 317 Novell PartnerNet Confidential 07/24/00<br />
Copyright © 2000 by Novell, Inc.
Once the location is determined through IE 5.0, close the browser and the location is added to the URL<br />
path, then choose next. A login dialog box appears, see Figure below, asking for username and password<br />
this is the users NDS username and password. Note: the password is not sent in clear text across the wire,<br />
because by default SSL is enabled.<br />
Page 127 of 317 Novell PartnerNet Confidential 07/24/00<br />
Copyright © 2000 by Novell, Inc.
The request is granted if the location is valid and an “Enter the name of this Web Folder:” dialog box<br />
appears. Enter a name that is descriptive because this is the name that is displayed in the Web Folders, i.e.<br />
Homedir, then choose Finish. A Web Folder is created in the Web Folders namespace (or shell.) Once the<br />
resource has been accessed and authenticated with a valid username and password, access to the resource is<br />
granted without a request to login again, see figure below.<br />
Page 128 of 317 Novell PartnerNet Confidential 07/24/00<br />
Copyright © 2000 by Novell, Inc.
However, if a different location is accessed, or the user logs out, then a login dialog box will appear.<br />
Subprocess 3—Accessing Documents and Web<br />
Folders<br />
Features of using WebDAV integration with Microsoft Office 2000 are numerous. Great care has been<br />
taken to make the protocol application-friendly. Existing applications can easily add WebDAV support<br />
because the protocol is compatible with the common "open, edit and save" style of most applications. This<br />
feature extends to the Microsoft Office 2000 suite of applications. For example, to save a document to a<br />
Web folder from within Word or Excel, you simply choose, File, Save and select the Web Folders Icon at<br />
the bottom of the left hand “Save in:” dialog box. Once the document is saved in a Web folder it is<br />
available through the WebDAV protocol and accessible to others for collaboration through a web browser,<br />
given proper rights have been granted.<br />
Subprocess 4—WebDAV and Home Directory<br />
(~homedir)<br />
One of the most requested features customers have asked for is the ~homedir feature. The ~homedir<br />
feature is similar to a Unix based Web Server’s personal web space feature, in that a user can type<br />
~username and access their home directory from anywhere on a system. This feature was incorporated into<br />
previous versions of the <strong>NetWare</strong> Web Server, but was not available using the Netscape Enterprise Web<br />
Server. This functionality has been incorporated into the <strong>NetWare</strong> Enterprise Web Server and utilizes<br />
Office 2000 Web folder integration. WebDAV provides this functionality through the use of a user’s home<br />
directory and a public_html subdirectory acting as a pointer for the WebDAV protocol.<br />
Page 129 of 317 Novell PartnerNet Confidential 07/24/00<br />
Copyright © 2000 by Novell, Inc.
It is required to setup the users home directory in either NWAdmin, ConsoleOne (or through a browser<br />
using WebDAV, if NDSDAV is enabled.) The users home directory can be either on the server the Web<br />
Server is on, or a remote server, as long as the properties of the users home directory point to the<br />
Server_Volume: and the full path of the location, See Figure below. Once a user’s home directory is setup<br />
and the appropriate directory created, create a public_html subdirectory within the user's directory. There<br />
needs to be at least one file in this directory, it works best for now if a file is placed here. Support Pack 1<br />
will hopefully correct this. The user’s home directory can be located anywhere the administrator wishes, as<br />
long as the home directory attribute of a user points to that location, and under that particular user there is a<br />
public_html directory with at least one file in it, as mentioned before. The public_html directory is what<br />
WebDAV uses to locate the https://servername/~homedirectory , for example the admin’s Homedir is<br />
https://notebook/~admin which corresponds to<br />
Notebook/sys:novonyx\suitespot\docs\users\admin\public_html if the users home directory is in the Web<br />
Servers root directory.<br />
If NDSDAV is enabled the user home directory can be modified through a browser. View the Figure<br />
below. Note: This can also be done through the Web Servers Admin server and it would look much the<br />
same as the figure below.<br />
Notice that the location of the user’s home directory has different path, and is located on the SYS volume<br />
of the Notebook server instead of the document root of the web server. Since the user’s home directory<br />
points to that location the admin user can access his Homedir with the same URLs mentioned above, either<br />
the https://Servername/~admin or https://IPAddress/~admin .<br />
Page 130 of 317 Novell PartnerNet Confidential 07/24/00<br />
Copyright © 2000 by Novell, Inc.
Subprocess 5—Using NDSDAV<br />
NDSDAV is Novell’s interesting and novel use of the WebDAV protocol. NDSDAV is also Novell’s way<br />
of exposing NDS functionality to the WebDAV protocol.<br />
What is NDSDAV?<br />
NDSDAV takes the NDS directory and makes it available to the WebDAV protocol. Normally WebDAV<br />
accesses the file system and not the directory, but NDSDAV accesses the directory in much the same way<br />
that WebDAV accesses the file system. NDSDAV NDS objects are only visible through the “My<br />
Network” virtual directory. The “My Network” directory exists in the document root of the Web Server and<br />
allows a WebDAV user access to NDS objects from their browser. The NDSDAV objects attributes can be<br />
modified from the browser as well by double clicking the object or right clicking and choosing attributes.<br />
Changes to the NDS rights and properties can also be accomplished through a browser as well. For<br />
example, to make a user a trustee of a folder using WebDAV and NDSDAV a document author need only<br />
to drag another user on top of the folder for which he needs trustee rights and the user is not copied to the<br />
folder, but is assigned rights to that folder, based on what WebDAV knows of user and folder objects.<br />
Properties of NDSDAV<br />
If NDSDAV is enabled an administrator has access to NDS resources, and has the ability to administer<br />
most attributes of users, groups and organizational units objects. With NDSDAV enabled an administrator<br />
Page 131 of 317 Novell PartnerNet Confidential 07/24/00<br />
Copyright © 2000 by Novell, Inc.
can add users, modify their rights, change passwords, delete users, create Organizational Units, assign<br />
trustee rights, modify home directory locations and other common NWAdmin functions. Compared to<br />
NWAdmin, NDSDAV does not provide all the same functionality, but it does allow an administrator the<br />
ability too, on the fly, assign trustee rights to an object or folder. Also, NDSDAV allows a document<br />
creator the ability to assign rights to their documents, using drag and drop. By granting a user the ability to<br />
assign trustees to their own files and folders extends the ability for that users to share with others and<br />
collaborate on projects, freeing the administrator to focus on other tasks.<br />
The Readme.htm document contents are listed below, giving a very good explanation of what each folder’s<br />
function is and how they are used.<br />
My Network Folder<br />
The My Network folder provides a central location on your <strong>NetWare</strong> server from which you can get to the<br />
rest of the network resources that you use. Unlike the Network Neighborhood folder seen in Windows that<br />
exists on the workstation, this folder virtually exists on your <strong>NetWare</strong> server instead of your workstation; it<br />
is simply a pointer for when NDSDAV is enabled. This folder is also accessed via industry standard web<br />
protocols. Because of these special qualities, you can access the My Network folder from any Windows<br />
workstation that is attached to the public Internet - anywhere in the world.<br />
Within the My Network folder, you will find your personalized version of the following items:<br />
Mapped Drive Web Folders<br />
If your network administrator has set up mapped network drives for you that are normally visible at the<br />
client, you will be able to see those same directories as web folders within the My Network folder. This<br />
Page 132 of 317 Novell PartnerNet Confidential 07/24/00<br />
Copyright © 2000 by Novell, Inc.
will allow you to access your corporate applications and data remotely without the need for a Novell client<br />
on your workstation.<br />
Please note that Windows and DOS applications that require traditional drive mappings will not of course<br />
work in this environment.<br />
Personal Web Publishing Folder<br />
When your login account was created on your Novell network, your network administrator will normally<br />
have created a home directory (user directory) for you out on the network. If your network administrator<br />
has enabled the User Home Directories feature, your My Network folder will contain a link to your<br />
personal web publishing directory.<br />
For example, if your home directory is on file://MyServer/Data/Users/Bob , then your personal web<br />
publishing folder will be called ~BOB and will actually contain all the HTML files that you publish into the<br />
file://MyServer/Data/Users/Bob/public_html subdirectory.<br />
Please note that you can control who can access your web publishing folders by dragging and dropping<br />
users and groups from your NDS directory web folders onto those folders.<br />
My Directory Tree Web Folder<br />
This folder allows you to see the contents of your Novell Directory Services tree. In particular, you can see<br />
all the users and groups that have been defined within your network. To view the properties of any object<br />
that you can see within the tree, double click its icon within the web folder.<br />
Note that your network administrator will likely allow you to only modify the properties of your own user<br />
object and modify rights for your personal web publishing folders. The rights to other users, groups and<br />
web folders are controlled by the network administrator.<br />
My Organizational Unit Web Folder<br />
Your organizational unit web folder contains users that represent all of your colleagues in your department<br />
as well as any groups of users that your network administrator may have defined. The users and groups you<br />
find within this folder will also include the special users [public] and [private].<br />
Use the users and groups within this web folder to modify the access rights on your web folders or any<br />
other areas in which the network administrator has given you access control rights.<br />
Setting up NDSDAV<br />
To enable NDSDAV change, NDSDAV:False (default) to NDSDAV:True in the webdav.conf file located<br />
\\Server\Volume\Novonyx\Suitespot\bin\webdav\html\ directory on the server running the <strong>NetWare</strong><br />
Enterprise Web Server. Turning NDSDAV On gives the network the ability to see the “My Network”<br />
folder and use it as an NDS portal to objects in the tree.<br />
The “My Network” folder is located in the web servers primary document root directory, by default the<br />
\\servername\volume\novonyx\suitespot\docs on the physical web server. This is a placeholder for all NDS<br />
objects. View Figure ? Below.<br />
Page 133 of 317 Novell PartnerNet Confidential 07/24/00<br />
Copyright © 2000 by Novell, Inc.
Note: the URL http[s]//hostname/~username is a basic Web Server function that works with normal web<br />
access and the WebDAV protocol, and accesses the username/public_html directory. However,<br />
http[s]//hostname/My Network/~fullndsname is a feature of NDSDAV and accesses the user’s home<br />
directory and not the public_html subdirectory.<br />
Examples of three possible Client/Server scenarios<br />
• Office 2000 and <strong>NetWare</strong> <strong>5.1</strong> server and a valid <strong>NetWare</strong> client<br />
WebDAV support is built into Office 2000 applications. With <strong>NetWare</strong> <strong>5.1</strong> and a valid <strong>NetWare</strong><br />
Client 32, then functionality is maximized. WebDAV connectivity is a function of the <strong>NetWare</strong><br />
<strong>5.1</strong> server, the <strong>NetWare</strong> Enterprise Web Server, and the loading of the WebDAV.NLM.<br />
WebDAV supports the access to resources on a <strong>NetWare</strong> <strong>5.1</strong> server through a standard HTTP<br />
browser, either Internet Explorer 5.0 or WebDAV enabled browser and the services being enable<br />
on the server. Having Office 2000 installed and the use of a valid <strong>NetWare</strong> <strong>5.1</strong> client to connect to<br />
a <strong>NetWare</strong> <strong>5.1</strong> server provides the great advantages over other options available. This option can<br />
be referred to as the fully functional method seeing as it has all the pieces in place to take<br />
advantage of the new <strong>NetWare</strong> <strong>5.1</strong> enhancements and Office 2000 integration. This option allows<br />
the user to access resources using WebDAV through a compliant browser, as well as, have access<br />
to network resources that are not available to workstations with no client installed, specifically<br />
administration. With client 32 connectivity to the network a user and workstation take advantage<br />
of the resources the network provides. Further an administrator has NWAdmin and ConsoleOne<br />
capabilities for administration, something that is missing from the other scenarios. Other major<br />
advantages for having a client installed are, accessing files from applications that do not support<br />
the WebDAV protocol, drive mappings for running applications and that the Microsoft Windows<br />
WebDAV implementation is slower.<br />
• Office 2000 and <strong>NetWare</strong> <strong>5.1</strong> server and no installed client<br />
Page 134 of 317 Novell PartnerNet Confidential 07/24/00<br />
Copyright © 2000 by Novell, Inc.
Another option is to have the same <strong>NetWare</strong> <strong>5.1</strong> server installed and have Microsoft Office 2000<br />
installed on the workstation, but not have a Microsoft or <strong>NetWare</strong> client installed on that<br />
workstation. The user is able to access the resource from a browser and open, edit and save the<br />
document in it’s original authored application and not have to be formally logged into the<br />
<strong>NetWare</strong> <strong>5.1</strong> server with either the Microsoft <strong>NetWare</strong> Client or Client 32. Currently IPP and<br />
Internet printing is available using WebDAV and Office 2000. Full administrative capabilities are<br />
not yet available, due to NWAdmin dependencies for client 32, but in the future advanced<br />
administration will be extended to include most, if not all, of the functionality of that NWAdmin<br />
and still not require a client to be installed. This is the vision of the developers of the WebDAV<br />
protocol and Novell’s use of it.<br />
• Office 97, IE 5 or other browser and <strong>NetWare</strong> <strong>5.1</strong><br />
WebDAV supports the connectivity of a user to a resource even without the Office 2000 products.<br />
This connectivity is a function of the <strong>NetWare</strong> <strong>5.1</strong> server, the <strong>NetWare</strong> Enterprise Web Server,<br />
and the loading of the WebDAV.NLM. WebDAV supports the access to resources on a <strong>NetWare</strong><br />
<strong>5.1</strong> server through a standard HTTP browser, either Microsoft IE 5 or a WebDAV enabled<br />
browser and the WebDAV services being enabled on the server. With IE 5 installed on a<br />
workstation the “My Computer” is extended to include Web Folders. The purpose of this is to<br />
allow the user to have access to the resource and be able to get to the documents, and be able to<br />
access these documents in their native format from a server. However, since Office 97 applications<br />
have not been extended to include the Save As Web Folders dialog box, a document will need to<br />
be placed in a valid Web folder in order for other WebDAV enabled applications to have typical<br />
Web folder access to them.<br />
If another browser was installed that was not WebDAV enabled then documents would need to be copied to<br />
the local workstation in order to be modified in the “creating” application, then saved and placed back on<br />
the server. This is similar to standard file access, except in a client-based connection the user can modify<br />
the document in place and can open, edit and save the document from it’s original location.<br />
With WebDAV the purpose is to allow a workstation without a client the ability to get to a resource and<br />
have access to documents without being tied to a specific client installation. This is not an ideal scenario,<br />
but the fact that it is possible is leaps ahead of where we started.<br />
Troubleshooting<br />
• Valid IP address<br />
• DNS/DHCP properly configured<br />
• PKIS/SAS properly installed and functioning<br />
• Error log on Enterprise Web Server: /novonyx/suitespot/https-servername/logs/errors.<br />
• The browser does not have a logout feature, so the only way to change the user is to reboot the<br />
workstation or logout of the Windows and log back in.<br />
• Support Pack 1 should address the need to have a single file placed in the Homedir directory for<br />
proper functionality and should address the creation of the Webdav.pdb file in all WebDAV<br />
enabled folders, this is a database of the attributes of the WebDAV objects. This is a function of<br />
the Homedir code and not necessarily a bug in WebDAV, and development is aware of the issue.<br />
• NDSDAV Note: The Homedir folder is still available once NDSDAV is turned off, what isn’t<br />
available is the “My Network” folder. The “My Network” folder is only available if NDSDAV is<br />
turned ON and working. If it is not the virtual directory and the subsequent NDS objects are<br />
unavailable. (An unexpected error has occurred”) will be displayed if the “My Network” Web<br />
Folder is attempted to be accessed.<br />
Page 135 of 317 Novell PartnerNet Confidential 07/24/00<br />
Copyright © 2000 by Novell, Inc.
• Common error messages for Web Folders are available at<br />
http://support.microsoft.com/support/kb/articles/Q195/8/51.ASP )<br />
• An in-place upgrade with the Netscape Enterprise Web server 3.0 loaded will need to upgrade to<br />
the <strong>NetWare</strong> Enterprise Web Server and be sure to turn WebDAV State to ON. See figure below:<br />
• The use of the users fully distinguished NDS name is the default however, if you wish to use<br />
common names, a change must be made in the <strong>NetWare</strong> Enterprise Web Server. Contexts will<br />
need to be added to the Global Settings, Configure Directory Services admin page of the Web<br />
Server that includes the users’ context. Administration of this can become cumbersome if the<br />
users are spread throughout many OUs, but if a few exist then this is a relatively easy change to<br />
implement. See figure below.<br />
Page 136 of 317 Novell PartnerNet Confidential 07/24/00<br />
Copyright © 2000 by Novell, Inc.
Conclusion<br />
WebDAV integration with Office 2000 applications and the <strong>NetWare</strong> <strong>5.1</strong> server is part of Novell’s first<br />
attempt at getting away from the standard “client” that we are all accustomed too. The capabilities that this<br />
protocol provides are functional, but not complete. The creator’s vision of a “collaborative Internet” has<br />
begun with the acceptance and more widespread use of this powerful protocol. As more and more<br />
applications are written to support the WebDAV protocol, more widespread and interesting uses’ will<br />
immerge for collaborative document creation and sharing. Novell’s own interesting use of the WebDAV<br />
protocol, NDSDAV, allows for common administrative tasks to be performed, this like the WebDAV<br />
protocol, is the first attempt at a pure “clientless” administration environment. Novell has taken great<br />
strides to embrace the changing times to reflect an image of a fully Internet-enabled software company and<br />
WebDAV integration with <strong>NetWare</strong> <strong>5.1</strong> and NDSDAV are very good steps in that direction.<br />
Subprocess 6—Create the WebDAV Report<br />
Document for the customer how to implement WebDAV.<br />
Page 137 of 317 Novell PartnerNet Confidential 07/24/00<br />
Copyright © 2000 by Novell, Inc.
Subprocess 7—Review and Deliver WebDAV Report to<br />
Customer<br />
Activity 1—Project Manager Review<br />
The project manager should review your WebDAV report and make any recommendations or suggestions.<br />
Activity 2—Deliver WebDAV Report<br />
Deliver WebDAV report to the customer.<br />
Page 138 of 317 Novell PartnerNet Confidential 07/24/00<br />
Copyright © 2000 by Novell, Inc.
Appendix A—IPX-Dependent Applications<br />
Worksheet<br />
Note: This completed worksheet should be included in the documentation (report) that is given to the<br />
customer.<br />
1 2 3 4 5<br />
Application Name Version Running on Server<br />
(server name)<br />
Mission<br />
Critical?<br />
Y / N Y / N Date<br />
Available<br />
IP-Only <strong>Upgrade</strong> Available? IPX-Depende<br />
Plan to <strong>Upgrade</strong><br />
to IP Version?<br />
Page 139 of 317 Novell PartnerNet Confidential 07/24/00<br />
Copyright © 2000 by Novell, Inc.<br />
(no IP-only up<br />
Will Support
Appendix B—CMD Essentials<br />
Note: we do not recommend, and actively discourages customer use of CMD servers if at all<br />
possible. There are many reasons for this, but among them are the NDS overhead issues of storing<br />
sapsrv.novell information in the SLP scopes, and the significantly reduced number of servers that<br />
can be placed into a single scope as a result of the size of the sapsrv.novell services entries in the<br />
SLP database (NDS).<br />
One of the easiest ways to make <strong>NetWare</strong> <strong>5.1</strong> interoperable with earlier versions of <strong>NetWare</strong> is to<br />
implement <strong>NetWare</strong> <strong>5.1</strong> over IPX. While this is an easy solution, it is probably not the most<br />
optimal. Novell is moving away from IPX as the standard communication protocol for <strong>NetWare</strong>.<br />
The primary reason most organizations are moving to <strong>NetWare</strong> <strong>5.1</strong> is to implement its TCP/IPbased<br />
features.<br />
We recommend the “dual-stack” approach to migrate to a pure IP environment. This approach<br />
involves the loading and binding of both the IPX and TCP/IP protocol on the <strong>NetWare</strong> <strong>5.1</strong> servers<br />
to provide backward compatibility. Once done, all IPX dependencies on the network are identified<br />
and removed. Once removed, IPX is then unbound from the servers, and the pure IP environment<br />
is in place.<br />
Unfortunately, some clients will not be able to implement this approach for a migration to a pure<br />
IP environment. There is an immediate need for IP-only clients to be able to use IPX services on<br />
the network. This can only be done using a Migration Agent that provides a gateway between the<br />
IP and IPX worlds. Additionally, clients can see benefit in removing the IPX protocol from WAN<br />
links for increased network performance. This piece can only be accomplished using the Backbone<br />
Support feature also available with compatibility mode. For these clients, compatibility mode is a<br />
primary key in the goal of migrating to a pure IP environment.<br />
Understanding Compatibility Mode Basics<br />
In order to plan for and design a compatibility mode infrastructure, it is important first to<br />
understand why technology like compatibility mode is needed. To get this understanding, it is<br />
important to see how clients and servers communicate in a <strong>NetWare</strong> environment. Traditionally,<br />
this communication has been accomplished using IPX as a transport protocol; however, the main<br />
“language” spoken by <strong>NetWare</strong> clients and servers is actually something called the <strong>NetWare</strong> Core<br />
Protocols (NCP). NCP is actually an abstraction at a higher layer of the OSI model of networking<br />
that sits above the Network layer, where the communication protocol is actually defined.<br />
Because NCP exists at a higher layer, the packet is constructed with the necessary <strong>NetWare</strong> related<br />
information and passed down to the Network layer, which is responsible for the actual protocol.<br />
Thus, NCP can pass its information to the IPX stack for IPX communications, or it can pass its<br />
information to the TCP/IP stack. In <strong>NetWare</strong> <strong>5.1</strong>, that is how NCP communications are able to use<br />
TCP/IP. NCP is protocol independent.<br />
Communication between IP-based <strong>NetWare</strong> <strong>5.1</strong> servers and clients is done over TCP. When a<br />
client requests services from a server, it creates a TCP packet using a high source port number<br />
(over 1024). The destination port number for this packet is 524 because this is the port on which<br />
<strong>NetWare</strong> <strong>5.1</strong> listens for NCP-based communications. The normal TCP three-way handshake to<br />
establish a session is initiated, and the client and server begin a normal communication session.<br />
In a perfect world, all programmers would code their applications to use NCP. Unfortunately, this<br />
is not the case. Many applications on the market or custom developed make calls directly to the<br />
SAP protocol or to the IPX stack itself. When the abstraction of NCP is bypassed in such a<br />
manner, there is no way for the packet to be passed to the TCP/IP stack instead of the IPX stack.<br />
This is why compatibility mode must exist. In a pure IP environment, these “misbehaving”<br />
Page 140 of 317 Novell PartnerNet Confidential 07/24/00<br />
Copyright © 2000 by Novell, Inc.
applications are still going to make calls to the IPX stack. A technology had to be created to<br />
address this.<br />
This technology is the compatibility mode driver (CMD). CMD is responsible for taking packets<br />
coming from the IPX stack. Because CMD does not know the calls that were made by the<br />
application in passing it to the IPX stack, it cannot remove the pertinent information and redirect<br />
them to NCP; however, it can redirect the entire IPX packet to the TCP/IP stack. This is, in fact,<br />
what CMD does. The IPX packet is redirected to the TCP/IP stack where it is encapsulated in a<br />
TCP/IP packet using a UDP header. The packet then goes out on the wire as IP instead of IPX.<br />
Figure B1 shows how the CMD module interacts with the other components on a <strong>NetWare</strong> <strong>5.1</strong><br />
client or server. Once the packet is out on the wire and reaches its destination, the destination host<br />
begins to process the incoming packet. After unwrapping the TCP/IP components, the destination<br />
host is left with an IPX packet to process. The IPX packet is redirected by CMD to the IPX stack<br />
where it is processed and sent up to the higher layers of the OSI model of networking. Thus, CMD<br />
must be loaded on both the source and destination machines for compatibility mode to function<br />
properly.<br />
Protocol<br />
Interface<br />
IPX<br />
CMD<br />
Redirect<br />
Libraries<br />
NCP<br />
Application<br />
SAP<br />
CMD<br />
Redirect<br />
Page 141 of 317 Novell PartnerNet Confidential 07/24/00<br />
Copyright © 2000 by Novell, Inc.<br />
IP<br />
Figure B1. Illustrating CMD redirections.<br />
SLP<br />
If the destination machine did not know how to process the IPX packet after unencapsulating it, an<br />
error condition would have occurred, and the packet would not have been processed. It is critical<br />
that the IPX stack be loaded on both the servers and clients because it is a necessary component of<br />
compatibility mode, just as much as CMD being loaded is required. However, once loaded, IPX<br />
cannot be bound to the network interface. This would defeat the purpose of compatibility mode, as<br />
IPX would be put out on the wire.
Figure B2 shows the different types of packets that can be put out on the network when clients and<br />
servers have CMD loaded. Only applications that call the IPX stack directly will produce<br />
encapsulated packets. These encapsulated packets are UDP packets addressed to port 2645 for<br />
both source and destination. Behaved applications making use of normal NCP calls will put<br />
NCP/IP packets out on the wire as discussed previously.<br />
Figure B3 shows an actual packet trace showing that a particular server will communicate over<br />
NCP/IP for certain functions while also encapsulating IPX in IP for other functions. In this<br />
example, the server 172.20.1.18 is using NCP/IP to perform NDS operations; however, the<br />
encapsulated packets being generated by this server can also be seen.<br />
Call to IPX<br />
I<br />
P<br />
X<br />
NCP<br />
CMD<br />
Call to NCP<br />
T<br />
C<br />
P<br />
I<br />
P<br />
NCP/IP--TCP port 524<br />
IPX encapsulated in IP<br />
IP-CMD Client<br />
UDP port 2645<br />
IP-CMD Server<br />
Figure B2. Traffic patterns with CMD.<br />
Page 142 of 317 Novell PartnerNet Confidential 07/24/00<br />
Copyright © 2000 by Novell, Inc.
Figure B3. A CMD server uses NCP/IP and encapsulation.<br />
Loading CMD on Servers and Clients<br />
As mentioned previously, if there are IPX-dependent applications on a network where only IP is<br />
allowed on the wire, CMD must be used. CMD must be loaded on all clients and servers where the<br />
IPX dependencies exist. The modules required for loading CMD on clients and servers come with<br />
the latest version of the <strong>NetWare</strong> client and are installed on a <strong>NetWare</strong> <strong>5.1</strong> server by default.<br />
To load CMD on the client, it is merely an installation option during the normal installation of the<br />
client. To install it, choose the Custom installation option. When prompted to install stacks,<br />
choose the IP with CMD option. This will load the TCP/IP stack, the IPX stack and the CMD<br />
driver, which acts as a shim for the IPX stack. In this configuration both protocol stacks are<br />
loaded, but only IP is bound to the network interface on the client.<br />
There are configuration options that need to be set on the CMD client. These are the CMD<br />
network number and preferred Migration Agent. They are settable on the CMD driver property<br />
page. By default, the CMD network number is FFFFFFFD. The need for the CMD network<br />
number and preferred Migration Agent will be discussed in the section on the Migration Agent.<br />
Note: It is recommended that the default CMD network number not be used. This will prevent the<br />
production environment from being affected by a renegade server brought up having the default<br />
CMD configuration loaded on it.<br />
For <strong>NetWare</strong> <strong>5.1</strong> servers, there is an NLM that is loaded to support CMD. This is SCMD.NLM,<br />
and it stands for Server Compatibility Mode Driver. This module can be loaded on a <strong>NetWare</strong> 5.0<br />
or <strong>5.1</strong> box, a <strong>NetWare</strong> 4.2 box, or a <strong>NetWare</strong> 4.11 box with at least Service Pack 6 installed. It<br />
should be noted that a <strong>NetWare</strong> 4.x box running CMD would always use CMD to communicate<br />
Page 143 of 317 Novell PartnerNet Confidential 07/24/00<br />
Copyright © 2000 by Novell, Inc.
with other servers. This is because <strong>NetWare</strong> 4.x boxes cannot support NCP/IP natively. Only<br />
<strong>NetWare</strong> 5.x has that capability.<br />
Note: SCMD.NLM does not come by default with <strong>NetWare</strong> 4.11. It has been incorporated into the<br />
service packs. It is recommended the latest version of the service pack be applied to<br />
<strong>NetWare</strong> 4.11.<br />
Note: SCMD.NLM is dependent upon SLP for reasons that will be discussed later. When<br />
SCMD.NLM is loaded on a <strong>NetWare</strong> 4.11 or 4.2 box, it is imperative to make sure the latest<br />
versions of SLP.NLM and SLPTCP.NLM are also installed and loaded on that box.<br />
After SCMD is loaded for the first time on a <strong>NetWare</strong> <strong>5.1</strong> box, some new SET parameters become<br />
available. These parameters can be configured using the SET utility at the server console or by<br />
using MONITOR. The new parameters can be found under the Communications option. When<br />
SCMD is installed on a <strong>NetWare</strong> 4.x box, there are no new SET parameters. Options must be set<br />
at the command line when the SCMD.NLM module is loaded.<br />
SCMD does not require any options to load in default mode; however, some advanced features of<br />
SCMD can only by implemented by using command line switches. Table 1 summarizes some<br />
useful switches associated with SCMD.<br />
Switch Description<br />
/BS, /G, /MA Loads SCMD in Migration Agent/Backbone Support mode<br />
/NET= Specifies CMD network number<br />
/PREFIP= Specifies IP address CMD uses on server w/ multiple NICs<br />
/STAT Displays CMD server statistics<br />
/NOSLP CMD uses static list to discover other Migration Agents<br />
Table B1. Useful SCMD.NLM command line switches.<br />
Note: The /STAT option is used when SCMD is already loaded. At the server console, load<br />
SCMD.NLM re-entrantly with the /STAT switch. Statistics will be displayed.<br />
Note: The /NOSLP option is used only when SCMD.NLM is in Migration Agent mode. This<br />
option does not affect the normal SLP dependencies inherent in CMD.<br />
When SCMD is loaded on the server, two new SLP enabled services are registered on the<br />
network. This means that if DAs are being used on the network, two SLP service objects will be<br />
registered in the NDS scope. The services that are registered are the sapsrv.novell object and the<br />
cmd.novell object. In the event SCMD is loaded with the /BS, /G, or /MA switch, the types of<br />
services registered will be mgw.novell instead of cmd.novell. Like all SLP objects, these objects<br />
will contain the necessary attributes pertaining to the service.<br />
The reason for these types of SLP objects being registered has to do with the addressing scheme<br />
necessary for applications that call the IPX stack directly. Service resolution for CMD servers will<br />
be addressed in the next section.<br />
Page 144 of 317 Novell PartnerNet Confidential 07/24/00<br />
Copyright © 2000 by Novell, Inc.
Service Resolution with CMD<br />
Because the IPX dependent applications make calls directly to SAP or the IPX stack, bindery<br />
information is required on the server. This bindery information refers to the SAP information<br />
normally found on an IPX network. That is the only type of addressing scheme IPX dependent<br />
applications know, and CMD has to provide that functionality for the applications since SAP<br />
information is not available on the wire.<br />
This particular discussion of service resolution assumes that all nodes on the network are IP nodes<br />
running CMD for IPX dependent applications. Having both IPX and IP networks with CMD will<br />
be discussed in the next sections on Migration Agents and Backbone Support.<br />
When SCMD is loaded on a <strong>NetWare</strong> <strong>5.1</strong> server, the server will build its own internal SAP table<br />
to provide bindery information to IPX dependent applications. It populates this table with<br />
information it learns through SLP. Specifically, the SAP table is built by looking at all SLP<br />
objects of type sapsrv.novell on the network. When the SCMD module is loaded, the user agent on<br />
the server makes a service request for all sapsrv.novell objects. How it does this depends upon<br />
how the user agent is configured to perform SLP service resolution (multicast or DA). The<br />
information returned from the SLP service request is put into the SAP table.<br />
Because only CMD servers on the network register SLP objects of type sapsrv.novell, only CMD<br />
servers will be listed in the SAP tables. <strong>NetWare</strong> <strong>5.1</strong> servers running pure IP will not be accessible<br />
to IPX dependent applications running on a CMD server. Figure B4 illustrates the population of<br />
the CMD server SAP tables. In this diagram, all service agents have already registered their<br />
services with the DA. The SCMD module will periodically force the user agent to retrieve a list of<br />
sapsrv.novell objects to build the internal SAP table. Only those servers that have registered a<br />
sapsrv.novell object will be returned by the DA and entered into the internal SAP table.<br />
DA<br />
SA1 w/ CMD SA2 no CMD SA3 w/ CMD<br />
Bindery Table<br />
SA1<br />
SA3<br />
bindery.novell<br />
SA1<br />
SA2<br />
SA3<br />
sapsrv.novell<br />
SA1<br />
SA3<br />
SLP SReq<br />
sapsrv.novell<br />
sapsrv.novell<br />
SA1<br />
SA3<br />
Bindery Table<br />
SA2<br />
cmd.novell<br />
SA1<br />
SA3<br />
sapsrv.novell<br />
SA1<br />
SA3<br />
SLP SReq<br />
sapsrv.novell<br />
Bindery Table<br />
SA1<br />
SA3<br />
Figure B4. CMD servers build SAP tables from sapsrv.novell objects.<br />
Looking at the attributes of the sapsrv.novell object itself sheds light on how the server is able to<br />
build its internal SAP table with the information provided in the object. The attributes of the<br />
sapsrv.novell object include the following pieces of information:<br />
• The protocol of the service (IPX)<br />
Page 145 of 317 Novell PartnerNet Confidential 07/24/00<br />
Copyright © 2000 by Novell, Inc.
• The internal IPX number (server ID) of the originating server<br />
• The IPX socket number<br />
• The SAP type (i.e. type 4 for file server, type 278 for NDS tree, type 26B for time)<br />
• The IP address of the originating server in hexadecimal format<br />
• The IP subnet of the originating server in hexadecimal format<br />
• The name of the originating server<br />
With all of this information, CMD can build the internal SAP table on the server. Additionally, it<br />
can also translate the SAP service to an IP address for servers because all of that information is<br />
included in the sapsrv.novell object. But it is clear that CMD is an SLP dependent module because<br />
SLP is required to build the internal SAP table.<br />
Because CMD is dependent upon SLP, all of the rules concerning scoping apply. If servers<br />
register their sapsrv.novell objects with different scopes, they will not be able to see each other in<br />
the CMD realm, either. It is wise to register all sapsrv.novell objects with the same scope and have<br />
servers use that scope to provide seamless compatibility services for the network.<br />
In order to keep the SAP table current, CMD forces the user agent on the server to make an SLP<br />
service query for sapsrv.novell objects every five minutes. Thus, there is latency involved in<br />
bringing up or down CMD servers. When a server is brought up, it may not be visible, from a<br />
CMD perspective, to other servers for up to five minutes. Conversely, when a CMD server is<br />
downed, it will not disappear from the other servers’ SAP tables until the next SLP service query<br />
is sent out.<br />
To this point, the assumption has been made that all servers and clients are running the CMD<br />
pieces necessary to provide backward compatibility for IPX dependent applications. In this<br />
environment, only the IP protocol is allowed on the wire, but there are many instances and<br />
environments where IPX and IP need to coexist. For example, <strong>NetWare</strong> clients on an IP segment<br />
of the network may need to communicate with <strong>NetWare</strong> servers on an IPX segment. This is not<br />
possible given the current set of assumptions. However, it is possible when the SCMD module is<br />
loaded on a <strong>NetWare</strong> <strong>5.1</strong> server with Migration Agent capabilities enabled. This will be discussed<br />
in the next section.<br />
The Migration Agent<br />
A second feature or operating mode of the SCMD.NLM module on a <strong>NetWare</strong> <strong>5.1</strong> server is the<br />
Migration Agent (MA) function. The use of an MA on the network allows IPX clients and servers<br />
to successfully communicate with IP/CMD clients and servers. Thus, the MA becomes an integral<br />
part of a migration strategy where IPX and IP need to coexist in an environment for a period of<br />
time.<br />
To enable SCMD to function as an MA, SCMD must be loaded with the /G, /BS, or /MA switch.<br />
The server functioning as an MA must also have IP and IPX bound to its network interfaces. This<br />
makes sense because the MA actually functions as a gateway between the IP and IPX networks. It<br />
is not necessary for an MA to have two interfaces to function in that capacity; a server with only<br />
one network interface can efficiently function as a Migration Agent.<br />
Adding a Migration Agent to the network adds a bit of complexity to the CMD environment. This<br />
is because there is a whole set of IPX services that need to become visible to the CMD network<br />
and vice versa. The key to a successful implementation of a Migration Agent lies in understanding<br />
the inner workings of the MA and how it is able to facilitate the communication between these<br />
disparate protocols.<br />
Page 146 of 317 Novell PartnerNet Confidential 07/24/00<br />
Copyright © 2000 by Novell, Inc.
CMD to MA Communication<br />
When an MA is introduced to a CMD network, there are a number of new IPX services about<br />
which the CMD servers need to know. But these services do not exist in SLP. They exist on the<br />
IPX network itself. The CMD servers must rely upon the MA to obtain bindery information they<br />
cannot obtain by themselves. Figure B5 illustrates the separate IPX and IP networks.<br />
IPX Client<br />
IPX<br />
RIP/SAP<br />
Information from<br />
IPX Device<br />
Broadcasts<br />
Migration Agent<br />
IP/CMD Server FS2<br />
IP/CMD<br />
SAP Information<br />
from SLP<br />
Registered Services<br />
IPX Server FS1 IP/CMD Client<br />
Figure B5. The MA connects the IP and IPX networks.<br />
In Figure B5, file server FS1 is not a service that will register a sapsrv.novell object with SLP.<br />
This is because it is not an IP based device with an SLP enabled service to advertise itself. From a<br />
CMD perspective, FS2 needs to be able to communicate with FS1, but it cannot retrieve bindery<br />
information about FS1 through SLP. This is where the MA comes into play.<br />
When an IP/CMD server is brought up, it will try to find an MA on the network either through<br />
static configuration or through SLP. When it discovers an MA on the network, it will initiate a<br />
TCP connection with the MA. This connection is established on TCP port 2302, and it will be<br />
persistent as long as both servers are up. Once this session is established, the MA sends known<br />
bindery information from itself to the CMD server. In Figure B5, FS2 would establish a TCP<br />
connection with the MA, and the MA would send bindery information about the IPX network to<br />
FS2. FS2 populates its internal SAP table with the information the MA sends.<br />
Once per minute, the Migration Agent will forward changes in its SAP tables to the CMD servers<br />
that have established TCP connections. This is how the CMD servers are able to keep the<br />
information contained in their internal bindery tables current. Without this update, the CMD<br />
servers would time out the information about the legacy IPX network in the bindery tables.<br />
This is a one-way method of communication in terms of bindery information. The CMD server<br />
does not send bindery information back to the MA across the established TCP session. The MA<br />
discovers that information through SLP. Thus, the MA learns about the CMD server through the<br />
normal 5-minute sapsrv.novell object request SCMD performs. Figure B6 illustrates the exchange<br />
of bindery information on the CMD network between CMD servers and the MA.<br />
Page 147 of 317 Novell PartnerNet Confidential 07/24/00<br />
Copyright © 2000 by Novell, Inc.
Once per minute<br />
RIP/SAP broadcast<br />
Migration Agent<br />
Delta bindery information<br />
sent from MA to CMD<br />
TCP port 2302<br />
session established<br />
SLP SReq for<br />
sapsrv.novell objects<br />
Bindery information from<br />
CMD Network<br />
IP/CMD Server FS2<br />
IP/CMD<br />
Directory Agent<br />
Figure B6. Bindery information exchange on CMD network.<br />
In Figure B6, the server FS2 would populate its internal bindery tables with information learned<br />
from the MA. The Migration Agent would learn about FS2 from its query to the Directory Agent.<br />
Only when this SLP query is answered will the MA populate its internal bindery tables with<br />
information about FS2. Once that has been done, FS2 will be advertised on the IPX network when<br />
the MA does its next RIP/SAP broadcast.<br />
There are two requirements that must be satisfied before IP/CMD servers and Migration Agents<br />
will communicate bindery information to one another:<br />
• The Migration Agent and the CMD server must be in the same SLP scope. If they belong<br />
to different SLP scopes, they will not be able to see one another.<br />
• The Migration Agent and the CMD server must be part of the same CMD network.<br />
If the MA and CMD server are not part of the same CMD network (also known as the virtual IPX<br />
network), they will not be able to exchange information. From the MA perspective, all of the<br />
CMD servers belong to a virtual IPX network. That is how it is able to route IPX packets from the<br />
IPX network to the CMD network. The CMD network is advertised on the IPX segment as a<br />
normal IPX network that is one hop away from the MA. The MA passes any packets destined for<br />
the CMD network to the SCMD module, which takes care of the encapsulation and addressing of<br />
the packet to the CMD server on the CMD network.<br />
If an IPX client needs services from an IP/CMD server, the Migration Agent will encapsulate that<br />
packet and send it to the CMD server. Like all encapsulated IPX packets, the packet sent from the<br />
MA to the CMD server (data traffic) will be sent via a UDP packet utilizing port 2645. All<br />
encapsulated IPX traffic on the CMD network will use UDP port 2645 packets.<br />
Note: Migration Agents will only perform the encapsulation of IPX packets in forwarding them to<br />
the CMD network. They will not translate NCP/IPX packets into NCP/IP packets before<br />
forwarding them.<br />
Page 148 of 317 Novell PartnerNet Confidential 07/24/00<br />
Copyright © 2000 by Novell, Inc.
MA to IPX Communication<br />
Just as the MA is responsible for providing bindery information to CMD servers on the network, it<br />
is also responsible for advertising services available on the CMD network to the IPX network.<br />
This advertising of services is accomplished through the normal RIP/SAP broadcasts once per<br />
minute. But the MA must rely upon SLP to retrieve the SAP information from the CMD network,<br />
as was shown in Figure B6.<br />
Once every five minutes, the MA will make an SLP query (using UDP or TCP port 427 packets)<br />
to find a list of sapsrv.novell objects available on the CMD network. Once it retrieves this<br />
information, the MA will populate its internal SAP table with the services learned. On the next<br />
broadcast, any new services learned by the MA about the CMD network will be advertised to the<br />
IPX network.<br />
At the same time, the MA also advertises the virtual IPX network (CMD network) to which it is<br />
connected. This RIP information is required for routing to happen between the IPX segment and<br />
the CMD segment, which is represented as a virtual IPX network. Thus, the CMD network<br />
number must be unique to the entire network just as normal IPX network segments must be.<br />
IPX services need not know the specific address of the Migration Agents on the network because<br />
RIP takes care of all the routing on the IPX network. As long as the Migration Agent through SAP<br />
is properly advertising the CMD services, there is no extra configuration required of IPX clients to<br />
use the MA. The same is not true, however, of the IP/CMD clients.<br />
Note: HOP counts are added for SAP/RIP broadcasts from MA to CMD based on IP<br />
distance—not by the physical router distance. MA will add one hop if the CMD server is on the<br />
same segment, two hops if it is on different segment, and 3 hops if the CMD server is on a<br />
different IP network (but the same CMD network). Currently there is no parameter to change this<br />
value. This is an important factor to consider when designing CMD networks.<br />
IP/CMD Client Communication and Configuration<br />
Because IP/CMD clients are IP based, there is some client configuration required for MA use. In<br />
the CMD driver property page, there are two important parameters that can be configured. The<br />
first parameter is the CMD network number. As with IP/CMD servers, the IP/CMD client must be<br />
part of the same virtual IPX network the MA is servicing. If it is not, the IP/CMD client will be<br />
unable to utilize the MA.<br />
The second configurable parameter is the preferred Migration Agent. There are a number of ways<br />
for an IP/CMD client to discover Migration Agents on its CMD network:<br />
• The IP/CMD client can discover Migration Agents through SLP. It can send out an SLP<br />
query looking for objects of type mgw.novell, which indicate that the Migration Agent<br />
service is available on the network.<br />
• The IP/CMD client can obtain Migration Agent information through DHCP.<br />
• The IP/CMD client can be statically configured to look to a list of Migration Agents<br />
specified in the property page of the CMD driver at the client.<br />
When using DHCP to hand out CMD information, Novell has set aside option tags for use. The<br />
main option tag used to hand out CMD information is option tag 63, which is the same option tag<br />
for <strong>NetWare</strong>/IP. The pertinent sub-options of option tag 63 are as follows:<br />
• 63-12 specifies the CMD network number to which the client belongs.<br />
• 63-13 specifies the server resolution time.<br />
• 63-14 specifies the IP addresses of Migration Agents on the network.<br />
Page 149 of 317 Novell PartnerNet Confidential 07/24/00<br />
Copyright © 2000 by Novell, Inc.
Once the IP/CMD client has discovered the available Migration Agents on the network, its method<br />
for finding IPX services for its IPX-dependent application changes a little bit. Instead of only<br />
querying SLP for sapsrv.novell objects, the IP/CMD client will simultaneously query SLP and the<br />
MA for bindery information. This is how an IP/CMD client is able to obtain the services of an IPX<br />
only server. Remember that SLP will not return any information about IPX only services; those<br />
services are available only through the MA. Figure B7 illustrates the query process for finding and<br />
IPX-only server.<br />
IPX Client<br />
IPX<br />
IPX Server FS1<br />
Migration Agent<br />
Yes FS1<br />
IP/CMD Client<br />
IP/CMD<br />
IP/CMD Server FS2<br />
No FS1<br />
Directory Agent<br />
Page 150 of 317 Novell PartnerNet Confidential 07/24/00<br />
Copyright © 2000 by Novell, Inc.<br />
FS1?<br />
Figure B7. IP/CMD client queries both SLP and MA for service information.<br />
To this point, the discussion has been about CMD networks and interoperability with legacy<br />
services on an IPX network. Another operating mode of SCMD.NLM is to provide connectivity<br />
between non-contiguous IPX segments on a network. This is called Backbone Support and is a<br />
feature that can be used to remove IPX traffic from WAN links.<br />
Backbone Support<br />
Backbone Support is a popular feature of SCMD.NLM because it allows organizations to remove<br />
the IPX protocol from WAN links without interrupting end to end IPX services on the network.<br />
This is because SCMD.NLM servers configured to function, as Backbone Support Migration<br />
Agents will exchange the necessary RIP/SAP information by encapsulating that IPX information<br />
in an IP packet. Thus, the packets on the WAN link are IP-only.<br />
Enabling SCMD.NLM to function in Backbone Support also gives that server the capabilities of<br />
functioning as a CMD server and as an MA. To enable a server to utilize Backbone Support,<br />
SCMD.NLM must be loaded with the /G, /MA, or /BS switch at the command line. Additionally,<br />
the server must be configured to use the NLSP routing protocol (with RIP/SAP compatibility).<br />
This configuration can be done through INETCFG.NLM.<br />
Once Backbone Support has been enabled, the server will attempt to find other Backbone Support<br />
servers. It will do this in one of two ways:<br />
• The Backbone Support server will query SLP for services of type mgw.novell.<br />
FS1?
• The Backbone Support server will look to a statically configured list of other Backbone<br />
Support servers as specified by the Migration Agent List SET parameter.<br />
Note: If one Backbone Support server is statically configured to look for other Backbone Support<br />
servers, then all Backbone Support servers on the same CMD network must be statically<br />
configured to look for other Backbone Support servers. It is an all or nothing proposition.<br />
Just like CMD servers and Migration Agents, Backbone Support servers must be part of the same<br />
CMD network in order to communicate and exchange bindery information with one another.<br />
Backbone Support servers belonging to separate CMD networks will not communicate with each<br />
other to exchange that information.<br />
After Backbone Support servers discover one another, they exchange their RIP/SAP information,<br />
and they will continue to exchange their RIP/SAP information so that services advertised on their<br />
respective IPX networks will be current. The Migration Agent servers use the NLSP routing<br />
protocol to exchange route and SAP information between Migration Agents. Figure B8 shows a<br />
simple example of two Backbone Support servers exchanging RIP/SAP information.<br />
IPX<br />
Network<br />
1<br />
RIP/SAP info from IPX<br />
Network 1 encapsulated<br />
in IP (UDP 2645)<br />
Backbone Support<br />
Backbone Support<br />
Server<br />
Server<br />
RIP/SAP info from IPX<br />
Network 2 encapsulated<br />
in IP (UDP 2645)<br />
IPX<br />
Network<br />
2<br />
Figure B8. Backbone Support servers exchange RIP/SAP information.<br />
As noted in Figure B8, the RIP/SAP information from each IPX network is encapsulated in IP<br />
packets. This exchange of IP packets between the Backbone Support servers is accomplished<br />
using a UDP packet addressed to port 2645, as all IPX encapsulated traffic is. This figure assumes<br />
that the Backbone Support servers do belong to the same CMD network.<br />
The MA to MA Protocol<br />
When Migration Agents in Backbone Support mode exchange bindery information, this is called<br />
the MA to MA protocol. There are some special considerations to enabling a number of servers in<br />
Backbone Support mode because NLSP routing is enabled on the servers. This NLSP routing is<br />
what facilitates the efficient exchange of bindery information between the non-contiguous IPX<br />
networks, but there is an overhead cost involved by using NLSP.<br />
After Migration Agents in Backbone Support mode discover each other, they become NLSP<br />
neighbors in the virtual IPX network that has been created for CMD. Because these servers are<br />
NLSP neighbors, they must exchange the normal overhead packets required for NLSP routing.<br />
These administrative packets (or HELLO packets) are required by NLSP to maintain the NLSP<br />
routing tables. If the HELLO packets are not received within a specific time out window, the<br />
NLSP router marks its neighbor as being unavailable. Figure B9 illustrates the NLSP overhead<br />
packet in an IPX environment.<br />
Page 151 of 317 Novell PartnerNet Confidential 07/24/00<br />
Copyright © 2000 by Novell, Inc.
NLSP Neighbors<br />
NLSP2 Up 13<br />
NLSP3 Up 43<br />
NLSP4 Up 27<br />
NLSP1<br />
NLSP broadcast HELLO<br />
packet from NLSP1<br />
NLSP2<br />
NLSP Neighbors<br />
NLSP1 Up 60<br />
NLSP3 Up 43<br />
NLSP4 Up 27<br />
NLSP Neighbors<br />
NLSP1 Up 60<br />
NLSP2 Up 13<br />
NLSP3 Up 43<br />
NLSP4<br />
NLSP3<br />
Figure B9. The NLSP HELLO packet updates neighbor routing tables.<br />
NLSP Neighbors<br />
NLSP1 Up 60<br />
NLSP2 Up 13<br />
NLSP4 Up 27<br />
In Figure B9, server NLSP1 sends out its HELLO packet to its neighbors via broadcast. The<br />
neighbor NLSP routers receive this packet and update their tables to reflect the refresh of NLSP1<br />
as their active neighbor. They update the time to live (TTL) of NLSP1 in their NLSP neighbor<br />
table. This is shown in bold along with their other neighbors and their TTLs. Should the TTL of an<br />
NLSP neighbor reach zero, the neighbor will be marked as unavailable, and it cannot be used as a<br />
route to reach destination services.<br />
By default NLSP HELLO packets are sent out every 20 seconds by NLSP routers with a multiplier<br />
of three. This multiplier determines the TTL for the NLSP router in the NLSP neighbor table. This<br />
makes the default TTL for the neighbor router 60 seconds. By modifying the multiplier and<br />
HELLO packet interval, the NLSP overhead traffic can be controlled.<br />
To change the NLSP configuration on a server, the NLSP settings in INETCFG must be modified.<br />
Under Protocols⇒IPX⇒Expert Configuration Options, the NLSP Convergence Rate parameter<br />
must be set to Manual. Once done, the actual configuration of the NLSP convergence rate<br />
parameters can be done through the NLSP Convergence Rate Configuration option on the same<br />
menu. The parameters that most significantly affect the NLSP convergence rate are as follows:<br />
• Broadcast Hello Interval—this defines how often NLSP HELLO packets are sent out by<br />
the NLSP routers. Increasing this value decreases the frequency with which NLSP<br />
HELLO packets are put out on the wire.<br />
• Holding Timer Multiplier—this defines the TTL for an NLSP neighbor. Increasing this<br />
value increases the TTL value for the NLSP neighbor.<br />
In the example in Figure B9, one packet is required from every server at least every 60 seconds to<br />
update the NLSP neighbors table on neighbor NLSP routers. Thus, each of the four servers will<br />
send out a broadcast packet once at least every 60 seconds leading to a minimum total packet<br />
count of four for NLSP overhead. The HELLO packet is a small packet, and it is much more<br />
efficient than the server broadcasting its entire RIP/SAP tables once per minute.<br />
However, because NLSP is an IPX based routing protocol, NLSP packets cannot be placed<br />
natively on an IP-only segment. Something has to be done to encapsulate the NLSP packets in IP<br />
and to send them to the NLSP neighbors. Backbone Support is the tool by which this is<br />
accomplished. When the IPXRTR module on a Backbone Support server passes information the<br />
HELLO packet to the virtual IPX network, the SCMD module takes over. The NLSP packet is<br />
encapsulated in IP and sent to all other BS servers on the same virtual CMD network.<br />
Page 152 of 317 Novell PartnerNet Confidential 07/24/00<br />
Copyright © 2000 by Novell, Inc.
From an NLSP perspective, all Backbone Support servers that belong to the same virtual IPX<br />
network are NLSP neighbors. This means that all Backbone Support servers must exchange NLSP<br />
HELLO packets to keep their routing tables updated. If the TTL of the NLSP neighbor reaches<br />
zero, the route will no longer be available. This will lead to the disappearance of services through<br />
the IP-only segment of the network.<br />
SCMD has a lot of work cut out for it in mimicking the NLSP environment. NLSP is a broadcast<br />
based protocol. IPX encapsulation is not a broadcast protocol. SCMD has the responsibility for<br />
getting this originally broadcast information to all required destinations. Figure B10 shows how<br />
SCMD handles this.<br />
Inside <strong>NetWare</strong> server<br />
Migration Agents known<br />
MA1<br />
MA2<br />
MA3<br />
IPXRTR SCMD<br />
NLSP HELLO packet<br />
sent to virtual IPX network<br />
Encapsulated HELLO<br />
packet sent to MA1via<br />
UDP 2645<br />
Encapsulated HELLO<br />
packet sent to MA2via<br />
UDP 2645<br />
Encapsulated HELLO<br />
packet sent to MA3via<br />
UDP 2645<br />
Figure B10. NLSP HELLO packets are encapsulated and individually addressed.<br />
When the NLSP HELLO packet is passed from the IPXRTR module of the <strong>NetWare</strong> server to the<br />
virtual IPX network, SCMD takes over. SCMD takes the HELLO packet, encapsulates it, and<br />
individually addresses the packet to each known Migration Agent on the same CMD network. For<br />
the example shown in Figure B10, one NLSP HELLO packet requires three encapsulated packets<br />
sent across the IP only network to accomplish the update of NLSP neighbor tables. Figure B11<br />
shows the example from Figure B9 with SCMD. Notice that 3 packets are required to update the<br />
NLSP neighbor tables instead of the one broadcast packet from Figure B9.<br />
Page 153 of 317 Novell PartnerNet Confidential 07/24/00<br />
Copyright © 2000 by Novell, Inc.
NLSP Neighbors<br />
NLSP2 Up 13<br />
NLSP3 Up 43<br />
NLSP4 Up 27<br />
Encapsulated NLSP<br />
HELLO packet from<br />
NLSP1<br />
NLSP1 w/ SCMD<br />
Encapsulated NLSP<br />
HELLO packet from<br />
NLSP1<br />
NLSP2 w/ SCMD<br />
Encapsulated NLSP<br />
HELLO packet from<br />
NLSP1<br />
NLSP Neighbors<br />
NLSP1 Up 60<br />
NLSP3 Up 43<br />
NLSP4 Up 27<br />
NLSP Neighbors<br />
NLSP1 Up 60<br />
NLSP2 Up 13<br />
NLSP3 Up 43<br />
NLSP4 w/ SCMD<br />
NLSP3 w/ SCMD<br />
Figure B11. Updating NLSP tables across the virtual IPX network.<br />
NLSP Neighbors<br />
NLSP1 Up 60<br />
NLSP2 Up 13<br />
NLSP4 Up 27<br />
As the number of Backbone Support servers on the same CMD network increases, the number of<br />
packets required for NLSP overhead also increases. This needs to be factored into any Backbone<br />
Support server design. Besides the overhead NLSP traffic, there will also be the normal bindery<br />
information flowing between the servers as well. But this is where the benefit of NLSP is seen.<br />
Because NLSP is a link state routing protocol, it only needs to communicate changes in its routing<br />
tables to its neighbors. Instead of the entire RIP/SAP table of a server being broadcast out on the<br />
network once per minute, only the changes the router receives will be sent out. This drastically<br />
reduces the bindery information that needs to pass across the CMD network from Migration Agent<br />
to Migration Agent because all of them are NLSP neighbors of each other. Therefore the<br />
encapsulated NLSP traffic on the CMD network due to bindery information exchange is going to<br />
be much smaller than the amount of RIP/SAP traffic that would have to send on the same wire in<br />
the normal IPX environment.<br />
Filtering Considerations with Backbone Support<br />
Before implementing the MA to MA protocol on a network, it is important to consider the<br />
implications it may have. The MA to MA protocol is a virtual routing environment that sits on top<br />
of an existing physical routing environment. It is possible to route information across this virtual<br />
network that would not normally be permitted across the physical network.<br />
Figure B12 shows an example where the physical IPX network is intact with a set of routers<br />
between two IPX network segments. Between these IPX network segments is a router that filters<br />
SAP information. IPX services on network segment 1 are not visible on network segment 2 and<br />
vice versa. A Backbone Support server is installed on both network segments, and they discover<br />
one another through SLP.<br />
Page 154 of 317 Novell PartnerNet Confidential 07/24/00<br />
Copyright © 2000 by Novell, Inc.
IPX<br />
Network<br />
1<br />
Backbone Support<br />
Server1<br />
IPX filters enabled<br />
Router<br />
MA to MA protocol<br />
exchanges RIP/SAP info<br />
IPX<br />
Network<br />
2<br />
Backbone Support<br />
Server2<br />
Figure B12. MA to MA protocol can “break” IPX filters.<br />
Through the MA to MA protocol, IPX network 1 can see service information about IPX network<br />
2. The RIP/SAP information has come across the virtual IPX network, and the filters on the router<br />
are of no consequence. The MA to MA protocol has effectively bypassed the physical routing<br />
environment. If the MA to MA protocol is to be used in an environment, the filtering on the<br />
physical network needs to be applied to the virtual network.<br />
Fortunately, this can be done on a <strong>NetWare</strong> <strong>5.1</strong> server with SCMD. In order for filters to be<br />
enabled and enforced by a <strong>NetWare</strong> server, a LAN driver must be loaded. This LAN driver<br />
represents an interface through which traffic passes. These LAN drivers are loaded and configured<br />
with INETCFG.NLM. Once configured, FILTCFG.NLM can be loaded to configure filters. In<br />
FILTCFG.NLM, filters are only created and enforced on interfaces that have been loaded in<br />
INETCFG.NLM. Thus, SCMD needs to be loaded as a LAN driver before filtering across the<br />
virtual IPX network can occur.<br />
The latest version of SCMD, version 2.18g, includes such a LAN driver that will allow the<br />
enforcement of filters on the virtual IPX network. With this latest version, it is possible to prevent<br />
the MA to MA protocol from bypassing filters enabled on the physical network.<br />
CMD Design Points and Best Practices<br />
In order to propose a relevant CMD design for a client, it is important to apply the principles of<br />
the technology. As the design plan is being architected, it is critical to distinguish between the<br />
functional modes of CMD. There are three functional modes for CMD:<br />
• Compatibility Mode Driver<br />
• Migration Agent<br />
• Migration Agent with Backbone Support<br />
Each one has its own set of design points that need to be discussed. These designs points fall<br />
directly out of the technology itself, and the continual application of that knowledge by the<br />
designing consultant will ensure the proposed architecture is the best one for the client.<br />
To start, there are a couple of best practices to follow when considering the implementation of<br />
CMD for a protocol migration strategy:<br />
Page 155 of 317 Novell PartnerNet Confidential 07/24/00<br />
Copyright © 2000 by Novell, Inc.
• The dual stack migration strategy is the Novell recommended method for protocol<br />
migration. This is because of the inherent complexities and cost surrounding the CMD<br />
technology. These complexities include its dependence upon the SLP protocol, the<br />
implementation of a logical routing environment on top of an existing physical routing<br />
environment for the backbone migration strategy, and the investment in hardware<br />
required to provide the fault tolerance necessary for most organizations. The use of CMD<br />
for a protocol migration strategy should be avoided.<br />
• In the event the client insists upon using CMD in a protocol migration strategy, the<br />
presence of CMD should be minimized on the network. Propose a hybrid solution where<br />
CMD is used on a portion of the network while dual stack is implemented for the<br />
remainder. This will reduce the cost of the migration strategy.<br />
Design Considerations with Compatibility Mode Driver<br />
When the Compatibility Mode Driver is used as part of a protocol migration strategy, the strategy<br />
becomes dependent upon SLP. Thus, the migration strategy is also limited by any limitations<br />
affecting the SLP protocol. The overriding limitation of SLP version 1 is the 64KB limit in<br />
payload packet size for a single SLP query. This will greatly impact any design where servers are<br />
configured to use the Compatibility Mode Driver. For more information on SLP limitations, refer<br />
to Appendix D, “SLP Design”.<br />
The critical piece is that a <strong>NetWare</strong> CMD server or client will use SLP to find bindery type<br />
information on the network. It will perform an SLP query to find SLP services of type<br />
sapsrv.novell on the network. As has been shown in Appendix D, “SLP Design”, Novell<br />
recommends only registering 540 sapsrv.novell objects with a single scope when a directory agent<br />
is deployed.<br />
In exceeding this number, the risk of hitting the SLP 64KB limit increases. In the event the<br />
directory agent has more SLP information to deliver than 64KB, the SLP user agent on the<br />
<strong>NetWare</strong> server or client will only receive the first 64KB of information. Any information above<br />
and beyond the 64KB limit is truncated and not processed by the user agent. Thus, a user agent<br />
that receives this truncated information will not completely see all available services on the<br />
network. There will be incompleteness in the CMD environment, which will lead to service<br />
interruption.<br />
sapsrv from FS1<br />
sapsrv from FS2<br />
sapsrv from FS3<br />
...<br />
sapsrv from FS162<br />
IP/CDM Client<br />
sapsrv.novell objects<br />
sapsrv from FS1<br />
sapsrv from FS2<br />
sapsrv from FS3<br />
...<br />
sapsrv from FS162<br />
sapsrv from FS163<br />
Directory Agent<br />
sapsrv.novell?<br />
IP/CMD<br />
Network<br />
C00FFEE<br />
64KB of information<br />
sapsrv.novell object<br />
registered<br />
IP/CMD Server<br />
FS163<br />
Figure B13. The 64KB SLP limit will affect poorly designed CMD environments.<br />
Page 156 of 317 Novell PartnerNet Confidential 07/24/00<br />
Copyright © 2000 by Novell, Inc.
Figure B13 illustrates an example of this limitation. In this figure, the client workstation has an<br />
IPX dependent application, and it is looking to find the server FS163. To resolve this service, the<br />
client workstation looks to the SLP infrastructure to find a list of sapsrv.novell SLP objects. The<br />
directory agent returns the list of sapsrv.novell objects, but the list happens to be larger than<br />
64KB. The first 64KB of the list is returned to the client, but this information does not include<br />
information regarding FS163. The application on the client workstation experiences a failure<br />
because it is unable to resolve how to get to the file server FS163.<br />
Note: The server number 163 for this example was chosen at random. It is not meant to represent<br />
a specific limit to the number of servers that can register their services with an SLP scope before<br />
the 64KB ceiling is reached.<br />
From a design perspective, the number of CMD servers that can register with a single scope before<br />
the 64KB limit is reached depends upon the number of sapsrv.novell objects being registered by<br />
each server. <strong>NetWare</strong> CMD servers will register multiple sapsrv.novell objects. One such object is<br />
registered for each SAP type the server needs to advertise. For example, a single server will<br />
commonly register a separate sapsrv.novell object for each of the following services:<br />
• NDS replica (SAP type 278)<br />
• File server name (SAP type 4)<br />
• Time synchronization (SAP type 26B)<br />
• RCONSOLE (SAP type 107)<br />
Even though the recommended limit on the number of sapsrv.novell objects in a single scope is<br />
540, the actual number of physical servers that can register with a single scope is much smaller.<br />
The average number of sapsrv.novell objects per server at the client site needs to be assessed, and<br />
the design strategy needs to revolve around that number. For example, if the average number of<br />
SAPs per server at a client site is 4, then the actual number of physical servers that could register<br />
with a single SLP scope is 540 ÷ 4, which equals 135.<br />
Note: Do not propose a design in which the number of servers registering with a single scope<br />
exceeds the calculated limit.<br />
However, the number that is calculated does not represent a limit to the number of servers in a<br />
single CMD network. If a user agent knows of multiple scopes, it will query multiple directory<br />
agents and retrieve multiple lists of information. Thus, the user agent could query one scope for<br />
64KB of SLP information and a second scope for another 64KB of SLP information. The user<br />
agent can combine those separate lists it retrieves and can logically realize a larger set of CMD<br />
servers than a single SLP scope can deliver.<br />
Note: A large CMD server environment always requires a greater number of SLP scopes than a<br />
non-CMD environment. Understand the implications of having a larger number of SLP scopes<br />
before proposing such a solution. Refer to Appendix D, “SLP Design” for more details.<br />
Design Considerations with Migration Agent<br />
Having a CMD infrastructure generally means there will be a Migration Agent available on the<br />
network for a period of time. This Migration Agent acts as a gateway between the IPX and<br />
IP/CMD realms of the network. Whenever a solution is proposed with a Migration Agent, refer to<br />
the previous section, “Design Considerations with Compatibility Mode Driver”, for an initial set<br />
of design points. Once complete, read this section about design points with the Migration Agent.<br />
When thinking about the Migration Agent on a network, it can be reduced to the simple logical<br />
environment shown in Figure B14. However, don’t let the simplicity of this figure be<br />
overpowering. There could be a large and complex physical networking environment underneath it<br />
that needs to be and must be considered.<br />
Page 157 of 317 Novell PartnerNet Confidential 07/24/00<br />
Copyright © 2000 by Novell, Inc.
IPX Client<br />
IPX<br />
RIP/SAP<br />
Information from<br />
IPX Device<br />
Broadcasts<br />
Migration Agent<br />
IP/CMD Server FS2<br />
IP/CMD<br />
SAP Information<br />
from SLP<br />
Registered Services<br />
IPX Server FS1 IP/CMD Client<br />
Figure B14. The Migration Agent acts as a gateway between the IPX and IP/CMD networks.<br />
IP/CMD client and servers can only use Migration Agents participating in the same CMD<br />
network. This leads to two important design considerations when deploying a migration strategy<br />
that involves the use of Migration Agents:<br />
• The placement of the Migration Agent on the enterprise network with respect to the other<br />
devices in the same CMD network.<br />
• The scalability of the Migration Agent with respect to the number of IPX clients and<br />
servers that need to connect with IP/CMD devices.<br />
Migration Agent Placement<br />
Migration Agents need to be carefully placed on the network in relation to the other devices<br />
belonging to the same CMD network. As mentioned, even though the IPX and IP/CMD<br />
environments can be logically represented in a simplistic fashion, there is usually a complex<br />
physical routing environment existing underneath it. This physical WAN topology will greatly<br />
impact the placement of the Migration Agent and in effect the logical overlay of the CMD<br />
network. Take, for example, the scenario shown in Figure B15.<br />
Page 158 of 317 Novell PartnerNet Confidential 07/24/00<br />
Copyright © 2000 by Novell, Inc.
Migration Agent<br />
CMD net C00FFEE<br />
WAN link passes IPX and<br />
TCP/IP<br />
Router Router<br />
Figure B15. Poor placement of Migration Agents.<br />
IP/CMD Client<br />
CMD net C00FFEE<br />
IPX Server FS1<br />
Migration Agent<br />
CMD net BADBEEF<br />
In Figure B15, the physical routing environment is shown along with the placement of the IPX and<br />
IP/CMD devices on the network. There are two Migration Agents on the network; each one<br />
services a separate CMD network. The Migration Agent servicing the same CMD network as the<br />
vast majority of CMD devices is located across a WAN link. There are also a large number of IPX<br />
devices across the WAN link from the Migration Agent. For argument’s sake, IPX and IP are both<br />
being allowed to propagate across the WAN link from one network segment to the next.<br />
The IP/CMD client belonging to the CMD network C00FFEE is attempting to connect to file<br />
server FS1. Because the client is IP/CMD, the only way it can communicate with the server is<br />
through the Migration Agent associated with its CMD network number. To facilitate this<br />
communication, it must send its encapsulated IPX packets across the WAN link to the Migration<br />
Agent servicing the CMD network C00FFEE. From there, the IPX packets are unencapsulated and<br />
sent back across the WAN link to the file server. This is inefficient.<br />
Even though the services the IP/CMD client needs are on the same network segment, the client is<br />
now dependent upon the WAN link to reach them. The local Migration Agent will not help<br />
because it does not service the same CMD network as the IP/CMD client. The rule of thumb with<br />
Migration Agent placement is to place them as close to the CMD devices they are servicing. Try to<br />
avoid placing Migration Agents across WAN links from devices that need them.<br />
Note: When utilizing Migration Agents, try to avoid having a CMD network span a WAN link.<br />
This can lead to inefficient communication patterns.<br />
The best way to avoid this is to carefully look at the WAN diagrams and site maps provided in the<br />
PFC. Using this information will make the design more relevant to the client’s networking<br />
environment.<br />
Migration Agent Scalability<br />
There are two main functions that need to be considered when discussing Migration Agent<br />
scalability. These are as follows:<br />
• Population of the bindery tables on attached CMD servers through the TCP port 2302<br />
connection.<br />
• Handling traffic conversion of IPX to IP/CMD (or the reverse) for clients needing to<br />
access servers.<br />
Page 159 of 317 Novell PartnerNet Confidential 07/24/00<br />
Copyright © 2000 by Novell, Inc.
As can be seen from the diagram in Figure B15 above, the Migration Agent can easily become a<br />
bottleneck on the network when such a migration strategy is deployed. It is critical to understand<br />
the scalability of the Migration Agent so that it does not become a bottleneck that adversely affects<br />
the performance of the client’s network during the migration process.<br />
A number of tests were conducted at Novell’s Super Lab on the Migration Agent to determine its<br />
scalability. For the purposes of the results, refer to Figure B16 as the logical structure of the<br />
testing environment. There was a single Migration Agent connecting the IPX and IP/CMD<br />
segments together.<br />
IPX<br />
Segment<br />
Migration Agent<br />
IP/CMD<br />
Segment<br />
Figure B16. Logical diagram for Super Lab testing environment.<br />
The complete Super Lab testing results are included in TID 2953926, which can be found at<br />
http://support.novell.com. The pieces that pertain to the Migration Agent design are also included<br />
below.<br />
Test Objective:<br />
To test the Service population functionality of the MA from the IP/CMD network to the IPX<br />
network and collect the data for synchronization of these services between these networks.<br />
Test Results:<br />
This feature was tested with 500 sap services in the IP/CMD network. More services could not be<br />
put in the network since SLP can handle only 540 “sapsrv.novell” objects in a single SLP scope.<br />
With 500 sap services in the network, the MA which periodically (once in 3 minutes) populates<br />
the IPX router with the services was performing well with no services being dropped. Also the<br />
CPU utilization on the MA was very low with an average of 1%. The services were synchronized<br />
across the networks and any change in the IP/CMD network was reflected in the IPX network<br />
within a maximum time frame of 3 minutes.<br />
Test Objective:<br />
To test the MA-CMD Protocol and collect data regarding the following:<br />
• Performance of MA1 while handling multiple CMD servers<br />
• Traffic generated by the MA-CMD protocol (In both SLP modes)<br />
Test Results:<br />
This test was carried out in two different SLP modes, with and without the SLPDA in the network.<br />
Results for both the modes are described below:<br />
SLP Multicast Mode (without SLP DA):<br />
In this mode, one MA could handle up to 90 CMD servers at a time. All the CMD servers were<br />
connected to this one MA and the service/route transfer from the MA to the CMD servers was<br />
functioning perfectly without any services/routes being dropped. At this time 100+ different CMD<br />
clients were able to authenticate to the tree through the MA and 100+ IPX clients were able to<br />
map to 100+ different CMD servers through the MA at the same time. Addition of more CMD<br />
servers resulted in CMD servers not attaching to the MA since they could not discover the MA<br />
through SLP.<br />
SLP DA Mode:<br />
In this mode, one MA could handle 160+ CMD servers at a time. All the CMD servers were<br />
connected to this one MA and the service/route transfer from the MA to the CMD servers was<br />
Page 160 of 317 Novell PartnerNet Confidential 07/24/00<br />
Copyright © 2000 by Novell, Inc.
functioning perfectly without any services/routes being dropped. At this time 100+ different CMD<br />
clients were able to authenticate to the tree through the MA and 100+ IPX clients were able to<br />
map to 100+ different CMD servers through the MA at the same time. During this the average<br />
CPU utilization on the MA was 12%.<br />
Test Objective:<br />
To test the Service population functionality of the MA from the IPX network and collect the data<br />
for synchronization of the services between the IPX and CMD servers using the MA-CMD<br />
solution.<br />
Test Results:<br />
10,000 services were simulated from the IPX network and the MA could transfer the same to 160+<br />
CMD servers without any drops. The services were synchronized between the IPX and CMD<br />
networks within a span of 5 minutes. The IPX network was made dynamic by bringing down some<br />
services in the network and bringing them up again. The MA could handle this dynamism in the<br />
network and transfer the service changes in the IPX network to all the CMD servers. The services<br />
were synchronized between the IP and the IPX networks within a span of 5 minutes.<br />
Test Objective:<br />
Performance of a CMD server under stress from the IPX network.<br />
Test Results:<br />
One CMD server could handle 50+ IPX clients mapping to itself from the IPX network through<br />
the MA at the same time. The clients could also successfully complete massive data transfers<br />
(50MB) from the CMD server. The CMD server was also handling 10,000 services, which it had<br />
learnt from the MA. At this time the average CPU utilization of the CMD server was 20%<br />
Note: The overriding design consideration with an MA is that it effectively functions as a router.<br />
As such, it can become a bottleneck in terms of network performance, and it also becomes a single<br />
point of communications failure unless steps are taken to provide fault tolerance.<br />
Design Considerations with Backbone Support<br />
Backbone support is probably the most complicated infrastructure to design because it involves<br />
placing a logical routing infrastructure on top of an existing physical one. As was earlier shown in<br />
the section “Backbone Support”, Migration Agents utilizing backbone support mode rely heavily<br />
upon NLSP for routing information. However, this NLSP environment is a logical routing<br />
environment built upon an encapsulated IPX network.<br />
It is critical to understand the NLSP routing protocol to fully understand how Migration Agents set<br />
up in backbone support mode impact the network. For more information on NLSP itself, refer to<br />
both the protocol specification and some AppNotes Novell has published. Some important sources<br />
of information to review are as follows:<br />
• http://developer.novell.com/devres/langrp/specs.htm<br />
• http://developer.novell.com/research/appnotes/1995/november/a1frame.htm<br />
A common reason for using backbone support is to remove the IPX-based RIP/SAP broadcast<br />
traffic from WAN links to increase the performance of that link. Given that is the stated goal, it is<br />
imperative to ensure the Migration Agents are actually improving the performance of the link. It is<br />
possible to propose a design strategy where the Migration Agents actually decrease the<br />
performance of already congested WAN links. This must obviously be avoided at all costs.<br />
Note: It is possible to propose a design strategy with backbone support that actually requires more<br />
traffic for overhead than the existing RIP/SAP broadcast traffic. Every design strategy with<br />
backbone support must be evaluated to ensure it does not adversely affect WAN link performance.<br />
Page 161 of 317 Novell PartnerNet Confidential 07/24/00<br />
Copyright © 2000 by Novell, Inc.
The way to evaluate the impact of backbone support on a CMD network is to determine the<br />
current RIP/SAP traffic on the WAN link and compare it to the overhead traffic required for<br />
NLSP. Consider the following example where Migration Agents in backbone support are used to<br />
remove IPX from a set of WAN links on an enterprise network. The general layout of the network<br />
is illustrated in Figure B17. It is a star network topology with a hub site and 99 remote sites<br />
connected by WAN links.<br />
Single CMD Network<br />
With 100 MA's Using<br />
Backbone Support<br />
MA w/<br />
BS<br />
MA w/<br />
BS<br />
MA w/<br />
BS<br />
Migration Agent<br />
Backbone Support<br />
...<br />
MA w/<br />
BS<br />
Page 162 of 317 Novell PartnerNet Confidential 07/24/00<br />
Copyright © 2000 by Novell, Inc.<br />
MA w/<br />
BS<br />
MA w/<br />
BS<br />
Figure B17. A single CMD network with 100 Migration Agents.<br />
Consider that the reason for deploying the backbone support strategy was to increase the<br />
performance of the WAN links because they had to support the broadcast of 5000 RIP routes and<br />
5000 SAP services. Of course, the RIP/SAP broadcast happens once per minute. To assess the<br />
impact of the old traffic pattern and the new one, look at the traffic for a single WAN link.<br />
Consider the link connecting the far-left server back to the hub site on the network.<br />
From an old IPX-based RIP/SAP perspective, the amount of traffic due to service broadcast can be<br />
easily calculated. For SAP packets, 7 SAP services can fit into a single SAP broadcast packet.<br />
Each SAP service is 64 bytes in length. Including the necessary overhead for the packet, each SAP<br />
broadcast packet is 494 bytes in length. With 5000 SAP services being advertised on the network,<br />
this translates into 5000 ÷ 7 (rounded up) x 494 bytes. This equals 353210 bytes per minute.<br />
Divide this by 60 to determine the number of bytes per second on the WAN link due to SAP. This<br />
value is 5887 bytes/sec.<br />
RIP traffic takes a bit less bandwidth than SAP. For RIP packets, 50 RIP routes can fit into a<br />
single RIP broadcast packet. Each RIP route is 8 bytes in length. Including the necessary overhead<br />
for the packet, each RIP broadcast packet is 446 bytes in length. With 5000 RIP routes being<br />
advertised on the network, this translates into 5000 ÷ 50 (rounded up) x 446 bytes. This equals<br />
44600 bytes per minute. Divide this by 60 to determine the number of bytes per second on the<br />
WAN link due to RIP. This value is 743 bytes/sec.<br />
To recap, the total traffic on a single WAN link due to RIP and SAP broadcast traffic is as<br />
follows:<br />
• SAP = 5000 ÷ 7 x 494 ÷ 60 = 5887 bytes/sec<br />
• RIP = 5000 ÷ 50 x 446 ÷ 60 = 743 bytes/sec
Thus the aggregate amount of traffic on the WAN link due to RIP and SAP is 6630 bytes/sec. This<br />
is a considerable amount of traffic for slow WAN links.<br />
Once the existing traffic has been calculated, it is necessary to calculate the traffic that will be<br />
incurred on the WAN link due the NLSP traffic from backbone support. From the design example,<br />
there are 100 Migration Agents belonging to the same CMD network. From an NLSP perspective,<br />
this means that each IPX router believes it has 99 NLSP neighbors. This will impact the traffic<br />
calculation significantly.<br />
The calculations that should be conducted involve the steady state of the NLSP environment.<br />
There is obviously going to be a much larger amount of traffic when the NLSP environment is in<br />
its initialization state, but after the initialization, the general cost of NLSP is realized in the steady<br />
state environment.<br />
When discussing the steady state, there are two types of packets that are sent out on a regular<br />
basis. They are as follows:<br />
• NLSP Hello Packet—this packet is an advertisement of an NLSP router to its neighbors<br />
notifying the neighbors that it is still alive. This packet forces the neighbors to update the<br />
TTL of the sending NLSP router. By default, NLSP routers will send out NLSP Hello<br />
packets once every 20 seconds (with jitter to avoid simultaneous broadcast). The NLSP<br />
designated router for the area sends out NLSP Hello packets once every 10 seconds.<br />
• NLSP Complete Sequence Number Packet (CSNP)—this packet is sent out by the<br />
designated router once every 30 seconds. The CSNP is a brief summary of the designated<br />
router’s link state database, which includes a list of LSP numbers, sequence numbers, and<br />
checksums. NLSP routers in the area compare their link state database against the CSNP.<br />
If the router’s information is different than that contained in the CSNP, the router will<br />
update its link state database from the designated router’s link state database.<br />
Normally these packets are broadcast based packets; however, in the encapsulated IPX network,<br />
this information is directed unicast to each neighbor in the environment. As the number of<br />
Migration Agents with backbone support in a single CMD network increases, the traffic due to<br />
overhead increases exponentially.<br />
Given the example illustrated in Figure B17, each Migration Agent has 99 neighbors to whom it<br />
must send a unicast NLSP Hello packet. In turn, it receives back 99 NLSP Hello packets from its<br />
neighbors. This all happens within a 20-second period on the network. It is important to<br />
understand the impact this has on a single WAN link. To calculate the traffic, the size of the NLSP<br />
Hello packet must be calculated.<br />
There are two parts to the NLSP Hello packet. One is a fixed length, and the other is a variable<br />
length part of the packet. The fixed length of the packet consists of packet overhead and the Local<br />
MTU option. Packet overhead is 27 bytes and the Local MTU option is 6 bytes. In the variable<br />
length part of the packet, the Area Addresses option can be ignored because it is rarely used. This<br />
leaves the Neighbors part of the packet. Each neighbor of the NLSP router will be listed in this<br />
portion of the packet. Each neighbor will occupy 6 bytes of the packet. Since there are 99<br />
neighbors in the example, the size due to the neighbor list is 594 bytes plus one parity bit for a<br />
total of 595 bytes. Adding these together, the size of the NLSP Hello packet for the example is<br />
628 bytes.<br />
628 bytes would be the normal size of the packet if NLSP were able to operate in a normal IPX<br />
environment; however, the packet must still be encapsulated in a UDP header. This UDP header<br />
will add another 48 bytes to the packet size. The total size for each encapsulated NLSP Hello<br />
packet is 676 bytes. In general, use the following equation to calculate the size of each<br />
encapsulated NLSP Hello packet in the designed backbone support environment:<br />
Encapsulated NLSP Hello packet size = 27 + 6 + (6*(# of MA’s – 1) + 1) + 48<br />
Page 163 of 317 Novell PartnerNet Confidential 07/24/00<br />
Copyright © 2000 by Novell, Inc.
In the example provided, each Migration Agent will see 198 of these packets every 20 seconds.<br />
This translates into 676 x 198 ÷ 20 bytes per second, which equals 6692 bytes per second due to<br />
the encapsulated NLSP Hello packet traffic. In general, the way to calculate the total traffic (in<br />
bytes per second) on a WAN link due to encapsulated NLSP Hello packet traffic is shown by the<br />
equation below:<br />
Total NLSP Hello packet traffic = (Encapsulated NLSP Hello packet size) * (# of MA’s – 1) ÷<br />
20<br />
The other piece of overhead traffic due to NLSP is because of the CSNP. The calculation of the<br />
CSNP packet is not as easy as the NLSP Hello packet. The CSNP also has a fixed and a variable<br />
length part. In the variable length part there is an option called LSP Entries, which has some<br />
minimum information about all the Link State Packets (LSPs) in the link state database. The<br />
packet size will depend upon the number of LSPs in the database. To determine this, take the<br />
number of RIPs and SAPs on the network, as these are stored in LSPs. If the assumption is made<br />
that there are 5000 services and 5000 networks in the network, then number of approximate LSPs<br />
in the link state database can be calculated.<br />
The fixed part of the LSP packet is 27 bytes, and the LSP packet has a default size of 1024 bytes.<br />
Therefore, the available space to store RIP and SAP information is 1024 - 27(fixed part) - 20 (IPX<br />
header), which equals 977 bytes. Each SAP option in the LSP packet will take 64 bytes of space,<br />
and each route option will occupy 8 bytes of the packet. To store 5000 SAPs and 5000 RIPs<br />
360000 bytes will be needed (5000*64 + 5000*8). This can be stored in 369 LSPs, which is<br />
360000 bytes ÷ 977 bytes. Not all SAPs and RIPs will be accommodated in 369 LSPs. Assuming<br />
this happens, it is safe to assume 400 LSPs will be required to store 5000 services and 5000 routes.<br />
In general, the number of LSPs required to represent the link state database can be approximated<br />
by the following equation:<br />
Number of LSPs = ((# of SAPs x 64) + (# of RIPs x 8)) ÷ 977<br />
Increase that value by 10% to account for not every LSP being fully packed with RIP and SAP<br />
information.<br />
Once the number of LSPs has been approximated, the CSNP size can be calculated. Each LSP<br />
option will occupy 16 bytes. In most cases all the LSP information can be contained in one CSNP<br />
packet; however, the MTU limit will be exceeded, which means the CSNP may be broken up into<br />
multiple packets on the wire. This possibility needs to be calculated. To do this, take the size of<br />
the CSNP on the wire, which is 1500 bytes, and determine the fixed packet information. The<br />
header information and fixed part of the CSNP requires 81 bytes. 33 bytes are for the fixed part of<br />
the CSNP; 48 bytes are for the header information. This leaves 1419 bytes to store LSP summary<br />
information in the CSNP. 1419 bytes can fit information about 88 LSPs. This is calculated by<br />
1419 ÷ 16. Take the total number of LSPs representing the link state database and divide it by the<br />
number of LSPs that can be represented in a physical packet. The number calculated represents the<br />
number of physical packets required to transmit the CSNP on the wire:<br />
# of packets to transmit CSNP= (# of LSPs in link state database) ÷ 88<br />
Each physical packet for the CSNP will use 1500 bytes of bandwidth. To calculate the amount of<br />
bandwidth due to the CSNP on a WAN link, use the following equation:<br />
CSNP bandwidth = 1500 x (# of packets to transmit CSNP) ÷ 30<br />
For the current design example, 400 LSPs are required for the link state database. The bandwidth<br />
required for the CSNP is 1500 x 5, which equals 7500 bytes. This happens once every 30 seconds,<br />
so the bandwidth equals 250 bytes/second.<br />
Page 164 of 317 Novell PartnerNet Confidential 07/24/00<br />
Copyright © 2000 by Novell, Inc.
Note: This is the bandwidth required to transmit the CSNP from the designated router to a single<br />
Migration Agent on the network. To get the aggregate bandwidth required for the entire network<br />
to transmit the CSNP, multiply the CSNP bandwidth from above by the number of Migration<br />
Agents on the network.<br />
Therefore, the steady state NLSP traffic for the design example is calculated by adding the traffic<br />
from the NLSP Hello packet and the traffic from the transmission of the CSNP:<br />
Total steady state NLSP traffic = NLSP Hello traffic + CSNP transmission traffic<br />
For the design example, the total steady state NLSP traffic is 6692 + 250, which equals 6942<br />
bytes/second. Comparing this to the amount of current RIP/SAP traffic (6630 bytes/second), the<br />
new backbone support design actually incurs more overhead traffic than the original IPX<br />
environment. This is obviously a poor design.<br />
The point to remember is this comparison of information accounts only for the steady state of<br />
NLSP. It does not address the following NLSP issues, which will impact the amount of traffic on<br />
the network:<br />
• The NLSP initialization state will place more of a load on the network; however, it is<br />
temporary. Once the steady state is reached, the system exhibits a behavior that closely<br />
resembles that of the above study.<br />
• The traffic incurred by a dynamically changing network. The study does not address the<br />
normal delta traffic in an NLSP environment.<br />
• The normal update of the link state database. Once every 2 hours, the designated router<br />
will send its complete link state database to its neighbors. Normally, this is accomplished<br />
through broadcasting the database, but in the CMD environment the broadcast packet<br />
becomes multiple unicast directed packets.<br />
• The client SLP traffic required every 5 minutes for the Migration Agent to locate other<br />
Migration Agents on the network. Depending upon scope size, this could contribute to<br />
the amount of traffic on the WAN link.<br />
The designated router is responsible for a lot of the NLSP overhead required maintaining the<br />
routing environment. It is recommended that the designated router be at a hub site on the<br />
enterprise network. This is because the designated router for the NLSP neighborhood is<br />
responsible for generating and disseminating a large amount of information. The area of the<br />
network that holds the designated router is going to see more traffic due to NLSP overhead than<br />
areas that hold a subordinate NLSP router (in this case a Migration Agent).<br />
Of course, the example described here illustrates the need to minimize the number of Migration<br />
Agents on the same CMD network. This can be accomplished through the regionalization of CMD<br />
networks on the existing physical routing structure. For more information about deploying<br />
regional CMD networks, refer to the article “Removing IPX from WAN Segments During an<br />
<strong>Upgrade</strong> to <strong>NetWare</strong> 5: A Case Study”, which can be found in the September 1999 issue of<br />
AppNotes. It can also be found at the following URL:<br />
• http://developer.novell.com/research/appnotes/1999/septembe/a4frame.htm<br />
In the future, Migration Agents will also be able to handle multiple CMD networks. Instead of<br />
having Migration Agents share a common IPX segment to exchange bindery information, the<br />
Migration Agent will be able to do it internally. This will reduce the amount of hardware required<br />
to implement a regional CMD network approach.<br />
The most important thing to consider in proposing a backbone support infrastructure is the impact<br />
it will have on the network. The design must use the information gathered in the PFC to provide a<br />
relevant solution to the environment. Some other important points to consider are as follows:<br />
Page 165 of 317 Novell PartnerNet Confidential 07/24/00<br />
Copyright © 2000 by Novell, Inc.
• Migration Agents in backbone support mode effectively act as IPX routers. From a<br />
communications point of view, they also become a point of failure. If the physical router<br />
is up but the Migration Agent is not available, clients dependent upon that Migration<br />
Agent will not be able to connect to non-contiguous IPX portions of the network.<br />
• The impact of the virtual NLSP routing environment may be more severe than initially<br />
calculated. If the designated router for the CMD network is located across a slow WAN<br />
link from all of its neighbors, the slow WAN link will bear a large brunt of the NLSP<br />
overhead traffic. Also, if the physical routing environment resembles the one illustrated<br />
in Figure B18, there may be links that are more affected by the NLSP overhead traffic<br />
than others.<br />
• The design and implementation of a backbone support structure requires a high cost in<br />
development, configuration, and maintenance. The resulting infrastructure built must<br />
improve the performance of the WAN links for the client, or the implementation of such<br />
a structure is not worth the investment.<br />
Migration Agent<br />
Backbone Support<br />
Migration Agent<br />
Backbone Support<br />
Router<br />
Router<br />
Router Router<br />
Page 166 of 317 Novell PartnerNet Confidential 07/24/00<br />
Copyright © 2000 by Novell, Inc.<br />
Router<br />
Router<br />
Migration Agent<br />
Backbone Support<br />
Migration Agent<br />
Backbone Support<br />
Figure B18. Sections of the physical WAN environment may carry more NLSP overhead traffic than<br />
others.<br />
In Figure B18, the section of the physical WAN infrastructure between the two central routers will<br />
bear the brunt of NLSP overhead traffic more than the leaf network segments where the Migration<br />
Agents are located. This must be factored into any backbone support design. It is critical to look at<br />
the WAN and site maps provided by the client before designing the backbone support<br />
infrastructure.<br />
Note: One driving force behind the removal of IPX from WAN links is to increase link<br />
performance through the elimination of RIP/SAP overhead traffic. Given this, the backbone<br />
support design with NLSP must reduce that original overhead traffic by at least 50% for the design<br />
to be effective. If this figure cannot be reached, implement the dual stack migration strategy.
Appendix C—ACU Client Deployment<br />
Other good resources are:<br />
• TID 2942060 “Automatic Client <strong>Upgrade</strong>”<br />
• Search http://support.novell.com under keyword ACU<br />
• http://www.novell.com/coolsolutions/zenworks/features/a_basics_acu_zw.html “How to<br />
do an ACU using NCIMan”<br />
Novell’s Automatic Client <strong>Upgrade</strong> (ACU) provides a way to automatically upgrade to the latest<br />
Novell Client software without a visit to each workstation. ACU is a process that is initiated by a<br />
“switch” available with the Novell client software setup programs, i.e.:<br />
• SETUP.EXE /ACU (Windows 9x)<br />
• SETUPNW.EXE /ACU (Windows NT)<br />
• INSTALL.EXE /ACU (DOS/Windows 3.x).<br />
NCIMan ( N ovell C lient I nstall Man ager) is a GUI-based utility that can be used for creating<br />
Windows 9x or Windows NT UNATTEND.TXT files for use with the ACU process; there is no<br />
NCIMan for DOS/Windows 3.x. NCIMan ships with the ZENworks 1.0+ Client software. Prior<br />
to NCIMan, the UNATTEND.TXT file was manually created and/or edited from a sample<br />
UNATTEND.TXT file. The goal of the UNATTEND.TXT file is to set configuration options and<br />
answers to client installation questions, so that the user is not prompted for this information.<br />
Page 167 of 317 Novell PartnerNet Confidential 07/24/00<br />
Copyright © 2000 by Novell, Inc.
ACU Configuration Steps<br />
The following tasks will help you to ensure an orderly upgrade of the client software. The<br />
completed charts and appropriate login script(s) can be given to the customer as part of their<br />
report.<br />
Task 1: Determine and document which client software/version the customer is currently running<br />
that needs to be upgraded and whether or not this current client software is Bindery- or NDSbased,<br />
which in turn determines the login script to use for ACU commands.<br />
Current Client Version NDS-Based Bindery-Based Login Script to use<br />
for ACU<br />
Commands<br />
Novell Client for<br />
Windows 95/98<br />
Novell Client for<br />
Windows NT<br />
Novell Client for<br />
DOS/Windows<br />
Microsoft Client<br />
Virtual Loadable<br />
Modules (VLMs)<br />
NETx<br />
Other<br />
• If current clients are Bindery-based, the ACU commands go in the system login script<br />
(SYS:PUBLIC\NET$LOG.DAT). The ACU commands could go into user login scripts,<br />
(SYS:MAIL\) but this requires a lot of administrative effort.<br />
• If current clients are NDS-based, the ACU commands go into either a container or profile<br />
login script. The ACU commands could go into user login scripts, but this requires a lot<br />
of administrative effort.<br />
Page 168 of 317 Novell PartnerNet Confidential 07/24/00<br />
Copyright © 2000 by Novell, Inc.
Task 2: Determine and document which version of the client software will be installed using the<br />
ACU. This task determines whether or not NCIMan can be used. For the latest client versions,<br />
please refer to one of these sites:<br />
Client to be Installed<br />
with ACU<br />
Novell Client for<br />
Windows 9x<br />
Novell Client for<br />
Windows NT/2000<br />
Novell Client for<br />
DOS/Windows 3.x<br />
Other<br />
• http://support.novell.com – minimum patch list<br />
• http://www.novell.com/download<br />
• http://support.novell.com/Ftp/Updates/nw/nwclients/Date0.html<br />
Version NCIMan Can Be Used Comments<br />
• If you are upgrading to the Novell Client for Windows 9x 2.5+ -- NCIMan can be used.<br />
• If you are upgrading to the Novell Client for Windows NT 4.3+ (which only runs on<br />
Windows NT 4.0+) -- NCIMan can be used.<br />
• If you are upgrading to the Novell Client for Windows NT 4.11b (which only runs on<br />
Windows NT 3.51) -- NCIMan cannot be used. In this case, you will need to manually<br />
create the UNATTEND.TXT file.<br />
• If you are upgrading to the Client for DOS/Windows 3.x 2.5+ -- NCIMan cannot be used.<br />
. In this case, you will need to manually create the UNATTEND.TXT file.<br />
Page 169 of 317 Novell PartnerNet Confidential 07/24/00<br />
Copyright © 2000 by Novell, Inc.
Task 3: Preliminary Tasks Before Performing an ACU<br />
• Login to a server as Admin or a user with Admin equivalence. You will need to have<br />
sufficient rights to copy files and to modify login scripts.<br />
• On the appropriate <strong>NetWare</strong> server(s), create a client directory and copy the latest client<br />
software, e.g.:<br />
• SYS:PUBLIC\CLIENT\WIN95<br />
• SYS:PUBLIC\CLIENT\WINNT<br />
• Copy the *.CAB files to the appropriate directories.<br />
• Ensure that users who are scheduled for automatic upgrades have Read and File Scan file<br />
system rights to the appropriate directories.<br />
• Determine the appropriate parameters that should go into the UNATTEND.TXT file.<br />
Use the on-line help that ships with the Novell client software for a listing or the on-line<br />
help from NCIMan. In addition to the customized settings necessary for your<br />
environment (e.g., Preferred Server, Preferred Tree, Name Context, etc.), it is recommend<br />
that your UNATTEND.TXT file(s) install the following components for Windows NT:<br />
• Workstation Manager component (Workstation Manager 1.1)<br />
• Workstation Manager allows you to use Policy Package objects to manage your users and<br />
workstations via ZENworks and NDS.<br />
• NAL component (also known as the NAL NT Service Process)<br />
• The NAL NT Service Process allows NAL to distribute software without having the users<br />
be members of the NT Administrators group. When it is successfully installed, it will<br />
show up as an NT Process on the NT workstation. It is a one-time installation process on<br />
the NT workstations.<br />
• Checking the NWSETUP.INI File for Windows 9x<br />
• SETUP.EXE reads a configuration file named NWSETUP.INI to get information such as<br />
where the drivers will be copied to during the installation. NWSETUP.INI is located in<br />
the same directory as SETUP.EXE. The ACU uses the portion of NWSETUP.INI<br />
displayed below to determine if the workstation should be upgraded:<br />
• [ClientVersion]<br />
Version=0.1.0.0<br />
• There are four fields that can be used to identify the version of the client running on a<br />
workstation: MajorVersion, MinorVersion, Revision, and Level. These are specified<br />
under the [ClientVersion] heading in the format: Version=x.x.x.x.<br />
• Registry Settings for Windows 9x<br />
If you have already installed the IntranetWare Client for Windows 95 (or later), you will<br />
see keys corresponding to the Level, Major Version, Minor Version and Revision<br />
specified in the NWSETUP.INI file.<br />
These keys are found in the path HKEY_LOCAL_MACHINE | Network | Novell |<br />
System Config | Install | Client Version, as shown in the following sample screen.<br />
Level 0x00000000 (0)<br />
Major Version 0x00000000 (0)<br />
Minor Version 0x00000001 (1)<br />
Revision 0x00000000 (0)<br />
Note: REGEDIT lists the same four version fields as are found in the NWSETUP.INI<br />
file, only here they are in alphabetical order and the values are specified in both<br />
hexadecimal and decimal notation.<br />
SETUP.EXE compares the values in the Registry with the values in NWSETUP.INI to<br />
determine whether the ACU process should run. The ACU process runs only when<br />
Page 170 of 317 Novell PartnerNet Confidential 07/24/00<br />
Copyright © 2000 by Novell, Inc.
SETUP.EXE determines that the values in the Registry either do not exist or contain<br />
values less than those in the NWSETUP.INI file.<br />
If the values were set as shown in the previous two screen shots, the ACU process would<br />
not run because the Registry contains the same values in the Client Version fields as are<br />
specified in NWSETUP.INI (0.1.0.0 in both places). If you have newer files that need to<br />
be installed on this workstation, you need to change either the values in the Registry or<br />
those in the NWSETUP.INI file so that the version in NWSETUP.INI is greater than the<br />
corresponding version in the Registry. For example, 1.1.1.1 is greater than 1.1.1.0, and<br />
1.1.2.0 is greater than 1.1.1.9999.<br />
When the ACU finishes, it changes the settings in the Registry to match those in the<br />
NWSETUP.INI file. After the workstation is rebooted and the login script is processed<br />
again, the ACU will not be run because SETUP.EXE detects that the Registry now<br />
contains the same settings as NWSETUP.INI.<br />
Page 171 of 317 Novell PartnerNet Confidential 07/24/00<br />
Copyright © 2000 by Novell, Inc.
Task 4: Using ACU to <strong>Upgrade</strong> the Novell Client for Windows NT 4.10-4.11<br />
Note: This task assumes that the customer’s current client is the Novell Client for Windows NT<br />
4.10 or 4.11. If the customer’s current client is not 4.10 or 4.11, go to Task 5.<br />
Note: You cannot use NCIMan to create/edit the UNATTEND.TXT file with this client (4.10-<br />
4.11).<br />
Caution: After the Novell Client for Windows NT 4.10-4.11 software has been upgraded, the<br />
new clients will not read any of the “old” NT Configuration objects that may be in place;<br />
therefore, you will need to have ZENworks installed and user policy package objects set up in the<br />
tree prior to upgrading the client software so that the “workstation manager” feature is not<br />
disrupted. Here is the scenario:<br />
• The Novell Client for Windows NT versions 4.3+ cannot access Workstation Manager<br />
1.0 objects. (Workstation Manager was a component of the Novell Client for Windows<br />
NT 4.10-4.11 software.) These 4.3+ clients can only access the ZENworks 1.0+<br />
Dynamic Local User (DLU) Policy (aka Workstation Manager 1.1 objects).<br />
• The Novell Client for Windows NT versions 4.10-4.11 cannot access the ZENworks 1.0+<br />
Dynamic Local User (DLU) Policy (aka Workstation Manager 1.1 objects). These clients<br />
can only access Workstation Manager 1.0 objects, which are enabled as part of the Novell<br />
Client for Windows NT versions 4.10-4.11.<br />
With Windows NT clients, security comes into play in that the workstation that is to be upgraded<br />
requires appropriate rights to install the client software.<br />
Q: Do the users have local NT Workstation Administrator rights?<br />
Yes: Nothing special as far as security goes needs to be done, since the users already have<br />
local NT Workstation Administrator rights to upgrade their client software.<br />
Process:<br />
• Manually create (or copy and edit the sample) UNATTEND.TXT file that will be<br />
“read” by the ACU process.<br />
• Place the UNATTEND.TXT file in a location on the network where users have Read<br />
and File Scan rights, e.g., SYS:PUBLIC\ACU.<br />
• Mark the Enable Automatic Client <strong>Upgrade</strong> box of the Client Configuration object.<br />
• In the Alternate Login Script Location box, specify the UNATTEND.TXT file that<br />
you just created. Note: This field is required; you will get an error message if this<br />
field is not filled in.<br />
Note: You must use the older NWAdmnNT utility for creating and managing NT<br />
Configuration objects - not NWAdmn32.<br />
No: Two different possibilities and associated solutions:<br />
(1) Users who have the Novell Client for Windows NT 4.10 or 4.11 and have<br />
Workstation Manager 1.0 installed with the appropriate Trusted Tree.<br />
In this scenario, an ACU is possible even if the users don’t have administrative rights<br />
to the NT Workstation. This is accomplished by using the Client <strong>Upgrade</strong> property<br />
of the NT Configuration object. With this option enabled, the Novell Client for<br />
Windows NT creates a temporary account with administrative rights on the NT<br />
Workstation and it uses this account to run the client installation program. Once the<br />
Page 172 of 317 Novell PartnerNet Confidential 07/24/00<br />
Copyright © 2000 by Novell, Inc.
installation is complete, the NT Workstation is rebooted and the user then logs in<br />
normally.<br />
Process:<br />
• Manually create (or copy and edit the sample) UNATTEND.TXT file that will be<br />
“read” by the ACU process.<br />
• Place the UNATTEND.TXT file in a location on the network where users have Read<br />
and File Scan rights, e.g., SYS:PUBLIC\ACU.<br />
• Mark the Enable Automatic Client <strong>Upgrade</strong> box of the Client Configuration object.<br />
• In the Alternate Login Script Location box, specify the UNATTEND.TXT file that<br />
you just created. Note: This field is required; you will get an error message if this<br />
field is not filled in.<br />
Note: You must use the older NWAdmnNT utility for creating and managing NT<br />
Configuration objects - not NWAdmn32.<br />
(2) Users who have the Novell Client for Windows NT 4.10 or 4.11 but do not have<br />
Workstation Manager 1.0 installed and are not members of the local NT<br />
Administrators group. Additionally, these NT workstations are not part of an NT<br />
Server Domain.<br />
In this case, the update to the Novell Client for Windows NT will require a visit to<br />
the desktop. This is because installing Workstation Manager requires NT<br />
Workstation Administrator rights and there is no automatic way to make the user a<br />
member of the NT Administrators group.<br />
POSSIBLE WORK-AROUNDS TO TEST OUT:<br />
• There is a way to enable the workstation manager. The 4.11 client has a policy<br />
template to enable the workstation manager and to set the tree name. I think the<br />
name of the file is NWNT.ADM and is located in the admin directory. Create a<br />
NWCONFIG.POL file with POLEDIT and copy the file to the<br />
SYS:PUBLIC\WINNT directory of the default servers and all logged-in clients<br />
have workstation manager enabled.<br />
• Use NAL and the NAL NT Service Process to distribute the client software.<br />
This assumes the NAL NT Service Process is not dependent upon a client<br />
version<br />
• A Microsoft or third party utility (such as SU) that temporarily gives users<br />
administrative privileges.<br />
Available Switches for SETUPNW.EXE include:<br />
• /? Displays list of available switches<br />
• /ACU Automatic Client <strong>Upgrade</strong><br />
• /U Use default UNATTEND.TXT file<br />
• /U: <br />
• /W: Trusted Tree - to enable Workstation Manager<br />
Page 173 of 317 Novell PartnerNet Confidential 07/24/00<br />
Copyright © 2000 by Novell, Inc.
Task 5: Using ACU and NCIMan to <strong>Upgrade</strong> to the Novell Client for Windows NT 4.3+<br />
Note: This task assumes that the customer’s current client is the Novell Client for Windows NT<br />
4.3+. If the customer’s current client is not 4.3+, go back to Task 4.<br />
Note: You can use NCIMan to create/edit the UNATTEND.TXT file with this client (4.3+).<br />
With Windows NT clients, security comes into play in that the workstation that is to be upgraded<br />
requires appropriate rights to install the client software.<br />
Q: Do the users have local NT Workstation Administrator rights?<br />
Yes: Nothing special as far as security goes needs to be done, since the users already have<br />
local NT Workstation Administrator rights to upgrade their client software.<br />
Process:<br />
• Use NCIMan to create the appropriate UNATTEND.TXT file.<br />
• Place the UNATTEND.TXT file in a location on the network where users have Read<br />
and File Scan rights, e.g., SYS:PUBLIC\ACU.<br />
• Go to “Update Login Scripts”.<br />
No: This can be done with the new ZENworks Policy Package by scheduling<br />
SETUPNW.EXE to run with a “System” or an “Unsecure System” impersonation.<br />
Process:<br />
• Open a WINNT User Policy Package (or a WINNT Workstation Policy Package)<br />
• Click on the “Add action...” button, type “NT Client ACU” and click on the “Create”<br />
button<br />
• Double click on the “NT Client ACU” policy you just created and then click on the<br />
“Details” button<br />
• Select “Unsecure System” in the Impersonation drop down list. Unsecure System<br />
allows system rights for installation yet gives screen prompts for installation progress<br />
and user intervention if needed.<br />
• Choose the “Items” tab and then click on the “Add...” button<br />
• Enter the path to the executable in the “Name” field, e.g.:<br />
• \\servername\SYS\Public\Client\Winnt\i386\setupnw.exe<br />
• Enter any startup options in the “Parameters” field, e.g.:<br />
• /ACU /U:unattend.txt<br />
• Choose the “Schedule” tab to specify when you want the client update to occur, e.g.:<br />
• Executed when the user logs in<br />
• Note: Disable the use of the “Default package schedule” in this case<br />
• Choose the “Advanced” tab to specify any other options, e.g.: “Disable the action<br />
after completion” and “Reboot after completion”<br />
• Go to “Update Login Scripts”.<br />
Now, the next time the user logs in, SETUPNW.EXE will execute with administrative<br />
rights to the NT Workstation. When the installation is done, the NT Workstation will be<br />
rebooted and the user will log in normally.<br />
Page 174 of 317 Novell PartnerNet Confidential 07/24/00<br />
Copyright © 2000 by Novell, Inc.
ANOTHER SOLUTION TO TEST OUT:<br />
• Use NAL and the NAL NT Service Process to distribute the client software.<br />
Available Switches for SETUPNW.EXE include:<br />
• /? Displays list of available switches<br />
• /ACU (Automatic Client <strong>Upgrade</strong>)<br />
• /U Use default UNATTEND.TXT file<br />
• /U:<br />
• /W:Trusted Tree - to enable Workstation Manager<br />
Page 175 of 317 Novell PartnerNet Confidential 07/24/00<br />
Copyright © 2000 by Novell, Inc.
Task 6: Using ACU and NCIMan to <strong>Upgrade</strong> to the Novell Client for Windows 9x 2.5+<br />
Note: This task assumes that the customer’s current client is the Novell Client for Windows 9x<br />
2.5+.<br />
Note: You can use NCIMan to create/edit the UNATTEND.TXT file with this client.<br />
With Windows 9x clients, security is not an issue for installing the client software.<br />
Process:<br />
• Use NCIMan to create the appropriate UNATTEND.TXT file.<br />
• Place the UNATTEND.TXT file in a location on the network where users have Read and<br />
File Scan rights, e.g., SYS:PUBLIC\ACU.<br />
• Go to “Update Login Scripts”.<br />
Available switches for SETUP.EXE include:<br />
• /? Displays list of available switches<br />
• /ACU Automatic Client <strong>Upgrade</strong><br />
• /NCF No Cab Fix - The fix to prevent the copying of CAB files will not be applied<br />
• /RB Roll Back - to previous Client if Client installation fails<br />
• /U: <br />
Page 176 of 317 Novell PartnerNet Confidential 07/24/00<br />
Copyright © 2000 by Novell, Inc.
Task 7: Using ACU to <strong>Upgrade</strong> to the Novell Client for DOS/Windows 3.x 2.5+<br />
Note: This task assumes that the customer’s current client is the Novell Client for DOS/Windows<br />
3.x 2.5+.<br />
Note: You cannot use NCIMan to create/edit the UNATTEND.TXT file with the DOS/Windows<br />
3.x client.<br />
With DOS/Windows 3.x clients, security is not an issue for installing the client software.<br />
Process:<br />
• Manually create (or copy and edit the sample) UNATTEND.TXT file that will be “read”<br />
by the ACU process.<br />
• Place the UNATTEND.TXT file in a location on the network where users have Read and<br />
File Scan rights, e.g., SYS:PUBLIC\ACU.<br />
• Go to “Update Login Scripts”.<br />
Note: This login script does not contain commands for determining the DOS/Windows<br />
3.x clients.<br />
Page 177 of 317 Novell PartnerNet Confidential 07/24/00<br />
Copyright © 2000 by Novell, Inc.
“ Update Login Scripts ”<br />
A simplified example follows, showing the key components necessary. Testing in the lab<br />
environment will be required for the customer’s specific needs.<br />
Note: This login script was placed in this order for readability purposes; it may not execute as<br />
written.<br />
REM The following is the OS or Platform Check for Windows NT<br />
REM Check to see if a Novell Client is currently installed:<br />
IF “%OS” = “WINNT” THEN GOTO WINNTC32<br />
END<br />
WINNTC32:<br />
REM The following should be one line in your Login Script:<br />
@\\zensrvr\sys\public\client\winnt\i386\SETUPNW.EXE /ACU<br />
/U:\\zensrvr\sys\public\client\winnt\i386\nls\english\UNATTEND.TXT<br />
EXIT<br />
REM Check to see if a Microsoft Client is currently installed:<br />
IF = “Windows_NT” THEN GOTO WINNTMSC<br />
END<br />
WINNTMSC:<br />
MAP L:=zensrvr\sys:public\client\winnt\i386<br />
DRIVE L<br />
#SETUPNW.EXE /ACU /U:L:\nls\english\UNATTEND.TXT<br />
EXIT<br />
REM The following is the OS or Platform Check for Windows 98<br />
REM Check to see if a Novell Client is currently installed:<br />
IF "%OS" = "WIN98" THEN GOTO W98C32<br />
END<br />
W98C32:<br />
REM The following should be one line in your Login Script:<br />
@\\zensrvr\sys\public\client\win98\ibm_enu\SETUP.EXE /ACU /NCF<br />
/U:\\zensrvr\sys\public\client\win98\ibm_enu\UNATTEND.TXT<br />
EXIT<br />
REM Check to see if a Microsoft Client is currently installed:<br />
IF = "C:\WINDOWS" OR = "C:\WIN98" THEN GOTO<br />
MSCLIENT98<br />
END<br />
MSCLIENT98:<br />
MAP Y:=ZENSRVR\SYS:PUBLIC\CLIENT\WIN98\IBM_ENU<br />
DRIVE Y<br />
REM The following should be one line in your Login Script:<br />
#SETUP.EXE /ACU /NCF<br />
/U:\\zensrvr\sys\public\client\win98\ibm_enu\UNATTEND.TXT<br />
EXIT<br />
Page 178 of 317 Novell PartnerNet Confidential 07/24/00<br />
Copyright © 2000 by Novell, Inc.
REM The following is the OS or Platform Check for Windows 95"<br />
REM Check to see if a Novell Client is currently installed:<br />
IF "%OS" = "WIN95" THEN GOTO W95C32<br />
END<br />
W95C32:<br />
REM The following should be one line in your Login Script:<br />
@\\zensrvr\sys\public\client\win95\ibm_enu\SETUP.EXE /ACU /NCF<br />
/U:\\zensrvr\sys\public\client\win95\ibm_enu\UNATTEND.TXT<br />
EXIT<br />
REM Check to see if a Microsoft Client is currently installed:<br />
IF = "C:\WINDOWS" OR = "C:\WIN95" THEN GOTO<br />
MSCLIENT95<br />
END<br />
MSCLIENT95:<br />
MAP Y:=ZENSRVR\SYS:PUBLIC\CLIENT\WIN95\IBM_ENU<br />
DRIVE Y<br />
REM The following should be one line in your Login Script:<br />
#SETUP.EXE /ACU /NCF<br />
/U:\\zensrvr\sys\public\client\win95\ibm_enu\UNATTEND.TXT<br />
EXIT<br />
REM This checks for Windows 3.x platform<br />
IF PLATFORM "WIN" THEN BEGIN<br />
WRITE "This is not Windows 95-98 or Windows NT"<br />
WRITE "This is Windows 3.x"<br />
WRITE "You are seeing this because you are not using a"<br />
WRITE "supported desktop operating system"<br />
WRITE "Please call your network administrator or the help"<br />
WRITE "desk and report this message"<br />
PAUSE<br />
END<br />
EXIT<br />
Page 179 of 317 Novell PartnerNet Confidential 07/24/00<br />
Copyright © 2000 by Novell, Inc.
Upgrading to 32-Bit ODI Drivers<br />
You can use ACU to automate an upgrade from a 16-bit LAN driver configuration to a 32-bit ODI<br />
driver. Here are the steps:<br />
• With a text editor, open the NWSETUP.INI file (located in the same directory as the<br />
Windows 9x client software)<br />
(portion of the nwsetup.ini)<br />
[INF Files]<br />
1=NWClient.inf<br />
2=NWTrans.inf<br />
3=ODINSUP.inf<br />
4=NE3200.inf<br />
;5=NE2000.inf<br />
;6=NE15_21.inf<br />
;7=NE2.inf<br />
Find the line under the [INF Files] heading that corresponds to your network adapter. For<br />
example, if you have a 3Com EtherLink III adapter, the line is:<br />
;19=ODI3COM.inf<br />
Remove the semicolon (;) from the line. This causes SETUP.EXE to copy that INF file to<br />
the C:\WINDOWS\INF directory, where it can be used to install and configure the 32-bit<br />
ODI driver.<br />
• Copy the 32-bit driver *.LAN file (such as 3C5X9.LAN) to the ACU install directory.<br />
Add the “/o” command line parameter to the login script command that calls SETUP, as<br />
in the following example:<br />
#\\prv-client\sys\public\client\c32win95\ setup.exe /acu /o<br />
The “/o” parameter instructs SETUP to override the NDIS default and will install the<br />
IntranetWare Client with a 32-bit ODI driver.<br />
Page 180 of 317 Novell PartnerNet Confidential 07/24/00<br />
Copyright © 2000 by Novell, Inc.
Appendix D—SLP<br />
A Detailed Overview of SLP<br />
Note: You can proceed to the “SLP Design” section if you are already familiar with SLP.<br />
Before proposing any SLP infrastructure design, it is important to fully understand the SLP<br />
standard, how Novell has implemented that standard, and the impact SLP will have on a large<br />
network environment. This information follows:<br />
Service Location Protocol (SLP)<br />
In the IPX realm, services are advertised on a periodic basis through the use of the service<br />
advertisement protocol (SAP). This protocol is broadcast out on the network once per minute by<br />
all services on the network. The reason for this is so services are aware of all other services on the<br />
network dynamically. Address tables for services are not statically configured on a per server basis<br />
as it drastically increases the administrative overhead for large networks.<br />
Large networks have problems with IPX because of this dynamic discovery of information. With<br />
thousands of IPX-based services on the network, the amount of network bandwidth used by this<br />
service advertisement becomes significant. This is a major drawback to the scalability of IPX and<br />
SAP on a corporate network.<br />
The TCP/IP protocol suite itself does not have a mechanism for the advertisement of services. IP<br />
hosts generally learn about other IP hosts through statically configured files. This is not an<br />
acceptable solution in <strong>NetWare</strong> <strong>5.1</strong> for the discovery of services, as customers have become<br />
accustomed to the dynamic discovery mechanisms of IPX and SAP. Fortunately, there is an IPbased<br />
mechanism of dynamic service resolution based upon an IETF standard. That mechanism is<br />
the Service Location Protocol (SLP).<br />
To draw a crude analogy, SLP is to IP networks what SAP is to IPX networks. IP-based clients<br />
and servers on the network can find out about all other services on the network through SLP<br />
queries. But unlike SAP, SLP has some properties that make it a more attractive service location<br />
protocol:<br />
• SLP is a passive protocol, which is unlike the active SAP protocol. SAP forces itself out<br />
on the wire once per minute to advertise services. SLP is found on the wire only when<br />
user agents need to retrieve a list of available services on the network.<br />
• SLP is a pull technology, whereas SAP is a push technology. Pull technologies lend<br />
themselves better to the tailoring and customization of queries than push technologies.<br />
This provides for much more efficient use of network bandwidth because a pull<br />
technology like SLP places only useful information on the wire. A push technology like<br />
SAP tries to place all information needed for any query on the wire, whether it is truly<br />
needed or not.<br />
But this better technology comes at a cost. That cost is either an administrative cost or a network<br />
bandwidth cost. SLP can use different types of TCP/IP packets to facilitate a service resolution<br />
infrastructure. There are three types of packets in TCP/IP that can be used for communication<br />
between hosts. They are as follows:<br />
• Unicast—this is a directed packet between two hosts on the network. The packet is<br />
addressed specifically to the destination host. All other hosts on the network that see the<br />
packet ignore it.<br />
Page 181 of 317 Novell PartnerNet Confidential 07/24/00<br />
Copyright © 2000 by Novell, Inc.
• Broadcast—this is a general packet destined for all hosts on the same network as the<br />
sending host. Every host on the same network must process the packet. Broadcast storms<br />
can affect machine performance because CPU cycles must be spent processing the<br />
packets coming into the host.<br />
• Multicast—this packet is designed to reach a group of hosts on the network. There is a<br />
reserved range of IP addresses whose first octet ranges from 224 to 239. These addresses<br />
are multicast addresses, which is a way to logically identify a group of hosts on the<br />
network. Hosts on the network join the group upon booting, and when a packet is<br />
addressed to a specific multicast address, all members of the multicast group receive the<br />
packet. Non-members that see the packet ignore it.<br />
For SLP to work without any administrative overhead as SAP currently does, multicast must be<br />
enabled on the network to facilitate communications between user and service agents. If multicast<br />
is not an option, then a directory agent must be configured for the network, and the service agents<br />
on the network must be configured to find the directory agent. While multicast is the “out of the<br />
box” method of communication for SLP, it may not be the most efficient solution for a given<br />
environment. The inner workings of SLP will be discussed in the next sections.<br />
When Is SLP Required on a Network?<br />
When a pure IP <strong>NetWare</strong> environment is achieved, both clients and servers need a method for<br />
discovering services on a network. There are a number of ways that these services can be resolved,<br />
and many people choose to use a combination of service resolution mechanisms. The service<br />
mechanisms that can be used in a pure IP <strong>NetWare</strong> environment are as follows:<br />
• NWHOSTS file—the NWHOSTS file functions in the same manner the normal TCP/IP<br />
HOSTS file does. All IP addresses of all machines on the network are stored in this file,<br />
which is located locally on each workstation and server. This is not the optimal method<br />
for service resolution as this file needs to be updated and distributed every time there is a<br />
new machine added to the network or an existing machine’s address is modified.<br />
• Domain Name Service (DNS)—machines can use DNS to resolve fully qualified<br />
hostnames to IP addresses. Thus, a client attempting to map a drive to fs1.ey.com would<br />
resolve that address against the DNS servers. Once the address was resolved, the<br />
workstation would attempt to connect to the server defined by that IP address.<br />
• Dynamic Host Control Protocol (DHCP)—DHCP can be used to disseminate preferred<br />
server or preferred tree information to workstations. No resolution of services is<br />
necessary upon initial login because the IP address to which the workstation is<br />
connecting is already known.<br />
• Novell Directory Services (NDS)—NDS can be used as a service resolution mechanism.<br />
Once a workstation has been authenticated to the NDS tree, the user can walk to the NDS<br />
tree to find services available on the network. This process is accomplished through NDS<br />
and its tree walking capabilities; no extra configuration is required on the client.<br />
• Service Location Protocol (SLP)—as has already been mentioned SLP is an excellent<br />
method of service discovery in a pure IP <strong>NetWare</strong> environment. Once configured, the<br />
infrastructure needs a minimal amount of care and administration to function properly.<br />
Since all of these service resolution mechanisms are available, it is a logical question to ask, “Why<br />
is SLP needed in an enterprise network?” There are a number of reasons why SLP is<br />
recommended (and in some cases required) for large environments. They are listed below:<br />
• Efficiency of Directory Services—In the experiences Novell has had with large scale<br />
implementations of <strong>NetWare</strong> <strong>5.1</strong>, it has been shown that DS runs more efficiently with an<br />
SLP infrastructure in place that servers can use for service resolution.<br />
• Short Name Resolution—if users are accustomed to using only the server’s name to<br />
access services on the network, this is called short name resolution. For instance, if a user<br />
were mapping a drive to the SYS volume of FS1 using Universal Naming Convention<br />
Page 182 of 317 Novell PartnerNet Confidential 07/24/00<br />
Copyright © 2000 by Novell, Inc.
(UNC), the syntax would look like \\FS1\SYS. Because only the short name of the server<br />
is specified, this is an SLP dependent function if no other short name resolution protocol,<br />
such as DNS or SAP, is available. Without an SLP infrastructure in place, the drive<br />
mapping operation would fail.<br />
• Browsing—if users are accustomed to finding network resources through such utilities as<br />
Network Neighborhood, this is called a network browse function. For instance, if a user<br />
would access a server by double clicking on Network Neighborhood->Entire Network-<br />
><strong>NetWare</strong> Services-><strong>NetWare</strong> Servers, this is an SLP dependent function if no other<br />
short name resolution protocol, such as IPX or SAP, is available. Without an SLP<br />
infrastructure in place, this browsing capability would be lost.<br />
• Compatibility Mode—for organizations that are migrating from an IPX environment to a<br />
pure IP environment, there are different migration paths available. One of those migration<br />
strategies is to use the Compatibility Mode Driver provided by Novell to allow machines<br />
that are strictly using the IP protocol to communicate with machines and applications<br />
using only the IPX protocol for <strong>NetWare</strong> services. If this migration strategy is chosen, the<br />
Compatibility Mode Driver is SLP dependent. Without an SLP infrastructure in place, the<br />
Compatibility Mode Driver would not work properly.<br />
For a lot of organizations, short name resolution and browsing are functional requirements in a<br />
pure IP environment. A number will also make use of the compatibility mode driver as a migration<br />
strategy to achieve a pure IP environment. For these reasons, a comprehensive, robust SLP<br />
infrastructure is required. At the same time, DS will be much more efficient because it will have<br />
an SLP infrastructure to use. Even in a dual stack configuration, an SLP infrastructure will<br />
improve the performance of the client and facilitate the preference of the IP protocol.<br />
Note: A design criterion for NDS was to make it not dependent upon SLP. An SLP infrastructure<br />
will make NDS more efficient. However, there may be other services that are dependent upon<br />
SLP. For that reason, Novell recommends that an SLP infrastructure be implemented for all<br />
environments where IP is the preferred protocol.<br />
Understanding SLP Basics<br />
As mentioned previously, SLP is an open standard defined by the IETF. For more detailed<br />
information on SLP including advanced theory and packet construct information, please refer to<br />
RFC 2165 on the IETF web site, http://www.ietf.org/.<br />
There are three main components to the SLP methodology. The required components in an SLP<br />
network are the user agent and the service agent. The directory agent (optional) is a useful<br />
construct that must be implemented on an enterprise network for scalability and efficiency.<br />
Without the directory agent, the overhead traffic generated by a large number of multicast queries<br />
would adversely affect the performance of the network.<br />
The Service Agent (SA)<br />
The service agent is responsible for the advertisement of service attributes and configuration.<br />
When an SLP-enabled service comes up on a machine, it makes itself known to the SLP service<br />
agent, which also must be loaded. The service registers necessary attribute and configuration<br />
information with the service agent. It is the service agent’s responsibility to advertise this<br />
information when SLP queries from user agents are received. The SA will also register the service<br />
information with any directory agents it recognizes on the network.<br />
The “service agent” is not synonymous with “server.” Service agents can exist on any box. For<br />
example, if a <strong>NetWare</strong> client has an SLP-enabled service loaded on it, a service agent is required<br />
on the workstation to advertise this service.<br />
Page 183 of 317 Novell PartnerNet Confidential 07/24/00<br />
Copyright © 2000 by Novell, Inc.
The User Agent (UA)<br />
The user agent is responsible for retrieving information about service attributes and configuration<br />
available on the network. When an application needs a list of services, an SLP request is sent out<br />
to retrieve the available service information. This request can be sent to the SAs or DAs that exist<br />
on the network.<br />
The “user agent” is not synonymous with “workstation.” User agents can exist on any box. For<br />
example, <strong>NetWare</strong> servers need to advertise network services and also need to periodically<br />
retrieve lists of network services. The user agent is the responsible party for acquiring those lists<br />
of network resources. Thus, <strong>NetWare</strong> <strong>5.1</strong> servers have both SLP service agents and user agents<br />
running on them simultaneously.<br />
Default SLP Communications<br />
The default method of SLP communication, which is explained in this section, is heavily<br />
dependent upon multicast. This strategy works well for the small network, but it does not scale<br />
well in an enterprise environment, especially a large and complex one. This is because when a<br />
large number of service agents become members of the multicast group, a significant portion of<br />
the network bandwidth can be taken up by user agent multicast traffic and service agent responses.<br />
While the traffic will be less than the RIP/SAP broadcast traffic, it can still impede network<br />
throughput.<br />
On a network without directory agents, user and service agents use multicast to find each other.<br />
This is the general method of communication for SLP. When a service agent comes up for the first<br />
time, it will multicast out to the network using an IGMP packet addressed to 224.0.1.22. This is a<br />
join request so that any multicast-enabled routers on the network will add the service to their<br />
membership lists. This is how the routers on the network know how to forward the SLP queries<br />
from user agents on the network to the service agents registered with the multicast group.<br />
When a user agent needs to retrieve a list of services in the absence of a directory agent, it<br />
multicasts out on the same address looking for service agents. The service agents, listening on the<br />
multicast address, will unicast an SLP packet back to the requesting user agent with a list of the<br />
services requested. Only those service agents that have information to send back will send a<br />
unicast packet back to the service agent. This exchange of service information is shown in Figure<br />
D1 and can be verified using any packet sniffing utility. Figure D2 shows a sample packet trace<br />
taken from a pure IP network with only user and service agents.<br />
All of the packets shown logically in Figure D1 are SLP packets. SLP packets can be identified<br />
because they are TCP/IP based and addressed to port 427. SLP supports both UDP and TCP<br />
connectivity. UDP is the preferred method of transmission for SLP because it is more efficient<br />
from a network perspective. However, the connection oriented TCP communication is established<br />
when bulk transfer of information is required. In Novell’s implementation of SLP, the initial SLP<br />
packet is sent out as a UDP packet. If the response comes back as a UDP packet with the overflow<br />
bit set, as often happens when retrieving a list of SAPSRV.novell SLP objects, a TCP session is<br />
established to transfer the list of services.<br />
Page 184 of 317 Novell PartnerNet Confidential 07/24/00<br />
Copyright © 2000 by Novell, Inc.
User Agent<br />
requests services<br />
Unicast SLP packet<br />
addressed to original host<br />
Multicast SLP packet<br />
addressed to 224.0.1.22<br />
Unicast SLP packet<br />
addressed to original host<br />
Service Agent<br />
has service; reply is unicast<br />
Service Agent<br />
does not have service;<br />
no reply<br />
Service Agent<br />
has service; reply is unicast<br />
Figure D1. Using SLP multicast to discover services.<br />
There is a limit to the amount of information that can be returned in a single SLP service request.<br />
This limit is 64KB of information. Any information above 64KB is truncated and not seen by the<br />
user agent. This is a limitation arising from the SLP RFC itself and not from Novell’s<br />
implementation. According to the RFC, the information pertaining to the length in the SLP header<br />
packet is 16 bits. This translates into the 64KB limitation. In SLP version 2 (defined in RFC<br />
2608), the length information in the header has been expanded to 24 bits. This will allow for the<br />
return of over 15MB of service information from a single request. Novell has implemented SLP<br />
version 1 in <strong>NetWare</strong> <strong>5.1</strong>, and implementation of SLP version 2 is expected soon. For the purposes<br />
of this document, assume SLP version 1 as the underlying technology unless explicitly noted<br />
otherwise.<br />
Figure D2 shows the traffic pattern of a <strong>NetWare</strong> <strong>5.1</strong> server using the default SLP communication<br />
mechanism and a client requesting a list of SLP services. The server boot process in this example<br />
puts 23 packets of IP data out on the network. The figure shows the IGMP packets addressed to<br />
the service agent multicast address. This is from the service agent on the server registering itself<br />
with the multicast group. The user agent on the server then follows with a set of service requests<br />
itself. The SLP Service Request packets in the screen capture shows this.<br />
Some packets of interest are packets 4 and 11 in the screen capture. These packets show that the<br />
user agent on the <strong>NetWare</strong> <strong>5.1</strong> server is looking for a directory agent on the network. The<br />
directory agent will be discussed in more detail in the next section.<br />
Packets 24 through 26 show the multicast lookup mechanism for a user agent on the client. In<br />
packet 24, the user agent is multicasting for a particular SLP service (in this case the<br />
bindery.novell service). In packet 25, the <strong>NetWare</strong> <strong>5.1</strong> server, with IP address 4.3.1.119, responds<br />
to the client with the information requested. The user agent on the client then sends out another<br />
multicast packet to the network. This packet is required as part of the RFC. It represents the<br />
convergence algorithm used to discover all services connected to the original SLP request.<br />
Page 185 of 317 Novell PartnerNet Confidential 07/24/00<br />
Copyright © 2000 by Novell, Inc.
Figure D2. A packet trace illustrating default SLP communication.<br />
Because the user agent wants to find all instances of the service on the network, it makes an initial<br />
query to the service agent multicast address. After the user agent receives responses back to the<br />
request, it sends out another multicast packet looking for the same service; however, this packet<br />
includes a previous responder list. Thus, packet 26 includes the IP address of the service agent that<br />
has already responded. This is why a second response from the <strong>NetWare</strong> <strong>5.1</strong> server is not seen on<br />
the network.<br />
Only when there are no new responses is the request designated “complete.” Because there were<br />
no additional service agents on the network that could respond to the user agent’s request, the<br />
service list is complete, and the user agent makes no more queries to the network for the original<br />
request. The convergence algorithm will wait 3 seconds before marking the process complete. All<br />
information gained from the network at this point is passed back to the requesting application.<br />
There are other methods of discovering service information on a network that do not involve the<br />
heavy use of multicast. These methods deploy the directory agent, and it will be discussed in the<br />
next section.<br />
The Directory Agent<br />
The directory agent is the optional component of the SLP infrastructure architecture; however, it is<br />
probably the most useful in an enterprise network environment. As shown in the previous section,<br />
SLP is a passive protocol driven by user agent requests and service agent registrations. When a<br />
user agent sends a query to the network, all service agents holding pertinent information must<br />
respond. Thus, the user agent is getting service information from many different nodes on the<br />
network. With a directory agent on the network, the user agent will get service information from a<br />
limited number of nodes.<br />
Page 186 of 317 Novell PartnerNet Confidential 07/24/00<br />
Copyright © 2000 by Novell, Inc.
The directory agent basically acts as a central repository of SLP service information. All service<br />
agents that come up on the network register their list of services with the directory agent. All user<br />
agents making use of directory agents direct their requests to the directory agent instead of making<br />
the request through a general multicast packet. This makes for more efficient use of the network<br />
bandwidth because packets are directed unicast packets instead of multicast. Also, traffic can be<br />
isolated based upon the physical network topology instead of having to enable multicast packets<br />
end to end on the network.<br />
Directory Agent Basics<br />
In the presence of a directory agent on the network, the communications behavior of user and<br />
service agents on the network changes drastically. Instead of relying heavily upon multicast for the<br />
discovery and resolution of services, they rely upon the directory agent. This makes<br />
communications more efficient, but raises the question of how the user and service agents discover<br />
the directory agents on the network.<br />
User and service agents on the network can discover directory agents on the network in one of<br />
three ways:<br />
• Through multicast addressed packets.<br />
• Through configuration information received through DHCP.<br />
• Through static configuration.<br />
Discovery Through Multicast<br />
The first method of directory agent discovery is discovery through multicast. If multicast is<br />
enabled on a network, then this is a good option for the dynamic discovery of directory agents.<br />
Multicasting for directory agents happens only once per user and service agent upon loading and<br />
once per directory agent upon loading.<br />
When a directory agent is loaded on a machine configured for multicast discovery, it sends out an<br />
IGMP multicast request to join the directory agent multicast group. The address for this multicast<br />
group is 224.0.1.35. By joining this group, routers will be able to forward service request packets<br />
to the directory agents on the network. Joining the multicast group is a required function if service<br />
and user agents are going to discover directory agents on the network through multicast.<br />
Page 187 of 317 Novell PartnerNet Confidential 07/24/00<br />
Copyright © 2000 by Novell, Inc.
Figure D3. Packet trace showing the loading of a directory agent.<br />
Figure D3 shows the packet trace from loading a directory agent on a <strong>NetWare</strong> <strong>5.1</strong> server. The<br />
IGMP packets for the multicast group registration are shown in addition to a multicast directory<br />
agent advertisement. Packet 3 is a periodic packet sent out by the directory agent to ensure the<br />
activation of the directory agent on boxes running a service agent. This is called the “directory<br />
agent heartbeat packet”. The interval for distribution of this packet is configurable. By default, this<br />
packet is sent out once every 3 hours.<br />
When SLP user and service agents load on boxes configured to discover directory agents through<br />
multicast, they will perform a multicast request to the directory agent multicast address. The<br />
directory agents on the network will respond to the request using a unicast packet. Once the<br />
directory agent has been “activated” by the user or service agent, that directory agent is used for<br />
all SLP service requests. The user or service agent will no longer use multicast to discover<br />
services on the network. Figure D4 shows the general traffic pattern for a network configured to<br />
discover directory agents through multicast.<br />
From the user agent perspective, the directory agent that first responds to the multicast request for<br />
a given scope will be the primary DA for that scope. This means that all future SLP queries will be<br />
sent to that DA through a unicast SLP packet. In the event the primary DA for a user agent is<br />
unavailable, the user agent will then try the next DA in the list for that particular scope. Scoping<br />
itself will be discussed later in this document.<br />
Page 188 of 317 Novell PartnerNet Confidential 07/24/00<br />
Copyright © 2000 by Novell, Inc.
DA List<br />
DA1<br />
DA2<br />
DA3<br />
Unicast SLP packet<br />
addressed to original host<br />
Unicast SLP packet<br />
addressed to original host<br />
Multicast SLP packet<br />
User or Service Agent<br />
addressed to 224.0.1.35<br />
Looks for Directory<br />
Agent<br />
Unicast SLP packet<br />
addressed to original host<br />
DA1<br />
Directory Agent responds<br />
DA2<br />
Directory Agent responds<br />
DA3<br />
Directory Agent responds<br />
Figure D4. Discovering directory agents through multicast.<br />
In Figure D4, the user or service agent looks for the directory agent through multicast. In this<br />
example, all three DAs respond to the initial multicast packet with DA1’s packet getting to the<br />
requesting agent first. DA2 and DA3’s packets follow this. This makes DA1 the primary DA for<br />
the user or service agent. In the event DA1 is unavailable, the agent will attempt to contact the DA<br />
again based upon the SLP Retry Count parameter. If all of these retries fail, the agent marks the<br />
DA as “inactive”. The agent then moves to the next active DA on its known list and tries it. In this<br />
case, the agent will attempt to retrieve the list of services from DA2. Furthermore, if both DA1<br />
and DA2 are unavailable (as determined through the above process), the agent will attempt to<br />
retrieve the list of services from the next active DA on the network, DA3.<br />
Once the agent has established the DA list, all subsequent SLP service requests are directed to the<br />
DAs through a unicast SLP packet. This reduces the amount of multicast traffic on the network as<br />
compared to the default SLP communications method.<br />
Discovery Through DHCP<br />
Information about directory agents can also be disseminated through the Dynamic Host Control<br />
Protocol (DHCP). There are two DHCP option tags that can be used to dynamically deliver DA<br />
configuration information. They are DHCP options 78 and 79. Option 78 allows the DHCP client<br />
to obtain directory agent address information. Option 79 allows the DHCP client to obtain SLP<br />
scope information.<br />
Once the DA address is configured through DHCP, the agent should not use multicast to discover<br />
directory agents on the network. This is because the IP address of the directory agent is already<br />
present and has been “discovered”.<br />
Both <strong>NetWare</strong> clients and <strong>NetWare</strong> servers can use DHCP to obtain directory agent and SLP<br />
scope information. The client will obtain an IP address at the same time. The <strong>NetWare</strong> server will<br />
Page 189 of 317 Novell PartnerNet Confidential 07/24/00<br />
Copyright © 2000 by Novell, Inc.
make a DHCP request to a DHCP server to retrieve option tag information, but it will not get an IP<br />
address from a DHCP server. <strong>NetWare</strong> servers still must have statically configured IP addresses.<br />
Discovery Through Static Configuration<br />
The final method of DA discovery is through static configuration. This method and the DHCP<br />
method mentioned previously are the most scalable ways to implement SLP. With static<br />
configuration, the addresses of the DAs on the network are manually entered so agents can make<br />
use of the information. With static configuration of DAs, all multicast traffic can be removed from<br />
the network because agents will not multicast to discover directory agents on the network, and<br />
through the use of directory agents, user agents will not multicast to retrieve SLP service<br />
information. They will use directed unicast SLP packets.<br />
Static configuration of agents is accomplished rather simply in the <strong>NetWare</strong> environment. On the<br />
<strong>NetWare</strong> <strong>5.1</strong> server, there is a file called SLP.CFG contained in the SYS:ETC directory. This is<br />
the file used to hard code directory agent information. To specify a directory agent in this file, the<br />
format used is the following:<br />
DA IPV4, <br />
There can be any number of addresses contained in the SLP.CFG file. For each directory agent<br />
listed, the service agent will register with that directory agent. However, the user agent on the<br />
server will only use the first activated directory agent in the list to retrieve SLP service<br />
information. Thus, a service agent may register with numerous directory agents; however, service<br />
resolution will only be done against a single DA. Of course, the fail-over mechanisms described<br />
above exist so that if the primary directory agent is not available, the user agent will look to the<br />
next directory agent configured in the static list.<br />
Currently, it is possible to use fully qualified DNS names in the SLP.CFG file to specify directory<br />
agents; however, only the first directory agent specified in the list can be identified in such a<br />
manner. This is a limitation of the WINSOCK module on the <strong>NetWare</strong> 5.0 server, and it is<br />
expected to be fixed with Support Pack 3 and with the shipping code of <strong>NetWare</strong> <strong>5.1</strong>.<br />
For the <strong>NetWare</strong> <strong>5.1</strong> client, static information for the preferred directory agents on the network is<br />
set in the Novell client's property page through the Network control panel. The directory<br />
information and SLP scope information can be set through the Service Location tab found on this<br />
page.<br />
Setting Directory Agent Discovery Mechanisms<br />
How agents discover directory agents on the network can be set on a per machine basis. For<br />
instance, one client workstation might use multicast to discover directory agents on the network<br />
while another might be statically configured. For consistency’s sake and easier administration, it is<br />
generally a good idea to have the same discovery mechanism for all agents, but it is flexible<br />
depending upon the environment.<br />
To force a <strong>NetWare</strong> <strong>5.1</strong> server to discover directory agents through one or more of the three<br />
mechanisms, a SET parameter is used. This SET parameter is the SET SLP DA DISCOVERY<br />
OPTIONS parameter. It is executed at the server console or can also be set through MONITOR<br />
under the Service Location Protocol option. Some common values for this SET parameter are<br />
shown in Table 1.<br />
Parameter Value Description<br />
1 Discover DAs through multicast.<br />
Page 190 of 317 Novell PartnerNet Confidential 07/24/00<br />
Copyright © 2000 by Novell, Inc.
2 Discover DAs through DHCP.<br />
4 Discover DAs through static configuration.<br />
8 Disable dynamic discovery when DHCP or static files are present.<br />
Table D1. Common values for the SET SLP DA DISCOVERY OPTIONS parameter.<br />
It should be noted that the SET SLP DA DISCOVERY OPTIONS parameter setting is based upon<br />
a bit comparison test. If the least significant bit of the parameter is set to 1, the server will attempt<br />
to discover directory agents through multicast. If the second least significant bit of the parameter is<br />
set to 1, the server will attempt to discover directory agents through DHCP. The server can be set<br />
to use multiple methods of directory agent discovery by performing a bit-wise Boolean OR of the<br />
desired valued. Thus, if both multicast discovery and static discovery are desired for a<br />
<strong>NetWare</strong> <strong>5.1</strong> server, the calculation of the value would be as follows:<br />
00000001 Discovery through multicast<br />
00000100 Discovery through static configuration<br />
00000101 Discovery through multicast and static configuration<br />
Converting that number back to decimal, the SET SLP DA DISCOVERY OPTIONS parameter<br />
would be set to 5 to achieve directory agent discover through both multicast and static<br />
configuration.<br />
For the client, the configuration is a bit simpler. In the property’s page of the Novell client, there is<br />
a place to specify the address of the directory agent. There is also a check box labeled “Static”.<br />
When this box is checked, the client only discovers DA information through static configuration.<br />
When unchecked, the client will use both multicast and static configuration. Figure D5 shows the<br />
Service Location property page of the Windows NT <strong>NetWare</strong> client. In this figure, there has been<br />
one DA specified in the configured list, and the Static box has been checked. This means that if<br />
the sole DA in this list is unavailable, the client will not be able to retrieve any SLP information<br />
from the network.<br />
Note: Both IP addresses and DNS names can be used to specify directory agents in the <strong>NetWare</strong><br />
95/98 client. Using DNS names will facilitate easier administration of the SLP infrastructure from<br />
the client perspective.<br />
This is important information to consider because disabling an agent from using a specific means<br />
of directory agent discovery can adversely affect performance if directory agents are unavailable.<br />
Enabling multiple methods of discovery will provide a fault tolerance.<br />
Page 191 of 317 Novell PartnerNet Confidential 07/24/00<br />
Copyright © 2000 by Novell, Inc.
Figure D5. Setting directory agent discovery mechanisms on the Windows NT <strong>NetWare</strong> client.<br />
The Service Registration Process<br />
When directory agents are enabled and service agents are configured to use the directory agents,<br />
the service agents must register their services with the directory agent. The service agent registers<br />
all SLP enabled services on the box with the directory agent. When the directory agent receives<br />
this information, it sends back an acknowledgement to the service agent indicating the services<br />
have been registered.<br />
When the service agent registers a service, it attaches an associated time-to-live (TTL) to the<br />
service. This is the lifetime of the service. When the DA receives the service, it looks at the<br />
service’s TTL and begins a count down based upon the time since the service was registered. Once<br />
the TTL gets to zero, the service is no longer valid, and the DA will not advertise the service<br />
anymore. It is the responsibility of the service agent to re-register the service with the directory<br />
agent before the TTL of the service expires. If the service agent fails to do so, an interruption in<br />
service can occur because the service will no longer be advertised.<br />
There are different types of services registered by Novell service agents based upon the different<br />
types of services required in the Novell environment. Some of the more common services seen in<br />
Novell’s implementation of SLP are summarized in Table 2.<br />
Service Type Description<br />
Page 192 of 317 Novell PartnerNet Confidential 07/24/00<br />
Copyright © 2000 by Novell, Inc.
NDAP.novell Contains information regarding NDS tree partitions. Required for NDS tree walking and<br />
partition resolution.<br />
Bindery.novell Contains information regarding server names. Required for short name to IP address<br />
resolution.<br />
SAPSRV.novell Contains information pertaining to SAP. Required for compatibility mode and bindery<br />
information resolution.<br />
SRS.novell Contains information pertaining to the Service Registry Services agent of NDPS.<br />
Required for NDPS SRS services.<br />
RMS.novell Contains information pertaining to the Resource Management Services agent of NDPS.<br />
Required for NDPS RMS services.<br />
MGW.novell Contains information pertaining to Migration Agents on the network. Required for<br />
compatibility mode.<br />
CMD.novell Contains information pertaining to Compatibility Mode servers. Required for<br />
compatibility mode.<br />
Table D2. Novell SLP Service types.<br />
Additionally, SLP services are referred to using Universal Resource Locator (URL) notation. This<br />
is a construct from the RFC. For example, the URL for a <strong>NetWare</strong> <strong>5.1</strong> server named FS1 would be<br />
the following:<br />
service:bindery.novell:///FS1<br />
This URL describes an SLP service of type bindery.novell with the name ATLA_NDS1_US.<br />
There are three forward slashes in the URL for an UNSCOPED service. A scoped service could be<br />
seen through a packet trace, and the URL for a scoped service would include the scope name<br />
between the second and third slashes.<br />
The default TTL for Novell service agents is 3600 seconds (or one hour). This is a configurable<br />
parameter that is set on the service agent. Issuing the following command at the server console<br />
will set the TTL for all services registered by that service agent:<br />
SET SLP SA DEFAULT LIFETIME = <br />
The value for this parameter can be between 129 seconds and 65535 seconds. Care should be<br />
taken in how this value is set. Too small of a TTL can lead to increased network traffic as service<br />
agents will need to contact directory agents more frequently to reregister services. Too large of a<br />
TTL can lead to the advertisement of services that are no longer available because of a server<br />
ABEND.<br />
Service agents will also register services with all directory agents of which it has knowledge.<br />
Thus, if the service agent knows of five directory agents, it will place five separate registration<br />
requests—one for each DA. While good for fault tolerance, having too many DAs for each service<br />
agent can lead to increased network traffic due to SLP overhead.<br />
Page 193 of 317 Novell PartnerNet Confidential 07/24/00<br />
Copyright © 2000 by Novell, Inc.
When a directory agent receives a registration request, it will create an entry for the service in its<br />
own database. This entry will contain the name of the service, the type of service, the attributes of<br />
the service, and the TTL. As mentioned previously, it will send back an acknowledgement to the<br />
service agent that the service has been registered. Figure D6 shows the summarized registration<br />
process.<br />
DA List<br />
DA1<br />
DA2<br />
Service Agent 1<br />
Service registration using<br />
unicast SLP packet<br />
Service registration using<br />
unicast SLP packet<br />
Directory Agent creates<br />
entry for services<br />
registered<br />
ACK<br />
Service List<br />
SA1<br />
SA2<br />
Page 194 of 317 Novell PartnerNet Confidential 07/24/00<br />
Copyright © 2000 by Novell, Inc.<br />
DA1<br />
Unicast SLP request for<br />
list of services<br />
ACK<br />
User Agent<br />
DA2<br />
Service List<br />
SA1<br />
Unicast SLP response<br />
Services Learned<br />
SA1<br />
SA2<br />
Service registration using<br />
unicast SLP packet<br />
ACK<br />
Directory Agent creates<br />
entry for services<br />
registered<br />
Figure D6. Summary of the service registration process.<br />
Service Agent 2<br />
There are some important pieces to note in Figure D6. First, without a method for directory agent<br />
to directory agent synchronization, the list of services retrieved by a user agent is directly<br />
dependent upon the directory agent used for the lookup. If the user agent in Figure D6 had looked<br />
to DA2 to find a list of SLP services, it would only know about SA1. Second, after the DA<br />
discovery process, all SLP transactions are accomplished using directed unicast SLP packets.<br />
There is no multicast in the resolution of services when a directory agent is used.<br />
Service agents are also supposed to de-register their services if they are no longer available. When<br />
a service de-registers with a DA, the DA will no longer advertise the service to user agents.<br />
<strong>NetWare</strong> servers that are brought down gracefully will send a de-registration packet to the DA to<br />
remove the service. The service agent will make unicast SLP requests to known directory agents<br />
on the network to accomplish this de-registration. Each notified DA processes this packet and sets<br />
the time to live (TTL) of the service to zero, indicating it should no longer be advertised.<br />
Understanding Novell’s Implementation of the DA<br />
While the RFC defining the Service Location Protocol is very clear with regard to the user agent<br />
and service agent, there are some areas of interpretation left open with regard to the directory<br />
agent. For instance, the RFC indicates the methods by which the directory agent can communicate<br />
with the service and user agents; however, it does not address the issue of directory agent to<br />
directory agent synchronization. It also does not address the structure of the database used by the<br />
directory agent to store SLP information. There is room for interpretation.<br />
Novell has one of the best object oriented, distributed databases on the market that already takes<br />
care of such critical issues as synchronization. The choice was made in the development of<br />
Novell’s implementation of SLP to use Novell Directory Services (NDS) as the backend for an<br />
DA List<br />
DA1
SLP object data store and a method of DA to DA synchronization. It fits right into the strategy<br />
surrounding NDS and definitely plays to its features and benefits. So the question remains, “How<br />
did Novell implement their version of the directory agent?”<br />
The communication between user, service, and directory agents works as previously described in<br />
this document. However, when a DA gets a service registration from a service agent, it goes<br />
through a process to create an object in its local SLP cache as well as creating or modifying an<br />
object in NDS to update the service. When a directory agent is loaded, there is stored<br />
configuration information in NDS for that DA. This configuration information includes on which<br />
<strong>NetWare</strong> file server the DA is running and what scope the DA is servicing. Scopes will be<br />
discussed later in this document in the section titled “Scoping”.<br />
For each scope defined on the network, an SLP Scope Unit object is defined within NDS. Also in<br />
NDS, each DA object is configured to service a particular set of scopes. When the Novell DA<br />
receives an SLP service registration, it checks its local SLP cache. From there one of two things<br />
can happen:<br />
• If the service does not exist in the local SLP cache, an entry is created for the service with<br />
the attributes defined in the registration packet. The directory agent then creates an NDS<br />
SLP service object in each scope for which it is responsible.<br />
• If the service already exists in the local SLP cache, the entry is modified in the local SLP<br />
cache. The directory agent then also modifies the NDS SLP service object in all scopes<br />
the DA serves.<br />
When a DA modifies the NDS SLP service object, it triggers an NDS synchronization event. The<br />
synchronization trigger forces all replicas of the partition containing the NDS SLP service objects<br />
to exchange information to make the partition consistent. The other DAs on the network see the<br />
NDS synchronization event and reread the SLP service information from NDS to update their<br />
local SLP caches. Figure D7 illustrates the registration of an SLP service and the propagation of<br />
that information through NDS to other DAs on the network.<br />
DA receives service<br />
registration from a<br />
service agent<br />
DA sends ACK to SA<br />
Page 195 of 317 Novell PartnerNet Confidential 07/24/00<br />
Copyright © 2000 by Novell, Inc.<br />
DA2<br />
DA1 DA3<br />
1. DA creates (modifies)<br />
object in local SLP cache<br />
Services Learned<br />
SA1<br />
4. DA sees sync event<br />
and reads NDS for new<br />
SLP service object info<br />
3. NDS partition sync<br />
event is triggered<br />
2. DA creates (modifies)<br />
SLP service object in NDS<br />
5. DA creates (modifies)<br />
object in local SLP cache<br />
Services Learned<br />
SA1<br />
Figure D7. DA to DA synchronization.<br />
4. DA sees sync event<br />
and reads NDS for new<br />
SLP service object info<br />
5. DA creates (modifies)<br />
object in local SLP cache<br />
Services Learned<br />
SA1
The NDS SLP service objects contained in each scope reflect the SLP information for the entire<br />
network. This is because service agents belonging to the same scope do not necessarily have to<br />
register with all DAs servicing their scope. As seen in Figure D7, the SA only needs to register<br />
with the one DA. Assuming that all the DAs are in the same scope and all DAs hold a replica of<br />
the partition containing the NDS SLP service objects, the other DAs on the network will learn of<br />
the service without the service agent having to directly register via SLP.<br />
This is a method to isolate SLP registration traffic. Service agents need only register with the local<br />
DA. NDS synchronization will take care of propagating that registration to the other DAs<br />
servicing the SLP scope. The result is that any user agent on the network can retrieve the same list<br />
of SLP services regardless of which DA it queries.<br />
Using this scheme, NDS becomes the central repository of SLP service information for the<br />
network. The SLP information can be seen directly in NDS through such administration tools as<br />
<strong>NetWare</strong> Administrator. Figure D8 shows how the scope object looks in NDS along with the SLP<br />
service objects. For the NDS tree shown in Figure D8, there is one scope (UNSCOPED) and one<br />
<strong>NetWare</strong> <strong>5.1</strong> server in the tree holding a replica of the single partition.<br />
Figure D8. Viewing SLP service objects in <strong>NetWare</strong> Administrator.<br />
The information seen in <strong>NetWare</strong> Administrator at this level only displays the URL of the SLP<br />
service object. In Figure D8 there are only two SLP service objects. One is of type bindery.novell.<br />
The other is of type NDAP.novell. Notice that in <strong>NetWare</strong> Administrator the types have been<br />
changed from periods to underscores. This is to prevent confusion with fully qualified NDS<br />
names; however, when user agents request SLP information of a particular type, the query is<br />
addressed to the dotted name, such as bindery.novell.<br />
Page 196 of 317 Novell PartnerNet Confidential 07/24/00<br />
Copyright © 2000 by Novell, Inc.
It is possible to drill down deeper into the service object to see the attribute information. By<br />
double clicking on the SLP service object in <strong>NetWare</strong> Administrator, more information is<br />
displayed. It is shown in Figure D9.<br />
Figure D9. Viewing SLP service object attribute information in <strong>NetWare</strong> Administrator.<br />
Figure D9 displays a plethora of information about the SLP service object. The type of the object<br />
is displayed (NDAP.novell) along with the TTL for the object (3600 seconds). The official URL<br />
of the object is also shown along with the attribute information. The attribute information is going<br />
to be different for each type of object because certain services require attribute information that<br />
others do not; however, some of the information is common between types.<br />
Some useful information to know about the NDAP.novell service type has to deal with addressing<br />
and type information. Every NDAP.novell object contains information about an NDS partition<br />
including the addresses of all servers holding replicas of the partition. This can be seen in Figure<br />
D9. Under the svcaddr-ws attribute of the DEMO partition, three addresses are displayed. The first<br />
address (2-1-6) defines the address as a TCP address followed by the IP address in hexadecimal<br />
form (04030177). The second address (6-2-1000) defines the address as an IPX address followed<br />
by the internal IPX number of the server (08922DF1), and the third address (2-2-17) defines the<br />
address as a UDP address along with the IP address of the server in hexadecimal form (04030177).<br />
This addressing scheme defined here for the NDAP.novell object is the same for the<br />
bindery.novell object. This is how short name resolution is accomplished. When the user agent<br />
requests a type of service from the directory agent to find a server (using the bindery.novell type<br />
request), the user agent gets back a list of addresses associated with the server. It then decodes the<br />
information as above to determine how it can reach the desired destination.<br />
When a service agent de-registers with a Novell directory agent, the DA does not remove the<br />
service from NDS or its local SLP cache. It simply marks the TTL of the object to zero. This<br />
prevents the DA from advertising the service to user agents, but when the service reregisters itself<br />
in the future, the overhead of object creation in cache and NDS is not incurred. The TTL of the<br />
object is just renewed. This method of SLP object management creates efficiency in registration<br />
and de-registration of SLP services.<br />
Because the DA makes a lot of modifications to NDS, the partition containing SLP service objects<br />
becomes a very active partition. SLP object registration leads to increased NDS traffic, which will<br />
have an impact upon the network. However, this traffic is not severe compared to the RIP/SAP<br />
broadcast traffic required in the IPX realm. It is recommended that the SLP scope containers be<br />
made their own partitions. Those partitions should also only reside upon directory agents. There is<br />
no worry if information in that partition gets lost because it is easily recreated by setting up a DA<br />
and letting service agents register again.<br />
Scoping<br />
Throughout the document, the term “scope” has been used repeatedly, but it has not been well<br />
explained. Scoping is a method of organizing SLP information on a network so that only certain<br />
subsets of SLP data are available to user agents on the network. It is also a method to provide<br />
scalability in the SLP environment because scopes that are too large become inefficient.<br />
Page 197 of 317 Novell PartnerNet Confidential 07/24/00<br />
Copyright © 2000 by Novell, Inc.
User agents, service agents, and directory agents can all belong to a set of scopes. A user agent on<br />
a <strong>NetWare</strong> client belonging to a single scope will only request services from scopes that it knows<br />
of and no others. Likewise, if a DA is set to service a scope and the <strong>NetWare</strong> client user agent is<br />
configured to get services from a different scope, the user agent will not be able to retrieve lists of<br />
services from the DA. The user agent, service agent, and directory agent (if used) must belong to<br />
the same scope for service resolution through SLP to be successful.<br />
Figure D10 shows an example where the service agent and directory agent belong to the same<br />
scope but the <strong>NetWare</strong> client user agent does not. In this example, the service agent will be able to<br />
successfully register its service with the DA because they do belong to the same scope. However,<br />
the user agent is configured with the address of DA, and it needs to find the service registered by<br />
the service agent. It will not be able to find the service because the DA will ignore the SLP query<br />
from the user agent since it is a query for a different scope.<br />
Service Agent belonging<br />
to Scope 1<br />
Services Learned<br />
Services Learned<br />
SA1<br />
Service Registration<br />
Service Request<br />
Acknowledgement<br />
DA1 servicing<br />
Scope 1<br />
Figure D10. Example of scoping.<br />
User Agent belonging<br />
to Scope 2 and configured<br />
with address of DA1<br />
The user agent on the <strong>NetWare</strong> <strong>5.1</strong> server functions a bit differently than the user agent on the<br />
<strong>NetWare</strong> client. On the <strong>NetWare</strong> <strong>5.1</strong> server, the SET SLP SCOPE LIST parameter determines<br />
which scopes the service agent registers its services. This parameter does not affect the server’s<br />
user agent. The server’s user agent will query and retrieve lists of services from all SLP scopes<br />
about which it is aware. Thus, if the SET SLP SCOPE LIST parameter is set to SCOPE1 and the<br />
<strong>NetWare</strong> server knows of DA’s servicing both SCOPE1 and SCOPE2, the service agent will<br />
register the services with only SCOPE1. However, the server will know about SLP services<br />
registered with SCOPE1 and SCOPE2.<br />
Fortunately, user, service, and directory agents can belong to an unlimited number of scopes.<br />
When a service agent belongs to multiple scopes, it will register with DAs in each one of those<br />
scopes. When a user agent belongs to multiple scopes, it will keep an active primary DA for each<br />
scope. When it sends out SLP service request packets, it will send out a request for each scope to<br />
which it belongs. That way, it is ensured to get back a list of all services matching its request from<br />
all scopes to which it belongs.<br />
It should be noted that scoping is not hierarchical. DAs in one scope cannot query DAs in another<br />
scope on behalf of a client request. The user agent can only retrieve SLP service information from<br />
scopes to which it belongs. This is an important note to keep in mind because it is a method by<br />
which service filtering can be implemented. If it is desirable to have a set of clients unable to see a<br />
set of services, the user agents for the clients and the service agents for the services should belong<br />
to different scopes. This will prevent the user agents from resolving those services through SLP.<br />
In version 1 of the SLP RFC, the default scope for all services is a scope called “UNSCOPED”.<br />
All service agents that discover directory agents serving the UNSCOPED scope must register with<br />
that scope even if they are already scoped. Thus, if a service agent configured to use Scope1 finds<br />
a directory agent servicing the UNSCOPED scope, it must register with the DA servicing Scope1<br />
and the DA servicing the UNSCOPED scope. This will create two SLP service objects in<br />
NDS—one object in each scope.<br />
The default of the UNSCOPED scope is going to change with SLP version 2, and it is not<br />
recommended that the UNSCOPED scope be used. In SLP version 2, all user and service agents<br />
Page 198 of 317 Novell PartnerNet Confidential 07/24/00<br />
Copyright © 2000 by Novell, Inc.
must be configured to have a scope. With SLP version 1, an empty string represents the<br />
UNSCOPED scope. When the SLP infrastructure is eventually upgraded to version 2, all servers<br />
and workstations with empty scope lists will not function properly. Thus, starting with a defined<br />
scope even if the network is only going to use a single scope is a good idea for a number of<br />
reasons:<br />
• It will prevent a lot of administrative work for when SLP v2 is implemented. The<br />
UNSCOPED scope will have to be modified to a defined scope wherever it exists.<br />
• It prevents renegade SLP services from registering with production directory agents.<br />
Thus, if someone brings up a test <strong>NetWare</strong> 5 box on the network, the service will not be<br />
seen by anyone through SLP unless steps are taken to configure the test box with a scope.<br />
From a Novell implementation standpoint, an SLP scope unit object must be created in NDS for<br />
each scope that will be implemented. The DA server objects also need to be configured in NDS to<br />
service a particular scope or scopes. Once the configuration is done in NDS, then the service and<br />
user agents must be configured to look to a specific scope or scopes. This is accomplished on a<br />
<strong>NetWare</strong> <strong>5.1</strong> server using the SET SLP SCOPE LIST parameter. This command can be issued at<br />
the console or through MONITOR.<br />
The SLP SCOPE LIST is a comma-delimited list specifying the list of scopes for the service<br />
agent. On a <strong>NetWare</strong> client the scope list is specified through the <strong>NetWare</strong> client property pages.<br />
Figure D5 displays the page where scopes are configured on the Windows NT client. Both user<br />
and service agents can belong to an unlimited number of scopes, but it is rare that a large number<br />
of scopes will be needed in any given environment unless CMD technology is being used.<br />
It is also possible to redirect specific service types to specific scopes. This is done in the SLP.CFG<br />
file and requires <strong>NetWare</strong> 5.0 Support Pack 3 or <strong>NetWare</strong> <strong>5.1</strong>. Service redirection is handled as<br />
follows:<br />
Register Service Type “ndap.novell” To Scope “Global,XRegion”<br />
Register Service Type “mgw.novell” To Scope “Global,XRegion”<br />
Note: “xREGION” is the region in which the server exists. As shown, a service can be sent to<br />
multiple scopes by using a comma-delimited list.<br />
To maintain the server’s scope list registrations when redirecting services, those same scopes must<br />
also be included in the SLP.CFG redirection. The redirection in SLP.CFG takes precedence over<br />
any parameters specified in the SET SLP SCOPE LIST parameter.<br />
The general rule is this, Unfiltered services will go into all of the scopes in the servers SLP scope<br />
list. Filtered services will only go into the scopes they were told to go into, regardless of the scope<br />
list.<br />
Note: Any change to the scope redirection in the SLP.CFG file requires a server restart before<br />
changes take affect. For this reason you probably want to have your SLP design solidified before<br />
you begin the upgrade process.<br />
SLP Troubleshooting Tools<br />
It is useful to have a set of tools that can aid in the troubleshooting of SLP problems that may arise<br />
on the network. With <strong>NetWare</strong>, there are two basic types of boxes—<strong>NetWare</strong> clients and <strong>NetWare</strong><br />
servers. The troubleshooting tools between the boxes are different. Because <strong>NetWare</strong> file servers<br />
generally house user, service, and directory agents, there are more aggressive tools to help<br />
troubleshoot SLP problems. There is a tool for the <strong>NetWare</strong> client to display SLP information, but<br />
it is not as detailed as the tools that can be used on the <strong>NetWare</strong> servers.<br />
Page 199 of 317 Novell PartnerNet Confidential 07/24/00<br />
Copyright © 2000 by Novell, Inc.
<strong>NetWare</strong> Client SLP Tools<br />
The main tool that can be used to help solve SLP problems on the <strong>NetWare</strong> client is<br />
SLPINFO.EXE. This tool, run from a command prompt, will display SLP configuration<br />
information about the client. This tool is included in both the Windows 95/98 client and the<br />
Windows NT client. The Windows 95/98 client displays all SLP configuration information when<br />
SLPINFO.EXE is executed. The Windows NT client has a set of parameters that can be used to<br />
display specific information. This information is summarized in Table 3.<br />
Switch Description<br />
/D Displays information about known directory agents<br />
/C, /O Displays configured parameter settings<br />
/T Displays configured timer values<br />
/S Displays known SLP scopes<br />
/I Displays local interface information<br />
/A, /ALL Displays all options listed above<br />
/H, /HELP Displays the help screen<br />
Table D3. Command line options for Windows NT SLPINFO.EXE<br />
<strong>NetWare</strong> Server SLP Tools<br />
Because <strong>NetWare</strong> servers do most of the SLP work, there are more tools to help troubleshoot SLP<br />
problems. Most of these tools are run at the server console, but some information can be captured<br />
to text files for later review and examination. These tools won’t necessarily identify an SLP<br />
problem outright, but they will provide the information necessary to trace the cause of the problem<br />
so it can be corrected.<br />
DISPLAY SLP DA<br />
The first tool is a console command called DISPLAY SLP DA, and it does exactly that. It displays<br />
the directory agents known to the server. When this command is issued at the console, it displays<br />
information in a specific format:<br />
:::<br />
This is very useful information because the server may have marked a directory agent as being<br />
inactive, which could be the reason the server is unable to resolve any services. Also, the directory<br />
agent discovery method is shown. If multicast is not intended to be a method of discovery and it<br />
appears on this screen, steps need to be taken to determine why the server is multicasting for<br />
directory agent discovery.<br />
Page 200 of 317 Novell PartnerNet Confidential 07/24/00<br />
Copyright © 2000 by Novell, Inc.
DISPLAY SLP SERVICES<br />
Another useful tool for troubleshooting SLP problems is the DISPLAY SLP SERVICES utility.<br />
This is another console command that is executed at the server prompt. When issued, it shows the<br />
list of SLP services known by that server. If the server is configured to use multicast to discover<br />
SLP services, this command will send out an SLP service request to find all services on the<br />
network. If the server is configured to use a DA, an SLP service request will be sent to the DA for<br />
a list of SLP services. It is a useful utility because it can help determine exactly what type of<br />
information the DA on the network is returning. This is also a good way to get a glimpse of the<br />
DA’s local SLP object cache, if the command is issued from the console of the DA and it is<br />
configured to look to itself.<br />
If the server is configured to use a DA and this command is issued, the information displayed<br />
comes from the first active DA for each scope. The DAs queried by this command can be<br />
determined by viewing the information returned by the DISPLAY SLP DA command. The first<br />
active DAs for each scope are the DAs returning information in the DISPLAY SLP SERVICES<br />
command.<br />
There are some command line parameters available with the DISPLAY SLP SERVICES utility<br />
that allows for a filtered view of the SLP services on the network. The command line syntax for<br />
the utility is as follows:<br />
DISPLAY SLP SERVICES [//]<br />
For instance, to display only NDS partitions on the network, the command DISPLAY SLP<br />
SERVICES NDAP.novell would be issued from the server prompt. The same thing can be done<br />
for service types in a particular scope or service types that fit a specific predicate query.<br />
DISPLAY SLP ATTRIBUTES<br />
The DISPLAY SLP ATTRIBUTES command is another console-based command executed at the<br />
server prompt. This command requires an SLP URL as an argument and returns all of the attribute<br />
information associated with that URL. It is the same type of information that can be seen by<br />
opening up an SLP service object in <strong>NetWare</strong> Administrator. But if <strong>NetWare</strong> Administrator is not<br />
readily available, this command provides an easy way of retrieving attribute information.<br />
For example, if the attributes of the [Root] partition of the Novell tree were needed, the following<br />
console command could be executed from a <strong>NetWare</strong> 5 server on the network:<br />
DISPLAY SLP ATTRIBUTES service:ndap.novell:///NOVELL.<br />
In this example, the final period is required because it is part of the service URL. It denotes a fully<br />
qualified partition name in the NDS tree.<br />
SET SLP DEBUG<br />
The SLP debug utility is a SET parameter that can be executed from the server console or set in<br />
MONITOR. This utility will bring up another screen on the server that will show SLP information<br />
based upon the value to which the SET parameter is set. As SLP traffic that fits the parameter<br />
setting is generated or received, it is logged to the screen on the server. In this manner, the SLP<br />
communications between boxes can be monitored. This utility is most effective if run on a<br />
directory agent because service registrations and de-registrations can be seen along with NDS<br />
updates and user agent service requests.<br />
Some useful values for the SET parameter are summarized in Table 4. The value determines what<br />
type of SLP traffic is logged to the screen. It is important to have the correct type of information<br />
displayed when attempting to solve a problem. For example, if there is a problem with services<br />
Page 201 of 317 Novell PartnerNet Confidential 07/24/00<br />
Copyright © 2000 by Novell, Inc.
eing registered in NDS, but the value is not set to display API information, no useful information<br />
will be logged to the screen.<br />
Parameter Value Description<br />
1 Display basic SLP communication information<br />
2 Display SLP transport information<br />
4 Display SLP API calls (including DA calls to NDS)<br />
16 Display SLP errors<br />
32 Display service agent/directory agent traffic<br />
64 Display user agent/directory agent traffic<br />
Table D4. Useful SET SLP DEBUG parameter values.<br />
Like the SET SLP DA DISCOVERY OPTIONS parameter, the SET SLP DEBUG parameter is<br />
based upon a bit comparison test. Performing a bit-wise Boolean OR of the desired settings can<br />
allow for multiple logging options. Thus, to provide a debug output of all of options summarized<br />
in Table 4, the value would be set to the following:<br />
00000001 Communications<br />
00000010 Transport<br />
00000100 API<br />
00010000 Errors<br />
00100000 SA<br />
01000000 UA_DA<br />
01110111 Log all above services<br />
When that binary number is converted back to decimal, the value for the SET SLP DEBUG<br />
parameter is 119.<br />
It is more useful to have the information logged to a file rather than scrolling continuously on a<br />
server screen. This can be done for the SET SLP DEBUG command. At the server console<br />
prompt, type the following:<br />
SLP OPEN <br />
This command will open a file at the root of the SYS: volume to which the SLP debug information<br />
will be logged. When enough information has been captured, issue the following command at the<br />
console prompt:<br />
SLP CLOSE<br />
Page 202 of 317 Novell PartnerNet Confidential 07/24/00<br />
Copyright © 2000 by Novell, Inc.
Once this command has been executed, the file will be closed, and it can be opened with any text<br />
editor for further examination. This is incredibly useful for debugging SLP problems because the<br />
actual communications between agents can be seen using the debug command.<br />
Page 203 of 317 Novell PartnerNet Confidential 07/24/00<br />
Copyright © 2000 by Novell, Inc.
Novell’s SLP Design Recommendations<br />
Note: Please see the previous section “A Detailed Overview of SLP” if you are not familiar with<br />
SLP.<br />
This SLP Design section will discuss and provide design guidelines for implementing an SLP<br />
infrastructure. The intention here is to provide a discussion of design issues and criteria and to<br />
provide simple and complex design examples with the understanding that hybridization or other<br />
moderation of these designs is expected -- based upon the design criteria for each unique<br />
environment.<br />
In order to complete an SLP design the following information will be needed:<br />
• The WAN/Major Site Bubble Diagrams collected in the PFC, including link speeds<br />
• The Technical Assessment/Impact Study<br />
• NDS Diagrams and Partition/Replica matrix<br />
• Information on the number and location of intended CMD servers<br />
• If there are already <strong>NetWare</strong> 5.0 servers on the network, gather the documentation for<br />
how SLP is currently set up.<br />
In any customer site that is using TCP/IP for <strong>NetWare</strong> 5.x servers, an SLP infrastructure will be<br />
required. It is critical to design an effective SLP infrastructure that will minimize the amount<br />
traffic required for service resolution.<br />
The SLP design strategy will be affected by the protocol migration strategy chosen to move an<br />
organization from IPX to IP.<br />
In general, the SLP infrastructure is going to be used by two sets of machines. Those sets are<br />
<strong>NetWare</strong> 5.x servers and <strong>NetWare</strong> clients on the network. <strong>NetWare</strong> 5.x servers will need to make<br />
use of the SLP infrastructure. <strong>NetWare</strong> clients can accomplish service resolution through a number<br />
of mechanisms, which include DNS queries and NDS tree walking. To determine how much the<br />
clients are going to depend on the SLP infrastructure, ask the following questions:<br />
1. Does the customer want browsing or dynamic discovery of network resources (for example,<br />
using Entire Network through Network Neighborhood to see services on the network)?<br />
This functionality is what many <strong>NetWare</strong> (IPX) users are accustomed to and is<br />
accomplished with SAP. SLP gives IP-based clients the same functionality.<br />
If this type of browsing is not required, go to question 2.<br />
If browsing is required:<br />
• Should users be able to browse for all network resources available on the<br />
network? Yes / No<br />
• If browsing is required but users do not need to browse for all network<br />
resources, then document the segments users are on and the segments<br />
where the resources are located<br />
Page 204 of 317 Novell PartnerNet Confidential 07/24/00<br />
Copyright © 2000 by Novell, Inc.
2. Does the customer need short name resolution (SNR) for things like using a <strong>NetWare</strong><br />
server’s name in a login script (e.g., MAP G:=FS1\SYS:DATA)?<br />
Yes / No<br />
Note: This login script format is not possible in a pure IP environment without SLP or DNS<br />
to provide the SNR. Alternatively, the fully qualified NDS name of the object can be<br />
specified. This will cause the login script to use treewalking instead of a general service<br />
resolution.<br />
If SNR is not required (and dynamic discovery is also not required), users must be provided<br />
with NDS names, DNS names, or IP addresses to get to their needed resources.<br />
Additionally, you must ensure that all login scripts do not use SNR and that applications do<br />
not make API calls to SNR (as NWADMN32 does).<br />
The following are additional considerations in the event that client workstations are not<br />
going to be using an SLP infrastructure for service resolution:<br />
• In any size environment, leaving multicast on the local segments is OK as<br />
long as the number of <strong>NetWare</strong> servers is 20-30. In the event the primary<br />
service resolution mechanism is unavailable, the clients will be able to use<br />
multicast to access local services.<br />
Four ways to approach implementing SLP<br />
Options 1 through 3 are derived from RFC 2165. Option 4 is a hybrid solution from Novell IS&T<br />
for very large customers with extensive WAN links and, as you will see, uses components of<br />
options 1 through 3.<br />
There can, of course, be variations within all four options. The options as explained here are to get<br />
you started.<br />
Registered scope will be used here to refer to a scope created within NWAdmn32.<br />
Option 1<br />
Option 1<br />
Option 2<br />
Option 3<br />
Option 4<br />
"Hybrid" of 1-3<br />
Low Scaleability High Scaleability<br />
Figure D12. Scalability vs. Ease of Implementing SLP.<br />
This option is intended for small LAN environments (20-30 <strong>NetWare</strong> <strong>5.1</strong> servers) that are routing<br />
multicast. It uses only SAs and UAs (no DAs; therefore no scoping). There is zero configuration<br />
Page 205 of 317 Novell PartnerNet Confidential 07/24/00<br />
Copyright © 2000 by Novell, Inc.
and zero administration since all <strong>NetWare</strong> <strong>5.1</strong> servers are SAs (automatically) and all clients are<br />
UAs (automatically). Additionally, since multicast is being routed, all UAs will ask all SAs on the<br />
LAN for their services; therefore, UAs (clients) will dynamically discover all IP services on the<br />
LAN without any configuration.<br />
Router<br />
Supports Multicast<br />
SA SA SA<br />
SA SA SA<br />
Figure D13. Option 1: Implementing SLP in a small LAN environment.<br />
Note: The 20-30 UA-to-SA ratio is a general Novell guideline and depends upon available<br />
bandwidth.<br />
Option 1 is zero-maintenance, but will not scale well, so it will only suffice in small LAN<br />
environments.<br />
Option 2<br />
This option is intended for larger LAN or smaller WAN environments that are not routing<br />
multicast. With this option, DAs will be created for the following two situations:<br />
• Segments where there are 20-30 SAs that a UA could contact (referred to here as the<br />
UA’s multicast radius). On these segments, DAs are being used to “scale” SAs.<br />
• Two segments connected by a router where multicast is not routed and the two segments<br />
require services on the other side of the router. Example:<br />
Page 206 of 317 Novell PartnerNet Confidential 07/24/00<br />
Copyright © 2000 by Novell, Inc.<br />
UA
SA SA SA UA UA SA SA<br />
SA UA UA<br />
DA<br />
O=Novell<br />
Unscoped scope<br />
DA<br />
O=Novell<br />
Unscoped scope<br />
Page 207 of 317 Novell PartnerNet Confidential 07/24/00<br />
Copyright © 2000 by Novell, Inc.<br />
Router<br />
No Multicast<br />
Figure D14. Option 2: Implementing SLP in a large LAN or small WAN environment.<br />
Since the DAs on each side of the router point to the same unscoped scope object in NDS, UAs on<br />
both sides of the router will see all services.<br />
This example does not use registered scopes; rather, DAs will be left associated with the unscoped<br />
scope (to reduce configuration). Since all DAs register their services in the unscoped scope, all<br />
DAs will contain all services on the network; therefore, all clients will dynamically discover all<br />
services on the network (as in option 1). Notice that for this to work, the DAs on both sides of the<br />
router must be “pointing” to the same unscoped scope. Because multicast is not configured on the<br />
WAN link the each DA should have the other DA listed in its SLP.CFG configuration file or the<br />
DA objects must be in the same context so that NDS based discovery of the DAs can take place.<br />
The SLP.CFG file is found in the SYS:\ETC directory and the format for listing DAs in this file is<br />
as follows:<br />
DA IPV4, <br />
Option 2 is more scaleable than option 1. Option 2, however, needs more configuration than<br />
option 1.<br />
Option 3<br />
This option is intended for large WAN environments where multicast is not routed. This option<br />
uses DAs and registered scopes everywhere (i.e. it is a fully scoped configuration regardless of<br />
whether there are 20-30 SAs on a segment). This is because all of the registered scopes associated<br />
with each DA will be replicated to all other sites where there are DAs. As a general rule, either an<br />
unscoped scope is used or registered scopes are used. Novell does not recommend mixing these<br />
types of scopes, and in general, if multiple scopes were desirable an unscoped scope would be<br />
inappropriate anyway. With the advent of SLP version 2, the unscoped scope will be replaced with<br />
a default scope. For this reason, Novell Support does not recommend the use of the unscoped<br />
scope, but recommends that customers configure a global registered scope instead. Option 3,<br />
assumes that the company wants to provide global browsing for all services on the network (much<br />
like clients are used to in the IPX world with SAP). However, instead of using a single global<br />
scope, this customer was large enough, and the WAN links were fast enough to support this<br />
configuration.
Dallas<br />
DA<br />
DAL-SLPDA --> DAL-SCOPE<br />
replica: <br />
<br />
Router<br />
Backbone<br />
No multicast<br />
Router<br />
Router<br />
DA<br />
Toronto<br />
TOR-SLPDA --> TOR-SCOPE<br />
replica: <br />
<br />
Figure D15. Option 3: Implementing SLP in a large WAN environment.<br />
Page 208 of 317 Novell PartnerNet Confidential 07/24/00<br />
Copyright © 2000 by Novell, Inc.<br />
DA<br />
Seattle<br />
SEA-SLPDA --> SEA-SCOPE<br />
replica: <br />
<br />
Note: All DAs register themselves with the unscoped scope, too. In this example, an unscoped<br />
scope is not configured. Additionally,<br />
• Scopes must be defined with unique names across the network. Novell recommends<br />
standard naming conventions for DAs and scopes. An example is shown in the figure<br />
above.<br />
• DAs must be configured to support these scopes (through NWAdmn32).<br />
• A DA can service multiple scopes, as shown above.<br />
• SAs must be fully scoped using the SET SLP SCOPE LIST parameter.<br />
• Option 3 scales well to large WAN environments (unlike Options 1 and 2). However,<br />
Option 3 requires creating a fully-scoped SLP environment (which in turn requires more<br />
maintenance than options 1 and 2).<br />
Option 4<br />
This is our general recommendation. As you will see, it is a hybrid of the above three options. You<br />
use SAs for “local” discovery and use DNS for “global” discovery.
Router<br />
SLPDA - SRegion,Global<br />
DNS - syd.abc.com<br />
dal-fs1<br />
dal-fs2<br />
No multicast No multicast<br />
Backbone<br />
Multicast<br />
Sydney<br />
Dallas<br />
Multicast<br />
Router<br />
SLPDA - DRegion,Global<br />
DNS - dal.abc.com<br />
syd-fs1<br />
syd-fs2<br />
Figure D16. Option 4: Novell’s general recommendation for implementing SLP—a hybrid of Options<br />
1-3.<br />
Register “essential” services in DNS so they can be accessed from anywhere in the company. For<br />
example, suppose that users in Sydney consistently access a server in Dallas. You would register<br />
this Dallas server in Sydney’s DNS. Without DNS, users would have to use the IP Address or<br />
NDS tree walking to get to these “essential” services.<br />
Another variation on this approach is to use the regional SLP design in option 3 and redirect<br />
services that should be globally available to a Global scope. As seen in the diagram above, the<br />
local DAs serve the regional scope “xRegion” and the “Global” scope. There is no unscoped<br />
scope.<br />
Scope filtering, or redirection requires NW5SP3 or later. Redirection and global scoping is<br />
accomplished as follows:<br />
• All servers in DRegion have the following lines in their SLP.CFG file:<br />
• Register Service Type “ndap.novell” To Scope “DRegion,Global”<br />
• Register Service Type “mgw.novell” To Scope “DRegion,Global”<br />
• Static entries for “essential” services that need to be globally visible may also be added to<br />
the global scope.<br />
• The Local DA is also listed as “DA IPV4, “ on all SAs in the<br />
DRegion.<br />
• The DRegion DA has the remote DA/s listed in its SLP.CFG file.<br />
• These settings are modified for each region to reflect the local region.<br />
All of the DAs serve their local regional scope and the global scope. All servers have their “SLP<br />
SA Default Lifetime” set to something greater than 3600 seconds (1hour), the maximum being<br />
65535 seconds (18+hours), to reduce the frequency of service updates. All servers have their<br />
“SLP Scope List” set to “xRegion”, where x is the local region designator (in this case S or D).<br />
The “SLP Scope List” parameter tells the SAs where to register all of their services. You will<br />
note that the redirected services are told to register with both the local regional scope and the<br />
global scope. This is because redirected services register only with the scopes they are told to<br />
register with regardless of the scope list.<br />
Page 209 of 317 Novell PartnerNet Confidential 07/24/00<br />
Copyright © 2000 by Novell, Inc.
By combining this kind of configuration with the DNS configuration previously discussed, it is<br />
possible to provide users on this network with the highest level of scalability, reliability and fault<br />
tolerance possible. Providing Short Name Resolution (SNR) through both SLP and DNS, Global<br />
essential services through both SLP and DNS, and all other services through NDS and FQDN<br />
DNS names or IP addresses.<br />
Note: These types of configurations are obviously more administratively intense and should<br />
therefore be planned well in advance to allow implementation before and during the upgrade<br />
process. It should also be obvious that very large installations, customers with wide spread CMD<br />
implementations, and customers who don’t want global service visibility are the only customers<br />
who would need these kinds of configurations.<br />
Page 210 of 317 Novell PartnerNet Confidential 07/24/00<br />
Copyright © 2000 by Novell, Inc.
Consideration and Impact of CMD on Scoping<br />
The Compatibility Mode Driver (CMD) was written to provide a mechanism for “hiding” IPX<br />
from the wire, while providing backward compatibility with applications and physical devices that<br />
have dependencies on the IPX protocol. CMD is intended to be a temporary, intermediary between<br />
the IPX and IP worlds. CMD provides three different services. These are:<br />
• Software compatibility for applications with IPX dependencies.<br />
• Protocol Gateway for physical translation between IP and IPX devices. (Migration Agent<br />
Mode (MA) )<br />
• Backbone support for automatic, self configuring, tunneling of IPX traffic between<br />
Protocol Gateways. This functionality is provided automatically between MAs on the<br />
same CMD network.<br />
Because CMD’s function is to provide backward compatibility for IPX dependent applications and<br />
devices, it pumps the IPX SAPs advertised by the servers with the SCMD.NLM loaded on them<br />
into the SLP scope(s) the servers are configured to register with. This has a very significant impact<br />
on scoping and your SLP infrastructure design. Basically, the SAP information is quite large and<br />
because of the 64 KB response packet limitation in the SLP v1 RFC (discussed above in the<br />
section “A Detailed Overview of SLP”), widespread use of CMD can result in the need to create<br />
many more scopes than would otherwise be necessary.<br />
Widespread use of CMD (not Novell’s recommended approach) will require far more scopes to be<br />
configured than would otherwise be necessary. Once a certain threshold has been crossed,<br />
regarding the number of scopes in global use and amount of NDS replication traffic, a non-global,<br />
more regional approach, to SLP design is in order.<br />
Page 211 of 317 Novell PartnerNet Confidential 07/24/00<br />
Copyright © 2000 by Novell, Inc.
NDS Design Considerations for SLP<br />
Because SLP DAs store their services information in NDS, SLP’s impact on the NDS architecture<br />
must be taken into consideration when designing an SLP infrastructure. Most traditional NDS<br />
design rules apply to this architecture such as:<br />
• The need to minimize the number of replicas of a partition while still providing fault<br />
tolerance.<br />
• The need to minimize the amount of synchronization traffic crossing WAN links.<br />
• The need to manage the number of NDS objects per partition.<br />
• The need to place services close to the primary consumer.<br />
• The need to decentralize services and push them out to the Major Sites/Regions for fault<br />
tolerance<br />
The customer’s WAN Hub and Major Site network diagrams are used to determine the Hub points<br />
where SLP Directory Agents will be most effective and to minimize the number of Directory<br />
Agents required.<br />
The diagram below describes the recommended NDS architecture for SLP services. The SLP-<br />
Management container off of the root of the tree contains the DA objects and if an unscoped or<br />
global scope configuration is being used it contains the unscoped or global scope(s). The<br />
placement of the Global SLP-Management container in the tree is flexible and should consider the<br />
following:<br />
• The need to easily distinguish the Global SLP-Management container from other SLP-<br />
Management containers.<br />
• The need to minimize the number of Subordinate reference replicas.<br />
• The need to secure the container.<br />
If a scoped configuration is being used, then the SLP-Management container off of the root of the<br />
tree contains the DA objects and the Global services scope(s). The global service scope(s) should<br />
contain the services that need to be made globally available. In addition to the global scope,<br />
regional scopes need to be created at each WAN hub/major site for services that should be made<br />
available to users in an SLP region. These regional scopes are held in SLP-Management<br />
containers that are under the container for the WAN hub region/site they serve.<br />
In general Novell recommends the use of SLP for dynamic location of local services, and NDS<br />
and/or DNS for location of non-local services.<br />
In the scenario below, we assume five candidate locations for SLP Directory Agents. You will be<br />
using the customers WAN/Major site bubble diagrams collected during the Pre-Flight Checklist<br />
(PFC) for this purpose. We determined that there were five major points in this scenario where<br />
SLP Directory Agents could be placed. Three of these sites were WAN Hub sites and two were<br />
Major sites containing large numbers of users and servers.<br />
Page 212 of 317 Novell PartnerNet Confidential 07/24/00<br />
Copyright © 2000 by Novell, Inc.
SLP-Management<br />
containers at the WAN<br />
hubs and Major sites are<br />
only used if a scoped<br />
configuration is used. If an<br />
unscoped or global<br />
configuration is used then<br />
these SLP-Management<br />
containers would not<br />
exist. Note that DAs are<br />
still listed at the global<br />
SLP-Management level.<br />
This is done because the<br />
latest versions of SLP will<br />
allow NDS based SLP<br />
Directory Agent discovery.<br />
WAN Site Hub 1 1<br />
SLP-Management<br />
Local Scope<br />
General SLP/NDS Design<br />
WAN Hub 2<br />
SLP-Management<br />
Local Scope<br />
Org. Name<br />
[ROOT] (Sample_Tree)<br />
The SLP-Management Container<br />
should contain the Directory Agent<br />
(DA) and unscoped or global SLP<br />
Scope Objects. This partition should<br />
be replicated to all DA Servers. This<br />
SLP-Management<br />
should not represent a problem<br />
provided that these scopes are<br />
relatively small, or adequate WAN<br />
resoursces exist to handle the<br />
replication traffic, and/or the "SLP<br />
SA Default Lifetime" is increased in<br />
order to reduce the frequency of<br />
DA Objects Un-Scope or<br />
updates to the SLP scope database.<br />
Global Scope Objects<br />
State/locality 1 State/locality 2<br />
Site 3<br />
WAN Hub 3<br />
SLP-Management<br />
Local Scope<br />
Major Site 1<br />
SLP-Management<br />
Local Scope<br />
Figure D11. General SLP/NDS design.<br />
Grey areas indicate<br />
partition boundaries<br />
State/locality 3<br />
Major Site 2<br />
SLP-Management<br />
Local Scope<br />
The SLPDA.NLM should never be loaded on a server unless the Scope Unit object and<br />
Directory Agent object the server will service have already been created. Never accept the default<br />
configuration offered by the SLPDA.NLM. In general the Scope Unit object should be created<br />
first then the DA object. This is because when you create the DA object you need to associate it<br />
back to the server that will host the DA and the Scope(s) it will service. Of course it is not possible<br />
to make this association if the Scope Unit has not been created yet.<br />
Note: CMD will not take SAP information from a legacy IPX segment and place them in the SLP<br />
scope. Only SLP enabled servers with CMD loaded on them will register their SAP information.<br />
As a result of the 64KB limitation, it becomes necessary to create multiple scopes when certain<br />
service entry counts are exceeded. In general SLP service queries are for a specific type of service<br />
such as “ndap.novell”, or “bindery.novell”. This means that the number of services of each type<br />
that may live in a single SLP scope is limited to the number that will fit in the 64KB response<br />
packet. This number is variable depending on the length of certain variables such as SAP names,<br />
server names, and partition names. The average number of each service type that may be placed in<br />
a single scope without overflowing the SLP response packet are as follows:<br />
• The Bindery.Novell service - 700 to 1100 depending on the length of server names.<br />
• The NDAP.Novell service - Around 1200 depending on the length of partition names.<br />
• The MGW.Novell service - Around 1200.<br />
Page 213 of 317 Novell PartnerNet Confidential 07/24/00<br />
Copyright © 2000 by Novell, Inc.
• The Sapsrv.Novell service - No more than 540. Calculations based on SCMD engineering<br />
testing.<br />
As you can see, if the use of CMD is wide spread, and the average number of SAPs advertised by<br />
each CMD server is:<br />
• 4, the maximum number of CMD servers per scope is about 135.<br />
• 5, the maximum number of CMD servers per scope is about 108.<br />
• 6, the maximum number of CMD servers per scope is about 90.<br />
• 7, the maximum number of CMD servers per scope is about 77.<br />
• 8, the maximum number of CMD servers per scope is about 67.<br />
This issue is being addressed by SLP version 2; However, because SLP V2 is still in draft RFC<br />
mode and we will not implement this until it is an official RFC, we do not expect support for SLP<br />
v2 until late Q2 to Q3 of 2000. If service counts do become a problem at a large customer site you<br />
can start to use multiple scopes and DA's to get around this. For now, the applications using SLP<br />
have been getting around this issue by making service requests as explicit as possible.<br />
Minimizing the Number of SLP Scopes<br />
It will be important to minimize the number of SLP scopes in any environment. The reasons for<br />
this are as follows:<br />
• Reduction in overhead traffic from User Agents (UA).<br />
• Reduction in overhead traffic from Server Agents (SA).<br />
• Minimizing client configuration requirements.<br />
• Minimizing server configuration requirements.<br />
• Mitigating between good NDS design practices, and good SLP design practices.<br />
When User Agents (UAs) request services, the UAs on clients will place a packet on the wire for<br />
the unscoped scope and every scope it is configured to talk to. Server UAs will place a packet on<br />
the wire for the unscoped scope and every scope they know about, in search of a service. If more<br />
than one DA serves a scope, the server UA will query only the first active DA it knows about for<br />
each scope it knows about. Under these circumstances it could obviously be detrimental to create a<br />
large number of DAs without a real need to do so.<br />
The more scopes you create the more likely clients will need to query multiple scopes to find the<br />
services they need. If a customer wants to provide global short service name resolution through<br />
SLP, the larger the number of scopes, the more information is required in the clients scope list for<br />
clients to browse for services globally with SLP. Clients must be either manually configured with<br />
each scope and DA they need to talk to, or they need to be served this information from a DHCP<br />
server, or they need to discover these things dynamically through the use of multicast. Of course<br />
in most environments, multicast is not an option due to concern voiced by data communications<br />
staff for it and its limited ability to scale an SLP architecture. DHCP provides the next least<br />
administratively intense way to configure client UAs. This method requires the customer’s DHCP<br />
server options table to be extensible or that they implement Novell’s DHCP server that ships with<br />
<strong>NetWare</strong> <strong>5.1</strong>. Other automated methods for configuring a client’s DA and scope information could<br />
include the use of “reg” files, the Novell Automatic client <strong>Upgrade</strong> (ACU) or ZEN’s Workstation<br />
Manager scheduled tasks. Finally, this information could be configured manually on each client<br />
machine.<br />
The more granular your SLP environment is, the more likely it is that servers will need to live in<br />
and register services in more than one scope. The more scopes a server must register with or<br />
query, the more SLP traffic it must generate each time it attempts to resolve or register a service<br />
name.<br />
Page 214 of 317 Novell PartnerNet Confidential 07/24/00<br />
Copyright © 2000 by Novell, Inc.
While it is good practice to reduce the number of scopes wherever practicable there are times<br />
when best NDS design practices and best SLP design practices may be in direct conflict. Such as:<br />
• When replicating the SLP scopes partition to multiple DAs would unnecessarily increase<br />
the number of replicas in the replica ring.<br />
• When replication traffic would place detrimental loads on WAN links.<br />
• When the number of objects in an SLP scope is larger than prudent based on standard<br />
issues such as:<br />
• The speed of the hardware servicing the replica ring.<br />
• The speed of WAN links<br />
• The frequency of updates that trigger synchronization events.<br />
In these cases the consultant must weigh the issues and make the best determination possible with<br />
the information available whether or not it is advisable to create additional scopes.<br />
Page 215 of 317 Novell PartnerNet Confidential 07/24/00<br />
Copyright © 2000 by Novell, Inc.
A Global SLP Design Example<br />
The following is an example of a global SLP design. This particular customer wanted all services<br />
to be available to their users through SLP. They are using the recommended dual stack approach<br />
to protocol migration, which eliminated the need to do extensive scoping for CMD servers.<br />
The WAN/Major Site Bubble diagram below shows that the Customer network can be reduced to<br />
a straightforward model for the design of an SLP infrastructure. The network is basically broken<br />
up by geographical region. Each of these regions contains a hub site, and the regional office sites<br />
radiate out from the respective hub site. These regional office sites are connected back to the hub<br />
sites through WAN links. These WAN links are generally of T-1 speed, although some are faster<br />
(DS-3) and some are slower (512, 256, and 56KB). Generally speaking, a non T-1 speed WAN<br />
link is the exception rather than the rule.<br />
A redundant DS-3 cloud connects the hub sites to one another. This provides for robust and fast<br />
connectivity between geographic regions that also happens to be fault tolerant. In the event the<br />
link through one cloud is not available, the sites are able to connect through the second cloud.<br />
While the links between the hub sites are redundant, the WAN links connecting hub sites to<br />
regional offices are not redundant. In the event one of those WAN links is down, the regional<br />
office will not be able to connect to the rest of the Customer network.<br />
The diagram below represents the customer network in its reduced form. From this diagram, the<br />
general network traffic flow can also be deduced. For any communications to travel between<br />
regional offices, the traffic must come out through at least one frame relay cloud before reaching<br />
its final destination. Figure D17 only shows how the hub sites are connected to one another. The<br />
regional office sites are connected to their hub sites through the local Frame Relay cloud on the<br />
diagram.<br />
Page 216 of 317 Novell PartnerNet Confidential 07/24/00<br />
Copyright © 2000 by Novell, Inc.
FR to<br />
satelite<br />
offices<br />
FR to<br />
satelite<br />
offices<br />
FR to<br />
satelite<br />
offices<br />
H-Region<br />
Hub<br />
Atlanta<br />
Hub<br />
G-Region<br />
Hub<br />
FR to<br />
satelite<br />
offices<br />
B-Region<br />
Hub<br />
Frame Relay (FR)<br />
DS-3<br />
Cloud<br />
Los Angeles<br />
Hub<br />
FR to<br />
satelite<br />
offices<br />
Chicago<br />
Hub<br />
E-Region<br />
Hub<br />
FR to<br />
satelite<br />
offices<br />
D-Region<br />
Hub<br />
FR to<br />
satelite<br />
offices<br />
Figure D17. Hub sites are connected to one another through a Frame Relay cloud.<br />
FR to<br />
satelite<br />
offices<br />
The general user workflow on the network is also an important thing to consider. About 70% of<br />
the users at this customer are mobile and need to access their resources from anywhere on the<br />
network. However, those users that are not mobile generally use the network resources in their<br />
local offices. This workflow pattern needs to be supported in a pure IP environment, and SLP will<br />
help the customer accomplish that through a global service resolution environment.<br />
Now that the functional requirements have been defined and the physical network topology has<br />
been detailed, it is time to dive deeper into the SLP design.<br />
Designing the SLP Infrastructure Plan<br />
The key behind developing a long range SLP infrastructure plan is to minimize the amount of<br />
overhead traffic required to maintain the SLP infrastructure while staying true to the functional<br />
requirements of the organization. For convenience, the functional requirements of the customer<br />
with respect to the SLP infrastructure are listed below:<br />
• Currently, all services on the network are visible to all users. There is no filtering of SAP<br />
services on the network. This availability of services must be preserved in a pure IP<br />
environment.<br />
• Users are accustomed to browsing the network to find network resources. Because users<br />
are still in bindery mode, they are not aware of NDS or its hierarchical structure. The<br />
ability to browse the network independently of NDS to find network resources must be<br />
preserved in a pure IP environment.<br />
• The ability to use multicast addressed packets on WAN links as a method of service<br />
resolution is currently not permitted; however, if an appropriate business case can be<br />
shown as to why multicast addressed packets are needed, that policy may be changed.<br />
Page 217 of 317 Novell PartnerNet Confidential 07/24/00<br />
Copyright © 2000 by Novell, Inc.
• The service resolution infrastructure must be fault tolerant. This infrastructure must<br />
provide a single fail-over mechanism for fault tolerance. In the event the enterprise<br />
service resolution infrastructure fails, clients must still be able to at least connect to their<br />
local file servers.<br />
• The service resolution infrastructure must be scalable to meet the needs of the customer<br />
in the future. It should be able to accommodate a transition to a pure IP environment as<br />
well as leave room for growth.<br />
While easy to design an SLP infrastructure that meets these functional requirements, it is a bit<br />
more of a task to design one that will not adversely affect the performance of the corporate<br />
network.<br />
There will effectively be two phases to the rollout of the SLP infrastructure to this customer. The<br />
first phase will be to the <strong>NetWare</strong> <strong>5.1</strong> servers on the network themselves to facilitate server to<br />
server communication. Even for this first phase of the rollout, the infrastructure must be designed<br />
with the second phase in mind to ensure it is scalable and robust. The second phase of the SLP<br />
infrastructure rollout deals with the client workstations themselves using the infrastructure for<br />
service resolution.<br />
Note: The rollout of the SLP infrastructure to the client workstations cannot be accomplished until<br />
the latest version of the <strong>NetWare</strong> client is installed on those machines. This client contains the<br />
SLP user agent necessary to make use of the SLP infrastructure.<br />
Phase I—Server to Server Communication<br />
The implementation of the long-range SLP infrastructure is going to be very similar to option 3<br />
discussed earlier, but as you will see some hybridization will occur. The configuration is going to<br />
be different to reflect different numbers of scopes and directory agents for the network, but the<br />
tools used to configure the environment are exactly the same as previously discussed.<br />
SLP Infrastructure Overview<br />
The SLP infrastructure will need to be able to accommodate 530+ servers on customer network.<br />
Keeping an eye to the future, the infrastructure will also need to be able to service the SLP queries<br />
of 30,000+ potential users on the network. The key to the whole infrastructure is going to be the<br />
directory agents. There need to be enough directory agents on the network in strategic locations to<br />
service the SLP infrastructure but not so many as to clog the network with SLP overhead traffic.<br />
Note: Because the directory agents are key to the SLP infrastructure, the boxes chosen to serve<br />
this function should be robust. They should have a fast processor, a large amount of memory, and<br />
good bandwidth to the network. Additionally, these servers should be lightly loaded servers; their<br />
primary function should be serving SLP information to the network.<br />
For the customer’s environment, three directory agents should be sufficient to handle the SLP<br />
infrastructure, given those servers are dedicated to that function. Those servers should be placed at<br />
major hub sites on the corporate network for a number of reasons:<br />
• Because the hub sites are connected to one another at DS-3 speeds, the DS<br />
synchronization traffic required for SLP would be most efficient. Placing directory agents<br />
at regional office sites might begin to tax the T-1 lines connecting those offices to the<br />
corporate network.<br />
• The hub sites are centrally located on the corporate network. Service registrations and<br />
service requests from clients need only go to the central hub sites. They do not need to<br />
traverse multiple WAN links to reach their destination.<br />
Page 218 of 317 Novell PartnerNet Confidential 07/24/00<br />
Copyright © 2000 by Novell, Inc.
From a scoping perspective, one scope is not going to be sufficient for the number of servers on<br />
the customer’s network. Multiple scopes are going to be required, and they should be custom<br />
scopes. The UNSCOPED scope should not be used. The number of scopes required should also be<br />
minimized to reduce the amount of SLP traffic on the network for service resolution.<br />
In initial discussions with the customer staff, three scopes were considered based upon the time<br />
zones in the United States. However, after reviewing the data, it is evident that two scopes would<br />
be more efficient. The number of servers on the customer network would be split evenly between<br />
these two scopes, which means that each scope will hold the SLP service registrations for roughly<br />
265 servers. This provides much room for growth while minimizing the required traffic for SLP<br />
overhead.<br />
Each of the three directory agents on the network will service both SLP scopes; however, each<br />
server on the network will only register with a single scope. The DA objects will be located in a<br />
single container for NDS based DA discovery between the directory agents (requires NW5SP3 or<br />
later). This will ensure that all servers will be able to see all partitions in the NDS tree. This will<br />
maintain tree connectivity and integrity.<br />
Scope1<br />
ndap.novell 1<br />
ndap.novell 5<br />
ndap.novell 6<br />
FS1<br />
FS5<br />
FS6<br />
FS6<br />
Scope1<br />
ndap.novell 6<br />
FS5<br />
Scope1<br />
ndap.novell 5<br />
SReg<br />
FS1<br />
Scope1<br />
ndap.novell 1<br />
DA3 Services<br />
Scope1<br />
Scope2<br />
SReg<br />
DA1 Services<br />
Scope1<br />
Scope2<br />
WAN<br />
FS2<br />
Scope2<br />
ndap.novell 2<br />
DA2 Services<br />
Scope1<br />
Scope2<br />
Figure D18. Sample SLP infrastructure.<br />
Scope2<br />
ndap.novell 2<br />
ndap.novell 3<br />
ndap.novell 4<br />
FS2<br />
FS3<br />
FS4<br />
FS3<br />
Scope2<br />
ndap.novell 3<br />
SReg<br />
FS4<br />
Scope2<br />
ndap.novell 4<br />
Figure D18 illustrates how this setup would function. In this figure, each of the <strong>NetWare</strong> <strong>5.1</strong><br />
servers belongs to a single scope and registers its SLP services with a directory agent on the<br />
network. Only those servers registering with a particular scope are “seen” by the other servers<br />
belonging to that scope. This is acceptable because even though the “ndap.novell” services are<br />
split between the two global scopes, servers will be able to resolve NDS information because the<br />
UA on servers will query all scopes it knows about, and its DA will be serving both (all) scopes.<br />
For fault tolerance, it is a good idea to have each <strong>NetWare</strong> <strong>5.1</strong> server register its services with two<br />
of the three directory agents on the network. The DS synchronization process will ensure the<br />
directory agent that is left out of this direct service registration process will still get the necessary<br />
SLP information. This balances required fault tolerance in service registration with minimizing<br />
SLP overhead traffic.<br />
Page 219 of 317 Novell PartnerNet Confidential 07/24/00<br />
Copyright © 2000 by Novell, Inc.
Selecting the Directory Agents<br />
The directory agents chosen to serve the SLP infrastructure should be selected based upon a<br />
number of criteria. The hardware configuration is important as well as the machines physical<br />
location on the corporate network. At this customer, the logical choices for directory agents are the<br />
DS master servers. In discussions with the customer’s staff, the following three servers are going<br />
to be recommended to function as directory agents:<br />
• ATLA_NDS1_US<br />
• CHIC_NDS1_US<br />
• LOSA_NDS1_US<br />
These servers are well distributed on the network. These three servers will provide fault tolerance<br />
for the SLP infrastructure. In the rollout of the second phase, client workstations should prefer to<br />
use the directory agent that is closest to them, although this is not going to always be guaranteed.<br />
Two scopes will need to be created to service the customers SLP infrastructure. The names for<br />
these scopes are not critical; however, they should be easy to remember. The scope names should<br />
be similar to one another in terms of a naming standard. In the event that more scopes are needed,<br />
adding another scope is an easy thing to do; however, it will require manual reconfiguration of the<br />
user agents to make use of the new scope. The following are recommended scope names for this<br />
customer:<br />
• SLP_SCOPE1_US<br />
• SLP_SCOPE2_US<br />
Configuring the Directory Agents<br />
After the directory agents have been selected and the scopes decided, it is a matter of setting up<br />
the directory agent infrastructure. This is mostly accomplished through <strong>NetWare</strong> Administrator.<br />
Objects need to be created in the NDS tree to house the SLP information that will be registered by<br />
service agents on the network. The following objects will need to be created in the customer’s<br />
NDS tree:<br />
• 2 SLP Scope Unit objects to represent SLP_SCOPE1_US and SLP_SCOPE2_US.<br />
• 3 SLP Directory Agent objects to represent ATLA_NDS1_US, CHIC_NDS1_US, and<br />
LOSA_NDS1_US.<br />
A more appropriate place for these objects will also need to be created in the NDS tree. Each of<br />
the 2 SLP Scope Unit objects will be made into its own partition. These partitions should exist in<br />
an area of the tree where the number of subordinate references to them is minimized. A new<br />
organizational unit should be created beneath the selected context to house the SLP information<br />
for the NDS tree. This organizational unit can be called SLP, which would reflect its function in<br />
the tree.<br />
Figure D19 illustrates how the NDS objects pertaining to SLP would look in the NDS tree.<br />
Page 220 of 317 Novell PartnerNet Confidential 07/24/00<br />
Copyright © 2000 by Novell, Inc.
Figure D19. SLP objects in an NDS tree.<br />
Figures D20 and D21 show the details of the SLP Scope Unit objects. Note the value of the Scope<br />
Name field is SLP_SCOPE1_US. This is the location where the actual SLP scope value is set.<br />
Also, all directory agents service each scope. This is shown by the Serviced by fields in the<br />
figures.<br />
Figures D22 through D27 show detailed information about the directory agent objects themselves.<br />
Note that the value for the cache limit is 2048KB, or 2MB. This should be sufficient to hold the<br />
necessary SLP service information for the 2 scopes.<br />
Figure D20. Configuration information for the SLP_SCOPE1_US Scope Unit object.<br />
Page 221 of 317 Novell PartnerNet Confidential 07/24/00<br />
Copyright © 2000 by Novell, Inc.
Figure D21. Configuration information for the SLP_SCOPE2_US Scope Unit object.<br />
In the NDS tree, the SLP Directory Agent objects would need to be associated with NCP server<br />
objects. Clicking on the browse button to the right of the Host Server field will accomplish this.<br />
The scopes serviced by the directory agent are configured from the SLP Scope Unit property page.<br />
To allow the directory agent to service a scope, click on the Add button and find the SLP Scope<br />
Unit object in the NDS tree.<br />
Page 222 of 317 Novell PartnerNet Confidential 07/24/00<br />
Copyright © 2000 by Novell, Inc.
Figure D22. Configuration tab property page for the ATLA_NDS1_US_SLPDA NDS object.<br />
Figure D23. SLP Scope Units property page for the ATLA_NDS1_US_SLPDA NDS object.<br />
Page 223 of 317 Novell PartnerNet Confidential 07/24/00<br />
Copyright © 2000 by Novell, Inc.
Figure D24. Configuration tab property page for the CHIC_NDS1_US_SLPDA NDS object.<br />
Figure D25. SLP Scope Units property page for the CHIC_NDS1_US_SLPDA NDS object.<br />
Page 224 of 317 Novell PartnerNet Confidential 07/24/00<br />
Copyright © 2000 by Novell, Inc.
Figure D26. Configuration tab property page for the LOSA_NDS1_US_SLPDA NDS object.<br />
Figure D27. SLP Scope Units property page for the LOSA_NDS1_US_SLPDA NDS object.<br />
From a partitioning and replication perspective, all directory agents should have a copy of the<br />
partition/s that contain the SLP information. This will facilitate the efficient exchange of SLP<br />
information through NDS. Because this partition becomes an active partition, only directory<br />
agents should hold a copy of the partition. At this customer, new partitions should be created out<br />
Page 225 of 317 Novell PartnerNet Confidential 07/24/00<br />
Copyright © 2000 by Novell, Inc.
of the SLP_SCOPE1_US and SLP_SCOPE2_US SLP Scope Unit objects. Because these objects<br />
are container objects within NDS, they can be their own partitions.<br />
This new partition/s should have replicas placed on the ATLA_NDS1_US, CHIC_NDS1_US, and<br />
LOSA_NDS1_US servers because they are the servers functioning as directory agents. There<br />
could be some resultant subordinate references because of the partitioning and replication strategy<br />
used at the customer, but those subordinate references should not adversely affect the performance<br />
of NDS. The partitioning and replication strategy can be reviewed and modified to minimize the<br />
number of subordinate references present for these partitions.<br />
Directory Agent Service Agent Configuration<br />
Once the configuration of the SLP infrastructure has been completed in NDS, the service agent<br />
pieces on the directory agents need to be configured. This is a straightforward procedure that<br />
involves setting some parameters through the server console or modifying configuration files.<br />
Because multicast is not supported across the WAN we will need to be sure the DAs can discover<br />
each other. This will be accomplished by statically pointing the DAs at each other by modifying<br />
the SLP.CFG file in the servers’ SYS:ETC directories. If the <strong>NetWare</strong> 5.0 Support Pack 3 or later<br />
is applied, this can be accomplished through NDS provided all of the DA objects are stored in the<br />
same NDS context.<br />
The text below shows a sample SLP.CFG file for the directory agents at this customer. There is<br />
one thing to note here. With the application of the <strong>NetWare</strong> 5.0 Support Pack 3 and later, fully<br />
qualified DNS names can be used to refer to the directory agents on the network. IP addresses will<br />
also work.<br />
;This is a sample of the SLP configuration file.<br />
;Two types of entries can be made: 1)DA entries, 2)SA Register Filters<br />
;<br />
;The DA entry allows static configuration of a known DA. This would be used when<br />
;the DA is out of multicast range (or multicast is not supported) and DHCP is ;not<br />
being used to configure the DA.<br />
;The static DA configuration format is as follows ‘DA , ’.<br />
;The first word must be “DA”. The Addr Type is the address type. Currently, only<br />
;IPv4 has been defined. IPv6 will be defined in the future. The Addr is the IP<br />
;Address specified. NW5SP3 or later will also support FQDN DNS names.<br />
;<br />
;The following is an example of a static DA.<br />
;DA IPV4, 130.1.1.1<br />
;<br />
;The SA Register Filter would be used when the administrator wanted all services<br />
;of a specific type to be mapped to specific scope/s. For example, the<br />
;administrator wants all “LPR” printers mapped to scopes “print” and “a-region”.<br />
;The format is as follows: ‘REGISTER TYPE ““ to SCOPE ““’.<br />
;The parser will look for REGISTER, TYPE and SCOPE as keywords followed by a<br />
;double quote on a single line. Multiple scopes are defined with a comma<br />
;delimited list. Example:<br />
;<br />
;REGISTER TYPE “lpr” to SCOPE “print,a-region”<br />
;<br />
;The last line in the file must contain a carriage return and line feed. A<br />
;semicolon specifies a comment.<br />
;<br />
DA IPV4, atla-nds1-us.abc.com<br />
DA IPV4, chic-nds1-us.abc.com<br />
DA IPV4, losa-nds1-us.abc.com<br />
Page 226 of 317 Novell PartnerNet Confidential 07/24/00<br />
Copyright © 2000 by Novell, Inc.
Besides modifying the SLP.CFG file, there need to be two other modifications made at the server<br />
consoles of the directory agents:<br />
The SLP Scope List parameter needs to be set. In MONITOR, select Server Parameters->Service<br />
Location Protocol. In the parameters that appear, set the SLP Scope List to SLP_SCOPE1_US,<br />
SLP_SCOPE2_US.<br />
The SLP SA Default Lifetime parameter needs to be modified on all <strong>NetWare</strong> <strong>5.1</strong> servers. In<br />
MONITOR, select Server Parameters->Service Location Protocol. In the parameters that appear,<br />
set the SLP SA Default Lifetime to something greater than the default of 3600 seconds (one hour).<br />
Two to four hours would be a good place to start, and depending on stability and performance, this<br />
may be increased to a maximum of 65535 seconds (18+ hours).<br />
Those modifications will allow the directory agent to register its services with both scopes. It also<br />
changes the default registration time on all servers from one hour to two or more hours. This<br />
means that the services available on these servers will only need to update their service TTLs once<br />
every two or more hours, which will reduce the amount of SLP overhead traffic.<br />
Note: When modifying the value of the SLP Scope List or SLP SA Default Lifetime parameter,<br />
the server must be rebooted in order for the modification to take effect.<br />
After the modifications have been made and the server has been rebooted. Issue the following<br />
command from the server console of the directory agent:<br />
SLPDA<br />
Additionally, the AUTOEXEC.NCF file on the Directory Agent servers should be modified to<br />
load the SLPDA.NLM when the server boots. This will ensure the directory agent will be<br />
available in the event the server is rebooted.<br />
Configuring the Remaining <strong>NetWare</strong> <strong>5.1</strong> Boxes<br />
Outside of the three directory agents on the network, there will be 530 or more servers that will<br />
need to be configured to use the SLP infrastructure. There are three modifications that will need to<br />
be made per server to allow it to participate in the SLP infrastructure. They are as follows:<br />
• The SLP.CFG file on each server must be modified to specify the directory agents that<br />
server will use for service registration and service resolution.<br />
• The SLP Scope List needs to be set on each server.<br />
• The SLP SA Default Lifetime parameter needs to be set to 7200 or greater. This will<br />
require service re-registration once every two or more hours instead of once every hour.<br />
Before these modifications are made the list of servers needs to be assessed and examined. The<br />
servers need to be divided into two groups; these two groups will represent the two scopes that<br />
have been defined for the SLP infrastructure. The servers that need to be included in both groups<br />
are the NDS master servers on the customer network.<br />
Additionally, servers should be grouped in terms of the directory agents they will be using for<br />
service registration and service resolution. This is not as critical as the scope division described<br />
above, but there should be a good balance between the available directory agents on the network.<br />
SLP_SCOPE1_US Servers<br />
The servers that are chosen to be part of the SLP_SCOPE1_US scope should be configured in the<br />
following manner:<br />
Page 227 of 317 Novell PartnerNet Confidential 07/24/00<br />
Copyright © 2000 by Novell, Inc.
• The SLP.CFG file must be modified to reflect two of the directory agents on the network.<br />
• The SLP Scope List must be set to the value SLP_SCOPE1_US.<br />
• The SLP SA Default Lifetime parameter must be set to 7200.<br />
SLP_SCOPE2_US Servers<br />
The servers that are chosen to be part of the SLP_SCOPE2_US scope should be configured in the<br />
following manner:<br />
• The SLP.CFG file must be modified to reflect two of the directory agents on the network.<br />
• The SLP Scope List must be set to the value SLP_SCOPE2_US.<br />
• The SLP SA Default Lifetime parameter must be set to 7200.<br />
Note: Any time SLP scope or default lifetime parameters are modified on a server, it must be<br />
rebooted for the changes to take effect.<br />
Once the modifications have been made to the servers and they have been rebooted, they will be<br />
able to participate in the SLP infrastructure. When all servers have been configured, phase one of<br />
the SLP infrastructure rollout is complete. All <strong>NetWare</strong> <strong>5.1</strong> servers will be taking advantage of a<br />
fault-tolerant, robust service resolution mechanism.<br />
Impact of SLP Overhead Traffic<br />
It is important to look at the impact of the overhead traffic necessary to maintain the SLP<br />
infrastructure on the network. To reiterate the general equations that are used to calculate this<br />
traffic, the average amount of traffic on the network over the course of the default service lifetime<br />
is calculated as follows:<br />
(# of servers) x (avg. # of SLP registrations/server) x (avg. bandwidth/registration)<br />
The average number of registrations per server can be calculated as follows:<br />
(avg. # of SLP services/server) x (# of configured DAs/service) x (# of configured scopes)<br />
From the information gathered about the customer network, there are 536 servers on the network<br />
that will eventually participate in the SLP infrastructure. The average bandwidth required per<br />
service registration is 400 bytes. The average number of SLP services per server is seven, the<br />
number of configured directory agents per server is two, and the number of configured scopes<br />
from the infrastructure design is one (with the possible exception of the directory agent servers).<br />
Given these figures, the amount of traffic over the course of the default service lifetime (two<br />
hours) required to maintain the SLP infrastructure is about 2.86MB. Again, this is an aggregate<br />
value that is spread across the entire network with each directory agent seeing about one third of<br />
this traffic.<br />
To reiterate, this traffic is due to SLP overhead alone. It does not factor in the increased traffic due<br />
to NDS synchronization. Nor does it account for any SLP service resolution queries required by<br />
the servers on the network. However, across an enterprise network with a large amount of<br />
bandwidth, 2.86MB of data spread across the network every two hours is an acceptable amount of<br />
overhead for a service infrastructure.<br />
Phase II—SLP for Client Workstations<br />
The most difficult piece of setting up the SLP infrastructure really occurs in phase one. Once all of<br />
the SLP services on the network have been registered with the directory agents, the client<br />
workstations can query the directory agents and retrieve complete lists of available SLP services<br />
Page 228 of 317 Novell PartnerNet Confidential 07/24/00<br />
Copyright © 2000 by Novell, Inc.
on the network. The only thing that is really required for the client workstations to make use of the<br />
SLP infrastructure is the installation of the latest version of the <strong>NetWare</strong> client.<br />
Configuring the Client Workstation<br />
There are a number of ways a client workstation can resolve services on the network. Because this<br />
customer requires short name resolution and browsing of network resources, client workstations<br />
are going to need to utilize the SLP infrastructure. The other methods of service resolution can still<br />
be used, but SLP should be the primary method of service resolution on the network.<br />
After the latest <strong>NetWare</strong> client has been installed on the client workstation, it will attempt to use<br />
the SLP infrastructure by default. This can be verified in the property pages of the Novell client.<br />
To see these property pages, go into the Network applet on Windows 95/98/NT. Enter the property<br />
pages of the Novell client. Once there, select the Protocol Preferences tab. On that property page,<br />
the various methods of name resolution are displayed, as shown in Figure D28.<br />
Figure D28. The Novell client property pages on Windows NT.<br />
For the client to use the SLP infrastructure, the box to the left of SLP must be checked. It will also<br />
make the client more efficient if unused name resolution mechanisms are unchecked. For instance,<br />
if DNS is not going to be used as a method of name resolution for <strong>NetWare</strong> client services, the<br />
box to the left of DNS should be unchecked. This will not affect normal DNS name resolution for<br />
general IP-based applications, such as Netscape.<br />
Page 229 of 317 Novell PartnerNet Confidential 07/24/00<br />
Copyright © 2000 by Novell, Inc.
There are some other parameters that need to be configured for the clients to be able to use the<br />
SLP infrastructure that was set up in phase one. Because the customer is not using multicast as a<br />
discovery mechanism for directory agents, the directory agent addresses must be statically<br />
configured at the client. With this, the SLP Scope List for the clients must also be modified. This<br />
is accomplished through the Service Location tab, which is shown in Figure D29.<br />
In the Service Location tab, there are places to specify the Scope List and the Directory Agent<br />
List. The Directory Agent List can hold either the IP addresses of the directory agents on the<br />
network, or it can hold the fully qualified DNS names of the directory agents. The Scope List<br />
specifies to which scopes the client workstation belongs. As can be seen in Figure D29, the client<br />
workstation belongs to both the SLP_SCOPE1_US and SLP_SCOPE2_US scopes. The reason for<br />
this will be explained. The check in the Static box means the client is statically configured.<br />
Figure D29. The Service Location property page of the Windows NT Novell client.<br />
As was shown in the previous section, the servers available on the network have been split into<br />
two separate scopes. If the client belonged to a single scope, it would only be able to see those<br />
servers that also belonged to that scope. Effectively, the client would only be able to see one half<br />
of the servers on the network. This does not fit this customer’s functional requirements of the SLP<br />
infrastructure; however, making the client a member of both scopes will allow the client to see all<br />
of the servers on the network.<br />
For fault tolerance, all directory agents on the network are listed in the Directory Agent List. In the<br />
event the client’s primary directory agent is unavailable, it will attempt to use the next one on the<br />
list. Thus, all directory agents will need to have failed or the WAN link connecting the regional<br />
Page 230 of 317 Novell PartnerNet Confidential 07/24/00<br />
Copyright © 2000 by Novell, Inc.
office to the hub site will have to have been severed for the client to be unable to resolve SLP<br />
services.<br />
The one drawback to this phase of the rollout is that the client workstations need to be manually<br />
configured because this customer cannot make use of DHCP or ZENworks to automate the rollout<br />
of the SLP information. However, if a tool is available that will allow the network administrators<br />
to make Windows registry modifications remotely, these modifications can be automated. Novell<br />
strongly urges the automation of as much of this configuration as possible within a given<br />
computing environment.<br />
Modeling Client Service Resolution Traffic<br />
While it is straightforward to configure the client workstations to use the SLP infrastructure, it is<br />
important to understand how the clients are actually using the infrastructure for service resolution.<br />
In the event there are performance problems, this insight will aid in the problem resolution.<br />
When a client first boots up, it will attempt to find its preferred tree or preferred server. To do this,<br />
it will issue an SLP service request looking for a list of services available on the network. Before<br />
actually sending out the SLP queries, the workstation will have determined its primary directory<br />
agents on the network. A primary directory agent will be specified for each of the workstation’s<br />
SLP scopes.<br />
In the case of the customer’s SLP infrastructure, the client workstation will look to its static list of<br />
available directory agents. It will attempt to activate each one of those directory agents<br />
simultaneously. The first directory agent to respond will be considered the “primary” directory<br />
agent. Subsequent replies will cause the workstation to mark the directory agent as “active”, but it<br />
will not submit queries to those directory agents unless the primary directory agent is unavailable<br />
or the query is to a scope that can only be serviced by another directory agent.<br />
This process is repeated for each of the workstation’s SLP scopes. Thus, each client workstation<br />
will have two primary directory agents. One primary directory agent will be designated for<br />
SLP_SCOPE1_US, and one primary directory agent will be designated for SLP_SCOPE2_US.<br />
The primary directory agents for each scope may be the same or it may be different. For instance,<br />
CHIC_NDS1_US may be a workstation’s primary directory agent for SLP_SCOPE1_US while<br />
ATLA_NDS1_US may be a workstation’s primary directory agent for SLP_SCOPE2_US. It all<br />
depends upon the network latency and quickness of response on the part of the directory agents on<br />
the network.<br />
When a query for SLP services is requested, such as the one to resolve the preferred tree or<br />
preferred server, the workstation will send a query to each of its primary directory agents. Thus,<br />
for each service resolution, the SLP user agent on the workstation really makes two separate<br />
queries to each scope, collates the results, and passes the information back to the requesting<br />
application (Figure D30).<br />
One important fact to glean from Figure D30 is that all SLP service requests must cross at least<br />
one WAN link to get to a directory agent. In the event the WAN link is not available, there will<br />
not be any global service resolution from SLP. As will be explained in the next section, clients<br />
will still be able to access local <strong>NetWare</strong> services. But network browsing will not be available<br />
until the WAN link connection is restored.<br />
Page 231 of 317 Novell PartnerNet Confidential 07/24/00<br />
Copyright © 2000 by Novell, Inc.
Primary DA<br />
SLP_SCOPE1_US<br />
Hub site<br />
Frame Relay<br />
DS-3<br />
Hub site<br />
Primary DA<br />
SLP_SCOPE2_US<br />
Hub site<br />
Service Request<br />
bindery.novell<br />
Frame Relay<br />
(Regional)<br />
Service Request<br />
bindery.novell<br />
Regional office<br />
Figure D30. Sample SLP service resolution process for the SLP infrastructure.<br />
Desktop System<br />
In the event the primary directory agent is not available, the client will wait for a response based<br />
upon the Wait Before Giving Up On DA timer. By default, this value is 5 seconds. Once the client<br />
deems the DA unreachable, the client will attempt to contact the next active DA for that scope in<br />
its list.<br />
The client workstation will cache information it receives about services through SLP. The Cache<br />
SLP Replies timer on the workstation determines the amount of time this information is kept. By<br />
default, this value is 1 minute. The default values for these settings should be acceptable for the<br />
customer’s SLP infrastructure.<br />
WAN Link Failures and Client Fault Tolerance<br />
By looking at Figure D30, it is clear to see the SLP infrastructure is dependent upon the WAN<br />
links at this customer. While the DS-3 backbone connecting the hub sites is redundant, the WAN<br />
links connecting the regional offices back to the hub sites are not. Additionally, the clients are<br />
dependent upon SLP to find their preferred server or preferred tree. How will the clients be able to<br />
connect to their local file server in the event of a WAN link failure?<br />
There are two states that need to be addressed to completely answer this question, but the baseline<br />
is that the clients and local servers will fall back to the default method of SLP communication.<br />
They will begin to use multicast to find the services that are local to them. This means that<br />
multicast must be enabled on a per regional office basis. No multicast needs to cross the WAN<br />
links when they are active, but all machines need to participate in a local multicast infrastructure<br />
in the event the SLP infrastructure is unavailable due to a WAN link failure.<br />
How the client workstation will respond to this WAN link failure is dependent upon the state of<br />
the client. There are two scenarios, and they are listed below:<br />
Page 232 of 317 Novell PartnerNet Confidential 07/24/00<br />
Copyright © 2000 by Novell, Inc.
• The client workstation is booted after the WAN link failure.<br />
• The client workstation was using the SLP infrastructure before the WAN link failure.<br />
In the event the client workstation is booted after the WAN link failure, the machine will come up<br />
as normal. It will attempt to activate the directory agents listed in its statically configured list;<br />
however, they will not be activated because the WAN link is down. After the activation process<br />
fails, the client workstation will use the normal multicast method of SLP communication, as<br />
described in the section “Default SLP Communications,” to find any services that are local to it.<br />
This is the final fail-over mechanism for SLP.<br />
In the event the client workstation was using the SLP infrastructure before the WAN link failure,<br />
the machine may not experience any difficulties unless the user attempts to access a network<br />
resource not on the local LAN. Only if an SLP query is sent from the client to the directory agents<br />
after the WAN link failure will there be a delay in services. The client workstation will attempt to<br />
contact its primary DA for each scope and fail after five seconds. It will then attempt to contact the<br />
next active DA in the list, which will also fail after five seconds. Finally, it will attempt to contact<br />
the final active DA in the list, which again will fail after five seconds. After that, it will use the<br />
normal multicast method of SLP communication to find any services that are local to it. Because<br />
each client workstation has three configured directory agents, the time out period should be 15<br />
seconds before reverting to multicast.<br />
Once the WAN link connectivity has been restored, the client workstations should eventually<br />
reactivate their directory agents. However, to quickly facilitate this reactivation, reboot the<br />
workstations.<br />
SLP Infrastructure Room for Growth<br />
With this SLP infrastructure, the customer will have room for growth and scalability. There are<br />
two main ways that the SLP infrastructure can be impacted in the future at this customer. They are<br />
as follows:<br />
• A large number of <strong>NetWare</strong> <strong>5.1</strong> servers are added to the network. Because they will need<br />
to register and resolve services, they will need to participate in the SLP infrastructure.<br />
• The number of SLP services advertised per server increases. This can be the result of<br />
deploying Migration Agents on the network as part of an IPX to pure IP migration<br />
strategy.<br />
In either one of these scenarios, it can be shown that the designed SLP infrastructure can handle<br />
the growth. Because of the limitation of SLP version 1, only 400 to 500 servers should be included<br />
in any single SLP scope. This number drops drastically if CMD is used. After the initial<br />
deployment of phase one, each scope will house roughly 270 servers. This leaves room for growth<br />
of up to another 150 servers per scope. Thus, the customer’s network can grow by up to 300<br />
additional servers before the SLP infrastructure needs to be modified.<br />
If more SLP services per server require advertisement on the network, there will be no problem.<br />
The only impact that increase will have will be on the amount of SLP overhead traffic required to<br />
maintain the SLP infrastructure. That can be easily calculated based upon the equations that were<br />
provided earlier in this document.<br />
For the first scenario, the increase of 300 servers on the network participating in the SLP<br />
infrastructure will increase the amount of required SLP overhead traffic to approximately 4.54MB<br />
of traffic. Again, this is an aggregate amount of traffic spread across the entire network once every<br />
two or more hours, depending on the value of the “SA Default Lifetime” parameter.<br />
In the second scenario, the increase of advertised SLP services will increase the amount of<br />
required SLP overhead traffic. The amount that this traffic will increase depends upon the number<br />
of new SLP services being advertised. Taking the example of the Migration Agent, the average<br />
Page 233 of 317 Novell PartnerNet Confidential 07/24/00<br />
Copyright © 2000 by Novell, Inc.
number of SLP services being advertised per server will increase from seven to ten. This translates<br />
into approximately 4.09MB of traffic once every two or more hours, depending on the value of the<br />
“SA Default Lifetime” parameter.<br />
If it came to pass that both scenarios occurred in the customer’s environment, there would be an<br />
increase in the amount of required SLP overhead traffic. Running 850 servers at 10 SLP services<br />
per server through the equations, the amount of traffic due to SLP overhead would be<br />
approximately 6.48MB every two or more hours, depending on the value of the “SA Default<br />
Lifetime” parameter.<br />
These are numbers that are easily handled by the corporate network at this customer. There is<br />
definitely room for growth with the current design strategy. In the event that the customer does<br />
outgrow their current SLP infrastructure, it is fairly easy to scale it to accommodate the new<br />
demand.<br />
There are two ways that the customer may grow that would impact the SLP infrastructure. They<br />
are as follows:<br />
• The client load becomes too great for the three directory agents on the network.<br />
• There is a large influx of servers and more than the recommended number of servers is<br />
registered within the two SLP scopes.<br />
The SLP infrastructure is scalable so that these new demands can be met; however, it will require<br />
a significant amount of reconfiguration on the servers and clients. Should the client load become<br />
too great for the current number of directory agents on the network, another directory agent can be<br />
added to the network. This addition would have the following impact on the customer’s network:<br />
• The amount of traffic due to NDS synchronization traffic would increase because an<br />
additional replica of the SLP partition would be added to the replica ring.<br />
• The <strong>NetWare</strong> <strong>5.1</strong> servers on the network would have to be reconfigured so the load from<br />
their service registrations is distributed evenly across the four directory agents.<br />
• The <strong>NetWare</strong> clients would have to be reconfigured to make use of the new directory<br />
agent on the network.<br />
If the customer acquires a large number of new <strong>NetWare</strong> <strong>5.1</strong> servers, it may exceed the<br />
recommended number of servers registering per SLP scope. In the event the current scoping<br />
environment is obsolete, another scope can be added to the SLP infrastructure. Servers can be<br />
redistributed to the new scope so that any design limitations are met. Adding an additional scope<br />
would have the following impact on the customer’s network:<br />
• The amount of traffic due to NDS synchronization traffic would increase because there<br />
would be a new partition that needed to synchronize on a frequent basis.<br />
• The <strong>NetWare</strong> <strong>5.1</strong> servers on the network would have to be reconfigured so they can make<br />
use of the new scope. This means that the directory agents and NDS master servers would<br />
have to belong to all scopes.<br />
• The <strong>NetWare</strong> clients would have to be reconfigured to become a member of the new<br />
scope. This is required for end-to-end browsing and short name resolution on the<br />
network.<br />
While there would be a large amount of administrative overhead required adding a new directory<br />
agent or new scope to the SLP infrastructure, the infrastructure is scalable. However, this really<br />
should not be needed for a long time, as there is plenty of room to grow with the current SLP<br />
infrastructure design.<br />
Page 234 of 317 Novell PartnerNet Confidential 07/24/00<br />
Copyright © 2000 by Novell, Inc.
Conclusion<br />
This example provides detail about the SLP technology and how Novell has implemented it with<br />
respect to <strong>NetWare</strong> <strong>5.1</strong>. Additionally, it proposes a long-range SLP infrastructure design that<br />
fulfills the customer’s functional requirements set down:<br />
• All services on the network will be visible to all users using the SLP infrastructure. This<br />
availability of services will be preserved in a pure IP environment.<br />
• The ability to browse the network independently of NDS to find network resources will<br />
be preserved in a pure IP environment through the SLP infrastructure.<br />
• Multicast will not been used to implement the SLP infrastructure on the enterprise<br />
network. Multicast will only be used in the event of a WAN link failure, and it will be<br />
used only on the regional office segments. It will not be used across WAN links.<br />
• The service resolution infrastructure will be fault tolerant. This infrastructure will provide<br />
at least a single fail-over mechanism for fault tolerance. In the event the enterprise<br />
service resolution infrastructure fails, clients will still be able to at least connect to their<br />
local file servers.<br />
• The service resolution infrastructure will be scalable to meet the needs of the customer in<br />
the future. It will be able to accommodate a transition to a pure IP environment as well as<br />
leave room for growth.<br />
With the proposed SLP infrastructure, the customer will have a solid cornerstone upon which they<br />
can build a powerful and robust <strong>NetWare</strong> computing environment based upon the TCP/IP<br />
protocol.<br />
When Not to Use a Global SLP Design<br />
This section will discuss when the Global approach to SLP design may not be appropriate.<br />
Wan Link Constraints<br />
The customer may not have sufficient bandwidth to support a global approach to SLP. This may<br />
necessitate a look at the overhead demands of the SLP infrastructure and the current loading of<br />
their WAN links to determine if the SLP infrastructure proposed would place more overhead on<br />
the WAN than the service resolution protocols being replaced.<br />
NDS Synchronization Traffic<br />
This goes back to the WAN link constraints with regard to replication of scope partitions across<br />
WAN links. It adds the concern of whether or not it is prudent from an NDS design perspective to<br />
replicate across WAN links, and must take the size of the scopes being replicated, the speed of the<br />
replica ring hardware, and the speed of the WAN links into consideration.<br />
UA, SA, DA, and Client Traffic<br />
A global approach to SLP means that client UAs will be sending multiple request packets to every<br />
scope in the network. This may put unnecessary traffic on the WAN that could be managed more<br />
effectively with a regional approach to SLP design.<br />
The SA on <strong>NetWare</strong> <strong>5.1</strong> servers will query every scope known to them to find services. In a global<br />
approach all servers know all scopes. This may put unnecessary overhead on the network. It may<br />
be more prudent to create a very limited global scope and regional scopes so that SAs limit the<br />
number of scopes they query, and queries to the global scopes only return results when the<br />
services they are looking for are in that scope.<br />
Page 235 of 317 Novell PartnerNet Confidential 07/24/00<br />
Copyright © 2000 by Novell, Inc.
DAs will know about all DAs and therefore all scopes so all DAs will query all scopes when their<br />
UAs look for services. This is true in all approaches to SLP, so the amount of overhead traffic is<br />
directly proportional to the number of scopes in the network.<br />
64KB SLP Response Packet Size Limit<br />
Depending on the size of the customer’s network and/or the amount of CMD servers in the<br />
environment, you may run up against the 64 KB single response packet limitation of SLPv1. This<br />
may necessitate the implementation of more regional scopes, this would increase SLP overhead<br />
traffic if consideration were not given to regionalizing the SLP traffic and limiting the number of<br />
globally available scopes.<br />
CMD Requirements for Scoping<br />
The number of CMD servers in the network and the average number of SAPs advertised by each<br />
CMD server can drastically limit the number of servers per SLP scope. This means that the<br />
number of scopes can increase drastically as a result. This may necessitate the implementation of<br />
more regional scopes, this would increase SLP overhead traffic if consideration were not given to<br />
regionalizing the SLP traffic and limiting the number of globally available scopes.<br />
Need to Limit Service Visibility<br />
If the customer is currently filtering SAP services in order to limit service visibility, then a<br />
regional, or service visibility area approach may need to be taken in order to accommodate the<br />
customers design goals and criteria for their SLP environment.<br />
Page 236 of 317 Novell PartnerNet Confidential 07/24/00<br />
Copyright © 2000 by Novell, Inc.
A Regional SLP Design Example<br />
This section will focus on a customer whose needs indicated that a regional approach to SLP was<br />
in order. This section will not include the comprehensive technical information given earlier. If<br />
you do not understand the concepts being laid out in this section, you should return to the<br />
beginning of this section and review the technical information supplied in the preceding sections.<br />
The Customer Environment<br />
This section will explore the customer’s environment and the criteria upon which the design<br />
decisions are made.<br />
WAN Environment<br />
The customer’s WAN diagrams (Figure D31) show that they have over 800 sites connected by<br />
Frame Relay to three major hub sites. These three hub sites are connected in a linear fashion and<br />
there is no redundancy in the WAN backbone of the environment or at connected sites. The vast<br />
majority of the satellite sites are connected via Frame links that are 28.8kbps CIR with a 56kbpsclock<br />
rate. The hub sites are connected via T-1 clocked, 256kbps CIR Frame circuits. None of the<br />
circuits are compressed.<br />
~266 56k FR 28.8 CIR<br />
Mixed NWIP,IPX<br />
NWIP<br />
DSS<br />
Hub Site<br />
Region B<br />
no multicast<br />
~266 regional sites<br />
~86 servers<br />
Proposed CMD Region<br />
no multicast<br />
T-1 FR 256k CIR<br />
IP Only<br />
~266 56k FR 28.8 CIR<br />
Mixed NWIP,IPX<br />
NWIP<br />
DSS<br />
Hub Site<br />
Region A<br />
~266 regional sites<br />
~173 servers<br />
Proposed CMD Regions<br />
T-1 FR 256k CIR<br />
IP Only<br />
Page 237 of 317 Novell PartnerNet Confidential 07/24/00<br />
Copyright © 2000 by Novell, Inc.<br />
~266 56k FR 28.8 CIR<br />
Mixed NWIP,IPX<br />
Figure D31. Customer WAN diagram with Proposed CMD Region<br />
no multicast<br />
NWIP<br />
DSS<br />
Hub Site<br />
Region C<br />
no multicast<br />
~266 regional sites<br />
~86 servers<br />
Proposed CMD Region<br />
This customer has NWIP in their environment. DSS servers are located at each of the three major<br />
hub sites. Some satellite sites have forwarding gateways, some are NWIP sites and some are IPX<br />
only sites (correctional facilities) where IP traffic (for Internet access) is not allowed. The use of
NWIP will make it necessary to implement Migration Agents (MA) and CMD servers to maintain<br />
full connectivity during the migration process.<br />
Multicast is not supported even between LAN segments on the same physical site.<br />
The top level NDS has been designed to represent the WAN architecture, which facilitates the SLP<br />
infrastructure design.<br />
The Customer has about 400 <strong>NetWare</strong> servers in their entire environment.<br />
They currently do not use DHCP. All IP configuration on the clients is manual.<br />
LAN Environment<br />
The vast majority of this customer’s satellite offices consist of single server, or client only sites.<br />
Many of these sites have no need to communicate with other sites. The links are there for<br />
administrative purposes, client connectivity from non-server sites, and for the occasional user who<br />
in fact does connect to other sites. In spite of this scenario, many sites have severely congested<br />
WAN links. This is mainly due to the use of terminal emulators, and congestion in the FR provider<br />
network, not <strong>NetWare</strong> traffic.<br />
User Environment<br />
The majority, if not all, of the clients use the Novell client software. Little or none of them use<br />
Microsoft networking. ZENworks is not in use in the environment. They currently do not use<br />
DHCP. All IP configuration on the clients is manual.<br />
Design Goals and Criteria<br />
We have established that the customer’s offices do not need the global browsing capabilities<br />
provided with SAP or global SLP designs. It is therefore unnecessary to place the overhead of a<br />
global SLP design on the customer’s slow network links.<br />
The speed and congestion of some links and of the Frame Relay service provider’s network<br />
preclude requiring users to make requests to several global scopes.<br />
The lack of a multicast environment means servers and clients both will need to be statically<br />
configured.<br />
The use of NWIP will require the setup of Migration Agents.<br />
To outline, the customer’s objectives are as follows:<br />
• Provide local short name resolution.<br />
• Minimize the number of scopes.<br />
• Minimize NDS synchronization across WAN links.<br />
• Minimize SLP overhead traffic across WAN links.<br />
• Provide an SLP architecture to support the Migration Agent architecture.<br />
• Provide the ability for a select few individuals to do global SLP browsing.<br />
Page 238 of 317 Novell PartnerNet Confidential 07/24/00<br />
Copyright © 2000 by Novell, Inc.
Limitations and Considerations<br />
The primary considerations driving this architecture are the severely constrained and slow<br />
bandwidth WAN circuits. This absolutely necessitates minimization of the NDS sync. and SLP<br />
overhead traffic.<br />
Secondly, the SLP architecture was required because of the intended CMD servers in the<br />
environment. The NWIP architecture is very sensitive to the creation of routing loops so a<br />
carefully crafted SLP architecture is necessary to support the CMD architecture and the Migration<br />
Agents until the upgrade process is complete.<br />
Finally, the use of CMD in the environment precludes the creation of large scopes and requires a<br />
minimum of 4 scopes based on an average number of 4 to 5 SAPs per CMD server.<br />
Phase I—SLP Infrastructure Design<br />
This section will outline the actual design that was derived from the information collected above.<br />
NDS Design<br />
Figure D32 shows how the SLP NDS Information was integrated into the customer’s existing<br />
NDS Infrastructure.<br />
Page 239 of 317 Novell PartnerNet Confidential 07/24/00<br />
Copyright © 2000 by Novell, Inc.
Org. Name<br />
State/locality 1<br />
B-Region Hub<br />
SLP-Management<br />
B-Region Scope<br />
Regional SLP/NDS Design<br />
[ROOT] (Sample_Tree)<br />
SLP-Management<br />
DA Objects Global Scope<br />
Object<br />
A-Region Hub<br />
SLP-Management<br />
A1-Region<br />
Scope<br />
A2-Region<br />
Scope<br />
Grey areas indicate<br />
partition boundaries<br />
The SLP-Management Container should contain<br />
the Directory Agent (DA) and global SLP Scope<br />
Objects. This partition should be replicated to all<br />
DA Servers. This should not represent a<br />
problem provided that these scopes are<br />
relatively small, or adequate WAN resoursces<br />
exist to handle the replication traffic, and/or the<br />
"SLP SA Default Lifetime" is increased in order<br />
to reduce the frequency of updates to the SLP<br />
scope database.<br />
C-Region Hub<br />
SLP-Management<br />
C-Region Scope<br />
Figure D32. NDS Architecture to support a Regional SLP Design<br />
As you review this diagram please take note of the following:<br />
SLP-Management containers<br />
at the WAN hubs and Major<br />
sites are only used if a<br />
scoped configuration is used.<br />
If an unscoped or global<br />
configuration is used then<br />
these SLP-Management<br />
containers would not exist.<br />
Note that DAs are still listed<br />
at the global SLP-<br />
Management level. This is<br />
done because the latest<br />
versions of SLP will allow<br />
NDS based SLP Directory<br />
Agent discovery.<br />
• The SLP-Management container at the root of the tree is intended to be partitioned. The<br />
SLP-Management containers at the three hub sites are intended to be partitioned also.<br />
• The Global SLP-Management partition, which contains all of the DA objects, is<br />
replicated to all of the DAs as is the global scope partition.<br />
• The regional SLP-Management partitions with their regional scopes are replicated only<br />
between servers at the regional hub site.<br />
This approach limits NDS synchronization and SLP registration traffic that crosses the WAN<br />
backbone to only those services that are placed in the global scope. This allows services to remain<br />
local or regional except for the “essential” services that it is determined should be globally<br />
available. Services are published globally by redirecting service types to the global scope, or<br />
placing static entries for essential services in the global scope.<br />
Directory Agent (DA) Placement and Configuration<br />
The logical choice in placing the DAs was one of two approaches:<br />
Page 240 of 317 Novell PartnerNet Confidential 07/24/00<br />
Copyright © 2000 by Novell, Inc.
• Place the DAs on the existing NDS replica servers in the customer environment.<br />
• Add an additional replica server to each hub site to support NDS, SLP and CMD/MA.<br />
Because the current replica servers are the NWIP DSS servers and these servers will be connecting<br />
the three separate CMD environments at the customer site, the customer chose to provide new<br />
servers to host NDS, SLP and CMD/MA services. The addition of these replica servers allowed<br />
the customer to further reduce NDS replication across the WAN links by allowing the elimination<br />
of fault tolerant replicas that were at other WAN hub sites.<br />
For fault tolerance, the customer does intend to deploy a backup set of DAs once the <strong>NetWare</strong> <strong>5.1</strong><br />
migration is complete.<br />
The SLP Region ‘A’ DA configuration<br />
First we will cover the SLP set parameters that are set on the region ‘A’ DA. As you will see many<br />
of these parameters are identical across all DAs which will ease the complexity of modifying and<br />
distributing these set commands as well as the configuration files.<br />
The set parameters may be set through the monitor utility, set at the command prompt, or set with<br />
an NCF file. It is also possible to distribute these settings or NCF files with the On-Site Admin Pro<br />
utility available on the Novell Support web site at http://support.novell.com.<br />
The set parameters are as follows:<br />
• “Set SLP Scope List = A1-Region” This is necessary to tell the DA to register all of its<br />
own services with one of the ‘A’ Region scopes.<br />
• “Set SLP SA Default Lifetime = 65535” This setting (in seconds) pushes the TTL<br />
renewal time for SLP services that the DAs SA registers to slightly more than 18 hours,<br />
thus reducing SLP overhead traffic.<br />
• “Set SLP Discovery Option = 6” This setting tells the DA to turn off multicast discovery<br />
and discover other DAs via the static configuration in its SLP.CFG file. It also allows the<br />
server to use DHCP to discover DAs if and when the customer decides to use DHCP.<br />
Also remember that in NW5SP3 and later the SLP modules have supported DA discovery<br />
via NDS, which is why we placed all of the DA objects in the same context.<br />
Next we will look at the A-Region SLP.CFG file. An example follows:<br />
;This is a sample of the SLP configuration file.<br />
;Two types of entries can be made: 1)DA entries, 2)SA Register Filters<br />
;<br />
;The DA entry allows static configuration of a known DA. This would be used when<br />
;the DA is out of multicast range (or multicast is not supported) and DHCP is<br />
;not being used to configure the DA.<br />
;The static DA configuration format is as follows ‘DA , ’.<br />
;The first word must be “DA”. The Addr Type is the address type. Currently, only<br />
;IPv4 has been defined. IPv6 will be defined in the future. The Addr is the IP<br />
;Address specified. NW5SP3 or later will also support FQDN DNS names.<br />
;<br />
;The following is an example of a static DA.<br />
;DA IPV4, 130.1.1.1<br />
;<br />
;The SA Register Filter would be used when the administrator wanted all services<br />
;of a specific type to be mapped to specific scope/s. For example, the<br />
;administrator wants all “LPR” printers mapped to scopes “print” and “a-region”.<br />
;The format is as follows: ‘REGISTER TYPE ““ to SCOPE ““’.<br />
;The parser will look for REGISTER, TYPE and SCOPE as keywords followed by a<br />
;double quote on a single line. Multiple scopes are defined with a comma<br />
;delimited list. Example:<br />
;<br />
;REGISTER TYPE “lpr” to SCOPE “print,a-region”<br />
;<br />
REGISTER TYPE “mgw.novell” to SCOPE “global,a1-region”<br />
Page 241 of 317 Novell PartnerNet Confidential 07/24/00<br />
Copyright © 2000 by Novell, Inc.
REGISTER TYPE “ndap.novell” to SCOPE “global,a1-region”<br />
;<br />
;The last line in the file must contain a carriage return and line feed. A<br />
;semicolon specifies a comment.<br />
;<br />
DA IPV4, a-region-da.state.us<br />
DA IPV4, b-region-da.state.us<br />
DA IPV4, c-region-da.state.us<br />
The first thing you will note is that the “ndap.novell” and “mgw.novell” services this servers SA<br />
registers are being redirected to both its regional scope and the global scope. These services were<br />
redirected to the ‘Global’ scope because it was determined that “ndap.novell” and ‘mgw.novell’<br />
services should be globally available to increase the performance of locating migration agent<br />
servers and to facilitate NDS tree walking. Note that this is not a necessity it can however boost<br />
performance. The scopes are defined as a comma delimited list. The regional scope is in the list<br />
because once a service type is redirected it will no longer register with the scope(s) in its scope list<br />
unless it is specifically sent there.<br />
Next you will see that the DA has all of the DAs in its static list, including itself, as the first server<br />
in its list of DAs its SA will attempt to talk to.<br />
Finally, The DA object for the ‘A’ region DA is configured to serve the scopes:<br />
• A1-Region<br />
• A2-Region<br />
• Global<br />
You will note that A-Region is the only one with two regional scopes. This is due to the use of<br />
CMD in the environment, and the concentration of CMD servers in this particular hub site.<br />
The SLP Region ‘B’ DA configuration<br />
First we will cover the SLP set parameters that are set on the region ‘B’ DA.<br />
The set parameters are as follows:<br />
• “Set SLP Scope List = B-Region” This is necessary to tell the DA to register all of its<br />
own services with the ‘B’ Region scope.<br />
• “Set SLP SA Default Lifetime = 65535” This setting (in seconds) pushes the TTL<br />
renewal time for SLP services that the DAs SA registers to slightly more than 18 hours,<br />
thus reducing SLP overhead traffic.<br />
• “Set SLP Discovery Option = 6” This setting tells the DA to turn off multicast discovery<br />
and discover other DAs via the static configuration in its SLP.CFG file. It also allows the<br />
server to use DHCP to discover DAs if and when the customer decides to use DHCP.<br />
Also remember that in NW5SP3 and later the SLP modules have supported DA discovery<br />
via NDS, which is why we placed all of the DA objects in the same context.<br />
Next we will look at the B-Region SLP.CFG file. An example follows:<br />
;This is a sample of the SLP configuration file.<br />
;Two types of entries can be made: 1)DA entries, 2)SA Register Filters<br />
;<br />
;The DA entry allows static configuration of a known DA. This would be used when<br />
;the DA is out of multicast range (or multicast is not supported) and DHCP is ;not<br />
being used to configure the DA.<br />
;The static DA configuration format is as follows ‘DA , ’.<br />
;The first word must be “DA”. The Addr Type is the address type. Currently, only<br />
;IPv4 has been defined. IPv6 will be defined in the future. The Addr is the IP<br />
;Address specified. NW5SP3 or later will also support FQDN DNS names.<br />
Page 242 of 317 Novell PartnerNet Confidential 07/24/00<br />
Copyright © 2000 by Novell, Inc.
;<br />
;The following is an example of a static DA.<br />
;DA IPV4, 130.1.1.1<br />
;<br />
;The SA Register Filter would be used when the administrator wanted all services<br />
;of a specific type to be mapped to specific scope/s. For example, the<br />
;administrator wants all “LPR” printers mapped to scopes “print” and “a-region”.<br />
;The format is as follows: ‘REGISTER TYPE ““ to SCOPE ““’.<br />
;The parser will look for REGISTER, TYPE and SCOPE as keywords followed by a<br />
;double quote on a single line. Multiple scopes are defined with a comma<br />
;delimited list. Example:<br />
;<br />
;REGISTER TYPE “lpr” to SCOPE “print,a-region”<br />
;<br />
REGISTER TYPE “mgw.novell” to SCOPE “global,b-region”<br />
REGISTER TYPE “ndap.novell” to SCOPE “global,b-region”<br />
;<br />
;The last line in the file must contain a carriage return and line feed. A<br />
;semicolon specifies a comment.<br />
;<br />
DA IPV4, b-region-da.state.us<br />
DA IPV4, a-region-da.state.us<br />
DA IPV4, c-region-da.state.us<br />
The first thing you will note is that the “ndap.novell” and “mgw.novell” services this servers SA<br />
registers are being redirected to both its regional scope and the global scope. These services were<br />
redirected to the ‘Global’ scope because it was determined that “ndap.novell” and ‘mgw.novell’<br />
services should be globally available to increase the performance of locating migration agent<br />
servers and to facilitate NDS tree walking. Note that this is not a necessity it can however boost<br />
performance. The scopes are defined as a comma delimited list. The regional scope is in the list<br />
because once a service type is redirected it will no longer register with the scope(s) in its scope list<br />
unless it is specifically sent there.<br />
Next you will see that the DA has all of the DAs in its static list, including itself, as the first server<br />
in its list of DAs its SA will attempt to talk to.<br />
Finally, The DA object for the ‘B’ region DA is configured to serve the scopes:<br />
• B-Region<br />
• Global<br />
The SLP Region ‘C’ DA configuration<br />
First we will cover the SLP set parameters that are set on the region ‘C’ DA.<br />
The Set Parameters are as follows:<br />
• “Set SLP Scope List = C-Region” This is necessary to tell the DA to register all of its<br />
own services with the ‘C’ Region scope.<br />
• “Set SLP SA Default Lifetime = 65535” This setting (in seconds) pushes the TTL<br />
renewal time for SLP services that the DAs SA registers to slightly more than 18 hours,<br />
thus reducing SLP overhead traffic.<br />
• “Set SLP Discovery Option = 6” This setting tells the DA to turn off multicast discovery<br />
and discover other DAs via the static configuration in its SLP.CFG file. It also allows the<br />
server to use DHCP to discover DAs if and when the customer decides to use DHCP.<br />
Page 243 of 317 Novell PartnerNet Confidential 07/24/00<br />
Copyright © 2000 by Novell, Inc.
Also remember that in NW5SP3 and later the SLP modules have supported DA discovery<br />
via NDS, which is why we placed all of the DA objects in the same context.<br />
Next we will look at the C-Region SLP.CFG file. An example follows:<br />
;This is a sample of the SLP configuration file.<br />
;Two types of entries can be made: 1)DA entries, 2)SA Register Filters<br />
;<br />
;The DA entry allows static configuration of a known DA. This would be used when<br />
;the DA is out of multicast range (or multicast is not supported) and DHCP is ;not<br />
being used to configure the DA.<br />
;The static DA configuration format is as follows ‘DA , ’.<br />
;The first word must be “DA”. The Addr Type is the address type. Currently, only<br />
;IPv4 has been defined. IPv6 will be defined in the future. The Addr is the IP<br />
;Address specified. NW5SP3 or later will also support FQDN DNS names.<br />
;<br />
;The following is an example of a static DA.<br />
;DA IPV4, 130.1.1.1<br />
;<br />
;The SA Register Filter would be used when the administrator wanted all services<br />
;of a specific type to be mapped to specific scope/s. For example, the<br />
;administrator wants all “LPR” printers mapped to scopes “print” and “a-region”.<br />
;The format is as follows: ‘REGISTER TYPE ““ to SCOPE ““’.<br />
;The parser will look for REGISTER, TYPE and SCOPE as keywords followed by a<br />
;double quote on a single line. Multiple scopes are defined with a comma<br />
;delimited list. Example:<br />
;<br />
;REGISTER TYPE “lpr” to SCOPE “print,a-region”<br />
;<br />
REGISTER TYPE “mgw.novell” to SCOPE “global,c-region”<br />
REGISTER TYPE “ndap.novell” to SCOPE “global,c-region”<br />
;<br />
;The last line in the file must contain a carriage return and line feed. A<br />
;semicolon specifies a comment.<br />
;<br />
DA IPV4, c-region-da.state.us<br />
DA IPV4, b-region-da.state.us<br />
DA IPV4, a-region-da.state.us<br />
The first thing you will note is that the “ndap.novell” and “mgw.novell” services this servers SA<br />
registers are being redirected to both its regional scope and the global scope. These services were<br />
redirected to the ‘Global’ scope because it was determined that “ndap.novell” and ‘mgw.novell’<br />
services should be globally available to increase the performance of locating migration agent<br />
servers and to facilitate NDS tree walking. Note that this is not a necessity it can however boost<br />
performance. The scopes are defined as a comma delimited list. The regional scope is in the list<br />
because once a service type is redirected it will no longer register with the scope(s) in its scope list<br />
unless it is specifically sent there.<br />
Next you will see that the DA has all of the DAs in its static list, including itself, as the first server<br />
in its list of DAs its SA will attempt to talk to.<br />
Finally, The DA object for the ‘C’ region DA is configured to serve the scopes:<br />
• C-Region<br />
• Global<br />
Page 244 of 317 Novell PartnerNet Confidential 07/24/00<br />
Copyright © 2000 by Novell, Inc.
<strong>NetWare</strong> <strong>5.1</strong> Server Agent (SA) Configuration<br />
First we will cover the SLP set parameters that are set on all non-DA <strong>NetWare</strong> <strong>5.1</strong> servers. Note<br />
that X-Region denotes the region the server resides in. Also note that the servers in A-Region are<br />
split between the two A-Region scopes.<br />
The set parameters are as follows:<br />
• “Set SLP Scope List = X-Region” This is necessary to tell the servers SA to register all of<br />
its services with the ‘X’ Region scope.<br />
• “Set SLP SA Default Lifetime = 65535” This setting (in seconds) pushes the TTL<br />
renewal time for SLP services that the SA registers to slightly more than 18 hours, thus<br />
reducing SLP overhead traffic.<br />
• “Set SLP Discovery Option = 6” This setting tells the SA to turn off multicast discovery<br />
and discover DAs via the static configuration in its SLP.CFG file. It also allows the<br />
server to use DHCP to discover DAs if and when the customer decides to use DHCP.<br />
Next we will look at the non-DA SLP.CFG file. An example follows:<br />
;This is a sample of the SLP configuration file.<br />
;Two types of entries can be made: 1)DA entries, 2)SA Register Filters<br />
;<br />
;The DA entry allows static configuration of a known DA. This would be used when<br />
;the DA is out of multicast range (or multicast is not supported) and DHCP is ;not<br />
being used to configure the DA.<br />
;The static DA configuration format is as follows ‘DA , ’.<br />
;The first word must be “DA”. The Addr Type is the address type. Currently, only<br />
;IPv4 has been defined. IPv6 will be defined in the future. The Addr is the IP<br />
;Address specified. NW5SP3 or later will also support FQDN DNS names.<br />
;<br />
;The following is an example of a static DA.<br />
;DA IPV4, 130.1.1.1<br />
;<br />
;The SA Register Filter would be used when the administrator wanted all services<br />
;of a specific type to be mapped to specific scope/s. For example, the<br />
;administrator wants all “LPR” printers mapped to scopes “print” and “a-region”.<br />
;The format is as follows: ‘REGISTER TYPE ““ to SCOPE ““’.<br />
;The parser will look for REGISTER, TYPE and SCOPE as keywords followed by a<br />
;double quote on a single line. Multiple scopes are defined with a comma<br />
;delimited list. Example:<br />
;<br />
;REGISTER TYPE “lpr” to SCOPE “print,a-region”<br />
;<br />
REGISTER TYPE “mgw.novell” to SCOPE “global,X-region”<br />
REGISTER TYPE “ndap.novell” to SCOPE “global,X-region”<br />
;<br />
;The last line in the file must contain a carriage return and line feed. A<br />
;semicolon specifies a comment.<br />
;<br />
DA IPV4, X-region-da.state.us<br />
The first thing you will note is that the “ndap.novell” and “mgw.novell” services this servers SA<br />
registers are being redirected to both its regional scope and the global scope. These services were<br />
redirected to the ‘Global’ scope because it was determined that “ndap.novell” and ‘mgw.novell’<br />
services should be globally available to increase the performance of locating migration agent<br />
servers and to facilitate NDS tree walking. Note that this is not a necessity it can however boost<br />
performance. The scopes are defined as a comma delimited list. The regional scope is in the list<br />
Page 245 of 317 Novell PartnerNet Confidential 07/24/00<br />
Copyright © 2000 by Novell, Inc.
ecause once a service type is redirected it will no longer register with the scope(s) in its scope list<br />
unless it is specifically sent there.<br />
Next you will see that the server has only one DA in its static list of servers its SA will attempt to<br />
talk to. Note that in a fault tolerant configuration there would be two DAs serving this scope.<br />
Phase II—Client Configuration<br />
The most difficult piece of setting up the SLP infrastructure really occurs in phase one. Once all of<br />
the SLP services on the network have been registered with the directory agents, the client<br />
workstations can query the directory agents and retrieve lists of available SLP services in their<br />
region of the network. The few clients who need to see services from other regions simply add<br />
those regions to their scope lists, and the DAs that serves them to their DA list. The only thing that<br />
is really required for the client workstations to make use of the SLP infrastructure is the<br />
installation of the latest version of the <strong>NetWare</strong> client.<br />
Configuring the Client Workstation<br />
As was explained in the section “Service Location Protocol,” there are a number of ways a client<br />
workstation can resolve services on the network. Because this customer requires local short name<br />
resolution and browsing of network resources, client workstations are going to need to utilize the<br />
SLP infrastructure. The other methods of service resolution can still be used for global name<br />
resolution, but SLP should be the primary method of local service resolution on the network.<br />
After the latest <strong>NetWare</strong> client has been installed on the client workstation, it will attempt to use<br />
the SLP infrastructure by default. This can be verified in the property pages of the Novell client.<br />
To see these property pages, go into the Network applet on Windows 95/98/NT. Enter the property<br />
pages of the Novell client. Once there, select the Protocol Preferences tab. On that property page,<br />
the various methods of name resolution are displayed, as shown in Figure D33.<br />
Page 246 of 317 Novell PartnerNet Confidential 07/24/00<br />
Copyright © 2000 by Novell, Inc.
Figure D33. The Novell client property pages on Windows NT.<br />
For the client to use the SLP infrastructure, the box to the left of SLP must be checked. It will also<br />
make the client more efficient if unused name resolution mechanisms are unchecked. For instance,<br />
if DNS is not going to be used as a method of name resolution for <strong>NetWare</strong> client services, the<br />
box to the left of DNS should be unchecked. This will not affect normal DNS name resolution for<br />
general IP-based applications, such as Netscape.<br />
There are some other parameters that need to be configured for the clients to be able to use the<br />
SLP infrastructure that was set up in phase one. Because the customer is not using multicast as a<br />
discovery mechanism for directory agents, the directory agent addresses must be statically<br />
configured at the client. With this, the SLP Scope List for the clients must also be modified. This<br />
is accomplished through the Service Location tab, which is shown in Figure D34.<br />
In the Service Location tab, there are places to specify the Scope List and the Directory Agent<br />
List. The Directory Agent List can hold either the IP addresses of the directory agents on the<br />
network, or it can hold the fully qualified DNS names of the directory agents. The Scope List<br />
specifies to which scopes the client workstation belongs. As can be seen in Figure D34, the client<br />
workstation belongs to both the SLP_SCOPE1_US and SLP_SCOPE2_US scopes. The reason for<br />
this will be explained. The check in the Static box means the client is statically configured.<br />
Page 247 of 317 Novell PartnerNet Confidential 07/24/00<br />
Copyright © 2000 by Novell, Inc.
Figure D34. The Service Location property page of the Windows NT Novell client.<br />
As was shown in the previous section, the servers available on the network have been split<br />
between four separate scopes. Since most of the clients belong to a single scope, they will only be<br />
able to see those servers that also belonged to that scope. This does not violate this customer’s<br />
functional requirements of the SLP infrastructure; however, making the client a member of more<br />
than one scope will allow the client to see all of the servers on the network that are in those<br />
scopes.<br />
The one drawback to this phase of the rollout is that the client workstations need to be manually<br />
configured because this customer cannot make use of DHCP or ZENworks to automate the rollout<br />
of the SLP information. However, if a tool is available that will allow the network administrators<br />
to make Windows registry modifications remotely, these modifications can be automated. Novell<br />
strongly urges the automation of as much of this configuration as possible within a given<br />
computing environment.<br />
Modeling Client Service Resolution Traffic<br />
While it is straightforward to configure the client workstations to use the SLP infrastructure, it is<br />
important to understand how the clients are actually using the infrastructure for service resolution.<br />
In the event there are performance problems, this insight will aid in the problem resolution.<br />
When a client first boots up, it will attempt to find its preferred tree or preferred server. To do this,<br />
it will issue an SLP service request looking for a list of services available on the network. Before<br />
actually sending out the SLP queries, the workstation will have determined its primary directory<br />
Page 248 of 317 Novell PartnerNet Confidential 07/24/00<br />
Copyright © 2000 by Novell, Inc.
agents on the network. A primary directory agent will be specified for each of the workstation’s<br />
SLP scopes.<br />
In the case of the customer’s SLP infrastructure, the client workstation will look to its static list of<br />
available directory agents. It will attempt to activate each one of those directory agents<br />
simultaneously. The first directory agent to respond will be considered the “primary” directory<br />
agent. Subsequent replies will cause the workstation to mark the directory agent as “active”, but it<br />
will not submit queries to those directory agents unless the primary directory agent is unavailable<br />
or the query is to a scope that can only be serviced by another directory agent.<br />
This process is repeated for each of the workstation’s SLP scopes. Thus, each client workstation<br />
will have two primary directory agents. One primary directory agent will be designated for<br />
GLOBAL, and one primary directory agent will be designated for X-REGION. The primary<br />
directory agents for each scope may be the same or it may be different once fault tolerant DAs are<br />
setup. It all depends upon the network latency and quickness of response on the part of the<br />
directory agents on the network.<br />
When a query for SLP services is requested, such as the one to resolve the preferred tree or<br />
preferred server, the workstation will send a query to each of its primary directory agents. Thus,<br />
for each service resolution, the SLP user agent on the workstation really makes two separate<br />
queries to each scope, collates the results, and passes the information back to the requesting<br />
application (Figure D35).<br />
One important fact to glean from Figure D35 is that all SLP service requests must cross at least<br />
one WAN link to get to a directory agent. In the event the WAN link is not available, there will<br />
not be any global service resolution from SLP. As will be explained in the next section, clients<br />
will still be able to access local <strong>NetWare</strong> services that are reachable via multicast. But network<br />
browsing will not be available until the WAN link connection is restored.<br />
Main DA<br />
Primary DA<br />
GLOBAL<br />
Frame Relay<br />
Hub site Regional office<br />
(Regional)<br />
Fault Tolerance DA<br />
Primary DA<br />
X-REGION<br />
Service Request<br />
bindery.novell<br />
Service Request<br />
bindery.novell<br />
Desktop System<br />
Figure D35. Sample SLP service resolution process for the SLP infrastructure.<br />
Page 249 of 317 Novell PartnerNet Confidential 07/24/00<br />
Copyright © 2000 by Novell, Inc.
In the event the primary directory agent is not available, the client will wait for a response based<br />
upon the Wait Before Giving Up On DA timer. By default, this value is five seconds. Once the<br />
client deems the DA unreachable, the client will attempt to contact the next active DA for that<br />
scope in its list.<br />
The client workstation will cache information it receives about services through SLP. The Cache<br />
SLP Replies timer on the workstation determines the amount of time this information is kept. By<br />
default, this value is one minute. The default values for these settings should be acceptable for the<br />
customer’s SLP infrastructure.<br />
WAN Link Failures and Client Fault Tolerance<br />
By looking at Figure D35, it is clear to see the SLP infrastructure is dependent upon the WAN<br />
links at this customer. The T-1 backbone connecting the hub sites is not redundant, and the WAN<br />
links connecting the regional offices back to the hub sites are not either. Additionally, the clients<br />
are dependent upon SLP to find their preferred server or preferred tree. How then will the clients<br />
be able to connect to their local file server in the event of a WAN link failure?<br />
There are two states that need to be addressed to completely answer this question, but the baseline<br />
is that the clients and local servers will fall back to the default method of SLP communication.<br />
They will begin to use multicast to find the services that are local to them. This means that<br />
multicast must be enabled on a per regional office basis. No multicast needs to cross the WAN<br />
links when they are active, but all machines need to participate in a local multicast infrastructure<br />
in the event the SLP infrastructure is unavailable due to a WAN link failure. This works for this<br />
customer because the vast majority of the satellite offices are single segment networks, and the<br />
hub sites host the DAs.<br />
How the client workstation will respond to this WAN link failure is dependent upon the state of<br />
the client. There are two scenarios, and they are listed below:<br />
• The client workstation is booted after the WAN link failure.<br />
• The client workstation was using the SLP infrastructure before the WAN link failure.<br />
In the event the client workstation is booted after the WAN link failure, the machine will come up<br />
as normal. It will attempt to activate the directory agents listed in its statically configured list;<br />
however, they will not be activated because the WAN link is down. After the activation process<br />
fails, the client workstation will use the normal multicast method of SLP communication, as<br />
described in the section “Default SLP Communications,” to find any services that are local to it.<br />
This is the final fail-over mechanism for SLP.<br />
In the event the client workstation was using the SLP infrastructure before the WAN link failure,<br />
the machine may not experience any difficulties unless the user attempts to access a network<br />
resource not on the local LAN. Only if an SLP query is sent from the client to the directory agents<br />
after the WAN link failure will there be a delay in services. The client workstation will attempt to<br />
contact its primary DA for each scope and fail after five seconds. If fault tolerant DAs have been<br />
set up, it will then attempt to contact the next active DA in the list, which will also fail after five<br />
seconds. After that, it will use the normal multicast method of SLP communication to find any<br />
services that are local to it. Because each client workstation has two configured directory agents in<br />
a fault tolerant configuration, the time out period should be ten seconds before reverting to<br />
multicast.<br />
Once the WAN link connectivity has been restored, the client workstations should eventually<br />
reactivate their directory agents. However, to quickly facilitate this reactivation, reboot the<br />
workstations.<br />
Page 250 of 317 Novell PartnerNet Confidential 07/24/00<br />
Copyright © 2000 by Novell, Inc.
When to Use a Regional Approach to SLP<br />
This section discusses the circumstances when a regional approach to SLP infrastructure design<br />
might be appropriate.<br />
Scalability<br />
The regional approach to SLP provides the greatest level of scalability of any type of SLP design.<br />
Environmental Needs<br />
Every customer environment is unique and must be assessed individually. There are certain<br />
environmental factors in a customer’s network that would tend to lead you toward a regional SLP<br />
design approach.<br />
Large Enterprise Networks<br />
This is appropriate for very large networks where SAP filtering is in common use today and<br />
services are not generally globally available.<br />
Need to Minimize NDS Synchronization Across WANs<br />
WAN link constraints may require you to avoid replication of non-essential services globally.<br />
Need to Reduce the Size of Partitions and Replica Rings<br />
Large environments may have many DAs. A global approach to design may result in an inordinate<br />
number of objects per partition or replicas per partition and as a result a large amount of NDS<br />
synchronization traffic. In these instances a regional approach to SLP design would be in order.<br />
Page 251 of 317 Novell PartnerNet Confidential 07/24/00<br />
Copyright © 2000 by Novell, Inc.
Appendix E—Double-Byte Compatibility<br />
Issues<br />
Asian Double-Byte Compatibility—Basic Issues<br />
Numerous sources describe the Asian double-byte compatibility issues. The following sections list<br />
a few very basic compatibility issues and what to watch for.<br />
Background<br />
Most Indo-European writing system characters can be rendered on computer systems using singlebyte<br />
code pages. Asian writing systems, however, contain many thousands of characters and need<br />
double-byte code pages to have enough combinations to render the characters.<br />
Problem Areas<br />
Monocasing or Uppercasing<br />
While English single-byte characters can generally be monocased (upper/lower cased) without<br />
causing problems, Asian double-byte characters must not be monocased or the rendered characters<br />
will change.<br />
Wildcard and Path Delimiter Characters<br />
Because some Asian double-byte characters use code points that are wildcard characters (“*” star,<br />
“.” dot, “?” question mark) and the path delimiter character (“\” back slash), <strong>NetWare</strong> must<br />
temporarily change these characters to different values to avoid confusing them with wildcard<br />
characters. Consequently these characters (2Ah, 2Eh, 3Fh, 5Ch) are “OR’ed” with 80h to produce<br />
augmented characters AAh, AEh, BFh, and 5Ch respectively. When these characters are stored in<br />
the Asian <strong>NetWare</strong> 3.x bindery, they are mapped down to 10h, 11h, 12h, and 13h and saved. The<br />
<strong>NetWare</strong> operating system knows to map up these characters when handing them to other<br />
programs.<br />
How augmented characters are handled and stored on the file system is different, depending upon<br />
the <strong>NetWare</strong> operating system version. For <strong>NetWare</strong> 3.1 these characters are stored mapped down<br />
in the file system; whereas, in <strong>NetWare</strong> 3.11+ these characters are stored mapped up. It is usually<br />
the responsibility of the <strong>NetWare</strong> client software to map up characters before handing them off for<br />
processing or display.<br />
When <strong>NetWare</strong> 4 was modified for Asia, the BINDCONV.EXE utility was created to map up<br />
special bindery characters in a 3.x server bindery before implementing a NETSYNC connection<br />
between a <strong>NetWare</strong> 4 server and the <strong>NetWare</strong> 3.x server. No utility exists, however, to correctly<br />
map up Asian file system characters.<br />
Caveats<br />
Programs that deal with double-byte characters must properly handle mapped down and<br />
augmented characters. Most <strong>NetWare</strong> product utilities have been developed to properly handle<br />
these characters, but not all third-party programs have. Test to ensure that programs properly<br />
handle, transfer, store, print, and correctly display double-byte characters.<br />
Page 252 of 317 Novell PartnerNet Confidential 07/24/00<br />
Copyright © 2000 by Novell, Inc.
Special augmented characters are stored in the file system differently in various <strong>NetWare</strong><br />
products. Programs must be able to recognize this and intelligently convert the special characters<br />
before processing them.<br />
Conclusion<br />
<strong>NetWare</strong> needed to be adapted to avoid confusing and changing Asian double-byte characters. The<br />
<strong>NetWare</strong> server operating system and most <strong>NetWare</strong> product utilities correctly handle “mappeddown”<br />
or “augmented” characters. Third-party developed programs and utilities may or may not<br />
properly handle special double-byte characters, depending on whether or not they properly use<br />
Novell APIs. Applications that blindly monocase characters will certainly ruin or change original<br />
double-byte characters. Test to ensure that original double-byte character values are preserved.<br />
Page 253 of 317 Novell PartnerNet Confidential 07/24/00<br />
Copyright © 2000 by Novell, Inc.
Appendix F—NDS HealthCheck “Lite”<br />
Note: We strongly encourage you to recommend to your customers to purchase a full HealthCheck<br />
from Novell..<br />
We have included a basic HealthCheck “Lite” here to help you to ensure that NDS is stable before<br />
extending the schema for Netware <strong>5.1</strong> At some point, the NDS HealthCheck BSO will also<br />
contain the “Lite” version.<br />
Basic NDS HealthCheck (HealthCheck Lite)<br />
The following items are the steps to take when doing a quick assessment of an NDS tree’s health<br />
before extending the schema. Ensure that you are using the latest NLMs when performing these<br />
tasks.<br />
Back up the DSREPAIR Log<br />
Check the NDS Version<br />
Confirm that the latest version of the DS <strong>NetWare</strong> Loadable Module (NLM) is running on the<br />
network servers. Use NDSMGR or DSREPAIR to verify and/or update DS versions. If using<br />
DSREPAIR, be sure to run it from a server containing a [Root] replica, preferably the Master.<br />
Check NDS Time Synchronization<br />
These are the steps to properly check Time Synchronization:<br />
1. Load DSREPAIR.NLM at server console.<br />
Do this from the server that contains the Master of [Root].<br />
2. From the Available Options menu, select the Time Synchronization option.<br />
3. Verify that YES is displayed in the TIME IS field in the SYNC column.<br />
This can also be accomplished using DSDIAG.NLM:<br />
1. From the Check NDS Versions report, press F8 for Display Options.<br />
2. Enable Additional Info. Timesync Check is an option available from the menu.<br />
Check Partition Continuity<br />
This option is available in DSREPAIR. At a minimum, you want to do this from the server<br />
holding the Master of [Root].<br />
Check “Servers Known to this Database”<br />
This option is available in DSREPAIR. You want to ensure the servers are in an “Up” state. At a<br />
minimum, you want to do this from the server holding the Master of [Root].<br />
Page 254 of 317 Novell PartnerNet Confidential 07/24/00<br />
Copyright © 2000 by Novell, Inc.
Appendix G—<strong>NetWare</strong> <strong>5.1</strong> Rapid<br />
Deployment and Standardization<br />
Strategies<br />
Overview<br />
One of the primary ways to reduce time and costs for deploying <strong>NetWare</strong> <strong>5.1</strong> is to develop a<br />
custom installation solution for the customer. This allows you to tailor the install/upgrade process<br />
to the customer’s individual needs. It attempts to eliminate questions and decision-making<br />
requirements during the install/upgrade. This approach also minimizes training and skill<br />
requirements for the implementation teams. In addition the final product is consistent and<br />
reproducible.<br />
Available Options<br />
A range of options exists in development of a rapid deployment and standardization strategy. The<br />
level of customization should be based on the customer goals and requirements. The following list<br />
outlines the various options:<br />
• <strong>NetWare</strong> Accelerated <strong>Upgrade</strong><br />
• <strong>NetWare</strong> <strong>5.1</strong> Installation with a Response File<br />
• Installations Scripts for <strong>NetWare</strong> <strong>5.1</strong><br />
• Custom CD image with patches and drivers integrated<br />
• RexxWare Migration Tool Kit 2.0+<br />
• Custom NCF/Config file generation<br />
The above options are covered in detail in the sections below.<br />
<strong>NetWare</strong> Accelerated <strong>Upgrade</strong><br />
You can run <strong>NetWare</strong> Accelerated <strong>Upgrade</strong> from a Windows client workstation, so that you don't<br />
need to be physically present at the server console. Although <strong>NetWare</strong> Accelerated <strong>Upgrade</strong> is<br />
quicker than the standard installation process, it does not install additional network products,<br />
licensing services, or license certificates.<br />
For more information:<br />
• http://www.novell.com/documentation/lg/nw51/docui/index.html#../othr_enu/data/ h9v4j5<br />
ki .html<br />
The utility itself is located at the root of the <strong>NetWare</strong> <strong>5.1</strong> Operating System CD (ACCUPG.EXE).<br />
<strong>NetWare</strong> <strong>5.1</strong> Installation with a Response File<br />
Installing the <strong>NetWare</strong> <strong>5.1</strong> operating system software can be easier and more flexible when you<br />
use a response file. When used with the graphical server installation, a response file lets you:<br />
• Set and display specific defaults<br />
• Bypass entire sections of the installation<br />
• Automate the entire server installation process<br />
Page 255 of 317 Novell PartnerNet Confidential 07/24/00<br />
Copyright © 2000 by Novell, Inc.
A response file is a text file containing sections and keys (similar to a Windows .INI file). You can<br />
create a response file using any ASCII text editor. If you use a response file, the <strong>NetWare</strong> <strong>5.1</strong><br />
server installation reads the installation parameters directly from the response file, replacing the<br />
default installation values with response file values.<br />
This process (for <strong>NetWare</strong> 5) is documented in two AppNotes published in December of 1998 and<br />
February of 1999 (see the AppNotes listing at the beginning of this consultant guide).<br />
For more information:<br />
• http://www.novell.com/documentation/lg/nw51/docui/index.html#../othr_enu/data/ h9v4j5<br />
ki .html<br />
The following is a sample response file that can be used as a starting point for automating the<br />
installation process. The specific script elements can be understood from the two AppNotes<br />
mentioned above. The following script was written for <strong>NetWare</strong> 5 and may need to be slightly<br />
modified for <strong>NetWare</strong> <strong>5.1</strong>:<br />
[NWI:Product Information]<br />
Major Version=<strong>NetWare</strong> 5<br />
Minor Version=00<br />
[NWI:Language]<br />
Server Language=4<br />
Prompt=FALSE<br />
[NOVELL:NOVELL_ROOT:1.0.0]<br />
OverwriteNewerVersion=Yes<br />
OverwriteOlderVersion=Yes<br />
ShowWelcomeScreen=No<br />
LogLevel=DEBUG_DETAIL<br />
[Selected Nodes]<br />
prompt=FALSE<br />
Novell:<strong>NetWare</strong>5:1.0.0=Novell:<strong>NetWare</strong>5OS:5.0.0,Novell:Products:1.0.0<br />
Novell:<strong>NetWare</strong>5OS:5.0.0=Novell:Disk<br />
Carver:1.0.0,Novell:Protocols:1.0.0,Novell:DS_Install:1.0.0,Novell:LicensePrompt:1<br />
.0.0,Novell:NW:1.0.0,Novell:NDPS Server Files:1.0.0<br />
Novell:NW:1.0.0=Novell:Startup:1.0.0,Novell:SYS:1.0.0,Novell:DriverFiles:1.0.0<br />
Novell:Startup:1.0.0=Novell:StartupDirectory:1.0.0<br />
Novell:SYS:1.0.0=Novell:SYSDirectory:1.0.0,Novell:ETCDirectory:1.0.0,Novell:PROFIN<br />
ST_NODE:1.0.0<br />
Novell:DriverFiles:1.0.0=Novell:LANFiles:1.0.0,Novell:SBDFiles:1.0.0<br />
Novell:NDPS Server Files:1.0.0=Novell:NDPS System:1.0.0,Novell:NDPS Public:1.0.0<br />
Novell:Products:1.0.0=Novell:NICIInstall:1.0.0<br />
Novell:NICIInstall:1.0.0=Novell:NICIModule:1.0.0<br />
[NWI:Install Options]<br />
<strong>Upgrade</strong>=FALSE<br />
Prompt=FALSE<br />
Startup Directory=C:\NWSERVER<br />
[NWI:Install Script]<br />
Close Script=sys:/system/postgui.ips<br />
[NWI:Locale]<br />
Page 256 of 317 Novell PartnerNet Confidential 07/24/00<br />
Copyright © 2000 by Novell, Inc.
Uses Vgadisp=false<br />
Code Page=850<br />
Country Code=001<br />
Keyboard=United States<br />
Replace DOS Config Files=TRUE<br />
Prompt=FALSE<br />
[NWI:Mouse and Video]<br />
Mouse=PS/2<br />
Use Super Vga=FALSE<br />
Prompt=FALSE<br />
[NWI:Hardware]<br />
CD-ROM Driver=<strong>NetWare</strong><br />
PSM Detection=TRUE<br />
Storage Detection=TRUE<br />
Network Detection=TRUE<br />
Prompt=FALSE<br />
[NWI:NW VOLUME]<br />
Prompt=FALSE<br />
SYS VOLUME SIZE=2000<br />
SYS PARTITION HOTFIX SIZE=4.0<br />
ALLOW VOLUME PROPERTIES=TRUE<br />
BLOCK SIZE=64<br />
COMPRESSION=TRUE<br />
SUBALLOCATION=TRUE<br />
DATA MIGRATION=FALSE<br />
GUI Prompt=FALSE<br />
[NWI:File Server]<br />
Prompt=false<br />
Servername=SRV01<br />
Server Id Number=OAOAC70A<br />
[NWI:PROTOCOLS]<br />
Prompt=false<br />
[NWI:TCPIP]<br />
Logical Name 1=NIC1_IP<br />
IP Address 1=10.10.199.10<br />
Subnet Mask 1=255.255.0.0<br />
Gateway 1=10.10.0.1<br />
[NWI:IPX]<br />
Logical Name 1=NIC1_IPX<br />
IPX Address 1=0AOA0000<br />
[NWI:Time Zone]<br />
Use Daylight Saving Time=true<br />
Time Zone=EST<br />
Prompt=false<br />
[NWI:NDS]<br />
Page 257 of 317 Novell PartnerNet Confidential 07/24/00<br />
Copyright © 2000 by Novell, Inc.
Schema<br />
Extensions=sys:/system/schema/NLS.SCH,sys:/system/schema/AUDITING.SCH,sys:/system/<br />
schema/NWADMIN.SCH,sys:/system/schema/NRD.SCH,sys:system/schema/SAS.SCH,sys:/syste<br />
m/schema/NDSPKI.SCH,sys:/system/schema/MASV.SCH,sys:/system/schema/SLP.SCH,sys:sys<br />
tem/schema/LDAP.SCH,sys:system/schema/LDAPUPDT.SCH,sys:system/schema/CATALOG.SCH,s<br />
ys:system/schema/WANMAN.SCH,sys:system/schema/SMS.SCH,sys:system/schema/NDPS100.SC<br />
H,sys:system/schema/NDPS200.SCH,sys:system/schema/SVC.SCH<br />
Schema Extensions Pre DS=sys:/system/schema/NDS500.SCH,sys:/system/schema/NLS.SCH<br />
Admin Language=4<br />
Tree Name=ACMETREE<br />
Server Context=SALES.ACME<br />
New Tree=FALSE<br />
Admin Login Name=ADMIN<br />
Admin Context=ACME<br />
Admin Password=ADMIN<br />
Display Summary=false<br />
Add Replica=FALSE<br />
Prompt=false<br />
[NWI:License]<br />
Display License Agreement=FALSE<br />
Prompt=FALSE<br />
License File=d:\nwinst\mla\mla.nlf<br />
[NWI:Time Synchronization]<br />
Default Time Server Type=Secondary<br />
[Initialization]<br />
SummaryPrompt=False<br />
[Novell:NOVELL_ROOT:1.0.0]<br />
closeScreen=SilentCloseScreen<br />
Reboot=True<br />
[NWI:Misc]<br />
Relogin Password=ADMIN<br />
Installations Scripts for <strong>NetWare</strong> <strong>5.1</strong><br />
<strong>NetWare</strong> Installation Scripts (formerly known as CDWare Script Installation) let you:<br />
• Alter or extend the <strong>NetWare</strong> <strong>5.1</strong> installation process.<br />
• Install additional products or services on a <strong>NetWare</strong> <strong>5.1</strong> server after the operating system<br />
has been installed. Third-party products can be installed from a custom CDWare script<br />
that is set to run post install using the Close Script parameter in the response file. This<br />
script can call the third-party install scripts, or can incorporate them into one master<br />
script.<br />
For more information:<br />
•<br />
http://www.novell.com/documentation/lg/nw51/docui/index.html#../othr_enu/data/h9v4j5<br />
ki.html<br />
Page 258 of 317 Novell PartnerNet Confidential 07/24/00<br />
Copyright © 2000 by Novell, Inc.
Custom CD Image<br />
A custom CD image can be developed which integrates the latest support packs and patches as<br />
well as the latest drivers for the customer’s hardware. This image will speed up the install/upgrade<br />
process as well as ensure a standard file set across all servers. It is also recommended that the<br />
image include the customer’s license and NICI foundation key for distribution to all servers.<br />
RexxWare Migration Tool Kit 2.0+<br />
Available at: http://www.simware.com/products . There is no charge to Novell customers for this<br />
product.<br />
REXXWARE offers tools for performing reliable, fast migration of bindery and data to<br />
<strong>NetWare</strong> 5.0. (check their web site for support with <strong>NetWare</strong> <strong>5.1</strong>). A Java-based GUI allows the<br />
migration to be managed from a workstation, while the data and processing are completed on the<br />
server.<br />
As with the Novell upgrade processes, REXXWARE allows for in-place upgrade, across-the-wire<br />
upgrade, and across-the-wire manual upgrade. The benefit is that all of the processing is handled<br />
by the file server, which leverages the server processing power. There are also utilities to design<br />
and report update information prior to the upgrade.<br />
REXXWARE <strong>Upgrade</strong><br />
Advantages Disadvantages<br />
Platform is server-based so file copies are more<br />
quickly performed.<br />
Servers/volumes can be individually mapped to<br />
appropriate NDS context.<br />
Allows for features such as undo last NDS update<br />
and checkpoint restart after equipment failure that<br />
ensure the migration will run with little risk.<br />
Selective migration allows extensive search masks<br />
on attributes to create subsets of objects before<br />
editing, moving, etc.<br />
Selective file migration allows selection of files<br />
(example: SYSTEM directory) not to be migrated.<br />
Objects can be edited singly or multiple search<br />
masks allow edits to be applied to entire subsets of<br />
object.<br />
User and system login scripts are migrated and<br />
reflect the new server and volume names.<br />
Passwords can be randomly generated for new<br />
<strong>NetWare</strong> <strong>5.1</strong> users or have no password but force<br />
the user to define one at initial logon.<br />
Data import is performed via batch mode import of<br />
new fields and attributes from external sources.<br />
NDS can be modeled off-line and “what if’ scenarios<br />
tested.<br />
You can do “trial run” on moving files with zerolength<br />
files to verify directory structure.<br />
You can generate customized or predefined reports<br />
on 3.x databases, including complete dumps of all<br />
objects, all fields, all attributes, etc.<br />
Will migrate passwords, but only if all of the file<br />
servers in the enterprise are up and running. Expect<br />
failure of the process and have a contingency plan.<br />
Page 259 of 317 Novell PartnerNet Confidential 07/24/00<br />
Copyright © 2000 by Novell, Inc.
Uses the REXX scripting language. You have to have expertise in REXX.<br />
Custom NCF File Generation<br />
To encourage and enforce standards in <strong>NetWare</strong> <strong>5.1</strong> installations and upgrades, custom NCF and<br />
configuration files can be generated by utilities called in the post-install script. A variety of<br />
methods can be used and will be outlined in the scripting options section. Below is a sample Java<br />
class that will create a standard autoexec.ncf.<br />
// BuildAutoexec.java<br />
package com.novell.consulting.nwinst;<br />
import java.util.*;<br />
import java.io.*;<br />
import com.novell.application.install.ResponseFile;<br />
import com.novell.consulting.nwinst.AutoexecNcfFile;<br />
//----------------------------------------------------------------------------<br />
//||||||||||||||||||||||||||||||||||||||||||||||||||||||||||||||||||||||||||||<br />
//--------------------------------------------------------------------------class<br />
BuildAutoexec<br />
{<br />
static private PrintWriter _autoexecFile;<br />
static private ResponseFile _responseFile;<br />
public static void main(String argv[])<br />
{<br />
if(argv.length < 2)<br />
{<br />
System.out.println(““);<br />
System.out.println(“Error: incorrect argument count”);<br />
System.out.println(““);<br />
System.out.println(“Usage:”);<br />
System.out.println(“ java com.novell.consulting.nwinst.BuildAutoexec<br />
responsefile autoexecfile”);<br />
System.out.println(““);<br />
return;<br />
}<br />
////////////////////////////////////////////////////////////////////////<br />
// Open the response file which is in ini format<br />
_responseFile = new ResponseFile(argv[0]);<br />
try<br />
{<br />
_responseFile.initialize(false, false);<br />
}<br />
catch (IOException e)<br />
{<br />
// FileNotFoundException<br />
Page 260 of 317 Novell PartnerNet Confidential 07/24/00<br />
Copyright © 2000 by Novell, Inc.
System.out.println (“IOException: “ + e);<br />
return;<br />
} // catch<br />
catch(IllegalArgumentException e)<br />
{<br />
System.out.println (“IllegalArgumentException: “ + e);<br />
return;<br />
}<br />
////////////////////////////////////////////////////////////////////////<br />
// Open the output file<br />
try<br />
{<br />
_autoexecFile = new PrintWriter (new FileOutputStream(argv[1]));<br />
} // try<br />
catch(IOException e)<br />
{<br />
System.out.println (“BuildAutoexec IOException: “ + e);<br />
} // catch<br />
////////////////////////////////////////////////////////////////////////<br />
// Build the Time Zone Section<br />
// Todo:<br />
// Need to figure out how to pull this from response file<br />
AutoexecNcfFile oldAutoexecNcfFile = new<br />
AutoexecNcfFile(“sys:\\system\\autoexec.pj”);<br />
String sTimeInfoString = oldAutoexecNcfFile.GetTimeHeader();<br />
_autoexecFile.println (“;--------------------------”);<br />
_autoexecFile.println (“;- Set Server Time Zone -”);<br />
_autoexecFile.println (“;--------------------------”);<br />
_autoexecFile.println (sTimeInfoString);<br />
//_autoexecFile.println (“SET Time Zone = EST5EDT”);<br />
//_autoexecFile.println (“SET Daylight Savings Time Offset = 1:00:00”);<br />
//_autoexecFile.println (“SET Start Of Daylight Savings Time = (APRIL SUNDAY<br />
FIRST 2:00:00 AM)”);<br />
//_autoexecFile.println (“SET End Of Daylight Savings Time = (OCTOBER SUNDAY<br />
LAST 2:00:00 AM)”);<br />
_autoexecFile.println (““);<br />
////////////////////////////////////////////////////////////////////////<br />
// Build the Bindery Services Section<br />
String fileServerCx = _responseFile.getString(“NWI:NDS”, “Server Context”);<br />
_autoexecFile.println (“;----------------------”);<br />
_autoexecFile.println (“;- Bindery Services -”);<br />
Page 261 of 317 Novell PartnerNet Confidential 07/24/00<br />
Copyright © 2000 by Novell, Inc.
_autoexecFile.println (“;----------------------”);<br />
_autoexecFile.println (“Set Bindery Context = “ + fileServerCx);<br />
_autoexecFile.println (““);<br />
////////////////////////////////////////////////////////////////////////<br />
// Build the File Server Information Section<br />
String fileServerName = _responseFile.getString(“NWI:File Server”,<br />
“Servername”);<br />
String ServerID = _responseFile.getString(“NWI:File Server”, “Server Id<br />
Number”);<br />
”);<br />
”);<br />
”);<br />
_autoexecFile.println (“;--------------------------------------------------<br />
_autoexecFile.println (“;- Name Server & Assign Internal Network Number -<br />
_autoexecFile.println (“;--------------------------------------------------<br />
_autoexecFile.println (“FILE SERVER NAME “ + fileServerName);<br />
_autoexecFile.println (“SERVERID “ + ServerID);<br />
_autoexecFile.println (““);<br />
////////////////////////////////////////////////////////////////////////<br />
// Build the Console Logging Section<br />
_autoexecFile.println (“;-------------------------------”);<br />
_autoexecFile.println (“;- Log Boot/AUTOEXEC Process -”);<br />
_autoexecFile.println (“;-------------------------------”);<br />
_autoexecFile.println (“LOAD CONLOG Entire=Yes”);<br />
_autoexecFile.println (““);<br />
_autoexecFile.println (“;----------------------------------”);<br />
_autoexecFile.println (“;- Tune Server (Set Parameters) -”);<br />
_autoexecFile.println (“;----------------------------------”);<br />
_autoexecFile.println (“Set NCP Protocol Preferences = TCP UDP IPX”);<br />
_autoexecFile.println (“Set Immediate Purge of Deleted Files = On”);<br />
_autoexecFile.println (““);<br />
_autoexecFile.println (“;-----------------------”);<br />
_autoexecFile.println (“;- Mount All Volumes -”);<br />
_autoexecFile.println (“;-----------------------”);<br />
_autoexecFile.println (“MOUNT ALL”);<br />
_autoexecFile.println (““);<br />
String ipxFrameType = _responseFile.getString(“NWInst:Custom”,<br />
“IPXFrameType”);<br />
String ipFrameType = _responseFile.getString(“NWInst:Custom”,<br />
“IPFrameType”);<br />
int ipFrameTypeLineNumber = 0;<br />
int ipxFrameTypeLineNumber = 0;<br />
int i = 1;<br />
String tempFrameType = ““;<br />
Page 262 of 317 Novell PartnerNet Confidential 07/24/00<br />
Copyright © 2000 by Novell, Inc.
while(i < 5)<br />
{<br />
tempFrameType = _responseFile.getString(“NWI:Network Adapter 1”, “Frame<br />
Type “ + Integer.toString(i) );<br />
System.out.println(“Checking Frame type”);<br />
if(tempFrameType.equalsIgnoreCase(ipxFrameType))<br />
{<br />
ipxFrameTypeLineNumber = i;<br />
System.out.println(“Found IpxFrameType”);<br />
}<br />
if(tempFrameType.equalsIgnoreCase(ipFrameType))<br />
{<br />
ipFrameTypeLineNumber = i;<br />
System.out.println(“Found IpFrameType”);<br />
}<br />
i++;<br />
}<br />
////////////////////////////////////////////////////////////////////////<br />
// Build the IP Protocol Section<br />
String ipLoadLineTemp = _responseFile.getString(“NWI:Network Adapter 1”,<br />
“Load Line “ + Integer.toString(ipFrameTypeLineNumber));<br />
//String ipLoadLine = ipLoadLineTemp.substring(0,<br />
ipLoadLineTemp.lastIndexOf(“NAME=“));<br />
//ipLoadLine += “NAME=NIC1_IP”;<br />
String ipLoadLine = ipLoadLineTemp;<br />
String ipBoardName = _responseFile.getString(“NWI:Network Adapter 1”,<br />
“Logical Name “ + Integer.toString(ipFrameTypeLineNumber));<br />
String ipAddress = _responseFile.getString(“NWI:TCPIP”, “IP Address 1”);<br />
String ipMask = _responseFile.getString(“NWI:TCPIP”, “Subnet Mask 1”);<br />
String ipGate = _responseFile.getString(“NWI:TCPIP”, “Gateway 1”);<br />
_autoexecFile.println (“;-------------------------------------------------<br />
”);<br />
_autoexecFile.println (“; IP Protocol Section”);<br />
_autoexecFile.println (“;-------------------------------------------------<br />
”);<br />
_autoexecFile.println (“LOAD TCPIP”);<br />
_autoexecFile.println (ipLoadLine);<br />
_autoexecFile.println (“BIND IP “ + ipBoardName + “ addr=“ + ipAddress + “<br />
mask=“ + ipMask + “ gate=“ + ipGate);<br />
_autoexecFile.println (““);<br />
////////////////////////////////////////////////////////////////////////<br />
// Build the IPX Protocol Section<br />
String ipxLoadLineTemp = _responseFile.getString(“NWI:Network Adapter 1”,<br />
“Load Line “ + Integer.toString(ipxFrameTypeLineNumber));<br />
Page 263 of 317 Novell PartnerNet Confidential 07/24/00<br />
Copyright © 2000 by Novell, Inc.
String ipxLoadLine = ipxLoadLineTemp.substring(0,<br />
ipxLoadLineTemp.lastIndexOf(“NAME=“));<br />
//ipxLoadLine += “NAME=NIC1_IPX”;<br />
String ipxLoadLine = ipxLoadLineTemp;<br />
String ipxBoardName = _responseFile.getString(“NWI:Network Adapter 1”,<br />
“Logical Name “ + Integer.toString(ipxFrameTypeLineNumber));<br />
”);<br />
”);<br />
String ipxNet = _responseFile.getString(“NWI:IPX”, “IPX Address 1”);<br />
_autoexecFile.println (“;-------------------------------------------------<br />
_autoexecFile.println (“; IPX Protocol Section”);<br />
_autoexecFile.println (“;-------------------------------------------------<br />
_autoexecFile.println (“LOAD IPXRTR”);<br />
_autoexecFile.println (ipxLoadLine);<br />
_autoexecFile.println (“BIND IPX “ + ipxBoardName + “ NET=“ + ipxNet);<br />
_autoexecFile.println (“LOAD IPXRTRNM”);<br />
_autoexecFile.println (““);<br />
////////////////////////////////////////////////////////////////////////<br />
// Build the Final Section<br />
_autoexecFile.println (“;---------------------------”);<br />
_autoexecFile.println (“;- Add Java To Search Path -”);<br />
_autoexecFile.println (“;---------------------------”);<br />
_autoexecFile.println (“SEARCH ADD SYS:\\JAVA\\BIN”);<br />
_autoexecFile.println (“SEARCH ADD SYS:\\JAVA\\NWGFX”);<br />
_autoexecFile.println (““);<br />
_autoexecFile.println (“;------------------”);<br />
_autoexecFile.println (“;- Launch The GUI -”);<br />
_autoexecFile.println (“;------------------”);<br />
_autoexecFile.println (“; STARTX.NCF”);<br />
_autoexecFile.println (““);<br />
_autoexecFile.println (“;---------------------------------”);<br />
_autoexecFile.println (“;- Load Remote Console Support -”);<br />
_autoexecFile.println (“;---------------------------------”);<br />
_autoexecFile.println (“LOAD SPXS”);<br />
String rconsolePass = _responseFile.getString(“NWI:NDS”, “Admin Password”);<br />
_autoexecFile.println (“LOAD RCONAG6 “+ rconsolePass + “ 2034 16800”);<br />
_autoexecFile.println (““);<br />
_autoexecFile.println (“;---------------------”);<br />
_autoexecFile.println (“;- Load ManageWise -”);<br />
_autoexecFile.println (“;---------------------”);<br />
_autoexecFile.println (“; sys:/system/nma/nma5.ncf”);<br />
_autoexecFile.println (““);<br />
_autoexecFile.println (“;-----------------”);<br />
_autoexecFile.println (“;- Load Backup -”);<br />
_autoexecFile.println (“;-----------------”);<br />
_autoexecFile.println (““);<br />
_autoexecFile.println (“;--------------------------”);<br />
Page 264 of 317 Novell PartnerNet Confidential 07/24/00<br />
Copyright © 2000 by Novell, Inc.
}<br />
_autoexecFile.println (“;- Load Console Monitor -”);<br />
_autoexecFile.println (“;--------------------------”);<br />
_autoexecFile.println (“LOAD MONITOR”);<br />
_autoexecFile.println (““);<br />
_autoexecFile.println (“;-------------------------------”);<br />
_autoexecFile.println (“;- Stop Logging Boot Process -”);<br />
_autoexecFile.println (“;-------------------------------”);<br />
_autoexecFile.println (“UNLOAD CONLOG”);<br />
//_autoexecFile.flush();<br />
_autoexecFile.close();<br />
}<br />
Scripting Options<br />
As you can see from the above, a variety of mechanisms are available to customize and script<br />
additions to the install process. The following lists the more common options available in order of<br />
complexity:<br />
Mechanism Discussion<br />
NCF Files NCF files can be used to launch NLMs and ILS scripts. They can be<br />
used for basic customization.<br />
Installation Scripts (formerly<br />
known as CDWare Scripts)<br />
The installation scripting language is the language used by most all<br />
Novell server based installs. It is a powerful scripting language and is<br />
documented in a file which can be located on http://support.novell.com<br />
by searching the knowledgebase for the word CDWare.<br />
Java Classes Once the Java support files have been copied to the server Java<br />
applications can be used to automate many processes. An example<br />
was shown above in the section “Custom NCF File Generation.”<br />
Custom NLMs Custom NLMs can be developed that accomplish certain operations at<br />
the API level. This kind of development requires a compiler capable of<br />
compiling NLMs as well as the Novell SDK files which are freely<br />
available from http://developer.novell.com.<br />
Conclusion<br />
A variety of options are available for rapid, consistent and minimum effort <strong>NetWare</strong> <strong>5.1</strong><br />
installations and upgrades. The choices made should reflect the size and standardization<br />
requirements of the environment.<br />
Page 265 of 317 Novell PartnerNet Confidential 07/24/00<br />
Copyright © 2000 by Novell, Inc.
Appendix H—SAP Types<br />
This table lists SAP types (in hex) with a description of what it is used for. This information came<br />
from<br />
http://support.novell.com :<br />
• TID 2945808 = SAPs 0001 - 043F<br />
• TID 2945810 = SAPs 0441 - FFFF<br />
Type Description<br />
0001 User Novell - Provo Corp HQ<br />
0002 User Group Novell – Provo Corp HQ<br />
0003 <strong>NetWare</strong> Print Queue or Print Group<br />
Novell - Provo Corp HQ<br />
0004 <strong>NetWare</strong> File Server (can be emulated by<br />
NT Server running FPNW or Win95 with<br />
File and Print Share for NW) Novell - Provo<br />
Corp HQ<br />
0005 Job Server Novell - Provo Corp HQ<br />
0006 Gateway Novell - Provo Corp HQ<br />
0007 Print Server or Silent Print Server Novell -<br />
Provo Corp HQ<br />
0008 Archive Queue Novell - Provo Corp HQ<br />
0009 Archive Server Novell - Provo Corp HQ<br />
000A Job Queue Novell - Provo Corp HQ<br />
000B Administration Novell - Provo Corp HQ<br />
0017 Diagnostics None<br />
0020 NetBios None<br />
0021 SNA Gateway National Advanced Systems<br />
0022 Sperry Corp Computer Systems<br />
0023 NACS Async Gateway KTA<br />
0024 Remote Bridge Server Novell - Provo Corp<br />
HQ<br />
0025 Data Language Corp<br />
0026 Bridge Server or Asynchronous Bridge<br />
Server Computer Logics<br />
0027 TCP/IP Gateway Santa Clara Systems<br />
0028 Point-point Eicon Technology<br />
0029 Multi-point X.25 Gateway Eicon<br />
Technology<br />
002A Chi Corp<br />
002B Compass Computing<br />
002C PC Chalkboard Intel - Hillsboro<br />
002D Time Synchronization VAP Novell - Provo<br />
Corp HQ<br />
002E Target Service Agent (ARCserve<br />
5.0/Palindrome Backup Directory 4.x)<br />
Type Description<br />
Novell Provo Corp HQ<br />
0044 0 Connection Station Service Type<br />
Corollary Inc<br />
0047 Advertising Print Server Novell - Provo<br />
Corp HQ<br />
0048 TCP/IP Gateway Micom – InterLAN<br />
0049 Business Records Corp<br />
004A NetBlazer Modems Paradata Computer<br />
Networks<br />
004B Btrieve Server - VAP 5.0 Pervasive<br />
Software Inc<br />
004C <strong>NetWare</strong> SQL VAP Pervasive Software Inc<br />
004D Xtree-Net Central Point Software<br />
004E ICL Gateway VAP Computer<br />
Communication Consult<br />
004F Database Server Emerald Bay<br />
0050 Btrieve VAP 4.11 Novell - Provo Corp HQ<br />
0051 LAN Services<br />
0052 QuickLink ICM<br />
0053 MAC Project Novell - Provo Corp HQ<br />
0054 Value Added File System Novell - Provo<br />
Corp HQ<br />
0055 Term Emulator Systems Analysis Inc<br />
0056 Stocknet Broker SAP Type Novell - Provo<br />
Corp HQ<br />
0057 Stocknet Exchanger SAP Type Novell -<br />
Provo Corp HQ<br />
0058 Multi-point X.25 Router Eicon Technology<br />
0059 LAN Services<br />
005A Business Records Corp<br />
005B Business Records Corp<br />
005C Business Records Corp<br />
005D Business Records Corp<br />
005E Business Records Corp<br />
005F Business Records Corp<br />
0060 Stocknet Broker - Static Novell - Provo<br />
Page 266 of 317 Novell PartnerNet Confidential 07/24/00<br />
Copyright © 2000 by Novell, Inc.
Type Description<br />
Corp HQ<br />
0061 Stocknet Queue Type Novell - Provo Corp<br />
HQ<br />
0062 Stocknet Player Type Novell - Provo Corp<br />
HQ<br />
0063 Interactive Financial Solution<br />
0064 ARCserve Interactive Financial Solution<br />
0065 Interactive Financial Solution<br />
0066 ARCserve 3.0 Interactive Financial<br />
Solution<br />
0067 Interactive Financial Solution<br />
0068 Interactive Financial Solution<br />
0069 Interactive Financial Solution<br />
006A Interactive Financial Solution<br />
006B Interactive Financial Solution<br />
006C Interactive Financial Solution<br />
006D Stocknet Exchange - Static Novell - Provo<br />
Corp HQ<br />
006E NACS NetPro Inc<br />
006F Rabbit Software Corp<br />
0070 MIC SNA DFV Server Mikado<br />
0071 Tape Drive Server Digi-Data Corp<br />
0072 WANcopy Utility Novell - Provo Corp HQ<br />
0073 Novell - Provo Corp HQ<br />
0074 Novell - Provo Corp HQ<br />
0075 <strong>NetWare</strong> Btrieve Novell - Provo Corp HQ<br />
0076 <strong>NetWare</strong> SQL Novell - Provo Corp HQ<br />
0077 Novell - Provo Corp HQ<br />
0078 Novell - Provo Corp HQ<br />
0079 Novell - Provo Corp HQ<br />
007A TES - <strong>NetWare</strong> VMS Novell - Provo Corp<br />
HQ<br />
007B Mergent International<br />
007C Interactive Financial Solution<br />
007D Interactive Financial Solution<br />
007E Interactive Financial Solution<br />
007F Interactive Financial Solution<br />
0080 Interactive Financial Solution<br />
0081 Interactive Financial Solution<br />
0082 Interactive Financial Solution<br />
0083 Interactive Financial Solution<br />
Type Description<br />
0084 Interactive Financial Solution<br />
0085 Interactive Financial Solution<br />
0086 Interactive Financial Solution<br />
0087 Interactive Financial Solution<br />
0088 Interactive Financial Solution<br />
0089 Interactive Financial Solution<br />
008A Interactive Financial Solution<br />
008B Interactive Financial Solution<br />
008C Interactive Financial Solution<br />
008D Mail Server McGill University<br />
008E Rational Data Systems<br />
008F Queue Types Tate Associates Inc<br />
0090 TNET X.21 IDA Bridge British Telecom<br />
0091 TNET X.21 Bridge British Telecom<br />
0092 Tape Backup Server Emerald Systems<br />
Corp<br />
0093 Watcom<br />
0094 Sila Com Software Novell - Provo Corp HQ<br />
0095 VMS Router Control Interconnections<br />
0096 Micro DataBase Systems<br />
0097 Dart College Hill Systems<br />
0098 <strong>NetWare</strong> Access Server Novell - Provo<br />
Corp HQ<br />
0099 Network Courier Microsoft Workgroup<br />
Canada<br />
009A Named Pipes Server Novell - Provo Corp<br />
HQ<br />
009B Job Server DIS<br />
009C Raylynn Knight<br />
009D CQ3270 LAN CQ Computer<br />
Communications<br />
009E Unix - Portable Group/Portable <strong>NetWare</strong><br />
Novell - Provo Corp HQ<br />
009F Progress Database Progress Software<br />
Corp<br />
00A0 Gupta SQL Base Server Gupta<br />
Technologies<br />
00A1 Powerchute-VAP/NLM Server Power<br />
Supply American Power Conversion<br />
00A2 Auditor Package Blue Lance Network Info<br />
Sys<br />
00A3 Security Blue Lance Network Info Sys<br />
00A4 “Corel Driver Product under Novell 386<br />
Page 267 of 317 Novell PartnerNet Confidential 07/24/00<br />
Copyright © 2000 by Novell, Inc.
Type Description<br />
Corel Systems Corp, Optical Div”<br />
00A5 Archive Server Gigatrend Inc<br />
00A6 Menu Program R&S Data Systems<br />
00A7 386 NLM Unisys - Camarillo<br />
00A8 LAN 1 Router Atlanta Technologies<br />
00A9 “Object Type Corel Systems Corp, Optical<br />
Div”<br />
00AA “Object Type Corel Systems Corp, Optical<br />
Div”<br />
00AC IDA Status Utility Compaq Computer Corp<br />
00AD LANport Virtual Extension of Ports<br />
Microtest Inc<br />
0100 Peer Logic<br />
0101 R21PX Crosstalk<br />
0102 Inventory Manager Intel - Hillsboro<br />
0103 SequelNet Oracle Corp<br />
0104 VAP Pillsbury Company<br />
0105 Gateway to Unisys Marshfield Clinic<br />
0106 Gateways to Unisys Marshfield Clinic<br />
0107 RSPX Server /386 <strong>NetWare</strong> Novell - Provo<br />
Corp HQ<br />
0108 <strong>NetWare</strong> for VM & MVS Phaser Systems<br />
Inc<br />
0109 <strong>NetWare</strong> for VM & MVS Phaser Systems<br />
Inc<br />
010A <strong>NetWare</strong> for VM & MVS Phaser Systems<br />
Inc<br />
010B <strong>NetWare</strong> for VM & MVS Phaser Systems<br />
Inc<br />
010C Net 3270 McGill University Computing CT<br />
010D Image Server File Net<br />
010E RTK Owl Micro Systems<br />
010F Novell SNA Gateway Novell - Provo Corp<br />
HQ<br />
0110 Artefact Network Support<br />
0111 Test Server Novell - Austin<br />
0112 Print Server Hewlett Packard - Boise<br />
0113 Communication Server Novell - Provo<br />
Corp HQ<br />
0114 CSA MUX /Communication Server Novell -<br />
Provo Corp HQ<br />
0115 CSA LCA /Communication Server Novell -<br />
Provo Corp HQ<br />
0116 CSA CM /Communication Server Novell -<br />
Provo Corp HQ<br />
Type Description<br />
0117 CSA SMA /Communication Server Novell -<br />
Provo Corp HQ<br />
0118 CSA DBA /Communication Server Novell -<br />
Provo Corp HQ<br />
0119 CSA NMA /Communication Server Novell -<br />
Provo Corp HQ<br />
011A CSA SSA /Communication Server Novell -<br />
Provo Corp HQ<br />
011B CSA Status /Communication Server Novell<br />
- Provo Corp HQ<br />
011C SAA Data Link Agent Novell - Provo Corp<br />
HQ<br />
011D Communication Server Novell - Provo<br />
Corp HQ<br />
011E CSA APPC /Communication Server Novell<br />
- Provo Corp HQ<br />
011F Communication Server Novell - Provo<br />
Corp HQ<br />
0120 Communication Server Novell - Provo<br />
Corp HQ<br />
0121 Communication Server Novell - Provo<br />
Corp HQ<br />
0122 Communication Server Novell - Provo<br />
Corp HQ<br />
0123 Communication Server Novell - Provo<br />
Corp HQ<br />
0124 Communication Server Novell - Provo<br />
Corp HQ<br />
0125 Communication Server Novell - Provo<br />
Corp HQ<br />
0126 SNA Test /Communication Server Novell -<br />
Provo Corp HQ<br />
0127 Communication Server Novell - Provo<br />
Corp HQ<br />
0128 Communication Server Novell - Provo<br />
Corp HQ<br />
0129 Communication Server Novell - Provo<br />
Corp HQ<br />
012A CSA Trace /Communication Server Novell<br />
- Provo Corp HQ<br />
012B Super SNA Agent /<strong>NetWare</strong> for SAA<br />
Novell - Provo Corp HQ<br />
012C Communication Server Novell - Provo<br />
Corp HQ<br />
012D Communications Server Novell - Provo<br />
Corp HQ<br />
012E Communications Server/IKARUS Virus<br />
Scan Utility Novell - Provo Corp HQ<br />
012F Communications Server Novell - Provo<br />
Corp HQ<br />
Page 268 of 317 Novell PartnerNet Confidential 07/24/00<br />
Copyright © 2000 by Novell, Inc.
Type Description<br />
0130 Communications<br />
Executive/Communications Server Novell -<br />
Provo Corp HQ<br />
0131 Image Server Wang Laboratories Inc<br />
0132 BT X.25 British Telecom<br />
0133 NNS Domain /Elmer Project Novell - Provo<br />
Corp HQ<br />
0134 Elmer Project Novell - Provo Corp HQ<br />
0135 NNS Profile /Elmer Project Novell - Provo<br />
Corp HQ<br />
0136 Elmer Project Novell - Provo Corp HQ<br />
0137 NNS Queue /Elmer Project Novell - Provo<br />
Corp HQ<br />
0138 Elmer Project Novell - Provo Corp HQ<br />
0139 Elmer Project Novell - Provo Corp HQ<br />
013A Elmer Project Novell - Provo Corp HQ<br />
013B Elmer Project Novell - Provo Corp HQ<br />
013C Elmer Project Novell - Provo Corp HQ<br />
013D Securities Trading & Technology<br />
013E Securities Trading & Technology<br />
013F Network Designers Ltd<br />
0140 Network Management System Accunetics<br />
0141 Software GMBH Lufthansa Information<br />
Service<br />
0142 Aladdin Knowledge Systems<br />
0143 CDROM Online Computer Systems<br />
0144 NetWise Inc<br />
0145 Communication Processor Evergreen<br />
Systems<br />
0146 XDB Server Database XDB Systems Inc<br />
0147 Piggyback Login Net_inc Micro<br />
Enhancement Inc<br />
0148 Network Software Associates<br />
0149 Advertising Remote Server Artefact<br />
Network Support<br />
014A ID 5001 Weather Station Zenith Data<br />
Systems<br />
014B Novell - Provo Corp HQ<br />
014C Netframe <strong>NetWare</strong> 386 Net Frame<br />
Systems<br />
014D Netframe <strong>NetWare</strong> 386 Net Frame<br />
Systems<br />
014E Netframe <strong>NetWare</strong> 386 Net Frame<br />
Systems<br />
Type Description<br />
014F Netframe <strong>NetWare</strong> 386 Net Frame<br />
Systems<br />
0150 Maxiback - VAP Sysgen<br />
0151 DCS System Server Computer Concepts<br />
Corporation<br />
0152 DCA IPX Communication Product/<br />
IRMALAN Gtwy DCA<br />
0153 DCA IPX Communication Product DCA<br />
0154 Forms Capability Rochester Telephone<br />
Corp<br />
0155 Forms Capability Rochester Telephone<br />
Corp<br />
0156 Forms Capability Rochester Telephone<br />
Corp<br />
0157 Forms Capability Rochester Telephone<br />
Corp<br />
0158 Forms Capability Rochester Telephone<br />
Corp<br />
0159 Forms Capability Rochester Telephone<br />
Corp<br />
015A Forms Capability Rochester Telephone<br />
Corp<br />
015B Forms Capability Rochester Telephone<br />
Corp<br />
015C Network Computing Inc - NCI<br />
015D Network Computing Inc - NCI<br />
015E Network Computing Inc - NCI<br />
015F Network Computing Inc - NCI<br />
0160 Network Computing Inc - NCI<br />
0161 Advertising Remote Server Artefact<br />
Network Support<br />
0162 System 9 HBF Group<br />
0163 System 9 HBF Group<br />
0164 System 9 HBF Group<br />
0165 System 9 HBF Group<br />
0166 NW Management Novell - Provo Corp HQ<br />
0167 InstantCom Communications Server<br />
Instant Information<br />
0168 PickIt (Comm Server) Intel PCED -<br />
Hillsboro<br />
0169 Peer Logic<br />
016A Open Image for <strong>NetWare</strong> Wang<br />
Laboratories Inc<br />
016B Open Image for <strong>NetWare</strong> Wang<br />
Laboratories Inc<br />
016C Open Image for <strong>NetWare</strong> Wang<br />
Page 269 of 317 Novell PartnerNet Confidential 07/24/00<br />
Copyright © 2000 by Novell, Inc.
Type Description<br />
Laboratories Inc<br />
016D Open Image for <strong>NetWare</strong> Wang<br />
Laboratories Inc<br />
016E Open Image for <strong>NetWare</strong> Wang<br />
Laboratories Inc<br />
016F Luminar Optical Server Corel Systems<br />
Corp<br />
0170 TXD Thomas Conrad Corp<br />
0171 LANFax Redirector Alcom Inc<br />
0172 File Share Compaq Computer Corp<br />
0173 File Share Compaq Computer Corp<br />
0174 Compaq SNMP Agent /File Share Compaq<br />
Computer Corp<br />
0175 File Share Compaq Computer Corp<br />
0176 File Share Compaq Computer Corp<br />
0177 LANWare Horizon Technology Inc<br />
0178 LANWare Horizon Technology Inc<br />
0179 LANWare Horizon Technology Inc<br />
017A LANWare Horizon Technology Inc<br />
017B LANWare Horizon Technology Inc<br />
017C LANWare Horizon Technology Inc<br />
017D LANWare Horizon Technology Inc<br />
017E LANWare Horizon Technology Inc<br />
017F LANWare Horizon Technology Inc<br />
0180 NMI LAN Services Horizon Technology Inc<br />
0188 SYSM/LAN2 H&W Computer Systems<br />
0189 Xtree Server Central Point Software<br />
018E PC Metro Crystal Point<br />
018F PC Metro Crystal Point<br />
0190 Service Point Interpoint Software<br />
0191 Service Point Interpoint Software<br />
0192 Netway 2000 Tri Data Systems<br />
0193 Netway SNA Tri Data Systems<br />
0194 Maxway 500 Tri Data Systems<br />
0195 TCP/IP Gateway Computer Vision<br />
Services<br />
0196 Integrated Technologies Inc<br />
0197 Share Master Storage Dimensions<br />
0198 Zenith Electronics Corp<br />
0199 Zenith Electronics Corp<br />
019A Zenith Electronics Corp<br />
Type Description<br />
019B APT Net Remote Automated Programming<br />
Tech<br />
019C APT Net Remote Automated Programming<br />
Tech<br />
019D APT Net Remote Automated Programming<br />
Tech<br />
019E APT Net Remote Automated Programming<br />
Tech<br />
019F Mailslots IBM - Franklin Lakes<br />
01A0 Terminal Gateway for Unisys Mainframe<br />
Upstanding Systems<br />
01A1 DB Server Lodgistix Inc<br />
01A2 Spare Lodgistix Inc<br />
01A3 “Gateway, Composite Page, & Etc Servers<br />
Teknos Systems”<br />
01A4 “Gateway, Composite Page, & Etc Servers<br />
Teknos Systems”<br />
01A5 “Gateway, Composite Page, & Etc Servers<br />
Teknos Systems”<br />
01A6 “Gateway, Composite Page, & Etc Servers<br />
Teknos Systems”<br />
01A7 “Gateway, Composite Page, & Etc Servers<br />
Teknos Systems”<br />
01A8 “Gateway, Composite Page, & Etc Servers<br />
Teknos Systems”<br />
01A9 “Gateway, Composite Page, & Etc Servers<br />
Teknos Systems”<br />
01AA “Gateway, Composite Page, & Etc Servers<br />
Teknos Systems”<br />
01AB “Gateway, Composite Page, & Etc Servers<br />
Teknos Systems”<br />
01AC “Gateway, Composite Page, & Etc Servers<br />
Teknos Systems”<br />
01AD Menu Program R&S Data Systems<br />
01AE Menu Program R&S Data Systems<br />
01B0 Object Type for GARP Server Net<br />
Research Pty Ltd<br />
01B1 “Licensing Restrictions/BindView LAN<br />
Support Group, Network Res”<br />
01B2 “Licensing Restrictions/Bindery Type LAN<br />
Support Group, Network Res”<br />
01B3 Media Touch Systems<br />
01B4 Network Management Product NCR - SE<br />
Columbia<br />
01B5 Network Management Product NCR - SE<br />
Columbia<br />
01B6 Network Management Product NCR - SE<br />
Columbia<br />
Page 270 of 317 Novell PartnerNet Confidential 07/24/00<br />
Copyright © 2000 by Novell, Inc.
Type Description<br />
01B7 Network Management Product NCR - SE<br />
Columbia<br />
01B8 Network Management Product NCR - SE<br />
Columbia<br />
01B9 Bonsai Technologies<br />
01BA BizTech<br />
01BB Bonsai Technologies<br />
01BC Bonsai Technologies<br />
01BD Bonsai Technologies<br />
01BE Server Type KM Systems<br />
01BF “Server Type for Value Added Product/<br />
LanDesk Mgr Connect Computer Co/<br />
Intel”<br />
01C0 “Object Type Collegiale, City of (Ottawa)”<br />
01C1 Object Types J&L Information Systems<br />
01C2 Object Types J&L Information Systems<br />
01C3 Object Types J&L Information Systems<br />
01C4 Object Types J&L Information Systems<br />
01C5 Object Types J&L Information Systems<br />
01C6 Distributed Application Folio Corporation<br />
01C7 Bindery Type Microtest Inc<br />
01C8 Object Bindery Type Madge Networks Inc<br />
01C9 Object Types Funk Software<br />
01CA Object Types Funk Software<br />
01CB NetModem/E Shiva Corp<br />
01CC LanRover/E Shiva Corp<br />
01CD LanRover/T Shiva Corp<br />
01CE Shiva Corp<br />
01CF E-mail Queue Object-type C&D Data<br />
Services<br />
01D0 E-mail Server Object-type C&D Data<br />
Services<br />
01D1 Lanlord Product Microcom Client Server<br />
Tech Gr<br />
01D2 Mark Hurst<br />
01D3 Mark Hurst<br />
01D5 Centers for Disease Control<br />
01D6 On-Queue Task Queue NetPlus Software<br />
Inc<br />
01D7 On-Queue Task Server NetPlus Software<br />
Inc<br />
01D8 FAXPress Server Castelle Inc<br />
Type Description<br />
01D9 Castelle Inc<br />
01DA LANPress Print Server Castelle Inc<br />
01DB Castelle Inc<br />
01DC FAX/Xerox 7033 Fax Server/Excel Lan Fax<br />
Castelle Inc<br />
01DD Castelle Inc<br />
01DE Castelle Inc<br />
01DF Castelle Inc<br />
01E0 Castelle Inc<br />
01E1 Castelle Inc<br />
01E2 Area Code & Exchange Look-Up Server<br />
Equinox Information Systems<br />
01E3 Sorting Server Equinox Information<br />
Systems<br />
01E4 Wall Data<br />
01E6 X25 Automated Bridge Monitor & Control<br />
Automated Interactions-Div Of<br />
01E7 Rational Data Systems<br />
01E8 Rational Data Systems<br />
01E9 Rational Data Systems<br />
01EA Rational Data Systems<br />
01EB Media Touch Systems<br />
01EC Powergrid Network Daemon Cognos Inc<br />
01ED Integralis Ltd<br />
01EE Integralis Ltd<br />
01EF Felsina Software<br />
01F0 Legato Systems<br />
01F1 Legato Systems<br />
01F2 Legato Systems<br />
01F3 Legato Systems<br />
01F4 Legato Systems<br />
01F5 Legato Systems<br />
01F6 Andersen <strong>Consulting</strong> - Chicago<br />
01F8 Sytron Corp<br />
01F9 “For Unibase Bv, Based in Holland<br />
Integralis Ld”<br />
01FB Northeast Broadcast Consultant<br />
01FC Extended Systems<br />
01FD IBM - Endicott<br />
0200 NP/SQL Server Novell - Provo Corp HQ<br />
0201 The Make Server Novell - Provo Corp HQ<br />
Page 271 of 317 Novell PartnerNet Confidential 07/24/00<br />
Copyright © 2000 by Novell, Inc.
Type Description<br />
0202 Generic Job Server Novell - Provo Corp<br />
HQ<br />
0203 RMF2 Utility Novell - Provo Corp HQ<br />
0204 Novell - Provo Corp HQ<br />
0205 Novell - Provo Corp HQ<br />
0206 Novell - Provo Corp HQ<br />
0207 Novell - Provo Corp HQ<br />
0208 Novell - Provo Corp HQ<br />
0209 Novell - Provo Corp HQ<br />
020A Novell - Provo Corp HQ<br />
020B Novell - Provo Corp HQ<br />
020C Novell - Provo Corp HQ<br />
020D Novell - Provo Corp HQ<br />
020E Novell - Provo Corp HQ<br />
020F Novell - Provo Corp HQ<br />
0210 Novell - Provo Corp HQ<br />
0211 Novell - Provo Corp HQ<br />
0212 Novell - Provo Corp HQ<br />
0213 Novell - Provo Corp HQ<br />
0214 Novell - Provo Corp HQ<br />
0215 Novell - Provo Corp HQ<br />
021A OT_Messaging_Server Novell - San Jose<br />
021D MPR - <strong>NetWare</strong> Mobile IPX Home Router<br />
Novell - Fortune<br />
021E <strong>NetWare</strong> Lontalk Gateway Novell<br />
0233 NW Management - Management Agent 1.x<br />
Novell - Provo Corp HQ<br />
0234 Network Management Info Server Novell -<br />
Provo Corp HQ<br />
0235 Bindery Type - TIRPC Service Novell -<br />
Provo Corp HQ<br />
0236 Novell - Salt Lake City<br />
0237 NMS IPX Discover or LANtern Read/Write<br />
Channel Novell - San Jose<br />
0238 NMS IP Discovery or LANtern Trap/Alarm<br />
Channel Novell - San Jose<br />
0239 NW Management - HMI Hub Management<br />
Novell - San Jose<br />
023A NW Management - Lanalyzer Agent Novell<br />
- San Jose<br />
023B Bindery Type for Broadcast Novell - Provo<br />
Corp HQ<br />
023C DOS Target Service Agent Novell - Provo<br />
Type Description<br />
Corp HQ<br />
023D SMS Workstation Name Object Novell -<br />
Provo Corp HQ<br />
023E SMS Testing & Development Novell -<br />
Provo Corp HQ<br />
023F SMS Testing & Development Novell -<br />
Provo Corp HQ<br />
0240 Novell - San Jose<br />
0241 Novell - San Jose<br />
0242 Novell - San Jose<br />
0243 Novell MHS DS Gateway for OCE Novell -<br />
Walnut Creek<br />
0244 NDS Gateway for OCE Novell - Walnut<br />
Creek<br />
0245 Superlab File Distribution Server Novell -<br />
Provo Corp HQ<br />
0246 Version Control Queue Novell - Provo<br />
Corp HQ<br />
0247 NVT Remote Login over SPX Novell - Salt<br />
Lake City<br />
0248 Queue Server for IBM PSF/2 Novell -<br />
Provo Corp HQ<br />
0249 Lantern RMON Novell - San Jose<br />
024A LAT Transport Service Provider Novell -<br />
Sunnyvale Western Reg<br />
024B LAT Session Manager Novell - Sunnyvale<br />
Western Reg<br />
024C LAT Network from <strong>NetWare</strong> Novell -<br />
Sunnyvale Western Reg<br />
024D Address Server Novell - Provo Corp HQ<br />
024F Appletalk Remote Access Service Novell -<br />
Sunnyvale Western Reg<br />
025E Xapia Interface for NW 3.11 Novell - Indisy<br />
Canada Inc<br />
025F X.400 Protocol Access Module Novell -<br />
Indisy Canada Inc<br />
0260 SNADS Protocol Access Module Novell -<br />
Indisy Canada Inc<br />
0261 Superlab Network Switch Server Novell -<br />
Provo Corp HQ<br />
0262 Hub Services Novell - Sunnyvale -<br />
Western Reg<br />
0263 <strong>NetWare</strong> Management Agent Novell -<br />
Sunnyvale - Western Reg<br />
0264 Global MHS Novell - Sunnyvale - Western<br />
Reg<br />
0265 SNMP Novell - Sunnyvale - Western Reg<br />
0266 Version Control Server Novell - Provo Corp<br />
Page 272 of 317 Novell PartnerNet Confidential 07/24/00<br />
Copyright © 2000 by Novell, Inc.
Type Description<br />
HQ<br />
0267 Application Rights Program Novell - Provo<br />
Corp HQ<br />
0268 HP JetDirect Novell - San Jose<br />
0269 Superlab Automation Server Novell - Provo<br />
Corp HQ<br />
026A NW Management - NMS Console Novell -<br />
San Jose<br />
026B NW Time Synchronization Novell - Provo<br />
Corp HQ<br />
026D Advertising Job Server Novell - Provo Corp<br />
HQ<br />
0272 Datalink Switching (DLSW) Novell - San<br />
Jose<br />
0273 Nest Device Novell - Provo Corp HQ<br />
0274 GroupWise Message Multiple Servers<br />
Novell - Orem<br />
0275 Sample Code from Dev. Support Novell -<br />
Provo Corp HQ<br />
0277 SAP Server Type Novell - San Jose<br />
0278 Directory Server/ NDS Replica /Tree<br />
Novell - Provo Corp HQ<br />
0281 Domain Application Services Novell -<br />
Sunnyvale - Western Reg<br />
0282 NDPS Service Registry Service Novell -<br />
Provo Corp HQ<br />
0283 Domain Application Services Novell -<br />
Sunnyvale - Western Reg<br />
0284 Domain Application Services Novell -<br />
Sunnyvale - Western Reg<br />
0285 Domain Application Services Novell -<br />
Sunnyvale - Western Reg<br />
0286 Domain Application Services Novell -<br />
Sunnyvale - Western Reg<br />
0287 Domain Application Services Novell -<br />
Sunnyvale - Western Reg<br />
0288 Domain Application Services Novell -<br />
Sunnyvale - Western Reg<br />
028A MPR - IPX Address Mapping Gateway<br />
Novell - San Jose<br />
028B ManageWise Novell - San Jose<br />
028D Salutation Manager Novell - Orem<br />
028E Novell Administrator for Win NT/Tabasco<br />
Novell - Provo Corp HQ<br />
0292 <strong>NetWare</strong> Client Libraries Novell - Provo<br />
Corp HQ<br />
02FF Novell - Provo Corp HQ<br />
0300 VAP - Advertising Services Firefox<br />
Type Description<br />
Communications Ltd<br />
0301 VAP - Advertising Services Firefox<br />
Communications Ltd<br />
0302 VAP - Advertising Services Firefox<br />
Communications Ltd<br />
0303 VAP - Advertising Services Firefox<br />
Communications Ltd<br />
0304 VAP - Advertising Services/ SAA Gateway<br />
Firefox Comm Ltd/Novell<br />
0305 VAP - Advertising Services Firefox<br />
Communications Ltd<br />
0306 NPS (<strong>NetWare</strong> Print Services)<br />
InterConnections Inc<br />
0307 NPS Spool Client InterConnections Inc<br />
0308 HP NS Util Hewlett Packard - Boise<br />
0309 Document Management Package Soft<br />
Solutions<br />
030A Worldgroup BBS Server Galacticomm Inc<br />
030B Lucid Systems Pty LTD<br />
030C HP JetDirect/ Quick Silver Hewlett Packard<br />
- Boise<br />
030D Broadcast Operation Sup Utah Scientific<br />
030E Fault Tolerant Control Utah Scientific<br />
030F CD ROM Server Trantor System Ltd<br />
0310 CD ROM Server Trantor System Ltd<br />
0311 CD ROM Server Trantor System Ltd<br />
0312 CD ROM Server Trantor System Ltd<br />
0313 CD ROM Server Trantor System Ltd<br />
0314 CD ROM Server Trantor System Ltd<br />
0315 CD ROM Serve Trantor System Ltd<br />
0316 CD ROM Server Trantor System Ltd<br />
0317 Batch Processor Computer Aided<br />
Business Sol<br />
0320 Gateway Attachmate Corporation<br />
0321 Chicago Research & Trading<br />
0322 Frye Computer Systems<br />
0323 Wang Laboratories<br />
0324 Wang Laboratories<br />
0325 X.500 DSA Server AAC Associates<br />
0326 Novell Remote ISDN Router LANWorks<br />
0327 BootWare/Microsoft Diagnostics (MSD)<br />
LANWorks<br />
0328 SQL Server Watcom<br />
Page 273 of 317 Novell PartnerNet Confidential 07/24/00<br />
Copyright © 2000 by Novell, Inc.
Type Description<br />
0329 Aetna Life & Casualty<br />
032A Aetna Life & Casualty<br />
032B Fax Server Digital Visions Corp<br />
032C Voice Server Digital Visions Corp<br />
032D Interprocess Exchange Server Digital<br />
Visions Corp<br />
032E Application Server Nationsbank Mortgage<br />
Corp<br />
0330 SAS Share Server SAS Institute<br />
0331 SAS Connect SAS Institute<br />
0332 Archetype<br />
0333 Archetype<br />
0334 Aetna Life & Casualty<br />
0335 Multisynch Communications Server<br />
Multitech<br />
0336 Communications Server Multitech<br />
0337 Magee Enterprises Inc<br />
0338 Magee Enterprises Inc<br />
0339 Magee Enterprises Inc<br />
033A Magee Enterprises Inc<br />
033B Magee Enterprises Inc<br />
033C Magee Enterprises Inc<br />
033D Magee Enterprises Inc<br />
033E Magee Enterprises Inc<br />
033F Magee Enterprises Inc<br />
0340 Magee Enterprises Inc<br />
0341 Data Service to Workstation/School Admin<br />
Chancery Software<br />
0342 Bindery Type Microtest Inc<br />
0343 Bindery Type Microtest Inc<br />
0344 Bindery Type Microtest Inc<br />
0345 Bindery Type Microtest Inc<br />
0346 Bindery Type Microtest Inc<br />
0347 Bindery Type Microtest Inc<br />
0348 Bindery Type Microtest Inc<br />
0349 Bindery Type Microtest Inc<br />
034A Public Preferred Systems Inc.<br />
034B Preferred Systems Inc.<br />
034C Preferred Systems Inc.<br />
034D Preferred Systems Inc.<br />
Type Description<br />
034E Preferred Systems Inc.<br />
034F Preferred Systems Inc.<br />
0350 Preferred Systems Inc.<br />
0351 Preferred Systems Inc.<br />
0352 Bindery Type Fujitsu Ltd<br />
0353 Bindery Type Fujitsu Ltd<br />
0354 Bindery Type Fujitsu Ltd<br />
0355 Backup Exec Arcada Software<br />
0356 LANovation<br />
0357 LANovation<br />
0358 Bindery Object Type CBIS Inc<br />
035A MBAC<br />
035B Right-Hand-Man E-mail/scheduling Pkg<br />
LAN Aces Inc<br />
035C Fax Server Transfax Corporation<br />
035D Fax Print Server Transfax Corporation<br />
035E Fax Merge Server Transfax Corporation<br />
035F Network Management Server Transfax<br />
Corporation<br />
0360 Object Type Funk Software<br />
0362 “Object-type, Pseudo Peer-to-peer US<br />
Army Corps of Engineers”<br />
0363 Print Server - Laser Jet Extended Systems<br />
0364 Server-type for LAN Times Japan Softbank<br />
Corp<br />
0365 Queue-type for LAN Times Japan Softbank<br />
Corp<br />
0366 MGATE - Communication Gateway/LANs<br />
+ Vax Coefficient Systems Corp<br />
0367 Excalibur Technologies Corp<br />
0368 Excalibur Technologies Corp<br />
0369 Excalibur Technologies Corp<br />
036A Excalibur Technologies Corp<br />
036B Bindery Type Aetna Life & Casualty<br />
036C IPX Layer Peer-to-peer Communications<br />
Sewell Development<br />
036D Micro Integration<br />
036E NLM Server Praxis<br />
036F Bindery Type Avail Systems Corp<br />
0372 Digital Equipment - Merrimack<br />
0373 NLM Advertising for UPS Info Brainstorm<br />
Engineering<br />
Page 274 of 317 Novell PartnerNet Confidential 07/24/00<br />
Copyright © 2000 by Novell, Inc.
Type Description<br />
0374 Shareware Communications Server Cherry<br />
Tree Software<br />
0375 Enterprise ECS Intel Corp - Hillsboro<br />
0376 Enterprise Initialization Mode Intel Corp -<br />
Hillsboro<br />
0377 Comm Svr - Net Bios IPX US Robotics<br />
Software<br />
0378 NLM Advertising for UPS Info Brainstorm<br />
Engineering<br />
0379 Fax Server Extended Systems<br />
037A Fax Server Extended Systems<br />
037B Fax Server Extended Systems<br />
037C Fax Server Extended Systems<br />
037D Gateway Management Wall Data<br />
037E Powerchute Alert - UPS Monitoring<br />
American Power Conversion<br />
037F ViruSafe Notify Central Point Software<br />
0380 Fax Server Optus Information Systems<br />
0381 “TNS Transport Network Substrate, Vers 2<br />
Oracle”<br />
0382 ID for Lasermaster Printer Products Laser<br />
Master Corp<br />
0383 PowerChute Administrative American<br />
Power Conversion<br />
0384 Sequel Link Client-server Middleware<br />
Techgnosis Inc<br />
0385 Mail Systems Synectic Systems Ltd<br />
0386 Hewlett Packard Bridges Hewlett Packard -<br />
Roseville<br />
0387 Hewlett Packard Hubs Hewlett Packard -<br />
Roseville<br />
0388 Workstation Peer-to-peer Communications<br />
IBM - Research Triangle Park<br />
0389 Datanex Corporation<br />
0394 <strong>NetWare</strong> Connect NCS (Mac) Server<br />
Novell<br />
039A HP Open Mail & Portable <strong>NetWare</strong> Hewlett<br />
Packard - Berkshire<br />
039B Lotus Notes Iris Associates<br />
039C Communications Server Bindery Dator 3<br />
SPOL SRO<br />
039D Communications Server SAP Dator 3<br />
SPOL SRO<br />
039E Fax Server Ferrari Electronic GMBH<br />
039F Computer Vision Services<br />
03A0 Bindery Type for CD Server Jostens<br />
Type Description<br />
Learning Corp<br />
03A1 Neumeier & Walch Systemtechnik<br />
03A2 Hyprotech Ltd<br />
03A3 “Kyocera Corp, Yohaga Office”<br />
03A4 “Kyocera Corp, Yohaga Office”<br />
03A5 “Kyocera Corp, Yohaga Office”<br />
03A6 “Kyocera Corp, Yohaga Office”<br />
03A7 Object Type for a Group Stadt Pforzheim<br />
03A8 Object Type for a Queue Stadt Pforzheim<br />
03A9 Object Type for a Server Stadt Pforzheim<br />
03AA Universal Data Systems - Motorola<br />
03AB Universal Data Systems - Motorola<br />
03AC Universal Data Systems - Motorola<br />
03AD Universal Data Systems - Motorola<br />
03AE Raima Corp<br />
03AF Copy Protection Server Pace Software<br />
Systems Inc<br />
03B0 TNA Communication with 2 NLM's<br />
Palindrome<br />
03B1 Ethernet LAN Controller for <strong>NetWare</strong> Bus<br />
Tech<br />
03B2 Server ID for NLM Network Designers LTD<br />
03B3 File Management Services Systems Axis<br />
PLC<br />
03B4 Queue Management Services Systems<br />
Axis PLC<br />
03B5 Object Type IWI - Integrated Workstation<br />
Inc<br />
03B6 LANtech Services<br />
03B8 Modem Protocall - Sharing Serial Ports<br />
LANsource Technologies<br />
03B9 Global Info Application Exec Environment<br />
Funk Software<br />
03BA Magix Database Server Advanced<br />
Software Technologies<br />
03BB Performance Monitor Computer<br />
Communications Co/ Ameridata<br />
03BC NetPort Advertising Intel PCED<br />
03BD Wan Connection Server IDE Corporation<br />
03BE WICAT Jostens Learning Corp<br />
03BF WICAT Server Jostens Learning Corp<br />
03C0 Embedded in OEM Plotter Product<br />
CalComp<br />
03C1 Embedded in OEM Plotter Product<br />
Page 275 of 317 Novell PartnerNet Confidential 07/24/00<br />
Copyright © 2000 by Novell, Inc.
Type Description<br />
CalComp<br />
03C2 Embedded in OEM Plotter Product<br />
CalComp<br />
03C3 Embedded in OEM Plotter Product<br />
CalComp<br />
03C7 LAN Spool 3.5 Intel - Hillsboro<br />
03C8 Network Management Madge Networks<br />
Ltd<br />
03C9 Diatek<br />
03CA Point-of-sale Server Optical Mark Systems<br />
Ltd<br />
03CB Software Access Control Server U of<br />
Plymouth<br />
03CC Axnetwar - Envelope/label Print Server<br />
Thuridion Software Engineering<br />
03CF Database Engine Blue Lance Network Info<br />
Sys<br />
03D0 Report Engine Blue Lance Network Info<br />
Sys<br />
03D1 Job Server Blue Lance Network Info Sys<br />
03D2 Object Type Blue Lance Network Info Sys<br />
03D3 Object Type Blue Lance Network Info Sys<br />
03D4 Visinet NLM ID# Technology Dynamics Inc<br />
03D5 Print Servers Lexmark International<br />
03D6 Print Servers Lexmark International<br />
03D7 Print Servers (type 4033-011) Lexmark<br />
International<br />
03D8 XLE Print Servers (type 4033-301)<br />
Lexmark International<br />
03D9 Server Monitoring Program Trellis<br />
03DA Multiple Services & Applications Think<br />
Systems Corp<br />
03DB Multiple Services & Applications Think<br />
Systems Corp<br />
03DC Multiple Services & Applications Think<br />
Systems Corp<br />
03DD Developing Server Performance Analyzer<br />
Banyan Systems Inc<br />
03DE Gupta Sequel Base Server / NW SQL<br />
Gupta Technologies<br />
03DF Remote Database Services Interactive<br />
Data Corp HQ<br />
03E0 Object Store Server Object Design<br />
03E1 Univel Server Type (Unixware) Univel<br />
03E2 Univel Server Type Univel<br />
03E3 Univel Server Type Univel<br />
Type Description<br />
03E4 Univel Server Type (Unixware) Univel<br />
03E5 Univel Server Type Univel<br />
03E6 Univel Server Type Univel<br />
03E7 Univel Server Type Univel<br />
03E8 Univel Server Type Univel<br />
03E9 Univel Server Type Univel<br />
03EA Univel Server Type Univel<br />
03EB Univel Server Type Univel<br />
03EC Univel Server Type Univel<br />
03ED Univel Server Type Univel<br />
03EE Univel Server Type Univel<br />
03EF Univel Server Type Univel<br />
03F0 Univel Server Type Univel<br />
03F1 First Call Thomson Financial<br />
03F2 Access Rights Server QM <strong>Consulting</strong><br />
03F3 Vital Signs/LAN Server Blue Line Software<br />
Inc<br />
03F4 LAA Server Bindery Saber Software<br />
03F5 Microsoft SQL Server IPX/SPX Support<br />
Microsoft<br />
03F6 Asynchronous Serial Communications<br />
Black Creek Integrated Systems<br />
03F7 Asynchronous Serial Communications<br />
Black Creek Integrated Systems<br />
03F8 Asynchronous Serial Communications<br />
Black Creek Integrated Systems<br />
03F9 Asynchronous Serial Communications<br />
Black Creek Integrated Systems<br />
03FA Watson - Communications Server Prodigy<br />
Services<br />
03FB Netport Advertising Intel PCED - Hillsboro<br />
03FC Netport Advertising Intel PCED - Hillsboro<br />
03FD Netport Advertising Intel PCED - Hillsboro<br />
03FE Netport Advertising Intel PCED - Hillsboro<br />
03FF Modular Software Corporation<br />
0400 Bindery Object Types Artefact Network<br />
Support<br />
0401 Bindery Object Types Artefact Network<br />
Support<br />
0402 Bindery Object Types Artefact Network<br />
Support<br />
0403 Bindery Object Types Artefact Network<br />
Support<br />
Page 276 of 317 Novell PartnerNet Confidential 07/24/00<br />
Copyright © 2000 by Novell, Inc.
Type Description<br />
0404 Bindery Object Types Artefact Network<br />
Support<br />
0405 Bindery Object Types Artefact Network<br />
Support<br />
0406 Bindery Object Types Artefact Network<br />
Support<br />
0407 Bindery Object Types Artefact Network<br />
Support<br />
0408 Bindery Object Types Artefact Network<br />
Support<br />
0409 Bindery Object Types Artefact Network<br />
Support<br />
040A Image Application Laser Data<br />
040B Image Application Laser Data<br />
040C Image Application Laser Data<br />
040D Image Application Laser Data<br />
040E Image Application Laser Data<br />
040F Image Application Laser Data<br />
0410 Image Application Laser Data<br />
0411 Image Application Laser Data<br />
0412 Image Application Laser Data<br />
0413 Image Application Laser Data<br />
0414 Netsprint Digital Products Inc<br />
0415 Remote Database Services - Bindery<br />
Interactive Data Corp Corp HQ<br />
0416 Dealing Room Servers Teknos Systems<br />
Ltd<br />
0417 Dealing Room Servers Teknos Systems<br />
Ltd<br />
0418 Dealing Room Servers Teknos Systems<br />
Ltd<br />
0419 Dealing Room Servers Teknos Systems<br />
Ltd<br />
041A Dealing Room Servers Teknos Systems<br />
Ltd<br />
041B Dealing Room Servers Teknos Systems<br />
Ltd<br />
041C Dealing Room Servers Teknos Systems<br />
Ltd<br />
041D Dealing Room Servers Teknos Systems<br />
Ltd<br />
041E Dealing Room Servers Teknos Systems<br />
Ltd<br />
041F Dealing Room Servers Teknos Systems<br />
Ltd<br />
0420 Dealing Room Servers Teknos Systems<br />
Ltd<br />
Type Description<br />
0421 Dealing Room Servers Teknos Systems<br />
Ltd<br />
0422 Dealing Room Servers Teknos Systems<br />
Ltd<br />
0423 Dealing Room Servers Teknos Systems<br />
Ltd<br />
0424 Dealing Room Servers Teknos Systems<br />
Ltd<br />
0425 Dealing Room Servers Teknos Systems<br />
Ltd<br />
0426 Dealing Room Servers Teknos Systems<br />
Ltd<br />
0427 Dealing Room Servers Teknos Systems<br />
Ltd<br />
0428 Dealing Room Servers Teknos Systems<br />
Ltd<br />
0429 Dealing Room Servers Teknos Systems<br />
Ltd<br />
042A Full Text Retrieval Client/server DB Eng<br />
Impact Italiana SRL<br />
042B Gateway Software Datev HA<br />
Systemtechnik<br />
042C Gateway Software Datev HA<br />
Systemtechnik<br />
042D Client-server Driver for IPX/SPX Reference<br />
Point Software<br />
042E Intrak Inc<br />
042F Loader Bindery Type Casper Systems Inc<br />
0430 Finder Bindery Type Casper Systems Inc<br />
0432 Filemaker Pro Claris Corp<br />
0433 Networking Hub (281x Advanced SNMP<br />
Agent) Synoptics<br />
0434 Network Terminal Emulator IDE<br />
Corporation<br />
0435 Administration Server McGill University<br />
0436 Network Dynamic Data Exchange Net<br />
Logic<br />
0437 Asynchronous Communications Server US<br />
Robotics Inc<br />
0438 Back up Product Corel Systems Corp<br />
0439 Back up Product Corel Systems Corp<br />
043A Miscellaneous Software Communications<br />
Tentera Computer Services<br />
043B Enterprise in Maintenance Mode Intel<br />
PCED - Hillsboro<br />
043C Connection Station Service Type Corollary<br />
Inc<br />
Page 277 of 317 Novell PartnerNet Confidential 07/24/00<br />
Copyright © 2000 by Novell, Inc.
Type Description<br />
043D Connection Station Service Type Corollary<br />
Inc<br />
043E Connection Station Service Type Corollary<br />
Inc<br />
043F Connection Station Service Type Corollary<br />
Inc<br />
0441 Connection Station Service Type Corollary<br />
Inc<br />
0442 Connection Station Service Type Corollary<br />
Inc<br />
0443 Connection Station Service Type Corollary<br />
Inc<br />
0444 SNA Gateway / Microsoft SNA Server<br />
Microsoft<br />
0445 Workstation Terminal AccessHSD<br />
Hardware Software Dev<br />
0446 DE International Ltd<br />
0447 Distributive Cache Product Raima Corp<br />
044D IBM Host Gateway Idea Courier<br />
044E Project ID Urban Science Applications<br />
044F Common Communication Interface<br />
Computer Associates<br />
0450 Communications Server SDD Synthesizer<br />
Scandinavian Airlines<br />
0451 Tape Back-up for NLM Applications<br />
Mountain Network Solutions Inc<br />
0452 Tape Back-up for NLM Applications<br />
Mountain Network Solutions Inc<br />
0453 Tape Back-up for NLM Applications<br />
Mountain Network Solutions Inc<br />
0454 Tape Back-up for NLM Applications<br />
Mountain Network Solutions Inc<br />
0455 Tape Back-up for NLM Applications<br />
Mountain Network Solutions Inc<br />
0456 Tape Back-up for NLM Applications<br />
Mountain Network Solutions Inc<br />
0457 Canon Peripheral Server (GP55) Canon<br />
Information Systems<br />
0458 <strong>NetWare</strong> Server Product Intel - Phoenix<br />
0459 Object Oriented Database System Ontos<br />
Inc<br />
045A QMS Printer - Remote Configuration QMS<br />
045B Client Server Monitoring Util (SCSI Array<br />
Monitor) Dell Computer Corp<br />
045C Bindery Type - Application Definition<br />
LANovation<br />
045D Fax Server Ferrari Electronic GMBH<br />
Type Description<br />
045E Fax Server Ferrari Electronic GMBH<br />
045F Fax Server Ferrari Electronic GMBH<br />
0460 Fax Server Ferrari Electronic GMBH<br />
0461 Communications Gateway - OSI Eicon<br />
Technology<br />
0462 Communications Gateway - SNA Eicon<br />
Technology<br />
0464 Batchfiler Application Jovandi International<br />
Inc<br />
0465 NLM on File Server Jovandi International<br />
Inc<br />
0466 Time Synchronization Server Jovandi<br />
International Inc<br />
0468 Telephone Answering System A & M<br />
Communications<br />
046A Fax Server Extended Systems<br />
046B Cadence Time Service Polygon Inc<br />
046C Poly-portal for <strong>NetWare</strong>/Ethernet Gateway<br />
Polygon Inc<br />
046D Poly-link PC to Vax Networking Utilities<br />
Polygon Inc<br />
046E LAT ServicePolygon Inc<br />
046F Automatic Tracking System Automated<br />
Interations<br />
0470 Measureservers and Measureclients<br />
Advantech Benelux BV<br />
0471 Disk Monitor Storage Dimensions<br />
0472 Enterprise Network Services Banyan<br />
Systems Inc<br />
0474 Sybase SQL Server Sybase<br />
0475 Sybase SQL Server Console Sybase<br />
0476 Sybase SQL Server Monitor Sybase<br />
0477 Sybase SQL Server Back-up Sybase<br />
0478 Sybase Open Server Sybase<br />
0479 Sybase Open Server Console Sybase<br />
047C Remote Printer Console Peerless<br />
047D Auto-on/off Control NLM Mitsubishi Denki<br />
Computer<br />
047E Ascom Fax Server Ascom<br />
Telecommunications Ltd<br />
047F Ascom Advertising Fax Server Ascom<br />
Telecommunications Ltd<br />
0480 Ascom Fax Queue Ascom<br />
Telecommunications Ltd<br />
0481 Job Server High Aspect Development<br />
Page 278 of 317 Novell PartnerNet Confidential 07/24/00<br />
Copyright © 2000 by Novell, Inc.
Type Description<br />
0482 Job Queue High Aspect Development<br />
0483 Finance Think Systems Corp<br />
0484 Forcasting Think Systems Corp<br />
0485 Schema Think Systems Corp<br />
0486 Fail Safe Analysis Think Systems Corp<br />
0487 Think Systems Corp<br />
0488 Communication Between Client and Server<br />
CDC Federal Credit<br />
0489 Store Name of Special File on Fileserver<br />
Delta Information Systems<br />
048A Main NLM Server for Calendar Manager<br />
Russell Information Sciences<br />
048B Array Monitor Server Core International<br />
048C Document Processing Server NLM Boss<br />
Logic Inc<br />
048D Document Processing Server NLM Boss<br />
Logic Inc<br />
048E Document Processing Server NLM Boss<br />
Logic Inc<br />
048F Document Processing Server NLM Boss<br />
Logic Inc<br />
0490 Power Product for File Server Brainstorm<br />
Engineering<br />
0491 NetBlazer Communication Server Telebit<br />
Corp<br />
0492 RTS Terminal Emulation Data Research &<br />
Applications<br />
0493 RSCF Client-Server API Data Research &<br />
Applications<br />
0494 CD Networker Bindery Type Lotus<br />
Development<br />
0495 Remote Back-Up Device Astora Software<br />
Inc<br />
0496 SQL Server IPX/SPX Hidden Server<br />
Microsoft<br />
0497 Database Lock Server High Aspect<br />
Development<br />
0498 Meter Server Polymeter Response Ltd<br />
0499 Lancorp EOMS Lancorp Pty Ltd<br />
049A Bull HN SDMLancorp Pty Ltd<br />
049B Network Management Agent Eicon<br />
Technology<br />
049C ICOT SNA Gateway ICOT<br />
049D Software NLM Interconnections<br />
049E Internet Gateway Metascybe Systems Ltd<br />
049F Email & Calendaring Communication<br />
Type Description<br />
Server Attachmate Canada<br />
04A1 Automation Information Router Kurt<br />
Manufacturing<br />
04A2 Xbase Record Engine Extended Systems<br />
04A3 Remote Procedure Call System Fortunet<br />
Inc<br />
04A4 Delivery of Valuable Info W/usage<br />
Tracking Wave Systems Corporation<br />
04A5 Remote Access Server Traveling<br />
Software Inc<br />
04A6 Bindery for Program Metering Database<br />
Pilot Systems<br />
04A7 Lt Auditor 4.00 Plus Blue Lance Network<br />
Info Sys<br />
04A8 Bindery Service Fujitsu<br />
04A9 Bindery Service Fujitsu<br />
04AA SAP Service Fujitsu<br />
04AB SAP Service Fujitsu<br />
04AC Calendar Server Campbell Services Inc<br />
04AE LED Server Inova Corporation<br />
04B0 CDnet Server Meridian Data Corp<br />
04B1 Policy Engine Emerald Systems<br />
04B2 Policy Engine Emerald Systems<br />
04B3 Policy Engine Emerald Systems<br />
04B4 Policy Engine Emerald Systems<br />
04B5 Policy Engine Emerald Systems<br />
04B6 Policy Engine Emerald Systems<br />
04B7 LAN Assist plus Remote Control Microtest<br />
04B8 LAN Assist plus Remote Control Microtest<br />
04B9 LAN Assist plus Remote Control Microtest<br />
04BA LAN Assist plus Remote Control Microtest<br />
04BB Map Assist Peer-to-peer Microtest<br />
04BC Map Assist Peer-to-peer Microtest<br />
04BD Map Assist Peer-to-peer Microtest<br />
04BE Map Assist Peer-to-peer Microtest<br />
04BF Jetnet Driver for Novell IPX Protocols<br />
Jetstream Technology Ltd<br />
04C0 Database Server Running as NLM<br />
Lodestar Data Systems Inc<br />
04C1 Asynchronous Communications Servers<br />
US Robotics Inc<br />
04C2 Database Server Faircom<br />
04C3 Taurus Database Server DCI<br />
Page 279 of 317 Novell PartnerNet Confidential 07/24/00<br />
Copyright © 2000 by Novell, Inc.
Type Description<br />
04C4 Taurus Serial Server DCI<br />
04C5 Casper Queue Casper Queue<br />
04C6 Casper Ghost Casper Systems Inc<br />
04C7 Conferencing Service<br />
04C8 Mail System Queue Service Mitsubishi<br />
Electric<br />
04C9 Video Server Novell - Multimedia<br />
04CA Message Express Product Horizon<br />
Strategies Inc<br />
04CB CD ROM Server CBIS Inc<br />
04CC Cost Recovery Server Vincent Larsen<br />
04CD PC-based SNA Gateway Ungermann<br />
Bass<br />
04CF User Restrictions Val Laboratory Co Ltd<br />
04D0 User Restrictions Val Laboratory Co Ltd<br />
04D1 SAP Advertising on Print Server Nissin<br />
Electric Co Ltd<br />
04D2 OT Ellipse Server Bachman Information<br />
Systems<br />
04D3 Asynchronous Access Server Skyline<br />
Technology<br />
04D4 Enterprise Description Object<br />
Ingenieurburo Spatzier<br />
04D5 Print Server Foresyte Technologies<br />
04D7 Cubix QL Server Cubix Corp<br />
04D8 Cubix QL Client Cubix Corp<br />
04D9 Job Server Storage Dimensions<br />
04DA Communication Server Firefox<br />
Communications Ltd<br />
04DB Communication Server Firefox<br />
Communications Ltd<br />
04DC Communication Server Firefox<br />
Communications Ltd<br />
04DD Communication Server Firefox<br />
Communications Ltd<br />
04DE Communication Server Firefox<br />
Communications Ltd<br />
04DF Communication Server Firefox<br />
Communications Ltd<br />
04E0 Communication Server Firefox<br />
Communications Ltd<br />
04E1 Communication Server Firefox<br />
Communications Ltd<br />
04E2 Communication Server Firefox<br />
Communications Ltd<br />
04E3 Communication Server Firefox<br />
Type Description<br />
Communications Ltd<br />
04E4 Communication Server Firefox<br />
Communications Ltd<br />
04E5 Communication Server Firefox<br />
Communications Ltd<br />
04E6 Communication Server Firefox<br />
Communications Ltd<br />
04E7 Communication Server Firefox<br />
Communications Ltd<br />
04E8 Communication Server Firefox<br />
Communications Ltd<br />
04E9 Communication Server Firefox<br />
Communications Ltd<br />
04EA Communication Server Firefox<br />
Communications Ltd<br />
04EB Communication Server Firefox<br />
Communications Ltd<br />
04EC Communication Server Firefox<br />
Communications Ltd<br />
04ED Communication Server Firefox<br />
Communications Ltd<br />
04EE Remote Access Server ICC<br />
04EF Statistic Management MultiTech<br />
04F0 Statistic Management MultiTech<br />
04F1 Remote Control Software MultiTech<br />
04F2 Remote Control Software MultiTech<br />
04F3 MultiTech<br />
04F4 NetLynx Communication Server Andrew<br />
Corporation<br />
04F5 NetLynx Communication Server Andrew<br />
Corporation<br />
04F6 Netlynx Communication Server Andrew<br />
Corporation<br />
04F7 Netlynx Communication Server Andrew<br />
Corporation<br />
04F8 Netlynx Communication Server Andrew<br />
Corporation<br />
04F9 Netlynx Communication Server Andrew<br />
Corporation<br />
04FA Netlynx Communication Server Andrew<br />
Corporation<br />
04FB Netlynx Communication Server Andrew<br />
Corporation<br />
04FC Netlynx Communication Server Andrew<br />
Corporation<br />
04FD Netlynx Communication Server Andrew<br />
Corporation<br />
04FE Netlynx Communication Server Andrew<br />
Page 280 of 317 Novell PartnerNet Confidential 07/24/00<br />
Copyright © 2000 by Novell, Inc.
Type Description<br />
Corporation<br />
04FF Netlynx Communication Server Andrew<br />
Corporation<br />
0500 Netlynx Communication Server Andrew<br />
Corporation<br />
0501 Netlynx Communication Server Andrew<br />
Corporation<br />
0502 Netlynx Communication Server Andrew<br />
Corporation<br />
0503 Netlynx Communication Server Andrew<br />
Corporation<br />
0504 Deskview X Bindery Type Quarterdeck<br />
Office Systems<br />
0505 Print Server Add-on Intel - Hillsboro<br />
0506 Index Sequential Access NLM Infopoint<br />
Systems<br />
0507 Associative Index Server Infopoint<br />
Systems<br />
0508 Netscribe Server Meridian Data Corp<br />
0509 Print Server for Remote Workstations<br />
Fuji Xerox Co Ltd<br />
050A Netmagic Bindery IdNet Magic Systems<br />
Inc<br />
050B Financial Market Information Server AT<br />
Financial<br />
050C Network Modem Anagram<br />
050D Network Modem Anagram<br />
050E Document Management Service Imagery<br />
Software Inc<br />
050F Image Management Service Imagery<br />
Software Inc<br />
0510 Mass Storage Service Imagery Software<br />
Inc<br />
0511 Database Server Tobit Hard & Software<br />
GMBH<br />
0512 Teli-Link Voice Server Computer &<br />
Communications Co<br />
0513 Print Server Emulex Corporation<br />
0514 1012 Hub Agent Asante Technologies<br />
0515 1012 Hub Agent Asante Technologies<br />
0516 1012 Hub Agent Asante Technologies<br />
0517 1012 Hub Agent Asante Technologies<br />
0518 1012 Hub Agent Asante Technologies<br />
0519 1012 Hub Agent Asante Technologies<br />
051A 1012 Hub Agent Asante Technologies<br />
051B 1012 Hub Agent Asante Technologies<br />
Type Description<br />
051C 1012 Hub Agent Asante Technologies<br />
051D 1012 Hub Agent Asante Technologies<br />
051E Advertising Network Modems LANsource<br />
Technologies<br />
051F Application Programs U of Plymouth<br />
0520 Bloomberg Audio Server Bloomberg LP<br />
0521 Bloomberg Process Server Bloomberg LP<br />
0522 Net Modem Server Practical Peripherals<br />
Inc<br />
0525 Agent for Hub Management Idea Courier<br />
0526 Named Pipe Communications Service<br />
Symantec Group<br />
0527 Print Server/Remote Printer Pacific Data<br />
Products<br />
0528 Print Server Seiko Epson Corp<br />
0529 InterServer File Copying Bankers Trust<br />
Co<br />
052A Fax & Voice Server DCA<br />
052B Angora Enterprise Gateway Rabbit<br />
Software Corp<br />
052C LANtronix / Remote Login Terminal<br />
Gordian<br />
052D Application Server Citrix Systems<br />
052E OT_Bloomberg Media Touch Systems<br />
052F Microcom Remote Access Server<br />
Microcom Inc<br />
0530 Remark Voice Server Simpact Associates<br />
Inc<br />
0531 IPX Communication Server Symantec<br />
Group<br />
0532 Access Server for Modem Sharing Bay<br />
Technical Associates Inc<br />
0533 Gateway Between Network & Visa Pos-<br />
Port Hemko Systems<br />
0534 Device Location via Remote Config Tool<br />
Milan Technology Corp<br />
0535 Device Location via Remote Config Tool<br />
Milan Technology Corp<br />
0536 Device Location via Remote Config Tool<br />
Milan Technology Corp<br />
0537 Device Location via Remote Config Tool<br />
Milan Technology Corp<br />
0538 Device Location via Remote Config Tool<br />
Milan Technology Corp<br />
0539 Device Location via Remote Config Tool<br />
Milan Technology Corp<br />
053A Device Location via Remote Config Tool<br />
Page 281 of 317 Novell PartnerNet Confidential 07/24/00<br />
Copyright © 2000 by Novell, Inc.
Type Description<br />
Milan Technology Corp<br />
053B Device Location via Remote Config Tool<br />
Milan Technology Corp<br />
053C Device Location via Remote Config Tool<br />
Milan Technology Corp<br />
053D Device Location via Remote Config Tool<br />
Milan Technology Corp<br />
053E Remoted SMS Server New Era Systems<br />
Services Ltd<br />
053F Listener/<strong>NetWare</strong> Sterling Tefen Lab<br />
0540 Listener/DOS Sterling Tefen Lab<br />
0541 Listener/Windows Sterling Tefen Lab<br />
0542 Listener/OS2 Sterling Tefen Lab<br />
0543 Listener/MAC Sterling Tefen Lab<br />
0544 Listener/Unix Sterling Tefen Lab<br />
0545 Techra Client/Server RDBMS Kvatro As<br />
0546 DOCRA Client/Server Doc Mgmt System<br />
Kvatro As<br />
0547 Voice/fax Responding Machine System<br />
Sophia<br />
0548 I4/LS Naming Service Gradient<br />
Technologies<br />
0549 TNSI Network Utilities Toadally Network<br />
Systems Inc<br />
054A RM3 Configuration Cayman Systems Inc<br />
054B SNMP Configuration Cayman Systems Inc<br />
054D Imagesolve_ofs Imagesolve International<br />
054E District Communication Gateway<br />
Chancery Software Ltd<br />
054F District Link Chancery Software Ltd<br />
0550 EDM Client/PC Computer Vision<br />
0552 Security Object Bank of New Zealand<br />
0555 “Printers, Plotters & Routers Seiko<br />
Instruments Inc”<br />
0556 Fax Services OAZ Communications Inc<br />
0557 Fax Services OAZ<br />
0558 Fax Services OAZ<br />
0559 AT&T Joint Venture Telephony Server<br />
Novell - Provo Corp HQ<br />
055A AT&T Joint Venture Telephony Server<br />
Novell - Provo Corp HQ<br />
055B AT&T Joint Venture Telephony Server<br />
Novell - Provo Corp HQ<br />
055C AT&T Joint Venture Telephony Server<br />
Novell - Provo Corp HQ<br />
Type Description<br />
055D Hostview Utility Attachmate Corp<br />
055E Print Server Lexmark International Inc<br />
055F Print Server Lexmark International Inc<br />
0560 Print Server Lexmark International Inc<br />
0561 Print Server Lexmark International Inc<br />
0562 Statistics Gathering Agent Netcraft<br />
Software Development<br />
0563 ERL Database Server Silver Platter<br />
Information Ltd<br />
0564 ERL Directory Server Silver Platter<br />
Information Ltd<br />
0565 Newswire Notification Generation<br />
Technologies Corp<br />
0566 Ziff Proprietary Services Ziff Information<br />
Services<br />
0567 Time Server NLM Meinberg Funkuhren<br />
0568 X-Base Database Server Extended<br />
Systems<br />
0569 Advertising Media-DB Server Ravi<br />
Technologies Inc<br />
056A OEM Remote Access for Ethernet Shiva<br />
Corp<br />
056B OEM Remote Access for Tokenring Shiva<br />
Corp<br />
056C Integrated Remote Access for Ethernet<br />
(LanRover/E Plus) Shiva Corp<br />
056D Integrated Remote Access for Tokenring<br />
(LanRover/T Plus) Shiva Corp<br />
056F Med Station Server Pyxis Corporation<br />
0570 Telnet IPX Router Teletrol Systems Inc<br />
0571 NLM Server SR Associates/Cybermedia<br />
0572 Advertising NetModem Server Practical<br />
Peripherals Inc<br />
0573 Satellite Connections ULF Zimmermann<br />
0574 LAN/CD Server Logicraft<br />
0576 Peer Communications Tool Intelec<br />
Systems Corporation<br />
0577 Communication Server Norman Data<br />
Defense Systems<br />
0578 Modem Sharing Software SEG<br />
0579 Hops Database Server Hops<br />
International<br />
057A Datafile Access Handler LMS<br />
057B Novus Gateway Product Firefox<br />
Communications Ltd<br />
057C LGS Interconections<br />
Page 282 of 317 Novell PartnerNet Confidential 07/24/00<br />
Copyright © 2000 by Novell, Inc.
Type Description<br />
057D LGS-PFT Interconections<br />
057E LGS-PPS Interconections<br />
057F TN 3270 Gateway Bus Tech Inc<br />
0580 McAfee Virus Pattern Server (NetShield)<br />
McAfee Associates<br />
0581 Optical Server Optisys<br />
0582 Proride X.500 LDAP Support Control Data<br />
Systems<br />
0583 Net Trax Alarm Monitor Net X Corp<br />
0584 Net Trax File Server Agent Net X Corp<br />
0585 Net Trax Workstation Agent Net X Corp<br />
0586 Net Trax Bridge Agent Net X Corp<br />
0587 Team Office Product ICL Personal<br />
Systems OY<br />
0589 Hyperdesk Distribute Object Mgmt System<br />
Hyperdesk<br />
058A Hyperdesk Database Type Hyperdesk<br />
058B TCP/SuperLAT Host Print SAP Meridian<br />
Technology Corp<br />
058C OCS SafeServer Omnitech Corporate<br />
Solutions<br />
058D Jukebox User Group Todd Enterprises Inc<br />
058E Full Screen Login Confirm<br />
058F Meeting Space Server World Benders<br />
Inc<br />
0590 LAN Product Server BMC Software Inc<br />
0591 CBT Server First Class Systems<br />
0592 Net Tune Service Hawknet Inc<br />
0593 Print Server Ricoh Company Ltd<br />
0594 Remote Printer Ricoh Company Ltd<br />
0595 Slathp Status NLM Meridian Technology<br />
Corp<br />
0597 IPX Named Pipes Communication Service<br />
Symantec Group<br />
0598 Appmeter for Suites Funk Software<br />
059C ServerLog Diamond Software Inc<br />
05A0 Service Location Protocol Eicon<br />
Technology<br />
05A1 NMS Icons Networth Inc<br />
05A2 NMS Icons Networth Inc<br />
05A3 NMS Icons Networth Inc<br />
05A4 NMS Icons Networth Inc<br />
05A5 NMS Icons Networth Inc<br />
Type Description<br />
05A6 NMS Icons Networth Inc<br />
05A7 NMS Icons Networth Inc<br />
05A8 NMS Icons Networth Inc<br />
05A9 NMS Icons Networth Inc<br />
05AA NMS Icons Networth Inc<br />
05AB NMS Icons Networth Inc<br />
05AC NMS Icons Networth Inc<br />
05AD NMS Icons Networth Inc<br />
05AE NMS Icons Networth Inc<br />
05AF NMS Icons Networth Inc<br />
05B0 NMS Icons Networth Inc<br />
05B1 NMS Icons Networth Inc<br />
05B2 NMS Icons Networth Inc<br />
05B3 Multi-System Manager - Netview Interface<br />
IBM - Research Triangle Park<br />
05B4 Online Transaction Transportation System<br />
ABG Technology/United Card Svc<br />
05B6 Datastar NLM Apertus Technologies<br />
05B7 DS_LCC - Logical Link Controller Apertus<br />
Technologies<br />
05B8 Database Management Services<br />
Revelation Technologies<br />
05B9 Distribution Services Discovery IBM -<br />
Rome<br />
05BA Managing Hardware Routers Compatible<br />
Systems Corp<br />
05C0 Calendar Server Campbell Services Inc<br />
05C1 Network Management Application Xircom<br />
05C2 Network Management Application Xircom<br />
05C3 Network Management Application Xircom<br />
05C4 Network Management Application Xircom<br />
05C5 Network Management Application Xircom<br />
05C6 Network Management Application Xircom<br />
05D9 Ethernet-Managed Stackable Hub IBM -<br />
Research Triangle Park<br />
05E4 FileNet Network Clearinghouse File Net<br />
05E5 HPCS Data-Based Products Tobit Hard &<br />
Software GMBH<br />
05E6 AST SNMP Instrumented Server AST<br />
Research Inc<br />
05EB Office Extend Server Fransen King<br />
05EC Windows NT Named Pipe Server Optus<br />
Information Systems<br />
Page 283 of 317 Novell PartnerNet Confidential 07/24/00<br />
Copyright © 2000 by Novell, Inc.
Type Description<br />
05ED Gateway Server Fujitsu Ltd<br />
05EE Bindery File Fujitsu Ltd<br />
05EF Fax Workstation Object Sofnet Inc<br />
05F2 Router Administration Server Livingston<br />
Enterprises<br />
05F3 Client Server Array Monitor Program<br />
Allodyne Inc<br />
05F4 Evergreen Management Agent Goodall<br />
Software Engineering<br />
05F5 Windows Bulletin Board System Pacer<br />
Software<br />
05F8 UPS SNMP Monitor NLM Computer Site<br />
Technologies Inc<br />
05FA Goodall Virtual Protocol Adaptor Goodall<br />
Software Engineering<br />
0603 Time Card Server Advanced<br />
Management Solutions<br />
0606 Image Server Address Look-up<br />
Watermark Software<br />
0607 Arts RLogind Server Reuters/ American<br />
Real Time<br />
0608 Arts Generic Server Reuters/ American<br />
Real Time<br />
0609 Arts RUUPD - Are You up Daemon<br />
Reuters/ American Real Time<br />
060A Money Center Data Server Knight Ridder<br />
Financial Inc<br />
060C Axis Printer Server Axis Communications<br />
AB<br />
060D Unix Mail Server Felpausch<br />
0610 SCSI Management Adaptec Inc<br />
0611 Stealth Event Capture Engine<br />
Intelligence Quotient Intl Ltd<br />
0613 Universal Data Transporter Conseil<br />
Formation et Developpe<br />
0614 Communication Software (NLM) NEC -<br />
Nippon Electric Company<br />
0615 Communication Software (NLM) NEC -<br />
Nippon Electric Company<br />
0616 Fax Gateway Server Russell <strong>Consulting</strong><br />
061C Print Server Emulex Corporation<br />
061D Print Server Emulex Corporation<br />
061E Print Server Emulex Corporation<br />
061F Print Server Emulex Corporation<br />
0620 Print Server Emulex Corporation<br />
0625 Setup Manager Access Control<br />
Maximized Software<br />
Type Description<br />
062F Metering Program Secure Design<br />
0636 Comet Terminal Server Goodall Software<br />
Engineering<br />
0637 Comet File Server Goodall Software<br />
Engineering<br />
0640 Windows NT Server-RPC Services<br />
Gateway Services for NW<br />
Win 95-User Level Security Microsoft<br />
064E NT Server-Internet Information Server<br />
Microsoft<br />
073D Connect:Direct NLM Server Sterling<br />
Software<br />
073E Connect:Direct NLM Server Sterling<br />
Software<br />
073F Connect:Direct NLM Server Sterling<br />
Software<br />
0740 Connect:Direct NLM Server Sterling<br />
Software<br />
0741 Connect:Direct NLM Server Sterling<br />
Software<br />
0742 Connect:Direct NLM Server Sterling<br />
Software<br />
0743 Maxserv 3270 Maxserv<br />
0744 Maxserv Price Maxserv<br />
0745 Maxserv Mail Maxserv<br />
0746 Maxserv Macs Maxserv<br />
0747 Maxserv Reserved Maxserv<br />
0748 Maxserv Reserved Maxserv<br />
0749 Tasking IPX/LWSI Gateway Tasking<br />
Software BV<br />
074D NLM Applications KNX Ltd<br />
074E NLM Applications KNX Ltd<br />
074F NLM Applications KNX Ltd<br />
0750 NLM Application KNX Ltd<br />
0753 STP Protocol Service Agent (CSA_FTP)<br />
Digital Technologies<br />
0754 IndF$file File Transfer Agt (CSA_indfile)<br />
Digital Technologies<br />
0755 All Kalpana Switches Kalpana<br />
0756 Chat Server Microsoft<br />
0757 Titanium Database Engine Micro<br />
Database Systems Inc<br />
0758 TCS Communication Server Micro<br />
Tempus Inc<br />
0759 PC Communication Partner SAP Fujitsu<br />
Page 284 of 317 Novell PartnerNet Confidential 07/24/00<br />
Copyright © 2000 by Novell, Inc.
Type Description<br />
Ltd<br />
075A PC Communication Partner SAP Fujitsu<br />
Ltd<br />
075B PC Communication Partner Bindery<br />
Fujitsu Ltd<br />
075C DPC Server SAP Fujitsu Ltd<br />
075D DPC Server Bindery Fujitsu Ltd<br />
075E CAM Host TMD <strong>Consulting</strong><br />
075F Server Monitoring Application Softwork<br />
GMBH<br />
076A Alarm Manager NLM Arcada/ Conner<br />
Peripherals<br />
076B Event Manager NLM Arcada/ Conner<br />
Peripherals<br />
076D Desktop Management NLM Advanced<br />
Modular Solutions Inc<br />
0770 Real-Time Integration Services Industrial<br />
Peer-to-Peer<br />
0771 LANDeep Server Monitor Deerfield<br />
Computer Solutions<br />
0773 Hitecsoft Api Manager Hitecsoft Corp<br />
0774 Hitecsoft Public Library Hitecsoft Corp<br />
0775 Hitecsoft Phone Server Hitecsoft Corp<br />
077B Advantage X-Base Server Extended<br />
Systems<br />
077F Security Auditor Secure Design<br />
0780 “U of Wisconsin Utilities U of Wisconsin -<br />
Madison, CAE”<br />
0781 “U of Wisconsin Utilities U of Wisconsin -<br />
Madison, CAE”<br />
0782 “U of Wisconsin Utilities U of Wisconsin -<br />
Madison, CAE”<br />
0783 “U of Wisconsin Utilities U of Wisconsin -<br />
Madison, CAE”<br />
078B A Non-Name-Pipe Server Team<br />
Development Corp<br />
0798 NetHopper Router Rockwell Network<br />
Systems<br />
0799 NetHopper Client Router Rockwell<br />
Network Systems<br />
079A NetHopper Client Rockwell Network<br />
Systems<br />
079F Timbuktu Address Resolutions Farallon<br />
Computing<br />
07A0 Remote Access Server Meridian<br />
Technology Corp<br />
07A7 Backup Exec Job Queue Arcada<br />
Software<br />
Type Description<br />
07A8 Backup Exec Job Manager Arcada<br />
Software<br />
07A9 Backup Exec Job Service Arcada Software<br />
07AA Serverbench Server PC Weeks Labs<br />
07AB Serverbench Controller PC Weeks Labs<br />
07AC Service NW_Connect_PW_Server<br />
Flagstar<br />
07AF Site Meter Server Brightwork<br />
Development<br />
07B0 Proxy Agent Site Meter Brightwork<br />
Development<br />
07B3 Disc Disaster Recovery Software<br />
Scheduler Columbia Data Products<br />
07B4 Cubix Comm Server Cubix<br />
07B8 Identify Server Vendor for NMS Siemens-<br />
Nixdorf Information Sys<br />
07BA File Transfer Between LAN/Mainframe<br />
Proginet Corp<br />
07BF Database Server Comp Soft PLC<br />
07C0 Application Advertisement Comp Soft PLC<br />
07C1 Internet Apps on NW PCs Mango Systems<br />
Inc<br />
07CE Computer Supported Telephony Apps<br />
Global Communications<br />
07D1 Asynchronous Communication LAN<br />
Access Corp<br />
07D2 RM Auditor-Monitoring NW Usage<br />
Research Machines<br />
07D3 Generic NW Management Product 3Com<br />
Corp<br />
07D4 SCSI Mgmt Adaptec Inc<br />
07D9 Distribution Job Server Emotion Inc<br />
07DA Distribution Queue Emotion Inc<br />
07DB Distribution Feedback Job Server<br />
Emotion Inc<br />
07DC Voice Processing Server International<br />
Voice Exchange<br />
07DD Telephony Server Monitor International<br />
Voice Exchange<br />
07E0 Print Server Creative Controllers Inc<br />
07E1 “Box Router Supporting IP, IPX &<br />
Appletalk Furukawa Electric Co Ltd”<br />
07E2 TEL Serve Fujitsu NS Center<br />
07E3 Telemarketing Library Fujitsu NS Center<br />
07E4 Multi-Server Metering Brightwork<br />
Development<br />
Page 285 of 317 Novell PartnerNet Confidential 07/24/00<br />
Copyright © 2000 by Novell, Inc.
Type Description<br />
07E6 Stress Magic Installation Utility Handler<br />
Net Magic Systems Inc<br />
07EC Financial Data Server Telemet America<br />
07ED ISDN Software Sharing of ISDN Boards in<br />
Network High Soft Tech Ingenieurburo<br />
07EE Comgate-Comm Gateway for IBM<br />
AS/400Comware International<br />
07F0 Zip Code Server Third Planet Software<br />
07F2 Norton Anti-virus Client Server Comm<br />
Symantec<br />
07F8 Software Entertainment Origin System Inc<br />
07F9 Remote Management of Remote Access<br />
Server Meridian Technology Corp<br />
07FC FTmanager - Controls <strong>NetWare</strong> Server<br />
Mitsubisi Denki Computer<br />
07FD SAP for Audittrack version 2.0 EG<br />
Software<br />
07FF Soft-tub Agent Proxy for Tri-com Adaptor<br />
3Com<br />
0801 SAP for Onguard EG Software<br />
080D IFONYFLOW for <strong>NetWare</strong> Fujitsu Social<br />
Science Lab<br />
080E Print Server for NW 3.x Ishigaki Computer<br />
System Corp<br />
0810 ELAN License Server Demo ELAN<br />
Computer Group<br />
0811 ELAN License Server ELAN Computer<br />
Group<br />
0813 “BVNCS Enterprise WAN LAN Support<br />
Group, Network Res”<br />
0814 Evergreen Windcap Management Agent<br />
Goodall Software Engineering<br />
0816 Policy Engine Emerald Systems<br />
0817 Policy Engine Emerald Systems<br />
0818 Policy Engine Emerald Systems<br />
0819 Policy Engine NCSU<br />
081A Policy Engine NCSU<br />
081B Policy Engine NCSU<br />
081C Policy Engine NCSU<br />
081D Off Line Copying On Technologies<br />
0827 Palindrome Service Broker Palindrome<br />
0829 LAN LENS Server Digital Equipment Corp<br />
082A LAN LENS Probe Digital Equipment Corp<br />
082B Job Queue Arcada Software<br />
082F DB Server 3.x Simultan AG<br />
Type Description<br />
0830 Pin64 Asahi Electronics Co Ltd<br />
0832 Appmeter 2-Licensing Product Funk<br />
Software<br />
0833 Communication Server Digital Products<br />
Inc<br />
0834 FTanalyzer Mitsubishi Electronic Corp<br />
0835 Instant Internet Performance Technology<br />
0836 High Speed Communication Server C<br />
Spec Corp<br />
0837 Atlanta/3 Print Server Kelly Computer<br />
Systems<br />
083D Application Server for NT Citrix Systems<br />
083E Custom Authentication/Load Balancing<br />
Univ of Pittsburgh<br />
0840 IP to IPX Gateway InterNet Junction<br />
0841 RDB/7000 Fujitsu Ltd LAN Technical Ctr<br />
084C ROUTE ONE and Related 2 Software<br />
Bug Inc<br />
084D 98 Server Manager NEC Corp<br />
0850 APLinkterm Mikasa System Engineering<br />
0853 APLinkgate Mikasa System Engineering<br />
0854 Automation Protocol Server Arcada<br />
Software<br />
0855 Tape ID Server Arcada Software<br />
0858 <strong>NetWare</strong> to Internet Gateway On<br />
Technology<br />
085A RDB/7000 Server for <strong>NetWare</strong> Fujitsu<br />
Limited<br />
085C DB-Express Fujitsu Kobe Engineering<br />
Limited<br />
085F Agent Router Proxy Arcada Software<br />
0860 Catalog Server Arcada Software<br />
0861 Inetix Gateway Micro Computer Systems<br />
0868 SoundByte Server Envision Telephony<br />
Inc<br />
0869 Peer-to-Peer File Redirection Alex Lloyd<br />
086F Vision 20 Multi-Functional Product Ricoh<br />
Corp<br />
0870 DPS-SV PFU Limited<br />
0876 “Audit Server LAN Support Group,<br />
Network Res”<br />
0877 “Alert Server LAN Support Group,<br />
Network Res”<br />
0878 “NetSqueeze LAN Support Group, Network<br />
Res”<br />
Page 286 of 317 Novell PartnerNet Confidential 07/24/00<br />
Copyright © 2000 by Novell, Inc.
Type Description<br />
0879 “EWAM LAN Support Group, Network<br />
Res”<br />
087A “Binding Server LAN Support Group,<br />
Network Res”<br />
087B “Authentication Server LAN Support<br />
Group, Network Res”<br />
087D Modem Pool Server Attachmate<br />
087E Flora Manager for <strong>NetWare</strong> Hitachi Ltd<br />
Software Devt Ctr<br />
0886 Multi-user DOS Gold Concurrent Controls<br />
Inc<br />
088B SPX Telenet Agent Telebit<br />
0892 “UPS Control Software (UPSCON)<br />
Koubunsha, Ltd.”<br />
0897 Shared LAN Cache Measurement<br />
Techniques<br />
089A Clear it Dell Computer Corp<br />
089D Fax Server - Perfect Fit Newtech<br />
Systems<br />
089F Net Tune Pro License Hawknet Inc<br />
08A0 Net Tune Pro Alert Service Hawknet Inc<br />
08A1 “PowerVisor, PowerMonitor S Alfatech Inc”<br />
08A4 Inetix Gateway Admin Service Micro<br />
Computer Systems<br />
08A8 Rapport 112Shiva Corp<br />
08AA CPA Corp Print Accounting Blue Lance<br />
Network Info Sys<br />
08AC GroupEase for Windows Neighborhood<br />
Watch Ethosoft<br />
08AD CS-Care Network Management System<br />
Compu-Shack Prague<br />
08AE Firecall Team Development Corp<br />
08B0 <strong>NetWare</strong> Enhanced Integration for AS400<br />
IBM<br />
08B2 Overdrive Stampede Technologies Inc<br />
08B3 IIR AnswerSoft Inc<br />
08B4 Wanderlink Dialout Funk Software<br />
08B6 F-PROT Professional for <strong>NetWare</strong><br />
Command Software Systems<br />
08B7 Web Management Coffee Computing<br />
08B8 CNA Distributed Traffic Monitor Chevin<br />
Software Engineering Ltd<br />
08B9 DS Gate Datastream International<br />
08BA VTD/X Gateway Micro-Matic Research<br />
08BB Salient Corp Salient Technologies Inc<br />
Type Description<br />
08BC IP Access American Internet Corporation<br />
08BE “Electronic Arts Games Electronic Arts,<br />
Inc”<br />
08BF IPX/IP Gateway Ukiah Software Solutions<br />
08C0 Norton Enterprise Framework (NEF)<br />
Symantec Corporation<br />
08C1 Xyratex VirtualSCSI NLM Xyratex<br />
08C2 8235 DIALs Switch for Token Ring IBM<br />
08C3 Stampede Overdrive Stampede<br />
Technologies Inc<br />
08C4 Intergate Netsphere Communications<br />
Corp<br />
08C6 Piccolo Cornerstone Software<br />
08C8 ServerTrak Intrak Inc<br />
08C9 CDserve M4com Limited<br />
08CC Powerburst/Integrated Shiva Corp<br />
08CD SurfCONTROLJSB Computer Systems Ltd<br />
08CE “Trend Trak Intrak, Inc”<br />
08CF SurfCONTROLJSB Computer Systems Ltd<br />
08D0 Internet LANbridge Virtual Motion Inc<br />
08D1 Hyperdrive Paperwise<br />
08D2 Golf Scoring System Information & Display<br />
08D3 SurfCONTROLJSB Computer Systems Ltd<br />
08D4 SurfCONTROLJSB Computer Systems Ltd<br />
08D5 SurfCONTROLJSB Computer Systems Ltd<br />
08D6 SurfCONTROLJSB Computer Systems Ltd<br />
08D7 SurfCONTROLJSB Computer Systems Ltd<br />
08D8 SurfCONTROLJSB Computer Systems Ltd<br />
08D9 SurfCONTROLJSB Computer Systems Ltd<br />
08DA SurfCONTROLJSB Computer Systems Ltd<br />
08DB SurfCONTROLJSB Computer Systems Ltd<br />
08DC SurfCONTROLJSB Computer Systems Ltd<br />
08DD SurfCONTROLJSB Computer Systems Ltd<br />
08DE SurfCONTROLJSB Computer Systems Ltd<br />
08DF SurfCONTROLJSB Computer Systems<br />
Ltd`<br />
08E0 “HTTP-WebMail, ExpressIt!_2000 Infinite<br />
Technologies”<br />
08E1 “SMTP-WebMail, Infinite InterChange,<br />
ExpressIt!_2000 Infinite Technologies”<br />
08E2 “POP3-Infinite InterChange,<br />
ExpressIt!_2000 Infinite Technologies”<br />
Page 287 of 317 Novell PartnerNet Confidential 07/24/00<br />
Copyright © 2000 by Novell, Inc.
Type Description<br />
08E3 “IMAP4-Infinite InterChange,<br />
ExpressIt!_2000Infinite Technologies”<br />
08E4 “NNTP-Infinite InterChange,<br />
ExpressIt!_2000 Infinite Technologies”<br />
08E5 MPR for ISDN AVM GMBH<br />
08E7 Procomm Remote Control Quarterdeck<br />
Corp<br />
08E8 fiNDS Netoria<br />
08E9 MyNet CKS Software Ltd<br />
08F1 Axis StorPoint Axis Communications<br />
08F4 Keylabs Automation Server Keylabs<br />
08F5 “LiftOff NewMoon Software, Inc”<br />
08F9 TSI Name Services Traveling Software<br />
Incorporated<br />
08FA ITA Agent Axent Technologies<br />
08FC CD FORCE Procom Technology<br />
08FD CallWare TAPIserve CallWare<br />
Technologies<br />
08FE Yoda Extended Systems Inc<br />
08FF Communications Servers for Windows NT<br />
IBM of Research Triangle<br />
0909 Dash Network Phone System Dash Inc.<br />
090A AutoXfer Platinum Technology<br />
090C Network Scan Server Axis Communication<br />
090D CD-Vision Ornetix<br />
Type Description<br />
090F Omniguard/ESM Manager Axent<br />
Technologies<br />
0910 Omniguard/ESM Agent Axent<br />
Technologies<br />
0915 Server Transfer System (STS) Prophet<br />
Systems Inc<br />
0916 KeyServer Sassafras Software Inc<br />
0918 Client/Server Database UMB Drecker<br />
GMBH<br />
091A SNA Gateway Product (GAP Protocol)<br />
Attachmate Corporation<br />
091B “Control, Configure, Administer TCP and<br />
SNA nets IBM Corporation of Raleigh”<br />
0C29 License Profile Integrity Software<br />
0C2A Virus File List Integrity Software<br />
0C2C Global License SAP Integrity Software<br />
0C31 License Report Definition / PlotterCalcomp<br />
238C Meeting Maker XP On Technology<br />
238D NLMOn Technology<br />
238E NLMOn Technology<br />
8202 NDPS Broker Agent Novell - Provo Corp<br />
HQ<br />
9620 License Profile Administrator Integrity SW<br />
FFFF All Types Novell - Provo Corp HQ<br />
Page 288 of 317 Novell PartnerNet Confidential 07/24/00<br />
Copyright © 2000 by Novell, Inc.
Appendix I—Steps for Transitioning to<br />
Pure IP<br />
Note: In the following descriptions, pure IP means no IPX anywhere on the network and,<br />
therefore, no capability for running IPX-dependent applications, printing, services, and so forth.<br />
The assumption is that pure IP is the ultimate goal, in which case you should complete all steps in<br />
this task. When referring to other Novell documentation, keep in mind that not all Novell<br />
documentation defines pure IP this way.<br />
Dual Stacks<br />
Follow these steps to complete the transition to IP using the dual stacks option:<br />
1. Using the customer’s LAN/WAN diagrams, including locations of servers, clients, and<br />
routers, identify all network segments and the <strong>NetWare</strong> servers and clients on the segments.<br />
2. Using the customer’ LAN/WAN diagrams, design an SLP infrastructure (see Appendix D,<br />
SLP Design, for more information).<br />
3. Complete the upgrading/installing of your servers and clients using the IP and IPX option.<br />
• When using the dual stack option, it does not matter if you upgrade servers<br />
or clients first, nor do the clients and servers need to be upgraded at the<br />
same time.<br />
When all servers and clients have been upgraded to <strong>NetWare</strong> <strong>5.1</strong> using dual stacks, client to<br />
server communication is still available through either IP or IPX. Steps 4-7 start preparing<br />
you to get to pure IP and can be done simultaneously with step 3. Some aspects of these<br />
steps can be addressed in advance of step 3.<br />
4. Identify all IPX-based applications (refer to server applications and NLMs listed previously<br />
in Appendix A, IPX-Dependent Applications Worksheet.) Until you “turn off” IPX (step 8),<br />
your IPX-dependent applications will continue to run without problem.<br />
5. <strong>Upgrade</strong>, reconfigure, and eliminate identified IPX-dependent applications to use TCP/IP<br />
until all IPX-dependent applications have been removed. At the very least, consolidate local<br />
IPX dependencies as much as possible.<br />
6. Identify and then replace all IPX-dependent devices. Until you turn off IPX (step 8), your<br />
IPX-dependent devices will continue to function. Common examples of such devices are<br />
printers, CD-ROM towers, and fax servers. Printing will likely be the most pervasive of<br />
these. Remove this IPX dependency by migrating to an IP printing environment using NDPS<br />
or another IP printing solution, such as LPR. See the NDPS section in this Consultant <strong>Guide</strong><br />
for more information.<br />
7. Eliminate SAP/RIP on the wire by modifying the configuration of the <strong>NetWare</strong> <strong>5.1</strong> servers<br />
to be IP-only (no CMD) by unbinding IPX from the LAN drivers.<br />
Hint: If an unknown IPX dependency is discovered at this point, re-bind IPX until the IPX<br />
dependency can be eliminated.<br />
Page 289 of 317 Novell PartnerNet Confidential 07/24/00<br />
Copyright © 2000 by Novell, Inc.
8. Turn off IPX at the routers only after the following conditions have been met:<br />
• All <strong>NetWare</strong> servers have been upgraded/installed to <strong>NetWare</strong> <strong>5.1</strong> with<br />
both IP and IPX (step 3).<br />
• All <strong>NetWare</strong> clients have been upgraded/installed with both IP and IPX<br />
(step 3).<br />
• All IPX applications have been upgraded/replaced with IP versions (step<br />
5).<br />
• All printing has been migrated to IP (step 6).<br />
Note: IPX can be removed from the network when a segment has been deemed “IPX<br />
independent” instead of waiting for all IPX dependencies to be removed.<br />
9. Modify the configuration of the <strong>NetWare</strong> clients to be IP-only (no CMD) using ZENworks,<br />
ACU, or some other automated method to propagate the configuration changes.<br />
When you have completed these steps, you are at pure IP according to the definition given above.<br />
Page 290 of 317 Novell PartnerNet Confidential 07/24/00<br />
Copyright © 2000 by Novell, Inc.
Using IP/CMD<br />
There are two options for performing the transition:<br />
• Pure IP via the MA-to-MA Protocol of CMD<br />
• Full CMD Implementation (using IP/CMD “islands” and the MA-to-MA Protocol)<br />
Pure IP Via the MA-to-MA Protocol of CMD<br />
Ethernet Segment<br />
IP/IPX Backbone<br />
Router Router<br />
IP only via the MA to MA Protocol IP only via the MA to MA Protocol<br />
IP and IPX<br />
<strong>NetWare</strong> Server with<br />
SCMD /bs /net=FFFFFFFC<br />
<strong>NetWare</strong> Server with<br />
SCMD /bs /net=FFFFFFFC<br />
<strong>NetWare</strong> Server with<br />
SCMD /bs /net=FFFFFFFD<br />
<strong>NetWare</strong> Server with<br />
SCMD /bs /net=FFFFFFFD<br />
Dual Stack Clients<br />
PC PC PC PC<br />
Dual Stack Servers<br />
IP and IPX<br />
Ethernet Segment<br />
Dallas Sydney<br />
This diagram shows the connection of discontinuous IPX network segments<br />
using the MA to MA Protocol feature of CMD.<br />
Figure J1. MA-to-MA Protocol feature of CMD<br />
Migrating the backbone first is commonly referred to as “providing IP backbone support.”<br />
Essentially this means connecting two or more noncontiguous IPX network segments across an IP<br />
network backbone, as shown in the figure above. This method primarily uses the SCMD.nlm MAto-MA<br />
protocol, or “Backbone support” feature.<br />
Page 291 of 317 Novell PartnerNet Confidential 07/24/00<br />
Copyright © 2000 by Novell, Inc.
1. Using the customer’s LAN/WAN diagrams, including locations of servers, clients, and<br />
routers, identify the backbone and the <strong>NetWare</strong> servers in the backbone. Also, identify all<br />
network segments (non-backbone) and the <strong>NetWare</strong> servers and clients in them.<br />
2. Determine and implement the SLP design. (See Appendix D, SLP Design.)<br />
3. Determine MA-to-MA Protocol Infrastructure design (see Appendix B, CMD Essentials).<br />
4. Prepare backbone for MA-to-MA protocol.<br />
a. Choose an appropriate <strong>NetWare</strong> <strong>5.1</strong> server on the backbone for an MA (ideally<br />
two will be used to provide fault tolerance).<br />
b. Load dual stack on the chosen server.<br />
c. Configure NLSP routing environment.<br />
d. Configure any necessary IPX filtering.<br />
e. Load SCMD with the appropriate CMD network number and configure any<br />
related parameters deemed necessary in the design.<br />
5. Enable MA-to-MA protocol between the hub sites and remote WAN link sites.<br />
a. Choose an appropriate <strong>NetWare</strong> <strong>5.1</strong> server on the backbone for an MA (ideally<br />
two will be used to provide fault tolerance).<br />
b. Load dual stack on the chosen server.<br />
c. Configure NLSP routing environment.<br />
d. Configure any necessary IPX filtering.<br />
e. Load SCMD with the appropriate CMD network number and configure any<br />
related parameters deemed necessary in the design.<br />
f. Remove the IPX routing function from the router’s WAN interface to the hub<br />
site so that the MA to MA link is the only IPX path to the corporate network.<br />
The resulting infrastructure removes native IPX traffic off of the WAN links and limits IPX traffic<br />
to the LAN where it is usually not a problem.<br />
Once the MA-to-MA infrastructure is in place, a dual stack approach is easily implemented at each<br />
of the sites now connected by the MA-to-MA protocol.<br />
Once all the IPX dependencies have been eliminated, the resulting infrastructure provides a<br />
complete pure IP solution as previously defined above.<br />
Page 292 of 317 Novell PartnerNet Confidential 07/24/00<br />
Copyright © 2000 by Novell, Inc.
Full CMD Implementation Method (using IP/CMD “islands” and the MA-to-MA Protocol)<br />
Ethernet Segment<br />
IP/IPX Backbone<br />
Router Router<br />
IP and IPX IP and IPX<br />
IP and IPX<br />
<strong>NetWare</strong> Server with<br />
SCMD /bs /net=ABF02A14<br />
<strong>NetWare</strong> Server with<br />
SCMD /bs /net=ABF02A15<br />
IP/CMD Clients<br />
PC PC PC PC<br />
<strong>NetWare</strong> Servers with<br />
SCMD /net=ABF02A14<br />
<strong>NetWare</strong> Clients with<br />
CMD /net=ABF02A14<br />
IP/CMD Servers<br />
IP and IPX<br />
Ethernet Segment<br />
Dallas Sydney<br />
This diagram shows the CMD "island" concept.<br />
<strong>NetWare</strong> Clients with<br />
CMD /net=ABF02A15<br />
<strong>NetWare</strong> Servers with<br />
SCMD /net=ABF02A15<br />
Figure J2. Full CMD Implementation Method<br />
1. Using the customer’s LAN/WAN diagrams, including locations of servers, clients, and<br />
routers, identify the backbone and the <strong>NetWare</strong> servers in the backbone. Also, identify all<br />
network segments (non-backbone) and the <strong>NetWare</strong> servers and clients in them.<br />
2. Determine the SLP design. (See Appendix D, SLP Design.)<br />
3. Determine MA-to-MA protocol design for the backbone. (See Appendix B, CMD<br />
Essentials.)<br />
4. Determine CMD/MA “island” infrastructure design. (See Appendix B, CMD Essentials.)<br />
5. Determine implementation order, backbone first or CMD “island” at each WAN link site. If<br />
the backbone is first, follow the backbone migration strategy previously discussed. If the<br />
backbone is to be migrated after the CMD “islands,” a similar backbone migration strategy<br />
can be used.<br />
Page 293 of 317 Novell PartnerNet Confidential 07/24/00<br />
Copyright © 2000 by Novell, Inc.
6. All users must have a dual stack <strong>NetWare</strong> <strong>5.1</strong> supported client before upgrading any server<br />
to <strong>NetWare</strong> <strong>5.1</strong> at the site.<br />
7. Create CMD “islands” on the network. For each planned island:<br />
a. Choose an appropriate <strong>NetWare</strong> <strong>5.1</strong> server at the site for an MA (ideally two<br />
will be used to provide fault tolerance).<br />
1. Load dual stack on the chosen server.<br />
2. Load SCMD with the unique CMD network number and configure any<br />
related parameters deemed necessary in the design.<br />
b. <strong>Upgrade</strong> remaining servers to <strong>NetWare</strong> <strong>5.1</strong> dual stack.<br />
c. Convert all clients from dual stack to CMD in the appropriate CMD network.<br />
d. Convert all non-MA servers from dual stack to CMD in the appropriate CMD<br />
network.<br />
8. Minimize IPX dependencies (applications and devices) identified in Appendix A through<br />
consolidation and eventual elimination. The most pervasive IPX dependency will likely be<br />
printing. Either NDPS or an LPR-based solution will suffice. (See the NDPS section in this<br />
Consultant <strong>Guide</strong>.)<br />
9. Remove CMD from all servers and clients as quickly as possible. This can be done as IPX<br />
dependencies are eliminated.<br />
10. Remove the IPX bindings from all MA servers as quickly as possible. This can be done as<br />
IPX dependencies are eliminated.<br />
Once all the IPX dependencies have been eliminated, the resulting infrastructure provides a<br />
complete pure IP solution as previously defined above.<br />
Page 294 of 317 Novell PartnerNet Confidential 07/24/00<br />
Copyright © 2000 by Novell, Inc.
Appendix J—Lab Requirements for<br />
<strong>NetWare</strong> <strong>5.1</strong> <strong>Upgrade</strong> Testing<br />
Try to set up the lab to emulate the production environment as much as possible; this should make<br />
the pilot and implementation phases more successful.<br />
NDS Design<br />
Set up the tree the way it is or will be in the production environment, including the appropriate<br />
DS.NLM version. This does not have to include the production environment’s<br />
partitioning/replication scheme unless you have a way to simulate WAN links in the lab.<br />
Workstations<br />
Make sure you have the following:<br />
• Same hardware configuration as in the production environment<br />
• Same Novell client software as production workstations (especially if an ACU will be<br />
tested in the lab)<br />
• Same patch levels on the desktop operating system as production workstations<br />
Network and Server<br />
You should have a lab server running the same <strong>NetWare</strong> version(s) and patch levels as the servers<br />
that will be upgraded in the production environment. This server should be installed in a separate<br />
NDS tree, but the lab network should be physically connected to the production network to allow<br />
access to the production network, the Internet, etc.<br />
Office 2000 Integration (WebDAV) with <strong>NetWare</strong> <strong>5.1</strong><br />
Make sure you have the following:<br />
• <strong>NetWare</strong> <strong>5.1</strong> installed on the appropriate server(s) in the lab<br />
• Same Internet browser software as is used in production on the appropriate workstation(s)<br />
in the lab<br />
• Office 2000 installed on the appropriate workstation(s) in the lab<br />
In addition, if you are currently running the Netscape Web Server on a <strong>NetWare</strong> server that will be<br />
upgraded to <strong>NetWare</strong> <strong>5.1</strong> and support Office 2000 Integration, set this configuration up in the lab.<br />
Novell Distributed Print Services (NDPS)<br />
Emulate the printing environment that is in production so the transition to NDPS can be<br />
documented and tested. Be sure to include Novell’s print server solution (PSERVER.NLM) and<br />
any hardware print servers.<br />
Page 295 of 317 Novell PartnerNet Confidential 07/24/00<br />
Copyright © 2000 by Novell, Inc.
Page 296 of 317 Novell PartnerNet Confidential 07/24/00<br />
Copyright © 2000 by Novell, Inc.
Appendix K—What’s New (Included) in<br />
<strong>NetWare</strong> <strong>5.1</strong><br />
• NDS eDirectory (Enterprise Directory Services) = NDS 8<br />
• Support Pack 4 is automatically installed<br />
• Novell Distributed Print Services (NDPS) = superset of earlier, stand-alone NDPS<br />
product plus it includes IP printing (IPP) and LPR<br />
• Lightweight Directory Access Protocol (LDAP) version 3 = LDAP services for NDS<br />
eDirectory<br />
• Novell Internet Access Server (NIAS)<br />
• Storage Management Services (SMS)<br />
• Catalog Services<br />
• WAN Traffic Manager<br />
• Public Key Infrastructure Services (PKIS)<br />
• Cryptographic Infrastructure (NICI), version 1.3.1; NICIU0 (U.S. / Canada 128-bit),<br />
version 1.3.1<br />
• Security Authentication Services (SAS), which provides SSL support<br />
• Domain Name System (DNS)<br />
• Domain Host Control Protocol (DHCP)<br />
• <strong>NetWare</strong> Enterprise Web Server, version 3.<strong>5.1</strong>, which when installed includes:<br />
• Novell Directory Services Web Management<br />
• Novell SQL Connector<br />
• Virtual Directory Support<br />
• Servlet Gateway 2.0<br />
• NSP, NDODB (support for ASP, ADO programs)<br />
• Cluster Management (ability to manage groups of <strong>NetWare</strong> <strong>5.1</strong> servers running Web,<br />
News, Virtual and Multiple Web Server instances)<br />
• WebMon (Web Server Monitoring Utility) = <strong>NetWare</strong> Web Manager<br />
• WebDAV NSAPI Extension (for working with Microsoft Office 2000)<br />
• ~HomeDir Support (for working with Microsoft Office 2000)<br />
• Novell Script (for working with Microsoft Office 2000)<br />
• <strong>NetWare</strong> FTP Server<br />
• <strong>NetWare</strong> News Server<br />
• Novell Script (support for VBScript on the server)<br />
• <strong>NetWare</strong> Management Portal = web-based management of <strong>NetWare</strong> <strong>5.1</strong><br />
• <strong>NetWare</strong> Web Search Server<br />
• <strong>NetWare</strong> MultiMedia Server<br />
• Novell JVM<br />
• Client Software<br />
Third-party products include the following:<br />
• Nombas JavaScript (support for JavaScript on the server)<br />
Page 297 of 317 Novell PartnerNet Confidential 07/24/00<br />
Copyright © 2000 by Novell, Inc.
• Halcyon InstantASP<br />
• IBM WebSphere Application Server– can be plugged into <strong>NetWare</strong> Enterprise Web<br />
Server<br />
• WebSphere NSAPI Plug-in– can be plugged into <strong>NetWare</strong> Enterprise Web Server<br />
• WebSphere Studio Standard Edition– can be plugged into <strong>NetWare</strong> Enterprise Web<br />
Server<br />
• Oracle 8i<br />
• WebDB (Oracle web extensions)<br />
Page 298 of 317 Novell PartnerNet Confidential 07/24/00<br />
Copyright © 2000 by Novell, Inc.
Appendix L—Time Sync<br />
Table 1: What’s New in <strong>NetWare</strong> <strong>5.1</strong><br />
The design basics of laying out a time synchronization configuration are covered in the NDS<br />
Design BSO. However, two new features have been added in TIMESYNC.NLM <strong>5.1</strong>4 (which<br />
ships with Support Pack 4 in <strong>NetWare</strong> <strong>5.1</strong> and can be downloaded for use with <strong>NetWare</strong> 5.0):<br />
• Auto Disocvery over IP<br />
TIMESYNC.NLM <strong>5.1</strong>4 can now auto-discover time sources using SLP. The autodiscovery<br />
in IP works the same way as auto-discovery in IPX (which uses SAP). The<br />
two SET parameters which enables this feature are:<br />
• TIMESYNC SERVICE ADVERTISING=ON<br />
This paramemter enables TIMESYNC.NLM to advertise the “timesync.novell”<br />
service in SLP. This would also enable advertising over SAP if the server has the<br />
IPX stack enabled.<br />
• DIRECTORY TREE MODE=ON.<br />
This parameter confines auto-discovery to servers in the same NDS tree.<br />
• DNS Name Recognition<br />
TIMESYNC.NLM <strong>5.1</strong>4 now allows you to enter the DNS name of the <strong>NetWare</strong> server to<br />
contact for time instead of entering the IP address. The complete DNS name has to be<br />
entered including the domain name, e.g.:<br />
TIMESYNC TIME SOURCES = MYSERVER.PROVO.NOVELL.COM;<br />
If time is being taken from an NTP server, the DNS name needs to be followed by the<br />
port no 123, e.g.:<br />
TIMESYNC TIME SOURCES = NTPSERVER.PROVO.NOVELL.COM:123;<br />
Timesync internally resolves the name by doing a DNS lookup using the WinSock API’s<br />
exported by the WinSock NLMs.<br />
Page 299 of 317 Novell PartnerNet Confidential 07/24/00<br />
Copyright © 2000 by Novell, Inc.
Table 2: Updated Time Sync FAQ for <strong>NetWare</strong> <strong>5.1</strong><br />
Frequently Asked Questions<br />
Novell's Recommendations on Time Synchronization<br />
Why is time synchronization necessary?<br />
Time synchronization ensures that all servers in a enterprise network report the same time. Such<br />
synchronization is important because applications and services such as Novell Directory Services (NDS)<br />
require time stamps to establish the order of events and record real-world time values.<br />
What is Novell's recommended approach to achieve time synchronization amongst <strong>NetWare</strong> servers?<br />
Novell recommends the use of TIMESYNC NLM to achieve time synchronization amongst <strong>NetWare</strong><br />
servers.<br />
TIMESYNC NLM version 5.08 onwards has the capability to talk to other NTP sources and exchange time<br />
information with them. This allows a <strong>NetWare</strong> server running TIMESYNC NLM version 5.08 and above to<br />
synchronize time with an external time server (public NTP source) as well as allowing an NTP client to<br />
obtain time from a <strong>NetWare</strong> server.<br />
I need to synchronize my <strong>NetWare</strong> servers with an NTP time source. What is Novell's<br />
recommendation on this?<br />
TIMESYNC NLM has been enhanced to work with NTP time sources. This version of TIMESYNC NLM<br />
(ver 5.08 or later) is available on http://support.novell.com and will also be available on future support<br />
packs of <strong>NetWare</strong> 5.<br />
Please check http://www.support.novell.com for the latest downloadable TIMESYNC NLM.<br />
The latest downloadable version (as of 16 May 1999) is 5.09 from NW5SP2.EXE.<br />
What is the role of NTP NLM in time synchronization?<br />
Novell is committed to making Internet standards available on its platform. To achieve this, Novell has<br />
provided the NTP.NLM on <strong>NetWare</strong> 5 -- a service which implements the Network Time Protocol (NTP)<br />
definition described in RFC1305. In addition, Novell has enhanced its time synchronization service,<br />
TIMESYNC NLM, to inter-operate directly with NTP based time sources.<br />
TIMESYNC NLM has features such as: a comprehensive collection of set parameters, easy setup, auto<br />
discovery over IPX, interoperability with IPX and IP, and interoperability with <strong>NetWare</strong> 4.x and <strong>NetWare</strong><br />
5. This makes the TIMESYNC NLM easy to use and manage. NTP.NLM met some specific customer needs<br />
when it was introduced, but is much less robust.<br />
Of the two implementations for synchronizing time in a <strong>NetWare</strong> environment, Novell recommends using<br />
TIMESYNC NLM. Wherever standard NTP interoperability is needed (to either serve time or take time from<br />
NTP time sources), TIMESYNC NLM's new features can be used. In effect, the NTP interoperability<br />
enhancement to TIMESYNC NLM eliminates the need to use NTP.NLM.<br />
Page 300 of 317 Novell PartnerNet Confidential 07/24/00<br />
Copyright © 2000 by Novell, Inc.
Since NTP.NLM was introduced for the first time on <strong>NetWare</strong> 5 whereas TIMESYNC NLM has been in the<br />
field since <strong>NetWare</strong> 4.x and is now capable of providing NTP functionality on <strong>NetWare</strong>, it is best to use<br />
TIMESYNC NLM for all purposes of time synchronization.<br />
How is the working of TIMESYNC NLM different in <strong>NetWare</strong> 5 compared to <strong>NetWare</strong> 4.11?<br />
TIMESYNC NLM on <strong>NetWare</strong> 4.x only used IPX as its communication protocol. This also implies that it<br />
used SAP (Service Advertising Protocol) to advertise itself. This protocol relies on periodic network<br />
broadcasts to advertise services.<br />
TIMESYNC NLM in <strong>NetWare</strong> 5 has been enhanced to work over IP. It still retains its ability to work over<br />
IPX. This implies that if you have a network comprising both pure IP and pure IPX servers, time can flow<br />
from IPX to IP, and vice- versa, as long as there is at least one server that has both IP and IPX to provide<br />
translation between the two sides. You do not need the Migration Gateway solution for this purpose.<br />
SLP (Service Location Protocol) is used to advertise and locate services in an IP network. This is much less<br />
bandwidth intensive than SAP, but requires more administration. TIMESYNC NLM has not yet been<br />
enhanced to perform auto discovery of time servers over IP. This feature is expected to be available in<br />
Support Pack 3.<br />
Apart from these differences in protocols, the working of TIMESYNC NLM in <strong>NetWare</strong> 4.x and <strong>NetWare</strong> 5<br />
remains identical. There is no difference in the packet format, time synchronization algorithms, or for that<br />
matter, in anything.<br />
With <strong>NetWare</strong> 5 Support Pack 2, TIMESYNC NLM has the capability to serve as an NTP client as well as<br />
an NTP server as described in an answer to an earlier question.<br />
How do I achieve time synchronization in a mixed environment comprising platforms such as<br />
<strong>NetWare</strong>, Unix, Windows NT and mainframes?<br />
The only way to achieve time synchronization in a mixed environment is by using an open, standard<br />
protocol for time synchronization such as NTP.<br />
Unix boxes often have NTP built into the base OS. NTP implementations are also available for MS<br />
Windows NT and Apple Macintosh computers. Once you have identified an NTP implementation for your<br />
platform, and have deployed it on your platform, you are ready to talk to other NTP sources such as<br />
<strong>NetWare</strong>, Unix boxes, Internet time sources etc.<br />
How do I build fault tolerance into the time synchronization at my enterprise?<br />
Fault tolerance is achieved by configuring Timesync NLM with multiple time sources. This can be done by<br />
setting the "timesync time source" set parameter. Therefore, if one server cannot be contacted for any<br />
reason, the time can be got from other servers in the time source network.<br />
Multiple time sources can be entered by separating the two time sources with a semicolon. For example :<br />
SET TIMESYNC TIME SOURCES=1.2.3.4; 5.6.7.8;<br />
The semicolon (;) is used as a separator between two sources.<br />
TIMESYNC NLM and NTP<br />
What are the similarities and differences between TIMESYNC NLM and NTP?<br />
TIMESYNC NLM is a Novell proprietary time synchronization service available on <strong>NetWare</strong>. NTP is an<br />
Internet protocol specification (Internet RFC 1305), that needs to be implemented by vendors on platforms.<br />
NTP implementations are available on <strong>NetWare</strong>, NT, Mac, Unix, etc.<br />
TIMESYNC.NLM now provides Novell timesync protocol, NTP client and NTP server capability.<br />
Page 301 of 317 Novell PartnerNet Confidential 07/24/00<br />
Copyright © 2000 by Novell, Inc.
NTP believes in the absolute concept of time i.e. the number of seconds elapsed since 1 January, 1900<br />
referred to as UTC (Universal Coordinated Time). All clocks need to synchronize with UTC time.<br />
However, TIMESYNC NLM has no such absolute concept of time. As long as all the computers in an<br />
intranet serve the same time, they are considered to be synchronized. The <strong>NetWare</strong> server may show a time<br />
different from the actual time of the day and still claim to be synchronized to the network provided all other<br />
<strong>NetWare</strong> servers are showing the same time. NTP has been designed for the Internet, whereas TIMESYNC<br />
NLM has been designed keeping an intranet in mind.<br />
TIMESYNC NLM is actually an adaptation of NTP. TIMESYNC NLM uses the same algorithms as NTP to<br />
account for network delay when obtaining time from a time source. However, NTP as a protocol is quite a<br />
heavyweight. When adapting TIMESYNC NLM, some features have been omitted to make it simple and<br />
practical. Some of the features in NTP that are not present in TIMESYNC NLM, are :<br />
• Leap second insertion: At regular intervals, clocks need to be compensated by inserting a leap<br />
second to the clock time.<br />
• Drift compensation: NTP keeps track of the pattern of changes to the clock, and over a period of<br />
time it computes a drift compensation factor that is applied to the clock.<br />
• Clock filtering and clock selection algorithms: NTP uses fairly complex algorithms to assess the<br />
reliability of each of the time sources in its list of time sources, and selects only those that are<br />
considered to be reliable.<br />
• Authentication: NTP can use authentication to ensure the integrity of the time source. TIMESYNC<br />
NLM, which has been designed for the intranet, trusts all time sources.<br />
• NTP is quite strict while considering a time source as a contender for obtaining time. If a time<br />
source is more than 1000 seconds (about 17 minutes) away from the local clock, NTP rejects the<br />
time source. The time source is labeled an "insane" time source.<br />
NTP never corrects time directly. The time polled is given as a feedback to the clock, so that the clock<br />
corrects its time. This is in contrast to TIMESYNC NLM, where the difference in time is gradually applied<br />
to the local clock. Typically, TIMESYNC NLM tries to correct time within one polling interval (the default<br />
value is 10 minutes). As a consequence of this approach, TIMESYNC NLM is able to synchronize time in a<br />
network much faster. NTP takes much longer to make this happen.<br />
The other differences between TIMESYNC NLM and NTP have to do with manageability and ease of setup.<br />
TIMESYNC NLM has several set parameters that enables administrators to control the working of<br />
TIMESYNC NLM to a great extent. In NTP, the only things that can be configured are the time servers.<br />
Almost nothing else is configurable. TIMESYNC NLM has features such as auto discovery over IPX, and<br />
uses multiple naming schemes ( SAP names , dotted NDS names and IP addresses can be entered into the<br />
time sources list) to identify time sources. These features make TIMESYNC NLM easier to setup and<br />
manage.<br />
TIMESYNC NLM over IP<br />
Does TIMESYNC NLM work over IP?<br />
Yes, TIMESYNC NLM in <strong>NetWare</strong> 5 works over IP. IP addresses can be specified in the time sources set<br />
parameter. For example :<br />
SET TIMESYNC TIME SOURCES=1.2.3.4;<br />
Does TIMESYNC NLM require CMD (Compatibility Mode Driver) to work over IP?<br />
Page 302 of 317 Novell PartnerNet Confidential 07/24/00<br />
Copyright © 2000 by Novell, Inc.
TIMESYNC NLM in <strong>NetWare</strong> 5 works natively over IP. In other words, TIMESYNC NLM itself handles all<br />
IP related communication, and hence does not need CMD to work over IP.<br />
Why are questions such as: "Does TIMESYNC NLM work over IP?" still asked?<br />
Users and administrators are familiar and comfortable with the TIMESYNC NLM of <strong>NetWare</strong> 4.x.<br />
TIMESYNC NLM over 4.x used SAP for auto discovery; the first server in a tree was set to TIMESYNC<br />
NLM type SINGLE reference, and subsequent servers were set to SECONDARY by the installation<br />
process. The Secondary servers discovered the Single reference server using SAP.<br />
Because TIMESYNC NLM in <strong>NetWare</strong> 5 does not feature auto discovery over IP, each Secondary server<br />
needs to be explicitly configured to take time from the Single server. If this is not done, the Secondary<br />
server will report that it is out of sync, and hence gives the impression that "TIMESYNC NLM does not<br />
work over IP".<br />
Auto-discovery over IP will be available by <strong>NetWare</strong> 5 Support Pack 3 and will us the SLP (Service<br />
Location Protocol) over IP instead of SAP in IPX for auto-discovering time servers on the network.<br />
When will CMD be required?<br />
If a pure IP network needs to obtain time from a pure IPX server by giving a server name in the time<br />
sources set parameter, CMD is required to resolve the IPX address.<br />
Setting up TIMESYNC NLM over IP<br />
I am setting up a network of <strong>NetWare</strong> 5 servers. How do I set up time synchronization?<br />
Refer to the TIMESYNC NLM documentation to decide whether to use a Single - Secondary model, or a<br />
Reference - Primary - Secondary model. Single - Secondary models are good for small networks (30<br />
servers or less). Reference - Primary - Secondary models are suitable for larger networks, and for networks<br />
that span geographical separate regions.<br />
Each TIMESYNC NLM server, that needs to get time from another server, needs to be explicitly configured.<br />
For example, if server B needs to take time from Server A, server B needs to be set up as follows:<br />
From the console prompt, type:<br />
Set timesync configured sources = on<br />
Set timesync time sources = ;<br />
Run monitor NLM. Select the option Server Parameters -> Time. The parameter "Timesync configured<br />
sources" should be on. The IP address of Server A should be entered in the "Timesync time sources" field.<br />
Ensure that only dotted decimal IP addressed are entered. TIMESYNC NLM cannot understand DNS names.<br />
TIMESYNC NLM will be enhanced to understand DNS names in one of the support packs subsequent to<br />
Support Pack 3.<br />
Over IPX, I did not need to set up configured sources. Why do I have to do it now?<br />
Over IPX, TIMESYNC NLM could automatically discover other TIMESYNC NLM sources using SAP.<br />
TIMESYNC NLM over IP as yet does not have this capability. This functionality will be shipped in Support<br />
Pack 3 of <strong>NetWare</strong> 5.<br />
Can I use a server name in the configured sources?<br />
In an IP only setup, IP addresses are preferred. This will de done away with the ability to recognise DNS<br />
names in a future release of TIMESYNC NLM.<br />
Page 303 of 317 Novell PartnerNet Confidential 07/24/00<br />
Copyright © 2000 by Novell, Inc.
Using TIMESYNC NLM with NTP time sources<br />
Can TIMESYNC NLM work with NTP time sources?<br />
Yes. TIMESYNC NLM, ver 5.08 or later, can work with NTP. This implies that TIMESYNC NLM can take<br />
time from an NTP time source, and can serve time to NTP clients.<br />
How do you setup a TIMESYNC NLM server to obtain time from an NTP time source?<br />
The configuration is similar to obtaining time from a normal TIMESYNC NLM time source. Set the value<br />
of the "Configured Source" set parameter to "on". Specify the IP address of the NTP time source in the<br />
"Time sources". However, an NTP time source needs to be differentiated from a TIMESYNC NLM time<br />
source by suffixing ":123" to the IP address. 123 has been chosen as it is the standard port for NTP.<br />
For example :<br />
SET TIMESYNC CONFIGURED SOURCES=ON<br />
SET TIMESYNC TIME SOURCES= 1.2.3.4:123;<br />
Where 1.2.3.4 is an NTP source.<br />
Can Timesync Reference and Timesync Single servers take time from an NTP time source?<br />
In a pure timesync scenario, Single and Reference servers read time from their local hardware clocks and<br />
serve it to time clients. They do not change their time. In other words, even if you have entered timesync<br />
time sources in Single or Reference server, they will not be used to change the time on the Single or<br />
Reference server.<br />
However, the NTP feature now enables Single and Reference servers to obtain time from NTP time<br />
sources. This means that the Single or Reference server, if setup with NTP sources in its time sources set<br />
parameter, would poll the NTP time source periodically, and adjust its local clock to synchronize with the<br />
NTP time source.<br />
Can Timesync Secondary and Timesync Primary servers take time from an NTP time source?<br />
Yes. All types of timesync servers can obtain time from an NTP time source.<br />
I have an existing network of <strong>NetWare</strong> servers. I want this network to take time from an NTP time<br />
source. How do I configure the network?<br />
Identify the "root" time servers in the network. If you have used a Single - Secondary model, the Single<br />
server is the root. If you have used the Reference - Primary - Secondary model, the Reference server and<br />
Primary servers together act as the root for serving time to the rest of the network.<br />
Update the root server(s) to get time from the NTP time source. The steps required to do this are explained<br />
above.<br />
As the entire network looks to the root time sources for time, we are ensuring that the entire network takes<br />
time from the NTP time source.<br />
How does TIMESYNC NLM provide time to an NTP client?<br />
TIMESYNC NLM, ver 5.08 or later, has the capability to provide time to an NTP client. This service is<br />
provided through UDP port 123.<br />
If you want your Unix machines to take time from a <strong>NetWare</strong> server, set up NTP on your Unix machines<br />
with the IP address of the <strong>NetWare</strong> server. This is done by entering the following statement in the NTP<br />
configuration file (usually /etc/ntp.conf) for the Unix system :<br />
Page 304 of 317 Novell PartnerNet Confidential 07/24/00<br />
Copyright © 2000 by Novell, Inc.
Server <br />
Can TIMESYNC NLM obtain time from an Internet Time source?<br />
Internet time sources are typically public domain NTP time sources that are at Stratum 1 or 2. This being<br />
the case, setting up TIMESYNC NLM to obtain time from an Internet source is no different from setting it<br />
up to obtain time from an NTP time source within the intranet. The configuration steps to achieve this are<br />
identical.<br />
NTP uses the nomenclature of “stratum” to indicate the accuracy of a time source. The stratum ranges from<br />
1 to 16. 1 stands for source which is most accurate where as 16 stands for one which is “out of sync”. A<br />
NTP server at stratum “n+1” is one which accepts time from a NTP server at stratum “n”. Thus a server at a<br />
lower stratum indicates a server which is more accurate than one at a higher stratum.<br />
What are the limitations of this NTP enhancement to TIMESYNC NLM?<br />
This enhancement enables TIMESYNC NLM to understand NTP wire format. However, the NTP Protocol<br />
specification, contained in RFC 1305, mandates several features such as: leap second insertion and clock<br />
drift correction, that were considered heavy weight, and have, therefore, not been included in this<br />
enhancement. Thus, TIMESYNC NLM provides the NTP client and NTP server functionality while at the<br />
same time continues to be lightweight.<br />
Traffic generated by TIMESYNC NLM<br />
What are the different ways in which a TIMESYNC NLM server generates traffic?<br />
A TIMESYNC NLM server can generate the following kinds of traffic: advertisement traffic, discovery<br />
traffic, time request traffic and time response traffic.<br />
Advertisement traffic is generated when TIMESYNC NLM announces its service in the network. Over IPX,<br />
this is achieved through SAP. Over IP, TIMESYNC NLM does not advertise its service. Service<br />
Advertisement using SLP is expected in future releases . SAP traffic is typically generated once every<br />
minute. SLP advertisement is performed only when TIMESYNC NLM starts up, or when TIMESYNC NLM<br />
has to re-register when the SLP Service or the SLP Directory Agent goes down. Advertisement traffic over<br />
IP (when this feature is available in future releases) is expected to be significantly less than the SAP based<br />
advertisement traffic in IPX.<br />
Discovery traffic is generated when TIMESYNC NLM tries to discover the presence of other TIMESYNC<br />
NLM servers in the network. In IPX, this actually does not cause any traffic at all, as all <strong>NetWare</strong> servers<br />
contain a SAP cache, which can be queried to perform discovery. Over IP, SLP is used for discovery and<br />
hence, discovery implies that a call needs to be made to an SLP service agent.<br />
Time request traffic is generated when a server needs to take time from another server. This is periodic in<br />
nature, and in the steady state, its frequency is controlled by the "timesync polling interval" set parameter.<br />
The default value of this polling interval is 10 minutes. However, the frequency of polling is higher when a<br />
<strong>NetWare</strong> server starts up, or loses time synchronization for any reason. This implies that TIMESYNC NLM<br />
will generate much more traffic during server startup.<br />
Time response traffic is generated when a server receives a request for time from another server. In<br />
TIMESYNC NLM, time is provided only when it is requested by another server. In other words, a "pull"<br />
model is used to distribute time, and time is not "pushed" to other servers. Therefore, under normal<br />
circumstances time response traffic is equal to time request traffic, and hence follows the same periodicity.<br />
How do you control the traffic generated by TIMESYNC NLM?<br />
Set parameters of TIMESYNC NLM can be used to modify the traffic generated by TIMESYNC NLM to suit<br />
your requirements. The following table indicates the set parameters to be used to modify TIMESYNC NLM<br />
traffic:<br />
Page 305 of 317 Novell PartnerNet Confidential 07/24/00<br />
Copyright © 2000 by Novell, Inc.
Timesync<br />
Traffic Type<br />
Advertisemen<br />
t<br />
Traffic<br />
Discovery<br />
Traffic<br />
Time request<br />
traffic<br />
Time<br />
response<br />
traffic<br />
Set Parameter to be<br />
used<br />
Timesync service<br />
advertising<br />
No set parameter<br />
can control this<br />
traffic.<br />
Timesync polling<br />
interval<br />
Timesync<br />
synchronization<br />
radius<br />
Time polling count<br />
Depends entirely on<br />
request traffic. All<br />
the set parameters<br />
that impact request<br />
traffic also impact<br />
response traffic.<br />
Notes of the use of the set<br />
parameter<br />
Set timesync service advertising =<br />
off eliminates all advertisement<br />
traffic.<br />
Increase in polling interval may<br />
reduce traffic.<br />
Increase in synchronization radius<br />
may reduce traffic.<br />
Timesync polls 3 times (the default<br />
value of this parameter). A reduced<br />
value will obviously reduce traffic.<br />
TIMESYNC NLM, Transport Protocols, and Firewalls<br />
Recommendations<br />
What transport protocols does TIMESYNC NLM use? What are the port numbers used?<br />
TIMESYNC NLM uses datagrams over IPX and IP.<br />
This server cannot be discovered using<br />
auto discovery; explicit configuration is<br />
needed to take time from this server.<br />
Recommended for IPX and not for IP.<br />
This traffic is quite minimal anyway.<br />
Polling interval may be increased up to<br />
60 minutes. Increasing the interval<br />
beyond 60 is not recommended.<br />
Synchronization radius depends on the<br />
kinds of applications that run on<br />
networks. Some may need more precise<br />
time than others.<br />
Polling count may be reduced to 2 in a<br />
LAN where the chance of packet loss is<br />
quite a loss. It is not prudent to reduce<br />
this value if timesync is operating<br />
across a WAN.<br />
In an IP environment, TIMESYNC NLM uses UDP on port 524. The request packet is dispatched from 524,<br />
but the response is received on a dynamic port.<br />
When communicating with an NTP time source, TIMESYNC NLM uses UDP port 123, which is the popular<br />
port for NTP. The request packet is dispatched from 123, and the response is also received at 123.<br />
Can TIMESYNC NLM work across a firewall?<br />
TIMESYNC NLM can work across a firewall only if the firewall permits incoming UDP traffic.<br />
If TIMESYNC NLM has to communicate with a TIMESYNC NLM source across the firewall, all incoming<br />
UDP traffic must be permitted. This is because the incoming TIMESYNC NLM packet is destined to be an<br />
dynamic port.<br />
If TIMESYNC NLM has to communicate with an NTP source across the firewall, incoming UDP traffic for<br />
UDP port 123 must be permitted.<br />
On the working of TIMESYNC NLM<br />
How do servers establish time synchronization in the first place?<br />
Page 306 of 317 Novell PartnerNet Confidential 07/24/00<br />
Copyright © 2000 by Novell, Inc.
When a server starts up, TIMESYNC NLM on Secondary and Primary servers obtains time from Single /<br />
Reference servers as appropriate and sets the RTC (Real Time Clock) of the computer. The original time of<br />
the RTC is totally disregarded by this operation. Once the RTC of the Secondary / Primary server has been<br />
set, time synchronization should be established.<br />
For a Single or Reference server that does not point to a NTP time source, TIMESYNC NLM copies time<br />
from RTC into its buffer, and declares that time is synchronized. By definition, Single or Reference (that do<br />
not point to NTP time sources) will always be synchronized.<br />
If a Single or Reference server points to an NTP time source, its behavior is identical to that of Secondary<br />
or Primary servers.<br />
How and why can servers fall out of time synchronization?<br />
Assuming that servers have been synchronized for some time, exceptional conditions may cause them to<br />
fall out of time synchronization. Some of the conditions can be:<br />
• A clogged network<br />
• A faulty router<br />
• An NLM that hogs CPU cycles and prevents the software clock from being updated<br />
• An NLM that sets off clock interrupts so that the software clock does not get updated<br />
What are the differences between a Primary and Secondary server when obtaining time from<br />
multiple sources?<br />
A Secondary server may be setup to have multiple time sources. However, it will contact only one time<br />
source. It will attempt to contact the next time source only if it fails to obtain a response from the first time<br />
source. After obtaining time from the time source, a Secondary server will adjust its clock to approach the<br />
time obtained. However, in this process, the Secondary server does not give any importance to its own<br />
clock. For example, if a Secondary server has the time 10:03, and the time obtained from the Single server<br />
is 10:04, the difference of 60 seconds is made up by accelerating the clock gradually over a polling interval.<br />
If the polling interval is 600 seconds, an adjustment of 60 / 600 or 1 second for every 10 seconds elapsed is<br />
made.<br />
This gradual adjustment of time is very important. Sudden changes of time can throw many distributed<br />
applications out of gear.<br />
A Primary server contacts all its time sources, and not just one of them (as the Secondary server does). This<br />
is done during every polling interval. The Primary server then calculates the average of all the values. Time<br />
from Reference servers is given more importance than the time obtained from Primary Servers. This is<br />
done by assigning a weight of 16 to the time from the Reference server and a weight of 1 to that obtained<br />
from other Primary servers. The difference in time is gradually applied to the RTC of the server.<br />
Should the Single or Reference server be a <strong>NetWare</strong> 4.11 or a <strong>NetWare</strong> 5 server?<br />
As mentioned before, apart from protocol differences, there are no fundamental differences between the<br />
working of TIMESYNC NLM between <strong>NetWare</strong> 4.11 and <strong>NetWare</strong> 5. At a fundamental level, it does not<br />
matter whether the Single server is on a <strong>NetWare</strong> 4.11 or a <strong>NetWare</strong> 5 server. Actually, a TIMESYNC NLM<br />
server has no way of making out if the time is from a <strong>NetWare</strong> 4.11 or from <strong>NetWare</strong> 5 (the packet formats<br />
are identical).<br />
However, other considerations may favor one or the other alternative. If you need to set up the Single<br />
server to obtain time from an NTP time source, this is possible only in <strong>NetWare</strong> 5.<br />
Page 307 of 317 Novell PartnerNet Confidential 07/24/00<br />
Copyright © 2000 by Novell, Inc.
DNS Name Recognition feature and AutoDiscovery over IP in<br />
Timesync.NLM<br />
DNS Name recognition feature has now been added to Timesync in ver <strong>5.1</strong>4 and will ship with <strong>NetWare</strong><br />
Support Pack 4. So now a user can enter the DNS name of the <strong>NetWare</strong> server to contact for time instead of<br />
entering the IP address. The complete DNS name has to be entered including the domain name.<br />
e.g. Timesync Time sources= MYSERVER.PROVO.NOVELL.COM;<br />
If time is being taken from an NTP server, the DNS name need to be followed by the port no 123.<br />
e.g. Timesync Time Sources = NTPSERVER.PROVO.NOVELL.COM:123;<br />
Timesync internally resolves the name by doing a DNS lookup using the Winsock APIS exported by the<br />
winsock nlms. DNS feature works fine with <strong>NetWare</strong> 5 with Support Pack 3 installed on it. It may not work<br />
without SP3 as the winsock nlms had to be fixed for SP3.<br />
Timesync can also now auto discover time sources over IP. This is also a feature that is being rolled out<br />
with Timesync ver <strong>5.1</strong>4. Timesync uses SLP in IP for autodiscovery of time sources. The autodiscovery in<br />
IP works the same way as autodiscovery in IPX which uses SAP. The set parameter which would enable<br />
this feature is TIMESYNC SERVICE ADVERTISING and DIRECTORY TREE MODE. Both of these<br />
need to be set ON.<br />
TIMESYNC SERVICE ADVERTISNG set to ON enables Timesync to advertise the “timesync.novell”<br />
service in SLP. This would also enable advertiing over SAP if the server has the IPX stack enabled. The<br />
DIRECTORY TREE MODE set to ON confines autodiscovery to servers in the same NDS tree.<br />
TIMESYNC.NLM Debug Switches<br />
To open up the timesync debug screen , one needs to do “set timesync debug=7” at the server console. At<br />
present there is only one Timsync debug switch enabled.<br />
Timesync debug screen gives info like the time server type of thie server , which server was contacted for<br />
time and its time server type, at what time did the polling take place, what was the time offset discovered<br />
and if time is synchronized or not. This information is printed at each polling interval.<br />
Page 308 of 317 Novell PartnerNet Confidential 07/24/00<br />
Copyright © 2000 by Novell, Inc.
Appendix M—<strong>NetWare</strong>/IP<br />
<strong>NetWare</strong>/IP Considerations for Protocol Migration<br />
Whenever <strong>NetWare</strong>/IP is being used, the migration mechanisms are somewhat different. As with<br />
any protocol migration, improper planning and implementation can lead to significant loss of<br />
service. Since <strong>NetWare</strong>/IP implementations can vary widely, this document will limit the scope to<br />
the simplest examples of <strong>NetWare</strong>/IP deployments. It should be noted that Novell does not<br />
support <strong>NetWare</strong>/IP on <strong>NetWare</strong> <strong>5.1</strong> at the time of this writing. If <strong>NetWare</strong>/IP becomes a<br />
<strong>NetWare</strong> <strong>5.1</strong> supported product, a future version of this methodology will incorporate this change.<br />
In the meantime, complex and/or cumbersome migration mechanisms may be required. Such a<br />
migration is made possible by the ability to run SCMD.NLM on a <strong>NetWare</strong> 4.11/4.2 server.<br />
Scenario 1: <strong>NetWare</strong>/IP on the WAN (IPX on the LAN)<br />
This <strong>NetWare</strong>/IP “backbone” deployment strategy is very common since it addresses the most<br />
significant consequences of IPX SAP/RIP for an enterprise. This case can also be the simplest to<br />
address. If the <strong>NetWare</strong>/IP infrastructure can be left in place and unchanged until all IPX<br />
dependencies are removed, the migration essentially becomes a dual stack approach. As noted<br />
throughout this document, a dual stack approach is always the preferred migration mechanism. If<br />
this is not possible, the <strong>NetWare</strong>/IP “backbone” will need to be replaced with a combination of a<br />
CMD “island” and MA to MA protocol solution. This approach is basically the CMD island<br />
approach previously discussed.<br />
Scenario 2: <strong>NetWare</strong>/IP on the WAN and the LAN (<strong>NetWare</strong>/IP clients and servers)<br />
Since <strong>NetWare</strong>/IP is not supported on <strong>NetWare</strong> <strong>5.1</strong> at this time, maintaining access to services<br />
between these two environments is more cumbersome since a dual stack approach is not possible.<br />
Instead, the use of CMD and therefore SLP is required.<br />
Scenario 3: Mixed <strong>NetWare</strong>/IP on WAN and LAN<br />
Essentially this type of environment will require a combination of mechanisms.<br />
The migration steps for these three scenarios are presented in the following Novell documents:<br />
• Migration Strategies for Upgrading IPX and <strong>NetWare</strong>/IP Networks to Pure IP, June 1999<br />
• NWIPCMD.HTM (included in the NW 4.11 Support Pack—IWSP6a.exe at the time of<br />
writing)<br />
• IP AND <strong>NetWare</strong>/IP (NWIP), TID 2944678<br />
In any of these cases, current problems due to an unhealthy <strong>NetWare</strong>/IP environment can easily be<br />
exacerbated by attempting to use pure IP to solve these problems. In all protocol migration<br />
projects, a very careful and methodical migration is recommended. An unhealthy <strong>NetWare</strong>/IP<br />
domain requires the utmost care and planning. The most prudent course of action would be to<br />
address the current <strong>NetWare</strong>/IP issues to attain a stable <strong>NetWare</strong>/IP domain before proceeding<br />
with a <strong>NetWare</strong> <strong>5.1</strong> protocol migration.<br />
Page 309 of 317 Novell PartnerNet Confidential 07/24/00<br />
Copyright © 2000 by Novell, Inc.
Appendix N—<strong>NetWare</strong> Management<br />
Portal<br />
Prerequisites<br />
• <strong>NetWare</strong> <strong>5.1</strong>+<br />
• Browser requirements are Netscape 4.5+ or IE 5.0+.<br />
• TCP/IP port 8008 is used<br />
Setup<br />
• PORTAL.NLM is automatically loaded during <strong>NetWare</strong> <strong>5.1</strong> installation; no setup or<br />
configuration is required.<br />
• By default, Portal is installed with SSL enabled. SSL can be disabled for Portal by<br />
commenting out this section in the server’s AUTOEXEC.NCF:<br />
#<br />
### To prevent Portal from using SSL, comment out the following lines as shown:<br />
# Load httpstk.nlm/SSL /keyfile:”SSL Certificate IP”<br />
#<br />
Without SSL on your Portal server, information passed between the browser and the<br />
server is not secure. For this reason, you should probably not disable SSL on a<br />
production server.<br />
Overview of <strong>NetWare</strong> Management Portal<br />
Novell’s direction in network management is web-based, and the <strong>NetWare</strong> Management Portal is<br />
Novell’s first generation of web-based management tools. Wherever there is a web browser<br />
running on a client workstation, you can use Management Portal to manage <strong>NetWare</strong> servers.<br />
Management Portal supports traditional management services or features, which allow you to<br />
accomplish the following tasks:<br />
• Mounting and dismounting volumes<br />
• Accessing files on volumes and DOS partitions<br />
• Managing server connections<br />
• Configuring SET parameters<br />
• Monitoring system resources<br />
• Viewing server console screens<br />
• Downing, restarting, or resetting a server<br />
• Browsing the NDS tree and viewing partitions<br />
Management Portal provides some new tools. These tools address a server’s health and resources<br />
by doing the following tasks:<br />
• Checking the general server health status<br />
• Viewing the status of all loaded modules, including memory usages for each NLM<br />
• Viewing information about all hardware adapters, hardware resources and processor data<br />
Page 310 of 317 Novell PartnerNet Confidential 07/24/00<br />
Copyright © 2000 by Novell, Inc.
• Monitoring the health of many server processes and resources.<br />
Using Portal<br />
Running Portal from your client browser is simple:<br />
• Open your web browser<br />
• In the address field enter the Portal server’s IP address, e.g.: http://137.6<strong>5.1</strong>23.11<br />
• Click Login (admin or admin-equivalence is required to access all of the features)<br />
• If you have <strong>NetWare</strong> Enterprise WebServer installed on your server, you will have to add<br />
the port number 8008 to the end of the IP address for your Portal server. So, using the<br />
example above, the new address field will look like this: http://137.6<strong>5.1</strong>23.11:8008<br />
Online help is provided and it is good. Detailed information in Help is provided for every section,<br />
feature and function. Also, you will see a question mark (?) icon. Clicking on that icon will give<br />
you component-specific help for each line item on the Server Health page. Nice feature.<br />
Portal Considerations<br />
• The reset button does a warm boot on the server, so if autoexec.bat does not include the<br />
command to load the server you will lose access to the server. The browser will show a<br />
traffic light that is dark when this happens. When you regain communication, the traffic<br />
light will display the server’s status.<br />
• Use the delete function with caution since the Admin user can delete any object including<br />
itself.<br />
• In Monitor, you can view connection information. Portal has the same information,<br />
however, .Portal’s Connection Information screen includes all information about<br />
Connection 0. Another difference between Portal and Monitor is that Portal does not use<br />
the asterisk character to mark connections that count against the server’s connection<br />
limit.<br />
• Server Up Time (days:hours:minutes:seconds) does not tick; the page must be reloaded.<br />
• Server Health Status is reported by the traffic light and is updated every five seconds, but<br />
the graphic will only refresh if the status has changed.<br />
• Multi-Server Health. Depending on how much memory is loaded on the client<br />
workstation and the Web browser you are using, if you view more than 40 servers<br />
simultaneously, you may experience unpredictable results, like shut down the browser.<br />
Brief Description of Portal’s Management Features<br />
• Server Information: This header section on the main page, contains Server’s name,<br />
<strong>NetWare</strong> version, version and date of SEVER.EXE, version and date of PORTAL.NLM<br />
and the Server’s total up time.<br />
• Server Health Status:Green means health is good, Yellow means something is suspect<br />
and Red means bad or trouble.<br />
• Login/Logout: If you are not logged in, click the login button. If you are logged in, on the<br />
front page, you will see a status saying that you are logged in. If you are logged out, you<br />
will get a “Greetings Username” just below the traffic light. Unless all your browser<br />
windows are closed, Portal session will remain open, and you do not have to log in again.<br />
• Main Page Configuration: This is where you adjust port numbers, start and stop HTTP<br />
log files, toggle settings for SET parameters and hidden console commands. Also, you<br />
can unload/reload PORTAL.NLM, setup IP filtering to control access to Portal.<br />
Page 311 of 317 Novell PartnerNet Confidential 07/24/00<br />
Copyright © 2000 by Novell, Inc.
• Support Connection Link:There is a Novell logo, top right corner that if pressed, will take<br />
you to Support Connection Web page. You can download server patch kits or upgrades<br />
by using this feature.<br />
• Home Button: Every page has this and clicking this takes you to the Main page.<br />
• Customizing Main Page:It is possible to customize Portal’s home page. Create a file<br />
using text, graphics, custom links and save it as PRTLANNC.HTM and save it in the<br />
SYS:\LOGIN directory, this is the Portal server’s directory. Any information that is<br />
included in this file will appear on the bottom of the main page.<br />
• Volumes Management Tab: List of server’s volumes, access to DOS partitions, attributes<br />
and mount status of volumes, manage and view server’s file system. From this page, you<br />
also have access to the following:<br />
• NSS Volumes: Basic file access, but you cannot change the volume attributes.<br />
• File Access Rights: Via NDS login, you can copy files to and from any given directory,<br />
as well as access. With Admin rights, you have access to the DOS partition. If SHARE is<br />
not loaded in DOS, and you select the Shareable attribute on a DOS file, it will not work.<br />
SHARE has to be loaded.<br />
• Browsing the File System: View file system on DOS partitions, Volumes. Browse<br />
directories, files, view, change attributes of files, directories and volumes. To move<br />
down, click the volume, drive or whatever. To move up, click the double dots.<br />
• File/Directory Information: Click the Info icon for a file, directory will show creation<br />
date, rights, file space useage. You can delete, rename a directory or file. You can also<br />
create new subdirectories, but you can only do so on <strong>NetWare</strong> volumes.<br />
• Viewing Files: Browsers setup to look at extensions, Portal will allow you to click and<br />
view any file.<br />
• File Upload: Portal allows you to copy a file at a time (next release will allow for<br />
multiple selects) from any mapped drive to the directory that you are in. You have to<br />
have the Write right for this to occur.<br />
• Mount/Dismount: Admin rights given, you can dismount, mount volumes. You are asked<br />
to confirm your choice before it is actually dismounted. By dismounting SYS volume,<br />
icons in Portal (they reside in SYS:\LOGIN) will not display. Mount SYS and reload the<br />
page, icons reappear.<br />
• Connection Management: Here you can view current connections, clear specific<br />
connections, clear all not logged in, and broadcast to users. And for specific users, you<br />
can view the login time, connection number, network address, login status, files in use,<br />
etc.<br />
• Memory Management: View server memory in pie charts, statistics, also links to Swap<br />
file, Virtual Memory information, and Memory usage, NLM’s.<br />
• System Resources: Lists all resource tags in use at any given time.<br />
• System Statistics: Network Management information, Kernal information, Media<br />
Manager statistical information and LSL statistic information.<br />
• Screens: View all current console screens. You get simple command line input with 32<br />
characters supported. Load/Unload a module.<br />
• Down Server Options: Admin’s can down, restart, reset the server. You are asked to<br />
confirm your selection.<br />
• Module List: List of all NLM’s currently loaded in servers memory, you can sort , via the<br />
column heading, by: module name, memory usage, code/data size. Click the memory<br />
value, and you will be displayed information about that NLM. You can load an NLM<br />
from here as well. You will see it as an entry field.<br />
• Registry: Read only of <strong>NetWare</strong> Registry tree structure.<br />
• Winsock 2.0 Management: Detailed information about Winsock Sockets and<br />
Applications, API are shown here.<br />
Page 312 of 317 Novell PartnerNet Confidential 07/24/00<br />
Copyright © 2000 by Novell, Inc.
• Tree Walker: View NDS tree, get information and details about individual objects. NDS<br />
Partition Page provides info about NDS partitions on the server.<br />
• Remote Access Tab: Access other servers that have Portal loaded on them.<br />
PORTAL.NLM has to be loaded on those servers. If you do an upgrade from NW 4 or 5<br />
to <strong>5.1</strong>, PORTAL.NLM is automatically loaded.<br />
• Suppose you have “Non-Portal” servers in your tree, you can still get to them, by clicking<br />
<strong>NetWare</strong> Servers. That will load an additional module called NWRSA and then list other<br />
non-Portal servers reported by SLP in the current server’s tree. You can’t do any health<br />
monitoring or other admin stuff. When you see a question mark, next to the server,<br />
Portal is checking its availability. The question mark will change to a server icon if it is in<br />
the current tree. The question mark will be removed, if it is not found in the current tree.<br />
• A simple question to ask our customers: Do you want to use Portal as your Network<br />
Management Tool? If the answer is yes, then make sure tree merges are done first, so<br />
that you can take advantage of Portal excellent management tools.<br />
• Hardware Adapters: Storage and network adapters are listed here, you can get detailed<br />
views of information by clicking on the LAN adapters.<br />
• Processor Information: Status of processors available on the server. On multi processor<br />
boxes, you can start/stop the processor. You can not stop Processor 0, for obvious<br />
reasons.<br />
• Hardware Resources: Shared memory, slots, ports, DMA, interrupts are shown here.<br />
• PCI Device Information: Detail information on each PCI device listed by HIN (hardware<br />
instance number) and give links to additional details.<br />
• Server Health Page: This page allows you to view numerous options. Each of the items<br />
are listed below.<br />
• DS Thread usage<br />
• Work to do response time<br />
• Allocated server processes<br />
• Available server processes<br />
• Abend/debug information<br />
• CPU Utilization<br />
• Connection usage<br />
• Available Memory<br />
• Virtual Memory Performance<br />
• Cache Performance<br />
• DS Status-loaded or open<br />
• Packet receive buffers<br />
• Available ECB’s<br />
• LAN traffic<br />
• Available disk space<br />
• Available directory entries<br />
• Disk throughput<br />
Page 313 of 317 Novell PartnerNet Confidential 07/24/00<br />
Copyright © 2000 by Novell, Inc.
Appendix O—Template Preliminary<br />
Report<br />
The preliminary meeting for the <strong>NetWare</strong> <strong>5.1</strong> <strong>Upgrade</strong> project was held on _________ . The purpose of this meeting was to kick off the project, set expectations, and gather the<br />
required information so that this project can stay within its timelines.<br />
In attendance at this meeting were:<br />
• ______<br />
• ______<br />
Team Members / Roles<br />
The following are the consulting team members and their roles in this project:<br />
• _______<br />
• _______<br />
The following are __________’s team members and their roles in this project:<br />
• _______<br />
• _______<br />
Project Goals<br />
The following are _________’s expectations:<br />
• <strong>Upgrade</strong> ___ Netware 3.x (be specific with versions) to <strong>NetWare</strong> <strong>5.1</strong><br />
• <strong>Upgrade</strong> ___ Netware 4.x (be specific with versions) to <strong>NetWare</strong> <strong>5.1</strong><br />
• <strong>Upgrade</strong> ___ Netware 5.0 servers to <strong>NetWare</strong> <strong>5.1</strong><br />
• Design and implement Novell Distributed Print Services (NDPS)<br />
• Office 2000 Integration (WebDAV) with <strong>NetWare</strong> <strong>5.1</strong><br />
• <strong>Upgrade</strong> ___ client workstations to the latest <strong>NetWare</strong> <strong>5.1</strong> client software<br />
To-Do: Include the appropriate portions from the Statement of Work and anything “new”<br />
uncovered from the preliminary meeting. In this section, you want to clearly state to the customer<br />
what work is expected and will be delivered.<br />
Information Still Needed<br />
You still requires the following documentation and information:<br />
• LAN/WAN Diagrams<br />
• TCP/IP Infrastructure Diagrams (DNS, DHCP)<br />
• NDS Design Documents<br />
To-Do: Document any missing documentation not collected during the preliminary meeting and<br />
who is responsible for obtaining this information.<br />
Page 314 of 317 Novell PartnerNet Confidential 07/24/00<br />
Copyright © 2000 by Novell, Inc.
If not applicable, remove this section and you can change it to a section stating that the following<br />
information was collected and will be used to upgrade to <strong>NetWare</strong> <strong>5.1</strong>.<br />
Lab Requirements<br />
The following are the necessary lab requirements to ensure a successful engagement. Failure to<br />
have an adequate lab can result in project delays or even project failures.<br />
To-Do: Include a completed (and updated for your specific project) Appendix J here.<br />
Critical Success Factors<br />
The following are ___________’s citical success factors for this engagement:<br />
To-Do: Include success factors here (from the problem analysis document and/or the preliminary<br />
meeting).<br />
Additional <strong>NetWare</strong> <strong>5.1</strong> Software<br />
The following software will be used on <strong>NetWare</strong> <strong>5.1</strong> servers:<br />
• _______<br />
• _______<br />
To-Do: From the preliminary meeting.<br />
eDirectory or other version of NDS<br />
________ will be implementing:<br />
• eDirectory (NDS 8)<br />
• Legacy NDS (NDS 7)<br />
To-Do: From the preliminary meeting.<br />
Licensing Scheme<br />
________ is a customer for <strong>NetWare</strong> <strong>5.1</strong>.<br />
To-Do: From the preliminary meeting.<br />
Project Milestones / Timeframe<br />
The following are _________’s milestones for this project:<br />
To-Do: For example, Phase 1 = having xxx number of servers in the xxx office upgraded to<br />
<strong>NetWare</strong> <strong>5.1</strong> by . Phase 2 = having NDPS installed in the xxx office by .<br />
Next Steps<br />
Now that the preliminary meeting has been completed, the next steps in this project for are:<br />
• _______<br />
Page 315 of 317 Novell PartnerNet Confidential 07/24/00<br />
Copyright © 2000 by Novell, Inc.
• _______<br />
To-Do: If you are following the consultant guide, you can state that the next step is to perform a<br />
technical assessment and impact study, the goal being to get the <strong>NetWare</strong> production environment<br />
to a baseline system before upgrading to <strong>NetWare</strong> <strong>5.1</strong>. Also note that the completed PFC is<br />
needed and will be used for this step.<br />
Sign-Off<br />
Lead Consultant Signature: ___________________________ Date: ______________<br />
Customer Signature: ______________________________________ Date: ______________<br />
Page 316 of 317 Novell PartnerNet Confidential 07/24/00<br />
Copyright © 2000 by Novell, Inc.
Appendix P—Template Technical<br />
Assessment and Impact Study Report<br />
Many customer projects have suffered limited success or even failure as a result of their not<br />
properly assessing the current environment prior to upgrading to <strong>NetWare</strong> <strong>5.1</strong>. Problems can be<br />
minimized greatly by careful review of the current environment. To minimize this risk, we<br />
conducted a technical assessment of your current environment to determine if it is capable of<br />
supporting <strong>NetWare</strong> <strong>5.1</strong>.<br />
The technical assessment compared your current <strong>NetWare</strong> environment with the <strong>NetWare</strong> <strong>5.1</strong><br />
minimum recommendations (or Novell Customer Services’ real-world recommendations) to<br />
identify deficiencies.<br />
The impact study here documents the impact of each deficiency found, as it pertains to<br />
implementing Netware <strong>5.1</strong>.<br />
We strongly recommends that all of these deficiences be resolved before any production<br />
upgrade to <strong>NetWare</strong> <strong>5.1</strong>. The solution design we develop for you will assume that your<br />
production environment is (or will be) at a baseline system.<br />
• Deficiencies found in the technical assessment were:<br />
• Solutions for resolving these deficiencies are:<br />
Note: You can state that further testing needs to be done in the lab.<br />
• Possible problems if these deficiencies are not resolved before the <strong>NetWare</strong> <strong>5.1</strong> upgrade<br />
include:<br />
Note: You can state that further testing needs to be done in the lab.<br />
• Persons responsible for resolving these deficiencies are:<br />
Sign-Off<br />
Lead Consultant Signature: _________________________________ Date: ______________<br />
Customer Signature: ______________________________________ Date: ______________<br />
Page 317 of 317 Novell PartnerNet Confidential 07/24/00<br />
Copyright © 2000 by Novell, Inc.