SWING SHOWER DOOR Models Nos. - Sterling
SWING SHOWER DOOR Models Nos. - Sterling
SWING SHOWER DOOR Models Nos. - Sterling

Create successful ePaper yourself
Turn your PDF publications into a flip-book with our unique Google optimized e-Paper software.
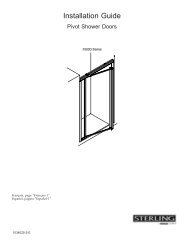
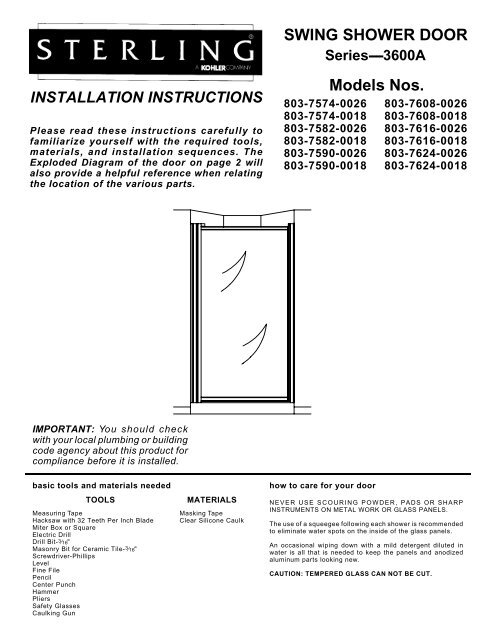
INSTALLATION INSTRUCTIONS<br />
Please read these instructions carefully to<br />
familiarize yourself with the required tools,<br />
materials, and installation sequences. The<br />
Exploded Diagram of the door on page 2 will<br />
also provide a helpful reference when relating<br />
the location of the various parts.<br />
IMPORTANT: You should check<br />
with your local plumbing or building<br />
code agency about this product for<br />
compliance before it is installed.<br />
basic tools and materials needed<br />
TOOLS<br />
Measuring Tape<br />
Hacksaw with 32 Teeth Per Inch Blade<br />
Miter Box or Square<br />
Electric Drill<br />
Drill Bit- 3⁄16"<br />
Masonry Bit for Ceramic Tile- 3⁄16"<br />
Screwdriver-Phillips<br />
Level<br />
Fine File<br />
Pencil<br />
Center Punch<br />
Hammer<br />
Pliers<br />
Safety Glasses<br />
Caulking Gun<br />
MATERIALS<br />
Masking Tape<br />
Clear Silicone Caulk<br />
<strong>SWING</strong> <strong>SHOWER</strong> <strong>DOOR</strong><br />
Series----3600A<br />
803-7574-0026<br />
803-7574-0018<br />
803-7582-0026<br />
803-7582-0018<br />
803-7590-0026<br />
803-7590-0018<br />
how to care for your door<br />
<strong>Models</strong> <strong>Nos</strong>.<br />
803-7608-0026<br />
803-7608-0018<br />
803-7616-0026<br />
803-7616-0018<br />
803-7624-0026<br />
803-7624-0018<br />
NEVER USE SCOURING POWDER, PADS OR SHARP<br />
INSTRUMENTS ON METAL WORK OR GLASS PANELS.<br />
The use of a squeegee following each shower is recommended<br />
to eliminate water spots on the inside of the glass panels.<br />
An occasional wiping down with a mild detergent diluted in<br />
water is all that is needed to keep the panels and anodized<br />
aluminum parts looking new.<br />
CAUTION: TEMPERED GLASS CAN NOT BE CUT.
2<br />
part names for installation<br />
Anchor<br />
No.<br />
8-32<br />
Nut<br />
No. 8<br />
Cup<br />
Washer<br />
Plug<br />
Bracket<br />
No. 8-32 x 5⁄16"<br />
Undercut Head<br />
Screw<br />
Pin<br />
" L" Jamb<br />
No. 8-18 x 1⁄2"<br />
Panhead Screw<br />
Bracket<br />
No.<br />
8-18 x 2"<br />
Panhead<br />
Screw<br />
No.<br />
8-32 x 3⁄4"<br />
Panhead<br />
Screw<br />
Pin<br />
Washer<br />
Door Panel<br />
Flat Seal<br />
No. 8-18 x 1⁄2"<br />
Panhead Screw<br />
Bottom<br />
Track<br />
Seal<br />
Strike<br />
Jamb<br />
Bottom Track<br />
Wall<br />
Jamb<br />
Anchor<br />
No. 8-18 x 2"<br />
Panhead Screw
1MEASURING<br />
AND CUTTING<br />
BOTTOM TRACK<br />
A.<br />
B.<br />
2<br />
A.<br />
B.<br />
DETERMINING DIRECTION OF <strong>SWING</strong><br />
Determine whether the door will swing<br />
toward the right or left. Check that<br />
there are no obstacles in the door path<br />
as it swings open.<br />
It is recommended that the swing side<br />
of the door be installed on the opposite<br />
side from the showerhead. Be sure<br />
there are no obstructions.<br />
All of the following illustrations are<br />
for door that swings open toward the<br />
left. Door that swings open toward<br />
right would be opposite.<br />
3PLACING<br />
BOTTOM TRACK<br />
ON <strong>SHOWER</strong> LEDGE<br />
A.<br />
B.<br />
NOTE: WEAR SAFETY GLASSES.<br />
Note: If your stall has a curve in the<br />
corners at the side walls, be sure to<br />
measure distance D above the curves<br />
and cut bottom track 1 1 ⁄8" shorter<br />
than distance D.<br />
Measure distance D from wall to wall as<br />
shown and cut the bottom track 1 1 ⁄8"<br />
shorter than distance D. For best<br />
results use a 32-tooth per inch hacksaw<br />
blade and miter box. File rough edges.<br />
CAUTION: If a steel tape is used, be<br />
sure to add the width of the case to<br />
the measurement.<br />
NOTE: Locate bottom track on flattest<br />
part of ledge.<br />
Place the bottom track on the ledge as<br />
shown. Make sure the space between the<br />
wall and bottom track is the same on both<br />
ends and the distance from the outer edge<br />
of the shower ledge to front edge of the<br />
bottom track is the same measurement on<br />
both ends.<br />
Temporarily secure the bottom track with<br />
masking tape and mark the shower ledge<br />
with a soft pencil along the front edge of<br />
the bottom track.<br />
Bottom<br />
Track<br />
D<br />
TOP VIEW<br />
Swings open<br />
toward left<br />
TOP VIEW<br />
Swings open<br />
toward right<br />
Inside of<br />
Shower<br />
3
4<br />
4<br />
LOCATING STRIKE SIDE WALL JAMB<br />
AND DRILLING HOLES<br />
A.<br />
B.<br />
C.<br />
D.<br />
Note: Shorter legs of wall jamb<br />
against wall with flange holes<br />
toward the inside of shower.<br />
Note: Wear Safety Glasses.<br />
Place wall jamb with shorter legs<br />
against showerhead side of stall<br />
opening and fit over the bottom<br />
track. Flange with holes must<br />
face to inside of stall. If<br />
necessary, shape bottom end of<br />
jamb to fit curve at side wall. Use<br />
level to align wall jamb vertically<br />
and mark hole locations.<br />
Remove jamb and lightly center<br />
punch the 4 hole locations. On<br />
ceramic tile, use the center<br />
punch to nick the surface glaze.<br />
Tap the punch lightly with your<br />
hammer so you don’t crack the<br />
tile.<br />
Drill all four holes with a 3⁄16" drill<br />
bit. (Use a masonry bit for<br />
ceramic tile*).<br />
After drilling, thoroughly clean<br />
the shower ledge and insert<br />
anchors in all four holes.<br />
*Start drilling slowly to<br />
prevent damage.<br />
Shorter Legs<br />
Against Wall<br />
Level<br />
Flange<br />
Holes<br />
Toward<br />
Inside<br />
of<br />
Shower<br />
Inside of<br />
Shower<br />
Pencil<br />
Strike Side<br />
Wall Jamb
5<br />
A.<br />
LOCATING "L" JAMB AGAINST WALL,<br />
MARKING HOLE LOCATION AND<br />
DRILLING HOLES<br />
Place the "L" Jamb down over the<br />
bottom track and against the wall<br />
opposite the showerhead. Be sure the<br />
end of bottom track is against the "L"<br />
Jamb.<br />
NOTE:The "L" Jamb must sit flat<br />
against the wall with the legs of "L"<br />
Jamb fully engaged with bottom<br />
track. If the jamb is not fully engaged<br />
with the bottom track, use a file to<br />
shape the bottom end of jamb to fit<br />
the curve at side wall of shower.<br />
B. Use a level to plumb the "L" Jamb as<br />
shown and mark the 6 hole locations.<br />
Do not mark the 2 bottom holes.<br />
These holes are used to install<br />
bottom bracket in step 7.<br />
C.<br />
D.<br />
E.<br />
F.<br />
Note: Wear Safety Glasses.<br />
Remove the "L" Jamb and bottom track.<br />
Lightly center punch the 6 hole<br />
locations. On ceramic tile, use the<br />
center punch to nick the surface glaze.<br />
Tap the punch lightly with your hammer<br />
so you don’t crack the tile.<br />
Drill all 6 holes with a 3⁄16" drill bit. (Use<br />
a masonry bit for ceramic tile).<br />
After drilling, thoroughly clean shower<br />
ledge and insert anchors in all six<br />
holes.<br />
Pencil<br />
"L" Jamb<br />
Do Not Mark<br />
Bottom Bracket<br />
Holes<br />
Bottom<br />
Track<br />
Inside of<br />
Shower<br />
This Leg Toward<br />
Inside of Shower<br />
Level<br />
5
6<br />
A.<br />
B.<br />
A.<br />
B.<br />
6<br />
CAULKING AND INSTALLING<br />
BOTTOM TRACK<br />
Apply a bead of caulk on the underside<br />
of bottom track as shown.<br />
Install the bottom track at location<br />
marked on the shower ledge and use<br />
masking tape to hold the bottom track<br />
in place.<br />
7INSTALLLING<br />
BOTTOM BRACKET<br />
At the bottom end of the "L" Jamb,<br />
position a bracket against the Jamb<br />
and align the holes in bracket with the<br />
holes in "L" Jamb.<br />
Secure with 2 No. 8-32 x 3 ⁄4" panhead<br />
screws and No. 8-32 square nuts. Use<br />
pliers to hold square nuts as screws are<br />
tightened.<br />
Caulk<br />
Here<br />
Bottom<br />
Track<br />
Bottom<br />
Bracket<br />
No. 8-32 x 3 ⁄4"<br />
Panhead Screw<br />
"L" Jamb<br />
No. 8-32<br />
Square<br />
Nut
8<br />
A.<br />
B.<br />
C.<br />
D.<br />
E.<br />
INSTALLING "L" JAMB<br />
Insert a pivot pin through the hole<br />
in bottom bracket with the head of<br />
pin toward the bottom track.<br />
Place the washer down over the<br />
pin as shown.<br />
Holding the pin in place, install<br />
the "L" Jamb down over the<br />
bottom track and align the holes<br />
in the "L" Jamb with the holes in<br />
wall.<br />
Through the 4 holes below the top<br />
bracket holes, secure the "L"<br />
Jamb to wall with 4 No. 8-18 x 2"<br />
panhead screws.<br />
Place a bracket at top of "L" Jamb<br />
and align the holes in bracket<br />
with the holes in "L" Jamb.<br />
Secure with 2 No. 8-18 x 2"<br />
panhead screws.<br />
Add caulk to the top bracket plug<br />
and insert the plug into the top<br />
bracket as shown.<br />
Washer<br />
Top<br />
Bracket<br />
Plug<br />
"L" Jamb<br />
No. 8-18 x 2"<br />
Panhead Screw<br />
Bottom<br />
Bracket<br />
Pivot<br />
Pin<br />
No. 8-18 x 2"<br />
Panhead Screw<br />
Inside of<br />
Shower<br />
7
9<br />
8<br />
INSTALLING STRIKE SIDE<br />
WALL JAMB<br />
A.<br />
B.<br />
C.<br />
Place the wall jamb down<br />
over bottom track and align<br />
wall jamb holes with holes in<br />
wall.<br />
Secure with 4 No. 8-18 x2"<br />
panhead screws.<br />
Caulk where bottom track<br />
and wall jamb join.<br />
Inside of<br />
Shower<br />
No. 8-18 x 2"<br />
Panhead Screw<br />
Strike Side<br />
Wall Jamb<br />
Caulk<br />
Here<br />
Bottom<br />
Track
10<br />
A.<br />
B.<br />
INSTALLING STRIKE<br />
EXPANDER JAMB<br />
Fit the strike expander jamb<br />
over the strike side wall jamb.<br />
Align vertically with a level<br />
and align slots in strike jamb<br />
with holes in wall jamb.<br />
Fasten with 3 No. 8-18 x 1⁄2"<br />
panhead screws.<br />
Strike Side<br />
Wall Jamb<br />
No.<br />
8-18 x 1⁄2"<br />
Panhead<br />
Screw<br />
Inside of<br />
Shower<br />
Strike<br />
Expander<br />
Jamb<br />
9
11<br />
A.<br />
B.<br />
C.<br />
D.<br />
E.<br />
10<br />
INSTALLING BOTTOM<br />
TRACK SEAL<br />
Remove tape from bottom track.<br />
Measure from the front edge of<br />
the strike expander jamb to the<br />
edge of bottom bracket as shown.<br />
Cut the seal distance measured.<br />
Push the seal into the bottom<br />
track as shown.<br />
Trim the seal leg to fit around the<br />
strike expander jamb magnet.<br />
Bottom<br />
Bracket<br />
Trim<br />
Seal<br />
Here<br />
Seal<br />
Inside of<br />
Shower<br />
Measure Here<br />
Strike<br />
Expander<br />
Jamb<br />
Assembly<br />
Bottom<br />
Track<br />
Bottom<br />
Track<br />
Strike<br />
Expander<br />
Jamb<br />
Assembly
12<br />
A.<br />
B.<br />
LOCATING BLOCKS<br />
Measure distance between<br />
bracket pin at bottom and the<br />
edge of strike expander jamb as<br />
shown.<br />
Slide the block in the top frame<br />
of the door panel toward the pivot<br />
side frame.<br />
C. Measure from the edge of door<br />
handle to the center of the<br />
farthest pin hole in block and<br />
locate the block 1⁄4" less than<br />
measurement from A.<br />
D.<br />
E.<br />
F.<br />
Insert a No. 8-18 x 1⁄2" panhead<br />
screw through frame slot of the<br />
door panel top frame and into<br />
block screwport.<br />
Fasten the screw into block<br />
screwport.<br />
Use same procedures to locate<br />
the block in the door panel bottom<br />
frame.<br />
Pin<br />
Hole<br />
Block<br />
Door Panel Block Location-1⁄4" less<br />
than measurement from A.<br />
No.<br />
8-18 x 1⁄2"<br />
Panhead<br />
Screw<br />
Bracket<br />
Pin<br />
Measure Here<br />
Top<br />
Frame<br />
Block<br />
Screwport<br />
Strike<br />
Expander<br />
Jamb<br />
Assembly<br />
Handle<br />
11
13<br />
A.<br />
B.<br />
C.<br />
D.<br />
E.<br />
F.<br />
G.<br />
H.<br />
I.<br />
14<br />
A.<br />
B.<br />
12<br />
INSTALLING <strong>DOOR</strong> PANEL<br />
Insert a pivot pin into the top<br />
bracket hole.<br />
Lift the door panel and position<br />
door handle magnet toward strike<br />
jamb magnet.<br />
From inside shower, place door<br />
panel bottom block’s farthest hole<br />
from door handle down over<br />
bottom bracket pin. Be sure not<br />
to place side frame of door panel<br />
down over pin.<br />
Pull top bracket pivot pin up and<br />
align the top block’s farthest hole<br />
from door handle with the top<br />
bracket hole and insert pin<br />
through bracket hole and into the<br />
block hole.<br />
Loosen the block screws and<br />
slowly close door panel and slide<br />
blocks in top and bottom frames<br />
so that door closes with<br />
approximately 1⁄4" clearance from<br />
edge of strike jamb. Make sure<br />
that the bottom of door panel<br />
does not rub on the bottom track<br />
seal.<br />
Tighten the block screws.<br />
For final adjustment, loosen the<br />
strike expander jamb screws.<br />
Align the strike expander jamb<br />
with the door panel handle frame<br />
with a 1⁄4" gap at top and bottom<br />
of the door panel.<br />
Tighten the strike expander jamb<br />
screws.<br />
INSTALLING WASHER<br />
AND SCREW<br />
NOTE: It is necessary to install<br />
the No. 8 cup washer and the<br />
No.8-32 x 5⁄16" undercut head<br />
screw to prevent the top pivot<br />
pin from moving upward out of<br />
the pivot block.<br />
Place the No. 8 cup washer over<br />
the hole in the top bracket.<br />
Insert the No.8-32 x 5⁄16" undercut<br />
head screw through the washer<br />
into the hole in the bracket and<br />
tighten.<br />
Bracket<br />
Hole<br />
Block<br />
Hole<br />
Inside of<br />
Shower<br />
Block Hole<br />
Pivot<br />
Pin<br />
No.8-32 x 5⁄16"<br />
Undercut Head<br />
Screw<br />
Pivot<br />
Pin<br />
Bottom<br />
Bracket<br />
Top<br />
Bracket<br />
No. 8 Cup<br />
Washer<br />
Do Not<br />
Place<br />
Pivot Pin<br />
in This<br />
Area<br />
Top<br />
Bracket
14<br />
A.<br />
B.<br />
C.<br />
15<br />
A.<br />
B.<br />
C.<br />
INSTALLING FLAT SEAL<br />
INTO <strong>DOOR</strong> PANEL<br />
PIVOT SIDE FRAME<br />
From inside the shower and with<br />
the door panel open, slide the flat<br />
seal into the "T" shaped slot of<br />
door panel pivot side frame. Pull<br />
the seal down until it is even with<br />
the bottom of door panel.<br />
Cut off excess flat seal from the<br />
top of door.<br />
With a pair of pliers, squeeze the<br />
edge of the "T" shaped slot at the<br />
top of door panel to hold the flat<br />
seal in place.<br />
CAULKING<br />
Carefully caulk where the jambs<br />
and wall meet (1), bottom track<br />
and shower ledge join (2).<br />
Caulk at the bottom of the door<br />
handle as shown.<br />
Caulk the bottom bracket as<br />
shown.<br />
(1) Caulk Here<br />
(Outside Only)<br />
Caulk<br />
Here<br />
Inside of<br />
Shower<br />
Door<br />
Panel<br />
Handle<br />
Flat<br />
Seal<br />
(2) Caulk Here<br />
(Outside Only)<br />
Bottom<br />
Bracket<br />
Caulk<br />
Here<br />
Pivot Side Frame<br />
"T" Shaped Slot<br />
(1) Caulk Here<br />
(Outside Only)<br />
Inside of<br />
Shower<br />
Caulk<br />
Here<br />
13
14<br />
PARTS LIST When ordering parts, specify model number, part number, quantity and color.<br />
8<br />
16<br />
18<br />
11<br />
8<br />
8<br />
8<br />
8<br />
15<br />
19<br />
9<br />
3<br />
9<br />
9<br />
9<br />
13 12<br />
12<br />
10<br />
14<br />
9<br />
17<br />
10<br />
2<br />
1<br />
5<br />
7<br />
10<br />
10<br />
10<br />
6<br />
9<br />
9<br />
9<br />
9<br />
4<br />
8<br />
8<br />
8<br />
8
Key<br />
No.<br />
1<br />
2<br />
3<br />
4<br />
5<br />
6<br />
7<br />
8<br />
9<br />
10<br />
11<br />
12<br />
13<br />
14<br />
15<br />
16<br />
17<br />
18<br />
19<br />
PARTS LIST When ordering parts, specify model number, part number, quantity and color.<br />
Door<br />
Description Qty.<br />
Flat Seal<br />
‘‘L’’ Jamb<br />
Wall Jamb<br />
Bottom Track<br />
Strike Jamb Assembly<br />
Bottom Track Seal<br />
Anchor<br />
No. 8 -18 x 2" Panhead Screw<br />
No. 8 -18 x 1⁄2" Panhead Screw<br />
Bracket*<br />
Pin<br />
Bracket*<br />
Washer<br />
Plug<br />
No. 8-32 Nut<br />
No. 8-32 x 3⁄4" Panhead Screw<br />
No. 8 Cup Washer<br />
No. 8-32 x 5⁄16" Undercut Head Screw<br />
1<br />
1<br />
1<br />
1<br />
1<br />
1<br />
1<br />
10<br />
10<br />
5<br />
1<br />
2<br />
1<br />
1<br />
1<br />
2<br />
2<br />
1<br />
1<br />
*Bracket Numbers Molded on Part<br />
Part <strong>Nos</strong>. For Model <strong>Nos</strong>.<br />
803-7574-0018<br />
803-7582-0018<br />
803-7590-0018<br />
803-7608-0018<br />
803-7616-0018<br />
803-7624-0018<br />
860965<br />
860966<br />
860967<br />
860968<br />
860969<br />
860970<br />
627700<br />
860302<br />
698802<br />
698902<br />
699802<br />
818501<br />
162217<br />
456332<br />
456335<br />
722902<br />
698600<br />
723002<br />
217807<br />
726702<br />
627901<br />
456407<br />
10559.02<br />
232117<br />
803-7574-0026<br />
803-7582-0026<br />
803-7590-0026<br />
803-7608-0026<br />
803-7616-0026<br />
803-7624-0026<br />
860937<br />
860939<br />
860941<br />
860943<br />
860945<br />
860947<br />
627700<br />
860301<br />
698801<br />
698901<br />
699801<br />
818501<br />
162217<br />
456331<br />
456334<br />
722901<br />
698600<br />
723001<br />
217807<br />
726701<br />
627901<br />
456406<br />
10559.01<br />
232116<br />
15