

Tune that dial - Index of
Tune that dial - Index of
Tune that dial - Index of

You also want an ePaper? Increase the reach of your titles
YUMPU automatically turns print PDFs into web optimized ePapers that Google loves.
free supplement<br />
<strong>Tune</strong> <strong>that</strong> <strong>dial</strong><br />
shortwave receiver<br />
with DDS<br />
2.4 GHz WLAN antennas<br />
in practice<br />
Unusual Christmas presents<br />
gadgets & wannahaves<br />
Extra! free 24 page supplement<br />
The i-TRIXX Collection<br />
Spy radio stations • Flowcode v. 3 is here •<br />
Boxing up prototypes<br />
DECEMBER 2006<br />
£3.80<br />
www.elektor.com<br />
R50
IR Romote Control<br />
Extender MKII<br />
KC-5432 £7.25 + post & packing<br />
Operate your DVD player or digital decoder<br />
using its remote control from another room. It<br />
picks up the signal from the remote control and<br />
sends it via a 2-wire cable to an infrared LED<br />
located close to the device. This improved<br />
model features fast data transfer, capable <strong>of</strong><br />
transmitting Foxtel digital remote control signals<br />
using the Pace 400 series decoder. Kit supplied<br />
with case, screen printed front panel, PCB with<br />
overlay and all electronic<br />
components.<br />
Requires 9VDC<br />
wall adaptor<br />
(Maplin #GS74R<br />
£9.99)<br />
Battery Zapper MKII<br />
KC-5427 £29.00 + post & packing<br />
This kit attacks a common cause <strong>of</strong> failure in wet<br />
lead acid cell batteries: sulphation. The circuit<br />
produces short bursts <strong>of</strong> high level energy to<br />
reverse the damaging sulphation effect. This new<br />
improved unit features a battery health checker<br />
with LED indicator, new circuit protection against<br />
badly sulphated batteries, test points for a DMM<br />
and connection for a battery<br />
charger. Kit includes case with<br />
screen printed lid, PCB with<br />
overlay, all electronic<br />
components and clear<br />
English instructions.<br />
Suitable for 6, 12 and 24V<br />
batteries<br />
• Powered by the battery<br />
itself<br />
Theremin Synthesiser MKII<br />
KC-5426 £43.50 + post & packing<br />
By moving your hand between the metal<br />
antennae, create unusual sound effects! The<br />
Theremin MkII improves on its predecessor by<br />
allowing adjustments to the tonal quality by<br />
providing a better waveform. With a multitude <strong>of</strong><br />
controls, this instrument's musical potential is only<br />
limited by the skill and imagination <strong>of</strong> its player.<br />
Kit includes stand, PCB with overlay, machined<br />
case with silkscreen<br />
printed lid, loudspeaker,<br />
pitch antennae, all<br />
specified electronic<br />
components<br />
and clear English<br />
instructions.<br />
As used in the<br />
Beach Boys<br />
classic hit ‘Good<br />
Vibrations’<br />
Improved<br />
Model!<br />
Improved<br />
Model!<br />
Improved<br />
Model!<br />
Requires 9-12VDC<br />
wall adaptor<br />
(Maplin #JC91Y £14.99)<br />
Log on to<br />
www.jaycarelectronics.co.uk/catalogue<br />
for your FREE catalogue!<br />
0800 032 7241<br />
(Monday - Friday 09.00 to 17.30 GMT + 10 hours only).<br />
For those who want to write: 100 Silverwater Rd<br />
Silverwater NSW 2128 Sydney AUSTRALIA<br />
For a FREE copy<br />
<strong>of</strong> our 410+ page catalogue from<br />
Australia (It’s no prickly problem)<br />
log on to our website<br />
www.jaycarelectronics.co.uk/catalogue<br />
All prices<br />
in £ Stg<br />
Free<br />
410+ page<br />
Catalogue<br />
All prices in £ Stg<br />
Galactic Voice Kit<br />
KC-5431 £13.25 + post & packing<br />
Be the envy <strong>of</strong> everyone at the<br />
next Interplanetary<br />
Conference for Evil Beings<br />
with this galactic voice<br />
simulator kit. Effect and<br />
depth controls allow you to<br />
vary the effect to simulate<br />
everything from the<br />
metallically-challenged C-3PO,<br />
to the hysterical ranting <strong>of</strong> Daleks hell-bent on<br />
exterminating anything not nailed down. The kit<br />
includes PCB with overlay, enclosure, speaker and all<br />
components. For those who really need to get out <strong>of</strong><br />
the house a lot more. Take me to your leader.<br />
• Requires 9V battery<br />
High Range Adjustable<br />
Switch with LCD<br />
KC-5376 £22.75 + post & packing<br />
This temperature switch can be set anywhere up<br />
to 1200ºC, so it’s extremely versatile. The relay<br />
can be used to trigger an extra thermo fan on an<br />
intercooler, mount a sensor near your turbo<br />
manifold and trigger water spray cooling, or a<br />
simple alarm to warn you <strong>of</strong> overheating. The LCD,<br />
which can easily be dash mounted, displays the<br />
temperature constantly. Kit supplied with solder<br />
masked PCB with overlay, LCD panel, temperature<br />
probe and all electronic components.<br />
Smart Fuel Mixture Display Kit<br />
KC-5374 £8.95 + post & packing<br />
This kit features auto dimming for night driving,<br />
emergency lean-out alarm, better circuit<br />
protection, and a ‘dancing’ display which functions<br />
when the ECU is operating in closed loop. Kit<br />
supplied with PCB and all electronic components.<br />
• Car must be fitted with air flow and<br />
EGO sensors (standard on all EFI<br />
systems) for full<br />
functionality.<br />
Recommended box<br />
UB3 (HB-6013)<br />
£1.40 each<br />
We stock<br />
an extensive<br />
range <strong>of</strong> quality<br />
automotive<br />
kits<br />
POST AND PACKING CHARGES:<br />
Order Value Cost<br />
£20 - £49.99 £5<br />
£50 - £99.99 £10<br />
£100 - £199.99 £20<br />
Order Value Cost<br />
£200 - £499.99 £30<br />
£500+ £40<br />
Max weight 12lb (5kg). Heavier<br />
parcels POA. Minimum order £20.<br />
Magnetic Cartridge Pre-amp<br />
KC-5433 £11.75 + post & packing<br />
This kit is used to amplify the 3-4mV signals from<br />
a phono cartridge to line level, so you can use your<br />
turntable with the CD or tuner inputs on your Hi-Fi<br />
amplifier - most modern amps don't include a<br />
phono input any more. Dust <strong>of</strong>f the old LP<br />
collection or use it to record your LPs on to CD.<br />
The design is suitable for 12" LPs, and also allows<br />
for RIAA equalisation <strong>of</strong> all the really old 78s.<br />
Please note <strong>that</strong> the input sensitivity <strong>of</strong> this design<br />
means it's only suitable for moving-magnet, not<br />
moving-coil cartridges. Kit<br />
includes PCB with overlay and all<br />
electronic components.<br />
• Requires 12VAC power<br />
Universal High Energy Ignition Kit<br />
KC-5419 £27.75 + post & packing<br />
A high energy 0.9ms spark burns fuel faster and<br />
more efficiently to give you more power! This<br />
versatile kit can be connected to conventional<br />
points, twin points or reluctor ignition<br />
systems. Kit supplied with<br />
diecast case, PCB<br />
and all electronic<br />
components.<br />
Intelligent Turbo Timer Kit<br />
KC-5383 £14.75 + post & packing<br />
This great module uses input from an airflow,<br />
oxygen, or MAP sensor to determine how hard<br />
the car has been driven. It then uses this<br />
information to calculate how long the car needs to<br />
idle, reducing unnecessary idle time. The<br />
sensitivity and maximum idle time are both<br />
adjustable, so you can be sure your turbo<br />
will cool properly. Kit supplied with<br />
PCB, and all electronic<br />
components.<br />
Recommended<br />
box UB3 (HB-6013)<br />
£1.40 each
Digital Storage Oscilloscope<br />
Up to 4 analog channels using industry standard<br />
probes or POD connected analog inputs.<br />
�<br />
Mixed Signal Oscilloscope<br />
Capture and display up to 4 analog and 8 logic<br />
channels with sophisticated cross-triggers.<br />
�<br />
Spectrum Analyzer<br />
Integrated real-time spectrum analyzer for each<br />
analog channel with concurrent waveform display.<br />
�<br />
Logic Analyzer<br />
8 logic, External Trigger and special purpose<br />
inputs to capture digital signals down to 25nS.<br />
�<br />
Data Recorder<br />
Record anything the DSO can capture and<br />
� display. Supports live data replay image export.<br />
Networking<br />
Flexible network connectivity supporting<br />
� multi-scope operation, remote monitoring and<br />
data acquisition.<br />
PC Oscilloscopes & Analyzers<br />
DSO Test Instrument S<strong>of</strong>tware for BitScope Mixed Signal Oscilloscopes<br />
DSO<br />
2.0<br />
DSO<br />
2.0<br />
4 Channel BitScope 2 Channel BitScope Pocket Analyzer<br />
Data Export<br />
Export data with DSO using portable CSV files or<br />
use libraries to build custom BitScope solutions.<br />
�<br />
BitScope DSO S<strong>of</strong>tware for Windows and Linux<br />
BitScope DSO is fast and intuitive multi-channel test and measurement s<strong>of</strong>tware for your<br />
PC or notebook. Whether it's a digital scope, spectrum analyzer, mixed signal scope,<br />
logic analyzer, waveform generator or data recorder, BitScope DSO supports them all.<br />
Capture deep buffer one-shots or display waveforms live just like an analog scope.<br />
Comprehensive test instrument integration means you can view the same data in<br />
different ways simultaneously at the click <strong>of</strong> a button.<br />
DSO may even be used stand-alone to share data with colleagues, students or<br />
customers. Waveforms may be exported as portable image files or live captures replayed<br />
on other PCs as if a BitScope was locally connected.<br />
BitScope DSO supports all current BitScope models, auto-configures when it connects<br />
and can manage multiple BitScopes concurrently. No manual setup is normally required.<br />
Data export is available for use with third party s<strong>of</strong>tware tools and BitScope's networked<br />
data acquisition capabilities are fully supported.<br />
www.bitscope.com
From<br />
the Editor’s desk<br />
With this extra-thick December issue we<br />
close <strong>of</strong>f the publication year 2006. I’ve<br />
a few points to share with you all and I<br />
guess it does no harm to mention them<br />
in this month’s Editorial space — in<br />
random order!<br />
All change to dot com. As you may<br />
have noticed on last month’s front cover,<br />
our website is also available at<br />
www.elektor.com. We are using this<br />
domain name because it is easier to<br />
remember (and type!) than<br />
www.elektor-electronics.co.uk .<br />
However, both websites run 100% in<br />
parallel and the old domain name will<br />
continue to be used.<br />
The i-TRIXX supplement you get free<br />
<strong>of</strong> charge with this issue is actually<br />
the sixth gift our readers get this year.<br />
Earlier this year we gave away a Visual<br />
Basic booklet (January 2006); a C<br />
booklet and an FPGA poster (March<br />
2006); an RFID card (September<br />
2006); and an E-Simulation DVD (October<br />
2006). The circuits in the 24-page<br />
i-TRIXX supplement are aimed at the<br />
younger generation (11 to 15s) and we<br />
would appreciate if you would let us<br />
know what you think <strong>of</strong> it.<br />
We’re hiring! Due to our expanding<br />
activities we’re looking for:<br />
• free-lance translators, German-English<br />
and Dutch-English;<br />
• a free-lance News Correspondent (UK<br />
based);<br />
• a free-lance Books Acquisition Manager<br />
(UK based).<br />
For details regarding these positions,<br />
please contact me on<br />
editor@elektor.com and<br />
I will put you in touch with the responsible<br />
person within our organisation.<br />
The Cumulative <strong>Index</strong> for Elektor Electronics<br />
volume 32 (2006) will be available<br />
as a free pdf download from our website.<br />
Like last year, we feel <strong>that</strong> the three<br />
precious pages taken up by the year<br />
index are better used for projects and<br />
other articles. Readers without internet<br />
access may write or telephone to request<br />
a free copy <strong>of</strong> the document on paper.<br />
Finally, from all <strong>of</strong> us here at Elektor, we<br />
thank all our readers, business partners<br />
and advertisers for their continued support<br />
during the past year and wish you<br />
all a Merry Christmas and a peaceful<br />
and prosperous 2007!<br />
Jan Buiting, Editor<br />
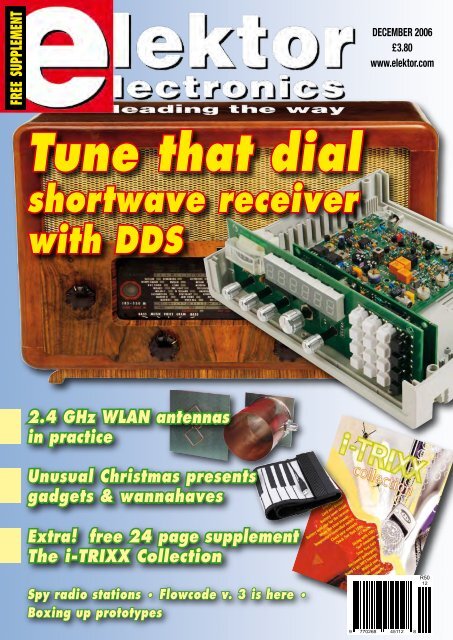
24 Shortwave<br />
Capture<br />
As a special treat for all radio amateurs we<br />
present a general-coverage AM/FM/SSB recei-<br />
ver with a wide range <strong>of</strong> features, which uses a<br />
DDS chip in the VFO section and also has a DRM output<br />
<strong>that</strong> can be fed into a computer. The receiver is controlled<br />
by an 8-bit Atmel RISC processor. The frequency readout is<br />
on a clearly legible 7-segment LED display.<br />
20 Tightly Packed<br />
There are an incredible number <strong>of</strong> options these days<br />
for the safe ‘packing up’ <strong>of</strong> electronic circuits. Open<br />
any catalogue from any well-known mail-order company<br />
and you will get an impression <strong>of</strong> the extensive<br />
range on <strong>of</strong>fer. This article gives an overview <strong>of</strong> the<br />
different types with their particular characteristics and<br />
provides hints as to how you can make a pr<strong>of</strong>essional<br />
looking front panel yourself.<br />
FREE 24-page<br />
i-TRIXX supplement<br />
starts on page 45<br />
70 WLAN Antenna Design<br />
The domestic use <strong>of</strong> WLANs has grown rapidly as DSL routers with<br />
built-in wireless Ethernet have become available, and now it is easy to<br />
use a notebook PC to surf<br />
the Internet wirelessly<br />
from the comfort <strong>of</strong><br />
one’s s<strong>of</strong>a. However,<br />
things get trickier if<br />
a reinforced concrete<br />
wall stands<br />
in the way, or if a<br />
neighbour happens<br />
to be using the same<br />
frequency...
CONTENTS<br />
88 A New Flowcode<br />
A new version <strong>of</strong><br />
Flowcode for E-blocks<br />
has just been released<br />
— version 3. This is<br />
more than a simple<br />
upgrade: Flowcode<br />
has matured into a<br />
nice if not impressive<br />
development tool.<br />
Volume 32<br />
December 2006<br />
no. 360<br />
know-how<br />
70 WLAN Antenna Design<br />
76 Where am I —<br />
and Where are the Others?<br />
hands-on<br />
23 Multi-Purpose 3D Milling<br />
Machine (announcement)<br />
24 Shortwave Capture<br />
42 Go with the Flow<br />
79 Design Tips<br />
Client-server quizmaster<br />
Pencil rubber cleans solder pads<br />
84 FPGA Course (7)<br />
88 A New Flowcode<br />
92 Intelligent Voltmeter in a<br />
Plug<br />
94 A Wire with Total Recall<br />
technology<br />
34 Spy Radio Stations<br />
38 Wireless Key<br />
80 Radio Control using<br />
WLAN ICs<br />
96 Smaller is not Always Better<br />
info & market<br />
6 Colophon<br />
8 Mailbox<br />
10 News & New Products<br />
20 Tightly Packed<br />
108 Sneak Preview<br />
infotainment<br />
14 Christmas Presents<br />
100 SSB Receiver for 20m and<br />
80m (1987)<br />
101 Hexadoku
Volume 32, Number 360, December 2006 ISSN 0268/4519<br />
Elektor Electronics aims at inspiring people to master electronics at any personal<br />
level by presenting construction projects and spotting developments in<br />
electronics and information technology.<br />
Publishers: Elektor Electronics (Publishing), Regus Brentford,<br />
1000 Great West Road, Brentford TW8 9HH, England. Tel. (+44) 208 261 4509,<br />
fax: (+44) 208 261 4447 www.elektor.com<br />
The magazine is available from newsagents, bookshops and electronics retail outlets, or on<br />
subscription. Elektor Electronics is published 11 times a year with a double issue for July & August.<br />
Under the name Elektor and Elektuur, the magazine is also published in French, German and<br />
Dutch. Together with franchised editions the magazine is on circulation in more than 50 countries.<br />
International Editor: Mat Heffels (m.heffels@segment.nl)<br />
Editor: Jan Buiting (editor@elektor.com)<br />
International editorial staff: Harry Baggen, Thijs Beckers, Ernst Krempelsauer,<br />
Jens Nickel, Guy Raedersdorf.<br />
Design staff: Ton Giesberts, Paul Goossens, Luc Lemmens, Christiaan Vossen<br />
Editorial secretariat: Hedwig Hennekens (secretariaat@segment.nl)<br />
Graphic design / DTP: Giel Dols<br />
Managing Director / Publisher: Paul Snakkers<br />
Marketing: Carlo van Nistelrooy<br />
Customer Services: Margriet Debeij (m.debeij@segment.nl)<br />
Subscriptions: Elektor Electronics (Publishing),<br />
Regus Brentford, 1000 Great West Road, Brentford TW8 9HH, England.<br />
Tel. (+44) 208 261 4509, fax: (+44) 208 261 4447<br />
Internet: www.elektor.com<br />
Email: subscriptions@elektor.com<br />
Rates and terms are given on the Subscription Order Form<br />
Head Office: Segment b.v. P.O. Box 75 NL-6190-AB Beek The Netherlands<br />
Telephone: (+31) 46 4389444, Fax: (+31) 46 4370161<br />
Distribution: Seymour, 2 East Poultry Street, London EC1A, England<br />
Telephone:+44 207 429 4073<br />
UK Advertising: Huson International Media, Cambridge House, Gogmore Lane,<br />
Chertsey, Surrey KT16 9AP, England.<br />
Telephone: +44 1932 564999, Fax: +44 1932 564998<br />
Email: r.elgar@husonmedia.com<br />
Internet: www.husonmedia.com<br />
Advertising rates and terms available on request.<br />
International Advertising: Frank van de Raadt, address as Head Office<br />
Email: advertenties@elektuur.nl<br />
Advertising rates and terms available on request.<br />
Copyright Notice<br />
The circuits described in this magazine are for domestic use only. All drawings, photographs, printed<br />
circuit board layouts, programmed integrated circuits, disks, CD-ROMs, s<strong>of</strong>tware carriers and article<br />
texts published in our books and magazines (other than third-party advertisements) are copyright<br />
Segment. b.v. and may not be reproduced or transmitted in any form or by any means, including<br />
photocopying, scanning an recording, in whole or in part without prior written permission from<br />
the Publishers. Such written permission must also be obtained before any part <strong>of</strong> this publication is<br />
stored in a retrieval system <strong>of</strong> any nature. Patent protection may exist in respect <strong>of</strong> circuits, devices,<br />
components etc. described in this magazine. The Publisher does not accept responsibility for failing<br />
to identify such patent(s) or other protection. The submission <strong>of</strong> designs or articles implies permission<br />
to the Publishers to alter the text and design, and to use the contents in other Segment publica-<br />
tions and activities. The Publishers cannot guarantee to return any material submitted to them.<br />
Disclaimer<br />
Prices and descriptions <strong>of</strong> publication-related items subject to change. Errors and omissions excluded.<br />
© Segment b.v. 2006 Printed in the Netherlands<br />
elektor electronics - 12/2006
12/2006 - elektor electronics 7
info & market mailbox<br />
Poor man’s VGA Tester<br />
Hi Elektor people — I attach a circuit diagram <strong>of</strong> a simple<br />
VGA Tester. The circuit is suitable for direct connection<br />
to a VGA display with a resolution <strong>of</strong> 480×640 pixels<br />
and generates a chessboard pattern. I designed the tester<br />
around a PIC12F508. It contains very few components<br />
and I believe the circuit speaks for itself. Jumper JP1 permits<br />
the colour selection between red, green and blue. By<br />
replacing it with three diodes (1N4148), the test picture<br />
goes black and white. The video output level is adjustable<br />
with preset P1.<br />
The s<strong>of</strong>tware I wrote for the tester is also simplicity itself.<br />
In principle, a loop is executed in which the image is built<br />
up bit by bit. The listing contains information regarding<br />
the pulse timing, which should enable users to adapt the<br />
program to suit other resolutions.<br />
I designed the circuit with the help <strong>of</strong> MPLAB IDE v7.20<br />
and Eagle 4.16.<br />
Hans Kooij (Netherlands)<br />
Thanks Hans, we agree <strong>that</strong> your circuit is hard to beat in<br />
terms <strong>of</strong> component count. The signal is composed entirely by<br />
the PIC and with some dexterity the tester could be built into a<br />
VGA plug. The source codce is available for free downloading<br />
from our website — the file number is 060215-11.zip.<br />
Phono Splitter —<br />
some points to note<br />
Dear Editor — I write to<br />
mention a few small errors<br />
<strong>that</strong> apparently have kept in<br />
my project ‘Phono Splitter’<br />
published in the July/August<br />
2006 issue.<br />
• Compensation capacitor<br />
C4 should have a value <strong>of</strong><br />
47 pF, not 470 pF.<br />
• T1 should be a BC560C<br />
like T2 and T3.<br />
• In my prototype, diodes<br />
D2 and D3 were types<br />
1N4448, mainly because<br />
oif their tighter specifications<br />
in respect <strong>of</strong> forward<br />
bias voltage. I would<br />
expect 1N4148s to work<br />
equally well, though.<br />
Thanks for publishing my design<br />
and hope a few readers<br />
benefit from it.<br />
Marcel van de Gevel<br />
(Netherlands)<br />
Thanks Marcel, and our apologies<br />
for the errors in reproducing<br />
your design. With over 100 article<br />
files being produced in<br />
four languages within a period<br />
<strong>of</strong> about four weeks, the production<br />
<strong>of</strong> our Summer Circuits<br />
edition is a tour de force where<br />
errors can not be ruled out entirely,<br />
particularly when making<br />
the drawings.<br />
Apple-01 Replica<br />
computer<br />
Dear Jan — just tro say <strong>that</strong> I<br />
built a replica <strong>of</strong> the 30 year<br />
old Apple-1 computer (see<br />
photo). I was honoured to get<br />
a personal ‘OK’ from Steve<br />
Wozniak to reuse his A1 firmware<br />
on my replica computer<br />
which I dubbed ‘A-ONE’.<br />
The A-ONE works fine as far<br />
as I can check. Here are some<br />
data:<br />
• 6502 at 1 MHz<br />
• 6821 PIA<br />
• 32 kB RAM<br />
• EPROM with WOZ-Mon<br />
and WOZ BASIC<br />
• GAL for address decoding<br />
etc.<br />
• TINY2313 for PS2<br />
keyboard and RS232<br />
(reception)<br />
• MEGA32 for video and<br />
RS232 (transmission)<br />
• 2 x 22 pin A1 compatible<br />
slot<br />
A nice change, I would say,<br />
from all <strong>that</strong> new fangled stuff<br />
around.<br />
Franz Achatz (Germany)<br />
Free e-SIM DVD<br />
Dear Jan — I believe 754C1<br />
is the answer to Hexadoku,<br />
October 2006 (correct! Ed.).<br />
I was looking for something<br />
to read at the shop, and<br />
found your magazine which<br />
I subscribed to in my student<br />
days, some twenty years ago.<br />
I have already tried some <strong>of</strong><br />
the programs on the e-SIM<br />
DVD, thanks for bringing me<br />
back to the days <strong>of</strong> PCBs and<br />
simulations!<br />
Magnus R. Berg (Norway)<br />
Welcome back Magnus, you’re<br />
in good company here.<br />
Pontavi-Thomson Bridge<br />
Dear Jan — there is nothing<br />
new in this life! The above<br />
bridge (Retronics, September<br />
2006, Ed.) is a simplified<br />
version <strong>of</strong> the Kelvin Bridge<br />
and featured in a few old<br />
books on calibration. I have<br />
a splendid version in a teak<br />
case with a large brass scale,<br />
made by Pye <strong>of</strong> Cambridge,<br />
and it is accurate to .1%.<br />
I have a collection <strong>of</strong> over<br />
twenty bridges made<br />
by Sullivan, Cambridge<br />
Instruments, Wayne & Kerr,<br />
Marconi, etc. together with<br />
elektor electronics - 12/2006
RFID Quest extended<br />
To give readers more time to read out the number stored on the free RFID card they got<br />
with their September 2006 issue (using a home built reader unit or one <strong>of</strong> the designs<br />
published in the same issue), the period for reporting winning card numbers has been<br />
extended to 15 December 2006. See also the RFID pages at www.elektor.com<br />
More power<br />
from the<br />
High-End Power Amp<br />
Dear Editor — I believe the<br />
relatively low output power <strong>of</strong> the<br />
High-End Power Amplifier from<br />
the March 2005 issue is mostly<br />
owing to the enclosure used. In<br />
other words, if a larger cabinet<br />
is used, more space is available<br />
to step up the power supplied<br />
by the amp. For example, the<br />
transformer voltage can be<br />
increased from 18 V to 25 V.<br />
After rectification, this results in<br />
about 31 VDC. The modifications<br />
I carried out at the<br />
component level are:<br />
Power supply:<br />
225 VA toroidal transformer,<br />
2x22 V<br />
C5, C6, etc.: 10,000 µF 35 V<br />
Fuses: 1.5 A<br />
Two NTCs in series with the mains<br />
voltage<br />
Amplifier board:<br />
R18: 10k<br />
R42: 220k<br />
R45: 220Ω<br />
D14;D15: 12V<br />
Heatsink: 2 x Fischer SK 155, 75 mm<br />
(0.9 K/W)<br />
Indicator board:<br />
R16;R17;R33;R34: 330Ω<br />
R5;R22: 820Ω<br />
12/2006 - elektor electronics<br />
R6;R23: 10k<br />
galvanometers, standards and<br />
precision potentiometers. The<br />
workmanship is incredibly<br />
high and part <strong>of</strong> our heritage<br />
we should all be proud <strong>of</strong>.<br />
John Price (UK)<br />
Indeed we should, John. Thanks<br />
for letting us know about the<br />
origins <strong>of</strong> the Pontavi-Thomson<br />
bridge. Photograph reproduced<br />
courtesy <strong>of</strong> Kenyon College,<br />
Ohio (quite a distance from<br />
Kelvin Way Bridge, Glasgow).<br />
P1 and P2 allow the gain <strong>of</strong> the indicator<br />
board to be adjusted between<br />
9 and about 13.7 times. I selected<br />
the Monacor (Monarch) type UC-<br />
204/SW case which has a size <strong>of</strong><br />
437×82×235 mm. Because <strong>of</strong> the larger<br />
output power, the indicator board is no<br />
longer required, hence I did not fit the<br />
LEDs on the front panel. Because the<br />
feedback is reduced, I fear the distortion<br />
goes up while damping is reduced.<br />
Lacking high-end test equipment I am<br />
unable to say if my modifications reduce<br />
the amplifier’s performance in any way.<br />
P. Kempenaar (Netherlands)<br />
MailBox Terms<br />
•Publication <strong>of</strong> reader’s<br />
correspondence is at the<br />
discretion <strong>of</strong> the Editor.<br />
•Viewpoints expressed by corres<br />
pondents are not necessarily<br />
those <strong>of</strong> the Editor or Publisher.<br />
•Correspondence may be<br />
translated or edited for length,<br />
clarity and style.<br />
•When replying to Mailbox<br />
correspondence,<br />
please quote Issue number.<br />
•Please send your MailBox<br />
correspondence to:<br />
editor@elektorelectronics.co.uk<br />
or<br />
Elektor Electronics, The Editor,<br />
1000 Great West Road,<br />
Brentford TW8 9HH, England.<br />
Our audio design specialist Ton<br />
Giesberts confirms <strong>that</strong> his High-End<br />
Power Amplifier design has potential<br />
for higher output power. The supply<br />
voltage may be increased to 35 V<br />
maximum, but not without major<br />
surgery to the existing design. For<br />
example, a larger heatsink must be<br />
used on the driver stage, and the<br />
resistor with the relay (R45) has to<br />
be adapted, as you have done. The<br />
sensitivity also requires adapting<br />
— it is now fairly low at 1.5 V for<br />
full drive. We confirm <strong>that</strong> it can<br />
be done by using 10 kΩ for R18,<br />
but stress <strong>that</strong> the modification<br />
modifies the carefully designed<br />
feedback response, which is likely<br />
to result in instability. This part <strong>of</strong> the<br />
modification really calls for a redesign.<br />
We recommend the use <strong>of</strong> an<br />
oscilloscope and a protected power<br />
supply if you want to stay on top <strong>of</strong> any<br />
tendencey to oscillation.<br />
The OPA177 has a maximum supply voltage<br />
spec <strong>of</strong> 22 V, hence is hard pushed in the<br />
original design already. Zener diodes <strong>of</strong> at<br />
least 12 V (D14; D15) are recommended at<br />
the suggested supply level <strong>of</strong> 31 VDC. At<br />
a supply voltage <strong>of</strong> 35 V, the zener diodes<br />
should be exchanged for 15-V types.<br />
Regarding the output power, at a supply<br />
voltage <strong>of</strong> 31 V, about 50 watts can be<br />
delivered into 8 ohms, while the minimum<br />
load impedance goes up to about 3 ohms<br />
to keep the power transistors within their<br />
safe operating area.
info & market news & new products<br />
Single-cell 1-A Li-Ion / Li-polymer charge management controllers<br />
M i c r o c h i p a n n o u n c e s t h e<br />
MCP73833 and MCP73834 single-cell,<br />
high current (1 amp), Li-<br />
Ion/Li-Polymer linear charge-management<br />
controllers. These fully<br />
integrated devices combine several<br />
key charge-management and<br />
safety features in a single chip for<br />
reliable charging <strong>of</strong> high-capacity<br />
single-cell Li-Ion and Li-Polymer<br />
batteries.<br />
By including a pass transistor, current-sense<br />
and reverse-discharge<br />
protection on a single chip, the<br />
MCP73833/4 charge-management<br />
controllers eliminate the need<br />
for external components. Multiple<br />
combinations <strong>of</strong> key charging parameters,<br />
including pre-conditioning<br />
current threshold and ratio,<br />
charge-termination threshold and<br />
recharge threshold ratio are available,<br />
meaning the devices provide<br />
standard product support for a variety<br />
<strong>of</strong> high-current Li-Ion/Li-Polymer<br />
charging applications. In addition,<br />
with a high charging current<br />
<strong>of</strong> up to 1 A and support for<br />
Are you CO sure?<br />
If you have a Carbon Monoxide<br />
(CO) concern and need to know<br />
more, Lascar Electronics’ EL-USB-<br />
CO carbon monoxide data logger<br />
could help in determining the nature<br />
<strong>of</strong> the problem.<br />
Carbon Monoxide (CO) is a poisonous<br />
gas which is both odourless<br />
and colourless. It is produced<br />
by equipment/machinery <strong>that</strong><br />
isn’t working correctly and can<br />
be found anywhere from construction<br />
sites and furnace rooms to <strong>of</strong>fice<br />
blocks and homes. Lascar’s<br />
EL-USB-CO data logger monitors<br />
and records CO levels in an environment<br />
over a period <strong>of</strong> time.<br />
DAB/FM radio module<br />
Frontier Silicon announces the<br />
launch <strong>of</strong> Naples FS2011, an integrated<br />
standalone dual-band<br />
DAB/FM radio module. The unit<br />
is a complete DAB module operating<br />
in both master and slave<br />
modes and incorporating Frontier<br />
Silicon’s Apollo RF front-end, Chorus<br />
DAB baseband processor and<br />
NXP Semiconductor’s TEA 5764<br />
FM radio IC. The module is meas-<br />
multiple regulated output voltages<br />
(4.2 V, 4.35 V, 4.4 V and 4.5 V),<br />
the devices can be used with various<br />
generations <strong>of</strong> Lithium battery<br />
technology.<br />
Safety features on the new devices<br />
to prevent overcharging and<br />
overheating include charge timers,<br />
battery-temperature feedback<br />
and thermal-current regulation. The<br />
charge timer shuts the charger <strong>of</strong>f<br />
This can help the user to determine<br />
where and when peak levels<br />
<strong>of</strong> CO occur, allowing corrective<br />
action to be carried out to remedy<br />
the problem.<br />
The EL-USB-CO stores over 32,000<br />
readings and can record CO levels<br />
from 0 to 1000 ppm. Setup <strong>of</strong><br />
the data logger is completed using<br />
the supplied EL-USB s<strong>of</strong>tware,<br />
with the EL-USB-CO plugging directly<br />
into the USB port <strong>of</strong> a PC.<br />
Here the user can assign the logger<br />
a name, choose a sample rate<br />
(from a choice <strong>of</strong> once every: 10<br />
secs, 30 secs, 1 mins, 5 mins), as<br />
well as determining a high-alarm<br />
uring 35mm x 38mm x 2.7mm on<br />
a single-sided PCB.<br />
The DAB signal processing functions<br />
and protocol stack are implemented<br />
in firmware running on the<br />
Chorus processor, which also runs<br />
the control interface to Naples. In<br />
a master configuration the module<br />
requires a power source, antenna,<br />
LCD and keypad to create a fully<br />
featured digital radio. Alternative-<br />
if a charge is not terminated before<br />
timeout is reached. The battery-temperature<br />
feedback reduces<br />
the charge current if the battery’s<br />
temperature reaches the limit <strong>of</strong><br />
safety and the thermal-current regulation<br />
feature decreases the charge<br />
current if the charge-controller itself<br />
reaches its thermal limits.<br />
Device-specific features include<br />
a power-good output on the<br />
level. Once setup is complete the<br />
EL-USB-CO should be left in the<br />
environment where the study is to<br />
take place.<br />
The EL-USB-CO is available for pur-<br />
ly, the module can be controlled<br />
by an existing microcontroller as<br />
a slave module via a serial port<br />
or SCB (serial control bus) compliant<br />
device allowing it to be integrated<br />
into larger audio systems.<br />
The module also supports various<br />
s<strong>of</strong>tware features such as DAB dynamic<br />
DLS radio service text, 256<br />
kbps decode capacity, stored presets<br />
and manual tuning when con-<br />
MCP73833 and a timer-enable<br />
input on the MCP73834. Both<br />
devices also <strong>of</strong>fer a low dropout<br />
regulator (LDO) test mode <strong>that</strong> enables<br />
application system test even<br />
in the absence <strong>of</strong> a battery; and<br />
both feature two status outputs to<br />
provide the user with additional<br />
information about the state <strong>of</strong> the<br />
charge-controller.<br />
To support development, Microchip<br />
<strong>of</strong>fers the MCP73833 Evaluation<br />
Board (Part # MCP73833EV). The<br />
board is available today at www.<br />
microchipdirect.com.<br />
The MCP73833/4 charge-management<br />
controllers are available<br />
in 10-pin MSOP and thermally<br />
efficient 3 x 3 mm DFN packages.<br />
They are available for sampling at<br />
sample.microchip.com and for volume<br />
ordering at www.microchipdirect.com.<br />
For more information, visit Microchip’s<br />
website at<br />
www.microchip.com/MCP73833.<br />
(067227-VII)<br />
chase at £49.00 from the Lascar<br />
website (www.lascarelectronics.<br />
com).<br />
(067227-III)<br />
figured in system applications.<br />
www.frontier-silicon.com<br />
10 elektor electronics - 12/2006<br />
(067227-I)
Mid-power 24-Vin maxi modules<br />
Vicor announces the addition <strong>of</strong><br />
eight mid-power Maxi DC-DC converters<br />
to the 24 Vdc input family:<br />
a 3.3-Vout, 200-W model and 300-<br />
W models at 5, 12, 15, 24, 28,<br />
36, and 48-Vout. The modules —<br />
which incorporate Vicor’s patented<br />
low-noise Zero-Current and Zero-<br />
Voltage Switching (ZCS/ZVS) topology<br />
— are appropriate for industrial<br />
or process control, distributed<br />
power, medical, ATE, communications,<br />
defence, and aerospace applications.<br />
With switching frequencies<br />
up to 1MHz, the 24Vdc family<br />
provides rapid transient response<br />
well suited for RF applications.<br />
The new products provide design-<br />
12/2006 - elektor electronics<br />
ers who do not need the full-power<br />
capability <strong>of</strong> a 24V Maxi module<br />
with a mid-power option, with all <strong>of</strong><br />
the functionality and configurability<br />
<strong>of</strong> the high power models. In addition,<br />
low-noise ZCS/ZVS greatly<br />
reduces the design effort and filtering<br />
costs required for power converters<br />
to meet agency conducted<br />
emissions requirements.<br />
The modules, which are available<br />
in RoHS compliant models, are a<br />
compact 117 x 56 x 12.7 mm in<br />
size, with a height above board<br />
<strong>of</strong> 10.9 mm.<br />
With these new models, the 24 Vin<br />
Maxi family now comprises 16<br />
models with output voltages from<br />
3.3 to 48 Vdc and power levels<br />
from 200 to 400 W. The converters<br />
operate from 24 V nominal input,<br />
with an input range <strong>of</strong> 18 V<br />
to 36 V. Efficiencies range up to<br />
88% for the higher output voltages.<br />
These models are available in<br />
five different environmental grades,<br />
with six different pin options and<br />
three choices <strong>of</strong> baseplate. They<br />
8-bit microcontrollers with integrated Ethernet peripheral<br />
Microchip announces a family<br />
<strong>of</strong> the world’s smallest 8-bit microcontrollers<br />
with an integrated<br />
IEEE 802.3-compliant Ethernet<br />
communications peripheral. The<br />
PIC18F97J60 family is optimized<br />
for embedded applications, and<br />
has an on-chip Medium Access<br />
Controller (MAC) and Physical<br />
Layer Device (PHY).<br />
By integrating a 10BASE-T Ethernet<br />
controller onto a 10 MIPS PIC18<br />
microcontroller with up to 128<br />
kBytes <strong>of</strong> Flash program memory,<br />
Microchip is providing embedded<br />
systems designers with a simple,<br />
cost-effective single-chip remotecommunication<br />
solution for a wide<br />
range <strong>of</strong> applications. Microchip<br />
also <strong>of</strong>fers a free TCP/IP s<strong>of</strong>tware<br />
stack to reduce development time.<br />
Ethernet is the leading networking<br />
technology for local area networks<br />
(LANs), and it can be used to connect<br />
embedded devices through a<br />
LAN to the Internet. Ethernet’s infrastructure,<br />
performance, interoperability,<br />
scalability and ease <strong>of</strong><br />
development have made it a standard<br />
choice for such embedded<br />
communications.<br />
Any embedded application <strong>that</strong><br />
requires Ethernet connectivity can<br />
take advantage <strong>of</strong> the new ninemember<br />
PIC18F97J60 microcontroller<br />
family. Such applications<br />
can include Industrial Automation<br />
(e.g. industrial control, power-supply<br />
monitoring, network/server<br />
monitoring and environmental<br />
monitoring); Building Automation<br />
(e.g. fire & safety, access control,<br />
security panels, lighting control<br />
and VoIP intercoms).<br />
Key features <strong>of</strong> the new family<br />
include:<br />
• Seamless Migration: add Eth-<br />
can be configured in any combination<br />
in Vicor’s Custom Module<br />
Design System.<br />
A datasheet is available on:<br />
www.vicorpower.com/library/<br />
technical_documentation/<br />
datasheets/2nd_gen/.<br />
www.vicoreurope.com<br />
(067227-V)<br />
ernet to existing PIC18 designs<br />
with minimal cost and development<br />
time.<br />
• IEEE 802.3-Compliant: on-chip<br />
10BASE-T MAC and PHY provide<br />
reliable packet-data transmission<br />
and reception.<br />
• Dedicated 8-kByte Ethernet Buffer:<br />
enables efficient packet storage,<br />
retrieval and modification,<br />
and reduces the demand on the<br />
integrated microcontroller.<br />
• 128 kBytes <strong>of</strong> Flash and 4<br />
Kbytes SRAM: to accommodate<br />
the TCP/IP stack and Web server,<br />
leaving ample space for application<br />
code.<br />
The PIC18F97J60 PICDEM.net<br />
2 Development Board (part #<br />
DM163024) has been created<br />
specifically to assist development<br />
with these new integrated devices.<br />
In addition, the latest version <strong>of</strong> Microchip’s<br />
free PIC18 TCP/IP Ethernet<br />
Stack can be downloaded at<br />
www.microchip.com/tcpip . The<br />
new family is also supported by<br />
Microchip’s suite <strong>of</strong> development<br />
tools, including the MPLAB® VDI<br />
Visual Device Initializer, Application<br />
Maestro s<strong>of</strong>tware, MPLAB<br />
C18 C compiler and the MPLAB<br />
ICD 2 in-circuit debugger.<br />
The new PIC devices are all <strong>of</strong>fered<br />
in RoHS-compliant TQFP<br />
packages.<br />
www.microchip.com/ethernet<br />
(067227-II)<br />
11
Special Christmas Offer<br />
3Elektor Books/CD-ROMs<br />
£ 27.50 for just | $ 52.50<br />
Offer valid untill 1 January 2007 Excl. P&P<br />
PC Interfaces<br />
under Windows<br />
PC Interfaces can be used for more<br />
than just the printer, mouse, mo dem<br />
and joystick! While it was relatively<br />
easy to directly access PC inter faces<br />
using a DOS computer, under<br />
Windows things are not all <strong>that</strong><br />
simple. This book (CD-ROM incl.)<br />
shows you how it can be done.<br />
265 pages<br />
£ 25.95<br />
US$ 52.00<br />
Bestseller<br />
Handbook for Sound<br />
Technicians<br />
This book contains chapters on<br />
basic theory; micro phones and<br />
musical instruments; various types<br />
<strong>of</strong> amplifier; loudspeakers; effects<br />
equipment; recording techniques;<br />
lighting equipment; the rehearsal<br />
room; and fault finding and small<br />
repairs.<br />
Save £££’s<br />
276 pages<br />
£ 20.75<br />
US$ 42.00<br />
Build your own High-end<br />
Audio Equipment<br />
For those who cannot, or<br />
will not, pay high prices<br />
for high end equipment,<br />
a solution is <strong>of</strong>fered in this<br />
book: build your own at<br />
considerable cost savings.<br />
262 pages<br />
£ 15.55 | US$ 31.00<br />
Lasers: Theory and Practice<br />
A valuable book on the practical use <strong>of</strong> lasers.<br />
It consists <strong>of</strong> two main parts. The first deals<br />
with the fundamentals <strong>of</strong> lasers, including<br />
such topics as types <strong>of</strong> laser,<br />
modes <strong>of</strong> laser operation,<br />
wavelengths, chopping,<br />
scanning and applications.<br />
The second part contains a<br />
number <strong>of</strong> practical circuits<br />
and experiments.<br />
180 pages<br />
£ 20.75 | US$ 42.00<br />
PC Service and Repair<br />
This book provides the information<br />
you need to be able to deal with<br />
computer system faults when ever<br />
they occur. With the aid <strong>of</strong> this book,<br />
you can tackle faultfinding at<br />
various levels, ranging from the<br />
replacement <strong>of</strong> complete cards<br />
or assem blies to the identi-<br />
fication <strong>of</strong> a single faulty com-<br />
ponent.<br />
479 pages<br />
£ 31.15 | US$ 63.00<br />
make your<br />
choice<br />
Designing Audio Circuits<br />
How does speech, music, or, indeed, any<br />
sound get from the record, CD, or casset-<br />
te tape to the loudspeaker?<br />
This book endeavours to give<br />
a comprehensible answer.<br />
350 pages<br />
£ 20.75 | US$ 42.00<br />
Faultfinding<br />
in Computers<br />
and Digital<br />
Circuits<br />
This book covers faultfinding not just in<br />
microprocessor systems, microcontrollers<br />
and industrial PCs, but also in consumer<br />
items such as personal computers, multi-<br />
media devices, digital television and so on.<br />
625 pages | £ 31.15 | US$ 63.00<br />
CD-ROM Audio Collection 1 + 2<br />
Two must-haves for the true audio lover.<br />
Each CD-ROM contains no fewer than 75<br />
audio designs from Elektor Electronics. Using<br />
the included Acrobat Reader you are able to<br />
browse the articles on your computer, as well<br />
as print texts, circuit diagrams and PCB layouts.<br />
£ 12.05<br />
US$ 21.25
CD-ROM S<strong>of</strong>tware Toolbox 2<br />
This CD-ROM contains s<strong>of</strong>tware tools for, and<br />
information about, microcontrollers. Toolbox 2<br />
gives specific attention to technical documen-<br />
tation about protocols, field buses, as well<br />
as modern information carriers which find<br />
increasing use. The hardware side <strong>of</strong> things is<br />
not forgotten either.<br />
CD-ROM Robotics<br />
A large collection <strong>of</strong> data sheets,<br />
s<strong>of</strong>tware tools, tips en tricks,<br />
addresses, Internet links to<br />
assor ted robot constructions<br />
and ge neral technical informa-<br />
tion. All aspects <strong>of</strong> modern<br />
robotics are covered, from<br />
sensors to motors, mechanical<br />
parts to microcontrollers, not<br />
forgetting matching program-<br />
ming tools and libraries for<br />
signal processing.<br />
£ 12.05<br />
US$ 21.25<br />
£ 12.05 | US$ 21.25<br />
CD-ROM ECD Edition 3<br />
Elektor’s Components Database<br />
gives you easy access to design<br />
data for over 5,000 ICs, more<br />
than 35,000 transistors, FETs,<br />
thyristors and triacs, just under<br />
25,000 diodes and 1,800 opto-<br />
couplers. All databank appli-<br />
cations are fully interactive,<br />
allowing the user to add, edit<br />
and complete component data.<br />
£ 14.95 | US$ 26.50<br />
No Order Form here?<br />
CD-ROM Elektor Electronics<br />
2001 + 2004<br />
These Elektor Electronics annual<br />
CD-ROMs contain all editorial<br />
articles published in Elektor<br />
Electronics magazine volume 2001<br />
and 2004.<br />
The CD-ROMs are packed with<br />
features including a powerful<br />
search engine and the possibility<br />
to edit PCB layouts with a graphics<br />
program, or printing hard copy at<br />
printer resolution.<br />
£ 16.25 | US$ 28.75<br />
No problem, you can still benefit from our <strong>of</strong>fer.<br />
Please contact us:<br />
Offer valid<br />
untill<br />
1 January 2007<br />
Elektor Electronics (Publishing)<br />
Regus Brentford | 1000 Great West Road<br />
Brentford TW8 9HH | United Kingdom<br />
Telephone +44 208 261 4509 | Fax +44 208 261 4447<br />
Email: sales@elektor.com<br />
CD-ROM Digital Circuit Library 1-2-3<br />
Each CD-ROM contains over 300 circuits complete<br />
with diagram and text. Zoom and print module.<br />
Fast search facility. Error-tolerant index search system.<br />
Many printed-circuit board layouts.<br />
£ 12.05 | US$ 21.25<br />
Limited<br />
Stock
info & market gadgets & musthaves<br />
Christmas Presents<br />
For the electronics hobbyist who has everything already<br />
Do you still need help choosing gifts for others (or for yourself)? We’d like to<br />
lend you a hand with a variegated selection <strong>of</strong> interesting, fun, handy, gadgetlike<br />
or simply unusual gifts. It also includes several items <strong>that</strong> people with no<br />
special interest in electronics will enjoy.<br />
Time on the fly<br />
The XP3 clock is a programmable<br />
digital clock <strong>that</strong> displays the time<br />
and messages hovering in the air. A<br />
set <strong>of</strong> LEDs fitted to a rod <strong>that</strong> swings<br />
back and forth at a tidy 16-Hz rate<br />
flash on and <strong>of</strong>f at just the right<br />
times to create visible messages.<br />
Each message appears in a different<br />
form. You can program four individual<br />
messages, each with a maximum<br />
<strong>of</strong> 200 characters. They can<br />
be combined with the date and time<br />
display in all sorts <strong>of</strong> ways. There are also several preprogrammed<br />
messages, in English <strong>of</strong> course.<br />
Seen at: www.gadgethouse.nl<br />
T-shirt with graphic analyser<br />
Hovering football<br />
We must admit <strong>that</strong> this ‘hovering<br />
football’ isn’t actually round. However,<br />
it’s a nice alternative to the real<br />
thing for a spot <strong>of</strong> football in the<br />
living room without doing too much<br />
damage to the furniture. This is a<br />
genuine hovercraft in the form <strong>of</strong> a<br />
flattened ball. It floats on a cushion<br />
<strong>of</strong> air blown out at the bottom, so it can hover over the<br />
floor and move easily. It doesn’t have any electronics – just<br />
a battery-powered motor.<br />
Seen at: http://smm.de<br />
You’re bound to attract attention if you wear this T-shirt to a disco or café. An illuminated panel in the<br />
form <strong>of</strong> a graphic analyser is fitted into the front <strong>of</strong> the T-shirt. The accompanying microphone and electronics<br />
pick up ambient sound and drive the bars <strong>of</strong> the graphic display accordingly. The analyser is powered by a detachable<br />
battery pack. The T-shirt is available in two sizes. Unfortunately, it can only be washed by hand, so you<br />
have to be prepared to handle it with TLC. Seen at: www.bestel.nl<br />
Solar-powered headphone radio<br />
With this set <strong>of</strong> headphones, you have music with you wherever you<br />
go – all without batteries. An FM receiver is built into the ear shells,<br />
and it is powered by a set <strong>of</strong> rechargeable AAA cells. The cells are<br />
charged by a solar panel fitted on top <strong>of</strong> the headband. One hour<br />
<strong>of</strong> sunlight is enough for<br />
1 to 3 hours <strong>of</strong> pleasant<br />
listening.<br />
The headband, which also<br />
includes an integrated antenna,<br />
can easily be adjusted<br />
to fit any head size.<br />
Seen at: www.paramountzone.com<br />
Mini drum set<br />
Who doesn’t occasionally<br />
get the urge to have a go<br />
at being a drummer? But<br />
how many <strong>of</strong> us have a<br />
drum set at home? And<br />
<strong>of</strong> course, you have to remember<br />
the neighbours…<br />
Now there’s a solution for<br />
the weekend drummer: an<br />
affordable electronic mini<br />
drum set. Several drums,<br />
and even a cymbal, are located on a surface with the dimensions<br />
<strong>of</strong> a mouse pad. You can drum on these instruments with<br />
your fingers. Of course, it takes a bit <strong>of</strong> practice to get the hang<br />
<strong>of</strong> it. There are also several control knobs behind the drums.<br />
This way you don’t have to worry about complaints from the<br />
neighbours – as long as you can resist the temptation to connect<br />
the drum set to your stereo system!<br />
Seen at: www.megagadgets.nl<br />
14 elektor electronics - 12/2006
12/2006 - elektor electronics<br />
Talking toilet<br />
paper holder<br />
This gadget is just the<br />
thing for surprising<br />
your friends and acquaintances.<br />
It generates<br />
a spoken message<br />
each time some pulls<br />
toilet paper <strong>of</strong>f the roll. You can record your own message,<br />
either serious or humorous. For instance, you could use it to<br />
remind your children to wash their hands when they’re finished,<br />
or to remind adults to close the lid before they leave.<br />
As for humorous messages, <strong>that</strong>’s something we’ll leave up<br />
to you! The toilet roll holder has a spring-loaded middle piece,<br />
so it can be used with nearly every standard holder.<br />
Seen at: www.bestel.nl<br />
Remote-controlled golf ball<br />
Just when you thought you’d seen it all! You<br />
may wonder how anyone came up with the<br />
idea <strong>of</strong> a remotely controlled golf ball, but it’s<br />
mainly intended as a sort <strong>of</strong> practical joke.<br />
Suppose you’re golfing with a friend, and he<br />
suddenly sees his golf ball making strange<br />
lurching motions. You know the answer: you<br />
swapped a remotely controlled ball for his<br />
real ball.<br />
You can use the remote control to cause the<br />
ball to swing to the right or left while it’s rolling.<br />
Just the thing<br />
for golfers with a<br />
healthy sense <strong>of</strong><br />
humour!<br />
Seen at: www.<br />
iwantone<strong>of</strong>those.com<br />
Flexible keyboard<br />
With this unusual keyboard, which is not only flexible and waterpro<strong>of</strong><br />
but also features trendy blue illumination, you’re immune to just about<br />
everything. It simply shrugs <strong>of</strong>f c<strong>of</strong>fee,<br />
bread crumbs and tobacco residues.<br />
An occasional rinse under the tap is<br />
enough to keep it looking as good as<br />
new. It will last for years if you take<br />
good care <strong>of</strong> it, and it’s great with<br />
a laptop – just roll it up and pack it<br />
away.<br />
Seen at: www.usbgeek.com<br />
Mini UFO<br />
If you always wanted to pilot a<br />
UFO, here’s your chance. The X-<br />
UFO consists <strong>of</strong> a thin frame with four propellers, along with the<br />
control and receiver electronics you need to operate it. It is gyroscopically<br />
stabilised in flight.<br />
The X-UFO is made from ultra-lightweight carbon fibre and EPP<br />
foam. Four LEDs (one red and three blue) not only help you keep<br />
track <strong>of</strong> the X-UFO, but also give it an unworldly appearance.<br />
The X-UFO comes with a four-channel proportional R/C unit.<br />
Seen at: www.gadgethouse.nl<br />
Illuminated toilet seat<br />
Are you always irritated by the dim<br />
lighting in the WC when you have<br />
to use it in the wee hours? And does<br />
you wife always complain <strong>that</strong> you<br />
leave the toilet seat up after you use<br />
it at night?<br />
The intelligent LavNav toilet light puts<br />
an end to all these problems. After<br />
you fit this tiny light to the bottom <strong>of</strong><br />
the toilet lid, it automatically illuminates the toilet bowl discreetly when<br />
you approach the toilet. And so you don’t forget whether the toilet seat<br />
is raised or lowered, the lamp has two different colours. green means<br />
it’s OK to sit down, while red means watch out, the seat’s still up!<br />
Seen at: www.gadgets.co.uk<br />
Colourful loudspeakers<br />
The Lightwave loudspeakers are small spherical loudspeakers made from transparent plastic <strong>that</strong><br />
change colour in rhythm with the music. They also have beat detection.<br />
Listeners can choose from three different colour patterns or a specific constant colour, or they can<br />
let the colours respond to the music.<br />
The speakers are approximately 10 cm in diameter, and the built-in amplifier delivers 5 W<br />
PMPO. They are an ideal complement to an MP3 player or a portable CD player.<br />
Seen at: www.gadgets.uk<br />
15
info & market gadgets & musthaves<br />
Hovering globe<br />
Shake those numbers!<br />
You’re probably already familiar with pocket torches<br />
<strong>that</strong> you shake to generate the necessary energy.<br />
The same principle has now been applied<br />
to pocket calculators. The little calculator<br />
shown here has a small tube at the top<br />
with a magnet inside <strong>that</strong> can move<br />
back and forth. When you shake the<br />
calculator, a coil surrounding the tube<br />
generates enough electrical energy from the<br />
moving magnet to power the calculator for a<br />
short while. That’s naturally something else than a<br />
calculator <strong>that</strong> runs on solar cells or uses water as a<br />
source <strong>of</strong> energy.<br />
Seen at: www.gadgets.co.uk<br />
It’s still something special to see<br />
a metal globe hovering in the air<br />
thanks to a magnetic field. Here a<br />
bit <strong>of</strong> electronics and a coil are used<br />
to attract the globe just enough to<br />
keep it hovering in the air. Various<br />
models are available. Last year we<br />
had a very modern one, and this<br />
time we chose an ‘antique’ model<br />
with a nice 20-cm globe. The base<br />
<strong>of</strong> the copper-coloured frame houses<br />
a full-fledged microcontroller <strong>that</strong> adjusts the magnetic<br />
field 16,000 times per second.<br />
Seen at: www.gadgets.co.uk<br />
USB slippers<br />
USB rocket launcher<br />
This article is full <strong>of</strong> all sorts <strong>of</strong><br />
gadgets with USB interfaces, but<br />
this is really the best <strong>of</strong> the lot.<br />
This miniature rocket launcher<br />
has a rocket holder with three<br />
foam-rubber rockets. You can<br />
use the included s<strong>of</strong>tware (Mac<br />
and PC versions) to aim the rockets<br />
horizontally and vertically<br />
and then fire them. The propulsive<br />
force is provided by several<br />
springs in the rocket holder, and<br />
the range is approximately 3<br />
metres.<br />
This rocket launcher has become so popular <strong>that</strong><br />
hackers have already developed modified s<strong>of</strong>tware<br />
for it. Several successor models have also<br />
been sighted already.<br />
Seen at: www.gadgets.co.uk<br />
Roll-up keyboard<br />
If you <strong>of</strong>ten sit in front <strong>of</strong> your computer until the wee<br />
hours, it can get pretty uncomfortable sometimes, especially<br />
during the cold season. However, you can avoid cold feet with<br />
these USB-powered electric slippers. These fluffy slippers can be<br />
connected to any computer with a USB port (PC or Mac) or even a<br />
game console. The heating element is washable, and it warms the<br />
slippers to a maximum temperature <strong>of</strong> 48 °C. Now <strong>that</strong>’s comfort!<br />
One caution: make sure your computer has enough USB ports<br />
and a hefty power supply, since otherwise it probably won’t to be<br />
able to handle all these USB gadgets.<br />
Seen at: www.usbgeek.com<br />
Electronic Lederhose<br />
This pair <strong>of</strong> electronic Lederhose (leather shorts) comes from the<br />
Bavarian clothing manufacturer Lodenfrey. This traditional south-German<br />
garment is fitted with an MP3 player with 512 MB<br />
<strong>of</strong> memory and a built-in (or should<br />
we say sewn-in) control panel. It also<br />
has a handsfree function for your<br />
mobile phone. Now you can slap<br />
your thighs, listen to music and make<br />
phone calls all at the same time.<br />
Seen at: www.lodenfrey.de<br />
This keyboard (the musical kind) has 49 keys and a USB port (which<br />
is where it draws its operating power) along with another convenient<br />
feature: your can roll it up. That’s something keyboard players who are<br />
familiar with normal ‘hardcase’ keyboards will certainly appreciate.<br />
Especially since this flexible USB keyboard can hold its own<br />
against its space-gobbling cousins. The keyboard<br />
features eight percussion instruments,<br />
demo songs, vibrato and other effects, a<br />
metronome, and much more. You can<br />
also compose your own rhythms if<br />
you want. The beat can be adjusted<br />
from a sedate 40 beats per minute<br />
to a nerve-wracking 208.<br />
Seen at: www.usbgeek.com<br />
High-tech ballpoint pen<br />
This is something we all need! Now<br />
you don’t have to chew on your pencil<br />
during a drawn-out press conference.<br />
Instead, you can listen to relaxing<br />
music with this high-tech MP3 ballpoint<br />
pen. Thanks to its generous<br />
storage capacity <strong>of</strong> 512 MB or 1 GB,<br />
the pen is also suitable for long meetings.<br />
After you’ve listened to all the<br />
music, you can simply switch on the<br />
built-in FM radio. If somebody happens<br />
to say something interesting,<br />
the built-in microphone will pick it<br />
up nicely for you, so<br />
you don’t have to miss<br />
anything. The rechargeable<br />
lithium-ion<br />
battery is good for 7<br />
hours <strong>of</strong> operation.<br />
Seen at: www.usbgeek.com<br />
16 elektor electronics - 12/2006
Pleasant scents<br />
You know the type: glued to the computer day<br />
and night while churning out code at the rate<br />
<strong>of</strong> several pages a minute. This talent is <strong>of</strong>ten<br />
accompanied by sleep deficiency, personal<br />
hygiene <strong>that</strong> leaves something to be desired,<br />
and a penetrating musty odour. To help camouflage<br />
the aroma <strong>of</strong> canned cola and<br />
ambulant pizza leftovers, we recommend this<br />
USB-powered aroma dispenser as a suitable<br />
gift. Citronella and anise, camphor and orange-peel<br />
oil are mind-expanding, so they help with debugging.<br />
Seen at: www.usbgeek.com<br />
Binary clock<br />
12/2006 - elektor electronics<br />
Overclock your<br />
brain<br />
Overclocking CPUs is old<br />
news by now – the new rage<br />
is overclocking the grey matter<br />
between your ears. This<br />
gadget provides especially intensive training<br />
<strong>of</strong> your grey nerve cells. With this device and<br />
a bit <strong>of</strong> practice, you can significantly boost<br />
the ‘clock frequency’ <strong>of</strong> your brain. It trains<br />
your assimilation speed. We’ve heard <strong>that</strong> our<br />
boss has already ordered a thousand or so.<br />
Seen at: http://shop.elv.de<br />
Seen enough <strong>of</strong> those omnipresent LCD<br />
clocks <strong>that</strong> show the time in hours and<br />
minutes with painstaking precision?.<br />
How about a clock <strong>that</strong> displays the time<br />
using blue LEDs, and what’s more in<br />
binary form? That makes checking the<br />
time a mental exercise, since the six columns<br />
correspond to hours, minutes and<br />
seconds, each in the form <strong>of</strong> tens and<br />
units. The time displayed by the clock in<br />
the photo is 12 hours, 1 minute and 47<br />
seconds. The LED brightness can be set<br />
to three different levels. Of course, as an<br />
electronics whiz you’ll master this new<br />
way <strong>of</strong> telling time in only a couple <strong>of</strong><br />
minutes.<br />
Seen at: http://www.bestel.nl<br />
Heated gloves<br />
Suppose you’re sitting in the Trans-Siberia Express on<br />
your way to an important presentation on drilling for<br />
oil. Just when you want to run through your PowerPoint<br />
presentation again, the train’s heating system fails. No<br />
problem – you simply slip on these USB-powered heated<br />
gloves and carry on. Incidentally, they match nicely with<br />
the USB slippers described in this article. However, in this<br />
case we recommend <strong>that</strong> you<br />
at least purchase a reserve battery,<br />
since otherwise you could<br />
easily find yourself sitting with<br />
cold feet, cold hands, and a<br />
blank screen.<br />
Seen at: www.usbgeek.com<br />
Water-powered calculator<br />
Following in the steps <strong>of</strong> pocket calculators powered by<br />
AC adapters, batteries and solar cells comes the most<br />
ecologically responsible model yet. It doesn’t run on alcohol,<br />
but instead on water, which explains its name: H2O.<br />
It goes for several weeks on just a few drops. When it<br />
doesn’t want to work any more, just fill it up under the tap<br />
and you’re all set for several more weeks. Handy, ecological,<br />
and economical – and above all a lot <strong>of</strong> fun!<br />
Seen at: www.ledindon.com<br />
H Racer: a hydrogen-powered car<br />
The first car fully powered by hydrogen: <strong>that</strong>’s the technology<br />
<strong>of</strong> the future! Unfortunately, this model is rather small,<br />
but the 21st century is still young. The H Racer is a fullfledged<br />
demonstration <strong>of</strong> a hydrogen propulsion system. A<br />
solar cell supplies the energy to produce the hydrogen (H),<br />
and the transparent housing lets you easily see what happens:<br />
blue LEDs illuminate the tiny bubbles <strong>of</strong> oxygen (O2)<br />
<strong>that</strong> are expelled from the water reservoir.<br />
Seen at: www.latestbuy.com.au<br />
Cubite speaker and USB hub<br />
We’d be lost without USB in this world, and USB<br />
hubs are at least equally indispensable. The Cubite<br />
Speaker USB hub is a stylishly fashioned box<br />
<strong>that</strong> houses not only an excellent speaker for your<br />
PC, but also a USB hub with ports for your webcam,<br />
MP3 player, memory stick and digital camera.<br />
The speaker has a large volume knob and two<br />
smaller knobs to adjust the treble and bass. It is<br />
powered from the USB port, so it doesn’t need an<br />
external power supply (or any additional s<strong>of</strong>tware).<br />
Seen at: www.iwantone<strong>of</strong>those.com<br />
17
info & market enclosures<br />
Tightly Packed<br />
Enclosures and front panels<br />
Thijs Beckers<br />
There are an incredible number <strong>of</strong> options these days for the safe ‘packing up’ <strong>of</strong> electronic<br />
circuits. Open any catalogue from any well-known mail-order company and you will get an<br />
impression <strong>of</strong> the extensive range on <strong>of</strong>fer. This article gives an overview <strong>of</strong> the different<br />
types with their particular characteristics and provides hints as to how you can make a<br />
pr<strong>of</strong>essional looking front panel yourself.<br />
From an economic and marketing perspective, the enclosure,<br />
including the front panel, <strong>of</strong> commercial equipment<br />
is very important for the manufacturer. Equipment <strong>that</strong><br />
does not look attractive will sell poorly, <strong>of</strong> course, and<br />
is nearly impossible to extol its virtues in advertisements.<br />
So it is logical <strong>that</strong> much time and effort is spent on the<br />
design <strong>of</strong> these enclosures. An additional consideration<br />
is the ergonomics <strong>of</strong> equipment <strong>that</strong> has many operating<br />
controls. The design <strong>of</strong> the enclosure is then already taken<br />
into account during the development <strong>of</strong> the circuit.<br />
This is usually not the case for prototypes, small (handmade)<br />
production runs and home-built circuits. Of course,<br />
the marketing aspect is not a consideration here either.<br />
Specific characteristics, such as extra heavy-duty waterpro<strong>of</strong><br />
and explosion resistant boxes, are a little bit over<br />
the top for the average home project. A standard box is<br />
usually good enough. But <strong>that</strong> does not distract from the<br />
fact <strong>that</strong> appearance and function certainly also do play<br />
a role in your own circuits. With a little bit <strong>of</strong> searching<br />
for a nice and appropriate enclosure and a little bit <strong>of</strong> ef-<br />
fort for a front panel you can definitely make a nice looking<br />
piece <strong>of</strong> equipment <strong>that</strong> would not look out <strong>of</strong> place<br />
when displayed in the average electronics shop window.<br />
With a clean design and your own logo on the front panel<br />
it will look like the real thing.<br />
Making a choice<br />
For prototypes you usually choose from a few types <strong>of</strong><br />
enclosures <strong>that</strong> may optionally conform to some standard,<br />
(see inset Industrial Enclosures). For each design you<br />
will look at what type <strong>of</strong> enclosure suits best. There are a<br />
number <strong>of</strong> different types <strong>of</strong> enclosures <strong>that</strong> may be categorised<br />
as follows:<br />
1. 19-inch enclosures, which can be easily built into, or<br />
removed from, a standard rack or industrial box.<br />
2. Enclosures <strong>that</strong> are deliberately sized for the common<br />
‘Euro format’ PCB.<br />
18 elektor electronics - 12/2006
3. Console enclosures with a tailored front panel or (sloping)<br />
top for control or mixing panels.<br />
4. Small enclosures with a built-in mains plug, which<br />
plugs into a power point just like a mains power adapter.<br />
5. Enclosures for handheld applications, such as<br />
multimeters.<br />
6. Enclosures for DIN rail systems, which are commonly<br />
used in an industrial environment.<br />
A few <strong>of</strong> the factors <strong>that</strong> are important for the type <strong>of</strong><br />
enclosure are <strong>of</strong> course the size, safety, construction material,<br />
method <strong>of</strong> mounting and – mainly important in industrial<br />
applications – the NEMA and/or IP classification [1].<br />
The size obviously depends on the components <strong>that</strong> have<br />
to fit in the enclosure, together with the connection and<br />
mounting options, internal and external access, thermal<br />
conditions and potential future extensions. The material<br />
selected needs to be able to withstand the conditions <strong>that</strong><br />
the enclosure will be subjected to at the location at which<br />
it will be used. Considerations are corrosion resistance<br />
and rigidity requirements. The NEMA and/or IP classification<br />
is an industrial standard for the protective characteristics<br />
<strong>of</strong> an enclosure. Tables 1 and 2 in the inset Industrial<br />
Enclosures give an overview <strong>of</strong> these two common<br />
protection classifications.<br />
Machining<br />
The internal electronics will, in all likelihood, be connected<br />
to the outside world via cables and plugs. This<br />
requires a number <strong>of</strong> plugs and contact points, which usually<br />
requires some machining <strong>of</strong> the enclosure.<br />
In addition, the operating buttons need to be given a<br />
logical position, generally on the front panel. The front<br />
panel usually demands the most attention. To make an<br />
attractive aluminium front panel, complete with labelling,<br />
requires a fair amount <strong>of</strong> equipment (drills, routers,<br />
screen printer, sander, etc.) and the process is not easy.<br />
Also, if you only need to do these things every once in a<br />
while it is not worthwhile to invest in the required equipment.<br />
There are a number <strong>of</strong> companies <strong>that</strong> specialise<br />
in the manufacture <strong>of</strong> front panels, such as the German<br />
company Schaeffer [2], the American Internet company<br />
eMachineShop [3], the English company CTL-Components<br />
[4], the international company Elma [5] and the<br />
Dutch company Antronics [6]. Schaeffer and eMachine-<br />
Shop even <strong>of</strong>fer their own (free!) s<strong>of</strong>tware, which makes<br />
it easy to draw your own design. This design can then<br />
be sent to the manufacturer who will then machine and<br />
12/2006 - elektor electronics<br />
screen print the front panel. In this way you can obtain a<br />
pr<strong>of</strong>essional looking front panel.<br />
Do it yourself<br />
The specialist equipment <strong>that</strong> is required for this machining<br />
has its price, <strong>of</strong> course. This is <strong>of</strong>ten clearly noticed<br />
from the amount <strong>of</strong> money you have hand over for a custom<br />
manufactured front panel. A cheaper solution is the<br />
self-adhesive, transparent film <strong>that</strong> can be printed with a<br />
laser printer. This film gives only limited protection from<br />
scratches and gives a somewhat dull result. The latter can<br />
be improved with some plastic spray.<br />
In addition to the special film for laser printers there is<br />
also the overhead transparency for inkjet printers. This<br />
Case manufacturers<br />
Manufacturer Website<br />
ABB www.abb.nl<br />
APW www.apw.com<br />
Bernstein www.bernstein-ag.de<br />
Bopla www.bopla.de<br />
Boss www.boss-enclosures.co.uk<br />
Box www.boxenclosures.com<br />
Cooper www.b-line.com<br />
Deltron Emcon www.deltron-emcon.com<br />
Dold www.dold.com<br />
Erni www.erni.com<br />
Eurobox www.euroboxenclosures.com<br />
Fibox www.fibox.nl<br />
Himel www.himelenclosures.com<br />
Hammond Manufactoring www.hammfg.com<br />
Lawtronics www.lawtronics.co.uk<br />
Monacor www.monacor.nl<br />
Moeller benelux.moeller.net/nl<br />
OKW www.okw.com<br />
Pactec www.pactecenclosures.com<br />
Retex www.retex.es<br />
Rittal www.rittal.nl<br />
Rolec www.rolec.de<br />
ROSE Systemtechnik www.rose-pw.de<br />
Sarel www.sarel.nl<br />
Schr<strong>of</strong>f www.schr<strong>of</strong>f.co.uk<br />
Serpac www.serpac.com<br />
Spelsberg www.spelsberg.nl<br />
TEKO www.tekoenclosures.com<br />
VERO www.vero-electronics.com<br />
Weidmüller www.weidmuller.nl<br />
19
info & market enclosures<br />
Table 1: Description degrees <strong>of</strong> protection<br />
to DIN EN 60529 (VDE 0470) (IP-type)<br />
Number<br />
Degrees <strong>of</strong> protection for people<br />
and solid objects (first number)<br />
0 No protection No protection<br />
1<br />
2<br />
3<br />
4<br />
5<br />
6<br />
7 -<br />
8 -<br />
9 -<br />
Protection against solid objects greater than 50 mm<br />
diameter<br />
Protection against solid objects greater than 12 mm<br />
diameter<br />
Protection against solid objects greater than 2.5 mm<br />
diameter<br />
Protection against solid objects greater than 1 mm<br />
diameter<br />
Completely protected against accidental touch, partially<br />
against dust<br />
Completely protected against accidental touch and<br />
against dust<br />
Table 2: NEMA standard for enclosures<br />
Degrees <strong>of</strong> protection against water<br />
(second number)<br />
Vertically falling drops <strong>of</strong> water do not cause damage<br />
Drops <strong>of</strong> water with up to 15° from vertical do not<br />
cause any damage<br />
Drops <strong>of</strong> water with up to 60° from vertical do not<br />
cause any damage<br />
Splashing water from any direction does not cause<br />
any damage.<br />
Low pressure water jets from any direction do not<br />
cause any damage<br />
Strong jets <strong>of</strong> water do not cause any damage<br />
Water does not cause any damage if the enclosure is<br />
submerged by 0.15-1 m<br />
Water does not cause any damage if the enclosure is<br />
submerged by a specified amount<br />
Water under high pressure from any angle does not<br />
cause any damage<br />
NEMA<br />
standard<br />
Description<br />
NEMA 1<br />
Enclosures constructed for indoor use to provide a degree <strong>of</strong> protection to personnel against incidental contact<br />
with the enclosed equipment and to provide a degree <strong>of</strong> protection against falling dirt.<br />
NEMA 2 As NEMA 1, and to provide a degree <strong>of</strong> protection against dripping and light splashing <strong>of</strong> liquids.<br />
Enclosures constructed for either indoor or outdoor use to provide a degree <strong>of</strong> protection to personnel<br />
NEMA 3<br />
against incidental contact with the enclosed equipment; to provide a degree <strong>of</strong> protection against falling dirt,<br />
rain, sleet, snow, and windblown dust; and <strong>that</strong> will be undamaged by the external formation <strong>of</strong> ice on the<br />
enclosure.<br />
NEMA 3R As NEMA 3, except no protection against dust<br />
NEMA 3S As NEMA 3, and in which the external mechanism(s) remain operable when ice laden<br />
NEMA 4<br />
As NEMA 3, and hose-directed water and <strong>that</strong> will be undamaged by the external formation <strong>of</strong> ice on the<br />
enclosure<br />
NEMA 4X As NEMA 4, and protected against corrosion<br />
NEMA 5 As NEMA 2, but protection against airborne dust, lint, fibers<br />
NEMA 6 As NEMA 4, and protected against water during occasional temporary submersion at a limited depth<br />
NEMA 6P As NEMA 6, but protected against water during prolonged submersion at a limited depth<br />
Enclosure for indoor use at locations specified as Class I, Group A, B, C and D (refer National Electrical Code,<br />
NEMA 7 NEC) withstands pressure caused by internal explosion and prevents the ignition if explosive gasses. Also internal<br />
heat does not cause danger to the environment<br />
NEMA 8 As NEMA 7, enclosure submerged in oil<br />
NEMA 9<br />
Enclosures for indoor use at locations specified as Class II, Group E, F en G (refer NEC). Protected against<br />
dust, internal<br />
NEMA 10 over-heating does not create an explosion hazard for surrounding gasses<br />
NEMA 11 Suitable for use in corrosive environments, enclosure submerged in oil<br />
NEMA 12 As NEMA 5, for industrial use<br />
NEMA 12K As NEMA 12, with knock-outs<br />
NEMA 13 As NEMA 5, also protected against oil and non-corroding cooling fluids<br />
20 elektor electronics - 12/2006
film is printed on the reverse side. First stick clear, doublesided<br />
adhesive foil (available in stationery shops) to the<br />
front panel and then the mirror-printed film. In this way<br />
the ink is also protected against scratches. In colour and<br />
using at least 300 dpi it will also look good and is not<br />
expensive.<br />
Before sticking the film to the front panel, you first have<br />
to make the holes in it. Tip: it is better to deburr the front<br />
side <strong>of</strong> small holes once the film is in place. The opening<br />
in the film will then have the correct diameter at the same<br />
time. You can easily cut square or large openings in the<br />
film with a sharp knife.<br />
On (ugly) plastic front panels you can use the standard<br />
sticker sheets for the front panel layout. Or alternatively,<br />
you can use standard paper and the above-mentioned<br />
double-sided adhesive foil. The colour <strong>of</strong> the paper<br />
will obviously determine the colour <strong>of</strong> the front <strong>of</strong> the<br />
enclosure.<br />
Tip: a ‘membrane keyboard’ can be made quite easily<br />
with an additional printed film between the front panel<br />
and the adhesive foil. Behind the printed keyboard is an<br />
opening in the front panel <strong>that</strong> could contain miniature<br />
pushbuttons. The front panel can be made from cheap<br />
materials, <strong>of</strong> course.<br />
Drilling<br />
To drill small round holes, twist drills are obviously the<br />
best choice. A good drill stand is very handy and a drill<br />
press is ideal. If you mark the locations <strong>of</strong> the holes with a<br />
centre punch then the tip <strong>of</strong> the drill will not wander if you<br />
are drilling free-hand. Large, round holes are best made<br />
by first drilling a smaller hole and then enlarging it with a<br />
reamer.<br />
Rectangular openings are a little harder. With simple tools<br />
it is best to proceed as follows: drill, within the cutout, a<br />
hole <strong>that</strong>’s large enough for the saw blade <strong>of</strong> a hacksaw.<br />
Now cut the material to within about 0.5 to 1 mm <strong>of</strong> the<br />
desired opening. Remove the last little bit with a file.<br />
If you are using thin sheet for the enclosure it is better to<br />
use a jigsaw for this, instead <strong>of</strong> a hacksaw. Sandwich<br />
the thin sheet with thin plywood or something similar, <strong>that</strong><br />
you cut at the same time. In this way the thin sheet will not<br />
bend. Leave the plywood in place also when filing.<br />
Industrial enclosures<br />
12/2006 - elektor electronics<br />
For very narrow openings (for slide potentiometers, for<br />
example), drill a number <strong>of</strong> small holes next to each other<br />
(with a good drill press and a short drill these holes can<br />
even overlap). With a little key file you can then remove<br />
the remaining unwanted material.<br />
A nice result<br />
Both in industry as well as for your own applications, the<br />
purpose <strong>of</strong> the enclosure is mainly to protect the electronics<br />
components from permanent damage caused by<br />
moisture, chemicals and dust. At the same time it provides<br />
a protective function for the environment. This can be protection<br />
to prevent the accidental touching <strong>of</strong> hazardous<br />
voltages but also for EMI.<br />
A second good reason to package a circuit is to make it<br />
look more attractive. The average user is not fascinated<br />
with a collection <strong>of</strong> components on a circuit board. A<br />
good front panel layout will also make it immediately obvious<br />
what each operating button does and how to use<br />
the equipment.<br />
In industry there is <strong>of</strong>ten great emphasis on the physical<br />
appearance. That is why specifically designed enclosures<br />
are <strong>of</strong>ten used, <strong>that</strong> are evaluated at an early stage <strong>of</strong> the<br />
The material from which an enclosure is made determines its physical properties for the most part. Plastic is usually chosen for<br />
portable applications, because <strong>of</strong> its weight and wear resistance. In other applications other factors such as mechanical strength,<br />
electrical and thermal resistance and fire resistance are more important. Tables 1 and 2 show the protection classification <strong>that</strong><br />
an enclosure can <strong>of</strong>fer for two common standards.<br />
To provide protection against EMI, the enclosures can be coated with, for example, carbon, aluminium or copper. This is very important,<br />
in particular for sensitive electronics, if the circuit is to operate without problems. Up to 1 MHz you can use electronic filters<br />
and metal screens. Above <strong>that</strong> frequency a decent Faraday cage is required. To also keep out magnetic fields, an aluminium<br />
or steel sheet enclosure is inadequate. This application requires special µ-metal.<br />
A number <strong>of</strong> common materials for plastic enclosures are polycarbonate, polystyrene, polypropylene and ABS. Some enclosures<br />
are transparent for IR. This is very handy for remote controls, for example. And there are many more special properties along<br />
these lines.<br />
If we select a metal enclosure, we can make a distinction between aluminium, galvanised steel sheet, stainless steel and a<br />
number <strong>of</strong> other materials. A metal enclosure has the advantage <strong>that</strong> it will largely block electric fields, <strong>of</strong> course.<br />
21
info & market enclosures<br />
Advertisement<br />
overall design. The initial costs <strong>of</strong> a newly designed enclosure<br />
may be quite high, but large numbers reduce the<br />
price per enclosure considerable. Buying large numbers<br />
<strong>of</strong> standard enclosures would be much more expensive<br />
in the end, because the various holes still need to be<br />
machined.<br />
If you are working with prototypes then the considerations<br />
are completely different <strong>of</strong> course. It is <strong>of</strong>ten the case<br />
<strong>that</strong> the circuit is already finished and you only need an<br />
enclosure <strong>that</strong> will fit everything. With the directions given<br />
above, it is entirely possible to make a front panel <strong>that</strong><br />
does not have to look inferior to <strong>that</strong> <strong>of</strong> a pr<strong>of</strong>essional<br />
piece <strong>of</strong> equipment.<br />
Weblinks:<br />
[1] www.nema.org<br />
[2] www.schaeffer-ag.de<br />
[3] www.emachineshop.com<br />
[4] www.ctl-components.com<br />
[5] www.elma.de<br />
[6] www.supermoduul.nl<br />
(060298-I)<br />
All photographs: Conrad Electronics.<br />
GLOSSARY<br />
ABS: Acrylonitrile Butadiene-Styrene. Rigid man-made fi-<br />
bre with very little tendency to shrink.<br />
EMI: Electromagnetic Interference. Undesired interference<br />
from electromagnetic fields.<br />
NEMA: National Electronic Manufacturers Association,<br />
American association which represents the designers<br />
and manufacturers <strong>of</strong> electronic equipment.<br />
IP: Ingress Protection, protection against access or touch.<br />
Stainless Steel: alloy <strong>of</strong> iron, chromium and carbon<br />
which forms a layer <strong>of</strong> chromium-oxide on the outside<br />
so <strong>that</strong> the material does not corrode any further.<br />
µ-metal (mu-metal): Nickel-iron alloy with 2% copper<br />
and molybdenum with a very high magnetic permeabi-<br />
lity. As a result it is very suitable for blocking magnetic<br />
22 elektor electronics - 12/2006<br />
fields.
milling hands-on<br />
next month in elektor electronics<br />
Multi-Purpose<br />
3D Milling Machine<br />
Ready to go kit<br />
specially for Elektor readers<br />
In next month’s issue, Elektor<br />
– in cooperation with a renowned<br />
manufacturer – presents an extraordinary<br />
project many readers have eagerly awaited<br />
for many years: a real 3D milling machine<br />
for home construction from a kit.<br />
Although we can’t go into<br />
details right now, we also<br />
can’t resist printing a photograph<br />
<strong>of</strong> all metal parts<br />
<strong>that</strong> go into building<br />
the Elektor 3D Milling<br />
Machine. Tell us if<br />
we’re wrong when claiming<br />
<strong>that</strong> this is the first affordable<br />
tabletop milling<br />
machine for anyone doing<br />
precision mechanical<br />
work, be it for electronics,<br />
electromechanical applications<br />
or modelling.<br />
The machine is versatile<br />
in <strong>that</strong> it can be used not<br />
just for the production <strong>of</strong><br />
front panels and 3D models,<br />
but also to mill your<br />
own PCBs at home, at incredible<br />
precision.<br />
The net X-Y working surface<br />
<strong>of</strong> the milling machine<br />
is 300×400 mm,<br />
while the Z (vertical)<br />
range is specified as<br />
100 mm.<br />
A complete kit<br />
The Elektor 3D Milling<br />
Machine comes as a<br />
comprehensive kit con-<br />
12/2006 - elektor electronics<br />
taining all metal parts (see photograph), the stepper motors,<br />
two ready-assembled circuit boards for the drive electronics,<br />
a spindle motor with the associated clamping device and a<br />
base plate. The kit comes with special control s<strong>of</strong>tware <strong>that</strong>’s<br />
remarkable for its user-friendliness and general structure.<br />
All this is supplied to you no less than 700 pounds (approx.<br />
1,000 euros) cheaper than a comparable instrument.<br />
Thanks to the article in the January 2007 issue and the supplied<br />
manual, construction <strong>of</strong> the Elektor Milling Machine<br />
is straightforward. Our serious advice is not to miss this<br />
unique project in next month’s issue!<br />
(060232-a)<br />
23
hands-on sw receiver<br />
Shortwave Cap<br />
0-30 MHz SSB/CW/FM/AM/DRM<br />
based on DDS and RISC<br />
Gert Baars<br />
As a special treat for all radio amateurs we present a general-coverage AM/FM/SSB receiver with a<br />
wide range <strong>of</strong> features, which uses a DDS chip in the VFO section and also has a DRM output <strong>that</strong> can<br />
be fed into a computer. The receiver is controlled by a modern 8-bit Atmel RISC processor. The frequency<br />
readout is on a clearly legible 7-segment LED display.<br />
This receiver can be seen as the successor<br />
to the receiver published in<br />
January 1999. The experience gained<br />
with this predecessor (which, incidentally,<br />
has given a lot <strong>of</strong> listening enjoyment<br />
to many constructors), has been<br />
used to develop a more advanced RF<br />
receiver.<br />
The best parts <strong>of</strong> the original design<br />
have been kept, such as the Intermediate<br />
Frequency (IF) and double conversion<br />
superheterodyne sections. This<br />
new receiver also has some new functions<br />
up its sleeve. For example, there<br />
is a DRM output <strong>that</strong> can be fed to a PC<br />
for decoding. The tuning resolution has<br />
also been improved to provide better<br />
fine-tuning, for example for SSB reception.<br />
This makes the frequency readout<br />
more precise and a BFO is no longer<br />
necessary.<br />
Some thought has also gone into the<br />
aerial input stage, where an active input<br />
circuit makes the need for a long<br />
wire aerial superfluous.<br />
We’ve also used a number <strong>of</strong> contemporary<br />
components, such as a DDS<br />
chip <strong>that</strong> is used as a VFO; the receiver<br />
is controlled by a modern 8-bit Atmel<br />
RISC processor.<br />
In the design our preference went to 7segment<br />
LED displays for the frequen-<br />
cy readout, which look better and are<br />
easier to read than a standard LCD.<br />
This receiver has three switchable<br />
bandwidths, each <strong>of</strong> which is optimised<br />
for use with one <strong>of</strong> the possible<br />
reception modes (AM, FM, USB, LSB or<br />
DRM).<br />
The sensitivity and the ability to deal<br />
with large input signals have been improved<br />
for the reception bands <strong>of</strong> this<br />
receiver, largely through the use <strong>of</strong> a<br />
diode-ring mixer as the first mixer.<br />
The receiver itself generates very little<br />
noise. This can be clearly heard when<br />
you aren’t tuned into a station and connect<br />
an aerial: the noise then increases<br />
markedly.<br />
A sensitivity better than 1 µV makes<br />
little sense at lower frequencies<br />
(roughly below 7 MHz), since it isn't the<br />
weak signals <strong>that</strong> make reception difficult,<br />
but rather the strong signals <strong>that</strong><br />
swamp the others. A higher gain just<br />
doesn't make sense under these circumstances.<br />
Furthermore, you should<br />
find <strong>that</strong> most signals in <strong>that</strong> frequency<br />
range are strong enough to be picked<br />
up, even with a telescopic aerial.<br />
In a nutshell, this is a receiver <strong>that</strong> is<br />
suitable to pick up all broadcast and<br />
amateur bands between 0 and 30 MHz.<br />
The ease <strong>of</strong> operation, its various functions<br />
and its performance are guaran-<br />
teed to provide you with many hours <strong>of</strong><br />
listening enjoyment.<br />
Block diagram<br />
The block diagram (Figure 1) starts<br />
with the aerials. The internal aerial is<br />
followed by a high impedance amplifier<br />
with adjustable gain. This amplifier<br />
isn’t required for an external aerial.<br />
Directly after the aerial switch is a<br />
low-pass filter with a corner frequency<br />
<strong>of</strong> 30MHz. This suppresses any possible<br />
image frequencies and other unwanted<br />
signals. Following this is the<br />
first mixer. Its purpose is to convert<br />
the range <strong>of</strong> 0 to 30 MHz into 45 MHz.<br />
For this we require a VFO frequency <strong>of</strong><br />
45 to 75 MHz. A first IF <strong>of</strong> 45 MHz is<br />
a good choice because the first image<br />
frequencies are 90 MHz away, which<br />
make them easy to suppress.<br />
The VFO signal is produced by a DDS<br />
generator. More details on its operation<br />
can be found in the DDS RF Signal<br />
Generator article <strong>that</strong> was published in<br />
the October 2003 issue. The reference<br />
frequency for this DDS is obtained by<br />
multiplying the 10 MHz crystal oscillator<br />
frequency by a factor <strong>of</strong> three to<br />
obtain 30 MHz. Inside the DDS a PLL<br />
multiplies this signal a further 6 times,<br />
so <strong>that</strong> the internal reference frequency<br />
24 elektor electronics - 12/2006
ture<br />
becomes 180 MHz. Normally the maximum<br />
output frequency <strong>of</strong> the DDS<br />
should be around 40% <strong>of</strong> this reference<br />
frequency. But if we add a better bandpass<br />
filter at the output it is possible to<br />
increase this figure somewhat.<br />
The DDS can now produce frequencies<br />
in 0.04 Hz steps. The required 100 Hz<br />
resolution therefore isn’t a problem.<br />
The DDS is controlled by a microcontroller<br />
<strong>that</strong> also takes care <strong>of</strong> driving<br />
the frequency readout, the scanning <strong>of</strong><br />
the keypad and a rotary controller for<br />
tuning.<br />
A number <strong>of</strong> extra I/O lines take<br />
care <strong>of</strong> the selection <strong>of</strong> the audio<br />
bandwidth and reception mode<br />
(FM/AM/LSB/USB).<br />
After the first mixer is the first IF filter,<br />
which has a bandwidth <strong>of</strong> 15 kHz.<br />
This bandwidth determines the maximum<br />
possible bandwidth <strong>of</strong> the receiver.<br />
This filter suppresses the image frequencies<br />
<strong>of</strong> the second mixer. It also<br />
removes any other unwanted by-products<br />
from the output <strong>of</strong> the first mixer.<br />
The signal now arrives at the second<br />
mixer. This converts the signal into an<br />
IF <strong>of</strong> 455 kHz. It does this using a fixed<br />
local oscillator frequency <strong>of</strong> 44.545<br />
MHz. A frequency <strong>of</strong> 455 kHz was chosen<br />
because this low frequency can<br />
be easily amplified, and also because<br />
12/2006 - elektor electronics<br />
Specifications<br />
•Double conversion superheterodyne receiver - first IF 45 MHz, second IF 455 kHz<br />
Microcontroller control <strong>of</strong> the DDS generator and other functions<br />
•<br />
•<br />
•<br />
•<br />
•<br />
•<br />
•<br />
•<br />
•<br />
•<br />
•<br />
•<br />
Tuning range <strong>of</strong> 0 to 30 MHz in steps <strong>of</strong> 1 kHz or 100 Hz<br />
DRM output, suitable for connection to a PC soundcard<br />
Audio bandwidth <strong>of</strong> 3, 6 or 15 kHz, dependent on the reception mode<br />
Keypad with 16 keys for inputting the frequency, mode and bandwidth<br />
Memory for 64 frequencies, including bandwidth and mode<br />
Synchronous detector for AM<br />
Quadrature detector for FM<br />
Product detector for SSB<br />
Built-in adjustable input amplifier for a telescopic aerial<br />
Approximate sensitivity <strong>of</strong> 1 to 2 µV (without preamp)<br />
Supply voltage <strong>of</strong> 13 to 15 V, max. 650 mA<br />
25
hands-on sw receiver<br />
In the early days <strong>of</strong> Elektor Electronics many types <strong>of</strong> receivers were published<br />
on a regular basis. Due to the relatively high cost <strong>of</strong> semiconductors<br />
in those days these receivers were usually fairly simple designs. As a comparison<br />
we’ll show you a shortwave receiver <strong>that</strong> was published almost 40<br />
years ago in Elektuur magazine. The use <strong>of</strong> a tunnel diode in this design<br />
is <strong>of</strong> particular interest because it was an unusual component at the time.<br />
The construction method was nothing like what we expect these days: some<br />
soldering pins and wires were used to connect all the components together<br />
because it was quite difficult at the time to produce a PCB.<br />
(Note: referring article not available in English)<br />
there are many inexpensive but goodquality<br />
filters available for this muchused<br />
frequency.<br />
The gain <strong>of</strong> the second mixer can be<br />
adjusted automatically or manually.<br />
To prevent overloading the receiver<br />
when very strong SW signals are<br />
picked up via a wire aerial we had to<br />
add a type <strong>of</strong> AGC circuit. Manually reducing<br />
the gain can improve the clarity<br />
<strong>of</strong> SSB signals in the amateur bands,<br />
because this reduces the QRM.<br />
After buffering the signal it reaches<br />
three switches <strong>that</strong> select one <strong>of</strong> three<br />
filters, each with a different bandwidth.<br />
These switches are controlled<br />
by the microcontroller.<br />
The three bandwidths in question are<br />
3, 6 and 15 KHz. 3 kHz is suitable for<br />
SSB, 6 kHz for AM and 15 kHz for FM<br />
and DRM.<br />
After another buffer is the IF amplifier.<br />
This actually consists <strong>of</strong> two amplifiers,<br />
each with an adjustable gain.<br />
This combination can provide a variable<br />
gain up to 80 dB, which is sufficient<br />
to keep the output signal level <strong>of</strong><br />
the IF amplifier constant for both weak<br />
and strong signals. An AGC circuit is<br />
used to adjust this gain automatically.<br />
This adjustment follows the signal fairly<br />
quickly, for example to suppress the<br />
fading <strong>of</strong> AM signals. But for SSB reception<br />
it is made to react more slowly.<br />
The fast ‘attack’ and slow ‘decay’<br />
<strong>of</strong> this AGC circuit improves the audio<br />
quality <strong>of</strong> SSB and CW signals.<br />
The DRM detector takes the IF signal<br />
before it reaches the IF amplifier.<br />
This is because we don’t need much<br />
amplification <strong>of</strong> the signal for this output.<br />
The DRM transmitters are powerful<br />
enough to produce a few hundred<br />
Back in time<br />
Internal and external aerial<br />
This receiver has the facility to accept two different aerials, each <strong>of</strong> which is suitable for different frequency bands.<br />
mV pp before the IF amplifier. This also<br />
avoids any noise from being introduced<br />
by the extra amplifiers.<br />
The DRM detector consists <strong>of</strong> a product<br />
detector with a local oscillator <strong>of</strong><br />
467 kHz. The difference between this<br />
and 455 kHz is 12 kHz, which is filtered<br />
before being made available at<br />
the DRM output. The 10 kHz wide signal<br />
now covers frequencies between 7<br />
and 17 kHz, which is exactly what is<br />
required by the DRM program, Dream.<br />
An AGC circuit is not really necessary<br />
for DRM because the soundcard<br />
and the Dream program can cope with<br />
widely varying signal strengths.<br />
Following the IF amplifier are the AM,<br />
FM and SSB detectors. The AM demodulator<br />
used here is a variation on<br />
the well-known synchronous detector.<br />
The principle <strong>of</strong> operation is <strong>that</strong> the<br />
AM signal is multiplied by an unmodu-<br />
Since even a suspended 20-metre length <strong>of</strong> wire has a higher impedance at low frequencies, an external aerial will work better than an internal<br />
one down to about 500 kHz. For lower frequencies it is better to switch to a telescopic aerial, which also has a high impedance, but is only very<br />
lightly loaded by the pre-amplifier.<br />
The external aerial can be a 10 to 20 metre length <strong>of</strong> wire, suspended between 2 isolators, which in turn should be half a metre away from their<br />
mounting points. These isolators can be easily made from a length <strong>of</strong> PVC tubing. Two pieces around 20 cm long, with holes drilled at the ends<br />
are perfectly suitable. There is nothing special about the wire used for the aerial, as long as it can withstand strong winds and heavy rain.<br />
We would advise against connecting an aerial longer than about 1 metre to the pre-amplifier. This can result in distortion and other interference.<br />
You would also pick up a lot <strong>of</strong> noise. A telescopic aerial or a 50 cm length <strong>of</strong> wire works perfectly well.<br />
26 elektor electronics - 12/2006
lated signal with exactly the same frequency<br />
and phase. This signal can be<br />
extracted using a PLL with a slow control<br />
loop, which keeps the frequency<br />
and phase intact should the AM signal<br />
momentarily fade. This results in<br />
less distortion than would otherwise<br />
occur when the signal fades. It is however<br />
also possible to extract the mix<br />
signal directly from the input signal as<br />
long as the modulation components<br />
are removed first. This is easily done<br />
with the help <strong>of</strong> a limiter. This limiter<br />
provides a mix signal with a constant<br />
amplitude. This results in good quality<br />
AM reception and provides better resistance<br />
to distortion caused by fading<br />
(which occurs in diode detectors).<br />
We have used a quadrature detector for<br />
INT<br />
ANT<br />
EXT<br />
ANT<br />
ANT<br />
GAIN<br />
6 x<br />
INT<br />
EXT<br />
7 SEGMENT DISPLAY<br />
DISPLAY DRIVER<br />
KEYPAD<br />
the FM demodulator. This type <strong>of</strong> detector<br />
is well known for the good quality<br />
audio it produces. The limiter used<br />
in the AM section is also used to supply<br />
a constant amplitude signal to the<br />
FM demodulator. This helps to avoid<br />
distortion caused by very strong input<br />
signals. It also suppresses AM noise<br />
components, which could overload<br />
the detector if their amplitude was too<br />
large. The overall result is a much better<br />
signal to noise ratio.<br />
The actual operation <strong>of</strong> the quadrature<br />
detector is quite straightforward. The<br />
12/2006 - elektor electronics<br />
0 - 30 MHz<br />
45 - 75 MHz<br />
MIX-1<br />
DDS<br />
0 - 30 MHz<br />
45 MHz<br />
RF<br />
GAIN<br />
x 3<br />
TUNING<br />
rotary<br />
encoder<br />
44.545 MHz<br />
10 MHz<br />
MIX-2<br />
LSB/USB<br />
SSB<br />
AM<br />
FM<br />
NARROW<br />
MEDIUM<br />
WIDE<br />
FM signal is multiplied by the same<br />
signal, but with a phase shift. This<br />
phase shift is exactly 90 degrees at the<br />
IF, but increases/decreases for an increase/decrease<br />
in the input frequency.<br />
The multiplier has a corresponding increase/decrease<br />
in its output voltage.<br />
A balanced multiplier is in fact very<br />
similar to an EXOR phase detector.<br />
The SSB detector is a product detector.<br />
If we multiply the USB or LSB signal<br />
with another signal <strong>that</strong> differs in<br />
frequency by 1.5 kHz we obtain the<br />
audio signal. Note <strong>that</strong> the first mixer<br />
creates a mirror image <strong>of</strong> the spectrum<br />
because we’ve using high-side injection,<br />
so USB becomes LSB and vice<br />
versa. The local oscillator used here<br />
is controlled via the microcontroller to<br />
NARROW<br />
MEDIUM<br />
WIDE<br />
455 kHz<br />
3 kHz<br />
455 kHz<br />
6 kHz<br />
455 kHz<br />
15 kHz<br />
S METER<br />
467 kHz<br />
IF AMP<br />
produce either 456.5 or 453.5 kHz. This<br />
way the selection can be made via the<br />
keypad.<br />
The microcontroller selects the required<br />
mode with the help <strong>of</strong> analogue<br />
switches <strong>that</strong> follow each <strong>of</strong> the detectors.<br />
Since the microcontroller controls<br />
both the mode and the bandwidth it<br />
can automatically select the appropriate<br />
bandwidth for each mode.<br />
After the switches is an adjustable<br />
low-pass filter with a steep cut-<strong>of</strong>f.<br />
This suppresses whistles and other interference<br />
caused by nearby stations.<br />
AGC<br />
SLOW<br />
SSB<br />
DRM<br />
OUT<br />
LIMITER<br />
LSB/USB<br />
This comes in very useful when receiving<br />
SSB and CW signals. The corner<br />
frequency can be adjusted from about<br />
500 to 3500 Hz.<br />
To reduce interference from hum and<br />
other low-frequency noise a high-pass<br />
filter is also included, with a corner frequency<br />
<strong>of</strong> 300 Hz.<br />
The last stage is an audio power amplifier.<br />
This has sufficient output power<br />
to drive a 2 W loudspeaker.<br />
Schematic<br />
We should now be familiar with the<br />
general design <strong>of</strong> the receiver. This<br />
makes it a lot easier to interpret the<br />
circuit diagrams in Figures 2, 3 and<br />
4, and not be alarmed by the large<br />
AM DET<br />
SSB DET<br />
90ϒ<br />
456.5 kHz / 453.5 kHz<br />
AM<br />
FM<br />
030417 - 13<br />
Figure 1. The block diagram for the shortwave receiver is fairly elaborate. At the bottom-left you can see the DDS generator and the microcontroller.<br />
FM DET<br />
SSB<br />
VOLUME<br />
500 - 3500 Hz<br />
300 Hz<br />
number <strong>of</strong> components. The blocks<br />
shown in Figure 1 can be found in the<br />
diagrams quite easily.<br />
We start with descriptions <strong>of</strong> the principal<br />
parts in the receiver section <strong>of</strong><br />
Figure 2. At the top-left is the pre-amplifier<br />
for the telescopic aerial. This<br />
consists <strong>of</strong> a two-stage configuration<br />
using low-noise DG MOSFETs (T1/T2).<br />
The first stage provides a high-impedance<br />
input and some gain, the second<br />
stage functions as a 50 Ω driver. The<br />
gain can be adjusted from about +6 to<br />
–20 dB.<br />
AF<br />
27
hands-on sw receiver<br />
28 elektor electronics - 12/2006<br />
L1<br />
330nH<br />
C14<br />
39p<br />
C11<br />
6p8<br />
L2<br />
470nH<br />
C15<br />
150p<br />
C12<br />
15p<br />
L3<br />
330nH<br />
C16<br />
150p<br />
C13<br />
15p<br />
C17<br />
39p<br />
R11<br />
56Ω<br />
L4<br />
100nH<br />
L5<br />
470nH<br />
C18<br />
40p<br />
C19<br />
40p<br />
FL1<br />
45G15B1<br />
L6<br />
150nH<br />
L7<br />
390nH<br />
T3<br />
BF992<br />
R12<br />
470 Ω<br />
C20<br />
10n<br />
C22<br />
150p<br />
C23<br />
10n<br />
R14<br />
47k R13<br />
150k<br />
R15<br />
470 Ω T4<br />
J310<br />
L8<br />
100µH<br />
+9V<br />
C24<br />
100n<br />
C25<br />
100n<br />
C21<br />
100n<br />
L9<br />
820µH<br />
A1<br />
R19<br />
220k<br />
P2<br />
100k<br />
C34<br />
100n<br />
R18<br />
47k<br />
C35<br />
470n<br />
T5<br />
BFR93A<br />
R17<br />
2k2<br />
C28<br />
39p<br />
C29<br />
56p<br />
R16<br />
390k<br />
L10<br />
390nH<br />
L11<br />
100µH<br />
+9V<br />
C33<br />
100n<br />
C30<br />
40p<br />
C27<br />
100n<br />
C26<br />
40p<br />
C31<br />
2p2<br />
C32<br />
10p<br />
X1<br />
44,545MHz<br />
FL3<br />
SFR455H<br />
R23<br />
2k2<br />
D5<br />
BA482<br />
FL4<br />
SFR455E<br />
R24<br />
2k2<br />
D6<br />
BA482<br />
FL2<br />
SFR455J<br />
R22<br />
2k2<br />
D4<br />
BA482<br />
R25<br />
10k<br />
R26<br />
10k<br />
R27<br />
10k<br />
C39<br />
100n<br />
C38<br />
C37<br />
TR1<br />
LMC4202A<br />
R29<br />
100k<br />
R30<br />
220 Ω<br />
R28<br />
150k<br />
T7<br />
J310<br />
C43<br />
100n<br />
C41<br />
1n<br />
L13<br />
100µH<br />
C40<br />
100n<br />
C44<br />
100n<br />
78L09<br />
IC12<br />
C132<br />
100n<br />
+9V<br />
U+<br />
C45<br />
10n<br />
R31<br />
22k<br />
NE612<br />
IC1<br />
OUTA<br />
OUTB<br />
INA<br />
INB<br />
OSC OSC<br />
1<br />
2 5<br />
6<br />
4<br />
8<br />
3<br />
7<br />
C49<br />
270p<br />
C50<br />
330p<br />
X2<br />
CSB470<br />
C46<br />
10n<br />
L14<br />
100µH<br />
C47<br />
100n<br />
C48<br />
100n<br />
+5VD<br />
C51<br />
2n2<br />
C52<br />
1n<br />
R32<br />
5k6<br />
C53<br />
10n<br />
K1<br />
DRM<br />
NE612<br />
IC5<br />
OUTA<br />
OUTB<br />
INA<br />
INB<br />
OSC OSC<br />
1<br />
2 5<br />
6<br />
4<br />
8<br />
3<br />
7<br />
C86<br />
220p<br />
C87<br />
330p<br />
X3<br />
CSB455<br />
C85<br />
10n<br />
L18<br />
100µH<br />
C81<br />
100n<br />
C82<br />
100n<br />
+5VD<br />
C88<br />
22n<br />
C89<br />
8n2<br />
R51<br />
10k<br />
C84<br />
10n<br />
C94<br />
100p<br />
T14<br />
R56<br />
47k R55<br />
10k<br />
C93<br />
100p<br />
T13<br />
BF494<br />
R54<br />
47k R53<br />
10k<br />
C90<br />
100n<br />
R52<br />
2k2<br />
R50<br />
220 Ω<br />
C91<br />
100n<br />
C83<br />
1n<br />
R49<br />
3k9<br />
AD603<br />
IC3<br />
COM<br />
5<br />
7<br />
3<br />
4<br />
2<br />
1<br />
6<br />
8<br />
L16<br />
100µH<br />
C64<br />
100n<br />
C65<br />
100n<br />
C62<br />
100n<br />
R37<br />
3k3<br />
R38<br />
3k3<br />
C63<br />
100n<br />
AD603<br />
IC4<br />
COM<br />
5<br />
7<br />
3<br />
4<br />
2<br />
1<br />
6<br />
8<br />
L17<br />
100µH<br />
C71<br />
100n<br />
C72<br />
100n<br />
C69<br />
100n<br />
R41<br />
3k3<br />
R42<br />
3k3<br />
C70<br />
100n<br />
D7<br />
1N4148<br />
R43<br />
15k<br />
R44<br />
330k<br />
C75<br />
100n<br />
C73<br />
10n<br />
C74<br />
100n<br />
C67<br />
10n<br />
R40<br />
27k<br />
C66<br />
100n<br />
R39<br />
22k<br />
+10V<br />
C76<br />
100n<br />
IC14<br />
78L10<br />
C56<br />
100n<br />
U+<br />
T9<br />
BS170<br />
C77<br />
47µ<br />
C78<br />
100n<br />
T8<br />
BC547B<br />
+10V<br />
R45<br />
4k7<br />
5k<br />
P3<br />
FS<br />
2k5<br />
P4<br />
NUL<br />
+10V<br />
C60<br />
1n<br />
MAR8<br />
IC2<br />
2<br />
4<br />
3<br />
1<br />
C61<br />
1n<br />
R36<br />
68Ω<br />
78L10<br />
IC13<br />
C54<br />
100n<br />
U+<br />
L15<br />
1µH<br />
C55<br />
100n<br />
NE612<br />
IC6<br />
OUTA<br />
OUTB<br />
INA<br />
INB<br />
OSC OSC<br />
1<br />
2 5<br />
6<br />
4<br />
8<br />
3<br />
7<br />
C99<br />
10n<br />
L19<br />
100µH<br />
C95<br />
100n<br />
C96<br />
100n<br />
+5VD<br />
C101<br />
22n<br />
C102<br />
3n9<br />
R58<br />
10k<br />
C103<br />
100n<br />
C100<br />
1n<br />
C97<br />
10n<br />
L20<br />
LMC4100A<br />
C98<br />
33p<br />
NE612<br />
IC7<br />
OUTA<br />
OUTB<br />
INA<br />
INB<br />
OSC OSC<br />
1<br />
2 5<br />
6<br />
4<br />
8<br />
3<br />
7<br />
C108<br />
10n<br />
L21<br />
100µH<br />
C109<br />
100n<br />
C110<br />
100n<br />
+5VD<br />
C111<br />
22n<br />
C106<br />
1n<br />
C107<br />
10n<br />
R60<br />
470 Ω<br />
C112<br />
100n<br />
T10<br />
BF494<br />
T11<br />
BF451<br />
R46<br />
5k6<br />
R47<br />
3k3<br />
R48<br />
5k6<br />
+5VD<br />
C79<br />
100n<br />
C80<br />
100n<br />
R59<br />
4k7<br />
R57<br />
2k2<br />
C105<br />
1n<br />
IC15<br />
78L05<br />
C57<br />
100n<br />
U+<br />
MAX7400<br />
IC8<br />
SHDN<br />
OUT<br />
CLK<br />
COM<br />
OS<br />
IN<br />
7<br />
4<br />
3<br />
5<br />
6<br />
2<br />
8<br />
1<br />
C116<br />
10n<br />
D8<br />
KV1235<br />
C115<br />
100n C118<br />
47n<br />
C119<br />
47n<br />
C120<br />
47n<br />
C121<br />
47n<br />
C122<br />
47n<br />
R62<br />
330k<br />
R63<br />
5k6<br />
C117<br />
100n<br />
C114<br />
1µ<br />
P5<br />
10k<br />
R65<br />
10k<br />
R64<br />
15k<br />
R66<br />
22k<br />
R68<br />
100k R67<br />
100k<br />
R69<br />
47k<br />
C124<br />
470n<br />
LF356<br />
IC9<br />
2<br />
3<br />
6<br />
7<br />
4<br />
1<br />
5<br />
R34<br />
220k<br />
C125<br />
100n<br />
R33<br />
220k<br />
C123<br />
47p<br />
C127<br />
100n<br />
C126<br />
1µ<br />
IC16<br />
78L05<br />
C59<br />
100n<br />
U+<br />
C58<br />
100n<br />
P6<br />
50k<br />
log<br />
LM380N-8<br />
IC10<br />
2<br />
3<br />
7<br />
4<br />
5<br />
6<br />
C128<br />
470µ 25V<br />
R35<br />
2Ω7<br />
C130<br />
100n<br />
C129<br />
220µ<br />
25V<br />
8 Ω<br />
LS1<br />
2W<br />
T1<br />
BF991<br />
T2<br />
BF992<br />
R1<br />
100k<br />
R3<br />
220 Ω R2<br />
1k<br />
R4<br />
270k<br />
R5<br />
15k<br />
R7<br />
39Ω R6<br />
56Ω<br />
C3<br />
100n<br />
C5<br />
100n<br />
C2<br />
100n<br />
C1<br />
150p<br />
C4<br />
1n<br />
C6<br />
1µ<br />
P1<br />
100k<br />
R8<br />
2k2<br />
R9<br />
2k2<br />
C8<br />
100n<br />
C9<br />
100n<br />
D3<br />
BA482<br />
K2 C7<br />
1µ<br />
D2<br />
BA482<br />
C10<br />
1µ<br />
R10<br />
1k<br />
JP1<br />
IC11<br />
78L09<br />
INT EXT<br />
C131<br />
100n<br />
U+<br />
ANT<br />
GAIN<br />
ANT<br />
EXT<br />
T12<br />
BS170<br />
C92<br />
100n<br />
T15<br />
BS170<br />
C104<br />
100n<br />
S<br />
D<br />
G<br />
T16<br />
BS170<br />
C113<br />
100n<br />
R61<br />
4k7<br />
D1<br />
1N4001<br />
3x<br />
ASK-1<br />
MIX1<br />
RF<br />
IF<br />
LO<br />
4<br />
5<br />
2 6<br />
3 1<br />
2x<br />
WIDE<br />
MEDIUM<br />
030417 - 11<br />
VOLUME<br />
RF GAIN<br />
(15dB)<br />
U+<br />
C36<br />
10p<br />
R21<br />
4k7<br />
+13V...+15V<br />
L12<br />
10µH<br />
FL2A<br />
SFR455J<br />
R20<br />
1k8<br />
D10<br />
D9<br />
1N4148<br />
2x<br />
K3<br />
LSB/USB<br />
C68<br />
100n<br />
SSB<br />
FM<br />
AM<br />
Synth.<br />
L22<br />
820µH<br />
K7 K6<br />
U+<br />
500mA<br />
150mA<br />
250mA<br />
K4<br />
NARROW<br />
K5<br />
M1<br />
150µA<br />
+<br />
S-meter<br />
A<br />
B<br />
MAR8<br />
1<br />
2<br />
3<br />
4<br />
G1 G2<br />
S D<br />
C<br />
B E<br />
J310<br />
D<br />
S<br />
G<br />
BS170<br />
D<br />
G<br />
S<br />
35<br />
A K<br />
KV1235<br />
BF991<br />
BF992 BFR93A<br />
(SOT143) (SOT23)<br />
7V8<br />
1V4<br />
3V8<br />
4V5<br />
3V7<br />
4V0<br />
4V0<br />
5V1<br />
2V5<br />
6V0<br />
5V1<br />
3V1<br />
4V4<br />
1V4<br />
3V8<br />
1V4<br />
3V8<br />
1V4<br />
3V8<br />
0V27<br />
1V6<br />
0V9<br />
8V6<br />
0V28<br />
2
3<br />
3k9<br />
22k<br />
Two BA482 switching diodes (D2 and<br />
D3) have been used to switch between<br />
the pre-amplifier and the input for an<br />
external aerial. This type <strong>of</strong> diode has a<br />
very low AC resistance when a certain<br />
forward current flows through it.<br />
LD6<br />
SC52-11GWA<br />
a<br />
b<br />
10<br />
CC dp<br />
7<br />
6<br />
4<br />
c<br />
2<br />
d<br />
1<br />
e<br />
9<br />
f<br />
g<br />
5<br />
CC<br />
3 8<br />
12/2006 - elektor electronics<br />
R1<br />
R2<br />
C'<br />
BC557B<br />
R3<br />
C41 K1<br />
1k T1<br />
LD5<br />
SC52-11GWA<br />
a<br />
b<br />
100n<br />
KEYPAD<br />
ENCODER<br />
DISPLAY<br />
10<br />
CC dp<br />
7<br />
6<br />
4<br />
c<br />
2<br />
d<br />
1<br />
e<br />
9<br />
f<br />
g<br />
5<br />
CC<br />
3 8<br />
K4<br />
C2<br />
33p<br />
40<br />
8MHz<br />
L1<br />
100µH<br />
31<br />
ICP<br />
OC1B<br />
29<br />
AT90S8515<br />
10<br />
PD0(RXD) PA0(AD0)<br />
39<br />
11<br />
PD1(TXD) PA1(AD1)<br />
38<br />
12<br />
PD2(INT0) PA2(AD2)<br />
37<br />
13<br />
PD3(INT1) PA3(AD3)<br />
36<br />
14<br />
PD4<br />
PA4(AD4)<br />
35<br />
15<br />
PD5(OC1A) PA5(AD5)<br />
34<br />
16<br />
PD6(WR) PA6(AD6)<br />
33<br />
17<br />
PD7(RD) PA7(AD7)<br />
32<br />
X1 X2<br />
20 19 18<br />
X1<br />
C3<br />
33p<br />
C1<br />
100n<br />
C10<br />
100n<br />
IC6<br />
78L05<br />
9<br />
RESET<br />
30<br />
ALE<br />
IC1<br />
1<br />
PB0(T0)<br />
2<br />
PB1(T1)<br />
3<br />
PB2(AIN0)<br />
4<br />
PB3<br />
5<br />
PB4(SS)<br />
6<br />
PB5(MOSI)<br />
7<br />
PB6(MISO)<br />
8<br />
PB7(SCK)<br />
PC0(A8)<br />
PC1(A9)<br />
PC2(A10)<br />
PC3(A11)<br />
PC4(A12)<br />
PC5(A13)<br />
PC6(A14)<br />
PC7(A15)<br />
21<br />
22<br />
23<br />
24<br />
25<br />
26<br />
27<br />
28<br />
L3<br />
L4<br />
L5<br />
L6<br />
L7<br />
L8<br />
L9<br />
100µH<br />
100µH<br />
100µH<br />
100µH<br />
100µH<br />
100µH<br />
100µH<br />
C12 C13 C14 C15 C16 C17<br />
AM<br />
FM<br />
LSB/USB<br />
SSB<br />
NARROW<br />
MEDIUM<br />
WIDE<br />
C18<br />
C40<br />
10n<br />
AM<br />
AM<br />
FM<br />
FM<br />
LSB/USB<br />
SSB<br />
SSB<br />
NARROW<br />
NARROW<br />
MEDIUM<br />
MEDIUM<br />
WIDE WIDE<br />
LSB/USB<br />
LD4<br />
SC52-11GWA<br />
a<br />
b<br />
10<br />
CC dp<br />
7<br />
6<br />
4<br />
c<br />
2<br />
d<br />
1<br />
e<br />
9<br />
f<br />
g<br />
5<br />
CC<br />
3 8<br />
LD3<br />
SC52-11GWA<br />
a<br />
b<br />
10<br />
CC dp<br />
7<br />
6<br />
4<br />
c<br />
2<br />
d<br />
1<br />
e<br />
9<br />
f<br />
g<br />
5<br />
CC<br />
3 8<br />
A'<br />
B'<br />
C11<br />
+U<br />
100n<br />
100n 100n 100n 100n 100n 100n 100n<br />
C23<br />
C24 C27<br />
L12 L10 L13<br />
C25<br />
C26<br />
4x<br />
6 23 11 18 3x<br />
100n<br />
PVCC DVDD AVDD AVDD<br />
100n<br />
4<br />
D0<br />
3<br />
D1<br />
2<br />
D2<br />
1<br />
D3<br />
28<br />
D4<br />
IC3<br />
15<br />
VINN<br />
9<br />
REFCLK<br />
27<br />
D5<br />
VOUTN<br />
13<br />
26<br />
D6<br />
VOUTP<br />
14<br />
25<br />
D7<br />
DACBP<br />
17<br />
7<br />
AD9851BRS<br />
WCLK<br />
8<br />
FQUD<br />
22<br />
RST<br />
IOUT<br />
21<br />
16<br />
VINP<br />
12<br />
RSET<br />
IOUTB<br />
20<br />
R6<br />
PGND DGND AGND AGND<br />
R7<br />
5 24 10 19<br />
4k7<br />
10µH<br />
+5VA<br />
10µH<br />
+5VA<br />
10µH<br />
IC7<br />
7805<br />
From the aerial switch the signal is fed<br />
into a low-pass filter consisting <strong>of</strong> inductors<br />
L1 to L3 and capacitors C11<br />
to C17. These form a Cauer-like filter,<br />
which cuts <strong>of</strong> steeply at 30 MHz and<br />
which has a fairly flat transfer function<br />
LD2<br />
SC52-11GWA<br />
a<br />
b<br />
10<br />
CC dp<br />
7<br />
6<br />
4<br />
c<br />
2<br />
d<br />
1<br />
e<br />
9<br />
f<br />
g<br />
5<br />
CC<br />
3 8<br />
4<br />
9<br />
C19<br />
100n<br />
19 18<br />
LD1<br />
SC52-11GWA<br />
ISET<br />
1<br />
DIN<br />
13<br />
14 IC2 CLK<br />
SEGA<br />
12<br />
16<br />
LOAD<br />
SEGB<br />
20<br />
SEGC<br />
23<br />
SEGD<br />
DIG7<br />
DIG6<br />
8<br />
5<br />
21<br />
SEGE DIG5<br />
10<br />
15<br />
SEGF DIG4<br />
3<br />
10<br />
CC<br />
17<br />
SEGG DIG3<br />
22<br />
SEGDP DIG2<br />
DIG1<br />
MAX7219<br />
24<br />
DOUT DIG0<br />
7<br />
6<br />
11<br />
2<br />
dp<br />
220μ 16V 100n<br />
a<br />
7<br />
6<br />
b<br />
4<br />
c<br />
2<br />
d<br />
1<br />
e<br />
f<br />
9<br />
g<br />
5<br />
CC<br />
3 8<br />
C28<br />
C29<br />
100 Ω<br />
C20<br />
100n<br />
22p<br />
R10<br />
100 Ω C34<br />
S1<br />
ENCODER<br />
+U<br />
K3<br />
C<br />
L15<br />
330nH<br />
+U<br />
C4<br />
100n<br />
13<br />
R8<br />
10k<br />
IC4.F<br />
1<br />
12<br />
X2<br />
+U<br />
10MHz<br />
C36<br />
68p<br />
IC5<br />
7805<br />
1<br />
IC4.A<br />
1<br />
2<br />
3<br />
IC4.B<br />
1<br />
4<br />
L16<br />
100nH<br />
IC4.E<br />
11 10<br />
1<br />
C31<br />
10p<br />
C30<br />
40p<br />
C5<br />
100n<br />
C32<br />
22p<br />
R4<br />
4Ω7<br />
C6<br />
220µ<br />
16V<br />
+5VA L11<br />
100µH<br />
C21<br />
C22 14<br />
IC4<br />
100n 100n 7<br />
IC4 = 74HCU04<br />
C35<br />
L17<br />
820nH<br />
L18<br />
1µH<br />
C38<br />
10p<br />
27p<br />
C37<br />
68p<br />
L20<br />
100nH<br />
L19<br />
330nH<br />
C39 R11<br />
68Ω<br />
6p8<br />
Figure 2. Schematic for the receiver section. There is a heap <strong>of</strong> components, but with the help <strong>of</strong> the block diagram you should be able to recognise the different sections.<br />
+5VD<br />
9<br />
R9<br />
10k<br />
IC4.D<br />
1<br />
8<br />
L14<br />
1µH2<br />
IC4.C 5<br />
C33<br />
1<br />
220p<br />
6<br />
Figure 3. The electronics for the microcontroller board. The wiring diagram at the bottom-left shows how K3 and K4 on the receiver board should be connected to K3 on the microcontroller board.<br />
Figure 4. This part is on the display board: display driver, six-digit 7-segment display, rotary encoder and a keypad with 16 keys.<br />
4<br />
+5D<br />
+5VD<br />
C7<br />
100n<br />
L2<br />
100μH<br />
C8<br />
C9<br />
10k<br />
R5<br />
K5<br />
ENCODER<br />
DISPLAY<br />
030417 - 12b<br />
030417 - 12a<br />
68Ω<br />
R12<br />
Synth.<br />
from 0 Hz onwards. The input and output<br />
impedance <strong>of</strong> this filter is 50 Ω.<br />
Following this input filter is the first<br />
mixer (MIX1). We have used an ASK-1<br />
diode-ring mixer made by Mini-Circuits<br />
Labs because <strong>of</strong> its ability to handle<br />
S14<br />
1<br />
S15<br />
4<br />
S16<br />
7<br />
S17<br />
*<br />
S10<br />
2<br />
S11<br />
5<br />
S12<br />
8<br />
S13<br />
0<br />
S6<br />
3<br />
S7<br />
6<br />
S8<br />
9<br />
S9<br />
#<br />
K2<br />
+5D<br />
K6<br />
S2<br />
A<br />
S3<br />
B<br />
S4<br />
C<br />
S5<br />
D<br />
KEYPAD<br />
030417 - 12c<br />
29
hands-on sw receiver<br />
large input signals. Eagle-eyed readers<br />
will have noticed <strong>that</strong> we've swapped<br />
the input (RF) and output (IF) <strong>of</strong> this<br />
mixer. The mixer still works well in this<br />
configuration, but it has the advantage<br />
<strong>that</strong> the input frequency can be a lot<br />
lower (almost down to 0 Hz, which is<br />
exactly what we require).<br />
At the output <strong>of</strong> this mixer is a filter<br />
(FL1) <strong>that</strong> suppresses unwanted byproducts<br />
and the image frequencies<br />
<strong>of</strong> the second mixer. An LC network at<br />
the output <strong>of</strong> the filter is used to match<br />
the impedances.<br />
We now come to the second mixer,<br />
which is built around T3. Again we've<br />
chosen a low-noise BF992 DG MOS-<br />
FET, which has a somewhat better<br />
gain than most <strong>of</strong> its equivalents.<br />
As far as large signals are concerned,<br />
we don't demand as much from this<br />
mixer as from the first one because<br />
we're only really dealing with one frequency<br />
here.<br />
The purpose <strong>of</strong> the second mixer is<br />
to convert the first IF (45 MHz) to the<br />
second IF (455 kHz). Specifically designed<br />
crystals with a frequency <strong>of</strong><br />
44.545 MHz are available for this.<br />
The local oscillator signal for the first<br />
mixer is supplied by a VFO. This signal<br />
should have a frequency range from 45<br />
to 75 MHz, with a resolution <strong>of</strong> 100 Hz.<br />
We have chosen an AD9851 DDS made<br />
by Analog Devices (IC3 in Figure 3),<br />
which provides a stable output <strong>that</strong><br />
can be accurately programmed in small<br />
frequency steps. The frequency range<br />
is just about wide enough for use in<br />
our application.<br />
At the output <strong>of</strong> the DDS is a bandpass<br />
filter (C34 to C39, L15 to L20) with<br />
a pass-band <strong>of</strong> 45 to 75 MHz. The impedance<br />
<strong>of</strong> this filter is about 100 Ω.<br />
The impedance is lowered to 50 Ω using<br />
resistors R11 and R12. The resulting<br />
signal is then fed into a MAR8 (IC2<br />
in Figure 2). This IC (made by Mini-Circuits)<br />
is a wide-band amplifier with an<br />
output impedance <strong>of</strong> 50 Ω. It also has<br />
enough output power to provide a good<br />
signal to the first mixer.<br />
After buffer T4 come the three IF-filters.<br />
These can be individually turned<br />
on using BA482 switch diodes (using<br />
the same principle as for the aerial<br />
switch). In this way the processor<br />
can switch between bandwidths <strong>of</strong> 3,<br />
6 or 15 kHz. The IF transformer (TR1)<br />
provides a load to the filters <strong>that</strong> is<br />
equal to their characteristic impedance<br />
(about 2 kΩ).<br />
Following buffer stage T7 we end up<br />
at the IF amplifier consisting <strong>of</strong> two<br />
AD603 ICs made by Analog Devices<br />
(IC3/IC4). The gain <strong>of</strong> each IC can be<br />
adjusted over a range <strong>of</strong> 40 dB using<br />
a control voltage. This gives us a total<br />
AGC range <strong>of</strong> 80 dB. The AGC voltage<br />
is also used to drive the S-meter (M1)<br />
via T8.<br />
The detector for DRM signals has been<br />
placed straight after the IF filters. The<br />
IF amplifier is therefore not used for<br />
DRM signals, as we saw from the block<br />
diagram.<br />
The DRM signal is decoded using a<br />
product detector <strong>that</strong> mixes the input<br />
signal with a fixed frequency signal.<br />
The mixer chosen for this job, an<br />
NE612 (IC1), has an internal Colpitts<br />
oscillator. This can be set up in such<br />
a way <strong>that</strong> it will oscillate at a slightly<br />
lower frequency than the resonant<br />
frequency (470 kHz) <strong>of</strong> the CSB470 resonator<br />
used here. In this case we require<br />
467 kHz, which is used to convert<br />
the 455 kHz signal into an audio signal<br />
with a centre frequency <strong>of</strong> 12 kHz and<br />
a bandwidth <strong>of</strong> 10 kHz.<br />
We've now arrived at the detection<br />
stages for AM/FM/SSB. Each <strong>of</strong> the<br />
three stages has been built around an<br />
NE612 mixer IC.<br />
The SSB detector is a product detector,<br />
as is usual for SSB detection. The<br />
internal oscillator <strong>of</strong> IC5 has been configured<br />
in such a way <strong>that</strong> only one<br />
resonator is required for USB as well<br />
as LSB operation. The trick used here<br />
is <strong>that</strong> transistors T13 and T14 switch<br />
a trimmer capacitor either in series or<br />
parallel with the resonator.<br />
The quadrature detector for FM demodulation<br />
is built around IC6. This<br />
detector is very suitable for demodulating<br />
narrow-band FM, which is normally<br />
used in the 11-metre CB band.<br />
Because this type <strong>of</strong> demodulator is<br />
somewhat sensitive to AM components,<br />
the signal is first fed through<br />
a limiter. This consists <strong>of</strong> a push-pull<br />
transistor pair (T10/T11). With the val-<br />
30 elektor electronics - 12/2006
ues for the base resistors as shown, the<br />
signal fed to the NE612 will be limited<br />
to about 250 mV pp .<br />
The simplest way <strong>of</strong> demodulating AM<br />
is with an ordinary diode. A disadvantage<br />
<strong>of</strong> this method is <strong>that</strong> distortion is<br />
introduced when the signal weakens.<br />
This is particularly a nuisance when<br />
the signal fades, which happens fairly<br />
<strong>of</strong>ten in the shortwave bands. A synchronous<br />
detector (IC7) is more resistant<br />
to these occurrences. For this we<br />
use the signal from the limiter in the<br />
FM demodulator as the mix signal.<br />
The amplitude <strong>of</strong> this signal is virtually<br />
constant, even when the signal<br />
strength varies a lot.<br />
There are now three available audio<br />
signals, which can be selected by the<br />
microcontroller with the help <strong>of</strong> three<br />
BS170 FETs <strong>that</strong> are used here as analogue<br />
switches.<br />
The receiver is equipped with an effective<br />
audio filter. This is an adjustable<br />
low-pass filter built around IC8, which<br />
is a switched capacitor filter. The<br />
MAX7400 contains a very steep 8 th -order<br />
elliptic filter where the corner frequency<br />
can be set with a capacitor. If<br />
a varicap (D8) is used for this capacitor<br />
then the corner frequency can easily be<br />
adjusted using a potentiometer.<br />
An active fifth-order high-pass filter<br />
built around opamp IC9 then filters out<br />
all frequencies below 300 Hz, thereby<br />
suppressing hum and other low-frequency<br />
noise.<br />
The final stage is an audio power<br />
amplifier, for which we’ve chosen an<br />
LM380N8. This 8-pin IC is capable <strong>of</strong><br />
delivering 2.5 W <strong>of</strong> audio power when<br />
supplied with a high enough voltage.<br />
In this case we supply the IC with the<br />
maximum permitted 15 V, which means<br />
it can output 1.7 Watts into 8 Ω. That<br />
should provide enough volume in even<br />
somewhat noisy environments.<br />
At the heart <strong>of</strong> the control section is an<br />
AT90S8515, a microcontroller made by<br />
Atmel (IC1, Figure 2). One <strong>of</strong> its many<br />
tasks is to provide the DDS chip (IC3)<br />
with the correct data. This happens serially,<br />
which requires fewer I/O lines.<br />
For each change in frequency the microcontroller<br />
sends a string <strong>of</strong> 40 bits<br />
to the DDS. This happens extremely<br />
quickly so you won’t experience any<br />
delays when changing the frequency.<br />
A rotary encoder (S1 in Figure 4) is<br />
used for tuning purposes, which supplies<br />
24 pulses per turn to the microcontroller.<br />
The encoder output is con-<br />
12/2006 - elektor electronics<br />
nected to an interrupt line, so not a<br />
single pulse will be missed by the s<strong>of</strong>tware.<br />
In this way you can tune through<br />
24 kHz per complete turn at 1 kHz resolution,<br />
which is sufficient for AM and<br />
FM. The resolution can also be set to<br />
100 Hz (via the D key on the keypad),<br />
which results in 2.4 kHz per turn. This<br />
is more suitable for tuning to a SSB station<br />
on the amateur bands. It would be<br />
nice if the encoder could provide more<br />
pulses per turn, so <strong>that</strong> you could always<br />
tune with a resolution <strong>of</strong> 100 Hz.<br />
In this case you would need to replace<br />
it with an optical encoder.<br />
The keypad is another input device<br />
<strong>that</strong> is read by the microcontroller. This<br />
consists <strong>of</strong> 16 keys arranged in a 4x4<br />
matrix. In this configuration you only<br />
need eight I/O lines to scan the keypad.<br />
The scanning is fast enough never<br />
to miss a key press.<br />
Apart from the 10 digits there are four<br />
extra keys on this keypad (A, B, C and<br />
D), which are used as function keys.<br />
This reduces the number <strong>of</strong> switches<br />
required on the front panel, which<br />
makes the operation <strong>of</strong> the receiver<br />
easier and clearer.<br />
Three I/O lines from IC1 provide the<br />
display driver (IC2, a MAX7219) with<br />
data. This display driver can drive a<br />
maximum <strong>of</strong> eight 7-segment displays.<br />
This IC also has the ability to control<br />
the segments <strong>of</strong> each digit individually.<br />
In this application we’ve made use <strong>of</strong><br />
this to display an L for LSB mode, a U<br />
for USB mode, an F for FM and an A for<br />
AM, followed by the bandwidth <strong>of</strong> either<br />
3, 6 or 15.<br />
And last but not least, the microcontroller<br />
also controls the settings for the<br />
bandwidth and modes. This is implemented<br />
very simply using seven I/O<br />
lines, which are set high or low by the<br />
s<strong>of</strong>tware as required.<br />
The s<strong>of</strong>tware for the microcontroller<br />
was written in assembly language and<br />
consists <strong>of</strong> about 1800 lines. The program<br />
has 21 subroutines, a reset routine,<br />
two interrupt routines (encoder,<br />
timer) and a main program loop.<br />
A programmed microcontroller can be<br />
ordered from Elektor Electronics using<br />
order code 030417-41. In contrast with<br />
other Elektor Electronics projects we<br />
can’t provide you with the source and<br />
hex files.<br />
Each <strong>of</strong> the boards for the receiver has<br />
been provided with a liberal number <strong>of</strong><br />
voltage regulators, suppression chokes<br />
and capacitors. The supply voltage<br />
<strong>of</strong> 13 to 15 V (0.5 A) is provided by a<br />
mains adapter.<br />
Construction<br />
The electronics for the whole receiver<br />
have been divided across three boards:<br />
a receiver board, a microcontroller<br />
board and a display board. Due to a<br />
lack <strong>of</strong> space we can only show you<br />
photos <strong>of</strong> the completed boards in this<br />
article. All PCB layouts, component<br />
overlays and the accompanying parts<br />
lists can be downloaded free <strong>of</strong> charge<br />
from http://www.elektor.com/ (look in<br />
magazine/December 2006/Shortwave<br />
Capture). Ready-made circuit boards<br />
are available from Elektor’s business<br />
partner ‘The PCBShop’ (Eurocircuits)<br />
In a radio receiver you obviously have<br />
to use several special RF components.<br />
The best places to buy these are specialist<br />
electronics firms, such as internationally<br />
operating Barend Hendriksen<br />
(www.xs4all.nl/~barendh) or HaJé<br />
Electronics (www.haje.nl).<br />
A reasonably experienced electronics<br />
hobbyist shouldn’t have many problems<br />
with the construction. There is<br />
only one component <strong>that</strong> is difficult to<br />
solder: the DDS chip, which comes in<br />
an SSOP package!<br />
There are two parts lists: one for the<br />
receiver board (-1) and one for the microcontroller<br />
and display boards (-2).<br />
Take care not to mix up the part numbers<br />
between -1 and -2.<br />
The receiver board (030417-1) has been<br />
made very compact. Because <strong>of</strong> this,<br />
the space for resistors is smaller than<br />
usual and the leads have to be bent<br />
closer to the body. All SMD FETs and<br />
SMD transistors have to be soldered on<br />
the underside <strong>of</strong> the board. The MAR8<br />
can be soldered either way up, since<br />
its connections are symmetrical. Do<br />
take care <strong>that</strong> the lead with the indicator<br />
dot is soldered to the correct pad.<br />
We decided to make JP1 (aerial input<br />
selection) a header with a jumper, but<br />
if you intend to change the aerial input<br />
on a regular basis then it will be much<br />
easier if you add another switch to the<br />
front panel instead.<br />
As we mentioned earlier, the soldering<br />
<strong>of</strong> IC3 and its associated components<br />
on the microcontroller board requires<br />
very delicate work. The decoupling<br />
capacitors are also SMD; these<br />
should preferably be 0805 types, but<br />
1206 ones fit as well. You should first<br />
solder two decoupling caps (C24, C27)<br />
underneath (!) L12 and L13.<br />
The headers for K3, K6 and the supply<br />
are soldered onto the solder-side <strong>of</strong><br />
the microcontroller board (assuming<br />
<strong>that</strong> you don’t want to solder the con-<br />
31
hands-on sw receiver<br />
nection leads straight onto the board).<br />
The voltage regulators (IC5 and IC7)<br />
are also found here. These should be<br />
provided with a heatsink, otherwise<br />
they could overheat when the case is<br />
screwed shut.<br />
On the display board the following<br />
components are mounted on the underside<br />
<strong>of</strong> the board: the rotary encoder<br />
S1 (so the spindle sticks out through<br />
the front), the headers (if required) for<br />
K2, K5 and the supply, and electrolytic<br />
capacitor C8.<br />
It is best to use flexible wire for the<br />
connections between the boards. If<br />
you have plugs at one end it will be<br />
easier if you ever need to separate the<br />
boards in the future. The cables should<br />
be kept away from the receiver board<br />
as much as possible, otherwise you’re<br />
asking for trouble (unwanted oscillations<br />
etc.). Route the cables directly<br />
away from the board and only then<br />
bend them towards the other boards.<br />
Keep in mind <strong>that</strong> the order <strong>of</strong> the pins<br />
on K3 and K4 on the receiver board is<br />
different to <strong>that</strong> on K3 on the microcontroller<br />
board. We’ve added a wiring di-<br />
agram in Figure 3 to remind you. You<br />
should use a short length <strong>of</strong> thin 50 Ω<br />
coax cable like RG174 for the synthesiser<br />
connection.<br />
The supply for boards -1 and -2 loops<br />
from one to the other, which is why<br />
there are two connectors for the power<br />
supply. On the receiver board you<br />
could use K6 for the incoming +13 V<br />
for example, and use K7 to link it to<br />
the microcontroller board and display<br />
board. To avoid buying many different<br />
types <strong>of</strong> plugs we have used only 5 or<br />
8-way types and just removed the unwanted<br />
pins when necessary.<br />
The dimensions <strong>of</strong> the boards are such<br />
<strong>that</strong> they all fit in a standard case made<br />
by Bopla. The receiver board is mounted<br />
flat on the bottom <strong>of</strong> the case and the<br />
other two boards are mounted vertically<br />
behind each other (display board at the<br />
front). The spindles <strong>of</strong> the potentiometers<br />
<strong>of</strong> the receiver board fit through the<br />
holes in the other two boards.<br />
The potentiometers should therefore<br />
have long spindles so they can stick<br />
through the front panel. When you use<br />
the recommended Bopla case, the receiver<br />
board can be fitted using a few<br />
M2.5 bolts.<br />
It won't do any harm if you put some<br />
aluminium foil on the bottom inside<br />
the case and connect it to ground. This<br />
provides some extra shielding, which<br />
improves the stability <strong>of</strong> the receiver.<br />
An unetched piece <strong>of</strong> PCB is also suitable.<br />
We don't want any short-circuits,<br />
so the PCB should be placed with the<br />
copper side down, or if you used aluminium<br />
foil you should cover it with insulation<br />
tape.<br />
The microcontroller and the display<br />
boards are mounted vertically inside<br />
the case. Although there are slots<br />
on the left and right-hand side <strong>of</strong> the<br />
case for this purpose, we didn't use<br />
them because the boards wouldn't fit.<br />
Luckily the boards can also fit on either<br />
side <strong>of</strong> the slots. The 7-segment<br />
display ends up just behind the front<br />
panel and there is also enough room for<br />
the microcontroller board this way.<br />
At the back <strong>of</strong> the case is a connector<br />
for the supply, a feed-through for<br />
the telescopic aerial and a hole for a<br />
phono-socket for connecting an external<br />
aerial.<br />
32 elektor electronics - 12/2006
Adjustments<br />
There are nine trim points in this receiver.<br />
To start with it is best to set all<br />
trimmers at their halfway position. Before<br />
you continue, make sure <strong>that</strong> an<br />
aerial is connected and selected.<br />
Select the AM mode using the A key<br />
on the keypad. Next you should type<br />
in the frequency <strong>of</strong> a strong medium<br />
wave transmitter. If you use an internal<br />
aerial you should set the gain to<br />
its maximum; this also applies to the<br />
RF gain. Set the audio volume control<br />
to halfway. If necessary, use the rotary<br />
encoder until you hear a medium<br />
wave station. First set trimmer C30 in<br />
the collector <strong>of</strong> the local oscillator <strong>of</strong><br />
Operation<br />
Overview <strong>of</strong> all keypad functions:<br />
0 to 9 numerical input <strong>of</strong> frequency<br />
D ‘Enter’ after inputting the frequency<br />
A AM(6)/FM(15) mode<br />
B LSB(3)/USB(3) mode<br />
C select 3, 6 or 15 kHz bandwidth,<br />
independent <strong>of</strong> the current mode<br />
D select 100 Hz or 1 kHz tuning resolution<br />
* store the frequency, mode and bandwidth into memory<br />
*mm store into memory entry mm (mm = 00 t/m 63)<br />
# recall the frequency, mode and bandwidth from memory<br />
#mm r ecall memory entry mm (mm = 00 to 63)<br />
(When the receiver is turned on, memory entry 00 is used by default.)<br />
the second mixer to obtain maximum<br />
volume.<br />
Next you should set the trimmers <strong>of</strong> the<br />
first IF (C18 and C19) to obtain maximum<br />
volume.<br />
The full-scale trimmer (P3) and the<br />
null-trimmer (P4) for the S-meter should<br />
now be adjusted. The rest <strong>of</strong> the settings<br />
can now be completed with the<br />
help <strong>of</strong> the S-meter reading.<br />
If a very strong signal is received you<br />
should reduce the aerial gain a little.<br />
Adjust the core <strong>of</strong> the IF transformer<br />
following the IF filters (TR1) to get the<br />
maximum S-meter-reading.<br />
When the sensitivity <strong>of</strong> the receiver improves<br />
you can try tuning to a weaker<br />
station. The previously mentioned trim-<br />
12/2006 - elektor electronics<br />
mers should again be adjusted to get<br />
the maximum S-meter-reading.<br />
In a double conversion superheterodyne<br />
receiver there are two oscillators<br />
<strong>that</strong> determine the accuracy <strong>of</strong> the reception<br />
frequency: the reference oscillator<br />
for the DDS and the local oscillator<br />
for the second mixer. You will<br />
need a frequency counter to set these<br />
correctly. First type in a frequency <strong>of</strong><br />
30.000.0 MHz. Then adjust the trimmer<br />
<strong>of</strong> the 10 MHz reference oscillator<br />
(C30 on the microcontroller board) until<br />
the frequency at the output <strong>of</strong> the<br />
MAR8 (IC2) is 75.000.000 MHz. The<br />
frequency counter should now be connected<br />
to the second gate <strong>of</strong> the second<br />
mixer (T3). Use trimmer C26 near<br />
the 44.545 MHz crystal to adjust the<br />
frequency to 44.545.000 MHz.<br />
Once all these settings have been completed<br />
we can start with adjusting the<br />
FM demodulator. For this we need to<br />
tune in to an FM transmission in the<br />
27 MHz band. We then need to adjust<br />
the core <strong>of</strong> the IF transformer (L20) in<br />
the FM demodulator. (Make sure <strong>that</strong><br />
you have selected the FM mode with<br />
a 15 kHz bandwidth, using the A key.)<br />
As an alternative, you could adjust it<br />
for minimum audio output when receiving<br />
an AM station in FM mode, which<br />
is actually a bit more precise.<br />
The last trimmers to be adjusted are<br />
the two trimmer capacitors in the SSB<br />
product detector. <strong>Tune</strong> in to a known<br />
AM station, for example in the medium<br />
wave. Then use the B key to select<br />
LSB, and adjust C94 until you have a<br />
beat frequency <strong>of</strong> 0 Hz. Now use the B<br />
key to select USB, and adjust C93 until<br />
you have a beat frequency <strong>of</strong> 0 Hz.<br />
The receiver is now ready for use and<br />
the case can be put together.<br />
DRM use<br />
In order to process DRM signals you<br />
have to connect the DRM output <strong>of</strong> the<br />
receiver to the line input <strong>of</strong> a soundcard<br />
in a PC. Next you have to start a<br />
program called Dream. The bandwidth<br />
<strong>of</strong> the receiver has to be set to 15 kHz<br />
using the C key. The mode doesn’t mat-<br />
The display for the frequency readout consists <strong>of</strong> 6 digits and has<br />
a resolution <strong>of</strong> 100 Hz. This also means <strong>that</strong> when you input a frequency<br />
via the keypad you have to enter it down to the last 100 Hz.<br />
For most stations you’ll find <strong>that</strong> you have to input the frequency in<br />
kHz followed by an extra zero. But to receive the DCF time signal on<br />
77.5 kHz you just type in 775 and D.<br />
There are two fixed decimal points on the display. So for channel 14<br />
in the 27 MHz band for example, the display will show 27.125.0.<br />
When the A or B keys are used to change the reception mode, the<br />
display will show the selected mode for several seconds. For example,<br />
after pressing the A key it will show A-6, which means AM mode<br />
with a 6 kHz bandwidth. Pressing the A key again will show F-15 (FM<br />
mode, 15 kHz bandwidth).<br />
Pressing the B key changes the display to L-3 (LSB mode, 3 kHz<br />
bandwidth). Pressing the B key again shows U-3 (USB mode, 3 kHz<br />
bandwidth).<br />
Repeatedly pressing the C key doesn’t change the mode, but rather<br />
the bandwidth. Again, the display will show the last selected setting.<br />
When none <strong>of</strong> the A, B or C keys has been pressed for a period <strong>of</strong><br />
2 seconds the display will automatically revert back to the frequency<br />
readout.<br />
ter, but if you select AM you may be<br />
able to tell via the loudspeaker if there<br />
is any interference in the DRM signal.<br />
After setting up the soundcard on a PC<br />
(this is described in the March 2004 issue<br />
<strong>of</strong> Elektor Electronics) the receiver<br />
can be tuned to a DRM transmitter.<br />
Many DRM stations don’t transmit<br />
continuously, but according to a certain<br />
schedule. You can check via the<br />
loudspeaker <strong>of</strong> the receiver whether<br />
you’ve tuned into a DRM transmission.<br />
A harsh noise should come out <strong>of</strong> the<br />
loudspeaker. You can then turn down<br />
the volume on the receiver. Finally, you<br />
use the recording control on the PC to<br />
set the required level.<br />
(030417-I)<br />
33
technology communications<br />
Spy Number St<br />
Curious short wave transmissions...<br />
Jochen Schäfer<br />
Their programme content is not what you<br />
would describe as entertaining but these<br />
strange broadcasts have not only attracted<br />
the attention <strong>of</strong> shortwave enthusiasts but<br />
also songwriters and filmmakers… not<br />
forgetting government counter-intelligence<br />
departments.<br />
Those <strong>of</strong> you who choose to do a spot <strong>of</strong> short wave<br />
surfing during their idle moments will no doubt have<br />
hit upon one or two stations where the programme<br />
content is made up entirely <strong>of</strong> someone (usually female)<br />
monotonously reading out a series <strong>of</strong> numbers. Your first<br />
assumption may be <strong>that</strong> you have gate crashed a pirate<br />
radio version <strong>of</strong> Bingo until you notice <strong>that</strong> some <strong>of</strong> the<br />
numbers are repeated and grouped either in fours or<br />
fives.<br />
The enigmatic nature <strong>of</strong> these broadcasts is further<br />
enhanced by the station identification which can take the<br />
form <strong>of</strong> a repeated short extract <strong>of</strong> music played on what<br />
sounds like a Stylophone. Once you add in ionospheric<br />
distortion and fading the overall effect is quite spooky.<br />
Recording artists have exploited this aspect <strong>of</strong> the<br />
transmissions and used sampling and mixing to produce<br />
interesting effects. The film ‘vanilla sky’ also features them<br />
in the soundtrack. Directional antennas have been used<br />
to pin-point the sources <strong>of</strong> these transmissions but they do<br />
not appear on any <strong>of</strong>ficial broadcast schedule and when<br />
the authorities have been asked what the transmissions<br />
actually represent their explanation seems to favour<br />
‘meteorological data’.<br />
Emerging Patterns<br />
Transmissions from the number stations conform to a<br />
regular pattern: They begin (usually on the hour or half<br />
hour) with an interval signal (tone sequence, melody or<br />
call sign), followed by a three number ID (usually), a<br />
count value corresponding to the number <strong>of</strong> code groups<br />
in the transmission followed by transmission <strong>of</strong> the code<br />
groups. The former West German BND transmissions<br />
were always terminated by a combination <strong>of</strong> two<br />
characters from the NATO alphabet (over 80 different<br />
combinations were used) followed by a tone burst.<br />
The ‘Lincolnshire Poacher’ is an active station purported<br />
to emanate from the RAF base at Akrotiri in Cyprus. Each<br />
transmission begins on the hour and lasts for 45 minutes.<br />
Transmission starts with the first 15 notes <strong>of</strong> the English<br />
folk tune repeated 12 times followed by a 5 figure ID<br />
repeated six times and two notes from a glockenspiel.<br />
The message follows and is always composed <strong>of</strong> 200<br />
groups <strong>of</strong> five numbers (the last number in each group<br />
is pronounced with a rising terminal). The message ends<br />
with six repeats <strong>of</strong> the poacher tune.<br />
Number Stations do not exclusively use voice<br />
transmission; Morse is also used as well as tone signalling<br />
where each tone represents a different number. These<br />
‘polytone’ stations are thought to be operated by the<br />
Russian authorities.<br />
Some irregularities<br />
Not all the stations retain their original identity; take for<br />
example a German speaking station which had been<br />
broadcasting for over 30 years from a site in Poland.<br />
Its station identification was an extract <strong>of</strong> the ‘Swedish<br />
Rhapsody’ by Mantovani played on a music-box chime<br />
or ‘ice cream van’ as it became more affectionately<br />
known. The station closed after the catastrophic floods<br />
<strong>of</strong> 1997 but today it is again in operation, at the same<br />
site and frequency but this time thought to be run by the<br />
British SIS. The mechanised voice which popped up on<br />
this station was instantly recognised by Number Station<br />
listeners as belonging to ‘Cynthia’ who they had heard<br />
before on a station thought to be used by the American<br />
security department.<br />
The American security department ceased all Number<br />
Stations activity in October 2003 but up until then they<br />
34 elektor electronics - 12/2006
ations<br />
were thought to be operating (like the Russian security<br />
services) in Europe, transmitting in many languages<br />
including English, German and Spanish. Up until a few<br />
years ago there was also an Arabic speaking station.<br />
It has never been established which government was<br />
responsible for the ‘Swedish Rhapsody’ transmissions and<br />
some stations are not always what they first appear; a<br />
recent example was heard broadcasting from the Indian<br />
subcontinent in July 2005 and given the designation<br />
‘E22’, the transmissions bore the hallmarks <strong>of</strong> a Number<br />
Station but it was finally identified in December 2005<br />
as test transmissions by ‘All India Radio’ for a new<br />
transmitter site. The station has since become fully<br />
operational and reclassified as a broadcast station. More<br />
details <strong>of</strong> the transmissions can be found at [1] under the<br />
heading ‘E22 private room and study page’.<br />
Current activity<br />
Number Stations first appeared at a time when there<br />
were no alternative paths available to relay messages<br />
worldwide. Today we have a number <strong>of</strong> options which<br />
<strong>of</strong>fer global coverage including satellite communication<br />
and the Internet which you might reasonably assume<br />
would eventually supplant radio broadcasts but in recent<br />
months shortwave activity has actually grown more<br />
intense. Among the organisations thought to be making<br />
use <strong>of</strong> these stations are the British Secret Intelligence<br />
Service (formerly MI6) The Israeli intelligence agency<br />
(a.k.a. Mossad) and the Russian Federal Security Service<br />
(FSB) together with other organisations broadcasting<br />
from Chechnya, Cuba, Korea and two English speaking<br />
stations in Egypt.<br />
Their continued use by many countries highlights the<br />
advantages <strong>of</strong> this form <strong>of</strong> broadcast which includes low<br />
12/2006 - elektor electronics<br />
Tools <strong>of</strong> the trade<br />
One <strong>of</strong> the advantages <strong>of</strong> communicating via Number Stations is <strong>that</strong> no specialised<br />
equipment is needed to pick up the message, just a regular travel or ‘world<br />
band’ radio which can be purchased on the high street (some stations use upper<br />
side band). The operative just needs patience and an undisturbed period <strong>of</strong> time<br />
to take down the numbers. Communication is only one-way <strong>of</strong> course but small<br />
portable two-way HF radios have also been developed for use in the field.<br />
An example <strong>of</strong> this type <strong>of</strong> radio equipment is the SP-15 short wave set developed<br />
in the late 50s by Wandel & Goltermann together with Pfitzner. The receiver<br />
was fully transistorised while the transmitter used valves. The entire kit including<br />
aerial, headphones, Morse key, fast code generator, crystals, NiCd batteries and<br />
mains charger are all contained in a neat briefcase which enables the set to be<br />
ready for use in a very short time. A notable design feature is the simple superhet<br />
receiver covering 2.5 to 24 MHz in two ranges with a BFO. For its time it had<br />
an extremely good specification with a sensitivity <strong>of</strong> 22 µV at 10 dB S/N. Current<br />
consumption is just 8 mA. It was used by the German secret service ‘Gehlen’ (later<br />
the BND) and also by the German armed forces for military reconnaissance.<br />
The excellent receiver design also saw service in other NATO roles.<br />
An example <strong>of</strong> a similar piece <strong>of</strong> kit ’from the other side’ is the Soviet built R-353<br />
set, the transmitter and receiver are housed in a light metal case together with<br />
the power supply. In contrast to the SP-15 the R-353 receiver is a valve double<br />
superhet. An interesting feature <strong>of</strong> this unit is the programmable magnetic band<br />
cassette shown attached to the front <strong>of</strong> the radio. Number sequences can be recorded<br />
onto the tape using a 10-way <strong>dial</strong> and then sent very quickly in a short<br />
transmission burst. This dramatically reduces the risk <strong>of</strong> the transmitter being discovered<br />
by direction finding.<br />
The West German SP-15 (Photo: Max O. Altmann)<br />
Its Eastern Block rival: The R-353 (Photo: Max O. Altmann)<br />
35<br />
(EK)
technology communications<br />
Table<br />
Frequency<br />
(kHz)<br />
6959/ 9251/<br />
11545<br />
3150/4270,<br />
4461,<br />
6840/9130/<br />
11565/<br />
13533<br />
Enigma<br />
Identity<br />
E03<br />
E10<br />
Details<br />
Thought to be used by the British Secret Intelligence<br />
Service. Transmissions begin on the hour. Mode: USB<br />
(J3E). Station ident: A repeated keyboard rendition <strong>of</strong><br />
a phrase from the ‘The Lincolnshire Poacher’.<br />
Thought to be used by the Israeli Mossad. Letter<br />
groups are used instead <strong>of</strong> number groups.<br />
Transmissions begin on the hour and half hour.<br />
Mode: Mostly AM (A3E). Station ident: A three letter<br />
sequence.<br />
cost, low tech equipment (the signals can be picked up<br />
on a relatively inexpensive ‘world band’ type <strong>of</strong> radio),<br />
broad coverage (assuming the signals are not subject<br />
to Electronic Counter Measures) and excellent message<br />
security.<br />
The stations usually operate at frequencies between the<br />
recognised shortwave bands, using either AM (Amplitude<br />
Modulation) or USB (Upper Side Band). They can be<br />
located by sweeping these frequencies on the hour and<br />
half hour. The table gives details <strong>of</strong> two stations which<br />
are currently active. The ‘E03’ refers to the station identity<br />
assigned by ENIGMA.<br />
Those <strong>of</strong> you interested in exploring this subject in more<br />
depth are recommended to pay a visit to the website <strong>of</strong><br />
Simon Mason [2] it contains many fascinating curiosities.<br />
A popular American site is also included [3] — it has<br />
a link to the ‘FRS Commander Bunny’ transmissions<br />
complete with an attempt at decoding.<br />
The Usergroup<br />
The Number Station broadcasts have fascinated listeners<br />
for decades. Since the end <strong>of</strong> the 1990s there has been a<br />
European mailing list covering this subject from a Yahoo<br />
group with the name ENIGMA 2000 (European Number<br />
Information Gathering and Monitoring Association)<br />
which evolved form the earlier ENIGMA group. This<br />
organisation has catalogued and classified all the known<br />
Number Stations and given them the designations E =<br />
English speaking, G = German speaking, M = Morse<br />
transmissions, S = Slavic speaking (Russian, Polish etc.),<br />
V = various for transmissions in other languages and X<br />
= transmissions using special types <strong>of</strong> modulation (e.g.<br />
polytones as already mentioned). The mailing list for<br />
ENIGMA 2000 has currently grown to around 700<br />
subscribers.<br />
Securing the information<br />
It’s a sobering thought <strong>that</strong> while most radio programmes<br />
are designed to capture the greatest number <strong>of</strong> listeners<br />
this must be one <strong>of</strong> the few examples where the intended<br />
audience for an international broadcast may be just a<br />
single listener who alone possesses the key to unlock<br />
the message. When transmitting cipher text to what is<br />
potentially an entire global audience it is vital <strong>that</strong> the<br />
encryption method employed is absolutely bullet pro<strong>of</strong><br />
otherwise government counter intelligence departments<br />
with their vast computational resources will surely<br />
resolve (eventually) any encryption scheme based upon<br />
a mathematical algorithm. One such cipher which has<br />
proved to be perfectly secure is the Vernam cipher or<br />
‘one time pad’. The encryption key is a series <strong>of</strong> random<br />
numbers each <strong>of</strong> which are added to each character<br />
in the plain text message. The resulting cipher text is<br />
transmitted and the receiver subtracts the key on their<br />
‘one time pad’ to recover the plain text message. Even<br />
with knowledge <strong>of</strong> some part <strong>of</strong> the message it does not<br />
help to decipher the rest <strong>of</strong> the message provided truly<br />
random keys are used. The weakness <strong>of</strong> this method is<br />
<strong>that</strong> a ‘one time pad’ containing the keys must be carried<br />
securely by the operator and then destroyed (by both<br />
sender and receiver) after use, if it is stolen or copied<br />
security will be jeopardised.<br />
Over the years many agents working in foreign lands<br />
(both east and west) have been found in possession <strong>of</strong><br />
tiny ‘one time’ pads sometimes concealed in a hollowed<br />
out soap bar, sometimes inside the shell <strong>of</strong> a walnut (the<br />
most literal form <strong>of</strong> code cracking?). Governments are<br />
obliged to remain silent on matters <strong>of</strong> national security<br />
and have never acknowledged the existence <strong>of</strong> Number<br />
Stations or their possible role in espionage, the identical<br />
nature <strong>of</strong> sequences transmitted by Number Stations and<br />
those found on agent’s one time pads may <strong>of</strong> course<br />
prove to be purely coincidental.<br />
Without any hard evidence we are forced to accept<br />
the <strong>of</strong>ficial account <strong>that</strong> the transmissions are in fact<br />
reporting snow fall levels in the Mediterranean but if you<br />
find <strong>that</strong> explanation too difficult to swallow then maybe<br />
<strong>that</strong> thought about pirate radio Bingo (at the tax payer’s<br />
expense) really is the only plausible alternative.<br />
36 elektor electronics - 12/2006<br />
(060229-I)<br />
[1] http://mysite.wanadoo-members.co.uk/thesecretsite<strong>of</strong>mike<br />
[2] www.simonmason.karoo.net/page30.html<br />
[3] www.spynumbers.com<br />
Further interesting links:<br />
http://home.freeuk.com/spook007<br />
http://www.ir<strong>dial</strong>.com/conet.htm<br />
http://en.wikipedia.org/wiki/Numbers_station<br />
The Author<br />
Jochen Schäfer is 34 years old and has been blind from<br />
birth. He works as a documentation assistant at the German<br />
Blind Studies Institute (Blista) in Marburg. He has<br />
been tuning into Number Stations in his free time since<br />
1977 when he first started listening to short wave. His<br />
archive contains more than 1000 cassettes documenting<br />
Number Station broadcasts; he is a subscriber to the<br />
ENIGMA 2000 mailing list and one <strong>of</strong> four site moderators.<br />
In his capacity as Germany’s leading Number Stations<br />
specialist he has made contributions to many publications<br />
on the subject.<br />
His Email address is (the_kopf@yahoo.com). He is keen to<br />
get in touch with anyone who has any recordings <strong>of</strong> earlier<br />
broadcasts (from the 60’s to the 80’s) to add to his collection,<br />
he has particular interest in broadcasts made by West<br />
German BND stations with a two-letter call sign.
LED/Light Kits<br />
6 LED V.U. Meter £3.99<br />
10 LED V.U. Meter £4.99<br />
Wireless V.U. Meter £12.99<br />
2 LED Flasher £3.99<br />
3 LED Running Light £4.49<br />
5 LED Flasher £4.99<br />
10 LED Running Light £4.99<br />
1CH 700W AC Flasher £5.99<br />
2CH 1400W AC Flasher £7.99<br />
10 LED Running Light, S £8.99<br />
10 LED Running Light, C £8.99<br />
Two Way Chasing Light £8.99<br />
Circular Casing Light £10.99<br />
12V Xenon Tube Flasher £8.99<br />
Super Electronic Roulette £24.99<br />
Mini Roulette wheel £9.99<br />
Heads or Tails Game £4.99<br />
Deluxe Electronic Dice £10.99<br />
Dancing Light 3CH £19.99<br />
LED Flasher 2 colour £3.99<br />
Priority Machine £5.99<br />
Xenon Tube Flasher £15.99<br />
Super Bright Flasher £5.99<br />
Robot LED Flasher £5.99<br />
Fire Fly Light: £3.99<br />
6 Prog chasing light kit £15.99<br />
11 LED Star Flasher £6.99<br />
25 LED Star Burst £16.99<br />
4 Way Traffic Light £9.99<br />
21 LED Chasing Arrow £9.99<br />
Atom Chasing light £4.99<br />
Two Way Chasing Light £7.99<br />
Triangle Flasher 6 LED £4.99<br />
Electronic Windmill £9.99<br />
Electronic Sand Glass £14.99<br />
Radio Kits<br />
FM Wireless Mic 3V £6.99<br />
FM Wireless Mic 9V £6.99<br />
Easy FM Radio: £14.99<br />
Easy AM Radio: £7.99<br />
Walky Talky Kit: £34.99<br />
Advanced AM Radio Kit: £13.99<br />
Advanced AM/FM Radio £16.99<br />
IC Shortwave Receiver £9.99<br />
MK484/ZN141 AM Radio £9.99<br />
We would like to wish all<br />
the readers <strong>of</strong> Elektor a<br />
very merry Christmas<br />
and a happy new year!<br />
Free postage on any<br />
kits ordered above £10<br />
to the UK from now<br />
until Jan 1st 2007.<br />
Orders below £10 add £1 P&P<br />
Outside UK: £1.50 per item<br />
To order simply visit<br />
www.lichfieldelectronics.co.uk<br />
By Phone: (01543) 256684<br />
By e-mail: sales@lichfieldelectronics.co.uk<br />
Or by post to:<br />
Lichfield Electronics, Conduit Street<br />
Lichfield. Staffordshire. WS13 6JU<br />
Other Kits<br />
TV transmitter £27.99<br />
Sound Reversing Car £14.99<br />
DIY Digital Multimeter £16.99<br />
Electric Shock Machine £5.99<br />
300mA 6-9-12V PSU kit £8.99<br />
0-30V 3A DC Regulator £15.99<br />
0-30V 1A DC Regulator £7.99<br />
Emergency Light circuit 6V£5.99<br />
Rat/Cockroach Banisher £8.99<br />
Other Kits<br />
Muscle Massage equipment £12.99<br />
PIR Sensor with 7A relay £27.99<br />
Human to Robot Voice 12.99<br />
Raining Alarm & speaker £6.99<br />
Stereo Simulator Kit £14.99<br />
Low Battery Alarm 12V £6.99<br />
0-12V 500mA Regulator £4.99<br />
Digital Counter 2 digit. £12.99<br />
Transistor Checker £6.99<br />
Noisy Kits<br />
Steady Hand Game £7.99<br />
Ambulance Siren £5.99<br />
Fire Siren Kit £4.99<br />
Police Siren Kit £5.99<br />
Two Tone Door Bell £5.99<br />
Christmas <strong>Tune</strong> Generator £3.99<br />
13 Tone Mini Organ £4.99<br />
25 Tone Mini Organ £8.99<br />
Car Reversing Alarm £4.99<br />
Telephone Kits<br />
Recorder Starter: £9.99<br />
Telephone Amplifier £9.99<br />
10W Speaker ringer £9.99<br />
Phone Eavesdropper £8.99<br />
Dual Station Intercom £10.99<br />
Telephone In-Use display £2.99<br />
Privacy Protector £7.99<br />
FM Telephone Transmitter £8.99<br />
Ring Controlled Relay: £12.99<br />
Do-It-Yourself Phone: £28.99<br />
Switching Kits<br />
Light Activated Switch £7.99<br />
Light Controlled Switch £8.99<br />
Touch Switch £8.99<br />
Timer Switch 0-3hr £9.99<br />
Timer Switch 0-10hr £16.99<br />
Voice Activated Delay <strong>of</strong>f £9.99<br />
Voice Control Switch £9.99<br />
25ft Infrared Remote Relay £18.99<br />
2CH 50ft IR Remote Relay £29.99<br />
Light Dimmer 500W £5.99<br />
Electronic Code Switch £14.99<br />
Water Level Control £9.99<br />
Other Kits<br />
Intruder Alarm £9.99<br />
Visitors Chime £7.99<br />
Magnetic switch Alarm £16.99<br />
Infra Red Alarm £24.99<br />
50V 30W Mono Amp OTL £14.99<br />
12V 15W Stereo Amp BTL £24.99<br />
8W 12V Sterep Amp £13.99<br />
2W 9-12V Stereo Amp £9.99<br />
Stereo Tone Control kit 15V£22.99<br />
12/2006 - elektor electronics 37
TECHNOLOGY READER CIRCUITS<br />
Wireless Key<br />
Compact and secure<br />
Gert Baars<br />
Secure wireless switching can be useful in a variety <strong>of</strong> applications, such as<br />
activating or deactivating an alarm system, operating a garage door opener,<br />
or operating an anti-start device in your car. The circuit described here is<br />
compact and quite secure, and it operates in the 433-MHz ISM band.<br />
The circuit described here consists <strong>of</strong><br />
a transmitter and a receiver operating<br />
on a frequency in the 433-MHz ISM<br />
band. Frequencies in this band can be<br />
used without a licence if the transmitter<br />
power does not exceed 10 mW (10<br />
dBm). The transmitter is small enough<br />
to be fitted in a key fob, and it is powered<br />
by a 3-V lithium cell. The transmitter<br />
only emits RF signals in short<br />
bursts, so the current consumption is<br />
no more than 8 mA. As the battery<br />
has a capacity <strong>of</strong> more than 200 mAh,<br />
it will last for several years.<br />
The receiver operates from a supply voltage<br />
<strong>of</strong> 5 V and can be powered from a<br />
simple AC adapter. If it is used with a<br />
car battery, a 78L05 must be connected<br />
between the battery and the circuit. In<br />
the case <strong>of</strong> a 6-V battery (such as is used<br />
with motorcycles and scooters), a lowdrop<br />
5-V regulator must be used.<br />
A 24-bit code is used to ensure <strong>that</strong> the<br />
receiver only responds to the proper<br />
key transmitter. More than 16 million<br />
combinations are possible with such a<br />
code. To give you an idea <strong>of</strong> how big<br />
this number is, with a burst length <strong>of</strong><br />
300 ms for each transmitted code the<br />
transmitter would have to transmit an<br />
uninterrupted series <strong>of</strong> sequential<br />
codes for two months in order to work<br />
through all possible combinations.<br />
Microcontrollers are used in both units<br />
(transmitter and receiver) to encode<br />
and decode the key.<br />
Transmitter<br />
The actual transmitter consists <strong>of</strong> a<br />
Maxim MAX1472 (Figure 1). This tiny<br />
8-pin IC contains a crystal-controlled<br />
38<br />
ASK transmitter for frequencies in the<br />
300–450 MHz range. It includes a<br />
fixed-ratio PLL and a crystal reference<br />
oscillator. This type <strong>of</strong> design is more<br />
precise and more stable than an ISM<br />
transmitter based on a SAW filter.<br />
The frequency selected for this project<br />
is 433.920 MHz. It results from the fact<br />
<strong>that</strong> the PLL multiplies the crystal frequency<br />
by 32. Due to the narrow tolerances<br />
<strong>of</strong> crystals, the match between<br />
the transmitter and the receiver is<br />
always adequate without any need for<br />
tweaking, in part because the receiver<br />
has a relatively large bandwidth.<br />
The crystal has a frequency <strong>of</strong> 13.560<br />
MHz. It comes from Hong Kong X’tals<br />
[1]. The coil in series with the crystal<br />
ensures <strong>that</strong> the circuit oscillates at<br />
the series frequency <strong>of</strong> the crystal.<br />
The transmitter IC has a 10-mW output<br />
stage, which is good for a range <strong>of</strong> at<br />
least 10 metres indoors (the author<br />
only tested the unit in his house). A<br />
loop antenna etched on the circuit<br />
board is <strong>of</strong>ten used in such applications,<br />
but a dipole antenna (too short<br />
for the actual frequency) proves to give<br />
better results. Two radiating elements,<br />
each approximately 4 cm long and<br />
0.04” thick are fitted to the transmitter<br />
board for this purpose.<br />
The transmitter IC has a data input for<br />
ASK modulation. Although it can be<br />
modulated at up to 100 Kb/s, we have<br />
to point out <strong>that</strong> the reliability <strong>of</strong> the<br />
system is better at lower rates. As only<br />
a relatively small amount <strong>of</strong> data must<br />
be transmitted, a bit rate <strong>of</strong> 100 b/s<br />
can be used. It takes only 240 ms to<br />
send 24 bits at this rate.<br />
The total burst length is 300 ms,<br />
including the preamble and start bit.<br />
This burst is transmitted when the<br />
transmit button is pressed, with a total<br />
current consumption <strong>of</strong> around 8 mA.<br />
The microcontroller switches the transmitter<br />
<strong>of</strong>f immediately after the burst<br />
has been sent and then enters a<br />
power-down mode, with the result <strong>that</strong><br />
the total current consumption drops to<br />
less than 2 mA as long as the button<br />
is held pressed. This reduces the battery<br />
consumption to a minimum. In<br />
practice, it means the transmit button<br />
must be held down for approximately<br />
half a second to transmit all the data.<br />
A microcontroller is used to generate<br />
the code key and transmit it by modulating<br />
the transmitter IC. The selected<br />
microcontroller is the Atmel ATtiny15L,<br />
which is available in an 8-pin DIP package.<br />
This microcontroller has an internal<br />
RC clock generator <strong>that</strong> runs at 1.6<br />
MHz, and it can be set within a tolerance<br />
<strong>of</strong> 1% using a calibration byte.<br />
After the flash code memory has been<br />
programmed, the calibration byte must<br />
read from the internal ‘signature space’<br />
using the programming s<strong>of</strong>tware and<br />
then written to location 1023 ($3FF) <strong>of</strong><br />
the flash memory. This only has to be<br />
done once when the microcontroller is<br />
programmed. Each time the microcontroller<br />
starts up, it reads the calibration<br />
byte from the flash memory and then<br />
writes it to the oscillator calibration<br />
register to optimise the accuracy <strong>of</strong> the<br />
internal processor clock.<br />
Receiver<br />
The receiver is also a Maxim IC (Figure<br />
2). In this case it is a MAX1473, which<br />
elektor electronics - 12/2006
contains a complete superheterodyne<br />
receiver. Here again the reference frequency,<br />
in this case the local oscillator<br />
frequency, is provided by a PLL oscillator.<br />
As the PLL multiplication factor is 32<br />
and the IF is 10.7 MHz, the crystal frequency<br />
must be 13.2256 MHz (see [1]).<br />
A remarkable feature <strong>of</strong> this IC is the<br />
integrated image rejection mixer,<br />
which effectively means <strong>that</strong> the mixer<br />
stage also provides adequate image<br />
frequency suppression, so there is no<br />
need for a preselection filter at the<br />
input. As a result, the required number<br />
<strong>of</strong> external components can be<br />
reduced to around 20.<br />
The receiver does not have to be tuned,<br />
and it boasts a sensitivity <strong>of</strong> better than<br />
approximately 1 µV. The receiver IC also<br />
has an audio filter <strong>that</strong> is intended to<br />
reduce noise and interference. A ‘data<br />
slicer’ after the filter provides automatic<br />
operating point adjustment to provide<br />
data <strong>that</strong> is as reliable as possible even<br />
under weak signal conditions.<br />
The receiver unit is also fitted with an<br />
ATtiny15L microcontroller. The data<br />
slicer output <strong>of</strong> the receiver IC is connected<br />
to an input <strong>of</strong> the microcontroller,<br />
which decodes the burst signals<br />
from the transmitter. If the decoded<br />
data contains the correct key, it activates<br />
two outputs. Here OUT1 provides<br />
a 1-second pulse if the correct<br />
key is received. It is intended to be<br />
used to drive a mechanical latch<br />
opener, which is usually fitted with a<br />
solenoid. The second output (OUT2) is<br />
an alternate-action switch. OUT2<br />
L1:<br />
8mm<br />
L2: 5mm 7mm<br />
4mm<br />
switches to +5 V when the key is<br />
received once and then toggles to 0 V<br />
the next time it is received. It can thus<br />
be used to switch something on or <strong>of</strong>f,<br />
such the control unit <strong>of</strong> an alarm system<br />
or an anti-start device in a car.<br />
S<strong>of</strong>tware<br />
The s<strong>of</strong>tware consists <strong>of</strong> two separate<br />
programs – one for the transmitter and<br />
one for the receiver. At somewhat more<br />
than 400 lines each, these programs<br />
are fairly modest in size.<br />
At the transmitter end, after starting<br />
up the s<strong>of</strong>tware looks for a particular<br />
value (a ‘signature’) in the EEPROM <strong>of</strong><br />
IN<br />
FL1<br />
C7<br />
10n<br />
C3<br />
1n<br />
IN<br />
C1<br />
10n<br />
X1<br />
GND<br />
10,7MHz<br />
OUT<br />
C8<br />
1n<br />
2 7 14<br />
AVDD AVDD DVDD<br />
27<br />
11<br />
1<br />
PWRDN<br />
IRSEL<br />
XTAL1<br />
VDD5<br />
AGCDIS<br />
XTALSEL<br />
24<br />
15<br />
16<br />
28<br />
3<br />
12<br />
XTAL2<br />
LNAIN<br />
MIXOUT<br />
IC1<br />
LNAOUT<br />
MIXIN1<br />
PDOUT<br />
DATAOUT<br />
6<br />
8<br />
26<br />
25<br />
18<br />
IFIN2<br />
17<br />
IFIN1<br />
9<br />
MIXIN2<br />
L2<br />
4<br />
LNASRC<br />
22nH<br />
the microcontroller to see whether a<br />
valid key has already been generated.<br />
If it hasn’t, the s<strong>of</strong>tware immediately<br />
generates a 24-bit code and stores it in<br />
the EEPROM memory along with the<br />
signature so it will not have to generate<br />
a new key the next time.<br />
A random number generator <strong>that</strong> provides<br />
an arbitrary 24-bit value is<br />
needed to generate the key. This is<br />
implemented using a capacitor connected<br />
to pin 2 <strong>of</strong> the microcontroller.<br />
The algorithm used for this purpose is<br />
based on timing. Pin 2 is first configured<br />
as an output and held low for a<br />
certain length <strong>of</strong> time to discharge the<br />
capacitor. After <strong>that</strong> the pin is config-<br />
IC2<br />
1<br />
RESET PB0<br />
5<br />
7<br />
PB2 PB4<br />
2<br />
3<br />
PB3 PB1<br />
6<br />
ATTiny15L<br />
12/2006 - elektor electronics 39<br />
C1<br />
10n<br />
IC1<br />
5<br />
PB0 RESET<br />
1<br />
2<br />
PB4 PB2<br />
7<br />
6<br />
PB1 PB3<br />
3<br />
ATTiny15L<br />
C2<br />
100n<br />
MAX1473<br />
DSP<br />
DFFB<br />
DSN<br />
DFO<br />
OPP<br />
AGND AGND DGND<br />
5<br />
10<br />
13<br />
23<br />
22<br />
20<br />
19<br />
21<br />
C4<br />
1n<br />
C9<br />
100p<br />
C2<br />
10n<br />
C11<br />
100n<br />
L1<br />
Ø 15mm<br />
C5<br />
2p7<br />
R3<br />
220k<br />
C10<br />
47n<br />
C6<br />
220p<br />
1M<br />
10k<br />
R1<br />
R2<br />
DATA<br />
JP1<br />
LEARN<br />
Figure 2. The receiver is somewhat larger, primarily due to the extensive circuitry around the MAX1473.<br />
8<br />
4<br />
L1<br />
*<br />
3p3<br />
4cm 4cm<br />
*<br />
VDD<br />
GND PAGND<br />
C4<br />
10n<br />
5<br />
EN XTAL1<br />
1<br />
IC2<br />
X1<br />
6<br />
DATA<br />
MAX1472<br />
4<br />
PAOUT XTAL2<br />
8<br />
13.560MHz<br />
C3<br />
*<br />
7<br />
2 3<br />
+5V<br />
8<br />
4<br />
S1<br />
050364 - 11<br />
C12<br />
100n<br />
BT1<br />
CR2032 3V<br />
see text *<br />
Figure 1. The transmitter consists <strong>of</strong> only two ICs and can be built in a very compact form.<br />
820 Ω<br />
R4<br />
D1<br />
LOW<br />
CUR<br />
820 Ω<br />
050364 - 12<br />
R5<br />
D2<br />
OUT1<br />
OUT2
TECHNOLOGY READER CIRCUITS<br />
ured as an input, which also means <strong>that</strong><br />
an internal pull-up resistor is connected<br />
to the pin. The capacitor is charged via<br />
this resistor, but the charging time constant<br />
is much longer than the processor<br />
speed. During the interval when the<br />
input is still low, the value <strong>of</strong> the key is<br />
changed in rapid succession by a certain<br />
algorithm. This continues until the<br />
capacitor is fully charged. The input<br />
read as a ‘1’ at this point, at which time<br />
the key value stops changing. This<br />
results in a key with a random value.<br />
The randomness arises from the fact<br />
<strong>that</strong> the charging process is slow relative<br />
to the processor speed. The charging<br />
time corresponds to approximately<br />
10,000 processor cycles. Tests have<br />
shown <strong>that</strong> the charging time is not<br />
entirely constant. A 0.01-percent<br />
change in the charging time is sufficient<br />
to yield a different result. This<br />
also shows <strong>that</strong> two different transmitters<br />
will never generate the same key,<br />
especially because most capacitors<br />
have a tolerance <strong>of</strong> around 5%.<br />
With a normal start-up process<br />
(switching on power), the transmitter<br />
first reads the key present in memory,<br />
but it cannot be transmitted just like<br />
<strong>that</strong>. A preamble with a duty cycle <strong>of</strong><br />
exactly 50% is transmitted first to allow<br />
the operating point <strong>of</strong> the data slicer to<br />
be adjusted. The transitions in the preamble<br />
also serve to synchronise the<br />
timing at the receiver end with the timing<br />
at the transmitter end. A start bit<br />
is transmitted after the preamble to<br />
indicate <strong>that</strong> the key will be transmitted<br />
next. The ‘real’ data is only sent<br />
after the start bit, after which the<br />
transmitter is switched <strong>of</strong>f immediately<br />
and the microcontroller enters the<br />
power-down mode to minimise battery<br />
consumption.<br />
A different program is naturally necessary<br />
at the receiver end. In contrast to<br />
the transmitter, the receiver is always<br />
on. In this case the microcontroller listens<br />
to see whether anything is being<br />
received. If it is, it checks whether the<br />
received data stream has the correct<br />
format, which includes checking<br />
whether the start bit synchronisation<br />
is valid. After this it reads the key and<br />
compares it with the value <strong>of</strong> the key<br />
stored in its EEPROM memory.<br />
The microcontroller has a jumper <strong>that</strong><br />
enables it to read the key. If the jumper<br />
is fitted, the receiver is in ‘learn mode’.<br />
If a key is received in this mode, it is<br />
stored in the EEPROM. This means<br />
<strong>that</strong> the first time the receiver is<br />
switched on, the jumper must be fitted<br />
40<br />
and the code transmitted using the key<br />
transmitter so the key can be stored in<br />
the receiver’s memory. After the<br />
jumper is removed, the receiver should<br />
switch its outputs when the key transmitter<br />
is activated. It may be necessary<br />
to disconnect the receiver<br />
antenna for this procedure and activate<br />
the transmitter close to the receiver.<br />
This will reduce the effect <strong>of</strong> any interference<br />
signals present at 433.92 MHz.<br />
The watchdog timer is also enabled in<br />
the microcontroller on the receiver end.<br />
If the program counter is affected by a<br />
noise pulse on the supply line, for<br />
instance, which can lead to a ‘hung’<br />
system, the microcontroller will be<br />
reset automatically after approximately<br />
1 second and the receiver will execute<br />
a normal start-up.<br />
Data slicer and Manchester coding<br />
The data slicer in the receiver is built<br />
around an opamp in the receiver IC<br />
<strong>that</strong> is intended to be used for this purpose.<br />
A data slicer is simply a comparator<br />
with a reference level <strong>that</strong> is automatically<br />
set when a data signal with<br />
a duty cycle <strong>of</strong> 50% is received. It is<br />
thus important <strong>that</strong> the duty cycle <strong>of</strong><br />
the data signal is in fact 50%. Manchester<br />
coding is used to achieve this result.<br />
The circuit <strong>of</strong> the data slicer is shown<br />
in Figure 3. The time constant <strong>of</strong> R<br />
and C is large relative to the data bit<br />
rate <strong>that</strong> is used. As a result, the DC<br />
level at the inverting input is equal to<br />
the average value <strong>of</strong> the received signal.<br />
With a 50% duty cycle, it will thus<br />
be exactly halfway between the minimum<br />
and maximum values. However,<br />
a certain amount <strong>of</strong> hysteresis is desirable<br />
because the receiver also generates<br />
noise when no signal is present or<br />
the signal is relatively weak. This is<br />
provided by Rl and R2.<br />
It is also necessary to have the transmitter<br />
send a preamble before the<br />
actual data. The preamble consists <strong>of</strong><br />
a series <strong>of</strong> clock pulses with a duty<br />
cycle <strong>of</strong> 50% and a period <strong>that</strong> is much<br />
shorter than the RC time constant <strong>of</strong><br />
the data slicer. This ensures <strong>that</strong> the<br />
operating point <strong>of</strong> the data slicer is set<br />
properly. Manchester coding must be<br />
used to achieve the required 50% duty<br />
cycle with the signal used here. This<br />
essentially amounts to EXORing the<br />
data with a clock signal having the<br />
same period as the bit interval.<br />
The original bit stream is then recovered<br />
in the same manner by EXORing<br />
RSSI<br />
R1<br />
R<br />
C<br />
the received data with a clock signal.<br />
A drawback <strong>of</strong> Manchester coding is<br />
<strong>that</strong> it increases the bandwidth <strong>of</strong> the<br />
transmitted signal by a factor <strong>of</strong> 2, but<br />
this is not a problem with the low bit<br />
rate used here.<br />
In theory, the bytes output by the<br />
decoding logic when the clock is high<br />
are the same as the bytes output by<br />
the decoding logic when the clock is<br />
low. Both bytes are in fact decoded by<br />
the receiver s<strong>of</strong>tware. The second byte<br />
should essentially be a copy <strong>of</strong> the first<br />
one. The correctness <strong>of</strong> the timing is<br />
monitored closely by comparing the<br />
two bytes after each set <strong>of</strong> eight<br />
decoded bits.<br />
Timing<br />
The most important aspect with regard<br />
to the algorithms used in the s<strong>of</strong>tware<br />
at both ends (transmitter and receiver)<br />
is proper timing. The transmitter must<br />
generate a bit stream with a certain<br />
frequency, and the receiver must be<br />
able to recover it with sufficient accuracy.<br />
For this reason, the key transmitter<br />
sends the receiver a preamble consisting<br />
<strong>of</strong> clock pulses at the same frequency<br />
as the bit rate before it sends<br />
the coded 24-bit key. The preamble is<br />
followed by a start bit <strong>that</strong> enables the<br />
receiver to deduce <strong>that</strong> the preamble is<br />
finished and the actual data will follow.<br />
The ATtiny15L microcontrollers at each<br />
end run on their internal RC clocks. A<br />
calibration byte for the clock generator is<br />
programmed into each microcontroller<br />
by the manufacturer. However, this calibration<br />
value is intended to be used<br />
with a supply voltage <strong>of</strong> 5 V. As the<br />
transmitter operates at 3 V, its clock frequency<br />
is lower than it would be at 5 V.<br />
For this reason, an extra provision has<br />
been made in the s<strong>of</strong>tware <strong>of</strong> the<br />
receiver. With the receiver in learn mode<br />
(as described below), the receiver<br />
R2<br />
050364 - 13<br />
DATA OUT<br />
Figure 3. Design <strong>of</strong> the data slicer in the<br />
MAX1473.<br />
elektor electronics - 12/2006
copies the timing <strong>of</strong> the transmitter as well as its 24-bit<br />
key. Both values are stored in the EEPROM <strong>of</strong> the microcontroller<br />
and used when the receiver is operating in the<br />
normal mode.<br />
Programming settings<br />
The code for the ATtiny microcontrollers in the transmitter<br />
and receiver is available free <strong>of</strong> charge on the<br />
Elektor Electronics website under item number<br />
050364-11 (see month <strong>of</strong> publication). The microcontrollers<br />
must be programmed using a suitable programmer<br />
before they are fitted to the circuit boards.<br />
When you program the microcontroller, don’t forget to<br />
read the oscillator calibration byte from the signature<br />
memory <strong>of</strong> the microcontroller and reprogram it in flash<br />
memory location 1023 ($3FF). It is also important to tick<br />
BOD as enabled and set the BOD level to 4.0 V for the<br />
receiver or 2.7 V for the transmitter. If BOD is not programmed,<br />
the content <strong>of</strong> the EEPROM memory (which<br />
contains the key code) can be affected when power is<br />
switched on or <strong>of</strong>f, with the result <strong>that</strong> things may no<br />
longer work properly.<br />
The ‘very quickly rising power’ fuse settings (CKSEL =<br />
11) must also be programmed for the transmitter and<br />
the receiver. This is partly related to proper operation <strong>of</strong><br />
the watchdog timer.<br />
Initial use<br />
After you have fully assembled the transmitter board,<br />
you must first activate it so it can generate and store a<br />
code. It’s a good idea to do this a couple <strong>of</strong> times to be<br />
sure <strong>that</strong> a 24-bit code has been generated and stored.<br />
Next, fit J1 on the receiver board. Then switch on the<br />
receiver, but do not connect any antenna yet (to avoid<br />
picking up interference). Hold the transmitter close to<br />
the receiver board and activate it a couple <strong>of</strong> times.<br />
Now remove J1 while the receiver is still on and reset<br />
the receiver (by switching it <strong>of</strong>f and on) without J1. The<br />
supply voltage must drop to nearly zero during this<br />
process, so watch out for the effects <strong>of</strong> any large capacitors<br />
in the power supply. If everything goes well, the<br />
LED connected to OUT1 <strong>of</strong> the receiver will now light<br />
up for around 1 second each time you press the transmit<br />
button. To be on the safe side, hold the transmit<br />
button <strong>of</strong> the receiver pressed for at least 1 second<br />
each time you activate the transmitter.<br />
If everything is working the way it should, you can connect<br />
the receiver outputs to the device or circuit to be<br />
operated. Bear in mind <strong>that</strong> it may be necessary to connect<br />
a buffer stage or semiconductor relay between the<br />
receiver and the load.<br />
[1] Crystals used in this project:<br />
www.hongkongcrystal.com<br />
Tx: 9SMI356000E03FAFZOOO<br />
Rx: 9SMI322560E03FAFZOOO<br />
(050364-1)<br />
Coil data<br />
L1 (transmitter): 3 turns 0.3 mm dia. silver-plated copper<br />
wire, coil diameter 2.5 mm, length 5 mm<br />
L1 (receiver): see Figure 2.<br />
L2 (receiver): see Figure 2<br />
12/2006 - elektor electronics<br />
Advertisement<br />
Pr<strong>of</strong>essional Features – Exceptional Price<br />
34 Channels sampled at 500 MHz<br />
Sophisticated Multi-level Triggering<br />
Transitional Sampling / Timing and State<br />
Connect this indispensable tool to your PC’s<br />
USB 1.1 or 2.0 port and watch it pay for itself within hours!<br />
Economical<br />
2-day<br />
Shipping!<br />
500 MHz Max.Timing Mode<br />
Sample Rate (internal clock)<br />
200 MHz Max. Sample Rate<br />
State Mode (external clock)<br />
Multi-level Triggering on Edge,<br />
Pattern, Event Count, Group<br />
Magnitude/Range, Duration etc.<br />
Real-Time Hardware Sample<br />
Compression<br />
Qualified (Gated) State Mode<br />
Sampling<br />
Intronix Test Instruments, Inc.<br />
16421 N.Tatum Blvd. Unit 130<br />
Phoenix,Arizona 85032 USA<br />
Tel: (001) 602 493-0674<br />
Fax: (001) 602 493-2258<br />
www.pcTestInstruments.com<br />
www.pcTestInstruments.com<br />
Interpreters for I2C, SPI and<br />
RS232 included<br />
Integrated 300 MHz Frequency<br />
Counter<br />
+6V to -6V Adjustable Logic<br />
Threshold supports virtually all logic<br />
families<br />
Full version <strong>of</strong> s<strong>of</strong>tware free to<br />
download<br />
Mictor adapter available<br />
Visit our website for screenshots, specifications and<br />
to download the easy-to-use s<strong>of</strong>tware.<br />
* The amount <strong>of</strong> £210 was calculated at the time this ad<br />
was created. The actual price will depend upon the<br />
exchange rate at the time <strong>of</strong> purchase.<br />
Price does not include the UK VAT <strong>of</strong> 17.5% plus a small<br />
import fee <strong>of</strong> typically £5-10. These fees will be collected<br />
at the time <strong>of</strong> delivery (companies can claim a refund for<br />
the 17.5% VAT from HMRC). E&OE
HANDS-ON HOME & GARDEN<br />
Go with the Fl<br />
F<br />
Jürgen Maiß<br />
In this day and age enjoying<br />
constant hot water should<br />
not be an expensive luxury.<br />
All the same, the way some<br />
households squander energy<br />
to provide this on tap makes<br />
you wonder. Our novel circuit<br />
saves both your bank<br />
balance and the environment!<br />
The circulation pump in a heating system<br />
is the device <strong>that</strong> makes possible<br />
the accustomed luxury <strong>of</strong> having hot<br />
water at the turn <strong>of</strong> the tap. Unavoidable<br />
heat losses in the plumbing system<br />
and the constant operation <strong>of</strong> the<br />
circulation pump lead to pr<strong>of</strong>ligate<br />
waste <strong>of</strong> energy, however. In fact,<br />
according to Oxford University’s Environmental<br />
Change Institute, the pump<br />
consumes as much energy as lighting<br />
or the fridge in most households, and<br />
a pan-European drive is now underway<br />
to find ways <strong>of</strong> saving costs for<br />
what is one <strong>of</strong> the most ignored electrical<br />
devices in the home. To cut<br />
power consumption we need to lag all<br />
pipes well and reduce the amount <strong>of</strong><br />
time <strong>that</strong> the pump operates to only<br />
when hot water is actually required.<br />
There are already a variety <strong>of</strong> control<br />
systems on the market for managing<br />
circulation pumps. One <strong>of</strong> these relies<br />
on flow sensors, which react adequately<br />
fast but are hardly simple to<br />
install (they require plumbing into the<br />
pipe system). Other devices observe<br />
42<br />
temperature variations. These determine<br />
the temperature difference<br />
between the hot water and circulation<br />
pipes, using any variation from the<br />
desired value as the trigger. The systems<br />
are both reliable and very simple<br />
to install, since no ‘invasive action’ is<br />
necessary to the plumbing. Unfortunately<br />
the sluggish action <strong>of</strong> the temperature<br />
sensors means they do not<br />
operate very rapidly. One feature <strong>that</strong><br />
both systems share is their relatively<br />
high purchase cost. Our approach here<br />
takes a rather different route. A simple,<br />
readily available piezo sounder used as<br />
an acoustic emission sensor detects<br />
the sound <strong>of</strong> flowing water in the<br />
plumbing system. This is what we use<br />
as the switching trigger.<br />
Piezoelectric effect<br />
Piezoelectric sounders, also known as<br />
electronic buzzers, are used in many<br />
electronic circuits as audible transducers<br />
or ‘bleepers’. Easy to use, they also<br />
take up little space and are extremely<br />
affordable. A change in the voltage
ow<br />
SENSOR<br />
C1<br />
47n<br />
12/2006 - elektor electronics<br />
R1<br />
100k 100k<br />
R2<br />
1k<br />
R3<br />
1M R6<br />
100k<br />
3 7<br />
IC1<br />
6<br />
C3<br />
3 7<br />
2<br />
4<br />
10n<br />
2<br />
IC2<br />
LTC1049<br />
R4<br />
P1<br />
100k<br />
C2<br />
100n<br />
10k<br />
C4<br />
Piezoelectric transducer<br />
controls domestic water system<br />
4<br />
LTC1049<br />
R5<br />
100n<br />
applied to the piezo crystal in the<br />
sounder deforms it slightly, an effect<br />
<strong>that</strong> is used to generate sound. The<br />
principle is reversible too, enabling the<br />
transducer to work as a highly sensitive<br />
‘microphone’ as well. The variations<br />
in voltage charge resulting from<br />
altered mechanical stress on the crystal<br />
structure can be registered electronically<br />
and processed further. Piezoelectric<br />
sensors are widely used today in<br />
workshop tools, for automotive applications<br />
and in technical setups as<br />
pressure, power and dynamic<br />
accelerometer devices.<br />
The pump control system shown in<br />
Figure 1 comprises several modules,<br />
each with their own function.<br />
• The first is a preamplifier stage<br />
with an amplification factor <strong>of</strong> from 10<br />
to 1,000. The signal coming from the<br />
sensor has a value in the region <strong>of</strong> 100<br />
to 300 µV and is delivered via coupling<br />
capacitor C1 to the non-inverting<br />
input <strong>of</strong> IC1. The amplification <strong>of</strong><br />
this stage is set by trimpot P1. The<br />
6<br />
C5<br />
10n<br />
1M<br />
R7<br />
51k<br />
5k6<br />
R8<br />
3<br />
2<br />
IC3<br />
7<br />
4<br />
LTC1049<br />
R15<br />
P2<br />
20k<br />
6<br />
C6<br />
1µ<br />
C7<br />
33n<br />
100k<br />
6<br />
VCC<br />
1<br />
FIN SWIN<br />
5<br />
IC4 R<br />
LM2907<br />
RC GND<br />
4<br />
7<br />
2<br />
C<br />
3<br />
R12<br />
+9V...+12V D4<br />
78L05<br />
+5V<br />
1N4007<br />
C11<br />
10µ<br />
25V<br />
C10<br />
100n<br />
IC5<br />
C9<br />
100n<br />
C8<br />
1µ<br />
VSS<br />
8<br />
R13<br />
30k 10k<br />
5k1<br />
5k1<br />
Figure 1. The pump control comprises five capacitor-coupled stages.<br />
R17<br />
extremely low-noise precision amplifier<br />
LTC1049 (from Linear Technology)<br />
functions not only as an amplifier but<br />
also as an impedance adapter with a<br />
high-Z input resistor to avoid loading<br />
the sensor signal. Coupling capacitor<br />
C3 takes the now boosted sensor signal<br />
to a second amplifier (once more<br />
type LTC1049 with an amplification<br />
factor <strong>of</strong> 10). Total amplification is<br />
defined as A = [(R3 / (R4+P1)) +1] x<br />
[(R6 / R5) +1].<br />
• The signal, now amplified to around<br />
1.0 V is fed via C5 to a comparator<br />
stage. The switching threshold for IC3<br />
(yet again a LTC1049) is set in the<br />
region <strong>of</strong> around 0.5 to 1.55 V by R8,<br />
R15 and trimpot P2. If the sensor<br />
detects a flow signal, a squarewave<br />
output voltage <strong>of</strong> approximately 1 kHz<br />
appears at the output <strong>of</strong> IC3.<br />
• This squarewave signal is taken via<br />
C6 to the frequency-to-voltage converter<br />
LM2907 (IC4). This module<br />
operates in ‘speed switch-mode’ and<br />
above the frequency set as f = 1 / (2<br />
R9<br />
R10<br />
10k<br />
IC6<br />
2<br />
GP5/CIN<br />
GP4/COUT<br />
3<br />
4<br />
GP3/MC<br />
GP2<br />
5<br />
GP1<br />
6<br />
GP0<br />
7<br />
R11<br />
1<br />
8<br />
PIC12C675P<br />
R16<br />
10k<br />
DETECT<br />
C7R12) delivers a High output level,<br />
which —<br />
• provides the trigger signal for the<br />
PIC16F675 microcontroller <strong>that</strong> follows.<br />
As each <strong>of</strong> the switching elements is<br />
connected by coupling capacitors, they<br />
can all be modified easily for other<br />
applications too. The amplifier circuitry<br />
would, for instance, make a magnificent<br />
microphone amplifier, ultrasonic<br />
amplifier or ground motion detector<br />
(geophone). Linear Technology provides<br />
for its own modules a free and<br />
easy-to-use simulation tool called<br />
SwitcherCadIII. A simulation program<br />
for this project is contained in our Project<br />
S<strong>of</strong>tware archive file 060099-11.zip<br />
which can be downloaded free <strong>of</strong><br />
charge from www.elektor.com.<br />
S<strong>of</strong>t- and hardware<br />
The s<strong>of</strong>tware controlling the pump is<br />
relatively straightforward; the program<br />
can be modified according to requirements<br />
and the particular circuit appli-<br />
D3<br />
PUMP ON<br />
SCAN<br />
D2<br />
D1<br />
D6<br />
BC550<br />
1k<br />
060099 - 11<br />
R14<br />
+5V<br />
RE1<br />
T1<br />
M<br />
M1<br />
P<br />
230V<br />
N<br />
43
HANDS-ON HOME & GARDEN<br />
cation. After applying supply voltage<br />
the system is initialised, with all three<br />
LEDs activated sequentially. The flashing<br />
<strong>of</strong> SCAN indicator LED on Pin 7 <strong>of</strong><br />
the Controller indicates <strong>that</strong> monitoring<br />
is in progress. A High output produced<br />
by the analogue signal processing<br />
section is recognised by the microcontroller<br />
at pin 4 and activates the<br />
FLOW DETECT indicator LED on pin 6.<br />
False triggering is excluded to a large<br />
extent automatically as the Controller<br />
waits about three seconds for the High<br />
signal to be repeated. If this is the<br />
case, then the FLOW DETECT and<br />
PUMP ON indicator LEDs are activated<br />
for 50 s, together with circuit’s output<br />
pin 3 and consequently the relay as<br />
well. Turning on the hot water tap<br />
briefly (3 s) is sufficient to put the circulation<br />
pump into operation. Switching<br />
times should be adjusted in the<br />
s<strong>of</strong>tware according to the length and<br />
other characteristics <strong>of</strong> the plumbing.<br />
To facilitate this, the Project S<strong>of</strong>tware<br />
includes the source code in BASIC as<br />
well as the HEX data for programming<br />
the Controller.<br />
Construction and installation<br />
As the header photo shows, the author<br />
built the hardware using SMD technology,<br />
to enable everything to fit inside a<br />
small case. However, this is not<br />
absolutely necessary, after all the microcontroller<br />
comes in a normal DIL enclosure<br />
for easy reprogramming. Transparent<br />
silicon rubber (as used around sinks<br />
and showers) is ideal for fixing the sensor<br />
to the back <strong>of</strong> the enclosure, three or<br />
four small fixing pads on the edge <strong>of</strong> the<br />
sensor being entirely adequate. Figure<br />
2 indicates how the little device can<br />
be clamped to the hot water pipe with<br />
a couple <strong>of</strong> cable ties.<br />
The Controller switches the circulation<br />
pump on and <strong>of</strong>f using a transistor<br />
driver stage and a suitable relay. The<br />
relay is connected (looped) into the<br />
Live (L) wire <strong>of</strong> the pump as shown.<br />
Since we are dealing with mains voltage<br />
here all connections to the relay<br />
must be protected from accidental<br />
touch contact and installed according<br />
to the IEE Wiring Regulations, which<br />
are the national standard to which all<br />
domestic and industrial wiring must<br />
conform in Britain.<br />
Both potentiometers should be<br />
adjusted to their middle setting the<br />
first time the circuit is installed, so as<br />
to give an amplification factor A <strong>of</strong><br />
around 500 (trimpot P1) and a signal<br />
switching threshold <strong>of</strong> around 1.0 V<br />
44<br />
Figure 2. Two cable ties clamp the enclosure and sensor (glued onto it) to the hot water pipe.<br />
(trimpot P2) for the signal amplitude.<br />
The final task is to turn on the hot<br />
water tap and adjust the overall signal<br />
amplification factor <strong>of</strong> the system at P1<br />
so <strong>that</strong> the circuitry recognises the<br />
noise <strong>of</strong> water flowing reliably (maximum<br />
amplification with the trimpot<br />
turned fully to the left). If required, the<br />
amplitude switching threshold can<br />
also be increased or reduced.<br />
Links:<br />
(060099-I)<br />
Data sheet LTC 1049:<br />
www.linear.com/pc/downloadDocume<br />
nt.do?navId=H0,C1,C1154,C1009,C1<br />
027,P1189,D3403<br />
Simulation program:<br />
http://ltspice.linear.com/s<strong>of</strong>tware/<br />
swcadiii.exe<br />
Data sheet LM2907:<br />
www.national.com/pf/LM/LM2907.ht<br />
ml#Datasheet<br />
University <strong>of</strong> Oxford/European<br />
Union SAVE II project:<br />
www.eci.ox.ac.uk/lowercf/<br />
eusave_circulation.html<br />
IEE Wiring Regulations:<br />
http://en.wikipedia.org/wiki/Electrical<br />
_wiring_(UK) and<br />
www.iee.org/Publish/WireRegs<br />
elektor electronics - 12/2006
This Issue:<br />
24-PAGE ‘E-TRIXX’ SUPPLEMENT<br />
escaped from the Elektor kitchen<br />
Next Issue:<br />
FREE CD-ROM FROM MICROCHIP/LABCENTER/ELEKTOR<br />
MPLAB — C30 Compiler — EXPLORER-16 — Proteus VSM for PICs<br />
Want to know everything each month?<br />
SELECT YOUR OWN ANNUAL SUBSCRIPTION<br />
AND RECEIVE A FREE 1W LUXEON LED TORCHLIGHT *<br />
Fill out the Order Form with this issue today!<br />
Subscription rates and conditions may be found at the back <strong>of</strong> this issue.<br />
* Offer available to Subscribers who have not held a subscription to Elektor<br />
Electronics during the last 12 months. Offer subject to availability.
CONTENTS<br />
Did someone ring? 4<br />
A touch more bling, perhaps? 5<br />
Empty battery? 6<br />
Lord and master! 7<br />
Battery saver circuit 7<br />
Battery indicator for the caravan 8<br />
When the siren sounds… 9<br />
Temperature-controlled switch 10<br />
Check your contacts 11<br />
Check Out Your LEDs 12<br />
It’s Wet! 13<br />
Dicing with LEDs 14<br />
Surf simulator 15<br />
Save Your Ears 17<br />
Electronic poltergeist 18<br />
Pump it up: MP3 booster 19<br />
Musical saw 20<br />
Luminous house number 22<br />
Applause generator 23<br />
collection<br />
Circuits Allsorts<br />
This December 2006 issue <strong>of</strong> Elektor Electronics comes<br />
with a free collection <strong>of</strong> simple yet useful and sometimes<br />
playful circuits for home construction. The circuits, we hope<br />
and expect, are easily understood and reproducible and<br />
should appeal to the less advanced electronics enthusiast,<br />
although more experienced readers are also bound to<br />
fi nd interesting bits and bobs to help them through the<br />
dark winter evenings in a pleasant and educational way.<br />
A deafening siren <strong>that</strong> will make burglars run <strong>of</strong>f<br />
— electronic dice adds fun to games — a lighting house<br />
number helps your friends and acquaintances fi nd your<br />
home more easily in the dark. Do you want to stand out<br />
from the crowd in the local disco, or encourage annoying<br />
visitors to leave early, with a bit <strong>of</strong> help from an electronic<br />
poltergeist? All these, and more, circuits may be found<br />
in this 24-page i-TRIXX supplement, which is <strong>of</strong>fered to<br />
you free <strong>of</strong> charge.<br />
All i-TRIXX circuits in this supplement originate from<br />
the Elektor labs and are spin-<strong>of</strong>fs from larger projects,<br />
scribblings on the back <strong>of</strong> envelopes, dead-bug fi ddling,<br />
‘quick and dirty’ solutions, or even design ideas <strong>that</strong><br />
eventually became so intriguing the designer just had<br />
to develop it out for enthusiasm, curiosity and technical<br />
satisfaction — all at the same time in not a few cases.<br />
In this respect, i-TRIXX are truly ‘tricks <strong>of</strong> the trade’ <strong>that</strong><br />
got pencilled down and eventually — with the help <strong>of</strong><br />
our editorial team — made it to this publication in print<br />
instead <strong>of</strong> just ending up in a drawer or the more<br />
contemporary Windows Recycle Bin.<br />
From over 30 years experience in publishing for electronics<br />
enthusiasts all over the world we know <strong>that</strong> the Christmas<br />
holidays are a great time for fun circuits <strong>that</strong> cost next to<br />
nothing to build, <strong>of</strong>ten from parts found in the junkbox<br />
(now’s a good time to clean it out!). Especially newcomers<br />
to the hobby will fi nd i-TRIXX useful to learn about the<br />
process <strong>that</strong> begins with the ability to ‘read’ a circuit<br />
diagram and culminates in powering up a fully working<br />
prototype.<br />
Have fun with the i-TRIXX collection!<br />
Jan Buiting, Editor
4<br />
Did someone ring?<br />
If you’re expecting an important visitor but you just have to step out for a<br />
moment, an electronic doorbell memory can come in handy so you can see<br />
whether someone rang while you were out. Of course, you can’t tell whether<br />
it was the visitor you were expecting who dropped by then, but a call to the<br />
mobile phone <strong>of</strong> the person concerned can quickly answer <strong>that</strong> question. A<br />
doorbell memory can also save you the trouble <strong>of</strong> going to the front door (if you<br />
live upstairs) when you think you heard the bell but aren’t sure. And if you can’t<br />
buy one, then <strong>of</strong> course you can build one yourself! Read on to fi nd out how.<br />
Doorbell memory<br />
It takes only a handful <strong>of</strong> electronic components to<br />
build a handy tale-tale with an LED <strong>that</strong> indicates<br />
whether someone pressed the button <strong>of</strong> your doorbell.<br />
How many times have you thought you heard your<br />
doorbell while watching television in the evening? The<br />
sound <strong>of</strong> the well-known ‘ding–dong’ chimes occurs all<br />
too <strong>of</strong>ten, especially during the many commercials <strong>that</strong><br />
nowadays remind us at the most inconvenient times<br />
<strong>that</strong> the gripping fi lm we’re watching is only a fantasy.<br />
A glance at the LED <strong>of</strong> the doorbell memory will tell<br />
you whether you have to go to the door or can try to<br />
escape the ads by zapping to a different channel. Or<br />
if you’re expecting someone but have to make a quick<br />
trip to the neighbours to borrow a few beers for the<br />
occasion, it can be handy to be able to see whether<br />
your visitor already arrived while you were out. If so,<br />
you can always call him or her on the mobile to confess<br />
<strong>that</strong> you hadn’t properly prepared for the expected<br />
visit.<br />
The circuit is as simple as it<br />
is effective. It is connected<br />
in parallel with the bell and<br />
powered by a 3-V supply<br />
formed by two 1.5-V penlight<br />
batteries connected in series.<br />
The doorbell memory draws<br />
so little current <strong>that</strong> a set <strong>of</strong><br />
batteries will last several years<br />
in normal use.<br />
The circuit works as follows.<br />
When the supply voltage<br />
is switched on with switch<br />
S1, capacitor C1 (initially<br />
uncharged) prevents<br />
transistors T1 and T2 from<br />
conducting. LED D2 is <strong>of</strong>f,<br />
Electronics inside out !<br />
D1<br />
1N4002<br />
doorbell<br />
BC547B<br />
BC557B<br />
C<br />
R1<br />
E<br />
B<br />
470k<br />
and the memory is armed. When the doorbell button<br />
is pressed, the memory circuit receives an AC or<br />
DC voltage via diode D1, depending on the type <strong>of</strong><br />
doorbell. It can handle either type. Transistor T1<br />
thus receives a base current, so it starts conducting<br />
and drives T2 into conduction. The LED lights up as<br />
an indication <strong>that</strong> the doorbell has rung (i.e. was<br />
energised). The combination <strong>of</strong> transistor T2 and<br />
resistor R3 keeps T1 conducting after the bell voltage<br />
goes away (when the button is no longer pressed).<br />
The memory remains in this state until switch S1 is<br />
opened. This switch thus acts as a reset switch as well<br />
as a power switch.<br />
The circuit can be assembled compactly on a small<br />
piece <strong>of</strong> perforated prototyping board, so it can be<br />
fi tted into just about any model <strong>of</strong> doorbell. The<br />
transistors can be replaced by other, equivalent types<br />
as long as you use a combination <strong>of</strong> NPN and PNP<br />
types.<br />
C1<br />
10n<br />
T1<br />
R2<br />
100k<br />
BC547B<br />
R3<br />
47k<br />
+3V<br />
1k2<br />
T2<br />
BC557B<br />
D2<br />
R4<br />
1mA<br />
S1<br />
BT1<br />
2x 1V5<br />
051001 - 11<br />
i-TRIXX collection - 12/2006
Q11<br />
Q12<br />
Q13<br />
Q5<br />
Q4<br />
Q6<br />
Q3<br />
1<br />
2<br />
3<br />
4<br />
5<br />
6<br />
7<br />
74HC4060<br />
Q11<br />
Q12<br />
Q13<br />
Q5<br />
Q4<br />
Q6<br />
Q3<br />
V<br />
DD 16<br />
Q9<br />
Q7<br />
Q8<br />
R<br />
PI<br />
PO<br />
PO<br />
15 Q9<br />
14 Q7<br />
13 Q8<br />
12 RESET<br />
11 PI<br />
10 PO<br />
8 GND<br />
9 PO<br />
Figure 2. Fit the<br />
components as close<br />
together as possible on<br />
a piece <strong>of</strong> perforated<br />
circuit board to keep the<br />
fi nished circuit compact.<br />
R6<br />
BT1<br />
3V<br />
10k<br />
100k<br />
R5<br />
C1<br />
47n<br />
1M<br />
P1<br />
12<br />
10<br />
9<br />
11<br />
IC1<br />
RCX<br />
CT=0<br />
CTR14<br />
!G<br />
RX<br />
CX +<br />
16<br />
CT<br />
3<br />
4<br />
5<br />
6<br />
7<br />
8<br />
9<br />
11<br />
12<br />
13<br />
C2<br />
100n<br />
7<br />
5<br />
4<br />
6<br />
14<br />
13<br />
15<br />
1<br />
2<br />
3<br />
8<br />
74HC4060<br />
i-TRIXX collection - 12/2006 5<br />
R1<br />
R2<br />
R3<br />
R4<br />
8k2<br />
3k9<br />
2k2<br />
1k<br />
D1<br />
BAT85<br />
D2<br />
BAT85<br />
D3<br />
BAT85<br />
D4<br />
BAT85<br />
051002 - 11<br />
D5<br />
Figure 1. A binary<br />
counter (IC1) raises the<br />
current through LED<br />
D5 from zero to the<br />
maximum value in 16<br />
steps.<br />
Want to attract attention at bling-bling parties? That’s not so easy, since all the party animals there<br />
are doing their best to grab attention. The more bling, the more looks you get. An electronic disco<br />
brooch with a cool skin as an eyecatcher can certainly help. If you make it yourself, your chances <strong>of</strong><br />
success lie entirely in your own hands. And it’s certainly not all <strong>that</strong> diffi cult!<br />
A touch more bling, perhaps?<br />
Disco brooch<br />
The disco brooch described here is a small but<br />
attention-getting bit <strong>of</strong> electronic circuitry. It lights<br />
up a LED in steps until it reaches maximum brightness<br />
and then goes out, after which the entire process<br />
repeats itself, so you can attract attention at discos<br />
and parties. If you solder all the components on a small<br />
piece <strong>of</strong> perforated prototyping board, possibly along<br />
with a small battery, you can keep the whole thing nice<br />
and compact. We’ll come back to <strong>that</strong> later.<br />
First let’s have a brief look at how the circuit works.<br />
It is built around IC1 (see Figure 1), which is a binary<br />
counter chip. A digital pattern <strong>of</strong> ones and zeros<br />
appears at its outputs. Only the outputs on pins 4 to<br />
7 are used in this particular case. They thus generate<br />
a count from 0 (binary 0000) to 15 (binary 1111). All<br />
outputs are zero at the start, and the LED is dark.<br />
Resistors R1–R4 are dimensioned such <strong>that</strong> the current<br />
fl owing through LED D5 increases in steps to its<br />
maximum value during the following 15 states <strong>of</strong> the<br />
counter. This all happens at a rate <strong>that</strong> is controlled by<br />
the RC network connected to pins 9–11 <strong>of</strong> the IC. At<br />
the end <strong>of</strong> the cycle, the counter goes back to zero and<br />
the LED goes dark. You can use trimpot P1 to adjust<br />
the duration <strong>of</strong> each <strong>of</strong> the steps. The maximum length<br />
<strong>of</strong> the full step cycle is 1.5 seconds, and the minimum<br />
length is 0.14 seconds. At the minimum time setting, it<br />
appears <strong>that</strong> the LED just blinks.<br />
Diodes D1–D4 isolate the individual outputs <strong>of</strong> IC1 so<br />
they do not interfere with each other. They are Schottky<br />
diodes, which have a lower forward voltage drop<br />
than normal diodes. As a result, there will be enough<br />
voltage to provide adequate current through resistors<br />
R1–R4 (and thus through the LED) even when the<br />
battery voltage is low. Of course, the brightness <strong>of</strong> the<br />
LED still depends on the battery voltage. In practice,<br />
a battery voltage <strong>of</strong> 3 V gives very nice results. This<br />
voltage can be provided by a button cell, since the<br />
maximum current at this supply voltage is only around<br />
2 mA. If you use a suitable battery holder designed for<br />
PCB mounting, you can tuck the button cell away nicely<br />
on the circuit board (see Figure 2).<br />
Of course, you also have to be able to switch the<br />
brooch on and <strong>of</strong>f. You can use a safety pin for this<br />
purpose, and at the same time it can do what it is<br />
designed for, which is to attach the brooch to your<br />
clothing. To prepare the safety pin for this purpose, cut<br />
a piece out <strong>of</strong> the fi xed leg. That represents the opened<br />
switch. The easiest way to do this is to fi rst solder<br />
the pin in the proper position on the circuit board<br />
(see Figure 3). Use a bit <strong>of</strong> sandpaper to roughen the<br />
surface <strong>of</strong> the pin fi rst so the solder will stick better.<br />
After the pin is soldered securely in place, cut out a<br />
piece in the middle and your DIY switch is ready to use.<br />
Figure 3. You can make<br />
an on/<strong>of</strong>f switch from a<br />
safety pin, which also<br />
serves to pin the brooch<br />
to your clothing.
Photo: www.energizer.com<br />
6<br />
M1<br />
Empty battery?<br />
Is the battery empty, or is there something wrong with the device? That’s always a diffi cult<br />
question when your walkman or some other battery-powered device appears to be dead when<br />
you switch it on. Before you take it to the shop for servicing, the fi rst thing you should do is to<br />
test the battery or batteries. Of course, this means you need a reliable battery tester, but it also<br />
means you can limit the damage to the cost <strong>of</strong> a battery or two and a one-time investment <strong>of</strong><br />
time and money in building a suitable tester.<br />
Battery tester<br />
Many commercial battery testers consist <strong>of</strong> nothing<br />
more than a resistor, a simple little meter and a<br />
pushbutton. Some manufacturers include an even<br />
simpler tester with a set <strong>of</strong> batteries, consisting <strong>of</strong> a<br />
strip <strong>of</strong> plastic with a layer <strong>of</strong> some sort <strong>of</strong> electrically<br />
conductive material <strong>that</strong> changes colour when a<br />
current fl ows through it. If you press this strip over the<br />
battery between the positive and negative terminals, a<br />
fully charged battery will cause a more intense change<br />
in colour than a partially discharged battery. Naturally,<br />
tests <strong>of</strong> this sort do not provide especially reliable or<br />
accurate results.<br />
The idea behind the circuit described here is to load a<br />
single battery, a set <strong>of</strong> batteries connected in series,<br />
a rechargeable battery, or even a small button cell<br />
with a reasonably constant current and use a separate<br />
multimeter or voltmeter module (M1) to check the<br />
voltage. A quickly decreasing voltage indicates <strong>that</strong><br />
the battery or batteries will have to be replaced soon.<br />
E<br />
C<br />
B<br />
BD139<br />
BT1<br />
S1<br />
22Ω<br />
R1<br />
T1<br />
BD139<br />
Electronics inside out !<br />
T2<br />
BF245<br />
G D<br />
S<br />
BC640<br />
C1<br />
100n<br />
T3<br />
BC639<br />
BC640<br />
E B<br />
C<br />
T4<br />
2x<br />
BC639<br />
4k7<br />
R2<br />
051003 - 11<br />
D1<br />
BAT85<br />
T5<br />
BF245B<br />
If a constant-current circuit is used for the load, the<br />
current can never too be large and there is no need<br />
to make an adjustment for the number <strong>of</strong> cells. The<br />
constant-current circuit is specially designed to work<br />
with a voltage as low as 0.9 V. It’s quite diffi cult to<br />
make a circuit work at even lower voltages with normal<br />
transistors.<br />
The active constant-current element is transistor T1.<br />
The current through it is held constant by comparing<br />
the voltage across resistor R1 in its collector path with<br />
a relatively constant reference voltage across diode D1.<br />
This comparison is provided by differential amplifi er<br />
T3/T4. The voltage across diode D1 (a Schottky type) is<br />
reasonably constant by nature, but it is also stabilised<br />
by using FET T5 as a simple constant-current sink.<br />
T5 also limits the current at relatively high voltages<br />
(with several batteries in series). The constant voltage<br />
across D1 is transferred to resistor R12 by differential<br />
amplifi er T1/T2, so a constant current fl ows through<br />
R1 from the battery or batteries being tested. R1 has<br />
a relatively low resistance, so this current is larger<br />
than the current drawn by the rest <strong>of</strong> the circuit. The<br />
quiescent current, which incidentally is also reasonably<br />
constant, is thus negligible. The test current thus<br />
remains reasonably constant while the battery or<br />
batteries is/are being tested.<br />
The maximum battery voltage <strong>that</strong> the tester can<br />
handle is set by T5, and here it is 30 V. To ensure <strong>that</strong><br />
T1 does not get too warm at high battery voltages,<br />
keep the test as short as possible. Use a pushbutton<br />
switch as a test switch so the battery being tested<br />
cannot be left under load by accident.<br />
In these days <strong>of</strong> environmental awareness<br />
it has become desirable to use batteries<br />
as effi ciently as possible. A lot <strong>of</strong> battery<br />
powered electronic devices do not switch<br />
themselves <strong>of</strong>f automatically, such as<br />
multimeters. Forgetting to turn these <strong>of</strong>f isn’t<br />
just a nuisance (since you’ll fi nd <strong>that</strong> you don’t<br />
have a spare battery at the crucial moment),<br />
but you’re also unnecessarily reducing the<br />
lifespan <strong>of</strong> the batteries and causing extra<br />
pollution. And it isn’t really necessary for<br />
those electronic thermometers to display the<br />
temperature day and night. As a skilful and<br />
environmentally aware i-TRIXXer you should<br />
make one or more <strong>of</strong> these small battery saver<br />
circuits.<br />
i-TRIXX collection - 12/2006
Photo: Tratec Telecom BV – Veenendaal NL<br />
Lord and master!<br />
S1<br />
BT1<br />
3V<br />
BP104<br />
i-TRIXX collection - 12/2006 7<br />
1M<br />
R1<br />
D1<br />
BC557B<br />
R2<br />
10k<br />
R3<br />
100 Ω<br />
T1<br />
D2<br />
051004 - 11<br />
BC557B<br />
Men in particular enjoy the convenience <strong>of</strong> television remote controls – <strong>of</strong>ten to the annoyance <strong>of</strong><br />
their female partners. Men apparently want to know what they’re missing when the TV is tuned to<br />
a particular programme, so they like to keep zapping to other channels. With the remote control in<br />
their hands, they feel like they are the lord and master <strong>of</strong> the TV set. They are thus completely at a<br />
loss if the remote control doesn’t work properly. There are many reasons why a remote control unit<br />
can malfunction, such as defective IR receiver in the TV set, a defect in the remote control, or empty<br />
batteries. Here a tester <strong>that</strong> can determine whether the remote control unit still emits an IR signal can<br />
come in handy. If you want to keep the IR reins fi rmly in hand, you can build your own IR detector.<br />
IR detector<br />
If you have a few remote control units around the<br />
house, you’ll appreciate this little circuit. The LED<br />
clearly indicates whether the remote control unit<br />
actually emits an IR signal when you press one <strong>of</strong> the<br />
buttons on the unit.<br />
The circuit uses a photodiode (D1) to sense the infrared<br />
light emitted by the remote control unit (if it is working<br />
properly). The plastic package <strong>of</strong> this diode acts as an<br />
IR fi lter <strong>that</strong> is only transparent to invisible light with<br />
a wavelength <strong>of</strong> 950 nm. Although there are probably<br />
some remote control units <strong>that</strong> use IR diodes operating<br />
at a different wavelength, the circuit has enough sensitivity<br />
to detect them as well.<br />
Battery saver circuit<br />
i-TRIXX presents a small electronic switch <strong>that</strong><br />
connects a battery to the equipment for a certain<br />
amount <strong>of</strong> time when a push-button is momentarily<br />
pressed. And we have also taken the ambient light<br />
level into account; when it is dark you won’t be able to<br />
read the display so it is only logical to turn the switch<br />
<strong>of</strong>f, even if the time delay hasn’t passed yet.<br />
The circuit is quite straightforward. For the actual<br />
switch we’re using a well-known mosfet, the BS170.<br />
A mosfet (T2 in the circuit) used in this confi guration<br />
doesn’t need a current to make it conduct (just a<br />
C<br />
B<br />
BP104<br />
If enough light falls on photodiode D1, an electrical<br />
current will fl ow through the diode. In fact, what happens<br />
is <strong>that</strong> the leakage current increases, since photodiodes<br />
are usually operated in reverse-biased mode (as<br />
is the case here). If the current is large enough, transistor<br />
T1 conducts and causes LED D2 to light up. If LED<br />
D2 remains dark, this means the remote control unit is<br />
not producing any IR light. This can be due to an empty<br />
battery (or batteries) or a fault in the internal circuitry.<br />
Pay careful attention to the polarisation <strong>of</strong> the photodiode<br />
when wiring it into the circuit. The cathode is<br />
clearly marked by a special pin. For LED D2, use a lowcurrent<br />
type <strong>that</strong> can handle a current <strong>of</strong> at least 7 mA.<br />
The detector can be powered by a pair <strong>of</strong> 1.5-V penlight<br />
cells connected in series.<br />
voltage), which makes the circuit very effi cient. When<br />
the battery is connected to the battery saver circuit<br />
for the fi rst time, capacitor C2 provides the gate <strong>of</strong><br />
the mosfet with a positive voltage, which causes T2<br />
to conduct and hence connect the load (on the 9 V<br />
output) to the battery (BT1). C2 is slowly charged<br />
up via R3 (i.e. the voltage across C2 increases). This<br />
causes the voltage at the gate to drop and eventually<br />
it becomes so low <strong>that</strong> T2 can no longer conduct,<br />
removing the supply voltage to the load. In this state<br />
the battery saver circuit draws a very small current<br />
<strong>of</strong> about 1 µA. If you now press S1, C2 will discharge<br />
E
BT1<br />
12V<br />
8<br />
D1<br />
BAT85<br />
1M<br />
47k<br />
R1<br />
R2<br />
1M<br />
R3<br />
T1<br />
220k<br />
R4<br />
T2<br />
R5<br />
Battery indicator for the caravan<br />
330 Ω<br />
2x<br />
BC547B<br />
D2<br />
T3<br />
BF245A<br />
BF245<br />
G D<br />
S<br />
BC547B<br />
C<br />
E<br />
B<br />
061005 - 11<br />
This i-TRIXX circuit can prevent a whole lot <strong>of</strong> trouble<br />
for those <strong>of</strong> you who go on holiday in a caravan.<br />
It would be a signifi cant damper on your holiday<br />
spirit when you are ready to leave the camping and<br />
discover <strong>that</strong> you have used your battery too much<br />
and <strong>that</strong> you are now unable to start the car. This<br />
annoyance can be avoided if you were warned early<br />
enough by an illuminated LED when the charge in the<br />
battery threatens to become too low. A quiet, out <strong>of</strong> the way, in the countryside<br />
camping is what modern people look for to be able to unwind. However, we do<br />
not want to be completely deprived <strong>of</strong> all our creature comforts. We don’t cope<br />
very long without electric light or a TV! And in the absence <strong>of</strong> a mains power<br />
outlet the car battery has to function as energy source, with the risk <strong>that</strong> later<br />
on there will be too little left to start the engine. The little circuit presented<br />
here gives you an early warning when the battery voltage (and therefore its<br />
stored energy) threatens to become too low.<br />
The setting <strong>of</strong> T1 and T2 determines whether LED D2<br />
will light up when the battery voltage drops below<br />
a certain level. Junction FET T3 is used as a current<br />
source in order to try to keep the current through the<br />
LED as constant as possible. In this way the indicator<br />
remains lit even when the battery is in a state <strong>of</strong> very<br />
deep discharge (< 4 volt). The LED is a good lowcurrent<br />
type <strong>that</strong> is still very bright at a very small<br />
current (1 to 2 mA). Voltage divider R1 and R2 has<br />
been calculated such <strong>that</strong> T1 will start to conduct when<br />
the voltage <strong>of</strong> the battery is greater than 12 V. If you<br />
think this threshold is too high (or: if you think <strong>that</strong> you<br />
can still start your car with a lower battery voltage),<br />
then you can reduce the value <strong>of</strong> R2 or replace it<br />
with a 50-k preset (connected as an adjustable<br />
resistor). When T1 conducts, the base current to T2 is<br />
interrupted and the collector <strong>of</strong> T2 will become high<br />
through R4. In this state T3 does not conduct and<br />
the LED is <strong>of</strong>f. When the battery voltage drops below<br />
12 V, T1 will block and T2 will start to conduct. R5 is<br />
now connected to ground via T2 which turns T3 into<br />
a current source <strong>of</strong> about 2 mA <strong>that</strong> drives the LED.<br />
There is, <strong>of</strong> course, a transition region during which<br />
and the circuit returns to its initial state, with a new<br />
turn-<strong>of</strong>f delay. Resistor R5 is used to limit the discharge<br />
current through the switch to an acceptable level.<br />
You only need to hold down the switch for a few<br />
hundredths <strong>of</strong> a second to fully discharge C2.<br />
In our prototype, connected between a 9 V battery<br />
and a load <strong>that</strong> drew about 5 mA, the output voltage<br />
started to drop after about 26 minutes. After 30<br />
minutes the voltage had dropped to 2.4 V. You should<br />
use a good quality capacitor for C2 (one <strong>that</strong> has a<br />
very low leakage current), otherwise you could have to<br />
wait a very long time before the switch turns <strong>of</strong>f!<br />
The ambient light level is detected using an LDR<br />
(R1). An LDR is a type <strong>of</strong> light sensor <strong>that</strong> reduces<br />
in resistance when the light level increases. We<br />
recommend <strong>that</strong> you use an FW150, obtainable from<br />
Electronics inside out !<br />
the current through the LED slowly increases; after<br />
all, T1 and T2 do not switch with infi nite gain! In our<br />
prototype the LED changed from fully <strong>of</strong>f to fully on<br />
at a voltage variation from 12 to 11 V. As a bonus, a<br />
partially illuminated LED gives a rough indication as to<br />
how much the voltage actually is. Diode D1 prevents<br />
the circuit from inadvertently giving up the ghost if the<br />
circuit is connected incorrectly to the battery (reverse<br />
polarity).<br />
In practice, because <strong>of</strong> variations in the specifi cations<br />
<strong>of</strong> the transistors, the threshold and the current level<br />
through the LED can be different. Test the circuit<br />
thoroughly before using it. If you want a brighter<br />
indicator, you can increase the current through the LED<br />
by replacing T3 with a BF245B or BF245C.<br />
When the LED is <strong>of</strong>f, the current through the circuit<br />
is barely 30 µA at a battery voltage <strong>of</strong> 14.4 V. With<br />
the LED is on and at a battery voltage <strong>of</strong> about 10 V,<br />
the current consumption is about 2 mA. Even with an<br />
illuminated LED, the circuit is not likely to be the cause<br />
<strong>of</strong> a fl at battery. Even a good quality battery will have<br />
a selfdischarge rate which is many times greater than<br />
the maximum current consumption <strong>of</strong> this circuit!<br />
BC547B<br />
C<br />
BS170<br />
D<br />
E<br />
B<br />
G<br />
S<br />
BT1<br />
9V<br />
R1<br />
LDR<br />
10M<br />
R2<br />
C1<br />
100n<br />
100 Ω<br />
C2<br />
100µ<br />
25V<br />
R4<br />
T1<br />
BC<br />
547B<br />
061003 - 11<br />
R5<br />
10M 100 Ω<br />
R3<br />
S1<br />
G<br />
T2<br />
S D<br />
BS170<br />
9V<br />
i-TRIXX collection - 12/2006
When the siren sounds…<br />
In Greek mythology, a siren was a demonic being<br />
(half bird, half woman). Later on this idea was<br />
transformed in art into a mermaid: a combination<br />
<strong>of</strong> a fi sh and a woman. Mechanical and<br />
electromechanical versions were invented even<br />
later, and electronic models were developed in<br />
the last century. Sirens are characterised by their<br />
ability to produce sounds <strong>that</strong> attract attention.<br />
With the exception <strong>of</strong> the fl esh-and-blood models,<br />
they are thus used to warn people in a particular<br />
area <strong>of</strong> impending danger. The electronic versions<br />
are the most suitable for DIY construction.<br />
Siren<br />
There are lots <strong>of</strong> different ways to make an electronic<br />
siren. Here we use a binary counter (IC1) and an<br />
analogue multiplexer (IC2, which is a digitally<br />
confi gurable switch). The counter is a type 4060 IC,<br />
which has an integrated oscillator. The oscillator<br />
generates the tone <strong>of</strong> the siren. The frequency <strong>of</strong> this<br />
tone depends on the resistance between pin 10 <strong>of</strong> IC1<br />
and the junction <strong>of</strong> C1 and R9.<br />
The trick here is <strong>that</strong> the analogue multiplexer adjusts<br />
the clock rate <strong>of</strong> the counter depending on the state <strong>of</strong><br />
the counter. The frequency <strong>of</strong> the oscillator decreases<br />
as the resistance between pin 10 <strong>of</strong> IC1 and the<br />
junction <strong>of</strong> C1 and R9 increases, and the lower the<br />
frequency <strong>of</strong> the oscillator, the longer the counter<br />
remains in its current state. This means <strong>that</strong> high<br />
frequencies present on pin 9 are generated for shorter<br />
times than low frequencies.<br />
The values <strong>of</strong> resistors R1–R8 increase in uniform steps<br />
<strong>of</strong> approximately 10 kΩ, with the result <strong>that</strong> the output<br />
on pin 9 is a series <strong>of</strong> eight decreasing frequencies, and<br />
this series is constantly repeated in cyclical fashion.<br />
Transistor T1 (BD139) and resistor R10 are included<br />
to boost the signal from pin 9 to a level suitable for<br />
e.g. Conrad as part number 183547-89. When<br />
there is too little light its resistance increases and<br />
potential divider R1/R2 causes transistor T1 to<br />
conduct. T1 then charges up C2 very quickly through<br />
R4, which limits the current to a safe level. This<br />
stops T2 from conducting and the load is turned <strong>of</strong>f.<br />
The choice <strong>of</strong> value for R2 determines how dark it<br />
has to be before T1 starts to conduct.<br />
The battery saver circuit can be added to devices<br />
<strong>that</strong> use 6 or 9 volt batteries and which don’t draw<br />
more than 100 mA. The circuit can be built on a piece<br />
<strong>of</strong> experimenter’s board and should be made as<br />
compact as possible so <strong>that</strong> it can be built into the<br />
battery powered device.<br />
R9<br />
R1<br />
R2<br />
R3<br />
R4<br />
R5<br />
R6<br />
R7<br />
R8<br />
C1<br />
33n<br />
1M<br />
10k0<br />
20k0<br />
30k1<br />
40k2<br />
49k9<br />
60k4<br />
69k8<br />
80k6<br />
i-TRIXX collection - 12/2006 9<br />
C2<br />
100n<br />
12<br />
IC1<br />
CT=0<br />
16<br />
CTR14 3<br />
9 !G<br />
CX<br />
4<br />
5<br />
10<br />
RX + 6<br />
11<br />
RCX<br />
CT<br />
7<br />
8<br />
13<br />
14<br />
15<br />
12<br />
1<br />
5<br />
2<br />
4<br />
0<br />
1<br />
2<br />
3<br />
4<br />
5<br />
6<br />
7<br />
C3<br />
100n<br />
VEE<br />
VDD<br />
9<br />
11<br />
12<br />
13<br />
8<br />
4060<br />
16<br />
MDX<br />
8x<br />
IC2<br />
4051<br />
7<br />
0<br />
7<br />
VSS<br />
COM<br />
8<br />
7<br />
5<br />
4<br />
6<br />
14<br />
13<br />
15<br />
1<br />
2<br />
3<br />
+9V<br />
11<br />
0<br />
10<br />
1<br />
9<br />
2<br />
G8<br />
3<br />
6<br />
National Archaeological<br />
Museum <strong>of</strong> Athens<br />
driving a loudspeaker. The sound<br />
produced by this circuit may be<br />
familiar to some <strong>of</strong> our readers<br />
(especially if their memories extend<br />
back to older types <strong>of</strong> pinball and<br />
arcade game machines).<br />
You can also adjust the characteristics <strong>of</strong> the sound,<br />
since this circuit is primarily an invitation to experiment<br />
with the component values – in particular R1–R8<br />
(10 kΩ minimum), but also C1. The values <strong>of</strong> R1–R8 do<br />
not have to follow a strictly increasing series; they can<br />
also be selected randomly.<br />
The current consumption is primarily determined by<br />
resistor R10 and the loudspeaker (in our case an 8-Ω<br />
type). The siren circuit draws approximately<br />
33 mA at a supply voltage <strong>of</strong> 9 V. The supply<br />
current is 11 mA at the minimum supply<br />
voltage <strong>of</strong> 4 V, and it increases to 60 mA at<br />
the maximum supply voltage <strong>of</strong> 15 V.<br />
100 Ω<br />
T1<br />
4051<br />
4060<br />
BD139<br />
R10<br />
LS1<br />
E<br />
BD139<br />
C<br />
B<br />
051007 - 11<br />
+9V<br />
BT1<br />
9V
10<br />
Temperature-controlled switch<br />
It sounds rather mysterious: a switch <strong>that</strong> is controlled by its ambient temperature.<br />
All without the touch <strong>of</strong> a human hand, except for when you’re building this sort <strong>of</strong><br />
electronic thermostat.<br />
There are a lot <strong>of</strong> handy uses for a thermally controlled<br />
switch. If the temperature inside your PC gets too<br />
high sometimes, the circuit can switch on an extra<br />
fan. You can also use to switch on an electric heater<br />
automatically if the room temperature is too low.<br />
There are innumerable potential applications for the<br />
thermostat described here.<br />
There are lots <strong>of</strong> ways to measure the temperature<br />
<strong>of</strong> an object. One very simple way is to use a<br />
semiconductor sensor, such as the National<br />
Semiconductor LM35 IC.<br />
This sensor is accurate to within 0.5 °C at 25 ºC, and<br />
few other sensors can do better or even come close to<br />
this level <strong>of</strong> accuracy. In the circuit described here, the<br />
sensor (IC2) generates an output voltage <strong>of</strong> 10 mV/°C,<br />
so the minimum temperature <strong>that</strong> can be measured<br />
is 0 °C. At 25 °C, the output voltage <strong>of</strong> the sensor is<br />
(25 °C × 10 mV/°C) = 0.25 V.<br />
The circuit uses a TLC271 opamp as a comparator. It<br />
compares the voltage from the temperature sensor,<br />
which is connected to its non-inverting input (pin 3),<br />
with the voltage on its inverting input (pin 2). The<br />
latter voltage can be set with potentiometer P1. If the<br />
voltage from the sensor rises above the reference value<br />
set by P1 (which represents the desired temperature),<br />
the output <strong>of</strong> the comparator toggles to the full<br />
supply voltage level. The output is fed to<br />
transistor T1, which acts as a switch so<br />
the output can handle more current. This +5V<br />
makes it possible to energise a relay in<br />
order to switch a heavy load or a higher<br />
voltage. The transistor also supplies current<br />
to LED D1, which indicates whether the<br />
temperature is above the reference value.<br />
The reference value can be adjusted by<br />
P1 over the range <strong>of</strong> 18–30 °C with the<br />
indicated component values. Of course,<br />
you can adjust the range to suit your<br />
needs by modifying the value <strong>of</strong> R1 and/or<br />
R2. To prevent instability in the vicinity<br />
Electronics inside out !<br />
C2<br />
<strong>of</strong> the reference value, a small amount <strong>of</strong> hysteresis<br />
is provided by resistor R4 so the temperature will<br />
have to continue rising or falling by a small amount<br />
(approximately 0.5 °C) before the output state<br />
changes.<br />
The LM35 is available in several different versions. All<br />
versions have a rated temperature range <strong>of</strong> at least<br />
0–100 °C. One thing you may have to take into account<br />
is <strong>that</strong> the sensor has a relatively long response time.<br />
According to the datasheet, the sensor takes 3 minutes<br />
to reach nearly 100% <strong>of</strong> its fi nal value in still air.<br />
The opamp has very low drift relative to its input<br />
voltages, and in the low-power mode used here it<br />
draws very little current. The sensor also draws very<br />
little current, so the total current consumption is<br />
less than 80 µA when LED D1 is <strong>of</strong>f. The advantage<br />
<strong>of</strong> low current consumption is <strong>that</strong> the circuit can be<br />
powered by a battery if necessary (6 V, 9 V or 12 V).<br />
The sensor has a rated operating voltage range <strong>of</strong><br />
4–30 V, and the TLC271 is rated for a supply voltage <strong>of</strong><br />
3–16 V. The circuit can thus work very well with a 12-V<br />
supply voltage, which means you can also use it for<br />
car applications (at 14.4 V). In <strong>that</strong> case, you must give<br />
additional attention to fi ltering out interference on the<br />
supply voltage.<br />
100n<br />
IC2 1<br />
LM35<br />
3<br />
2<br />
390k<br />
15k<br />
R2<br />
R1<br />
LM35<br />
P1<br />
10k<br />
R3<br />
0V30<br />
1k<br />
0V18<br />
C1<br />
220n<br />
2<br />
3<br />
8<br />
7<br />
IC1<br />
4<br />
1<br />
TLC271<br />
R4<br />
5<br />
6<br />
R5<br />
6k8<br />
3k3<br />
820k R6<br />
TLC271<br />
BC547B<br />
C<br />
E<br />
B<br />
10k<br />
D1<br />
R7<br />
5V<br />
20mA max.<br />
T1<br />
051006 - 11<br />
BC547B<br />
i-TRIXX collection - 12/2006
Check your contacts<br />
Having good contacts is important – not only in your daily life, but also in electronics.<br />
In contrast to social contacts, the reliability <strong>of</strong> electrical contacts can be checked<br />
quickly and easily. Various types <strong>of</strong> continuity testers are commercially available<br />
for this purpose. Most multimeters also have a continuity test function for electrical<br />
connections. A simple beep helps you tell good contacts from bad ones. However,<br />
in some cases the tester doesn’t produce a beep because it won’t accept contact<br />
resistances <strong>that</strong> are somewhat higher than usual. Also, poorly conducting (and thus bad)<br />
connections are sometimes indicated to be good. Here e-trix comes to your aid with a design<br />
for a DIY continuity tester <strong>that</strong> helps you separate the wheat from the chaff.<br />
Continuity tester<br />
Many multimeters have a built-in continuity test<br />
function. However, in many cases the resistance<br />
necessary to activate the beeper when you are looking<br />
for bad connections is just a bit too high. It can also<br />
happen <strong>that</strong> the beeper sounds even though the<br />
resistance <strong>of</strong> the connection is unacceptably high. This<br />
circuit lets you adjust the threshold between bad and<br />
good contacts to suit your needs.<br />
The circuit is built around an operational amplifi er<br />
(IC1) wired as a comparator. The opamp compares the<br />
voltage on its inverting input (pin 2) with the voltage<br />
on its non-inverting input (pin 3). The voltage on pin 3<br />
can be set using potentiometer P1, so you can set the<br />
threshold between good and bad connections. When<br />
test probes TP1 and TP2 are placed on either side<br />
<strong>of</strong> a connection or contact to be tested, a voltage is<br />
generated across the probes by the current fl owing<br />
though resistors R1 and R3, and it appears on pin 2<br />
<strong>of</strong> the opamp. This voltage depends on the resistance<br />
between the probe tips. If the voltage on pin 2 is lower<br />
than the reference voltage on pin 3, the difference<br />
TLC271<br />
TP1 R1<br />
1k<br />
2<br />
8<br />
7<br />
IC1<br />
6<br />
R5<br />
10k<br />
3<br />
5<br />
D1<br />
4<br />
1<br />
TP2<br />
BC547<br />
C<br />
E<br />
B<br />
C1<br />
330n<br />
100k<br />
R2<br />
D2<br />
2x<br />
1N4148<br />
D3<br />
BAT<br />
85<br />
180k<br />
R3<br />
TLC271<br />
R4<br />
2M2<br />
P1<br />
25k<br />
C2<br />
100n<br />
is amplifi ed so strongly by the opamp <strong>that</strong> its output<br />
(pin 6) is practically the same as the supply voltage.<br />
This causes transistor T1 to conduct, which in turn<br />
causes DC buzzer BZ1 to sound. This means <strong>that</strong><br />
the resistance <strong>of</strong> the connection being tested is less<br />
than the threshold value set by P1, and thus <strong>that</strong> the<br />
connection is OK.<br />
By contrast, a bad connection will cause the<br />
relationship between the voltages on the inputs <strong>of</strong><br />
the opamp to be the opposite, with the result <strong>that</strong> its<br />
output will be at ground level. The transistor will not<br />
conduct, and the buzzer will remain still.<br />
To ensure <strong>that</strong> the opamp ‘toggles’ properly (which<br />
means <strong>that</strong> its output goes to ground level or the<br />
supply voltage level) when the difference voltage is<br />
suffi ciently large and does not oscillate during the<br />
transition interval due to small fl uctuations in the<br />
difference voltage produced by interference, its output<br />
is coupled back to its non-inverting input (pin 3) by<br />
resistor R4. This causes any change on the output to be<br />
passed back to this input in amplifi ed form, with the<br />
result <strong>that</strong> the detected difference voltage is amplifi ed<br />
(and thus boosted).<br />
Diodes D1, D2 and D3 protect<br />
the circuit against excessive<br />
4k7<br />
C3<br />
100µ<br />
25V<br />
R6<br />
22Ω<br />
R7<br />
T1<br />
BZ1<br />
12V<br />
BC547<br />
051005 - 11<br />
positive and negative input<br />
voltages <strong>that</strong> may come from<br />
the connections or contacts<br />
being tested. They also<br />
ensure <strong>that</strong> the continuity<br />
tester does not inject<br />
excessively high voltages<br />
into the item under test.<br />
Capacitor C1 suppresses<br />
high-frequency interference.<br />
The circuit draws only a small<br />
supply current, so it can<br />
easily be powered by a 9-V<br />
battery.<br />
i-TRIXX collection - 12/2006 11<br />
BT1<br />
9V<br />
Photo: Hirschmann Electronics BV
12<br />
Check Out Your LEDs<br />
You have to admit <strong>that</strong> these tiny electronic lamps are<br />
handy, and they last almost forever. Around 40 years after<br />
Nick Holanyak developed the fi rst LED, they have become<br />
just about indispensable. Any self-respecting electronics<br />
hobbyist always has a few in his junk box. But before you<br />
use LEDs, it’s a good idea to check them out. With a LED<br />
tester, you can even do it in the dark!<br />
LED tester<br />
LEDs are available nowadays in all shapes and colours.<br />
There are types with clear, colourless packages, while<br />
others have coloured plastic packages. Many modern<br />
types <strong>of</strong> LEDs need less current than older types. Some<br />
<strong>of</strong> them provide quite a puddle <strong>of</strong> light if you give them<br />
a decent amount <strong>of</strong> current.<br />
When you’re working with used LEDs from the junk<br />
box, there’s a good chance <strong>that</strong> you can’t tell which<br />
lead is which any more. (If the leads haven’t been<br />
trimmed, the short lead is always the cathode lead<br />
and the long lead is the anode lead.) If you use several<br />
LEDs in a display where they all have the same current,<br />
you naturally want all the LEDs to have the same<br />
brightness. But <strong>that</strong>’s not always the case, even with<br />
LEDs <strong>of</strong> the same type. To save yourself unnecessary<br />
soldering work, it’s a good idea to check the LEDs out<br />
fi rst. That’s the job <strong>of</strong> the LED tester described here.<br />
This circuit can be used to test up to three LEDs at<br />
once, connected in series. You can easily increase <strong>that</strong><br />
number by using a higher supply voltage. If you do<br />
so, you should allow 2.7 V for each additional LED.<br />
The Zener diodes are included in the circuit so it can<br />
also be used to test one or two LEDs. Another benefi t<br />
<strong>of</strong> the Zeners is <strong>that</strong> even if one or more <strong>of</strong> the LEDs<br />
are defective or connected with reverse polarity, the<br />
remaining ones will light up normally. That makes it<br />
easy to spot suspect LEDs. If you extend the tester to<br />
handle more LEDs, you must add another Zener diode<br />
for each LED position.<br />
The test current <strong>that</strong> fl ows through the LEDs is held<br />
reasonably constant by FET T1, independent <strong>of</strong> the<br />
number <strong>of</strong> LEDs being tested. The FET is used as<br />
a constant-current source to keep the circuit as<br />
simple as possible. The drawback <strong>of</strong> this approach<br />
is <strong>that</strong> the tolerance range <strong>of</strong> FET characteristics is<br />
especially large. The type used here even has three<br />
versions: A, B and C. We used the B version here so<br />
the current through the LEDs can be adjusted using<br />
Electronics inside out !<br />
BT1<br />
9V<br />
S1<br />
BF245B<br />
G D<br />
potentiometer P1 over the range <strong>of</strong> 1–7 mA. If you<br />
need more current, you can use a BF254C instead, but<br />
then you will also need a higher supply voltage. For<br />
example, you can connect two 9-V batteries in series or<br />
power the circuit from a mains adapter.<br />
However, some LEDs have a maximum rated current <strong>of</strong><br />
only 5 mA. You should thus always start testing at the<br />
lowest current by setting P1 to maximum resistance.<br />
You can easily see from the brightness whether you<br />
need more current. If an LED does not light up, it<br />
may be defective or connected the wrong way round.<br />
Reduce the current to the minimum level before<br />
reversing or replacing any LEDs.<br />
If you label the polarity <strong>of</strong> the terminals on the LED<br />
tester, you can easily mark the cathode and anode<br />
leads <strong>of</strong> the tested LEDs. To make it easy to swap the<br />
LEDs, you can use an IC socket as a test socket.<br />
The selected Zener diodes were chosen to make the<br />
tester suitable for red, yellow and green LEDs. Red<br />
LEDs have a forward voltage <strong>of</strong> 1.6 V to 1.8 V. The value<br />
for yellow LEDs is around 1.9 V, and with green LEDs<br />
the forward voltage can be as high as 2 V. If you also<br />
want to test modern blue or white LEDs, you will have<br />
to replace the Zener diodes with types having a voltage<br />
<strong>of</strong> 4.7 V or 5.1 V. The supply voltage will also have to<br />
be increased accordingly – for example, by connecting<br />
two 9-V batteries in series.<br />
D1<br />
2V7<br />
0W4<br />
D2<br />
2V7<br />
0W4<br />
D3<br />
2V7<br />
0W4<br />
T1<br />
BF245B<br />
P1<br />
2k5<br />
D4<br />
D5<br />
D6<br />
051009 - 11<br />
i-TRIXX collection - 12/2006<br />
S
It’s Wet!<br />
Have you ever seen the stairs to one <strong>of</strong> the upper stories in your house turn into<br />
a waterfall? Or maybe you’ve come home to fi nd your aquarium fi sh trying to<br />
swim across the carpet? For your sake, we hope not, because the consequences<br />
are usually fairly dramatic. With a handful <strong>of</strong> electronic components, you can at<br />
least ensure <strong>that</strong> you will be warned before you have to put on your waders.<br />
Water alarm<br />
It’s better to prevent water problems than to have to<br />
correct them. But no how many precautions you take,<br />
an occasional leak can still happen. A burst water<br />
supply hose for the washing machine, a bath tap <strong>that</strong><br />
someone forgot to turn <strong>of</strong>f, a broken aquarium wall,<br />
or a leaking boiler or central heating tank – anything<br />
is possible. In such cases, it’s nice to be warned as<br />
quickly as possible, for example by an acoustic water<br />
alarm. Then you can at least limit the damage.<br />
If you’re handy with a soldering iron and know the<br />
difference between an IC and a PC, you’ll no doubt<br />
enjoy building the electronic water alarm described<br />
here.<br />
The circuit takes advantage <strong>of</strong> the fact <strong>that</strong> ‘normal’<br />
water is always slightly contaminated, even if only<br />
slightly, and thus conducts electricity to a certain<br />
extent. It is built around an popular IC from the<br />
somewhat antiquated 4000-series logic family: the<br />
4093. This IC contains four inverted-output AND gates<br />
(NAND gates) with Schmitt-trigger inputs. If water is<br />
detected between the probes, it emits an intermittent<br />
and rather irritating beeping tone.<br />
The conductivity <strong>of</strong> the water is used to active the<br />
circuit built around IC1a. The two electrodes (probes)<br />
are fi tted at the lowest point where water will come<br />
to stand. They can be two tinned copper wires, but<br />
you can also use two pieces <strong>of</strong> circuit board with the<br />
copper surface coated with solder. The combination<br />
<strong>of</strong> IC1a, resistor R2 and capacitor C2 forms a simple<br />
oscillator <strong>that</strong> produces the intermittent (on/<strong>of</strong>f)<br />
effect <strong>of</strong> the alarm. If no water is present between the<br />
1<br />
IC1<br />
4093<br />
14<br />
7 8<br />
1M<br />
R1<br />
IC1 = 4093<br />
IC1.A<br />
1<br />
2 &<br />
3<br />
C2<br />
R2<br />
330n<br />
1M<br />
14<br />
IC1<br />
7<br />
C1<br />
100n<br />
IC1.B<br />
5<br />
IC1.C<br />
4 8<br />
6 &<br />
10<br />
9 &<br />
C3<br />
2n7<br />
R3<br />
100k<br />
probes, the input <strong>of</strong> IC1a is held low by R1 and the<br />
output <strong>of</strong> IC1b is also low. The oscillator is not active<br />
in this state. If moisture is sensed, the supply voltage<br />
pulls input 1 <strong>of</strong> gate IC1a high via the conductive<br />
water, causing the gate to start oscillating. Whenever<br />
the output <strong>of</strong> IC1b is high, the tone generator built<br />
around IC1c is enabled, and in turn it energises buzzer<br />
BZ1. The net result is a periodic, intermittent beeping<br />
tone.<br />
You can adjust the intermittent effect <strong>of</strong> the sound<br />
produced by the water alarm to suit your taste by<br />
simply adjusting the value <strong>of</strong> R2 or C2. You can also<br />
set the pitch <strong>of</strong> the sound with P1. The closer the pitch<br />
is to the resonant frequency <strong>of</strong> buzzer BZ1, the louder<br />
the tone will be. You should set the sound to the most<br />
irritating level possible.<br />
Gate IC1d is used to boost the amount <strong>of</strong> power than<br />
can be pumped into the buzzer. It inverts the output<br />
signal from IC1c to double the voltage applied to the<br />
buzzer.<br />
Naturally, the circuit <strong>of</strong> the alarm must be fi tted<br />
somewhere <strong>that</strong> will remain high and dry. Use a pair <strong>of</strong><br />
thin twisted wires to connect the electrodes (probes) to<br />
the board. Naturally, you should use insulated, fl exible<br />
wire for this purpose. Twisting the wires together<br />
makes the relatively long connection between the<br />
probes and the circuit less sensitive to false alarms due<br />
to external electromagnetic interference.<br />
The current consumption is very low (less than 0.1 µA)<br />
when everything is dry. When the buzzer is energised,<br />
the current consumption can rise to around 2 mA. We<br />
measured 3 mA with the frequency set to the maximum<br />
value. The battery will<br />
thus last for several<br />
years as long as no<br />
water is detected. Of<br />
IC1.D<br />
13<br />
course, you should<br />
11<br />
12 &<br />
bear in mind <strong>that</strong> the<br />
BZ1<br />
battery might start<br />
leaking after a while…<br />
P1<br />
1M<br />
051010 - 11<br />
i-TRIXX collection - 12/2006 13<br />
BT1<br />
9V
10k<br />
R6<br />
14<br />
R7<br />
220k<br />
C1<br />
220p<br />
R8<br />
470k<br />
S1<br />
12<br />
C2<br />
100n<br />
D11<br />
D12<br />
16<br />
CTR14<br />
CT=0<br />
IC1 4<br />
!G<br />
5<br />
6<br />
10<br />
9<br />
RX<br />
CX<br />
+ CT<br />
7<br />
8<br />
11<br />
RCX<br />
9<br />
4060<br />
8<br />
Dicing with LEDs<br />
Every self-respecting DIYer makes his own<br />
electronic dice with LEDs as spots. Then you don’t<br />
have to throw the dice anymore – just push the<br />
button. The electronics also ensures <strong>that</strong> nobody<br />
can try to improve his luck by fi ddling with the<br />
dice. Too bad for sore losers!<br />
This circuit proves <strong>that</strong> an electronic die built using<br />
standard components can be made quite compact. The<br />
key component <strong>of</strong> here is a type 4060 digital counter<br />
(IC1). This IC has an integrated oscillator stage, so<br />
only two resistors (R7 and R8) and a capacitor (C7) are<br />
necessary to generate the clock signal. The clock signal<br />
is divided by various factors by the internal digital<br />
circuitry <strong>of</strong> the IC. The division factors are designated<br />
by ‘CT’ in the IC drawing symbol. For instance, the<br />
signal on the CT3 output (pin 7) is a square wave with<br />
a frequency equal to the clock frequency divided by<br />
2 3 (8). The clock signal is divided by 2 4 (16) on the CT4<br />
output, by 2 5 (32) on the CT5 output, and so on. This<br />
means the output signals form a binary number <strong>that</strong><br />
3<br />
11<br />
12<br />
13<br />
T1<br />
BC557B R5<br />
7<br />
5<br />
4<br />
6<br />
14<br />
13<br />
15<br />
1<br />
2<br />
3<br />
470k<br />
D10<br />
R1<br />
2k7<br />
2k7<br />
D1<br />
D2<br />
D3<br />
R2<br />
D8...D12 = 1N4148 061001 - 11<br />
3k3<br />
Electronics inside out !<br />
D7<br />
R3<br />
D8<br />
D9<br />
2k7<br />
D4<br />
D5<br />
D6<br />
R4<br />
+9V<br />
counts upwards, which is naturally what a counter<br />
does.<br />
Of course, a die has only six possible values marked<br />
on the six sides <strong>of</strong> a cube. This means <strong>that</strong> at least<br />
three bits (the fi rst three outputs) <strong>of</strong> the counter are<br />
necessary to drive a display. Eight different counter<br />
states (2 3 ) can be represented with three bits, but in<br />
this case the counter must be restricted to six states.<br />
To make sure this happens, D11, D12 and R6 are used to<br />
reset the counter to its initial state when it reaches the<br />
seventh state, which means when it reaches a binary<br />
count <strong>of</strong> 110. When this happens, pins 4 and 5 <strong>of</strong> the IC<br />
are both logic ‘1’ (high level), which causes a logic ‘1’<br />
to be applied to pin 12 via resistor R6. This causes the<br />
counter to be reset, which is what we want.<br />
The display consists <strong>of</strong> seven LEDs arranged in the<br />
same pattern as the usual markings on a normal die.<br />
This arrangement is shown in the schematic diagram.<br />
Before you begin thinking about the proper logical<br />
connections between the LEDs and the counter<br />
outputs, you can start by noting <strong>that</strong> except for the ‘1’<br />
state there will always be two LEDs lit up at the same<br />
time. This means <strong>that</strong> only four distinct indications<br />
are necessary, instead <strong>of</strong> seven (with a total <strong>of</strong> seven<br />
LEDs). Another advantage <strong>of</strong> this is <strong>that</strong> the current<br />
consumption can be reduced by connecting pairs <strong>of</strong><br />
LEDs in series.<br />
Resistors R1–R4 limit the current through the LEDs to<br />
approximately 2 mA. This means you have to use lowcurrent<br />
LEDs. They are nice and bright at a current <strong>of</strong><br />
2 mA. Resistor R3 has a higher value because only one<br />
LED is driven via it.<br />
For convenience, the circuit is dimensioned based<br />
on using a 9-V battery. The current consumption <strong>of</strong><br />
the circuit depends on the number <strong>of</strong> LEDs <strong>that</strong> are<br />
illuminated, and with our prototype it varied over a<br />
range <strong>of</strong> approximately 2.5 mA to 6.5 mA. The LEDs<br />
still produce enough light even when the supply<br />
voltage is as low as 6 V, but this depends strongly on<br />
the characteristics <strong>of</strong> the low-current LEDs used in the<br />
circuit.<br />
Diodes D8–D10 and transistor T1 are necessary to<br />
enable all the states <strong>of</strong> a normal die to be shown. By<br />
<strong>that</strong>, we primarily mean the states with two or three<br />
spots, which must be located diagonally.<br />
state binary LEDs ‘on’ spots<br />
1 000 1, 3, 4, 6, 7 5<br />
2 001 1, 6, 7 3<br />
3 010 1, 2, 3, 4, 5, 6 6<br />
4 011 7 1<br />
5 100 1, 3, 4, 6 4<br />
6 101 1, 6 2<br />
i-TRIXX collection - 12/2006
For readers who want to delve more deeply into the<br />
design, the following table shows the six different<br />
binary states, which LEDs are lit up for each state, and<br />
the number <strong>of</strong> spots shown by the die.<br />
The die is operated by switch S1. In the quiescent state,<br />
the break contact <strong>of</strong> S1 is closed and the oscillator<br />
is stopped because the input <strong>of</strong> the oscillator stage<br />
is connected to ground via the switch. When S1 is<br />
pressed, the oscillator starts running and causes the<br />
states <strong>of</strong> the LEDs to change at a rate <strong>of</strong> 1 kHz, which<br />
is too fast to follow with the naked eye. This high<br />
frequency ensures <strong>that</strong> the state <strong>of</strong> the die is purely<br />
random when S1 is released, so there is no regularity<br />
or pattern in the results.<br />
The circuit can be assembled on a small piece <strong>of</strong><br />
perforated prototyping board. Fit the LEDs in exactly<br />
the same pattern as shown in the schematic diagram,<br />
since otherwise the spot patterns will not correspond<br />
to a real die. When you have assembled the circuit<br />
board, fi t it in a plastic enclosure along with a 9-V<br />
battery to provide power.<br />
BC547B<br />
C<br />
E<br />
B<br />
220k<br />
R17<br />
- 4V5<br />
+4V5<br />
1M<br />
R1<br />
C1<br />
100n<br />
T1<br />
1M<br />
R2<br />
BC547B<br />
4k7<br />
3<br />
2<br />
12<br />
13<br />
R3<br />
R16<br />
IC1.A<br />
C2<br />
- 4V5<br />
R4<br />
100k<br />
10k<br />
IC1.D<br />
47p<br />
1<br />
14<br />
R15<br />
33k<br />
P1 R14 D2<br />
2M5<br />
R13<br />
2M2<br />
C7<br />
47µ 25V<br />
100k<br />
120k<br />
100k<br />
R11<br />
R10<br />
Surf simulator<br />
Do you long for a beach holiday on a tropical<br />
island, but you don’t have the necessary<br />
wherewithal? We’ve got just the answer: build the<br />
i-TRIXX surf simulator, put on your headphones,<br />
and dream yourself away from this dreary realm.<br />
Let the rhythmic rush <strong>of</strong> the waves transport you<br />
to a sun-drenched beach with gently swaying<br />
palm trees, and relax for a while before returning<br />
to a chilly confrontation with reality. That’s the<br />
ultimate in low-budget travel. Book now!<br />
100k<br />
R5<br />
- 4V5<br />
C3 C4<br />
22k<br />
220n 3n3<br />
10<br />
9<br />
IC1.C<br />
8<br />
R9<br />
1k<br />
1N4148<br />
+4V5<br />
1N4148<br />
D1<br />
Isn’t it great to relax on the snow-white sand <strong>of</strong> a<br />
tropical beach with a cool drink in your hand? To enjoy<br />
the magnifi cent <strong>of</strong> earthly creation while letting your<br />
thoughts drift on the hypnotic mantra <strong>of</strong> the breaking<br />
surf? No relaxant brewed by human hands can possibly<br />
compete with it! But when you start thinking about<br />
how much it all costs, you’ll reach for the headache<br />
pills instead. Fortunately, there’s a less expensive way<br />
to relax — with a bit <strong>of</strong> electronics <strong>that</strong> imitates the<br />
soothing sound <strong>of</strong> the sea. You’ll have to imagine the<br />
corresponding surroundings on your own. A sunlamp<br />
and a few scoops <strong>of</strong> sand may help…<br />
This circuit uses more components <strong>that</strong> most <strong>of</strong> the<br />
i-TRIXX do it yourself projects, but this doesn’t make<br />
it harder to understand how it works. We have also<br />
designed a PCB layout for the circuit, which makes DIY<br />
construction <strong>that</strong> much easier.<br />
Noise is usually the last thing you want in any sort <strong>of</strong><br />
audio circuitry. Noise is generated in semiconductor<br />
1M<br />
R6<br />
10k<br />
6<br />
5<br />
R7<br />
IC1.B<br />
R12<br />
C5<br />
R8<br />
i-TRIXX collection - 12/2006 15<br />
C8<br />
2µ2<br />
10k<br />
47p<br />
7<br />
+4V5<br />
BT1<br />
- 4V5<br />
9V<br />
green<br />
C6<br />
220n<br />
3k9<br />
2k2<br />
065109 - 11<br />
R18<br />
R19<br />
D3<br />
C9<br />
220µ<br />
25V<br />
IC1 = TL084<br />
1<br />
C10<br />
100n<br />
IC1<br />
C11<br />
11<br />
100n<br />
IC1<br />
4<br />
TL084<br />
14<br />
7 8
16<br />
devices (transistors and diodes) as an undesirable by-product.<br />
However, in our surf simulator we just can’t get enough <strong>of</strong> it! Noise<br />
forms the basis for imitating the sound <strong>of</strong> breaking surf. We take<br />
advantage <strong>of</strong> the fact <strong>that</strong> a reverse-biased base–emitter junction<br />
<strong>of</strong> a transistor generates noise like the devil if the voltage is high<br />
enough. The noise source in the schematic diagram is transistor<br />
T1. The base–emitter junction <strong>of</strong> this transistor breaks down at<br />
approximately 7 V (depending on the specifi c transistor). R1 limits<br />
the current to a level <strong>that</strong> avoids destroying the transistor.<br />
T1 generates a constant noise signal, which doesn’t resemble the<br />
sound <strong>of</strong> breaking surf. If you listen carefully to the sound <strong>of</strong> real<br />
surf, you’ll notice <strong>that</strong> it resembles a noise signal <strong>that</strong> increases<br />
rapidly in volume (as the wave rolls up the beach) and then slowly<br />
dies down. This means the noise must rise and decay in a sawtooth<br />
waveform. To achieve this effect, we make use <strong>of</strong> the AC impedance<br />
<strong>of</strong> a normal diode (D1 in the schematic diagram), which depends on<br />
the amount <strong>of</strong> DC current fl owing through the diode. The higher the<br />
current through the diode, the lower its AC impedance (and thus its<br />
impedance to the noise signal). The voltage across R10 determines<br />
how much current fl ows through diode D1. The noise signal is<br />
amplifi ed by IC1d and applied to the diode, and the voltage across<br />
the diode is further amplifi ed by IC1c to the output level. As already<br />
mentioned, the amplitude <strong>of</strong> the noise signal depends on the DC<br />
current through diode D1. What we have to do now is make the<br />
current through D1 (or in other words, the voltage across R10) vary<br />
in a sawtooth pattern. This job is handled by amplifi ers IC1a and<br />
IC1b. You can use P1 to adjust the form <strong>of</strong> the sawtooth (and thus<br />
how the noise grows and decays) according to your taste.<br />
The circuit works best with a clean 9-V supply voltage, so an AC<br />
mains adapter with a stabilised 9-V output is the preferred choice<br />
as a power source. A balanced supply voltage is required for proper<br />
operation <strong>of</strong> the circuit, so a virtual ground is necessary. This is<br />
created in a simple manner by a voltage divider (R18 and R19).<br />
To reduce the current consumption (in case you want to power the<br />
circuit from a battery), it also provides a ‘power on’ indication.<br />
The current consumption <strong>of</strong> the circuit is approximately 9 mA,<br />
which means the battery would have to be replaced already after<br />
two days <strong>of</strong> continuous use if it is powered by a battery, so using<br />
an AC mains adapter is certainly advisable.<br />
We designed a PCB layout for this project to make it easier to<br />
assemble, since it is a bit more complex than most <strong>of</strong> the i-TRIXX<br />
circuits. If you follow the illustrated component layout, you<br />
shouldn’t have any trouble at all. The idea here is <strong>that</strong> you print<br />
the copper layout at actual size (52 × 52 mm) on transparent fi lm.<br />
The easiest way to do this is to use the supplied pdf fi le which you<br />
can open with Adobe Reader. You can then use the fi lm to expose<br />
a circuit board, develop it, and then etch it. Alternatively, you can<br />
take the fi lm to your local electronics shop and have them make a<br />
board for you.<br />
If you need a real holiday before tackling this, visit your local travel<br />
agent!<br />
Electronics inside out !<br />
COMPONENTS LIST<br />
Resistors<br />
R1,R2,R6 = 1 MΩ<br />
R3 = 4kΩ7<br />
R4,R8,R10,R14,R16 = 100 kΩ<br />
R5 = 22 kΩ<br />
R7,R12 = 10 kΩ<br />
R9 = 1 kΩ<br />
R11 = 120 kΩ<br />
R13 = 2MΩ2<br />
R15 = 33 kΩ<br />
R17 = 220 kΩ<br />
R18 = 3kΩ9<br />
R19 = 2kΩ2<br />
P1 = 2MΩ5 preset<br />
Capacitors<br />
C1,C10,C11 = 100 nF<br />
C2,C5 = 47 pF<br />
C3,C6 = 220 nF<br />
C4 = 3nF3<br />
C7 = 47 µF/25V ra<strong>dial</strong><br />
C8 = 2µ2 MKT lead pitch 5 or 7.5mm<br />
C9 = 220 µF/25V ra<strong>dial</strong><br />
Semiconductors<br />
D1,D2 = 1N4148<br />
D3 = LED, 3mm, green, low current<br />
T1 = BC547B<br />
IC1 = TL084<br />
Miscellaneous<br />
6 PCB solder pins<br />
BT1 = 9V battery with clip-on leads<br />
(however 9 V battery eliminator<br />
preferred)<br />
i-TRIXX collection - 12/2006
Save Your Ears<br />
‘Hello… HELLO! Are you deaf? Do you have disco ears?’ If people ask you this and<br />
you’re still well below 8 , you may be suffering from hearing loss, which can come from<br />
(prolonged) listening to very loud music. You won’t notice how bad it is until it’s too<br />
late, and after <strong>that</strong> you won’t be able to hear your favourite music the way it really is<br />
– so an expensive sound system is no longer a sound investment. To avoid all this, use<br />
the i-trixx sound meter to save your ears (and your neighbours’ ears!).<br />
Noise meter<br />
With just a handful <strong>of</strong> components, you can build a<br />
simple but effective sound level meter for your sound<br />
system. This sort <strong>of</strong> circuit is also called a VU meter.<br />
The abbreviation ‘VU’ stands for ‘volume unit’, which<br />
is used to express the average value <strong>of</strong> a music signal<br />
over a short time. The VU meter described here is what<br />
is called a ‘passive’ type. This means it does not need a<br />
separate power supply, since the power is provided by<br />
the input signal. This makes it easy to use: just connect<br />
it to the loudspeaker terminals (the polarity doesn’t<br />
matter) and you’re all set. The more LEDs <strong>that</strong> light<br />
up while the music is playing, the more you should be<br />
asking yourself how well you are treating your ears<br />
(and your neighbours’ ears).<br />
Of course, this isn’t an accurately calibrated meter. The<br />
circuit design is too simple (and too inexpensive) for<br />
<strong>that</strong>. However, you can have a non-disco type (or your<br />
neighbours) tell you when the music is really too loud,<br />
and the maximum number <strong>of</strong> LED lit up at <strong>that</strong> time<br />
can serve you as a good reference for the maximum<br />
tolerable sound level.<br />
Although this is a passive VU meter, it contains active<br />
components in the form <strong>of</strong> two transistors and six<br />
FETs. Seven LEDs light up in steps to show how much<br />
power is being pumped into the loudspeaker. The steps<br />
correspond to the power levels shown in the schematic<br />
for a sine-wave signal into an 8-ohm load.<br />
LED D1 lights up fi rst at low loudspeaker voltages.<br />
As the music power increases, the following LEDs (D2,<br />
D3, and so on) light up as well. The LEDs thus dance to<br />
the rhythm <strong>of</strong> the music (especially the bass notes).<br />
63V max<br />
R9<br />
39Ω<br />
BC337<br />
C<br />
B<br />
D14<br />
1N4004<br />
BF245<br />
E G D<br />
S<br />
R8<br />
C1<br />
10k<br />
BC337<br />
T8<br />
T7<br />
22µ<br />
63V<br />
BC337<br />
390 Ω<br />
D7<br />
D13<br />
27V<br />
R7<br />
D12<br />
18V<br />
T6<br />
R6<br />
1k D6<br />
This circuit can easily be assembled on a small piece<br />
<strong>of</strong> prototyping board. Use low-current types for the<br />
LEDs. They have a low forward voltage and are fairly<br />
bright at current levels as low as 1 mA. Connect the VU<br />
meter to the loudspeaker you want to monitor. If LED<br />
D2 never lights up (it remains dark even when LED D3<br />
lights up), reverse the polarity <strong>of</strong> diode D8 (we have<br />
more to say about this later on). In addition, bear in<br />
mind <strong>that</strong> the sound from the speaker will have to be<br />
fairly loud before the LEDs will start lighting up.<br />
If you want to know more about the technical details <strong>of</strong><br />
this VU meter, keep on reading.<br />
Each LED is driven by its own current source so it<br />
will not be overloaded with too much current when<br />
the input voltage increases. The current sources also<br />
ensure <strong>that</strong> the fi nal amplifi er is not loaded any more<br />
than necessary. The current sources for LEDs D1–D6<br />
are formed by FET circuits. A FET can be made to<br />
supply a fi xed current by simply connecting a resistor<br />
to the source lead (resistors R1–R6 in this case). With<br />
a resistance <strong>of</strong> 1 kΩ, the current is theoretically limited<br />
to 1 mA. However, in practice FETs have a especially<br />
broad tolerance range. The actual current level with<br />
our prototype ranged from 0.65 mA to 0.98 mA.<br />
To ensure <strong>that</strong> each LED only lights up starting at a<br />
defi ned voltage, a Zener diode (D8–D13) is connected<br />
in series with each LED starting with D2. The Zener<br />
voltage must be approximately 3 V less than the<br />
voltage necessary for the indicated power level.<br />
The 3-V <strong>of</strong>fset is a consequence <strong>of</strong> the voltage losses<br />
resulting from the LED, the FET, the rectifi er, and the<br />
overvoltage protection. The overvoltage protection<br />
60W 30W 12W 6W 3W 1W5 0W5<br />
D11<br />
10V<br />
T5<br />
R5<br />
1k D5<br />
i-TRIXX collection - 12/2006 17<br />
D10<br />
6V8<br />
T4<br />
R4<br />
1k D4<br />
T1...T6 = BF245A<br />
D9<br />
4V7<br />
T3<br />
R3<br />
1k D3<br />
D8<br />
2V0<br />
T2<br />
R2<br />
1k D2<br />
065107 - 11<br />
T1<br />
R1<br />
1k D1
18<br />
is combined with the current source for LED D7. One<br />
problem with using FETs as current sources is <strong>that</strong> the<br />
maximum rated drain–source voltage <strong>of</strong> the types used<br />
here is only 30 V. If you want to use the circuit with an<br />
especially powerful fi nal amplifi er, a maximum input<br />
level <strong>of</strong> slightly more than 30 V is much too low. We<br />
thus decided to double the limit. This job is handled by<br />
T7 and T8. If the amplitude <strong>of</strong> the applied signal is less<br />
than 30 V, T8 buffers the rectifi ed voltage on C1. This<br />
means <strong>that</strong> when only the fi rst LED is lit, the additional<br />
voltage drop <strong>of</strong> the overvoltage protection circuit is<br />
primarily determined by the base–emitter voltage <strong>of</strong><br />
T8. The maximum worst-case voltage drop across R8 is<br />
0.7 V when all the LEDs are on, but it has increasingly<br />
less effect as the input voltage rises. R8 is necessary so<br />
the base voltage can be regulated. R7 is fi tted in series<br />
with LED D7 and Zener diode D13, and the voltage drop<br />
across R7 is used to cause transistor T7 to conduct.<br />
This voltage may be around 0.3 V at very low current<br />
levels, but with a current <strong>of</strong> a few milliampères it can<br />
be assumed to be 0.6 V. Transistor T7 starts conducting<br />
if the input voltage rises above the threshold voltage<br />
<strong>of</strong> D7 and D13, and this reduces the voltage on the<br />
base <strong>of</strong> T8. This negative feedback stabilises the supply<br />
voltage for the LEDs at a level <strong>of</strong> around 30 V. With<br />
a value <strong>of</strong> 390 Ω for R7, the current through LED D7<br />
will be slightly more than 1 mA. This has been done<br />
intentionally so D7 will be a bit brighter than the other<br />
LEDs when the signal level is above 30 V. When the<br />
voltage is higher than 30 V, the circuit draws additional<br />
current due to the voltage drop across R8.<br />
The AC voltage on the loudspeaker terminals is halfwave<br />
rectifi ed by diode D14. This standard diode can<br />
handle 1 A at 400 V. The peak current level can be<br />
considerably higher, but don’t forget <strong>that</strong> the current<br />
still has to be provided by the fi nal amplifi er. Resistor<br />
R9 is included in series with the input to keep the<br />
additional load on the fi nal amplifi er within safe<br />
bounds and limit the interference or distortion <strong>that</strong><br />
may result from this load. The peak current can never<br />
exceed 1.5 A (the charging current <strong>of</strong> C1), even when<br />
the circuit is connected directly to an AC voltage with<br />
an amplitude <strong>of</strong> 60 V. C1 also determines how long<br />
the LEDs stay lit. This brings us to an important aspect<br />
<strong>of</strong> the circuit, which you may wish to experiment with<br />
in combination with the current through the LEDs. An<br />
important consideration in the circuit design is to keep<br />
the load on the fi nal amplifi er to a minimum. However,<br />
the combination <strong>of</strong> R9 and C1 causes an averaging<br />
<strong>of</strong> the complex music signal. The peak signal levels in<br />
the music are higher (or even much higher) than the<br />
average value. Tests made under actual conditions<br />
show <strong>that</strong> the applied peak power can easily be a<br />
factor <strong>of</strong> 2 to 4 greater than what is indicated by this<br />
Electronics inside out !<br />
Electronic<br />
How about an amusing (although your victims may<br />
not agree) circuit <strong>that</strong> you can use to play a trick on<br />
your friends or family, or to get rid <strong>of</strong> your mother-inlaw?<br />
A handful <strong>of</strong> electronic components can create<br />
a cricket-like chirping sound every few minutes or so.<br />
You should hide this electronic poltergeist such <strong>that</strong><br />
it’s diffi cult to fi nd, but can still be heard clearly. It is<br />
guaranteed to drive people mad! i-TRIXX shows you<br />
how to build this irritating circuit. Read on...<br />
- Did you hear <strong>that</strong>? - What? - That chirping noise.<br />
- Chirping noise? - Yes, I think there’s a cricket<br />
somewhere in the room. - I didn’t hear anything!<br />
- Well, it’s stopped now!<br />
A bit later: - There it is again! Did you hear it? - I heard<br />
nothing, go back to sleep! - I’m not going mad am I?<br />
I’m sure there’s a cricket around somewhere! We have<br />
to get rid <strong>of</strong> it, otherwise I won’t be able to sleep!<br />
This could be a possible conversation in the bedroom<br />
where you’ve hidden the electronic poltergeist. But<br />
before you can create all this mischief you’ll have to<br />
use your soldering iron. You’ll be pleased to hear <strong>that</strong><br />
the construction <strong>of</strong> this circuit won’t give you sleepless<br />
nights, as long as you work carefully.<br />
At the heart <strong>of</strong> the circuit is an old favourite IC, the<br />
4093. This chip contains four NAND gates, each <strong>of</strong><br />
which has two inputs. These NAND gates have Schmitt<br />
triggered inputs (more on this later) and are ideal for<br />
use in this particular application. Three <strong>of</strong> the gates<br />
are used as oscillators. The oscillator built around IC1A<br />
produces a high-pitched sound similar to <strong>that</strong> made by<br />
crickets when they rub their wings together. A second<br />
VU meter. This amounts to 240 W or more with an<br />
8-Ω loudspeaker. You can reduce the value <strong>of</strong> C1 to<br />
make the circuit respond more quickly (and thus more<br />
accurately) to peak signal levels.<br />
Now a few comments on D8. You may receive a<br />
stabistor (for example, from the Philips BZV86 series<br />
or the like) for D8. Unlike a Zener diode, a stabistor<br />
must be connected in the forward-biased direction.<br />
A stabistor actually consists <strong>of</strong> a set <strong>of</strong> PN junctions in<br />
series (or ordinary forward-biased diodes). Check this<br />
carefully: if D2 does not light up when D8 is fi tted as a<br />
normal Zener diode, then D8 quite likely a stabistor, so<br />
you should fi t it the other way round.<br />
i-TRIXX collection - 12/2006
poltergeist<br />
oscillator (IC1B) is used to interrupt this noise at<br />
regular intervals. The third oscillator (IC1C) is used to<br />
turn on the chirping noises for a short while, with a<br />
few minutes silence in between.<br />
So how do these oscillators work? We’ll take IC1A<br />
as an example. The output <strong>of</strong> this binary NAND gate<br />
will only be a logic low (virtually equal to 0 Volts)<br />
when both inputs are at a logic high level (typically<br />
just over half the supply voltage). Each input has a<br />
Schmitt trigger circuit so <strong>that</strong> slowly changing input<br />
signals can be also be dealt with. The Schmitt trigger<br />
makes the gate switch state suddenly when the input<br />
is slowly increasing and reaches the point where it<br />
could be considered at a logic high state. Inputs <strong>that</strong><br />
are hesitating somewhere between low and high are<br />
effectively given a helping hand upwards. When the<br />
supply voltage (a 9 V battery) is fi rst connected to the<br />
circuit, the input at pin 2 is at a logic low level (since<br />
capacitor C2 has not yet charged up). This means<br />
<strong>that</strong> the output <strong>of</strong> the NAND gate at pin 3 will be at<br />
a logic high level. Capacitor C2 is now charged up via<br />
the output at pin 3 and resistor R3 until the Schmitt<br />
trigger decides <strong>that</strong> the voltage level at pin 2 has<br />
increased enough for it to be at a logic high level. The<br />
output <strong>of</strong> the gate now switches over to a logic low<br />
level, assuming <strong>that</strong> the input at pin 1 is at a logic<br />
high level. Capacitor C2 will now be discharged by the<br />
output at pin 3 via R3, which causes the input at pin 2<br />
to become low again, and the whole cycle repeats<br />
itself. The speed (frequency) at which this charging and<br />
discharging takes place depends on the values <strong>of</strong> R3<br />
and C2.<br />
The oscillator built around<br />
IC1C works in a slightly<br />
differently way. In this<br />
case a diode (D1) causes<br />
capacitor C1 to charge<br />
via both R1 and R2, which<br />
is much quicker than<br />
when C1 discharges via<br />
R2 only. This causes the<br />
poltergeist to be quiet for<br />
three minutes (the slow<br />
discharge) and only make<br />
a noise for a second or so<br />
(the fast charge).<br />
The fourth gate (IC1D)<br />
Pump it up: MP3 booster<br />
MP3 players are all the rage these days.<br />
The smaller ones in memory-stick format are<br />
particularly easy to take with you; your very<br />
own ‘personal sound system’ on the move!<br />
It’s when you want others to share your taste<br />
in music <strong>that</strong> you fi nd these players to have a<br />
lack <strong>of</strong> power. You can get round this problem<br />
with the help <strong>of</strong> the i-TRIXX MP3 booster, a<br />
small amplifi er <strong>that</strong> can be used to connect<br />
your MP3 player directly to your Hi-Fi. When<br />
you next invite your friends to a party you can<br />
ask them to bring their ‘personal music’ as<br />
well as the usual drinks! But fi rst we have to<br />
build this booster!<br />
The small battery-powered players have an output<br />
signal <strong>that</strong> is more than suffi cient to drive a set<br />
is used to combine the two oscillators (IC1A, which<br />
makes the high-pitched sound <strong>of</strong> the wings rubbing<br />
together and IC1B, which imitates the periodic<br />
movement <strong>of</strong> the wings) and drive the sounder.<br />
It is possible to change the frequencies at which gates<br />
IC1A to IC1C operate by varying the values <strong>of</strong> resistors<br />
R1 to R4. A lower value results in a higher frequency,<br />
and a higher value lowers it. You could also consider<br />
reducing the volume <strong>of</strong> the sounder by increasing the<br />
value <strong>of</strong> R5; this will make it even more diffi cult to fi nd<br />
the circuit.<br />
The current consumption <strong>of</strong> our prototype was under<br />
300 µA during the time it was silent, which rose to<br />
about 1.3 mA when the circuit was producing sounds<br />
(this only lasts 1 second). With an ordinary 9 V battery<br />
this circuit can operate for several (irritating) months,<br />
and there won't be many people who could put up<br />
with <strong>that</strong>!<br />
<strong>of</strong> 32 Ohm headphones. You’ll <strong>of</strong>ten fi nd <strong>that</strong> with<br />
an output <strong>of</strong> 1 mW the sound pressure level (SPL)<br />
produced can reach up to 90 dB. This would be<br />
suffi cient to cause permanent damage to your hearing<br />
after only one hour! The maximum output voltage will<br />
then be around 200 mV. This, however, is insuffi cient<br />
to fully drive a power amplifi er. For this you’ll need<br />
an extra circuit <strong>that</strong> boosts the output voltage. Power<br />
amps usually require 1 V for maximum output, hence<br />
the signal has to be amplifi ed by a factor <strong>of</strong> fi ve. We<br />
will also have to bear in mind <strong>that</strong> quieter recordings<br />
may need to be amplifi ed even more. We’ve used a<br />
simple method here to select the gain, which avoids<br />
the use <strong>of</strong> potentiometers. After all, the MP3 player<br />
already has its own volume control. We decided to<br />
have two gain settings on the booster, one <strong>of</strong> three<br />
times and the other ten times.<br />
i-TRIXX collection - 12/2006 19<br />
C1<br />
R1<br />
8<br />
9<br />
220µ<br />
16V<br />
1<br />
10k<br />
R2<br />
3M3<br />
IC1.C<br />
&<br />
D1<br />
1N4148<br />
10<br />
IC1 = 4093<br />
IC1<br />
4093<br />
1<br />
2<br />
C2<br />
10n<br />
6<br />
5<br />
C3<br />
330n<br />
R3<br />
IC1.A<br />
R4<br />
47k<br />
47k<br />
&<br />
IC1.B<br />
&<br />
BT1<br />
3<br />
4<br />
+9V<br />
IC1.D<br />
13<br />
12 &<br />
C4 14<br />
9V IC1<br />
100n<br />
7<br />
11<br />
1k<br />
065126 - 11<br />
R5<br />
BZ1
20<br />
Musical saw<br />
Usually it’s the person who sings when the sawing goes well.<br />
But the saw itself can also be made to produce musical sounds<br />
by drawing a bow across its edge. By bending the saw in<br />
different ways an experienced saw player is able to extract a<br />
musical melody from the saw. If you don’t have a spare saw and<br />
bow to hand you could always build this electronic version. At<br />
least with this instrument you’ll never cut yourself! So warm up<br />
your soldering iron and get cracking!<br />
Everybody who has sawn some wood will be aware<br />
<strong>that</strong> the saw can sometimes produce musical sounds,<br />
especially when the sawing isn’t going very smoothly.<br />
There are even pr<strong>of</strong>essional musicians who use specially<br />
manufactured saws as musical instruments. You’ll only<br />
appreciate their skills if you happen to like this style<br />
<strong>of</strong> music though. As a dedicated electronics hobbyist<br />
you’d rather build an electronic version, <strong>of</strong> course, and<br />
we’ve designed a simple circuit for you. The circuit<br />
diagram may appear a bit complex at fi rst, but don’t let<br />
it worry you. We have also designed a printed circuit<br />
board for this circuit, which makes the construction a<br />
lot easier than if you had to use experimenter’s board.<br />
The complete circuit is built around a single IC, a TL084,<br />
which contains four opamps. These opamps have been<br />
confi gured as oscillators in this circuit, and together<br />
they produce sounds similar to <strong>that</strong> <strong>of</strong> a musical saw.<br />
The circuit consists mainly <strong>of</strong> three, almost identical,<br />
adjustable oscillators built round IC1B, IC1C and IC1D.<br />
The frequencies can be adjusted via potentiometers<br />
P1 to P3, with a slight overlap in the frequency range<br />
between the oscillators. A fourth (similar) oscillator,<br />
which produces the fi nal output, is modulated by the<br />
fi rst three oscillators, which creates a varying frequency<br />
<strong>that</strong> quite closely resembles the sounds produced<br />
Amplifi ers IC1A and IC1B (for the right and left<br />
channels) are housed in a single package, a TS922IN.<br />
The output signal <strong>of</strong> the MP3 player is fed via a stereo<br />
cable and socket K1 to the inputs <strong>of</strong> the amplifi ers. The<br />
gain depends on the relationship between resistors R2<br />
and R1 (R6 and R5 for the other channel) and is equal<br />
to ten times. When you add jumper JP1 (JP2), resistor<br />
R3 (R7) will be connected in parallel with the negative<br />
feedback resistor R1 (R6), which causes the gain to<br />
be reduced to about three. When you start using the<br />
booster you can decide which gain setting works best<br />
for you.<br />
Resistor R4 (R8) takes the amplifi ed MP3 signal to the<br />
output socket K2 (K3). A cable then connects these<br />
phono sockets to the input <strong>of</strong> your power amplifi er.<br />
The resistors connected in series with the output (R4<br />
and R8) are there to keep the booster stable when<br />
a long cable is connected to its output. Cables have<br />
an unwelcome, parasitic capacitance. This capacitive<br />
effect could (due to phase shifts <strong>of</strong> the signal) affect<br />
the negative feedback <strong>of</strong> the booster in such a way<br />
Electronics inside out !<br />
R8<br />
R12<br />
H1<br />
H4<br />
P2<br />
R7<br />
R6<br />
R5<br />
R9<br />
R10<br />
R11<br />
(C) ELEKTOR<br />
by a saw. Oscillator IC1B creates a type <strong>of</strong> vibrato<br />
effect (this is a quick variation <strong>of</strong> the frequency, and<br />
is comparable to the effect produced when you use<br />
your hand to rapidly change the amount <strong>of</strong> bending <strong>of</strong><br />
the saw). Oscillators IC1C and IC1D, which oscillate at<br />
lower frequencies, create an arbitrary variation <strong>of</strong> the<br />
frequency (melody) <strong>of</strong> the electronic saw (corresponding<br />
to small changes in the level <strong>of</strong> bending <strong>of</strong> the saw).<br />
The oscillators operate as astable multivibrators with<br />
a Schmitt trigger. We’ll take the oscillator built round<br />
IC1B to explain how it works. When power is fi rst<br />
applied, capacitor C1 will be completely discharged<br />
and a voltage <strong>of</strong> -9 Volts will appear at the inverting<br />
input (pin 6) <strong>of</strong> IC1B. Since the non-inverting input (pin<br />
5) will be at a higher potential (via R1 and R2), the<br />
output (pin 7) will be at a high level (virtually equal to<br />
the supply voltage <strong>of</strong> +9 Volts). This output will now<br />
charge capacitor C1 via P1 and R3, until such time<br />
<strong>that</strong> the voltage at pin 6 rises above <strong>that</strong> <strong>of</strong> pin 5. At<br />
<strong>that</strong> moment the output <strong>of</strong> the opamp switches over<br />
to -9 Volts (the negative supply voltage). This causes<br />
capacitor C1 to discharge via P1 and R3, until the<br />
voltage at the inverting input falls below <strong>that</strong> <strong>of</strong> the<br />
non-inverting input, when the whole process repeats<br />
itself. The output <strong>of</strong> the oscillator is therefore a square<br />
wave. Resistor R4 and capacitor C4 smooth the sharp<br />
<strong>that</strong> a positive feed back occurs, with the result <strong>that</strong><br />
the booster oscillates and possibly damages the power<br />
amplifi er! The resistors (R4 and R8) effectively isolate the<br />
output <strong>of</strong> the booster from the parasitic capacitance <strong>of</strong><br />
the output cable. They also protect the booster outputs<br />
from short circuits.<br />
We’ve used a TS922IN opamp in this booster because it<br />
can operate at very low supply voltages (the maximum<br />
is only 12 V!), but can still output a reasonable current<br />
(80 mA max.).<br />
For the supply we’ve used rechargeable batteries (e.g.<br />
NiCd or NiMH cells) so <strong>that</strong> we don’t need a mains<br />
supply. To keep the number <strong>of</strong> cells required as small as<br />
possible, we’ve chosen a supply voltage <strong>of</strong> 5 volt; this<br />
can be supplied by four rechargeable batteries. It is also<br />
possible to use four ordinary, non-rechargeable batteries;<br />
it’s true <strong>that</strong> the supply voltage then becomes a bit higher<br />
(6 Volts), but <strong>that</strong> won’t cause any harm.<br />
Since we’ve used a symmetrical supply for the booster<br />
(2 x 2 batteries), it will be easiest if you use two separate<br />
C3<br />
C2<br />
IC1<br />
C1<br />
P3 061002-1<br />
C5 P4<br />
POT2 POT1 POT3 POT<br />
061002-1<br />
R3<br />
R2<br />
R1<br />
R15<br />
R16<br />
R17<br />
R18<br />
P1<br />
R4<br />
R19<br />
T1<br />
C4<br />
D1<br />
R13<br />
R14<br />
C7<br />
i-TRIXX collection - 12/2006<br />
C8<br />
T2<br />
R20<br />
C6<br />
H2<br />
H3<br />
BT1<br />
BT2<br />
+<br />
K1<br />
+<br />
-<br />
T<br />
-<br />
OUT
–9V<br />
–9V<br />
–9V<br />
R1<br />
R5<br />
R9<br />
100k<br />
C1<br />
1µ<br />
63V<br />
100k<br />
C2<br />
2µ2<br />
63V<br />
100k<br />
C3<br />
4µ7<br />
63V<br />
5<br />
6<br />
R3<br />
10<br />
9<br />
R7<br />
12<br />
13<br />
R2<br />
47k<br />
IC1.B<br />
R6<br />
47k<br />
R11<br />
47k<br />
100k<br />
100k<br />
IC1.C<br />
R10<br />
100k<br />
IC1.D<br />
1M<br />
1M<br />
1M<br />
P1<br />
P2<br />
P3<br />
7<br />
8<br />
14<br />
edges <strong>of</strong> this square wave, which produces a more<br />
pleasing sound when it is fed into the fi nal oscillator<br />
(IC1A). The outputs <strong>of</strong> the other two oscillators (IC1C<br />
and IC1D) are also added to this modulation signal.<br />
P4 is used to adjust the level <strong>of</strong> modulation <strong>that</strong> is<br />
presented to the input <strong>of</strong> FET T1. This FET is connected<br />
in parallel with resistor R18 and determines the<br />
frequency (pitch) <strong>of</strong> oscillator IC1A. This oscillator also<br />
produces a square wave output (on pin 1). However,<br />
the output is taken from pin 2, which is a more rounded<br />
signal and therefore won’t sound so harsh. This signal<br />
is fi rst buffered by Darlington transistor T2 so <strong>that</strong> the<br />
frequency isn’t affected when you connect a load to the<br />
output.<br />
The electronic musical saw can also be played by hand.<br />
In <strong>that</strong> case you should replace presets P1 to P3 with<br />
slider potentiometers, which can be easily and quickly<br />
adjusted by hand.<br />
battery holders, each with two AA cells. The two<br />
holders are connected in series. Make sure <strong>that</strong><br />
the batteries are connected the right way round;<br />
the positive <strong>of</strong> one always has to be connected to<br />
the negative <strong>of</strong> the next. This also applies to the<br />
connection between the two battery holders. S1A/B is<br />
a double pole switch, which is used to turn both halves<br />
<strong>of</strong> the battery supply on or <strong>of</strong>f simultaneously.<br />
If you can’t fi nd the (dual) opamp we’ve used (or an<br />
equivalent), you could always use standard opamps<br />
such as the NE5532, TL082 or TL072. These do need<br />
a higher supply voltage to operate properly. In these<br />
cases you should use two 9 V batteries and replace<br />
resistor R9 with a 15 kΩ one. Do take care when you<br />
connect the circuit to your power amplifi er because<br />
the output signal can be a lot larger and you could<br />
overload the power amplifi er. (Although you’re more<br />
likely to damage the loudspeakers, rather than the<br />
amplifi er!)<br />
(Please note <strong>that</strong> these two 9 V batteries can’t be used<br />
as a supply for the TS922IN!)<br />
R4<br />
R8<br />
330k<br />
1M2<br />
R12<br />
1M2<br />
IC1 = TL084<br />
C4<br />
10µ<br />
63V<br />
–9V<br />
2M7<br />
4M7<br />
–9V<br />
R13<br />
P4<br />
1M<br />
R14<br />
BF256C<br />
G D<br />
S<br />
R15<br />
4k7<br />
C5<br />
220n<br />
BC517<br />
C<br />
B<br />
E<br />
3<br />
2<br />
R16<br />
100k<br />
IC1.A<br />
R18<br />
22k<br />
+9V<br />
The current consumption <strong>of</strong> the circuit is on average<br />
+/- 8 mA. When you use two 9 V batteries they can<br />
provide the circuit with many hours <strong>of</strong> (musical?) power.<br />
To make the construction <strong>of</strong> this circuit a lot easier<br />
we have designed a PCB layout. Since we have also<br />
included the component layout there’s not much <strong>that</strong><br />
could go wrong with the construction. You should copy<br />
the track layout at its true size (70 x 50 mm) to a sheet<br />
<strong>of</strong> transparent plastic. That is easiest if you download<br />
the PDF fi le supplied for this project and use Adobe<br />
Acrobat Reader to print it out. You can use this to<br />
expose, develop and etch your own PCB. Alternatively,<br />
you could take it to a local electronics shop who may be<br />
able to produce the PCB for you.<br />
1<br />
IC1<br />
1<br />
1N4148<br />
G<br />
BF256C<br />
100n<br />
R19<br />
10k<br />
T2<br />
–9V<br />
TS922IN<br />
K1<br />
1k<br />
BC517<br />
C6<br />
1M<br />
R17<br />
D1<br />
D<br />
T1<br />
S<br />
R20<br />
In our circuit we’ve used a stereo jack socket for the<br />
input and phono sockets for the output because these<br />
are the most compatible with MP3 players and power<br />
amplifi ers respectively. If you wanted to, you could solder<br />
shielded cables directly to the circuit instead, with<br />
the correct plugs on the ends. You’ll never fi nd yourself<br />
without the correct connection leads in <strong>that</strong> case!<br />
i-TRIXX collection - 12/2006 21<br />
K1<br />
R<br />
L<br />
R1<br />
R5<br />
1k<br />
1k<br />
BT1<br />
9V<br />
BT2<br />
9V<br />
C7<br />
100n<br />
C8<br />
100n<br />
1<br />
2<br />
3<br />
5<br />
6<br />
IC1<br />
TL084<br />
R3<br />
R2<br />
4k7<br />
10k<br />
IC1.A<br />
IC1.B<br />
R6<br />
R7<br />
4<br />
IC1<br />
11<br />
061002 - 11<br />
10k<br />
4k7<br />
+9V<br />
–9V<br />
1<br />
IC1 = TS922IN<br />
7<br />
JP1<br />
R4<br />
R8<br />
100 Ω<br />
100 Ω<br />
JP2<br />
K2<br />
K3<br />
R<br />
L<br />
* see text<br />
BT1<br />
*<br />
BT2<br />
BT3<br />
*<br />
BT4<br />
061002-1<br />
S1.A<br />
S1.B<br />
+5V<br />
(C) ELEKTOR<br />
C1<br />
100n<br />
C2<br />
100n<br />
8<br />
IC1<br />
4<br />
3k3<br />
R9<br />
D1<br />
065107 - 11
22<br />
Luminous house number<br />
During the dark autumn and winter months in<br />
particular you’ll fi nd <strong>that</strong> ordinary house numbers<br />
are more diffi cult to read, especially if your home<br />
is further back from the road. If you want to avoid<br />
<strong>that</strong> your family, friends and deliverymen drive<br />
past your home, you should build this electronic<br />
version. At the same time you can show the world<br />
<strong>that</strong> you’re an avid electronics hobbyist! It can<br />
easily be put together during a rainy weekend.<br />
For a change this isn’t a hi-tech circuit, but instead is<br />
quite straightforward and it comes in useful too. House<br />
numbers can sometimes be diffi cult to read. In this<br />
article we show you how to build a luminous version<br />
<strong>that</strong> uses large 7-segment displays made by Kingbright,<br />
which have digits with a height <strong>of</strong> 57 mm. There are<br />
<strong>of</strong> course other manufactures <strong>that</strong> produce similar<br />
displays and it is not essential <strong>that</strong> you use the same<br />
displays <strong>that</strong> we’ve used here. You do have to keep<br />
an eye on the number <strong>of</strong> LEDs used to make up each<br />
segment (7 in total) and on the forward voltage drop<br />
when the segments are lit, so <strong>that</strong> you don’t exceed the<br />
maximum current through the LEDS, but more on this<br />
later.<br />
The required segments <strong>of</strong> the display are connected<br />
to the supply via resistors. When you connect all<br />
segments you obtain the digit 8, for a 0, 6 or 9 one <strong>of</strong><br />
the segments is disconnected and a 1 for example only<br />
needs two segments lit. In this way you can display all<br />
<strong>of</strong> the digits from 0 to 9. Each segment in the display<br />
consists <strong>of</strong> a number <strong>of</strong> LEDs connected in series (in<br />
our module this is 4). In the display used by us the<br />
anodes <strong>of</strong> the fi rst LED in every segment are connected<br />
together, hence the term ‘common anode display’.<br />
The common anode obviously has to be connected to<br />
the positive supply. The ‘free’ ends <strong>of</strong> the segments<br />
<strong>that</strong> have to be lit are connected via a resistor to the<br />
negative supply (ground). The current through the<br />
segments and hence their brightness is dependent on<br />
the value <strong>of</strong> the resistors.<br />
For the power supply we can use a doorbell<br />
transformer, which is <strong>of</strong>ten already present and which<br />
generally supplies 8 Volts AC. The alternating voltage<br />
<strong>of</strong> the doorbell transformer is rectifi ed so <strong>that</strong> the<br />
peak current through the LEDs doesn’t exceed their<br />
limits. The rectifi er circuit consists <strong>of</strong> a standard bridge<br />
rectifi er followed by a smoothing capacitor. These<br />
can supply the right voltage for a one or two-digit<br />
house number. For house numbers <strong>of</strong> three digits or<br />
Electronics inside out !<br />
more you will have to experiment with the resistors<br />
to fi nd what values give the correct current through<br />
the segments. But for house numbers like 88, 80 or<br />
90 (many segments will be lit) this also applies. For<br />
every extra segment <strong>that</strong> is lit the current consumption<br />
increases, which causes the supply voltage to drop by<br />
an amount dependent on the quality <strong>of</strong> the doorbell<br />
transformer. It is therefore diffi cult to give an exact<br />
fi gure for the value <strong>of</strong> the current limiting resistors<br />
in the circuit; the 47 Ω mentioned here should be<br />
taken as a guideline to give a current <strong>of</strong> about 22 mA<br />
(which is a safe value for the type <strong>of</strong> display we used)<br />
when an 8 Volt doorbell transformer is used. If you<br />
want to be sure <strong>that</strong> you’re not exceeding the current<br />
limit you should place an ammeter in series with the<br />
supply and divide the measured current by the number<br />
<strong>of</strong> segments <strong>that</strong> are lit. If the result is greater than<br />
22 mA you should increase the values <strong>of</strong> the resistors,<br />
and reduce their value if the result is less than 22 mA.<br />
To determine what current fl ows through a segment<br />
you could <strong>of</strong> course measure the voltage across the<br />
resistor connected to it and use Ohm’s law to calculate<br />
the current.<br />
For the installation it’s best to split the circuit into<br />
two parts: the bridge rectifi er (B1) and the smoothing<br />
capacitor (C1) near the transformer and the display<br />
and resistors in a weather pro<strong>of</strong> box next to the front<br />
door. When your house number consists <strong>of</strong> two digits<br />
you should build two display modules (shown in the<br />
circuit diagram inside the dotted lines). The display<br />
section should be connected to the power supply<br />
section using a twin-cored cable such as loudspeaker<br />
cable. Try to use a cable with reasonably thick cores,<br />
especially if a lot <strong>of</strong> segments are lit. For ‘88’ the<br />
current requirement is 0.3 A!<br />
The house number also has to be legible in strong<br />
sunlight. To achieve a better contrast you can place<br />
a piece <strong>of</strong> transparent plastic (with the same colour<br />
as the LEDs) in front <strong>of</strong> the display, or you could stick<br />
transparent tape over the segments (using the right<br />
colour). In the latter case you should only cover the<br />
active segments so <strong>that</strong> you can still see the number<br />
without an applied voltage.<br />
The table below shows you which resistors need to be<br />
soldered to produce each digit:<br />
0 R1,R2,R3,R4,R5,R6<br />
1 R2,R3<br />
2 R1,R2,R4,R5,R7<br />
3 R1,R2,R3,R4,R7<br />
4 R2,R3,R6,R7<br />
5 R1,R3,R4,R6,R7<br />
6 R1,R3,R4,R5,R6,R7<br />
7 R1,R2,R3<br />
8 R1,R2,R3,R4,R5,R6,R7<br />
9 R1,R2,R3,R4,R6,R7<br />
8V<br />
B1<br />
B80C1500<br />
i-TRIXX collection - 12/2006<br />
C1<br />
1000µ<br />
16V
R1 *<br />
R2 *<br />
R3 *<br />
R4 *<br />
R5 *<br />
R6 *<br />
R7 *<br />
Applause generator<br />
No, the performance <strong>of</strong> our national team during the 2006 World Cup Soccer Tournament did not<br />
deserve any applause. Better occasions come to mind where a resounding applause is much more<br />
appropriate. And to prevent injury to your hands when this occasion does present itself, we developed<br />
an electronic applause generator. In this way you can avoid being the only one applauding in a busy hall<br />
and prevent both yourself as well as the receiver from feeling uncomfortable.<br />
Applause from a large crowd sounds very similar to<br />
noise. Noise is therefore also the source signal in this<br />
circuit. A proven method for the generation <strong>of</strong> noise is<br />
to ‘zener’ the base-emitter junction <strong>of</strong> a transistor.<br />
That is what T1 and R1 are for. The base-emitter junction<br />
is wired as a diode in the reverse biased direction<br />
and connected via R1 to the power supply voltage <strong>of</strong><br />
9 volts. Because <strong>of</strong> this relatively high voltage, the<br />
base-emitter diode will break down, but the high resistance<br />
value <strong>of</strong> R1 prevents the junction from failing<br />
because <strong>of</strong> excessive current. The voltage across the<br />
base-emitter diode is relatively constant; this diode<br />
acts like a zener diode. The noise <strong>that</strong> is produced is<br />
very small however and is considerably amplifi ed<br />
by opamp IC1 fi rst, before any further processing. The<br />
opamp is set to half the supply voltage by R2 and R3.<br />
The noise signal is applied to the input <strong>of</strong> the opamp<br />
via C1. This capacitor ensures the separation <strong>of</strong> the<br />
high DC voltage (the ‘zener voltage’) at the emitter <strong>of</strong><br />
T1 and the half-power-supply-voltage at pin 3 <strong>of</strong> the<br />
opamp. In our prototype this zener voltage amounted<br />
to 8.3 V. It can happen <strong>that</strong> this voltage is greater than<br />
9 V. In <strong>that</strong> case you will have to either increase the<br />
power supply voltage or pick another transistor for T1<br />
<strong>that</strong> has a lower zener voltage. This is just a case <strong>of</strong><br />
swapping the transistor and repeating the measurement.<br />
Because <strong>of</strong> the presence <strong>of</strong> C2 and C3, the opamp amplifi<br />
es mostly the low-frequency part <strong>of</strong> the noise. This<br />
results in the best approximation <strong>of</strong> real applause.<br />
The transistor stage <strong>that</strong> follows provides the clapping<br />
sound.<br />
The noise is presented to the base <strong>of</strong> T2 via C5. C6<br />
is charged slowly via R5 after the power supply is<br />
switched on and this causes T2, via R6, to progressively<br />
conduct more and more. As a result the noise signal at<br />
the collector <strong>of</strong> T2 will grow to a maximum.<br />
*<br />
see text<br />
LD1<br />
8<br />
7 a<br />
6 b<br />
4 c<br />
2 d<br />
1 e<br />
9<br />
10<br />
f<br />
g<br />
5<br />
dp<br />
CA<br />
3<br />
CA<br />
SA23-12EWA<br />
R1 ... R7 = 47Ω<br />
061004 - 11<br />
The emitter voltage is set by R7 and R8 to half <strong>of</strong> the<br />
power supply voltage. T2 comes out <strong>of</strong> conduction for<br />
part <strong>of</strong> the time because <strong>of</strong> the size <strong>of</strong> the noise signal.<br />
There is therefore a switching effect with the noise <strong>that</strong><br />
gives a strong impression <strong>of</strong> applause. The signal is<br />
available at the output via C7.<br />
If you object to the lower frequencies then you can<br />
pick a smaller value for C7. D1 ensures <strong>that</strong> C6 is<br />
discharged quickly when the circuit is switched <strong>of</strong>f<br />
so <strong>that</strong> when it is switched back on again the same<br />
delay and growth <strong>of</strong> applause results. If you like<br />
experimenting, you can change the values <strong>of</strong> C2, C3<br />
and R4 or choose a different opamp and try to make<br />
the sound even more realistic. If you would also like<br />
the applause to decay slowly, you can connect R5<br />
alternately to the positive and negative <strong>of</strong> the power<br />
supply, for example with the aid <strong>of</strong> a change-over<br />
switch (D1 is omitted in this case). A smaller value <strong>of</strong><br />
C6 accelerates the effect.<br />
The current consumption <strong>of</strong> the circuit is only 4 mA;<br />
a 9-V battery is therefore eminently suitable as the<br />
power supply. If you plan to put the circuit in a box<br />
then do not forget the on/<strong>of</strong>f switch.<br />
Once you’ve got the circuit to work, the fi rst applause<br />
is naturally for yourself!<br />
BT1<br />
9V<br />
100k<br />
R1<br />
i-TRIXX collection - 12/2006 23<br />
T1<br />
BC547B<br />
C1<br />
100n<br />
BC547B<br />
C<br />
1M<br />
1M<br />
R2<br />
R3<br />
E<br />
B<br />
C2<br />
47µ<br />
25V<br />
3<br />
2<br />
C3<br />
47µ<br />
25V<br />
R4<br />
1M<br />
C4<br />
1<br />
7<br />
IC1<br />
100n<br />
4<br />
TL081<br />
5<br />
6<br />
1N4148<br />
C5<br />
470n<br />
D1<br />
C6<br />
10µ<br />
63V<br />
TL081<br />
2M2<br />
100k<br />
R5<br />
R6<br />
2k2<br />
R7<br />
T2<br />
BC547B<br />
2k2<br />
2k2<br />
R9<br />
R8<br />
C7<br />
10µ<br />
63V<br />
100k<br />
R10<br />
061006 - 11
£ 65,99<br />
THREE-IN-ONE LAB UNIT<br />
��������� � ����������� � ����� ������ � � ��������� �����<br />
���� ���� ������ ��� �� ���� ���� ��� ������<br />
������� �������� ��� �������� �� ��������<br />
K8061<br />
K8077<br />
2 MODULAR DIGITS WITH<br />
SERIAL INTERFACE<br />
������� ���� ����������� ��������� �������� �������<br />
�������� ���� ������� ���������� �������� ����� ���<br />
�� ������ �� �� ���� ��� �� ������ ������ ��������<br />
��� ���� �������������� ������� ��������� ���<br />
���� �������������������� ������� ��� �����<br />
���������� ���������� ���� ��� �����<br />
SOUND STAR<br />
VU METER<br />
MK172<br />
£ 79,99<br />
LAB1<br />
SUBWOOFER KIT<br />
�������� ���� ���� ��� ����� ��� ���������<br />
�������� ��� ����� �������� ��� ����<br />
�������� ��� ���� ������ ���������� �����<br />
����� �������� ��� ��������<br />
������������ ��� ���� ��� ������� ���<br />
����������<br />
200W<br />
£ 399,99<br />
£ 89,99<br />
EXTENDED USB<br />
INTERFACE BOARD<br />
��������� ��� ���� ���� ���� ����������<br />
����� ��������� �������� �������������<br />
������� ��� ��� ����� ��� ���� ���<br />
PCSU1000<br />
1Gs/s<br />
2x60MHz<br />
M O D U L E S<br />
www.velleman.eu<br />
TWO-CHANNEL USB<br />
PC OSCILLOSCOPE<br />
��� �������� ������� ������� ������������ ���� ��� ����� ��<br />
���� �� �� ��������� ���������� ��������<br />
���� ��������� ����������� ���� �� �������<br />
10MS/s PERSONAL<br />
POCKET SCOPE<br />
������� ���� �������� �������������<br />
PC CONNECTION<br />
RS232<br />
8-CHANNEL RF REMOTE<br />
CONTROL SET<br />
��������� �� ������ ������� ����<br />
�������� �� ��������� ���� ��� ���� �������<br />
VM100<br />
VM118<br />
PPS10<br />
200W POWER AMPLIFIER MODULE<br />
��������� ����� ��� ������ ����� �������� ������� �������� ��� ������������� �����������<br />
£ 39,99<br />
ULTRASONIC RADAR<br />
MODULE<br />
£ 19,99<br />
������ ������� ���� � ���� � ����������� �������� ����������<br />
���� ���������� ���������� ����� ��������� ��� �����<br />
���������� ��� ������� ����� ������ ������������� �����<br />
notice.<br />
��������� ������ ���������� �������� ���������� ������� ����<br />
prior<br />
�������� ��������<br />
without<br />
£ 29,99<br />
change to<br />
K8063<br />
VM125<br />
subject<br />
FLASHING YELLOW<br />
DE LUXE XMAS 60-LED MULTI-<br />
are<br />
ELECTRONIC<br />
LED STAR<br />
CHRISTMAS<br />
TREE<br />
EFFECT STAR<br />
texts and<br />
TREE<br />
pictures<br />
FLASHING<br />
All<br />
RED LED<br />
STAR<br />
reserved. Misprints<br />
MK169Y<br />
MK170<br />
VAT.<br />
RIDING SANTA<br />
including<br />
MK100<br />
sterling in<br />
MK169R<br />
��� ����� ���� ���� ��� ���������� MK117<br />
quoted<br />
For more information and dealers, see www.vellemanprojects.com<br />
prices<br />
Suggested retail prices VAT included Suggested<br />
MK116<br />
£ 154,99<br />
ASSEMBLED<br />
PRODUCTS<br />
£ 69,99
12/2006 - elektor electronics 69
know-how rf<br />
WLAN Antenna Desi<br />
Increased range the easy way<br />
Stefan Tauschek and Thomas Scherer<br />
The domestic use <strong>of</strong> WLANs has grown rapidly as DSL routers with built-in wireless Ethernet have<br />
become available, and now it is easy to use a notebook PC to surf the Internet wirelessly from the<br />
comfort <strong>of</strong> one’s s<strong>of</strong>a. However, things get trickier if a reinforced concrete wall stands in the way, or<br />
if a neighbour happens to be using the same frequency...<br />
The enormous popularity <strong>of</strong> WLANs<br />
(wireless local area networks) is easy<br />
to understand: not everyone has their<br />
desk situated next to a telephone socket.<br />
Even in the case <strong>of</strong> desktop PCs it<br />
is now easier to provide a fast Internet<br />
connection via the ether rather<br />
than by installing fixed cables. Unfortunately,<br />
things do not always go perfectly<br />
smoothly in practice: sometimes<br />
it can be difficult to set up a reliable<br />
connection between two devices even<br />
just a short distance apart in the same<br />
building.<br />
The problems and their causes<br />
The frequency used for WLAN communications<br />
according to IEEE 802.11b or<br />
802.11g is around 2.4 GHz. At this frequency<br />
radio waves propagate quasi-optically<br />
and are considerably attenuated<br />
by moisture in walls. Reinforced<br />
concrete and limestone block<br />
the waves to an even greater extent<br />
because <strong>of</strong> their high metal content.<br />
A further limitation is <strong>that</strong> in Europe<br />
transmit power in this band is limited<br />
to 100 mW.<br />
Often also corners are cut in the interests<br />
<strong>of</strong> cost reductions. A WLAN<br />
router with a price tag <strong>of</strong> a few tens <strong>of</strong><br />
pounds will make a few compromises<br />
in performance: a typical device will<br />
have inside a mini-PCI WLAN card,<br />
just as a laptop might. Such cards <strong>of</strong>ten<br />
only output around 50 mW rather<br />
than 100 mW, and poor matching to<br />
the antenna <strong>of</strong>ten accounts for a few<br />
more dB <strong>of</strong> loss. The overall effective<br />
transmit power might only be around<br />
10 mW or 20 mW.<br />
A straightforward way to recoup some<br />
<strong>of</strong> this loss is to use a special antenna<br />
<strong>that</strong> <strong>of</strong>fers gain. And <strong>that</strong> is what this<br />
article is about: how to build a DIY directional<br />
WLAN antenna which focuses<br />
the available transmit power in the<br />
desired direction, providing a gain <strong>of</strong><br />
several dB over a conventional omnidirectional<br />
antenna. Furthermore, a directional<br />
antenna does not just provide<br />
gain in the transmit path; signals received<br />
from sources within the antenna’s<br />
beam are amplified by the same<br />
factor. Since the WLAN connection is<br />
bidirectional, this means <strong>that</strong> a directional<br />
antenna can give us a considerable<br />
increase in range without the need<br />
for complex RF electronics.<br />
The solutions<br />
When faced with a poorly-performing<br />
WLAN, it is wise to pause before<br />
reaching for the soldering iron. A couple<br />
<strong>of</strong> aspects should be considered<br />
before deciding to make or buy a directional<br />
antenna.<br />
First it is worth noting <strong>that</strong> the best<br />
Ethernet connection is a wired<br />
one. A wired connection is both<br />
faster and more reliable. If this is<br />
not an option for any reason, or if<br />
(because connection is to be made to<br />
a notebook) it is not convenient, then<br />
there are a few things one can do to<br />
improve the performance <strong>of</strong> a wireless<br />
network. The first step is to try moving<br />
the router a few feet closer to the<br />
computer. Another option is to splash<br />
out a few tens <strong>of</strong> pounds on a repeater,<br />
which can add five to ten metres<br />
<strong>of</strong> range within a building. Even better<br />
is to deactivate the WLAN part <strong>of</strong><br />
the router and, for a similar sum, purchase<br />
an access point (see Figure 1).<br />
This is a box <strong>of</strong> electronics which takes<br />
an Ethernet connection on one side<br />
and provides a WLAN connection on<br />
the other. The device can be connected<br />
to the router using an Ethernet cable.<br />
Because the device is dedicated<br />
to the one function, we might reasonably<br />
hope <strong>that</strong> it would provide better<br />
RF performance. A more significant<br />
advantage is <strong>that</strong> multifunction devices<br />
<strong>that</strong> combine a DSL modem with<br />
WLAN router and switch functions do<br />
not normally have a usable RF connector,<br />
and so it is hard to connect an external<br />
antenna. The small stub antenna<br />
usually provided is connected by a<br />
fixed wire to a sub-miniature connector<br />
on the internal WLAN card. This<br />
connector is not designed for repeated<br />
70 elektor electronics - 12/2006
gn<br />
plugging and unplugging<br />
and is unmanageably<br />
tiny. Access points, however, are available<br />
with common-or-garden SMA connectors<br />
(see Figure 2), making it easy<br />
to connect an external purchased or<br />
home-made directional antenna.<br />
One further piece <strong>of</strong> advice: it is preferable<br />
to use a longer Ethernet cable<br />
rather than a longer antenna cable. It<br />
is easy to achieve data transfer rates <strong>of</strong><br />
100 Mbit/s over 50 m or more <strong>of</strong> CAT5<br />
cable; but the losses in 50 m <strong>of</strong> antenna<br />
cable could easily cancel out the benefits<br />
<strong>of</strong> a directional antenna.<br />
Antenna types<br />
In the following discussion we shall<br />
not consider WLAN routers <strong>that</strong> employ<br />
several antennas and MIMO (multiple<br />
input multiple output) technology.<br />
Commercially-available access points<br />
(such as the one shown in Figure 1) are<br />
usually fitted with a so-called quarterwavelength<br />
stub antenna, or monopole<br />
(see Figure 3). Sometimes the stub<br />
can be entirely inside the enclosure (as<br />
long as it is made <strong>of</strong> plastic). The antenna<br />
consists <strong>of</strong> a piece <strong>of</strong> wire with<br />
12/2006 - elektor electronics<br />
length<br />
λ / 4 . A t<br />
2.44 GHz, this is<br />
a quarter <strong>of</strong> 300×10 6 / 2.44×10 9 metres,<br />
or slightly more than 3 cm.<br />
At the other end <strong>of</strong> the spectrum from<br />
this simple antenna is the parabolic reflector,<br />
which can have a diameter <strong>of</strong><br />
several metres. This can <strong>of</strong>fer a gain<br />
<strong>of</strong> up to 60 dB over the simple quarter-wavelength<br />
monopole. European<br />
regulations only allow such antennas<br />
to be fed at a very low power. Experiments<br />
in the USA with specially-constructed<br />
(and expensive) antennas <strong>of</strong><br />
this type have achieved ranges <strong>of</strong> up<br />
to 200 km.<br />
A wide range <strong>of</strong> directional antenna<br />
designs between these two extremes<br />
have been tried for WLAN applications.<br />
Two designs have proved most<br />
successful, <strong>of</strong>fering good gain and simple<br />
construction. The first type takes<br />
the form <strong>of</strong> a waveguide and goes by<br />
the catchy name <strong>of</strong> ‘cantenna’ (see<br />
left-hand half <strong>of</strong> Figure 4). The second<br />
type consists <strong>of</strong> specially-arranged<br />
diamond-shaped sections in front <strong>of</strong> a<br />
reflector, and is called a ‘biquad’ (see<br />
right-hand half <strong>of</strong> Figure 4). The lat-<br />
Figure 1. SMA connector on the rear panel <strong>of</strong> an access point.<br />
Figure 2. A typical access point: sometimes these are used to<br />
help reduce the length <strong>of</strong> antenna cable needed.<br />
71
know-how rf<br />
Figure 3. Quarter-wavelength stub antenna suitable for a<br />
WLAN router or access point.<br />
Figure 4. Prototype cantenna and biquad antenna constructed<br />
in the Elektor Electronics laboratory.<br />
Radiator<br />
Offset<br />
Radiator<br />
123 mm<br />
060056 - 11<br />
Figure 5. Construction drawing for the cantenna.<br />
Figure 6. Three-dimensional model <strong>of</strong> the cantenna plotted<br />
by 4NEC2.<br />
100 mm<br />
ter type can in theory <strong>of</strong>fer a gain <strong>of</strong><br />
around 12 dB (although as we shall see<br />
later, practice can deviate from theory!),<br />
somewhat more than the 10 dB<br />
<strong>that</strong> the cantenna can provide. Both<br />
types give considerable improvements<br />
over typical integrated antennas, and<br />
we shall now go on to look at them<br />
both in more detail.<br />
The cantenna<br />
As mentioned above, the cantenna<br />
operates as a kind <strong>of</strong> waveguide. The<br />
theory <strong>of</strong> such antennas is far from trivial;<br />
those interested can find a good introduction<br />
at [1]. As can be seen from<br />
Figure 4 and the drawing in Figure 5,<br />
the antenna consists <strong>of</strong> a can <strong>of</strong> certain<br />
specified dimensions and a carefullyarranged<br />
feed.<br />
There is a wide range <strong>of</strong> guides available<br />
to constructing cantennas <strong>of</strong> various<br />
dimensions [2]. The following suggestions<br />
have the advantage <strong>that</strong> they<br />
have been tested by simulation, carried<br />
out by Stefan Tauschek using a s<strong>of</strong>tware<br />
package called 4NEC2, available<br />
for free download from [3]. The program<br />
is based on the so-called boundary element<br />
method [4]: the idea is to convert<br />
Maxwell’s equations into a system <strong>of</strong><br />
linear algebraic equations, which are<br />
then stepwise integrated to calculate<br />
the current distribution in the antenna.<br />
The ‘NEC’ in the program name stands<br />
for ‘numerical electromagnetic code’.<br />
Although their derivation is complicated,<br />
the results themselves are simple:<br />
Figure 6 shows the three-dimensional<br />
model <strong>of</strong> the Cantenna in 4NEC2 and<br />
Figure 7 the calculated radiation pattern.<br />
The directional nature <strong>of</strong> the antenna<br />
is clear.<br />
To make an accurate cantenna the can<br />
must be exactly one wavelength long.<br />
At 2.44 GHz this is very nearly 123 mm.<br />
The internal diameter is approximately<br />
100 mm, slightly more than 4/5 λ.<br />
The feed stub, shown as a radiator,<br />
should be approximately λ/5, or 25 mm,<br />
long. Ideally this is a wedge-shaped or<br />
tapered piece <strong>of</strong> metal, with the thicker<br />
end pointing to the middle <strong>of</strong> the can.<br />
The distance from the base <strong>of</strong> the can,<br />
the ‘radiator <strong>of</strong>fset’, is the rather odd<br />
multiple <strong>of</strong> 7/32 times the wavelength,<br />
or 27 mm.<br />
It is difficult to find ready-made cans<br />
with these dimensions. A reasonably<br />
accurate version can be made by hand<br />
from copper sheet as shown in Fig-<br />
In the Elektor E<br />
When we had constructed prototypes in<br />
our laboratory we naturally wanted to<br />
test them immediately. The test equipment<br />
comprised an ordinary laptop and<br />
a PC as the fixed station to which the<br />
various antennas were connected. The<br />
walls <strong>of</strong> the laboratory building are built<br />
using a type <strong>of</strong> brick <strong>that</strong> absorbs RF <strong>of</strong><br />
this frequency very well. The layout <strong>of</strong> the<br />
building is a chain <strong>of</strong> rooms in a slightly<br />
staggered arrangement. There are many<br />
PCs and other electronic devices in the<br />
laboratory and in the editorial <strong>of</strong>fices,<br />
producing a high level <strong>of</strong> electromagnetic<br />
interference.<br />
We tested the ranges<br />
<strong>of</strong> four antennas: an<br />
ordinary λ/4 stub, the<br />
biquad, the cantenna,<br />
and a commercial<br />
model (the HA-<br />
O14SD from Hawking<br />
Technology: see<br />
Figure 12) costing<br />
around fifty pounds,<br />
with a quoted gain<br />
<strong>of</strong> at least 14 dB. In<br />
each case the antenna<br />
was connected to<br />
the WLAN card in the<br />
ure 4; deviations <strong>of</strong> up to 10 % from the<br />
nominal dimensions should be tolerable<br />
for ordinary use. Of course, there is<br />
plenty <strong>of</strong> scope for experimentation.<br />
The trickiest part <strong>of</strong> construction is<br />
connecting to the radiator. We can<br />
start from a commercially-available Ntype<br />
RF connector. Figure 8 shows an<br />
example <strong>of</strong> this type <strong>of</strong> connector with<br />
a radiator (sometimes called ‘exciter’)<br />
soldered to it. A suitable hole must be<br />
made in the can to fit the connector.<br />
Washers should be used when fitting<br />
the connector to avoid damage to the<br />
can. The antenna is now ready for use.<br />
If it is to be used outside it is worth<br />
considering waterpro<strong>of</strong>ing the connection<br />
to the radiator.<br />
Adaptor cables from N-type connectors<br />
to SMA connectors or other types<br />
are available ready made; alternatively,<br />
it is easy, as well as cheaper, to make<br />
up a suitable cable oneself. As noted<br />
above, the antenna cable should be no<br />
Web links<br />
[1] Waveguide theory:<br />
http://en.wikipedia.org/wiki/Waveguide_<br />
%28electromagnetism%29<br />
[2] Various antenna designs:<br />
http://qdg.sorbs.net/qdgant.htm<br />
72 elektor electronics - 12/2006
lectronics lab<br />
PC using an RF cable three metres long.<br />
We achieved the following results:<br />
1) Stub: 10 m<br />
2) HAO14SD: 20 m<br />
3) Biquad: 21 m<br />
4) Cantenna: 26 m<br />
Here again the cantenna comes out on top.<br />
The performance <strong>of</strong> the commercial antenna<br />
teaches us two things: first, one should<br />
not always believe in a manufacturer’s<br />
sometimes rather optimistic gain figures<br />
(the antenna is delivering<br />
an estimated gain<br />
<strong>of</strong> around 6 dB rather<br />
than 14 dB); and second,<br />
the DIY approach<br />
<strong>of</strong>ten pays <strong>of</strong>f!<br />
longer than necessary in order to get<br />
the most benefit from the gain <strong>of</strong> the<br />
antenna.<br />
Biquad<br />
An alternative design <strong>of</strong> antenna,<br />
which is also easy to construct, is the<br />
biquad. This takes the form <strong>of</strong> an angular<br />
figure-<strong>of</strong>-eight pattern <strong>of</strong> wire<br />
in front <strong>of</strong> and parallel to a reflector<br />
surface. The design has proved very<br />
popular on the Internet, where there<br />
are countless construction guides, no<br />
doubt because <strong>of</strong> its good theoretical<br />
performance and ‘high-tech’ appearance.<br />
The design described here has<br />
the advantage, shared with the cantenna<br />
above, <strong>that</strong> it has been simulated<br />
and optimised by computer.<br />
In essence the biquad is a folded multiple<br />
λ/4 dipole. As Figure 9 shows, the<br />
resulting shape resembles a figure-<strong>of</strong>eight.<br />
Each edge <strong>of</strong> the two squares<br />
[3] 4NEC2 s<strong>of</strong>tware:<br />
http://home.ict.nl/~arivoors<br />
12/2006 - elektor electronics<br />
Figure 12.<br />
The commercial directional<br />
WLAN antenna used for<br />
comparison tests.<br />
[4] Boundary element method:<br />
http://en.wikipedia.<br />
org/wiki/Boundary_element_method<br />
[5] Download page for NetStumbler:<br />
http://www.netstumbler.com/downloads<br />
is λ/4 = 30.5 mm long. A suitable material<br />
is 1 mm copper wire. The feed<br />
connection is made between the point<br />
where the two squares meet and the<br />
open ends, which are connected to<br />
ground (the feed cable screen). Figure<br />
10 clearly shows the current distribution<br />
due to the individual antenna<br />
elements. Current nodes and antinodes<br />
can be seen at the corners <strong>of</strong> the<br />
square: the antenna is in resonance.<br />
The figure-<strong>of</strong>-eight should be mounted<br />
approximately 15 mm to 17 mm in<br />
front <strong>of</strong> the reflector. Practical experiments<br />
have shown <strong>that</strong> it is possible<br />
to achieve an excellent SWR (standingwave<br />
ratio) <strong>of</strong> 1:1.15.<br />
It is recommended <strong>that</strong> the side <strong>of</strong> the<br />
reflector should be equal to one wavelength.<br />
In other words, the ideal reflector<br />
is a conducting square <strong>of</strong> metal<br />
measuring 123 mm on each side. Various<br />
materials are suitable: in the prototype<br />
we found copper-clad printed<br />
circuit board satisfactory. A reflector<br />
could also be made from a CD (the<br />
metallised part has diameter approximately<br />
118 mm). The dimensions <strong>of</strong> the<br />
multi-dipole are unfortunately rather<br />
critical.<br />
As shown in Figure 4, a suitable piece<br />
<strong>of</strong> copper pipe can be used to fix the<br />
biquad figure-<strong>of</strong>-eight. The pipe is soldered<br />
to the reflector and the RF coaxial<br />
cable passed through the pipe as<br />
the feed. The central conductor <strong>of</strong> the<br />
cable is then directly soldered to the<br />
middle <strong>of</strong> the figure-<strong>of</strong>-eight. Alternatively,<br />
an N-type connector can be used<br />
as with the cantenna, the correct distance<br />
to the reflector being achieved<br />
using two pieces <strong>of</strong> copper wire <strong>of</strong> suitable<br />
length.<br />
The figure at the beginning <strong>of</strong> the article<br />
shows the radiation pattern <strong>of</strong> a biquad<br />
antenna whose reflector is fitted<br />
with two plates, 30 mm high, on opposite<br />
sides to attenuate the rearwardspointing<br />
lobes. Using this construction<br />
a gain <strong>of</strong> between 10 dB and 12 dB can<br />
be achieved. There are reports <strong>of</strong> laptops<br />
equipped with biquad antennas<br />
connecting to an access point (also<br />
with a specially-constructed antenna)<br />
10 km away.<br />
Miscellanea<br />
Tall tales <strong>of</strong> spectacular results obtained<br />
by avid WLAN hunters abound,<br />
but it is true to say <strong>that</strong> there can be<br />
enormous differences in practicallyachievable<br />
range depending on the<br />
local townscape or countryside, on<br />
Figure 7. Radiation pattern <strong>of</strong> the cantenna calculated using<br />
4NEC2.<br />
Figure 8. N-type connector with a tapered radiator made from<br />
copper sheet soldered to it.<br />
30,5 mm<br />
30,5 mm<br />
060056 - 12<br />
Figure 9. Construction drawing for the figure-<strong>of</strong>-eight biquad<br />
antenna.<br />
Figure 10. Current distribution for the biquad antenna<br />
calculated using 4NEC2.<br />
73
know-how rf<br />
Antennas in practice<br />
The most detailed calculations and highest technical specifications<br />
count for nothing if good results are not achieved in practice. We<br />
therefore decided to take the antennas we built in the Elektor Electronics<br />
laboratory according to the designs calculated by Stefan<br />
Tauschek for a practical test. The most stringent test involved installing<br />
the various antennas at the home <strong>of</strong> Thomas Scherer in Frankfurt city<br />
centre and then using an ordinary Centrino laptop running NetStumbler<br />
to measure the signal strength in the street outside and determine<br />
over what range a connection could be achieved.<br />
Figure 11. List <strong>of</strong> WLANs found by NetStumbler.<br />
The screendump in Figure 11 was taken immediately outside the<br />
building. It shows <strong>that</strong> in this are there are many WLANs competing<br />
for the airwaves. The strongest signal, with SSID ‘IfPP Test Kanal 1’,<br />
is being produced by the access point shown in Figure 2 set up for<br />
this test.<br />
Table 1. Typical antenna ranges in the city centre.<br />
house layout and construction material,<br />
and even on the neighbours! For<br />
example, in Frankfurt city centre where<br />
Thomas Scherer carried out his antenna<br />
field tests there is practically no<br />
point where a laptop cannot pick up<br />
signals from at least 15 WLANs, and<br />
the same would go for any other major<br />
European city. To this we can add<br />
interference from microwave ovens,<br />
mobile telephones and other transmitters,<br />
all in or near the frequency band<br />
we are interested in. Things are quieter<br />
(as yet) in the 5 GHz band used by<br />
Antenna type<br />
Distance Stub Biquad Cantenna<br />
20 m –84 dB –80 dB –72 dB<br />
30 m – –85 dB –80 dB<br />
40 m – – –86 dB<br />
The building is a five-storey reinforced concrete structure built in the<br />
1980s. The walls screen radio signals so effectively <strong>that</strong> radio and<br />
digital television reception is difficult, even though the transmitter is<br />
IEEE 802.11a WLANs. It is also worth<br />
noting <strong>that</strong> the channels available in<br />
Europe, numbered from 1 to 13 in the<br />
IEEE 802.11b and 802.11g standards,<br />
provide for only three non-overlapping<br />
channels. A powerful WLAN run by a<br />
neighbour can interfere with between<br />
three and six channels on either side.<br />
If problems with signal quality are encountered,<br />
the first thing to check is<br />
what transmitters are active in the<br />
neighbourhood. The NetStumbler program<br />
[5], a favourite <strong>of</strong> ‘wardrivers’<br />
only 4 km away. The WLAN router is situated in a hallway on the third<br />
floor, surrounded by walls. Even just 5 m away, on the floor above,<br />
signal quality has dropped from ‘excellent’ to merely ‘good’. Inside<br />
the building only four <strong>of</strong> the 21 WLANs shown in Figure 11 can be<br />
received. The building thus makes an excellent test location..<br />
Table 1 shows how far the radio waves propagate along the street<br />
outside the building, after attenuation by one wall. The directional antennas<br />
were, <strong>of</strong> course, correctly aligned for the test. The first surprise<br />
is <strong>that</strong> the biquad is clearly outperformed by the cantenna. The reason<br />
for this disagreement with the theoretical results was not found:<br />
cable connections and the like were thoroughly checked. In the city<br />
(and with one wall interposed between transmitter and receiver) the<br />
cantenna <strong>of</strong>fers approximately double the range <strong>of</strong> the ordinary stub<br />
antenna. The performance <strong>of</strong> the biquad antenna sits between the<br />
two: we eagerly await the comments <strong>of</strong> our expert readership in the<br />
Elektor Electronics online forum!<br />
To see what a directional antenna is capable <strong>of</strong>, we need to get away<br />
from the electromagnetic smog <strong>of</strong> the city. To this end we moved the<br />
test setup to a house on the outskirts <strong>of</strong> a small village. The antenna,<br />
connected to an access point, was arranged to transmit from the<br />
(open) front door <strong>of</strong> the house over the fields beyond. The measurements<br />
therefore give the line-<strong>of</strong>-sight performance <strong>of</strong> the antennas.<br />
Besides the test WLAN, NetStumbler found two other WLANs in range,<br />
but both were at least six channels away from the test frequency.<br />
Table 2. Ranges achieved in open countryside.<br />
Antenna type<br />
Distance Stub Biquad Cantenna<br />
40m 22 Mbit 48 Mbit 54 Mbit<br />
60m – 11 Mbit 54 Mbit<br />
120m – – 5,5 Mbit<br />
Table 2 shows <strong>that</strong> line-<strong>of</strong>-sight communication is possible over considerably<br />
greater distances than in the city. We have shown the communication<br />
rates achieved, as this is the most practically useful figure.<br />
Communication over 120 m using a tin can is not a bad achievement,<br />
we think! The tripling <strong>of</strong> range achieved using the cantenna,<br />
compared to the stub antenna, is in line with the theoretical gain<br />
figure <strong>of</strong> 10 dB.<br />
If both access point and laptop are equipped with directional antennas,<br />
ranges under these conditions <strong>of</strong> over 200 m can easily be<br />
obtained. In this case the laptop must be used in conjunction with an<br />
external WLAN adapter (either a PCMCIA card or connected via USB)<br />
which has an RF connector, although this arrangement does make the<br />
laptop rather unwieldy!<br />
(people who drive around looking for<br />
WLANs using a laptop) is helpful here.<br />
It scans the radio frequencies in a configurable<br />
fashion and shows information<br />
about the various networks available,<br />
including their SSIDs and signal<br />
strengths. Depending on the WLAN<br />
hardware, the results might not always<br />
be perfectly accurate, but the relative<br />
values do usually give a good overview<br />
<strong>of</strong> the situation.<br />
74 elektor electronics - 12/2006<br />
(060056-I)
In all mains-operated equipment certain<br />
important safety requirements must be<br />
met. The relevant standard for most<br />
sound equipment is Safety <strong>of</strong> Information<br />
Technology Equipment, including<br />
Electrical Business Equipment (European<br />
Harmonized British Standard BS<br />
EN 60950:1992). Electrical safety under<br />
this standard relates to protection from<br />
• a hazardous voltage, <strong>that</strong> is, a voltage<br />
greater than 42.4 V peak or<br />
60 V d.c.;<br />
• a hazardous energy level, which is<br />
defined as a stored energy level <strong>of</strong><br />
20 Joules or more or an available<br />
continuous power level <strong>of</strong> 240 VA<br />
or more at a potential <strong>of</strong> 2 V or<br />
more;<br />
• a single insulation fault which would<br />
cause a conductive part to become<br />
hazardous;<br />
• the source <strong>of</strong> a hazardous voltage<br />
or energy level from primary power;<br />
• secondary power (derived from<br />
internal circuitry which is supplied<br />
and isolated from any power<br />
source, including d.c.)<br />
Protection against electric shock is<br />
achieved by two classes <strong>of</strong> equipment.<br />
Class I equipment uses basic insulation<br />
; its conductive parts, which may<br />
become hazardous if this insulation<br />
fails, must be connected to the supply<br />
protective earth.<br />
Class II equipment uses double or<br />
reinforced insulation for use where<br />
there is no provision for supply protective<br />
earth (rare in electronics – mainly<br />
applicable to power tools).<br />
The use <strong>of</strong> a a Class II insulated<br />
transformer is preferred, but note <strong>that</strong><br />
when this is fitted in a Class I equipment,<br />
this does not, by itself, confer<br />
Class II status on the equipment.<br />
Electrically conductive enclosures<br />
<strong>that</strong> are used to isolate and protect a<br />
hazardous supply voltage or energy<br />
level from user access must be protectively<br />
earthed regardless <strong>of</strong> whether the<br />
mains transformer is Class I or Class II.<br />
Always keep the distance between<br />
mains-carrying parts and other parts as<br />
large as possible, but never less than<br />
required.<br />
If at all possible, use an approved<br />
mains entry with integrated fuse holder<br />
and on/<strong>of</strong>f switch. If this is not available,<br />
use a strain relief (Figure, note 2)<br />
on the mains cable at the point <strong>of</strong> entry.<br />
In this case, the mains fuse should be<br />
placed after the double-pole on/<strong>of</strong>f<br />
switch unless it is a Touchpro<strong>of</strong>® type<br />
or similar. Close to each and every fuse<br />
must be affixed a label stating the fuse<br />
rating and type.<br />
The separate on/<strong>of</strong>f switch (Figure,<br />
note 4), which is really a ‘disconnect<br />
device’, should be an approved doublepole<br />
type (to switch the phase and neutral<br />
conductors <strong>of</strong> a single-phase mains<br />
supply). In case <strong>of</strong> a three-phase supply,<br />
all phases and neutral (where used)<br />
must be switched simultaneously. A<br />
pluggable mains cable may be considered<br />
as a disconnect device. In an<br />
approved switch, the contact gap in the<br />
<strong>of</strong>f position is not smaller than 3 mm.<br />
The on/<strong>of</strong>f switch must be fitted by<br />
as short a cable as possible to the<br />
mains entry point. All components in<br />
the primary transformer circuit, including<br />
a separate mains fuse and separate<br />
mains filtering components, must be<br />
placed in the switched section <strong>of</strong> the<br />
primary circuit. Placing them before the<br />
on/<strong>of</strong>f switch will leave them at a hazardous<br />
voltage level when the equipment<br />
is switched <strong>of</strong>f.<br />
If the equipment uses an open-construction<br />
power supply which is not<br />
separately protected by an earthed<br />
metal screen or insulated enclosure or<br />
otherwise guarded, all the conductive<br />
parts <strong>of</strong> the enclosure must be protectively<br />
earthed using green/yellow wire<br />
(green with a narrow yellow stripe – do<br />
not use yellow wire with a green stripe).<br />
The earth wire must not be daisychained<br />
from one part <strong>of</strong> the enclosure<br />
to another. Each conductive part must<br />
be protectively earthed by direct and<br />
separate wiring to the primary earth<br />
point which should be as close as possible<br />
to the mains connector or mains<br />
cable entry. This ensures <strong>that</strong> removal<br />
<strong>of</strong> the protective earth from a conductive<br />
part does not also remove the protective<br />
earth from other conductive<br />
parts.<br />
Pay particular attention to the metal<br />
spindles <strong>of</strong> switches and potentiometers:<br />
if touchable, these must be protectively<br />
earthed. Note, however, <strong>that</strong> such<br />
components fitted with metal spindles<br />
and/or levers constructed to the relevant<br />
British Standard fully meet all insulation<br />
requirements.<br />
The temperature <strong>of</strong> touchable parts<br />
must not be so high as to cause injury<br />
or to create a fire risk.<br />
Most risks can be eliminated by the<br />
use <strong>of</strong> correct fuses, a sufficiently firm<br />
construction, correct choice and use <strong>of</strong><br />
insulating materials and adequate cooling<br />
through heat sinks and by extractor<br />
fans.<br />
The equipment must be sturdy:<br />
repeatedly dropping it on to a hard surface<br />
from a height <strong>of</strong> 50 mm must not<br />
cause damage. Greater impacts must<br />
not loosen the mains transformer, electrolytic<br />
capacitors and other important<br />
components.<br />
Do not use dubious or flammable<br />
materials <strong>that</strong> emit poisonous gases.<br />
Shorten screws <strong>that</strong> come too<br />
close to other components.<br />
Keep mains-carrying parts and<br />
wires well away from ventilation holes,<br />
so <strong>that</strong> an intruding screwdriver or<br />
inward falling metal object cannot touch<br />
such parts.<br />
As soon as you open an equipment,<br />
there are many potential dangers. Most<br />
<strong>of</strong> these can be eliminated by disconnecting<br />
the equipment from the mains<br />
before the unit is opened. But, since<br />
testing requires <strong>that</strong> it is plugged in<br />
again, it is good practice (and safe) to<br />
fit a residual current device (RCD)*,<br />
rated at not more than 30 mA to the<br />
1. Use a mains cable with moulded-on plug.<br />
2. Use a strain relief on the mains cable.<br />
3. Affix a label at the outside <strong>of</strong> the enclosure near the mains entry stating the<br />
equipment type, the mains voltage or voltage range, the frequency or frequency<br />
range, and the current drain or curent drain range.<br />
4. Use an approved double-pole on/<strong>of</strong>f switch, which is effectively the ‘disconnect<br />
device’.<br />
5. Push wires through eyelets before soldering them in place.<br />
6. Use insulating sleeves for extra protection.<br />
7. The distance between transformer terminals and core and other parts must<br />
be ≥ 6 mm.<br />
8. Use the correct type, size and current-carrying capacity <strong>of</strong> cables and wires<br />
– see shaded table below.<br />
9. A printed-circuit board like all other parts should be well secured. All joints<br />
and connections should be well made and soldered neatly so <strong>that</strong> they are<br />
mechanically and electrically sound. Never solder mains-carrying wires<br />
directly to the board: use solder tags. The use <strong>of</strong> crimp-on tags is also good<br />
practice.<br />
10. Even when a Class II transformer is used, it remains the on/<strong>of</strong>f switch whose<br />
function it is to isolate a hazardous voltage (i.e., mains input) from the primary<br />
circuit in the equipment. The primary-to-secondary isolation <strong>of</strong> the<br />
transformer does not and can not perform this function.<br />
mains system (sometimes it is possible<br />
to fit this inside the mains outlet box or<br />
multiple socket).<br />
* Sometimes called residual current<br />
breaker – RCB – or residual circuit current<br />
breaker –RCCB.<br />
These guidelines have been drawn up<br />
with great care by the editorial staff <strong>of</strong><br />
3-core mains cable to BS6500 1990 with three stranded<br />
conductors in thick PVC sheath<br />
this magazine. However, the publishers<br />
do not assume, and hereby disclaim,<br />
any liability for any loss or damage,<br />
direct or consequential, caused by<br />
errors or omissions in these guidelines,<br />
whether such errors or omissions result<br />
from negligence, accident or any other<br />
cause.<br />
Max current 3 A 6 A 13 A<br />
conductor size 16/0.2 mm 24/0.2 mm 40/0.2 mm<br />
Nom cond area 0.5 mm 2 0.75 mm 2 1.25 mm 2<br />
overall cable dia. 5.6 mm 6.9 mm 7.5 mm<br />
Insulated hook-up wire to DEF61-12<br />
Max current 1.4 A 3 A 6 A<br />
Max working voltage 1000 V rms 1000 V rms 1000 V rms<br />
PVC sheath thickness 0.3 mm 0.3 mm 0.45 mm<br />
conductor size 7/0.2 mm 16/0.2 mm 24/0.2 mm<br />
Nom cond area 0.22 mm 2 0.5 mm 2 0.95 mm 2<br />
overall wire dia 1.2 mm 1.6 mm 2.05 mm<br />
3-flat-pin mains plug to BS 1363A<br />
ELECTRICAL SAFETY INFO & MARKET<br />
12/2006 - elektor electronics 75
know-how wlan<br />
Where am I – and W<br />
Position determination using WLAN<br />
Dennis Vredeveld<br />
Wireless LAN (WLAN) has become incredibly popular in the last few years. Wireless<br />
internet has now become very common in a corporate environment as well as in public<br />
spaces and in our homes. But what not many people know, is<br />
<strong>that</strong> WLAN can also be put to excellent use for other<br />
applications, such as, for example, determining the<br />
position <strong>of</strong> devices on the wireless network. How<br />
this works you can read in this article.<br />
Position determination technology is the basis for the now<br />
universally known GPS (Global Positioning System). GPS<br />
operates relatively accurately in the city and motorways,<br />
but is not suitable for use inside buildings. The reason is<br />
<strong>that</strong> the reception <strong>of</strong> the GPS signals from the satellites are<br />
too weak inside buildings so <strong>that</strong> there is very little left <strong>of</strong><br />
the original accuracy.<br />
An indoor equivalent <strong>of</strong> the GPS system is currently not<br />
available and there is not even the slightest sign <strong>of</strong> a<br />
possible standard. As a result we have to resort to other<br />
systems, which, even though they were not developed<br />
for this purpose, still provide surprisingly good results in<br />
practice. Such as, for example, position determination<br />
using WLAN!<br />
WLAN – how does it work?<br />
Devices with WLAN functionality generally have an integrated<br />
WLAN card. This card maintains the connection<br />
with the base station, the so-called Access Point (AP).<br />
76 elektor electronics - 12/2006
here are the Others?<br />
Wireless transfer <strong>of</strong> data can take place once a successful<br />
connection has been established. Because the quality <strong>of</strong><br />
the connection can diminish – or even disappear completely<br />
– when the user moves, the card scans at regular<br />
intervals for other Access Points <strong>that</strong> may be within range.<br />
Based on different algorithms <strong>that</strong> are implemented by<br />
the manufacturer in the driver for the card, the card can<br />
decide to establish a connection with another AP and<br />
terminate the old connection. This is called a ‘handover’.<br />
Which access point becomes the new connection<br />
depends on the signal strengths <strong>of</strong> the various APs. The<br />
signal strength is determined by the card based on data<br />
packets <strong>that</strong> are sent by the AP specifically for this purpose.<br />
The packets are called beacons and are transmitted<br />
by the AP at regular intervals (about 10 times per<br />
second). These beacons contain the unique MAC-address<br />
<strong>of</strong> the AP, as well as the name <strong>of</strong> the wireless network, the<br />
so-called SSID. Should the signal strength <strong>of</strong> the AP <strong>that</strong><br />
the card is currently connected to become too weak then<br />
the card starts to search for better alternatives. This is only<br />
valid <strong>of</strong> course if we have the use <strong>of</strong> a network with multiple<br />
APs (refer to the example in Figure 1).<br />
Relationship signal strength-position<br />
The method described here implies <strong>that</strong> there is a relationship<br />
between the position <strong>of</strong> the user (or more accurately:<br />
<strong>of</strong> the WLAN card in the device <strong>that</strong> the user is carrying)<br />
and the measured signal strength <strong>of</strong> the beacons <strong>that</strong> are<br />
received from different APs. This relationship can also be<br />
used to locate the user within the WLAN network. In principle<br />
two different methods can be thought <strong>of</strong> to achieve<br />
this:<br />
1. Simulation: We try to calculate the expected signal<br />
strength at each position in advance based on a model.<br />
Afterwards we compare the measured values and try to<br />
find out where the user is based on the results from the<br />
model.<br />
2. Calibration: Instead <strong>of</strong> calculating the expected signal<br />
strength for each location, the signal strength is measured<br />
at different, predetermined locations. This information is<br />
stored and used as data for comparison for subsequent<br />
measurements when the user is in an unknown location.<br />
Various tests have shown <strong>that</strong> the first method is not only<br />
significantly more complicated, but is also less accurate<br />
than the second. The reason for this is <strong>that</strong> the signal<br />
propagation in an indoor environment is so very complex<br />
<strong>that</strong> even very extensive models cannot take all existing<br />
factors into account.<br />
Reading Signal strengths<br />
The question now arises how we are going to obtain<br />
these seemingly very important signal strengths. Windows,<br />
after all, hides this information from us in the first<br />
instance by translating the received signal strengths<br />
into less accurate terms such as ‘very strong’ or ‘weak’.<br />
The answer to this? NDIS! NDIS is a standard Win-<br />
12/2006 - elektor electronics<br />
dows-API for communicating with network cards. In this<br />
way it is possible to obtain the necessary information<br />
from the WLAN-driver in a pre-defined manner, irrespective<br />
<strong>of</strong> the manufacturer. More information can be<br />
found at [1] and [2].<br />
Performing the calibration<br />
Before our positioning system can be used, we must first<br />
carry out the calibration. This consists <strong>of</strong> recording the<br />
Figure 1.<br />
This signal strength<br />
information is normally<br />
hidden from us by<br />
Windows.<br />
Figure 2.<br />
Visualisation <strong>of</strong> the signal<br />
strength <strong>of</strong> an AP, based on<br />
a simulation. Red means<br />
large signal strength,<br />
blue means weak signal<br />
strength.<br />
77
know-how wlan<br />
Advertisement<br />
signal strengths <strong>of</strong> all access points at different locations,<br />
scattered over the space <strong>that</strong> is covered by the LAN network.<br />
More points increase the accuracy, until the points<br />
are less than one meter apart. At every calibration location<br />
we measure the received signal strength in four different<br />
directions for a few seconds for all APs. This information<br />
is stored in a database. The different orientations are<br />
important because the human body has a measurable<br />
influence in the received signal strength. There is therefore<br />
a difference if we are facing the AP or if we are between<br />
the AP and the WLAN device.<br />
Where am I?<br />
Once this calibration has been completed, the actual position<br />
determination can begin. By measuring the signal<br />
strengths <strong>of</strong> all APs at regular intervals and comparing<br />
these with the calibrated locations, the most likely position<br />
can be calculated. Because we will not usually be at a<br />
calibration location, a weighted average is taken from the<br />
calibration positions <strong>that</strong> correspond best with the signal<br />
strength pr<strong>of</strong>ile.<br />
With additional mathematical tricks (such as calculating<br />
a running average <strong>of</strong> the recent locations) the accuracy<br />
<strong>of</strong> the system can be further improved. In this way we are<br />
able to achieve a resolution down to a few meters; sufficient<br />
to determine in which room or in which corner <strong>of</strong> a<br />
hall the user is located.<br />
The smarter the algorithm, the better the position can be<br />
determined. The development <strong>of</strong> a real clever algorithm<br />
redlineplc.com<br />
The author<br />
Dennis Vredeveld (vredeveld@imst.de) is a s<strong>of</strong>tware-architect<br />
at IMST GmbH in Kamp-Lintfort, Germany, where,<br />
among other things, work is being done on a s<strong>of</strong>twareframework<br />
for several indoor position determination technologies,<br />
including WLAN.<br />
More information can be found at www.imst.com and<br />
www.centrum21.de under the heading ‘ipos’.<br />
for determining the position is certainly no sinecure – we<br />
are curious for your solution. If you have developed a<br />
good method for this, then be sure to let us know!<br />
Web links<br />
[1] www.ndis.com<br />
(060269) Illustrations : IMST GmbH<br />
[2] http://msdn.micros<strong>of</strong>t.com/library/default.asp?url=/library/<br />
en-us/wceddk40/html/cxconNDISDriverArchitecture.asp<br />
Senior Power<br />
Engineer<br />
£35k - £55k Cambridge, UK<br />
Splashpower Ltd develops wireless power technology for recharging<br />
portable consumer electronics devices. Having completed a major<br />
phase <strong>of</strong> R&D, they are preparing to license their technology to<br />
global OEM’s. Based in the vibrant and Historic town <strong>of</strong> Cambridge,<br />
40 miles North <strong>of</strong> London, it is the centre <strong>of</strong> new and emerging<br />
technology within the UK.<br />
They are currently seeking a Senior Power Engineer to:<br />
• Lead all Power circuit design and assessment from requirements<br />
analysis through to acceptance and certification, providing<br />
technical leadership to implementation teams<br />
• Develop system level mapping, detail simulation tools<br />
and Design Methodology<br />
• Assist in the capture, and preparation <strong>of</strong>, design specifications<br />
from primary requirements to the implementation <strong>of</strong> secondary<br />
requirements<br />
If you have extensive experience in low power electronics (sub 100<br />
Watt), with knowledge <strong>of</strong> batteries, charging, and/or power systems<br />
(e.g. SMPS), we’d like to talk to you.<br />
If you want to work with some <strong>of</strong> Europe’s brightest Engineers contact<br />
Lisa Hart on +44 (0)1582 878827 or Lhart@redlineplc.com<br />
Redline<br />
Recruiting Excellence<br />
www.redlineplc.com<br />
cv@Redlineplc.com<br />
Luton: +44 (0)1582 450054<br />
Manchester: +44 (0)161 491 7830<br />
Scotland: +44 (0)1698 527120<br />
78 elektor electronics - 12/2006
Client-server quizmaster<br />
Manuel Schreiner<br />
This circuit is designed for use<br />
in quizzes involving several<br />
players. The situation is a familiar<br />
one: whoever presses (or,<br />
in practice, thumps) their button<br />
first lights their lamp and is given<br />
the opportunity to answer the<br />
question.<br />
We have published a number <strong>of</strong><br />
designs for such circuits over the<br />
years in Elektor Electronics, but<br />
admittedly none has been particularly<br />
straightforward, <strong>of</strong>ten<br />
using microcontrollers and even<br />
radio modules!<br />
This circuit demonstrates <strong>that</strong> we<br />
can do the job very simply, using<br />
just a couple <strong>of</strong> discrete (not<br />
to say antique!) components.<br />
Our terminology, on the other<br />
hand, is bang up-to-date: we<br />
have designed a client-server<br />
quiz system.<br />
The server (i.e., the quizmaster)<br />
BT1<br />
BC557<br />
is shown on the left in the circuit<br />
diagram. It consists <strong>of</strong> a relay<br />
(K2), a pull-up resistor (R1) and<br />
a transistor. The relay is used to<br />
switch a buzzer or bell. Switch<br />
S2 is used to reset the system.<br />
The client systems are connected<br />
Pencil rubber cleans solder pads<br />
Luc Lemmens<br />
Just in case you didn’t know,<br />
from 1 July 2006 all new electronics<br />
equipment has to be<br />
RoHS-compliant. One <strong>of</strong> the implications<br />
<strong>of</strong> the new rules is <strong>that</strong><br />
solder tin containing lead may<br />
no longer be used in newly produced<br />
equipment. Interestingly,<br />
exceptions are made for automotive<br />
electronics, medical and<br />
military equipment. Currently<br />
there are some doubts regarding<br />
the mechanical durability <strong>of</strong><br />
the substances used to replace<br />
the lead/tin alloy we’ve been<br />
using for decades to solder our<br />
circuits. The use <strong>of</strong> lead/tin solder<br />
is also still allowed for repair<br />
work on older equipment. Consequently<br />
it will take a while before<br />
the ‘old’ type <strong>of</strong> solder tin has<br />
disappeared from electronics in<br />
general.<br />
Browsing the soldering and soldering<br />
tools section <strong>of</strong> just about<br />
any catalogue from a major<br />
electronics supplier, you’ll soon<br />
be at a loss at what solder tin<br />
to choose, the choice <strong>of</strong> alloys<br />
and compounds being confusing<br />
to say the least. Still, 90% <strong>of</strong> all<br />
varieties have one thing in com-<br />
12/2006 - elektor electronics<br />
S2<br />
1k<br />
R1<br />
T2<br />
RE2<br />
S1<br />
BZ1<br />
mon: the lead component has<br />
been replaced by silver. Only<br />
the tin/silver ratio varies. In most<br />
cases, another metal has been<br />
added to optimise the chemical<br />
and thermal characteristics. Also,<br />
differences exist in the flux type<br />
and the amount <strong>of</strong> it added to<br />
the solder tin.<br />
Pre-tinned Elektor Electronics<br />
printed circuit boards, too, had<br />
to undergo a change in the pro-<br />
D4<br />
4x 1N4004<br />
D1<br />
D2<br />
D3<br />
BC547<br />
RE1<br />
T1<br />
060218 - 11<br />
+VCC<br />
LA1<br />
to the server and to one another<br />
using a three-wire bus. Each<br />
client consists <strong>of</strong> a relay, a transistor<br />
and a couple <strong>of</strong> diodes.<br />
One <strong>of</strong> the jobs <strong>of</strong> the relay is to<br />
switch on the lamp on the contestant’s<br />
desk.<br />
duction process. Since a few<br />
months, our board suppliers<br />
apply chemical silver to cover<br />
copper surfaces and so comply<br />
with RoHs. It took us some getting<br />
used to when the first boards<br />
started to arrive in our lab — to<br />
us, it seemed as if the white<br />
component overlay was covering<br />
the solder pads! Still, the<br />
boards turned out to be perfectly<br />
solderable.<br />
design tips hands-on<br />
The three bus wires carry V CC ,<br />
ground, and a blocking signal. A<br />
number <strong>of</strong> client systems, one per<br />
contestant, can be connected to<br />
the three wires. In the quiescent<br />
state the blocking signal carries<br />
the supply voltage V CC . When<br />
one <strong>of</strong> the contestants’ lamps is<br />
lit this drops to 0.7 V.<br />
When a contestant presses his<br />
button (S1) relay K1 pulls in as<br />
a result <strong>of</strong> the voltage (the blocking<br />
signal minus 0.7 V) applied<br />
to the base <strong>of</strong> transistor Q1. If<br />
another contestant subsequently<br />
presses his own button nothing<br />
will happen: the voltage appearing<br />
at the base <strong>of</strong> his transistor<br />
will now be 0 V, and so it will<br />
not be turned on.<br />
Relays with a working voltage <strong>of</strong><br />
6 V can be used, with a supply<br />
voltage not exceeding 9 V.<br />
(060218-I)<br />
Now, silver has a nasty habit if<br />
oxidising quickly. Just as table<br />
silver, our boards seem to turn<br />
black and dull after a while, especially<br />
if touched by fingers.<br />
It is therefore recommended to<br />
use airtight packaging for circuit<br />
boards when in storage or transit.<br />
After all, solder tin will not<br />
flow very well on silver oxide.<br />
If a circuit board shows black<br />
smudges, problems in soldering<br />
may be prevented by solving<br />
the silver oxide traces with a<br />
s<strong>of</strong>t piece <strong>of</strong> pencil rubber, which<br />
some <strong>of</strong> you may remember from<br />
the days when a pencil was used<br />
to make notes and drawings. The<br />
silver-oxide spots and areas will<br />
disappear remarkably quickly<br />
and soldering will be a breeze<br />
afterwards. If you solder immediately<br />
after applying the pencil<br />
rubber, the problems are solved<br />
for good. So far, we have not<br />
observed significant oxidising in<br />
joints made using the latest silver/tin<br />
based solder, so ‘polishing<br />
the silver’ is unlikely to become<br />
a recurrent subject in this<br />
magazine.<br />
(060230-11)<br />
79
technology radio remote control<br />
Radio Control using<br />
Dieter Perkuhn<br />
Model aircraft these days fly at lightning<br />
speed and with their backup systems can<br />
cost as much as a small car. If<br />
someone else’s control<br />
system blocks yours, the<br />
results can be dearly fatal for both aircraft!<br />
A new broadband-based system could prove<br />
an ideal solution.<br />
Until recently it was no exaggeration to describe radio<br />
control (R/C) systems for plane, car and ship models<br />
as utterly ‘stone age’, at least from a communications<br />
technology point <strong>of</strong> view. Transmission techniques had<br />
not moved forward since amplitude modulation (AM)<br />
was generally ditched in favour <strong>of</strong> frequency modulation<br />
(FM), and <strong>that</strong> was several decades ago. The standards<br />
established at <strong>that</strong> time are largely still in use around the<br />
world. Key points <strong>of</strong> this standardisation include using<br />
the frequency bands 27, 35 and 40 MHz for control<br />
signal transmission. Across Europe 35 MHz is reserved<br />
exclusively for model aircraft control, whereas a multitude<br />
<strong>of</strong> other users have access to the 27 and 40 MHz<br />
bands. The frequency bands are divided into channels<br />
10 kHz wide, making this a narrowband modulation system.<br />
With no guardbands between individual channels,<br />
it is technically simple for signals to bleed over into adjacent<br />
channels, requiring signals to be limited to 8 kHz<br />
bandwidth if interference is to be avoided. Most <strong>of</strong> today’s<br />
R/C receivers use IF filters having a 3-dB bandwidth<br />
<strong>of</strong> around 6 kHz.<br />
The simplest way <strong>of</strong> generating R/C transmissions is to<br />
code the signal using Time Division Multiplex (TDM) technology.<br />
To control between 4 (minimum) and 12 (maximum)<br />
servo functions, a corresponding number <strong>of</strong> pulses<br />
<strong>of</strong> variable width are generated sequentially with a repetition<br />
rate <strong>of</strong> around 20 ms, then used to modify the RF<br />
carrier using frequency modulation. For this kind <strong>of</strong> coding<br />
the term Pulse Position Modulation (PPM) has been<br />
defined. Over the years another system known as Pulse<br />
Code Modulation (PCM) has also been implemented and<br />
there is no single standard in use. Proprietary (manufacturer-specific)<br />
data compression systems reduce compatibility<br />
between PCM systems.<br />
Foto: Weatronic [5]<br />
Since the signal structure does no more than distinguish<br />
between two different amplitude levels, the modulation <strong>of</strong><br />
the RF carrier boils down to frequency switching between<br />
two fixed values. Figure 1 shows a block diagram <strong>of</strong> a<br />
current model aircraft R/C receiver using double superhet<br />
technology. Its architecture conforms to the classic<br />
frequency conversion process using a first IF <strong>of</strong> 10.7 MHz<br />
and a second IF <strong>of</strong> 455 kHz. Signal processing is handled<br />
by a microprocessor.<br />
Interference<br />
Unfortunately the interference problem is as old as the<br />
remote control hobby itself. Interference in the airwaves is<br />
both frequent and destructive, arising from many causes<br />
but chiefly through use <strong>of</strong> the same radio channels by<br />
more than one user simultaneously. In severe cases propagation<br />
effects can lead to near total signal blocking for a<br />
moment or two, although total data loss over any extended<br />
period is rare.<br />
Various measures can mitigate the problem <strong>of</strong> two users<br />
occupying the same channel simultaneously. Frequency<br />
band scanners built into the transmitters can prevent operation<br />
when it is detected <strong>that</strong> the selected channel is already<br />
occupied. This becomes a total solution only when<br />
every user’s transmitter is equipped in this way, which is<br />
seldom the case. The scanner is <strong>of</strong> no value <strong>of</strong> course if<br />
another user cuts into the channel after the first owner’s<br />
plane is already in flight.<br />
A higher level <strong>of</strong> interference protection is achieved by<br />
using more than one control channel simultaneously, as<br />
in the case <strong>of</strong> a commercial system <strong>that</strong> uses one channel<br />
each in the 35 and 40 MHz bands at the same time.<br />
The possibility <strong>of</strong> simultaneous interference on both chan-<br />
80 elektor electronics - 12/2006
WLAN ICs<br />
nels is more or less excluded, at the cost nevertheless <strong>of</strong><br />
increased hardware costs and greater failure risk arising<br />
from the higher component count.<br />
A broadband future?<br />
With some model aircraft now using jet propulsion (the<br />
heading illustration is a replica <strong>of</strong> the Albatros L-39 military<br />
jet) costing the same as a small car and representing<br />
a significant safety risk with air speeds <strong>of</strong> well over<br />
300 km/h, the desire for fully interference-resistant R/C<br />
systems is entirely comprehensible. Unfortunately, regulatory<br />
requirements and the need for backwards compatibility<br />
are hindering the introduction <strong>of</strong> any fundamentally<br />
new R/C technology. On the other hand practically proven<br />
communication techniques have existed for a long time<br />
<strong>that</strong> would adapt to model control extremely well. Examples<br />
taken from mobile radio include the DECT, WLAN,<br />
Bluetooth and ZigBee standards. In all these applications<br />
a multitude <strong>of</strong> point-to-point or user device-to-user device<br />
radio links are operated bi-directionally and simultaneously<br />
in the same frequency domain.<br />
The American Paul Beard and his firm Spektrum have<br />
developed a radio R/C system for models <strong>that</strong> exploits<br />
modern communication techniques and takes full advantage<br />
<strong>of</strong> cheap, <strong>of</strong>f-the-shelf chipsets [1]. The initial <strong>of</strong>fering,<br />
for R/C car models only, was RF modules for three<br />
servo functions. This was a far cry from the latest product,<br />
a fully airworthy system covering six servo functions with<br />
the code number DX6. Figure 2 shows the transmitter<br />
and receiver. The only restriction is <strong>that</strong> this control system<br />
is intended only for so-called parkflyers and micro helis.<br />
These craft have a range <strong>of</strong> 100 metres maximum.<br />
The technology<br />
Spektrum’s R/C system operates in the 2.4 GHz ISM<br />
(industrial, scientific, medical) frequency band <strong>that</strong> is<br />
available for use without a user licence in most countries.<br />
Consequently it is used by a multitude <strong>of</strong> applications<br />
including WLANs, Bluetooth and ZigBee. The effect<br />
<strong>of</strong> these other applications is <strong>of</strong> minor significance to us,<br />
since in the vast majority <strong>of</strong> cases the physical distance or<br />
separation between these indoor users and our outdoor<br />
R/C systems will be large enough to cause no difficulty.<br />
The generous breadth <strong>of</strong> spectrum at our disposal, around<br />
83 MHz (from 2.4 to 2.4835 GHz), enables modern digital<br />
modulation techniques to be used to their best advantage.<br />
Regulatory conditions lay down a spectral power<br />
density <strong>of</strong> 10 mW per MHz <strong>of</strong> bandwidth, capped at a<br />
maximum <strong>of</strong> 100 mW for the complete band. Depending<br />
on the bandwidth <strong>of</strong> the signal being radiated, transmit<br />
powers <strong>of</strong> between 10 and 100 mW are permissible. A<br />
purely theoretical calculation indicates a potential transmission<br />
range <strong>of</strong> over 10 km with 100 mW transmit power,<br />
–90 dBm receiver sensitivity and 6 dB antenna gain<br />
at transmitter and receiver—or 4 km using 10 mW. In a<br />
radio controlled aircraft context several conditions would<br />
have to be guaranteed to achieve this kind <strong>of</strong> range and<br />
experience with WLANs and Bluetooth indicates the dis-<br />
12/2006 - elektor electronics<br />
Broadband and DSSS<br />
technology for model aircraft<br />
controlledgain<br />
RF amp<br />
Antenne<br />
input bandpass<br />
35 MHz<br />
Toshiba<br />
TA31124<br />
plug-in 24.4 MHz xtal<br />
(channel 70)<br />
1 st IF filter<br />
10.7 MHz<br />
11.155 MHz<br />
xtal<br />
Toshiba<br />
TA31136<br />
2 nd IF filter<br />
455 kHz<br />
Demodulator<br />
060009 - 12<br />
Motorola<br />
SC402082<br />
Servos 1 ... 10<br />
3.41 MHz<br />
xtal<br />
Figure 1.<br />
Block diagram <strong>of</strong> a<br />
conventional remote<br />
control receiver for model<br />
aircraft (Photo: author).<br />
Figure 2.<br />
DX6 2.4 GHz model aircraft<br />
transmitter with receivers<br />
for six servo functions<br />
(Source: Graupner [6]).<br />
Figure 3.<br />
Transmit RF module and<br />
receiver for remote control<br />
<strong>of</strong> model cars<br />
(Photo: author).<br />
81
technology radio remote control<br />
Figure 4.<br />
Simplified block diagram <strong>of</strong><br />
the Cypress CYWUSB6934<br />
transceiver<br />
(Source: Cypress).<br />
tances achieved in practice are frequently well below the<br />
theoretical values.<br />
To establish what might be realistic results, range tests<br />
were carried out using transmit and receive modules<br />
made by Spektrum for radio-controlling model cars (Figure<br />
3). In these tests the transmitter and receiver were positioned<br />
around 1.5 metres <strong>of</strong>f the ground (flat landscape,<br />
ground covering damp, transmit and receive antennas in<br />
direct line <strong>of</strong> sight with around 800 m separation). Under<br />
these conditions the link was rock-solid, without any<br />
interference at all. However, as soon as either transmit or<br />
receive antenna were blocked by human bodies the link<br />
was lost altogether.<br />
The Spektrum transmit module has an output power <strong>of</strong><br />
10 mW and thus conforms to specification ETS 300 328<br />
for GSRDs (General Short Range Devices). By way <strong>of</strong><br />
comparison, data sheets for commercial WLAN routers<br />
indicate they provide radiated power levels <strong>of</strong> 15 dBm<br />
(equivalent to 31.6 mW), as they occupy a greater<br />
bandwidth.<br />
DIOVAL<br />
DIO<br />
IRQ<br />
SS<br />
SCK<br />
MISO<br />
MOSI<br />
RESET<br />
PD<br />
Digi tal<br />
SERDES<br />
A<br />
SERDES<br />
B<br />
X13IN<br />
X13<br />
X13OUT<br />
Synthesizer<br />
Chips with everything<br />
DSSS<br />
Baseband<br />
A<br />
DSSS<br />
Baseband<br />
B<br />
GFSK<br />
Modulator<br />
GFSK<br />
Demodulator<br />
CYWUSB6934 Only<br />
060009 - 13<br />
At the heart <strong>of</strong> Spektrum’s transmit and receive modules<br />
is the CYWUSB6934 transceiver made by the U.S semiconductor<br />
producer Cypress Semiconductor Corporation<br />
[2]. Receive sensitivity is –90 dBm (7 µV into 50 Ω)<br />
and transmit output power is 0 dBm (1 mW). Integrated<br />
with this is a 13 MHz reference oscillator for the internal<br />
frequency synthesiser. The oscillator is voltage-controlled<br />
so <strong>that</strong> it can cover the complete 2.4-GHz ISM band. Its<br />
circuit architecture reveals a single superhet with low IF<br />
and integrated IF filter (Figure 4 gives a simplified block<br />
diagram). According to the manufacturer the module is<br />
intended for cordless applications in PC mouse, keyboard<br />
und joystick applications, for game controllers, remote<br />
controllers, barcode scanners and toys. To achieve the<br />
output power <strong>of</strong> at least 10 dBm (10 mW) required for<br />
remote control <strong>of</strong> models, the transmit module uses an<br />
SE2526A power amplifier from SiGe Semiconductor [3]<br />
to boost the signal. This amplifier module is normally used<br />
in WLAN applications built according to IEEE 802.11b<br />
and g specifications <strong>that</strong> provide RF output levels up to<br />
20 dBm (100 mW). The chip has an integrated lowpass<br />
filter and an antenna changeover switch <strong>that</strong> makes<br />
separate transmit and receive connections possible. The<br />
transmit antenna is well matched and is connected using<br />
50-Ω coax cable. Whether Spektrum actually limits<br />
the output to 10 dBm would need precision measurement<br />
to establish but the power is certainly appreciable. The<br />
author’s tests were confined to making relative measurements.<br />
In this process the transmitter was switched on and<br />
<strong>of</strong>f many times at random so as to test occupancy <strong>of</strong> all<br />
possible 79 RF channels in the 2.4 GHz ISM band. The<br />
total frequency range covered was determined at around<br />
84 MHz, which squares up well with the permitted bandwidth<br />
<strong>of</strong> 83 MHz. The band occupancy <strong>of</strong> the signal in<br />
use in one <strong>of</strong> the 79 RF channels was around 830 kHz,<br />
corresponding to the channel spacing <strong>of</strong> 1 MHz.<br />
Construction and layout <strong>of</strong> transmitter and receiver printed<br />
circuit boards are shown in the following pictures. In<br />
Figure 5 the transmit RF board can be seen together with<br />
the subminiature co-ax socket for the antenna connection.<br />
The track from the connector to power amplifier chip has<br />
an impedance close to 50 Ω. Near the edge <strong>of</strong> the board<br />
is the 13-MHz reference oscillator for the transceiver IC.<br />
Figure 6 shows the transmit signal processing board<br />
with its microprocessor and clock oscillator, Figure 7 illustrates<br />
the receiver RF board with the transceiver. The<br />
simple wire antenna, which is not impedance-matched, is<br />
taken direct to the receiver input with filtering. Finally in<br />
Figure 8 we see the signal processing board for the receiver,<br />
complete with microprocessor and clock oscillator.<br />
With no adjustable filters used in either the transmit module<br />
or the receiver, construction is both straightforward<br />
and affordable. The VLSI chips used have a unit price <strong>of</strong><br />
less than five dollars (n quantities <strong>of</strong> 100 upwards).<br />
Management matters<br />
Organisation <strong>of</strong> signal generation and processing is handled<br />
in both the transmit RF module and the receiver by<br />
a Cypress CY8C27443-24PVI microprocessor [2]. The<br />
Cypress transceiver is configured so <strong>that</strong> it operates in<br />
one <strong>of</strong> the 79 possible channels within the 83 MHz wide<br />
2.4-GHz ISM band. To achieve this, a scanning process<br />
is initiated when the device is powered up. This means<br />
<strong>that</strong> the Spektrum transmitter operates bi-directionally; the<br />
receiver associated with the transmitter scans the band<br />
and gives the go-ahead to the transmitter only when an<br />
unoccupied channel is found. To avoid mistakes the transmit/receive<br />
management system ensures <strong>that</strong> the devices<br />
do not transmit and receive simultaneously. Test measurement<br />
show <strong>that</strong> the transmit signal is pulsed with an ‘on’<br />
time <strong>of</strong> just over 5 ms and 13 ms repetition rate.<br />
The signal used to control the servo functions is not in fact<br />
modulated directly onto the RF carrier. Cypress makes<br />
use <strong>of</strong> a digital modulation system by the name <strong>of</strong> DSSS<br />
(Direct Sequence Spread Spectrum) [4]. This is one <strong>of</strong> two<br />
prominent digital modulation techniques, the other being<br />
FHSS (Frequency Hopping Spread Spectrum). DSSS<br />
is used in WLANs, ZigBee, GPS and UMTS, with FHSS<br />
employed by Bluetooth. Both techniques have their roots<br />
in the military field. The FHSS technique involves signalhopping<br />
among the 79 channels <strong>of</strong> the ISM band 1,600<br />
times a second, following a fixed sequence determined<br />
individually between each transmitter and receiver.<br />
Military origins<br />
The remote control system <strong>that</strong> we are using employs<br />
DSSS. In the process the narrowband desired signal is<br />
first processed digitally so as to straddle a significantly<br />
broader bandwidth and is only then modulated onto the<br />
RF carrier. In this way the spectral power density is reduced<br />
to a level where the spread-out transmit signal dis-<br />
82 elektor electronics - 12/2006<br />
RFOUT<br />
RFIN
appears into the general noise background and can no<br />
longer be detected using conventional methods (the military<br />
connection now becomes clear). The receiver, if provided<br />
with the same code, can reverse the spread process<br />
using what is called ‘processing gain’. The gain here<br />
increases as the straddle code (‘chipping sequence’)<br />
becomes extended. Any transmitters using the ‘wrong’<br />
code will be heard as noise and ignored. It’s not all<br />
gain, however, and there are nevertheless limits <strong>that</strong> are<br />
set primarily by the limited processing power available.<br />
The bitrate change <strong>of</strong> the chipping sequence used by<br />
Spektrum for remote control amounts to 64 chips/bits<br />
corresponding to a calculated gain <strong>of</strong> 10log 10 (64) =<br />
18 dB. Various losses reduce this in practice to perhaps<br />
16 dB. To achieve an acceptable signal-to-noise ratio <strong>of</strong><br />
circa 10 dB and system losses <strong>of</strong> around 2 dB for good<br />
resistance to potential interference a signal processing<br />
gain <strong>of</strong> more than 30 dB would be required. In a situation<br />
like this the power <strong>of</strong> the interfering signal might be<br />
20 dB stronger than the wanted signal. This, however,<br />
would imply a bitrate change or chipping code length <strong>of</strong><br />
more than 1,000. It’s easy to see how the system parameters<br />
for really good interference suppression run rapidly<br />
out <strong>of</strong> control. It’s worth noting in addition <strong>that</strong> this process<br />
can work only when transmitter and receiver use the<br />
same code. With Spektrum’s remote control the transmit<br />
code is made known to the receiver at the start <strong>of</strong> operation<br />
using the so-called ‘binding process’ (it’s just conceivable<br />
<strong>that</strong> other receivers might be linked in too!).<br />
Finally, here’s an interesting thought to consider: for data<br />
transmission this new system employs one out <strong>of</strong> 79 channels<br />
each 1 MHz wide and prevents another user <strong>of</strong> the<br />
same system from sharing the same channel. Resilience to<br />
interference in the same channel is nevertheless minimal if<br />
a more powerful user employing another system appears.<br />
The WLAN system on the other hand employs three channels<br />
each 22 MHz broad and permits a limited number<br />
<strong>of</strong> devices using the same system within a single channel.<br />
And on account <strong>of</strong> the significantly greater channel bandwidth,<br />
WLAN is significantly more resistant to same-channel<br />
interference. It is nevertheless accepted <strong>that</strong> increasing<br />
user numbers in a channel reduces the data rate. This<br />
selfsame criterion is not acceptable for radio control,<br />
however; real-time response takes top priority. This is<br />
presumably the reason why Spektrum employs the system<br />
described, even though it is less interference-resistant. A<br />
further pointer in this direction is the fact <strong>that</strong> the new DX6<br />
remote control for model aircraft actually occupies two<br />
out <strong>of</strong> the 79 channels simultaneously and the receiver<br />
is also built on a twin-channel basis (Figure 2). It would<br />
be fascinating to learn how remote control systems <strong>of</strong> this<br />
kind perform when several users are using the same type<br />
<strong>of</strong> equipment concurrently.<br />
Web links<br />
[1] www.spektrumrc.com<br />
[2] www.cypress.com<br />
[3] www.sige.com<br />
[4] http://en.wikipedia.<br />
org/wiki/Direct-sequence_spread_spectrum<br />
[5] www.weatronic.com<br />
[6] www.graupner.de<br />
12/2006 - elektor electronics<br />
(060009-I)<br />
Figure 5.<br />
Transmitter RF board<br />
with subminiature co-ax<br />
connector for antenna<br />
connection. The circuit<br />
track from the connector to<br />
the transceiver IC has an<br />
impedance close to 50 Ω<br />
(Photo: author).<br />
Figure 6.<br />
Transmitter signal<br />
processing board with<br />
microprocessor and clock<br />
oscillator.<br />
Figure 7.<br />
Receiver RF board with<br />
transceiver IC. The simple<br />
wire antenna, which is<br />
not impedance-matched,<br />
is connected direct to the<br />
receiver input without<br />
filtering.<br />
Figure 8.<br />
Receive-side signal<br />
processing board with<br />
microprocessor and clock<br />
oscillator.<br />
83
hands-on fpga<br />
As you have probably already guessed, the VGA port<br />
can be used to display video imagery on a VGA monitor.<br />
We’ve kept the VGA hardware on the prototyping<br />
board quite simple. Three D/A converters are implement-<br />
Paul Goossens and Andreas Voggeneder<br />
A picture is worth a thousand words, which is probably why alphanumeric displays<br />
have given way to graphic displays in the latest mobile telephones. Although our FPGA<br />
prototyping board is not a small as a mobile phone, it can still generate video.<br />
That’s why it has a VGA port.<br />
ed using several resistors. Each converter has a resolution<br />
<strong>of</strong> 3 bits. They generate the red, green and blue (RGB)<br />
signals. The horizontal and vertical sync signals come<br />
straight from the FPGA.<br />
84 elektor electronics - 12/2006
VGA signals<br />
Naturally, all five VGA signals are generated by the<br />
FPGA. Before you delve into the details <strong>of</strong> the implementation,<br />
you need to know how theses signals ultimately<br />
create a video image.<br />
Here we limit ourselves to generating an image with<br />
a resolution <strong>of</strong> 640 × 480 pixels and a frame rate <strong>of</strong><br />
60 Hz. Every VGA monitor can easily display this standard<br />
resolution.<br />
Each frame consists <strong>of</strong> a number <strong>of</strong> lines <strong>of</strong> video information.<br />
A typical video line is shown in Figure 1. A video<br />
line can be decomposed into a certain number <strong>of</strong> pixel intervals.<br />
One image pixel can be generated in each pixel<br />
interval by the combined R, G and B signals.<br />
The R, G and B signals must be low during the first 96<br />
pixel intervals. The HSYNC signal is also low during this<br />
time. The monitor recognises the start <strong>of</strong> a new line from<br />
this set <strong>of</strong> signal states.<br />
This is followed by 48 pixel intervals during which<br />
HSYNC is high while the colour signals (R, G and B) remain<br />
low.<br />
The actual image line starts next. For each pixel interval,<br />
the R, G and B signals determine the colour and intensity<br />
<strong>of</strong> the associated pixel. As you might expect, this portion<br />
<strong>of</strong> the line consists <strong>of</strong> 640 pixel intervals – one for each<br />
pixel in a horizontal line. At the end <strong>of</strong> the line, there are<br />
another 16 pixel intervals during which the colour signals<br />
are all low. HSYNC remains high during this time. A single<br />
video line consists <strong>of</strong> 800 pixel intervals in total.<br />
It takes another 479 video lines after this one to send all<br />
the pixels to the monitor. They are followed by ten video<br />
lines <strong>that</strong> are fully black (RGB = 0). These lines are followed<br />
by another two lines (also black) with the VSYNC<br />
signal low. This tells the monitor <strong>that</strong> the next frame is<br />
coming. Finally, there are another 33 black video lines<br />
with VSYNC high again. The total number <strong>of</strong> lines in a<br />
frame is thus 525.<br />
Example 1<br />
The pixel frequency (dot rate) in this VGA mode is<br />
25.167 MHz. The length <strong>of</strong> one pixel interval is thus the<br />
inverse <strong>of</strong> this frequency, which is approximately 39.7 ns.<br />
For this example, we can round <strong>of</strong>f the frequency to<br />
25 MHz, which is easy to generate from the 50-MHz<br />
clock signal al- ready present on the board. This dif-<br />
12/2006 - elektor electronics<br />
VGA functions<br />
Various low-level routines <strong>that</strong> make it easier to use the<br />
VGA interface are located in fpga_lib.c. The most important<br />
routines are:<br />
Init_screen(): initialises the VGA controller<br />
SetCurrentColor (Color):<br />
sets the new foreground colour<br />
SetCurrentBkColor (Color):<br />
sets the new background colour<br />
Gotoxy(x,y): places the cursor at the specified position<br />
WriteScreen(Text): writes text to the screen starting at<br />
the current cursor position<br />
Clrscr(): erases the screen<br />
Several constants <strong>that</strong> can come in handy when you’re<br />
programming are located in infpga_lib.h and fpga_reg.h.<br />
They include constants for the various colours.<br />
fers from the desired frequency by approximately 0.7%,<br />
which is fairly small and lies within tolerance.<br />
Example 19 (ex19) generates a VGA signal <strong>that</strong> produces<br />
a colourful image on the monitor.<br />
The code in file ex19.vhd contains a process named vid,<br />
which generates the VSYNC and HSYNC signals. This<br />
process also keeps track <strong>of</strong> which column and line <strong>of</strong> the<br />
screen image is ‘at bat’. This information is stored in the<br />
Col and Line registers.<br />
VidEn indicates whether a pixel is being generated or<br />
the R, G and B signals must be set to 0. Note <strong>that</strong> the Col<br />
and Line signals are only valid when VidEn is set to 1.<br />
The qen signal divides the 50-MHz clock signal by 2.<br />
The rest <strong>of</strong> this process is very simple. Try to figure out for<br />
yourself exactly how it works!<br />
The fractal process uses the current coordinates (Col and<br />
Line) to determine the intensities <strong>of</strong> the red, green and<br />
blue signals. The algorithm used here is actually not significant<br />
– its only purpose is to generate a particular<br />
pattern on the monitor screen.<br />
After you compile the example<br />
and load it in the<br />
FPGA, connect a<br />
VGA monitor<br />
85
hands-on fpga<br />
DIY experiments<br />
Example 19 forms a good basis for some simple DIY experimenting.<br />
Be sure to make a copy <strong>of</strong> the file first so you can<br />
restore things to the original situation.<br />
To get you started, try making the following changes:<br />
- Delete lines 147–149<br />
- Replace the graph process with the following code:<br />
graph : process (clk, clr)<br />
begin<br />
if clr = ‘1’ then<br />
Red
to connector K9 on the prototyping board. If everything<br />
went right, you will be treated to a pretty design on the<br />
monitor.<br />
Dynamic<br />
Conjuring up a nice figure like this on your monitor is a<br />
lot <strong>of</strong> fun, but you’ll get tired <strong>of</strong> looking at it after while.<br />
It would be better (and more useful) to be able to display<br />
information on the screen. If you combine this with a bit<br />
<strong>of</strong> intelligence, you might just have something.<br />
This is the purpose <strong>of</strong> Example 20 (ex20). Here the<br />
trusty T51 microcontroller has been extended to include<br />
the PS/2 interface described in the last instalment and a<br />
VGA interface. The VGA interface is linked to the microcontroller<br />
via the XRAM bus. From the perspective <strong>of</strong> the<br />
microcontroller, this interface is simply a block <strong>of</strong> memory<br />
starting at address 0x8000 and a set <strong>of</strong> eight memory locations<br />
starting at address 0xAA00.<br />
As you can see from the size <strong>of</strong> the Graffikkarte-a.vhd file,<br />
this is a fairly sizeable design. For this reason, we don’t<br />
intend to describe it in detail here. Based on what you’ve<br />
already learned from the previous instalments, you should<br />
be able to figure it out on your own.<br />
However, it is good idea to say something about how the<br />
interface is driven by the s<strong>of</strong>tware.<br />
Driver<br />
Thanks to the C files provided with the course, the driver<br />
routine <strong>that</strong> runs in the microcontroller is fairly simple. The<br />
first thing ex20.c does is to call Initscreen(). This causes<br />
the VGA controller to be configured properly so it is<br />
ready to be used.<br />
Next, SetCurrentColor and SetCurrentBkColor set the image<br />
colours. Each character can be displayed in a different<br />
colour. Theses functions only change the colour <strong>that</strong> is<br />
used when the data is written to the screen.<br />
Next, Gotoxy(28,1) positions the (invisible) cursor to coordinates<br />
(28, 1).<br />
Writescreen(“text”) places the first text on the screen.<br />
Here the colour is determined by the previous SetCurrent-<br />
Color and SetCurrentBkColor functions.<br />
Finally, the putchar2() function displays individual characters<br />
on the screen. This function also uses the previous<br />
colour information.<br />
Use<br />
A welcome message will appear on the monitor after you<br />
configure the FPGA and connect a PS/2 keyboard. You<br />
can then use the keyboard to type in text, which will appear<br />
immediately on the monitor. You can use the function<br />
keys (F1 to F4) to change the colour <strong>of</strong> the text.<br />
As an exercise to familiarise yourself with the VGA interface,<br />
you can experiment with modifying the s<strong>of</strong>tware.<br />
For instance, try integrating the I 2 C interface described in<br />
one <strong>of</strong> the previous instalments so the output <strong>of</strong> the A/D<br />
converter can be displayed on the monitor. Another idea<br />
would be to display the scan codes received on the PS/2<br />
interface instead <strong>of</strong> the decoded characters. If you can’t<br />
get <strong>that</strong> to work, you can always ask other readers <strong>of</strong> Elektor<br />
Electronics for help via the Forum on our website.<br />
Let’s have fun!<br />
After all this hard work, it’s time for a bit <strong>of</strong> relaxation.<br />
As a special treat, we’ve developed a fun application for<br />
12/2006 - elektor electronics<br />
HSYNC<br />
R<br />
G<br />
B<br />
CLOCK<br />
96 48<br />
D Q<br />
D Q<br />
you. The hardware is exactly the same as for the previous<br />
example (ex20). The only difference is in the s<strong>of</strong>tware,<br />
which has been modified ‘slightly’. Example 21 (ex21)<br />
implements the familiar ‘four in a row’ game, but this time<br />
entirely in the FPGA.<br />
This example also shows how you can define your own<br />
characters – <strong>that</strong> is, if you can tear yourself away from<br />
the game long enough to have a look at the source code.<br />
300<br />
Join the FPGA Course<br />
with the<br />
96<br />
16<br />
060025 - 7 - 11<br />
D<br />
060025 - 7 - 12<br />
Elektor FPGA Package!<br />
Q<br />
(060025-7)<br />
The basis <strong>of</strong> this course is an FPGA Module powered by an<br />
Altera Cyclone FPGA chip, installed on an FPGA Prototyping<br />
Board equipped with a wealth <strong>of</strong> I/O and two displays<br />
(see the March 2006 issue).<br />
Both boards are available ready-populated and tested.<br />
Together they form a solid basis for you to try out the<br />
examples presented as part <strong>of</strong> the course and so build personal<br />
expertise and know-how in the field <strong>of</strong> FPGAs.<br />
Further information may be found on the shop/kits & modules<br />
pages at www.elektor.com<br />
Figure 1.<br />
Structure <strong>of</strong> a video line.<br />
Figure 2.<br />
Signal flow for a timing<br />
analysis.<br />
87
hands-on e-blocks<br />
A New Flowcode<br />
Many <strong>of</strong> our readers are now quite familiar with Flowcode,<br />
the s<strong>of</strong>tware brains behind all E-blocks projects,<br />
with some having actually bought the product. A number<br />
<strong>of</strong> E-blocks tutorials, reports and application examples<br />
were published earlier this year.<br />
Originally, Flowcode was designed to help College students<br />
develop electronic projects based on the popular<br />
PIC microcontroller. As time has passed, more and more<br />
features have been added to Flowcode, and the latest version<br />
3 has actually turned out to be quite a nice development<br />
tool not just for the programmers starting out but<br />
also for pr<strong>of</strong>essional engineers.<br />
In this respect, my own position is <strong>that</strong> I have been an<br />
electronics enthusiast for 30-odd years and have occasionally<br />
worked with microcontrollers, specifically the<br />
CDP1802 (see Retronics in the October 2006 issue). Fortunately,<br />
thanks to contributing authors and colleagues in<br />
the Elektor lab I have never been out <strong>of</strong> touch with microcontrollers<br />
and related stuff like (E)PROMs and Flash devices.<br />
Although I can read PIC, 8051 and AVR assembly<br />
code and the odd piece <strong>of</strong> C and Visual Basic, I must admit<br />
<strong>that</strong> I am not au fait with the latest in microcontroller<br />
land when it comes to programming. So, when the new<br />
Putting Flowcode 3<br />
through its paces<br />
Jan Buiting<br />
A new version <strong>of</strong> Flowcode for E-blocks<br />
has just been released — version 3. This<br />
is more than a simple upgrade: Flowcode<br />
has matured into a nice if not impressive<br />
development tool.<br />
Flowcode landed on my desk I thought I would see for<br />
myself whether it lived up to my expectation: microcontroller<br />
programming should be easier than 20 years ago.<br />
On the desk and on the PC<br />
To undertake the review I got hold <strong>of</strong> the 30-day demo<br />
copy <strong>of</strong> Flowcode 3, which is available as a free download<br />
from our website. At the time <strong>of</strong> writing I got Beta 5<br />
— the final version will be on our website. I also got out<br />
a set <strong>of</strong> E-blocks modules comprising a PICmicro Multiprogrammer<br />
board, an LED board, a Switch board and<br />
an LCD board. The lot was connected up as shown in<br />
Figure 1.<br />
My colleagues in the lab having estimated my pr<strong>of</strong>iciency<br />
(“zero”) and general chances <strong>of</strong> success (“we’ll see”),<br />
gave me an 18-pin PIC16F88 device (worth £2.75) to<br />
insert in the Multiprogrammer. Somehow I surmised <strong>that</strong><br />
this must be a low-end device but having looked up the<br />
datasheet on the Microchip website I discovered the device<br />
has 7 kB ROM, 368 bytes <strong>of</strong> RAM, seven 10-bit A<br />
to D channels, timers, a USART communication port and<br />
a host <strong>of</strong> other things I had never heard <strong>of</strong> (BOR? LVD?).<br />
88 elektor electronics - 12/2006
for E-blocks<br />
Looks like things have moved on a little since I last used a<br />
microprocessor! I was happy with my ‘low-end’ ‘F88 chip<br />
because its simple architecture would prevent me from attempting<br />
the impossible (yet).<br />
Having installed Flowcode 3 and the associated PPP driver<br />
(which was a breeze) I thought I would see if I was in<br />
control <strong>of</strong> the hardware and s<strong>of</strong>tware setup by getting a<br />
single LED to flash. I know the example is corny, but you<br />
have to walk before you run — writing <strong>that</strong> I 2 C bus driver<br />
or 8-level DMA demultiplexer will come later!<br />
The sequence<br />
Right. In Flowcode I started a new flowchart, dragged<br />
an Output icon onto the chart and clicked on it to get<br />
the properties up. I set bit 1 <strong>of</strong> PIC port A to go On and<br />
pressed the ‘PLAY’ button. The s<strong>of</strong>tware simulated the ‘program’<br />
and pin A0 on the PIC graphic faithfully went red<br />
to indicate a logic 1 had been placed on port A bit 0. After<br />
a little trial and error I very quickly had a program <strong>that</strong><br />
flashed A0 on and <strong>of</strong>f on the screen. No time wasted on<br />
editing assembly code, re-assembling the code, burning<br />
a new EPROM, stirring the c<strong>of</strong>fee and finally relaunching<br />
the application, fingers crossed and praying for success.<br />
That was 20 years ago.<br />
I learned a few things here: you need to slow Flowcode’s<br />
simulator down so you can see what is going on in your<br />
program. Correspondingly I deduced you need to put<br />
delays in the program otherwise what I had hoped to be<br />
a slowly flashing light will just look like a slightly dim LED.<br />
You can see my first program in Figure 2. Not bad for<br />
10 minutes work.<br />
Flushed with success I then decided it was time to see this<br />
in action on a real PICmicro device. Simulation is great<br />
but I am only convinced by real-life electronics. To download<br />
a program to a microcontroller, in my case the lowly<br />
16F88, you simply click on the small chip icon on the<br />
menu and <strong>of</strong>f it goes.<br />
Off it went — but nothing happened on my hardware.<br />
Time to read the Help file and the Getting Started guide,<br />
both <strong>of</strong> which can only be described as crisply produced,<br />
easy-going yet comprehensive documents with great<br />
educational value. Having gone through this I concluded<br />
<strong>that</strong> I needed to load the chip...configure screen to set up<br />
the parameters for the real-life PIC: set the clock oscillator<br />
for a Crystal, turn <strong>of</strong>f the watchdog timer, Brown Out<br />
Detection and Disable Low Voltage Programming. These<br />
settings, by the way, are now the number-1 problem experienced<br />
by readers having built an Elektor project based<br />
on a PIC, having burned their own PIC device and finding<br />
<strong>that</strong> it doesn’t work. Check those PIC config words!<br />
Then I pressed the Download to Chip icon again and I<br />
had my first program running on the real-life PIC. I looked<br />
at my watch — I started 30 minutes ago. For a relative<br />
newcomer who occasionally still gets nightmares in assembly<br />
code I did not think <strong>that</strong> was too bad.<br />
Learning curve<br />
Having read the Help file I discovered <strong>that</strong> Flowcode 3 is<br />
shipped with around 30 example files <strong>that</strong> demonstrate<br />
12/2006 - elektor electronics<br />
how the major features<br />
<strong>of</strong> Flowcode<br />
can be used. Some<br />
<strong>of</strong> these are based<br />
on the ‘F88 device<br />
I happened to have<br />
used for my experiment<br />
and others are based on<br />
a larger ‘F877 device.<br />
Flowcode can also operate<br />
on the much larger ‘18<br />
series range <strong>of</strong> PICs as well<br />
as the smaller ‘12 series. I<br />
then spent the next hour or so looking<br />
through the example files for the ‘F88, downloading<br />
a number <strong>of</strong> them to my hardware and launching the<br />
applications.<br />
Many only require the use <strong>of</strong> simple LEDs, switches and<br />
LEDs, but some call for more advanced components<br />
Figure 1.<br />
The E-blocks I connected up for my<br />
baptism <strong>of</strong> fire, so to speak.<br />
Figure 2.<br />
My first program.<br />
89
hands-on e-blocks<br />
What’s new & better<br />
in Flowcode Version 3<br />
Graphical User Interface improvements<br />
• Zoom: Multiple zoom levels, zoom to fit<br />
• Tiling: horizontal tile, vertical tile<br />
• Smaller PICmicro MCU on-screen device<br />
• Screen icons: new graphics, description now inside icons,<br />
better comments, more icons per screen viewable<br />
• Screen appearance: user selected icon shading, and background<br />
colour<br />
• Hardware and s<strong>of</strong>tware macros now have separate icon<br />
graphics now known as: ‘macro’ and ‘hardware macro’<br />
• New: Print Preview and print to screen zoom setting<br />
• Flowcharts can be exported to JPEG or BMP for incorporation<br />
into documents<br />
• Tile horizontal and vertical and auto-arrange for multiple macro<br />
viewing<br />
Figure 3. My final Decision Maker program.<br />
(i.e. E-blocks) like keypads and sensors. When you look<br />
through these examples, Flowcode’s two main strengths<br />
become clear. Firstly, it is a very good way for those <strong>that</strong><br />
are not front line programmers, like myself, to understand<br />
how programs work and can be created in a short time.<br />
This in turn means <strong>that</strong> the learning curve for Flowcode<br />
itself is actually very steep.<br />
Secondly, it is not a toy. Whilst it is great for those starting<br />
out to program, it is also quite powerful, with fully<br />
supported interrupts and a range <strong>of</strong> communication protocols<br />
like SPI, RS232, CAN, Bluetooth and even TCP/IP<br />
supported — all <strong>of</strong> which I will grind my teeth on — in<br />
due course!<br />
Improvements for migration to C<br />
• All icons have bubble help to display icon function<br />
• Icons can also produce equivalent C code <strong>of</strong> each icon as<br />
bubbles<br />
• Students can view the C code equivalent <strong>of</strong> the whole<br />
program<br />
• Students can view the Assembly code equivalent <strong>of</strong> the whole<br />
program<br />
• Screen layout is preserved on save to allow educators to<br />
build more relevant examples<br />
• Tutorial file descriptions now included<br />
• Tutorial files exploit features such as labelled components to<br />
add context<br />
Multilingual support<br />
• Main program and Help file: English, French, Dutch, Finnish,<br />
German, Spanish<br />
• Main program but not Help file: Chinese, Italian, Greek<br />
Earlier in this series<br />
Electronic Building Blocks, November 2005.<br />
E-blocks and Flowcode, December 2005.<br />
E-blocks in Cyberspace, January 2006.<br />
E-blocks – now you CAN, February 2006.<br />
E-blocks Making Waves, March 2006.<br />
E-blocks Making Waves at C, April 2006.<br />
From 2 to 3<br />
Those <strong>of</strong> you who are currently using Flowcode version 2<br />
will want to know what improvements have been made<br />
to version 3. I have no experience <strong>of</strong> version 2 but looking<br />
in the Help file it states <strong>that</strong> major improvements have<br />
been made to the graphical user interface, there are new<br />
features to help learners, lots <strong>of</strong> functionality improvements<br />
such as 16-bit numbers, support for strings, better<br />
interrupt handling, improved macros, more components,<br />
and so on. A full list is given in the inset.<br />
Flowcode flips the coin<br />
So, having trained myself up it was time to get down to<br />
developing an application <strong>that</strong>, although serious in intention,<br />
is the tongue-in-cheek equivalent <strong>of</strong> flipping a coin: a<br />
PIC-assisted Yes/No decision maker.<br />
Some people, mostly managers, attribute great authority<br />
and powers <strong>of</strong> decision to PCs and microcontrollers,<br />
arguing <strong>that</strong> they are 100% digital hence have no ‘grey<br />
areas’ or room for ‘discussion’.<br />
What I need to confirm these people in their beliefs (as<br />
well as making them forget the simple coin in their wallet)<br />
is a program where they could press a button and get a<br />
‘yes’ or ‘no’ decision to display on the LCD. So I set about<br />
making it — as an exercise, <strong>of</strong> course.<br />
You can see the final program in Figure 3. It took me<br />
about an hour in the end. I have put up the file ‘Decide.<br />
90 elektor electronics - 12/2006
S<strong>of</strong>tware functionality improvements<br />
• Better range <strong>of</strong> simulation speeds to check working program<br />
before downloading it to the PICmicro microcontroller<br />
• Alter variables whilst simulation is paused<br />
Support for 16-bit numbers and arithmetic, choice <strong>of</strong> types<br />
•<br />
includes CHAR, INT and STRING<br />
• Support for hexadecimal and binary numbers in all <strong>dial</strong>ogue<br />
boxes<br />
• Full support for strings including string manipulation commands<br />
like ADD, LEFT, RIGHT<br />
• Variables are now case sensitive<br />
•<br />
•<br />
New string process icon supports string manipulation<br />
Interrupt icon supports a larger range <strong>of</strong> interrupts as well as<br />
custom interrupt definition. Each interrupts run a macro <strong>of</strong><br />
your choice.<br />
• Improved Delay icon with a much greater range <strong>of</strong> delays<br />
• While icon can operate for a defined number <strong>of</strong> times<br />
• Subroutines can now have parameters passed to them, and<br />
returned<br />
• Larger range <strong>of</strong> supported devices now includes 18 series<br />
PICmicro microcontrollers (technical specification for full list).<br />
E-blocks for Prototyping, May 2006.<br />
E-blocks and X-10, June 2006.<br />
E-blocks Easy ARM Pack, September 2006.<br />
Articles may be downloaded individually<br />
from www.elektor.com.<br />
An overview <strong>of</strong> available E-blocks and s<strong>of</strong>tware is<br />
available on the SHOP pages at www.elektor.com<br />
fcf’ for free downloading with this article — the file<br />
number is 065096-11.zip.<br />
Unfortunately Flowcode does not have a random number<br />
generator so I created a simple counter and then used the<br />
MOD feature in a calculation icon to detect whether the<br />
count was odd or even. This outcome was used to answer<br />
Yes or No to whatever weighty decision the user had in<br />
mind.<br />
What impressed me is just how easy this was. The LCD<br />
was very easy to incorporate in the program and it really<br />
adds a lot <strong>of</strong> functionality to an electronic system.<br />
The hardest part <strong>of</strong> the job was deciding how I was going<br />
to structure the program itself in terms <strong>of</strong> the logical<br />
flow and the variables I needed to track the status <strong>of</strong> the<br />
program. Once I had done this on paper, transferring it<br />
to Flowcode was quite painless. The thing <strong>that</strong> most impressed<br />
me was <strong>that</strong> once I had got the program working<br />
using Flowcode’s simulation mode, when I transferred it<br />
to the hardware (this time having loaded the PIC config<br />
bits!) it worked just like the simulation did.<br />
Conclusion<br />
To a newcomer, Flowcode 3 ‘does what it says on the<br />
tin’. It was easy to get started and make a program, was<br />
intuitive to use, and produced code <strong>that</strong> worked. There<br />
are a few minor disappointments such as the lack <strong>of</strong> a<br />
random number generator, which I happened to stum-<br />
12/2006 - elektor electronics<br />
• Undo and Redo commands<br />
• Improved C compiler<br />
Component improvements<br />
• LCD: range supported now includes 40-character 2-line; 20character<br />
4-line etc.<br />
• Full LCD functions now supported with scroll and other<br />
features.<br />
• Switches can now be labelled, options for display vertical<br />
and horizontal, left to right or right to left.<br />
• LEDs can now be labelled, options for display vertical and<br />
horizontal;, left to right or right to left.<br />
• New PWM (Pulse Width modulation) component for motor<br />
control.<br />
• Analogue components available now include thermometer,<br />
<strong>dial</strong>, or slider<br />
• Target communications components now include RS232,<br />
I2C, Internet web server, Internet TCP/IP, Bluetooth, CAN<br />
bus and LIN bus<br />
Figure 4. An example <strong>of</strong> a more advanced Flowcode program.<br />
ble on for the Decision Maker program, and the fact <strong>that</strong><br />
floating-point numbers are not supported as variables. It<br />
does however seem to have more features and capabilities<br />
than you could shake a stick at. I was also struck by<br />
the thought <strong>that</strong> it was more fun than the day job. Then I<br />
realized <strong>that</strong> this was my day job!<br />
(065096-I)<br />
A full featured but 30-day limited demo version <strong>of</strong> Flowcode 3<br />
can be downloaded free <strong>of</strong> charge from www.elektor.com.<br />
Follow: magazine → volumes → 2006 → december → A New<br />
Flowcode for E-blocks<br />
91
infotainment modding & tweaking<br />
Intelligent Voltmeter<br />
Miniature 3-channel A/D converter<br />
Jeroen Domburg & Thijs Beckers<br />
This month we’ll make use <strong>of</strong> the ATTiny13 again. This versatile microcontroller is used here<br />
in a practical, compact voltmeter with an RS232 link for use ‘on the road’.<br />
In this article we show you how to build a small device<br />
<strong>that</strong> wouldn’t be out <strong>of</strong> place in the laptop case <strong>of</strong> an<br />
electronics fanatic. It is a three-channel A/D converter/<br />
voltmeter, connected via the serial port. Whether you<br />
want to measure transistor characteristics, battery discharge<br />
characteristics or just measure the voltage at a<br />
few points, this circuit can help you out as long as the<br />
voltages are between 0 and 5 V.<br />
Description<br />
One <strong>of</strong> the most important design criteria <strong>of</strong> this circuit<br />
is the amount <strong>of</strong> space it takes up. To keep this as small<br />
as possible we have left out as many components as we<br />
could. The final design consists <strong>of</strong> just five components,<br />
which were coaxed into a DB9 plug (see photos). The circuit<br />
uses RS232 for connecting to a PC, although the voltages<br />
don’t fully comply with the standards, as this saves<br />
on the number <strong>of</strong> components required. There is one section<br />
<strong>that</strong> is conspicuous by its absence: the power supply.<br />
This is in fact drawn from the serial port.<br />
The circuit diagram shows how simple this circuit is. The<br />
supply section consists <strong>of</strong> D1, IC1 and C1. When the serial<br />
port is in a ready state, the voltage on the DTR line is<br />
usually somewhere between 8 to 12 V. The circuit gratefully<br />
makes use <strong>of</strong> this. The 78L05 and the electrolytic capacitor<br />
ensure <strong>that</strong> IC2 is supplied with a stable 5 V. D1<br />
You only need five electronic parts, one DB9 connector & cover and some<br />
cable to build this project.<br />
protects the circuit from damage if the DTR line is somehow<br />
in the wrong state and outputs a negative voltage.<br />
At the hart <strong>of</strong> the circuit is an Atmel ATTiny13. This IC has<br />
the all-important 10-bit A/D converter and 1.1 V reference<br />
voltage integrated on the chip. The ATTiny13 is<br />
available in a DIP package as well as an SMD package.<br />
If there is a need for it, it’s therefore possible to construct<br />
an even tinier version.<br />
Interface<br />
There is no UART present inside the chip, so we had to<br />
implement this in s<strong>of</strong>tware. For this reason there is also no<br />
need to use a MAX232 or similar to invert the signals or<br />
convert them into 12 V. The latter has been done in the<br />
cheapest way possible: we’ve left it out altogether. The<br />
RS232 signal generated by the microcontroller is connected<br />
directly to the RxD line <strong>of</strong> the PC. Although this isn’t according<br />
to the <strong>of</strong>ficial specifications, in practice it seems<br />
to work most <strong>of</strong> the time.<br />
To convert the ±12 V <strong>of</strong> the TxD line from the PC into a<br />
TTL level for the microcontroller we use a single 10 k resistor<br />
(R1). The internal ESD diodes <strong>of</strong> the GPIO pin <strong>of</strong> the<br />
microcontroller short signals above 5 V and below 0 V to<br />
the supply lines. R1 limits the current to a safe level.<br />
The UART is, as mentioned earlier, emulated inside the microcontroller.<br />
A UART normally requires a stable clock to<br />
In this case a PCB would take up valuable space. Besides, it’s much more<br />
fun to construct it like this.<br />
92 elektor electronics - 12/2006
in a Plug<br />
operate, such as a crystal. This component is also missing<br />
from the circuit. Here we’re using the internal RC oscillator<br />
<strong>of</strong> the ATTiny13 as the clock, which is not very accurate.<br />
To obtain a stable timing signal we make use <strong>of</strong> the<br />
bit-clock <strong>of</strong> the serial signal from the PC. The first character<br />
received from the PC is analysed and the result is used<br />
to generate the bit-clock for the UART.<br />
Apart from the routines for the UART and the A/D converter,<br />
there is also a bit <strong>of</strong> s<strong>of</strong>tware <strong>that</strong> implements an autoranging<br />
function. If required, the s<strong>of</strong>tware can automatically<br />
switch the reference voltage for individual channels<br />
between the built-in 1.1 V and the 5 V supply voltage.<br />
Because the 5 V supply is a lot less stable than the 1.1 V<br />
reference voltage, it is possible to turn <strong>of</strong>f this feature.<br />
In use<br />
Because the circuit uses a microcontroller and RS232<br />
signals, it is fairly straightforward to control. When it is<br />
connected to a serial port you can use a terminal emulation<br />
program such as Hyperterm (Windows) or Minicom<br />
(Linux). The serial port settings are: 1200 baud, no parity,<br />
8 data bits and 1 stop bit. Pressing ‘enter’ will display the<br />
initial menu. From the menu you can adjust several settings.<br />
Choosing ‘run’ will make the measured samples <strong>of</strong><br />
the three channels scroll down the display. These can be<br />
looked at straight away, or they can be stored in a file by<br />
the terminal program, so <strong>that</strong> they can be analysed at a<br />
later date, using Excel for example.<br />
On the other hand…<br />
An ‘instrument’ with so few components also has some<br />
disadvantages. The inputs, for example, are not galvanically<br />
isolated from the serial port. Keep this in mind when<br />
you take measurements from devices connected to the<br />
same PC or even the same mains ring.<br />
The circuit is also fairly easily affected by the voltage levels<br />
on the serial port. If the voltage on the DTR line drops<br />
below 6 V, or the RxD line doesn’t accept a signal <strong>of</strong> only<br />
5 V you’ll find <strong>that</strong> the circuit won’t function reliably.<br />
The source code may be freely downloaded from the<br />
It’s a perfect fit.<br />
This way we don’t need to buy a special enclosure either.<br />
12/2006 - elektor electronics<br />
About the author<br />
Jeroen Domburg is a student at the Saxion Technical University in Enschede, the Netherlands.<br />
Jeroen is an enthusiastic hobbyist, with interests in microcontrollers, electronics<br />
and computers.<br />
In this column he displays his personal handiwork, modifications and other interesting<br />
circuits, which do not necessarily have to be useful. In most cases they are not<br />
likely to win a beauty contest and safety is generally taken with a grain <strong>of</strong> salt. But<br />
<strong>that</strong> doesn’t concern the author at all. As long as the circuit does what it was intended<br />
for then all is well. You have been warned!<br />
K1<br />
SUB D9<br />
websites <strong>of</strong> the author [1] or Elektor Electronics [2]. You<br />
are therefore free to modify the s<strong>of</strong>tware if you wish to<br />
change or add some extra functions.<br />
Web links:<br />
1<br />
6<br />
2 RxD<br />
7<br />
R1<br />
3 TxD<br />
10k<br />
8<br />
D1<br />
4 DTR<br />
9<br />
1N4001<br />
5 GND<br />
[1] http://sprite.student.utwente.nl/~jeroen/projects/serad<br />
[2] www.elektor.com<br />
IC1<br />
78L05<br />
And this is the end result.<br />
Nobody would guess <strong>that</strong> this contains a three-channel voltmeter.<br />
And this is what the computer display looks like. The three columns can<br />
also be logged, for analysis at a later date.<br />
C1<br />
1<br />
1<br />
RST<br />
IC2<br />
PB2<br />
7<br />
6<br />
PB1 PB3<br />
2<br />
5<br />
PB0 PB4<br />
3<br />
ATTiny13<br />
8<br />
4<br />
C1<br />
C2<br />
C3<br />
GND<br />
065120 - 11<br />
(065120)<br />
93
hands-on propulsion<br />
A Wire with Total Recall<br />
Exploring the properties <strong>of</strong> ‘memory wire’<br />
Burkhard Kainka<br />
Memory metal is <strong>of</strong>ten thought<br />
<strong>of</strong> as ‘a solution looking for<br />
a problem’. It’s an intriguing<br />
material; warming it makes<br />
it return to its original shape.<br />
The application described here<br />
is academic in <strong>that</strong> it doesn’t<br />
provide a solution to any great<br />
problem but instead produces a<br />
novel visual effect.<br />
This design should provide some relief<br />
for those <strong>of</strong> you who are irritated<br />
by the sight <strong>of</strong> continually blinking<br />
LEDs. This circuit grabs attention<br />
by swaying an LED gently back and<br />
forth like a tree bending in the wind.<br />
The movement could have easily<br />
been produced by a servo or electric<br />
motor but memory wire has the advantage<br />
<strong>of</strong> moving silently. This type<br />
<strong>of</strong> wire is also known as Nitinol, indicating<br />
<strong>that</strong> it is an alloy <strong>of</strong> nickel and<br />
titanium. The wire can be deformed<br />
into any shape which is retained<br />
until heat is applied then it returns<br />
to its original shape. The original<br />
shape is ‘programmed’ into the wire<br />
by heating it to a much higher temperature.<br />
A bent wire returns to its<br />
original straight shape or a straight<br />
wire returns to its original pattern.<br />
This looks particularly bizarre if the<br />
original shape is something like a paper<br />
clip; straighten it out then apply<br />
a little heat and watch it fold back up<br />
into a paper clip!<br />
Memory wire can also be used to provide<br />
mechanical propulsion; in this<br />
setup the wire is fixed between two<br />
points and then deformed by tensioning<br />
the wire. When heat is applied it<br />
shrinks back to its original length producing<br />
a pulling force between the two<br />
points. The wire is available in different<br />
diameters and from a number <strong>of</strong><br />
suppliers [2] [3] [4].<br />
The Mechanics<br />
This design repeatedly swings the LED<br />
along a trapezoidal shaped path. The<br />
motive force is provided by a 15 cm<br />
length <strong>of</strong> 0.15 mm diameter memory<br />
wire. It is necessary to put the wire<br />
under sufficient tension so <strong>that</strong> when<br />
heat is applied it shrinks by 4 to 5 %<br />
back to its original length. Heating<br />
is achieved by passing a current <strong>of</strong><br />
around 300 mA through the wire.<br />
The wire is fixed at either end and<br />
in the middle forming an angle <strong>of</strong> 90<br />
degrees. The shortening and lengthening<br />
<strong>of</strong> these small lengths <strong>of</strong> wire<br />
is barely perceptible so the movement<br />
is magnified by the mechanical<br />
leverage produced in the LED<br />
fixture (see Figure 1). Two lengths<br />
<strong>of</strong> insulated wire with hooked ends<br />
provide tension to the memory wire<br />
from a 1 cm diameter spring made<br />
up <strong>of</strong> four turns <strong>of</strong> 0.5 mm copper<br />
wire mounted on the circuit board.<br />
A small steel spring could be substituted<br />
to provide the tension.<br />
Each time current passes through one<br />
section <strong>of</strong> the memory wire it contracts<br />
and pulls the hook which makes the<br />
LED sway. A 10 cm long lever produces<br />
around 1 to 2 cm <strong>of</strong> movement in the<br />
LED which can be further increased by<br />
lengthening the lever. The complete<br />
mechanical structure and electronics<br />
are contained on the prototyping<br />
board. Figure 2 is a side view <strong>of</strong> the<br />
assembly and shows the memory wire<br />
particularly well.<br />
94 elektor electronics - 12/2006
Figure 1.<br />
The memory wire is clamped at three points and tensioned<br />
from a spring via two hooked wires.<br />
The LED is fitted to the top <strong>of</strong> the spring.<br />
Electronic control<br />
The memory wire used in this application<br />
is called Flex-150 [2]; it has a<br />
resistance <strong>of</strong> 50 ohms/m and can carry<br />
a maximum <strong>of</strong> 400 mA. Each 7.5 cm<br />
length <strong>of</strong> wire has a resistance <strong>of</strong> almost<br />
4 Ohm and should be used with a<br />
voltage supply <strong>of</strong> less than 1.6 V. A single<br />
1.5 V battery or 1.2 V rechargeable<br />
battery can be used for test purposes.<br />
A microcontroller is used to switch<br />
current through the wires so <strong>that</strong> the<br />
LED repeatedly moves along a twoaxis<br />
path defined by values stored in<br />
the s<strong>of</strong>tware (Figure 3).<br />
The switching waveforms have a relatively<br />
small ‘on to <strong>of</strong>f’ ratio so it is possible<br />
to switch current through the<br />
memory wire directly from the 4 to<br />
6 V supply (four NiMH cells would be<br />
a suitable power source). The BC337<br />
transistors can handle up to 1 A and<br />
the PWM switching waveforms are<br />
arranged so <strong>that</strong> there is never more<br />
than one transistor conducting at any<br />
one time. The program causes the LED<br />
to sway between four positions.<br />
Source code for the Tiny11 program<br />
can be downloaded free <strong>of</strong> charge from<br />
the Elektor Electronics website [5]. You<br />
can also access additional memory<br />
wire information along with some suggestions<br />
for further experimentation.<br />
Web links<br />
[1] www.stiquito.com<br />
[2] www.mikromodellbau.de<br />
[3] www.robotstore.com<br />
[4] www.memory-metalle.de<br />
[5] www.elektor.com (month <strong>of</strong> publication)<br />
12/2006 - elektor electronics<br />
(060144)<br />
Figure 3.<br />
Current through the wires is switched by a microcontroller, this<br />
ensures consistent, repeatable LED movement.<br />
A<br />
1<br />
PB5<br />
IC1<br />
PB2<br />
7<br />
2<br />
PB3 PB1<br />
6<br />
3<br />
PB4 PB0<br />
5<br />
ATTiny11<br />
8<br />
4<br />
R1<br />
220 Ω<br />
R2<br />
220 Ω<br />
+5V<br />
B<br />
T1<br />
BC337<br />
LED<br />
T2<br />
BC337<br />
060144- 12<br />
Figure 2. A side view <strong>of</strong> the assembly shows the memory wire fixing.<br />
Current through the memory wire causes it to pull the LED in <strong>that</strong> direction.<br />
C1<br />
100µ<br />
B<br />
A C<br />
100 Ω<br />
060144 - 11<br />
R3<br />
D1<br />
+5V<br />
C<br />
95
TECHNOLOGY LAB TALK<br />
96<br />
Smaller is not Always Better<br />
Faultfinding on inaccessible IC connections<br />
Karel Walraven<br />
Most <strong>of</strong> our readers will appreciate <strong>that</strong> miniaturisation has brought many benefits. It is<br />
certainly the case <strong>that</strong> those small, modern mobile phones look better and are more<br />
practical than those old-fashioned bricks you had to lug around (see Retronics elsewhere<br />
in this issue). At least as long as they work. Should something go wrong, it seems hopeless<br />
to repair it, but it isn’t impossible. We’ll look into this in more detail here.<br />
Have you ever wondered why it is <strong>that</strong> when you’re looking<br />
for a place on a map, you <strong>of</strong>ten find it nearer the<br />
edge? That is because the edge <strong>of</strong> a map takes up a<br />
much larger area than you would expect. For example,<br />
say you have a map <strong>of</strong> 1 by 1 m. Half the area <strong>of</strong> this<br />
map is taken up by a square in the middle with dimensions<br />
<strong>of</strong> 70 by 70 cm, and the other half is taken up by<br />
a strip along the edge, which is just 15 cm wide. It doesn’t<br />
seem much, a strip <strong>of</strong> just 15 cm, but in practice you<br />
find yourself staring at those wretched 15 centimetres for<br />
half the time...<br />
In a similar way, the introduction <strong>of</strong> ‘pinless’<br />
components<br />
has had a big impact on miniaturisation. The space taken<br />
up by the pins along the edge is just wasted space really.<br />
It would be much better if we could mount the ICs right<br />
next to each other, with all connections made on the<br />
underside. The so-called ‘Square Packs’ have therefore<br />
proved to be very popular (see main photo). The area<br />
gained becomes relatively bigger as the chips get<br />
smaller. This is because the connecting pins are <strong>of</strong> a<br />
fixed size, so smaller chips have a<br />
relatively larger area<br />
elektor electronics - 12/2006
taken up by the pins compared to larger chips. The difference<br />
in area can be as much as a factor <strong>of</strong> two. Just like<br />
our example with the map, a lot <strong>of</strong> area is ‘lost’ by the<br />
use <strong>of</strong> connecting pins along the edge.<br />
One <strong>of</strong> the main rules in faultfinding is <strong>that</strong> you should<br />
always take measurements at the pins <strong>of</strong> components.<br />
After all, you can never be certain <strong>that</strong> there is a perfect<br />
connection between the pin and the PCB track. With<br />
square packs it is no longer possible to physically access<br />
these connections, so we have to find some other way.<br />
However, all is not lost when you’re unsure <strong>of</strong> one <strong>of</strong><br />
these connections. Although you can’t directly access this<br />
connection, you can use a handy trick to test the connection<br />
with a multimeter (!). This technique also comes in<br />
very handy for those <strong>of</strong> you who solder SMDs, for example,<br />
with our SMD Oven from the January 2006 issue.<br />
When the circuit works straight away there is nothing to<br />
worry about, otherwise there is a possibility <strong>that</strong> there<br />
is a bad connection between one <strong>of</strong> the pads underneath<br />
a square pack (or another difficult to reach IC)<br />
and the IC itself. Even boards manufactured on an<br />
industrial scale have a certain percentage <strong>of</strong> failures,<br />
and with some patience and a bit <strong>of</strong> luck it is possible<br />
to repair these PCBs.<br />
Most multimeters have a setting <strong>that</strong> measures diode<br />
properties. In this setting the forward voltage drop <strong>of</strong> the<br />
diode is measured when a small test current (usually<br />
about 1 mA) is passed through it. That’s exactly what<br />
we’re looking for. First, check <strong>that</strong> your multimeter comes<br />
equipped with this setting (Figure 1). Then try it out<br />
with a normal silicon diode and then a Schottky diode.<br />
These should give readings <strong>of</strong> about 0.65 and 0.35 V<br />
respectively.<br />
And now for the big trick: how can we use the diode-test<br />
setting <strong>of</strong> a multimeter to check the connection <strong>of</strong> a pin<br />
<strong>that</strong> is inaccessible? Fortunately, virtually every pin on an<br />
IC has protection diodes built in (there are a few exceptions,<br />
such as oscillator circuits and open-collector outputs).<br />
Usually, there is a reverse-biased diode between<br />
the pin and ground, and another between the pin and<br />
the positive supply (Figure 2). We therefore connect the<br />
positive probe <strong>of</strong> the multimeter to the ground <strong>of</strong> the circuit<br />
and connect the negative probe to the track going<br />
to the pin. When there is a good connection between the<br />
track and the chip we get a measurement <strong>of</strong> the internal<br />
protection diode and the meter usually gives a reading <strong>of</strong><br />
about 0.6 to 0.7 V. On the other hand, if there is an<br />
open circuit the meter won’t give a reading. It is fairly<br />
obvious <strong>that</strong> when the fault is in the ground connection to<br />
the IC, all measurements to the pins will show a faulty<br />
connection.<br />
Unfortunately, the readings don’t always give a clear-cut<br />
result. This is because the track doesn’t only go to the<br />
suspect pin, but also to other components, and these<br />
extra connections will <strong>of</strong>ten influence the measurement.<br />
You should therefore refer to the circuit diagram and estimate<br />
how much <strong>of</strong> an effect these connections have<br />
(Figure 3). If there is a high-impedance resistor or FET<br />
then they can be ignored. Should the track go to another<br />
pin on an IC then it is impossible to know from which<br />
pin you’re measuring the protection diode. In such cases<br />
you’re left with just one option: you have to (temporarily)<br />
cut the track.<br />
12/2006 - elektor electronics<br />
(065103-I)<br />
1<br />
2<br />
3<br />
IC<br />
IC<br />
10k<br />
V +<br />
V -<br />
IC IC<br />
065103 - 12<br />
065103 - 13<br />
97
infotainment retronics<br />
SSB receiver for 20 and 80 m (1987)<br />
Jan Buiting, PE1CSI<br />
Elsewhere in this issue<br />
you’ll find an article<br />
describing a shortwave<br />
receiver (150 kHz<br />
- 30 MHz) with contemporary<br />
components like<br />
a DDS synthesizer, an<br />
ARM microcontroller<br />
and an LCD. Valuable<br />
as they are and adding<br />
considerably to ease <strong>of</strong><br />
use, the micro and the<br />
LCD are really just peripherals<br />
around the<br />
real thing: the receiver<br />
proper, i.e., the RF and<br />
AF circuitry. Out <strong>of</strong> curiosity<br />
I delved into the<br />
Elektor relics cabinet<br />
and pulled out an almost<br />
intact example <strong>of</strong><br />
the 20/80 m SSB receiver<br />
we published in the<br />
November 1987 issue.<br />
About 20 years ago<br />
(time flies!) no eye catching<br />
‘design highlights’ or<br />
‘quick specs’ boxes were<br />
included in technical articles,<br />
which look grim and<br />
dry by today’s standards,<br />
but are really a wonder<br />
<strong>of</strong> technical comprehensiveness.<br />
The style <strong>of</strong> the article<br />
text is ‘techie’ throughout. I recall<br />
writing it, the way it was done in<br />
1987, and a success it was.<br />
For the RF enthusiasts and old<br />
hands among you, a quick spec<br />
<strong>of</strong> the 1987 design would read<br />
like this: single-conversion USB/<br />
LSB receiver with 9-MHz IF; single<br />
free-running DG-MOSFET VCO;<br />
DG-MOSFET input stages with s<strong>of</strong>t<br />
bandpass and IF notches, manual<br />
20/80 m antenna switching; DG-<br />
MOSFET mixers; AGC acting on IF<br />
amp, 2.2-kHz audio.<br />
There were not too many design<br />
quirks in this receiver. The single<br />
(!) varicap-controlled VCO has a<br />
frequency range <strong>of</strong> 5.0-5.5 MHz.<br />
Mixing is additive for the 80-m<br />
band (3.5+5.5 = 9 MHz) and<br />
subtractive for the 20-m band<br />
(14–5 = 9 MHz). Three parallel-connected<br />
27-MHz quartz<br />
crystals operating at their funda-<br />
mental frequency (9 MHz) form<br />
the IF filter with a bandwidth <strong>of</strong><br />
about 2 kHz.<br />
The design has no fewer <strong>that</strong><br />
five dual-gate MOSFETs from<br />
the BF98x series, which were extremely<br />
popular at the time, approaching<br />
– to a considerable<br />
extent — the response and behaviour<br />
<strong>of</strong> valves. However the<br />
devices were also notorious for<br />
the ongoing confusion about their<br />
pinning. Depending on the manufacturer<br />
and sometimes even the<br />
production batch, the drain and<br />
source pins on these devices were<br />
identified in different ways (studs,<br />
longer/shorter pin, etc.). To help<br />
constructors <strong>of</strong> the receiver (and<br />
prevent lengthy technical discussions<br />
over the telephone), the<br />
DG-MOSFET circuit symbol and<br />
all three pinout variants <strong>of</strong> the<br />
BF981/982 were clearly printed<br />
in the circuit diagram.<br />
I realise the 1987 receiver has<br />
just two amateur radio bands<br />
as opposed to ‘general coverage’<br />
for this month’s DDS/ARM<br />
version but then the 20-m and<br />
80-m bands are by far the most<br />
popular hotspots in the shortwave<br />
spectrum and SSB is the<br />
default mode for voice communications,<br />
local (80 m) and DX<br />
(20 m). Also, a block diagram<br />
and concluding piece <strong>of</strong> text in<br />
the 1987 article explain how the<br />
receiver can be used as the tuneable<br />
IF section <strong>of</strong> a 0-30 MHz<br />
communication receiver. Food<br />
for thought for advanced constructors<br />
<strong>of</strong> RF gear.<br />
Having fitting two knobs <strong>that</strong><br />
were missing from the front panel<br />
<strong>of</strong> the 1987 receiver I gave it<br />
a quick ‘electrical’ inspection —<br />
everything was still in place as<br />
assembled 20 years ago by Jan<br />
Barendrecht our RF expert. The<br />
receiver came alive when connected<br />
to a 20-m/80-m com-<br />
bined dipole I had access<br />
to at my local radio<br />
club. The results were<br />
not bad, but not convincing<br />
either, particularly<br />
when compared to<br />
a vintage Yaesu FRG-<br />
7 I had also brought<br />
along. The first, glaring,<br />
shortcoming is the<br />
lack <strong>of</strong> a frequency readout<br />
— you really have<br />
no idea where you are<br />
on the band when turning<br />
<strong>that</strong> multiturn tuning<br />
control. Not admitting<br />
defeat, on 20 m I simply<br />
pitched reception <strong>of</strong><br />
a mid-strength Balkanish<br />
SSB station against<br />
the FRG-7. The frequency<br />
stability, BFO and<br />
AGC <strong>of</strong> the Elektor receiver<br />
were beyond reproach<br />
but the receiver<br />
as a whole was let down<br />
quite badly by none other<br />
than its audio section,<br />
more specifically,<br />
the loudspeaker fitted<br />
in the case! A world <strong>of</strong><br />
difference when I connected<br />
headphones,<br />
and even better results<br />
when I bypassed the<br />
flaky LM386, tapping the audio<br />
signal at the wiper <strong>of</strong> the volume<br />
pot and feeding it to a dedicated<br />
headphone amplifier.<br />
Although the receiver has poor<br />
prestage filtering, the BF982<br />
MOSFETs go a long way in preventing<br />
intermodulation and<br />
other effects owing to RF overloading.<br />
None the less it will require<br />
an antenna tuner / attenuator<br />
when the bands open up<br />
due to propagation. Also, the<br />
2.2-kHz bandwidth afforded by<br />
the 27 MHz xtals appears to be<br />
too wide nowadays and the IF<br />
filter slopes are not accurately<br />
defined. But then, the price tag<br />
compared to an FRG-7… in<br />
1987, <strong>of</strong> course!<br />
100 elektor electronics - 12/2006<br />
(065089-I<br />
A scanned copy <strong>of</strong> the 1987 article is available<br />
free <strong>of</strong> charge from our website.<br />
Go to MAGAZINE → December 2006.<br />
Retronics is a monthly column covering vintage electronics including legendary Elektor designs. Contributions, suggestions and requests are welcomed; please send an<br />
email to editor@elektor.com, subject: Retronics EE.
Hexadoku<br />
Puzzle with an electronic touch<br />
Time flies when you’re having fun but also when... solving an Elektor<br />
Hexadoku! Here’s the last puzzle for this year 2006 — we hope you or<br />
your family members enjoy solving it.<br />
If it’s your first attempt, don’t give up — persist and win a super prize!<br />
The instructions for this puzzle<br />
are straightforward. In the diagram<br />
composed <strong>of</strong> 16 x 16<br />
boxes, enter numbers such<br />
<strong>that</strong> all hexadecimal numbers<br />
0 through F (<strong>that</strong>’s 0-9 and<br />
A-F) occur once only in each<br />
row, once in each column<br />
and in each <strong>of</strong> the 4x4 boxes<br />
(marked by the thicker black<br />
lines). A number <strong>of</strong> clues are<br />
given in the puzzle and these<br />
determine the start situation.<br />
All correct entries received<br />
for each month’s puzzle go<br />
into a draw for a main prize<br />
and three lesser prizes. All<br />
you need to do is send us the<br />
numbers in the grey boxes.<br />
The puzzle is also available<br />
as a free download from our<br />
website (Magazine → 2006 →<br />
December).<br />
Prize winners<br />
The solution <strong>of</strong> the<br />
October 2006 Hexadoku is:<br />
754C1.<br />
The E-blocks Starter Kit<br />
Pr<strong>of</strong>essional goes to:<br />
Tomas Bakke<br />
(Horte, Norway).<br />
2 3 4 1 0 C A 8 D 5<br />
B C 3 7 4 8 1<br />
5 6 9 F 0 D E B 3<br />
8 4 5 B E 7 2<br />
5 4 6 A 7 9 8 E<br />
5 8 2 9 F 3 4 D<br />
3 A 0 F B 1 8 6 7<br />
6 9 D A 2 C 1<br />
E 7 1 9 C 3 0 A 2 F 8<br />
9 A F 0 4 5 C B 6<br />
3 4 6 1 D C<br />
B 2 8 D 1 A 9 5<br />
B 3 4 C 1 5 F<br />
E C 2 9 0 4<br />
4 0 B F E C 2 8 3 9<br />
F 5 D 1 C<br />
12/2006 - elektor electronics<br />
puzzle infotainment<br />
Participate!<br />
Please send your solution (the numbers in<br />
the grey boxes) by email, fax or post to:<br />
Elektor Electronics Hexadoku<br />
Regus Brentford<br />
1000 Great West Road<br />
Brentford TW8 9HH<br />
United Kingdom.<br />
Fax (+44)(0)208 2614447<br />
Email:<br />
editor@elektor-electronics.co.uk<br />
Subject: hexadoku 12-2006.<br />
The closing date is<br />
1 January 2006.<br />
The competition is not open to employees <strong>of</strong> Segment<br />
b.v., its business partners and/or associated<br />
publishing houses.<br />
An Elektor SHOP voucher<br />
worth £35.00 goes to:<br />
L. Bailey (Wheatley);<br />
Andrew Larkin (Wivenhoe);<br />
Jim Orchard (Chelmsford).<br />
Congratulations everybody!<br />
Solve Hexadoku<br />
and win!<br />
Correct solutions received<br />
enter a prize draw for an<br />
E-blocks<br />
Starter Kit Pr<strong>of</strong>essional<br />
worth £248.55<br />
and three<br />
Elektor Electronics SHOP<br />
Vouchers worth £35.00 each.<br />
We believe these prizes should<br />
encourage all our readers to<br />
participate!<br />
101
E L E K T O R S H O W C A S E<br />
To book your showcase space contact Huson International Media<br />
Tel. 0044 (0) 1932 564999 Fax 0044 (0) 1932 564998<br />
102<br />
ATC SEMITEC LTD<br />
www.atcsemitec.co.uk<br />
Thermal and current-sensitive components<br />
for temperature control and circuit protection;<br />
• NTC Thermistors • Current Diodes<br />
• Thermostats • Re-settable Fuses<br />
• Thermal Fuses • Temperature Sensors<br />
Call today for free samples and pricing<br />
Tel: 0870 901 0777 Fax: 0870 901 0888<br />
AVIT RESEARCH<br />
www.avitresearch.co.uk<br />
USB has never been so simple...<br />
with our USB to Microcontroller Interface cable.<br />
Appears just like a serial port to both PC and<br />
Microcontroller, for really easy USB connection to<br />
your projects, or replacement <strong>of</strong> existing RS232<br />
interfaces.<br />
See our webpage for more<br />
details. Only £29.99 inc vat.<br />
BAEC<br />
http://baec.tripod.com<br />
"The British Amateur Electronics<br />
Club Archive Website. Archiving<br />
extracts from 140+ Newsletters from 1966-<br />
2002. Currently have interesting and useful<br />
selected articles from 12 Newsletters. Also a<br />
section about built electronics projects with<br />
schematics and photos. Plus useful info.,<br />
downloads and links. NO ADVERTS!"<br />
BETA LAYOUT<br />
www.pcb-pool.com<br />
Beta layout Ltd Awardwinning<br />
site in both<br />
English and German<br />
<strong>of</strong>fers prototype<br />
PCBs at a fraction <strong>of</strong> the cost <strong>of</strong> the usual<br />
manufacturer’s prices.<br />
COMPULOGIC LTD<br />
www.compulogic.co.uk<br />
Internet Remote Control Starter Kit £139.99<br />
Create a simple web based remote control<br />
interface for many applications<br />
• Miniature Web Server Module<br />
• Analogue/Digital Module<br />
• PSU<br />
• Manuals, s<strong>of</strong>tware, example HTML code<br />
CONFORD ELECTRONICS<br />
http://www.confordelec.co.uk<br />
Lightweight portable battery/mains audio units<br />
<strong>of</strong>fering the highest technical performance.<br />
Microphone, Phantom Power and Headphone<br />
Amplifiers. Balanced/unbalanced signal lines<br />
with extensive RFI protection.<br />
DANBURY ELECTRONICS<br />
http://www.DanburyElectronics.co.uk<br />
Transformer manufacturers since 1983. Visit our<br />
new site! Also link directly to Mike Holme’s Valve/-<br />
Tube DIY amplifier site, featuring our standard Audio<br />
Transformers (Mains, Output, Chokes, PP, SE, etc).<br />
EASYSYNC<br />
http://www.easysync.co.uk<br />
EasySync Ltd sells a wide<br />
range <strong>of</strong> single and multiport<br />
USB to RS232/RS422<br />
and RS485 converters at competitive prices.<br />
ELNEC<br />
www.elnec.com<br />
• device programmer<br />
manufacturer<br />
• selling through contracted<br />
distributors all over the world<br />
• universal and dedicated device programmers<br />
• excellent support and after sale support<br />
• free SW updates<br />
• reliable HW<br />
• once a months new SW release<br />
• three years warranty for most programmers<br />
FIRST TECHNOLOGY TRANSFER LTD.<br />
http://www.ftt.co.uk/PICProTrng.html<br />
Microchip Pr<strong>of</strong>essional C<br />
and Assembly<br />
Programming Courses.<br />
The future is embedded.<br />
Microchip Consultant / Training Partner developed<br />
courses:<br />
• Distance learning / instructor led<br />
• Assembly / C-Programming <strong>of</strong> PIC16, PIC18,<br />
PIC24, dsPIC microcontrollers<br />
• Foundation / Intermediate<br />
FUTURE TECHNOLOGY DEVICES<br />
http://www.ftdichip.com<br />
FTDI designs and sells<br />
USB-UART and USB-FIFO<br />
interface i.c.’s.<br />
Complete with PC drivers,<br />
these devices simplify the task <strong>of</strong> designing or<br />
upgrading peripherals to USB<br />
FUTURLEC<br />
http://www.futurlec.com<br />
Save up to 60% on<br />
• Electronic Components<br />
• Microcontrollers, PIC, Atmel<br />
• Development Boards, Programmers<br />
Huge range <strong>of</strong> products available on-line for<br />
immediate delivery, at very competitive prices.<br />
HEROS TECHNOLOGY LTD<br />
www.herostechnology.co.uk<br />
Introducing Modular Concept for<br />
microcontrollers.<br />
Suitable for Developers, Pre-production,<br />
Educational and Hobby applications.<br />
• WinPIC2006 USB full speed programmer.<br />
• CPU microcontroller modules.<br />
• Peripheral modules for all microcontrollers.<br />
JLB ELECTRONICS<br />
www.jlbelectronics.com<br />
Suppliers <strong>of</strong> electrical / electronic parts and<br />
consumables. Including:<br />
• Cable ties / bases<br />
• Tools / hardware<br />
• Bootlace ferrules<br />
• Connectors<br />
• Solvent sprays & cleaners<br />
• PVC Tape<br />
• Heat Sink compound<br />
KMK TECHNOLOGIES Ltd.<br />
http://www.kmk.com.hk<br />
Low Cost DIY Robotic Kits<br />
and Computer<br />
Controller Boards.<br />
elektor electronics - 12/2006
p r o d u c t s a n d s e r v i c e s d i r e c t o r y<br />
LONDON ELECTRONICS COLLEGE<br />
http://www.lec.org.uk<br />
Vocational training and education for national<br />
qualifications in Electronics Engineering and<br />
Information Technology (BTEC First National,<br />
Higher National NVQs, GCSEs and Advanced<br />
Qualifications). Also Technical Management and<br />
Languages.<br />
MODular ElecTRONics<br />
www.modetron.com<br />
• Plug and Program<br />
• FREE application s/w<br />
• Hobbyist ease-<strong>of</strong>-use<br />
• Pr<strong>of</strong>essional finish with enclosure<br />
and LEXAN faceplate<br />
• We will design and brand your<br />
custom application<br />
• Growing range <strong>of</strong> PSU’s, i/o modules, displays<br />
and microcontrollers<br />
MQP ELECTRONICS<br />
http://www.mqpelectronics.co.uk<br />
Leaders in Device<br />
Programming Solutions.<br />
• Online shop<br />
• Low Cost Adapters for all<br />
Programmers<br />
• Single Site and Gang Programmers<br />
• Support for virtually any Programmable Device<br />
Elektor Electronics has a feature to help customers<br />
promote their business, Showcase - a permanent<br />
feature <strong>of</strong> the magazine where you will be able to<br />
showcase your products and services.<br />
• For just £220 + VAT (£20 per issue for eleven<br />
issues) Elektor will publish your company name,<br />
website adress and a 30-word description<br />
• For £330 + VAT for the year (£30 per issue<br />
for eleven issues) we will publish the above plus<br />
run a 3cm deep full colour image - e.g. a product<br />
shot, a screen shot from your site, a company<br />
logo - your choice<br />
Places are limited and spaces will go on a strictly<br />
first come, first served basis. So please fax back<br />
your order today!<br />
I wish to promote my company, please book my space:<br />
• Text insertion only for £220 + VAT • Text and photo for £330 + VAT<br />
NEW WAVE CONCEPTS<br />
www.new-wave-concepts.com<br />
S<strong>of</strong>tware for Hobbyists:<br />
• Livewire - circuit simulation<br />
s<strong>of</strong>tware, only £34.99<br />
• PCB Wizard - PCB design<br />
s<strong>of</strong>tware, only £34.99<br />
• Circuit Wizard - circuit, PCB and breadboard<br />
design s<strong>of</strong>tware, only £59.99<br />
Available from all Maplin Electronics stores and<br />
www.maplin.co.uk<br />
PCB WORLD<br />
http://www.pcbworld.org.uk<br />
World-class site: Your magazine project or<br />
prototype PCB from the artwork <strong>of</strong> your choice<br />
for less. Call Lee on 07946 846159 for details.<br />
Prompt service.<br />
ROBOT ELECTRONICS<br />
http://www.robot-electronics.co.uk<br />
Advanced Sensors and Electronics for Robotics<br />
• Ultrasonic Range Finders<br />
• Compass modules<br />
• Infra-Red Thermal sensors<br />
• Motor Controllers<br />
• Vision Systems<br />
• Wireless Telemetry Links<br />
• Embedded Controllers<br />
SHOWCASE YOUR COMPANY HERE<br />
NAME:..............................................................ORGANISATION:................................................<br />
JOB TITLE:......................................................................................................................................<br />
ADDRESS:.......................................................................................................................................<br />
..........................................................................................................................................................<br />
...........................................................................TEL:.......................................................................<br />
PLEASE COMPLETE COUPON BELOW AND FAX BACK TO 00-44-(0)1932 564998<br />
COMPANY NAME .........................................................................................................................<br />
WEB ADDRESS..............................................................................................................................<br />
30-WORD DESCRIPTION.............................................................................................................<br />
..........................................................................................................................................................<br />
..........................................................................................................................................................<br />
..........................................................................................................................................................<br />
..........................................................................................................................................................<br />
SOURCEBOOST TECHNOLOGIES<br />
http://www.sourceboost.com<br />
Next generation C compiler and<br />
development products at highly<br />
affordable prices:<br />
• C, C++, and Basic compilers for PIC12, PIC16,<br />
PIC18<br />
• Modern IDE, with PIC simulator, source level<br />
debugger and virtual devices.<br />
• RTOS for PICmicro.<br />
• PIC based controller and Development boards.<br />
• Download and try for Free from<br />
http://www.sourceboost.com<br />
SYTRONIC TECHNOLOGY LTD<br />
www.m2mtelemetry.com<br />
Supplier <strong>of</strong> wireless modules and accessories for<br />
remote monitoring M2M applications.<br />
• GSM/GPRS TCP/IP modules<br />
• Embedded GSM/GPRS modem<br />
• Development Kits<br />
• GPS modules<br />
• GSM/GPS antennas<br />
• Adapter cables<br />
Online ordering facilities.<br />
Tel: 01728 685802<br />
ULTRALEDS<br />
http://www.ultraleds.co.uk<br />
tel: 0871 7110413<br />
Large range <strong>of</strong> low cost Ultra bright leds and Led<br />
related lighting products. Major credit cards<br />
taken online with same day depatch.<br />
USB INSTRUMENTS<br />
http://www.usb-instruments.com<br />
USB Instruments specialises<br />
in PC based instrumentation<br />
products and s<strong>of</strong>tware such<br />
as Oscilloscopes, Data<br />
Loggers, Logic Analaysers<br />
which interface to your PC via USB.<br />
VIRTINS TECHNOLOGY<br />
www.virtins.com<br />
PC and Pocket PC based<br />
virtual instrument for<br />
electronics enthusiasts,<br />
students, pr<strong>of</strong>essionals and<br />
scientists, including sound<br />
card real time oscilloscope,<br />
spectrum analyzer, and signal generator. Free to<br />
download and try.<br />
12/2006 - elektor electronics 103
Electronic<br />
Project Labs<br />
An electronics course<br />
in a box! All assume no<br />
previous knowledge<br />
and require NO solder.<br />
See website for full<br />
details<br />
30 in ONE - £15.95<br />
Order Code EPL030KT<br />
130 in ONE - £37.95<br />
Order Code EPL130KT<br />
300 in ONE - £59.95<br />
Order Code EPL300KT<br />
500 in ONE - £149.95<br />
Order Code EPL500KT<br />
Quasar Electronics Limited<br />
PO Box 6935, Bishops Stortford<br />
CM23 4WP, United Kingdom<br />
Tel: 0870 246 1826<br />
Fax: 0870 460 1045<br />
E-mail: sales@quasarelectronics.com<br />
Web: www.QuasarElectronics.com<br />
Ho! Ho! Ho! Christmas 2006 is on it's way<br />
BUT DON'T PANIC!!<br />
We have some fantastic gift ideas for young (and old) enquiring minds<br />
Robot Sensor - £19.95<br />
Order Code EPLR20KT<br />
Digital Recording<br />
Laboratory - £29.95<br />
Order Code EPLDRKT<br />
Solderless<br />
Electronic<br />
Project Kits<br />
AM-FM Radio Kit - £6.95<br />
Order Code ERKAFKT<br />
Short Wave Kit - £6.95<br />
Order Code ERKSWKT<br />
Crystal Radio Kit - £6.95<br />
Order Code ERKCKT<br />
Electronic Bell - £8.95<br />
Order Code EAKEBKT<br />
Electronic Motor - £8.95<br />
Order Code EAKEMKT<br />
Generator - £8.95<br />
Order Code EAKEGKT<br />
Room Alarm - £4.95<br />
Order Code EAKRAKT<br />
Hand Held Metal<br />
Detector - £9.95<br />
Order Code ELMDX7KT<br />
Metal Detector - £9.95<br />
Order Code ELMDKT<br />
All prices INCLUDE 17.5% VAT.<br />
Postage & Packing Options (Up to 2Kg gross weight): UK Standard 3-7 Day<br />
Delivery - £3.95; UK Mainland Next Day Delivery - £8.95; Europe (EU) -<br />
£6.95; Rest <strong>of</strong> World - £9.95 (up to 0.5Kg).<br />
!Order online for reduced price UK Postage!<br />
Payment: We accept all major credit/debit cards. Make cheques/PO’s<br />
payable to Quasar Electronics.<br />
Call now for our FREE CATALOGUE with details <strong>of</strong> over 300 kits, projects,<br />
modules and publications. Discounts for bulk quantities.<br />
Credit Card<br />
Sales<br />
Mechanical<br />
Motorised<br />
Wooden Kits<br />
Future engineers can<br />
learn about the operation<br />
<strong>of</strong> transmissions<br />
steered through gears<br />
or pulleys. Easy to<br />
build, no glue or soldering<br />
required.<br />
Automech - £12.95<br />
Order Code C21-605KT<br />
Coptermech - £12.95<br />
Order Code C21-604KT<br />
Trainmech - £12.95<br />
Order Code C21-606KT<br />
Robomech - £12.95<br />
Order Code C21-603KT<br />
Stegomech - £12.95<br />
Order Code C21-602KT<br />
Tyrannomech - £12.95<br />
Order Code C21-601KT<br />
Festive<br />
Electronic<br />
Project Kits<br />
Musical LED Jingle<br />
Bells - £17.95<br />
Order Code 1176KT<br />
Flashing LED Christmas<br />
Tree - £6.95<br />
Order Code 4080KT<br />
See our website<br />
for even more<br />
great gift ideas!<br />
Secure Online Ordering Facilities � Full Product Listing, Descriptions & Photos � Kit Documentation & S<strong>of</strong>tware Downloads
Order now using the Order Form in<br />
the Readers Services section in this issue.<br />
CD-ROM<br />
BESTSELLERS<br />
USB TOOLBOX<br />
This CD-ROM contains technical<br />
data about the USB<br />
interface. It also includes a<br />
large collec tion <strong>of</strong> data sheets<br />
for specific USB components<br />
from a wide range <strong>of</strong> manufacturers.<br />
There are two ways<br />
to incorporate a USB interface<br />
in a microcontroller circuit: add<br />
a USB controller to an existing circuit, or use<br />
a microcontroller with an integrated USB interface.<br />
Included on this CD-ROM are USB Basic<br />
Facts, several useful design tools for hardware<br />
and s<strong>of</strong>tware, and all Elektor Electronics articles<br />
on the subject <strong>of</strong> USB. £18.95 (US$ 34.95)<br />
Home Automation<br />
This CD-ROM provides an<br />
overview <strong>of</strong> what manufacturers<br />
<strong>of</strong>fer today in the field <strong>of</strong><br />
Home Networking, both wired<br />
and wireless. The CD-ROM<br />
contains specifications, standards<br />
and protocols <strong>of</strong> commercially<br />
available bus and<br />
network systems. For developers,<br />
there are data sheets <strong>of</strong><br />
specific components and various items with<br />
application data. End-users and hobbyists will<br />
find ready-made applications <strong>that</strong> can be used<br />
immediately. £12.95 (US$ 22.90)<br />
ECD Edition 3<br />
Elektor’s Components Database<br />
gives you easy access<br />
to design data for over 5,000<br />
ICs, more than 35,000 transistors,<br />
FETs, thyristors and<br />
triacs, just under 25,000 dio -<br />
des and 1,800 optocouplers.<br />
All databank applications are<br />
fully interactive, allowing the<br />
user to add, edit and complete<br />
component data. £14.95 (US$ 26.50)<br />
1<br />
2<br />
3<br />
Elektor Electronics (Publishing)<br />
Regus Brentford<br />
1000 Great West Road<br />
Brentford TW8 9HH<br />
United Kingdom<br />
Telephone +44 208 261 4509<br />
Fax +44 208 261 4447<br />
Email: sales@elektor.com<br />
More information on www.elektor.com<br />
Microcontroller Basics<br />
Microcontrollers have become an indispensable<br />
part <strong>of</strong> modern electronics. They make things<br />
possible <strong>that</strong> vastly exceed what could be done<br />
previously. Innumerable applications show <strong>that</strong><br />
almost nothing is impossible. There’s thus every<br />
reason to learn more about them. This book<br />
<strong>of</strong>fers more than just a basic introduction.<br />
It clearly explains the technology using various<br />
microcontroller circuits and programs written in<br />
several different programming languages. In the<br />
course <strong>of</strong> the book, the reader gradually develops<br />
increased competence in converting his or her<br />
ideas into microcontroller circuitry.<br />
Visual Basic<br />
for Electronics Engineering Applications<br />
This book is targeted towards those people <strong>that</strong><br />
want to control existing or home made hardware<br />
from their computer. After famil ia rizing yourself<br />
with Visual Basic, its development environment<br />
and the toolset it <strong>of</strong>fers are discussed in detail.<br />
Each topic is accompanied by clear, ready to<br />
run code, and where necessary, schematics are<br />
provided <strong>that</strong> will get your projects up to speed<br />
in no time.<br />
1<br />
2<br />
3<br />
4<br />
5<br />
BESTSELLING BOOKS<br />
Top-5<br />
Visual Basic<br />
for Electronics Engineering Applications<br />
ISBN 0-905705-68-8 £27.50 (US$ 51.50)<br />
Microcontroller Basics<br />
ISBN 0-905705-67-X £18.70 (US$ 33.70)<br />
PC-Interfaces under Windows<br />
ISBN 0-905705-65-3 £25.95 (US$ 52.00)<br />
Modern High-end Valve Amplifiers<br />
ISBN 0-905705-63-7 £25.95 (US$ 52.00)<br />
308 Circuits<br />
ISBN 0-905705-66-1 £18.20 (US$ 37.00)<br />
More information on www.elektor.com<br />
ISBN 0-905705-67-X<br />
230 Pages<br />
£18.70 (US$ 33.70)<br />
ISBN 0-905705-68-8<br />
476 Pages<br />
£27.50 (US$ 51.50)
Order now using the Order Form in<br />
the Readers Services section in this issue.<br />
USB-stick with ARM<br />
and RS232<br />
(November 2006)<br />
Assembled and tested board<br />
060006-91<br />
£ 79.90 / $ 149.95<br />
PIC In-Circuit<br />
Debugger/Programmer<br />
(October 2006)<br />
Kit <strong>of</strong> parts including PCB,<br />
programmed controller and<br />
all components.<br />
050348-71<br />
£ 34.50 / $ 64.95<br />
MORE READY-BUILT PROJECTS £ $<br />
ClariTy 300-W Class-T Amplifier<br />
030217-91 Amplifier board with SMDs pre-fitted; cores for L1 & L2 34.50 55.70<br />
Electrosmog Tester<br />
050008-91 PCB, ready built and tested 50.00 94.25<br />
050008-71 Matching enclosure 10.25 19.30<br />
Flash Microcontroller Starter Kit<br />
010208-91 Ready-assembled PCB incl. s<strong>of</strong>tware, cable, adapter & related articles 69.00 112.50<br />
Gameboy Digital Sampling Oscilloscope (GBDSO)<br />
990082-91 Ready-assembled board, incl. the PC s<strong>of</strong>tware and related articles 103.00 183.00<br />
LPC210x ARMee Development System<br />
040444-91 Processor board, ready-made and tested 25.50 48.05<br />
Micro Webserver with MSC1210 Board<br />
030060-91 Microprocessor Board, ready-assembled 75.90 142.95<br />
044026-91 Network Extension Board, ready-assembled 44.50 83.95<br />
044026-92 Combined package (030060-91 & 044026-91 & related articles) 117.50 220.95<br />
NO. 361 DECEMBER 2006<br />
Shortwave Capture<br />
030417-1 PCB, bare (receiver board) www.thepcbshop.com<br />
030417-2 PCB, bare (control & display boards) www.thepcbshop.com<br />
030417-41 AT90S8515-8PC, programmed 11.40 21.45<br />
NO. 360 NOVEMBER 2006<br />
USB Stick with ARM and RS232<br />
060006-1 PCB, bare 11.00 20.75<br />
060006-41 AT91SAM7S64, programmed 27.60 51.95<br />
060006-91 assembled & tested board 79.90 149.95<br />
060006-81 CD-ROM, all project s<strong>of</strong>tware 5.20 9.75<br />
NO. 359 OCTOBER 2006<br />
PIC In-Circuit Debugger/Programmer<br />
050348-1 PCB 5.20 9.75<br />
050348-41 PIC16F877, programmed 17.90 33.75<br />
050348-71 Kit, incl. PCB, controller, all parts 34.50 64.95<br />
GBECG – Gameboy ElectroCardioGraph<br />
050280-91 PCB, ready built and tested 55.20 103.95<br />
GameBoy<br />
ElectroCardioGraph<br />
(October 2006)<br />
PCB, ready built and tested<br />
050280-91<br />
£ 55.20 / $ 103.95<br />
RC Servo Tester / Exerciser<br />
(July/August 2006)<br />
Kit <strong>of</strong> parts including<br />
PCB, programmed<br />
controller and all<br />
components.<br />
040259-71<br />
£ 22.70 / $ 42.85<br />
Order o<br />
www.ele<br />
ECG using a Sound Card<br />
040479-1 PCB 5.20 9.75<br />
040479-81 CD-ROM, all project s<strong>of</strong>tware 5.20 9.75<br />
NO. 358 SEPTEMBER 2006<br />
Elektor RFID Reader<br />
060132-91 PCB, ready assembled & tested, with USB cable 41.50 77.95<br />
030451-72 Standard back-lit LC display 7.25 13.65<br />
060132-71 Matching enclosure 8.90 16.85<br />
060132-81 CD-ROM, all project s<strong>of</strong>tware 5.20 9.75<br />
Experimental RFID Reader<br />
060221-11 Disk, all project s<strong>of</strong>tware 5.20 9.75<br />
060221-41 ATmega16, programmed 8.90 16.85<br />
DiSEqC Monitor<br />
040398-11 Disk, PIC source & hex code 5.20 9.75<br />
040398-41 PIC16F628A-20/P, programmed 5.50 10.35<br />
USB/DMX512 Converter<br />
060012-11 Disk, all project s<strong>of</strong>tware 5.20 9.75<br />
060012-41 PIC16C745, programmed 6.90 12.95<br />
NO. 356/357 JULY/AUGUST 2006<br />
RC Servo Tester/Exerciser<br />
040172-11 Disk, project s<strong>of</strong>tware 5.20 9.75<br />
040172-41 PIC16F84(A), programmed 10.30 19.40<br />
040172-71 Kit, incl. PCB, controller, all parts 22.70 42.85<br />
LED Thermometer<br />
030190-11 Disk, project s<strong>of</strong>tware 5.20 9.75<br />
030190-41 PIC16F873-20/SP, programmed 16.50 31.00<br />
Toothbrush Timer<br />
050146-11 Disk, project s<strong>of</strong>tware 5.20 9.75<br />
050146-41 AT90S2313-10PC, programmed 6.90 12.95<br />
Easy Home Control<br />
050233-11 Disk, project s<strong>of</strong>tware 5.20 9.75<br />
050233-41 PIC16F84, programmed 10.30 19.40<br />
Universal LCD Module<br />
050259-11 Disk, project s<strong>of</strong>tware 5.20 9.75<br />
050259-41 AT90S2313, programmed 6.90 12.95
nline at<br />
ktor.com<br />
Due to practical constraints, final illustrations and specifications<br />
may differ from published designs. Prices subject to change.<br />
See www.elektor.com for up to date information.<br />
Elektor RFID-reader<br />
(September 2006)<br />
Ready-built and tested PCB with USB port for connection<br />
to the PC. Including USB cable; not including display and<br />
enclosure.<br />
- Read and write 13.56 MHz RFID cards<br />
- MIFARE and ISO 14443-A compatible<br />
- Programmable<br />
060132-91<br />
£ 41.50 / $ 77.95<br />
LC-display<br />
030451-72<br />
£ 7.25 / $ 13.65<br />
Matching enclosure<br />
060132-71<br />
£ 8.90 / $ 16.85<br />
CD-ROM (all project s<strong>of</strong>tware)<br />
060132-81<br />
£ 5.20 / $ 9.75<br />
1-Wire Thermometer with LCD<br />
060090-11 Disk, project s<strong>of</strong>tware 5.20 9.75<br />
060090-41 PIC16F84A-04CP, programmed 10.30 19.40<br />
GBPLC - Gameboy PLC<br />
050190-1+2 PCBs, bare, GBPLC Module & Programming Interface 11.70 22.00<br />
050190-51 Programmed PAL, EEPROM and Flash IC 11.00 20.75<br />
050190-91 Ready-built and tested GBPLC Module and Programming Interface 84.95 159.95<br />
GBPLC - I2C I/O Box<br />
060098-1 PCB, bare 17.90 33.75<br />
060098-91 Ready-built and tested board 84.95 159.95<br />
Binary Clock<br />
020390-11 disk, project s<strong>of</strong>tware 5.20 9.75<br />
020390-41 PIC6C54-04/P, programmed 8.05 15.10<br />
No. 355 JUNE 2006<br />
FM Stereo Test Transmitter<br />
050268-1 PCB 11.70 22.00<br />
Network Cable Analyser<br />
050302-1 PCB 8.20 15.55<br />
050302-11 Disk, PIC source code 5.20 9.75<br />
050302-41 PIC16F874-20/P 16.90 31.85<br />
NO. 354 MAY 2006<br />
Onboard OBD-2 Analyser<br />
050176-72 Kit <strong>of</strong> parts, incl. 050176-1, 050176-2, 050176-42, all components,<br />
excl. LCD and Case 24.80 46.70<br />
050176-73 LCD, 4x20 characters with backlight 28.80 54.50<br />
050176-74 Case, Bopla Unimas 160 with Perspex cover and mounting plate 15.80 29.90<br />
050176-42 ATmega16, programmed 10.30 19.45<br />
050092-71 OBD-2 Analyser: Kit <strong>of</strong> parts without cable 52.50 96.95<br />
050092-72 OBD-2 Analyser: DB9 to OBD adapter cable 27.55 51.95<br />
Mini ATMega Board<br />
050176-1 PCB, includes adapter PCB 050176-2 8.95 16.85<br />
NO. 353 APRIL 2006<br />
Simple recharable A Cell Analyser<br />
050394-1 PCB, bare 4.80 9.04<br />
050394-11 Disk, PC S<strong>of</strong>tware 5.18 9.75<br />
Elektor Electronics (Publishing)<br />
Regus Brentford<br />
1000 Great West Road<br />
Brentford TW8 9HH<br />
United Kingdom<br />
Tel.: +44 (0) 208 261 4509<br />
Fax: +44 (0) 208 261 4447<br />
Email: sales@elektor.com<br />
Kits & Modules<br />
GameBoy Programmable Logic Controller<br />
(July/August 2006)<br />
GBPLC Module<br />
Ready-assembled and tested<br />
GBPLC Module and<br />
Programming Interface<br />
050190-91<br />
£ 84.95 / $ 159.95<br />
GBPLC I 2 C I/O Box<br />
Ready assembled and<br />
tested board<br />
060098-91<br />
£ 84.95 / $ 159.95<br />
Combined package<br />
GBPLC Module and I/O Extension<br />
£ 149.80 / $ 279.00<br />
Universal SPI Box<br />
050198-41 AT89C2051-24PC, Programmed 7.25 13.65<br />
No. 352 MARCH 2006<br />
Application Board for R8C/13<br />
050179-92 Ready-assembled board 48.27 90.94<br />
050179-1 PCB 13.77 25.94<br />
030451-72 LCD with backlight 7.25 13.65<br />
030451-73 Poly-LED display 25.50 48.05<br />
FPGA-Prototyping board<br />
050370-91 Ready assembled board<br />
For subscribers 181.80 333.50<br />
For non-subscribers 216.30 398.50<br />
Telephone Eavesdropper<br />
030379-1 PCB 9.05 17.05<br />
Versatile FPGA Module<br />
040477-91 Ready assembled plug-on module<br />
For subscribers 181.80 333.50<br />
For non-subscribers 216.30 398.50<br />
NO. 351 FEBRUARY 2006<br />
Brushless Motor Controller<br />
050157-41 ST7MC1, programmed 3.80 7.15<br />
A 16-bit Tom Thumb<br />
050179-91 R8C Starter Kit 8.30 15.60<br />
050179-C5 Set <strong>of</strong> 5 pcs. R8C13 microcontroller only 20.70 39.00<br />
No. 350 JANUARY 2006<br />
95-watt Laptop PSU Adaptor<br />
050029-1 PCB 4.80 9.05<br />
Automatic Attic Window Controller<br />
050139-11 Disk, PIC source & hex code 5.20 9.75<br />
050139-41 PIC16F84A-20I/P, programmed 13.10 24.65<br />
Products for older projects (if available) may be found on<br />
our website www.elektor.com<br />
home construction = fun and added value<br />
PRICE<br />
SLASHED!
info & market sneak preview<br />
Overclocking CPUs and Micros<br />
For as long as we can remember, CPUs in PCs have been subjected to overclocking experiments, sometimes with catastrophic results. Whenever a<br />
new CPU appears on the market, it does not take speed tweakers long to make things run faster. What’s rarely seen however is information on<br />
overclocking <strong>of</strong> laptop PCs. In our January issue we venture to cover the subject in some detail with a Centrino-based laptop as the guinea pig.<br />
Also…<br />
Multi-purpose Milling Machine; LED Rotating Text Display;<br />
Berlin Clock Remake; Texas Instruments Clock Generator;<br />
FPGA Course (8); Hexadoku.<br />
newsagents order form<br />
shop save / home delivery<br />
Please save / deliver one copy <strong>of</strong> Elektor Electronics magazine for me each month<br />
Name: . . . . . . . . . . . . . . . . . . . . . . . . . . . . . . . . . . . .<br />
Address: . . . . . . . . . . . . . . . . . . . . . . . . . . . . . . . . . . . .<br />
Post code: . . . . . . . . . . . . . . . . . . . . . . . . . . . . . . . . . . . .<br />
Telephone: . . . . . . . . . . . . . . . . . . . . . . . . . . . . . . . . . . . .<br />
Date: . . . . . . . . . . . . . . . . . . . . . . . . . . . . . . . . . . . .<br />
Signature: . . . . . . . . . . . . . . . . . . . . . . . . . . . . . . . . . . . .<br />
Please cut out or photocopy this form, complete details and<br />
hand to your newsagent.<br />
Elektor Electronics is published on the third Thursday <strong>of</strong> each<br />
month, except in July.<br />
elektor.com www.elektor.com www.elektor.com www.elektor.com www.elektor.co<br />
Elektor Electronics on the web<br />
All magazine articles back to volume 2000 are available online in pdf format. The article summary and parts list (if applicable)<br />
can be instantly viewed to help you positively identify an article. Article related items are also shown, including s<strong>of</strong>tware downloads,<br />
circuit boards, programmed ICs and corrections and<br />
updates if applicable. Complete magazine issues may also<br />
be downloaded.<br />
In the Elektor Electronics Shop you’ll find all other products<br />
sold by the publishers, like CD-ROMs, kits and books. A<br />
powerful search function allows you to search for items and<br />
references across the entire website.<br />
Also on the Elektor Electronics website:<br />
•Electronics news and Elektor announcements<br />
•Readers Forum<br />
•PCB, s<strong>of</strong>tware and e-magazine downloads<br />
•Surveys and polls<br />
FAQ, Author Guidelines and Contact<br />
•<br />
Free CD-ROM from<br />
Microchip/Labcenter/Elektor<br />
Nixie Clock in Sputnik Design<br />
Entirely fitting a January issue we have several articles on clocks and clocking<br />
systems. One <strong>of</strong> the pinnacles, we’re sure, is our Sputnik Clock which uses nixie<br />
tubes for the time readout. The clock is designed to look like a miniature version<br />
<strong>of</strong> the first man-made satellite to make it into an orbit around the earth.<br />
!<br />
In the January 2007 issue we launch EXPLORER-16, a 16-bit PIC microcontroller project brought to you<br />
jointly by Microchip, Labcenter and Elektor Electronics magazine. The project is based on a number <strong>of</strong> hardware<br />
and s<strong>of</strong>tware components, exclusively gathered for Elektor readers. The first instalment <strong>of</strong> the series<br />
covers the installation and practical use <strong>of</strong> two Microchip s<strong>of</strong>tware contributions to the free CD-ROM: the<br />
MPLAB development suite for PIC micros and — buckle up — the C30 Compiler! Space allowing we will also<br />
introduce you to the workings <strong>of</strong> Proteus VSM, Labcenter’s s<strong>of</strong>tware <strong>that</strong>’s so powerful it can simulate the interaction<br />
between a microcontroller and any analogue or digital hardware connected to it!<br />
RESERVE YOUR COPY NOW! The January 2007 issue goes on sale on Thursday 21 December 2006 (UK distribution only).<br />
UK mainland subscribers will receive the magazine between 18 and 20 December 2006. Article titles and magazine contents subject to change, please check www.elektor.com.<br />
108 elektor electronics - 12/2006
Order Form Order Form 12-2006<br />
✁<br />
✁<br />
12-2006<br />
Subscription<br />
Please supply the following. For PCBs, front panel foils, EPROMs, PALs, GALs, microcontrollers and diskettes, state the part number and<br />
description; for books, state the full title; for photocopies <strong>of</strong> articles, state full name <strong>of</strong> article and month and year <strong>of</strong> publication.<br />
PLEASE USE BLOCK CAPITALS.<br />
Description Price each Qty. Total Order Code<br />
CD-ROM USB Toolbox £ 18.95<br />
CD-ROM Home Automation £ 12.95<br />
Visual Basic for Electronics<br />
Engineering Applications £ 27.50<br />
Elektor RFID Reader £ 41.50<br />
Matching enclosure £ 8.90<br />
Prices and item descriptions subject to change.<br />
The publishers reserve the right to change prices<br />
without prior notification. Prices and item descriptions<br />
shown here supersede those in previous issues. E. & O.E.<br />
Name<br />
Address + Post code<br />
Tel. Email<br />
EL12<br />
EL12<br />
Sub-total<br />
P&P<br />
Total paid<br />
Date – – 2006 Signature<br />
Yes, I am taking out an annual subscription<br />
to Elektor Electronics and receive a free<br />
1 W Luxeon LED Torchlight.<br />
Name<br />
I would like:<br />
Address + Post code<br />
Standard Subscription (11 issues)<br />
Subscription-Plus<br />
(11 issues plus the Elektor Volume 2006 CD-ROM)<br />
* Offer available to Subscribers who have not held a subscription<br />
to Elektor Electronics during the last 12 months. Offer subject to availability.<br />
See reverse for rates and conditions.<br />
Tel. Email<br />
* cross out what is not applicable<br />
Date – – 2006 Signature<br />
METHOD OF PAYMENT<br />
(see reverse before ticking as appropriate)<br />
Bank transfer<br />
Cheque<br />
(UK-resident customers ONLY)<br />
Giro transfer<br />
Expiry date: .................................................<br />
Verification code: .........................................<br />
SWITCH ONLY:<br />
Start date: ....................................................<br />
Issue number : ..............................................<br />
Please send this order form to *<br />
(see reverse for conditions)<br />
Elektor Electronics (Publishing)<br />
Regus Brentford<br />
1000 Great West Road<br />
Brentford TW8 9HH<br />
United Kingdom<br />
Tel.: +44 208 261 4509<br />
Fax: +44 208 261 4447<br />
www.elektor.com<br />
sales@elektor.com<br />
*USA and Canada residents may<br />
(but are not obliged to)<br />
use $ prices, and send the order form to:<br />
Old Colony Sound Lab<br />
P.O. Box 876, Peterborough<br />
NH 03458-0876. Tel. (603) 924-6371, 924-6526,<br />
Fax: (603) 924-9467<br />
Email: custserv@audioXpress.com<br />
METHOD OF PAYMENT<br />
(see reverse before ticking as appropriate)<br />
Bank transfer<br />
Cheque<br />
(UK-resident customers ONLY)<br />
Giro transfer<br />
Expiry date: .................................................<br />
Verification code: .........................................<br />
SWITCH ONLY:<br />
Start date: ....................................................<br />
Issue number : ..............................................<br />
Please send this order form to<br />
Elektor Electronics (Publishing)<br />
Regus Brentford<br />
1000 Great West Road<br />
Brentford TW8 9HH<br />
United Kingdom<br />
Tel.: +44 208 261 4509<br />
Fax: +44 208 261 4447<br />
www.elektor.com<br />
subscriptions@elektor.com<br />
✁
ORDERING INSTRUCTIONS, P&P CHARGES<br />
Except in the USA and Canada, all orders, except for subscriptions (for which see below), must be sent BY POST or FAX to our Brentford address<br />
using the Order Form overleaf. On-line ordering: http://www.elektor-electronics.co.uk<br />
Readers in the USA and Canada may (but are not obliged to) send orders, except for subscriptions (for which see below),<br />
to the USA address given on the order form. Please apply to Old Colony Sound for applicable P&P charges. Please allow 4-6 weeks for delivery.<br />
Orders placed on our Brentford <strong>of</strong>fice must include P&P charges (Priority or Standard) as follows:<br />
UK: £4.00 Europe: £5.00 (Standard) or £7.00 (Priority) Outside Europe: £8.00 (Standard) or £12.00 (Priority)<br />
HOW TO PAY<br />
All orders must be accompanied by the full payment, including postage and packing charges as stated above or advised by Customer Services staff.<br />
Bank transfer into account no. 40209520 held by Elektor Electronics (Publishing) / Segment b.v. with ABN-AMRO Bank, London. IBAN: GB35<br />
ABNA 4050 3040 2095 20. BIC: ABNAGB2L. Currency: sterling (UKP). Please ensure your full name and address gets communicated to us.<br />
Cheque sent by post, made payable to Elektor Electronics (Publishing) / Segment b.v.. We can only accept sterling cheques and bank drafts<br />
from UK-resident customers or subscribers. We regret <strong>that</strong> no cheques can be accepted from customers or subscribers in any other country.<br />
Giro transfer into account no. 34-152-3801, held by Elektor Electronics (Publishing) / Segment b.v. Please do not send giro transfer/deposit<br />
forms directly to us, but instead use the National Giro postage paid envelope and send it to your National Giro Centre.<br />
Credit card VISA, Access, MasterCard, JCBCard and Switch cards can be processed by mail, email, web, fax and telephone. Online ordering<br />
through our website is SSL-protected for your security.<br />
COMPONENTS<br />
Components for projects appearing in Elektor Elec tronics are usually available from certain advertisers in this magazine. If difficulties in the supply<br />
<strong>of</strong> components are envisaged, a source will normally be advised in the article. Note, however, <strong>that</strong> the source(s) given is (are) not exclusive.<br />
TERMS OF BUSINESS<br />
Delivery Although every effort will be made to dispatch your order within 2-3 weeks from receipt <strong>of</strong> your instructions, we can not guarantee this<br />
time scale for all orders. Returns Faulty goods or goods sent in error may be returned for replacement or refund, but not before obtaining our<br />
consent. All goods returned should be packed securely in a padded bag or box, enclosing a covering letter stating the dispatch note number. If the<br />
goods are returned because <strong>of</strong> a mistake on our part, we will refund the return postage. Damaged goods Claims for damaged goods must be<br />
received at our Brentford <strong>of</strong>fice within 10-days (UK); 14-days (Europe) or 21-days (all other countries). Cancelled orders All cancelled orders<br />
will be subject to a 10% handling charge with a minimum charge <strong>of</strong> £5·00. Patents Patent protection may exist in respect <strong>of</strong> circuits, devices,<br />
components, and so on, described in our books and magazines. Elektor Electronics (Publishing) does not accept responsibility or liability for failing<br />
to identify such patent or other protection. Copyright All drawings, photographs, articles, printed circuit boards, programmed integrated circuits,<br />
diskettes and s<strong>of</strong>tware carriers published in our books and magazines (other than in third-party advertisements) are copyright and may not be<br />
reproduced or transmitted in any form or by any means, including photocopying and recording, in whole or in part, without the prior permission<br />
<strong>of</strong> Elektor Electro nics (Publishing) in writing. Such written permission must also be obtained before any part <strong>of</strong> these publications is stored in<br />
a retrieval system <strong>of</strong> any nature. Notwithstanding the above, printed-circuit boards may be produced for private and personal use without prior<br />
permission. Limitation <strong>of</strong> liability Elektor Electronics (Publishing) shall not be liable in contract, tort, or otherwise, for any loss or damage suffered<br />
by the purchaser whatsoever or howsoever arising out <strong>of</strong>, or in connexion with, the supply <strong>of</strong> goods or services by Elektor Electronics (Publishing) other<br />
than to supply goods as described or, at the option <strong>of</strong> Elektor Electronics (Publishing), to refund the purchaser any money paid in respect <strong>of</strong> the goods.<br />
Law Any question relating to the supply <strong>of</strong> goods and services by Elektor Electronics (Publishing) shall be determined in all respects by the laws<br />
<strong>of</strong> England. January 2006<br />
SUBSCRIPTION RATES FOR ANNUAL<br />
SUBSCRIPTION<br />
Standard Plus<br />
United Kingdom £41.90 £48.80<br />
Surface Mail<br />
Rest <strong>of</strong> the World £54.50 £61.40<br />
USA & Canada US$ 95.50 US$106.50<br />
Airmail<br />
Rest <strong>of</strong> the World £68.90 £75.80<br />
USA & Canada US$120.00 US$131.00<br />
HOW TO PAY<br />
Bank transfer into account no. 40209520 held by Elektor Electronics<br />
(Publishing) / Segment b.v. with ABN-AMRO Bank, London. IBAN: GB35<br />
ABNA 4050 3040 2095 20. BIC: ABNAGB2L. Currency: sterling (UKP).<br />
Please ensure your full name and address gets communicated to us.<br />
Cheque sent by post, made payable to Elektor Electronics (Publishing)<br />
/ Segment b.v.. We can only accept sterling cheques and bank drafts<br />
from UK-resident customers or subscribers. We regret <strong>that</strong> no cheques<br />
can be accepted from customers or subscribers in any other country.<br />
Giro transfer into account no. 34-152-3801, held by Elektor<br />
Electronics (Publishing) / Segment b.v. Please do not send giro transfer/<br />
deposit forms directly to us, but instead use the National Giro postage<br />
paid envelope and send it to your National Giro Centre.<br />
Credit card VISA, Access, MasterCard, JCBCard and Switch cards can<br />
be processed by mail, email, web, fax and telephone. Online ordering<br />
through our website is SSL-protected for your security.<br />
SUBSCRIPTION CONDITIONS<br />
The standard subscription order period is twelve months. If a permanent<br />
change <strong>of</strong> address during the subscription period means <strong>that</strong><br />
copies have to be despatched by a more expensive service, no extra<br />
charge will be made. Conversely, no refund will be made, nor expiry<br />
date extended, if a change <strong>of</strong> address allows the use <strong>of</strong> a cheaper<br />
service.<br />
Student applications, which qualify for a 20% (twenty per cent) reduction<br />
in current rates, must be supported by evidence <strong>of</strong> studentship<br />
signed by the head <strong>of</strong> the college, school or university faculty. A<br />
standard Student Subscription costs £33.50, a Student Subscription-<br />
Plus costs £40.40 (UK only).<br />
Please note <strong>that</strong> new subscriptions take about four weeks from receipt<br />
<strong>of</strong> order to become effective.<br />
Cancelled subscriptions will be subject to a charge <strong>of</strong> 25% (twentyfive<br />
per cent) <strong>of</strong> the full subscription price or £7.50, whichever is the<br />
higher, plus the cost <strong>of</strong> any issues already dispatched. Subsciptions<br />
cannot be cancelled after they have run for six months or more.<br />
January 2006
New<br />
CD-ROM<br />
USB TOOLBOX<br />
This CD-ROM contains all the essential<br />
information a designer needs to start working<br />
with the USB interface. It includes a large<br />
collection <strong>of</strong> data sheets for specific USB components from a wide<br />
range <strong>of</strong> manufacturers.<br />
There are two ways to incorporate a USB interface in a microcontroller<br />
circuit. You can add a USB controller to an existing circuit, or use<br />
a microcontroller with an integrated USB interface. Both options are<br />
available on this CD-ROM.<br />
USB Toolbox provides information on all ICs suitable for different<br />
applications. A sub-division has been made in controllers, hubs, microcontrollers<br />
and others. What is perhaps more interesting for many<br />
designers however, is the extremely extensive s<strong>of</strong>tware collection which<br />
contains drivers, tools and components for Windows, Delphi and various<br />
microcontroller families. Of course, none <strong>of</strong> the Elektor Electronics<br />
articles on the subject <strong>of</strong> USB are missing on this CD-ROM<br />
ATC Semitec Ltd, Showcase . . . . . . . . . .www.atcsemitec.co.uk . . . . . . . . . . . . . . . . . .102<br />
Avit Research, Showcase . . . . . . . . . . . . .www.avitresearch.co.uk . . . . . . . . . . . . . . . . .102<br />
BAEC, Showcase . . . . . . . . . . . . . . . . . . .http://baec.tripod.com . . . . . . . . . . . . . . . . . .102<br />
Beijing Draco . . . . . . . . . . . . . . . . . . . . . .www.ezpcb.com . . . . . . . . . . . . . . . . . . . . . . . .37<br />
Beta Layout, Showcase . . . . . . . . . . . . . .www.pcb-pool.com . . . . . . . . . . . . . . . . . . .7, 102<br />
Bitscope Designs . . . . . . . . . . . . . . . . . .www.bitscope.com . . . . . . . . . . . . . . . . . . . . . . .3<br />
ByVac . . . . . . . . . . . . . . . . . . . . . . . . . . .www.byvac.co.uk . . . . . . . . . . . . . . . . . . . . . . .69<br />
Compulogic, Showcase . . . . . . . . . . . . . .www.compulogic.co.uk . . . . . . . . . . . . . . . . . .102<br />
Conford Electronics, Showcase . . . . . . . .www.confordelec.co.uk . . . . . . . . . . . . . . . . . .102<br />
Cricklewood . . . . . . . . . . . . . . . . . . . . . . .www.cctvcentre.co.uk . . . . . . . . . . . . . . . . . . . .69<br />
Danbury, Showcase . . . . . . . . . . . . . . . . .www.DanburyElectronics.co.uk . . . . . . . . . . . .102<br />
Easysync, Showcase . . . . . . . . . . . . . . . .www.easysync.co.uk . . . . . . . . . . . . . . . . . . . .102<br />
Elnec, Showcase . . . . . . . . . . . . . . . . . . .www.elnec.com . . . . . . . . . . . . . . . . . . . . . . .102<br />
Epts<strong>of</strong>t . . . . . . . . . . . . . . . . . . . . . . . . . . .www.epts<strong>of</strong>t.com . . . . . . . . . . . . . . . . . . . . . . .78<br />
Eurocircuits . . . . . . . . . . . . . . . . . . . . . . .www.eurocircuits.com . . . . . . . . . . . . . . . . . . . .6<br />
First Technology Transfer Ltd, Showcase .www.ftt.co.uk . . . . . . . . . . . . . . . . . . . . . . . . .102<br />
Future Technology Devices, Showcase . . .www.ftdichip.com . . . . . . . . . . . . . . . .98, 99, 102<br />
Futurlec, Showcase . . . . . . . . . . . . . . . . .www.futurlec.com . . . . . . . . . . . . . . . . . . . . . .102<br />
Heros Technology, Showcase . . . . . . . . . .www.herostechnology.co.uk . . . . . . . . . . . . . .102<br />
Intronix Test Instruments . . . . . . . . . . . . .www.pcTestInstruments.com . . . . . . . . . . . . . .41<br />
Jaycar Electronics . . . . . . . . . . . . . . . . . .www.jaycarelectronics.co.uk . . . . . . . . . . . . . . . .2<br />
JB Systems, Showcase . . . . . . . . . . . . . .www.modetron.com . . . . . . . . . . . . . . . . . . . .103<br />
JLB Electronics, Showcase . . . . . . . . . . .www.jlbelectronics.com . . . . . . . . . . . . . . . . .102<br />
KMK Technologies Ltd, Showcase . . . . . .www.kmk.com.hk . . . . . . . . . . . . . . . . . . . . . .102<br />
Labcenter . . . . . . . . . . . . . . . . . . . . . . . .www.labcenter.co.uk . . . . . . . . . . . . . . . . . . . .112<br />
Lichfield Electronics . . . . . . . . . . . . . . . . .www.lichfieldelectronics.co.uk . . . . . . . . . . . . .37<br />
ISBN 90-5381-212-1<br />
£ 18.95 / US$ 34.95<br />
Embedded<br />
USB Know How<br />
INDEX OF ADVERTISERS<br />
Order now using the Order Form<br />
in the Readers Services section<br />
in this issue.<br />
Elektor Electronics (Publishing)<br />
Regus Brentford<br />
1000 Great West Road<br />
Brentford TW8 9HH<br />
United Kingdom<br />
Tel. +44 208 261 4509<br />
See also www.elektor.com<br />
London Electronics College, Showcase . .www.lec.org.uk . . . . . . . . . . . . . . . . . . . . . . . .103<br />
MQP Electronics, Showcase . . . . . . . . . .www.mqpelectronics.co.uk . . . . . . . . . . . . . . .103<br />
New Wave Concepts, Showcase . . . . . . .www.new-wave-concepts.com . . . . . . . . . . . .103<br />
Newbury Electronics . . . . . . . . . . . . . . . .www.newburyelectronics.co.uk . . . . . . . . . . . . .22<br />
Number One Systems . . . . . . . . . . . . . . .www.numberone.com . . . . . . . . . . . . . . . . . . . .69<br />
Nurve Networks . . . . . . . . . . . . . . . . . . . .www.xgamestation.com . . . . . . . . . . . . . . . . . .22<br />
PCB World, Showcase . . . . . . . . . . . . . . .www.pcbworld.org.uk . . . . . . . . . . . . . . . . . . .103<br />
Pico . . . . . . . . . . . . . . . . . . . . . . . . . . . . .www.picotech.com . . . . . . . . . . . . . . . . . . . . . . .7<br />
Quasar Electronics . . . . . . . . . . . . . . . . . .www.quasarelectronics.com . . . . . . . . . . . . . .104<br />
Redline . . . . . . . . . . . . . . . . . . . . . . . . . .www.redlineplc.com . . . . . . . . . . . . . . . . . . . . .78<br />
Robot Electronics, Showcase . . . . . . . . . .www.robot-electronics.co.uk . . . . . . . . . . . . .103<br />
Scantool . . . . . . . . . . . . . . . . . . . . . . . . .www.ElmScan5.com/elektor . . . . . . . . . . . . . . . .6<br />
Showcase . . . . . . . . . . . . . . . . . . . . . . . . . . . . . . . . . . . . . . . . . . . . . . . . . . . . . . . .102, 103<br />
SourceBoost Technologies, Showcase . . .www.sourceboost.com . . . . . . . . . . . . . . . . . .103<br />
Sytronic Technology Ltd, Showcase . . . . .www.m2mtelemetry.com . . . . . . . . . . . . . . . .103<br />
Ultraleds, Showcase . . . . . . . . . . . . . . . .www.ultraleds.co.uk . . . . . . . . . . . . . . . . . . . .103<br />
USB Instruments, Showcase . . . . . . . . . .www.usb-instruments.com . . . . . . . . . . . . . . .103<br />
Velleman . . . . . . . . . . . . . . . . . . . . . . . . .www.velleman.eu . . . . . . . . . . .i-TRIXX backcover<br />
Virtins Technology, Showcase . . . . . . . . .www.virtins.com . . . . . . . . . . . . . . . . . . . . . . .103<br />
Advertising space for the issue <strong>of</strong> 22 January 2007<br />
may be reserved not later than 22 December 2006<br />
with Huson International Media – Cambridge House – Gogmore Lane –<br />
Chertsey, Surrey KT16 9AP – England – Telephone 01932 564 999 –<br />
Fax 01932 564998 – e-mail: gerryb@husonmedia.com to whom all<br />
correspondence, copy instructions and artwork should be addressed.<br />
12/2006 - elektor electronics 111


