with lokring - Ledocom.cz
with lokring - Ledocom.cz
with lokring - Ledocom.cz
- TAGS
- lokring
- www.ledocom.cz
You also want an ePaper? Increase the reach of your titles
YUMPU automatically turns print PDFs into web optimized ePapers that Google loves.
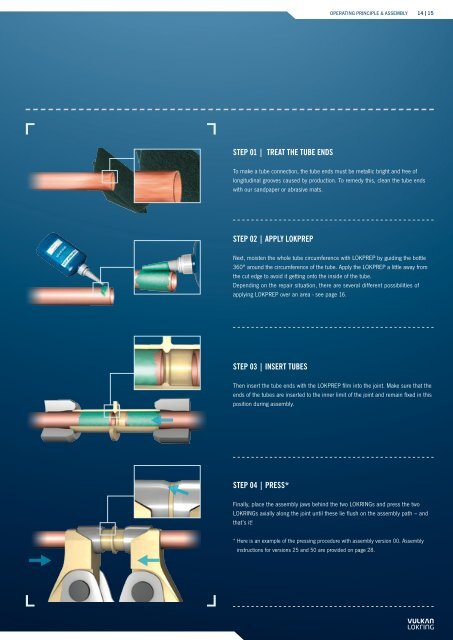
sTEP 01 | TREAT THE TUBE ENDs<br />
OPERATING PRINCIPLE & ASSEMBLY<br />
14 | 15<br />
To make a tube connection, the tube ends must be metallic bright and free of<br />
longitudinal grooves caused by production. To remedy this, clean the tube ends<br />
<strong>with</strong> our sandpaper or abrasive mats.<br />
sTEP 02 | APPLY LOKPREP<br />
Next, moisten the whole tube circumference <strong>with</strong> LOKPREP by guiding the bottle<br />
360° around the circumference of the tube. Apply the LOKPREP a little away from<br />
the cut edge to avoid it getting onto the inside of the tube.<br />
Depending on the repair situation, there are several different possibilities of<br />
applying LOKPREP over an area - see page 16.<br />
sTEP 03 | INsERT TUBEs<br />
Then insert the tube ends <strong>with</strong> the LOKPREP film into the joint. Make sure that the<br />
ends of the tubes are inserted to the inner limit of the joint and remain fixed in this<br />
position during assembly.<br />
sTEP 04 | PREss*<br />
Finally, place the assembly jaws behind the two LOKRINGs and press the two<br />
LOKRINGs axially along the joint until these lie flush on the assembly path – and<br />
that’s it!<br />
* Here is an example of the pressing procedure <strong>with</strong> assembly version 00. Assembly<br />
instructions for versions 25 and 50 are provided on page 28.


