B0099 - Robo Claw 2 Channel 5A Motor Controller ... - Basic Micro
B0099 - Robo Claw 2 Channel 5A Motor Controller ... - Basic Micro
B0099 - Robo Claw 2 Channel 5A Motor Controller ... - Basic Micro

Create successful ePaper yourself
Turn your PDF publications into a flip-book with our unique Google optimized e-Paper software.
<strong>B0099</strong> - <strong>Robo</strong> <strong>Claw</strong> 2 <strong>Channel</strong> <strong>5A</strong> <strong>Motor</strong> <strong>Controller</strong> Data Sheet<br />
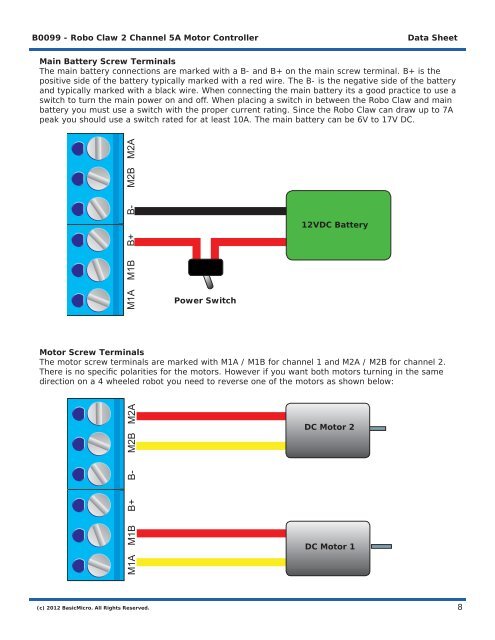
Main Battery Screw Terminals<br />
The main battery connections are marked with a B- and B+ on the main screw terminal. B+ is the<br />
positive side of the battery typically marked with a red wire. The B- is the negative side of the battery<br />
and typically marked with a black wire. When connecting the main battery its a good practice to use a<br />
switch to turn the main power on and off. When placing a switch in between the <strong>Robo</strong> <strong>Claw</strong> and main<br />
battery you must use a switch with the proper current rating. Since the <strong>Robo</strong> <strong>Claw</strong> can draw up to 7A<br />
peak you should use a switch rated for at least 10A. The main battery can be 6V to 17V DC.<br />
M1A M1B B+ B- M2B M2A<br />
<strong>Motor</strong> Screw Terminals<br />
The motor screw terminals are marked with M1A / M1B for channel 1 and M2A / M2B for channel 2.<br />
There is no specifi c polarities for the motors. However if you want both motors turning in the same<br />
direction on a 4 wheeled robot you need to reverse one of the motors as shown below:<br />
M1A M1B B+ B- M2B M2A<br />
(c) 2012 <strong>Basic</strong><strong>Micro</strong>. All Rights Reserved.<br />
Power Switch<br />
12VDC Battery<br />
DC <strong>Motor</strong> 2<br />
DC <strong>Motor</strong> 1<br />
8