Radbar 500 Micron Gas Membrane - RIBA Product Selector
Radbar 500 Micron Gas Membrane - RIBA Product Selector
Radbar 500 Micron Gas Membrane - RIBA Product Selector

You also want an ePaper? Increase the reach of your titles
YUMPU automatically turns print PDFs into web optimized ePapers that Google loves.
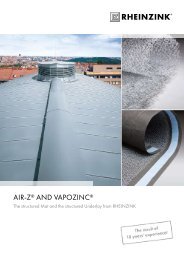
<strong>Radbar</strong> ®<br />
AMBER 2 GAS BARRIER<br />
<strong>500</strong> MICRON<br />
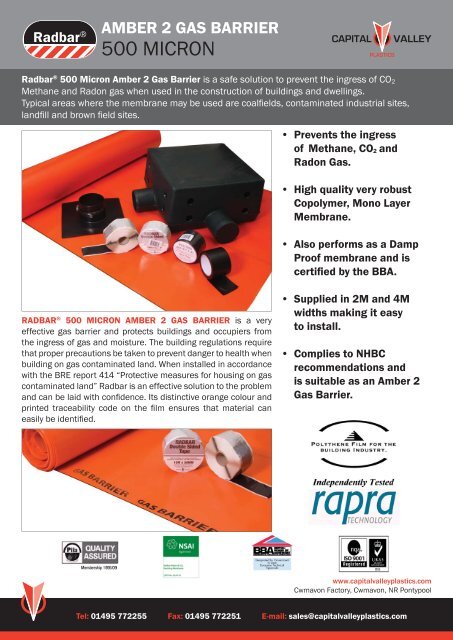
<strong>Radbar</strong> ® <strong>500</strong> <strong>Micron</strong> Amber 2 <strong>Gas</strong> Barrier is a safe solution to prevent the ingress of CO 2<br />
Methane and Radon gas when used in the construction of buildings and dwellings.<br />
Typical areas where the membrane may be used are coalfi elds, contaminated industrial sites,<br />
landfi ll and brown fi eld sites.<br />
RADBAR ® <strong>500</strong> MICRON AMBER 2 GAS BARRIER is a very<br />
effective gas barrier and protects buildings and occupiers from<br />
the ingress of gas and moisture. The building regulations require<br />
that proper precautions be taken to prevent danger to health when<br />
building on gas contaminated land. When installed in accordance<br />
with the BRE report 414 “Protective measures for housing on gas<br />
contaminated land” <strong>Radbar</strong> is an effective solution to the problem<br />
and can be laid with confi dence. Its distinctive orange colour and<br />
printed traceability code on the fi lm ensures that material can<br />
easily be identifi ed.<br />
• Prevents the ingress<br />
of Methane, CO 2 and<br />
Radon <strong>Gas</strong>.<br />
• High quality very robust<br />
Copolymer, Mono Layer<br />
<strong>Membrane</strong>.<br />
• Also performs as a Damp<br />
Proof membrane and is<br />
certifi ed by the BBA.<br />
• Supplied in 2M and 4M<br />
widths making it easy<br />
to install.<br />
• Complies to NHBC<br />
recommendations and<br />
is suitable as an Amber 2<br />
<strong>Gas</strong> Barrier.<br />
www.capitalvalleyplastics.com<br />
Cwmavon Factory, Cwmavon, NR Pontypool<br />
Tel: 01495 772255 Fax: 01495 772251 E-mail: sales@capitalvalleyplastics.com
Storage on site<br />
<strong>Radbar</strong> ® <strong>500</strong> <strong>Micron</strong> Amber 2 <strong>Gas</strong> Barrier is classifi ed as non-hazardous (code of practice CP102 1973).<br />
The product is chemically inert and any acids or alkalis present in the subsoil will not affect the membrane.<br />
<strong>Radbar</strong> ® <strong>500</strong> <strong>Micron</strong> Amber 2 <strong>Gas</strong> Barrier is not recommended for use when exposed to sunlight and general outdoor<br />
weather conditions for long periods of time. Weathering will not occur when installed with code of practise CP102 1973.<br />
Rolls should be stored undercover and on a fl at level surface.<br />
Handling on site<br />
Quality control during the laying of the membrane is extremely important. The membrane should be protected either<br />
through the use of temporary boarding over its whole area or the immediate laying of a fl oor screed.<br />
Installation<br />
<strong>Radbar</strong> ® <strong>500</strong> <strong>Micron</strong> Amber 2 <strong>Gas</strong> Barrier membrane system must be laid in accordance with the Building Research<br />
establishment BRE No.414. “Protective measures for housing on gas contaminated land.” <strong>Radbar</strong> ® <strong>500</strong> <strong>Micron</strong> Amber<br />
2 <strong>Gas</strong> Barrier membrane can be used in most common fl oor constructions. <strong>Radbar</strong> ® <strong>500</strong> <strong>Micron</strong> Amber 2 <strong>Gas</strong> Barrier<br />
membrane is installed in a similar way to damp proof membranes, but with much greater attention to joint sealing of<br />
the gas resisting membrane, under wall sealing and workmanship. The membrane will also perform the same function<br />
as a damp proof membrane.<br />
Where there is risk of hydrostatic pressure this product is not intended for use. <strong>Radbar</strong> ® <strong>500</strong> <strong>Micron</strong> Amber 2 <strong>Gas</strong><br />
Barrier membrane should be laid on a smooth surface or sand blinding to prevent the membrane from puncture.<br />
The membrane must be free from grease and dirt.<br />
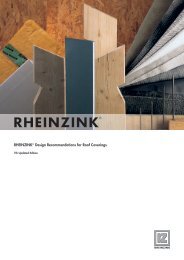
Cavity Wall / Floating Slab Application Raft Foundation<br />
The drawings should not be considered working drawings. It is the designer’s responsibility to develop fi nal details suitable for individual buildings.
Protecting the <strong>Membrane</strong> after Installation<br />
<strong>Radbar</strong> ® <strong>500</strong> <strong>Micron</strong> Amber 2 <strong>Gas</strong> Barrier should be protected as soon as possible once installed.<br />
A minimum thickness of 50mm screed is recommended. Care should be taken when the screed is applied not to<br />
cause stretching, puncture or displacement of the membrane.<br />
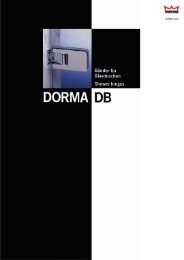
Jointing <strong>Radbar</strong> <strong>500</strong>μm Radon <strong>Gas</strong> Barrier<br />
Sheets must be clean and free from dirt and grease before application of <strong>Radbar</strong> double sided gas tape, and in view<br />
of the diffi culty of achieving gas tight seals under wet or dirty conditions it is recommended that special care is taken<br />
with this aspect of the installation. Unroll one width of the membrane after determining the most effective method<br />
of covering the area. Apply the <strong>Radbar</strong> double sided gas tape about 50mm from the edge, leaving the backing paper<br />
on. Lay the next width of membrane overlapping the fi rst by 150mm. Remove the backing paper from the <strong>Radbar</strong><br />
double sided gas tape and join the top sheet to the bottom sheet by applying pressure with a hand roller. Where the<br />
membranes overlap apply the 75mm single sided tape, equidistant on both membranes. See fi gure 1.<br />
All service entry points must have airtight seals. Top hats and corner pre-forms must be sealed<br />
using <strong>Radbar</strong> Double sided gas tape. (As in fi gure 1)<br />
(figure 1)<br />
<strong>Membrane</strong> 1<br />
<strong>Membrane</strong> 2<br />
Jointing of <strong>Membrane</strong><br />
1A<br />
Unroll the fi rst membrane,<br />
ensure the surface is dry<br />
and free from dust or grease.<br />
Inspect the membrane to<br />
ensure that there are no<br />
indentations or protrusions.<br />
If there are remove and apply<br />
sand blinding.<br />
<strong>Radbar</strong> 50mm<br />
Double sided tape<br />
150mm overlap<br />
2A<br />
Apply <strong>Radbar</strong> Double Sided<br />
Tape to the membrane,<br />
50mm from the edge. It<br />
is very important that the<br />
membrane is dry and free<br />
from dust and dirt.<br />
3A<br />
The second membrane must<br />
be unrolled overlapping the<br />
fi rst membrane by 150mm.<br />
Remove the protective paper<br />
from the <strong>Radbar</strong> Double<br />
Sided Tape and apply<br />
pressure to the membrane<br />
while joining the two<br />
membranes together.<br />
75mm single sided overlap tape<br />
4A<br />
Seal the two membranes<br />
by installing <strong>Radbar</strong> Single<br />
Sided Tape to the edge.<br />
(ensure that the membrane<br />
is completely dry, free from<br />
dust and dirt.
����������������<br />
��������������������������������<br />
� ��<br />
���������������<br />
���������� ������ μm<br />
���������� ������������������������<br />
����������� �����������������������<br />
������������ �����<br />
� �<br />
�����������������<br />
�������������������������������� ������������������������������<br />
�� �<br />
�������������������������������������������������������������������������������������������������������������������������<br />
���������������������������������������������������������������������������������<br />
�������������������������������������������������������������������������������<br />
���������������������������������������<br />
�����������������������������������������������������������������������������������������������<br />
�������������������������������������������������������������������������������������������������<br />
(CO )<br />
������������������������������<br />
2<br />
������������������������������������������������������ �������������������������������������<br />
������������������������������������������������������ ���������������������������������������������������������������<br />
�� ��<br />
�����������������������������������������������������������������������<br />
��������������������� ���������������������������������������������<br />
�������� ����������������<br />
��������������������� ������������������������<br />
�����������������������������<br />
������������������������<br />
������������������������<br />
www.capitalvalleyplastics.com<br />
Cwmavon Factory, Cwmavon, NR Pontypool<br />
Tel: 01495 772255 Fax: 01495 772251 E-mail: sales@capitalvalleyplastics.com