MultiBox II - Geovent
MultiBox II - Geovent
MultiBox II - Geovent
- TAGS
- multibox
- geovent
- geovent.dk

Create successful ePaper yourself
Turn your PDF publications into a flip-book with our unique Google optimized e-Paper software.
Instruction Manual for <strong>MultiBox</strong> <strong>II</strong><br />
1.0 General safety precautions<br />
IMPORTANT – Please study all the<br />
instructions before mounting and<br />
commissioning.<br />
Please keep these instructions in a safe<br />
place and instruct all users in the function<br />
and operation of the product.<br />
Installation and service should only be<br />
implemented after studying the wiring<br />
diagram thoroughly.<br />
Avoid the dismantling of any factorymounted<br />
parts, since it impedes the<br />
commissioning of the equipment.<br />
All electrical installations must be carried<br />
out by an authorised electrician.<br />
1.1 Danger<br />
Dismantling parts on the <strong>MultiBox</strong> whilst<br />
in operation could be deadly dangerous.<br />
Always disconnect the <strong>MultiBox</strong> from the<br />
mains, when removing the cover.<br />
2.0 Adjustment of parameters<br />
The <strong>MultiBox</strong> contains sevaral software<br />
programs, which controls how the<br />
<strong>MultiBox</strong> behaves. The <strong>MultiBox</strong> is by<br />
default set to 530, which is the program<br />
that is to be used in 9 out of 10 situations<br />
1. Connect the <strong>MultiBox</strong> to 230 Volts<br />
as shown in the diagram<br />
2. The Display will show “P0” on<br />
power-up<br />
3. Press “ENTER” and select the<br />
appropriate software program by<br />
scrolling with the “+” and “-“ keys<br />
and the press “ENTER” once<br />
more.<br />
4. Shift to P1 (the set point<br />
parameter) by using the “+” key<br />
and the press “ENTER” – adjust<br />
the value to your desired set point<br />
pressure (in Pascals) and press<br />
“ENTER” once more.<br />
5. Use the “+” until you get to P10.<br />
6. Keep the “ENTER” key pressed<br />
until you get a beep (tells you that<br />
the changes you have made are<br />
now saved in EEPROM).<br />
7. In case of failure – cut the power<br />
for at least 20 seconds and put it<br />
back on. The <strong>MultiBox</strong> is now reset<br />
and you must start the<br />
programming procedure again.<br />
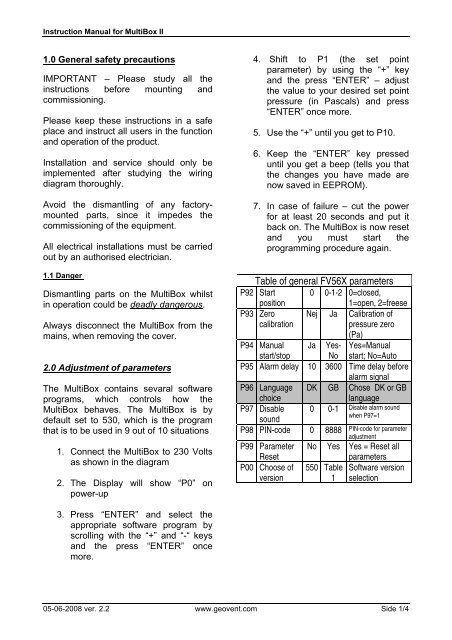
Table of general FV56X parameters<br />
P92 Start 0 0-1-2 0=closed,<br />
position<br />
1=open, 2=freese<br />
P93 Zero Nej Ja Calibration of<br />
calibration<br />
pressure zero<br />
(Pa)<br />
P94 Manual Ja Yes- Yes=Manual<br />
start/stop No start; No=Auto<br />
P95 Alarm delay 10 3600 Time delay before<br />
alarm signal<br />
P96 Language DK GB Chose DK or GB<br />
choice<br />
language<br />
P97 Disable<br />
sound<br />
0 0-1 Disable alarm sound<br />
when P97=1<br />
P98 PIN-code 0 8888<br />
P99 Parameter<br />
Reset<br />
P00 Choose of<br />
version<br />
PIN-code for parameter<br />
adjustment<br />
No Yes Yes = Reset all<br />
parameters<br />
550 Table Software version<br />
1 selection<br />
05-06-2008 ver. 2.2 www.geovent.com Side 1/4