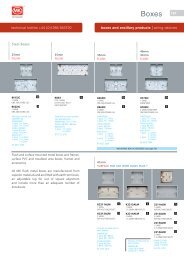
Technical Specification - MK Electric
Technical Specification - MK Electric
Technical Specification - MK Electric

You also want an ePaper? Increase the reach of your titles
YUMPU automatically turns print PDFs into web optimized ePapers that Google loves.
Logic Plus <strong>Technical</strong><br />
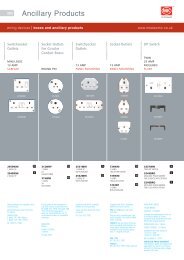
technical hotline +44 (0)1268 563720 white | wiring devices<br />
Plateswitches<br />
85<br />
85<br />
85<br />
85<br />
Dimensions (mm)<br />
1 gang 2 gang 3 gang<br />
85<br />
60.3 12<br />
85<br />
85<br />
85<br />
60.3 12<br />
85<br />
120.6 12<br />
85<br />
60.3 12<br />
85<br />
60.3 12<br />
85<br />
60.3 12<br />
85<br />
Two-way switching<br />
Two-way switching<br />
Two-way switching<br />
3<br />
85Two-way<br />
One-way wire control switching<br />
60.3 12<br />
4 gang 6 gang<br />
Two-way switching<br />
146<br />
146<br />
3 Two-way wire control switching plus<br />
3<br />
Two-way<br />
wire control<br />
switching<br />
intermediate switching<br />
Two-way switching<br />
3 wire control<br />
1 gang<br />
architrave<br />
32<br />
60.3<br />
146<br />
85<br />
2 gang<br />
architrave<br />
32<br />
120.6<br />
One-way switching<br />
Two-way One-way switching<br />
One-way switching<br />
One-way switching<br />
120.6 12<br />
Two-way plus<br />
intermediate Two-way plus<br />
Two-way<br />
switching<br />
intermediate Two-way plus switching<br />
intermediate 3 Two-way wire control plusswitching<br />
3 intermediate wire control switching<br />
12<br />
Two-way plus<br />
Two-way plus<br />
intermediate Two-way plusswitching<br />
intermediate switching<br />
3 Two-way<br />
intermediate wire 12 control plus<br />
switching<br />
3 wire control<br />
intermediate switching<br />
Sectional drawings show the furthest projections 3 from wire the control back of the<br />
frontplate (wall surface).<br />
Two-way plus<br />
intermediate switching<br />
3 wire control<br />
L<br />
N<br />
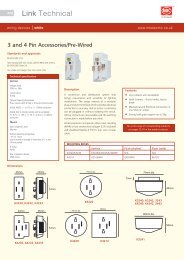
Wiring Diagrams<br />
One-way switching<br />
L<br />
L<br />
N<br />
LN<br />
N<br />
L<br />
LN<br />
L N<br />
NL<br />
N<br />
L<br />
N<br />
L<br />
N<br />
N<br />
L<br />
LN<br />
Lamp/s<br />
1<br />
N Lamp/s<br />
Lamp/s<br />
Lamp/s<br />
N<br />
Lamp/s<br />
1<br />
1<br />
Common<br />
Two-way switching Lamp/s – 2 wire control<br />
1<br />
Common<br />
Common<br />
Lamp/s<br />
Dotted lines show alternative switch positions Lamp/s<br />
1<br />
SW.L<br />
SW.L 1<br />
1<br />
SW.L<br />
SW.L 1<br />
Common<br />
1<br />
Lamp/s<br />
Lamp/s<br />
Dotted lines show Lamp/s alternative switch positions<br />
Common<br />
Common<br />
2<br />
Common<br />
Two-way switches 2 1<br />
Common<br />
2 Two-way switches 2<br />
1<br />
Common Common<br />
2 Two-way switches<br />
1<br />
1<br />
Common<br />
2<br />
1<br />
Dotted lines show alternative switch positions<br />
Dotted lines show alternative switch positions<br />
Lamp/s<br />
Lamp/s<br />
Two-way Dotted switching lines show alternative plus switch intermediate positions switching<br />
– 2 wire control<br />
12<br />
Common<br />
Common<br />
Common<br />
Common<br />
Two-way<br />
2 switch<br />
Two-way<br />
21<br />
switch<br />
Common<br />
2<br />
2<br />
2<br />
2<br />
2<br />
2<br />
1<br />
1<br />
Common<br />
Two-way switching – 3 wire control<br />
Common 2 1<br />
Two-way Common<br />
Intermediate<br />
2 1 switch<br />
1<br />
Common<br />
2 switch 1<br />
Common Two-way 2 1 Intermediate<br />
L<br />
2 1 switch<br />
2 1<br />
switch 1<br />
L<br />
1 2 Two-way Commonswitches<br />
21<br />
1<br />
Two-way<br />
2<br />
Intermediate<br />
L<br />
1<br />
N<br />
1 2 switch<br />
2 switch 1<br />
L<br />
Two-way<br />
Intermediate<br />
N<br />
2 1 switch<br />
2 1<br />
switch 1<br />
Lamp/s<br />
N<br />
L SW.L<br />
Lamp/s SW.L Dotted lines show alternative switch positions<br />
Lamp/s<br />
Dotted lines show alternative switch positions<br />
N Lamp/s<br />
Dotted lines show alternative switch positions<br />
Dotted lines show alternative switch positions<br />
Lamp/s<br />
Dotted lines show alternative switch positions<br />
L<br />
Lamp/s<br />
1<br />
1<br />
1<br />
2<br />
1 2<br />
SW.L<br />
Common<br />
2<br />
Lamp/s<br />
Two-way switches<br />
Common<br />
Two-way switches<br />
1<br />
Intermediate<br />
1 switch 1<br />
Intermediate<br />
1 Intermediate<br />
1 switch 1<br />
1<br />
Dotted lines show alternative switch positions<br />
Dotted lines show alternative switch positions<br />
Dotted lines show alternative switch positions<br />
Common<br />
Two-way<br />
switch<br />
2<br />
2<br />
2<br />
1<br />
Common<br />
Common<br />
Common<br />
1<br />
Common<br />
2 Two-way Commonswitches<br />
21<br />
Common 12<br />
1<br />
2 2<br />
2 Two-way switches 1<br />
Two-way Common<br />
Two-way switches<br />
1 switch 2 2 1<br />
2<br />
Intermediate Common<br />
1<br />
switch 1<br />
2<br />
Lamp/s Dotted lines show alternative switch positions<br />
Lamp/s Dotted lines show alternative switch positions<br />
Lamp/s<br />
SW.L<br />
Dotted lines show Dotted alternative lines show switch alternative positionsswitch<br />
positions<br />
Lamp/s<br />
2<br />
Two-way switches<br />
Dotted lines show alternative switch positions<br />
1<br />
1<br />
Intermediate<br />
switch<br />
1<br />
2<br />
Common<br />
Common<br />
Two-way<br />
2 switch<br />
Common Two-way<br />
2 switch<br />
Common<br />
Two-way<br />
2 switch<br />
Two-way<br />
2 switch<br />
Common<br />
Common<br />
Two-way<br />
2 switch<br />
Two-way<br />
2<br />
switch<br />
Common<br />
2<br />
Common<br />
Two-way<br />
switch<br />
Two-way switching plus intermediate switching<br />
– 3 wire control<br />
SW.L<br />
2<br />
Two-way<br />
switch<br />
2<br />
1<br />
1<br />
1<br />
2<br />
Intermediate<br />
switch<br />
Dotted lines show alternative switch positions<br />
1<br />
2<br />
Two-way<br />
switch<br />
N.B. Terminal positions may alter. The above diagrams are to<br />
show wiring layout.<br />
Common<br />
Two-way<br />
switch<br />
441