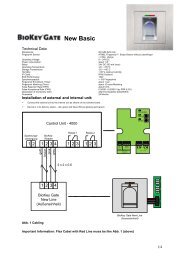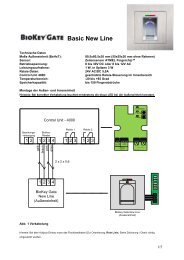
BioKey® Gate + Infrared Keypad handbook - Idencom
BioKey® Gate + Infrared Keypad handbook - Idencom
BioKey® Gate + Infrared Keypad handbook - Idencom

You also want an ePaper? Increase the reach of your titles
YUMPU automatically turns print PDFs into web optimized ePapers that Google loves.
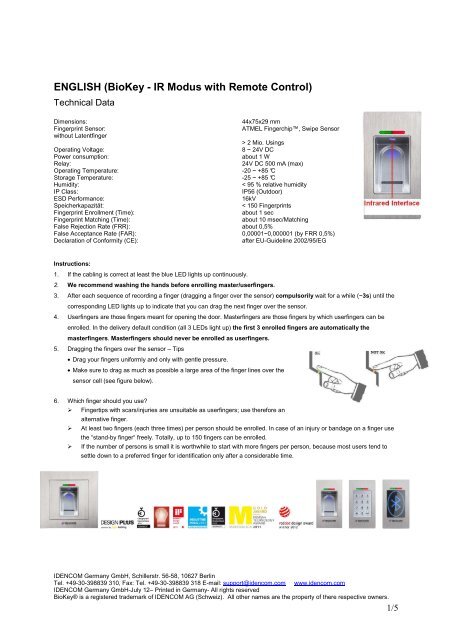
ENGLISH (BioKey - IR Modus with Remote Control)<br />
Technical Data<br />
Dimensions: 44x75x29 mm<br />
Fingerprint Sensor: ATMEL Fingerchip, Swipe Sensor<br />
without Latentfinger<br />
> 2 Mio. Usings<br />
Operating Voltage: 8 ~ 24V DC<br />
Power consumption: about 1 W<br />
Relay: 24V DC 500 mA (max)<br />
Operating Temperature: -20 ~ +85 °C<br />
Storage Temperature: -25 ~ +85 °C<br />
Humidity: < 95 % relative humidity<br />
IP Class: IP56 (Outdoor)<br />
ESD Performance: 16kV<br />
Speicherkapazität: < 150 Fingerprints<br />
Fingerprint Enrollment (Time): about 1 sec<br />
Fingerprint Matching (Time): about 10 msec/Matching<br />
False Rejection Rate (FRR): about 0,5%<br />
False Acceptance Rate (FAR): 0,00001~0,000001 (by FRR 0,5%)<br />
Declaration of Conformity (CE): after EU-Guideline 2002/95/EG<br />
Instructions:<br />
1. If the cabling is correct at least the blue LED lights up continuously.<br />
2. We recommend washing the hands before enrolling master/userfingers.<br />
3. After each sequence of recording a finger (dragging a finger over the sensor) compulsorily wait for a while (~3s) until the<br />
corresponding LED lights up to indicate that you can drag the next finger over the sensor.<br />
4. Userfingers are those fingers meant for opening the door. Masterfingers are those fingers by which userfingers can be<br />
enrolled. In the delivery default condition (all 3 LEDs light up) the first 3 enrolled fingers are automatically the<br />
masterfingers. Masterfingers should never be enrolled as userfingers.<br />
5. Dragging the fingers over the sensor – Tips<br />
• Drag your fingers uniformly and only with gentle pressure.<br />
• Make sure to drag as much as possible a large area of the finger lines over the<br />
sensor cell (see figure below).<br />
6. Which finger should you use?<br />
� Fingertips with scars/injuries are unsuitable as userfingers; use therefore an<br />
alternative finger.<br />
� At least two fingers (each three times) per person should be enrolled. In case of an injury or bandage on a finger use<br />
the “stand-by finger“ freely. Totally, up to 150 fingers can be enrolled.<br />
� If the number of persons is small it is worthwhile to start with more fingers per person, because most users tend to<br />
settle down to a preferred finger for identification only after a considerable time.<br />
IDENCOM Germany GmbH, Schillerstr. 56-58, 10627 Berlin<br />
Tel. +49-30-398839 310, Fax: Tel. +49-30-398839 318 E-mail: support@idencom.com www.idencom.com<br />
IDENCOM Germany GmbH-July 12– Printed in Germany- All rights reserved<br />
<strong>BioKey®</strong> is a registered trademark of IDENCOM AG (Schweiz). All other names are the property of there respective owners.<br />
1/5
Abbreviations and keyboard functions:<br />
MF = Masterfinger<br />
E = Enroll<br />
R1 = Relay1 R2 = Relay2<br />
D = Delete<br />
DA = Delete All (deletes all, including masterfingers)<br />
H = Security (High), M = Security (Medium), L = Security (Low)<br />
RT = Relay switching time<br />
B = Block (to block IDs)<br />
UB = Unblock (to unblock IDs)<br />
I. All functions at a glance (MF = Masterfinger)<br />
� We recommend washing the hands before enrolling master/userfingers.<br />
� When using for the first time or after a power outage wait for about 3 minutes until the fingerprint sensor has<br />
reached the optimal temperature.<br />
Function<br />
Description Procedure<br />
Enroll masterfinger<br />
Enroll userfinger<br />
for Relay 1 and Relay 2<br />
Identification<br />
Delete a userfinger<br />
Delete all fingers (Reset)<br />
Set the security level<br />
Set the security level<br />
Set the security level<br />
Set the connecting time for<br />
Relay 1<br />
Set the connecting time for<br />
Relay 2<br />
To define administrative fingers Delivery condition � Enroll 3x masterfinger<br />
To scan userfingers, together with<br />
an ID<br />
MF� E� ID� OK� Scan userfinger ………� MF<br />
Scan userfinger<br />
To delete individually through the ID MF� D� ID � OK� MF<br />
To reset to initial status MF� DA� MF<br />
Security (high, corresponds to a 5digit<br />
PIN code)<br />
Security (medium, corresponds to a<br />
4-digit PIN code)<br />
Security (low, corresponds to a 3digit<br />
PIN code)<br />
Block IDs Temporary blocking of users (e.g.<br />
guests)<br />
Unblock IDs<br />
MF� H� OK<br />
MF� M� OK<br />
MF� L� OK<br />
Relay switching time: 1 s to 65 s MF� RT � R1 � digit(s) � OK<br />
Relay switching time: 1 s to 65 s MF� RT � R2 � digit(s) � OK<br />
MF� B� ID � OK<br />
Unblocking users MF� UB � ID � OK<br />
Check ID To check if an ID already exists OK � ID � OK<br />
Unblock the terminal Exit the blocking mode Drag 2x directly consecutively an enrolled finger<br />
(master or userfinger) over the sensor<br />
Enroll userfinger for Relay 1<br />
Enroll userfinger for Relay 2<br />
To scan userfinger, together with an MF� E� ID � R1� OK � Scan userfinger � MF<br />
ID for only Relay 1<br />
To scan userfinger, together with an MF� E� ID � R2� OK � Scan userfinger � MF<br />
ID for only Relay 2<br />
2/5
II. All functions in detail<br />
1. Enroll masterfingers<br />
(3 x masterfinger: 3-times the same or three different fingers)<br />
The device must be initialized (red + green + blue LEDs light up continuously, otherwise see §5.)<br />
� Drag the first masterfinger over the sensor, blue LED flashes for approx. 3 secs; wait, red + green LEDs go off<br />
briefly and light up again continuously.<br />
� Drag the second masterfinger over the sensor, blue LED flashes for approx. 3 secs; wait, red + green LEDs go<br />
off briefly and light up again continuously.<br />
� Drag the third masterfinger over the sensor, blue LED flashes for approx. 3 secs; wait, green LED lights up<br />
briefly on and off.<br />
� When all 3 masterfingers are enrolled, the device will be ready for operation (only the blue LED lights up). Now, userfingers<br />
can be enrolled.<br />
� If during the enrolling operation a finger has been dragged but not accepted as masterfinger, then, the red + green LEDs continue to be<br />
on. In that case, repeat the operation to enroll the masterfinger. Timeout: 60 secs. Between each enrolling operation for masterfingers do<br />
not wait for more than 60 secs; otherwise the enrolling operation must be repeated.<br />
2. Enroll userfingers together with an ID number<br />
(Masterfingers must not be enrolled as userfingers.)<br />
� The enrolling mode for userfingers is activated by reading in a masterfinger.<br />
� Red and green LEDs flash briefly.<br />
� Press the E (Enrollment) button (below right) on the remote control.<br />
� Enter an ID between 1 and 150 over the remote control.<br />
� Press OK to confirm.<br />
� If the finger to be enrolled is to switch only one relay, press R1 for Relay 1 or R2 for<br />
Relay 2, before confirming with OK. If none of the relay buttons are operated, then both relays are switched automatically.<br />
� Enrolling one or more userfingers (dragging over the sensor)<br />
� If the enrolling operation is successful the green LED lights up; if the quality is inadequate the red LED lights up. We recommend<br />
enrolling individual userfingers 3-times in order to optimize the rate of recognition. All fingers will be stored under the entered ID.<br />
� The enrolling operation is completed by reading in a masterfinger once again.<br />
� Red and green LEDs light up briefly; it is possible to store several persons under one ID. But be forewarned that in the delete mode all<br />
those fingerprints will be deleted which are stored under a single ID.<br />
� If the enrolling operation is not completed within 10 secs after the last enrollment of a finger, the operation will be canceled without<br />
storing the previously enrolled fingers.<br />
3. Identification<br />
� Drag a userfinger over the sensor.<br />
� The green LED lights up if the finger is identified and the relay is switched on. The red LED lights up if the finger is not identified.<br />
4. Delete individual userfingers<br />
� The delete mode for userfingers is activated by reading in a masterfinger.<br />
� Red and green LEDs flash briefly.<br />
� Press the D (Delete) button (below left) on the remote control.<br />
� Green LED flashes.<br />
� Enter the ID of the userfinger to be deleted.<br />
� Press OK to confirm.<br />
� Green LED flashes.<br />
� The delete operation is completed by reading in a masterfinger once again.<br />
� Red and green LEDs flash briefly.<br />
3/5
5. Delete all fingers (including masterfingers)<br />
� Press the “Delete“ button on the internal unit (Control Unit) for several seconds.<br />
� The initial status is restored, and on the external unit the red + green + blue LEDs light up continuously.<br />
� Note: There is another way to delete all fingers on the external unit (fingerprint reader). For this, the masterfinger must be dragged totally 3-<br />
times consecutively over the sensor. After reading in the masterfinger 2-times the red LED starts flashing to indicate that the delete mode is<br />
being initialized. After dragging the masterfinger for the third time the delete operation is launched. The green LED begins to flash to indicate<br />
this. Finally, the device goes into the delivery default condition.<br />
� Note: There is yet another way to delete all fingers (directly in front of the terminal): Masterfinger-> Press the DA button (Delete All) on the<br />
remote control -> Masterfinger<br />
6. Set the security level<br />
� Press any of the H/M/L buttons, depending on your choice<br />
� Press OK to confirm<br />
� Button L: Low security (corresponds to 3-digit PIN-code security)<br />
� Button M: Medium security (corresponds to 4-digit PIN-code security)<br />
� Button H: High security (corresponds to 5-digit PIN-code security)<br />
� Red and green LEDs flash twice briefly to indicate that the setting is done.<br />
� The on delivery default security level is set to M. The security level can be reconfigured at any time.<br />
7. Set the relay switching time<br />
� Press the RT button.<br />
� Press the R1 for Relay 1, R2 for Relay 2 or the buttons R1 and R2 consecutively for both relays.<br />
� Enter the digit(s) for the relay switching time in seconds (1 to 65 seconds)<br />
� Press OK to confirm.<br />
� In the default delivery condition the switching time for both relays is set to 5 seconds.<br />
8. Block IDs (temporary users like guests)<br />
� Read in a masterfinger<br />
� Press the B button<br />
� Enter ID<br />
� Press OK to confirm<br />
� All fingerprints stored under the entered ID are now blocked and will be rejected.<br />
� Individual IDs can be temporarily blocked without having to lose the enrolled fingerprints. They can be unblocked again later, and the<br />
person concerned need not be present to enroll his/her finger once again.<br />
9. Unblock the IDs<br />
� Read in the masterfinger<br />
� Press the UB button.<br />
� Enter the ID.<br />
� Press OK to confirm.<br />
� All fingerprints of this ID are now unblocked again.<br />
10. Blocked mode (Block/Unblock the terminal)<br />
� Blocking: If a finger that has not been enrolled is dragged consecutively for 5-times over the<br />
sensor (red LED lights up), the module changes into blocked mode. This is to prevent<br />
unauthorized persons from gaining entry through indefinite number of attempts over a period.<br />
4/5
1<br />
2<br />
3<br />
4<br />
5<br />
ID<br />
6<br />
7<br />
8<br />
9<br />
10<br />
11<br />
12<br />
……<br />
150<br />
� If the device is in blocked mode, this is indicated by the flashing red LED. The blocked mode is initially time-limited; in case of 5 more<br />
failed attempts the blocked mode gets extended correspondingly (Blocking intervals: 1 minute, 5 minutes, 30 minutes, 1 hour,<br />
thereafter continuous blocking)<br />
� Unblocking: The blocked mode can be prematurely terminated by dragging an enrolled finger<br />
(master or userfinger) over the sensor twice directly consecutively.<br />
11. Check ID (to check if a number/ID is allocated already)<br />
� Press the OK button.<br />
� Enter the ID to be checked<br />
� Press the OK button again.<br />
� If the ID has been allocated already, both LEDs (red and green) light up.<br />
� If the ID is not allocated, only the red LED lights up.<br />
ID Person (Name) Description (Thumb Right / Index Finger<br />
Lefet ……)<br />
5/5