Xtreamer SideWinder 3 user Manual
Xtreamer SideWinder 3 user Manual
Xtreamer SideWinder 3 user Manual

You also want an ePaper? Increase the reach of your titles
YUMPU automatically turns print PDFs into web optimized ePapers that Google loves.
User <strong>Manual</strong><br />
<strong>Xtreamer</strong> <strong>SideWinder</strong> 3
Introduction<br />
Congratulations on your purchase of the <strong>Xtreamer</strong> <strong>SideWinder</strong> 3 media player, a state-ofthe-art<br />
consumer electronic device that will enrich your home multimedia experience.<br />
<strong>Xtreamer</strong> <strong>SideWinder</strong> 3 is a new generation Realtek based media player equipped with<br />
enhanced top quality hardware commonly used in high-end computing and consumer<br />
electronic solution. It has an additional memory, USB 3.0 slave connection for high-speed<br />
data transfer, GB LAN and can be equipped with one 2.5” HDD.<br />
With <strong>Xtreamer</strong> <strong>SideWinder</strong> 3 media player you can bring your movies, music and images<br />
to your living room, get rid of that bulky DVD collection, access hundreds of internet feeds<br />
and channels, check your favorite online services and social nets, browse the web, stream<br />
from your iOS device via Airplay, use Android applications and so on.<br />
This is the first media player that incorporates the full 3D support. Enjoy a full movie<br />
theater experience at home.<br />
In <strong>Xtreamer</strong> <strong>SideWinder</strong> 3 we also introduce Android 2.2.1 support giving you the wide<br />
world of thousands of Android applications.<br />
Due to the rapid development of our product we cannot possibly guarantee that this<br />
Guide will include all its features. So if you have questions please feel free to browse the<br />
<strong>Xtreamer</strong> Knowledge base or contact our staff.<br />
Please make sure to visit our site www.xtreamer.net for the <strong>Xtreamer</strong> news, official<br />
announcements and firmware upgrade.<br />
2<br />
English
Table of contents<br />
Page 5 – Hard Drive installation and connections<br />
Page 11 – Remote Control Functions<br />
Page 15 – Main Menu and Settings<br />
Page 28 – Basic Functions<br />
Movie, music and image playback<br />
Page 36 – Advanced Functions<br />
Internet, Android, Playlists etc<br />
Page 46 – Network Setup<br />
Page 50 – NFS Shortcut setup<br />
Page 55 – Settings up Network Shares<br />
Page 78 – <strong>SideWinder</strong> 3 Bit-Torrent client<br />
Page 82 – Android App installation<br />
Page 87 – Web UI<br />
Page 94 – Firmware Upgrade and Emergency Procedure<br />
Page 98 – Useful Links<br />
English
English
Connections<br />
English
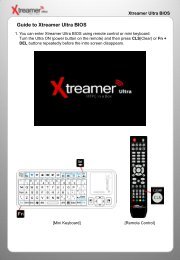
Hard-Disk Installation<br />
01.<br />
02.<br />
03.<br />
Open the hard disk cover on the<br />
front panel<br />
Connect the HDD guard to a 2,5” HDD as shown<br />
on the picture. Fasten the screws.<br />
As shown here, slowly and carefully push the HDD<br />
guard together with the HDD into the main body of<br />
<strong>Xtreamer</strong> <strong>SideWinder</strong> 3.<br />
6<br />
English
Video & Audio Output Connections<br />
ㆍHDMI cable connection<br />
Connections<br />
Connect HDMI cable to HDMI terminal at the back of product. Connect the remaining cable<br />
terminal to HDMI terminal at the back of a digital TV. Make sure to carefully distinguish<br />
between input and output terminals.<br />
ㆍComposite cable connection<br />
Connect yellow cable for video signal to the terminal located at the back of side of TV. Then,<br />
select external input of TV. Connect the remaining red and white terminal cables to the left/ right<br />
and audio output terminal at the back of the device. Then, connect red and white cables to the<br />
left/ right terminal of DTV input or component audio input located at the back of a digital TV.<br />
7<br />
English
ㆍComponent cable connection<br />
Connection<br />
Connect the green, blue and red terminal cables to the <strong>Xtreamer</strong> <strong>SideWinder</strong> 3 and TV in<br />
accordance with the color scheme; connect white AV cable to L terminal, and red AV cable to R<br />
terminal. (Component cable is an optional item)<br />
8<br />
English
ㆍOptical cable connection<br />
Connection<br />
You can enjoy high-quality 5.1CH sound when connected to an amplifier or a receiver with<br />
optical cable. Connect optical cable to Optical port on <strong>Xtreamer</strong> <strong>SideWinder</strong> 3 as shown above. Then,<br />
connect to an amplifier or a receiver. ( Optical cable is optional )<br />
ㆍCoaxial cable connection<br />
You can enjoy high-quality 5.1CH sound when connected to an amplifier or a receiver with<br />
coaxial output cable. Connect coaxial cable to coaxial port on <strong>Xtreamer</strong> <strong>SideWinder</strong> 3 as shown above.<br />
Then, connect to an amplifier or a receiver. ( Coaxial cable is optional )<br />
9<br />
English
Connect to the Network<br />
ㆍWired and Wireless Network<br />
Connection<br />
Wireless IP Sharing Router<br />
To set up your network connection please check the Settings guide below.<br />
To setup shared folders on your local network, please refer to this online guide or check<br />
a dedicated section below.<br />
10<br />
English
Remote Functions<br />
English
Remote Control Functions<br />
12<br />
English
General Remote Control Functions<br />
1 POWER Power on / off<br />
2<br />
3<br />
4<br />
5<br />
6<br />
7<br />
8<br />
9 ADD Add<br />
10 EJECT Eject for DVD<br />
11 DELETE Delete<br />
12 ZOOM<br />
13 GOTO<br />
14 MENU<br />
15 SETUP<br />
Page mode in browser, special functions<br />
Bookmarks, playlist, special functions<br />
Address bar input, special functions<br />
Special functions, playlist operations<br />
To enlarge and reduce screen/ repeatedly pressing for adjusting<br />
zooming percentage/moving to position of enlarged output by using<br />
direction keys./ Setup the X,Y position on screen<br />
To select file in the same title or to execute shortcut to the already<br />
designated chapter position/shortcut to the desired time position<br />
Opens a list of available functions in Media Library and during<br />
playback, allows access to DVD menu.<br />
Function available when playing media file or using menu’s in<br />
VIDEO IN screen to display various setup screens<br />
16 FUNC Opens a list of available file functions in Media Library<br />
17 TVOUT<br />
18 REFRESH Refreshes the lists<br />
19 PREVIEW<br />
20 BOOKMARK<br />
21 INFO<br />
Toggle Video Output Modes and resolution (HDMI, AV) - double<br />
press<br />
To turn on/ off preview screen automatically displayed in media play<br />
file search mode<br />
Supports adding a file to bookmark and to show bookmark lists<br />
To display the current status function available while playback /<br />
Open information of the movie playing<br />
13<br />
English
General Remote Control Functions<br />
22 RETURN Return to previous screen<br />
23<br />
NAVIGATION<br />
KEYS<br />
24 ENTER<br />
25 PLAY/PAUSE<br />
26 STOP To stop playback<br />
To move the cursor and select files<br />
27 HOME To return to the Main Menu.<br />
To confirm selection / play. When used to play a file toggles singlefile<br />
playback.<br />
To play and pause a selected file. When used toggles consecutive<br />
(file-by-file) playback.<br />
28 PGUP To move to previous chapter or file (list)<br />
29 PGDN To move to next chapter or file (list)<br />
30 VOLUME Volume adjustment<br />
31 AUDIO Option to change or select multiple audio tracks<br />
32 SUBTITLE Opens Subtitle browser<br />
33 RWD/FWD<br />
1.5x/2x/4x/8x/16x/32x speed, function available in movie files, mp3<br />
as well sound output available in 2x speed<br />
34 SHUFFLE To change play sequence to shuffle<br />
35 REPEAT<br />
36 A-B To set zone repetition<br />
To repeat file in play or to repeat all media files in the corresponding<br />
folder<br />
37 LED Turns On/Off LED part of <strong>Xtreamer</strong><br />
38 SLEEP Can be used to set the timer to turn off the player<br />
39 16:9 Screen shifts into 16:9/16:10/4:3 ratio during playback<br />
40 ANGLE Used if Angle is supported in a DVD file.<br />
41 MUTE Mutes the sound<br />
42 NTSC Change output to NTSC<br />
43 PAL Change output to PAL<br />
44<br />
SYNC<br />
SUBTITLE<br />
45 EJECT Eject disc<br />
46 TITLE Go to title menu (DVD-Video)<br />
47 URL<br />
48 SEARCH<br />
Adjust subtitle files to synch with a movie file(100ms/ 0.1sec)<br />
This function will be supported in the future.<br />
This function will be supported in the future.<br />
14<br />
English
Main Menu and Settings<br />
English
Main Menu<br />
Favorites<br />
Under FAVORITES you can find the shortcuts to the files and folders you<br />
added to your Favorites list as well as the playlists you created<br />
History<br />
HISTORY tab gives you a quick access to the Recently Played and Recently<br />
Added files.<br />
Media Library<br />
MEDIA LIBRARY is your getaway to the contents of your local storage and<br />
the network.<br />
Android<br />
ANDROID tab is your conduit to the wide and exciting world of Android OS<br />
with its tens of thousands of applications.<br />
Enjoy advanced web browsers, file managers, Internet Radio, online feeds<br />
and channels, reading documents, browsing Google maps and a more.<br />
Download and install new apps.<br />
App<br />
APP screen give you access to the built-in Internet applications and the<br />
Web-Browser as well as Shoutcast radio stations, xLive and other RSS-based<br />
projects<br />
Settings<br />
And finally SETTINGS which are very intuitive and <strong>user</strong>-friendly and allow<br />
you to easily configure your device to suit all your multi-media needs.<br />
16<br />
English
1. Adjusting output mode with TV output and Video output<br />
1. Automatically adjust the TV output mode when connected via HDMI cable.<br />
Cycle through available resolutions.<br />
Remote Control Key: TVOUT // Press 2 times consecutively<br />
2. . Connect Component / Composite cable<br />
Please note that video might suffer when connected via analogue.<br />
Remote Control Key: TVOUT // Press 2 times consecutively<br />
Different regions use different output standards:<br />
-- PAL(B) : HDMI Auto, 576P 50Hz, 720P 50Hz, 1080i 50Hz, 1080P 50Hz<br />
Europe, South Africa, Middle East, China, Austria, India<br />
-- NTSC : HDMI Auto, 480P 60Hz, 720P 60Hz, 1080i 60Hz, 1080P 60Hz<br />
Korea, Japan, US, Canada, Taiwan, Philippines, Colombia<br />
2. Select OSD language menu (default : English)<br />
Select the OSD language.<br />
Setting � Look and Feel � Menu Language � Select<br />
3. Select Subtitle\ID3-Tag encoding(default : Unicode(UTF8) )<br />
Select the subtitle code.<br />
Setting � Look and Feel � Text Encoding � Select.<br />
4. Select Audio Output.<br />
Basic Setup<br />
Select the audio setting according to your audio system.<br />
HDMI Outut<br />
Setting � Audio � HDMI Output � Select<br />
SPDIF Output<br />
Setting � Audio � SPDIF Output � Select<br />
17<br />
English
Video<br />
Settings<br />
TV System<br />
You will be able to select proper display resolution and video output type.<br />
PAL (B) (50Hz)<br />
NTSC (60Hz)<br />
Display<br />
Resolution<br />
Europe, Greenland, South Africa, the Middle East, China, Austria, India, Indonesia.<br />
Korea, the USA, Japan, Canada, Taiwan, the Philippines, Colombia.<br />
HDMI Auto / NTSC / PAL / 480P / 576P / 720P 50Hz / 720P 60Hz / 1080i 50Hz / 1080i 60Hz /<br />
1080P 50Hz / 1080P Supported.<br />
※ In some cases, display resolution on your TV can not be supported due to inactivity; therefore,<br />
you should check your TV specification.<br />
1080P 24Hz<br />
This feature allows you 1080P 24Hz output when playing Blu-ray files (BD); however, this function is<br />
only available when <strong>Xtreamer</strong> is connected using a HDMI cable to a TV that supports 24Hz frame rate.<br />
Note for 1080p 24p<br />
- TV, AV amp and media file you use must support 1080P 24Hz and your media file should be<br />
encoded 1080P 23.976fps.<br />
- If video isn’t properly played by selecting *ON+, you will be required to select *Off+.<br />
- The initial TV screen can be flickering when you switch on “1080P 24Hz” mode<br />
18<br />
English
Video<br />
Settings<br />
Aspect Ratio<br />
You will be able to select Aspect Ratio type of movie screen for playback.<br />
PanScan 4:3<br />
LetterBox 4:3<br />
16:9 Ratio converted to 4:3 Ratio is referred to as high definition TV. It will reduce<br />
scan lines to 4:3.<br />
16:9 Ratio converted to 4:3 Ratio is referred to as your TV. It will decompress image<br />
to 4:3.<br />
16:9 Video is fully displayed in 16:9 DVD frame as well as 4:3 Ratio fully displayed.<br />
16:10<br />
It enables you to add letterboxing bars above and below video screen, meanwhile,<br />
your TV maintains its aspect ratio of 16:9, e.g. 16:9=1920x1080 / 16:10=1920x1200.<br />
Brightness<br />
Brightness in video refers to the luminance portion of a video signal. It enables you to use Increase Brightness<br />
and Decrease Brightness commands by pressing [SETUP] button on your remote during playback.<br />
Contrast<br />
Allow you to adjust video contrast when using Increase Contrast and Decrease Contrast commands by pressing<br />
[SETUP] button on your remote during playback.<br />
Hue<br />
This option provides how to use the Hue adjustment to enhance your colors. Along the way, you will be able to<br />
use Increase Hue and Decrease Hue commands by pressing [SETUP] button on your remote during playback.<br />
Saturation<br />
This feature, saturation is one of three coordinates in the HSL and HSV color spaces. It enables you to use<br />
Increase Saturation and Decrease Saturation commands by pressing [SETUP] button on your remote while<br />
playback.<br />
19<br />
English
Audio<br />
HDMI Output<br />
Select a desired configuration for your digital audio output.<br />
SPDIF output<br />
Select a desired configuration for your optical audio output.<br />
Night Mode<br />
Off Outputting raw sound.<br />
On<br />
Comfort<br />
Settings<br />
It provides high-definition audio that is identical to, and every bit as spectacular as, the master<br />
recording. In spite of decreasing volume, you will be able to experience incredible surround<br />
sound that puts you right in the middle of the action without disturbing others.<br />
You will be able to hear every tiny sound in rich detail as well as comfortable sound<br />
levels solely for you.<br />
20<br />
English
Network<br />
Set up Wired or Wireless Network<br />
Settings<br />
On the Settings -> Network screen you can setup your <strong>Xtreamer</strong> <strong>SideWinder</strong> 3 to connect to your home network.<br />
You can use Wired or Wireless connection and give your <strong>Xtreamer</strong> a specific name under which it will appear on your<br />
Network.<br />
Refer to the dedicated section of this guide (or refer to this article) for setting up network on <strong>Xtreamer</strong> <strong>SideWinder</strong> 3.<br />
Accessing your Computer<br />
Please note that in order to access your home computer you will need to set up Shared folders.<br />
Check the dedicated section below.<br />
If you want learn how to setup shortcuts to NFS shares on <strong>Xtreamer</strong> <strong>SideWinder</strong> 3, please refer to the dedicated section<br />
( refer to this guide).<br />
21<br />
English
System Configuration<br />
Settings<br />
Time Zone<br />
Time zone selected time zone of <strong>Xtreamer</strong>. Select your time zone.<br />
HDD Format<br />
This feature supports internal HDD format function. Formatted file system is divided into Linux Swap<br />
partition and NTFS partition. By auto formatting, Linux swap partition is an independent section of hard<br />
disk used solely for swapping. The swap space is the amount of virtual memory available.<br />
Screen Saver Timing<br />
This is to set the time for automatic changing images on your screen during periods of <strong>user</strong> inactivity.<br />
Screensaver is designed to prevent phosphor burn-in on the LCD TV when the properties of the exposed<br />
areas of phosphor-coating on the inside of the screen gradually and permanently change, eventually<br />
leading to ghost image on the screen.<br />
BD-Lite Menu<br />
This feature toggles limited BD menu when playing a BD ISO file.<br />
Factory Default<br />
This option restores your player to the factory defaults. It will clear all the personal settings including<br />
passwords, favorites, custom skins etc.<br />
- Using this option will not damage the data on your HDD<br />
- Always reset your settings after a firmware upgrade<br />
22<br />
English
System configuration<br />
Settings<br />
DVD Autoplay<br />
The feature allows you to select automatic DVD play mode when inserting a DVD disk<br />
into the DVD ROM connected to your player via USB port<br />
.<br />
OFF<br />
DVD Disk isn’t automatically played<br />
ON<br />
DDVD Disk is automatically played.<br />
DLNA DMR<br />
Turn it on to automatically connect to DLNA devices<br />
Screen size<br />
Press ENTER button to adjust your video output to the size of your TV<br />
23<br />
English
System Service<br />
Settings<br />
NAS - Network Drive(SAMBA)<br />
Allows you to use your player as a NAS device on your network.<br />
NAS network drive provides storing and copying files services.<br />
BT<br />
Use it to enable built-in bit-torrent client.<br />
The client can by accessed from your computer via a browser program by typing <strong>SideWinder</strong> 3 internal<br />
IP/unicgi<br />
For more information please refer to the Bit-Torrent section of this guide.<br />
DLNA DMR<br />
This option enables DLNA service.<br />
Airplay<br />
Enable to stream videos (Youtube) and images from your iOS device to a TV via <strong>Xtreamer</strong> player.<br />
Android<br />
You can disable Android services if you want to dedicate all the device’s resources to playing media files.<br />
Transmission<br />
Popular torrent client that can work on multiple operating systems.<br />
Note<br />
If an option is not frequently used we recommend disabling it to reserve the memory and for security<br />
reasons.<br />
24<br />
English
Firmware Upgrade<br />
Upgrading your Firmware<br />
Settings<br />
Under System Firmware you can see your current firmware version.<br />
You can download the latest firmware file from our main site and install it <strong>Manual</strong>ly.<br />
Check below for details.<br />
IMPORTANT<br />
Every <strong>Xtreamer</strong> media player has its own specific firmware. Please make sure you download the correct file<br />
before running the upgrade procedure.<br />
Emergency Firmware<br />
Emergency firmware can be a great help for de-bricking an unresponsive unit and fixing various problems.<br />
The instructions are included with every firmware release. You can also check below.<br />
25<br />
English
Look and Feel<br />
Settings<br />
Menu Language<br />
You can specify UI language and enjoy operating the <strong>Xtreamer</strong> in you native language.<br />
Text Encoding<br />
You can specify the language used in subtitle files and ID3-tag in Mp3 files. Unicode [UTF-8] is an industry<br />
standard, and is set as default . If you are not using Unicode encoded files, select your preferred language.<br />
Resume Play<br />
You can begin playing <strong>Xtreamer</strong> from the point where you previously stopped it. Your system saves a<br />
record of the scene that was playing when you stopped playback so it knows where to resume playing.<br />
Key Tone Volume<br />
Use this option to regulate the sound the player makes when you are pressing the remote buttons.<br />
26<br />
English
Search and Indexing<br />
Easily find your Media files<br />
Settings<br />
Scan your local storage for media files on your local storage devices in order to be able to find them easily<br />
in the Media Library.<br />
Use Automatic scan or press Rescan Storage to manually update the database.<br />
Note: When Auto scan is enabled the player might take some additional time loading the system.<br />
27<br />
English
Basic Functions<br />
English
Using Media Sources<br />
General remote functions in the Media Library<br />
Cursor keys – use them to navigate the Media sources.<br />
ENTER – to make a selection or to play a file.<br />
Media Library<br />
MENU (6) – open a list of viewing options, file filtering, 3D playback functionality, Add to favorites feature,<br />
setup NFS shares, slideshow timing and effects, background music for image viewing and much<br />
more.<br />
FUNC – this key provides you with the function of a file manager and creation of playlists.<br />
RETURN – returns to the parent directory or the main screen<br />
HOME – returns you to the main menu.<br />
29<br />
English
Play Movies<br />
Most control buttons are the same as everywhere else: Play, Pause, Stop, Fast-Forward, Next and so on.<br />
Info button opens an time-bar with a relevant information about the file you are playing (see the picture<br />
above)<br />
While watching a movie press MENU (6) to open a list of options including an access to subtitles browser,<br />
GOTO menu, repeat options, audio channels and, in relevant cases, a 3D options menu.<br />
30<br />
English
Play Movies<br />
You can use LEFT and RIGHT cursor to skip – press ENTERT to jump to a desired location.<br />
ZOOM button to enlarge the picture.<br />
Audio button is used to switch between different audio channels and tracks.<br />
31<br />
English
Play Movies<br />
Subtitles button will open the subtitles browser that will allow you to customize the way your subtitles<br />
look on TV and switch the subtitles file if needed. It allows you to open an external file, change the color or<br />
the font, outline, change the size and encoding etc.<br />
GOTO button provides additional options for navigation.<br />
1. Title: It shows movie title lists and change playback file.<br />
2. Chapter: It provides moving to next (or previous) Chapter.<br />
3. Time: It provides moving to the point where you want to start from.<br />
32<br />
English
Play Movies. 3D playback<br />
<strong>Xtreamer</strong> <strong>SideWinder</strong> 3 is the first media player to support full 3D home experience.<br />
Please remember that you might need to enable 3D playback on you TV in order<br />
to enjoy it. Use 3D button on your remote or the TV set.<br />
Use MENU button on <strong>Xtreamer</strong> <strong>SideWinder</strong> 3 remote for additional options.<br />
33<br />
English
Play Music<br />
While playing music press MENU (6) to open a list of options including repeat options such as play once,<br />
repeat all and so on.<br />
Press SHUFFLE to toggle random playback.<br />
Start the playback to initiate music jukebox.<br />
You can use Cursor keys to navigate or regular command buttons such as Play, Pause, Fast-forward etc.<br />
Press RETURN to go back to the media library file list.<br />
34<br />
English
Use MENU key to toggle view mode options.<br />
Play Photo<br />
To start a Slideshow open a file (ENTER or PLAY) and press MENU of a list of advanced options.<br />
•You can set up the time intervals your images will be displayed using Slide Timing.<br />
•Slide Transition lets you to setup transition effects<br />
•Background music allows you to specify audio tracks for your Slideshow.<br />
35<br />
English
Advanced Features<br />
English
Displaying Cover art<br />
In Media Sources (the library) the corresponding image files stored in the file folders will be displayed if the<br />
Preview or Thumbnail modes are activated.<br />
Same the cover art file as folder.jpg in a relevant folder.<br />
For additional information and tips please refer to this article.<br />
37<br />
English
Creating a playlist<br />
You can use self-made M3U playlists on <strong>Xtreamer</strong> <strong>SideWinder</strong> 3. Just make sure that the paths are relative.<br />
You can also setup and save multiple playlists via <strong>Xtreamer</strong> <strong>user</strong> interface.<br />
Press FUNC button while in media library and choose Multiple Select<br />
38<br />
English
Creating a playlist<br />
Use the BLUE button to add files to the playlist (or to remove from the list)<br />
Press FUNC button again once you are done.<br />
39<br />
English
Creating a playlist<br />
Navigate to Save Playlist and press ENTER. Pick a name for your new playlist and press OK.<br />
Now you will be able to play the playlist from the media library.<br />
40<br />
English
Android on <strong>SideWinder</strong> 3<br />
You can use remote or a keyboard and mouse to use Android. Use the BLUE button for the Android option<br />
screen.<br />
Choose a pre-installed application or install your own. Currently we recommend manual installation.<br />
We are constantly testing and will post the our picks on the main site and our forum.<br />
For the guide on Android app installation please refer to a section below.<br />
In order to use the Android features make sure the service is turned on in the Settings.<br />
41<br />
English
Web Browser<br />
When you choose Web Browser in the main menu the list of Bookmarks will open. Press LEFT or RIGHT to<br />
navigate and ENTER to load.<br />
When viewing web pages you have two options - Page mode or Navigation mode. You can switch between<br />
the two of them using RED button.<br />
When using Page mode you can move up, down, left and right using the CURSOR buttons. This mode is<br />
essentially used for reading.<br />
Navigation mode allows you to pick links, check boxes, text areas etc. You can follow links, search the Web<br />
or enter personal information to login.<br />
Pressing FUNCTION key takes you to the browsing options menu.<br />
Press ENTER to type in an URL.<br />
The left column on the virtual keyboard screen is used to store the latest Web addresses and logins.<br />
GREEN button takes you to the Bookmarks list.<br />
42<br />
English
Apps<br />
You can access various internet resources via App section of the Main Menu.<br />
43<br />
English
Check out our amazing YouTube application.<br />
Apps<br />
And xLive – a wonderful collection of live Internet feeds and channels.<br />
You can find other RSS based projects on our forum (you will need to register) and install them on your<br />
machine.<br />
Many projects are being updated every few days with new content.<br />
44<br />
English
Apps<br />
Under App you can also find Internet Radio (alternatively, there are some Android applications) – an<br />
amazing way to listen to your favorite music, talks and news.<br />
Check the predefined stations, browse by genres or search. Add stations to favorites.<br />
<strong>Xtreamer</strong> also support PLS format so you can create files to access your own radio stations and play them<br />
from the Media Library. You can download a list of 17,000 stations HERE.<br />
45<br />
English
Network Setup<br />
English
Settings Up Network on <strong>Xtreamer</strong><br />
1. Setting up Wired Network<br />
DHCP IP (AUTO)<br />
The Dynamic Host Configuration Protocol DHCP is a networking protocol used to automatically retrieve IP address<br />
assignments through Wired LAN. This feature is set as a default value so that IP address is automatically assigned by RJ45<br />
connecting and rebooting. You need a network router in order to stream files from your PC.<br />
※ IP address of DHCP IP may sometimes be unstable.<br />
STATIC IP (MANUAL)<br />
Static IP is a manual way of obtaining an IP address, and is used for an assigned IP address that does not change often that<br />
being so it will most likely receive the same IP address through Wired LAN. IP will be allocated by <strong>user</strong>s when a fixed IP<br />
address is needed or DHCP server isn’t available.<br />
47<br />
English
Settings Up Network on <strong>Xtreamer</strong><br />
2. Wireless LAN Setup<br />
1. Choose Wireless Network option.<br />
2. Select [Infrastructure (AP)].<br />
3. Select SSID type (available wireless network), you want to use.<br />
4. Enter correct passkey, and then press [OK].<br />
Note<br />
- Only “Web hex character codes” is supported.<br />
- Web hex encoding supports 64-bit and 128-bit integers capable.<br />
- If you have the problem of unstable wireless network or low speed, check your wireless channels for<br />
optimum signal strength. Changing channel is available through your router.<br />
48<br />
English
Settings Up Network on <strong>Xtreamer</strong><br />
2. Wireless LAN Setup<br />
5. Navigate to OK button and press ENTER to test the connection.<br />
Device Name<br />
Use this option to give your <strong>Xtreamer</strong> a unique name under which it will appear on your<br />
local Network.<br />
49<br />
English
NFS Sharing Setup<br />
English
NFS Share Setup<br />
To setup an NFS share please go to the list of Media Library resources.<br />
Go to NFS and press MENU button<br />
51<br />
English
Add NFS client<br />
NFS Share Setup<br />
Enter IP address of the relevant device.<br />
52<br />
English
And the path to the shared folder<br />
NFS Share Setup<br />
53<br />
English
Press OK to confirm.<br />
NFS Share Setup<br />
The new entry will now be listed under NFS shortcuts in the Media Library.<br />
54<br />
English
Network Sharing<br />
English
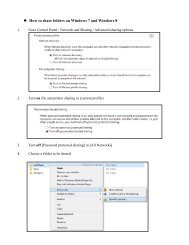
How to set-up Folder Sharing in Windows 7<br />
This instruction is for Window 7 Ultimate.<br />
Network Sharing<br />
1. Click [Start] – [Control Panel] - [View network status and tasks in Network and Internet].<br />
2. Click [Change advanced sharing settings] on the right side of the screen after appearing Network and<br />
Sharing Centre.<br />
56<br />
English
How to set-up Folder Sharing in Windows 7<br />
Network Sharing<br />
3. Change sharing options (refer to the above image).<br />
The sharing option needs to be applied in your home or company (Current Profile).<br />
57<br />
English
How to set-up Folder Sharing in Windows 7<br />
4. Select a folder you want to share, and click on the right side of mouse, then click [Properties] on pop-up<br />
menu.<br />
Click<br />
5. Click *Sharing+ on tap menu, and then click *Advanced Sharing…+.<br />
Network Sharing<br />
58<br />
English
How to set-up Folder Sharing in Windows 7<br />
Click<br />
Click<br />
6. Check on [Share this folder], then click [Permissions].<br />
Click<br />
Click<br />
Network Sharing<br />
7. Click *Add+ if there is no “Guest” account due to “Everyone” and “Guest” account is needed in order to<br />
Network sharing.<br />
59<br />
English
How to set-up Folder Sharing in Windows 7<br />
8. Click [OK] after entering [Guest] (refer to the above image).<br />
Network Sharing<br />
9. Click [OK] - [Apply] – *OK+ in order to confirm if “Guest” account is added or not.<br />
(Both Guest and Everyone account must be present).<br />
60<br />
Click<br />
English
How to set-up Folder Sharing in Windows 7<br />
10. Plus, add *Guest+ account on Security tap menu, then click *Edit…+ (refer to the above image).<br />
Click<br />
11. Click *Add…+ (refer to the above image).<br />
Network Sharing<br />
Click<br />
61<br />
English
How to set-up Folder Sharing in Windows 7<br />
12. Click [OK] after typing [Guest] account.<br />
Network Sharing<br />
13. Complete setup as confirming “Guest” account added by selecting *OK+ – [Apply] – [OK]<br />
(Both Guest and Account must be present). If there is no “Everyone”, you should add it.<br />
62<br />
English
How to set-up Folder Sharing in Windows Vista<br />
This instruction is for Window Visa Ultimate.<br />
1. Click [Start] - [Network] – [Properties].<br />
Click<br />
Network Sharing<br />
2. Click [Network discovery] - [Turn on network discovery] and then, click [Apply].<br />
63<br />
Click<br />
English
3. Click [File sharing] – [Turn on file sharing], and then click [Apply].<br />
Network Sharing<br />
How to set-up Folder Sharing in Windows Vista<br />
Click<br />
Click<br />
4. Important<br />
Click [Password protected sharing] – [Turn off password protected sharing], and then click<br />
[Apply]. Once completed, close the window.<br />
64<br />
Click<br />
Click<br />
English
5. Move cursor to which folder you want to share and then go to the [Properties] on pop-up menu as clicking<br />
on the right side of mouse.<br />
6. Click [Sharing] – *Advanced sharing…+.<br />
Network Sharing<br />
How to set-up Folder Sharing in Windows Vista<br />
Click<br />
Click<br />
65<br />
English
7. Check on [Share this folder], then click [Permissions].<br />
8. Click *Add…+ button in order to add “Guest” account.<br />
Network Sharing<br />
How to set-up Folder Sharing in Windows Vista<br />
Click<br />
Click<br />
Click<br />
66<br />
English
9. Type [Guest], and then click [OK].<br />
Network Sharing<br />
How to set-up Folder Sharing in Windows Vista<br />
Click<br />
Click<br />
10. Once completed, check if there is “Guest” account or not, then *OK+ – [Apply] – [OK].<br />
67<br />
Click<br />
Click<br />
English
Network Sharing<br />
How to set-up Folder Sharing in Windows Vista<br />
11. Click [Apply] – *OK+ so you will complete adding “Guest” account on sharing tap menu.<br />
12. Confirm if there are both “Guest” and “Everyone” accounts or not on “Security” tap menu.<br />
If there is no “Guest” account, click *Edit…+ (Both accounts should be present).<br />
Click<br />
68<br />
English
13. Click *Add+ if there is no “Guest” account.<br />
14. Type [Guest] (refer to the above image), then click [OK].<br />
Network Sharing<br />
How to set-up Folder Sharing in Windows Vista<br />
Click<br />
69<br />
Click<br />
English
15. Check if “Guest” account is correctly added or not, then click *Apply+ – [OK].<br />
16. Click [Close] to set completed.<br />
Network Sharing<br />
How to set-up Folder Sharing in Windows Vista<br />
70<br />
English
If folder accessing in window XP isn’t available.<br />
The instruction is subject to there isn’t any problem in Network Sharing<br />
Network Workgroup, Computer’s name, and so on. You, therefore, need to check Security set up part.<br />
1. Click [Start] – [Control Panel] - [Administrative Tools] [Local Security Policy] – [User Rights Assignment].<br />
1-1. Everyone, Users and Guest must be included in “Access this computer from network”.<br />
1-2. Add Everyone, Users and Guest if there is missing one in there.<br />
1-3. If there are Everyone, Users and Guest in “Deny Access to this computer form the network”, delete 3 of<br />
these accounts.<br />
1-4. Users and Guest must be included in “Log on locally”.<br />
1-5. Users and Guest must not be included in “Deny log on locally”.<br />
1-6. everyone and Users must be included in “By pass traverse checking”.<br />
2. Click [Start] – [Control Panel] –[Administrative Tools] – [Local Security Policy] – [Security Option].<br />
2-1. Network Security: *Send LM & NTCM responses+ in “Authentication Level”.<br />
2-2. Network Access : *Disabled+ in “Don’t allow anonymous enumeration of SAM accounts and shares”.<br />
3. Click [Start] – [Control Panel] – [Firewall].<br />
3-1. Check on *File and Printer Sharing+ in “Exception” tap menu.<br />
4. Click [Start] – [Control Panel] – [Administrative Tools] – [Services].<br />
4-1. Computer Browser: [Started in Status ] - [Automatic in Startup type].<br />
4-2. Server: [Started in Status ] – [Automatic in Startup type].<br />
4-3. Workstation: [Status Started] – [Startup type Automatic].<br />
Network Sharing<br />
Note:<br />
This instruction will be able to have effect on changing value, Network Sharing<br />
registry key correction in system, hence, you must not change other set value, incorrect setting value will be<br />
able to cause serious damage to your system].<br />
5. Click [Start] – [Run] and type [regedit] then click [OK].<br />
5-1 [HKEY_LOCAL_MACHINE] – [SYSTEM] – [Current Control Set] – [Control] –[Lsarestrictanonymous]<br />
“Lsarestrictanonymous” Value must be *0+. If there is no item, which means the value is the same as “0”.<br />
6. Once completed, you should reboot your computer so that setting value can be applied.<br />
71<br />
English
How to configure Folder Sharing Permission in Windows XP<br />
This instruction is for Windows XP Professional Users.<br />
1. Click [My Computer] – [Tools] – *Folder Options…+.<br />
Click<br />
Network Sharing<br />
2. Click *Folder Options…+ – [View] – *Use Simple File Sharing (Recommended)+ in “Advanced settings” – [OK].<br />
※ Use Simple File Sharing (Recommended) must not be selected.<br />
Click<br />
72<br />
English
3. Select a folder you want to share in Network, then click [Properties] – [Sharing].<br />
4. Click [Share this folder] – [Permission].<br />
If there is no “Guest” account, click *Add…+ button.<br />
Network Sharing<br />
How to configure Folder Sharing Permission in Windows XP<br />
Click<br />
Click<br />
73<br />
English
5. Type [Guest], and then click [OK].<br />
Network Sharing<br />
How to configure Folder Sharing Permission in Windows XP<br />
6. As you check “Guest” account added, the setting will be completed by clicking *OK+ – [Apply] – [OK].<br />
74<br />
Click<br />
English
7. Click [Share permissions] – [Add].<br />
8. Type [Guest] and then, click [OK].<br />
Network Sharing<br />
How to configure Folder Sharing Permission in Windows XP<br />
Click<br />
75<br />
Click<br />
English
Network Sharing<br />
How to configure Folder Sharing Permission in Windows XP<br />
9. As you check “Guest” account added in Security tap, setting will be completed by *Apply+ – [OK].<br />
Tip<br />
You will be able to use this method in order to allow (or block) the access by someone.<br />
76<br />
English
You can't access a share on your network<br />
The main reason that you cannot access a network share is that a GUEST account is not enabled on your<br />
system.<br />
In Windows 7 you might experience problems accessing your Network Shares if you have windows Live<br />
Essentials 2011 installed. In this case, try to access the folders via NET (MEDIA SOURCES)<br />
How to display “Guest” account “on” for Windows<br />
For Windows XP,<br />
(1) Select [Start] – [Control Panel] - [User accounts]<br />
(2) Change from [Guest accounts is off] to [Guest accounts is on]<br />
For Windows Vista,<br />
(1) Select [Start] – [Control Panel] – [User accounts] – [Manage another account]<br />
(2) Click [Guest]<br />
(3) Change from [Guest accounts is off] to [Turn on]<br />
Reboot PC and <strong>Xtreamer</strong>, then you will be able to connect Network.<br />
Network Sharing<br />
77<br />
English
Bit Torrent guide<br />
English
There is a built-in Bit-Torrent client on <strong>Xtreamer</strong> <strong>SideWinder</strong> 3 that can be accessed via Web UI.<br />
Step 1, Connect your <strong>SideWinder</strong> 3 to the local network (with access to the Internet) via Settings.<br />
Step 2, In the Settings turn BT on.<br />
Step 3, To access the bit-torrent interface launch a web browser program on your computer and at the<br />
address bar, type in the local IP address of your <strong>SideWinder</strong> 3 followed by /unicgi(for example -<br />
http://192.168.0.9/unicgi).<br />
Click BitTorrent Download on the home page to enter the Bit-Torrent Download page.<br />
3.11.1 Adding a new torrent<br />
Click Add new torrent on the BitTorrent Download page.<br />
- Click Browse to upload a torrent file, and click Yes to confirm.<br />
3.11.2 Managing the downloads<br />
The BitTorrent Download page also allows you to start, stop, delete torrents, and set priorities for<br />
torrents, as well as view the status of current torrents.
•Click Start to begin download.<br />
•Click Stop to stop download.<br />
•Click Delete to delete the selected torrent.<br />
•Click Refresh to refresh the current status.<br />
•Click Down arrow to decrease the priority for the selected torrent.<br />
•Click Up arrow to increase the priority for the selected torrent.
Alternatively you can enable Transmission in the Settings and access it’s Web Interface using the Prodigy’s<br />
internal IP followed by :9091 (for example 192.168.0.2:9091)<br />
The interface is easy to use and is similar to all the most popular bit-torrent clients.<br />
NOTE: Please remember that a media player is not a computer. Do not expect it to handle multi-tasking.<br />
Do not run a torrent client when operating it to run media files.
Android App Installation<br />
English
Android App Installation<br />
To manually install a new Android application you need to download an .apk file on a SD card, USB stick or<br />
internal drive.<br />
Enter Android home screen<br />
Choose the OI FILE MANAGER from the bar on the bottom<br />
83<br />
English
Android App Installation<br />
Navigate to a folder with the APK files.<br />
Choose an application to install and press ENTER.<br />
84<br />
English
Press INSTALL<br />
Android App Installation<br />
85<br />
English
Android App Installation<br />
Once the application is installed you can press OPEN to start it.<br />
It will also appear<br />
on the main Android screen.<br />
86<br />
English
Web UI
<strong>Xtreamer</strong> Web UI<br />
<strong>Xtreamer</strong> Web UI allows you to access your device via network, easily copy, move, download or<br />
upload files from a PC to your <strong>Xtreamer</strong> storage device, setup various services and operate your<br />
player remotely via virtual remote application that can also be used on an iOS or Android device.<br />
Please Note: not all the Web UI features are implemented in Prodigy and <strong>SideWinder</strong> 3 firmware.<br />
More will be added in the upcoming releases.<br />
88<br />
English
Connect to Web UI<br />
Initial Setting for Web Server connection<br />
In order to use “Web Server” <strong>Xtreamer</strong> player needs to be connected to a computer via network<br />
1. Firstly, check the player IP.<br />
2. Enter the allocated IP address of <strong>Xtreamer</strong> in browser URL address bar. The PC and <strong>Xtreamer</strong> need to be the<br />
same local network.<br />
- We’d recommend to connect to wired network to use Web Server.<br />
- Use the latest version of your browser.<br />
- MS IE6 many not work properly with the <strong>Xtreamer</strong> Web UI.<br />
89<br />
English
Web Server<br />
How to use “Set-up menu” of Web Server<br />
Menu Description<br />
Login Set up ID and PWD to access web-server.<br />
DDNS<br />
HTTP<br />
-It allows you to access your <strong>Xtreamer</strong> over the Internet from everywhere in the<br />
world. Simply type ***.myxtreamer.net in your browser.<br />
- The <strong>Xtreamer</strong> DDNS service is free<br />
- It changes HTTP Port (Default Value: 80).<br />
- It changes HTTP Port if 80 Port isn’t supported, e.g. 8080.<br />
- For instance, the case of Korea, if you access from external, you need to change 80 port due to<br />
it is blocked by Korea communication service. (Please make sure to open\forward a relevant port<br />
on your router).<br />
FTP It changes FTP connection port number (Default value : 21).<br />
Live<br />
- It provides adding <strong>user</strong> specified RSS address when you use <strong>Xtreamer</strong> Live.<br />
- Web port default value must be 80.<br />
- Live keyword: This button enables you to connect “make” button on <strong>Xtreamer</strong> key board input<br />
screen.<br />
- If you use keyword function, you can enter and search in multi-languages.<br />
Backup/Restore It saves or restores UPnP setting value.<br />
Language It changes language for UPnP media server.<br />
NAS Mode It blocks TV output from <strong>Xtreamer</strong> so that more stable network environment can be provided.<br />
NFS Client<br />
Workgroup/Hostname<br />
TV Skin It changes or restores GUI skin.<br />
It mounts NFS File System. Generally, it enables you to use the file system only for NAS Server<br />
product by mounting.<br />
It changes Network Group, and hostname of <strong>Xtreamer</strong> in Network.<br />
(Default Value : myxtreamer)<br />
Please note: not all the features are currently enabled.<br />
90<br />
English
Web Server<br />
How to use “Web GUI File Manager” of Web Server<br />
Menu Description<br />
Video To view video files only.<br />
Audio To view audio files.<br />
Photos To view photos files.<br />
All To display all files.<br />
Mylist It provides managing personal playlist i.e. Mylist, [Media Library] – [Mylist].<br />
Upload Allows you to upload one or several files.<br />
File Manager It enables you to create new folders, change names, copy, move, and delete files.<br />
Note: Please note that the remote downloading via web server only depends on your home<br />
network upload speed.<br />
91<br />
English
Web Server<br />
4 How to “File Upload & File Download”<br />
How to download files<br />
1. Click on the file you want to download via UPnP.<br />
Advanced Users Guide<br />
92<br />
How to Upload to Web Server<br />
1. If you click [Upload] button, window will be popped up<br />
(refer to the next image), and then add up files here.<br />
2. Click [Upload] button leads to automatic uploading.<br />
(Uploading in excess of 2GB is impossible due to<br />
capacity limitation of web browser)<br />
3. The list of uploaded files will disappear when the upload is<br />
finished.<br />
2. We’d recommend to use the latest version of UPnP web browser which provides a connection link in<br />
order to run GOM/VLC/WMP Player properly.<br />
English
Remote RC control<br />
To use <strong>Xtreamer</strong> virtual remote control applications simply enter <strong>Xtreamer</strong>’s internal IP into the URL<br />
bar of your preferred browser followed by /rc<br />
You can also use an iOS or Android device to operate your player remotely.<br />
There are 2 remote control applications available in the <strong>Xtreamer</strong> Web UI.<br />
Our community developers have created several alternative remote applications with unique features.<br />
Please visit our forum’s Community Projects section and check them out.<br />
93<br />
English
Firmware Upgrade<br />
English
Firmware Upgrade<br />
We constantly working to improve our devices. Firmware upgrades bring new features and fixes and will<br />
make your <strong>SideWinder</strong> 3 even more interesting and diverse device.<br />
Please check for new releases on our site in the Download section.<br />
Download the firmware file and unzip it into the root of a USB stick. Plug the stick into one of USB ports.<br />
Go to Settings -> Firmware Upgrade and choose Check for Firmware option. The device will automatically<br />
scan the USB stick for firmware files.<br />
Note: We recommend using a stick no bigger than 2GB. Format it FAT32<br />
95<br />
English
Firmware Upgrade<br />
Once the upgrade file is detected, press OK to start the procedure.<br />
Please be patient, the process takes time.<br />
Once the procedure is finished the <strong>SideWinder</strong> 3 will reboot.<br />
Make sure to reset your player to factory default settings after a firmware upgrade (Settings -> System<br />
Configuration -> Restore Default).<br />
96<br />
English
EMERGENCY FIRMWARE<br />
Emergency firmware is used for de-bricking unresponsive devices and fixing<br />
various issues.<br />
1. Download the firmware file from the <strong>Xtreamer</strong> main site.<br />
2. Unzip the file and copy (install.img) it to the root of a FAT32 formatted USB<br />
stick (we recommend a stick no bigger than 2GB).<br />
3. Disconnect all the cables, dongles, antennas, internal and external storage<br />
devices from your <strong>SideWinder</strong> 3.<br />
Disconnect it from power for 10-15 minutes.<br />
4. Plug the device into power and insert the USB stick into one of the ports on<br />
the side panel.<br />
5. Make sure the device is OFF and press the Power button on <strong>SideWinder</strong> 3<br />
for about 10-12 sec.<br />
The device LED will initially turn ON and after few sec it will turn OFF.<br />
Once the blue LED is OFF release your finger from the Power button and then<br />
the upgrade process screen will appear on your TV.<br />
(This procedure and can be used to clear personal data and reset passwords)<br />
Please be patient. It might be necessary to try the procedure several times.<br />
You might have to use another USB stick if you are not successful.
Useful Links<br />
Check the <strong>SideWinder</strong> 3 section on our Knowledge base. (please note that most of the<br />
<strong>Xtreamer</strong> Prodigy guides also apply to <strong>SideWinder</strong> 3)<br />
If you are new to the Media Players world you might consider subscribing to the<br />
<strong>Xtreamer</strong>4Dummies channel on Youtube.<br />
Check the download section of our site for firmware updates.<br />
For an updated version of this manual check here.<br />
If you are interested to become a member of the <strong>Xtreamer</strong> community please register on<br />
our forum. You might be interested in tip and opinions of your fellow <strong>Xtreamer</strong> enthusiasts.<br />
You can also find custom applications and mods on the forum.<br />
We publish all the new information and releases on the Forum Highlights page. Visit it first.