Finnigan™ SpectraSYSTEM™
Finnigan™ SpectraSYSTEM™
Finnigan™ SpectraSYSTEM™

You also want an ePaper? Increase the reach of your titles
YUMPU automatically turns print PDFs into web optimized ePapers that Google loves.
Finnigan <br />
SpectraSYSTEM <br />
UV/Vis Detectors<br />
Reference Manual<br />
A0099-540 Revision G
Finnigan and SpectraSYSTEM are trademarks of Thermo Electron Corporation.<br />
This manual and the instruments to which it applies have satisfied the requirements for CSA, FCC, the EMC,<br />
and Low Voltage Directives. Use of non-approved components and repair methods may reduce or invalidate<br />
the built-in protection that is required to meet the above certifications.<br />
Technical information contained in this publication is for reference purposes only and is subject to change<br />
without notice. Every effort has been made to supply complete and accurate information; however,<br />
Thermo Electron Corporation assumes no responsibility and will not be liable for any errors, omissions,<br />
damage, or loss that might result from any use of this manual or the information contained therein (even if this<br />
information is properly followed and problems still arise).<br />
This publication is not part of the Agreement of Sale between Thermo Electron Corporation and the purchaser<br />
of an LC system. In the event of any conflict between the provisions of this document and those contained in<br />
Thermo Electron Corporation’s Terms and Conditions, the provisions of the Terms and Conditions<br />
shall govern.<br />
System Configurations and Specifications supersede all previous information and are subject to change<br />
without notice.<br />
Printing History: Revision G printed in January 2004<br />
The products of Thermo Electron San Jose are produced under ISO 9001 accredited quality management systems.<br />
Australia: P.O. Box 239 Rydalmere • Unit 14, 38 – 46 South Street • Rydalmere, N.S.W. 2116 • [61] (02) 9898-9000<br />
Austria: Wehlistrasse 27b • A-1200 Wien • [43] (01) 333 50 34-0<br />
Belgium: Technologiestraat 47 • B-1082 Brussels • [32] (02) 482 30 30<br />
Canada: 5716 Coopers Avenue, Unit 1 • Mississauga, Ontario • L4Z 2E8 • [1] (905) 712-2258<br />
France: 16 Avenue du Québec • Silic 765 • Z.A. de Courtaboeuf • F-91963 Les Ulis Cédex • [33] (01) 60 92 48 00<br />
Germany: Im Steingrund 4-6 • D-63303 Dreieich • [49] (06103) 408 0<br />
Italy: Strada Rivoltana • I-20090 Rodano (Milano) • [39] (02) 95059 226<br />
Japan: C-2F • 3-9, Moriya-cho, Kanagawa-ku • Yokohama, Kanagawa • 221-0022 • [81] (45) 453 9100<br />
Japan: Esaka Grand Building • 2-3-1 Esaka-cho, Suita City • Osaka 564-0063 • [81] (06) 6387-6681<br />
Netherlands: Takkebijsters 1 • NL-4817 BL Breda • [31] (076) 5878 722<br />
P.R. China: Room 901, Ping-an Mansion • No. 23, Jin Rong Street • Xi Cheng District • Beijing 100032 • [86] (010) 6621 0839<br />
Spain: Sepulveda 7 A • ES-28108 Alcobendas (Madrid) • [34] (091) 657 4930<br />
Spain: Acer 30 – 32 • Edificio Sertram – Planta 2, Modulo 3 • ES-08038 Barcelona • [34] (093) 223 0918<br />
Sweden: Pyramidbacken 3 • S-141 75 Kungens Kurva (Stockholm) • [46] (08) 556 468 00<br />
United Kingdom: Stafford House • 1 Boundary Park • Boundary Way • Hemel Hempstead • Hertfordshire HP2 7GE • [44] (01442) 233 555<br />
U.S.A.: 355 River Oaks Parkway • San Jose, CA 95134-1991 • [1] (408) 965-6000<br />
Notes: The country code is enclosed in square brackets [ ]. The city code or area code is enclosed in parenthesis ( ). For countries other than the U.S.A.,<br />
when you are dialing from within the specified country, dial the 0 of the city code. For countries other than Italy, when you are dialing from outside the country,<br />
do not dial the 0 of the city code.<br />
Published by Technical Publications, Thermo Electron Corporation, San Jose, California.<br />
Copyright© 2004 Thermo Electron Corporation. All rights reserved. Printed in the United States of America.
Customer Registration... Register now and receive all the privileges associated with being a Thermo<br />
Electron, Finnigan product user, including application reports and technical reports.<br />
Name _______________________________________________________________________________________<br />
Title ________________________________________________________________________________________<br />
Company ___________________________________________________________________________________<br />
Address _____________________________________________________________________________________<br />
City/State/Postal Code _________________________________________________________________________<br />
Country _____________________________________________________________________________________<br />
Telephone _____________________________________________Ext. __________________________________<br />
SpectraSYSTEM UV/Vis Detector Serial # _________________Date Purchased ________________________<br />
Tell us more... Let us know more about how you use this product:<br />
My Organization Is: (Check one only) My Primary Application Is: (Check one only)<br />
� Commercial (for profit) lab � Analytical<br />
� Government lab � Biomedical<br />
� Hospital / Clinic � Clinical / Toxicology<br />
� Research Institute � Energy<br />
� University / College � Food / Agriculture<br />
� Veterinary � Forensic / Toxicology<br />
� Other ___________________________ � Pharmaceutical<br />
� Research / Education<br />
Job Function: (Check one only)<br />
� Other ___________________________<br />
� Administration<br />
� Lab Management<br />
� Operator<br />
� Other ___________________________<br />
Reader Survey... Help us to improve the quality of our documentation by answering a few questions:<br />
Finnigan SpectraSYSTEM<br />
UV/Vis Detector Reference Manual<br />
Strongly<br />
Agree Agree Disagree<br />
Revision G<br />
A0099-540<br />
Strongly<br />
Disagree<br />
The manual is well organized. 1 2 3 4<br />
The manual is clearly written. 1 2 3 4<br />
The manual contains all of the information I need. 1 2 3 4<br />
The instructions are easy to follow. 1 2 3 4<br />
The instructions are complete. 1 2 3 4<br />
The technical information is easy to understand. 1 2 3 4<br />
The figures are helpful. 1 2 3 4<br />
Additional Comments: (Attach additional sheets if necessary.)<br />
___________________________________________________________________________________<br />
___________________________________________________________________________________<br />
___________________________________________________________________________________<br />
___________________________________________________________________________________<br />
___________________________________________________________________________________<br />
___________________________________________________________________________________<br />
___________________________________________________________________________________<br />
Tear this sheet from the manual, fold it closed, stamp it, and drop it in the mail.
From _______________________________<br />
____________________________________<br />
____________________________________<br />
EDITOR, TECHNICAL PUBLICATIONS<br />
THERMO ELECTRON SAN JOSE<br />
355 RIVER OAKS PARKWAY<br />
SAN JOSE, CA 95134-1991<br />
UNITED STATES OF AMERICA<br />
Place<br />
Stamp<br />
Here<br />
fold<br />
fold
Contents<br />
Back Pocket:<br />
Quick Reference Card<br />
Menu Trees<br />
Customer Support ................................................................................................................................ iii<br />
Safety Information ............................................................................................................................ vii<br />
Start-up Checklist............................................................................................................................. xix<br />
List of Spare Parts, Consumables, and Kits.................................................................................... xxi<br />
Chapter 1 Getting Started<br />
Introduction ............................................................................................................................ 1<br />
Learning Your Way Around ................................................................................................... 1<br />
Instrument Control ................................................................................................................. 2<br />
Manual Conventions ............................................................................................................... 6<br />
What's Next? .......................................................................................................................... 8<br />
Chapter 2 A Quick Example<br />
Introduction ............................................................................................................................ 9<br />
UV1000, An Example ............................................................................................................ 10<br />
UV2000, An Example .......................................................................................................... 14<br />
What's Next? ........................................................................................................................ 18<br />
Chapter 3 Basic Operations<br />
Introduction .......................................................................................................................... 19<br />
Before You Begin ................................................................................................................. 19<br />
UV1000, Single-wavelength Operation ................................................................................. 20<br />
UV2000, Single- and Dual-wavelength Operation ............................................................... 26<br />
More about Files ................................................................................................................... 32<br />
Analog Outputs ..................................................................................................................... 35<br />
Chapter 4 Advanced Operations<br />
Introduction .......................................................................................................................... 37<br />
Wavelength Programming .................................................................................................... 37<br />
Programmed Autozero ......................................................................................................... 40<br />
Automatic Lamp Operations ................................................................................................ 41<br />
Other Features ...................................................................................................................... 43<br />
UV2000, Scanning ................................................................................................................. 46<br />
UV2000, Automatic Scanning ............................................................................................... 51<br />
The Develop File.................................................................................................................... 54<br />
Sample Queue......................................................................................................................... 56<br />
K-Factor ................................................................................................................................. 60<br />
Absorbance Ratios.................................................................................................................. 64<br />
01/2004 Thermo Electron i
Chapter 5 Required Maintenance<br />
Introduction .......................................................................................................................... 67<br />
Flowcells ............................................................................................................................... 67<br />
Lamps ................................................................................................................................... 73<br />
Appendix A Installation and Specifications<br />
Introduction .......................................................................................................................... 79<br />
Installation ............................................................................................................................ 79<br />
Specifications ........................................................................................................................ 90<br />
Appendix B Menu Reference<br />
Introduction .......................................................................................................................... 93<br />
Menu Trees ........................................................................................................................... 93<br />
Menu Reference .................................................................................................................... 97<br />
Appendix C Troubleshooting<br />
Introduction ........................................................................................................................ 105<br />
Theory of Operation ........................................................................................................... 105<br />
Common Problems ............................................................................................................. 107<br />
Troubleshooting Table ........................................................................................................ 107<br />
Error Messages ................................................................................................................... 110<br />
Diagnostic Tests ................................................................................................................. 112<br />
Appendix D Glossary<br />
Introduction ........................................................................................................................ 117<br />
Appendix E Cuvette Holder Accessory<br />
Introduction ........................................................................................................................ 121<br />
Installation .......................................................................................................................... 122<br />
Using the Cuvette Holder ................................................................................................... 127<br />
Maintenance ........................................................................................................................ 128<br />
Index<br />
ii Thermo Electron 01/2004
IN NORTH AMERICA<br />
Customer Support<br />
Thermo Electron San Jose products are supported by<br />
Thermo Electron Customer Service Engineers with customer support<br />
available in North America, in Europe, and in Australasia and Asia.<br />
In North America, Thermo Electron Customer Service Engineers are<br />
available from each of the Thermo Electron field offices as follows:<br />
Northeastern Region<br />
Phone [1] (732) 627-0220<br />
Fax [1] (732) 627-0260<br />
Southern Region<br />
Phone [1] (770) 516-5589<br />
Fax [1] (770) 516-6916<br />
Central Region<br />
Phone [1] (847) 310-0140<br />
Fax [1] (847) 310-0145<br />
Western Region<br />
Phone [1] (408) 965-6000<br />
Fax [1] (408) 965-6123<br />
Canada<br />
Phone [1] (905) 712-2258<br />
Fax [1] (905) 712-4203<br />
In the Americas, use the following telephone number or fax number<br />
to order parts for all instruments:<br />
Thermo Electron Customer Service Operations<br />
1400 Northpoint Parkway, Suite 10<br />
West Palm Beach, FL 33407<br />
Phone: [1] (800) 532-4752<br />
Fax: [1] (561) 688-8731<br />
Thermo Electron Technical Support is available at the following<br />
location:<br />
Thermo Electron Technical Support Operations<br />
1400 Northpoint Parkway, Suite 10<br />
West Palm Beach, FL 33407<br />
Phone: [1] (800) 685-9535<br />
Fax: [1] (561) 688-8736<br />
01/2004 Thermo Electron iii
IN EUROPE<br />
In Europe, customer support, replaceable parts, and technical support<br />
are available from each of the Thermo Electron offices as follows:<br />
Wien (Vienna), Austria<br />
Phone [43] (01) 333 50 34-0<br />
Fax [43] (01) 333 50 34-26<br />
Brussels, Belgium<br />
Phone [32] (02) 482 30 30<br />
Fax [32] (02) 482 30 31<br />
Les Ulis Cédex, France<br />
Phone [33] (01) 60 92 48 00<br />
Fax [33] (01) 60 92 49 00<br />
Dreieich, Germany<br />
Phone [49] (06103) 408 0<br />
Fax [49] (06103) 408 1222<br />
Milano, Italy<br />
Phone [39] (02) 95 059 226<br />
Fax [39] (02) 95 320 370<br />
Breda, Netherlands<br />
Phone [31] (076) 587 8722<br />
Fax [31] (076) 571 4171<br />
Madrid, Spain<br />
Phone [34] (091) 657 4930<br />
Fax [34] (091) 657 4937<br />
Barcelona, Spain<br />
Phone [34] (093) 223 0918<br />
Fax [34] (093) 223 0982<br />
Stockholm, Sweden<br />
Phone [46] (08) 556 468 00<br />
Fax [46] (08) 556 468 08<br />
Hemel Hempstead, United Kingdom<br />
Phone [44] (01442) 233 555<br />
Fax [44] (01442) 233 667<br />
For all other countries, contact your local Thermo Electron dealer.<br />
iv Thermo Electron 01/2004
IN AUSTRALASIA AND ASIA<br />
In Australasia and Asia, customer support, replaceable parts, and<br />
technical support are available from each of the Thermo Electron<br />
offices as follows:<br />
Rydalmere, N.S.W., Australia<br />
Phone [61] (02) 9898-9000<br />
Fax [61] (02) 9898-9800<br />
Yokohama, Japan<br />
Phone [81] (45) 453-9100<br />
Fax [81] (06) 453-9110<br />
Osaka, Japan<br />
Phone [81] (06) 6387-6681<br />
Fax [81] (06) 6387-6641<br />
Beijing, P.R. China<br />
Phone [86] (010) 6621 0839<br />
Fax [86] (010) 6621 0851<br />
For all other countries, contact your local Thermo Electron dealer.<br />
01/2004 Thermo Electron v
IDENTIFYING SAFETY<br />
INFORMATION<br />
Safety and EMC<br />
Information<br />
In accordance with Thermo Electron’s commitment to customer<br />
service and safety, these instruments have satisfied the requirements<br />
for the FCC and the European CE Mark including the Low<br />
Voltage Directive.<br />
Designed, manufactured and tested in an ISO9001 Registered facility,<br />
this system has been shipped to you from our manufacturing facility<br />
in a safe condition.<br />
This reference manual contains precautionary statements that can<br />
prevent personal injury, instrument damage, and loss of data if<br />
properly followed. All statements of this nature are called to your<br />
attention through the use of bold type and the following icons:<br />
CAUTION!<br />
HOT<br />
SURFACE!<br />
HIGH<br />
VOLTAGE!<br />
Every instrument has specific hazards, so be sure to read and comply<br />
with the following precautions. They will help ensure the safe, longterm<br />
use of your system.<br />
1. Before plugging in any of the instrument modules or turning on<br />
the power, always make sure that the voltage and fuses are set<br />
appropriately for your local power supply.<br />
2. Only use fuses of the type and current rating specified. Do not<br />
use repaired fuses and do not short-circuit the fuse holder.<br />
3. The supplied power cord must be inserted into a power outlet<br />
with a protective earth contact (ground). When using an<br />
extension cord, make sure that the cord also has an earth<br />
contact.<br />
4. Do not change the external or internal grounding connections.<br />
Tampering with or disconnecting these connections could<br />
endanger you and/or damage the system.<br />
CAUTION! The instrument is properly grounded in accordance with<br />
these regulations when shipped. You do not need to make any changes<br />
to the electrical connections or to the instrument's chassis to ensure<br />
safe operation.<br />
CAUTION! Do not override the lamp cover safety interlock, which<br />
turns the lamps off when the cover is removed, or personal injury<br />
could result.<br />
5. Never run the system without the top cover on. Permanent<br />
damage can occur.<br />
01/2004 Thermo Electron vii
GOOD LABORATORY<br />
PRACTICES<br />
6. Do not turn the instrument on if you suspect that it has incurred<br />
any kind of electrical damage. Instead, disconnect the power<br />
cord and contact a Thermo Electron Service Representative for<br />
a product evaluation. Do not attempt to use the instrument<br />
until it has been evaluated. (Electrical damage may have<br />
occurred if the system shows visible signs of damage, or has<br />
been transported under severe stress.)<br />
7. Damage can also result if the instrument is stored for prolonged<br />
periods under unfavorable conditions (e.g., subjected to heat,<br />
water, etc.).<br />
8. Always disconnect the power cord before attempting any type<br />
of maintenance.<br />
9. Capacitors inside the instrument may still be charged even if<br />
the instrument is turned off.<br />
10. Never try to repair or replace any component of the system that<br />
is not described in this manual without the assistance of<br />
Thermo Electron.<br />
Keep Good Records<br />
To help identify and isolate problems with either your equipment or<br />
your methodology, we recommend that you keep good records of all<br />
system conditions (e.g., %RSDs on migration times and peak areas,<br />
peak shape and resolution). At a minimum, keep an<br />
electropherogram of a typical sample and standard mixture, welldocumented<br />
with system conditions, for future reference. Careful<br />
comparison of migration times, peak shapes, peak sensitivity, and<br />
baseline noise can provide valuable clues to identifying and solving<br />
future problems.<br />
Chemical Toxicity<br />
Although the large volume of toxic and flammable solvents used and<br />
stored in laboratories can be quite dangerous, don't ignore the<br />
potential hazards posed by your samples. Take special care to read<br />
and follow all precautions that ensure proper ventilation, storage,<br />
handling, and disposal of both solvents and samples. Become<br />
familiar with the toxicity data and potential hazards associated with<br />
all chemicals by referring to the manufacturers' Material Safety Data<br />
Sheets (MSDS).<br />
Sample Preparation<br />
Always consider the solubility of your sample in the electrolyte<br />
buffer. Sample precipitation can plug the system by obstructing the<br />
flow through the capillary. This obstruction may result in irreparable<br />
damage to parts of the system. Particulate matter can be avoided by<br />
filtering the samples through 0.45- or 0.2-micron (or less) filters.<br />
viii Thermo Electron 01/2004
Solvent Requirements<br />
Many chemical manufacturers provide a line of high-purity or<br />
spectro-quality reagents that are free of chemical impurities.<br />
Routine filtration of all solvents or eluents through a 0.45- or<br />
0.2-micron (or less) fluorocarbon filter before placing them in<br />
the solvent reservoir will significantly prolong the life and<br />
effectiveness of the inlet filters, check valves and seals, injector,<br />
and column. Typically, HPLC-grade solvents do not require<br />
filtration.<br />
Choose a mobile phase that's compatible with the sample and<br />
column you've selected for your separation. Remember that<br />
some solvents are corrosive to stainless steel.<br />
Inert/biocompatible instrument versions are also available from<br />
Thermo Electron.<br />
Degas the Eluents<br />
Degas your eluents using either the vacuum degassing or the<br />
helium sparging technique. Complete information for using<br />
either of these techniques is found in separate documentation<br />
provided with degas accessories.<br />
Solvent Disposal<br />
Make sure you have a solvent waste container or other kind of<br />
drain system available at or below the benchtop level. Most<br />
solvents have special disposal requirements and should not be<br />
disposed of directly down a drain. Follow all governmental<br />
regulations when disposing of any chemical.<br />
High-pressure Systems and Leaks<br />
LC systems operate at high pressures, but since liquids aren't<br />
highly compressible, they do not store much energy. Thus, little<br />
immediate danger arises from the high pressure in an LC system.<br />
However, if a leak occurs, it should be corrected as soon as<br />
possible. Finally, we recommend that you always wear eye and<br />
skin protection when working on an LC system and that you<br />
always shut down the system and return it to atmospheric<br />
pressure before attempting any maintenance.<br />
01/2004 Thermo Electron ix
IDENTIFICATION DES<br />
INFORMATIONS SUR LA<br />
SÉCURITÉ<br />
Information sur<br />
la sécurité et la<br />
compatibilité<br />
électromagnétique (CEM)<br />
Selon notre engagement à assurer à nos clients service et sécurité, ces<br />
instruments sont déclarés conformes aux normes de la FCC et à la<br />
réglementation européenne (CE), y compris à la directive sur les<br />
basses tensions.<br />
Conçu, fabriqué et testé dans une installation homologuée ISO9001,<br />
cet instrument a été livré à partir de notre usine de fabrication dans le<br />
respect des règles de sécurité.<br />
MISE EN GARDE ! Cet instrument doit être utilisé selon les<br />
instructions figurant dans ce manuel. Le non respect des consignes<br />
d’utilisation de cet instrument décrites dans le présent manuel risque<br />
d’endommager l’instrument et/ou d’infliger des blessures à<br />
l’opérateur.<br />
Ce manuel de référence contient des précautions d’usage afin de<br />
prévenir tout dommage corporel ou matériel ainsi que toute perte de<br />
données lorsque l’opérateur se conforme aux instructions indiquées.<br />
Ces instructions sont accompagnées des icônes suivantes et sont<br />
affichées en caractères gras pour attirer l’attention de l’opérateur :<br />
MISE EN<br />
GARDE !<br />
SURFACE<br />
BRÛLANTE !<br />
HAUTE<br />
TENSION !<br />
Chaque instrument présentant des dangers spécifiques, il incombe à<br />
l’opérateur de lire les précautions suivantes et de s’y conformer, afin<br />
de maintenir la durée de vie et la sécurité du système.<br />
1. Avant de brancher un module d’instruments ou de le mettre<br />
sous tension, toujours s’assurer que la tension et les fusibles<br />
sont réglés de façon à correspondre à la tension locale du<br />
secteur.<br />
2. N’utiliser que des fusibles du type et du courant nominal<br />
spécifiés. Ne pas utiliser de fusibles réparés et ne pas courtcircuiter<br />
le porte-fusible.<br />
01/2004 Thermo Electron xi
BONNES PRATIQUES DE<br />
LABORATOIRE<br />
3. Le cordon d’alimentation accompagnant l’instrument doit être<br />
branché à une prise de courant avec mise à la terre. En cas<br />
d’utilisation d’une rallonge électrique, s’assurer que celle-ci<br />
comporte également une mise à la terre.<br />
4. Ne pas modifier les connexions de mise à la terre internes ou<br />
externes. La modification ou le débranchement de ces<br />
connexions représente un danger pour l’opérateur et/ou risque<br />
d’endommager le système.<br />
MISE EN GARDE ! Cet instrument est mis à la terre conformément<br />
aux règlements applicables lors de son expédition. Ne pas modifier<br />
les branchements électriques ou le châssis de l’instrument afin<br />
d’assurer un fonctionnement en toute sécurité.<br />
MISE EN GARDE ! Ne pas abroger le contact de sécurité de<br />
couverture de lampe (qui éteignez la lampe quand le couverture est<br />
enlevé) ou les blessures pourraient résulter.<br />
5. Ne jamais faire fonctionner le système sans son boîtier.<br />
Des dommages permanents pourraient en résulter.<br />
6. Ne pas mettre l’instrument sous tension si celui-ci a subi des<br />
dommages électriques. Débrancher le cordon d’alimentation de<br />
l’appareil et consulter un représentant du service technique<br />
pour procéder à un examen du produit. Ne pas essayer<br />
d’utiliser l’instrument avant qu’il n’ait été examiné. (Des<br />
dommages électriques peuvent s’être produits si le système<br />
montre des signes visibles d’endommagement ou si les<br />
conditions de transport ont été extrêmement difficiles.)<br />
7. L’instrument peut également être endommagé s’il est entreposé<br />
pendant une période de temps prolongée, dans de mauvaises<br />
conditions (par exemple, s’il est exposé à la chaleur, à<br />
l’humidité, etc.).<br />
8. Toujours débrancher le cordon d’alimentation avant d’effectuer<br />
n’importe quel type d’entretien.<br />
9. Les condensateurs présents à l’intérieur de l’instrument<br />
peuvent toujours être chargés, même si l’instrument est hors<br />
tension.<br />
10. Ne jamais tenter de réparer ou de remplacer un composant du<br />
système non décrit dans ce manuel sans obtenir de l’aide<br />
auprès d’un représentant du service technique.<br />
Bonne tenue des dossiers<br />
Pour permettre d’identifier et d’isoler les problèmes pouvant survenir<br />
avec l’équipement ou la méthodologie utilisés, il est recommandé de<br />
tenir correctement des dossiers de toutes les conditions du système (p.<br />
ex., % CV sur les temps de rétention et les zones de pics, la forme et<br />
la résolution des pics). Il est recommandé tout au moins de conserver<br />
xii Thermo Electron 01/2004
pour référence future un chromatogramme d’un échantillon type et<br />
d’un mélange standard, bien documenté et accompagné des<br />
conditions du système. Une comparaison précise des temps de<br />
rétention, des formes et de la sensibilité des pics ainsi que des bruits<br />
de référence peuvent fournir des indices précieux pour l’identification<br />
et la résolution de problèmes futurs.<br />
Toxicité chimique<br />
Bien que l’utilisation et l’entreposage dans les laboratoires de grandes<br />
quantités de solvants inflammables et toxiques puissent représenter un<br />
danger, ne pas négliger les dangers potentiels posés par les<br />
échantillons. Veiller particulièrement à lire et à suivre toutes les<br />
précautions indiquées pour assurer la ventilation, le stockage, la<br />
manutention et l’élimination des solvants et des échantillons. Se<br />
familiariser avec les données sur la toxicité et les dangers potentiels<br />
associés à tous les produits chimiques en consultant les fiches<br />
techniques sur la sécurité des substances (FTSS) du fabricant.<br />
Préparation des échantillons<br />
Toujours considérer la solubilité de l’échantillon dans la phase<br />
mobile. La précipitation des échantillons peut boucher la colonne, les<br />
tubes et/ou la cellule de dilution, et en limiter le débit. Cette<br />
obstruction peut endommager le système de façon irréparable.<br />
L’accumulation de particules peut être évitée par la filtration des<br />
échantillons à travers des filtres de 0,45 ou 0,2 µm (ou moins).<br />
Caractéristiques des solvants<br />
Un grand nombre de fabricants de produits chimiques fournissent des<br />
réactifs de pureté élevée ou de qualité spectrographique dépourvue de<br />
toute impureté chimique. La filtration systématique de tous les<br />
solvants ou éluants à travers un filtre fluorocarboné de 0,45 ou 0,2 µm<br />
(ou moins) avant de les placer dans le réservoir de solvants prolonge<br />
de façon significative la durée de vie et l’efficacité des filtres<br />
d’entrée, des clapets et des joints d’étanchéité, de l’injecteur et de la<br />
colonne. De façon générale, les solvants pour chromatographie<br />
liquide sous haute pression ne nécessitent pas de filtration.<br />
Choisir une phase mobile qui est compatible avec l’échantillon et la<br />
colonne sélectionnés pour la séparation. Noter que certains solvants<br />
sont corrosifs pour l’acier inoxydable. Des versions inertes et<br />
biocompatibles des instruments sont disponibles auprès de<br />
Thermo Electron.<br />
Dégazage des éluants<br />
Effectuer le dégazage des éluants selon la méthode de dégazage par le<br />
vide ou à l’hélium. Une description complète de ces méthodes est<br />
disponible dans la documentation fournie séparément avec les<br />
accessoires de dégazage.<br />
01/2004 Thermo Electron xiii
Élimination des solvants<br />
S’assurer qu’il existe un conteneur pour solvants à éliminer ou tout<br />
autre système de vidange au niveau de la table de travail ou audessous<br />
de celle-ci. La plupart des solvants doivent être éliminés dans<br />
des conditions particulières et ne doivent pas être évacués directement<br />
par les canalisations. Respecter la réglementation en vigueur<br />
concernant l’évacuation des produits chimiques.<br />
Systèmes à haute pression et fuites<br />
Les systèmes de chromatographie liquide (CL) fonctionnent à des<br />
pressions élevées. Les liquides n’accumulent pas de grandes quantités<br />
d’énergie car ils ne sont pas hautement compressibles. Par<br />
conséquent, le risque d’un danger immédiat causé par les pressions<br />
élevées dans un système CL est faible. En revanche, si une fuite<br />
survient, il est nécessaire de la réparer le plus rapidement possible.<br />
Enfin, il est recommandé à l’opérateur de se protéger en permanence<br />
les yeux et la peau lorsqu’il travaille sur un système CL. De plus, il<br />
doit toujours mettre le système hors tension et le ramener à la<br />
pression atmosphérique avant de procéder à tout entretien.<br />
xiv Thermo Electron 01/2004
ERKENNEN VON<br />
SICHERHEITS-<br />
INFORMATIONEN<br />
Informationen zu<br />
Sicherheit und<br />
Funkentstörung<br />
Wir sind dem Dienst am Kunden und der Sicherheit des Kunden<br />
verpflichtet. Diese Geräte entsprechen den Anforderungen<br />
für die FCC-Zulassung und für das CE-Zeichen sowie den<br />
Bestimmungen der Richtlinie für Niederspannungsgeräte.<br />
Dieses Gerät wurde in einer nach ISO 9001 zertifizierten<br />
Fertigungsstätte entwickelt, hergestellt und getestet und hat<br />
unser Werk in sicherem Zustand verlassen.<br />
VORSICHT! Dieses Gerät darf nur nach den Vorschriften<br />
dieser Bedienungsanleitung benutzt werden. Wenn dieses<br />
Gerät auf andere Weise als hier beschrieben benutzt wird,<br />
kann dies zu Schäden am Gerät oder zur Verletzung des<br />
Bedieners führen.<br />
Dieses Handbuch enthält Warnhinweise, deren genaue Befolgung<br />
Personenschäden, Schäden am Gerät oder Datenverluste verhindern<br />
kann. Auf alle derartigen Warnhinweise wird durch Fettschrift und<br />
durch<br />
Verwendung der nachfolgenden Symbole gesondert<br />
aufmerksam gemacht:<br />
VORSICHT!<br />
OBERFLÄCHE<br />
HEISS!<br />
HOCHSPAN-<br />
NUNG<br />
Jedes Gerät kann unter bestimmten Umständen gefährlich<br />
sein. Lesen Sie daher in jedem Fall die nachstehenden<br />
Sicherheitshinweise, und ergreifen Sie die entsprechenden<br />
Maßnahmen. Auf dieses Weise sorgen Sie für einen sicheren Betrieb<br />
und eine lange Lebensdauer des Geräts.<br />
1. Bevor Sie eines der Gerätemodule einstecken oder das<br />
Gerät einschalten, überprüfen Sie in jedem Fall, ob die<br />
Nennspannung und die Sicherungen der Netzspannung<br />
der örtlichen Stromversorgung entsprechen.<br />
2. Verwenden Sie nur Sicherungen des angegebenen Typs<br />
und der angegebenen Amperezahl. Verwenden Sie keine<br />
reparierten Sicherungen, und überbrücken Sie die<br />
Sicherung nicht.<br />
01/2004 Thermo Electron xv
3. Das mitgelieferte Netzkabel muß in eine Steckdose<br />
mit Schutzleiter eingesteckt werden. Wird ein<br />
Verlängerungskabel verwendet, muß auch hier<br />
der Schutzleiter durchgeführt sein.<br />
4. Verändern Sie nichts an den externen oder internen<br />
Schutz- bzw. Erdungskontakten. Wenn Sie sich an<br />
diesen zu schaffen machen oder sie unterbrechen,<br />
können Sie sich selbst und andere gefährden, oder<br />
das Gerät könnte beschädigt werden.<br />
VORSICHT! Das Gerät ist bei der Auslieferung vorschriftsmäßig<br />
geerdet. Es brauchen keine Veränderungen an der elektrischen<br />
Verkabelung oder am Gerätechassis vorgenommen werden,<br />
um einen sicheren Betrieb zu gewährleisten.<br />
VORSICHT! Setzen Sie niemals den Sicherheitsschalter der<br />
Lampenabdeckung ausser Kraft! Der Sicherheitsschalter schaltet die<br />
Lampen aus, wenn die Abdeckung entfernt wird. Die Überbrückung<br />
des Sicherheitsschalters kann zu Gesundheitsschäden oder<br />
Verletzungen führen.<br />
5. Nehmen Sie das Gerät nie mit geöffnetem Gehäuse in Betrieb,<br />
da dies zu irreparablen Schäden führen kann.<br />
6. Schalten Sie das Gerät nicht ein, wenn Sie den<br />
Verdacht haben, daß an der Elektrik möglicherweise Schäden<br />
eingetreten sind. Ziehen Sie in diesem Fall den Netzstecker<br />
heraus, und lassen Sie das Gerät von einem<br />
Kundendiensttechniker untersuchen. Versuchen Sie bis<br />
zu dieser Untersuchung keinesfalls, das Gerät in Betrieb<br />
zu nehmen. (Eine Beschädigung der Elektrik kann z.B.<br />
eingetreten sein, wenn das Gerät äußere Schäden aufweist oder<br />
unter problematischen Umständen transportiert wurde.)<br />
7. Schäden können auch eintreten, wenn das Gerät längere Zeit<br />
unter ungünstigen Umständen gelagert wurde (z.B. unter der<br />
Einwirkung von Hitze oder Wasser).<br />
8. Ziehen Sie vor allen Wartungsmaßnahmen immer zuerst<br />
den Netzstecker aus der Steckdose.<br />
9. Auch wenn das Gerät abgeschaltet ist, können die im Inneren<br />
befindlichen Kondensatoren nach wie vor unter Spannung<br />
stehen.<br />
10. Versuchen Sie niemals, Gerätekomponenten zu reparieren oder<br />
auszutauschen, die nicht in diesem Handbuch beschrieben sind,<br />
ohne einen Kundendiensttechniker<br />
zu Rate zu ziehen.<br />
xvi Thermo Electron 01/2004
GLP-VORSCHRIFTEN<br />
(GOOD LABORATORY<br />
PRACTICES)<br />
Ordnungsgemäße Aufzeichnungen<br />
Damit Probleme mit Geräten oder Methoden erkannt<br />
und eingegrenzt werden können, empfehlen wir Ihnen,<br />
ordnungsgemäße Aufzeichnungen sämtlicher Gerätezustände (z.B. %<br />
RSDs zu Retentionszeiten, Kurvenflächen, Kurvenformen und<br />
Auflösung). Archivieren Sie als Minimum ein Chromatogramm einer<br />
typischen Probe und einer Standardmixtur mit umfassender<br />
Dokumentation der Systembedingungen zum späteren Vergleich. Ein<br />
sorgfältiger Vergleich von Retentionszeiten, Kurvenformen,<br />
Empfindlichkeitswerten und Hintergrundrauschen liefert wertvolle<br />
Hinweise für den Fall, daß zu einem späteren Zeitpunkt Probleme<br />
auftreten und eingegrenzt und behoben werden müssen.<br />
Chemische Toxizität<br />
Die großen Mengen an toxischen oder brennbaren Lösungsmitteln,<br />
die im Labor verwendet und aufbewahrt werden, können ein<br />
erhebliches Gefahrenpotential darstellen, doch darf man hierüber<br />
nicht die mögliche Gefährdung durch<br />
die Proben selbst vergessen. Achten Sie insbesondere darauf,<br />
sämtliche Warnhinweise hinsichtlich ausreichender Belüftung,<br />
Lagerung, Handhabung und Entsorgung von Lösungsmitteln ebenso<br />
wie von Proben sorgfältig zu lesen und zu befolgen. Machen Sie sich<br />
mit den Toxizitätsdaten und den möglichen Gefahren sämtlicher<br />
verwendeter Chemikalien anhand der betreffenden<br />
Sicherheitsdatenblätter vertraut, die von den Produktherstellern zur<br />
Verfügung gestellt werden.<br />
Probenvorbereitung<br />
Überprüfen Sie stets die Löslichkeit der Probe in der mobilen Phase.<br />
Durch das Ausfällen von Feststoffen können die Säule, die Leitungen<br />
oder die Durchflußzelle verstopfen und damit den Durchfluß<br />
hemmen. Durch eine solche Verstopfung können irreparable Schäden<br />
am System entstehen. Die Ablagerung von Partikeln läßt sich durch<br />
Filtrieren der Proben durch ein Filter mit einer Porengröße von 0,45<br />
oder 0,2 µm (oder weniger) vermeiden.<br />
Anforderungen an das Lösungsmittel<br />
Viele chemische Hersteller bieten eine Produktserie hochreiner<br />
Reagenzien in spektroskopisch reiner Qualität an, die frei<br />
von chemischen Unreinheiten sind. Die routinemäßige Filtrierung<br />
aller Lösungs- und Extraktionsmittel durch ein<br />
Fluorkohlenwasserstoff-Filter mit einer Porengröße von<br />
0,45 oder 0,2 µm (oder weniger) vor dem Einfüllen in den<br />
Lösungsmittelbehälter verlängert die Lebensdauer der Einlaßfilter,<br />
der Ventile und Dichtungen, des Injektors und<br />
der Säule beträchtlich. Spezielle HPLC-Lösungsmittel<br />
brauchen normalerweise nicht filtriert zu werden.<br />
01/2004 Thermo Electron xvii
Wählen Sie eine mobile Phase, die zur Probe und zur für die<br />
Separation verwendete Säule kompatibel ist. Dabei ist darauf zu<br />
achten, daß Edelstahl durch bestimmte Lösungsmittel korrodiert wird.<br />
Reaktionsträge, biokompatible Geräteausführungen werden ebenfalls<br />
von Thermo Separation Instruments angeboten.<br />
Entgasen des Lösungsmittels<br />
Lösungs- und Extraktionsmittel sollten entgast werden, und zwar<br />
entweder durch Vakuum oder Heliumdurchperlung. Eine umfassende<br />
Beschreibung dieser Techniken finden Sie in dem separaten<br />
Handbuch, das dem Entgasungszubehör beiliegt.<br />
Entsorgung von Lösungsmitteln<br />
Sorgen Sie dafür, daß ein Auffangbehälter für Lösungsmittel oder<br />
eine andere Auffangvorrichtung in Höhe des Arbeitstisches oder<br />
darunter zur Verfügung steht. Für die meisten Lösungsmittel gelten<br />
besondere Entsorgungsvorschriften; eine Entsorgung über die<br />
Abwasserleitung ist hier nicht zulässig.<br />
Bei der Entsorgung von Chemikalien gleich welcher Art sind<br />
die einschlägigen Vorschriften streng zu beachten.<br />
Hochdrucksysteme und Undichtigkeiten<br />
Flüssigchromatographen arbeiten unter hohem Druck. Da<br />
Flüssigkeiten kaum komprimierbar sind, können sie nicht viel Energie<br />
speichern. Dementsprechend stellt der hohe Druck in einem<br />
Flüssigchromatographen auch kaum eine unmittelbare Gefahr dar.<br />
Jedoch sollten auftretende Undichtigkeiten umgehend beseitigt<br />
werden. Schließlich ist noch zu empfehlen, bei der Arbeit mit einem<br />
Flüssigchromatographen stets Augen und Haut zu schützen und vor<br />
allen Wartungsarbeiten darauf zu achten, daß das Gerät abgeschaltet<br />
und druckfrei gemacht wurde.<br />
xviii Thermo Electron 01/2004
UNPACKING<br />
POSITIONING DETECTOR<br />
POWER CHECKOUT<br />
Startup Checklist<br />
Use this checklist to ensure that you have completed all the steps<br />
necessary for the proper installation of your Finnigan<br />
SpectraSYSTEM UV/Vis detector. Complete installation<br />
information can be found in Appendix A.<br />
❒ Unpack and inspect your instrument. Check for damage.<br />
❒ Check your accessory kit and manual. Are they:<br />
❍ present?<br />
❍ complete?<br />
❒ Read the Safety Information Card.<br />
❒ Place on benchtop as close as possible to the column and at<br />
least 5 inches (13 cm) from the wall.<br />
❒ Set voltage for local requirements.<br />
❒ Check that the correct fuses are installed.<br />
REAR PANEL CONNECTIONS<br />
❒ Insert the 8- and 12-pin green connectors into their<br />
corresponding sockets.<br />
❒ Connect the Analog Output and the corresponding ground<br />
terminals to your data system/recorder.<br />
❒ Connect the desired remote communications terminals to<br />
external devices:<br />
❍ STOP (Input)<br />
❍ RUN (Input)<br />
❍ ZERO (Input)<br />
❍ READY (Output)<br />
❒ Connect the power cord.<br />
01/2004 Thermo Electron xix
FLOWCELL CONNECTIONS<br />
❒ Remove the detector's front panel.<br />
❒ Remove the flowcell assembly from the detector.<br />
❒ Connect the flowcell inlet directly to your LC column<br />
outlet.<br />
❒ Connect the flowcell outlet to waste tubing and a waste<br />
container.<br />
❒ Replace the detector's front panel.<br />
INSTRUMENT POWER-UP<br />
REGISTRATION CARD<br />
❒ Install the power cord and turn on the instrument.<br />
❒ Check that self-tests are running and that no error messages<br />
appear.<br />
❒ Check that the Status Screen appears on display.<br />
❒ Complete and return the registration card.<br />
xx Thermo Electron 01/2004
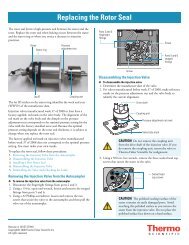
Flowcells<br />
List of Spare Parts,<br />
Consumables, and Kits<br />
Shown below is a list of spare parts and consumables<br />
available from Thermo Electron for use with your<br />
Finnigan SpectraSYSTEM UV/Vis detector. Contact your local<br />
Thermo Electron representative for current prices.<br />
9550-0100 Analytical LC (6 mm)<br />
9550-0234 Analytical LC (10 mm)<br />
9550-0197 Biocompatible LC (6 mm)<br />
9550-0053 Microbore (3 mm)<br />
9550-0265 Microbore (6 mm)<br />
9550-0101 Semi-preparative, Open Column (3 mm)<br />
9550-0263 Cuvette Cell Holder<br />
Options And Accessories<br />
2103-9119 External Events Connector<br />
A4095-010 Remote Interface Cable<br />
9551-0022 Tungsten Lamp, prealigned<br />
9551-0023 Deuterium Lamp, prealigned<br />
9051-0143 Regulated Backpressure Accessory<br />
Manuals<br />
A0099-540 UV/Vis Detectors Reference Manual (English)<br />
Maintenance Parts<br />
A4051-010 Standard Fittings Kit<br />
(Kit includes stainless steel fittings and tubing used in a Finnigan<br />
SpectraSYSTEM LC system.)<br />
A4061-010 Inert/Biocompatible Fittings Kit<br />
(Kit includes PEEK fittings and tubing used in an<br />
inert/biocompatible Finnigan SpectraSYSTEM LC system.)<br />
Upgrade Kits<br />
Upgrade kits are available for the Finnigan SpectraSYSTEM UV1000 detector. Contact your local<br />
Thermo Electron Representative for details.<br />
01/2004 Thermo Electron xxi
1 Getting Started<br />
Introduction<br />
This Chapter provides you with the three basic rules you'll need for<br />
using your Thermo Electron, Finnigan SpectraSYSTEM UV/Vis<br />
detector. It also introduces you to the instrument's command center<br />
and describes the conventions we'll use in this manual.<br />
Before you start this chapter, be sure to read the Safety Information<br />
section beginning on page v of this manual and to install your<br />
detector as described in Appendix A.<br />
Throughout our explanations, we encourage you to explore the<br />
general architecture of the instrument's menus and screens. Use the<br />
Menu Tree in Appendix B as your guide if you wish. Learning Your<br />
Way Around<br />
AS EASY AS 1-2-3! It's easy to learn your way around a SpectraSYSTEM detector. Just<br />
remember these three rules:<br />
1. The arrow keys ([∧], [∨], []) move the cursor in the<br />
direction printed on the key.<br />
HINT: Press [MENU] to jump quickly to the top of the menu<br />
structure.<br />
2. The shape of the cursor determines how you make a selection:<br />
• If a triangular Cursor appears, press [ENTER].<br />
• If a blinking square cursor ( ) appears, press the [+] or [-]<br />
keys to change values. Depending on the field, you will<br />
scroll up or down through preset choices, or change<br />
alphanumeric entries one letter or digit at a time.<br />
3. There are four ways to accept (and automatically save) an<br />
entry. Just move the cursor out of the field by any of the<br />
following methods:<br />
• Pressing [ENTER]<br />
• Using the arrow keys<br />
• Pressing [MENU]<br />
• Pressing [STATUS]<br />
NOTE: You won't be able to leave a menu if errors are present or if<br />
you haven't filled in all the necessary entries.<br />
01/2004 Thermo Electron 1
VISUAL CLUES The following conventions are used on the detector's display:<br />
Instrument Control<br />
1. Top-level menu choices are displayed in all-capital letters.<br />
2. A field's square cursor changes to an underscore cursor when<br />
you're scrolling through preset choices or entering numerical<br />
values and characters.<br />
3. A solid down-arrow (�) on the right side of some displays<br />
indicates that the current menu continues on additional screens.<br />
To access additional menu lines, press the down-arrow<br />
key, [∨].<br />
4. The last line of a longer menu is frequently a blank display line<br />
(without a solid down-arrow).<br />
Take a look at the keypad and two-line display located on the front<br />
panel (Fig. 1.1). This is the command center from which you'll access<br />
menus and control the instrument's operations. A brief explanation of<br />
the keys and the main menus and screens follows.<br />
RUN<br />
STOP<br />
ZERO<br />
STATUS MENU<br />
ENTER<br />
SpectraSYSTEMUV2000<br />
Figure 1.1 The detector's command center<br />
2 Thermo Electron 01/2004<br />
DET\Z008\FM
THE KEYPAD The keypad of each SpectraSYSTEM instrument consists of twelve<br />
keys. Four keys directly control the instrument's operation: [RUN],<br />
[STOP], [STATUS], and, on the detector, a blank key called [ZERO].<br />
The remaining keys either access commands ([MENU] and<br />
[ENTER]), or are used to set parameters and move around the display<br />
([∧], [∨], [], [+], [-]). The function of each is explained below.<br />
[RUN]<br />
Pressing [RUN] starts a run. The detector must be in the READY<br />
state (or QREADY if a queue is loaded), indicating that the detector is<br />
stabilized and waiting to begin a run.<br />
[STOP]<br />
Pressing [STOP] halts a run, stops the internal clock, and returns the<br />
detector to a READY state. If a wavelength program is operating,<br />
pressing [STOP] halts the program and returns the detector to its<br />
initial conditions.<br />
[STATUS]<br />
Pressing [STATUS] displays the Status Screen (Fig. 1.1). From the<br />
Status Screen you can monitor the run in progress. You can also<br />
access the Status Menu. See page 5 for more information.<br />
[ZERO]<br />
The unlabeled key is the only variable key in the whole<br />
SpectraSYSTEM family. On the detector, the blank key is the<br />
[ZERO] key. The key's name appears on the nameplate below the<br />
key.<br />
Pressing [ZERO] resets the detector output to zero volts, plus or<br />
minus any offset.<br />
[MENU]<br />
Pressing [MENU] displays the Main Menu (Figs. 1.2 and 1.1). See<br />
page 4 for more information.<br />
[ENTER]<br />
Pressing [ENTER] accepts a selected choice or menu entry. The<br />
[ENTER] key also advances the cursor to a new field, either on the<br />
same line of the display or in the line below.<br />
01/2004 Thermo Electron 3
MENUS, SCREENS,<br />
AND MESSAGES<br />
[∧], [∨], []<br />
Pressing any arrow key (up, down, left, or right) moves the cursor in<br />
the direction indicated on the key. The up- and down-arrow keys also<br />
move the cursor between menus and displays.<br />
[+] and [-]<br />
Pressing the [+] and [-] keys scrolls you through a field's available<br />
choices or changes the value of alphanumeric entries. Holding down<br />
either key will continuously scroll the list of choices forward or<br />
backward until you release the key.<br />
In fields that require numerical entries, the value of each digit is<br />
increased or decreased by one unit each time you press the [+] or [-]<br />
key. In fields that accept either numeric or character entries, such as<br />
the File Name field, the [+] and [-] keys scroll through the alphabet<br />
from A to Z, then through the numbers 0 to 9, and finally to a slash,<br />
hyphen, and blank space.<br />
In other fields, the [+] key advances you through a preset list of<br />
choices while the [-] key takes you back through the list.<br />
Your detector's display can show you three kinds of information:<br />
menus, screens, and messages. Menus require you to make selections<br />
or enter specific values. Screens display information that cannot be<br />
edited. Messages confirm actions and point out errors. The Menu<br />
Tree in Appendix B outlines the structure and content of the detectors'<br />
menus and screens.<br />
Main Menu<br />
The Main Menu is the top level of the menu structure. In the<br />
UV1000, (Fig 1.2) the Main Menu gives you access to four other<br />
menus: FILE, COMMANDS, OPTIONS, and TESTS. In the<br />
UV2000, there is and additional menu choice, QUEUE (Fig. 1.3). To<br />
see the Main Menu, press the [MENU] key at any time.<br />
> FILES ❑ COMMANDS<br />
❑ OPTIONS ❑ TESTS<br />
Figure 1.2 The UV1000's Main Menu<br />
> FILES ❑ QUEUE ❑ TESTS<br />
❑ COMMANDS ❑ OPTIONS<br />
Figure 1.3 The UV2000's Main Menu<br />
4 Thermo Electron 01/2004
From the UV1000’s and the UV2000's File(s) Menu you can edit,<br />
load, delete or copy files. The UV2000 also lets you copy files. The<br />
Commands Menu lets you insert an event mark onto your<br />
chromatogram, short outputs, or shut down the detector. The Tests<br />
Menu lets you run built-in instrument tests and diagnostics. In the<br />
Options Menu, you can set up or change your instrument's<br />
configuration. From the Queue Menu you can edit or change the<br />
order of files in the sample queue. Refer to Chapters 3, 4, 5, and<br />
Appendix B for more information on any of the instrument's menus.<br />
Status Screen<br />
The Status Screen (Fig. 1.4) displays the detector status, wavelength<br />
setting(s), and the absorbance reading. It automatically appears<br />
whenever the instrument is powered on or the [STATUS] key is<br />
pressed. No entries are made on the Status Screen.<br />
Status λ AU<br />
READY 250 0.00001 �<br />
Figure 1.4 The Status Screen<br />
Status Menu<br />
Just below the Status Screen is the Status Menu. To access the Status<br />
Menu, press the down-arrow key from the Status Screen. The Status<br />
Menu lets you review and edit run parameters during a run.<br />
Chapter 3 discusses the Status Menu in more detail.<br />
MESSAGES There are three different kinds of messages that can appear on your<br />
detector's display: user messages, confirmation messages, and error<br />
messages.<br />
User Messages<br />
User messages, indicated on the display by double asterisks, tell you<br />
about an existing instrument condition or ask for further actions.<br />
Some of these will only appear on the display for three seconds. An<br />
example of a message requiring further action is shown in Figure 1.5.<br />
** Protected File **<br />
No Editing Allowed<br />
Figure 1.5 An example of a user message<br />
01/2004 Thermo Electron 5
Manual Conventions<br />
Confirmation Messages<br />
Confirmation messages (Fig. 1.6), also indicated on the display by<br />
asterisks, appear for one second after an operation has been carried<br />
out successfully.<br />
** File Loaded **<br />
Figure 1.6 An example of a confirmation message<br />
Error Messages<br />
Error messages (Fig. 1.7), indicated on the display with capital letters<br />
and exclamation points, are shown whenever an undesirable condition<br />
exists that prevents the instrument from carrying out an operation.<br />
Error messages remain on the display until you press a key.<br />
!! RAM ERROR !!<br />
Figure 1.7 An example of an error message<br />
This manual uses several conventions. Among them are menu<br />
displays, text conventions (brackets, slashes, etc.), standard words,<br />
and several different icons.<br />
DISPLAYS Figure 1.8 shows how we depict the two-line display. Note that, in<br />
menu illustrations, the triangular cursor location is indicated by a<br />
caret (>).<br />
> FILE ❑ COMMANDS<br />
❑ OPTIONS ❑ TESTS<br />
Figure 1.8 A two-line menu display<br />
Frequently the two lines shown on the display are only part of a<br />
longer menu. In this manual, menus having more than two lines are<br />
represented as in Figure 1.9.<br />
6 Thermo Electron 01/2004
Zero on λ Change Yes<br />
Cursor Speed Medium<br />
---------------------------------------------------------<br />
Status Lock Off<br />
READY Output Active Hi<br />
Figure 1.9 A menu longer than two lines<br />
TEXT Three typographic conventions are used to differentiate between keys,<br />
menus, and fields.<br />
Brackets<br />
Brackets, [ ], indicate instrument keys. For example: Press [MENU].<br />
Slashes<br />
Slashes, / /, are used around menu choices. For example: From the<br />
Main Menu, select /FILES/.<br />
Capitalization<br />
Capitalization is used to make field and menu names appear just as<br />
they do on the display. Generally, the first letters of field names are<br />
capitalized. For example: Select /FILES/, /Copy/, Copy File #.<br />
STANDARD WORDS We have also standardized the meanings of two words: "select" and<br />
"enter."<br />
select<br />
The word "select" is used when you need to choose from among<br />
available options. For example, to "select" a particular menu choice,<br />
you would move the cursor to the appropriate choice and press<br />
[ENTER]. To "select" a field entry, move the cursor to the<br />
appropriate field and use the [+] and [-] keys to scroll to the desired<br />
preset value.<br />
enter<br />
The word "enter" is used when you need to specify individual<br />
alphanumeric digits. To "enter" a particular value, move the cursor to<br />
the desired field and use the [+] and [-] keys to increment or<br />
decrement each digit in the field until the desired value or letter<br />
appears.<br />
01/2004 Thermo Electron 7
ICONS This manual uses the following icons to alert you to various<br />
situations. Each is called out by an icon in the left margin.<br />
What's Next?<br />
Caution!<br />
A caution alerts you to situations that could result in personal injury.<br />
It also tells you how to avoid them.<br />
High Voltage!<br />
This icon alerts you to the presence of high voltage and to the<br />
potential injury that could occur from electrical shock were you to<br />
come in contact with a specific instrument area or component. It also<br />
tells you how to avoid contact with the high-voltage areas in your<br />
instrument.<br />
Hot Surface!<br />
This icon alerts you to potential injury that could occur from coming<br />
in contact with a heated surface or area on or in an instrument. It also<br />
tells you how to avoid contact with the heated surfaces in your<br />
instrument.<br />
Note<br />
Notes alert you to the correct operating or maintenance procedures<br />
needed to prevent equipment or data damage. They also alert you to<br />
important exceptions, side effects, or unexpected occurrences that<br />
may result from certain action(s).<br />
Hint<br />
Hints call out general rules or shortcuts. They specify ways to obtain<br />
the best performance and results from your instrument.<br />
Now you're ready to try the practice example in Chapter 2: A Quick<br />
Example.<br />
8 Thermo Electron 01/2004
2 A Quick Example<br />
Introduction<br />
In Chapter 1, you read about the three easy rules for using your<br />
detector's command center and some of its menus and screens. In this<br />
chapter, you will find an example procedure that shows you how the<br />
rules and keys actually work as you move through the various menus.<br />
Instructions begin on page 10 for the UV1000 and on page 14 for<br />
the UV2000.<br />
This quick example uses only a fraction of the features available on<br />
your detector and is included only as a first step in becoming familiar<br />
with your new instrument.<br />
After experimenting with this example, you'll want to turn to<br />
Chapters 3 and 4, which cover the detector's basic and more advanced<br />
operations. It is in those chapters that you'll learn about the full<br />
capabilities of your detector. First though, to give you a general<br />
understanding of the detectors' capabilities and design, we will briefly<br />
describe the features and benefits of the UV1000 and UV2000 here.<br />
THE UV1000 The UV1000 detector is a time-programmable, variable-wavelength<br />
UV/Vis (ultraviolet/visible) absorbance detector. It operates in<br />
single-wavelength mode in either the UV range (using a deuterium<br />
lamp), or in the visible range (with an optional tungsten lamp). The<br />
UV1000’s optical system has a novel, high light-throughput design<br />
that provides high sensitivity detection along with maximal<br />
application versatility. The UV1000 detector can be upgraded to a<br />
UV2000.<br />
THE UV2000 The UV2000 detector is a full-featured, time-programmable, dualwavelength<br />
UV/Vis absorbance detector. It operates in both single-<br />
and dual-wavelength modes in the UV and visible ranges. The<br />
UV2000 offers the same optical system design as the UV1000. In<br />
addition to the features of the UV1000, the UV2000 also offers<br />
spectral scanning, a Develop File (for method development),<br />
multiple file storage, a Queue feature (that allows you to link files),<br />
and more.<br />
BEFORE<br />
YOU BEGIN<br />
Once the detector is installed in your chromatographic system<br />
according to the procedures described in Appendix A and you have<br />
completed the Startup Checklist, you are ready to begin your quick<br />
example.<br />
01/2004 Thermo Electron 9
An Example<br />
UV1000<br />
In this example, we will show you how to prepare an edit file and<br />
how to load the edit file into the detector's run file. After a practice<br />
run, we will add a stop-time.<br />
HINT: You may wish to keep the Menu Tree in Appendix B on hand as you<br />
work through this example. If you lose your place at any time, you can:<br />
1. Press the [∧] key to move back to a previous screen.<br />
2. Or, press [STATUS] to return to the Status Screen and retrace<br />
your steps.<br />
STARTUP Set the power switch located on the detector's rear panel to On. After<br />
a series of power-up tests, the Status Screen (Fig. 2.1) appears on the<br />
display. (We will discuss the Status Screen after you have set up your<br />
operating parameters.)<br />
SETTING<br />
PARAMETERS<br />
Status λ AU<br />
READY 250 0.00001 �<br />
Figure 2.1 The UV1000's Status Screen<br />
To set your parameters, you need to prepare an edit file. The<br />
following steps will show you how to access the Edit Menu and<br />
prepare the file:<br />
1. Press the [MENU] key. The detector's Main Menu appears on<br />
the screen (Fig. 2.2).<br />
> FILE ❑ COMMANDS<br />
❑ OPTIONS ❑ TESTS<br />
Figure 2.2 The UV1000's Main Menu<br />
2. Now select /FILES/ to display the Files Menu (Fig. 2.3).<br />
> Edit ❑ Load<br />
❑ Delete<br />
Figure 2.3 The UV1000's Files Menu<br />
10 Thermo Electron 01/2004
3. Select /Edit/ to display the Edit Menu (Fig. 2.4).<br />
> Wavelength Program<br />
❑ Options<br />
Figure 2.4 The UV1000's Edit Menu<br />
Wavelength You use the Wavelength program to set the monitoring wavelength.<br />
Wavelength is an example of a field that requires a numeric entry.<br />
To set the wavelength:<br />
1. From the Edit Menu (Fig. 2.4), select /Wavelength Program/ to<br />
display the Wavelength Program (Fig. 2.5).<br />
Time Wavelength<br />
0.00 254<br />
Figure 2.5 The UV1000's wavelength program<br />
2. Using the [+] and [-] keys, edit the wavelength field to the<br />
desired setting for your analysis. Remember that each digit<br />
must be edited individually.<br />
3. Press [ENTER] to accept the new wavelength setting.<br />
Range Range is an example of a field that has a preset list of choices. To set<br />
the range:<br />
1. Select /Options/ from the Edit Menu (Fig. 2.4) to display the<br />
Options Menu (Fig. 2.6).<br />
Rise Time 1.0<br />
Autozero Time 0.00<br />
---------------------------------------------------------<br />
Range 1.0<br />
Figure 2.6 The UV1000's Options Menu<br />
2. Scroll down in the Options Menu and move the cursor to<br />
Range 1 using the [∨] key.<br />
3. Using the [+] or [-] key, select the desired setting from the list<br />
of choices.<br />
4. Press [ENTER] to accept the new range setting.<br />
We will use the rise time and autozero time default settings for this<br />
example. You will learn more about setting these parameters in<br />
Chapter 3.<br />
01/2004 Thermo Electron 11
Loading the File You are now ready to load the settings from the edit file into the<br />
detector's operating parameters (its run file). To load the file:<br />
1. Return to the File Menu (Fig. 2.3) using the [∧] key.<br />
2. Select /Load/. The screen in Figure 2.7 appears.<br />
>Load File<br />
Figure 2.7 The Load File command<br />
3. Press [ENTER] to execute. The confirmation message shown<br />
in Figure 2.8 appears for one second.<br />
** File Loaded **<br />
Figure 2.8 The file-loaded message<br />
You are automatically returned to the Status Screen and are ready to<br />
run your detector.<br />
A PRACTICE RUN Now you're ready for a practice run! Note that the Status Screen<br />
(Fig. 2.1) now displays your wavelength setting, the detector's status,<br />
and the absorbance reading. If the Status reads READY, the required<br />
lamp is lit; if it reads NRDY (Not Ready), there is an error or the<br />
lamp isn't lit; and if it reads UVW, the ultraviolet (D2) lamp is still<br />
warming up.<br />
When the baseline is stabilized:<br />
1. Press the [ZERO] key to zero the detector's analog output<br />
signal.<br />
2. Inject your sample.<br />
During setup, you may have noticed that there was no stop-time<br />
entered in the detector's parameters. In this case, the detector stays in<br />
the READY state and continually monitors the column eluant. You<br />
do not need to manually start or stop a run with this set-up.<br />
12 Thermo Electron 01/2004
ADDING A<br />
STOP-TIME<br />
RUNNING WITH<br />
A STOP-TIME<br />
To add a stop-time, you need to modify the detector's operating<br />
parameters as follows. We will then show you how to start and stop a<br />
run using the new setting.<br />
1. From the Status Screen, press the [∨] key to move down to the<br />
Status Menu (Fig. 2.9), which is the programming area below<br />
the Status Screen. The cursor appears on the “tens” digit of the<br />
wavelength value.<br />
Time Wavelength<br />
0.00 250�<br />
-----------------------------------------------------------<br />
Rise Time 1.0<br />
Autozero Time 0.00<br />
Range 1.0<br />
Figure 2.9 The UV1000's Status Menu<br />
2. Using the [∨] key, move the cursor to the blank line below the<br />
0.00 time line and press [+]. This adds a second line, with a<br />
time of 1.00 and the same wavelength setting as the first.<br />
Change 1.00 to the desired stop-time for the run, and leave the<br />
wavelength unchanged.<br />
3. To save your edits, scroll down to the words "Save File" which<br />
now appear below Range, and press [ENTER]. The<br />
confirmation message shown in Figure 2.10 appears and you<br />
are automatically returned to the Status Screen.<br />
** File Saved **<br />
Figure 2.10 The file-saved message<br />
Now that you have entered a stop-time, you will need to start the run<br />
with each injection.<br />
1. Zero the detector's analog output signal by pressing the<br />
[ZERO] key.<br />
2. When the detector is stabilized, inject your sample and press<br />
[RUN].<br />
Notice that Status now shows the run time. If you wish to stop your<br />
run before the set stop-time, simply press [STOP].<br />
01/2004 Thermo Electron 13
An Example<br />
UV2000<br />
In this example, specifically designed for the UV2000, we will show<br />
you how to prepare a file and how to load it into the detector's<br />
operating parameters. After a practice run, we will add a stop-time.<br />
To keep the instructions simple, we will use the single-wavelength<br />
mode.<br />
HINT: You may wish to keep the Menu Tree in Appendix B on hand as you<br />
work through this example. If you lose your place at any time, you can:<br />
1. Press the [∧] key to move back to a previous screen.<br />
2. Or, press [STATUS] to return to the Status Screen and retrace<br />
your steps.<br />
STARTUP Set the power switch located on the detector's rear panel to On. After<br />
a series of power-up tests, the Status Screen (Fig. 2.11) appears on the<br />
display. (We will discuss the Status Screen after you have set up your<br />
operating parameters.)<br />
SETTING<br />
PARAMETERS<br />
Status λ AU<br />
READY 250 0.00001 �<br />
Figure 2.11 The UV2000's Status Screen<br />
To set your parameters, you need to prepare an edit file. The<br />
following steps will show you how to access the Edit Menu and<br />
prepare the file:<br />
1. Press the [MENU] key. The detector's Main Menu appears on<br />
the screen (Fig. 2.12).<br />
> FILES ❑ QUEUE ❑ TESTS<br />
❑ COMMANDS ❑ OPTIONS<br />
Figure 2.12 The UV2000's Main Menu<br />
2. Now select /FILES/ to display the Files Menu (Fig. 2.13).<br />
> Edit ❑ Load<br />
❑ Copy ❑ Delete<br />
Figure 2.13 The UV2000's Files Menu<br />
14 Thermo Electron 01/2004
3. Select /Edit/ to display the Edit Menu (Fig. 2.14).<br />
Edit File 1<br />
File Name<br />
---------------------------------------------------------<br />
> Wavelength Program<br />
❑ Options<br />
Figure 2.14 The UV2000's Edit Menu<br />
For this example, we will use a file designation of 1 and leave the File<br />
Name field blank.<br />
Wavelength Wavelength is an example of a field that requires a numeric entry. To<br />
set the wavelength:<br />
1. From the Edit Menu (Fig. 2.14), select /Wavelength Program/<br />
to display the Wavelength Program (Fig. 2.15).<br />
Program Single λ<br />
---------------------------------------------------------<br />
Time Wavelength<br />
0.00 254<br />
Figure 2.15 The UV2000's wavelength program<br />
2. Scroll down to the wavelength field.<br />
3. Using the [+] and [-] keys, edit the wavelength field to the<br />
desired setting for your analysis. Remember that each digit<br />
must be edited individually.<br />
4. Press [ENTER] to accept the new wavelength setting.<br />
Range Range is an example of a field that gives you a preset list of choices.<br />
Note that Range 1 and 2 correspond to Analog Outputs 1 and 2 on the<br />
rear panel of your detector. To set the range:<br />
1. Select /Options/ from the Edit Menu (Fig. 2.14) to display the<br />
Options Menu (Fig. 2.16).<br />
Rise Time 1.0<br />
Autozero Time 0.00<br />
---------------------------------------------------------<br />
Range 1 1.0<br />
Range 2 1.0<br />
Figure 2.16 The UV2000's Options Menu<br />
01/2004 Thermo Electron 15
2. Scroll down in the Options Menu and move the cursor to<br />
Range 1 using the [∨] key.<br />
3. Using the [+] or [-] key, select the desired setting from the list<br />
of choices.<br />
4. Press [ENTER] to accept the new Range 1 setting.<br />
We will use the rise time, autozero time, and range 2 default settings<br />
for this example. You will learn more about setting these parameters<br />
in Chapter 3.<br />
Loading the File You are now ready to load the settings from File 1 into the detector's<br />
operating parameters. To load the file:<br />
1. Return to the Files Menu (Fig. 2.13) by pressing either<br />
[ENTER] or the [∨] key.<br />
2. Select /Load/. The screen in Figure 2.17 appears.<br />
> Load File 1:(filename)<br />
Figure 2.17 The Load File command<br />
3. You will be able to select from among several files in the Load<br />
File field. Depending on whether or not your detector has ever<br />
been used before, these files will either contain previously<br />
stored settings or default settings. Use the [+] and [-] keys to<br />
scroll through available choices. When the file you wish to<br />
load appears (we're using the default settings for this example),<br />
press [ENTER] to execute the load command.<br />
4. The confirmation message shown in Figure 2.18 appears for<br />
one second, after which you are automatically returned to the<br />
Status Screen.<br />
** File Loaded **<br />
Figure 2.18 The file-loaded message<br />
A PRACTICE RUN Now you're ready for a practice run! Note that the Status Screen<br />
(Fig. 2.11) now displays your wavelength setting, the detector's<br />
status, and the absorbance reading. If the Status reads READY, the<br />
required lamp is lit; if it reads NRDY (Not Ready), there is an error<br />
(for example, you may have chosen a wavelength outside the selected<br />
lamp's range) or the lamp isn't lit; and if it reads UVW, the ultraviolet<br />
(D2) lamp is still warming up.<br />
16 Thermo Electron 01/2004
ADDING A<br />
STOP-TIME<br />
When the detector is stabilized:<br />
1. Press the [ZERO] key to zero the detector's analog output<br />
signal.<br />
2. Inject your sample.<br />
During setup, you may have noticed that there was no stop-time<br />
entered in the detector's parameters. In this case, the detector stays in<br />
the READY state and continually monitors the column eluant. You<br />
do not need to manually start or stop a run with this set-up.<br />
To add a stop-time, you need to modify the detector's operating<br />
parameters as follows. We will then show you how to start and stop a<br />
run using the new setting.<br />
1. From the Status Screen, press the [∨] key to move down to the<br />
Status Menu (Fig. 2.19), which is the programming area below<br />
the Status Screen.<br />
File 1:<br />
---------------------------------------------------------<br />
Time Wavelength<br />
0.00 250<br />
Rise Time 1.0<br />
Autozero Time 0.00<br />
Range 1 1.0<br />
Range 2 1.0<br />
Figure 2.19 The UV2000's Status Menu<br />
2. Using the [∨] key, move the cursor to the blank line below the<br />
0.00 time line and press [+]. This adds a second line, with a<br />
time of 1.00 and the same wavelength setting as the first.<br />
Change 1.00 to the desired stop-time for the run, and leave the<br />
wavelength unchanged.<br />
3. To save your edits, scroll down to the words "Save File" which<br />
now appear below Range 2, and press [ENTER]. The<br />
confirmation message shown in Figure 2.20 appears and you<br />
are automatically returned to the Status Screen.<br />
01/2004 Thermo Electron 17<br />
�<br />
** File Saved **<br />
Figure 2.20 The file-saved message
RUNNING WITH<br />
A STOP-TIME<br />
What's Next?<br />
Now that you have entered a stop-time, you will need to start the run<br />
with each injection.<br />
1. Zero the detector's analog output signal by pressing the<br />
[ZERO] key.<br />
2. When the detector is stabilized, inject your sample and press<br />
[RUN].<br />
Notice that Status now shows the run time. If you wish to stop your<br />
run before the set stop-time, simply press [STOP].<br />
Once you have completed this example and are comfortable with the<br />
keypad and display, proceed to Chapter 3, Basic Operations, to learn<br />
more about your detector.<br />
18 Thermo Electron 01/2004
3 Basic Operations<br />
Introduction<br />
Before You Begin<br />
This Chapter provides step-by-step instructions for the most<br />
frequently used detector operations, including setup and run<br />
procedures for single- and dual-wavelength modes, detector file<br />
management and protection, and analog output operations.<br />
To keep the instructions easy to follow, we have divided the Chapter<br />
into two sections. Instructions for the UV1000 begin on page 20.<br />
Instructions for the UV2000 begin on page 26. You may wish to<br />
keep the Menu Tree and the Menu Reference from Appendix B on<br />
hand as you work through this chapter.<br />
NOTE: You should be aware that your display's values may differ from<br />
those presented in this manual, especially if the detector has been previously<br />
programmed.<br />
Before you begin this chapter, your detector should be installed in a<br />
chromatographic system (see Appendix A), and you should have<br />
completed the Startup Checklist located at the front of this manual.<br />
We also recommend that you review Chapter 1, Getting Started,<br />
which includes general instructions for using the detector keypad and<br />
which lists the conventions used throughout this manual.<br />
01/2004 Thermo Electron 19
Single-wavelength Operation<br />
SETTING<br />
PARAMETERS<br />
UV1000<br />
The UV1000 uses a standard deuterium lamp to operate in a singlewavelength<br />
mode in the ultraviolet (UV) range. Adding an optional<br />
tungsten lamp increases the detector’s capabilities to the visible (Vis)<br />
range.<br />
To perform a single-wavelength operation, you first enter the desired<br />
detector parameters into an edit file. You then load the edit file into<br />
the run file, which contains the detector's current operating<br />
parameters. These instructions will show you how to start and stop a<br />
run, and how to modify the detector's operating parameters.<br />
You set up the UV1000’s parameters by using the File Menu to<br />
prepare an edit file. You then load the edit file into the run file.<br />
To access the File Menu, first press [MENU]. The Main Menu<br />
appears on the screen. From the Main Menu, select /FILE/. The<br />
menu shown in Figure 3.1 will appear.<br />
> Edit ❑ Load<br />
❑ Delete<br />
Figure 3.1 The UV1000's Files Menu<br />
From the File Menu, select /Edit/ to display the Edit Menu. The Edit<br />
Menu (Fig. 3.2) selections are /Wavelength Program/, which contains<br />
time and wavelength fields, and /Options/, which contains the Rise<br />
Time, Autozero Time, and Range fields.<br />
❑ Wavelength Program<br />
❑ Options<br />
Figure 3.2 The UV1000's Edit Menu<br />
20 Thermo Electron 01/2004
Wavelength<br />
Program<br />
Select /Wavelength Program/ from the Edit Menu. The Wavelength<br />
Program is a Table containing the Time and Wavelength fields<br />
(Fig. 3.3).<br />
Time Wavelength<br />
0.00 254<br />
Figure 3.3 The UV1000's Wavelength Program<br />
In the single-wavelength mode, you can operate with either a one-line<br />
or a two-line wavelength program. Using a one-line program, the<br />
detector is always in the READY state and you can continually<br />
monitor the baseline. Using a two-line program, you can use a stopline<br />
and you can start and stop the detector during a chromatographic<br />
run. (Stop-lines are useful, for example, in an automated series of<br />
runs where you want to autozero the detector's baseline after each<br />
injection.)<br />
For a one-line program, enter the wavelength(s) for your analysis in<br />
the Wavelength field that corresponds to the time of 0.00.<br />
For a two-line program, add an additional line (the stop-line) by<br />
scrolling down to the blank line below the time 0.00 line and pressing<br />
[+]. The second line will automatically have a time setting of 1.00<br />
and the same wavelength setting(s) as the first. Change 1.00 to the<br />
desired stop-time for the run, and leave the wavelength value<br />
unchanged.<br />
An example of a two-line wavelength program for a nine-minute run<br />
at 283 nm is shown in Figure 3.4.<br />
Time Wavelength<br />
0.00 283<br />
---------------------------------------------------------<br />
9.00 283<br />
Figure 3.4 An example of a two-line wavelength program with<br />
a programmed stop-time<br />
01/2004 Thermo Electron 21
Options Menu Select /Options/ from the Edit Menu to display the Options Menu<br />
(Fig. 3.5). Use this menu to set the detector's rise time, autozero time,<br />
and range.<br />
Rise Time 1.0<br />
Autozero Time 0.00<br />
-------------------------------------------------------<br />
Range 1.0<br />
Figure 3.5 The UV1000's Options Menu<br />
Rise Time<br />
This field controls the detector's response time. Rise time is inversely<br />
proportional to the amount of baseline noise. For example, the longer the<br />
rise time, the less noise detected. The one-second default value is<br />
appropriate for most applications.<br />
HINT: To minimize baseline noise while retaining maximum resolution, select a<br />
rise time that is at least one-tenth of the peak width at the base of the narrowest<br />
peak of interest.<br />
Autozero Time<br />
This parameter tells the detector when to perform an automatic zero<br />
of the baseline. If you do not wish to set an autozero and you are<br />
using a stop-line in your wavelength program, simply set the autozero<br />
time to a value greater than your stop-time.<br />
HINT: It is good practice to zero the detector automatically at the start of<br />
each run. This will keep the detector output in range throughout an<br />
automated series of runs.<br />
Range<br />
This parameter ranges the signal from the Ranged Output. (labeled as<br />
“Ranged Output” on the detector's rear panel). Set the range to an<br />
appropriate full-scale absorbance for your sample. For more<br />
information on the use of ranges and analog outputs, see pages 25<br />
and 84.<br />
HINT: We recommend a range of 1.0 when you are using an integrator or<br />
data system.<br />
Loading the Edit File When you are ready to load the settings from the edit file into the<br />
detector’s run file, select /Load/ from the File Menu. The screen will<br />
display the words "Load File." Press [ENTER] to accept the settings.<br />
The confirmation message shown in Figure 3.6 will appear for one<br />
second. You are then returned to the Status Screen.<br />
** File Loaded **<br />
Figure 3.6 The file-loaded message<br />
22 Thermo Electron 01/2004
RUNNING YOUR<br />
DETECTOR<br />
Once you've set your detector parameters in the edit file and have<br />
loaded the parameters into the run file, you’re ready to run your<br />
analysis. First, check the detector's status by viewing the Status<br />
Screen. If you’re using a stop-line in your wavelength program, you<br />
will start and stop the run with each injection.<br />
Status Screen You can check the detector's status, wavelength setting, and<br />
absorbance reading from the Status Screen (Fig. 3.7). To access the<br />
Status Screen, press [STATUS].<br />
Status λ AU<br />
READY 254 +0.00001 �<br />
Figure 3.7 The UV1000's Status Screen<br />
If the Status reads READY, the detector is stabilized and ready to run.<br />
If NRDY appears, the detector's lamps may need additional time to<br />
warm up, or a wavelength outside the selected lamp's range may have<br />
been chosen.<br />
Inject your Sample When the detector is stabilized and you are ready to inject your<br />
sample, first manually zero the detector by pressing the [ZERO] key.<br />
If you are not using a stop-line in the wavelength program, the<br />
detector remains in the READY state throughout your<br />
chromatographic runs. If you are using a stop-line, you must start and<br />
stop the run with each injection, following the procedures below.<br />
Starting a Run If you are using a stop-line in your wavelength program, you need to<br />
start the run with each injection. There are two ways to start a run<br />
using the UV1000:<br />
1. Manually, by pressing [RUN] each time you make an injection.<br />
2. Automatically, by interfacing the detector with a remote runsignal<br />
from the injector (see Appendix A for details). In this<br />
scenario, a signal that is equivalent to pressing [RUN] is<br />
automatically sent from the injector to the detector with each<br />
injection.<br />
During the run, you can monitor the run time from the Status Screen.<br />
Stopping a Run There are two ways to stop a run:<br />
1. Manually, by pressing [STOP] before the programmed stoptime.<br />
2. Automatically, by allowing the run to finish at the programmed<br />
stop-time.<br />
In either case, the detector returns to its READY state.<br />
01/2004 Thermo Electron 23
CHANGING RUN<br />
PARAMETERS<br />
There are two ways to change the detector's run parameters:<br />
1. You can use the Files Menu and follow the procedures outlined<br />
under "Setting Parameters" on page 20.<br />
2. Or you can use the Status Menu, which is the programming<br />
area below the Status Screen.<br />
Each method has a distinct advantage. Programming in the Status<br />
Menu allows you to change the detector's current operating<br />
parameters, even while the detector is running. Programming in the<br />
Files Menu allows you to prepare an edit file containing the changes<br />
without altering the current detector settings. The file may then be<br />
loaded later.<br />
Status Menu From the Status Screen, scroll down to the Status Menu (Fig. 3.8).<br />
The Status Menu contains the Wavelength Program, Rise Time,<br />
Autozero Time, and Range.<br />
Time Wavelength<br />
0.00 254<br />
---------------------------------------------------------<br />
Rise Time 1.0<br />
Autozero Time 0.00<br />
Range 1.0<br />
Figure 3.8 The UV1000's Status Menu<br />
The parameters are set using the same instructions given under<br />
“Wavelength Program” and “Options Menu,” starting on page 21.<br />
When you use the Status Menu to change the UV1000 settings, each<br />
change is effective immediately upon leaving the field.<br />
Notice the words “Save File” below the Range field. Press [ENTER]<br />
when the cursor is in the Save File field to save the new settings to the<br />
run file. The confirmation message shown in Figure 3.9 will appear<br />
briefly.<br />
** File Saved **<br />
Figure 3.9 The File Saved message<br />
NOTE: When you change the detector settings from the Status Menu, the<br />
contents of the edit file do not change. Only the run file values are modified.<br />
24 Thermo Electron 01/2004<br />
�
To return to your previous setting without saving the new ones, do not<br />
press [ENTER]. Instead, you may reenter the unaltered file, as follows::<br />
1. Press [MENU].<br />
2. Select /FILE/.<br />
3. Select /Load/.<br />
4. The words "Load File" will appear on the screen. Press<br />
[ENTER].<br />
A confirmation message (Fig 3.6) will appear for one second. You<br />
are then returned to the Status Screen, and all settings will contain<br />
their original values.<br />
DELETING THE FILE To delete the edit file, select /Delete/ in the File Menu. The words<br />
“Delete File” will appear on the screen. When you press [ENTER],<br />
the confirmation message shown in Figure 3.10 appears briefly, and<br />
the display returns to the File Menu. The edit file parameters return<br />
to their default settings.<br />
Analog Outputs<br />
** File Deleted **<br />
Figure 3.10 The File- Deleted message<br />
There are two analog outputs for the UV1000: Analog Output 1and<br />
Analog Output 2. On the detector’s rear panel, they appear as<br />
“Unranged output” and “Ranged Output.” Analog Output 1 is set at 1<br />
V/AU and is intended for an integrator interface. Analog Output 2 is<br />
range-selectable and is used for recorders and other devices. Rearpanel<br />
connections for both outputs are discussed on page 84.<br />
ANALOG OFFSETS Analog offsets may be used when there is a high background<br />
absorbance reading, or when there is considerable baseline drift from<br />
your chromatographic system and you are unable to keep your<br />
integrator’s (recorder’s) signal on-scale.<br />
Because integrators have very limited capacity for handling negative<br />
signals, you may wish to set a small positive offset (1%) when using<br />
an integrator.<br />
Use negative offsets with recorders, where you may wish to set the<br />
pen at either side of the strip chart.<br />
01/2004 Thermo Electron 25
Offset options are selectable from the Analog Outputs Menu.<br />
To access these options:<br />
1. Press [MENU].<br />
2. Select /OPTIONS/<br />
3. Select /Analog Outputs/.<br />
The Analog Outputs Menu is shown in Figure 3.11.<br />
Analog 1 Offset (mV) 0<br />
Analog 1 Offset (%) 0<br />
Figure 3.11 The UV1000's Analog Outputs Menu<br />
HINT: Although the default for the Analog 1 offset is set at zero, we<br />
recommend a 1 mV setting for use with your data system or integrator.<br />
UV2000<br />
Single- and Dual-wavelength Operation<br />
SETTING<br />
PARAMETERS<br />
You can operate the UV2000 in either a single- or a dual-wavelength<br />
mode. In the dual-wavelength mode, the detector simultaneously<br />
monitors two wavelengths in either the UV range or the visible range<br />
in a single run.<br />
To perform a single- or dual-wavelength operation, you need to be<br />
able to identify and enter a file, load that file into the detector's<br />
current operating parameters, and start and stop a run. This section<br />
will also show you how to modify the detector's current operating<br />
parameters.<br />
Before you set any detector parameters, you need to access the Files<br />
Menu to identify the file you wish to edit.<br />
To access the Files Menu, first press [MENU]. The Main Menu<br />
appears on the screen. From the Main Menu, select /FILES/. The<br />
menu shown in Figure 3.12 will appear.<br />
>Edit ❑ Load<br />
❑ Copy ❑ Delete<br />
Figure 3.12 The UV2000's Files Menu<br />
26 Thermo Electron 01/2004
Select /Edit/ from the Files Menu to display the Edit Menu<br />
(Fig. 3.13).<br />
Edit File 1<br />
File Name<br />
---------------------------------------------------------<br />
❑ Wavelength Program<br />
❑ Options<br />
Figure 3.13 The UV2000's Edit Menu<br />
File Identification Enter the number of the file you wish to edit in the Edit File field.<br />
The UV2000 can store up to four files in memory, so file numbers<br />
from 1 to 4 are allowed. You may also enter a name of up to eight<br />
characters in the File Name field.<br />
Wavelength<br />
Program<br />
While in the Edit File, you will see file choices of "S" and "D" that<br />
represent the Scan and Develop files, respectively. These files are<br />
some of the UV2000's advanced features that you will learn about in<br />
Chapter 4.<br />
From the Edit Menu, select /Wavelength Program/. The Wavelength<br />
Program designates dual- or single-wavelength operation, and also<br />
contains a Table of time and wavelength. A wavelength program for<br />
dual-wavelength operation appears in Figure 3.14.<br />
Program Dual λ(190-450)<br />
---------------------------------------------------------<br />
Time λ1 λ2<br />
0.00 254 280<br />
Figure 3.14 The UV2000's Wavelength Program<br />
in dual-wavelength mode<br />
Select Single λ, Dual λ(190-450), or Dual λ(366-700) in the Program<br />
field. The Table for time and wavelength(s) will appear. (For singlewavelength<br />
operation, there is only one wavelength field.)<br />
You can operate with either a one-line or a two-line wavelength<br />
program. Using a one-line program, the detector is always in the<br />
READY state and you can continually monitor the chromatographic<br />
eluant. Using a two-line program, you can use a stop-line and you<br />
can start and stop the detector during a chromatographic run. (Stoplines<br />
are useful, for example, in an automated series of runs where<br />
you want to autozero the detector's baseline after each injection.)<br />
01/2004 Thermo Electron 27
For a one-line program, enter the wavelength(s) for your analysis in<br />
the λ1 and λ2 (or Wavelength) fields that correspond to the time<br />
of 0.00.<br />
For a two-line program, add an additional line (the stop-line) by<br />
scrolling down to the blank line below the time 0.00 line and pressing<br />
[+]. The second line will automatically have a time setting of 1.00<br />
and the same wavelength setting(s) as the first. Change 1.00 to the<br />
desired stop-time for the run, and leave the wavelength value(s)<br />
unchanged.<br />
An example of a dual-wavelength, nine-minute run at 254 and<br />
283 nm is shown in Figure 3.15.<br />
Time λ1 λ2<br />
0.00 254 283<br />
---------------------------------------------------------<br />
9.00 254 283<br />
Figure 3.15 A wavelength program with<br />
a programmed stop-time<br />
Options Select /Options/ from the Edit Menu to display the Options Menu<br />
(Fig. 3.16). Use this menu to set the detector's rise time, autozero<br />
time, and ranges.<br />
Rise Time 1.0<br />
Autozero Time 0.00<br />
--------------------------------------------------------<br />
Range 1 1.0<br />
Range 2 1.0<br />
Figure 3.16 The UV2000's Options Menu<br />
Rise Time<br />
This field controls the detector's response time. Rise time is inversely<br />
proportional to the amount of baseline noise. For example, the longer<br />
the rise time, the less noise detected. The one-second default value is<br />
appropriate for most applications.<br />
HINT: To minimize baseline noise while retaining maximum resolution,<br />
select a rise time that is at least one-tenth of the peak width at the base of the<br />
narrowest peak of interest.<br />
28 Thermo Electron 01/2004
Autozero Time<br />
This parameter tells the detector when to perform an automatic zero<br />
of the baseline. If you do not wish to set an autozero and you are<br />
using a stop-line in your wavelength program, simply set the autozero<br />
time to a value greater than your stop-time.<br />
HINT: It is good practice to zero the detector automatically at the start of<br />
each run. This will keep the detector output in range throughout an<br />
automated series of runs.<br />
Range 1 and 2<br />
These parameters range the signal from Analog Output 1 and Analog<br />
Output 2 (shown as ANLG 1 Output and ANLG 2 Output on the<br />
detector's rear panel). Set each range to an appropriate full-scale<br />
absorbance for your sample. For more information on the use of<br />
ranges and analog outputs, see pages 35 and 84.<br />
HINT: We recommend a range of 1.0 when you are using an integrator or<br />
data system.<br />
Loading a File When you are ready to load a file into the detector settings, select<br />
/Load/ from the Files Menu. The screen will display the words "Load<br />
File 1:(filename)." Use the [+]/[-] keys to view the number and name<br />
of available files. When the desired file number appears, press<br />
[ENTER].<br />
RUNNING YOUR<br />
DETECTOR<br />
The confirmation message shown in Figure 3.17 will appear for one<br />
second. You are then returned to the Status Screen.<br />
** File Loaded **<br />
Figure 3.17 The message that's displayed<br />
when a file is loaded<br />
NOTE: When a dual-wavelength program is loaded, you'll hear the motor<br />
start to operate in dual-wavelength mode even though you didn't press<br />
[RUN].<br />
Once you've set your detector parameters in the designated file and<br />
have loaded the file into the detector's operating parameters, you are<br />
ready to run your analysis. First, check the detector's status by<br />
viewing the Status Screen. If you are using a stop-line in your<br />
wavelength program, you will start and stop the run with each<br />
injection.<br />
01/2004 Thermo Electron 29
Status Screen You can check the detector's status, wavelength setting(s), and<br />
absorbance reading(s) from the Status Screen. To access the Status<br />
Screen, press [STATUS]. The Status Screen for the UV2000 in dualwavelength<br />
mode appears below (Fig. 3.18). Note that, in the singlewavelength<br />
mode, the third line does not appear.<br />
Status λ AU<br />
READY 254 +0.00001 �<br />
---------------------------------------------------------<br />
280 -0.00001<br />
Figure 3.18 The UV2000's Status Screen<br />
for dual-wavelength operation<br />
If the Status reads READY, the detector is stabilized and ready to run.<br />
If NRDY appears, the detector's lamps may need additional time to<br />
warm up, or a wavelength outside the selected lamp's range may have<br />
been chosen.<br />
Inject your Sample When the detector is stabilized and you are ready to inject your<br />
sample, first manually zero the detector by pressing the [ZERO] key.<br />
If you are not using a stop-line in the wavelength program, the<br />
detector remains in the READY state throughout your<br />
chromatographic runs. If you are using a stop-line, you must start and<br />
stop the run with each injection, following the procedures below.<br />
Starting a Run If you are using a stop-line in your wavelength program, you need to<br />
start the run with each injection. There are two ways to start a run<br />
using the UV2000:<br />
1. Manually, by pressing [RUN] each time you make an injection.<br />
2. Automatically, by interfacing the detector with a remote runsignal<br />
from the injector (see Appendix A for details). In this<br />
scenario, a signal that is equivalent to pressing [RUN] is<br />
automatically sent from the injector to the detector with each<br />
injection.<br />
During the run, you can monitor the run time from the Status Screen.<br />
Stopping a Run There are two ways to stop a run:<br />
1. Manually, by pressing [STOP] before the programmed stoptime.<br />
2. Automatically, by allowing the run to finish at the programmed<br />
stop-time.<br />
If you're conducting a dual-wavelength run, you can also stop the run<br />
by loading a single-wavelength file.<br />
Regardless of how you stop a run, the detector returns to READY.<br />
30 Thermo Electron 01/2004
CHANGING RUN<br />
PARAMETERS<br />
If you wish to change the detector's parameters:<br />
1. You can use the Files Menu and follow the procedures outlined<br />
under "Setting Parameters" on page 26.<br />
2. Or you can use the Status Menu, which is the programming<br />
area below the Status Screen.<br />
Each method has a distinct advantage. Programming in the Status<br />
Menu allows you to change the detector's current operating<br />
parameters, even while the detector is running. Programming in the<br />
Files Menu allows you to prepare an edit file containing the changes<br />
without altering the current detector settings. The file may then be<br />
loaded later.<br />
Status Menu From the Status Screen, scroll down to the Status Menu (Fig. 3.19).<br />
The Status Menu contains the loaded file identification (its number<br />
and name), Wavelength Program, Rise Time, Autozero Time, and<br />
Ranges.<br />
File 1:<br />
---------------------------------------------------------<br />
Time λ1 λ2<br />
0.00 254 280<br />
Rise Time 1.0<br />
Autozero Time 0.00<br />
Range 1 1.0<br />
Range 2 1.0<br />
Figure 3.19 The UV2000's Status Menu<br />
for dual-wavelength operation<br />
The Status Menu shown in Figure 3.19 is typical for dual-wavelength<br />
operation. In the single-wavelength mode, only one wavelength field<br />
appears in the wavelength program.<br />
The detector's parameters are set following the same instructions<br />
given under "Wavelength Program" and "Options Menu," starting on<br />
page 27. However, you cannot modify either the file identification or<br />
the wavelength mode (dual or single) from the Status Menu.<br />
NOTE: When you modify a file's parameters from the Status Menu, you do<br />
not change the contents of the same file number stored in the detector's<br />
memory. Only the copy of the active file is modified.<br />
01/2004 Thermo Electron 31<br />
�
Saving the File When you change the UV2000's settings from the Status Menu, each<br />
change is effective as soon as you leave the field. You'll also see that<br />
the File identification on the first line of the Status Menu (Fig. 3.19)<br />
now reads "File N:xxxx-changed" (where N:xxxx is the file number<br />
and name) and that the words "Save File" now appear below Range 2.<br />
More about Files<br />
To save the changed file, press [ENTER]. The confirmation message<br />
shown in Figure 3.20 will appear briefly.<br />
** File Saved **<br />
Figure 3.20 The File Saved message<br />
To keep the original file without saving the changes, don't press<br />
[ENTER]. Instead, reload the unaltered file using the Files Menu as<br />
follows:<br />
1. Press [MENU].<br />
2. Select /FILES/.<br />
3. Select /Load/.<br />
4. The words "Load File" will appear on the screen. Enter the<br />
desired file number and press [ENTER].<br />
A confirmation message (Fig 3.17) will appear for one second. You<br />
are then returned to the Status Screen, and all settings will contain<br />
their original values.<br />
On page 26, you learned how to edit and load files from the Files<br />
Menu. The UV2000 also allows you to copy and delete files (and to<br />
protect files from being edited, copied to, or deleted) in a few, easy<br />
steps.<br />
COPYING FILES To copy a file:<br />
1. Press [MENU].<br />
2. Select /FILES/ to display the Files Menu (Fig. 3.21).<br />
> Edit ❑ Load<br />
❑ Copy ❑ Delete<br />
Figure 3.21 The UV2000's Files Menu<br />
32 Thermo Electron 01/2004
3. Select /Copy/. The Copy Menu will appear on the screen<br />
(Fig. 3.22).<br />
> Copy File 1: (filename1)<br />
❑ To File 2: (filename2)<br />
Figure 3.22 The UV2000's Copy Menu<br />
4. Enter the identification number for the file you wish to copy in<br />
the Copy File field.<br />
5. Enter the number of the file to which you wish to copy in the<br />
To File field.<br />
6. Press [ENTER]. The confirmation message shown in<br />
Figure 3.23 appears briefly, and you are returned to the Files<br />
Menu.<br />
** File Copied **<br />
Figure 3.23 The message that's displayed<br />
when a file is copied<br />
If you attempt to copy to a protected file (see the section below, titled<br />
"Protecting Files"), you will get the message shown in Figure 3.24. If<br />
a file is not protected, make sure it's empty or unwanted before you<br />
copy to it, as it will be overwritten.<br />
** Protected File **<br />
Cannot Be Copied To<br />
Figure 3.24 The message that is displayed<br />
when you attempt to copy to a protected file<br />
You cannot use Copy for the Scan or Develop files. (You will learn<br />
more about these files in Chapter 4.)<br />
DELETING FILES To delete a file:<br />
1. Press [MENU].<br />
2. Select /FILES/ to display the Files Menu (Fig. 3.21).<br />
3. Select /Delete/. The Delete File field will appear on the screen.<br />
4. Enter the identification number of the file you wish to delete.<br />
When you press [ENTER], the confirmation message shown in<br />
Figure 3.25 appears briefly and the display returns to the Files<br />
Menu. (The parameters in the file you have just deleted return<br />
to their default values.)<br />
01/2004 Thermo Electron 33
** File Deleted **<br />
Figure 3.25 The message that's displayed<br />
when a file is deleted<br />
If you attempt to delete a protected file (see the next section,<br />
"Protecting Files"), you will get the message shown in Figure 3.26.<br />
** Protected File **<br />
Cannot Be Deleted<br />
Figure 3.26 The message that's displayed<br />
when you try to delete a protected file<br />
PROTECTING FILES The UV2000 allows you to protect files from being edited, copied to,<br />
or deleted. To access the file protection operation, follow these steps:<br />
1. Press [MENU].<br />
2. Select /OPTIONS/. The Options Menu appears in Figure 3.27.<br />
> Lamps<br />
❑ Analog Outputs<br />
---------------------------------------------------------<br />
❑ More<br />
Figure 3.27 The UV2000's Options Menu<br />
3. Select /More/. The More Menu appears in Figure 3.28.<br />
Zero on λ Change Yes<br />
Cursor Speed Medium<br />
---------------------------------------------------------<br />
Status Lock Off<br />
READY Output Active Hi<br />
File Name Protect<br />
1: Off<br />
2: Off<br />
3: Off<br />
4: Off<br />
Figure 3.28 The UV2000's More Menu<br />
4. Scroll down to the Table containing the fields File Name and<br />
Protect. To protect a file, select On in the Protect field<br />
corresponding to the appropriate file number. To remove the<br />
file protection, select Off.<br />
34 Thermo Electron 01/2004
Analog Outputs<br />
There are two analog outputs on the UV2000, Analog Output 1 and<br />
Analog Output 2. On the detector's rear panel, they appear as<br />
ANLG 1 Output and ANLG 2 Output. Rear-panel connections for<br />
both outputs are discussed on page 84.<br />
ANALOG OUTPUT 1 By default, Analog Output 1 is either the absorbance reading for<br />
single-wavelength operation, or the absorbance reading of wavelength<br />
one (λ1) for dual-wavelength operation.<br />
ANALOG OUTPUT 2 Analog Output 2 is selectable (AU, AU1-K*AU2, and AU1/AU2),<br />
and so can be used to monitor several different outputs. To access<br />
these options:<br />
1. Press [MENU].<br />
2. Select /OPTIONS/.<br />
3. Select /Analog Outputs/. The Analog Outputs Menu shown in<br />
Figure 3.29 appears.<br />
Analog 1 Offset (%) 0<br />
Analog 2 Offset (%) 0<br />
---------------------------------------------------------<br />
Analog 2 AU<br />
K Factor 1.000<br />
Figure 3.29 The UV2000's Analog Outputs Menu<br />
4. Scroll down to Analog 2. The selections are:<br />
• AU, which is either the same absorbance reading you got<br />
from Analog Output 1 in single-wavelength operation, or<br />
the absorbance reading of wavelength two (λ2) for dualwavelength<br />
operation.<br />
• AU1-K*AU2, which is the readout of the suppressed signal<br />
using the K-Factor technique. See page 60 for more<br />
details.<br />
• AU1/AU2, which is the ratio of the dual-wavelength<br />
absorbance values. This ratio is sometimes used to check<br />
peak purity. See page 64 for more details.<br />
01/2004 Thermo Electron 35
ANALOG OFFSETS Both analog outputs 1 and 2 can be offset on the UV2000. Analog<br />
offsets may be used in cases where there is a high background<br />
absorbance reading, or when there is considerable baseline drift from<br />
your chromatographic system and you are unable to keep your<br />
integrator's (recorder's) signal on-scale.<br />
Because integrators have very limited capacity for handling negative<br />
signals, you may wish to set a small positive offset (1%) when using<br />
an integrator.<br />
Negative offsets are available for use with recorders, where you may<br />
wish to set the pen at either side of the strip chart.<br />
The offset options are selectable from the Analog Outputs Menu<br />
shown in Figure 3.29.<br />
HINT: Although the offset for each output is set at 0% of full-scale readout<br />
by default, we recommend a 1% setting for use with your data system or<br />
integrator.<br />
36 Thermo Electron 01/2004
4 Advanced Operations<br />
Introduction<br />
Wavelength Programming<br />
BUILDING THE<br />
PROGRAM<br />
In this chapter, you will learn to use the more advanced capabilities of<br />
your detector. The chapter’s first section covers the capabilities<br />
offered by both the UV1000 and the UV2000 detectors; the second<br />
section, beginning on page 46, contains those functions specific to the<br />
UV2000. You should be familiar with the instructions presented in<br />
Chapter 3, Basic Operations, before you begin.<br />
UV1000 and UV2000<br />
Your detector can change wavelength as a function of time, a feature<br />
we call Wavelength Programming. This feature gives you maximum<br />
detection sensitivity for each component of a mixture without making<br />
multiple injections of the sample.<br />
NOTE: A wavelength program can be built in either the Status Menu or the<br />
File(s) Menu.<br />
In wavelength programming, you enter time lines into a "Wavelength<br />
Program." Each time line specifies the time at which you want a<br />
wavelength change to occur.<br />
The following instructions are for single-wavelength operation, but if<br />
you have a UV2000, you can build a dual-wavelength program using<br />
the same procedure.<br />
01/2004 Thermo Electron 37
Initial Conditions Access the Wavelength Program (Fig. 4.1) through either the Status<br />
Menu or the Files Menu.<br />
Time Wavelength<br />
0.00 250<br />
Figure 4.1 The wavelength program for single-wavelength operation<br />
The initial time entry is 0.00. Move the cursor to the corresponding<br />
Wavelength field, and enter the initial wavelength for your analysis.<br />
Adding Lines To add a second time line, scroll down to the first blank line and press<br />
[+]. The second line will automatically have a time setting of 1.00<br />
and the same wavelength setting as the first. Change the Time and<br />
corresponding Wavelength fields to the desired values. Subsequent<br />
lines are added in the same fashion.<br />
A wavelength program may contain as many as ten lines for a single<br />
run. On the UV1000, all of the lines’ wavelengths must be in the<br />
same range (either UV or visible). On the UV2000, however, you<br />
can cross between the UV and visible ranges (in single-wavelength<br />
mode only).<br />
If you enter time lines out of sequence, the detector will automatically<br />
sort the lines and place them all in chronological order.<br />
The Stop-line The last line of the program (the stop-line) lists the time at which the<br />
detector will automatically end the run and return to initial conditions.<br />
Since wavelength is not important in the stop-line, it can be set to any<br />
value.<br />
NOTE: Remember, the last line of the program is always the detector's<br />
signal to end a run; it is not a programmed wavelength change!<br />
Deleting a Line To delete an entire time line, place the cursor in the Time field and<br />
press [-] repeatedly until the value goes blank. When you leave the<br />
line, it will be deleted.<br />
38 Thermo Electron 01/2004
An Example Figure 4.2 shows a completed wavelength program for singlewavelength<br />
operation.<br />
RUNNING THE<br />
PROGRAM<br />
Time Wavelength<br />
0.00 254<br />
---------------------------------------------------------<br />
5.00 280<br />
7.00 265<br />
10.00 265<br />
Figure 4.2 An example of a completed<br />
wavelength program<br />
In our example, the initial detection wavelength is 254 nm. At 5.00<br />
minutes into the run, the wavelength changes to 280 nm. At 7.00<br />
minutes, it changes to 265 nm. The run ends at 10.00 minutes, and<br />
the detector returns to its initial wavelength of 254 nm and to its<br />
READY state.<br />
After you set the rest of your parameters, the detector is ready to run.<br />
It is good practice to zero the detector at the beginning of every run<br />
and at each wavelength change. See the next section, titled<br />
"Programmed Autozero," for details.<br />
Once you start the run, you may edit any timed event (wavelength<br />
change, autozero, or stop-time) that has not yet taken place. These<br />
edits can only be made from the Status Menu however! Each edit is<br />
entered immediately into the detector's operating wavelength<br />
program.<br />
For example, for the program displayed in Figure 4.2, the stop-time is<br />
10.0 minutes. If, at 7.00 minutes into the run, you determine that the<br />
run should be 9.00 minutes long, you can edit the last line of the<br />
program such that the current run will stop at 9.00 minutes.<br />
01/2004 Thermo Electron 39
Programmed Autozero<br />
The detector can be programmed to perform an automatic zero with<br />
each wavelength change during a run using the Zero on λ Change<br />
field. To access this feature:<br />
1. Press [MENU] and select /OPTIONS/ to access the Options<br />
Menu (Fig. 4.3).<br />
> Lamps<br />
❑ Analog Outputs<br />
---------------------------------------------------------<br />
❑ More<br />
Figure 4.3 The Options Menu<br />
2. Select /More/ to display the More Menu.<br />
3. Place the cursor on the Zero on λ Change field. This field<br />
appears on the first line of the More Menu for both the<br />
UV1000 and the UV2000.<br />
4. Select Yes, to automatically zero the detector response with<br />
each wavelength change during a run, or No, to turn this<br />
feature off.<br />
You can also use this automatic zero feature to add autozeros into<br />
your wavelength program without changing the detector's wavelength<br />
settings. To do this, simply add additional time lines. Adding<br />
autozeros in this way is convenient in cases such as solvent<br />
programming, where the detector's baseline may drift due to changes<br />
in solvent background.<br />
An example program is shown in Figure 4.4.<br />
Time Wavelength<br />
0.00 254<br />
---------------------------------------------------------<br />
2.00 254<br />
5.00 280<br />
7.00 280<br />
10.00 280<br />
Figure 4.4 An example of a wavelength program<br />
with automatic autozeros<br />
With Zero on λ Change set to Yes, the detector will autozero at 2.00,<br />
5.00, and 7.00 minutes into the run, even though the wavelength will<br />
only change once (at 5.00 minutes into the run).<br />
40 Thermo Electron 01/2004
Automatic Lamp Operations<br />
THE LAMPS MENU The Lamps Menu (Fig. 4.5) allows you to select lamps, track lamp<br />
life, and turn the lamps on and off automatically. Field descriptions<br />
for this menu follow.<br />
To access the Lamps Menu:<br />
1. Press [MENU] and select /OPTIONS/.<br />
2. Select /Lamps/.<br />
Lamp D2 (190-365)<br />
D2 Lamp Hours 0<br />
---------------------------------------------------------<br />
W Lamp Hours 0<br />
Current Time 0:00<br />
Startup Manual<br />
Startup Time 0:00<br />
Shutdown Manual<br />
Shutdown Time 0:00<br />
Time from READY 1:00<br />
Figure 4.5 The UV2000's Lamps Menu<br />
Lamp<br />
The Lamp field allows you to select from the following:<br />
• D2 (190-365), for deuterium<br />
[the UV1000 reads D2 (190-380)],<br />
• W (366-800), for tungsten,<br />
• D2+W (190-800), for dual-lamp operation<br />
• or Off, to shut the lamp(s) off.<br />
Actually though, the wavelength setting in the loaded file<br />
automatically selects the appropriate lamp for you. In fact, the<br />
wavelength setting you choose in your file has priority over any<br />
selection you make here in the Lamp field!<br />
For example, if the loaded file designates a wavelength in the UV<br />
range, but you manually selected W (366-800) in the Lamp field, the<br />
detector's display will read NRDY (not ready) for the deuterium lamp.<br />
01/2004 Thermo Electron 41
Lamp Hours (W and D2 fields)<br />
These fields automatically track the number of hours each lamp has<br />
been in operation. For the value to be accurate, set the appropriate<br />
Lamp Hours field to zero each time you install a new lamp.<br />
HINT: If you switch lamps before they are burned out (with the intention of<br />
using them again at a later date), keep a record of how many hours they<br />
have been in operation.<br />
Startup and Shutdown<br />
When you set the Startup and Shutdown fields to "Manual," the lamp<br />
designated in the Lamp field turns on and off when the detector<br />
power is switched on and off, respectively.<br />
Startup and Shutdown Times<br />
When you set the Startup and Shutdown fields to "Time" (see above),<br />
the designated lamp will automatically turn on and off at the local<br />
time set in the Startup Time and Shutdown Time fields, respectively.<br />
NOTE: For the detector to perform automatic lamp startup and shutdown<br />
correctly, the detector's 24-hour clock must be set to your local time. Set the<br />
clock in the Current Time field. Since the clock resets to zero each time the<br />
detector is turned off, it will have to be reset prior to performing automatic<br />
lamp startup and shutdown unless the detector has been left on continuously.<br />
Time from READY<br />
If you prefer, you can program the detector to shut the lamp off after a<br />
series of automated runs by using the Time from READY feature.<br />
Time from READY is a preset time interval that automatically begins<br />
each time the detector returns to its READY state. If the Time from<br />
READY interval elapses without a run signal being received from<br />
either the keypad or the detector's Run(Input) terminal, the detector's<br />
lamp turns itself off.<br />
To use the Time from READY feature:<br />
1. Select Time from READY in the Shutdown field.<br />
2. In the Time from READY field, enter the length of time during<br />
which a run signal must be received by the detector before the<br />
lamp turns off.<br />
For example, let's say your chromatographic system is set up for an<br />
automated run and the autosampler signals the detector to run after<br />
each injection. With the detector settings shown in Figure 4.6, the<br />
lamp will turn off ten hours after the last run is completed.<br />
Shutdown Time from READY<br />
Shutdown Time 00:00<br />
---------------------------------------------------------<br />
Time from READY 10:00<br />
Figure 4.6 An example of the Time from Ready feature<br />
42 Thermo Electron 01/2004
Other Features<br />
You can also program the UV2000's lamps to turn off at the end of a<br />
queue by selecting End of Queue in the Shutdown field. For more<br />
information on the Queue feature, see page 57.<br />
Additional features offered by the UV1000 and UV2000 include the<br />
abilities to lock the Status Screen, to short the detector outputs, to<br />
place an event mark on the chromatogram, and to send a ready signal<br />
to external devices. You can also control the display's contrast and<br />
cursor speed, and do a quick shutdown of the detector's lamps and<br />
motors.<br />
STATUS LOCK You can lock the detector's display using the Status Lock field. This<br />
feature lets you prevent accidental changes to a file that is currently<br />
being run. With the lock on in the UV1000, only the Status Screen<br />
appears. In the UV2000, you can scroll down from the Status Screen<br />
as far as the Status Menu's File Name field. You will still be able to<br />
access the Main Menu and the rest of the menu structure using the<br />
[MENU] key however.<br />
To access Status Lock:<br />
1. Press [MENU].<br />
2. Select /OPTIONS/.<br />
3. Select /More/.<br />
4. Scroll down to Status Lock. Select On or Off to turn the lock<br />
on or off, respectively.<br />
5. Press [STATUS].<br />
SHORT OUTPUTS When zeroing a readout device such as an integrator or recorder, it's<br />
convenient to be able to short the detector outputs. You can do this<br />
using the Short Outputs feature.<br />
To access Short Outputs:<br />
1. Press [MENU].<br />
2. Select /COMMANDS/. The Commands Menu (Fig. 4.7)<br />
appears.<br />
> Event Mark<br />
❑ Short Outputs<br />
---------------------------------------------------------<br />
❑ Shutdown Detector<br />
Figure 4.7 The Commands Menu<br />
01/2004 Thermo Electron 43
When you select Short Outputs, the detector's analog outputs are<br />
shorted together (zero volts) and the field name changes to "Unshort<br />
Outputs." To remove the short and return the outputs to their normal<br />
operating state, select Unshort Outputs, and the field changes back,<br />
now reading "Short Outputs." (When you leave this screen, the field<br />
returns automatically to Short Outputs.)<br />
EVENT MARK Using the event mark feature, you can place an event mark on your<br />
chromatogram to note various occurrences, such as the turning of a<br />
sampling valve. The event mark is a spike (15% of full-scale for one<br />
second) in both detector output signals.<br />
To access Event Mark:<br />
1. Press [MENU].<br />
2. Select /COMMANDS/. The Commands Menu (Fig. 4.7)<br />
appears.<br />
3. Place the cursor on Event Mark. Press [ENTER] each time you<br />
wish to place an event mark on your chromatogram.<br />
NOTE: You may not want to use event marks if your data will be analyzed by<br />
an integrator. Integrators can misinterpret event marks as peaks!<br />
READY OUTPUT Using the READY(Output) terminal on the detector's back panel, the<br />
detector can send a signal to other devices each time it goes to its<br />
READY state. This feature is frequently used with autosamplers to<br />
signal that the detector is ready for the next injection.<br />
To access the READY Output field:<br />
1. Press [MENU].<br />
2. Select /OPTIONS/.<br />
3. Select /More/.<br />
4. Scroll down to the READY Output field. Select Active Hi or<br />
Active Lo, depending on which signal you wish to send.<br />
HINT: All SpectraSYSTEM instruments are set to receive high<br />
signals, so select Active Hi if you are hooking up to this type of<br />
chromatograph. For any other type of instrument, refer to the<br />
appropriate reference manual.<br />
44 Thermo Electron 01/2004
DISPLAY<br />
CONTRAST<br />
You can vary the display's contrast to make it easier to read.<br />
To change the display's contrast, first press [STATUS] to access the<br />
Status Screen. Then simultaneously press the [>] key and the [+] key<br />
to increase the contrast, or the [>] key and the [-] key to reduce the<br />
contrast.<br />
CURSOR SPEED You can control the display's cursor speed to make it easier to use.<br />
SHUTDOWN<br />
DETECTOR<br />
To access Cursor Speed:<br />
1. Press [MENU].<br />
2. Select /OPTIONS/.<br />
3. Select /More/.<br />
4. Scroll down to Cursor Speed and select Fast, Medium, or<br />
Slow.<br />
This feature offers a quick shutdown, and subsequent startup, of the<br />
detector's lamps and motors. The electronics stay on to maintain the<br />
detector's memory.<br />
To shut down the detector:<br />
1. Press [MENU].<br />
2. Select /COMMANDS/.<br />
3. Scroll down to the Shutdown Detector field.<br />
4. Press [ENTER]. The confirmation message shown in<br />
Figure 4.8 appears on the display.<br />
** Detector Shutdown **<br />
Figure 4.8 Shutdown confirmation message<br />
To start the detector up again, press any key on the keypad. The<br />
detector will come up under the same conditions present when the<br />
Shutdown Detector command was activated.<br />
01/2004 Thermo Electron 45
Scanning<br />
UV2000 only<br />
The UV2000 can perform a spectral scan on eluting peaks without<br />
stopping the eluant flow. This unique feature greatly simplifies the<br />
determination of wavelength maxima for individual compounds in your<br />
sample during method development work.<br />
HOW IT WORKS When a scan is initiated, the monochromator moves from the runwavelength<br />
to the scan's start-wavelength. The detector scans by<br />
stepping through a defined spectral range at specified wavelength<br />
increments. Individual absorbance values are read at each increment<br />
until the monochromator has reached the last wavelength.<br />
The UV2000 can collect and store as many as ten spectra from a<br />
single chromatographic run in its memory. The actual number of<br />
spectra is determined by the number of data points in each scan.<br />
Since the number of data points varies with the wavelength interval<br />
and the scanning range, first calculate the number of data points using<br />
Equation 1, then use either Equation 2 or Equation 3 to determine the<br />
number of spectra you will be able to collect.<br />
Equation 1. Use this equation to calculate the number of data points<br />
for any scan between λ1 (the lower wavelength), and λ2 (the higher<br />
wavelength):<br />
λ2 - λ1<br />
# of data points = ⎯⎯⎯⎯⎯ + 1<br />
λ interval<br />
Equation 2. Use this equation to calculate the number of spectra you<br />
can collect when using wavelength intervals of 2 nm or greater.<br />
Round the resulting number down to the nearest integer.<br />
5000 - (# of data points * 12)<br />
# of spectra = ⎯⎯⎯⎯⎯⎯⎯⎯⎯⎯⎯⎯⎯<br />
(# of data points * 4) + 14<br />
Equation 3. Use this equation to calculate the number of spectra you<br />
can collect when using wavelength intervals of 1 nm. Round the<br />
resulting number down to the nearest integer.<br />
5000 - (# of data points * 4)<br />
# of spectra = ⎯⎯⎯⎯⎯⎯⎯⎯⎯⎯⎯⎯⎯<br />
(# of data points * 4) + 14<br />
46 Thermo Electron 01/2004
SELECTING<br />
THE SCAN FILE<br />
SETTING UP<br />
THE SCAN FILE<br />
For example, if you want to scan from 190 to 564 nm in 2-nm steps,<br />
there would be 188 data points and the UV2000 would be able to<br />
store up to 3 spectra:<br />
5000 - (188 * 12) 2744<br />
# of spectra = ⎯⎯⎯⎯⎯⎯⎯⎯ = ⎯⎯⎯ = 3.58 = 3<br />
(188 * 4) + 14 766<br />
Each scan is corrected for baseline absorbance before being played<br />
back either as individual data points, or as a smoothed, continuous<br />
spectrum.<br />
To select spectral scanning, follow these step-by-step instructions.<br />
1. Press [MENU]. Select /FILES/.<br />
2. Select /Edit/.<br />
3. Use the [+] key to increment the Edit File field until an "S" is<br />
displayed (Fig. 4.9). The File Name field is automatically<br />
named SCAN. (You cannot edit the Scan File's name.)<br />
Edit File S<br />
File Name SCAN<br />
---------------------------------------------------------<br />
❑ Setup<br />
❑ Replay<br />
Figure 4.9 The Scan File's Edit Menu<br />
4. Select /Setup/ to set up your spectral scanning parameters.<br />
The Scan File's Setup Menu is shown in Figure 4.10.<br />
Start λ 220<br />
End λ 365<br />
---------------------------------------------------------<br />
λ Interval 5<br />
Run λ 250<br />
Rise Time 1.0<br />
Scan Zero Time 0.00<br />
Range 1 1.0<br />
Range 2 1.0<br />
Figure 4.10 The Scan File's Setup Menu<br />
01/2004 Thermo Electron 47
RUNNING<br />
THE SCAN FILE<br />
Use these steps to set the parameters for scanning:<br />
1. In the Start λ field, enter the wavelength at which each scan<br />
should start.<br />
2. In the End λ field, enter the wavelength at which each scan<br />
should end.<br />
3. In λ Interval, enter the wavelength interval to be used. To<br />
perform a scan, the UV2000 takes individual absorbance<br />
readings at wavelengths incremented by the interval you<br />
specify.<br />
HINT: Five nanometers is an excellent wavelength interval for most<br />
applications. At this interval, you get very rapid scans and you can<br />
still display the λMax to 1 nm accuracy.<br />
4. In Run λ, enter the wavelength at which the chromatographic<br />
run will be monitored.<br />
5. In /Scan Zero Time/, enter the runtime at which you wish the<br />
detector to perform an automatic baseline scan. If you use an<br />
automatic baseline scan, make sure no peaks are eluting during<br />
the designated scan time.<br />
6. Fill in entries for Rise Time, Range 1, and Range 2 as you<br />
would for any chromatographic run.<br />
When you are finished setting up the Scan File, you are ready to load<br />
it and run.<br />
When the Scan File is loaded, you will notice the fields Zero and<br />
Scan in the Status Screen (Fig. 4.11).<br />
Status λ AU ❑ Scan<br />
READY 250 0.0001 > Zero �<br />
Figure 4.11 The Status Screen with the Scan File loaded<br />
Zero<br />
/Zero/ is used to perform baseline scans of the solvent's background<br />
absorbance. With the detector's baseline stabilized and the cursor on<br />
the Zero field, press [ENTER]. The UV2000 performs and stores a<br />
baseline scan using the parameters you set in the Scan File. While the<br />
detector is performing a baseline scan, the Status field displays<br />
SCAN 0.<br />
Baseline scans may be taken at any time during the run, as long as no<br />
peak is eluting at that time. Subsequent sample scans are corrected<br />
using the last baseline scan taken. This is especially advantageous for<br />
gradient elution, where the background absorbance of the eluant may<br />
be constantly changing.<br />
48 Thermo Electron 01/2004
For example, let's say you perform a baseline scan before you initiate<br />
a run, and then again at 5.00 minutes into the run. You also perform<br />
sample scans of your eluting peaks at 2.4 and 5.6 minutes into the<br />
run. The sample scan taken at 2.4 minutes will be corrected using the<br />
baseline scan taken before the run began. The sample scan taken at<br />
5.6 minutes will be corrected using the baseline scan taken at 5.0<br />
minutes.<br />
Scan<br />
Once you begin the run, the cursor will move from Zero to Scan in<br />
the Status Screen. Each time you wish to perform a sample scan,<br />
press [ENTER].<br />
NOTE: There is a one-second delay from the time the detector takes its<br />
absorbance readings to the time you see the same reading on the analog<br />
readout. Keep this in mind when choosing your scan times.<br />
Each time you perform a sample scan, the detector's monochromator<br />
moves from the run wavelength to the start wavelength. The detector<br />
performs each scan (from the start wavelength to the end wavelength)<br />
by taking individual absorbance readings at wavelengths incremented<br />
by the interval you set in the Scan File. When the scan is finished, the<br />
monochromator returns to the run wavelength.<br />
For example, using the default Scan File Setup Menu shown in<br />
Figure 4.10, the detector would monitor the run at 250 nm. Each scan<br />
would include absorbance readings for wavelength settings of 220,<br />
225, 230, 235, and so on, up to 350 nm.<br />
NOTE: If you chose starting and ending wavelengths that were not an exact<br />
multiple of your wavelength interval, the ending spike (event mark) on your<br />
chromatogram would be placed at the last multiple of the wavelength<br />
interval that falls within the scanning range. For example, with a starting<br />
wavelength of 200 nm, an ending wavelength of 365 nm, and a wavelength<br />
interval of ten, the end spike on your chromatogram would be at 360 nm, the<br />
last full wavelength multiple within the range.<br />
While the detector is scanning, the Status field displays SCAN.<br />
NOTE: During scanning, the output signal will hold at the last absorbance<br />
value taken before the scan was initiated until the scan is finished. For this<br />
reason, quantitative analysis should never be performed when scanning.<br />
01/2004 Thermo Electron 49
Scan Summary<br />
Data Screen<br />
STOPPING THE<br />
SCAN FILE<br />
When the Scan File is loaded, the normal Status Menu no longer<br />
appears below the Status Screen. Instead, several new lines that we<br />
call the "Scan Summary Data Screen" appear. The Scan Summary<br />
Data Screen is useful in setting up the parameters to replay your<br />
stored spectra.<br />
An example of the Scan Summary Data screen as it appears after two<br />
sample scans is shown in Figure 4.12.<br />
File S: SCAN<br />
---------------------------------------------------------<br />
Time λMax λMaxAU λMin<br />
10.50 280 1.6668 230<br />
11.66 255 0.7768 220<br />
Figure 4.12 An example of the Scan Summary Data Screen<br />
The Scan Summary Data Screen has four fields:<br />
• Time, which is the run time at which the scan was initiated<br />
• λMax, which is the scan wavelength where the maximum<br />
absorbance occurred<br />
• λMaxAU, which is the maximum absorbance<br />
• λMin, which is the scan wavelength where the minimum<br />
absorbance occurred<br />
If no maximum was found, the λMax and λMaxAU fields read 0<br />
(zero). The summary information is updated as each sample scan is<br />
completed.<br />
NOTE: The UV2000 uses a second derivative to find the "local" λMax.<br />
In our example (Fig. 4.12), scans were taken at 10.50 and 11.66<br />
minutes into the run. The scan taken at 10.50 minutes has a<br />
maximum absorbance of 1.6668 AU at 280 nm. The minimum<br />
absorbance occurred at 230 nm. To replay your 10.50-minute scan,<br />
you would use a range of 2.0 AUFS to keep the absorbance values<br />
on-scale.<br />
There is no programmed stop in the Scan mode. The run will<br />
continue until it reaches 99.99 minutes, or until you press [STOP].<br />
50 Thermo Electron 01/2004
Automatic Scanning (Model UV2000 only)<br />
If you've set the Auto Scan field in the Setup Menu to On, your<br />
detector will perform an automatic scan whenever there are at least<br />
three consecutive data points with positive slopes followed by three<br />
consecutive data points with negative slopes. The absorbance values<br />
for all these data points must exceed 5 percent of the value set in the<br />
/Range 2/ field. In our example chromatogram (Fig. 4.13), a scan<br />
would occur automatically for Peak A, since it has at least three data<br />
points with positive slopes followed by at least three data points with<br />
negative slopes, all of which exceed 5% of the value set in /Range 2/.<br />
Conversely, no scan would occur for peak B, since none of its<br />
absorbance values exceeds the 5% threshold, even though it may<br />
satisfy the consecutive-slope criteria.<br />
Peak A<br />
Time<br />
5% of Range 2<br />
Peak B<br />
Figure 4.13 An example of how automatic scanning works<br />
An automatic baseline scan will occur at the time specified in the<br />
Spectra Menu's /Scan Zero Time/ field.<br />
NOTE: Make sure that no peaks are eluting at the specified scan-zero time<br />
or your baseline scan will be zeroed erroneously for the eluting peak's value<br />
at the moment when the scan zero occurs. This will produce a baseline scan<br />
that is heightened artificially.<br />
01/2004 Thermo Electron 51<br />
DT\Z155E\DT
REPLAYING YOUR<br />
SPECTRA<br />
Setting Replay<br />
Parameters<br />
When you have completed your run, you can retrieve your stored<br />
sample spectra using the Replay Menu (Fig. 4.14).<br />
To access the Replay Menu:<br />
1. Press [MENU]. Select /FILES/.<br />
2. Select /Edit/ to display the Scan File's Edit Menu (Fig. 4.9).<br />
3. Select /Replay/.<br />
Range 1 1.0<br />
Range 2 1.0<br />
---------------------------------------------------------<br />
Replay Rate (nm/sec) 5<br />
Spectra Time 10.50<br />
❑ Replay Spectra<br />
❑ Display AU,λ<br />
To set the parameters for replay:<br />
Figure 4.14 The Replay Menu<br />
1. Set Range 1 and Range 2 for Analog Output 1 and Analog<br />
Output 2. If you are using only one output, disregard the<br />
appropriate range.<br />
2. Enter the Replay Rate (nm/sec). This is the rate at which the<br />
detector will read out the spectral data to your chart. You will<br />
use this value and an appropriate chart speed to calculate<br />
wavelength increments on your printed sample spectrum.<br />
For example, if your sample scan were taken between 190 and<br />
340 nm (a span of 150 nm), a replay rate of 5 nm/sec would<br />
print the spectrum in 30 seconds. A chart speed of 30 cm/min<br />
would give you a scan of 15 centimeters in increments of<br />
10 nm/cm.<br />
3. Select the spectrum you want to replay by selecting its start<br />
time in the Spectra Time field. Each spectrum taken during the<br />
run is individually identified by the run time at which it was<br />
initiated.<br />
When you finish setting your replay parameters, you are ready to send<br />
the spectral data to your chart using the Replay Spectra command.<br />
Running Replay To initiate the Replay Spectra command in the Replay Menu, press<br />
[ENTER]. While the replay is occurring, the screen shown in<br />
Figure 4.15 appears on the display.<br />
52 Thermo Electron 01/2004
Replay λ AU<br />
10.50 220 0.00001<br />
Figure 4.15 The display as it appears<br />
while spectra are being replayed<br />
The screen's Replay field displays the start time of the spectrum being<br />
replayed. The λ and AU fields display the individual data points<br />
being plotted.<br />
The UV2000 uses advanced curve-fitting algorithms to present a<br />
smooth, continuous plotted spectrum. The spectrum is replayed in<br />
1-nm steps regardless of the wavelength interval selected. To change<br />
the appearance of replayed spectra from 1-nm stepped curves to<br />
smooth curves (or vice versa), vary the recording device's replay rate<br />
and response time.<br />
If no spectra are stored in memory when you activate the Replay<br />
Spectra command, the message shown in Figure 4.16 will appear on<br />
the display. When the replay is finished, the display returns to the<br />
Replay Menu.<br />
** No Scans Stored **<br />
Figure 4.16 The message that appears<br />
when no spectra are stored in memory<br />
Stopping Replay You may stop a replay at any time by pressing [STOP].<br />
SPECTRAL<br />
DATA STORAGE<br />
Spectral data are stored in the UV2000's memory until a new file or<br />
queue is loaded or the detector is turned off.<br />
Viewing Data You can display the individual data points of your stored spectra by<br />
selecting the Display AU, λ field in the Replay Menu (Fig. 4.14). A<br />
screen similar to that shown in Figure 4.17 will appear on the display.<br />
Display λ AU<br />
10.50 220 0.00001<br />
Figure 4.17 The Display AU, λ screen<br />
01/2004 Thermo Electron 53
The Develop File<br />
SELECTING THE<br />
DEVELOP FILE<br />
EDITING THE<br />
DEVELOP FILE<br />
NOTE: Only actual data points (separated by the proper wavelength<br />
interval) can be displayed.<br />
The Display AU, λ screen shows the time at which the scan was<br />
initiated, along with each wavelength and absorbance reading<br />
collected. You can scroll through the data using the [+] and [-] keys.<br />
To return to the Replay Menu, press [∧].<br />
The Develop File is unique to the UV2000. It allows you to make<br />
sequential sample injections at different wavelengths automatically.<br />
This automation makes method development much easier because<br />
you can use an automated run to determine the optimum wavelength<br />
of detection for each component in your sample. You can also use<br />
the Develop File to troubleshoot chromatographic problems, or to<br />
confirm method transfer from laboratory to laboratory.<br />
Use the following instructions to select the Develop File.<br />
1. Press [MENU]. Select /FILES/.<br />
2. Select /Edit/.<br />
3. Use the [+] key to increment the Edit File field until a "D" is<br />
displayed. The File Name field will read DEVELOP. (You<br />
cannot edit the Develop File's name.)<br />
Follow these instructions to edit Develop File parameters:<br />
1. Once you've selected the Develop File as described above,<br />
press either the [ENTER] or the [∨] key to access the Develop<br />
File's Edit Menu (Fig. 4.18).<br />
Edit File D<br />
File Name DEVELOP<br />
---------------------------------------------------------<br />
Start λ 220<br />
End λ 350<br />
λ Interval 5<br />
Run Time 10.00<br />
Runs per λ 2<br />
Rise Time 1.0<br />
Autozero Time 0.00<br />
Range 1 1.0<br />
Range 2 1.0<br />
Figure 4.18 The Develop File's Edit Menu<br />
54 Thermo Electron 01/2004
RUNNING THE<br />
DEVELOP FILE<br />
2. In the Start λ field, enter the wavelength at which the first<br />
chromatogram is to be monitored.<br />
3. In the End λ field, enter the wavelength at which the last<br />
chromatogram is to be monitored.<br />
4. In λ Interval, enter the wavelength increment that the detector's<br />
monochromator should use for each wavelength change.<br />
5. In Run Time, enter how long each run should last.<br />
6. In Runs per λ, enter the number of injections to be made at<br />
each wavelength setting.<br />
7. Enter Rise Time, Autozero Time, Range 1, and Range 2, as you<br />
would for a typical run. Note that Range 1 and Range 2 are the<br />
corresponding ranges for Analog Outputs 1 and 2, respectively.<br />
As an example, we will use the Develop File shown in Figure 4.18.<br />
The UV2000 would make its first two ten-minute runs at 220 nm.<br />
The monochromator would then change to 225 nm, and the detector<br />
would make two runs at this wavelength. This pattern would<br />
continue in five-nanometer increments until the detector has made<br />
two runs at the last wavelength, 350 nm.<br />
After setting up your Develop File, you are ready to load it and run.<br />
When the Develop File is loaded, you will notice an additional field<br />
in the Status Screen, #Runs (Fig. 4.19).<br />
Status λ AU #Runs<br />
READY 220 +0.0001 1/3 �<br />
Figure 4.19 The Status Screen with the Develop File loaded<br />
#Runs<br />
The #Runs field in the Status Screen shows the current run number,<br />
followed by a forward slash and the total number of injections for the<br />
wavelength specified in the λ field. For example, if the file is set up<br />
to make three injections per wavelength, and the detector is in the<br />
second run for the 250-nm setting, the #Runs field would appear as<br />
2/3. The field is updated with each injection.<br />
01/2004 Thermo Electron 55
Status Menu The Status Menu looks the same for a Develop File as it does for a<br />
typical chromatographic file (Fig. 4.20).<br />
REPEATING THE<br />
DEVELOP FILE<br />
Sample Queue<br />
File D: DEVELOP<br />
---------------------------------------------------------<br />
Time Wavelength<br />
0.00 250<br />
10.00 250<br />
Rise Time 1.0<br />
Autozero Time 0.00<br />
Range 1 1.0<br />
Range 2 1.0<br />
Figure 4.20 The Status Menu with the Develop File<br />
NOTE: You can change any of the parameters in the Status Menu while the<br />
detector is running, but the changes will be effective only until the next<br />
wavelength is loaded.<br />
After the last wavelength is run, the detector is reset automatically to<br />
the starting wavelength in the Develop File. The file can be run as<br />
many additional times as you wish, as long as the detector continues<br />
to receive run signals.<br />
Sometimes it's convenient to group samples together under different<br />
detector conditions in an automated run. For these occasions, the<br />
UV2000 offers a queuing feature. Using a queue, you can program<br />
the detector to load and run a specified file for your first group of<br />
samples, and then automatically load a second file to run your next<br />
group of samples. The queue feature allows you to run as many as<br />
ten groups in a single queue.<br />
QUEUE MENU To access the Queue Menu, follow these steps:<br />
1. Press [MENU].<br />
2. Select /QUEUE/.<br />
When no queue is loaded, the Queue Menu appears as shown in<br />
Figure 4.21. On page 58, we'll see how the menu appears when a<br />
queue is loaded.<br />
56 Thermo Electron 01/2004<br />
�
SETTING UP<br />
A QUEUE<br />
> Edit ❑ Load<br />
❑ Delete<br />
Figure 4.21 The Queue Menu with no queue loaded<br />
To set up a queue, select /Edit/ from the Queue Menu. For an empty<br />
queue, the display appears as shown in Figure 4.22.<br />
Order<br />
1<br />
File:Name #Runs<br />
Figure 4.22 An empty queue<br />
Entering a Line A "1" is automatically placed in the Order field of the first file to be<br />
run. You can't change that, so the cursor appears under the first<br />
editable field, File:Name. Scroll through the available files and press<br />
[ENTER] when your choice appears.<br />
NOTE: You may only select numbered files. The Scan and Develop files are<br />
not available in the Queue mode.<br />
Enter the number of injections to be made in the #RUNS field and<br />
press [ENTER]. You can have as many as 999 injections per file.<br />
Adding More Lines After completing the first line, a second line appears automatically.<br />
The Order field reads 2, and the rest of the line is blank. Select the<br />
proper file and the number of injections to be made for that file. You<br />
can have as many as ten groups in the queue.<br />
Deleting a Line To delete a line, use the [-] key in the File:Name field until it goes<br />
blank. When you leave the line, it is deleted and the queue is resorted<br />
automatically.<br />
An Example An example of a queue appears in Figure 4.23.<br />
Order File:Name #Runs<br />
1 2:THEOPHYL 5<br />
2 3:ABCD 25<br />
3 1:BARBITUA 10<br />
Figure 4.23 An example of a queue<br />
In our example, we have programmed the detector to run File 2 for<br />
the first five injections, File 3 for the next 25 injections, and File 1 for<br />
the last ten injections.<br />
01/2004 Thermo Electron 57
LOADING A QUEUE To load a queue, select /Load/ in the Queue Menu. When the words<br />
"Load Queue" appear, press [ENTER]. The confirmation message in<br />
Figure 4.24 appears for one second.<br />
** Queue Loaded **<br />
Figure 4.24 The confirmation message<br />
when a queue is loaded<br />
When a queue is loaded, the letter "Q" appears at the extreme left of<br />
the Status Screen (Fig. 4.25).<br />
Status λ AU<br />
Q READY 250 +0.00001 �<br />
Figure 4.25 The Status Screen when a queue is loaded<br />
If you attempt to load a queue when no queue exists, the message<br />
shown in Figure 4.26 will appear on the display.<br />
** No Queue Available **<br />
Figure 4.26 The message that is displayed<br />
when no queue is available<br />
RUNNING A QUEUE When the detector receives its first start signal, it loads and runs the<br />
file designated in Order 1. It will continue to run this file each time it<br />
receives a start signal until the file has run the number of times<br />
specified in the #Runs field. The detector will then load and run the<br />
file designated in Order 2 and run it the number of times specified in<br />
that line, and so on, until the entire queue has run.<br />
Viewing its<br />
Progress<br />
To view a queue's progress while it is running:<br />
1. Press [MENU].<br />
2. Select /QUEUE/. Note that when a queue is loaded, the Queue<br />
Menu (Fig. 4.27) looks different. The Load field has been<br />
replaced by "Pause," which we will discuss on page 59.<br />
> Edit ❑ Pause<br />
❑ Delete<br />
Figure 4.27 The Queue Menu with a queue loaded<br />
58 Thermo Electron 01/2004
3. Select /Edit/ to display the queue. (Refer to Figure 4.23 for an<br />
example queue.)<br />
While the queue is running, the #Runs field automatically decreases<br />
by one with each injection. When a particular file's last injection is<br />
made, the queue is automatically resorted. In other words, the<br />
information for Order 2 is now moved up to Order 1, the information<br />
for Order 3 is moved up to Order 2, and so forth. This process<br />
continues until the queue becomes empty, is paused, or is deleted.<br />
Loading other Files When a queue is loaded or running, you may not load any other file<br />
from the Files Menu without first pausing or deleting the queue. If<br />
you forget to pause or delete the queue and attempt to load a different<br />
file, you will get the message shown in Figure 4.28. You are then<br />
returned to the Files Menu.<br />
** Queue Loaded **<br />
Cannot Load File<br />
Figure 4.28 The message that appears when you attempt to load a<br />
file when a queue is already loaded or running<br />
EDITING A QUEUE To edit an existing queue, follow the procedures outlined in "Setting<br />
Up a Queue" on page 57. You are allowed to edit the Queue while it<br />
is running, but if you want to edit anything in Order 1, you'll have to<br />
pause the queue first.<br />
PAUSING A QUEUE To pause a queue:<br />
1. Select /Pause/ from the Queue Menu.<br />
2. When the words "Pause Queue" appear, press [ENTER]. If a<br />
file is running, the run continues until it is completed, at which<br />
point the detector returns to its READY state. The letter Q no<br />
longer appears in the Status Menu.<br />
DELETING/<br />
STOPPING A<br />
QUEUE<br />
When you wish to continue, you must reload the queue. When the<br />
detector receives a start signal, the queue will resume operation at the<br />
point where it left off.<br />
Use the following steps to delete an existing queue or to stop a<br />
running queue:<br />
1. Display the Queue Menu.<br />
2. Select /Delete/.<br />
3. When the words "Delete Queue" appear, press [ENTER]. If a<br />
file is running, the run continues until it is completed. The<br />
confirmation message shown in Figure 4.29 appears for one<br />
second and you are returned to the Queue Menu.<br />
01/2004 Thermo Electron 59
K-Factor<br />
** Queue Deleted **<br />
Figure 4.29 The queue-deleted message<br />
You may delete or stop a queue at any time, but remember that the<br />
queue will be subsequently erased from the detector's memory. It is<br />
good practice to delete an existing queue prior to designing a new<br />
one.<br />
The K-factor calculates a factored response that can be used to<br />
eliminate, add, or subtract absorbances. This technique is useful for<br />
suppressing peaks when there are two co-eluting, or poorly resolved,<br />
peaks in your chromatogram. It is also useful in applications where<br />
you want to add or subtract absorbances at two different wavelengths<br />
in real-time.<br />
For example, if you want to quantitate a peak without interference<br />
from another peak, you would use the K-factor to calculate a response<br />
of zero.<br />
More specifically, let's say you want to analyze for Compound A in<br />
the presence of Compound B. If both absorb at the monitoring<br />
wavelength, λ1, but only Compound B absorbs at a second<br />
wavelength, λ2, you can calculate a K-factor for Compound B using<br />
its absorbances at λ1 and λ2. You can then use the K-factor to<br />
calculate the absorbance due only to Compound A at the monitoring<br />
wavelength (λ1), by subtracting Compound B's contribution from the<br />
total absorbance. The UV2000 uses the algorithm:<br />
Absorbance due to A at λ1 = TAbs(λ1) - K x TAbs(λ2)<br />
where TAbs(λ1) is the sum of the absorbances of A and B at the<br />
monitoring wavelength, K is the K-factor, and TAbs(λ2) is the total<br />
absorbance obtained at λ2.<br />
60 Thermo Electron 01/2004
AN EXAMPLE Figure 4.30 shows a chromatogram of a mixture of toluene and butyl<br />
paraben where the two compound peaks overlap. Toluene (Peak A) is<br />
the compound of interest. Butyl paraben (Peak B) is the peak we<br />
want to suppress. We will use this example throughout the following<br />
steps for determining and using the K-factor.<br />
1.35 1.51<br />
Time (in Minutes)<br />
01/2004 Thermo Electron 61<br />
B<br />
Figure 4.30 A chromatogram of two unresolved peaks:<br />
toluene (A) and butyl paraben (B)<br />
Choosing a Pair of Wavelengths<br />
The first step in determining the K-factor is to choose a pair of<br />
wavelengths for your analysis.<br />
1. Take an absorbance spectrum of each compound. You can do<br />
this by injecting samples of compound A and compound B<br />
alone, separately, under the same chromatographic conditions<br />
as your analysis, and using the UV2000's scanning feature.<br />
(See "Scanning" on page 46.)<br />
For the compounds in our example, we get the spectra shown<br />
in Figure 4.31.<br />
A<br />
DT-Z023E\FM
Toluene<br />
Butyl Paraben<br />
200 380<br />
200 380<br />
Wavelength (nm)<br />
Figure 4.31 Spectra of individual compounds<br />
2. Label the wavelength maximum for your peak of interest as λ1.<br />
3. From the spectra, pick a wavelength for which compound B<br />
absorbs and compound A does not. This wavelength is labeled<br />
λ2. For our example, we have chosen 254 nm as λ1 and 280<br />
nm as λ2.<br />
62 Thermo Electron 01/2004<br />
DT-Z024E/FM
Calculating the K-factor<br />
Use the UV2000's Display AU, λ screen (page 53) to obtain the<br />
individual absorbance value data from your scan of compound B.<br />
Calculate the K-factor using the following equation:<br />
K = AU1/AU2<br />
where AU1 and AU2 are the absorbance values for compound B at λ1<br />
and λ2, respectively.<br />
For our example, the absorbance values are 0.0144 and 0.0032 (for<br />
254 and 280 nm respectively), so our K-factor is 4.5, calculated as<br />
follows:<br />
K = 0.0144 / 0.0032 = 4.5<br />
Using the K-Factor<br />
To use the K-factor, set the parameters in the Analog Outputs Menu,<br />
inject your sample, and monitor the results as follows:<br />
1. Press [MENU].<br />
2. Select /OPTIONS/.<br />
3. Select /Analog Outputs/.<br />
The menu shown in Figure 4.32 will appear.<br />
Analog 1 Offset (%) 0<br />
Analog 2 Offset (%) 0<br />
---------------------------------------------------------<br />
Analog 2 AU<br />
K Factor 1.000<br />
Figure 4.32 UV2000's Analog Outputs Menu<br />
4. Scroll down to Analog 2 and select AU1-K*AU2.<br />
5. Scroll down to K-factor and enter your calculated value<br />
(4.5, for our example).<br />
6. Inject your sample.<br />
HINT: Make sure your file was set to dual-wavelength mode as<br />
described in Chapter 3. Also remember that in this example, AU1<br />
(λ1) is 254 nm and AU2 (λ2) is 280 nm.<br />
7. Use Analog Output 2 on the detector's rear panel to monitor the<br />
chromatograms for your peak of interest.<br />
01/2004 Thermo Electron 63
1.51<br />
Time (in Minutes)<br />
Figure 4.33 Chromatogram of toluene with butyl paraben suppressed<br />
Absorbance Ratios<br />
Our example chromatogram would now appear as shown in<br />
Figure 4.33, with a slightly lowered response for toluene and no<br />
absorbance contribution from butyl paraben. Using the K-factor in<br />
this way, we can quantitate toluene in the presence of butyl paraben<br />
without altering the chromatography.<br />
Ratioing the detector's outputs from two different wavelengths can be<br />
a useful way of confirming peak purity. When a peak is pure, the<br />
ratio of the absorbances should remain constant. Thus, the ratio for a<br />
pure compound produces a relatively square wave, while the ratio for<br />
an impure compound produces a distorted wave (see the plots at 1.57<br />
and 0.97 minutes, respectively, in Figure 4.34).<br />
64 Thermo Electron 01/2004<br />
DT-Z025E/FM
Chromatogram<br />
AU1/AU2 Plot<br />
Mixture of<br />
Two Compounds<br />
0.97 1.57<br />
Mixture of<br />
Two Compounds<br />
0.97 1.57<br />
Time (in Minutes)<br />
Pure<br />
Compound<br />
Pure<br />
Compound<br />
Figure 4.34 Using absorbance ratios to determine the purity<br />
of two peaks in a chromatogram<br />
01/2004 Thermo Electron 65<br />
DET\Z17V\FM
To use absorbance ratioing, you need to select AU1/AU2 for the<br />
Analog 2 Output field in the Analog Outputs Menu. You also need to<br />
select the two wavelengths you want to ratio.<br />
To select the most appropriate wavelengths, use the UV2000's Scan<br />
File to collect a spectrum across a range of wavelengths. Then select<br />
/Display AU, λ/ from the Replay Menu and examine the collected<br />
data.<br />
The data shown in Figure 4.35 are typical.<br />
Display λ AU<br />
1.50 220 0.00001<br />
---------------------------------------------------------<br />
1.50 250 1.66681<br />
1.50 280 0.28831<br />
Figure 4.35 The Display AU, λ screen<br />
Ratioing only occurs when the absorbance value for each wavelength<br />
exceeds 12.5% of the corresponding range value. So, in our example,<br />
if Ranges 1 and 2 were set to 1.0 in the /FILES/, /Edit/, Options<br />
Menu, the 250 and 280 nm wavelengths could be ratioed. [Twelve<br />
and a half percent of 1.0 (the range) is 0.125. Absorbance values less<br />
than 0.125 are too low for ratioing.] No ratio output is produced<br />
when the absorbance values fall below 7.5% of the range values.<br />
Generally, good wavelengths to choose are:<br />
1. the lambda max of the main peak (AU1)<br />
2. a wavelength with an absorbance value less than the lambda<br />
max but greater than 12.5% of the corresponding range (AU2)<br />
HINT: A good rule of thumb is to select a second wavelength that is<br />
either half the height of the lambda max or more than ten nanometers<br />
removed from the lambda max.<br />
Whichever wavelengths you choose, don’t select a wavelength that<br />
has a low absorbance value. Low absorbance values decrease the<br />
signal-to noise ratio, thus making the absorbance ratios less<br />
meaningful. Similarly, a small fluctuation in AU2 results in a big<br />
difference in the absorbance ratio if AU2 is very small. Fortunately,<br />
by relying on the preset range values, the UV 2000 has a built-in<br />
safeguard that prevents the ratioing of low absorbance values.<br />
66 Thermo Electron 01/2004
5 Required Maintenance<br />
Introduction<br />
Flowcells<br />
CHANGING THE<br />
FLOWCELL<br />
Finnigan SpectraSYSTEM detectors are finely-tuned scientific<br />
instruments that we at Thermo Electron are proud to stand behind.<br />
Even so, routine maintenance is necessary to ensure peak<br />
performance, so we can only guarantee our detectors' performance if<br />
you follow proper care and maintenance procedures.<br />
This Chapter shows you how to replace and clean your detector's<br />
flowcell and lamps.<br />
Also included in this Chapter is a procedure for testing the detector's<br />
absorbance linearity. This characteristic is particularly useful if your<br />
laboratory's standard operating procedures require periodic detector<br />
validation. You will need the optional cuvette holder to perform the<br />
test.<br />
If you have any questions on proper maintenance or would like to<br />
arrange for a preventive maintenance program, please contact your<br />
local Thermo Electron representative.<br />
This section describes the changing and general cleaning of your<br />
detector's flowcell. For other flowcell problems, such as a cracked<br />
window or leaks that occur in locations other than at the inlet/outlet<br />
fittings, contact your Thermo Electron representative.<br />
NOTE: Flowcells are factory-assembled units that should not be<br />
disassembled under any circumstance.<br />
The flowcell needs to be removed whenever you replace a broken<br />
cell, change specialized applications, or clean the cell with nitric acid.<br />
For a list of available flowcells, see "Specifications - Flowcells" in<br />
Appendix A. All flowcells are shipped premounted in a holder for<br />
easier installation and alignment.<br />
To access the flowcell, remove the front panel of the detector. The<br />
flowcell assembly is located behind the lower housing (Fig. 5.1).<br />
Once the housing is removed, the flowcell is easily identified by the<br />
tubing that extends from the fittings on either side of the cell body<br />
(Fig. 5.2).<br />
01/2004 Thermo Electron 67
Lamp<br />
Housing<br />
Flowcell<br />
Housing<br />
RUN<br />
STOP<br />
STATUS<br />
68 Thermo Electron 01/2004<br />
MENU<br />
ENTER<br />
ZERO SpectraSYSTEM UV2000<br />
Figure 5.1 Detector flowcell and lamp housings<br />
Display<br />
Keypad<br />
Flowcell Removal Use the following steps to remove the flowcell:<br />
1. Disconnect the power cord from the rear panel of the detector<br />
and make sure that the instrument is turned off.<br />
2. If you have not already done so, remove the detector's front<br />
panel by grasping the bottom of the panel firmly with one hand<br />
and pulling back.
Flowcell<br />
Inlet<br />
Tubing<br />
Clamp<br />
Flowcell<br />
Assembly<br />
3. Loosen the knurled thumbscrew that holds the flowcell housing<br />
in place, and remove and set aside both the thumbscrew and the<br />
housing.<br />
4. Disconnect the flowcell inlet tube from the chromatograph and<br />
free the flowcell outlet tubing from the waste reservoir.<br />
5. Loosen the two thumbscrews on the photodiode mount and<br />
carefully pull the mount straight back (Fig. 5.2). The cable that<br />
connects the photodiode mount to the detector is sufficiently<br />
long to allow the mount to rest on the bench top.<br />
NOTE: Avoid putting fingerprints or scratches on the flowcell<br />
windows, photodiode surface, or monochromator lens, all of which<br />
are exposed during these procedures. If dirty, the surfaces should be<br />
cleaned with spectroscopic-grade methanol (or isopropanol) and lintfree<br />
lens paper only.<br />
Flowcell Assembly<br />
Thumbscrews<br />
Figure 5.2 Removing the cell cover to expose the flowcell<br />
and the photodiode mount<br />
Flowcell<br />
Outlet<br />
Photodiode<br />
Mount<br />
6. Loosen the thumbscrew that holds the tubing clamp in place.<br />
Gently pull the clamp toward you just far enough to disengage<br />
the tubing.<br />
7. Loosen the two thumbscrews that hold the flowcell assembly.<br />
Carefully pull the assembly toward you to remove it from the<br />
detector.<br />
01/2004 Thermo Electron 69<br />
DT-Z019E\FM
Flowcell Installation To install a flowcell, follow these steps:<br />
1. With the inlet tube on the bottom, slide the flowcell assembly<br />
onto the alignment pins (Fig. 5.3) and securely fasten it in place<br />
with the two thumbscrews.<br />
Tubing<br />
Clamp<br />
Flowcell<br />
Alignment<br />
Pins<br />
Figure 5.3 Installing the flowcell assembly<br />
Photodiode<br />
Mount<br />
Flowcell<br />
Assembly<br />
2. Slip the flowcell's inlet and outlet tubes into the slots of the<br />
tubing clamp and tighten the thumbscrew that holds the clamp<br />
in place.<br />
3. Replace the photodiode mount and fasten it securely with the<br />
two thumbscrews.<br />
4. Connect the inlet tubing to the chromatographic column and<br />
the outlet tubing to the waste reservoir.<br />
5. Taking care not to pinch the cable or tubing, replace the<br />
flowcell housing and secure it with the knurled thumbscrew.<br />
Replace the detector's front cover.<br />
6. Connect the power cord to the rear detector panel.<br />
70 Thermo Electron 01/2004<br />
DT-Z020E\FM
CLEANING THE<br />
FLOWCELL<br />
Cleaning with<br />
Organic Solvents<br />
The exterior and/or interior surfaces of the flowcell can become<br />
contaminated. When flowcell contamination occurs, it is usually<br />
caused by precipitation or solubility problems, such as when the<br />
quality of your mobile phase solvent components and the cleanliness<br />
of your samples are variable. Signs of a contaminated flowcell are<br />
increased baseline noise, signal spiking, erratic or drifting baselines,<br />
and increased backpressure.<br />
If you suspect that your flowcell needs to be cleaned, start with the<br />
following procedure using organic solvents.<br />
NOTE: Flowcells are factory-assembled units that should not be<br />
disassembled under any circumstance. If you encounter contamination<br />
problems that are not remedied by this cleaning procedure, contact your<br />
local Thermo Electron representative to arrange for repair or replacement.<br />
1. Make certain that the cleaning solvent(s) you plan to use is/are<br />
miscible with the solvent already present in the flowcell and<br />
pump. Isopropanol is a good choice for most applications.<br />
NOTE: If the last solvent in the pump was an aqueous buffer<br />
solution, be sure to pump 25 - 40 mL of HPLC-grade water (or<br />
equivalent) through the system to remove any salts before flushing<br />
with the cleaning solvent(s).<br />
2. Flush the flowcell with 40 - 50 milliliters of solvent (HPLCgrade<br />
water, methanol, or isopropanol). You can either pump<br />
the solvent through the flowcell with the chromatographic<br />
pump, or you can draw the solvent through the flowcell using a<br />
large-volume syringe.<br />
If you use an LC pump to flush the flowcell, first remove the<br />
column from your chromatographic system to avoid column<br />
degradation. Replace the column with an appropriate length of<br />
tubing, ensuring that all connections are snug and leak-free.<br />
If you use a syringe, always draw the solution through the<br />
flowcell.<br />
CAUTION! Never use a syringe to force solvent through a<br />
flowcell. Pressurizing the syringe could cause a leak or rupture<br />
that would result in an extremely dangerous, uncontrolled<br />
spraying of solvent.<br />
01/2004 Thermo Electron 71
Cleaning with<br />
Nitric Acid<br />
Methanol or isopropanol is generally sufficient for cleaning a<br />
flowcell. However, if the flowcell is still contaminated after flushing<br />
with organic solvents, follow this nitric acid procedure.<br />
CAUTION! Nitric acid is extremely corrosive and can react explosively<br />
with alcohols (especially methanol). Be sure to adhere to your<br />
company's safety procedures for handling and disposal of corrosive<br />
acids. Flush the flowcell with water to remove all traces of alcohol prior<br />
to flushing with nitric acid!<br />
1. Remove the flowcell assembly from the detector housing<br />
(following the procedure on page 68) before cleaning with a<br />
nitric acid solution. This will prevent possible leaks from<br />
harming the mechanical or electronic components of the<br />
detector.<br />
2. Flush the flowcell with water before proceeding. This step is<br />
very important!<br />
3. Prepare a 20% (v/v) solution of nitric acid in HPLC-grade<br />
water.<br />
4. Pump the nitric acid solution through the flowcell with the<br />
chromatographic pump or draw it through with a large-volume<br />
syringe.<br />
If you use an LC pump, replace your column with tubing and<br />
make sure water was the last solvent in the pump and solvent<br />
reservoir. If you use a syringe, always draw the solution<br />
through the flowcell.<br />
CAUTION! Never use a syringe to force nitric acid through a<br />
flowcell. Pressurizing the syringe could cause a leak or rupture<br />
that would result in an extremely dangerous, uncontrolled<br />
spraying of nitric acid.<br />
5. After you have finished the cleaning procedure and before<br />
returning to the buffer solution, pump another 25 - 40 mL of<br />
water through the flowcell to remove all traces of nitric acid<br />
before returning to your chromatographic solvents. Reinstall<br />
the flowcell assembly.<br />
NOTE: Flush the pump with water immediately after the nitric acid<br />
flush. Leaving nitric acid solution in the pump for prolonged periods<br />
can damage pump seals.<br />
72 Thermo Electron 01/2004
Lamps<br />
Lamp<br />
Housing<br />
Flowcell<br />
Housing<br />
As lamps age, there is a reduction in light output that results in<br />
increased baseline noise. If the noise level on your detector's output<br />
signal is increasing and cleaning the flowcell doesn't help, you should<br />
change the appropriate lamp, using the procedures in this section.<br />
Remove the front panel of the detector. The deuterium and tungsten<br />
lamps are located in the upper housing (Fig. 5.4). Both lamps are<br />
supplied prealigned in their individual assemblies to make them easy<br />
to install and align.<br />
NOTE: Never loosen the screws that hold the lamp to its assembly or<br />
attempt to rotate or move the lamp up or down in the assembly. Either of<br />
these actions can cause a loss of alignment and degrade the system's<br />
performance.<br />
RUN<br />
STOP<br />
STATUS<br />
01/2004 Thermo Electron 73<br />
MENU<br />
ENTER<br />
ZERO SpectraSYSTEM UV2000<br />
Figure 5.4 Location of lamp housing<br />
Display<br />
Keypad
THE DEUTERIUM<br />
LAMP<br />
The deuterium (D2) lamp typically requires a warm-up time of twenty<br />
to thirty minutes. However, for applications that demand great<br />
sensitivity, you may want to allow a warm-up period of up to an hour.<br />
The deuterium lamp's lifetime is usually at least 1000 hours. Each D2<br />
lamp assembly is equipped with a chronometer (Fig. 5.5) that tracks<br />
the total hours of lamp operation. To read the chronometer, note the<br />
position of the "gap" in the mercury tube against the graduated<br />
background. You can also track lamp life automatically. (See<br />
"Automatic Lamp Operations" on page 41 for details.)<br />
NOTE: The lamp surface must be kept free of fingerprints and smudges.<br />
If the surface needs cleaning, use a lint-free lens paper moistened with<br />
methanol or isopropanol.<br />
Plug-In<br />
Connector<br />
74 Thermo Electron 01/2004<br />
0<br />
Gap<br />
Lamp Leads<br />
Hours 2000<br />
Figure 5.5 Deuterium lamp chronometer<br />
D2 Lamp Removal These four steps explain how to remove the deuterium lamp.<br />
1. Disconnect the power cord from the detector's rear panel and<br />
make sure that the instrument is turned off.<br />
CAUTION! Intense UV light can damage your eyes. Always<br />
disconnect the power cord before exposing the lamp and always<br />
allow sufficient time for the lamp to cool before removing it, as it<br />
gets quite hot when lit.<br />
2. If you have not already done so, remove the detector's front<br />
panel by grasping the bottom of the panel firmly with one hand<br />
and pulling back.<br />
DT-Z038E/DG
Tungsten<br />
Lamp Assembly<br />
Deuterium<br />
Lamp Assembly<br />
Flowcell<br />
Inlet<br />
Flowcell<br />
Assembly<br />
RUN<br />
STOP<br />
STATUS MENU<br />
01/2004 Thermo Electron 75<br />
ENTER<br />
ZERO SpectraSYSTEM UV2000<br />
Figure 5.6 Deuterium and tungsten lamp assemblies<br />
Flowcell<br />
Outlet<br />
3. Remove the lamp housing by loosening the thumbscrew and<br />
pulling the cover straight back to expose the lamp assemblies<br />
(Fig. 5.6).<br />
4. Unplug the deuterium lamp lead from the detector, taking care<br />
not to twist the connector as you gently pull it out.<br />
5. Loosen the two thumbscrews that hold the lamp assembly in<br />
place and pull the assembly straight out.<br />
DT-Z004E\FM
D2 Lamp Installation Follow these steps to install a new D2 lamp.<br />
1. Hold the deuterium lamp assembly so that the leads are at the<br />
top. Slide the assembly onto the alignment pin shown in<br />
Figure 5.7. (The alignment pin is located directly below the<br />
detector's monochromator aperture.)<br />
2. Securely fasten the assembly in place with the two<br />
thumbscrews and aluminum standoffs.<br />
3. Connect the lamp lead to the right-hand terminal in the lamp<br />
compartment.<br />
4. Replace the lamp housing and secure it with the knurled<br />
thumbscrew. Replace the detector's front cover.<br />
5. Connect the power cord to the rear detector panel.<br />
Tungsten<br />
Lamp<br />
Alignment<br />
Pins<br />
Deuterium<br />
Lamp<br />
Alignment<br />
Pin<br />
Figure 5.7 Deuterium and tungsten lamp alignment pins<br />
76 Thermo Electron 01/2004<br />
DT-Z021E/M
THE TUNGSTEN<br />
LAMP<br />
The tungsten (W) lamp typically requires only fifteen minutes of<br />
warm-up time. Its lifetime is approximately 2500 hours. You can<br />
track lamp life automatically. (See "Automatic Lamp Operations" on<br />
page 41 for details.)<br />
W Lamp Removal Follow the steps below to remove the tungsten lamp.<br />
1. Disconnect the power cord from the detector's rear panel and<br />
make sure that the instrument is turned off.<br />
CAUTION ⎯ Hot Surface! Avoid burns. Always allow<br />
sufficient time for the lamp to cool before removing it.<br />
2. If you have not already done so, remove the detector's front<br />
panel by grasping the bottom of the panel firmly with one hand<br />
and pulling back.<br />
3. Remove the lamp housing by loosening the thumbscrew and<br />
pulling the cover straight back to expose the lamp assembly<br />
(Fig. 5.7).<br />
4. Unplug the tungsten lamp lead from the detector, taking care<br />
not to twist the connector as you gently pull it out.<br />
5. Loosen the thumbscrew and the aluminum standoff that hold<br />
the lamp assembly in place and pull the assembly straight out.<br />
W Lamp Installation These five steps explain how to replace the tungsten lamp.<br />
1. Hold the lamp assembly so that the leads are at the top. Slide<br />
the assembly onto the two alignment pins shown in Figure 5.7.<br />
(The alignment pins are located on either side of the detector's<br />
monochromator aperture.)<br />
2. Securely fasten the assembly in place with the thumbscrew and<br />
aluminum standoff.<br />
3. Connect the lamp lead to the left-hand terminal in the lamp<br />
compartment.<br />
4. Replace the lamp housing and fasten securely with the<br />
thumbscrew.<br />
5. Connect the power cord to the rear detector panel.<br />
01/2004 Thermo Electron 77
A Installation and<br />
Specifications<br />
Introduction<br />
Installation<br />
This Appendix covers the initial installation of your UV/Vis detector,<br />
including hookup to other chromatographic instrumentation. As you<br />
go through unpacking and installation, you may want to use the<br />
Start-up Checklist located at the beginning of this manual. The<br />
checklist is an abbreviated version of this Appendix and is supplied as<br />
a quick reference of how to conduct a successful installation. After<br />
installation, verify that the detector is working properly by running<br />
the two tests described on page 116.<br />
Also included in this Chapter is a list of your detector's specifications.<br />
UNPACKING Carefully remove the detector from the shipping container and inspect<br />
both the detector and packing for any signs of damage. If you find<br />
any damage, immediately contact the shipping company.<br />
The shipping container should contain the detector, an accessory kit,<br />
any options you ordered for your detector, and this manual. The<br />
accessory kit should contain the following items:<br />
• 8-pin connector<br />
• 12-pin connector<br />
• Nut and ferrule tubing set<br />
• Teflon tubing<br />
• 1/16 nut fitting (1/4-28 thread)<br />
• 1/16 ferrule fitting<br />
• Union<br />
• External run/autozero cable<br />
• Analog cable<br />
• Extra cap screws (2)<br />
• LC test mix vial<br />
• 3-foot, 4-conductor cable<br />
01/2004 Thermo Electron 79
CHECKING THE POWER<br />
Carefully check to make sure you received all the items listed on the<br />
packing list. If any items are missing, contact your Thermo Electron<br />
representative immediately.<br />
You will need the following tools for installation:<br />
• a narrow-tip screwdriver (2 mm wide)<br />
• a #2 Phillips screwdriver<br />
Place the detector on the benchtop as close as possible to the<br />
chromatographic column outlet (thus minimizing the length of tubing<br />
necessary for connection to the flowcell inlet). Allow at least five<br />
inches (13 cm) of clear space between the detector's rear panel and<br />
any wall or obstruction. This provides both access to the rear-panel<br />
connectors and a free flow of cooling air.<br />
The detector is shipped with the voltage and fuses preset for your<br />
location. To verify the correct setting, look through the cut-out<br />
window on the voltage selector cover (Figure A.1). (The cover is<br />
located on the detector’s rear panel but, if your instrument is new, it<br />
may be hidden behind a precautionary sticker.) If the voltage setting<br />
satisfies you local site requirements, skip to “Fuses” on page 82. If<br />
not, proceed to the next section, “Voltage Selection.”<br />
NOTE: Do not plug in the instrument without first verifying that the voltage<br />
is properly set for your location! And never run the detector at more than<br />
10 % below the nominal line voltage!<br />
Voltage Selection If the preset voltage does not satisfy your local requirements, select<br />
the correct voltage by following these steps:<br />
1. Insert a small flat-blade screwdriver into the slot at the top of<br />
the voltage selector cover (Fig. A.1).<br />
PRY OPEN HERE<br />
80 Thermo Electron 01/2004<br />
220Vac<br />
Figure A.1 Opening the voltage selector cover<br />
DT-Z033E/FM/CT
Current<br />
Voltage<br />
Selection<br />
Voltage-<br />
Selector<br />
Drum<br />
Fuse<br />
Holder<br />
Figure A.2 Voltage selector barrel and fuse holders<br />
2. Gently pry open the cover. Once unlatched, the cover will<br />
swing downward to reveal the voltage selector barrel and the<br />
fuses.<br />
3. Remove the voltage selector barrel from the detector. The<br />
selector resembles a wheel with four settings: 100, 120, 220,<br />
and 240 V (Fig. A.2)<br />
4. Rotate the barrel such that the desired voltage setting will be<br />
visible through the cut-out in the cover when it is replaced.<br />
5. Replace the barrel in the detector. Before closing the cover,<br />
check the fuses according to the procedure on page 82.<br />
01/2004 Thermo Electron 81<br />
DT-Z026E/DG
Fuses To verify that your detector is fitted with the correct fuses, follow<br />
these steps. (If you haven't already done so, first open the voltage<br />
selector cover according to step 1 in the "Voltage Selection"<br />
procedure listed above.)<br />
1. Pull each fuse holder straight towards you. The fuse holders<br />
are the black squares with arrows located directly beneath the<br />
voltage selector (Fig. A.2).<br />
2. Remove each fuse from its holder. Check the fuse amperage,<br />
voltage, and type according to the following description. You<br />
should have either:<br />
• two T2A/250V fuses, for 100 - 120 VAC operation, or<br />
• two T1A/250V fuses, for 220 - 240 VAC operation<br />
Fuse Holders<br />
Figure A.3 Fuses<br />
Door of<br />
Power-Entry Module<br />
82 Thermo Electron 01/2004<br />
Fuse<br />
3. Assuming that you have the proper fuses on hand, reinsert the<br />
fuses and fuse holders, making sure that the arrows on the<br />
holders are oriented in the same direction as the arrow inside<br />
the cover panel (Fig A.3).<br />
4. Close the cover panel by swinging it upward and pressing it in<br />
until it snaps closed. The correct voltage should appear in the<br />
cut-out panel.<br />
NOTE: To avoid damaging the instrument, verify that the new voltage<br />
setting (displayed in the cut-out window) is correct before you turn it on!<br />
Power Cord Attach the power cord at the lower left of the detector’s rear panel.<br />
DT-Z027E\DG
MAKING<br />
REAR PANEL<br />
CONNECTIONS<br />
I ON<br />
O OFF<br />
220Vac<br />
TERMINAL CONFIGURATION<br />
Locate the two connectors (8-pin and 12-pin) in your accessory kit<br />
and insert them in the appropriate sockets on the detector's rear panel<br />
(Fig. A.4). Note that the connectors are both labeled and keyed to the<br />
sockets, making it impossible to insert them incorrectly.<br />
UV1000<br />
TERMINAL CONFIGURATION<br />
12. STOP (Input)<br />
11. GROUND<br />
10. RUN (Input)<br />
9. GROUND<br />
8. ZERO (Input)<br />
7. GROUND<br />
6. CHASSIS GND.<br />
5. GROUND<br />
4. READY (Output)<br />
3.<br />
2.<br />
1.<br />
H.<br />
G.<br />
F. 1AU/V<br />
E. GROUND<br />
D.<br />
C.<br />
B. 1.O. VF/S<br />
A. GROUND<br />
THIS PRODUCT IS COVERED BY ONE OR MORE OF THE FOLLOWING PATENTS:<br />
498, 812<br />
UV2000<br />
TERMINAL CONFIGURATION<br />
12. STOP (Input) ANALOG 1<br />
11. GROUND OUTPUT<br />
10. RUN (Input)<br />
9. GROUND<br />
8. ZERO (Input)<br />
7. GROUND<br />
6. CHASSIS GND.<br />
5. GROUND<br />
4. READY (Output)<br />
3.<br />
2.<br />
1.<br />
H.<br />
G.<br />
F. 1.O. VF/S<br />
E. GROUND<br />
ANALOG 2<br />
OUTPUT<br />
D.<br />
C.<br />
B. 1.O. VF/S<br />
A. GROUND<br />
THIS PRODUCT IS COVERED BY ONE OR MORE OF THE FOLLOWING PATENTS:<br />
498, 812<br />
Figure A.4 Analog output and remote communications connectors<br />
The upper connector holds the detector's analog output terminals.<br />
The lower connector allows the detector to communicate with other<br />
devices in your liquid chromatographic system. There is also a<br />
communications port, labeled COMM.<br />
Use the cables supplied with your detector to make the connections<br />
described in this section. For each connection, insert the cable's bare<br />
wire into the appropriate detector terminal. Hold the wire in place<br />
while you tighten the small setscrew located next to each opening.<br />
01/2004 Thermo Electron 83<br />
DT-Z170E/DT
UV2000 Analog<br />
Output Connections<br />
UV1000 Analog<br />
Output Connections<br />
The terminals on the UV2000's analog output connector are labeled<br />
ANLG 1 Output and ANLG 2 Output (Fig. A.4). Each output has<br />
four terminals, labeled H through E for Output 1, and D through A for<br />
Output 2. These terminals correspond to:<br />
• 0.01 V full-scale (terminals H and D)<br />
• 0.10 V full-scale (terminals G and C)<br />
• 1.0 V full-scale (terminals F and B)<br />
• Ground (terminals E and A)<br />
NOTE: Analog outputs are driven to twice their range. In other words,<br />
their maximum output is twice the selected range. To avoid clipping the<br />
voltage, be sure to connect integrators and data systems to the 1.0 V<br />
terminal and to use caution when connecting recorders to the 0.01 or 0.10 V<br />
terminals.<br />
The terminals on the UV1000's analog output connector are labeled<br />
UNRANGED Output and RANGED Output (Fig. A.4). The<br />
UNRANGED Output is a 1 AU/VOLT unrangeable output primarily<br />
used for integrators and workstations. The UNRANGED Output can<br />
be connected to terminal F with a ground at terminal E or A. The<br />
RANGED Output has four terminals:<br />
• 0.01 V full-scale (terminals H and D)<br />
• 0.10 V full-scale (terminals G and C)<br />
• 1.0 V full-scale (terminals F and B)<br />
• Ground (terminals E and A)<br />
Integrators/Workstations<br />
For the UV2000, connect your integrator/workstation to the 1.0VF/S<br />
(F or B) and corresponding ground (E or A) terminals. For the<br />
UV1000, connector your integrator/workstation to the 1AU/V output<br />
terminal (F) and the ground (E) terminal.<br />
Recorders<br />
Connect the positive input from your recorder to the full-scale voltage<br />
(0.01, 0.10, or 1.0 V) appropriate for your recorder. Connect the<br />
recorder's floating ground input to the corresponding GROUND<br />
terminal.<br />
NOTE: Do not connect the detector's GROUND to any earth ground on<br />
your recorder. This would lead to an increased noise level and a subsequent<br />
decrease in sensitivity.<br />
84 Thermo Electron 01/2004
Remote<br />
Communications<br />
Connections<br />
Your detector can accept inputs from, and send inputs to, remote<br />
devices through the remote communications connector (Fig. A.4).<br />
For example, if your chromatographic system has programmable<br />
timed events (contact closures or TTL), you can use one to<br />
automatically zero the detector signal during a run.<br />
The terminals available on the detector's remote communications<br />
connector are labeled STOP (Input), RUN (Input), ZERO (Input), and<br />
READY (Output), each with an associated ground terminal. The<br />
terminals are labeled 12 through 1.<br />
STOP (Input)<br />
You can use a timed event from your chromatographic system to take<br />
the detector out of run by connecting the system's event to the<br />
detector's STOP (Input) and GROUND terminals (terminals 12<br />
and 11).<br />
RUN (Input)<br />
You can use the remote-start event on your injector or autosampler to<br />
automatically put the detector into run whenever an injection occurs<br />
by connecting the event to the detector's RUN (Input) and GROUND<br />
terminals (terminals 10 and 9).<br />
ZERO (Input)<br />
You can zero the detector signal automatically by connecting a timed<br />
event on your chromatograph to the detector's ZERO (Input) and<br />
GROUND terminals (terminals 8 and 7).<br />
READY (Output)<br />
The detector is capable of driving one TTL load each time it goes to<br />
its READY state through the READY(Output) terminal. This ability<br />
to signal other instruments is particularly useful with autosamplers,<br />
where the detector can signal that it is ready for the next injection in<br />
an automated series of runs. To hook up the READY(Output)<br />
terminal, connect the input from the other instrument to the detector's<br />
READY(Output) and GROUND terminals (terminals 4 and 5). For<br />
more information on accessing this feature through the detector's<br />
keypad, see page 44.<br />
01/2004 Thermo Electron 85
CONNECTING TO<br />
THE FLOWCELL<br />
Lamp<br />
Housing<br />
Flowcell<br />
Housing<br />
Use the following steps to connect the flowcell:<br />
1. Remove the front panel of the detector. Although the flowcell<br />
assembly is located behind the lower housing (Fig. A.5), the<br />
housing does not need to be removed to connect your inlet and<br />
outlet lines.<br />
RUN<br />
STOP<br />
STATUS<br />
86 Thermo Electron 01/2004<br />
MENU<br />
ENTER<br />
ZERO SpectraSYSTEM UV2000<br />
Display<br />
Keypad<br />
Figure A.5 The flowcell assembly is located behind the flowcell housing
Flowcell<br />
Inlet<br />
Tubing<br />
Clamp<br />
Flowcell<br />
Assembly<br />
2. Use the finger-tight fitting and ferrule sets included with the<br />
installation kit to connect the column outlet directly to the<br />
detector's flowcell (fluid) inlet. Figure A.6 shows how the inlet<br />
line enters the detector from the left side, and winds around the<br />
flowcell before entering the flowcell from the bottom.<br />
NOTE: If additional tubing is required to reach the inlet, use a zero<br />
dead-volume union.<br />
3. Connect the detector's fluid outlet to the low-pressure union<br />
and waste tubing supplied in the installation kit.<br />
HINT: If you have several detectors (fluorescence, refractive index,<br />
electrochemical, etc.) hooked up in series, place your UV1000 or<br />
UV2000 detector closest to the column outlet, as its flowcell can<br />
withstand the greatest backpressure.<br />
4. Replace the front panel of the detector; making sure that the<br />
tubing passes through the slots without being pinched.<br />
Flowcell Assembly<br />
Thumbscrews<br />
Figure A.6 The flowcell assembly showing thumbscrews,<br />
photodiode mount, and flowcell inlet<br />
Flowcell<br />
Outlet<br />
Photodiode<br />
Mount<br />
01/2004 Thermo Electron 87<br />
DT-Z019E\FM
OPTIONAL FLOWCELLS<br />
Thermo Electron offers several different flowcells for use in different<br />
applications. Each flowcell possesses distinct design characteristics<br />
and performance specifications. These characteristics are compiled in<br />
Table A.1. Contact your Thermo Electron representative for details.<br />
Table A.1 Design and performance specifications for Finnigan SpectraSYSTEM flowcells *<br />
Path Max.<br />
Path Length Tubing Max. Flow Press.<br />
Flowcell (mm) Volume (µL) Diam. (in.) Material ** (mL/min) (psi)<br />
Analytical LC 6 9 .01 SS1 50 1000<br />
Analytical LC 10 15 .01 SS1 50 1000<br />
Microbore 3 1.2 .005 SS1 10 1000<br />
Microbore 6 7.0 .007 SS1 20 1000<br />
Semi-Prep,<br />
Open Column 3 4.5 .02 SS1 100 1000<br />
* All cells use sapphire for windows. All but the preparative flowcells have a heat exchanger.<br />
** SS1 = Stainless Steel with TFE Gaskets.<br />
Flowcell Orientation<br />
The flowcells listed above are configured for use with any<br />
SpectraSYSTEM detector. These detectors are vertically-oriented<br />
detectors that have the tubing clamp located above the flowcell as<br />
shown in Figure A.7.<br />
If you plan to use any of these flowcells on non- SpectraSYSTEM<br />
detectors (primarily horizontally-oriented detectors that have their<br />
tubing clamps located to the left side of the flowcell as shown in<br />
Figure A.8), you must realign the cell holder as described in the<br />
following instructions.<br />
Figure A.7 shows the flowcell as it is shipped.<br />
NOTE: Figures A.7 and A.8 show the tubing clamp as an aid to the<br />
proper positioning of the inlet and outlet tubes. The tubing clamp,<br />
however, is actually mounted onto the detector and is not part of the<br />
flowcell itself.<br />
HINT: To ensure proper alignment, always hold the cell holder and<br />
flowcell in the orientation shown in the illustrations.<br />
88 Thermo Electron 01/2004
Tubing Clamp<br />
(on<br />
verticallyoriented<br />
detectors)<br />
Mounting<br />
Screws<br />
Inlet Tube Outlet Tube<br />
Photodiode<br />
Standoffs<br />
Figure A.7 The alignment of UV1000 and UV2000 flowcells<br />
as they are shipped<br />
Photodiode<br />
Standoffs<br />
01/2004 Thermo Electron 89<br />
A.<br />
1. Remove the mounting screws and set them aside.<br />
2. Rotate the cell holder 90° counterclockwise. Do not rotate the<br />
cell body! Part B of Figure A.8 shows the cell holder in its<br />
new position. Note the new position of the photodiode<br />
standoffs.<br />
Tubing Clamp<br />
(on horizontallyoriented<br />
detectors)<br />
Cell Holder<br />
Inlet Tube<br />
Mounting Screw<br />
Holes<br />
B. C.<br />
DET\Z014\FM<br />
Outlet Tube<br />
Figure A.8 Changing the alignment of a flowcell so that it can be used on other detectors.<br />
(Turn the cell holder as shown in Part B. Align the inlet and outlet tubes<br />
with the tubing clamp as shown in Part C.)
Specifications<br />
3. Reattach the cell body by replacing and securing the mounting<br />
screws.<br />
4. Gently bend the inlet and outlet tubes as shown in Part C of<br />
Figure A.8. The inlet tube (wound around the cell body)<br />
should always enter at the bottom of the flowcell; the outlet<br />
tube should always exit at the top of the flowcell.<br />
Wavelength: D2 lamp: 190 to 380 nm (UV1000)<br />
190 to 365 nm (UV2000)<br />
W lamp: 366 to 800 nm<br />
Lamp(s): UV1000: D2 standard, W optional<br />
UV2000: D2 and W standard<br />
Bandwidth: 6 nm<br />
Wavelength Accuracy: ± 1.0 nm<br />
Wavelength Precision: ± 0.1 nm<br />
Range Selections: 3.0, 2.0, 1.0, 0.5, 0.2, 0.1,<br />
0.05, 0.02, 0.01, 0.005,<br />
0.002, 0.001, 0.0005 AUFS<br />
Absorbance Range: 0.0005 to 3.0 AUFS<br />
Absorbance Linearity<br />
@ 254 nm: Better than 1% to 2.0 AU<br />
Analog Outputs:<br />
UV2000:<br />
Outputs 1 and 2: Range-selectable over entire<br />
absorbance range<br />
Communications:<br />
Remote Inputs: Run, Stop, and Zero<br />
Remote Outputs: Ready<br />
90 Thermo Electron 01/2004
Specifications (cont.)<br />
Noise:<br />
Single-wavelength Mode:<br />
@ 254 nm,<br />
1.0-sec rise time: < ± 1.0 × 10 -5 Dual-wavelength Mode:<br />
AU<br />
@ 254 280 nm,<br />
1.0-sec rise time<br />
(UV2000 only): < ± 2.5 × 10 -5 AU<br />
Drift:<br />
after warm-up @ 254 nm < 2 × 10 -4 AU/hour<br />
Display: 2 × 24 character, high-contrast LCD<br />
Dimensions: 14.5” (37 cm) × 6” (15 cm) ×<br />
18.5” (47 cm)<br />
Weight: 40 lb. (18 kg)<br />
Power Requirements: 100/120/220/240 VAC<br />
50/60 Hz<br />
1.5/1.6/8.0/0.8A, 225VA<br />
Environmental: 10-40°C<br />
5-95% RH noncondensing<br />
01/2004 Thermo Electron 91
B Menu Reference<br />
Introduction<br />
Menu Trees<br />
This Appendix provides you with two Menu Trees, one each for the<br />
UV1000 (page 94) and the UV2000 (page 95). It also provides you<br />
with an alphabetical description of all the instrument's display fields.<br />
Fortunately, it is not necessary to read this Appendix in order to learn<br />
how to use your detector. It is included in the manual simply as a<br />
quick reference and aid to using your instrument.<br />
The Menu Trees are a representation of the detector’s overall menu<br />
structure. They show the location and interrelation of all the menus<br />
for your detector and, as such, they are a good reference to keep on<br />
hand while you work through the operating instructions in Chapters 3<br />
and 4. The menu trees will also help if you become "lost" while<br />
moving through the detector's menus. Separate, removable copies can<br />
be found in the pocket at the front of this manual.<br />
The Menu Reference is an alphabetical listing of each menu field and<br />
command. Included in each listing is the field's definition and, where<br />
appropriate, all allowable and default values.<br />
The UV1000 and UV2000 Menu Trees are useful tools for learning<br />
your way around your detector. You may wish to keep one handy<br />
while you learn where each display is located in the overall menu<br />
structure.<br />
01/2004 Thermo Electron 93
Wavelength Program<br />
Edit<br />
UV1000 Menus<br />
Time Wavelength<br />
0.00 250<br />
Wavelength Program<br />
Options<br />
FILE<br />
Options<br />
Load<br />
Edit Load<br />
Delete<br />
1.0<br />
0.00<br />
1.0<br />
Rise Time<br />
Autozero Time<br />
Range<br />
Load File<br />
COMMANDS<br />
Event Mark<br />
Short Output<br />
Shutdown Detector<br />
Delete<br />
Delete File<br />
[MENU]<br />
FILE COMMANDS<br />
OPTIONS TESTS<br />
DT-Z041E/DT<br />
94 Thermo Electron 01/2004<br />
[STATUS]<br />
Lamps<br />
AU<br />
0.00001<br />
1.0<br />
0.00<br />
1.0<br />
Status λ<br />
READY 250<br />
Time Wavelength<br />
0.00 250<br />
Rise Time<br />
Autozero Time<br />
Range<br />
D2 (190-380)<br />
0<br />
0<br />
0:00<br />
Manual<br />
0:00<br />
Manual<br />
0:00<br />
1:00<br />
Lamp<br />
D2 Lamp Hours<br />
W Lamp Hours<br />
Current Time<br />
Startup<br />
Startup Time<br />
Shutdown<br />
Shutdown Time<br />
Time From Ready<br />
OPTIONS<br />
Lamps<br />
Analog Outputs<br />
More<br />
Analog Outputs<br />
Analog 1 Offset (mV) 10<br />
Analog 2 Offset (%) 10<br />
More<br />
TESTS<br />
Yes<br />
Medium<br />
Off<br />
Active Hi<br />
Zero on λ Change<br />
Cursor Speed<br />
Status Lock<br />
READY Output<br />
Software Version<br />
Light Levels<br />
Diode Offsets<br />
Self-Tests
Edit<br />
UV2000 Menus<br />
pg 1 of 2<br />
Program Single λ<br />
Wavelength Program<br />
Options<br />
Files 1-4<br />
Edit File 1:<br />
File Name<br />
Program Single λ<br />
Time Wavelength<br />
0.00 250<br />
FILES<br />
Load<br />
Edit Load<br />
Copy Delete<br />
Program Dual λ (190-450)<br />
Load File 1:<br />
Program Dual λ (190-450)<br />
Time λ1 λ2<br />
0.00 250 280<br />
File S: Scan<br />
(see page 2)<br />
Copy<br />
Program Dual λ (366-700)<br />
Copy File 1:<br />
To File 1:<br />
COMMANDS<br />
Program Dual λ (366-700)<br />
Time λ1 λ2<br />
0.00 366 700<br />
File D: Develop<br />
(see page 2)<br />
Event Mark<br />
Short Outputs<br />
Shutdown Detector<br />
Delete<br />
Options<br />
Delete File 1:<br />
Rise Time<br />
Autozero Time<br />
Range 1<br />
Range 2<br />
OPTIONS<br />
Lamps<br />
Analog Outputs<br />
More<br />
[MENU]<br />
D2 (190-365)<br />
0<br />
0<br />
0:00<br />
Manual<br />
0:00<br />
Manual<br />
0:00<br />
1:00<br />
Lamp<br />
D2 Lamp Hours<br />
W Lamp Hours<br />
Current Time<br />
Startup<br />
Startup Time<br />
Shutdown<br />
Shutdown Time<br />
Time From Ready<br />
Software Version<br />
Light Levels<br />
Diode Offsets<br />
Self-Tests<br />
01/2004 Thermo Electron 95<br />
FILES QUEUE TESTS<br />
COMMANDS OPTIONS<br />
Lamps<br />
TESTS<br />
1<br />
1<br />
AU<br />
+01.000<br />
Analog 1 Offset (%)<br />
Analog 2 Offset (%)<br />
Analog 2<br />
K Factor<br />
Analog Outputs<br />
Yes<br />
Medium<br />
Off<br />
Active Hi<br />
Protect<br />
Off<br />
Off<br />
Off<br />
Off<br />
Zero On λ Change<br />
Cursor Speed<br />
Status Lock<br />
READY Output<br />
File Name<br />
1:<br />
2:<br />
3:<br />
4:<br />
QUEUE<br />
More<br />
DT-Z042E\DT<br />
(see page 2)
220<br />
350<br />
5<br />
250<br />
1.0<br />
0.00<br />
1.0<br />
1.0<br />
Start λ<br />
End λ<br />
UV2000 Menus<br />
Run λ<br />
Rise Time<br />
Autozero Time<br />
Range 1<br />
Range 2<br />
λ Interval<br />
Setup<br />
pg 2 of 2<br />
Setup<br />
Replay<br />
File S: Scan<br />
Single λ<br />
Status λ AU<br />
READY 250 0.0001<br />
File 1:<br />
Time Wavelength<br />
0.00 250<br />
Rise Time 1.0<br />
Autozero Time 0.00<br />
Range 1<br />
1.0<br />
Range 2<br />
1.0<br />
Replay Spectra<br />
Replay λ AU<br />
Replay<br />
Display AU, λ<br />
1.0<br />
1.0<br />
5<br />
0.00<br />
Display λ AU<br />
Range 1<br />
Range 2<br />
Replay Rate (nm/sec)<br />
Spectra Time<br />
Replay Spectra<br />
Display AU, λ<br />
220<br />
350<br />
5<br />
10.00<br />
1<br />
1.0<br />
0.00<br />
1.0<br />
1.0<br />
Start λ<br />
End λ<br />
Run Time<br />
Runs Per λ<br />
Rise Time<br />
Autozero Time<br />
Range 1<br />
Range 2<br />
λ Interval<br />
File D: Develop<br />
Dual λ<br />
Status λ AU<br />
READY 250 0.0001<br />
READY 280 0.0001<br />
File 1:<br />
Time λ1 λ2<br />
0.00 250 280<br />
Rise Time 1.0<br />
Autozero Time 0.00<br />
Range 1<br />
1.0<br />
Range 2<br />
1.0<br />
Load<br />
96 Thermo Electron 01/2004<br />
[STATUS]<br />
Load Queue<br />
Single λ<br />
Dual λ<br />
Scan File Loaded<br />
Develop File Loaded<br />
No Queue Loaded<br />
[MENU]<br />
Edit<br />
Edit Load<br />
Delete<br />
FILES QUEUE TESTS<br />
COMMANDS OPTIONS<br />
Scan File Loaded<br />
Order File Name # Runs<br />
1 (filename) 1<br />
Status λ AU Scan<br />
READY 250 0.0001 Zero<br />
File S:Scan<br />
Time λMax λMaxAU lMin<br />
Delete<br />
QUEUE<br />
Delete Queue<br />
Queue is Loaded<br />
Edit Pause<br />
Develop File Loaded<br />
Delete<br />
Status λ AU #Runs<br />
READY 250 0.0001 1/3<br />
File D:Develop<br />
Time Wavelength<br />
Pause<br />
Pause Queue<br />
DT-Z043E/DT<br />
1.0<br />
0.00<br />
1.0<br />
1.0<br />
0.00 250<br />
Rise Time<br />
Autozero Time<br />
Range 1<br />
Range 2
Menu Reference<br />
For quick reference, we have included this alphabetical list of each<br />
field, including a short definition, and allowable and default values.<br />
For a more detailed explanation of the functions of your detector, you<br />
should refer to Chapter 3: Basic Operations, and Chapter 4: Advanced<br />
Operations.<br />
Some fields are common to both the UV1000 and the UV2000, so we<br />
have indicated the detector name for fields that appear in only one<br />
detector.<br />
Analog 1 Offset (mV) This field offsets the Analog 1 output signal by 0, 1, 2, 5, 10, 20, or 50 mV.<br />
The default setting of 10 mV is appropriate in most cases. UV1000 only.<br />
Analog 1 Offset (%) This field offsets the Analog 1 output signal by a positive or negative 50, 20,<br />
10, 5, 2, 1, or 0 percent of the full-scale range. Default is 0%. UV2000 only.<br />
Analog 2 This field allows you to select the output signal from the Analog Output 2<br />
terminal. The selections are AU (the absorbance signal for wavelength one<br />
in single-wavelength operation or from wavelength two in dual-wavelength<br />
operation), AU1-KxAU2 (a calculated peak response using the K Factor<br />
technique), and AU1/AU2 (the absorbance ratio of wavelength 1 to<br />
wavelength 2). Default is AU. UV 2000 only.<br />
Analog 2 Offset (%) This field offsets the Analog 2 output signal by a positive or negative 50, 20,<br />
10, 5, 2, 1, or 0 percent of the full-scale range. Default is 0%.<br />
Analog Outputs This menu allows you to offset the signals from the analog output terminals<br />
located on the back panel of the instrument. For the UV2000, you can also<br />
select the output signal for Analog Output 2 and input a K factor.<br />
AU This field, located in the Status Screen, shows the detector's current<br />
absorbance reading. It is a six-digit number, ranging from -3.00000 to<br />
+3.00000 AUFS.<br />
Autozero Time This field tells the detector when to perform an automatic zero. Allowable<br />
values are 0.00 to 999.99 minutes. Default is 0.00 minutes.<br />
COMMANDS The Commands Menu lets you put an event mark into your chromatogram,<br />
short detector outputs, and shut down the detector.<br />
Copy This field accesses the Copy File field. UV2000 only.<br />
Copy File This field, along with the To File field, allows you to copy from the specified<br />
file to another file designation. UV2000 only.<br />
Current Time This field displays local time ranging from 0:00 to 23:59.<br />
Cursor Speed This field may be set to Slow, Medium, or Fast according to your need.<br />
Default is Medium.<br />
01/2004 Thermo Electron 97
Delete Under the top-level menu FILE(S), this field accesses the Delete File<br />
command.<br />
Under the top-level menu QUEUE, this field accesses the Delete Queue<br />
command. UV2000 only.<br />
Delete File This field deletes the designated file, setting all fields to their default values.<br />
After pressing [ENTER], the confirmation message **File Deleted**<br />
appears for one second.<br />
Delete Queue This field deletes the queue. After pressing [ENTER], the confirmation<br />
message **Queue Deleted** appears for one second. UV2000 only.<br />
D2 Lamp Hours This field tracks the total number of hours the detector's deuterium lamp has<br />
been in operation (up to 9999). When a new lamp is installed, you must set<br />
this parameter to zero.<br />
Diode Offsets This field displays the analog-to-digital (A/D) conversion frequencies of the<br />
sample and reference diodes when both lamps are turned off. These values<br />
can be used to measure the detector's digital noise level.<br />
Display AU, λ This command calls up the Display AU, λ screen, a screen that shows the<br />
incremental wavelength versus absorbance data for the selected spectral<br />
scan.<br />
Edit Under the top-level FILE(S) menu, the Edit Menu allows you to set up or<br />
edit files. The edits do not change the current settings of the detector until<br />
the file is loaded.<br />
Under the top-level QUEUE menu, the Edit Menu allows you to set up or<br />
edit a Queue. Edits may not be made to Order 1 while a queue is loaded or<br />
running unless you pause the queue first. UV2000 only.<br />
Edit File This field allows you to identify the file for set up or edit. Allowable<br />
designations are 1 to 4, S for the Scan file, and D for the Develop file.<br />
Default is 1. UV2000 only.<br />
End λ In the Scan File Setup, this field defines the wavelength at which the detector<br />
should finish the scan. Allowable values are 191 to 800 nm. Default is 350<br />
nm. UV2000 only.<br />
In the Develop File Setup, this field defines the wavelength at which the<br />
detector should run its last set of injections. Allowable values are 191 to 800<br />
nm. Default is 350 nm. UV2000 only.<br />
Event Mark The Event Mark field applies a 15% of full-scale spike on the detector's<br />
output signals.<br />
FILE(S) The UV1000’s FILES Menu and the UV2000’s FILES Menu allow you to<br />
edit, load, and delete files. On the UV2000, the FILES Menu also lets you<br />
copy files.<br />
98 Thermo Electron 01/2004
File Name This field allows you to enter a file name for a designated file (numbered<br />
1 to 4). The name can contain up to eight characters from the following list:<br />
A to Z, 0 to 9, /, -, and blank. Default is blank. UV2000 only.<br />
For Files S and D, the file names are automatically designated as SCAN and<br />
DEVELOP, respectively. No editing of these file names is allowed.<br />
UV2000 only.<br />
K Factor This field is used in the technique. Allowable values are -99.999 to 99.999.<br />
Default is 1.000. UV2000 only.<br />
λ (λ1, λ2) The wavelength field (λ in the UV1000, λ1, λ2 in the UV2000) located in<br />
the Status Screen shows the current detector wavelength setting(s).<br />
For the UV2000 only, these fields also appear in the Wavelength Program<br />
for dual-wavelength operation.<br />
λ Calibration The wavelength calibration screen located in the Tests Menu shows the<br />
current detector wavelength setting(s).<br />
λ Interval In the Scan File Setup, this field defines the wavelength interval at which the<br />
detector should perform the scan. Allowable values are 1, 2, 3, 4, 5, and 10<br />
nm. Default is 5 nm. UV2000 only.<br />
In the Develop File Setup, this field defines the wavelength increment the<br />
detector monochromator should use for wavelength changes between each<br />
set of injections. Allowable values are 1, 2, 3, 4, 5, 10, and 20 nm. Default<br />
is 5 nm. UV2000 only.<br />
λMax This field is the wavelength maximum in a spectral scan. UV2000 only.<br />
λMaxAU This field is the absorbance value for the corresponding wavelength<br />
maximum in a spectral scan. UV2000 only.<br />
λMin This field is the wavelength minimum in a spectral scan. UV2000 only.<br />
λ Offset The lambda offset screen lets you choose a number of steps, each<br />
representing 0.25 nm, by which you want to offset the wavelength. This<br />
field is used to check the detector's wavelength accuracy. Allowable entries<br />
are: 0, 1, 2, 3, 4, 5, 6, 7, 8, 9, 10, -1, -2, -3, -4, -5, -6, -7, -8, -9, and -10.<br />
The default is 0.<br />
Lamp The Lamp field allows you to choose from among several selections: D2<br />
(190-380) for the UV1000's deuterium lamp; D2 (190-365) for the UV2000's<br />
deuterium lamp; W (366-800) for the tungsten lamp; D2+W (190-800) for<br />
dual-lamp operation (UV2000 only); or Off to shut the lamp(s) off. Default<br />
is D2 (190-380) or D2 (190-365), for the UV1000 and UV2000,<br />
respectively.<br />
Lamps The Lamps Menu allows you to control the detector's lamp operations.<br />
Light Levels This field displays the analog-to-digital (A/D) conversion frequencies of the<br />
light detected by the sample and reference diodes when the D2 lamp is on.<br />
01/2004 Thermo Electron 99
Load Under the top-level menu FILE(S), the Load selection accesses the Load File<br />
command.<br />
Under the top-level menu QUEUE, the Load selection accesses the Load<br />
Queue field. UV2000 only.<br />
Load File The Load File field loads the designated file settings into the active runfile.<br />
After pressing [ENTER], the confirmation message **File Loaded**<br />
appears for one second.<br />
Load Queue The Load Queue field loads the queue. After pressing [ENTER], the<br />
confirmation message **Queue Loaded** appears for one second. UV2000<br />
only.<br />
More This menu allows you to access the Zero on λ Change, Cursor Speed, Status<br />
Lock, and READY Output fields. In the UV2000, you can also protect files<br />
from this menu.<br />
OPTIONS Found in the Main Menu, the Options Menu allows you to perform lamp and<br />
analog output operations.<br />
Options The Options selection in the Edit Menu of FILE(S) allows you to edit Rise<br />
Time, Autozero Time, and Range.<br />
Order This field designates the order in which the selected files in a queue will be<br />
run. UV2000 only.<br />
Pause This field accesses the Pause Queue command. UV2000 only.<br />
Pause Queue This field pauses an active queue. If a file is running, it continues until<br />
completed, and the detector returns to a READY state. UV2000 only.<br />
Program This field allows you to select single- or dual-wavelength operation. The<br />
selection toggles between Single λ, Dual λ(190-450), and Dual λ(366-700).<br />
Default is Single λ.<br />
Protect This field, along with the File Name field, protects a specified file from<br />
being edited, copied to, or deleted. The field toggles between On, allowing<br />
no changes to the file, and Off, where changes may be made. Default is Off.<br />
UV2000 only.<br />
QUEUE The Queue Menu allows you to edit, load, delete, or pause a queue. A queue<br />
is a series of files that are run in a specific order, and is typically used for<br />
automated runs. UV2000 only.<br />
Range The Range field controls the full-scale output range for the UV1000’s<br />
Analog Output 2 terminal. Allowable full-scale ranges are 3.0, 2.0, 1.0, 0.5,<br />
0.2, 0.1, 0.05, 0.02, 0.01, 0.005, 0.002, 0.001, and 0.0005 AUFS. Default is<br />
1.0 AUFS. UV1000 only.<br />
100 Thermo Electron 01/2004
Range 1, Range 2 The Range 1 and Range 2 fields control the full-scale output ranges for the<br />
UV2000's Analog Output 1 and Analog Output 2 terminals. Allowable fullscale<br />
ranges are 3.0, 2.0, 1.0, 0.5, 0.2, 0.1, 0.05, 0.02, 0.01, 0.005, 0.002,<br />
0.001, and 0.0005 AUFS. Default is 1.0 AUFS. UV2000 only.<br />
READY Output This field is used to communicate with other devices through the detector's<br />
READY(Output) terminal. This TTL terminal switches the transistor<br />
between high and low states whenever the detector starts a run. Select<br />
"Active Hi" or "Active Lo," for the high or low state, respectively. Default<br />
is Active Hi.<br />
Replay The Replay command sends you to the Replay Menu, from which you can<br />
set up the parameters for replaying stored spectra. UV2000 only.<br />
Replay Spectra This command is used to initiate replay of the designated spectrum. UV2000<br />
only.<br />
Replay Rate This field designates the rate at which the detector replays a stored spectrum.<br />
Allowable values are 1, 2, 5, 10, and 20 nm/sec. Default is 5 nm/sec.<br />
UV2000 only.<br />
Rise Time This field controls the detector's response time. Rise time is inversely<br />
proportional to the amount of baseline noise. Allowable values are 0.0, 0.1,<br />
0.2, 0.5, 1.0, 2.0, 3.0, 4.0, and 5.0 seconds. Default is 1.0 second.<br />
#Runs When this field appears in the Status Screen, the current run and the total<br />
number of injections to be made at the displayed wavelength appear directly<br />
below it. The field is updated at the beginning of each injection. UV2000<br />
only.<br />
When this field appears in a Queue setup, it displays the number of times<br />
each file runs in a queue. UV2000 only.<br />
Run λ This field designates the monitoring wavelength to be used when running the<br />
Scan file. Allowable values are 190 to 800 nm. Default is 254 nm. UV2000<br />
only.<br />
Run Time Located in the Develop file, this field is the amount of time designated for<br />
each chromatographic run. Allowable values are 0.01 to 999.99 minutes.<br />
Default is 10.00 minutes. UV2000 only.<br />
Runs per λ Located in the Develop file, this field designates the number of injections to<br />
be performed at each wavelength increment. Allowable values are 1 to 9.<br />
Default is 1. UV2000 only.<br />
Scan This field appears in the Status Screen when the Scan file is loaded. To<br />
initiate a scan, move the cursor to this field and press [ENTER]. UV2000<br />
only.<br />
Scan Zero Time This field allows you to set a runtime at which the detector will perform a<br />
baseline scan automatically. Allowable values are 0.00 to 99.99 minutes.<br />
Default is 0.00. UV2000 only.<br />
01/2004 Thermo Electron 101
Self-Tests This command tells the detector to run through its internal diagnostic tests.<br />
Setup The Setup Menu allows you to set up the parameters in the Scan file.<br />
UV2000 only.<br />
Short Outputs This command allows you to short the detector's outputs together. When<br />
you select Short Outputs, the detector's analog outputs are shorted together<br />
(zero volts) and the field changes to Unshort Outputs. To remove the short<br />
and return the outputs to their normal operating state, select Unshort<br />
Outputs, and the field changes back to Short Outputs. When you leave this<br />
screen, the field returns automatically to Short Outputs.<br />
Shutdown This field toggles between Manual (you turn off the lamp manually), Time<br />
(the lamp turns off automatically at a preset time), Time from READY (as<br />
explained under the Time from READY field), and End of Queue (the lamp<br />
turns off when the queue is finished, UV2000 only). Default is Manual.<br />
Shutdown Detector This command shuts down the detector's lamps and motors, leaving the<br />
electronics on to preserve memory. Press any key to return the detector to<br />
the same settings as when this field was activated.<br />
Shutdown Time This field displays the local time, ranging from 0:00 to 23:59, at which you<br />
have programmed the lamp to turn off automatically. Default is 0:00.<br />
Software Version This field displays the EPROM version of your detector's software.<br />
Spectra Time This field displays a list of the scans that are currently stored in memory.<br />
Each scan is identified by the runtime at which it was initiated. UV2000<br />
only.<br />
Start λ In the Scan File Setup, this field defines the wavelength at which the detector<br />
should begin the scan. Allowable values are 190 to 799 nm. Default is 220<br />
nm. UV2000 only.<br />
In the Develop File Setup, this field defines the wavelength at which the<br />
detector should run its first set of injections. Allowable values are 190 to<br />
799 nm. Default is 220 nm. UV2000 only.<br />
Startup The Startup field toggles between Manual, where you manually turn on the<br />
lamp, and Time, where the lamp automatically powers up at a preset time.<br />
Default is Manual.<br />
Startup Time This field displays the local time, ranging from 0:00 to 23:59, at which you<br />
have programmed the lamp to start up automatically. Default is 0:00.<br />
102 Thermo Electron 01/2004
Status This field in the Status Screen shows the current condition of the detector.<br />
The possible conditions are: READY (the selected lamp is lit and ready for<br />
initiation of a run), NRDY (the detector is set to the wrong lamp for the runwavelength<br />
requested, is performing internal tests, or has a possible internal<br />
problem), or UVW (the deuterium lamp is warming up). The run time is<br />
displayed when the running file has a programmed stop-time.<br />
In the UV2000, the letter Q appears at the beginning of this field when a<br />
queue is loaded.<br />
Status Lock The Status Lock field limits accessibility to the Status Menu (the<br />
programming section below the Status Screen). When set to On, only the<br />
Status Screen appears on the display and the down-arrow icon is not seen.<br />
Default is Off.<br />
TESTS The allows you to perform the detector's internal diagnostic, light level, and<br />
diode offset tests.<br />
Time, Wavelength The Wavelength Program contains the Time and Wavelength fields. It<br />
allows you to program changes in the detector's wavelength as a function of<br />
time.<br />
Time refers to the run time, in minutes, when a timed event (wavelength<br />
change, autozero, or run stop) is to occur. Allowable values range from 0.00<br />
to 999.99 minutes. Default is 0.00 minutes.<br />
Wavelength refers to the wavelength that will be set at a specified time.<br />
Allowable values for the UV1000 are: 190 to 380 nm with the deuterium<br />
lamp, and 366 to 800 nm with the tungsten lamp. Allowable values for the<br />
UV2000 are: 190 to 365 nm with the deuterium lamp, and either 366 to<br />
700 nm or 366 to 800 nm with the tungsten lamp (depending on whether the<br />
detector is operating in the dual-wavelength or the single-wavelength mode,<br />
respectively). Default is 250 nm.<br />
Time from READY A preset time interval from the Ready state of the detector, after which the<br />
detector lamp will turn off if a start signal has not been received from the<br />
keypad or external Run(Input) terminal. Allowable values range from 0:30<br />
to 9:59 hours. Default is 1:00.<br />
To File This field, along with the Copy File field, allows you to copy a file to the<br />
specified file identification. UV2000 only.<br />
W Lamp Hours This field tracks the total number of hours the detector's tungsten lamp has<br />
been in operation (up to 9999). When a new lamp is installed, you must set<br />
this parameter to zero.<br />
Wavelength Program This command allows you to access the Wavelength Program. See the<br />
"Time, Wavelength" description above for details.<br />
01/2004 Thermo Electron 103
Zero This field appears in the Status Screen when the Scan file is loaded. To<br />
initiate a background scan, move the cursor to this selection and press<br />
[ENTER]. UV2000 only.<br />
Zero on λ Change This field toggles between Yes, where the detector baseline automatically<br />
zeroes at each timed event during a programmed run, and No. Default<br />
is Yes.<br />
104 Thermo Electron 01/2004
C Troubleshooting<br />
Introduction<br />
Theory of Operation<br />
This Appendix provides you with helpful information for<br />
troubleshooting possible detector and chromatographic system<br />
problems. We have divided it into four sections:<br />
• a brief theory of operation<br />
• a troubleshooting guide that lists symptoms, possible problems,<br />
and remedies<br />
• error messages you might see on the detector's display<br />
• a description of internal and external diagnostic tests<br />
This brief Theory of operation is included to aid you in<br />
troubleshooting problems and performing maintenance for your<br />
detector. For more detailed information, you should contact your<br />
Thermo Electron representative.<br />
01/2004 Thermo Electron 105
OVERVIEW Figure C.1 shows the optical system used in both the UV1000 and<br />
UV2000 detectors. The detector operates in a double-beam mode<br />
using a fiber-optic beam-splitter that creates sample and reference<br />
beams. The reference beam is directed to a reference photodiode.<br />
The sample beam is lens-focused prior to passing through the flowcell<br />
to a sample photodiode.<br />
Lamps<br />
Deuterium<br />
"D2"<br />
Tungsten<br />
"W"<br />
An analog PCB processes the signals from the photodiodes and<br />
provides analog output signals through an 8-pin external connector.<br />
The digital PCB contains the EPROM (the built-in software),<br />
provides digital processing circuitry, and interfaces with the<br />
keyboard/display and the remote communications devices.<br />
(Additional software is held on an EPROM PCB.) The Motherboard<br />
provides all the necessary interconnections and power supplies.<br />
Shutter<br />
Baffles<br />
Beam<br />
Splitter<br />
Lens<br />
Grating<br />
Reference<br />
Photodiode<br />
Sample Cell<br />
Sample Photodiode<br />
Figure C.1 The optical system for the UV1000 and UV2000 detectors<br />
(Only the UV2000 has a shutter.)<br />
The deuterium and tungsten lamps are continuum light sources that<br />
provide high light intensity over the UV and visible wavelength<br />
ranges. Two sets of baffles minimize stray light. A concave<br />
holographic grating actuated by a microprocessor-controlled stepper<br />
motor provides wavelength selection.<br />
106 Thermo Electron 01/2004<br />
DT-Z001E/FM
Common Problems<br />
Troubleshooting Table<br />
This next section contains a table of symptoms, possible causes, and<br />
remedies for some common problems you may observe in detector<br />
response. Many of the problems attributed to the detector may<br />
actually be due to other components in the chromatographic system,<br />
so we have included references to these types of problems and<br />
solutions as well.<br />
Symptom Cause Remedy<br />
1. Spikes on baseline. a. Gas bubbles in the flowcell. a. Degas mobile phase. Supply<br />
backpressure device to flowcell (check<br />
back-pressure rating). Check for leaks at<br />
high-pressure fittings.<br />
b. Immiscible solvent bubbles<br />
following mobile phase<br />
changeover.<br />
b. Flush flowcell with 2-propanol, then<br />
with mobile phase.<br />
c. Electrical interference. c. Check electrical lines for good<br />
connections and/or interference from<br />
broadcast radiation. Check for ground<br />
loops.<br />
d. Extremely large fluctuations<br />
in voltage on AC line.<br />
d. Remove systems (e.g., ovens) that cause<br />
voltage fluctuations, isolate the detector<br />
to "quiet" circuit, or use UPS (UPS,<br />
uninterruptible power supply).<br />
2. Random noisy baseline. a. Contaminated flowcell. a. Flush flowcell with cleaning solvents as<br />
described in Chapter 5. Check for leaks.<br />
b. Leak in sample inlet line. b. Check all fittings from column outlet to<br />
flowcell inlet for leaks.<br />
c. Bubble trapped in flowcell. c. Increase flow rate until bubble is<br />
removed. Supply backpressure device to<br />
flowcell (check back-pressure rating to<br />
avoid rupturing flowcell).<br />
d. Leaking flowcell. d. Replace flowcell.<br />
01/2004 Thermo Electron 107
Troubleshooting Table (cont.)<br />
Symptom Cause Remedy<br />
2. Random noisy baseline,<br />
cont'd.<br />
3. Excessive baseline drift.<br />
See Baseline problems.<br />
e. Insufficient lamp warm-up. e. Allow a 30 minute warm-up for normal<br />
operation; one hour for maximum<br />
sensitivity.<br />
f. Lamp aging or defective. f. Replace lamp.<br />
g. Ground loop problem<br />
between integrator and<br />
detector.<br />
h. Flowcell, lamp, lenses, or<br />
photodiode dirty.<br />
i. Integrator input voltage<br />
does not match detector<br />
output voltage.<br />
g. Check for proper cable connections for<br />
detector output; do not ground at both<br />
ends of cable.<br />
h. Clean dirty component as described in<br />
Chapter 5.<br />
i. Connect integrator to appropriate output<br />
connectors on detector (see<br />
Appendix A). Check attenuation setting<br />
on integrator.<br />
a. Flowcell contaminated. a. Flush flowcell with cleaning solvents as<br />
described in Chapter 5. Check for leaks.<br />
b. Mobile phase<br />
contamination.<br />
c. Material bleeding from<br />
column.<br />
d. Leaks in system, or<br />
flowcell.<br />
e. Tiny bubble trapped in<br />
flowcell.<br />
f. Large temperature<br />
fluctuations.<br />
b. Replace with fresh mobile phase made<br />
with high-purity solvents.<br />
c. Clean or replace column.<br />
d. Check all fittings for leaks. Replace<br />
flowcell.<br />
e. Increase flow rate until bubble is<br />
removed. Connect backpressure device<br />
to flowcell outlet (check back-pressure<br />
rating to avoid rupturing flowcell).<br />
f. Remove system from drafts. Thermostatically<br />
control column temperature.<br />
108 Thermo Electron 01/2004
Troubleshooting Table (cont.)<br />
Symptom Cause Remedy<br />
4. No peaks, or peaks much<br />
smaller than expected.<br />
a. Incorrect wavelength setting. a. Check wavelength setting. Make sure<br />
the correct file is selected.<br />
b. Lamp not on or defective. b. Make sure lamp is lit. Run detector's<br />
diagnostic tests to check lamp. Replace<br />
lamp if necessary.<br />
c. Integrator input voltage<br />
does not match detector<br />
output voltage.<br />
d. Insufficient sample reaching<br />
the detector.<br />
5. Broad, tailing peaks. a. Rise time is too large (too<br />
slow).<br />
6. Clicking sound when<br />
UV2000 is in dualwavelength<br />
mode.<br />
c. Connect integrator to appropriate output<br />
connectors on detector (see<br />
Appendix A). Check attenuation setting<br />
on integrator.<br />
d. Check entire chromatographic system for<br />
leaks. Verify sample injection volume.<br />
a. Lower the rise time selection.<br />
b. Flowcell volume too large. b. Change to a flowcell with smaller<br />
volume.<br />
a. Noise comes from grating<br />
motor, and is normal.<br />
7. Detector won't power up. a. Tripped circuit breaker at AC<br />
wall outlet.<br />
a. No action necessary.<br />
a. Resolve problem, reset circuit breaker.<br />
b. Blown detector fuse. b. Resolve problem, replace fuse.<br />
c. Incorrect voltage selected. c. Reset detector for correct incoming linevoltage<br />
(see Appendix A).<br />
d. Power cord not connected. d. Connect power cord.<br />
01/2004 Thermo Electron 109
Error Messages<br />
There are three types of error messages that you may see on your<br />
detector's display:<br />
• System errors<br />
• Real-time errors<br />
• User-input errors<br />
Each type of error is explained below in further detail.<br />
SYSTEM ERRORS System errors are indicated on the display by a double set of<br />
exclamation points (!! !!). They occur whenever an undesirable<br />
condition exists that prevents the detector from operating. If one of<br />
these messages appears, try turning the detector's power switch off<br />
and on. If the message recurs, contact your Thermo Electron<br />
representative.<br />
• SYSTEM RESET<br />
• RAM ERROR<br />
• ADDRESS ERROR<br />
• BUS ERROR<br />
• DIVIDE BY ZERO<br />
• LOW L0 ERROR<br />
• LOW L1 ERROR<br />
• DISTANT QUEUE ERROR<br />
REAL-TIME<br />
ERRORS<br />
Real-time error messages indicate that you need to correct a certain<br />
hardware condition. Possible messages are:<br />
Lamp Cover Open<br />
Check that the detector's lamp housing is in place and properly<br />
installed.<br />
Low Light Detected From Deuterium Lamp<br />
This message indicates that the deuterium lamp may not be on, may<br />
be improperly installed, or needs to be replaced due to low light<br />
energy. It can also appear if the lamp cover is replaced while the<br />
lamp is on.<br />
Using the Lamps Menu (see "Automatic Lamp Operations" on<br />
page 41), turn the lamp state to off, wait five seconds, and then switch<br />
the lamp on. If the error message recurs, check for proper lamp<br />
installation according to the procedure outlined in Appendix A.<br />
If the lamp is installed correctly, its surface is clean, and the message<br />
still appears, replace the lamp.<br />
110 Thermo Electron 01/2004
Low Light Detected From Tungsten Lamp<br />
This message indicates that the tungsten lamp may not be on, may be<br />
improperly installed, or needs to be replaced due to low light energy.<br />
Using the Lamps Menu (see "Automatic Lamp Operations" on<br />
page 41), turn the lamp state to off, wait five seconds, and then switch<br />
the lamp on. If the error message recurs, check for proper lamp<br />
installation according to the procedure outlined in Appendix A.<br />
If the lamp is installed correctly, its surface is clean, and the message<br />
still appears, replace the lamp.<br />
INPUT ERRORS The following error messages indicate improper use of the detector's<br />
menu system.<br />
A File Is Already Running<br />
You cannot start a different file while a file is already running.<br />
Invalid Parameters, Spectrum Not Allowed<br />
Invalid scanning setup parameters have been entered, so the detector<br />
cannot perform a spectral scan.<br />
No More Available Memory<br />
All available system memory is full.<br />
No Queue Available<br />
You cannot load a queue if none has been set up first. (Because<br />
queues are not available on the UV1000, this message only appears<br />
on the UV2000.<br />
No Spectra Available<br />
You cannot run Replay Spectra when no spectra are available in<br />
memory. Because there is no scanning feature on the UV1000, this<br />
message only appears on the UV2000.<br />
Protected File, Cannot Be Copied To<br />
You cannot copy to a protected file. (File protection is not offered on<br />
the UV1000, so this message can only appear on the UV2000.<br />
Protected File, Cannot Be Deleted<br />
You cannot delete a protected file. (File protection is not offered on<br />
the UV1000, so this message can only appear on the UV2000.<br />
Protected File, Cannot Be Edited<br />
You cannot modify a protected file. (File protection is not offered on<br />
the UV1000, so this message can only appear on the UV2000.<br />
Queue Loaded, Cannot Load File<br />
When a queue is loaded, you cannot load any other file. Because<br />
queues are not available on the UV1000, this message only appears<br />
on the UV2000.<br />
01/2004 Thermo Electron 111
Diagnostic Tests<br />
INTERNAL<br />
DIAGNOSTIC<br />
TESTS<br />
Run In Progress, Testing Not Allowed<br />
You cannot run the detector's built-in diagnostics while a run is in<br />
progress.<br />
Run Not In Progress, No Scanning Allowed<br />
A spectral scan can only be performed when a run is in progress.<br />
Because there is no scanning feature on the UV1000, this message<br />
only appears on the UV2000.<br />
Detector Shutdown<br />
This message occurs when you use the Shutdown Detector field to<br />
turn off the detector. (See "Shutdown Detector" in Chapter 4.) Press<br />
any key on the keypad to turn on the detector.<br />
Scan Memory Full<br />
This message occurs when the Scan File is loaded and the scan data<br />
memory storage is full. Because there is no scanning feature on the<br />
UV1000, this message only appears on the UV2000.<br />
Run In Progress, No Replay Allowed<br />
The UV2000 does not allow you to replay stored spectral scans when<br />
the Scan file is loaded and a run is active. Because there is no<br />
scanning feature on the UV1000, this message only appears on the<br />
UV2000.<br />
This section describes the internal diagnostic tests supplied with your<br />
detector. It also references two external tests that you can run. Use<br />
these tests if you suspect that your detector is not working properly.<br />
You can access the detector's internal diagnostic tests by following<br />
these steps:<br />
1. Press [MENU].<br />
2. Select /TESTS/.<br />
3. The Tests menu appears in Figure C.2.<br />
❑ Software Version<br />
❑ Light Levels<br />
---------------------------------------------------------<br />
❑ Diode Offsets<br />
❑ λ Calibration<br />
❑ Self-Tests<br />
Figure C.2 Detector's Tests Menu<br />
112 Thermo Electron 01/2004
Software Version Select this field to display the EPROM version of your detector's<br />
software (Fig. C.3).<br />
Version 1.01<br />
Figure C.3 The software version<br />
Light Levels The Light Levels test displays numbers related to the level of light<br />
intensity seen by the sample and reference photodiodes. When you<br />
select /Light Levels/, the screen in Figure C.4 appears.<br />
S1: nnnnn.n R1: nnnnn.n<br />
S2: nnnnn.n R2: nnnnn.n<br />
Figure C.4 The Light Levels screen<br />
The sample (S1, S2) and reference (R1, R2) numbers may differ<br />
considerably between instruments. A five- or six-digit number is<br />
typical. If you get an unusual reading, check the photodiodes and the<br />
analog PCB. These components are the ones that are the most likely<br />
to affect light intensity. If any of the numbers is zero, call<br />
Thermo Electron.<br />
Diode Offsets The Diode Offsets test presents numbers related to the level of<br />
background signal received from the sample and reference<br />
photodiodes when the lamps are off (dark current). When you select<br />
/Diode Offsets/, the screen in Figure C.5 appears.<br />
>C S1: nnnn.n R1: nnnn.n<br />
S2: nnnn.n R2: nnnn.n<br />
Figure C.5 The diode offsets screen<br />
The sample (S1, S2) and reference (R1, R2) numbers may vary<br />
considerably between instruments. A three- or four-digit number is<br />
typical. As with the Light Levels test, check the photodiodes and the<br />
analog PCB, the components most likely to affect light intensity, if<br />
you get an unusual reading. If any of the numbers are zero, call<br />
Thermo Electron.<br />
To recalculate the diode offsets, select C. The offsets may need to be<br />
recalculated if the light levels are less than the diode offsets. This<br />
situation normally occurs after slight diode offset drift or while<br />
working with extremely low light.<br />
λ Calibration Selecting /λ Calibration/ brings up the screen shown in Figure C.6.<br />
You can use this screen (in combination with the optional Cuvette<br />
01/2004 Thermo Electron 113
Holder Accessory) to offset the factory-calibrated wavelength to more<br />
closely match an FDA, industry, or in-house calibration standard.<br />
NOTE: If you wish to conduct your calibration using the Cuvette Holder,<br />
the following procedure has also been detailed in Appendix E for your<br />
convenience.<br />
λ Offset (steps) 0<br />
Figure C.6 The lambda offset screen<br />
NOTE: The UV1000 and UV2000 detector is calibrated using a mercury<br />
lamp fixture. This provides a very narrow emission line at 254 nm. Broadband<br />
calibration standards, such as holmium oxide and didymium filters,<br />
make calibration more difficult and less accurate.<br />
To offset the factory-calibrated wavelength, select the number of<br />
"steps" by which you want the wavelength to be offset. Each step<br />
represents approximately 0.25 nm, so if you choose "2" for the<br />
number of steps, you will have offset the wavelength by + 0.5 nm.<br />
You can offset the wavelength by as much as ± 2.5 nm.<br />
NOTE: The offset value is not cleared upon resetting the RAM memory. It<br />
can only be changed from the lambda offset screen.<br />
Self-Tests The detector automatically runs eight internal diagnostic tests when it<br />
is powered up. To run the tests at any other time, simply select<br />
/Self-Tests/.<br />
If any test (other than the two lamp tests) fails, you'll see a message to<br />
that effect on the display. Clear the message and run the remainder of<br />
the self-tests by pressing [ENTER]. Repeat this process as many<br />
times as necessary until all self-tests are completed and the Status<br />
Screen appears. If any test has failed, the Status Screen will read<br />
"NRDY" (Not Ready).<br />
Although you can frequently get back to the Ready state on your own<br />
(e.g., you can manually turn on the lamps from the Options Menu, or<br />
load a file), the detector may not function properly and your results<br />
may be affected. For this reason, and to help you troubleshoot the<br />
detector on your own, we have listed the MLF (most likely failure)<br />
for each test. Problems that are not readily resolved should be<br />
referred to your Thermo Electron representative.<br />
114 Thermo Electron 01/2004
The eight self-tests are:<br />
1. RAM. This test checks both non-volatile and volatile RAM<br />
with a read/write test. The "Testing RAM" message only<br />
appears during self-initiated testing. On power-up, the test<br />
occurs without any special message. A failure during either<br />
type of testing is indicated by the messages "Bad DRAM" or<br />
"Bad NOVRAM." MLF: Digital PCB.<br />
2. Voltages. This test checks the circuitry-supply voltages.<br />
MLF: Motherboard.<br />
3. Analog Outputs. This test checks the scale and linearity of the<br />
output signal (recorder/integrator). Failure is indicated by a<br />
"Fail" or a "Bad Analog Linearity" message. MLF: Analog<br />
PCB.<br />
4. Diode Offsets. This test checks the diodes (photodiodes) with<br />
the lamp(s) off (dark current). Either a “Bad Sample Diode” or<br />
an “Intense Light Detected” message indicates failure. You<br />
should verify that the sample photodiode is fastened securely to<br />
the flowcell and that light is actually passing through the<br />
flowcell. If "Fail" or a "Bad Ref. Diode Detected" appear, call<br />
your Thermo Electron representative. MLF: Photodiode or<br />
Analog PCB.<br />
5. Motor. The Motor Test checks the monochromator motor and<br />
its voltages. MLF: Motor.<br />
6. Deuterium Lamp. This test checks the D2 lamp and its<br />
voltages when the lamp is on and when it is off. If the message<br />
"D2 Not Detected" appears, the lamp voltages are good, but the<br />
lamp is either not present or not functioning properly. Try<br />
replacing the deuterium lamp and retrying the test. If the word<br />
"Fail" appears, call your Thermo Electron representative.<br />
MLF: Lamp or Motherboard.<br />
7. Tungsten Lamp. This test checks the W lamp and its voltages<br />
when the lamp is on and when it is off. If the message "W Not<br />
Detected" appears, the lamp voltages are good, but the lamp is<br />
not present or is not functioning properly. Try replacing the<br />
tungsten lamp and retrying the test. If the word "Fail" appears,<br />
call your Thermo Electron representative. MLF: Lamp or<br />
Motherboard.<br />
8. Lamp and Shutter. (UV2000 only)This test actually has<br />
several parts, each of which checks a different part of the<br />
lamps' and shutter's operation. If either of the lamps fails, an<br />
appropriate message will be displayed. Try replacing the lamp<br />
and retrying the test. If a "Bad Shutter" message appears, call<br />
your Thermo Electron representative. MLF: part listed on<br />
display.<br />
01/2004 Thermo Electron 115
EXTERNAL<br />
DIAGNOSTIC<br />
TESTS<br />
This section describes two external diagnostic tests that can be used to<br />
verify that your detector is working properly.<br />
LC Test Mix An ampule of prepared LC Test Mix is included as part of your<br />
detector's accessory kit. An instruction sheet describing the<br />
parameters for running the test mix and showing the resulting<br />
chromatogram is also enclosed. This is a good test to run when you<br />
first set up your LC system.<br />
Absorbance<br />
Linearity<br />
HINT: Keep the chromatogram that you generate with the LC Test Mix.<br />
It can be a useful baseline for troubleshooting problems later on.<br />
Use the optional cuvette holder (see Appendix E) and certified<br />
standards to test the absorbance linearity of your detector in the UV<br />
range (approximately 235 nm to 350 nm). For your convenience, the<br />
following procedure is also detailed in Appendix E.<br />
HINT: This procedure is particularly useful for laboratories that require<br />
periodic detector validation.<br />
To perform the test, you will need procedure E 925 from the<br />
American Society for Testing and Materials (ASTM) and standard<br />
potassium dichromate (SRM 930) from the National Institute of<br />
Standards and Technology (NIST; formerly the National Bureau of<br />
Standards, NBS). The test involves the preparation of acidic<br />
solutions of potassium dichromate at four concentrations and the<br />
absorbance measurement of each solution at four wavelengths<br />
between 235 and 350 nm. After correcting for an absorbance blank,<br />
the linearity deviation of a plot of absorbance versus concentration<br />
should be less than 1%.<br />
If you want more information on this test, or find that your instrument<br />
does not conform to these specifications and requires service, contact<br />
your local Thermo Electron representative.<br />
116 Thermo Electron 01/2004
D Glossary<br />
Introduction<br />
A - C<br />
We have included a glossary to define certain technical terms used<br />
throughout the manual's text. These terms are consistent with<br />
standard definitions used throughout the analytical industry, and are<br />
added here as a quick reference only.<br />
A/D Analog-to-digital. Converts a detector's analog signal to a digital signal.<br />
AUFS Absorbance units full-scale; a measure of sensitivity.<br />
absorbance A process where the intensity of light shining through a sample is decreased;<br />
the transmitted light is measured in absorbance units, which are directly<br />
proportional to the concentration of the absorbing sample.<br />
analog offset A voltage applied to the output signal in order to keep the signal "on-scale"<br />
throughout a run.<br />
background scan The reference spectrum of the mobile phase. It is subtracted from the sample<br />
spectral scans to correct for baseline absorbances. Also called baseline scan.<br />
baseline The reference line at the bottom of a chromatogram from which<br />
measurements are made. A baseline represents the chromatogram that<br />
would be drawn if only the mobile phase (with no sample) were run through<br />
the column.<br />
chronometer A gauge for measuring the total amount of time something has been in<br />
operation.<br />
D - F<br />
defaults The values or choices built-in to a system. If no specific choice is made, the<br />
detector will run using the default settings.<br />
develop file A feature that allows you to make multiple injections of a sample at different<br />
wavelengths, automatically.<br />
degassing The practice of removing air from the mobile phase, usually by sparging or<br />
applying a vacuum.<br />
diagnostics Methods used to detect and isolate problems.<br />
display The two-line screen on all SpectraSYSTEM instruments.<br />
01/2004 Thermo Electron 117
edit file A copy of the file used for editing. Once loaded, the parameters set in the<br />
edit file are transferred to the runfile.<br />
error message A displayed message that notifies you of a problem.<br />
field The area in a display, screen, or menu where an entry is required or a choice<br />
must be made.<br />
file A list of detector parameters that contains the desired settings for an<br />
analysis.<br />
G - K<br />
gradient elution A liquid chromatographic technique where the mobile phase composition<br />
changes over time; changes may be continuous or in steps.<br />
ground terminal A terminal used to connect the ground or earth lead of a signal or contact<br />
closure cable.<br />
K-factor A factor used to calculate a response of zero for one of two coeluting or<br />
poorly resolved peaks; also known as peak suppression.<br />
keypad All of the keys that you use to communicate with your instrument.<br />
M - Q<br />
menu A list of choices.<br />
miscible Two solvents are miscible if they combine with each other to form a single<br />
phase.<br />
parameter A value or set of values used to define the characteristics of behavior of an<br />
instrument or system.<br />
peak broadening The dilution of a peak as it moves through the chromatographic system.<br />
peak suppression A technique that uses a factor (the K-factor) to calculate a response of zero<br />
for one of two coeluting or poorly resolved peaks.<br />
photodiode The detector component that measures light intensity.<br />
queue A set of items (i.e., samples, files) in a prearranged order.<br />
118 Thermo Electron 01/2004
R - S<br />
RAM Random Access Memory.<br />
range A detector parameter that controls the full-scale range for the output signal.<br />
replay Retrieves a stored spectrum that can then be played back as either individual<br />
data points or a smoothed spectrum.<br />
rise time A detector parameter that controls its response time; rise time is inversely<br />
proportional to the amount of baseline noise.<br />
runfile The runfile is the file that contains the current detector parameter settings.<br />
run time The duration of a sample run, from injection to detection.<br />
signal to noise A measurement of the sensitivity of a detector; the ability to measure a very<br />
small sample response over the baseline noise.<br />
solvent programming See gradient elution.<br />
spectral scan A sample spectrum.<br />
status The current condition.<br />
T - Z<br />
timed events An instrument action triggered to occur at a specific, preset time during a run<br />
(e.g., autozero, wavelength change, stop-time).<br />
troubleshooting Locating the cause of problems with equipment or procedures, and solving<br />
these problems.<br />
wavelength programming Programming the detector to change the monitoring wavelength as a function<br />
of time during a run.<br />
01/2004 Thermo Electron 119
E Cuvette Holder Accessory<br />
Introduction<br />
This Appendix provides information on the installation, use, and<br />
maintenance of the Cuvette Holder Accessory (Fig. E.1). This<br />
accessory is available to simplify calibration/standardization of your<br />
UV2000 UV/Vis detector using FDA, industry, or in-house<br />
calibration standards. The cuvette holder is a modular accessory that<br />
installs in place of the detector flowcell. It allows analysis of<br />
calibration standards (for example, potassium dichromate) to ensure<br />
your detector's compliance with FDA, industry, and/or in-house<br />
regulations.<br />
To use the cuvette holder, prepare your calibration standard according<br />
to the instructions provided with the sample. Then place the sample<br />
in a standard 10.0 mm I.D. (12.5 mm O.D.) quartz cuvette. Analyze<br />
the sample and compare its measured maxima to its certified maxima.<br />
If there's a discrepancy in the measured wavelength, the detector can<br />
be recalibrated using the procedure described on page 114.<br />
Mounting<br />
Screws<br />
Cuvette<br />
Figure E.1 Cuvette Holder accessory<br />
Photodiode<br />
Standoffs<br />
01/2004 Thermo Electron 121<br />
DT-Z045/DG
Installation<br />
The cuvette holder attaches to your detector using the standard<br />
flowcell mounting hardware.<br />
Use the following steps to remove the flowcell and install the cuvette<br />
holder:<br />
1. Remove the front panel of the detector (Fig. E.2) to gain access<br />
to the flowcell mounting area. Note that the front panel is a<br />
friction-grip mount and will snap free if you pull outward on its<br />
lower edge.<br />
2. Remove the thumbscrew that secures the flowcell cover to the<br />
front of the detector (Fig. E.3). Remove the flowcell cover and<br />
set it aside.<br />
3. Remove the two thumbscrews that secure the photodiode<br />
assembly to the front of the flowcell (Fig. E.4) and then<br />
reposition the photodiode assembly out of the way to provide<br />
access to the flowcell.<br />
4. Remove the two thumbscrews (top left, lower right) that secure<br />
the flowcell mount (Fig. E.5) to the front of the detector and<br />
then remove/reposition the flowcell.<br />
NOTE: You needn't disconnect the flowcell's tubing connections to<br />
your LC system if the cuvette holder is only going to be used long<br />
enough to conduct a calibration. Simply reposition the flowcell and<br />
omit Step 7 of this procedure.<br />
5. Position the cuvette holder and secure the two thumbscrews (at<br />
top left and lower right) that secure the holder to the threaded<br />
holes on the detector's front panel.<br />
6. Replace the photodiode assembly and secure it to the cuvette<br />
holder's standoffs with its two thumbscrews (at top right and<br />
lower left).<br />
7. Snap the detector's front panel back in place.<br />
122 Thermo Electron 01/2004
RUN<br />
STOP<br />
ZERO<br />
STATUS MENU<br />
SpectraSYSTEM<br />
Grip and Pull<br />
Here<br />
01/2004 Thermo Electron 123<br />
ENTER<br />
UV2000<br />
Figure E.2 Detector front panel<br />
Removable<br />
Front Panel<br />
DT-Z046\FM
Flowcell<br />
Housing<br />
RUN<br />
STOP<br />
STATUS MENU<br />
124 Thermo Electron 01/2004<br />
ENTER<br />
ZERO SpectraSYSTEM UV2000<br />
Figure E.3 Detector with front panel removed to expose flowcell housing<br />
DT-Z047\FM
Flowcell<br />
Inlet<br />
Rear of<br />
Photodiode<br />
Assembly<br />
RUN<br />
STOP<br />
STATUS MENU<br />
01/2004 Thermo Electron 125<br />
ENTER<br />
ZERO SpectraSYSTEM UV2000<br />
Figure E.4 Detector with flowcell assembly exposed to show<br />
photodiode assembly-mounting thumbscrews<br />
Flowcell<br />
Outlet<br />
Tubing<br />
Clamp<br />
Mounting<br />
Thumbscrews<br />
DT-Z048\FM
Flowcell<br />
Inlet<br />
Tubing<br />
Clamp<br />
Mounting<br />
Thumbscrews<br />
RUN<br />
STOP<br />
STATUS MENU<br />
126 Thermo Electron 01/2004<br />
ENTER<br />
ZERO SpectraSYSTEM UV2000<br />
Flowcell<br />
Outlet<br />
Photodiode<br />
Assembly<br />
Figure E.5 Detector with photodiode assembly repositioned to expose flowcell<br />
DT-Z049\FM
Using the Cuvette Holder<br />
ABSORBANCE<br />
LINEARITY<br />
The two procedures that follow allow you to use the Cuvette Holder<br />
to test the linearity of your detector's absorbance and to recalibrate the<br />
detector, if necessary.<br />
NOTE: Be sure to insert the cuvette inside the holder so that its transparent<br />
sides (rather than the frosted ones) are in line with the beam of light from<br />
the detector's lamp. Failure to insert the cuvette properly may result in<br />
insufficient light levels for accurate analyses.<br />
You can use the optional Cuvette Holder and certified standards to<br />
test the absorbance linearity of your detector in the UV range<br />
(approximately 235 to 350 nm).<br />
HINT: This procedure is particularly useful for laboratories that require<br />
periodic detector validation.<br />
To perform the test, you'll need procedure E 925 from the American<br />
Society for Testing and Materials (ASTM) as well as standard<br />
potassium dichromate (SRM 930) from the National Institute of<br />
Standards and Technology (NIST; formerly the National Bureau of<br />
Standards, NBS). The test involves the preparation of acidic<br />
solutions of potassium dichromate at four concentrations and the<br />
absorbance measurement of each solution at four wavelengths<br />
between 235 and 350 nm. After correcting for an absorbance blank,<br />
the linearity deviation of a plot of absorbance versus concentration<br />
should be less than 1%.<br />
If you want more information on this test, or find that your instrument<br />
does not conform to these specifications and requires service, contact<br />
your local Thermo Electron representative.<br />
λ CALIBRATION Selecting /λ Calibration/ brings up the screen shown in Figure E.6.<br />
You can use this screen to offset the factory-calibrated wavelength to<br />
more closely match FDA, industry, or in-house standards.<br />
λ Offset (steps) 0<br />
Figure E.6 The lambda (wavelength) offset screen<br />
01/2004 Thermo Electron 127
Maintenance<br />
NOTE: The UV2000 detector is calibrated using a mercury-lamp fixture.<br />
This provides a very narrow emission line at 254 nm. Broad-band<br />
calibration standards, such as holmium oxide and didymium filters, make<br />
calibration more difficult and less accurate.<br />
To offset the factory-calibrated wavelength, select the number of<br />
"steps" by which you want the wavelength to be offset. Each step<br />
represents approximately 0.25 nm, so if you choose "2" for the<br />
number of steps, you will have offset the wavelength by + 0.5 nm.<br />
You can offset the wavelength by as much as ± 2.5 nm.<br />
NOTE: The offset value isn't cleared upon resetting the RAM memory. It<br />
can only be changed from the lambda offset screen.<br />
The cuvette holder contains no user serviceable components;<br />
however, cleanliness of the cuvettes is critical to obtaining accurate<br />
analyses. Therefore, these instructions are provided for inspecting<br />
and cleaning the cuvettes.<br />
Inspecting a Cuvette Cuvettes, whether previously used or new, should always be visually<br />
inspected before use. Use the following steps to inspect a cuvette:<br />
1. Grasp the cuvette by its two frosted sides and hold it up in front<br />
of a bright light source such as a fluorescent fixture,<br />
incandescent bulb, or sunny window.<br />
2. Carefully observe the cuvette's two transparent glass sides.<br />
Look for physical damage such as chips, cracks, scratches, etc.<br />
Also look for dirt, smudges, fingerprints, and so forth.<br />
3. Based on the results of your inspection, you can do one of the<br />
following three things:<br />
a. If no optical-surface damage or contamination is noted,<br />
you can fill the cuvette with sample and use it for your<br />
analysis.<br />
b. If you see physical damage or severe contamination on the<br />
optical surfaces, you may wish to replace the cuvette with a<br />
new one.<br />
c. If no physical damage is noted and only light to moderate<br />
contamination, clean the cuvette using the procedure that<br />
follows in the next section of this appendix.<br />
128 Thermo Electron 01/2004
Cleaning a Cuvette If the visual inspection reveals contamination of or damage to the<br />
cuvette's optical surfaces (the inner and/or outer surfaces of the<br />
cuvette's two transparent faces), then the cuvette should be cleaned<br />
before use. Use the following steps to clean a cuvette:<br />
1. Immerse the cuvette in a small beaker filled with an<br />
appropriate cleaning solution. Use detergent and water to clean<br />
cuvettes that are contaminated with residue from water-based<br />
solutions. Use an appropriate organic solvent (e.g., methanol,<br />
ethanol, isopropanol, etc.) for cuvettes contaminated with<br />
residue from organic-solvent-based samples.<br />
2. Place the beaker containing the cuvette(s) and cleaning solution<br />
in an ultrasonic bath and set the timer. Use a time setting that's<br />
appropriate for the amount of contamination that has to be<br />
removed.<br />
3. Remove the cuvette from the beaker, handling it by its frosted<br />
sides only. Rinse it thoroughly with clean deionized water<br />
until all traces of detergent and dirt have been flushed away.<br />
4. Dry the cuvette thoroughly with a lint-free wiper, exercising<br />
care to handle the cuvette only by its two frosted (non-optical)<br />
sides.<br />
5. Carefully inspect the cuvette for residual contamination using<br />
the steps detailed in the preceding section of this appendix. If<br />
any is noted, repeat Steps 1 through 4 until the cuvette is<br />
completely clean and dry.<br />
NOTE: In cases of serious contamination that resists removal, it may<br />
be easier to simply replace a dirty cuvette than to spend a lot of time<br />
cleaning it.<br />
01/2004 Thermo Electron 129
INDEX<br />
The asterisks (*) in this index refer to topics that are common to both the UV1000 and the UV2000<br />
detectors. For each asterisked item, there are two page numbers. The first refers to the appropriate<br />
page number for the UV1000 detector; the second refers to the page number for the UV2000.<br />
KEYS<br />
[+] and [-] keys 1, 4<br />
[] key 4<br />
[ENTER] key 3<br />
[MENU] key 3<br />
[RUN] key 3<br />
[STATUS] key 3<br />
[STOP] key 3<br />
[ZERO] key 3<br />
[∧] key 4<br />
[∨] key 4<br />
A<br />
A File Is Already Running message 111<br />
A/D defined 117<br />
Absorbance<br />
defined 117<br />
linearity 116, 127<br />
ratioing (UV2000 only) 35, 64<br />
Accessory kit 79<br />
Alphabetical entries, changing 1<br />
Alphanumeric entries, changing 4<br />
Amperage requirements, see Fuses<br />
Analog offset, see Analog outputs<br />
Analog Output Connections<br />
UV1000 84<br />
UV2000 84<br />
Analog outputs<br />
adjusting for different devices* 25, 36<br />
connections to 84<br />
recorders 84<br />
description of* 25, 35<br />
event mark 44<br />
fields defined 97<br />
illustration of connectors 83<br />
K-factor 63<br />
offsets* 25, 36<br />
term defined 117<br />
range* 22, 29<br />
scanning 52<br />
shorting the 43<br />
testing the 115<br />
use of negative and positive offsets* 25, 36<br />
Analog Outputs Menu<br />
accessing the* 26, 35<br />
general description of 97<br />
illustration of* 26, 35<br />
ANLG, see Analog outputs<br />
Arrow keys 1, 4<br />
Asterisks, use of 5, 6<br />
ASTM Procedure E 925 127<br />
AU<br />
analog output choice 35<br />
entries (for analog 2) 35<br />
field described 97<br />
AU entries (for analog 2) 97<br />
AUFS, acronym defined 117<br />
Auto Scan<br />
illustration of 51<br />
Autozero<br />
example of 40<br />
programming 39, 40<br />
time field described 97<br />
time* 22, 29<br />
B<br />
Back-pressure<br />
causes of 71<br />
detectors in series 87<br />
increasing 71<br />
specifications for flowcells 88<br />
Background scan<br />
defined 117<br />
zeroing 48<br />
Baseline problems<br />
baseline defined 117<br />
correcting for background absorbance 48<br />
Thermo Electron index-i
drifting<br />
causes of 71, 108<br />
correcting with autozero 40<br />
correcting with offsets* 25, 36<br />
erratic, causes of 71<br />
noise, causes of 71, 107<br />
spikes, causes of 71, 107<br />
Blank key 3<br />
Brackets, reason for 7<br />
C<br />
Calibration 114, 116, 127, 128<br />
Capitalization, standard use of 7<br />
CAUTIONS!, what they signify 8<br />
Changing the fuses 82<br />
Chemical hazard, icon defined 8<br />
Chronometer<br />
defined 117<br />
illustration of 74<br />
tracking deuterium lamp life 74<br />
Cleaning procedures<br />
deuterium lamp surface 74<br />
flowcell 71<br />
optical surfaces 69<br />
Clicking sound (UV2000 only) 109<br />
Clock, internal 42<br />
Column bleed 108<br />
COMM port 83<br />
Commands Menu<br />
accessing the 43<br />
general description of 5, 97<br />
illustration of 43<br />
Communications to external devices 83, 85<br />
Confirmation messages 6<br />
Connectors, see External contacts<br />
Conventions used in manual 6<br />
brackets 7<br />
capitalization 7<br />
icons 8<br />
slashes 7<br />
standard words 7<br />
two-line display 6<br />
Copy Menu<br />
accessing the 32<br />
illustration of 33<br />
Copying files 32, 103<br />
copy field described 97<br />
Copy File command 97, 103<br />
Develop File 33<br />
protected files 33<br />
Scan File 33<br />
CSA, see Safety Information<br />
Current time field 42, 97<br />
Cursor<br />
blinking square 1<br />
movement 1<br />
speed, setting the 45, 97<br />
triangular 1<br />
Curves, smoothing spectral replays 53<br />
Cuvette holder<br />
cleaning a cuvette 129<br />
cuvette size defined 121<br />
function of 121<br />
inspecting a cuvette 128<br />
installation of 122<br />
maintenance of 128<br />
testing absorbance linearity with 127<br />
wavelength calibration using 127<br />
index-ii Thermo Electron 01/2004<br />
D<br />
D, see Develop File<br />
D2 Lamp Hours 98<br />
Dark current, test for 115<br />
Defaults<br />
see Appendix B<br />
term defined 117<br />
Degassing 117<br />
Delete commands<br />
Delete File 98<br />
Delete Queue 98<br />
fields defined 98<br />
Deleting<br />
a queue 59<br />
files* 25, 33<br />
protected files 34<br />
time lines 38<br />
Detector<br />
calibration 114, 128<br />
command center 2<br />
front panel, illustration of 2<br />
modes described 3<br />
rules for operation 1<br />
Shutdown message 45<br />
Deuterium lamp<br />
alignment of 76<br />
changing the 74<br />
chronometer 74<br />
cleaning the surface 74
D2 lamp hours field 97<br />
illustration of 75<br />
lamp life 74<br />
Low Light Detected message 110<br />
testing the 115<br />
tracking D2 hours 74<br />
warm-up time 74<br />
Develop File (UV2000 only)<br />
#Runs field 55, 101<br />
accessing the 54<br />
advantages of 54<br />
defined 54, 117<br />
Edit Menu 54<br />
editing parameters 54<br />
editing while running 56<br />
example of 55<br />
no copying 33<br />
repeating the file 56<br />
setting parameters 54<br />
Status Menu 56<br />
Status Screen 55<br />
DEVELOP, see Develop File<br />
Diagnostic tests<br />
analog outputs 115<br />
deuterium lamp 115<br />
diagnostics defined 118<br />
external<br />
absorbance linearity 116, 127<br />
LC test mix 116<br />
internal<br />
diode offsets<br />
self-test 115<br />
user-selected 113<br />
light levels 113<br />
software version 113<br />
wavelength calibration test 114, 127<br />
lamp and shutter (UV2000 only) 115<br />
light levels 98<br />
motor 115<br />
RAM 115<br />
self-tests 114<br />
software version 102<br />
Tests Menu<br />
illustration of 112<br />
tungsten lamp 115<br />
voltages 115<br />
Diode Offsets<br />
field described 98<br />
self-test 115<br />
user-selected test 113<br />
Display<br />
changing the contrast 45<br />
changing the cursor speed 45<br />
illustration of the 2<br />
term defined 118<br />
the Display AU, l screen 53, 98<br />
Down-arrow (t) key, right side of display 2<br />
Drift, see Baseline problems<br />
Dual-wavelength operation 26<br />
analog output 2 35<br />
selecting 100<br />
Status Screen 30<br />
stopping a run 30<br />
wavelength program 27<br />
01/2004 Thermo Electron index-iii<br />
E<br />
Edit File 20, 98, 118<br />
Edit Menu<br />
accessing the* 20, 27<br />
general description of 98<br />
illustration of* 20, 27<br />
while in the Develop File 54<br />
while in the Scan File 47<br />
Editing<br />
a file<br />
from the File(s) Menu* 20, 26<br />
from the Status Menu* 24, 31<br />
a queue 59<br />
parameters during a run 5<br />
the Develop File 54<br />
time lines 39<br />
Electrical interference, causes of 107<br />
End λ 98<br />
End of queue 43<br />
Enter, as a standard word 7<br />
ENTER key 3<br />
Equipment damage, avoiding 8<br />
(see also Safety Information)<br />
Error messages<br />
conventions of 6<br />
definition of 118<br />
see also Messages<br />
Event mark 44, 98<br />
accessing 44<br />
placement of 49<br />
Exclamation points, use of 6
External contacts 83<br />
analog outputs<br />
connections to 84<br />
scanning 49<br />
shorting 43<br />
ANLG 84<br />
connectors 83<br />
illustration of 83<br />
making connections 83<br />
READY(Output) 85<br />
accessing command 44<br />
RUN(Input) 42, 85<br />
STOP(Input) 85<br />
ZERO(Input) 85<br />
F<br />
FCC, see Safety Information<br />
Fields<br />
alphabetical listing of 97<br />
changing entries in 1, 4<br />
description of all 97<br />
term defined 118<br />
File Menu (UV1000 only)<br />
accessing the 20<br />
general description of 5, 98<br />
illustration of 20<br />
loading the edit file 22<br />
setting parameters 20<br />
Files<br />
copying (UV2000 only) 32, 97, 103<br />
deleting* 25, 33<br />
edit file 20<br />
editing from File(s) Menu* 20, 26<br />
editing from Status Menu* 24, 31<br />
escaping without saving changes* 25, 32<br />
identification of (UV2000 only) 27, 99<br />
loading<br />
an example* 12, 16<br />
fields described 100<br />
technique described* 22, 29<br />
while a queue is running 59<br />
managing (UV2000 only) 32<br />
messages<br />
Already Running 111<br />
Copied 33<br />
Deleted* 25, 34<br />
Loaded* 22, 29<br />
Protected, Cannot Be Copied To 33<br />
Protected, Cannot Be Deleted 34<br />
Saved* 24, 32<br />
name field (UV2000 only) 99<br />
protecting (UV2000 only) 34, 100<br />
run file 20<br />
saving* 24, 32<br />
term defined 118<br />
Files Menu (UV2000 only)<br />
accessing the 26<br />
general description of 5, 98<br />
illustration of 14, 26<br />
loading the file 29<br />
setting parameters 26<br />
Floating ground 84<br />
Flowcell<br />
bubbles in the 107, 108<br />
changing the 67<br />
cleaning the<br />
precautions during 71<br />
safety precautions 72<br />
using a pump 71, 72<br />
using a syringe 71, 72<br />
windows 69<br />
with nitric acid 72<br />
with organic solvents 71<br />
connecting to inlet/outlet lines 86<br />
contamination of 71<br />
different types of 88<br />
disassembly of 67<br />
installing the 70<br />
leaks 107<br />
location of 67<br />
maintenance of 67<br />
orientation for non-Finnigan<br />
SpectraSYSTEM detectors 88<br />
removing flowcell and housing 68<br />
specifications 88<br />
Fluid connections 86<br />
Front panel, illustration of 2<br />
Fuses<br />
changing the 82<br />
illustration of fuses 82<br />
illustration of holders 81<br />
requirements 82<br />
index-iv Thermo Electron 01/2004<br />
G<br />
Glossary 117<br />
Good laboratory practices, see Safety<br />
Information<br />
Gradient elution 48, 118
Ground loop problems, causes of 108<br />
Ground terminal 118<br />
hooking to recorders 84<br />
Grounding 1<br />
H - I<br />
High voltage warning 8<br />
Hints, defined 8<br />
Icons, how they're used 8<br />
Identification of files 27, 99<br />
Injecting a sample* 23, 30<br />
Input errors 111<br />
Installation<br />
accessory kit 79<br />
analog outputs 84<br />
connecting to recorders 84<br />
connecting to inlet/outlet lines 86<br />
flowcell connections 86<br />
fluid connections 86<br />
fuses 82<br />
illustration of 82<br />
illustration of holders 81<br />
requirements 82<br />
positioning the detector 80<br />
power cord 82<br />
power requirements 80<br />
rear panel connections 83<br />
tools for 80<br />
unpacking 79<br />
voltage selection 80<br />
Instrument control 2<br />
Integrators/Workstations<br />
rear panel connections to 84<br />
Invalid Parameters, Spectrum Not Allowed<br />
message 111<br />
J - K<br />
K-factor 60<br />
algorithm for 60<br />
allowable values of 98<br />
calculation of 63<br />
choosing wavelengths for 61<br />
defined 118<br />
operating in the K-factor mode 63<br />
setting analog output for 35<br />
uses for 60<br />
using Display AU, λ screen 63<br />
using the Scan File 61<br />
Keypad 3, 118<br />
illustration of 2<br />
moving around 1<br />
Keys, description of 3<br />
01/2004 Thermo Electron index-v<br />
L<br />
Laboratory safety, see Safety Information<br />
Lambda (λ)<br />
fields defined 50<br />
max (lMax) 50<br />
maxAU (lMaxAU) 50<br />
min (lMin) 50<br />
Lambda (λ)<br />
fields defined 99<br />
Lamps<br />
aging 73<br />
alignment illustrated 76<br />
and shutter tests 115<br />
changing the 73, 77<br />
Cover Open message 110<br />
deuterium, see Deuterium lamp 74<br />
illustration of assemblies 75<br />
installation of 76, 77<br />
lamp hours fields 42, 98<br />
lamp life 74, 77<br />
location of 73<br />
removal of 74, 77<br />
selecting the 41, 99<br />
priority over 41<br />
shutting down the<br />
at end of queue 43<br />
automatically 42<br />
manually 42<br />
shutdown fields described 102<br />
Time from READY 42, 103<br />
tungsten, see Tungsten lamp 77<br />
turning on the 102<br />
automatically 42<br />
manually 42<br />
Lamps Menu<br />
accessing the 41<br />
general description of 99<br />
illustration of 41<br />
LC test mix 116<br />
LCD, see Display<br />
Light Levels test 99, 113<br />
Linearity of response 116, 127<br />
Load fields<br />
described 100<br />
used/illustrated
Load command* 12, 16<br />
Load File command* 12, 16<br />
Load Queue command (UV2000 only)<br />
58<br />
Loading<br />
a file<br />
an example* 12, 16<br />
technique described* 22, 29<br />
while a queue is running 59<br />
a queue (UV2000 only) 58<br />
Locking the status screen 43<br />
Low Light Detected messages<br />
from deuterium lamp 110<br />
from tungsten lamp 111<br />
M<br />
Main Menu<br />
accessing the* 20, 26<br />
general description of 4<br />
illustration of* 10, 14<br />
Maintenance, see Chapter 5<br />
Manual, conventions used in 6<br />
MENU key<br />
function of 3<br />
used to access Main Menu* 20, 26<br />
Menu Reference 97<br />
Menu Tree 93<br />
Menus<br />
display conventions of 4<br />
general description of upper-level 5<br />
illustration of longer 6<br />
moving between/within 1, 4<br />
term defined 118<br />
Messages<br />
A File Is Already Running 111<br />
Detector Shutdown 45, 112<br />
File Copied 33<br />
File Deleted* 25, 34<br />
File Loaded* 22, 29<br />
File Saved* 24, 32<br />
Invalid Parameters, Spectrum Not Allowed<br />
114<br />
Lamp Cover Open 110<br />
Low Light Detected 110, 111<br />
No More Available Memory 111<br />
No Queue Available 58, 111<br />
No Scans Stored 53<br />
No Spectra Available 111<br />
NRDY (for one of the lamps) 41<br />
Protected File<br />
Cannot Be Copied To 33, 111<br />
Cannot Be Deleted 34, 111<br />
Cannot Be Edited 111<br />
Queue Deleted 60, 98<br />
Queue Loaded 58, 100<br />
Queue Loaded, Cannot Load File 59, 111<br />
real-time errors 110<br />
Run In Progress, No Replay Allowed 112<br />
Run In Progress, Testing Not Allowed 112<br />
Run Not In Progress, Spectrum Not<br />
Allowed 112<br />
Scan Memory Full 112<br />
system errors 109<br />
types of messages 5, 110<br />
user-input errors 111<br />
Method development, see Develop File<br />
Method transfer, see Develop File<br />
Miscible 118<br />
MLF (most likely failure) 114<br />
Monochromator<br />
cleaning the lens 69<br />
illustration of apertures 70<br />
motor, testing the 115<br />
movement during a scan 49<br />
More Menu<br />
accessing the* 34, 40<br />
general description of 100<br />
illustration of 34<br />
Motor test 115<br />
Moving within/between menus 1, 4<br />
index-vi Thermo Electron 01/2004<br />
N<br />
Negative signals 25, 36<br />
Nitric acid<br />
safety precautions 72<br />
used to clean the flowcell 72<br />
No More Available Memory message 111<br />
No Queue Available message 58, 111<br />
No Scans Stored message 53<br />
No Spectra Available message 111<br />
Notes, what they signify 8<br />
NRDY (not ready message) 23, 30, 41, 103<br />
Numerical entries, changing 1, 4<br />
O<br />
Offsets, see Analog outputs<br />
Optical system 106
Options Menu<br />
(chosen from the Edit Menu) 100<br />
accessing the* 22, 28<br />
description of* 22, 28<br />
illustration of* 22, 28<br />
(chosen from the Main Menu) 100<br />
accessing the* 34, 40<br />
illustration of 40<br />
illustration of (UV2000 only) 34<br />
general description of 5<br />
Order 1<br />
defined 100<br />
editing 59, 97<br />
in a queue 58<br />
Order field 57<br />
Organic solvents, used to clean flowcells 71<br />
Outputs, see Analog outputs<br />
P<br />
Parameters<br />
allowable and default values 97<br />
defined 118<br />
setting* 20, 27<br />
Pausing a queue 59<br />
pause command 100<br />
pause queue command 100<br />
resuming 59<br />
Peak<br />
problems<br />
broadening 109, 118<br />
size 109<br />
tailing 109<br />
purity 35, 64<br />
suppression<br />
analog output for 35<br />
defined 118<br />
see also K-factor<br />
Photodiode<br />
cleaning the surface 69<br />
defined 118<br />
mount<br />
illustration of 69, 87<br />
removing the 69<br />
Positioning the detector 80<br />
Power<br />
cord 82<br />
requirements 80<br />
switch, location of* 10, 14<br />
Preset choices, selecting from 4<br />
Preventative maintenance 67<br />
Program field 27, 100<br />
Programmed autozero 39, 40<br />
example of 40<br />
illustration of 40<br />
Protected files 34, 100<br />
copying to 33<br />
deletion of 34<br />
illustration of 34<br />
messages<br />
Cannot Be Copied To 33, 111<br />
Cannot Be Deleted 34, 111<br />
Cannot Be Edited 111<br />
Pumps, used to clean flowcells 71, 72<br />
Purity determinations 35, 64<br />
01/2004 Thermo Electron index-vii<br />
Q<br />
Q, see Queue<br />
Queue (UV2000 only) 56<br />
a "Q" in the display 58, 103<br />
defined 118<br />
deleting a line 57<br />
deleting a queue 59, 98<br />
description of 56<br />
editing a 59<br />
example of 57<br />
field described 100<br />
file name 57<br />
illustration of an empty queue 57<br />
lamp shutdown at end of 43<br />
Loaded message 59<br />
loading a 58, 99<br />
messages<br />
No Queue Available 58, 111<br />
Queue Deleted 60<br />
Queue Loaded 58, 100<br />
Queue Loaded, Cannot Load File 111<br />
monitoring while running 58<br />
number of files per queue 57<br />
number of injections per file 57<br />
order 1 58<br />
order field 57, 100<br />
pausing a 59, 100<br />
resuming after a pause 59<br />
running a 58<br />
setting up 57<br />
Status Screen 58<br />
stopping a 59
Queue Menu<br />
accessing the 56<br />
general description of 5<br />
illustrations<br />
with no queue loaded 57<br />
with queue loaded 58<br />
pause field 58, 100<br />
R<br />
RAM<br />
defined 119<br />
testing 115<br />
Range<br />
example of use* 11, 15<br />
fields defined 100<br />
setting the* 22, 29<br />
term defined 119<br />
Ratioing absorbance values (UV2000 only)<br />
35, 64<br />
READY<br />
output<br />
accessing the command 44<br />
connecting to terminal 85<br />
field described 101<br />
use of 44<br />
state* 23, 30<br />
time from ready field 42<br />
Real-time error messages 110<br />
Recorders<br />
connecting to analog outputs 84<br />
Remote communications 85<br />
Replay<br />
fields described 101<br />
rate 52<br />
term defined 119<br />
Replay Menu (UV2000 only)<br />
accessing the 52<br />
replay fields described 101<br />
replay spectra<br />
command 52<br />
illustration of display 53<br />
stopping replay 53<br />
setting parameters 52<br />
Reviewing parameters during a run 5<br />
Rise time*<br />
defined 119<br />
field described 101<br />
incorrect setting, results of 109<br />
suggestions for use* 22, 28<br />
Run<br />
fields<br />
fields described 101<br />
used in a queue 57<br />
used in the Develop File 55<br />
input terminal 85<br />
shutting down lamps 42<br />
parameters* 20, 27<br />
programming during a* 24, 31<br />
progress messages<br />
No Replay Allowed 112<br />
No Scanning Allowed 112<br />
Testing Not Allowed 112<br />
ready signal for external devices 85<br />
starting a<br />
example of* 13, 18<br />
from an external device 85<br />
technique described* 23, 30<br />
stopping a<br />
example of* 13, 18<br />
from an external device 85<br />
technique described* 23, 30<br />
the run file 20<br />
the run file, defined 119<br />
time, defined 119<br />
RUN key<br />
example of use* 13, 18<br />
functions of 3<br />
Runfile, defined 119<br />
index-viii Thermo Electron 01/2004<br />
S<br />
S, see Scan File 47<br />
Safety<br />
certification, see Safety Information<br />
definition of icons 8<br />
general precautions, see Safety Information<br />
nitric acid precautions 72<br />
Sample Queue, see Queue<br />
Save File command* 24, 32<br />
Saving an entry 1<br />
Scan File (UV2000 only) 46<br />
accessing<br />
summary data 50<br />
the Scan File 47<br />
analog output 49<br />
background, defined 117<br />
baseline scan<br />
automatic 48<br />
defined 117
manual 48<br />
subtracting 48<br />
choosing scan times 49<br />
data storage 53<br />
Display AU, l screen 53<br />
illustration of display 53<br />
Display AU, λ screen<br />
K-factor calculation 63<br />
Edit Menu for 47<br />
fields described 101<br />
file name 47<br />
how the detector scans 46<br />
an example 49<br />
identification of stored spectra 52, 102<br />
initiating a scan 49<br />
K-factor 61<br />
Memory Full message 112<br />
min/max wavelength fields 99<br />
no copying 33<br />
No Scans Stored message 53<br />
quantitative analysis 49<br />
Replay Menu<br />
accessing the 52<br />
illustration of 52<br />
replay fields described 101<br />
replay rate 52<br />
replay spectra command 52<br />
setting parameters 52<br />
replay spectra command<br />
illustration of display 53<br />
stopping replay 53<br />
running replay 52<br />
running the 48<br />
setting the wavelength<br />
end of scan 48, 98<br />
interval for scan 48, 99<br />
monitoring the run 48, 102<br />
start of scan 48, 102<br />
setting up the 47<br />
Setup Menu for 47, 102<br />
spectral scan, defined 119<br />
Status Screen for 48<br />
stopping a scanning run 50<br />
subtracting baseline scans 48<br />
summary data screen, illustration of 50<br />
wavelength min/max fields 99<br />
zero command 48<br />
zero time field 48<br />
SCAN, see Scan File<br />
Scan Summary Data Screen<br />
accessing the 50<br />
illustration of 50<br />
Scan zero time 48, 101<br />
Scanning<br />
automatically 51<br />
how it works 51<br />
number of spectra stored 46<br />
replaying spectra<br />
corrected for baseline absorbance 47<br />
see also Scan File 47<br />
Scrolling through choices 4<br />
Select, as a standard word 7<br />
Self-Tests 116<br />
analog outputs 115<br />
command described 102<br />
deuterium lamp 115<br />
diode offsets 115<br />
lamp and shutter (UV2000 only) 115<br />
motor 115<br />
RAM 115<br />
tungsten lamp 115<br />
voltages 115<br />
Setting parameters<br />
current time 42<br />
Develop File 54<br />
example of 55<br />
File(s) Menu* 20, 26<br />
replaying spectra 52<br />
sample queue 57<br />
scanning 47<br />
Status Menu* 24, 31<br />
Setup Menu<br />
general description of 102<br />
illustration of 47<br />
Short outputs<br />
accessing 43<br />
command described 44, 102<br />
Shortcuts, icon for 8<br />
Shutdown detector<br />
accessing the command 45<br />
command described 102<br />
message described 112<br />
restarting the detector 45<br />
Shutdown lamps<br />
how 102<br />
when 41, 102<br />
Signal-to-noise defined 119<br />
Single-wavelength operation<br />
analog output 2 (UV2000 only) 35<br />
selecting 100<br />
using* 20, 26<br />
Slashes, reason for 7<br />
01/2004 Thermo Electron index-ix
Software version 102, 113<br />
Solvents<br />
disposal of wastes, see Safety Information<br />
programming 40, 119<br />
used to clean the flowcell 71<br />
Specifications<br />
flowcells 88<br />
instrument 90<br />
Spectra<br />
changing the appearance of 53<br />
corrected with baseline scan 48<br />
getting ready to replay 50<br />
identification of 52<br />
replaying 52<br />
Spectra Time field defined 102<br />
storage of 53<br />
Spectral scanning, see Scan File<br />
Spiking 71<br />
Standard words 7<br />
Start λ 102<br />
Starting a run* 23, 30<br />
from an external device 85<br />
Startup fields defined 102<br />
Status<br />
field defined 103<br />
lock feature 43, 103<br />
term defined 119<br />
STATUS key<br />
brings up Status Screen 5<br />
functions of 3<br />
Status Menu<br />
accessing the* 24, 31<br />
general description of 5<br />
illustration of* 24, 31<br />
setting parameters* 24, 31<br />
when Develop File is loaded 56<br />
when Scan File is loaded 50<br />
Status Screen<br />
accessing the* 23, 30<br />
general description of 5<br />
illustration of* 23, 30<br />
locking the 43, 103<br />
when a queue is loaded 58<br />
when Develop File is loaded 55<br />
when Scan File is loaded 48<br />
STOP key<br />
example of use* 13, 18<br />
functions of 3<br />
to stop replaying spectra 53<br />
used to stop a run* 23, 30<br />
STOP(Input) terminal 85<br />
Stop-line<br />
adding a* 13, 17<br />
affects how you start a run* 23, 30<br />
in a wavelength program 21, 27, 38<br />
used to stop a run* 23, 30<br />
Stop-time, see Stop-line<br />
Stopping<br />
a queue 59<br />
a run<br />
from an external device 85<br />
techniques for* 23, 30<br />
with a stop-line* 21, 27<br />
a scan 50<br />
dual-wavelength files 30<br />
System error messages 110<br />
index-x Thermo Electron 01/2004<br />
T<br />
Temperature fluctuations, results of 108<br />
Terminals, see External contacts<br />
Tests Menu<br />
accessing the 112<br />
general description of 5, 103<br />
illustration of 112<br />
Tests, see Diagnostic tests<br />
Text, conventions of 7<br />
Theory of operation 105<br />
Time<br />
current time field 42<br />
field in Wavelength Program 103<br />
setting the 42<br />
stop-times 38<br />
Time from READY 103<br />
accessing 42<br />
description of 42<br />
example of 42<br />
illustration of 42<br />
Time lines, see Wavelength programming<br />
Timed events 85<br />
autozero 40<br />
defined 119<br />
lamp startup and shutdown 42<br />
on wavelength change 40<br />
scanning 51<br />
stop-time 38<br />
Tools needed for installation 80<br />
Troubleshooting<br />
clicking sound 109<br />
flowcell contamination 71<br />
MLF (most likely failure) 114
Table of common problems 107<br />
term defined 119<br />
Tungsten lamp<br />
alignment of 76<br />
changing the 77<br />
illustration of 75<br />
lamp life 103<br />
Low Light Detected message 111<br />
testing the 115<br />
W lamp hours field 103<br />
warm-up time 77<br />
TÜV/GS certification, see Safety Information<br />
U<br />
Unpacking your detector 79<br />
Unshort outputs 44<br />
UPS, uninterrupTable power supply 107<br />
User messages 5<br />
UV1000<br />
allowable and default values 97<br />
analog outputs 25, 84<br />
building a wavelength program 21<br />
checking the status 23<br />
deleting a file 25, 98<br />
diagnostic tests 112<br />
features 9, 43<br />
installation 79<br />
lamp operations 41<br />
locking the Status Screen 43<br />
maintenance 67<br />
periodic validation 67<br />
programmed autozero 40<br />
quick example 10<br />
running the detector 23<br />
setting detector parameters 20, 24<br />
single-wavelength operation 20<br />
software version 113<br />
starting a run 23<br />
stopping a run 23<br />
troubleshooting 107<br />
wavelength programming 37<br />
UV2000<br />
allowable and default values 97<br />
analog outputs 35, 84<br />
building a wavelength program 27<br />
checking the status 30<br />
copying files 32, 97<br />
deleting a file 98<br />
Develop File 54<br />
diagnostic tests 112<br />
dual-wavelength operation 26<br />
features 9, 43<br />
file identification 27, 99<br />
installation 79<br />
K-factor 60<br />
lamp operations 41<br />
loading a file 29<br />
locking the Status Screen 43<br />
maintenance 67<br />
periodic validation 67<br />
programmed autozero 40<br />
protecting files 34<br />
quick example 14<br />
running the detector 29<br />
sample queues 56<br />
scanning ability 46<br />
setting detector parameters 26, 31<br />
single-wavelength operation 26<br />
software version 113<br />
starting a run 30<br />
stopping a run 30<br />
troubleshooting 107<br />
wavelength programming 37<br />
UVW message 103<br />
01/2004 Thermo Electron index-xi<br />
V<br />
Validation<br />
of linearity 116, 127<br />
of wavelength 114, 127<br />
VDE, see Safety Information<br />
Voltage<br />
AC line problems 107<br />
clipping 84<br />
preset 80<br />
selector barrel<br />
illustration of 81<br />
location of 80<br />
setting the 80<br />
setting 80<br />
testing the 115<br />
W<br />
W Lamp Hours 103<br />
WARNINGS!, what they signify 8<br />
Wavelength<br />
(λ) fields defined 99<br />
calibration test 99, 114, 127<br />
ending (in Develop file) 55
example of setting the* 11, 15<br />
field in the Status Screen 99<br />
field in Wavelength Program 103<br />
interval 55<br />
offset field described 99<br />
recalibration using Cuvette Holder 127<br />
starting 55<br />
testing accuracy 114, 127<br />
Wavelength Program 103<br />
accessing from the Edit Menu* 21, 27<br />
accessing from the Status Menu* 24, 31<br />
command described 103<br />
description of 21, 27, 37<br />
example of a stop-line* 21, 28<br />
illustration of* 21, 27<br />
single-line* 21, 27<br />
two-line* 21, 27<br />
using a stop-line* 21, 27, 38<br />
Wavelength programming<br />
adding time lines 38<br />
automatic ordering 38<br />
autozeroing with or without a wavelength<br />
change 40<br />
building a program 37<br />
deleting a line 38<br />
described 37<br />
editing while running 39<br />
example of 39<br />
illustration of 39<br />
last line 38<br />
sorting time lines 38<br />
term defined 119<br />
using a stop-line 38<br />
zeroing the baseline 39<br />
X - Z<br />
Zero<br />
(Input) terminal 85<br />
example of use* 12, 17<br />
fields described 104<br />
from an external device 85<br />
key, functions of 3<br />
programming an autozero 40<br />
used for baseline scans 48<br />
.End Index<br />
index-xii Thermo Electron 01/2004