EuroChrom 2000 for Windows Basic Edition version 2.05
EuroChrom 2000 for Windows Basic Edition version 2.05
EuroChrom 2000 for Windows Basic Edition version 2.05

Create successful ePaper yourself
Turn your PDF publications into a flip-book with our unique Google optimized e-Paper software.
<strong>EuroChrom</strong> <strong>2000</strong> <strong>for</strong> <strong>Windows</strong><br />
<strong>Basic</strong> <strong>Edition</strong><br />
<strong>version</strong> <strong>2.05</strong><br />
Addition to Users’ Handbook v.1.2<br />
1. Support of the KNAUER mini-instruments<br />
The additional detectors are implemented in the Hardware Constructor’s Instrument Category List:<br />
• the KNAUER UV Filter Photometers K200, K<strong>2000</strong>/1<br />
• the KNAUER UV Spectral Photometer K2500<br />
• the KNAUER RI detectors K2300/K2400/1.<br />
Adjustment of all mini detectors (and pumps) is per<strong>for</strong>med with the same Setup dialog box.<br />
Digital (through RS232 serial COMx port) or analog (through integrating output and HPLC Interface<br />
box) data transmission to a PC can be chosen.<br />
Modification in the Hardware Configuration will result in the modification of the time table in the<br />
method description. For example, if the Filter Photometer K<strong>2000</strong>/1 or the Spectral Photometer K2500/1<br />
is included in the hardware configuration, a new column (wavelength control) will appear in the time<br />
table of the method. In case of analog data transmission the HPLC Interface box produces an output<br />
voltage on the Analog Output Nr.4 (Wavelength control) which corresponds to the wavelength. It is at<br />
the responsibility of the user, to define the instrument which should be controlled by the box.<br />
The KNAUER pumps K-500/1, K-120 and K-100 support serial communications and can be controlled<br />
by the <strong>EuroChrom</strong> <strong>2000</strong> v.<strong>2.05</strong> software directly via COM port. A separate COM port is required <strong>for</strong><br />
every instrument!<br />
2. Support of the new KNAUER switching valves<br />
Three types of new KNAUER switching valves are supported: the Injection valve (possible positions<br />
are Inject/Load), the 6-port and the 16-port switching valves.<br />
They can be adjusted in the same manner as mini-instruments and controlled by either the interface<br />
box serially via RS232 port.<br />
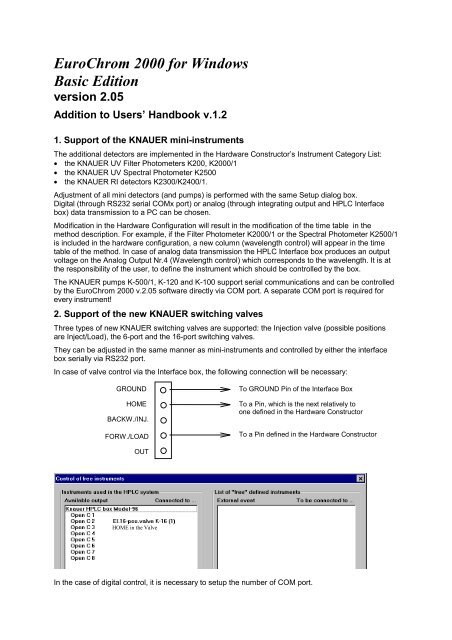
In case of valve control via the Interface box, the following connection will be necessary:<br />
Knauer<br />
GROUND<br />
HOME<br />
BACKW./INJ.<br />
FORW./LOAD<br />
OUT<br />
HOME in the Valve<br />
To GROUND Pin of the Interface Box<br />
To a Pin, which is the next relatively to<br />
one defined in the Hardware Constructor<br />
To a Pin defined in the Hardware Constructor<br />
In the case of digital control, it is necessary to setup the number of COM port.
Depending on the type of valve used a new column appears in the time table that allows the user to<br />
define the position of a switching valve (I/L, 1-6 and 1-16 correspondingly). The <strong>EuroChrom</strong> <strong>2000</strong> <strong>for</strong><br />
<strong>Windows</strong> software analyses the value from the cell and produces a sequence of pulses or sends an<br />
appropriate command to move the valve into the desired position.<br />
3. Support of the Spark Autosamplers<br />
When you work with the Spark autosamplers, please pay attention to the following:<br />
In the hardware constructor, in the <strong>Basic</strong> Marathon SETUP choose the communication port and the<br />
Autosampler ID (all other fields like Manufacturer, Type, Serial Number have no influence on control of<br />
the instrument and used <strong>for</strong> documentation only). The port and ID MUST correspond to the actual<br />
connection and settings.<br />
If you chosen the serial mode <strong>for</strong> the Spark autosamplers, it is necessary to press F4 button <strong>for</strong><br />
<strong>Basic</strong>-Marathon to switch the autosampler to serial mode;<br />
To setup the ID on the autosampler, press PROG/END button when you are in the serial mode.<br />
This ID MUST CORRESPOND to the ID selected in the Hardware constructor.<br />
The control of the Spark autosamplers <strong>Basic</strong>-Marathon and Triathlon in the <strong>EuroChrom</strong> <strong>2000</strong> <strong>for</strong><br />
<strong>Windows</strong> software is accessible from a macro table.<br />
Autosampler<br />
Settings<br />
The software detects the autosampler described in the system and after selecting the EDIT<br />
AUTOSAMPLER SETTINGS function a tool corresponding to the autosampler type will appear. In<br />
principle, it is possible to use different methods in the macro table, although they must have similar<br />
hardware configuration.<br />
General settings <strong>for</strong> the <strong>Basic</strong>-Marathon autosampler can be adjusted in the MARATHON SETUP<br />
dialog (Partial loopfilling option can be chosen <strong>for</strong> the <strong>Basic</strong> Marathon Plus)
and <strong>for</strong> the Triathlon autosampler in the TRIATHLON SETUP dialog:<br />
The First Vial and Last Vial fields in a Macro table are dependent of the autosampler used and its<br />
settings.<br />
For the <strong>Basic</strong> Marathon autosampler the following values are acceptable:<br />
• First Vial<br />
from 1 to 96 samples without washing (1.5 ml vials);<br />
from 1 to 92 samples with washing (1.5 ml vials);<br />
from 1 to 48 samples <strong>for</strong> large sample vials (5 ml);<br />
• Last Vial<br />
Position of the last vial of the sample series in the tray;<br />
Empty positions in the sample tray must be avoided<br />
• Inj./Vial (Repeat)<br />
Number of Injections of the same sample.<br />
9 Inj./Vial<br />
For the Triathlon autosampler the values depend on a tray configuration:
• First Vial<br />
from 1 to 96 samples <strong>for</strong> 1.5 ml vials;<br />
from 1 to 72 samples <strong>for</strong> 4.0 ml vials;<br />
from 1 to 32 samples <strong>for</strong> 10 ml vials;<br />
from 1 to 160 samples <strong>for</strong> micro vials (0.8 ml);<br />
• Last Vial<br />
Position of the last vial of the sample series in the tray must be in the range defined<br />
above.<br />
• Inj./Vial (Repeat)<br />
9 Inj./Vial<br />
Settings <strong>for</strong> a particular injection method are defined in every Macro line and stored in the INJECTION<br />
METHOD cell. Double-click on the cell allows to edit the injection method.<br />
The programming possibilities are dependent of the autosampler:<br />
The <strong>Basic</strong> Marathon autosampler can per<strong>for</strong>m full loop injections only. The injection volume is defined<br />
by the loop volume and Flush Volume or Flush Time can be defined <strong>for</strong> the injection method. For the<br />
<strong>Basic</strong> Marathon Plus you can specify Injection Volume.<br />
• Injection Volume<br />
the loop volume <strong>for</strong> the <strong>Basic</strong> Marathon<br />
from 0 to 50 % of the programmed loopvolume with steps 10 ul (10, 20, 30, ....) <strong>for</strong> the <strong>Basic</strong><br />
Marathon Plus<br />
• Flush Volume<br />
flushing volume <strong>for</strong> needle and connecting tubing prior filling the loop;<br />
from 30 (50 <strong>for</strong> Marathon Plus) to 999 µl<br />
this field is enabled <strong>for</strong> Volume Base only.<br />
• Flush Time (sec)<br />
duration of headspace pressure <strong>for</strong> filling the loop.
from1 to 999 sec.<br />
this field is enabled <strong>for</strong> Time Base only.<br />
The Triathlon autosampler allows to select different injection methods. The maximum programmable<br />
injection volumes are:<br />
• Partial loopfill injections<br />
50 % of the programmed loop volume<br />
• µl pick-up injections<br />
volume = (loop volume - 3 x needle volume)/2<br />
• Flushed loop injections<br />
not programmable, is equal to the loop volume but needs more sample to fill the loop<br />
completely.<br />
• Flush Volume<br />
from 0 to 999 µl<br />
Programming of time based methods is also supported <strong>for</strong> the Triathlon autosampler.<br />
Please refer to a corresponding autosampler user manual <strong>for</strong> more details.<br />
Tip: the serial mode is recommended <strong>for</strong> the Spark autosamplers;<br />
it is necessary to press F4 button <strong>for</strong> <strong>Basic</strong>-Marathon and MENU / SERIAL <strong>for</strong><br />
Triathlon on the autosampler to switch the autosampler to serial mode;<br />
PIN-Layout <strong>for</strong> the interface cable PC/Spark autosampler:<br />
25 Pol Marathon male 9 Pol PC female<br />
Pin 2 Pin 2<br />
Pin 3 Pin 3<br />
Pin 7 Pin 5<br />
Pin 4/5 bridge Pin 1/6 bridge<br />
Pin 6/8 bridge Pin 1/4 bridge<br />
Pin 8/20 bridge Pin 7/8 bridge
4. Realisation of batch protocol printing<br />
In the previous <strong>version</strong> it was possible to print protocol either from a graphic window or from a peak<br />
report. Independently of how many chromatograms are displayed in the graphic window, only the<br />
protocol <strong>for</strong> the current chromatogram could be printed.<br />
The current <strong>version</strong> now allows printing of all displayed chromatograms after activation of the<br />
FILE/PRINT PROTOCOL operation.<br />
5. Setup the target directory <strong>for</strong> macro<br />
In the previous <strong>version</strong> the files that were created after running a macro were saved in only one and<br />
the same directory. It was not possible to choose between specific directories or sub-directories.<br />
The possibility to select a target sub-directory <strong>for</strong> measured data is now supported. After activation of<br />
MACRO/SET TARGET DIRECTORY the user selects the desired sub-directory and all the measured<br />
and related data is saved in this directory.<br />
6. Start macro from any position<br />
To start a macro from any line is supported. The <strong>version</strong> 1.2 of the software allowed the start of a<br />
macro from the last executed position (if the macro was interrupted) or to start it from the very<br />
beginning. Sometimes it is necessary to run a macro <strong>for</strong> one or several predefined samples (i.e. to<br />
change usual macro run).<br />
7. Changing sorting mechanism <strong>for</strong> the tables<br />
In the previous <strong>version</strong> a sorting mechanism was supported <strong>for</strong> a time table. After modification of time<br />
the lines are reordered to keep consistent time order. Focus was defined by the current position of line,<br />
i.e. it kept the same position after reordering the lines and currently edited line lost the focus. Now, the<br />
focus is linked to the edited line, so after reordering the edited line keeps the focus.<br />
8. Table column Auto-fill possibility<br />
A possibility to fill all the cells in one column by the value taken from the current table cell (Menu<br />
EDIT/FILL COLUMN) is supported.<br />
9. Extension of a Header in Protocol printing<br />
A new check-field appears in Print Protocol (Header structure) settings - Print Linked Objects. If this<br />
field is checked, the measurement method name and analysis parameters name as well as their<br />
creation time appear in a header of a chromatogram.<br />
This certainly makes sense <strong>for</strong> the option of printing the protocol consisting of two objects:<br />
chromatogram and peak report (which seems to be the most often used option).<br />
Additionally, Creation Time as well as an Operator name are added <strong>for</strong> all objects which are printed in<br />
the Protocol.<br />
10. Calibration as an entry in the main menu<br />
To speed up an access to a manual calibration utility, a new entry CALIBRATION appeared in the<br />
<strong>EuroChrom</strong> <strong>2000</strong> main menu. It has exactly the same functionality as an option<br />
MEASUREMENT/SERVICE/CALIBRATE from a measurement method window.<br />
11. Support of various per<strong>for</strong>mance calculations<br />
<strong>EuroChrom</strong> <strong>2000</strong> <strong>for</strong> <strong>Windows</strong> <strong>Basic</strong> <strong>Edition</strong> calculates the following values that can be used to assess<br />
overall system per<strong>for</strong>mance:<br />
• Relative Retention<br />
• Theoretical Plates<br />
• Capacity Factor<br />
• Resolution<br />
• Peak Asymmetry<br />
The following diagram shows the parameters used to calculate these system per<strong>for</strong>mance values <strong>for</strong><br />
the separation of two chromatographic components.
Injection<br />
Unretained Peak<br />
t a<br />
Time<br />
t<br />
1<br />
t<br />
2<br />
W 1<br />
Separation of Two Chromatographic Components<br />
Note: To accurately calculate suitability values, the sampling frequency (set in Acquisition Setup) must be<br />
set to provide at least 20 data (10 <strong>for</strong> the leading edge and 10 <strong>for</strong> the tailing edge of the peak) points<br />
<strong>for</strong> the narrowest peak of interest.<br />
Relative Retention (Selectivity)<br />
t 2 - ta<br />
α =<br />
t 1 - ta<br />
Where<br />
α = Relative retention.<br />
t2 = The retention time measured from point of injection<br />
Capacity Factor (k’)<br />
Where<br />
t 2<br />
k' = −1<br />
ta<br />
ta = The retention time of an inert component not retained by the column, taken<br />
from "Unretained R(etention) T(ime)" in the Detection Parameters section.<br />
t1 = The retention time from point of injection <strong>for</strong> reference peak defined in the<br />
Detection Parameters section. If no reference peak is found, this value<br />
becomes -1.<br />
k' = Capacity Factor<br />
t 2 = The retention time measured from point of injection<br />
t a = The retention time of an inert component not retained by the column, taken<br />
from "Unretained R(etention) T(ime)" in the Detection Parameters section.<br />
USP (United States Pharmacopia) calculation method<br />
Theoretical Plates<br />
t<br />
n = 16( )<br />
W<br />
2<br />
Where<br />
n = theoretical plates<br />
t = The retention time of the component<br />
W = The width of the base of the component peak using tangent method.<br />
W 2
Peak Asymmetry (Tailing Factor)<br />
.<br />
T = W 0 05<br />
2f<br />
Where<br />
T = Peak asymmetry, or tailing factor<br />
W0.05 = The distance from the leading edge to the tailing edge of the peak, measured<br />
at a point 5% of the peak height from the baseline<br />
f = The distance from the peak maximum to the leading edge of the peak at the<br />
position of 5% peak height<br />
Peak Front Peak Tail<br />
f<br />
W 0.05<br />
Peak Maximum<br />
Asymmetric Peak<br />
0.05 h<br />
Resolution<br />
2( t 2−t1) R =<br />
W2 + W1<br />
Where<br />
R = Resolution between a peak of interest (peak 2) and the peak preceding it<br />
(peak 1).<br />
t2 = The retention time measured from point of injection of peak 2.<br />
t 1 = The retention time measured from point of injection of peak 1.<br />
W 2 = The width of the base of the component peak 2<br />
W 1 = The width of the base of the component peak 1<br />
EMG (Exponential Modified Gaussian) calculation method<br />
Theoretical Plates<br />
Where<br />
N =<br />
� t �<br />
�<br />
W<br />
�<br />
� 0.<br />
1�<br />
41.<br />
7 ×<br />
b0.<br />
1<br />
+ 1.<br />
25<br />
a0.<br />
1<br />
2<br />
N= The number of theoretical plates<br />
t= The retention time of the component<br />
W0.1 = The width of the peak at the position of 10% peak height<br />
a0.1 = The width of the first half (start to top) of peak at the position of 10% peak<br />
height<br />
b0.1 = The width of the second half (top to end) of peak at the position of 10% of<br />
peak height<br />
Peak Asymmetry (Tailing Factor)<br />
.<br />
T = W 0 05<br />
2f<br />
Where<br />
h
Resolution<br />
Where<br />
T = Peak asymmetry, or tailing factor<br />
W0.05 = The distance from the leading edge to the tailing edge of the peak, measured<br />
at a point 5% of the peak height from the baseline<br />
f = The distance from the peak maximum to the leading edge of the peak at the<br />
position of 5% peak height<br />
( t<br />
R = 2.<br />
15×<br />
W<br />
2 − 1)<br />
0.<br />
1<br />
+<br />
t<br />
W<br />
p0.<br />
1<br />
R = Resolution between a peak of interest (peak 2) and the peak preceding it<br />
(peak 1).<br />
t2 = The retention time measured from point of injection of peak 2.<br />
t 1 = The retention time measured from point of injection of peak 1.<br />
W 0.1 = The width of peak at the position of 10% peak height<br />
W p0.1 = The width of previous peak at the position of 10% peak height<br />
DAB (German Pharmacopia) calculation method<br />
NOTE: This calculation equation is also called the BP (British Pharmacopia), EP (European Pharmacopia),<br />
and ASTM.<br />
Theoretical Plates<br />
Where<br />
N<br />
=<br />
5.<br />
54<br />
� t<br />
×<br />
�<br />
�W<br />
0.<br />
5<br />
�<br />
�<br />
�<br />
2<br />
N = Theoretical plates<br />
t = The retention time of the component<br />
W0.5 = Width of peak at the position of 50% peak height<br />
Peak Asymmetry (Tailing Factor<br />
T W005<br />
.<br />
=<br />
2f<br />
Where<br />
T = Peak asymmetry, or tailing factor<br />
W0.05 = The distance from the leading edge to the tailing edge of the peak, measured<br />
at a point 5% of the peak height from the baseline<br />
f = The distance from the peak maximum to the leading edge of the peak at the<br />
position of 5% peak height<br />
Resolution<br />
( t<br />
R = 1.<br />
18×<br />
W<br />
Where<br />
2 − 1)<br />
0.<br />
5<br />
+<br />
t<br />
W<br />
p 05<br />
R = Resolution between a peak of interest (peak 2) and the peak preceding it<br />
(peak 1).<br />
t2 = The retention time measured from point of injection of peak 2.<br />
t 1 = The retention time measured from point of injection of peak 1.
W 0.5 = The width of the component peak at 50 % peak height.<br />
W p0.5 = The width of the previous component peak at 50 % peak height.<br />
Japanese Pharmacopoeia (JP) calculation<br />
Theoretical Plates<br />
Where<br />
N<br />
=<br />
5.<br />
55<br />
� t<br />
×<br />
�<br />
�W<br />
0.<br />
5<br />
�<br />
�<br />
�<br />
2<br />
N = Theoretical plates<br />
t = The retention time of the component<br />
W0.5 = Width of peak at the position of 50% peak height<br />
Peak Asymmetry (Tailing Factor)<br />
T W005<br />
.<br />
=<br />
2f<br />
Where<br />
T = Peak asymmetry, or tailing factor<br />
W0.05 = The distance from the leading edge to the tailing edge of the peak, measured<br />
at a point 5% of the peak height from the baseline<br />
f = The distance from the peak maximum to the leading edge of the peak at the<br />
position of 5% peak height<br />
Resolution<br />
( t<br />
R = 1.<br />
18×<br />
W<br />
Where<br />
2 − 1)<br />
0.<br />
5<br />
+<br />
t<br />
W<br />
p 05<br />
R = Resolution between a peak of interest (peak 2) and the peak preceding it<br />
(peak 1).<br />
t2 = The retention time measured from point of injection of peak 2.<br />
t 1 = The retention time measured from point of injection of peak 1.<br />
W 0.5 = The width of the component peak at 50 % peak height.<br />
W p0.5 = The width of the previous component peak at 50 % peak height.<br />
12. Database viewer: new status in<strong>for</strong>mation, „Put into directory“- and „Copy<br />
with links“- options<br />
The number of different objects stored in a current sub-directory of a database as well as the number<br />
of selected objects is shown on a Status bar of a database viewer.<br />
A possibility to copy a set of linked objects without breaking the links is implemented. There are two<br />
modes: copy all linked objects (if someone copies one chromatogram which is linked to a method and<br />
the method is linked to more chromatograms, all the chromatograms will be copied); stop at method<br />
(other chromatograms linked to the method will not be copied).<br />
Contrary to Copy/Move operations, the option PUT into DIRECTORY does not per<strong>for</strong>m any physical<br />
movements of the chosen data. It modifies a structure of internal in<strong>for</strong>mational links in a way that the<br />
objects are visible in a selected sub-directory. The option is especially helpful <strong>for</strong> re-organization of<br />
large customer databases.
13. „Locate“ function <strong>for</strong> every object: jump into a corresponding sub-directory<br />
in a database<br />
The function „Locate“ is available <strong>for</strong> every object and accessible from menu FILE/LOCATE of a<br />
corresponding window. It allows to jump into the sub-directory of a database where the object is stored<br />
even if the database is already closed. If there is no opened database viewers at the moment, the<br />
function activates new one.<br />
14. „Find object“ function:<br />
Search <strong>for</strong> an object of all possible types by name with wildcards (‘*’ and/or ‘?’ symbols), case<br />
sensitive/insensitive, pre-search by date, search in all registered databases, current database or<br />
current directory, option „look in sub-directory“ is supported. The function is accessible from a<br />
Database Viewer window menu BASE/FIND OBJECT.<br />
15. Tracing LogBooks<br />
The <strong>EuroChrom</strong> <strong>2000</strong> v.<strong>2.05</strong> software supports multiple log books. Contrary to previous <strong>version</strong>s of the<br />
software supporting only one HISTORY file, the current <strong>version</strong> creates a new history file (log book)<br />
every time it starts a new working session. The log book is stored into a subdirectory HISTORY/MM-<br />
DD-YY (the date of start of a working session) in the working directory of the <strong>EuroChrom</strong> software. The<br />
possibilities to open one of the previous log books (the <strong>EuroChrom</strong> main menu OPTIONS/SHOW<br />
LOGBOOK) or the current log book (OPTIONS/SHOW CURRENT HISTORY) are supported.<br />
16. Validation utility with report printing possibility<br />
A new feature - a possibility to validate all vitally important files with following report printing is<br />
supported now. The following parameters are checked by the validation program: size, time, date,<br />
check sum. A copy of the validation result is stored also in an ASCII data file in the <strong>EuroChrom</strong> working<br />
directory.<br />
17. Support of multiple HPLC systems under <strong>Windows</strong> NT<br />
The <strong>EuroChrom</strong> <strong>2000</strong> v.<strong>2.05</strong> software allows to run several HPLC systems from one PC. A special<br />
ECW<strong>2000</strong> Multiple utility is required to organize a PC environment <strong>for</strong> multi-System operation. Please<br />
call KNAUER customer support <strong>for</strong> the details.<br />
18. Installation of the Diode Array Detector (ISA and PCI Interface cards)<br />
The <strong>EuroChrom</strong> <strong>2000</strong> v.<strong>2.05</strong> software supports the K-2700 Diode Array Detector (PhotoDiode Array)<br />
with two possible interface cards: <strong>for</strong> ISA bus and PCI bus. If you install the K-2700 Diode Array<br />
Detector support you have to chose the appropriate interface card type:
NOTE: Do not check both PCI DAD and ISA DAD support simultaneously.<br />
In case of PCI DAD you should install the PCI DAD driver.<br />
To install the PCI DAD driver:<br />
1. Insert the CDROM into your CD drive<br />
2. Double-click on “My Computer”<br />
3. Right-Mouse click on your CDROM<br />
4. Select “Explore” from the right-mouse menu, go to Drivers\K2700<br />
5. Double-click on Setup.exe<br />
You should also select the appropriate Interface Board Type when creating the hardware configuration<br />
from the <strong>EuroChrom</strong> hardware constructor