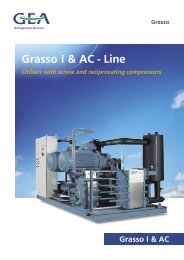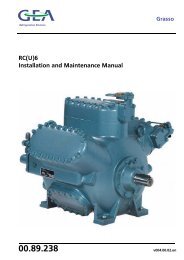
MANUAL DE INSTRUCCIONES INSTRUCTION MANUAL
MANUAL DE INSTRUCCIONES INSTRUCTION MANUAL
MANUAL DE INSTRUCCIONES INSTRUCTION MANUAL

Create successful ePaper yourself
Turn your PDF publications into a flip-book with our unique Google optimized e-Paper software.
7- PUESTA EN MARCHA<br />
Una vez verificada la instalación de<br />
posibles fugas (utilícese nitrógeno seco)<br />
debe vaciarse la instalación incluyendo el<br />
compresor (lleva también carga de<br />
nitrógeno seco) con bomba de vacío<br />
conectada a un tubo en presión de alta y el<br />
otro en baja, hasta alcanzar completamente<br />
el vacío.<br />
Debemos recordar que para hacer el vacío<br />
deben de estar las válvulas solenoides en<br />
posición de abiertas.<br />
NUNCA debe ponerse en marcha el<br />
compresor en vacío ni para probarlo.<br />
En caso de probar la instalación con aire<br />
seco, recuérdese que las válvulas de<br />
servicio del compresor deben de estar<br />
cerradas para evitar que se altere la<br />
estabilidad del aceite.<br />
7.1- Carga de refrigerante<br />
Para cargar de refrigerante, debe<br />
comprobarse que el nivel de aceite es el<br />
correcto y a continuación póngase en<br />
marcha la resistencia del cárter.<br />
El refrigerante puede ser cargado en forma<br />
líquida directamente al condensador o<br />
recipiente de la unidad, con el compresor<br />
parado aprovechando por ejemplo el vacío<br />
previo a la puesta en marcha. Si después<br />
de la puesta en marcha hace falta<br />
completar la carga, puede hacerse en fase<br />
gaseosa por aspiración (o forzosamente<br />
con líquido para los refrigerantes<br />
zeotrópicos) dosificando el caudal a fin de<br />
evitar un exceso de líquido que pueda<br />
comprometer las válvulas de aspiración o la<br />
propia carga de aceite<br />
7.2- Comprobaciones<br />
- El nivel de aceite debe estar según se<br />
muestra en la fig.5<br />
Cuando un compresor sea desmontado de<br />
la instalación para su sustitución, al montar<br />
el nuevo se debería comprobar si es<br />
necesario drenar parte del aceite inicial<br />
existente en el sistema.<br />
- La temperatura del compresor esta en su<br />
óptimo funcionamiento ( de 15ºC a 20ºC<br />
más que la temperatura ambiente)<br />
-Comprobar la funcionalidad de los<br />
dispositivos de seguridad<br />
- Reles de tiempo<br />
- Presostatos de alta y baja<br />
7. STARTING<br />
Once the installation has been checked for<br />
possible leaks (use dry nitrogen), the<br />
installation must be drained, including the<br />
compressor (this also is loaded with dry<br />
nitrogen) with the vacuum pump connected<br />
to a high and low pressure pipe, until the<br />
vacuum is completely formed.<br />
Remember that to make the vacuum, the<br />
solenoid valves must be open.<br />
NEVER start the compressor empty, even<br />
for testing purposes.<br />
If testing the installation with dry air,<br />
remember that the service valves of the<br />
compressor must be closed in order to<br />
avoid any change in the stability of the oil.<br />
7.1. Coolant loading<br />
To change the refrigerant, it must be made<br />
sure that the oil level is correct and then<br />
start the resistance of the housing.<br />
The refrigerant may be changed in liquid<br />
form directly into the condenser or recipient<br />
of the unit, with the compressor turned off,<br />
making use, for instance, of the vacuum<br />
available before starting. If after starting,<br />
the load has to be completed, it may be<br />
undertaken in gaseous phase by suction (or<br />
forcefully with liquids with zeotropic<br />
refrigerants), controlling the flow to make<br />
sure that no surplus liquid enters, which<br />
could damage the suction valves or the oil<br />
load itself.<br />
7.2. Checking<br />
- The oil level must be as we see in Fig. 5.<br />
When a compressor is disassembled from<br />
the installation for replacement, on fitting<br />
the new one we must check whether it is<br />
necessary to drain off part of the oil, there<br />
already being oil in the system.<br />
- The temperature of the compressor is at<br />
optimal working (from 15ºC to 20ºC above<br />
room temperature).<br />
- Check the working of the safety devices<br />
- Time relays<br />
- High and low pressure gauges.