Guía de inicio (PDF) - Logitech
Guía de inicio (PDF) - Logitech
Guía de inicio (PDF) - Logitech

You also want an ePaper? Increase the reach of your titles
YUMPU automatically turns print PDFs into web optimized ePapers that Google loves.
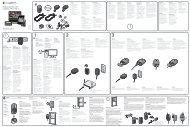
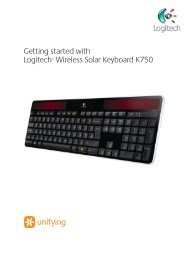
Getting started with<br />
Première utilisation<br />
<strong>Logitech</strong>® Wireless<br />
Touch Keyboard K400<br />
2<br />
1<br />
2<br />
3 4<br />
Getting started with<br />
Première utilisation<br />
<strong>Logitech</strong>® Wireless<br />
Touch Keyboard K400<br />
AA<br />
K400<br />
1 2 3 4 5<br />
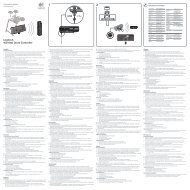
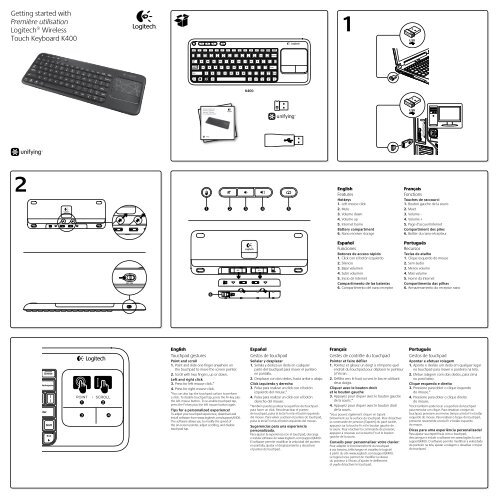
English<br />
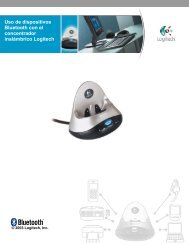
Touchpad gestures<br />
Point and scroll<br />
1. Point and sli<strong>de</strong> one finger anywhere on<br />
the touchpad to move the screen pointer.<br />
2. Scroll with two fingers, up or down.<br />
Left and right click<br />
3. Press for left mouse click.*<br />
4. Press for right mouse click.<br />
*You can also tap the touchpad surface to perform<br />
a click. To disable touchpad tap, press the Fn-key plus<br />
the left mouse button. To re-enable touchpad tap,<br />
press the Fn-key plus the left mouse button again.<br />
Tips for a personalized experience!<br />
To adjust your touchpad experience, download and<br />
install software from www.logitech.com/support/K400.<br />
The software allows you to modify the speed of<br />
the on-screen pointer, adjust scrolling, and disable<br />
touchpad tap.<br />
6<br />
AA<br />
Español<br />
Gestos <strong>de</strong> touchpad<br />
Señalar y <strong>de</strong>splazar<br />
1. Señala y <strong>de</strong>sliza un <strong>de</strong>do en cualquier<br />
parte <strong>de</strong>l touchpad para mover el puntero<br />
en pantalla.<br />
2. Desplazar con dos <strong>de</strong>dos, hacia arriba o abajo.<br />
Click izquierdo y <strong>de</strong>recho<br />
3. Pulsa para realizar un click con el botón<br />
izquierdo <strong>de</strong>l mouse.*<br />
4. Pulsa para realizar un click con el botón<br />
<strong>de</strong>recho <strong>de</strong>l mouse.<br />
*También pue<strong>de</strong>s puntear la superficie <strong>de</strong>l touchpad<br />
para hacer un click. Para <strong>de</strong>sactivar el punteo<br />
<strong>de</strong> touchpad, pulsa la tecla Fn más el botón izquierdo<br />
<strong>de</strong>l mouse. Para volver a activar el punteo <strong>de</strong> touchpad,<br />
pulsa la tecla Fn más el botón izquierdo <strong>de</strong>l mouse.<br />
Sugerencias para una experiencia<br />
personalizada.<br />
Para ajustar la experiencia con el touchpad, <strong>de</strong>scarga<br />
e instala software <strong>de</strong> www.logitech.com/support/K400.<br />
El software permite modificar la velocidad <strong>de</strong>l puntero<br />
en pantalla, ajustar el <strong>de</strong>splazamiento y <strong>de</strong>sactivar<br />
el punteo <strong>de</strong> touchpad.<br />
1<br />
English<br />
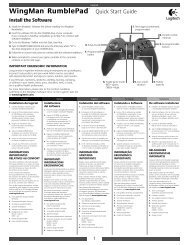
Features<br />
Hotkeys<br />
1. Left mouse click<br />
2. Mute<br />
3. Volume down<br />
4. Volume up<br />
5. Internet home<br />
Battery compartment<br />
6. Nano receiver storage<br />
Español<br />
Funciones<br />
Botones <strong>de</strong> acceso rápido<br />
1. Click con el botón izquierdo<br />
2. Silencio<br />
3. Bajar volumen<br />
4. Subir volumen<br />
5. Inicio <strong>de</strong> Internet<br />
Compartimento <strong>de</strong> las baterías<br />
6. Compartimento <strong>de</strong>l nano receptor<br />
Français<br />
Gestes <strong>de</strong> contrôle du touchpad<br />
Pointer et faire défiler<br />
1. Pointez et glissez un doigt à n’importe quel<br />
endroit du touchpad pour déplacer le pointeur<br />
à l’écran.<br />
2. Défilez vers le haut ou vers le bas en utilisant<br />
<strong>de</strong>ux doigts.<br />
Cliquer avec le bouton droit<br />
et le bouton gauche<br />
3. Appuyez pour cliquer avec le bouton gauche<br />
<strong>de</strong> la souris.*<br />
4. Appuyez pour cliquer avec le bouton droit<br />
<strong>de</strong> la souris.<br />
*Vous pouvez également cliquer en tapant<br />
brièvement sur la surface du touchpad. Pour désactiver<br />
la comman<strong>de</strong> <strong>de</strong> pression (Tapoter) du pavé tactile,<br />
appuyez sur la touche Fn et le bouton gauche <strong>de</strong><br />
la souris. Pour réactiver la comman<strong>de</strong> <strong>de</strong> pression,<br />
appuyez à nouveau sur la touche Fn et le bouton<br />
gauche <strong>de</strong> la souris.<br />
Conseils pour personnaliser votre clavier:<br />
Pour adapter le fonctionnement du touchpad<br />
à vos besoins, téléchargez et installez le logiciel<br />
à partir du site www.logitech.com/support/K400.<br />
Le logiciel vous permet <strong>de</strong> modifier la vitesse<br />
du pointeur à l’écran, d’ajuster le défilement<br />
et yyy<strong>de</strong> désactiver le touchpad.<br />
Français<br />
Fonctions<br />
Touches <strong>de</strong> raccourci<br />
1. Bouton gauche <strong>de</strong> la souris<br />
2. Muet<br />
3. Volume -<br />
4. Volume +<br />
5. Page d’accueil Internet<br />
Compartiment <strong>de</strong>s piles<br />
6. Boîtier du nano-récepteur<br />
Português<br />
Recursos<br />
Teclas <strong>de</strong> atalho<br />
1. Clique esquerdo do mouse<br />
2. Sem áudio<br />
3. Menos volume<br />
4. Mais volume<br />
5. Home da Internet<br />
Compartimento das pilhas<br />
6. Armazenamento do receptor nano<br />
Português<br />
Gestos <strong>de</strong> touchpad<br />
Apontar e efetuar rolagem<br />
1. Aponte e <strong>de</strong>slize um <strong>de</strong>do em qualquer lugar<br />
no touchpad para mover o ponteiro na tela.<br />
2. Efetue rolagem com dois <strong>de</strong>dos, para cima<br />
ou para baixo.<br />
Clique esquerdo e direito<br />
3. Pressione para obter o clique esquerdo<br />
do mouse.*<br />
4. Pressione para obter o clique direito<br />
do mouse.<br />
*Você também po<strong>de</strong> tocar a superfície do touchpad<br />
para executar um clique. Para <strong>de</strong>sativar o toque do<br />
touchpad, pressione ao mesmo tempo a tecla Fn e botão<br />
esquerdo do mouse. Para reativar o toque do touchpad,<br />
pressione novamente a tecla Fn e botão esquerdo<br />
do mouse.<br />
Dicas para uma experiência personalizada!<br />
Para ajustar sua experiência com o touchpad,<br />
<strong>de</strong>scarregue e instale o software em www.logitech.com/<br />
support/K400. O software permite modificar a velocida<strong>de</strong><br />
do ponteiro na tela, ajustar a rolagem e <strong>de</strong>sativar o toque<br />
do touchpad.
English<br />
The <strong>Logitech</strong>® Unifying receiver<br />
Plug it. Forget it. Add to it.<br />
Your new <strong>Logitech</strong> product ships with a <strong>Logitech</strong><br />
Unifying receiver. Did you know you can add<br />
a compatible <strong>Logitech</strong> wireless <strong>de</strong>vice that uses<br />
the same receiver as your current <strong>Logitech</strong><br />
Unifying product?<br />
Are you Unifying-ready?<br />
If you have a <strong>Logitech</strong> wireless <strong>de</strong>vice<br />
that’s Unifying-ready, you can pair it with<br />
additional Unifying <strong>de</strong>vices. Just look for<br />
the orange Unifying logo on the new <strong>de</strong>vice<br />
or its packaging. Build your i<strong>de</strong>al combo.<br />
Add something. Replace something.<br />
It’s easy, and you’ll use only one USB port<br />
for up to six <strong>de</strong>vices.<br />
Getting started is easy<br />
If you’re ready to pair your <strong>de</strong>vice(s) via Unifying,<br />
here’s what you need to do:<br />
1. Make sure your Unifying receiver<br />
is plugged in.<br />
2. If you haven’t already, download<br />
the <strong>Logitech</strong>® Unifying software from<br />
www.logitech.com/unifying.<br />
3. Start the Unifying software* and follow the<br />
onscreen instructions to pair the new wireless<br />
<strong>de</strong>vice with your existing Unifying receiver.<br />
*Go to Start / All Programs / <strong>Logitech</strong> / Unifying /<br />
<strong>Logitech</strong> Unifying Software<br />
www.logitech.com<br />
Español<br />
Receptor <strong>Logitech</strong>® Unifying<br />
Conéctalo. Olvídate <strong>de</strong> él. Agrega más.<br />
Tu nuevo producto <strong>Logitech</strong> se entrega<br />
con un receptor <strong>Logitech</strong> Unifying.<br />
¿Sabías que pue<strong>de</strong>s agregar un dispositivo<br />
inalámbrico <strong>Logitech</strong> compatible que utiliza<br />
el mismo receptor que tu producto <strong>Logitech</strong><br />
Unifying actual?<br />
¿Estás listo para Unifying?<br />
Si tienes un dispositivo inalámbrico compatible<br />
con Unifying, pue<strong>de</strong>s emparejarlo con otros<br />
dispositivos Unifying. Busca el logo naranja<br />
<strong>de</strong> Unifying en el nuevo dispositivo o en<br />
su embalaje. Crea la combinación i<strong>de</strong>al.<br />
Agrega algo. Sustituye algo. Es sencillo:<br />
sólo utilizarás un puerto USB para hasta<br />
seis dispositivos.<br />
Es muy sencillo<br />
Si estás listo para emparejar los dispositivos<br />
mediante Unifying, sigue estos pasos:<br />
1. Comprueba que el receptor Unifying<br />
esté conectado.<br />
2. Si no lo has hecho aún, <strong>de</strong>scarga el software<br />
<strong>Logitech</strong>® Unifying <strong>de</strong>s<strong>de</strong> www.logitech.com/<br />
unifying.<br />
3. Inicia el software* Unifying y sigue<br />
las instrucciones en pantalla para emparejar<br />
el nuevo dispositivo inalámbrico con<br />
el receptor Unifying existente.<br />
*Vaya a Inicio / Todos los programas / <strong>Logitech</strong> /<br />
Unifying / Software <strong>Logitech</strong> Unifying<br />
© 2011 <strong>Logitech</strong>. All rights reserved. <strong>Logitech</strong>, the <strong>Logitech</strong> logo, and other <strong>Logitech</strong> marks are owned<br />
by <strong>Logitech</strong> and may be registered. All other tra<strong>de</strong>marks are the property of their respective owners.<br />
<strong>Logitech</strong> assumes no responsibility for any errors that may appear in this manual. Information contained herein<br />
is subject to change without notice.<br />
© 2011 <strong>Logitech</strong>. Tous droits réservés. <strong>Logitech</strong>, le logo <strong>Logitech</strong> et les autres marques <strong>Logitech</strong> sont la propriété<br />
exclusive <strong>de</strong> <strong>Logitech</strong> et sont susceptibles d’être <strong>de</strong>s marques déposées. Toutes les autres marques sont<br />
la propriété exclusive <strong>de</strong> leurs détenteurs respectifs. <strong>Logitech</strong> décline toute responsabilité en cas d’erreurs<br />
dans ce manuel. Les informations énoncées dans le présent document peuvent faire l’objet <strong>de</strong> modifications<br />
sans avis préalable.<br />
620-003198.006<br />
Français<br />
Récepteur <strong>Logitech</strong>® Unifying<br />
Branchez-le. Oubliez-le.<br />
Ajoutez <strong>de</strong>s dispositifs.<br />
Votre nouveau produit <strong>Logitech</strong> est livré avec<br />
un récepteur <strong>Logitech</strong> Unifying. Saviez-vous<br />
qu’il est possible d’ajouter un dispositif <strong>Logitech</strong><br />
sans fil compatible utilisant le même récepteur<br />
que votre produit <strong>Logitech</strong> Unifying actuel?<br />
Etes-vous compatible Unifying?<br />
Si vous possé<strong>de</strong>z un dispositif <strong>Logitech</strong><br />
sans fil compatible Unifying, vous pouvez<br />
l’associer à d’autres dispositifs Unifying.<br />
Recherchez la présence du logo orange<br />
Unifying sur le nouveau dispositif ou<br />
son emballage. Créez votre combinaison<br />
parfaite. Ajoutez un dispositif. Remplacez-en un.<br />
C’est très simple, et vous pouvez utiliser un seul<br />
port USB pour six dispositifs.<br />
L’installation est très facile.<br />
Si vous êtes prêt à associer vos dispositifs<br />
en utilisant le récepteur Unifying,<br />
voici comment procé<strong>de</strong>r:<br />
1. Vérifiez que le récepteur Unifying<br />
est correctement branché.<br />
2. Si ce n’est déjà fait, téléchargez le logiciel<br />
<strong>Logitech</strong>® Unifying à partir du site<br />
www.logitech.com/unifying.<br />
3. Lancez le logiciel Unifying* et suivez<br />
les instructions à l’écran pour coupler<br />
le nouveau dispositif sans fil au récepteur<br />
Unifying existant.<br />
*Cliquez sur Démarrer / Tous les programmes /<br />
<strong>Logitech</strong> / Unifying / Logiciel <strong>Logitech</strong> Unifying<br />
Português<br />
O receptor <strong>Logitech</strong>® Unifying<br />
Conecte-o. Esqueça-o. Adicione a ele.<br />
Seu novo produto da <strong>Logitech</strong> inclui um receptor<br />
<strong>Logitech</strong> Unifying. Sabia que é possível adicionar<br />
um dispositivo sem fio compatível da <strong>Logitech</strong><br />
que usa o mesmo receptor que o atual produto<br />
<strong>Logitech</strong> Unifying?<br />
Está preparado para Unifying?<br />
Se tiver um dispositivo sem fio da <strong>Logitech</strong><br />
que esteja preparado para Unifying, é possível<br />
emparelhá-lo com dispositvos Unifying<br />
adicionais. Procure o logotipo laranja do Unifying<br />
no novo dispositivo ou na embalagem. Faça sua<br />
combinação i<strong>de</strong>al. Adicione algo. Substitua algo.<br />
É fácil, e você usará somente uma porta USB<br />
para até seis dispositivos.<br />
É fácil começar<br />
Se estiver pronto para emparelhar dispositivos<br />
através do Unifying, faça o seguinte:<br />
1. Verifique se o receptor Unifying está<br />
conectado.<br />
2. Se ainda não o fez, faça o download<br />
do software <strong>Logitech</strong>® Unifying em<br />
www.logitech.com/unifying.<br />
3. Inicie o software* do Unifying e siga<br />
as instruções na tela para emparelhar<br />
o novo dispositivo sem fio com o receptor<br />
Unifying existente.<br />
*Vá para Iniciar / Todos os programas / <strong>Logitech</strong> /<br />
Unifying / <strong>Logitech</strong> Unifying Software<br />
What do you think?<br />
¿Cuál es su opinión?<br />
Qu’en pensez-vous?<br />
O que você acha?<br />
Please take a minute to tell us. Thank you for purchasing our product.<br />
Nos gustaría conocerla, si pue<strong>de</strong> <strong>de</strong>dicarnos un minuto.<br />
Le agra<strong>de</strong>cemos la adquisición <strong>de</strong> nuestro producto.<br />
Prenez quelques minutes pour nous faire part <strong>de</strong> vos commentaires.<br />
Vous venez d’acheter ce produit et nous vous en remercions.<br />
Reserve um minuto para nos dizer. Obrigado por adquirir nosso produto.<br />
www.logitech.com/ithink<br />
English<br />
Help with setup<br />
•Is the keyboard powered on?<br />
•Power Off and power On the keyboard.<br />
•Is the Unifying receiver securely plugged into a computer USB port? Try changing USB ports.<br />
•If the Unifying receiver is plugged into a USB hub, try plugging it directly into a USB port<br />
on your computer.<br />
•Did you pull the battery tab? Check the orientation of the batteries insi<strong>de</strong> the keyboard,<br />
or replace the two AA alkaline batteries.<br />
•Remove metallic objects between the keyboard and its Unifying receiver.<br />
•Try moving the Unifying receiver to a USB port closer to the keyboard.<br />
•Try reconnecting the keyboard and Unifying receiver using the <strong>Logitech</strong> Unifying software<br />
(Refer to the Unifying section in this gui<strong>de</strong>.)<br />
Español<br />
Ayuda con la instalación<br />
•¿Has encendido el teclado?<br />
•Apaga y encien<strong>de</strong> el teclado.<br />
•¿Está el receptor Unifying conectado correctamente a un puerto USB <strong>de</strong> la computadora?<br />
Prueba otros puertos USB.<br />
•Si el receptor Unifying está conectado a un concentrador USB, conéctalo directamente<br />
a un puerto USB <strong>de</strong> la computadora.<br />
•¿Tiraste <strong>de</strong> la lengüeta <strong>de</strong> las baterías? Comprueba la orientación <strong>de</strong> las baterías <strong>de</strong>ntro<br />
<strong>de</strong>l teclado, o sustituye las dos baterías alcalinas AA.<br />
•Retira cualquier objeto metálico situado entre el teclado y el receptor Unifying.<br />
•Lleva el receptor Unifying a un puerto USB más cercano al teclado.<br />
•Vuelve a conectar el teclado y el receptor Unifying mediante el software <strong>Logitech</strong> Unifying<br />
(consulta la sección Unifying <strong>de</strong> esta guía).<br />
Français<br />
Ai<strong>de</strong> pour la configuration<br />
•Le clavier est-il sous tension?<br />
•Eteignez le clavier et rallumez-le.<br />
•Le récepteur Unifying est-il correctement branché sur un port USB <strong>de</strong> l’ordinateur?<br />
Réessayez en changeant <strong>de</strong> port USB.<br />
•Si le récepteur Unifying est branché sur un hub USB, branchez-le directement sur un port USB<br />
<strong>de</strong> l’ordinateur.<br />
•Avez-vous retiré la languette <strong>de</strong> protection? Vérifiez l’orientation <strong>de</strong>s piles dans le clavier<br />
ou remplacez les <strong>de</strong>ux piles alcalines AA.<br />
•Retirez tout objet métallique se trouvant entre le clavier et le récepteur Unifying.<br />
•Essayez <strong>de</strong> brancher le récepteur Unifying dans un port USB plus proche du clavier.<br />
•Essayez <strong>de</strong> reconnecter le clavier et le récepteur Unifying à l’ai<strong>de</strong> du logiciel <strong>Logitech</strong><br />
Unifying (reportez-vous à la section Unifying <strong>de</strong> ce gui<strong>de</strong>).<br />
Português<br />
Ajuda para a instalação<br />
•O teclado está ligado?<br />
•Desligue e ligue o teclado.<br />
•O receptor Unifying está <strong>de</strong>vidamente conectado a uma porta USB do computador?<br />
Tente alternar portas USB.<br />
•Se o receptor Unifying estiver conectado a um concentrador USB, tente conectá-lo<br />
diretamente a uma porta USB no computador.<br />
•Você puxou a lingüeta do compartimento das pilhas? Verifique a orientação das pilhas<br />
no interior do teclado ou substitua as duas pilhas alcalinas AA.<br />
•Remova objetos metálicos entre o teclado e o receptor Unifying.<br />
•Tente mover o receptor Unifying para uma porta USB mais próxima do teclado.<br />
•Tente reconectar o teclado e o receptor Unifying usando o software <strong>Logitech</strong> Unifying.<br />
(Consulte a seção Unifying neste guia.)<br />
www.logitech.com/support<br />
United States +1 646-454-3200<br />
Argentina +00800-555-3284<br />
Brasil +0 800-891-4173<br />
Canada +1 866-934-5644<br />
Chile 1230 020 5484<br />
Latin America +1 800-578-9619<br />
Mexico 001 800 578 9619<br />
M/N:C-U0007<br />
5 ,<br />
Approval No.: ETA-418/2010/WRLO<br />
CMIIT ID: 2010DJ0355<br />
14418/POSTEL/2010<br />
2100<br />
FCC ID: JNZCU0007<br />
IC: 4418A-CU0007<br />
Z855<br />
CCAI10LP0020T1<br />
DZL-C-U0007