Scarica il manuale di istruzioni (.pdf - 4,5 Mb - 11 lingue - contiene ...
Scarica il manuale di istruzioni (.pdf - 4,5 Mb - 11 lingue - contiene ...
Scarica il manuale di istruzioni (.pdf - 4,5 Mb - 11 lingue - contiene ...

Create successful ePaper yourself
Turn your PDF publications into a flip-book with our unique Google optimized e-Paper software.
INSTRUCTION MANUAL FOR WIRE FEEDER<br />
IMPORTANT: BEFORE STARTING THE EQUIPMENT,<br />
READ THE CONTENTS OF THIS MANUAL, WHICH MUST<br />
BE STORED IN A PLACE FAMILIAR TO ALL USERS FOR<br />
THE ENTIRE OPERATIVE LIFE-SPAN OF THE MACHINE.<br />
THIS EQUIPMENT MUST BE USED SOLELY FOR WELD-<br />
ING OPERATIONS.<br />
FOR THE DIMENSIONS AND WEIGHT OF THIS WELDING<br />
MACHINE, SEE THE SPECIFIC CATALOGUE.<br />
1 SAFETY PRECAUTIONS<br />
WELDING AND ARC CUTTING CAN BE HARMFUL TO<br />
YOURSELF AND OTHERS. The user must therefore be educated<br />
against the hazards, summarized below, deriving from<br />
wel<strong>di</strong>ng operations. For more deta<strong>il</strong>ed information, order the<br />
manual code 3.300.758<br />
ELECTRIC SHOCK - May be fatal.<br />
· Install and earth the wel<strong>di</strong>ng machine accor<strong>di</strong>ng to<br />
the applicable regulations.<br />
· Do not touch live electrical parts or electrodes with<br />
bare skin, gloves or wet clothing.<br />
· Isolate yourselves from both the earth and the workpiece.<br />
· Make sure your working position is safe.<br />
FUMES AND GASES - May be hazardous to your health.<br />
· Keep your head away from fumes.<br />
· Work in the presence of adequate vent<strong>il</strong>ation, and<br />
use vent<strong>il</strong>ators around the arc to prevent gases from<br />
forming in the work area.<br />
ARC RAYS - May injure the eyes and burn the skin.<br />
· Protect your eyes with wel<strong>di</strong>ng masks fitted with f<strong>il</strong>tered<br />
lenses, and protect your body with appropriate<br />
safety garments.<br />
· Protect others by installing adequate shields or curtains.<br />
RISK OF FIRE AND BURNS<br />
· Sparks (sprays) may cause fires and burn the skin;<br />
you should therefore make sure there are no flammable<br />
materials in the area, and wear appropriate<br />
protective garments.<br />
NOISE<br />
This machine does not <strong>di</strong>rectly produce noise<br />
excee<strong>di</strong>ng 80dB. The plasma cutting/wel<strong>di</strong>ng procedure<br />
may produce noise levels beyond said limit;<br />
users must therefore implement all precautions required by<br />
law.<br />
PACEMAKERS<br />
· The magnetic fields created by high currents may affect the<br />
operation of pacemakers. Wearers of vital electronic equipment<br />
(pacemakers) should consult their physician before<br />
beginning any arc wel<strong>di</strong>ng, cutting, gouging or spot wel<strong>di</strong>ng<br />
operations.<br />
EXPLOSIONS<br />
· Do not weld in the vicinity of containers under pressure,<br />
or in the presence of explosive dust, gases or<br />
fumes. · All cylinders and pressure regulators used in<br />
wel<strong>di</strong>ng operations should be handled with care.<br />
6<br />
ELECTROMAGNETIC COMPATIBILITY<br />
This machine is manufactured in compliance with the<br />
instructions contained in the harmonized standard IEC<br />
60974-10, and must be used solely for professional purposes<br />
in an industrial environment. There may be potential<br />
<strong>di</strong>fficulties in ensuring electromagnetic compatib<strong>il</strong>ity<br />
in non-industrial environments.<br />
DISPOSAL OF ELECTRICAL AND ELECTRONIC<br />
EQUIPMENT<br />
Do not <strong>di</strong>spose of electrical equipment together<br />
with normal waste!In observance of European<br />
Directive 2002/96/EC on Waste Electrical and Electronic<br />
Equipment and its implementation in accordance with<br />
national law, electrical equipment that has reached the<br />
end of its life must be collected separately and returned<br />
to an environmentally compatible recycling fac<strong>il</strong>ity. As<br />
the owner of the equipment, you should get information<br />
on approved collection systems from our local representative.<br />
By applying this European Directive you w<strong>il</strong>l<br />
improve the environment and human health!<br />
IN CASE OF MALFUNCTIONS, REQUEST ASSISTANCE<br />
FROM QUALIFIED PERSONNEL.<br />
2 GENERAL DESCRIPTION<br />
2.1 SPECIFICATIONS<br />
This manual has been prepared for the purpose of educating<br />
personnel assigned to install, operate and service<br />
the wel<strong>di</strong>ng machine.<br />
The purchaser should address any complaints for losses<br />
or damage to the vector. Please in<strong>di</strong>cate the article<br />
and serial number whenever requesting information<br />
about the wel<strong>di</strong>ng machine.<br />
3 INSTALLATION<br />
Only sk<strong>il</strong>led personnel should install the machine .<br />
All connections must be carried out accor<strong>di</strong>ng to current<br />
regulations, and in full observance of safety laws.<br />
3.1 PLACEMENT<br />
Unpack the wire feeder and place it above the wel<strong>di</strong>ng<br />
machine, using the flexible rotating cylinder provided.<br />
At the first start stage the operator must select the article he<br />
wants to use.<br />
Once the generator has been connected to the carriage by<br />
means of the connector, the machine can be started.<br />
The screen H of the wire feed carriage shows 3 flashing<br />
lines; to select just push one of the 2 push-buttons N or O to<br />
<strong>di</strong>splay the welder article you want to use.<br />
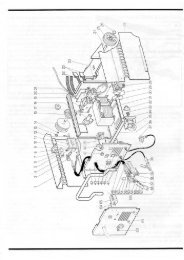
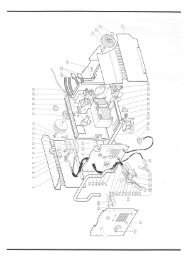
4 DESCRIPTION OF CONTROLS<br />
4.1 CONTROLS ON THE FRONTOF THE MACHINE.<br />
A- Green LED.<br />
Signals that the <strong>di</strong>splay H shows the current<br />
HOLD<br />
or voltage value measured during wel<strong>di</strong>ng.<br />
To <strong>di</strong>splay one of the two values, simply press one of the<br />
two selection keys N or O.