Scarica il manuale di istruzioni (.pdf - 4,5 Mb - 11 lingue - contiene ...
Scarica il manuale di istruzioni (.pdf - 4,5 Mb - 11 lingue - contiene ...
Scarica il manuale di istruzioni (.pdf - 4,5 Mb - 11 lingue - contiene ...

You also want an ePaper? Increase the reach of your titles
YUMPU automatically turns print PDFs into web optimized ePapers that Google loves.
complete, the LED and <strong>di</strong>splay remain lit for 5 seconds.<br />
By using the 2 selector switches R and S from within any<br />
synergic program, pressing one of the 2 keys toggles the<br />
LEDs I, L, M, and <strong>di</strong>splay H alternates <strong>di</strong>splaying the current,<br />
recommended thickness and voltage. This function<br />
is useful when you need to know in advance at what current,<br />
voltage or thickness you wish to weld.<br />
Pressing the 2 keys simultaneously for at least 5 seconds<br />
causes us to enter the sub-menu, where we find the following<br />
functions that may be selected via the key E:<br />
1 - Spot wel<strong>di</strong>ng time.<br />
When this function is selected the <strong>di</strong>splay H shows the<br />
letter (E). Using one of the 2 keys you may adjust the spot<br />
wel<strong>di</strong>ng or working time, which may range from 0.3 to 5<br />
seconds. Setting the time to 0 <strong>di</strong>sables the function. The<br />
function is active only wh<strong>il</strong>e wel<strong>di</strong>ng.<br />
2 - Pause time of the jog function.<br />
When this function is selected the <strong>di</strong>splay H shows the<br />
letter (F). Using one of the 2 keys you may adjust the<br />
pause time between wel<strong>di</strong>ng segments, which may range<br />
from 0.3 to 5 seconds. Setting the time to 0 <strong>di</strong>sables the<br />
function. The function is active only wh<strong>il</strong>e wel<strong>di</strong>ng, and if<br />
any spot wel<strong>di</strong>ng or working time is active.<br />
3 - Burn-back.<br />
When this function is selected the <strong>di</strong>splay H shows the<br />
letter (b). Using one of the 2 keys you may adjust the time<br />
for which the wire continues to be output from the wel<strong>di</strong>ng<br />
torch after the operator has released the button. This<br />
time ranges from 10 to 400 m<strong>il</strong>liseconds.<br />
4 - Soft start (speed).<br />
When this function is selected the <strong>di</strong>splay H shows the<br />
letter (A).<br />
Changes the wire speed from the one set; this speed<br />
remains active for the time governed by the Soft Start<br />
function (time).<br />
The speed may be adjusted using the 2 keys N and O<br />
from 10% to a maximum of 150% of the set wel<strong>di</strong>ng<br />
speed. This function, combined with the soft start function<br />
(time), serves to improve arc striking.<br />
5 - Post gas.<br />
When this function is selected the <strong>di</strong>splay H shows the<br />
letter (P).<br />
Using the two keys N and O, it is possible to adjust the<br />
gas flow after wel<strong>di</strong>ng to between 0 and 10 seconds.<br />
This function is especially useful when wel<strong>di</strong>ng stainless<br />
steel and aluminum.<br />
6 - Soft Start (time).<br />
When this function is selected the <strong>di</strong>splay H shows the<br />
letter (d).<br />
Adjusts the time for which the soft start speed remains<br />
active. This function, combined with the soft start function<br />
(speed), serves to improve arc striking.<br />
Using the 2 keys N and O, the soft start time may be<br />
adjusted from 0 to 1 second.<br />
8<br />
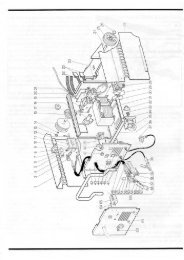
P- Setting knob.<br />
SYNERGIC<br />
4<br />
5 6<br />
7<br />
3<br />
8<br />
2<br />
1<br />
9<br />
10<br />
When using any synergic program, the<br />
knob in<strong>di</strong>cator must be set to the label<br />
SYNERGIC. When a synergic program<br />
is selected, the <strong>di</strong>splay H shows<br />
the set current.<br />
This current corresponds to a given<br />
speed. If you wish to correct this<br />
speed, simply turn the knob clockwise<br />
to increase or counter-clockwise to<br />
decrease.<br />
Changes in wire speed are always in<strong>di</strong>cated on the <strong>di</strong>splay<br />
H by a current.<br />
When the program 00 (manual) is in use, adjusts the wire<br />
speed from 0 to 20 meters per minute.<br />
The <strong>di</strong>splay H shows the meters per minute.<br />
T - Quick-fitting socket.<br />
This fitting must be connected to the red water<br />
hose leaving the wel<strong>di</strong>ng torch.<br />
U - Quick-fitting socket.<br />
This fitting must be connected to the blue water<br />
hose leaving the wel<strong>di</strong>ng torch.<br />
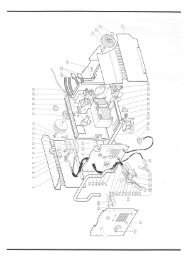
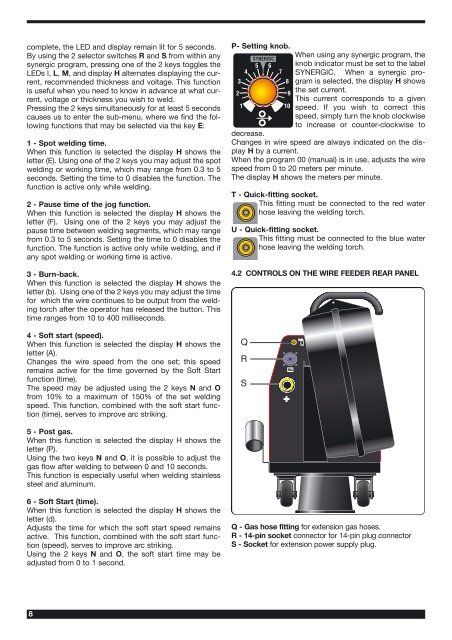
4.2 CONTROLS ON THE WIRE FEEDER REAR PANEL<br />
Q<br />
R<br />
S<br />
Q - Gas hose fitting for extension gas hoses.<br />
R - 14-pin socket connector for 14-pin plug connector<br />
S - Socket for extension power supply plug.