Scarica il manuale di istruzioni (.pdf - 4,5 Mb - 11 lingue - contiene ...
Scarica il manuale di istruzioni (.pdf - 4,5 Mb - 11 lingue - contiene ...
Scarica il manuale di istruzioni (.pdf - 4,5 Mb - 11 lingue - contiene ...

Create successful ePaper yourself
Turn your PDF publications into a flip-book with our unique Google optimized e-Paper software.
A<br />
B<br />
C<br />
D<br />
E<br />
F<br />
G<br />
T<br />
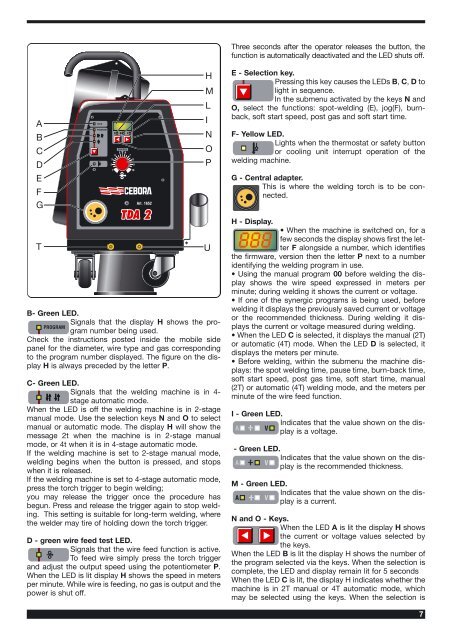
B- Green LED.<br />
Signals that the <strong>di</strong>splay H shows the pro-<br />
PROGRAM<br />
gram number being used.<br />
Check the instructions posted inside the mob<strong>il</strong>e side<br />
panel for the <strong>di</strong>ameter, wire type and gas correspon<strong>di</strong>ng<br />
to the program number <strong>di</strong>splayed. The figure on the <strong>di</strong>splay<br />
H is always preceded by the letter P.<br />
C- Green LED.<br />
Signals that the wel<strong>di</strong>ng machine is in 4stage<br />
automatic mode.<br />
When the LED is off the wel<strong>di</strong>ng machine is in 2-stage<br />
manual mode. Use the selection keys N and O to select<br />
manual or automatic mode. The <strong>di</strong>splay H w<strong>il</strong>l show the<br />
message 2t when the machine is in 2-stage manual<br />
mode, or 4t when it is in 4-stage automatic mode.<br />
If the wel<strong>di</strong>ng machine is set to 2-stage manual mode,<br />
wel<strong>di</strong>ng begins when the button is pressed, and stops<br />
when it is released.<br />
If the wel<strong>di</strong>ng machine is set to 4-stage automatic mode,<br />
press the torch trigger to begin wel<strong>di</strong>ng;<br />
you may release the trigger once the procedure has<br />
begun. Press and release the trigger again to stop wel<strong>di</strong>ng.<br />
This setting is suitable for long-term wel<strong>di</strong>ng, where<br />
the welder may tire of hol<strong>di</strong>ng down the torch trigger.<br />
D - green wire feed test LED.<br />
Signals that the wire feed function is active.<br />
To feed wire simply press the torch trigger<br />
and adjust the output speed using the potentiometer P.<br />
When the LED is lit <strong>di</strong>splay H shows the speed in meters<br />
per minute. Wh<strong>il</strong>e wire is fee<strong>di</strong>ng, no gas is output and the<br />
power is shut off.<br />
H<br />
M<br />
L<br />
I<br />
N<br />
O<br />
P<br />
U<br />
Three seconds after the operator releases the button, the<br />
function is automatically deactivated and the LED shuts off.<br />
E - Selection key.<br />
Pressing this key causes the LEDs B, C, D to<br />
light in sequence.<br />
In the submenu activated by the keys N and<br />
O, select the functions: spot-wel<strong>di</strong>ng (E), jog(F), burnback,<br />
soft start speed, post gas and soft start time.<br />
F- Yellow LED.<br />
Lights when the thermostat or safety button<br />
or cooling unit interrupt operation of the<br />
wel<strong>di</strong>ng machine.<br />
G - Central adapter.<br />
This is where the wel<strong>di</strong>ng torch is to be connected.<br />
H - Display.<br />
When the machine is switched on, for a<br />
few seconds the <strong>di</strong>splay shows first the let-<br />
888 ter F alongside a number, which identifies<br />
the firmware, version then the letter P next to a number<br />
identifying the wel<strong>di</strong>ng program in use.<br />
Using the manual program 00 before wel<strong>di</strong>ng the <strong>di</strong>splay<br />
shows the wire speed expressed in meters per<br />
minute; during wel<strong>di</strong>ng it shows the current or voltage.<br />
If one of the synergic programs is being used, before<br />
wel<strong>di</strong>ng it <strong>di</strong>splays the previously saved current or voltage<br />
or the recommended thickness. During wel<strong>di</strong>ng it <strong>di</strong>splays<br />
the current or voltage measured during wel<strong>di</strong>ng.<br />
When the LED C is selected, it <strong>di</strong>splays the manual (2T)<br />
or automatic (4T) mode. When the LED D is selected, it<br />
<strong>di</strong>splays the meters per minute.<br />
Before wel<strong>di</strong>ng, within the submenu the machine <strong>di</strong>splays:<br />
the spot wel<strong>di</strong>ng time, pause time, burn-back time,<br />
soft start speed, post gas time, soft start time, manual<br />
(2T) or automatic (4T) wel<strong>di</strong>ng mode, and the meters per<br />
minute of the wire feed function.<br />
I - Green LED.<br />
A V<br />
In<strong>di</strong>cates that the value shown on the <strong>di</strong>splay<br />
is a voltage.<br />
- Green LED.<br />
A V<br />
In<strong>di</strong>cates that the value shown on the <strong>di</strong>splay<br />
is the recommended thickness.<br />
M - Green LED.<br />
A V<br />
In<strong>di</strong>cates that the value shown on the <strong>di</strong>splay<br />
is a current.<br />
N and O - Keys.<br />
When the LED A is lit the <strong>di</strong>splay H shows<br />
the current or voltage values selected by<br />
the keys.<br />
When the LED B is lit the <strong>di</strong>splay H shows the number of<br />
the program selected via the keys. When the selection is<br />
complete, the LED and <strong>di</strong>splay remain lit for 5 seconds<br />
When the LED C is lit, the <strong>di</strong>splay H in<strong>di</strong>cates whether the<br />
machine is in 2T manual or 4T automatic mode, which<br />
may be selected using the keys. When the selection is<br />
7