wireless adsl2+ modem router quick install guide - Amazon Web ...
wireless adsl2+ modem router quick install guide - Amazon Web ...
wireless adsl2+ modem router quick install guide - Amazon Web ...

You also want an ePaper? Increase the reach of your titles
YUMPU automatically turns print PDFs into web optimized ePapers that Google loves.
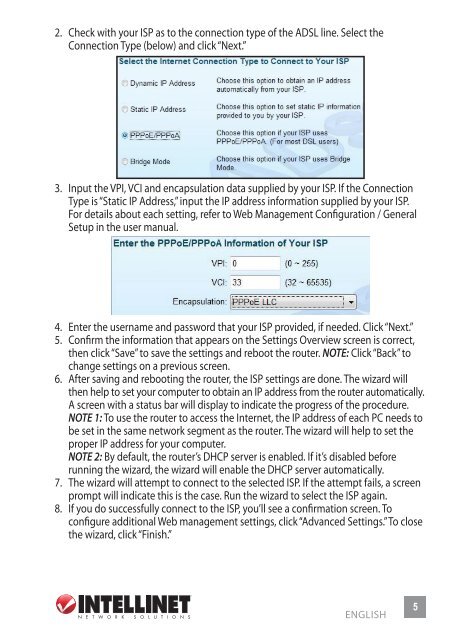
2. Check with your ISP as to the connection type of the ADSL line. Select the<br />
Connection Type (below) and click “Next.”<br />
3. Input the VPI, VCI and encapsulation data supplied by your ISP. If the Connection<br />
Type is “Static IP Address,” input the IP address information supplied by your ISP.<br />
For details about each setting, refer to <strong>Web</strong> Management Configuration / General<br />
Setup in the user manual.<br />
4. Enter the username and password that your ISP provided, if needed. Click “Next.”<br />
5. Confirm the information that appears on the Settings Overview screen is correct,<br />
then click “Save” to save the settings and reboot the <strong>router</strong>. NOTE: Click “Back” to<br />
change settings on a previous screen.<br />
6. After saving and rebooting the <strong>router</strong>, the ISP settings are done. The wizard will<br />
then help to set your computer to obtain an IP address from the <strong>router</strong> automatically.<br />
A screen with a status bar will display to indicate the progress of the procedure.<br />
NOTE 1: To use the <strong>router</strong> to access the Internet, the IP address of each PC needs to<br />
be set in the same network segment as the <strong>router</strong>. The wizard will help to set the<br />
proper IP address for your computer.<br />
NOTE 2: By default, the <strong>router</strong>’s DHCP server is enabled. If it’s disabled before<br />
running the wizard, the wizard will enable the DHCP server automatically.<br />
7. The wizard will attempt to connect to the selected ISP. If the attempt fails, a screen<br />
prompt will indicate this is the case. Run the wizard to select the ISP again.<br />
8. If you do successfully connect to the ISP, you’ll see a confirmation screen. To<br />
configure additional <strong>Web</strong> management settings, click “Advanced Settings.” To close<br />
the wizard, click “Finish.”<br />
ENGLISH<br />
5