2-in-1 Fabric Steamer & Iron - Air & Water
2-in-1 Fabric Steamer & Iron - Air & Water
2-in-1 Fabric Steamer & Iron - Air & Water
Create successful ePaper yourself
Turn your PDF publications into a flip-book with our unique Google optimized e-Paper software.
ENGLISH<br />
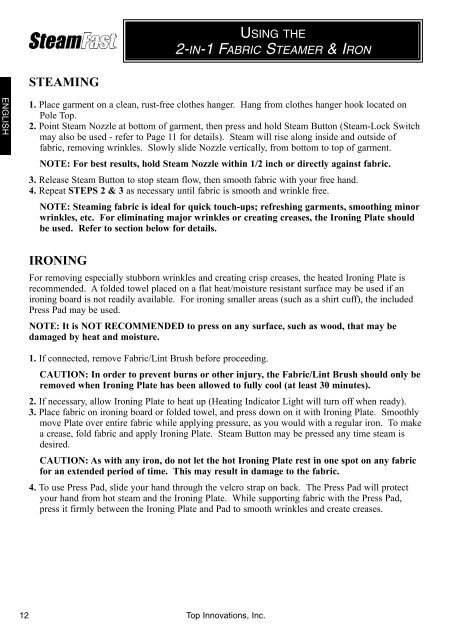
STEAMING<br />
12 Top Innovations, Inc.<br />
USING THE<br />
2-IN-1 FABRIC STEAMER & IRON<br />
1. Place garment on a clean, rust-free clothes hanger. Hang from clothes hanger hook located on<br />
Pole Top.<br />
2. Po<strong>in</strong>t Steam Nozzle at bottom of garment, then press and hold Steam Button (Steam-Lock Switch<br />
may also be used - refer to Page 11 for details). Steam will rise along <strong>in</strong>side and outside of<br />
fabric, remov<strong>in</strong>g wr<strong>in</strong>kles. Slowly slide Nozzle vertically, from bottom to top of garment.<br />
NOTE: For best results, hold Steam Nozzle with<strong>in</strong> 1/2 <strong>in</strong>ch or directly aga<strong>in</strong>st fabric.<br />
3. Release Steam Button to stop steam flow, then smooth fabric with your free hand.<br />
4. Repeat STEPS 2 & 3 as necessary until fabric is smooth and wr<strong>in</strong>kle free.<br />
NOTE: Steam<strong>in</strong>g fabric is ideal for quick touch-ups; refresh<strong>in</strong>g garments, smooth<strong>in</strong>g m<strong>in</strong>or<br />
wr<strong>in</strong>kles, etc. For elim<strong>in</strong>at<strong>in</strong>g major wr<strong>in</strong>kles or creat<strong>in</strong>g creases, the <strong>Iron</strong><strong>in</strong>g Plate should<br />
be used. Refer to section below for details.<br />
IRONING<br />
For remov<strong>in</strong>g especially stubborn wr<strong>in</strong>kles and creat<strong>in</strong>g crisp creases, the heated <strong>Iron</strong><strong>in</strong>g Plate is<br />
recommended. A folded towel placed on a flat heat/moisture resistant surface may be used if an<br />
iron<strong>in</strong>g board is not readily available. For iron<strong>in</strong>g smaller areas (such as a shirt cuff), the <strong>in</strong>cluded<br />
Press Pad may be used.<br />
NOTE: It is NOT RECOMMENDED to press on any surface, such as wood, that may be<br />
damaged by heat and moisture.<br />
1. If connected, remove <strong>Fabric</strong>/L<strong>in</strong>t Brush before proceed<strong>in</strong>g.<br />
CAUTION: In order to prevent burns or other <strong>in</strong>jury, the <strong>Fabric</strong>/L<strong>in</strong>t Brush should only be<br />
removed when <strong>Iron</strong><strong>in</strong>g Plate has been allowed to fully cool (at least 30 m<strong>in</strong>utes).<br />
2. If necessary, allow <strong>Iron</strong><strong>in</strong>g Plate to heat up (Heat<strong>in</strong>g Indicator Light will turn off when ready).<br />
3. Place fabric on iron<strong>in</strong>g board or folded towel, and press down on it with <strong>Iron</strong><strong>in</strong>g Plate. Smoothly<br />
move Plate over entire fabric while apply<strong>in</strong>g pressure, as you would with a regular iron. To make<br />
a crease, fold fabric and apply <strong>Iron</strong><strong>in</strong>g Plate. Steam Button may be pressed any time steam is<br />
desired.<br />
CAUTION: As with any iron, do not let the hot <strong>Iron</strong><strong>in</strong>g Plate rest <strong>in</strong> one spot on any fabric<br />
for an extended period of time. This may result <strong>in</strong> damage to the fabric.<br />
4. To use Press Pad, slide your hand through the velcro strap on back. The Press Pad will protect<br />
your hand from hot steam and the <strong>Iron</strong><strong>in</strong>g Plate. While support<strong>in</strong>g fabric with the Press Pad,<br />
press it firmly between the <strong>Iron</strong><strong>in</strong>g Plate and Pad to smooth wr<strong>in</strong>kles and create creases.


