

2-in-1 Fabric Steamer & Iron - Air & Water
2-in-1 Fabric Steamer & Iron - Air & Water
2-in-1 Fabric Steamer & Iron - Air & Water

Create successful ePaper yourself
Turn your PDF publications into a flip-book with our unique Google optimized e-Paper software.
ENGLISH<br />
8<br />
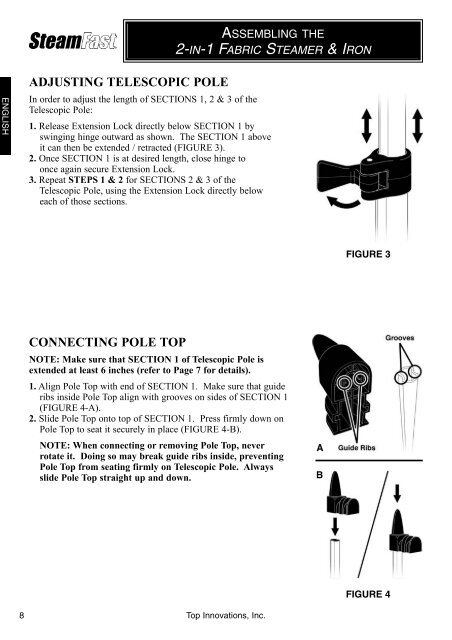
ADJUSTING TELESCOPIC POLE<br />
ASSEMBLING THE<br />
2-IN-1 FABRIC STEAMER & IRON<br />
In order to adjust the length of SECTIONS 1, 2 & 3 of the<br />
Telescopic Pole:<br />
1. Release Extension Lock directly below SECTION 1 by<br />
sw<strong>in</strong>g<strong>in</strong>g h<strong>in</strong>ge outward as shown. The SECTION 1 above<br />
it can then be extended / retracted (FIGURE 3).<br />
2. Once SECTION 1 is at desired length, close h<strong>in</strong>ge to<br />
once aga<strong>in</strong> secure Extension Lock.<br />
3. Repeat STEPS 1 & 2 for SECTIONS 2 & 3 of the<br />
Telescopic Pole, us<strong>in</strong>g the Extension Lock directly below<br />
each of those sections.<br />
CONNECTING POLE TOP<br />
NOTE: Make sure that SECTION 1 of Telescopic Pole is<br />
extended at least 6 <strong>in</strong>ches (refer to Page 7 for details).<br />
1. Align Pole Top with end of SECTION 1. Make sure that guide<br />
ribs <strong>in</strong>side Pole Top align with grooves on sides of SECTION 1<br />
(FIGURE 4-A).<br />
2. Slide Pole Top onto top of SECTION 1. Press firmly down on<br />
Pole Top to seat it securely <strong>in</strong> place (FIGURE 4-B).<br />
NOTE: When connect<strong>in</strong>g or remov<strong>in</strong>g Pole Top, never<br />
rotate it. Do<strong>in</strong>g so may break guide ribs <strong>in</strong>side, prevent<strong>in</strong>g<br />
Pole Top from seat<strong>in</strong>g firmly on Telescopic Pole. Always<br />
slide Pole Top straight up and down.<br />
Top Innovations, Inc.<br />
A<br />
B<br />
FIGURE 3<br />
FIGURE 4


