Procedimiento de instalación - Hitecsa
Procedimiento de instalación - Hitecsa
Procedimiento de instalación - Hitecsa

Create successful ePaper yourself
Turn your PDF publications into a flip-book with our unique Google optimized e-Paper software.
<strong>Procedimiento</strong> <strong>de</strong> instalación<br />
Cableado eléctrico<br />
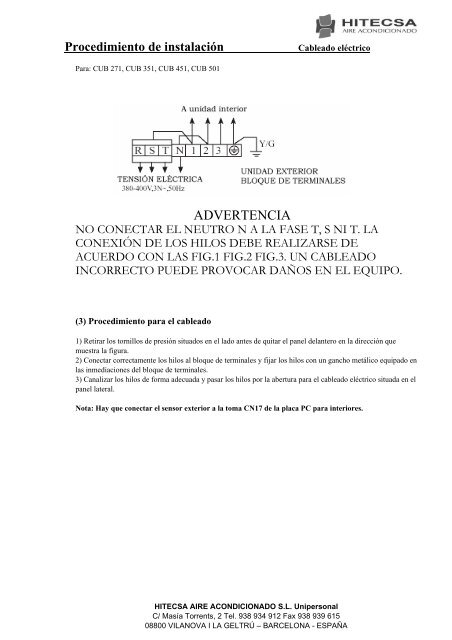
Para: CUB 271, CUB 351, CUB 451, CUB 501<br />
ADVERTENCIA<br />
NO CONECTAR EL NEUTRO N A LA FASE T, S NI T. LA<br />
CONEXIÓN DE LOS HILOS DEBE REALIZARSE DE<br />
ACUERDO CON LAS FIG.1 FIG.2 FIG.3. UN CABLEADO<br />
INCORRECTO PUEDE PROVOCAR DAÑOS EN EL EQUIPO.<br />
(3) <strong>Procedimiento</strong> para el cableado<br />
1) Retirar los tornillos <strong>de</strong> presión situados en el lado antes <strong>de</strong> quitar el panel <strong>de</strong>lantero en la dirección que<br />
muestra la figura.<br />
2) Conectar correctamente los hilos al bloque <strong>de</strong> terminales y fijar los hilos con un gancho metálico equipado en<br />
las inmediaciones <strong>de</strong>l bloque <strong>de</strong> terminales.<br />
3) Canalizar los hilos <strong>de</strong> forma a<strong>de</strong>cuada y pasar los hilos por la abertura para el cableado eléctrico situada en el<br />
panel lateral.<br />
Nota: Hay que conectar el sensor exterior a la toma CN17 <strong>de</strong> la placa PC para interiores.<br />
HITECSA AIRE ACONDICIONADO S.L. Unipersonal<br />
C/ Masía Torrents, 2 Tel. 938 934 912 Fax 938 939 615<br />
08800 VILANOVA I LA GELTRÚ – BARCELONA - ESPAÑA